Mystic Diary: Missing Pages Walkthrough, Guide, & Tips
Mystic Diary: Missing Pages Walkthrough

Welcome to the Mystic Diary: Missing Pages Walkthrough
Stop a black magician from gaining immortality and destroying the world!
Whether you use this document as a reference when things get difficult or as a road map to get you from beginning to end, we’re pretty sure you’ll find what you’re looking for here.
This document contains a complete Mystic Diary: Missing Pages game walkthrough featuring annotated screenshots from actual gameplay!
We hope you find this information useful as you play your way through the game. Use the walkthrough menu below to quickly jump to whatever stage of the game you need help with.
Remember to visit the Big Fish Games Forums if you find you need more help. Have fun!
This walkthrough was created by BrownEyedTigre, and is protected under US Copyright laws. Any unauthorized use, including re-publication in whole or in part, without permission, is strictly prohibited.
General Tips

 >
>
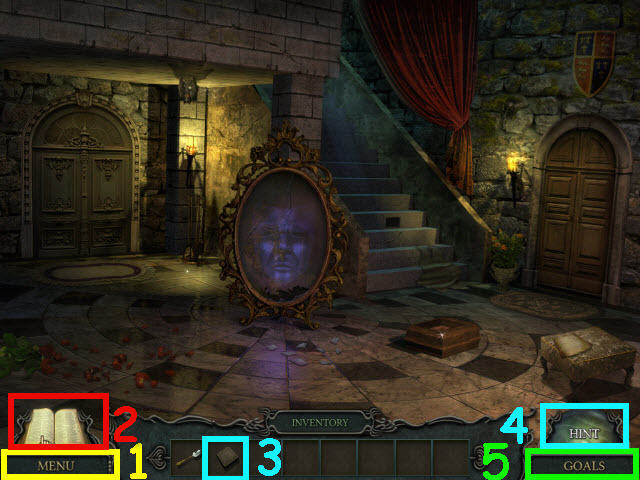
- Select Menu (1) to adjust the Music, Effects and Environment Volume. You may also adjust Full Screen and Custom Cursor.
- Throughout the guide, we will use the acronym ‘HOS’ for Hidden Object Scenes.
- Items written in gold in HOS require an extra step before they can be obtained.
- There is a short penalty for random clicking.
- In order to complete some of the puzzles you will need to collect the clues in your diary first.
- In order to trigger some HOS, you will need to examine specific areas first.If there is a HOS in the walkthrough that you do not have available yet, please check the walkthrough for something you may have missed.
- Most Puzzles can be skipped.Select the Help button on the bottom left of the puzzle box to get directions for the puzzles.
- Select the diary (2) to find collected clues and story updates.
- Drag an inventory item (3) into the hint sphere (4) to see where to use the item.
- Select the goals tab (5) to check your current tasks.
Chapter 1 – Hector’s House
 >
>
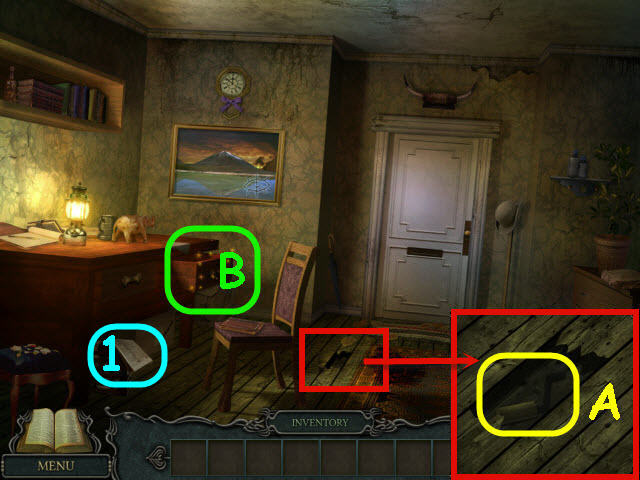
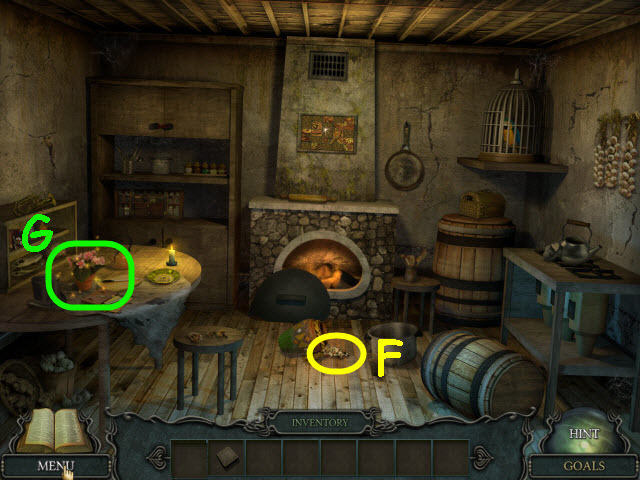
- Examine the hole in the floor; take the GRINDER HANDLE (A).
- Examine the newspaper (1) to get a diary update.
- Examine the desk drawer (B) to access a HOS.
 >
>
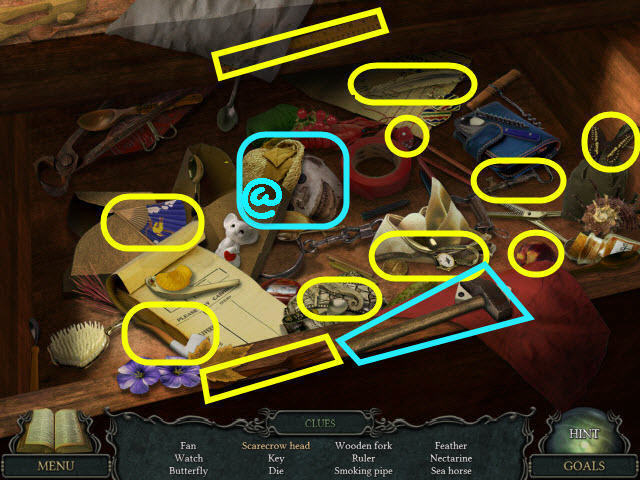
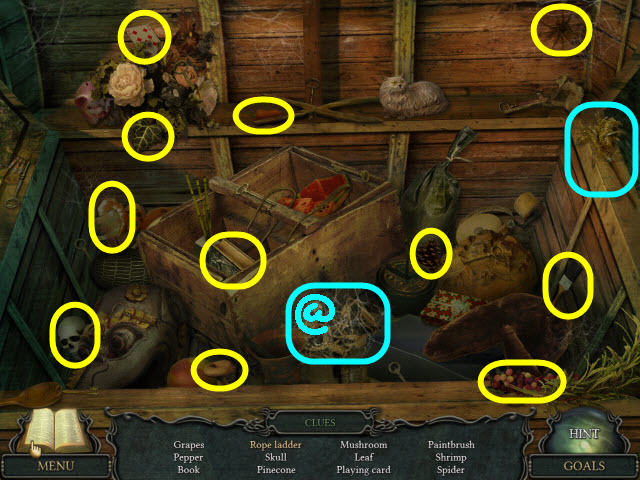
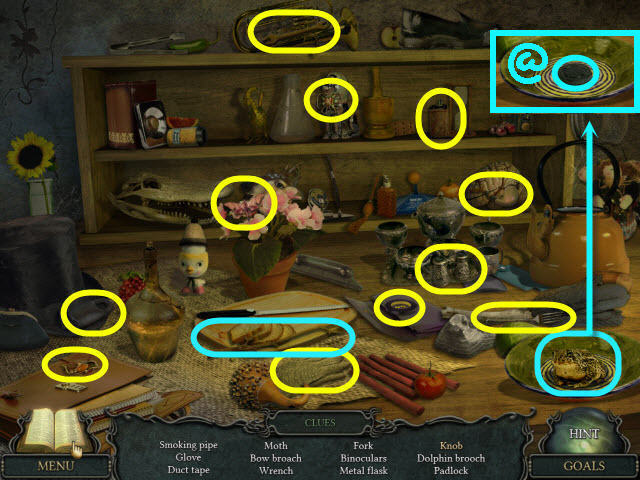
- Find the items listed.
- Use the hammer on the clay pot to get the SCARECROW HEAD (@).
- Go forward through the door.
 >
>
- Examine and open the garbage can; take the LAMP HANDLE (C) and FIRST CLOCK HAND (D).
- Back out.
 >
>
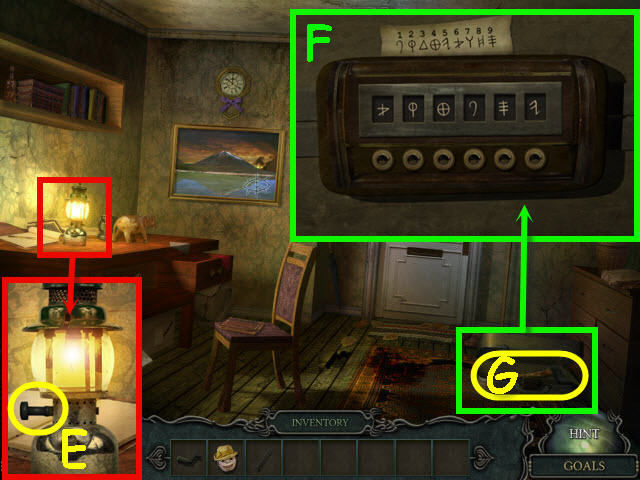
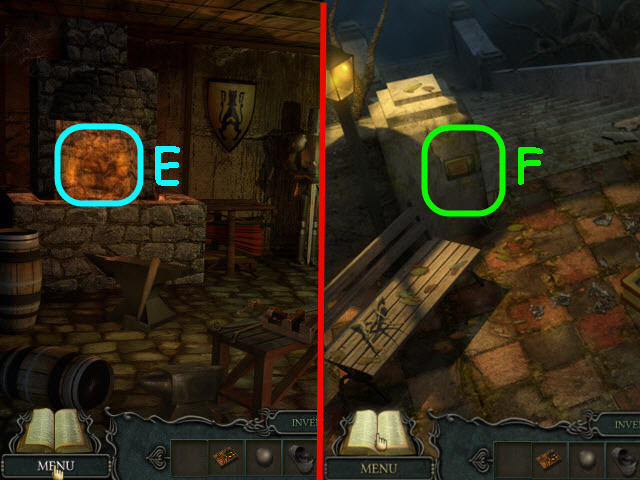
- Examine and place the LAMP HANDLE on the lamp; turn the LAMP HANDLE (E) to get a code in your diary.
- Touch the shadow on the door.
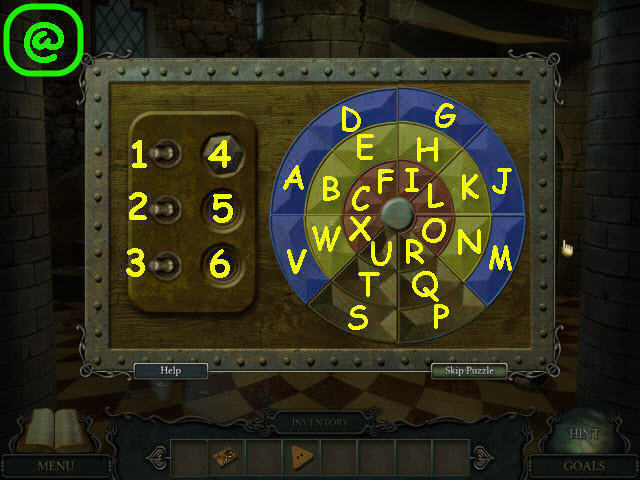
- Examine the suitcase to trigger a puzzle.
- Enter the code from the diary by pushing the buttons on the bottom row and note that the numbers are reversed.
- To solve the puzzle, enter the symbols that represent the following numbers from left to right: 624195 (F).
- Take the BLUNT AXE (G).
- Go forward through the door.
 >
>
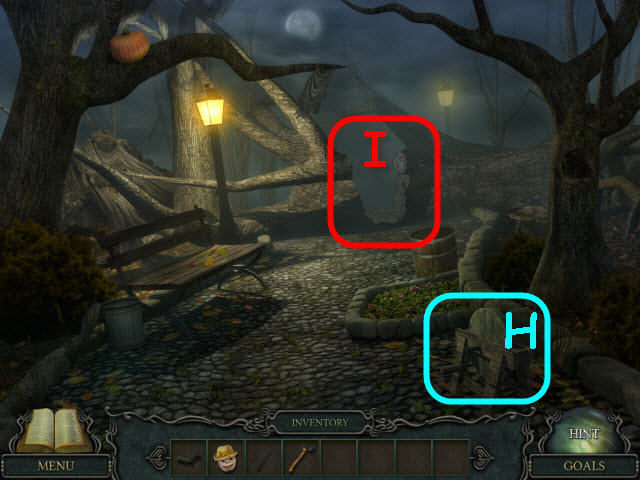
- Place the GRINDER HANDLE on the grinder (H).
- Use the BLUNT AXE on the grinder to get a SHARP AXE.
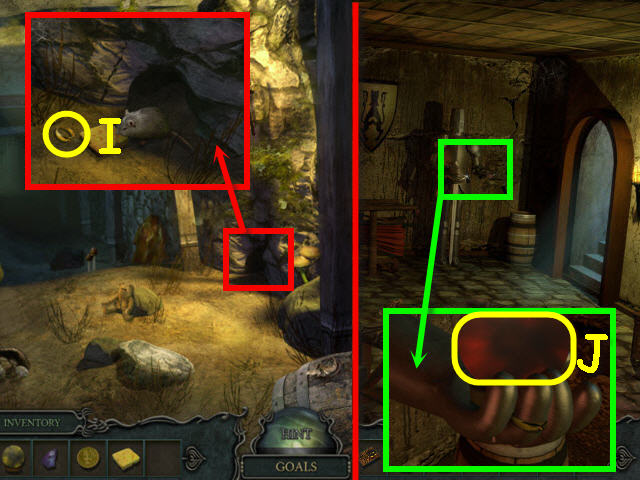
- Use the SHARP AXE on the fallen tree (I).
- Go forward.
 >
>
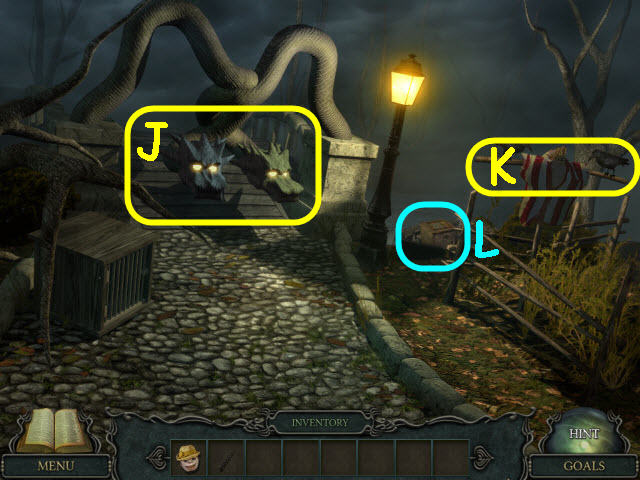
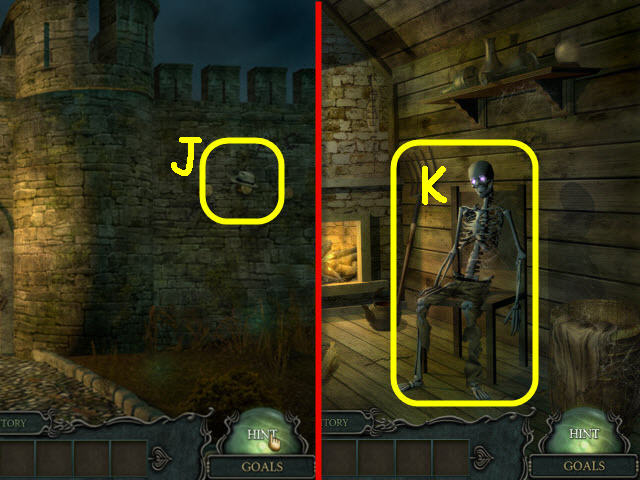
- Examine the two headed creature (J) to get your next goal.
- Place the SCARECROW HEAD on the scarecrow; take the WOODEN STICK (K).
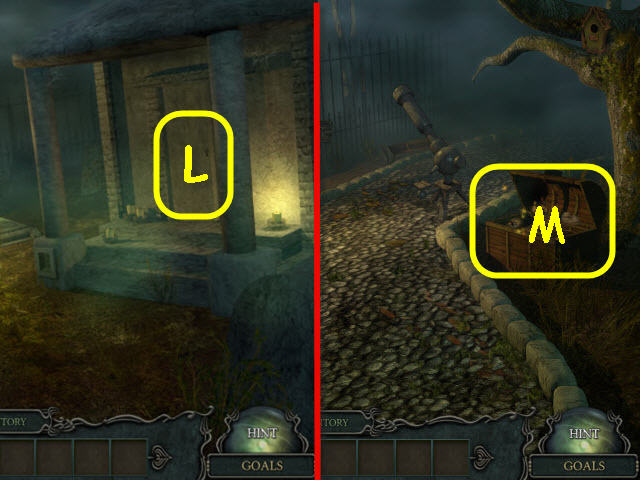
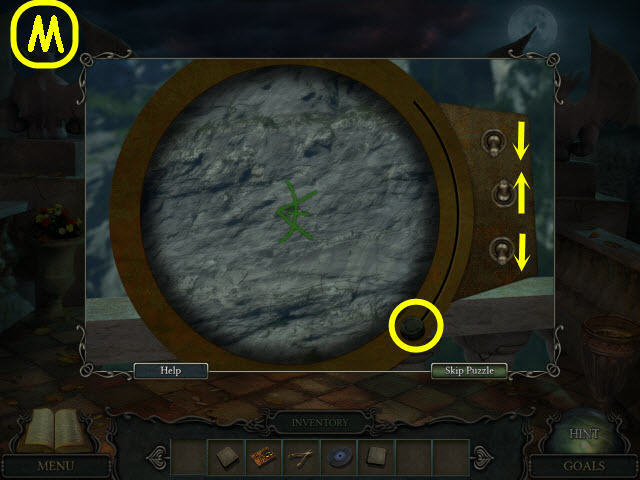
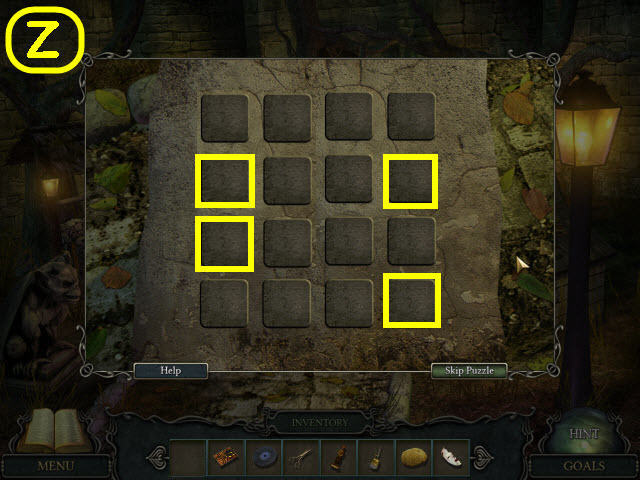
- Examine the boat (L) to trigger a puzzle.
 >
>
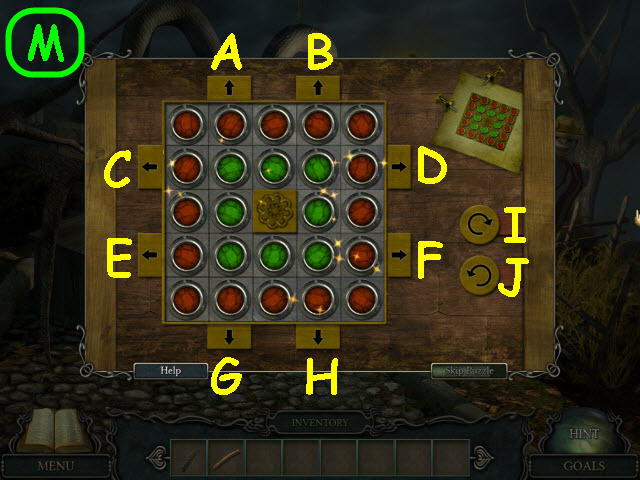
- Arrange the green squares to match the pattern in the upper right.
- Select the arrows in the following order: I, F x 2, J, A, D, I x 3, and H (M).
- Get a GOLDEN FISH and SECOND CLOCK HAND.
- Back out.
 >
>
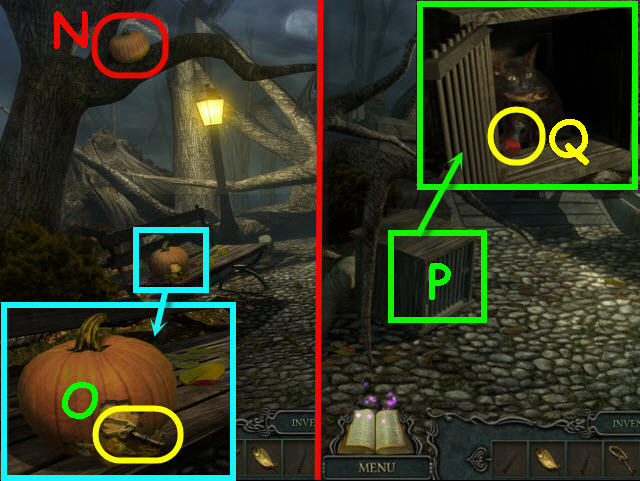
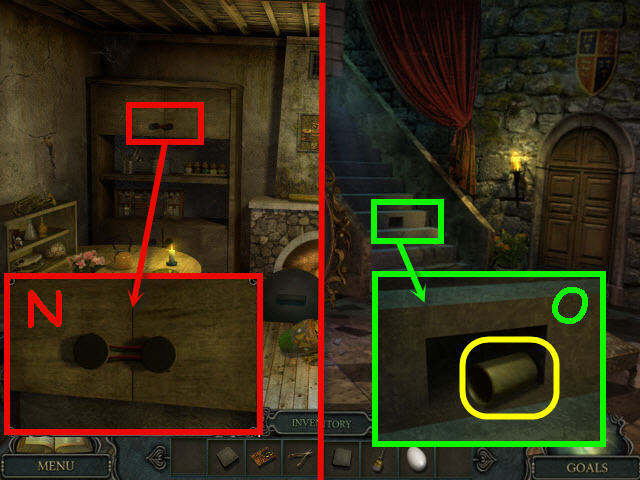
- Use the WOODEN STICK on the pumpkin (N).
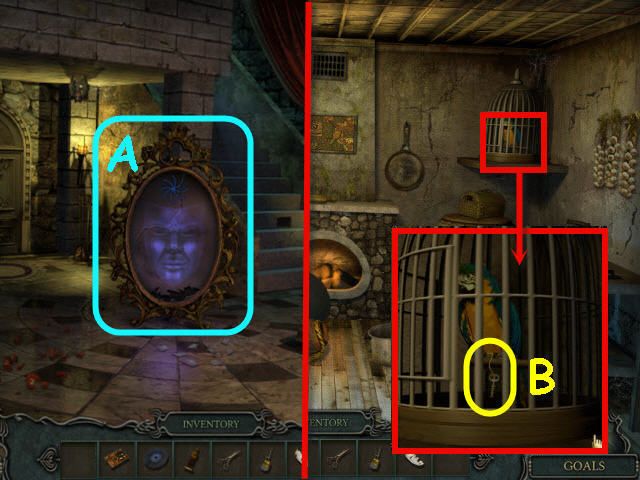
- Examine the fallen pumpkin; take the CAGE KEY (O).
- Go forward.
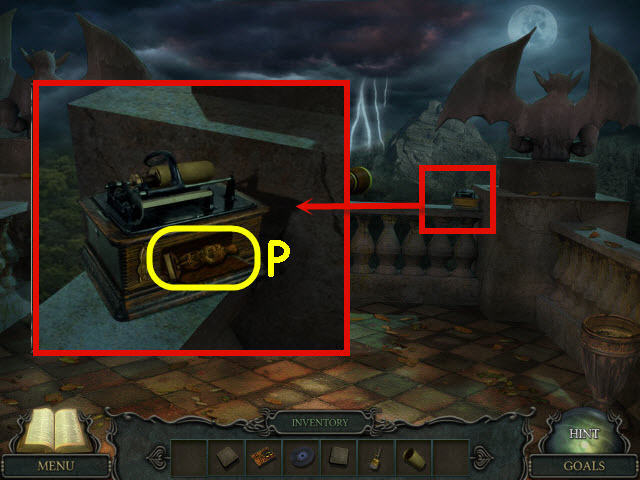
- Examine and use the CAGE KEY on the cage (P).
- Give the GOLDEN FISH to the cat; take the POTION OF LIFE (Q).
- Back out.
 >
>
- Examine and use the POTION OF LIFE on the flower bed; take the DIARY PAGE (R).
- Go forward.
- Give the DIARY PAGE to the creature (S).
- Go forward over the bridge.
Chapter 2 – Cemetery
 >
>
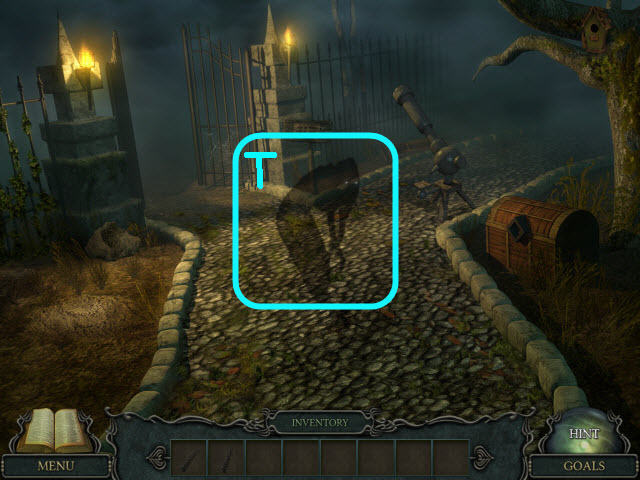
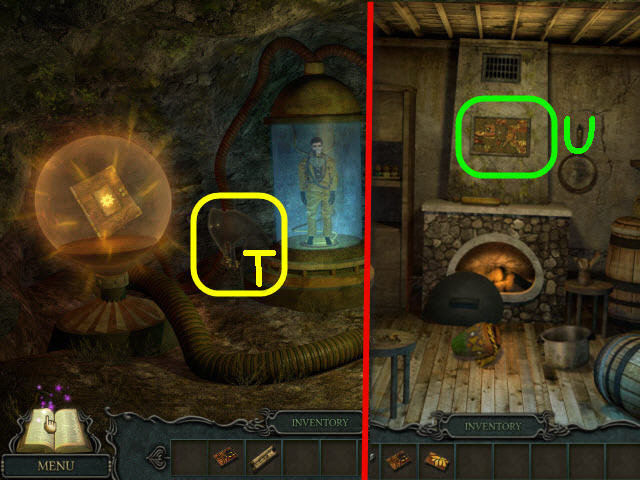
- Touch the shadow (T).
- Go forward and then right into the crypt.
 >
>
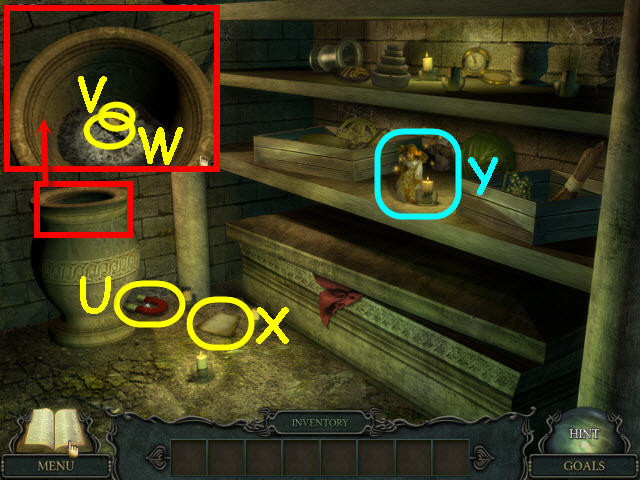
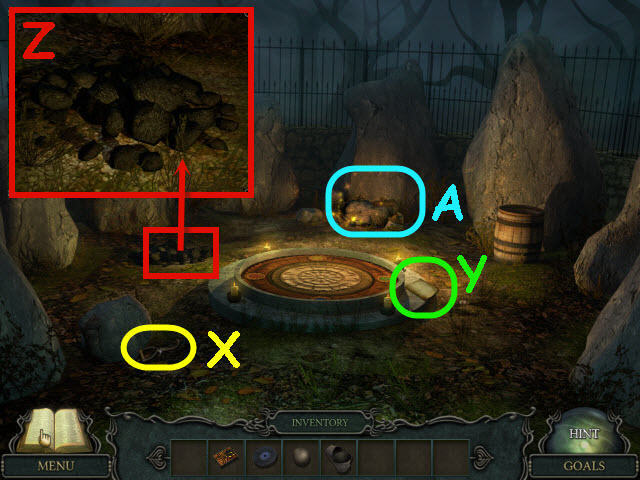
- Move the urn; take the MAGNET (U).
- Examine the top of the urn; take the LIGHTER (V) and the THIRD CLOCK HAND (W).
- Collect the note to get a diary update (X).
- Examine the angel (Y) on the bottom shelf to access a HOS.
 >
>
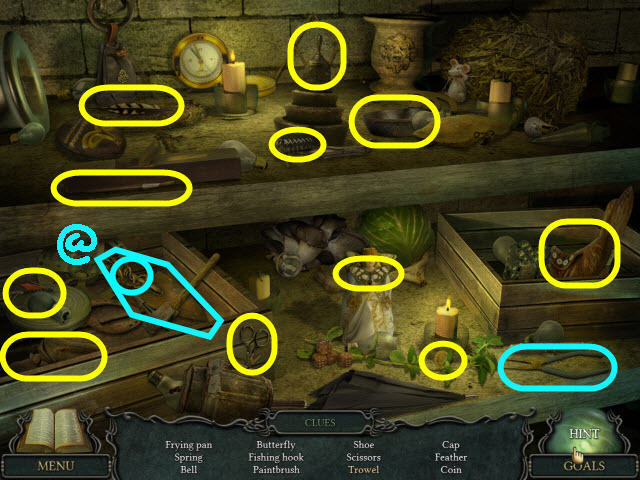
- Find the items listed.
- Use the pliers on the wire to get the TROWEL (@).
- Back out and go forward into the caretaker’s office.
 >
>
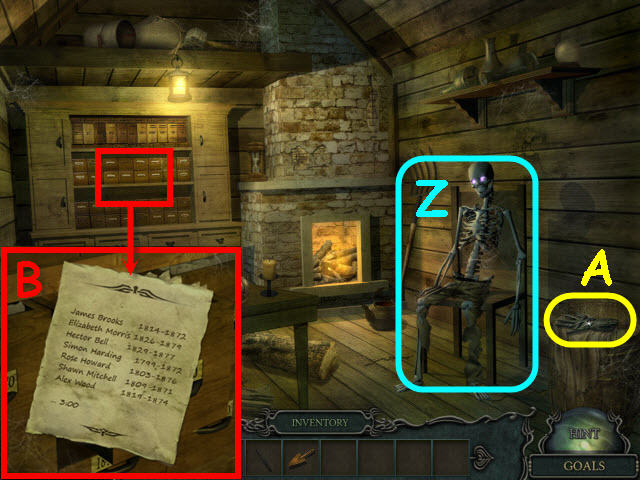
- Examine the caretaker’s skeleton (Z) to get a new goal.
- Take the GLOVE (A).
- Examine and open the file drawer; select the papers twice to get a diary update (B).
- Back out.
 >
>
- Examine and use the GLOVE on the thorny gravestone; take the PAIR OF ARROW BUTTONS (C).
- Note the dates on the gravestone.
- Go straight into the caretaker’s office.
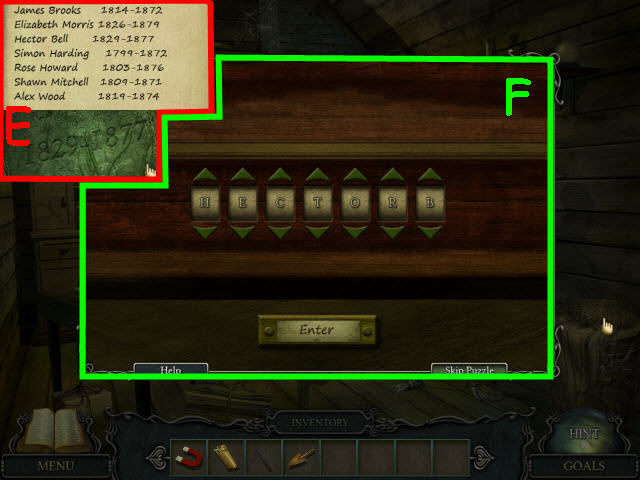
- Examine and place the PAIR OF ARROW BUTTONS on the box (D) to trigger a puzzle.
 >
>
- Enter the correct name on the box to open.
- To solve the puzzle, use the dates from the thorny gravestone and the paper from the files in the caretaker’s office (E) and enter: H-E-C-T-O-R-B (F).
- Press the enter button when set.
 >
>
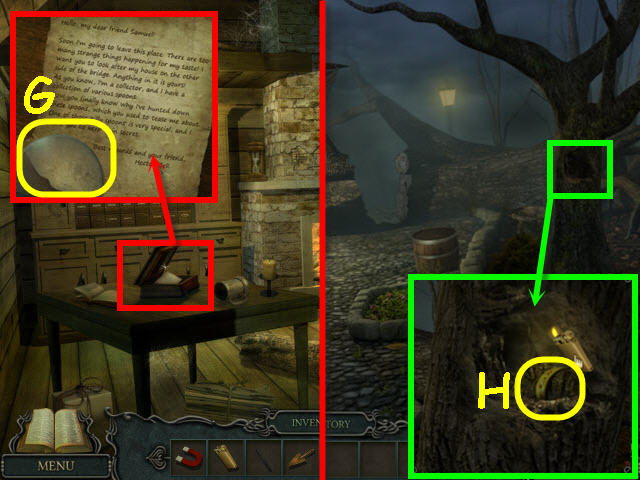
- Examine the box; take the LENS (G) and automatically get a diary update.
- Back out four times.
- Examine and use the LIGHTER on the hole in the tree; take the LEFT HALF MOON (H).
- Back out.
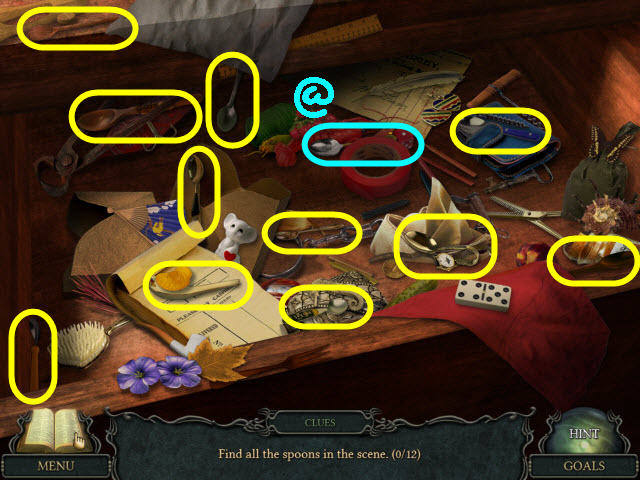
- Examine the desk drawer to access a HOS.
 >
>
- Find the 12 spoons.
- Get a HALF SILVER SPOON (@).
- Go forward four times to the cemetery.
 >
>
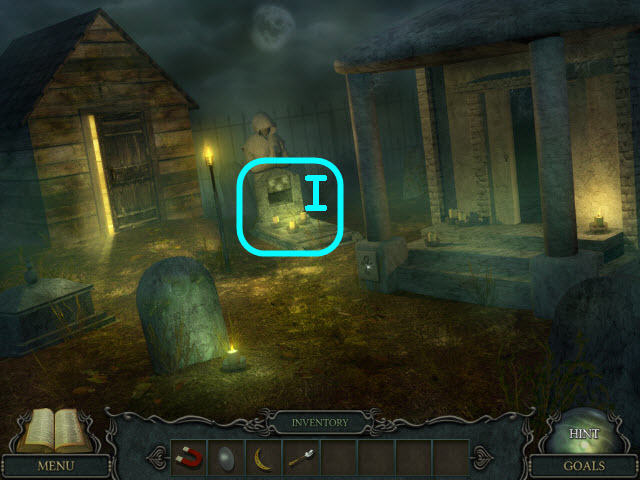
- Examine the gravestone with the 3 candles (I).
- Place the FIRST CLOCK HAND, SECOND CLOCK HAND and THIRD CLOCK HAND on the gravestone to trigger a puzzle.
 >
>
- Turn the dials so that all are on number III.
- Turn dial 3 clockwise until dial 1 and 2 are both on II (A).
- Turn dial 2 clockwise until dial 1 and 2 are both in between VII and VIII (B).
- Turn dial 1 clockwise until all are on the III (C).
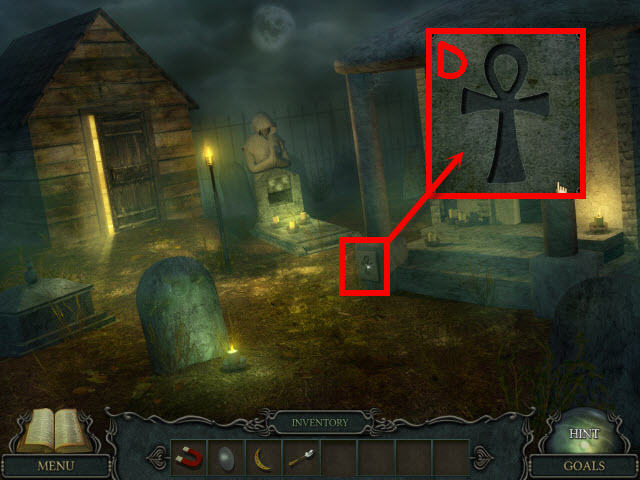
- You will earn an ANKH.
Chapter 3 – Sarcophagus
 >
>
- Examine the plinth; place the ANKH in the inset (D); get the RIGHT HALF MOON.
- Back out.
 >
>
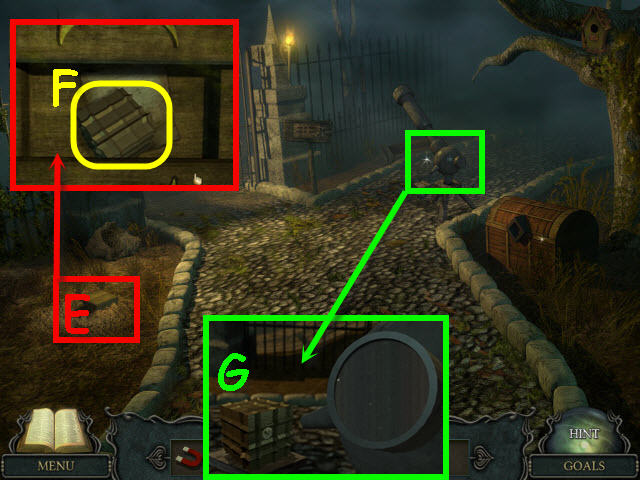
- Use the TROWEL on the earth; examine and place the LEFT HALF MOON and RIGHT HALF MOON on the box (E).
- Take the MOON CUBE (F) and get a diary update.
- Examine and place the LENS on the telescope and place the MOON CUBE on the platform (G) to trigger a puzzle.
 >
>
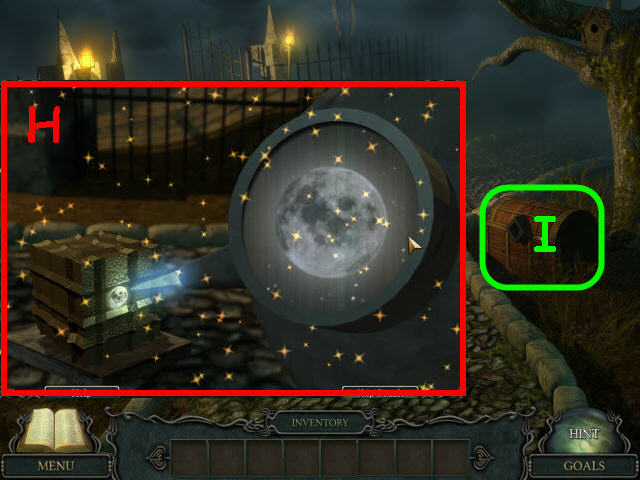
- Select, hold, and drag the cursor around the lens to find the planet.
- Solution: Scroll all the way down and then go slowly right until you see the planet on the top. Scroll up to get the full planet and select it (H).
- You will get a CHARGED CUBE.
- Examine and place the CHARGED CUBE on the chest (I).
- Examine the chest to access a HOS.
 >
>
- Find the items listed.
- Use the feather duster on the cobwebs to get the ROPE LADDER (@).
- Go right.
>
- Use the ROPE LADDER on the hat; take the HAT (J).
- Back out and go forward twice into the caretaker’s office.
- Give the HAT to the caretaker (K); get a WEDDING RING and CROWBAR.
- Back out.
 >
>
- Select the crypt door (L) to get a goal.
- Back out.
- Examine the chest (M) to access a HOS.
 >
>
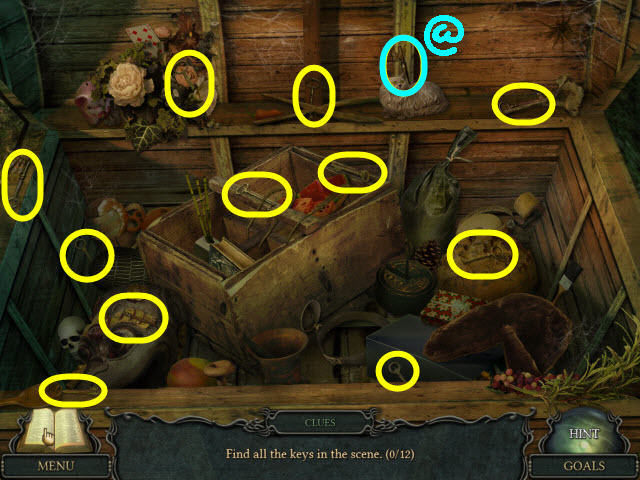
- Find the 12 keys to get a CRYPT KEY (@).
- Go forward.
- Use the CRYPT KEY on the crypt door.
- Enter the crypt.
 >
>
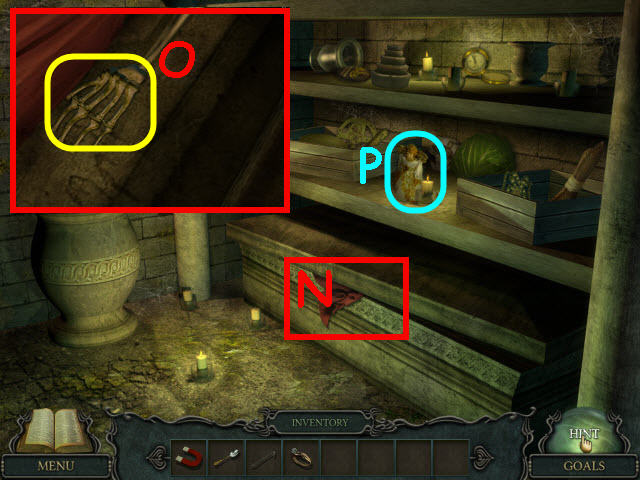
- Use the CROWBAR on the sarcophagus (N).
- Examine the skeleton; place the WEDDING RING on the hand (O).
- Examine the angel (P) to access a HOS.
 >
>
- Find the 12 light bulbs.
- You will earn a LIGHT BULB (@).
 >
>
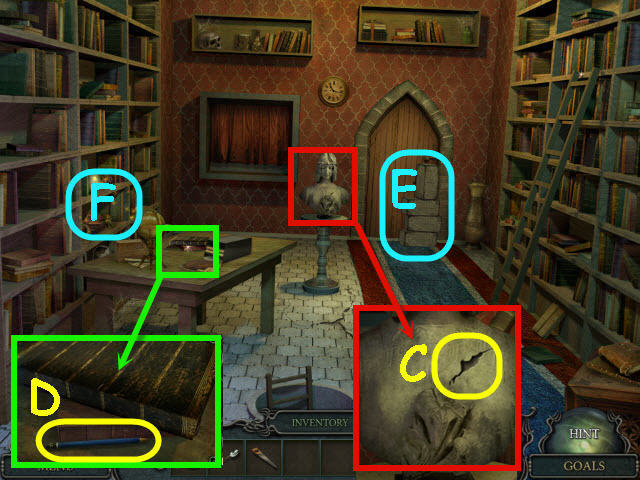
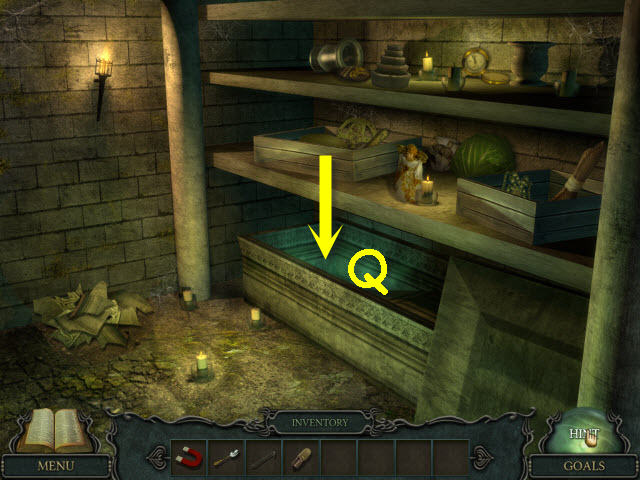
- Enter the sarcophagus (Q) to go to the underground.
Chapter 4 – Underground
 >
>
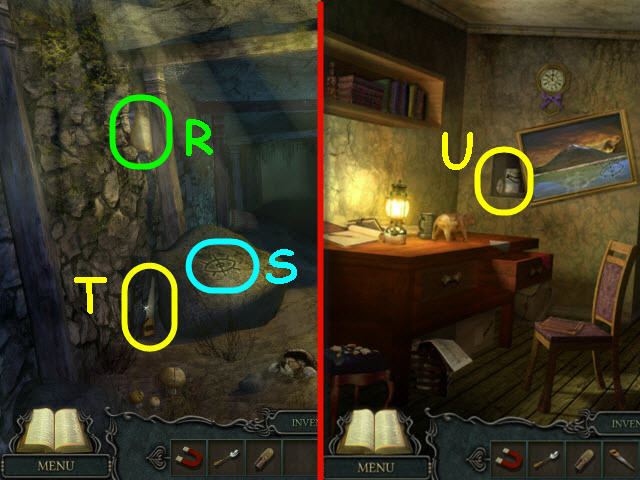
- Take the note (R) to get a diary update.
- Use the CROWBAR on the boulder; select the symbol (S) to get a diary update.
- Take the SAW (T).
- Back out all the way to the house.
- Take the EMPTY JAR (U).Note: If you did not select the symbol on the boulder (S), you will be unable to get the jar.
- Go forward three times and go right to the castle entrance.
 >
>
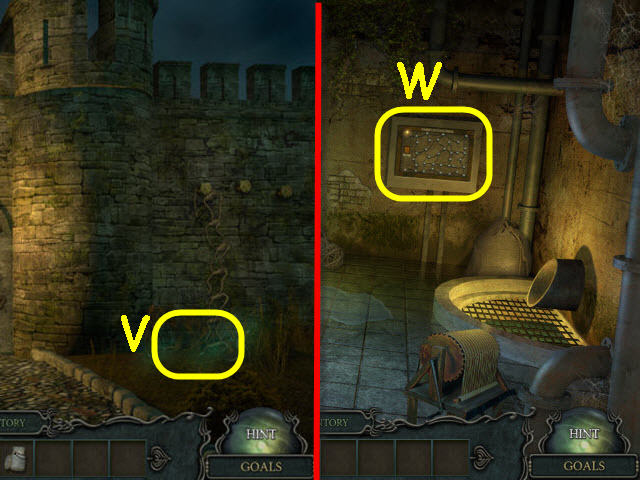
- Use the EMPTY JAR on the fireflies (V); get a JAR WITH FIREFLIES.
- Go to the underground via the sarcophagus and go forward.
- Use the JAR WITH FIREFLIES anywhere in the dark room.
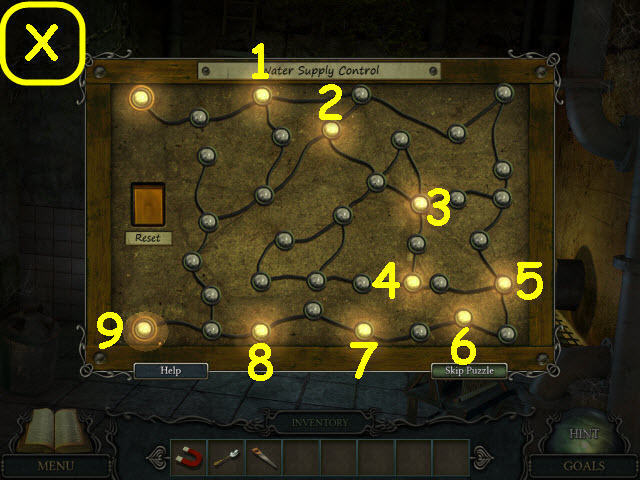
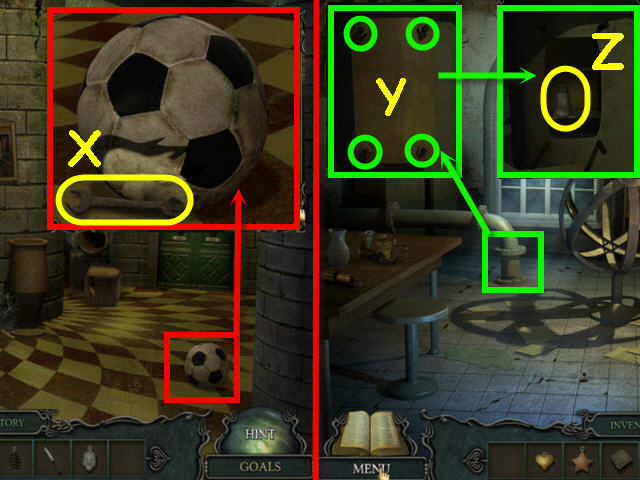
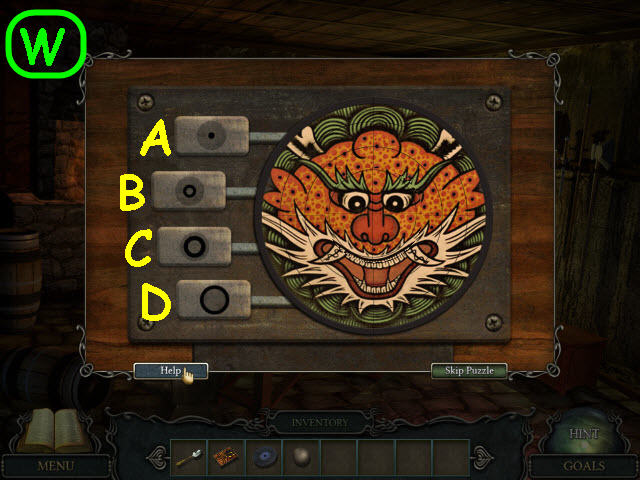
- Examine and place the LIGHT BULB on the control panel to trigger a puzzle (W).
 >
>
- Select the correct lamps to complete the circuit.
- See screenshot for solution (X).
 >
>
- Take the CHISEL (Y).
- Back out.
- Examine and use the CHISEL on the amber four times to get a STATUETTE (Z).
- Go forward.
- Examine and place the STATUETTE in the recess (A).
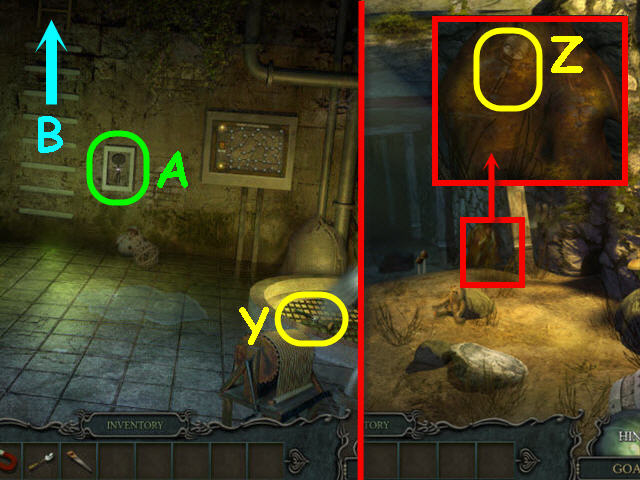
- Go up the ladder (B).
>
- Examine the bust; use the MAGNET on the crack (C) to get the OLD KEY.
- Examine the table; take the PENCIL (D).
- Remove the 4 bricks from the doorway (E).
- Examine the bookshelf (F) to access a HOS.
 >
>
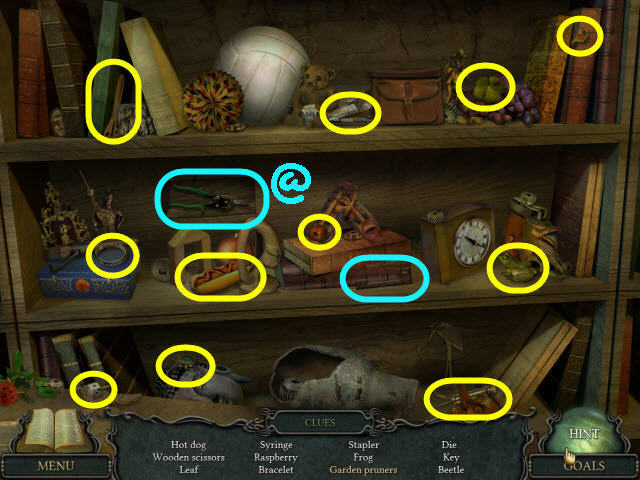
- Find the items listed.
- Use the wooden key in the recess to get the PAIR OF GARDEN PRUNERS (@).
- Back out five times and go right to the castle entrance.
 >
>
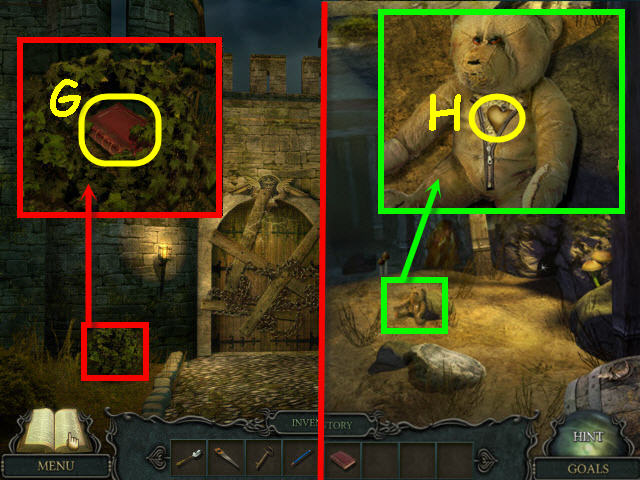
- Examine and use the PAIR OF GARDEN PRUNERS on the bush four times to get the RED BOOK (G).
- Go back to the underground.
- Examine and use the PENCIL on the teddy bear; take the HEART AMULET (H).
- Go forward and up the ladder.
 >
>
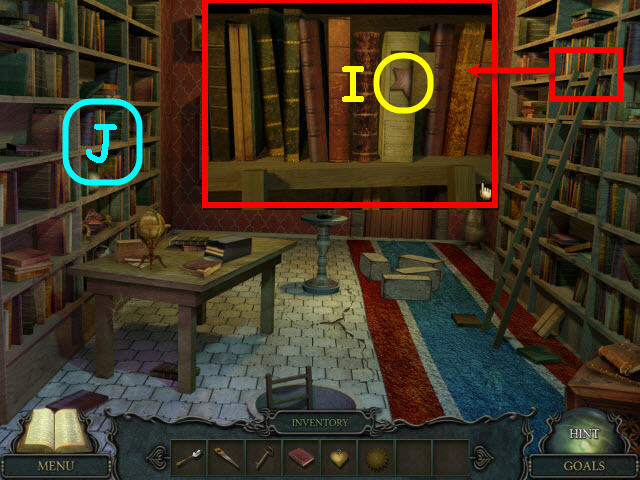
- Examine the top of the ladder on the right; place the RED BOOK in the space and take the STAR AMULET (I).
- Examine the left bookshelf (J) to access a HOS.
 >
>
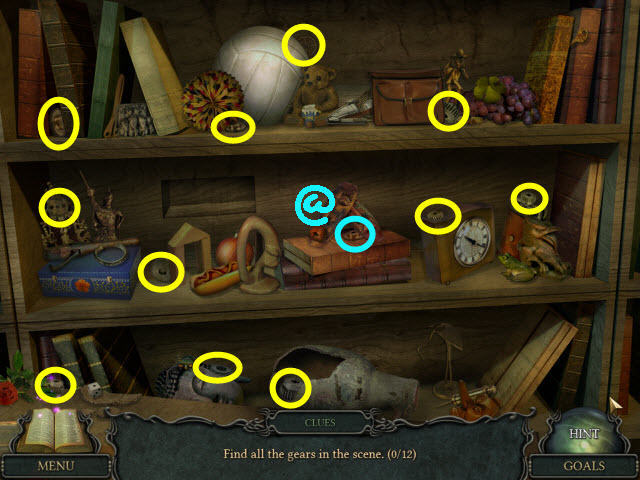
- Find the 12 gears.
- You will earn a GEAR (@).
- Open and go forward through the door (move the bricks if you did not do so earlier) and go up the stairs.
 >
>
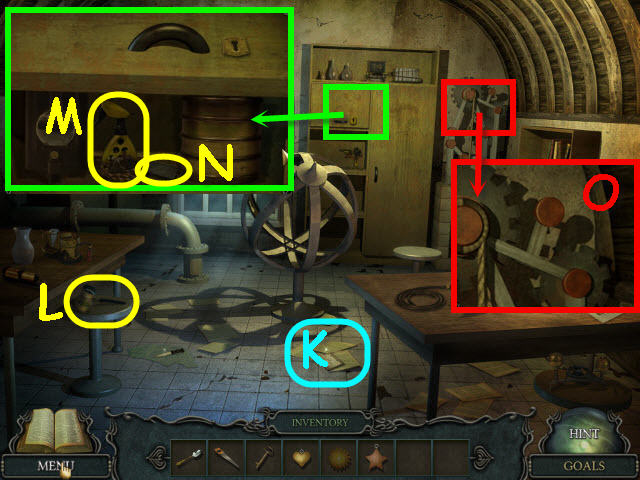
- Examine and select the note to get a diary update (K).
- Take the DIPPER (L).
- Examine and use the OLD KEY on the cabinet; zoom in and take the INSECT SPRAY (M) and STONE BUTTON (N).
- Examine and place the GEAR on the mechanism (O).
- Back out three times.
 >
>
- Examine the dumbwaiter; use the SAW on the box and take the SOLVENT (P).
- Go up the ladder and then straight.
- Examine the symbol (Q) to get a diary update.
- Examine and use the INSECT SPRAY on the urn; take the SPIRAL AMULET (R) and SKULL FORM (S).
- Go up the stairs.
>
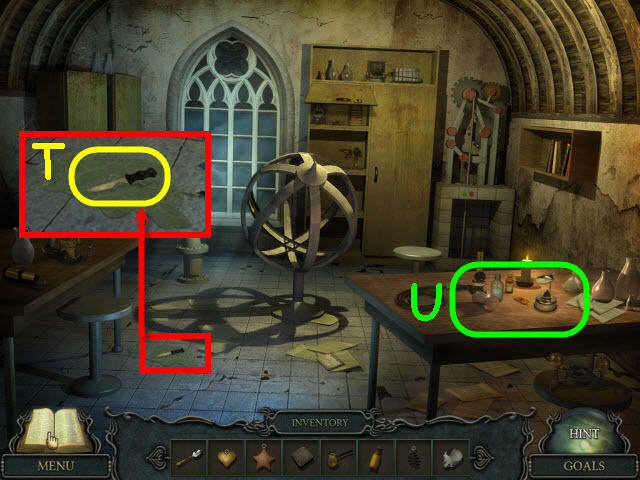
- Examine and use the SOLVENT to get the KNIFE (T).
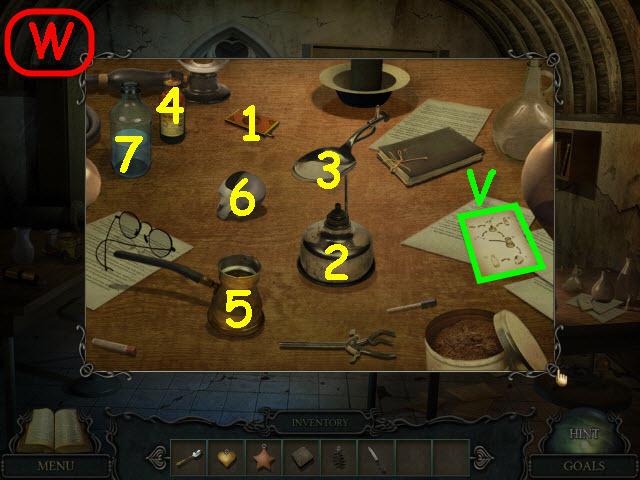
- Examine and place the SKULL FORM and DIPPER on the table (U) to trigger a puzzle.
 >
>
- Make the solution according to the directions (V).
- Solution: Use 1 on 2, place the HALF SILVER SPOON on 3 and wait for it to melt.
- Use 4 on 3, use 5 on 3, use 5 on 6, use 7 on 6, and select 6 to get a SILVER SKULL AMULET (W).
- Back out.
 >
>
- Examine and use the KNIFE on the soccer ball; take the WRENCH (X).
- Go up the stairs.
- Examine the pipe; use the WRENCH on each of the four nuts (Y).
- Take the SALT (Z).
- Back out twice.
 >
>
- Examine the curtained recess (A).
- Hang the SILVER SKULL AMULET, SPIRAL AMULET, STAR AMULET and HEART AMULET on the hooks to trigger a puzzle.
- Pull the amulets in the correct order.
- To solve the puzzle, pull the amulets in the following order: 3, 1, 4, and 2 (B).
- You will earn a SUGAR.
- Go forward.
Chapter 5 – Old Mirror
 >
>
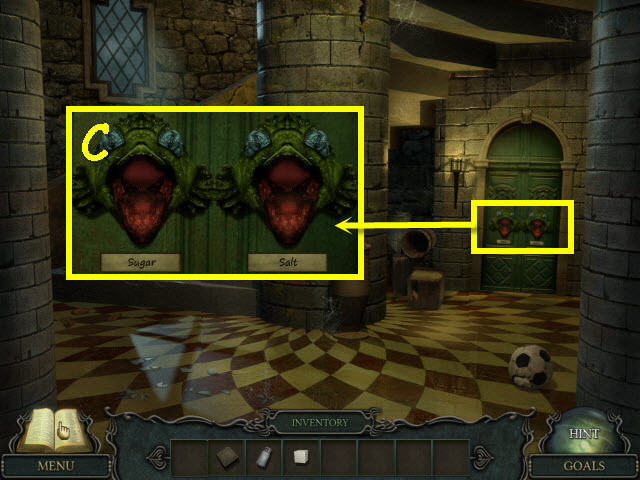
- Examine the door; place the SALT and SUGAR in the respective mouths (C).
- Go through the newly-opened door.
 >
>
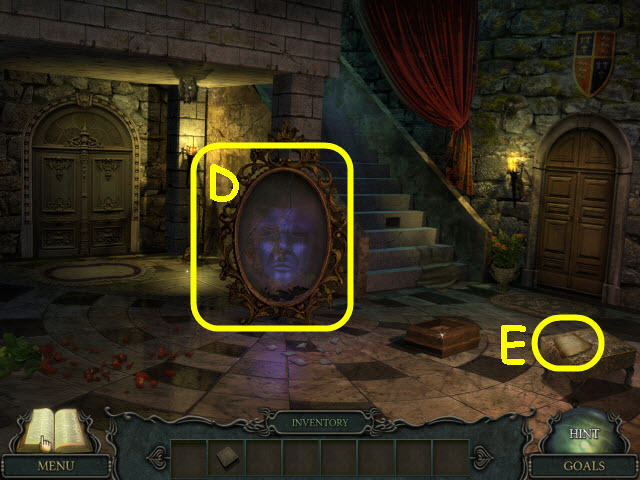
- Examine the mirror (D) to get a new goal and a diary update.
- Take the note to get a diary update (E).
- Go through the door on the right.
 >
>
- Knock over the vase; take the SEEDS (F).
- Examine the table (G) to access a HOS.
 >
>
- Find the items listed.
- Use the twig on the frog to get a KNOB (@).
- Back out and go up the stairs.
 >
>
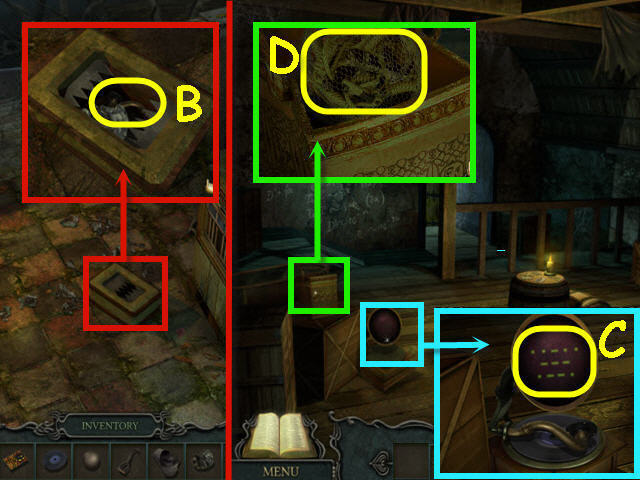
- Examine the desk; take the FIRST PIECE OF PICTURE (H) and NIPPERS (I).
- Go through the doorway on the left.
- Take the GRAMOPHONE RECORD (J).
- Examine and place the SEEDS by the doves; take the 2nd STONE BUTTON (K).
- Examine and place the KNOB on the telescope (L) to trigger a puzzle.
 >
>
- Focus the telescope using the knob and switches.
- To solve the puzzle, flip the switches in the following order, starting from the top: Down, up and down, and then move the knob all the way down (M).
- You will get a diary entry.
- Back out twice and go through the door on the right.
 >
>
- Examine the cabinet; use the NIPPERS on the wire (N) and get an EGG and OIL CAN.
- Back out.
- Examine and place the EGG in the hole in the stair riser (O); take the WAX CYLINDER.
- Go up the stairs and through the door on the left.
 >
>
- Examine and place the WAX CYLINDER on the music box; take the MISSING STATUETTE (P).
- Back out and go into the room on the right at the end of the hall.
 >
>
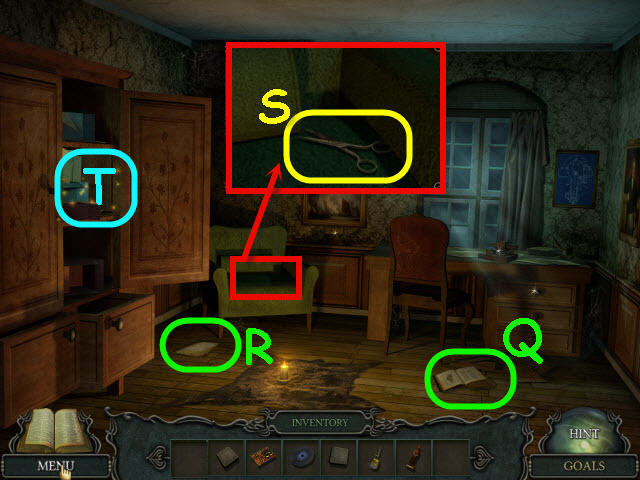
- Examine the book and select the left page to get a diary update (Q).
- Take the note to get a diary update (R).
- Examine the chair; take the SCISSORS (S).
- Examine the cabinet (T) to access a HOS.
 >
>
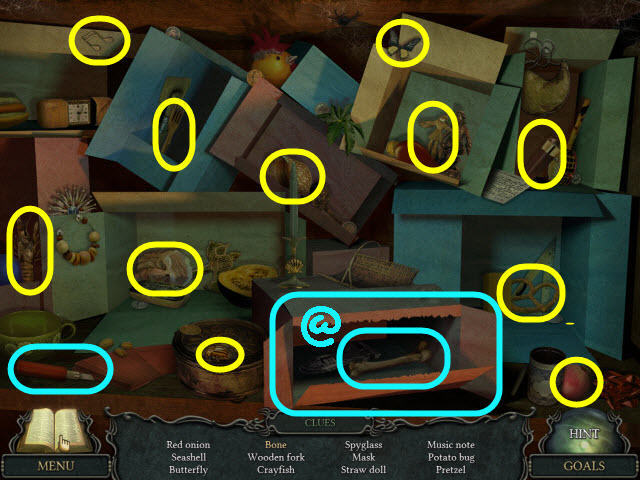
- Find the items listed.
- Use the utility knife on the box to get a BONE (@).
- Back out twice and go straight through the double doors.
 >
>
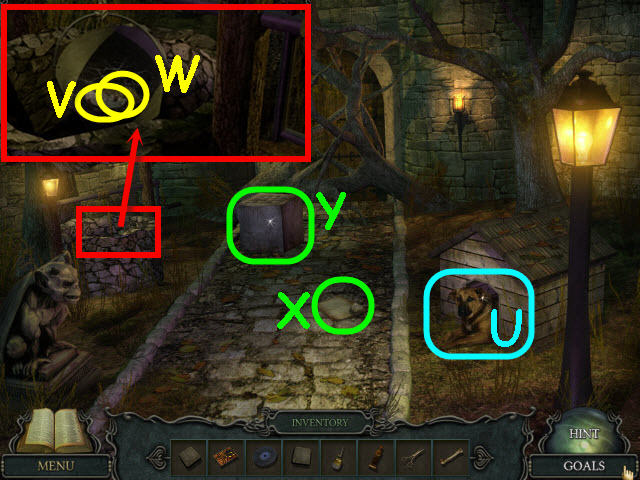
- Examine and give the BONE to the dog (U); get a FEATHER DUSTER.
- Examine and use the OIL CAN on the well.
- Use the FEATHER DUSTER on the bucket to get a LEFT FACE HALF (V) and SPONGE (W).
- Take the note (X) to get a diary update.
- Examine and place the 2 STONE BUTTONS on the stone block (Y) to trigger a puzzle.
 >
>
- Push the correct buttons so that all buttons are pushed down.
- See screenshot for the correct buttons to push (Z).
- Select the symbol on the stone block when complete to get a diary update.
- Back out.
 >
>
- Use the SPONGE on the mirror (A) to get a diary update.
- Go into the room on the right.
- Examine and use the SCISSORS on the cage to get a SMALL KEY (B).
- Back out; go up the stairs, and into the room on the right.
 >
>
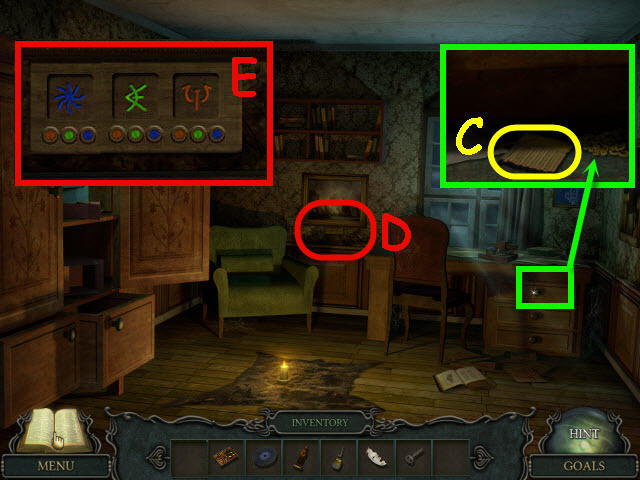
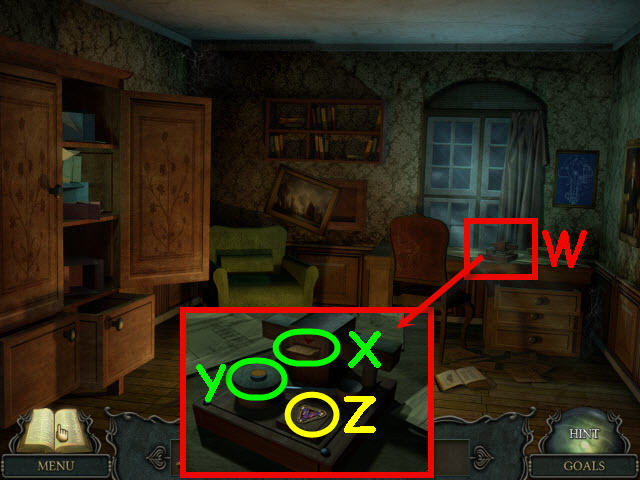
- Examine and use the SMALL KEY on the locked drawer; take the MATCHES (C).
- Examine the plate under the picture (D).
- Select the colors to match the colors of the matching symbols in your diary collected from completing the mirror task, the stone block puzzle, and the telescope puzzle.
- Solution from left to right: Blue – green – red (E).
- You will earn a METAL BUG and DYNAMITE.
- Back out twice.
 >
>
- Examine and place the METAL BUG the box (F) to trigger a puzzle.
- Press the arrows to move all the bugs to the right.
- To solve the puzzle, press the buttons as follows: B x 3, C x 3, and press D x 29 (G).
- You will earn a RIGHT FACE HALF.
- Go up the stairs.
Chapter 6 – Stoke the Fire
 >
>
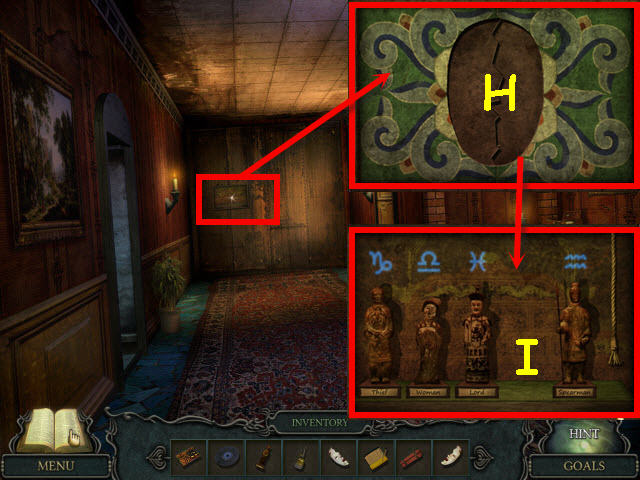
- Examine and place the RIGHT FACE HALF and LEFT FACE HALF in the frame (H).
- Place the MISSING STATUETTE on the shelf (I) to trigger a puzzle.
 >
>
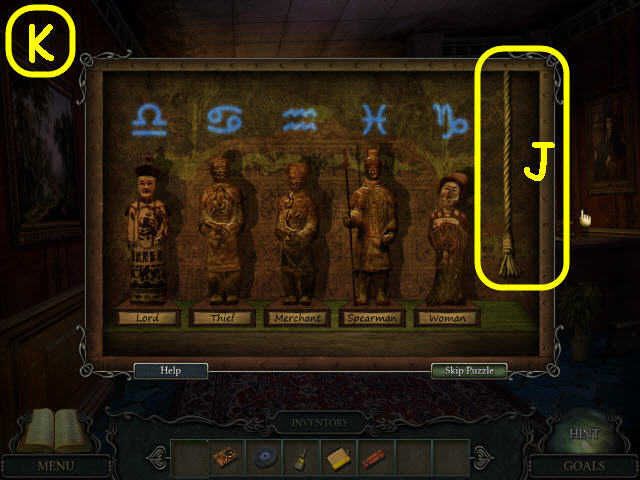
- Arrange the statues and symbols in the correct order.
- Pull the rope (J) to get a clue for the order.
- To solve the puzzle, arrange the statues and symbols in the following order starting from the left: Libra/Lord, Cancer/Thief, Aquarius/Merchant, Pisces/Spearman, and Capricorn/Woman (K).
 >
>
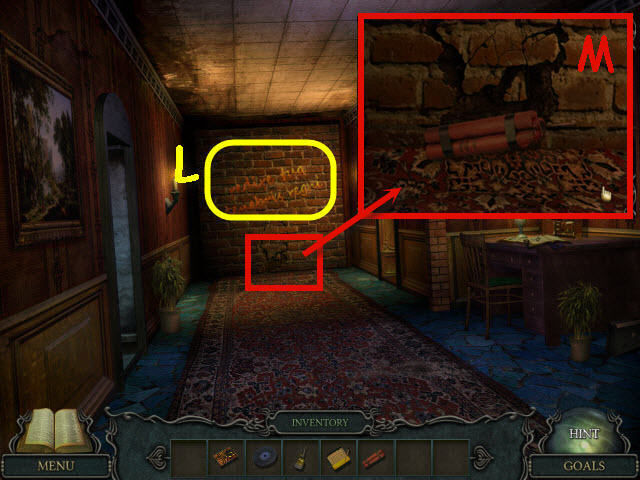
- Select the writing on the wall to get a diary update (L).
- Examine and place the DYNAMITE by the crack in the wall; use the MATCHES on the DYNAMITE (M).
- Go forward.
 >
>
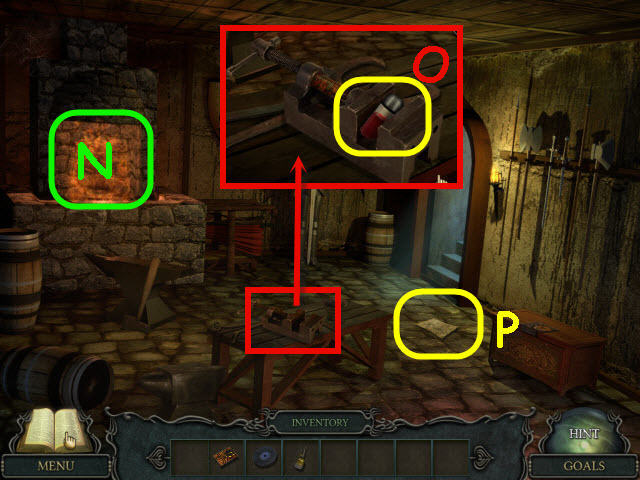
- Examine the fireplace (N) to get a new goal.
- Examine and use the OIL CAN on the vise; press on the vise four times to get the BLOOD VIAL (O).
- Examine and select the note (P) to get a diary update.
- Back out twice.
 >
>
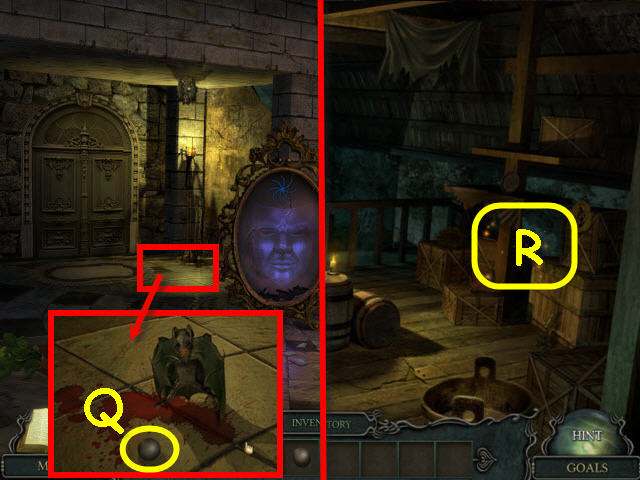
- Examine and place the BLOOD VIAL on the floor under the bat; take the METAL BALL (Q).
- Go upstairs, straight, and through the doorway on the right.
- Examine the crates (R) to access a HOS.
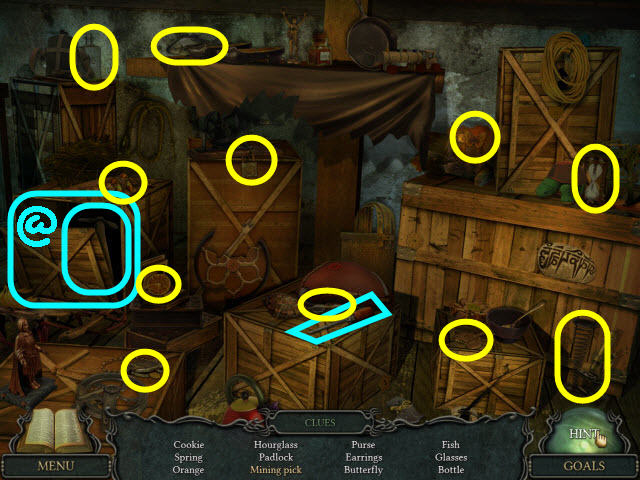 >
>
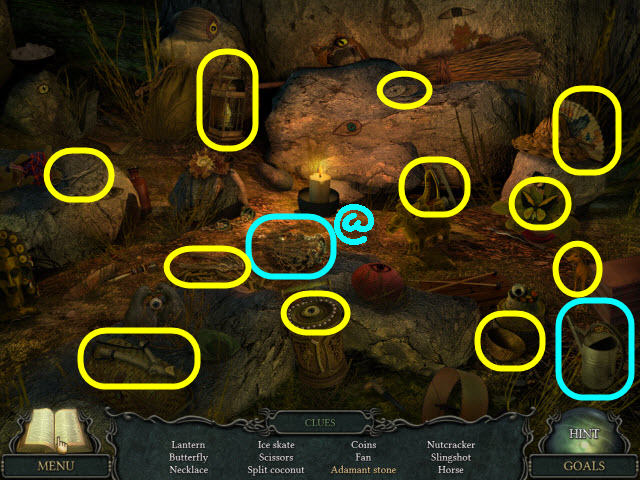
- Find the items listed.
- Use the pry bar to open the crate and get the MINING PICK (@).
- Go forward through the doorway.
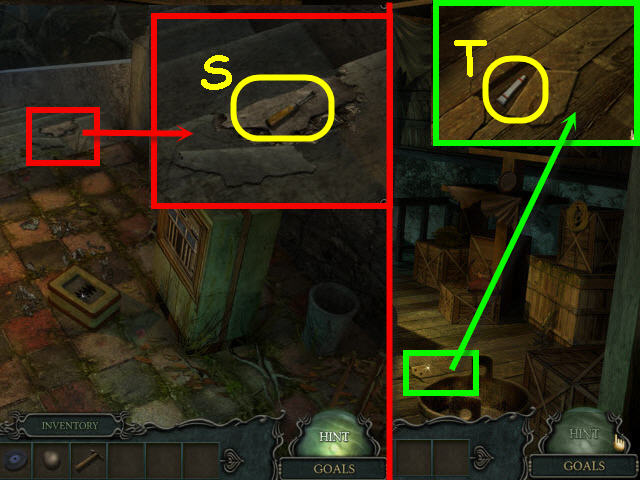 >
>
- Examine and use MINING PICK on the landing; take the NAIL PULLER (S).
- Back out.
- Examine and use the NAIL PULLER on the floorboard; take the GLUE (T).
- Go forward through the doorway.
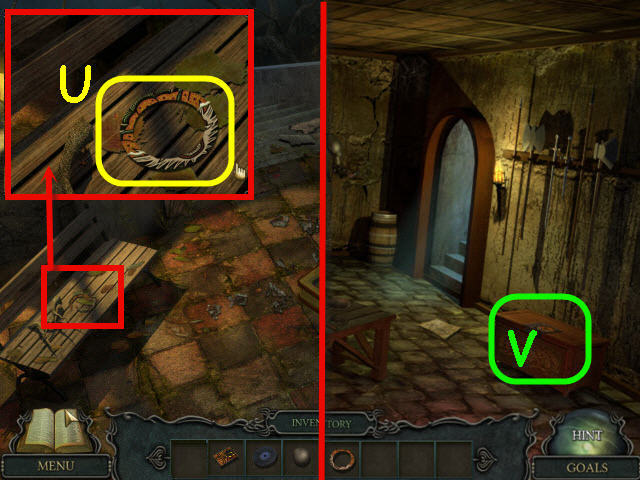 >
>
- Examine and use the GLUE on the ring; take the MISSING RING (U).
- Back out twice.
- Examine and place the MISSING RING on the chest (V) to trigger a puzzle.
 >
>
- Turn the rings and press the buttons to complete the face.
- To solve the puzzle, press the buttons in the following order: A x 2, B, C x 2, and D x 2. Next, rotate each of the rings so that the features are all upright (W).
- You will earn a COAL HOLDER.
- Go out the door on the right, straight, and then down the stairs.
 >
>
- Move the small boulder; take the HOOK (X).
- Take the note to get a diary update (Y).
- Examine and use the COAL HOLDER on the coal to get COAL (Z).
- Examine the broken boulder (A) to access a HOS.
 >
>
- Find the items listed.
- Use the watering can on the smoldering pile to get the ADAMANT STONE (@).
- Back out.
 >
>
- Examine and use the ADAMANT STONE on the box; take the GRAMOPHONE ARM (B).
- Back out.
- Examine and place the GRAMOPHONE ARM and the GRAMOPHONE RECORD on the gramophone; select the code to get a diary update and NOTE WITH CODE (C).
- Examine and use the HOOK on the basket to get a SCOOP NET (D).
- Back out.
Chapter 7 – Spheres
 >
>
- Place the COAL in the fireplace (E); get a SPHERE OF KNOWLEDGE.
- Go through the right doorway and forward.
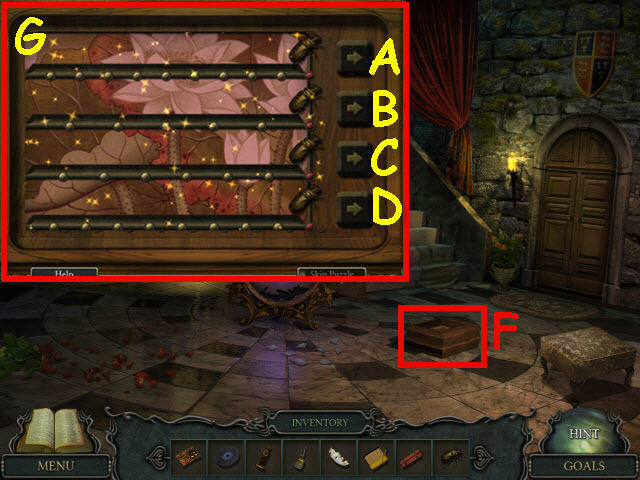
- Examine and place the NOTE WITH CODE on the panel (F) to trigger a puzzle.
 >
>
- Turn the correct squares to open the panel.
- To solve the puzzle use the clue in the diary and turn the squares marked in yellow (G).
- Place the METAL BALL on the new panel to trigger a puzzle.
 >
>
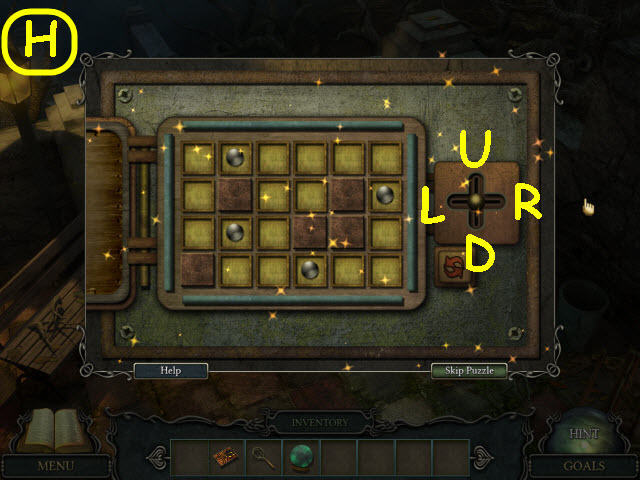
- Use the lever to move the balls over the X’s.
- To solve the puzzle, move the lever on the right in the following directions: U, R x 2, D x 3, R x 2, L x 2, U, and L (H).
- Take the ENERGY CRYSTAL.
- Back out three times and go through the right door.
- Examine the cabinet on the left to access a HOS.
 >
>
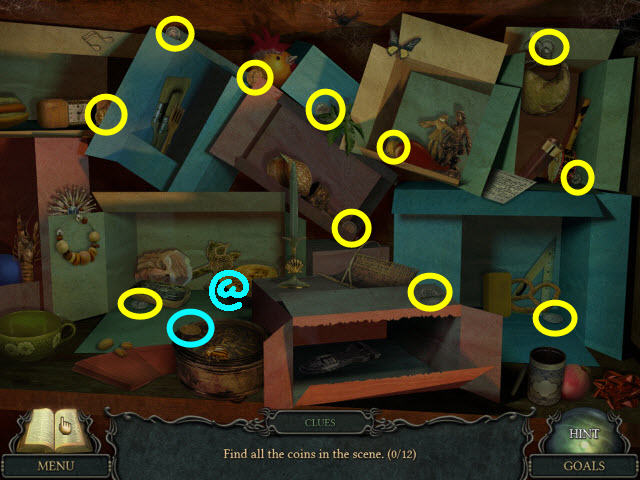
- Find the 12 coins to earn a COIN (@).
- Back out twice and go right through the door.
- Examine the table to access a HOS.
 >
>
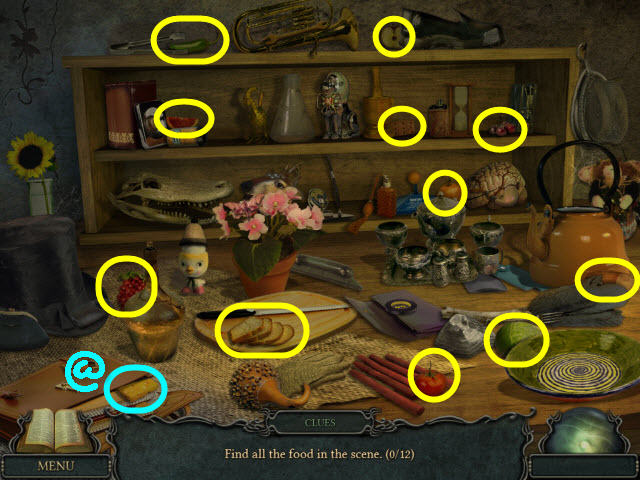
- Find the 12 food items to earn CHEESE (@).
- Back out five times.
 >
>
- Examine and place the CHEESE by the hole; take the RING (I).
- Go to the blacksmith’s room.
- Examine the armor; place the RING on the finger and take the SPHERE OF POWER (J).
- Go right out the door and forward.
 >
>
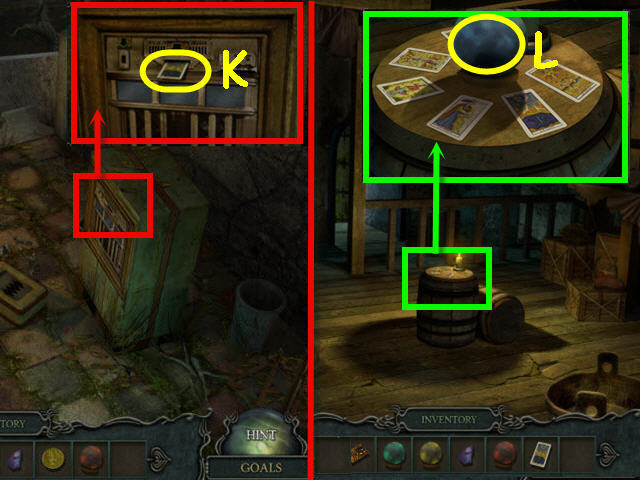
- Examine and place the COIN in the machine; take the TAROT CARD (K).
- Back out.
- Examine and place the TAROT CARD on the center barrel; take the SPHERE OF MAGIC (L).
- Go forward and down the stairs.
 >
>
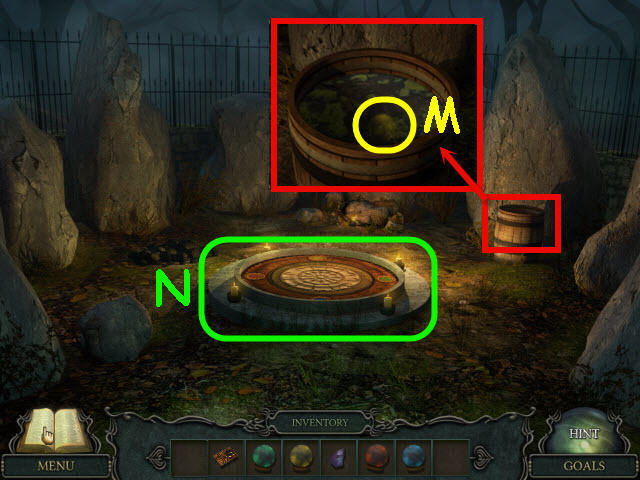
- Examine and use the SCOOP NET on the barrel; get a SPHERE OF LIGHT (M).
- Examine and place the SPHERE OF KNOWLEDGE, SPHERE OF LIGHT, SPHERE OF POWER, SPHERE OF MAGIC, and ENERGY CRYSTAL in the center ring (N).
- Go down into the ring.
 >
>
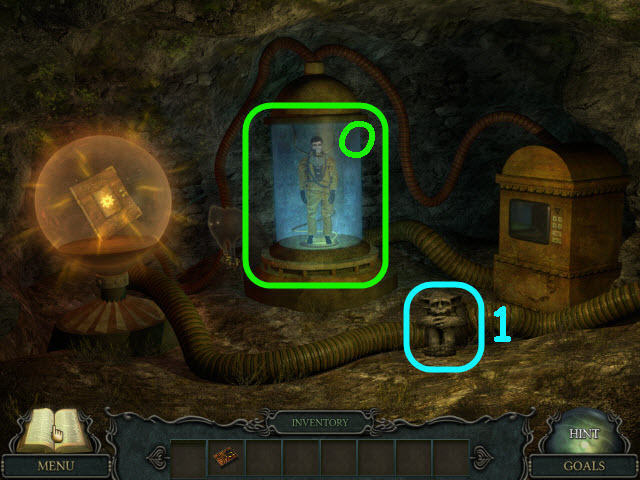
- Examine the center cylinder (O) to get a goal.
- Examine the gargoyle (1) and select the socket of the missing eye.
- Back out.
- Examine the broken boulder to access a HOS. Note: If you did not select the missing eye socket of the gargoyle (1), you will not trigger the HOS.
Chapter 8 – Stop the Experiment
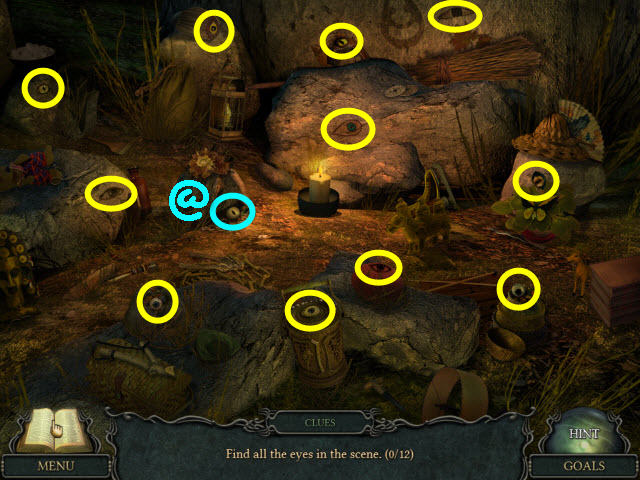 >
>
- Find the 12 eyes to get an ARTIFICIAL EYE (@).
- Go down into the ring.
 >
>
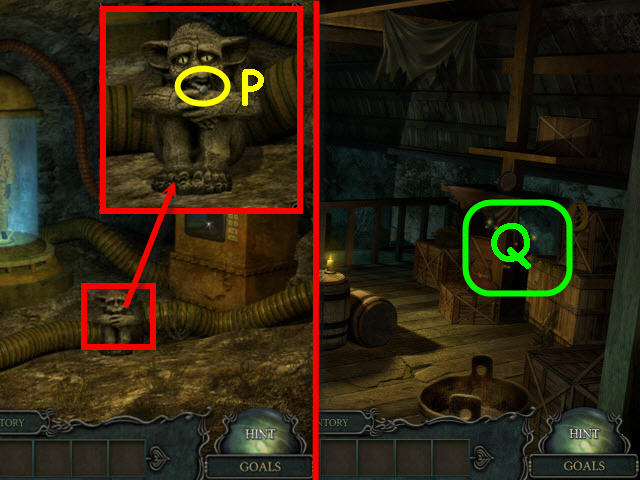
- Examine and place the ARTIFICIAL EYE on the gargoyle; take the BIG SCREW (P).
- Back out three times.
- Examine the crates to access a HOS (Q).
 >
>
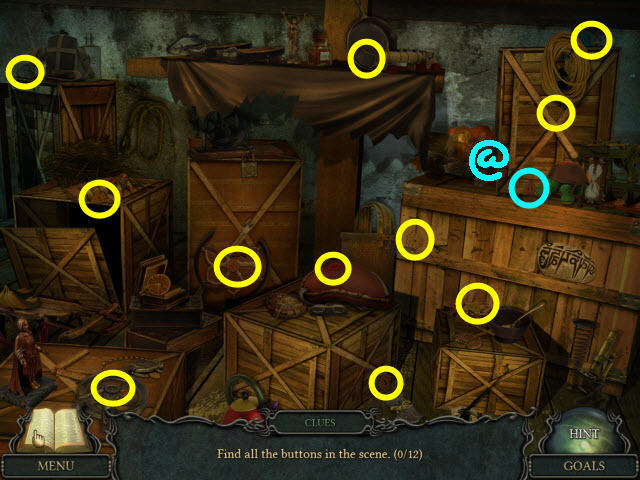
- Find the 12 buttons to get a TRIANGULAR BUTTON (@).
- Back out four times.
 >
>
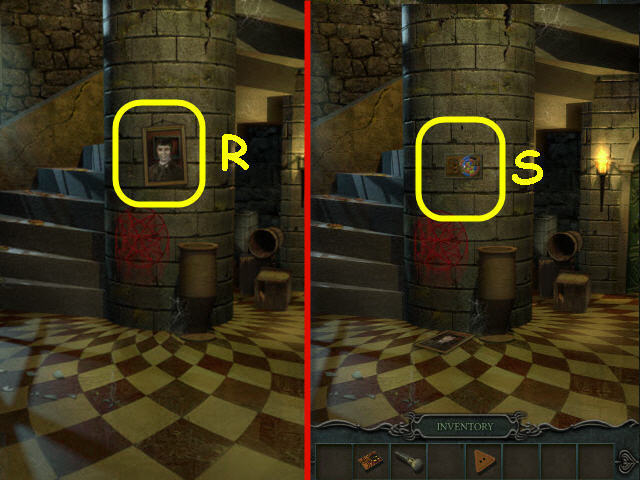
- Remove the picture (R).
- Examine and place the BIG SCREW on the panel to trigger a puzzle (S).
 >
>
- Move the colors to the matching colored frames.
- To solve the puzzle, select the following: 1, 4, D, E, F, I, H, K, J, 2, M, N, O, L, I, H, K, N, 3, O, R, Q, P, M, N, K, J, M, P, Q, N, K, L, O, R, Q, N, K, L, O, R, Q, N, K, L, O, R, Q, N, K, L, O, R, and Q.
- 6, P, S, V, 4, A, B, W, X, C, F, E, B, C, X, W, V, A, B, E, F, C, X, W, B, C, X, 6, U, R, Q, T, W, X, U, R, Q, and T (@).
- You will earn a BANISHMENT SCROLL.
- Go to Gustav in the machine.
 >
>
- Use the BANISHMENT SCROLL on the shadow (T); get the SECOND PIECE OF PICTURE.
- Back out six times and go into the room on the right.
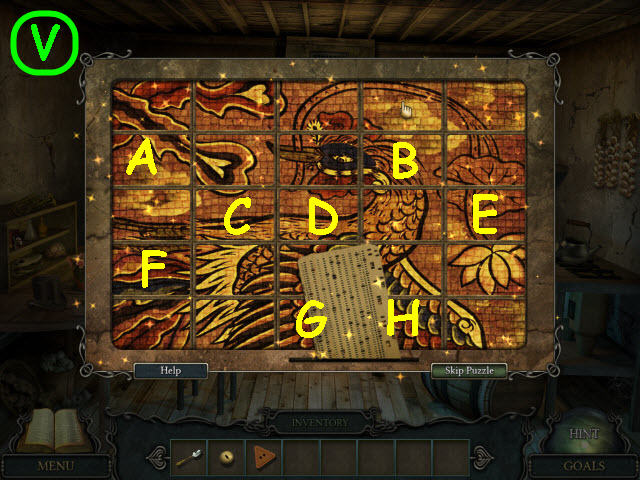
- Examine and place the FIRST PIECE OF PICTURE and the SECOND PIECE OF PICTURE on the picture to trigger a puzzle (U).
 >
>
- Turn over all the picture pieces.
- To solve the puzzle, turn the following pieces: A x 2, C, D, B x 3, E x 3, H, G, and F x 3 (V).
- Take the PUNCHED CARD.
- Back out; go up the stairs, and into the room on the right.
 >
>
- Examine and place the TRIANGULAR BUTTON on the machine (W).
- Place the PUNCHED CARD in the slot (X); push the button (Y) and take the TRIANGULAR AMULET (Z).
- Go to Gustav in the underground chamber.
 >
>
- Examine the machine (A).
- Place the TRIANGULAR AMULET on the machine to trigger a puzzle.
 >
>
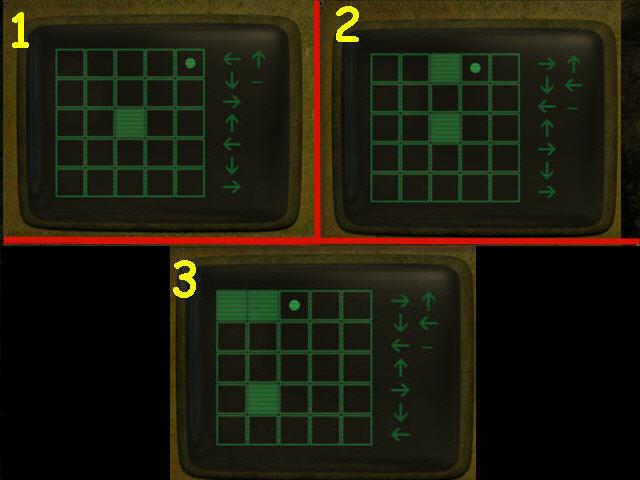
- Use the arrows to move the circle through all the spaces.
- To solve the puzzle, select the following arrows: First solution – Left, Down, Right, Up, Left, Down, Right and up (1). Press the green arrow when set.
- Second Solution: Right, Down, Left, Up, Right, Down, Right, Up, and Left (2).
- Third Solution: Right, Down, Left, Up, Right, Down, Left, Up, and Left (3).
- Congratulations! You have successfully completed Mystic Diary: Missing Pages.


 Sea of Lies: Mutiny of the Heart Walkthrough, Guide, & Tips
 Best in Show Solitaire Walkthrough, Guide, & Tips
 Mystery Crusaders: Resurgence of the Templars Walkthrough, Guide, & Tips
 Dark Strokes: Sins of the Fathers Walkthrough, Guide, & Tips
 Grim Facade: Sinister Obsession Walkthrough, Guide, & Tips