Twisted Lands: Origin Walkthrough, Guide, & Tips
Twisted Lands: Origin Walkthrough

Welcome to the Twisted Lands: Origin Walkthrough
Experience the birth of the terror that gripped the island of Tormente! Every story has a beginning, but few are as horrifying as this!
Whether you use this document as a reference when things get difficult or as a road map to get you from beginning to end, we’re pretty sure you’ll find what you’re looking for here.
This document contains a complete Twisted Lands: Origin game walkthrough featuring annotated screenshots from actual gameplay!
We hope you find this information useful as you play your way through the game. Use the walkthrough menu below to quickly jump to whatever stage of the game you need help with.
Remember to visit the Big Fish Games Forums if you find you need more help. Have fun!
This walkthrough was created by Margie B, and is protected under US Copyright laws. Any unauthorized use, including re-publication in whole or in part, without permission, is strictly prohibited.
General Tips

- Twisted Lands: Origin is a Hidden Object Puzzle Adventure.
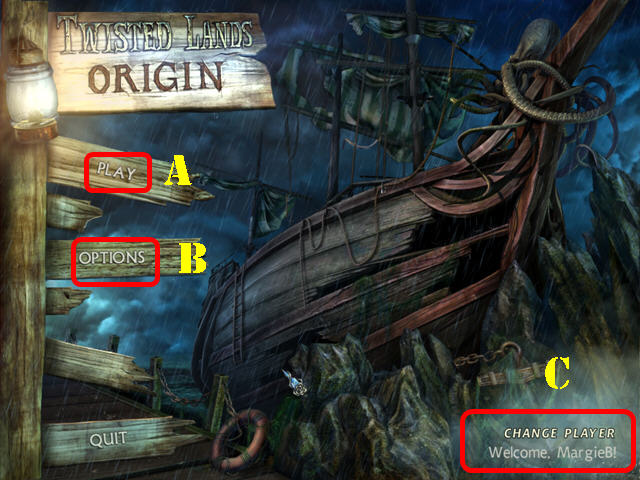
- Select ‘Play’ (A) to begin your adventure.
- The ‘Options’ (B) button allows you to adjust the screen size, volume, cursor, and difficulty level.
- The ‘change, player’ button (C) can be used to add or delete a player.
- You can skip a puzzle once the ‘SKIP’ button fills at the top of each puzzle.
- Click on the magnifying glass icon when it appears to take a closer look at an area.
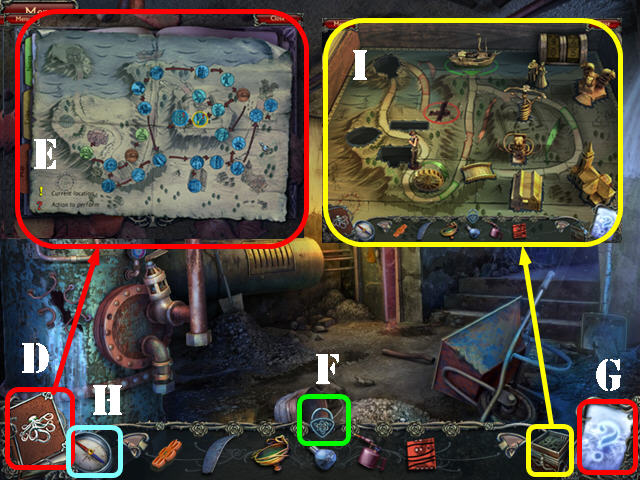
- Read your Journal for important clues collected throughout the game (D). There are 3 tabs in the Journal: Notes, Tasks, and the Map (E). Use the Map to view your current location and to view areas needing attention.
- Your inventory is located in the lower panel – move your cursor down to reveal your inventory. Click on the lock icon, to lock or unlock the inventory tray (F).
- Hints are unlimited, but you must wait for the meter to refill (G).
- Hidden Object Scenes will be referred to as HOS in this walkthrough. Items listed in orange in HOS require an extra step.
- Use the Compass (H) to view all available exits in a scene.
- Add the different items to your case as they appear; a mini-puzzle will have to be solved from time to time in this section (I).
Chapter 1: Fork in the Road
- Select ‘crawl’ at the bottom of the scene or ‘jump’ at the top of the scene.
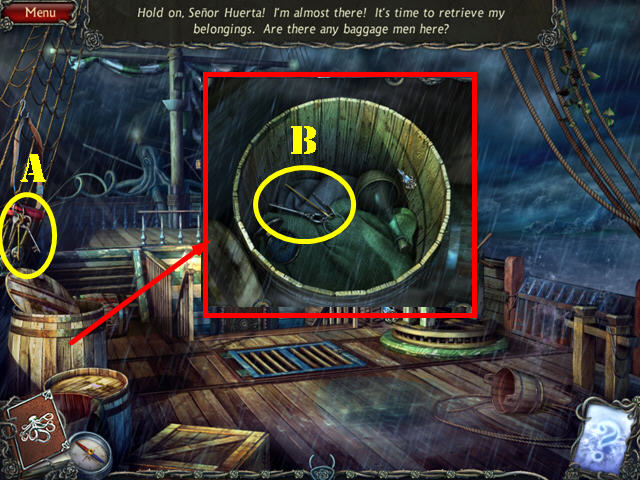
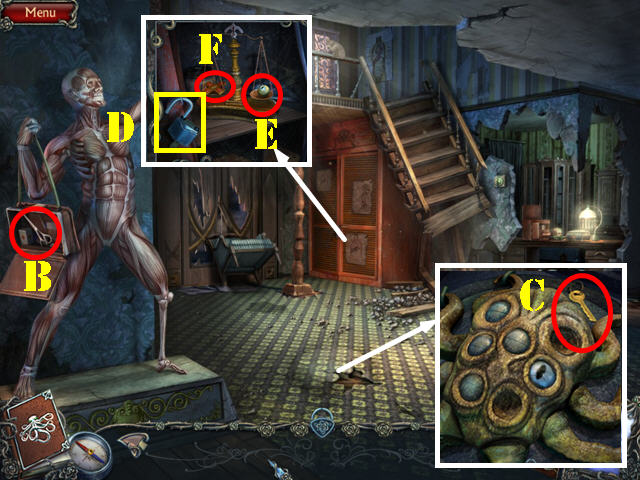
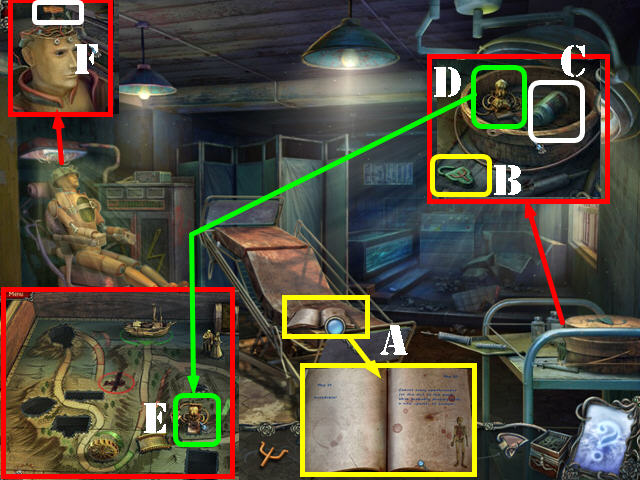
- Touch the keys (A); zoom into the barrel. Remove the lid and take the HOLD KEYS (B).

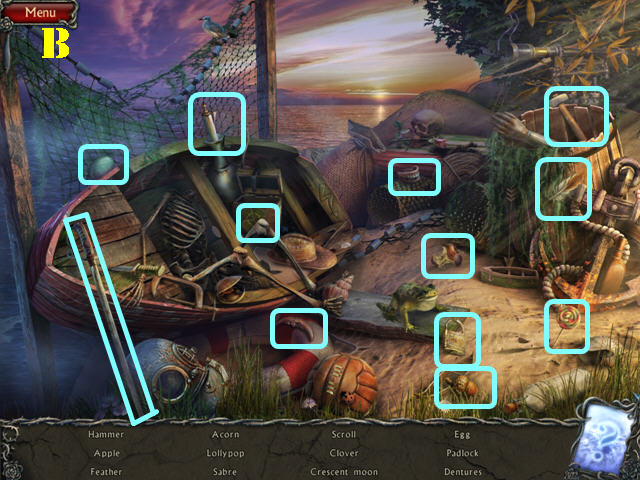
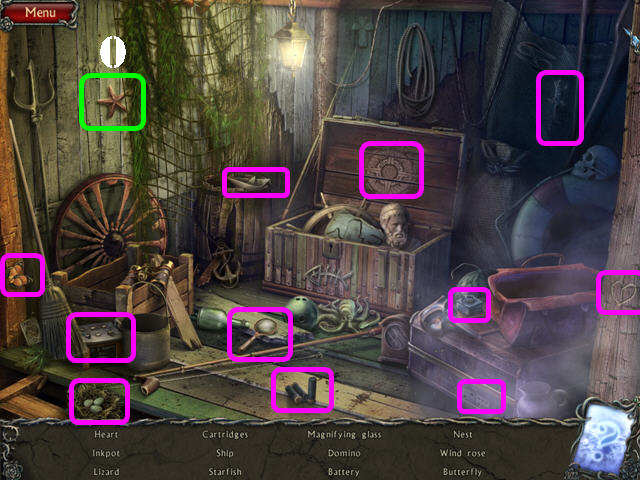
- Play the HOS.
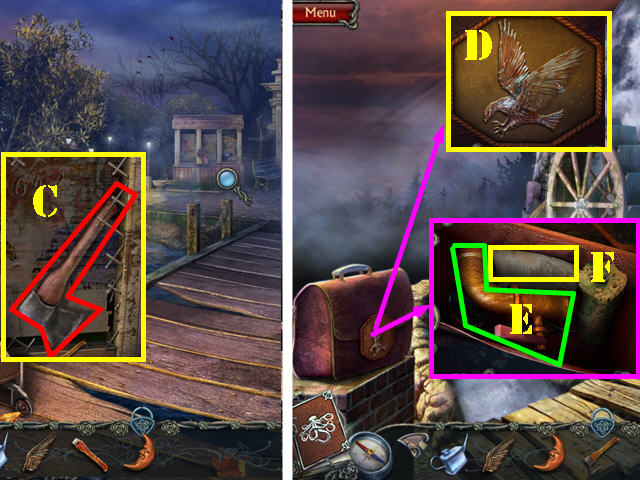
- Move the curtain and take the hook (C).
- You will receive the HOOK and the SHIP.
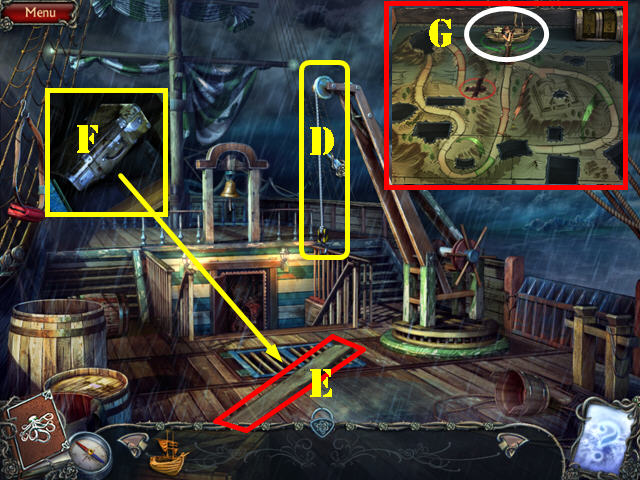
- Put the HOOK on the pulley (D) and then pull on it.
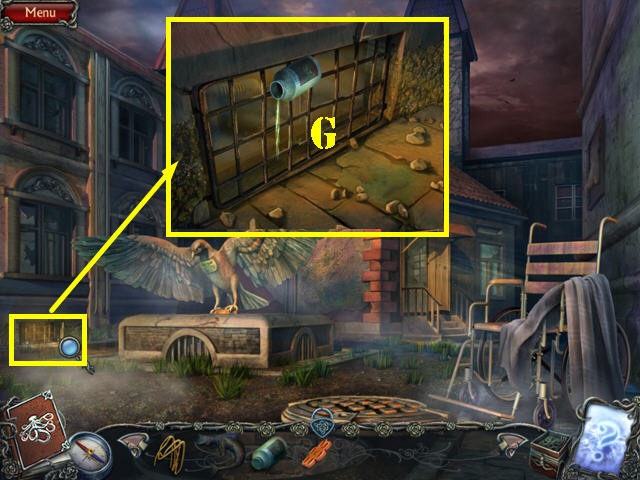
- Remove the board (E); open the grate and press on the case (F). Take the case.
- Put the SHIP in the case (G).
- Exit the ship on the right.
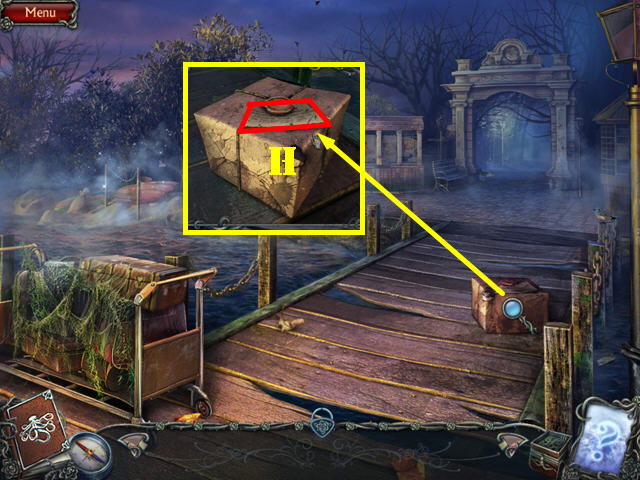
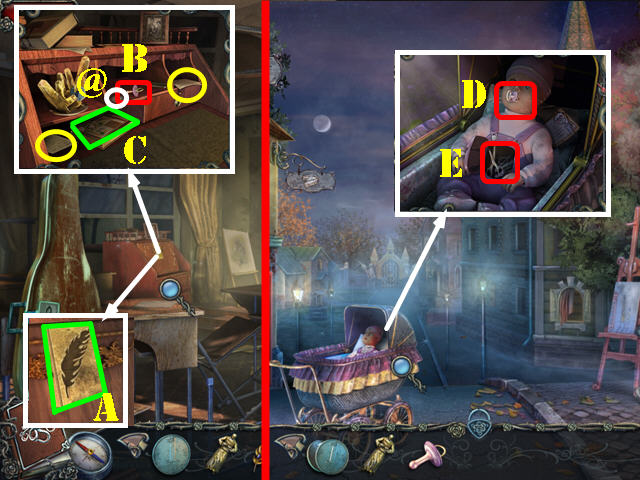
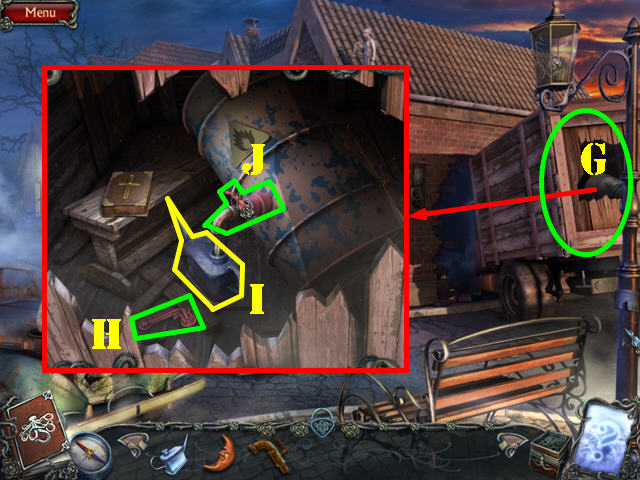
- Zoom into the package and take the letter (H).
- Zoom into the case to activate a puzzle.
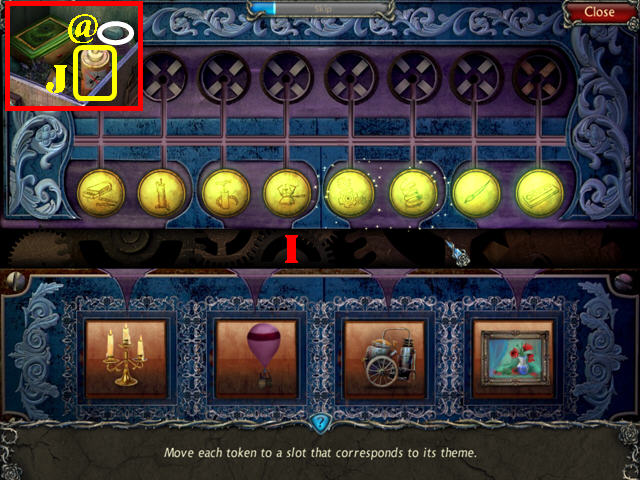
- Select a token and then select the space you want to move it to.
- Please look at the screenshot for the solution (I).
- Take the COIN (@) and the BUG SPRAY (J).
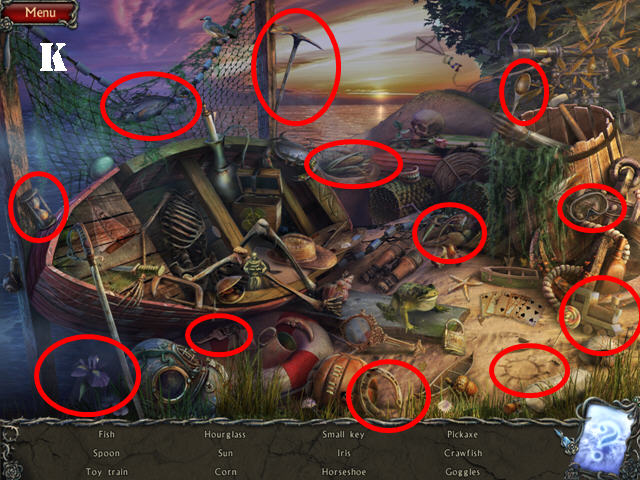
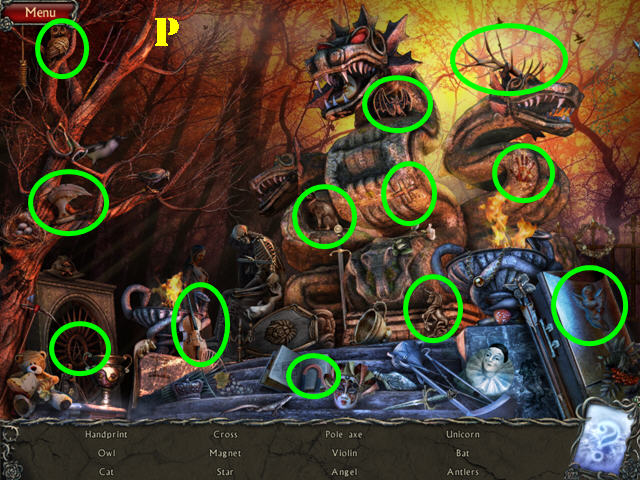
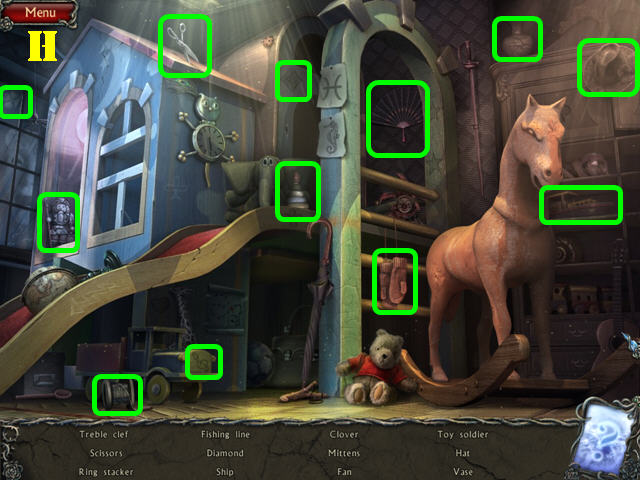
- Play the HOS on the left.
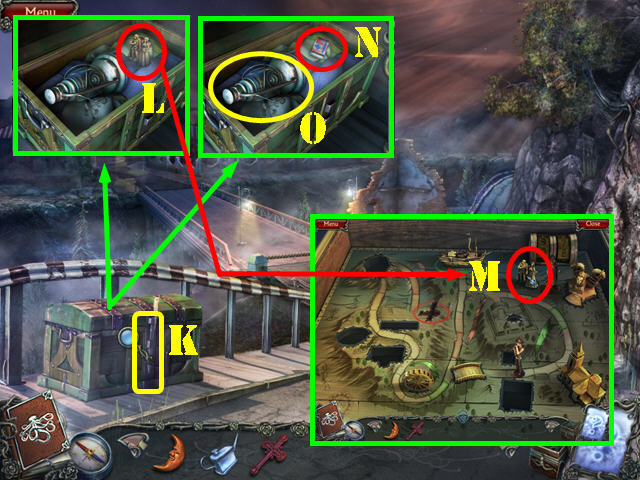
- Find all the items listed to receive the SMALL KEY (K).
- Take the small bridge on the left to reach the hospital gate.
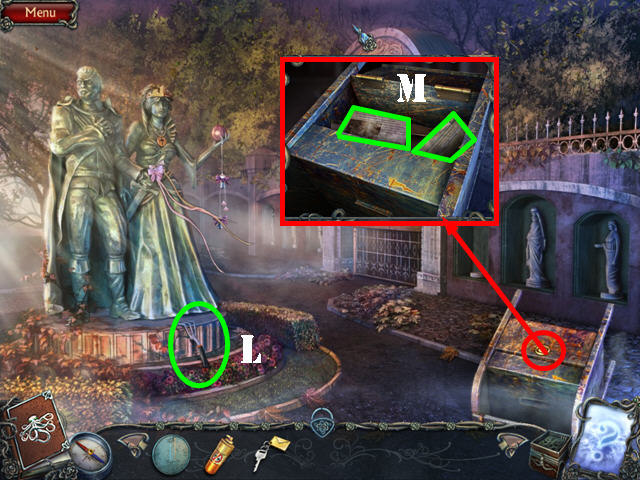
- Take the HAND RAKE (L).
- Use the SMALL KEY on the lock; zoom into the box and read both notes (M). The code 8317 appears.
- Walk down.
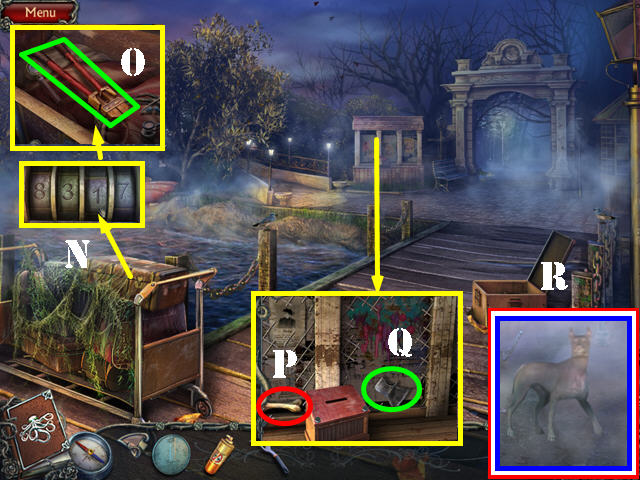
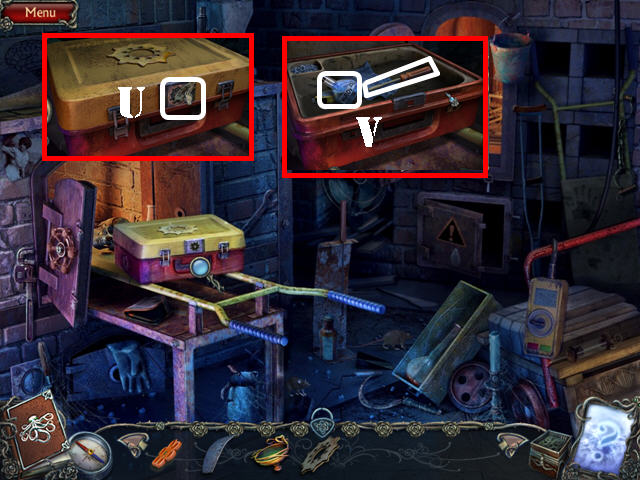
- Zoom into the suitcase; enter the code 8317 on the tumblers (N).
- Take the WIRE CUTTERS (O).
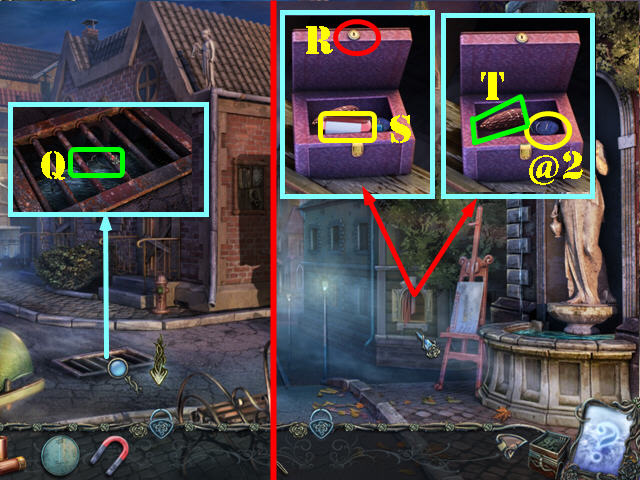
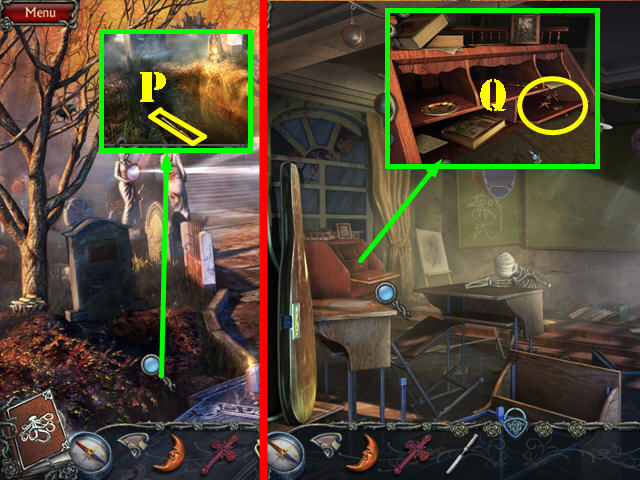
- Look at the stand; use the WIRE CUTTERS on the mesh; take the BONE (P) and note the axe handle (Q).
- Exit the stand and head right through the arches.
- Give the BONE to the dog (R).
- Go right.
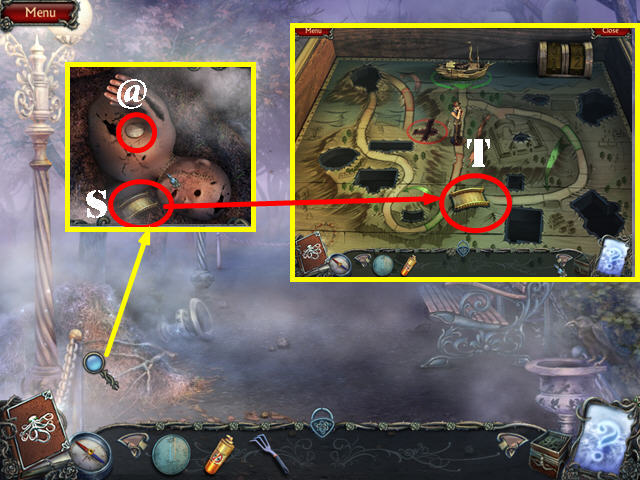
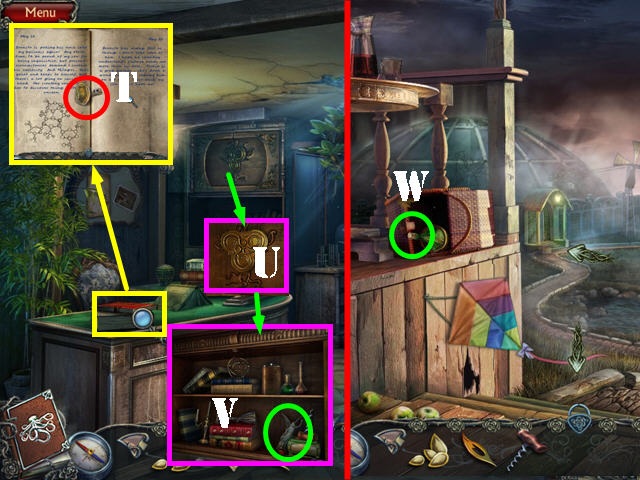
- Look at the ground; use the HAND RAKE on the soil; take the COIN (@) and the BRIDGE (S).
- Put the BRIDGE in the case (T) and exit the case.
- Walk down and go forward twice to reach the fork in the road.
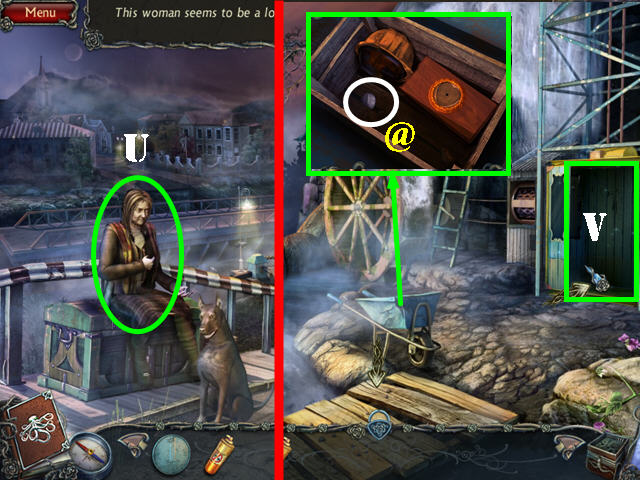
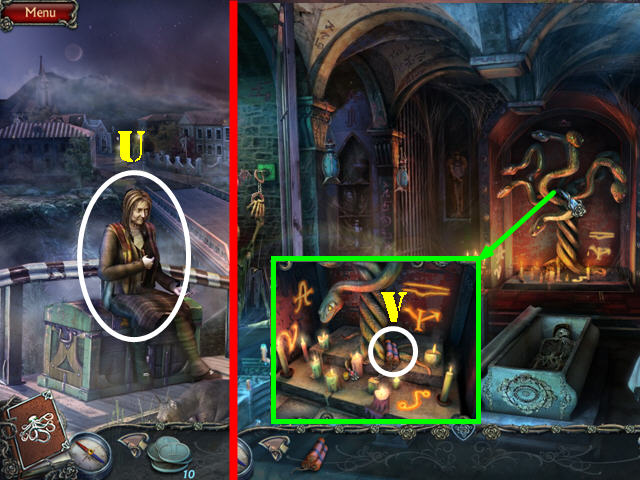
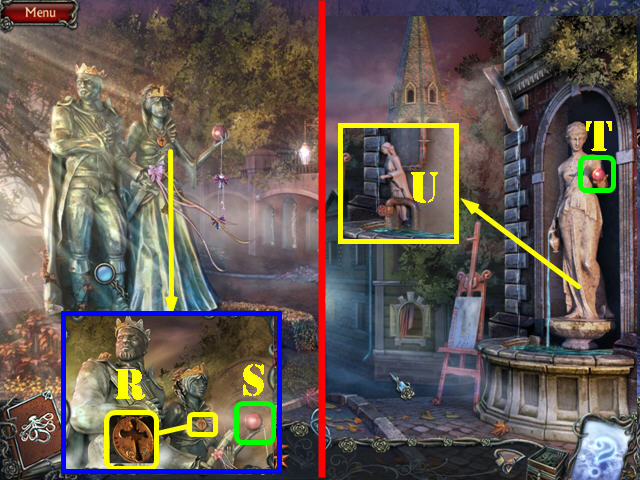
- Talk to the woman (U).
- Take the road on the right. Go forward after the rockslide to reach the elevator.
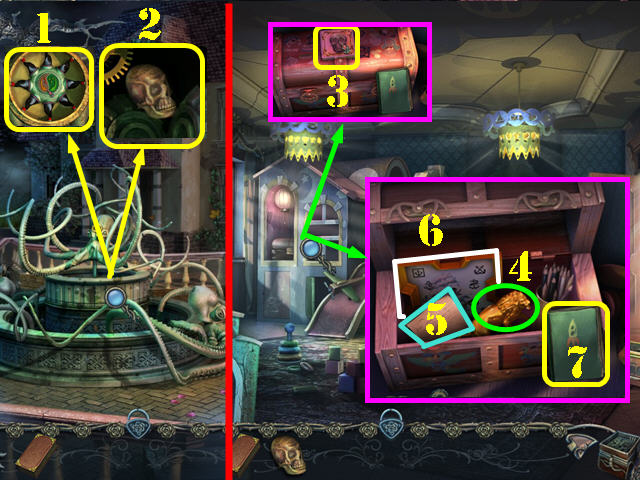
- Examine the wheelbarrow; remove the clipboard. Open the helmet and take the COIN (@).
- Enter the elevator (V).
- Take the pathway ahead to reach the mansion entrance.
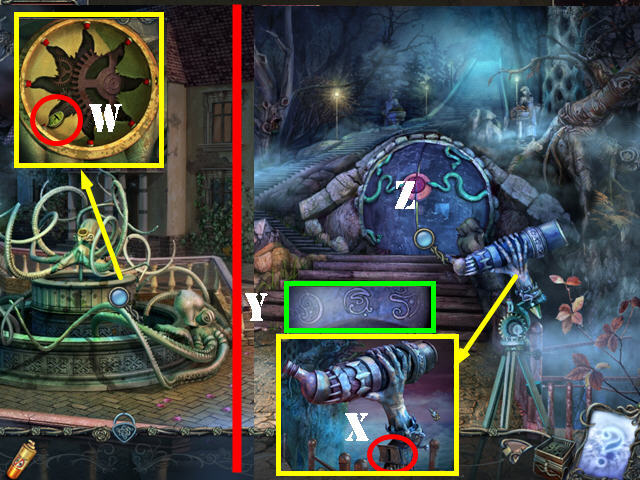
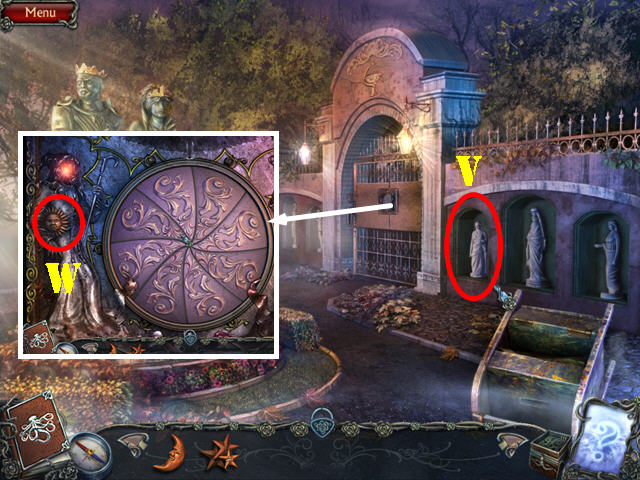
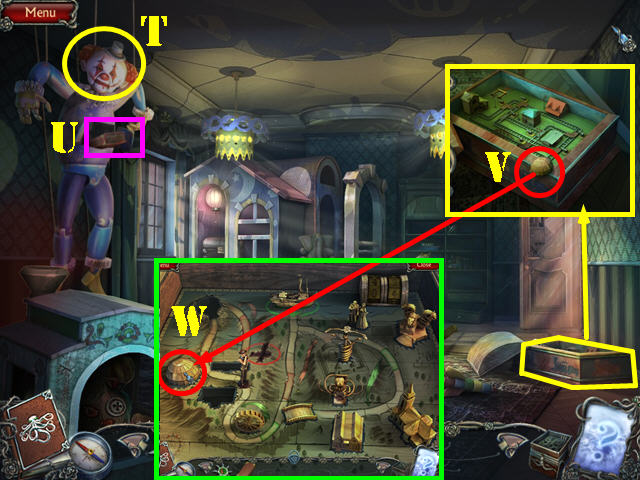
- Look at the fountain and take the TOKEN (W).
- Walk down.
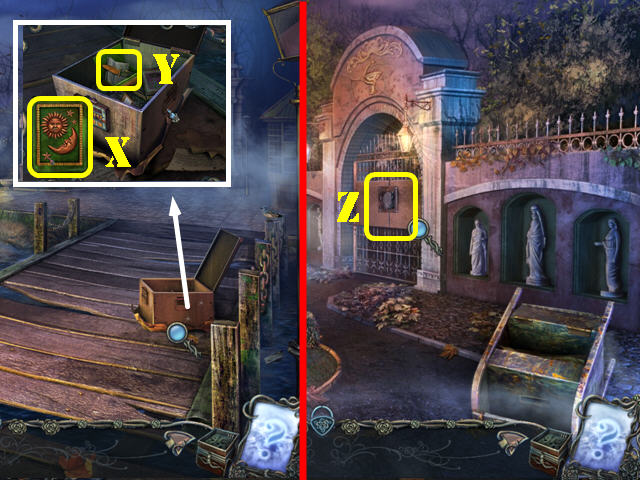
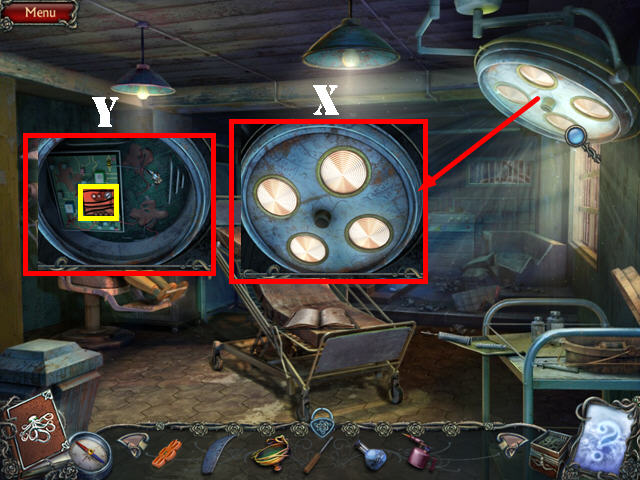
- Zoom into the telescope and insert the TOKEN in the slot (X).
- Touch the telescope to view a code (Y).
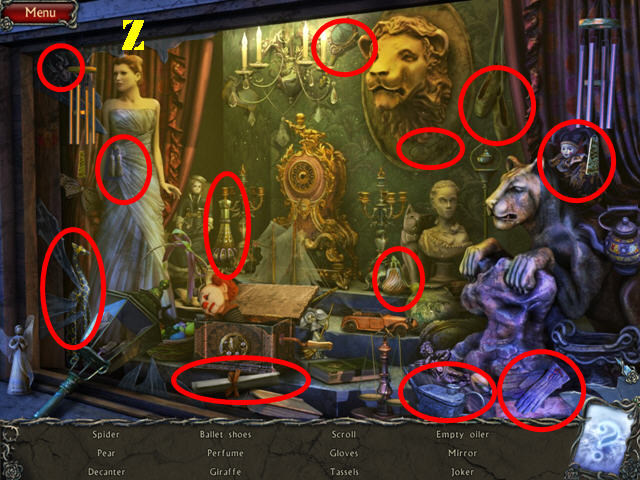
- Zoom into the door (Z) to activate a puzzle.
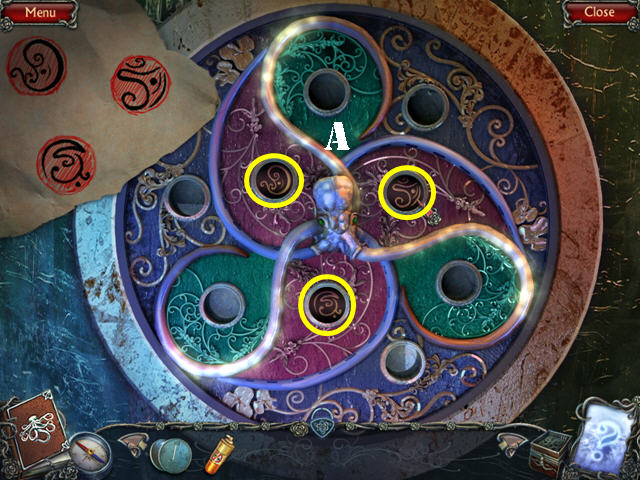
- Change the symbols in each slot according to the code on the left.
- Please look at the screenshot for the solution (A).
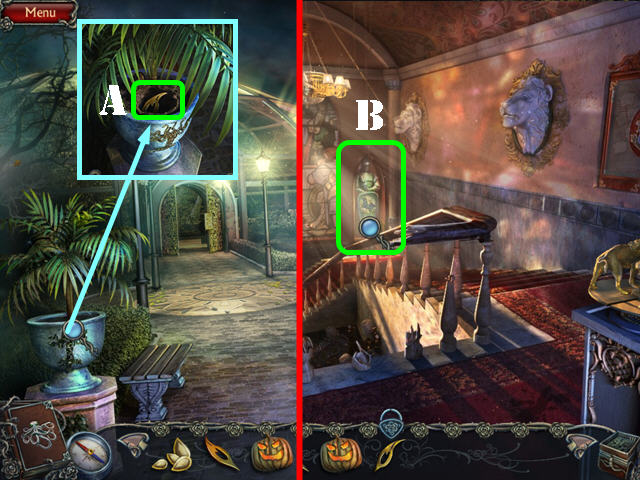
- Enter the catacombs.
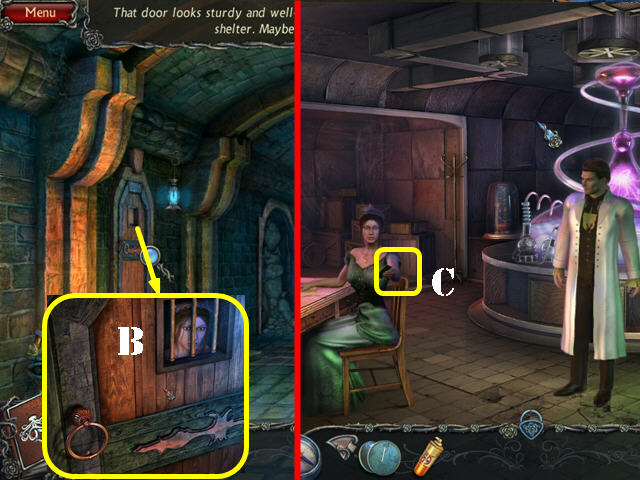
- Look at the left door; knock on it for Teresa to appear and to be transported to another scene (B).
- Take the LETTER from Teresa (C).
- Click on ‘Smash the door down’ twice. You will be automatically transported back to the fork in the road.

- Talk to the woman; she will give you a list of things for sale (D). The 3 coins are located in these areas: dock – after solving the token puzzle, foggy park – after using hand rake in the soil, and in the wheelbarrow by the elevator.
- Touch her again and select: ‘I think I’ll buy something’ and then choose to buy a HAMMER with 3 COINS. The HAMMER goes into inventory. Now choose ‘Goodbye, senora’.
- Return to the elevator area.
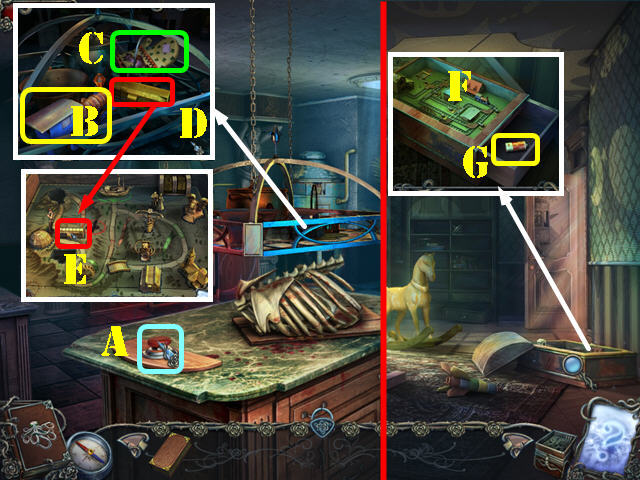
- Repair the ladder with the HAMMER (E).
- Look above the ladder and take the LEVER (F).
- Walk down twice.
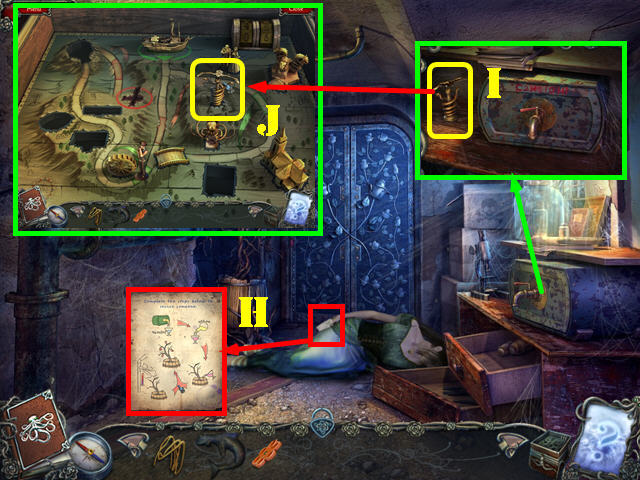
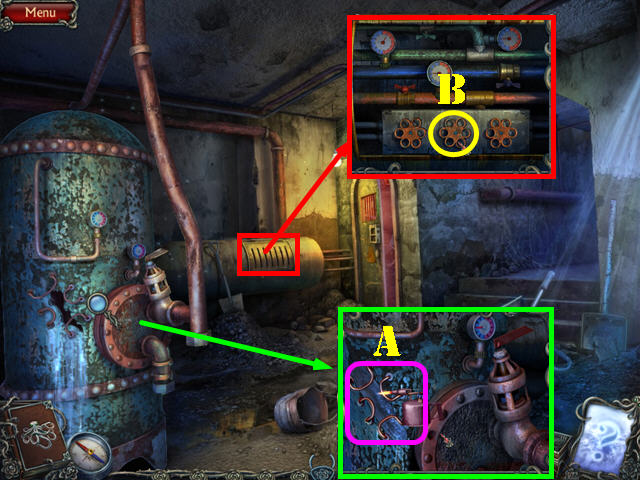
- Zoom into the bridge control; put the LEVER in the slot (G) and zoom into the gears to activate a mini-game.
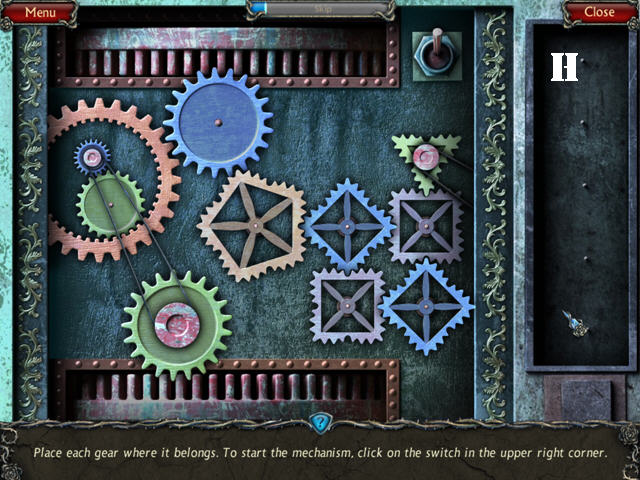
- Place each gear on the right into the right spot. Select a gear and then select the section you want to place it into.
- Please look at the screenshot for the solution (H).
- Take the bridge and then go forward to reach the outside of the police station.
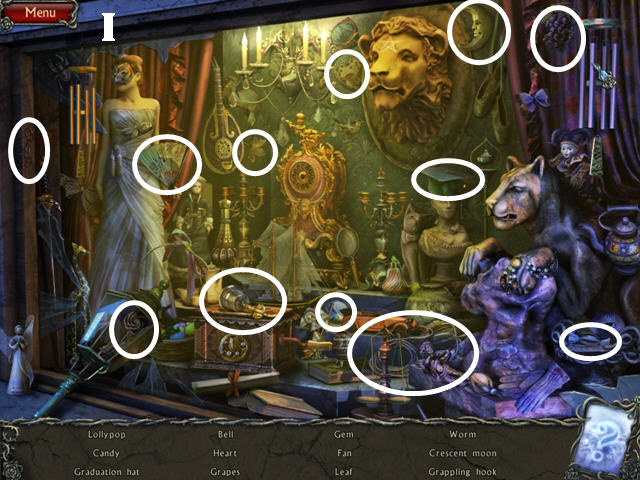
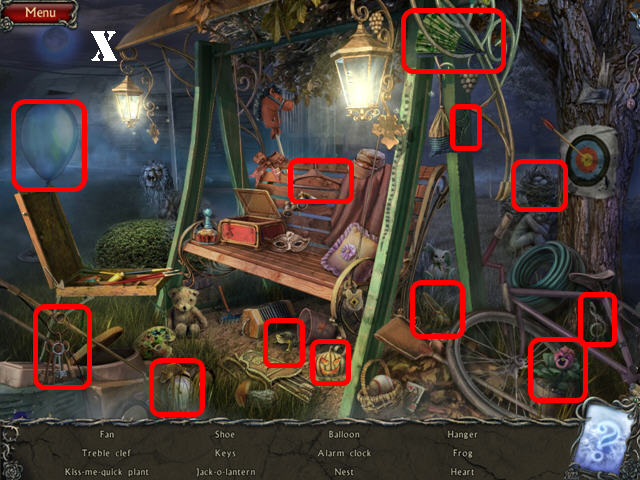
- Play the HOS.
- Smash the glass by clicking on it once. Find all the items on the list to receive the GRAPPLING HOOK (I).
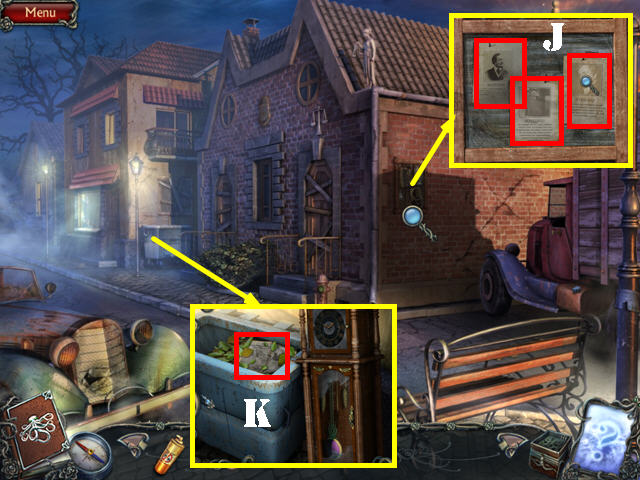
- Zoom into the bulletin board and look at the 3 notes (J).
- Look at the bins and look at the note (K).
- Go left to reach Main Street.
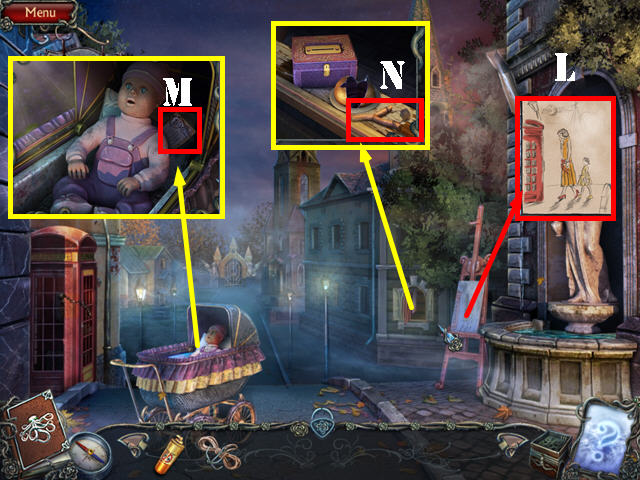
- Take a closer look at the easel (L).
- Zoom into the baby carriage; look at the note (M).
- Look at the window; take the SLINGSHOT (N).
- Go towards the gate.
- Talk to the monk (O).
- Look in the well; touch the wheel to drop the bucket (#). Zoom into the well and put the GRAPPLING HOOK in the well to get the BUCKET (P).
- Look at the stand (Q); read the note.
- Walk down.
- Put the BUCKET in the fountain to get the BUCKET OF WATER (R).
- Walk down.
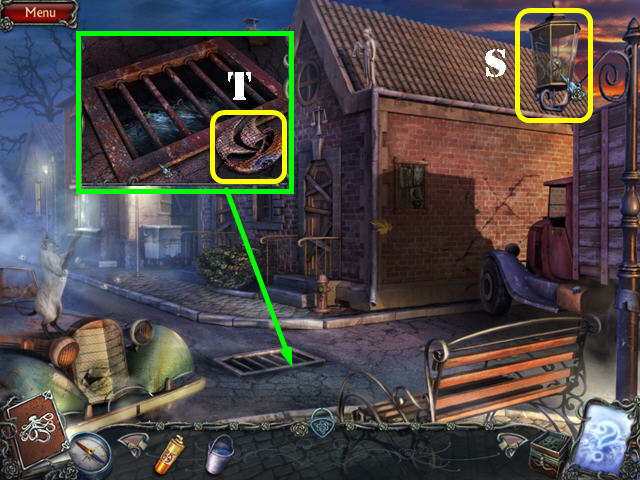
- Use the SLINGSHOT on the lamp (S).
- Look at the grate and take the SMALL SHIP (T).
- Return to the area by the church.
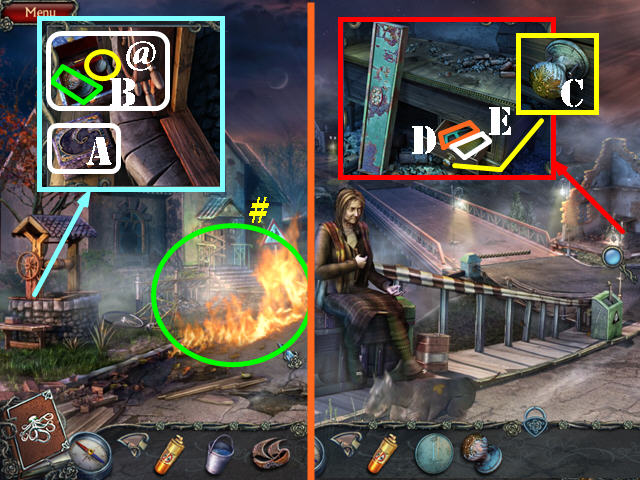
- Use the BUCKET OF WATER on the fire (#).
- Zoom into the well; put the SHIP in the indentation on the box (A). Take the DRAWER KNOB (B) and the COIN (@).
- Walk down 4 times.
- Take a closer look at drawer; put the DRAWER KNOB into the hole and push in the screws (C).
- Open the drawer; take the HACKSAW (D) and look at the notebook (E); flip through the pages.
- Return to Main Street.
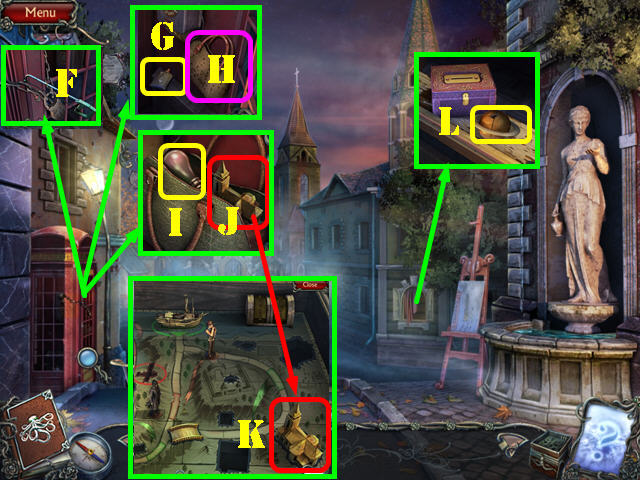
- Zoom into the phone booth; cut the chain with the HACKSAW (F).
- Take the GLUE (G).
- Zoom into the purse and use the BUG SPRAY on it (H).
- Open the purse; take the LIGHT BULB (I) and the CHURCH (J). Put the CHURCH in the case (K).
- Look in the window; use the GLUE on the broken planet and take the PLANET (L).
- Return to the church area and go towards the door on the left. Go through the window to access the schoolhouse.
Chapter 2: The Schoolhouse
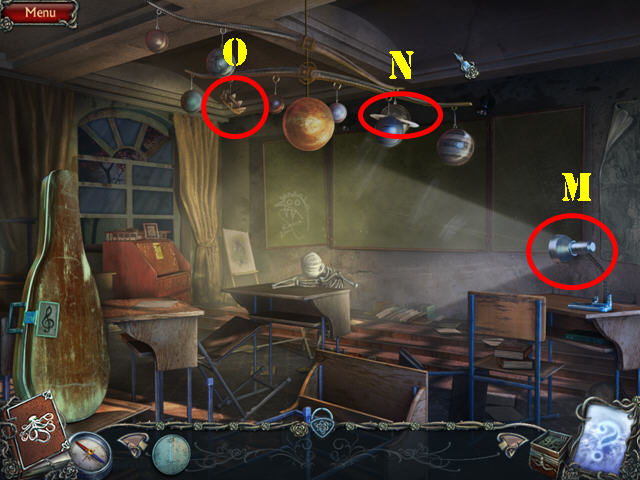
- Put the LIGHT BULB in the lamp (M).
- Put the PLANET on the solar system (N) and then take the CROWN (O).
- Walk down 9 times to return to the dock.
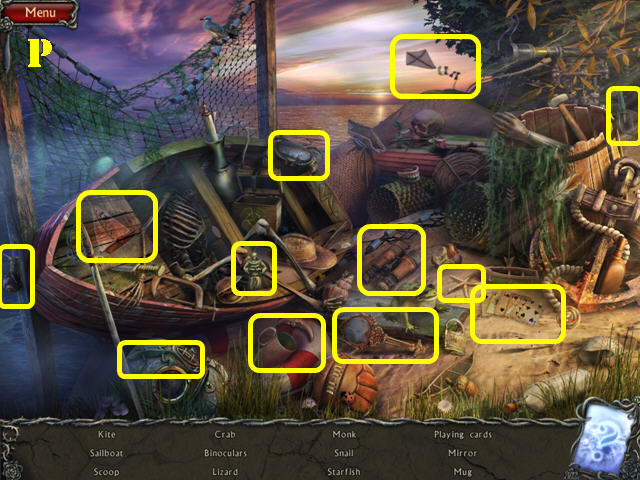
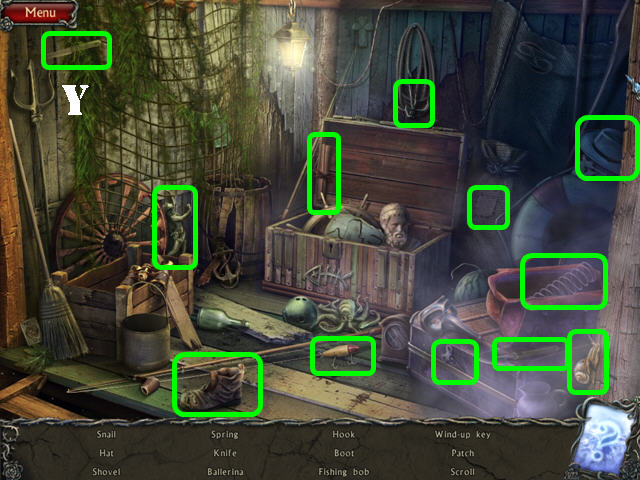
- Play the HOS.
- Find all the items listed to receive the MONK (P).
- Go left.
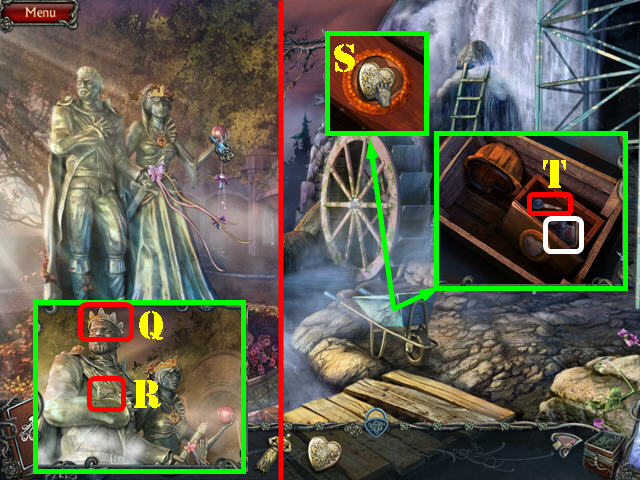
- Zoom into the statues; put the CROWN on the king’s head (Q).
- Take the HEART (R).
- Return to the elevator.
- Zoom into the wheelbarrow; put the HEART on the box (S).
- Take the TRUCK KEY and look at the picture (T).
- Return to the outside of the police station.
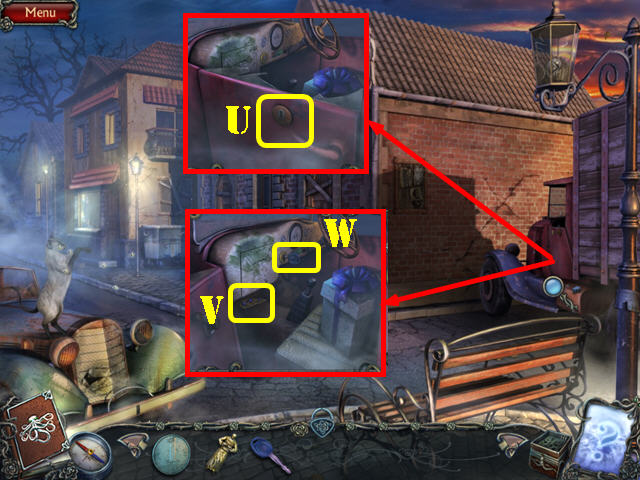
- Look at the truck; use the TRUCK KEY in the lock (U).
- Take the FEATHER (V).
- Put the TRUCK KEY in the ignition (W) and turn the key; the vehicle is out of gas.
- Return to the schoolhouse.
- Zoom into the desk; put the FEATHER in the slot (A); take the PACIFIER (B) and the COIN (@).
- Look at the 2 notes (yellow) and the book (C).
- Walk down 3 times to return to Main Street.
- Zoom into the baby carriage; put the PACIFIER in its mouth (D) and take the SCISSORS (E).
- Walk down.
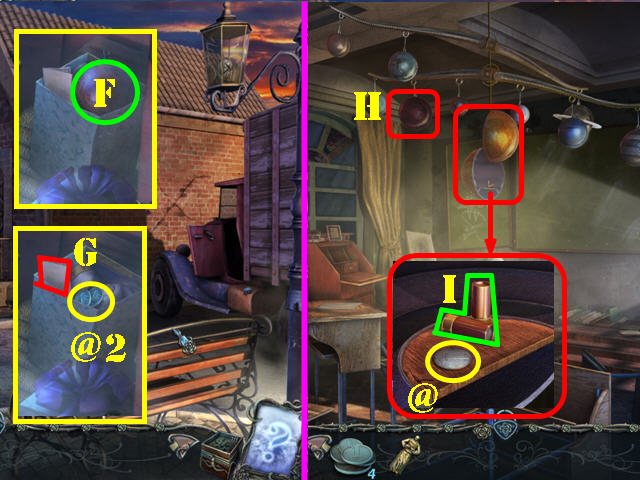
- Zoom into the truck; cut the ribbon on the package with the SCISSORS. Take the second PLANET (F) and the 2 COINS (@2). Read the note (G).
- Return to the schoolhouse.
- Put the second PLANET on the solar system (H).
- Look into the planet; take the COIN (@) and the CARTRIDGES (I).
- Walk down 6 times.

- Talk to the woman and buy the GASOLINE for 5 COINS (J). The coins are located in these areas: 2 are in the gift box in the truck by the police station, schoolhouse desk, inside the box by the well near the church, and inside the second planet you place on the solar system in the schoolroom.
- Return to the outside of the police station.
- Pour the GASOLINE in the gas tank (K).
- Look inside the truck and turn the key (L); the truck will break through the police wall.
- Enter the police station.
- Touch the scene and a beam will fall.
- Take the SCREWDRIVER (M).
- Return to Main Street.
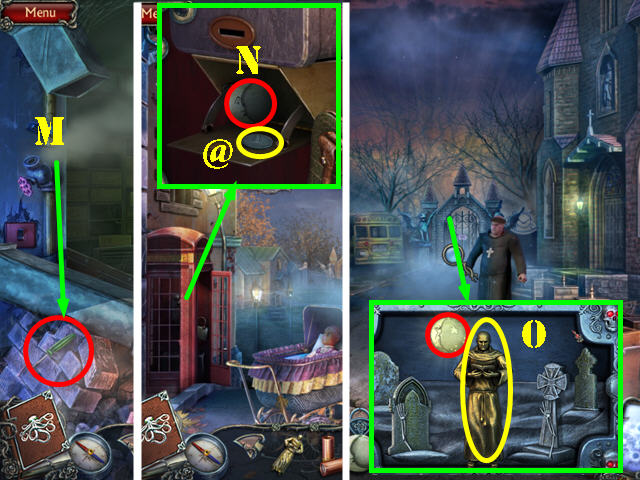
- Look in the phone booth and then take a closer look at the phone. Remove the screw with the SCREWDRIVER. Take the CRESCENT MOON (N) and the COIN (@).
- Return to the church area and zoom into the gate; insert the CRESCENT MOON and the MONK into the indentations (O).
- Go through the gate to reach the cemetery.
- Play the HOS.
- Find the items listed to get the MAGNET (P).
- Walk down 3 times.
- Zoom into the grate; use the MAGNET to retrieve the PIN (Q).
- Go left.
- Zoom into the window; use the PIN in the lock (R).
- Take the SOLVENT (S), 2 COINS (@2), and the CLOCK WEIGHT (T).
- Walk down.
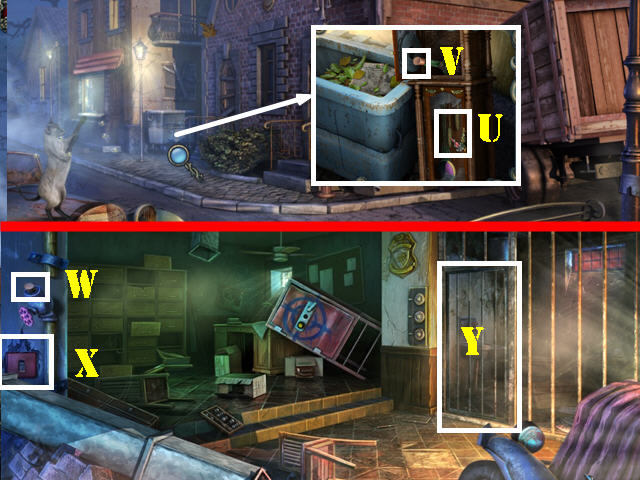
- Zoom into the bins; put the CLOCK WEIGHT on the clock (U).
- Press on the CORK twice to add it to inventory (V).
- Go into the police station.
- Put the CORK over the steam (W).
- Press on the switch (X).
- Open the door and enter the cell.
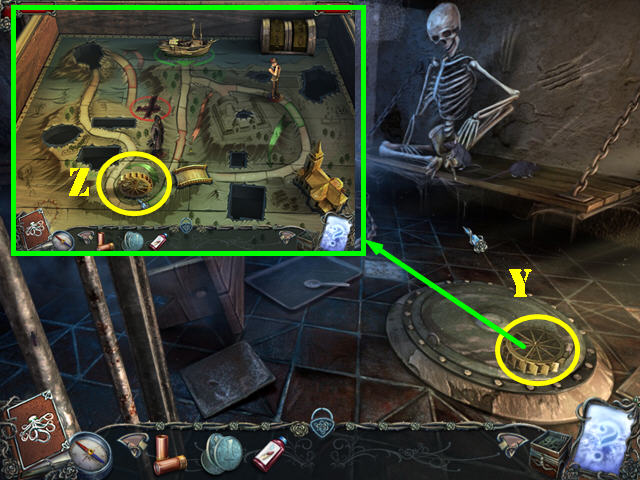
- Take the MILL WHEEL (Y).
- Put the MILL WHEEL in the case (Z).
- Walk down 7 times to return to the dock.
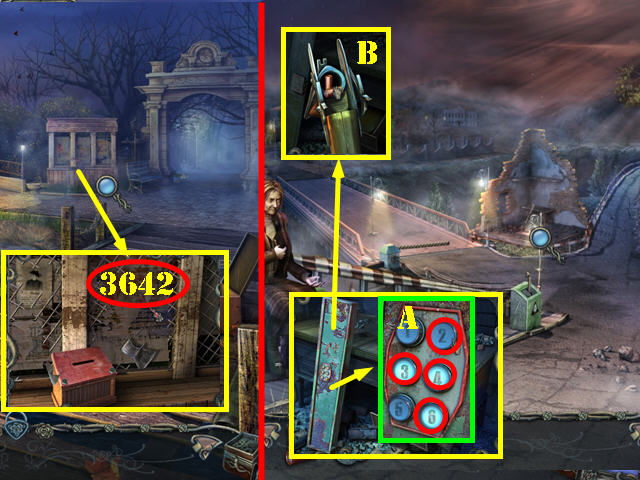
- Zoom into the stand; use the SOLVENT on the paint to view the code (3642).
- Return to the fork in the road.
- Zoom into the drawer area; look at the keypad and enter 3642 (A).
- Touch the shotgun and insert the CARTRIDGES to get the SHOTGUN (B).
- Return to the police station.
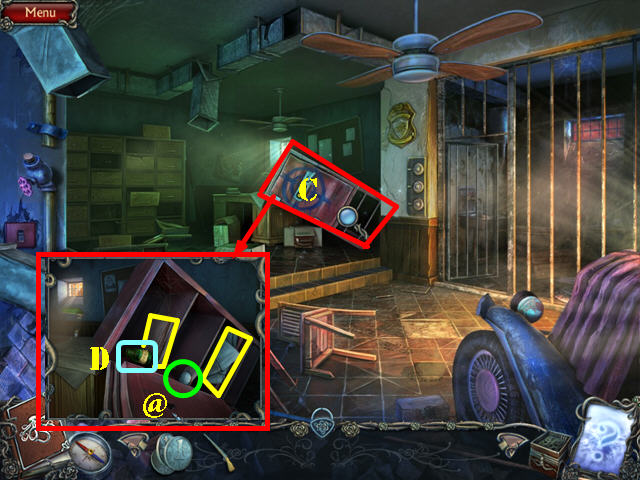
- Zoom into the safe; shoot the safe with the SHOTGUN (C).
- Take the COIN (@), the ACID (D), and look at the 2 sets of files (yellow).
- Exit the police station.
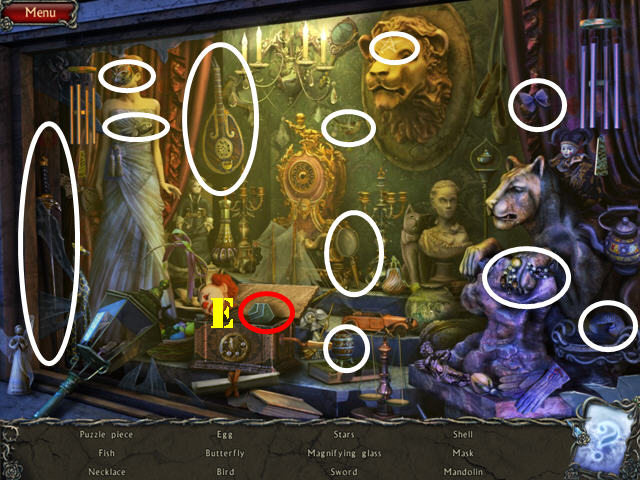
- Play the HOS outside the police station.
- Open the box and take the PUZZLE PIECE (E).
- Find the rest of the listed items to get the first PUZZLE PIECE.
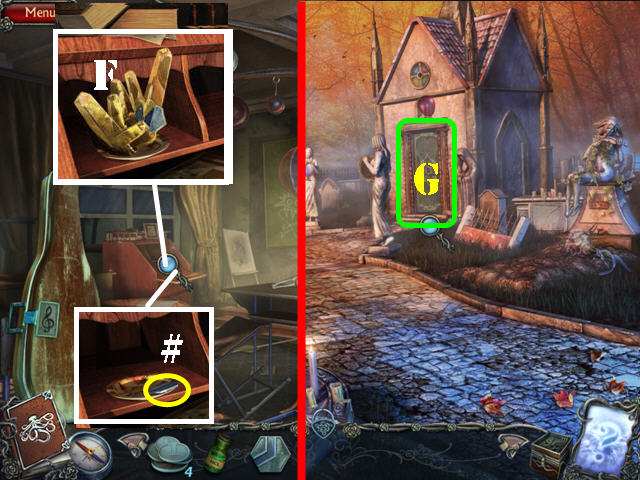
- Return to the schoolhouse.
- Zoom into the desk; use the ACID on the crystal (F) and take the second PUZZLE PIECE (#).
- Return to the cemetery.
- Zoom into the crypt door (G) and put the 2 PUZZLE PIECES on the door to activate a puzzle.
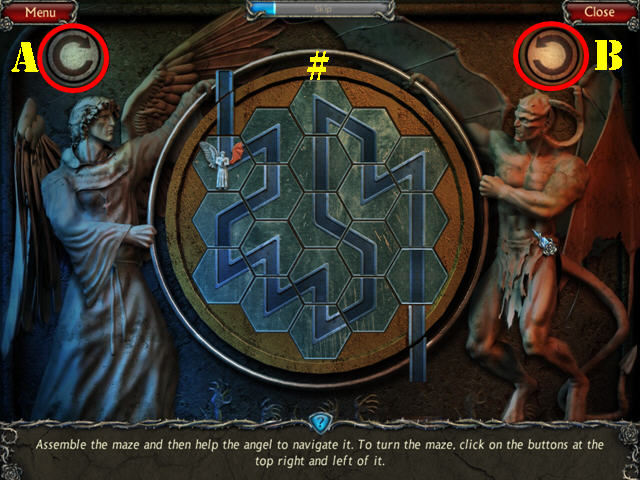
- You must first rotate all the pieces correctly so that all the lines are connected.
- Please look at the screenshot for the solution (#).
- Secondly, you must use the buttons (A and B) to rotate the board so the angel navigates through the whole maze.
- To solve the puzzle, press on the buttons in this order: A x 2, B x 3, A x 3, B x 2, A x 2, B x 2, A x 4, B x 4, A x 2, and B x 2 .
- Enter the crypt.
Chapter 3: The Crypt
- Look at the casket; take the WIND-UP KEY (C).
- Walk down.
- Look at the statue; put the WIND-UP KEY on the music box (D).
- Take the BAT (E) and look at the note (F).
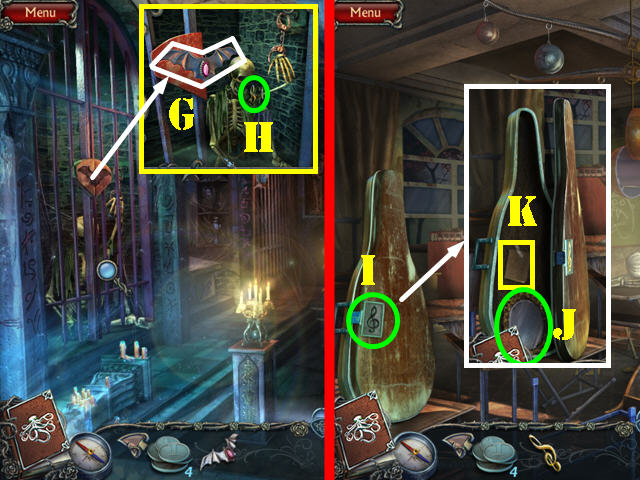
- Go back into the crypt.
- Look at the cell on the left; put the BAT in the slot (G) and take the TREBLE CLEF (H).
- Return to the schoolhouse.
- Put the TREBLE CLEF into the indentation (I); take the MIRROR (J) and look at the note (K).
- Return to the cemetery.
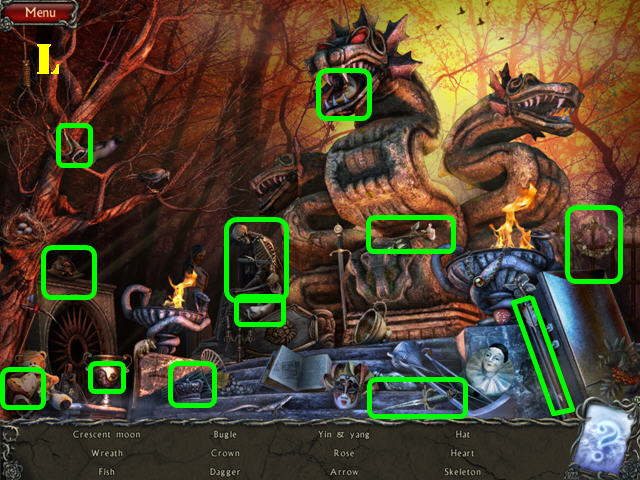
- Play the HOS.
- Find the listed items to get the SKELETON (L).
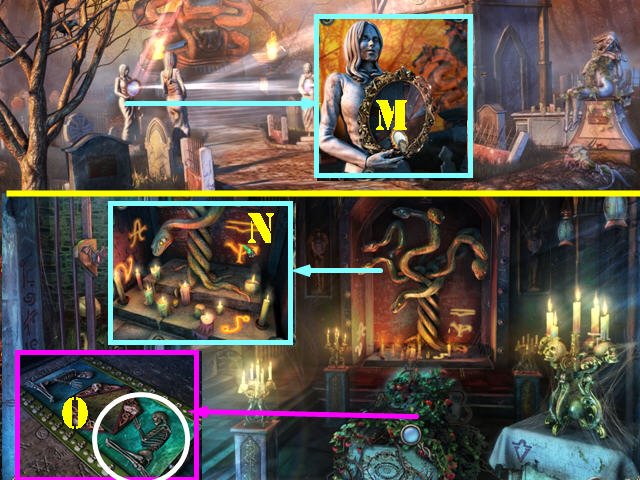
- Look at the statue with the broken mirror; replace the broken mirror with the MIRROR (M).
- Go back into the crypt.
- Zoom into the codes on the altar (N).
- Look at the coffin; put the SKELETON into the indentation (O).
- Look at the coffin again and press on the triangle to activate a mini-game.
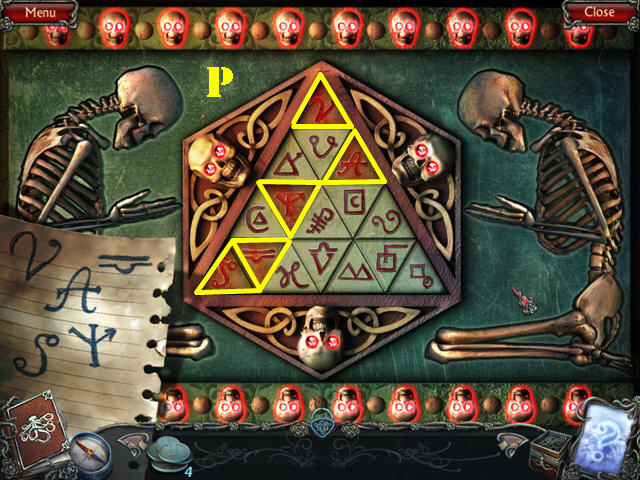
- Press on the symbols in the center according to the code.
- Please look at the screenshot for the solution (P).
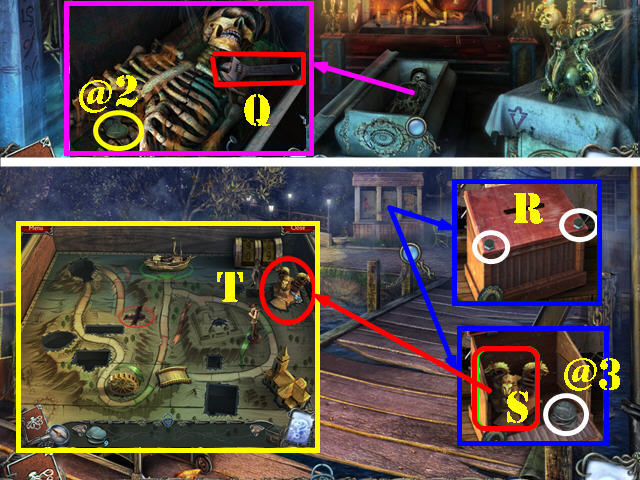
- Look in the coffin; take the WRENCH (Q) and the 2 COINS (@2).
- Return to the dock and look at the stand.
- Remove the bolts with the WRENCH (R).
- Take the 3 COINS (@3) and the SNAKE STATUE (S).
- Place the SNAKE STATUE in the case to activate a puzzle (T).
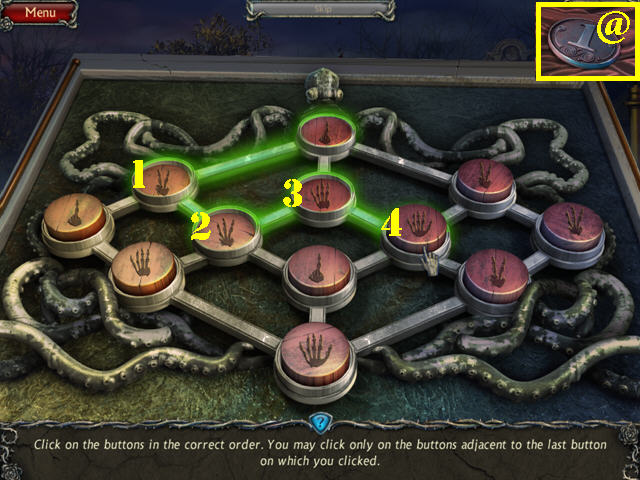
- Press on the buttons in a logical fashion. Hint: count the number of fingers.
- To solve the puzzle, press on the buttons in the order shown in the screenshot (1-4).
- Take the COIN (@).
- Return to the woman on the fork in the road.
- Buy the DYNAMITE from her for 10 COINS (U). The coins are located in these areas: in the phone booth on Main Street, 2 in the box in the window on Main Street, in the safe at the police station, 2 in the crypt coffin, 3 inside the box by the stand in the dock, you will receive one after you solve the case puzzle on the dock.
- Return to the crypt.
- Zoom into the altar and put the DYNAMITE on it (V).
- Walk down.
- Play the HOS.
- Open the casket and take the TONGS (W).
- The TONGS will be added to inventory.
- Go back into the crypt.
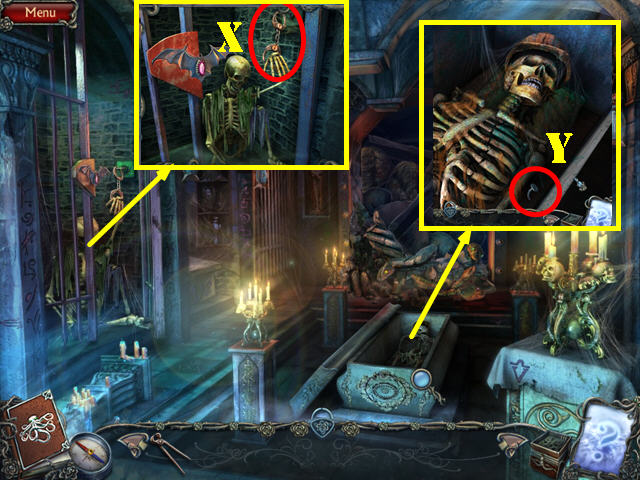
- Zoom into the coffin; remove the BENT NAIL (X) with the TONGS.
- Look in the cell; use the BENT NAIL on the HANDCUFFS to add them to inventory (Y).
- Walk down twice to talk to the monk and then walk down twice again.
- Play the HOS outside the police station.
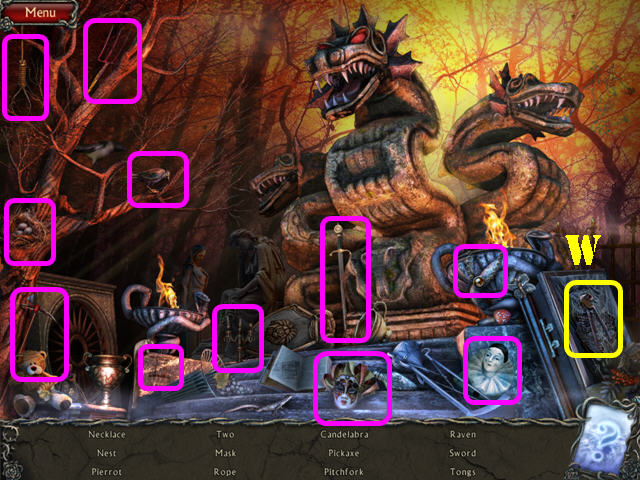
- Find the items listed to get the EMPTY OILER (Z).
- Go into the jail cell in the police station.
- Use the HANDCUFFS on the hatch; take the WING and the AXE HANDLE (A).
- Return to the dock.
- Play the HOS.
- Find the items listed to get the CRESCENT MOON (B).
- Look at the stand; put the AXE HANDLE on the axe head to get the AXE (C).
- Return to the elevator.
- Zoom into the bag; put the WING on it (D).
- Take the TAP (E) and look at the note (F).
- Return to the outside of the police station.
- Use the AXE on the back of the truck (G).
- Zoom into the truck and take the CROSS (H).
- Put the EMPTY OILER down (I).
- Put the TAP on the spout (J); turn the tap and take the FULL OILER.
- Walk down twice.
- Zoom into the trunk; remove the pin and use the FULL OILER on the lock (K).
- Open the trunk and take the ROYAL FAMILY (L). Put the ROYAL FAMILY in the case (M).
- Zoom back into the trunk; take the MATCHES (N).
- Use the MATCHES on the lantern and then take the LANTERN (O).
- Return to the cemetery.
- Look at the grave and put the LANTERN in it; take the CHISEL (P).
- Return to the schoolhouse.
- Look at the desk; use the CHISEL on the lock and take the STARS (Q).
- Return to the dock and then go left to reach the hospital gate.
- Zoom into the large statues and then on the queen’s pendant; put the CROSS on the pendant (R).
- Take the STONE SPHERE (S).
- Return to Main Street.
- Put the STONE SPHERE into the statue’s hand (T) and take the STATUE (U).
- Return to the hospital gate.
- Put the STATUE in the niche (V).
- Look at the gate and take the SUN (W).
- Walk down.
- Zoom into the box and then on the book; put the CRESCENT MOON, STARS, and SUN on the book (X).
- Take the CADUCEUS and look at the note below it (Y).
- Go left.
- Zoom into the gate (Z) and put the CADUCEUS on the puzzle to activate it.
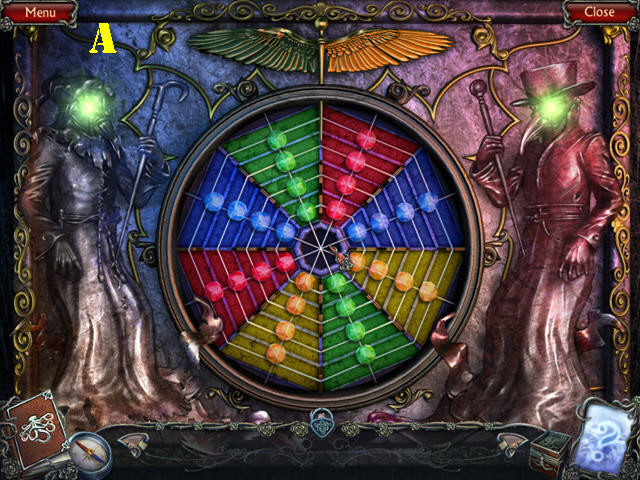
- Put the gems into their matching spots.
- Press on a gem to move it to an empty spot, either in the middle, or in between the lines until all gems are on their matching backgrounds.
- Please look at the screenshot for the final solution (A). The beginning configuration for this puzzle is random. Check out our video solution below.
- Go through the gate. Click on ‘need to hurry’ on the screen. You will be transported to the doctor’s house.
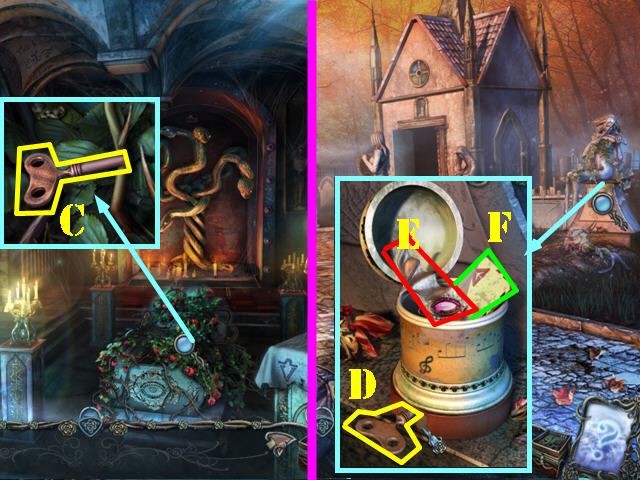
- Open the first aid kit and take the SCISSORS (B).
- Look at the carpet and cut it with the SCISSORS; take the CLOSET KEY (C).
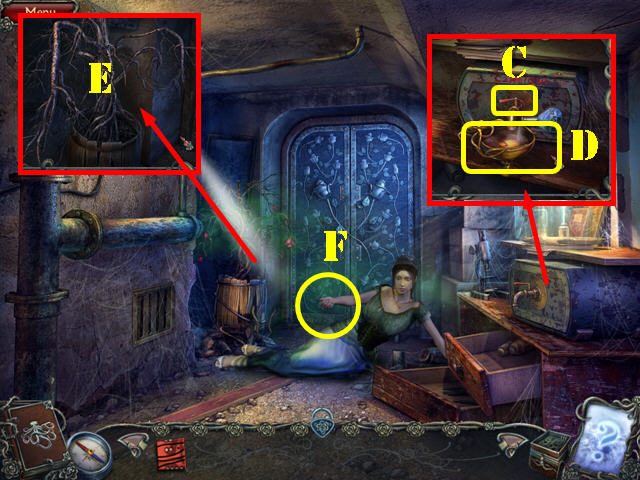
- Look at the closet and use the CLOSET KEY on the lock (D). Open the curtain; take the first GLASS EYE (E) and the MEDICAL CROSS (F).
- Look at the desk.
- Take the YELLOW POWDER (G).
- Put the MEDICAL CROSS in the slot (H); take the GREEN POWDER (I) and read the note (J).
- Put the YELLOW POWDER and the GREEN POWDER in the bowl and take the second GLASS EYE (K).
- Exit the desk and zoom into the puzzle in the carpet.
- Put the 2 GLASS EYES in the slots to activate the puzzle.
- Press on the eyes in the correct order until all the eyes remain open.
- To solve the puzzle, press on the eyes in this order (1-3).
- Go down the hatch; make a left and then go forward to reach the colonnade.
- Play the HOS.
- Find the items listed to get the WRENCH (L).
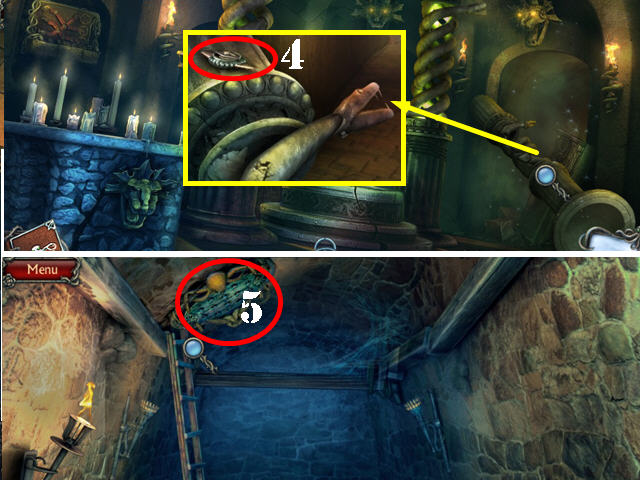
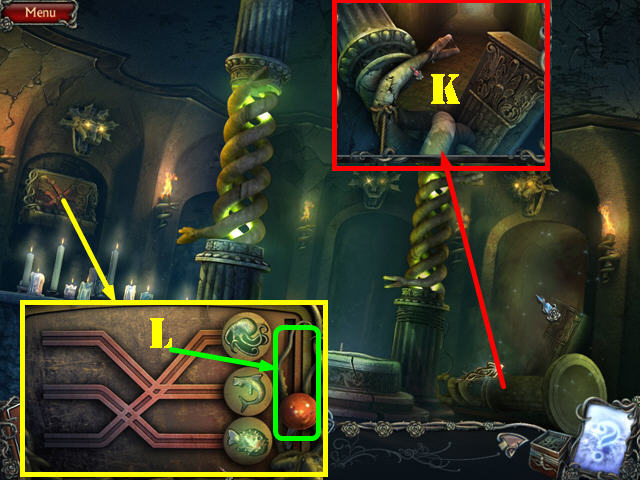
- Look at the fallen right column; take the KNOB (4).
- Walk down twice and go through the right door.
- Examine the hatch above the ladder; put the KNOB on the hatch to activate a puzzle (5).
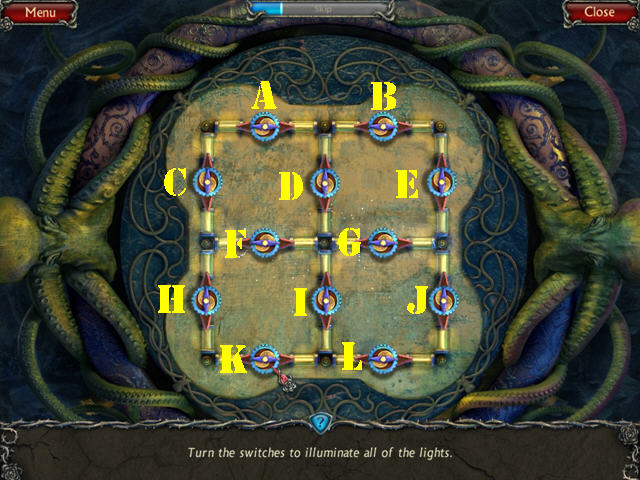
- Flip the switches in the right order to illuminate all of the lights.
- To solve the puzzle, press on the knobs in this order: A, E, G, B, E, C, F, D, J, L, and K. Check out our video solution below.
- Go up the hatch to reach the hospital yard.
Chapter 4: Hospital
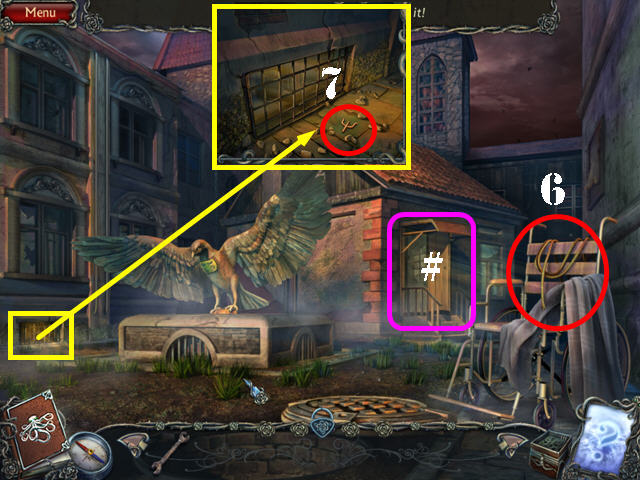
- Take the ROPE (6).
- Look at the grate; take the GREEK LETTERS (7).
- Enter the procedure room (#).
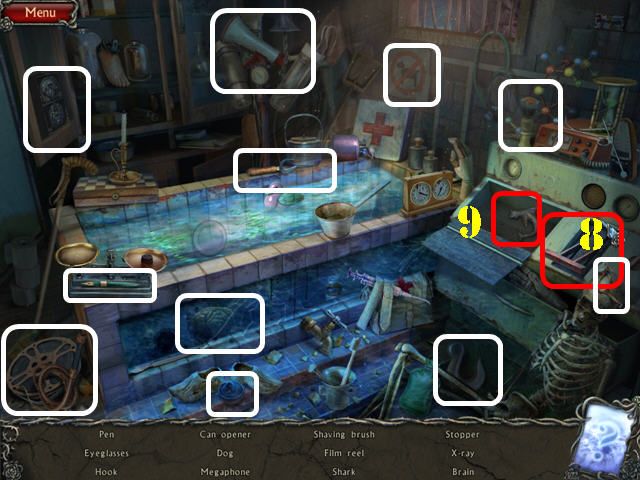
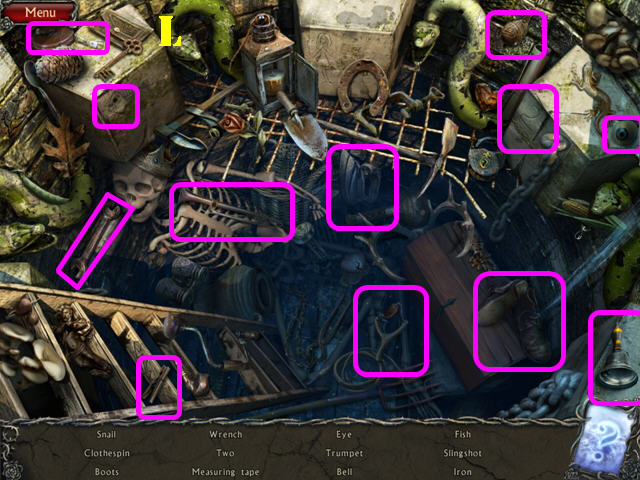
- Play the HOS.
- Pull on the lever (8) and take the shark (9).
- You will receive the SHARK.
- Look at the book and turn the pages (A).
- Look at the tray table; put the GREEK LETTER in the slot (B).
- Take the SULFURIC ACID (C).
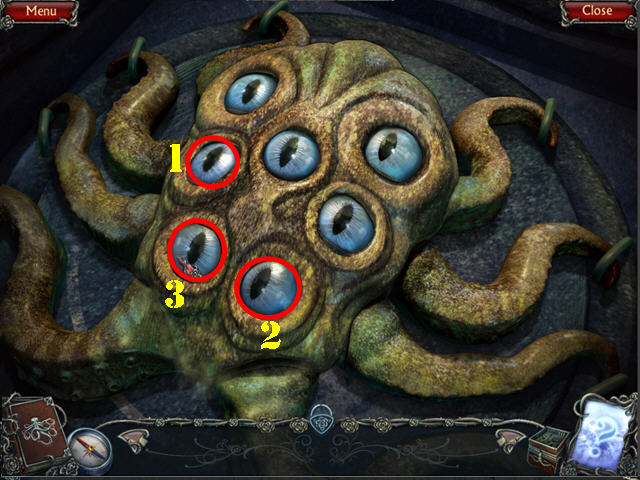
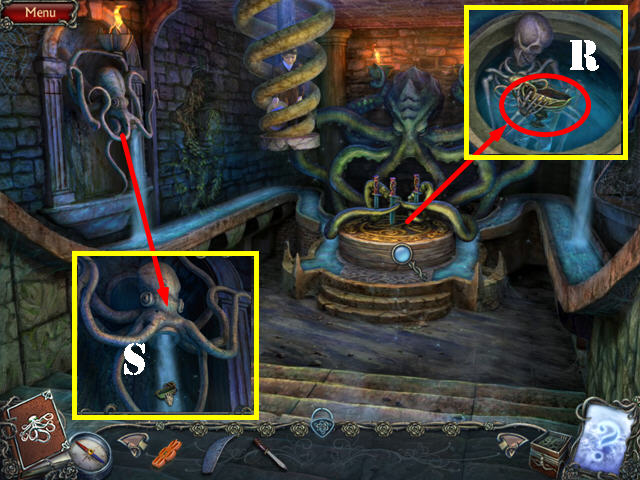
- Take the OCTOPUS (D) and put it in the case (E).
- Look at the dummy; use the WRENCH on the bolts on the helmet; remove the helmet and take the VALVE HANDLE (F).
- Walk down.
- Look at the grate and put the SULFURIC ACID on the bars (G).
- Go through the window to access the basement. Take the steps on the right to reach the rose door room.
- Talk to Teresa. Look at the instructions in her hand (H).
- Look at the device; take the CADUCEUS (I) and place it in the case (J).
- Walk down 4 times; go through the left door and then forward to return to the colonnade.
- Examine the fallen column on the right; put the ROPE around it (K).
- Look at the mechanism; put the SHARK on the board and pull the lever (L).
- Go through the right door.
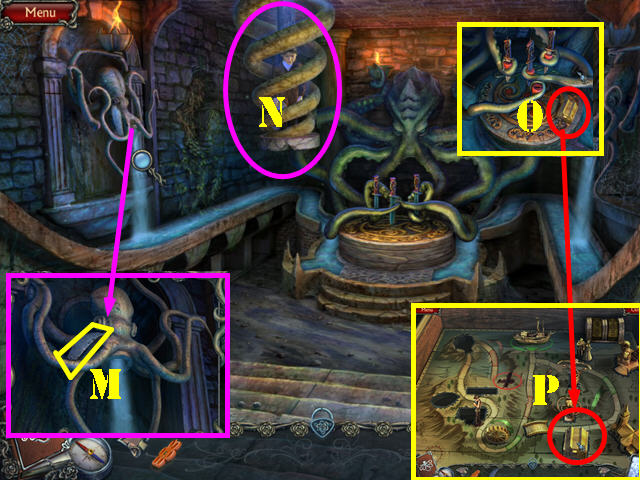
- Look at the octopus and take the METAL PLATE (M).
- Talk to Ernesto; ask him if he knows how his father opened the crypt (N).
- Look at the mechanism; take the POLICE STATION (O) and put it in the case to activate a puzzle (P).
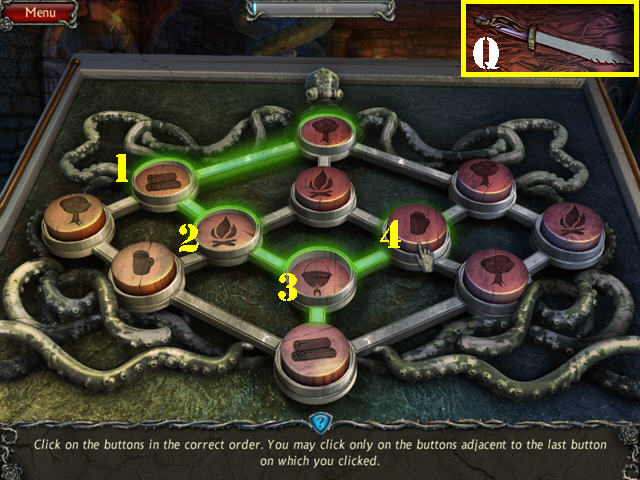
- Press on the buttons in the most logical order. Hint: think of steps to make a hot beverage.
- Please look at the screenshot for the solution (1-4).
- Take the DAGGER (Q).
- Look at the mechanism again; put the DAGGER on it and take the DIRTY BOWL (R).
- Look at the octopus; put the DIRTY BOWL in the water to get CLEAN BOWL (S).
- Walk down.
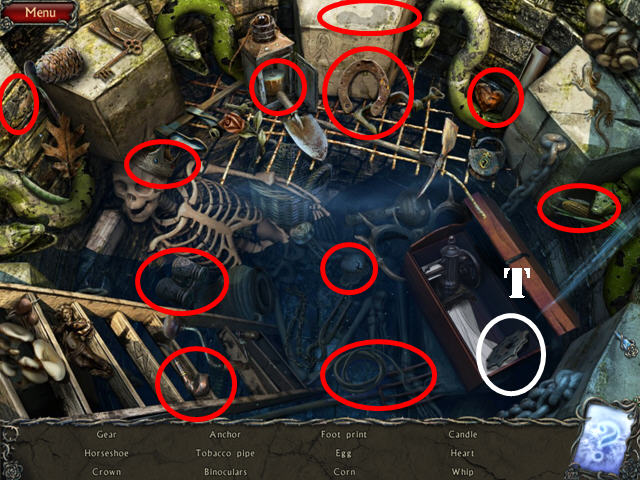
- Play the HOS.
- Open the trunk and take the gear (T).
- The GEAR will be added to inventory.
- Walk down twice; go through the right door; up the hatch; return to the basement and go through the door.
- Look at the box; put the GEAR in the lock (U).
- Take the SCREWDRIVER and the REAGENT (V).
- Return to the procedure room.
- Play the HOS.
- Find the items listed to get the BLOWTORCH (W).
- Look at the light and remove the cover (X).
- Remove the screw with the SCREWDRIVER to get the MICROCHIP (Y).
- Return to the basement.
- Examine the boiler; put the METAL PLATE on the brackets (A) and then use the BLOWTORCH on that area.
- Zoom into the pipes; remove the cover and put the VALVE HANDLE on it (B); turn the valves.
- You will be automatically taken to the rose door room.
- Zoom into the device; put the CLEAN BOWL down; turn the valve (C).
- Put the REAGENT in the bowl and take the BOWL OF LIQUID (D).
- Put the BOWL OF LIQUID on the plant (E).
- Take the BIRD KEY from Teresa (F).
- Walk down twice.
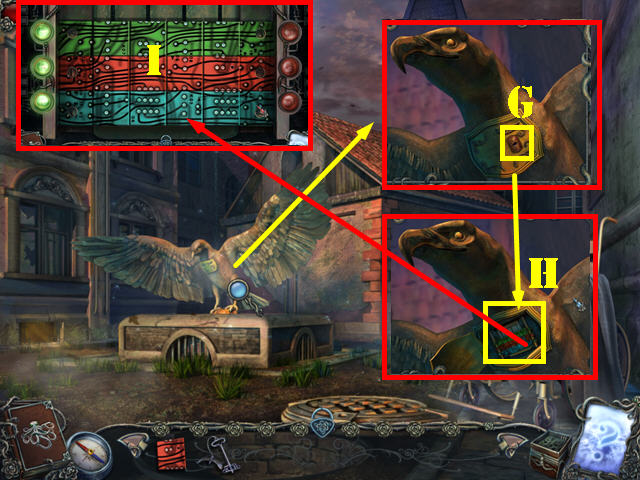
- Zoom into the eagle: use the BIRD KEY in the lock (G).
- Zoom into the board (H) and put the MICROCHIP on it (I).
- Click on ‘need to hurry’ on the screen; you will be transported back to the basement.
- Go right and then go through the door.
- Take the SUN-SHAPED KEY (J).
- Go right (K).
- Zoom into the hatch; put the SUN-SHAPED KEY in the slot (L). Go through the hatch.
- Take the PICKAXE (M).
- Go forward twice and right, and then forward to arrive by the elevator.
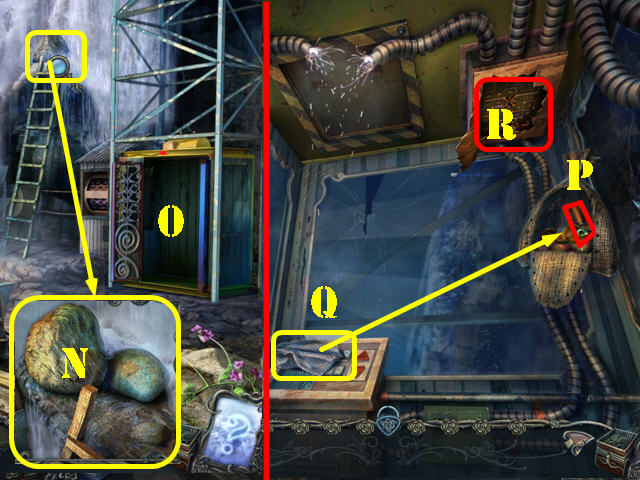
- Examine the top of the ladder; use the PICKAXE on the rocks (N).
- Go into the elevator (O).
- Open the bag and take the CAN OPENER (P).
- Take the RAG (Q); put the RAG on the bag to get the OILY RAG.
- Use the CAN OPENER on the fuse box (R).
- Zoom into the fuse box for a puzzle.
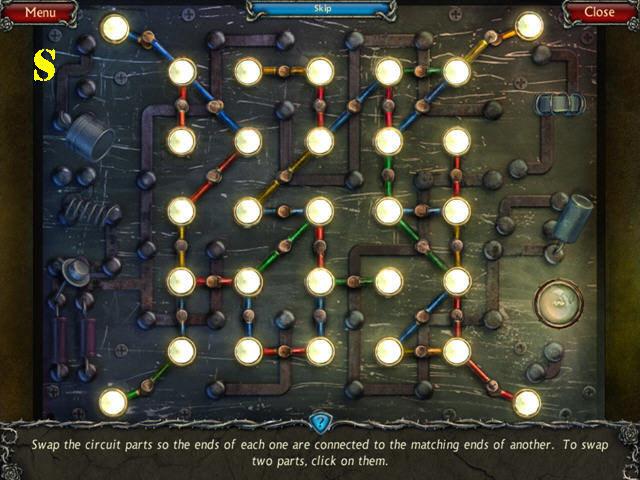
- Select two circuit parts to swap their positions until all ends are connected.
- Please look at the screenshot for the solution (S).
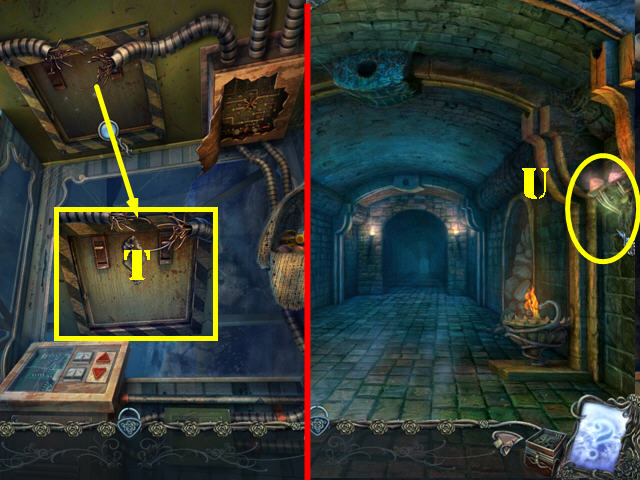
- Look at the hatch and use the OILY RAG on the latches (T).
- Push the hatch door and go out; climb the tower.
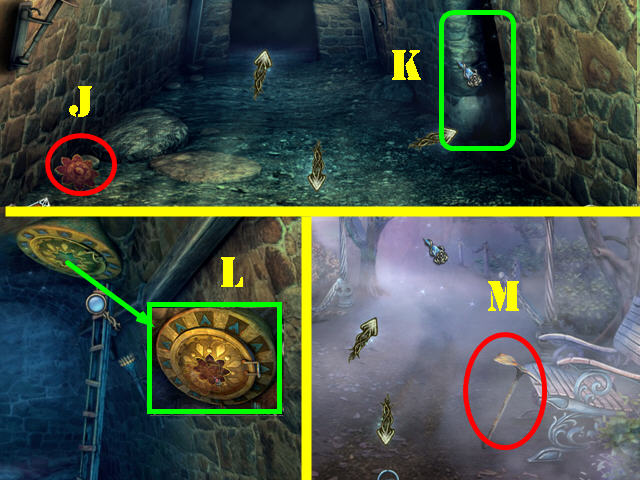
- Go into the catacombs.
- Take the LUMINESCENT MUSHROOMS (U).
- Go through the left door to reach the shelter.
Chapter 5: The Mansion
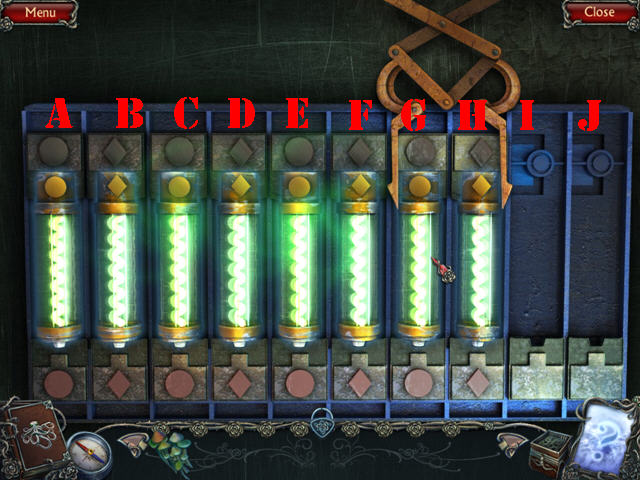
- Examine the device in the center to activate a puzzle.
- Arrange the fuses in the correct order so the symbols on the fuses match the ones on the board.
- You can only move two fuses at a time. Place your cursor in between two fuses and click on them to pick them up; then select the spot you want to drop the fuses in.
- To de-select a set of fuses, click on them again.
- To solve the puzzle, move the pieces in this order: CD-HI, GH-CD, IJ-GH, FG-IJ, DE-FG, GH-DE, and IJ-GH. Check out our video solution below.

- Examine the desk; take the SACK OF SEEDS (#) and look at the note (K).
- Put the SACK OF SEEDS and the LUMINESCENT MUSHROOMS in the mortar (L).
- Mix the items in the mortar and take the SNAKE POWDER.
- Walk down and go forward.
- Use the SNAKE POWDER on the snake (M).
- Take the CHAIN (N).
- Go through the right door; take the AMULET (O).
- Walk down and go forward.
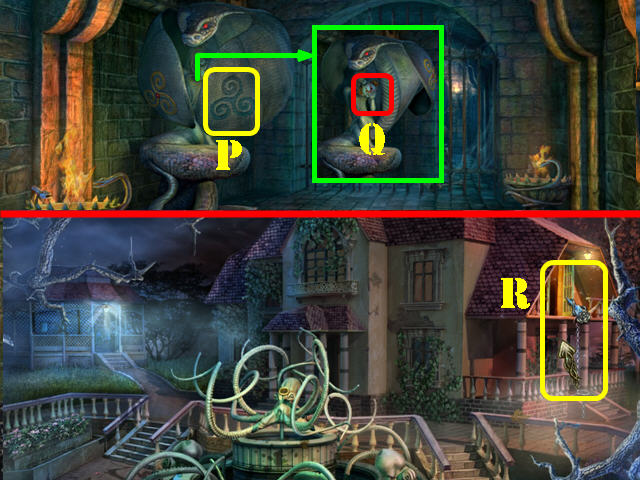
- Put the AMULET on the snake (P).
- Take the CLOWN’S HEAD (Q).
- Walk down 3 times and up the stairs to reach the mansion entrance.
- Put the CHAIN on the window and go into the window to reach the nursery (R).
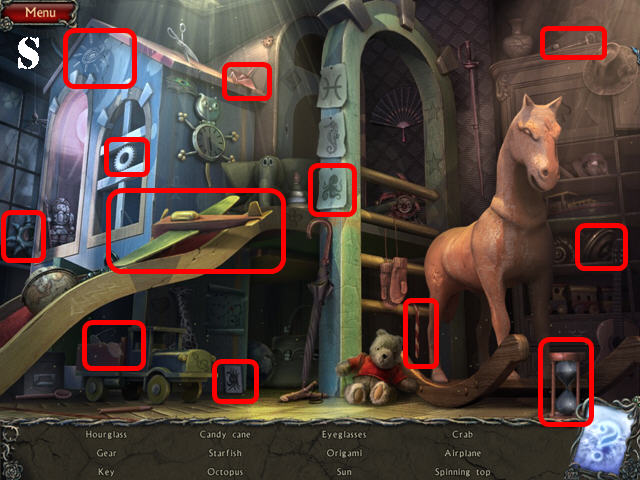
- Play the HOS.
- Find the items listed to get the STARFISH (S).
- Pull on the tassel in the upper left for the clown body to appear; put the CLOWN’S HEAD on the body (T).
- Take the first BOOK (U).
- Look in the case; take the GREENHOUSE (V) and add it to the board (W).
- Walk down.
- Zoom into the fountain; put the STARFISH in the slot (1).
- Take the SKULL (2).
- Go back into the nursery.
- Look at the chest; put the SKULL in the slot (3) and take the LION (4).
- Look at the note (5), clue (6), and open the book (7).
- Go through the right door to reach the stairs.

- Put the LION on the stand to raise the chandelier (8).
- Go through the door to reach the kitchen (9).
- Press the button to lower the tray (A).
- Zoom into the tray; take the TRAIN (B), OVEN MITT (C), and SHED (D). Put the SHED in the case (E).
- Walk down twice.
- Look at the case and put the TRAIN in it (F).
- Take the BATTERY (G).
- Play the HOS.
- Find the items listed to get the FISHING LINE (H).
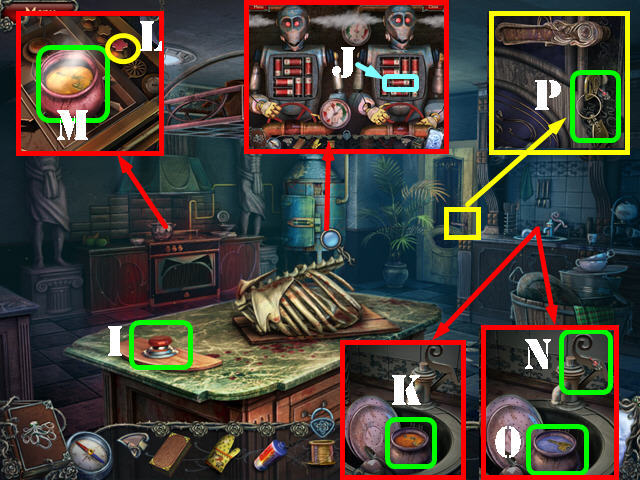
- Return to the kitchen.
- Press on the button again to raise the tray (I).
- Zoom into the robots; put the BATTERY in the slot (J).
- Look in the sink; take the SOLIDIFIED HONEY (K).
- Look at the stove; put the SOLIDIFIED HONEY on the stove and turn the valve (L).
- Use the OVEN MITT to get the HOT HONEY (M).
- Look at the sink; put the HOT HONEY in it; touch the faucet handle (N) and take the KEY (O).
- Look at the door; put the KEY in the lock and go outside to reach the porch (P).
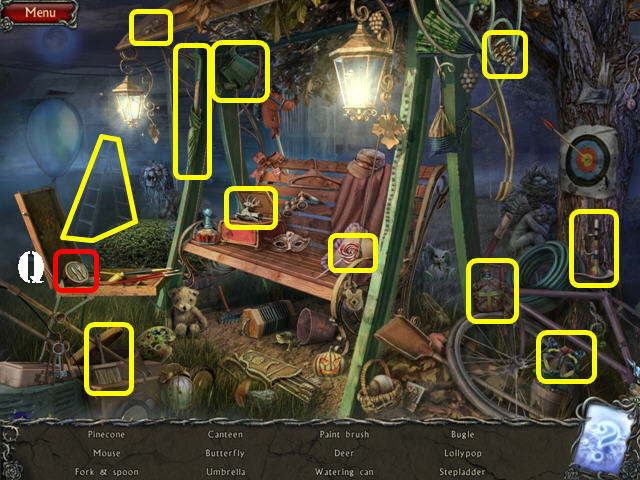
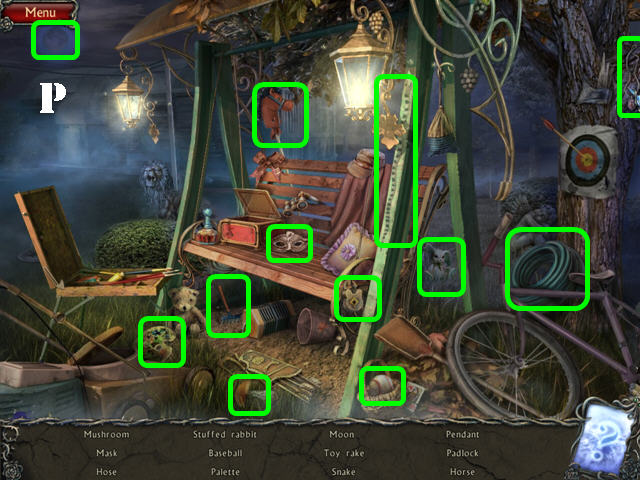
- Play the HOS.
- Open the crate and take the fork and spoon (Q).
- Find the rest of the items to get the FORK AND SPOON.

- Put the FORK AND SPOON in the slot on the basket (R).
- Take the MATCHES (S).
- Take the second BOOK (T).
- Go towards the hangar on the right.
- Take the LEAVES and the PIECE OF BREAD underneath (U).
- Grab the ROPE (green).
- Walk down.
- Look at the fishing rod; put the FISHING LINE on it and take the FISHING ROD.
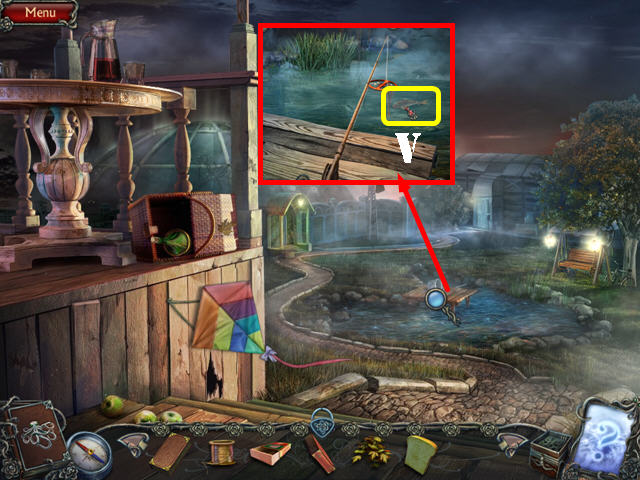
- Put the PIECE OF BREAD in the water. Catch the FISH with the FISHING ROD (V).
- Return to the outside of the hangar.
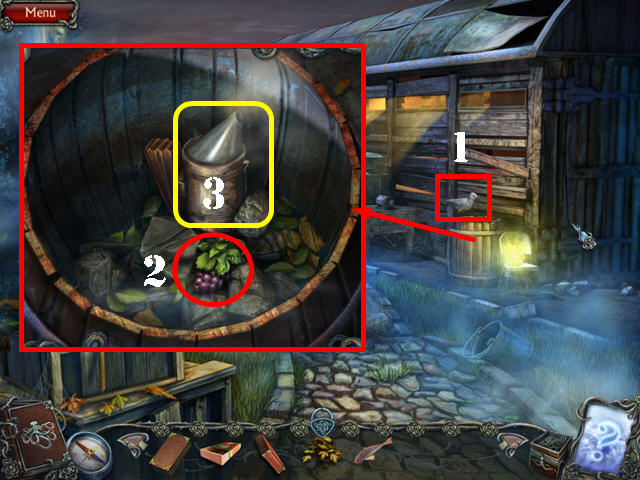
- Give the FISH to the bird (1).
- Look in the barrel and take the first GRAPES (2).
- Open the smoker and put the LEAVES, followed by the MATCHES in it to get the SMOKER (3).
- Walk down.
- Zoom into the door and put down the SMOKER (4).
- Go through the door and then go right to the ferry.
Chapter 6: The Greenhouse
- Play the HOS.
- Open the trunk and take the service cap (A).
- Find the rest of the items to get the HARPOON.
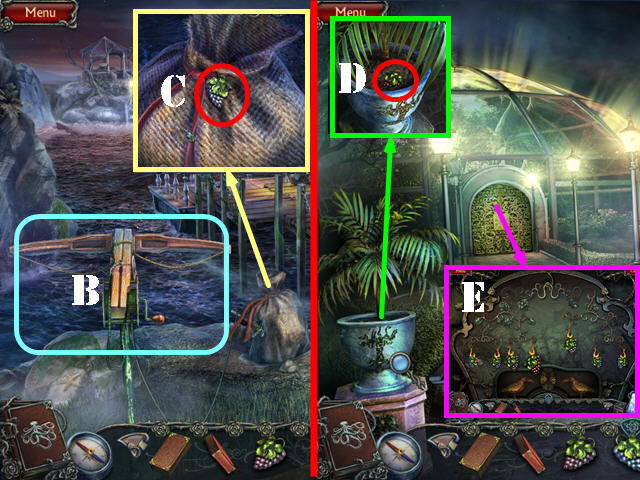
- Put the HARPOON and the ROPE on the crossbow (B).
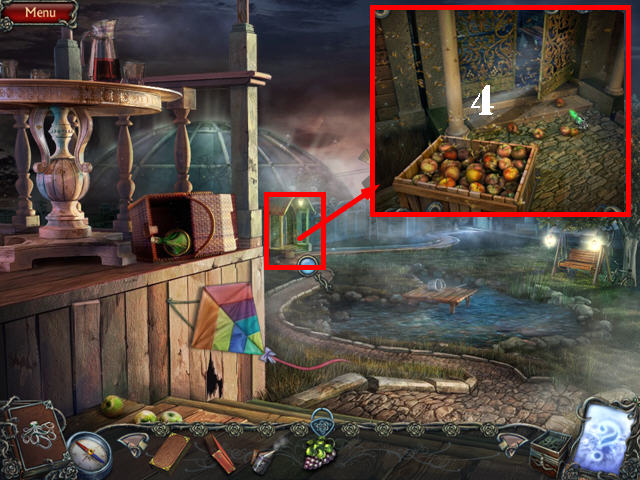
- Pull on the crossbow and zoom into the bag; take the second GRAPES (C).
- Walk down.
- Look in the potted plant and take the third GRAPES (D).
- Zoom into the door and put the 3 GRAPES on the hooks (E).
- Go into the greenhouse.
- Look at the books; take the FLOWER (F).
- Move the plant and zoom into the chest; put the FLOWER on the lock (G).
- Take the third BOOK (H).
- Take the HOUSE (I) and put it in the case (J).
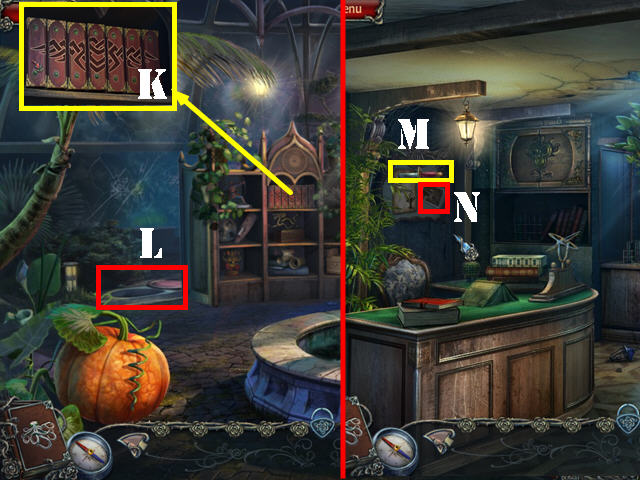
- Look at the books; put the 3 BOOKS on the shelf (K).
- Go down the hatch to reach the study (L).
- Take the KNIFE (M).
- Look at the pavilion photo (N).
- Walk down.

- Use the KNIFE on the pumpkin and take the PUMPKIN SEEDS (O).
- Walk down and go right.
- Zoom into the sack; use the KNIFE on the sack and take the second SNAKE KEY (P).
- Go forward.

- Take the SUMMERHOUSE (Q) and place it in the case to activate a puzzle (R).
- Press on the buttons in a logical manner.
- To solve the puzzle, press on the buttons in the order shown in the screenshot (1-4).
- Take the first BAS-RELIEF FRAGMENT (S).
- Return to the study.
- Look at the book; flip the page and take the first SNAKE KEY (T); keep flipping pages.
- Zoom into the cabinet; put the 2 SNAKE KEYS in the lock (U).
- Take the CORKSCREW (V).
- Walk down 3 times.
- Pull out the cork with the CORKSCREW and look at the note (W).
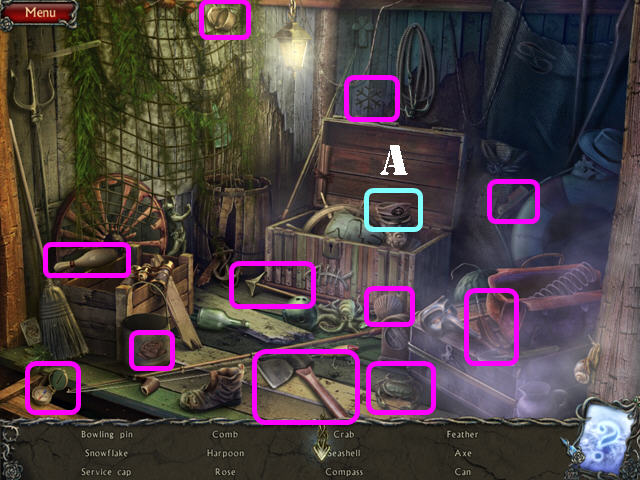
- Play the HOS.
- Find all the items on the list to get the JACK-O-LANTERN (X).
- Return to the ferry.
- Play the HOS.
- Find all the items listed to get the SHOVEL (Y).
- Walk down.
- Look at the potted plant; use the SHOVEL in the soil and take the second BAS-RELIEF FRAGMENT (A).
- Walk down 3 times.
- Zoom into the shield; put the JACK-O-LANTERN on it to activate a puzzle (B).
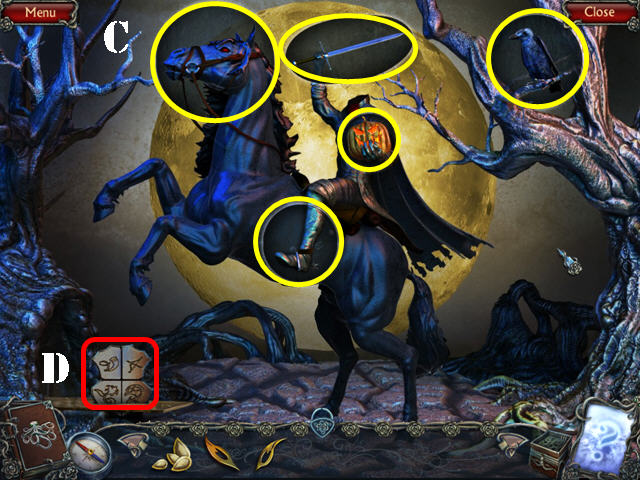
- Press on the 5 slots to change the images until they are all correct.
- Please look at the screenshot for the solution (C).
- Take the COAT OF ARMS (D).
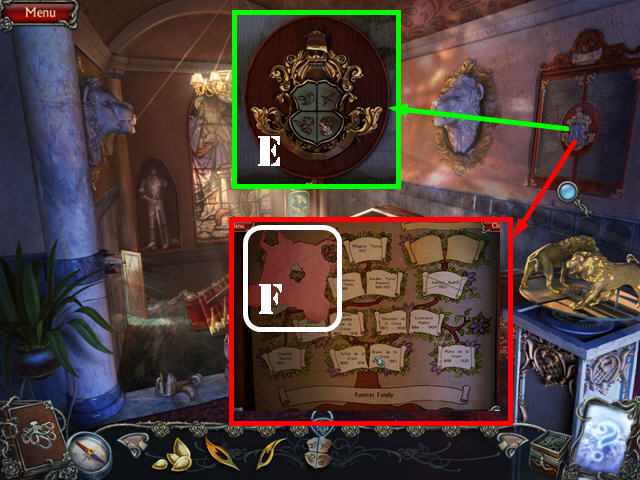
- Zoom into the crest; put the COAT OF ARMS on it (E).
- Take the STENCIL (F).
- Walk down.
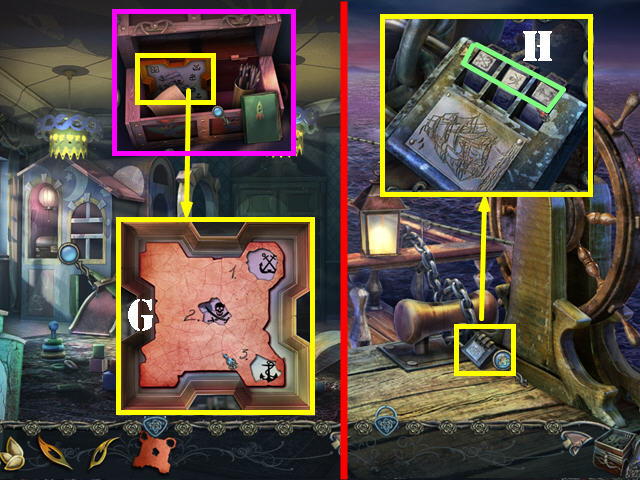
- Inspect the chest.
- Look at the frame and put the STENCIL on it to get a clue (G).
- Return to the ferry and go forward.
- Take a closer look at the lock; enter the code shown on the screenshot (H).
- Turn the wheel to reach the pavilion.
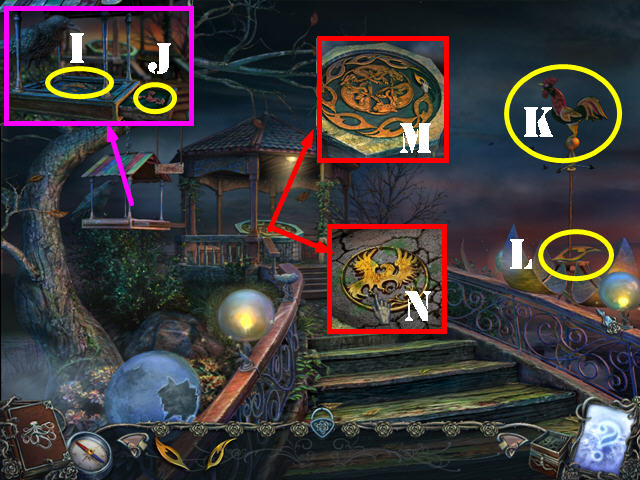
- Look at the birdfeeder and put the PUMPKIN SEEDS on it (I).
- Take the WEATHERVANE (J).
- Put the WEATHERVANE on the globe (K) and take the third BAS-RELIEF FRAGMENT (L).
- Look at the bas-relief and add the 3 BAS-RELIEF FRAGMENTS in the slots (M).
- Take the BIRD FIGURINE (N).
- Walk down.
- Play the HOS.
- Move the net and take the starfish (O).
- Find the rest of the items to get the BATTERY.
- Walk down twice.
- Play the HOS.
- Find the items listed to get the HOSE (P).

- Return to the outside of the hangar.
- Zoom into the door and put the BIRD FIGURINE on the door (Q).
- Enter the hangar.
- Open the generator compartment and put the BATTERY in it (R).
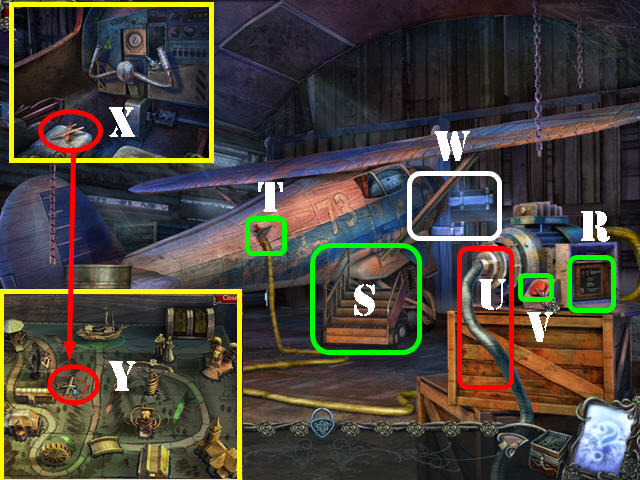
- Move the steps (S) and connect the hose on the floor to the plane by clicking on this area (T).
- Connect the HOSE (from inventory) to the generator (U).
- Push the red button (V).
- Examine the door (W) and click on the latches.
- Look inside the plane and take the PLANE MODEL (X). Put the PLANE MODEL in the case to activate a puzzle (Y).
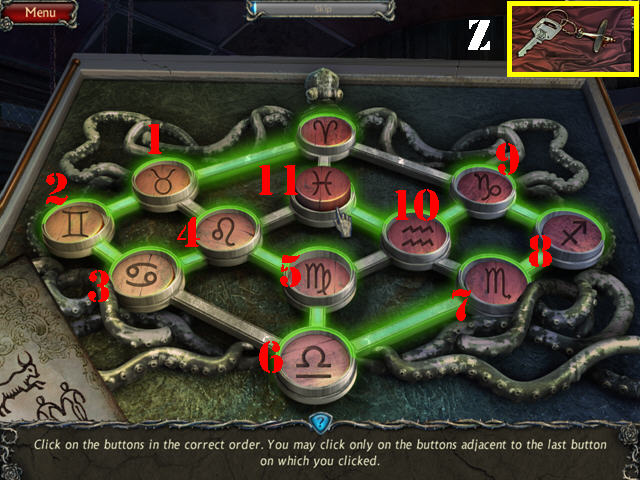
- Push the buttons in a logical manner. Hint: think of the order of the zodiac signs.
- Please look at the screenshot for the solution (1-11).
- Take the PLANE KEY (Z).
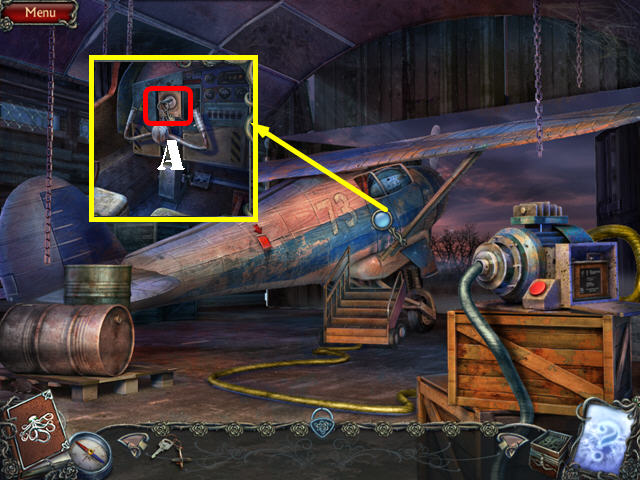
- Enter the plane.
- Put the PLANE KEY in the ignition and turn the key (A).
- Congratulations, you have completed Twisted Lands: Origin!


 Where Angels Cry: Tears of the Fallen Walkthrough, Guide, & Tips
 Fear for Sale: Sunnyvale Story Walkthrough, Guide, & Tips
 The Mystery of the Crystal Portal: Beyond the Horizon Walkthrough, Guide, & Tips
 Joan Jade and The Gates of Xibalba Walkthrough, Guide, & Tips
 Surface: Alone in the Mist Walkthrough, Guide, & Tips