The Great Unknown: Houdini's Castle Walkthrough, Guide, & Tips
The Great Unknown: Houdini’s Castle Walkthrough
Welcome to the The Great Unknown: Houdini’s Castle Walkthrough
Your honeymoon turns sour when a madman kidnaps your husband, forcing you to expose Houdini’s greatest trick.
Whether you use this document as a reference when things get difficult or as a road map to get you from beginning to end, we’re pretty sure you’ll find what you’re looking for here.
This document contains a complete The Great Unknown: Houdini’s Castle game walkthrough featuring annotated screenshots from actual gameplay!
We hope you find this information useful as you play your way through the game. Use the walkthrough menu below to quickly jump to whatever stage of the game you need help with.
Remember to visit the Big Fish Games Forums if you find you need more help. Have fun!
This walkthrough was created by Margie B, and is protected under US Copyright laws. Any unauthorized use, including re-publication in whole or in part, without permission, is strictly prohibited.
General Tips
- This is the official walkthrough for The Great Unknown: Houdini’s Castle.
- Select ‘Play’ on the main menu to begin your adventure.
- The ‘Options’ button on the main menu allows you to adjust the screen size, volume, cursor, and turn on and off the tutorials.
- You can skip a puzzle once the ‘SKIP’ button fills at the top of each puzzle.
- Click on the magnifying glass icon when it appears to take a closer look at an area.
- Read your Journal for important clues collected throughout the game.
- View the Film Reels you collect throughout the game in the projector located on the left side of the inventory tray or on the projector in the cinema room.
- Hints are unlimited, but you must wait for the meter to refill.
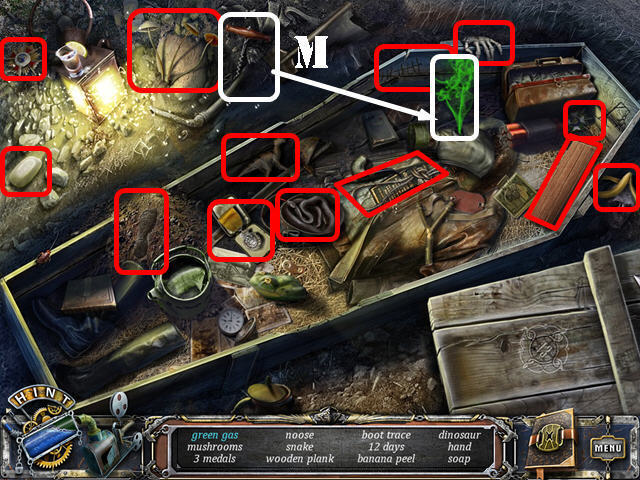
- Hidden Object Scenes will be referred to as HOS in this walkthrough. Items listed in blue in HOS require an extra step.
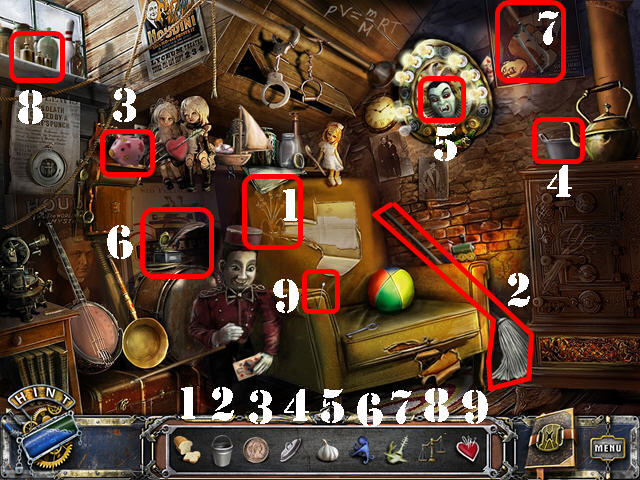
Chapter 1: The Fireplace

- Touch anywhere on the scene.
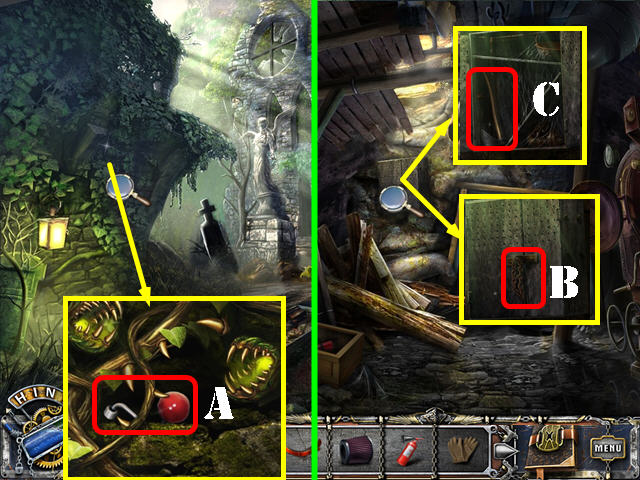
- Look at the note (A).
- Zoom into the bottom of the umbrella stand; take the DOOR LOCK PART 1/2 (B).
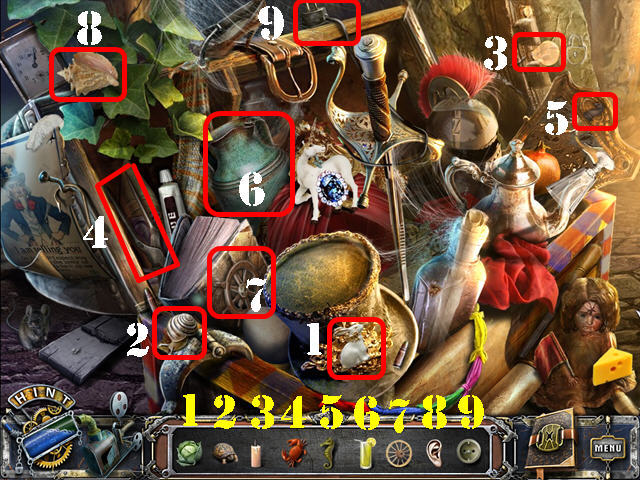
- Play the HOS.
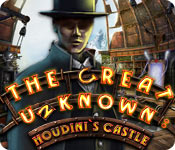
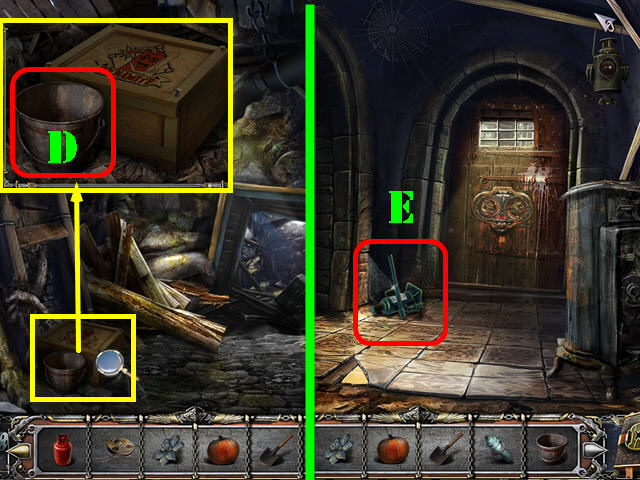
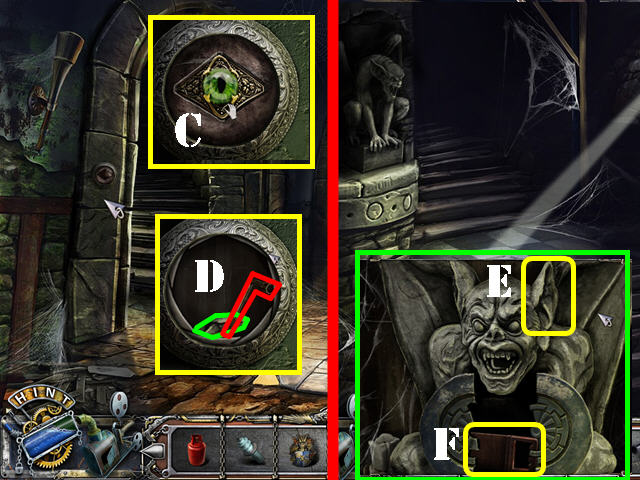
- Drag the + 1 (C) to the 9 and take the 10.
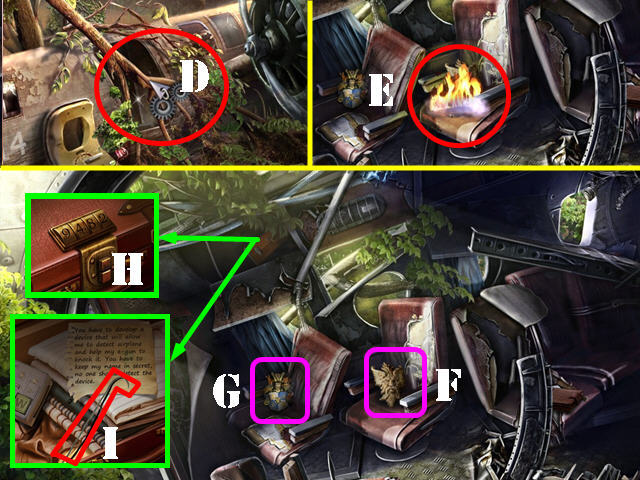
- Drag the cube piece (D) to the cube; rotate the top tier 3 times and take the puzzle cube (E).
- The DRAWER KNOB will be acquired.
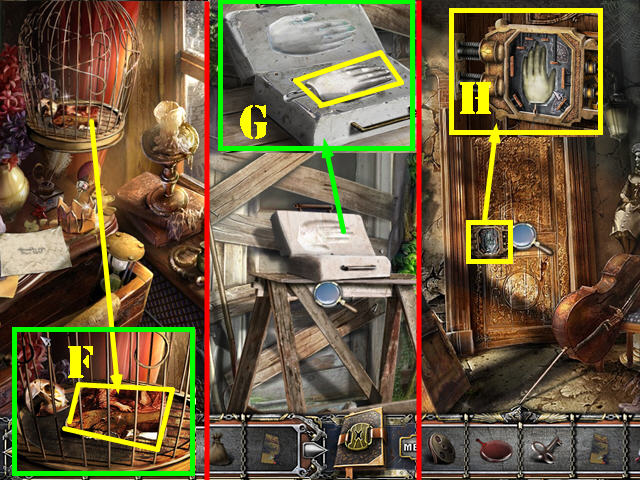
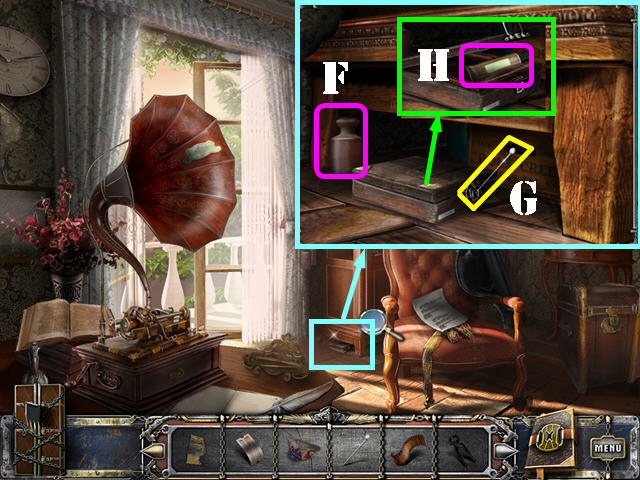
- Go to the bedroom window on the right.
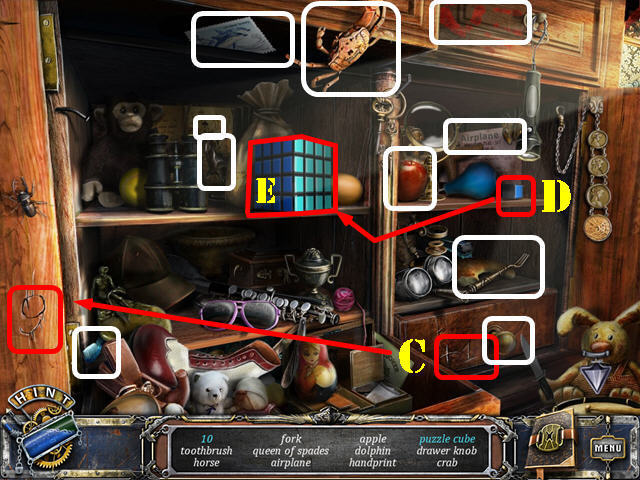
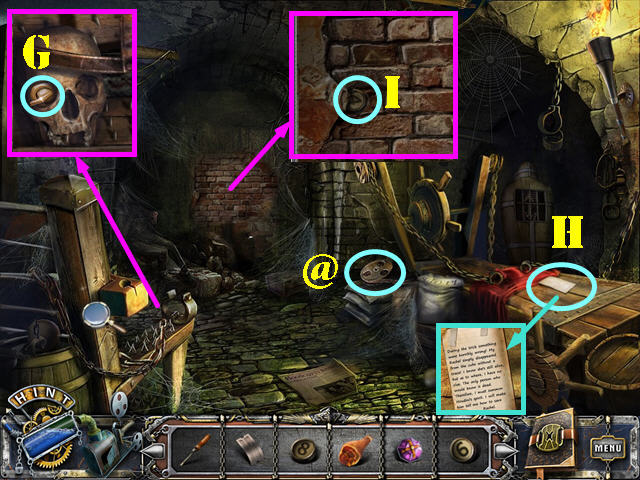
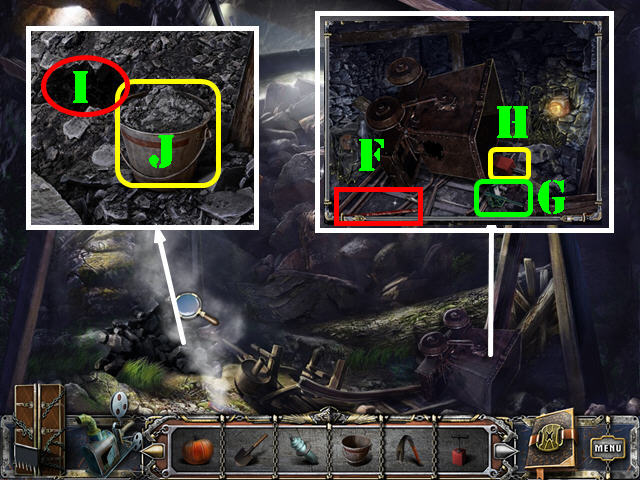
- Take the first WEIGHT (F).
- Put the DRAWER KNOB on the drawer (G); open it and take the RABBIT MEDALLION (H).
- Zoom into the paper and open it; take the STONE (I) and read the note below it.
- Walk down.
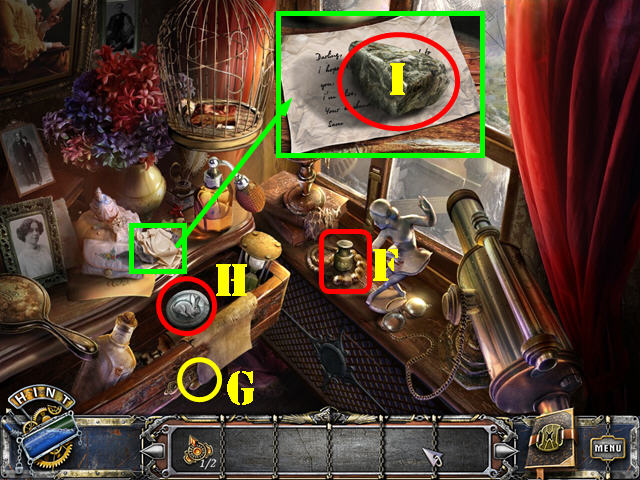
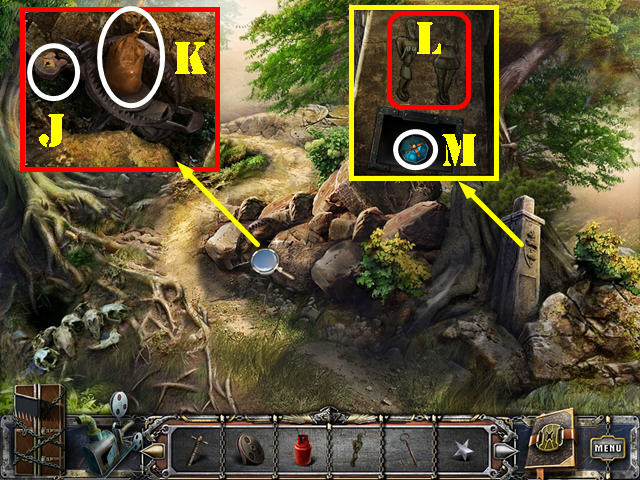
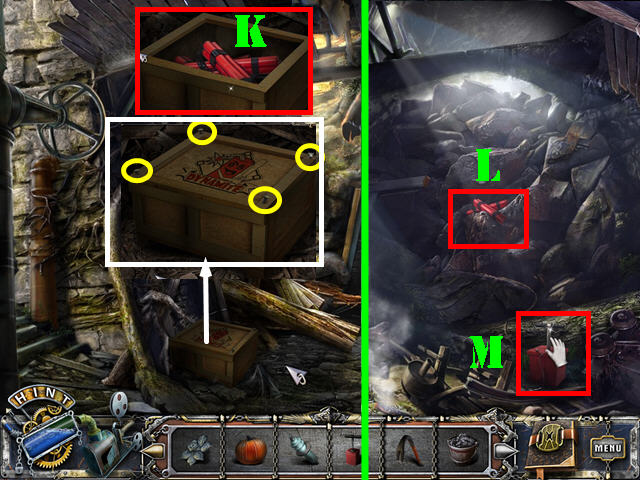
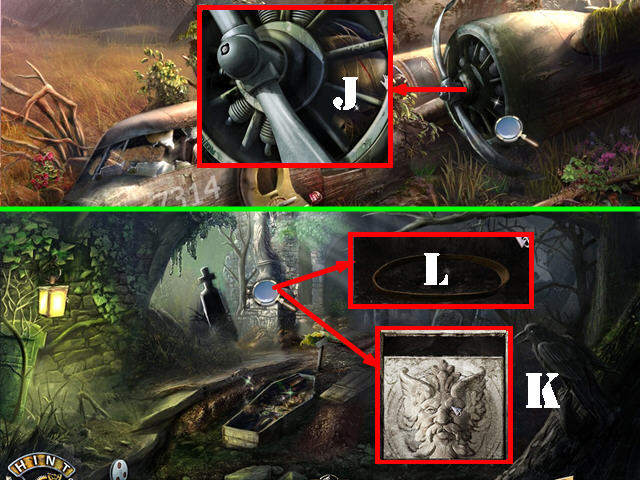
- Unwrap the box and look at it; put the RABBIT MEDALLION on the lock (J).
- Open the box and take the DOOR LOCK PART 2/2 (K).
- Zoom into the door; put the 2 DOOR LOCK PARTS in the 2 slots to activate a puzzle.
- Turn the knobs (white) next to each lock part to change the lock part adjacent to it.
- Keep turning the lock until you get the right image.
- Please look at the screenshot for the solution (L).
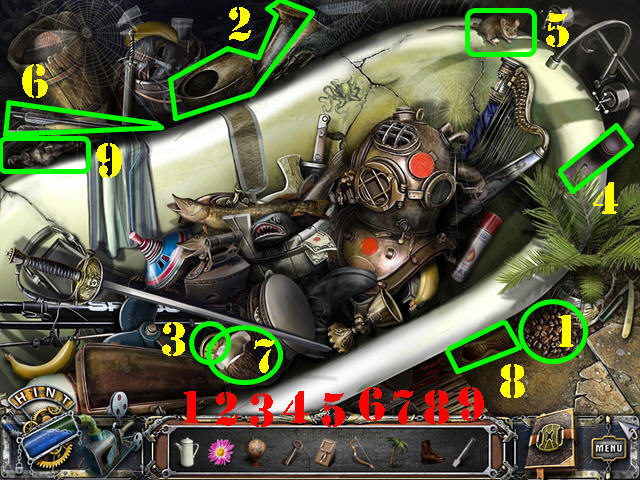
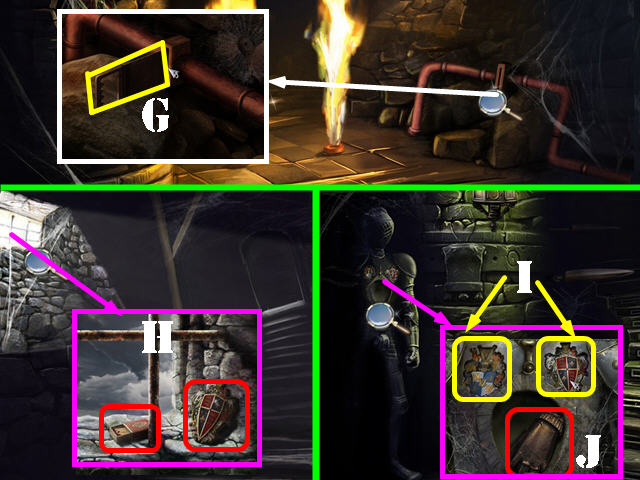
- Go through the door to reach the fireplace.

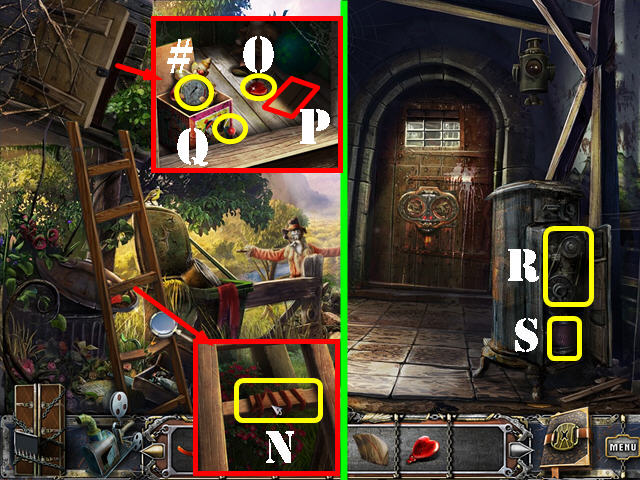
- Look at the chair and take the MIRROR SHARD (M).
- Look at the picture on the mantle (N).
- Examine the boar head; take the note (O).
- Go right to the metal gate.
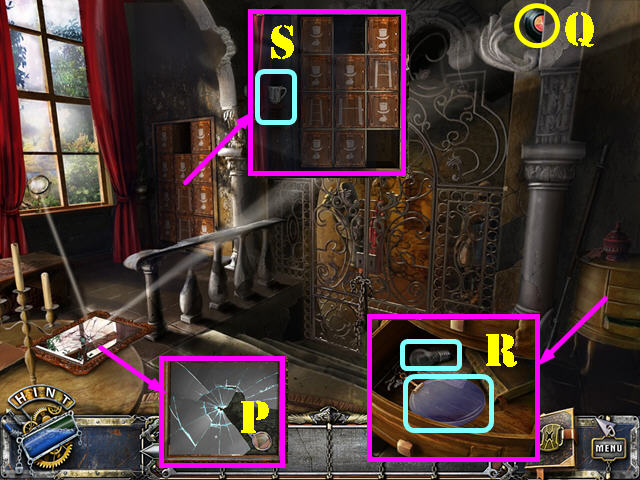
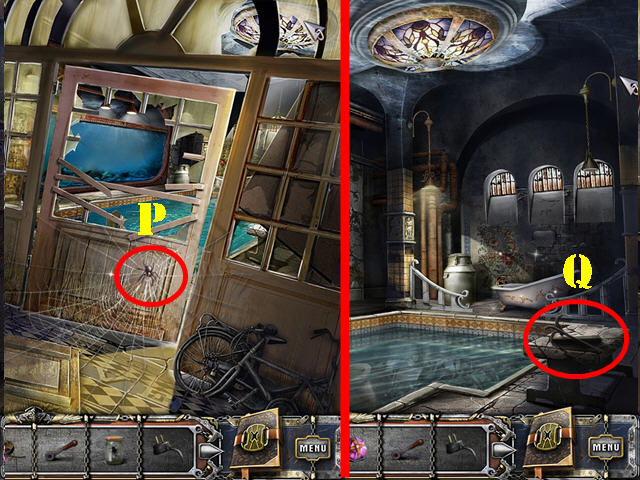
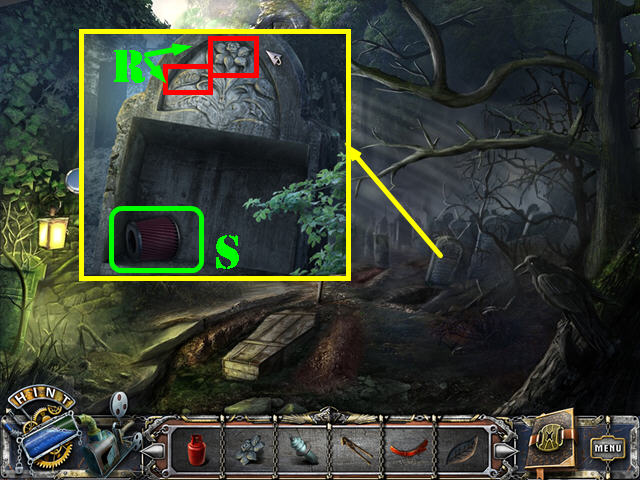
- Look at the mirror; put the MIRROR SHARD on it (P) and then take the RECORD (Q).
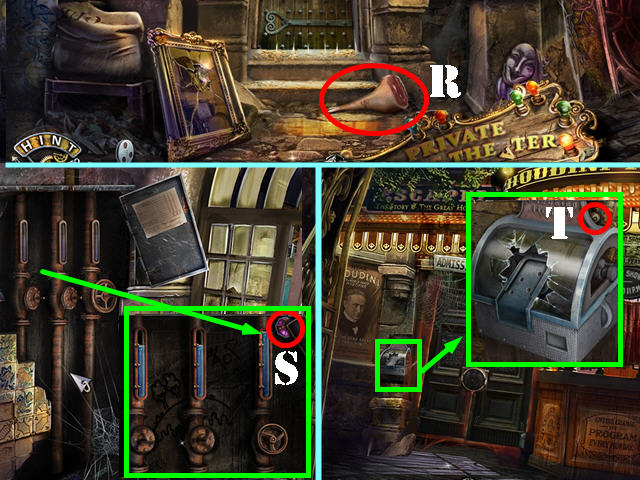
- Take a closer look at the drawer; take the LIGHT BULB and the BLUE LENS (R).
- Look at the boxes; take the PITCHER (S).
- Walk down and then go left into the cinema room.
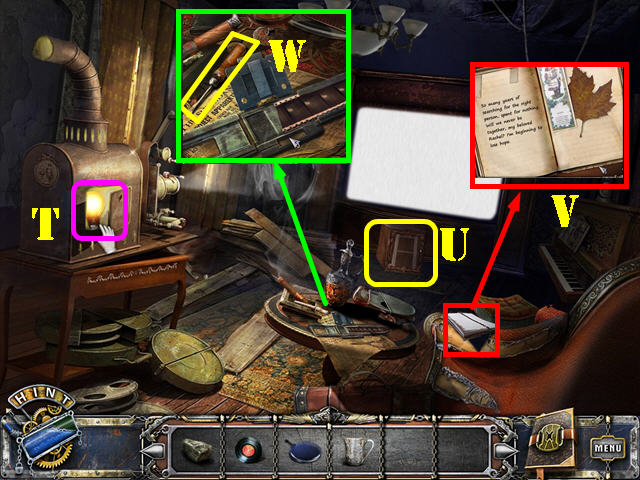
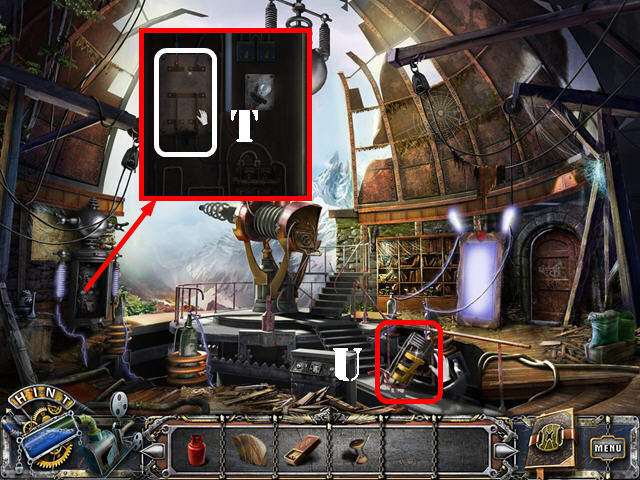
- Put the LIGHT BULB in the projector (T).
- Take the BOX (U).
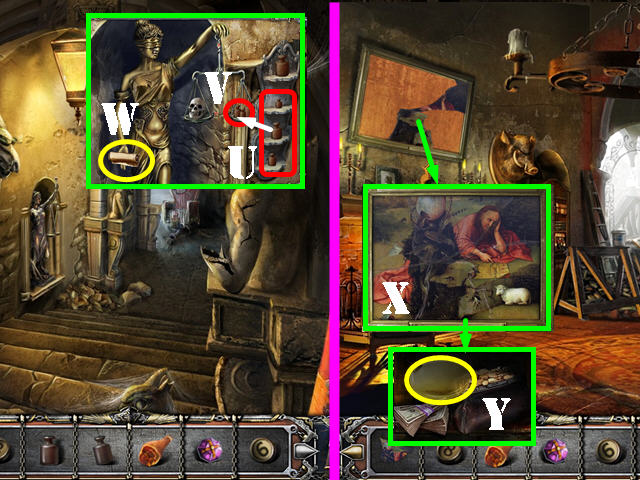
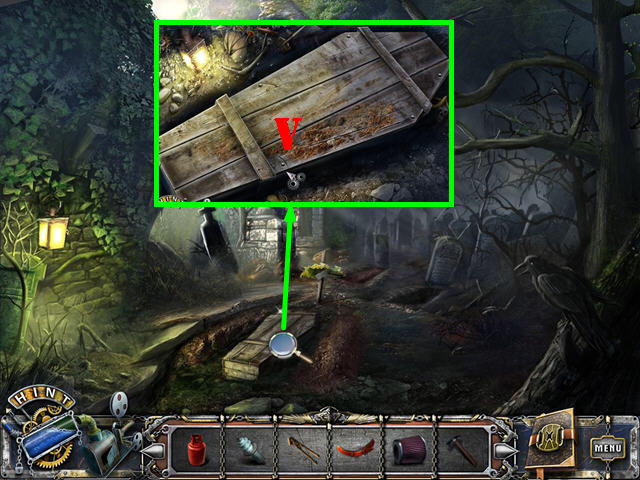
- Take a closer look at the notebook (V).
- Look at the table and take the SCREWDRIVER (W).
- Walk down and go right.
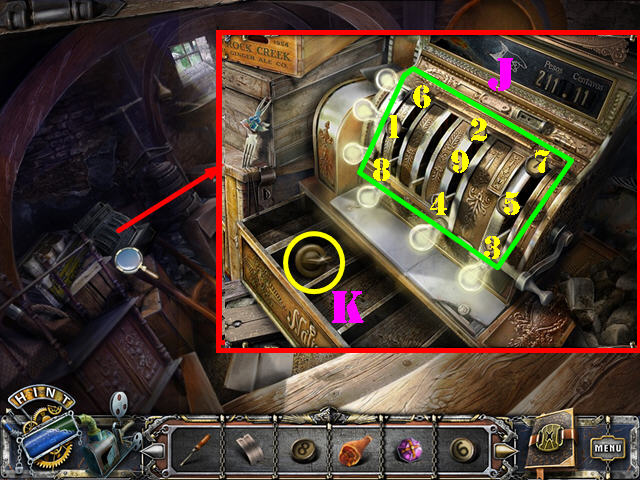
- Look at the boxes; put the BOX on it to activate a puzzle.
- Assemble the ladder correctly.
- To solve the puzzle, press on the boxes in this order: C, F, I, L, K, H, G, D, E, H, I, F, E, B, C, F, E, B, and C.
- Take the LADDER (M).
- Walk down.
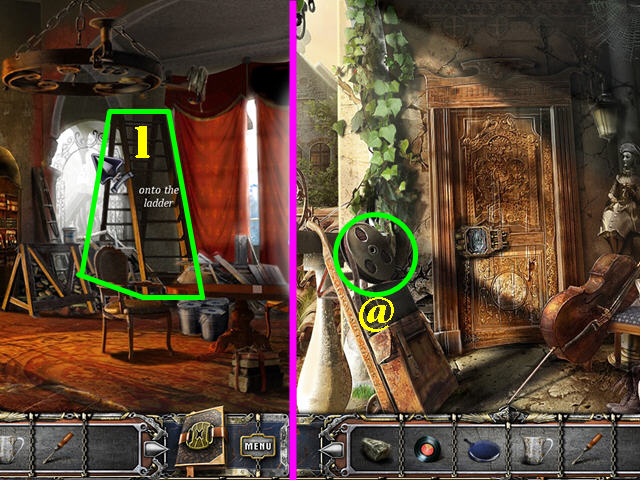
- Put the ladder over the pile of junk and use the ladder (1).
- Go right to the terrace and forward to the door.
- Take the FILM REEL (@).
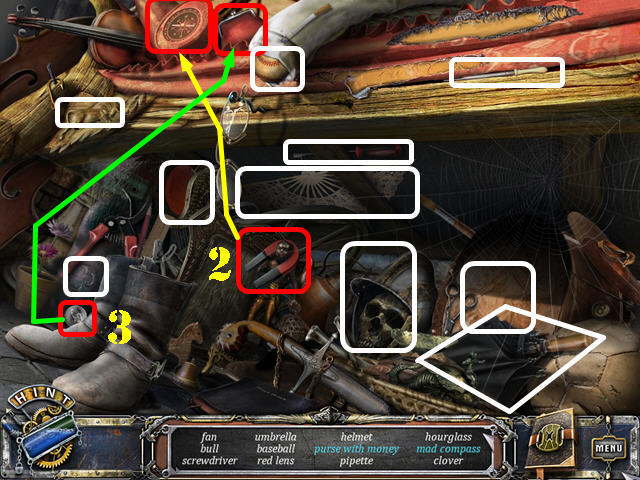
- Play the HOS.
- Drag the magnet (2) to the compass; take the mad compass.
- Drag the coin (3) to the coin purse; take the purse with money.
- The RED LENS will be acquired.
- Walk down twice and then go out the door to reach the yard.
Chapter 2: The Yard
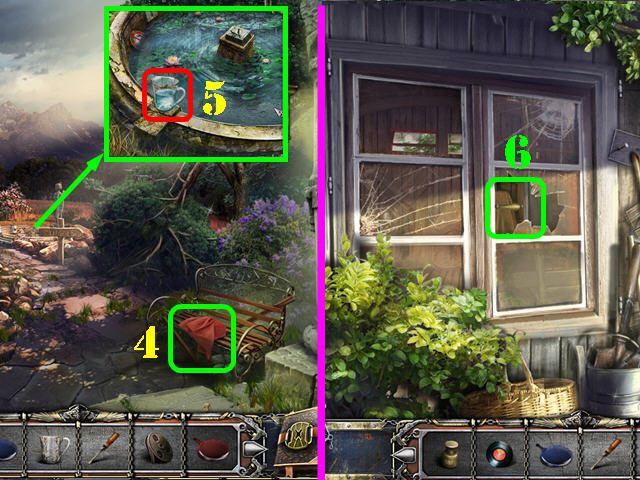
- Take the MAGIC SHAWL (4).
- Look at the fountain; dip the PITCHER in the water and take the PITCHER WITH WATER (5).
- Go towards the barn.
- Break the window with the STONE; pull the latch (6) and go through the window.
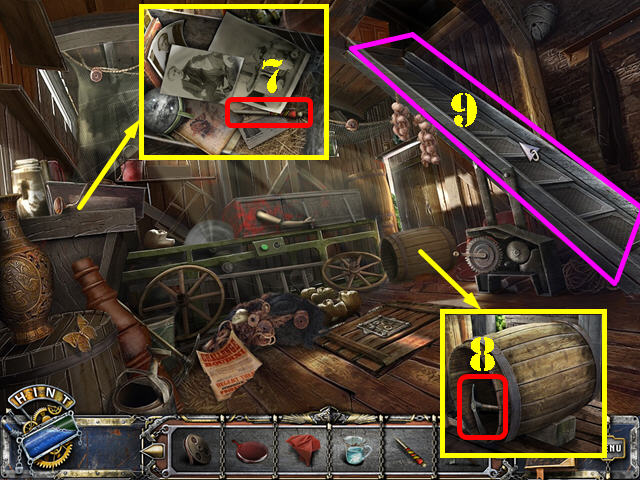
- Examine the box; move the papers aside and take the MAGIC WAND (7).
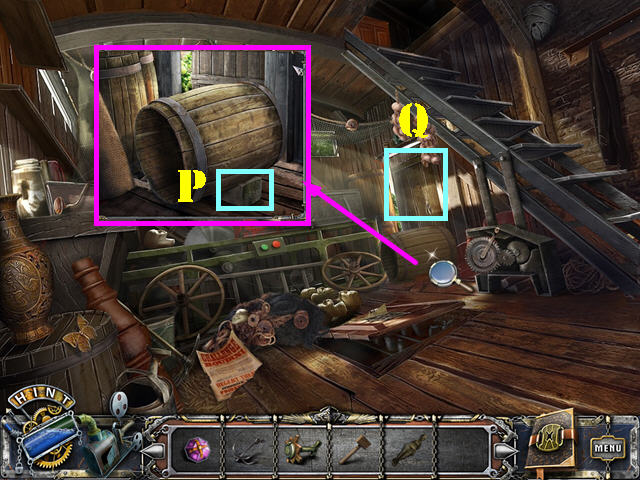
- Look at the barrel; take the PICKAX (8).
- Try to go up the stairs and you will not be able to (9).
- Walk down 3 times.
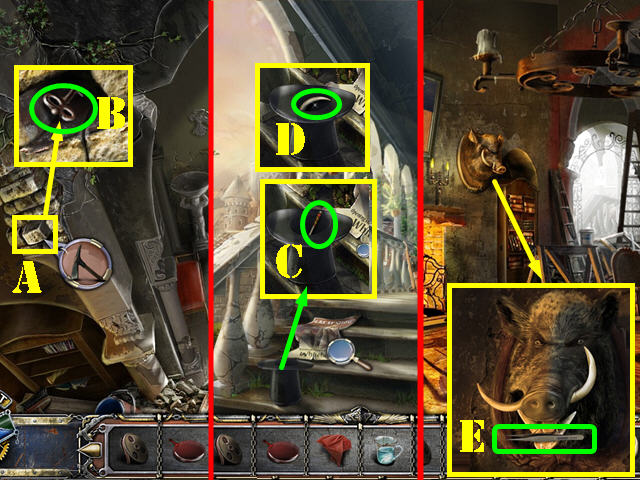
- Use the PICKAX on the loose stone (A); zoom into the niche and take the PADLOCK KEY (B).
- Go right.
- Zoom into the hat; put the MAGIC WAND in it (C) and then cover it with the MAGIC SHAWL.
- Take the TUSK (D).
- Return to the fireplace.
- Zoom into the boar and put the TUSK on it to activate a puzzle.
- Move the left tusk as shown in the screenshot and take the TWEEZERS (E).
- Walk down.
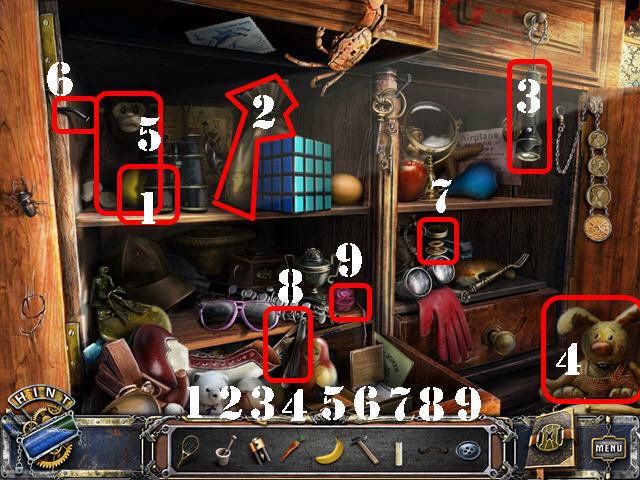
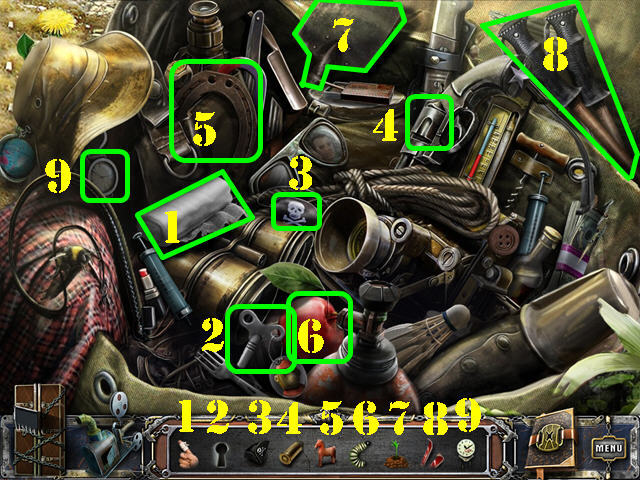
- Play the HOS.
- Put the items in the bottom tray next to their related items on the scene.
- Please look at the screenshot for the solution (1-9); give the carrot (4) to the bunny first.
- The PLASTER OF PARIS will be acquired.
- Go to the bedroom window.
- Zoom into the cage; use the TWEEZERS to get the first CANVAS PIECE (F).
- Return to the outside of the barn.
- Zoom into the mold; put the PLASTER OF PARIS in it followed by the PITCHER WITH WATER. Close the mold and then take the PLASTER HAND (G).
- Return to the terrace door.
- Zoom into the door and put the PLASTER HAND on the lock (H).
- Go through the door to reach the cabinet.
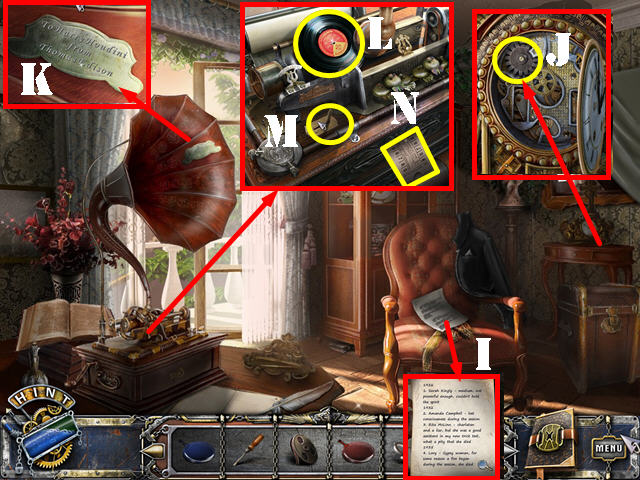
- Take a closer look at the note on the chair (I).
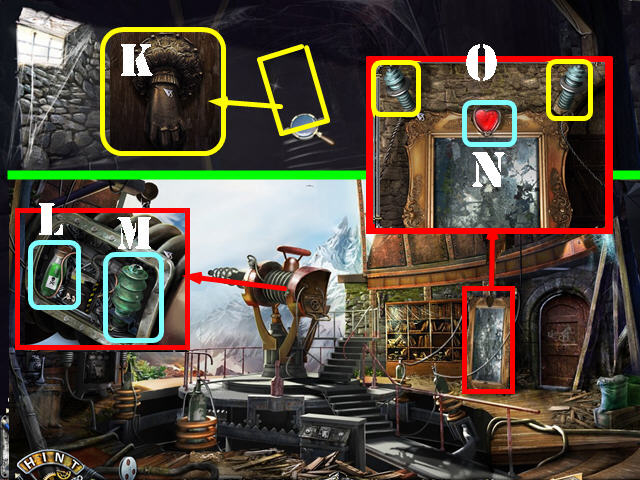
- Look at the clock; remove the screw with the SCREWDRIVER and take the COGWHEEL (J).
- Look at the inscription on the phonograph (K).
- Zoom into the phonograph; put the RECORD on the turntable (L) and push the switch (M).
- Take the TICKET (N).
- Return to the barn.
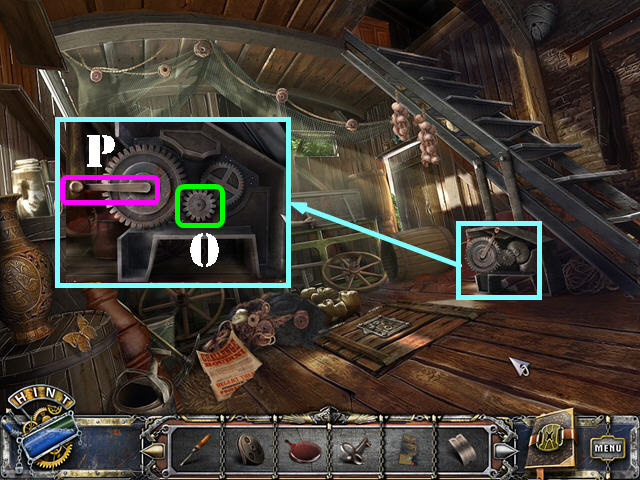
- Look at the mechanism; add the COGWHEEL to it (O) and press the handle (P).
- Go up the steps to reach the attic.
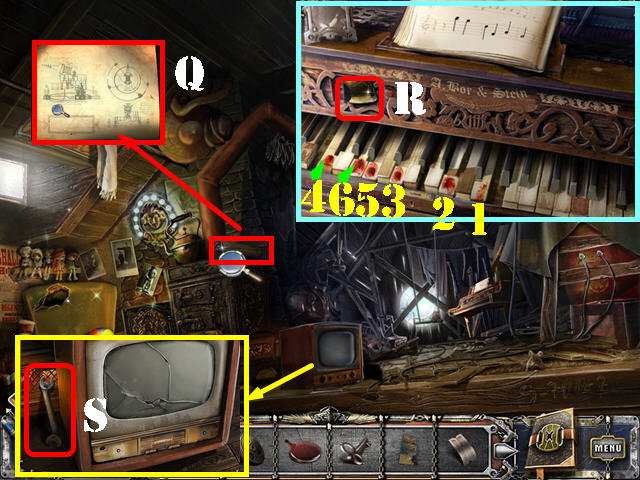
- Look at the schematic (Q).
- Zoom into the piano.
- Touch the keys in the order shown in the screenshot (1-6).
- Take the second CANVAS PIECE (R).
- Look at the TV and take the WRENCH (S).
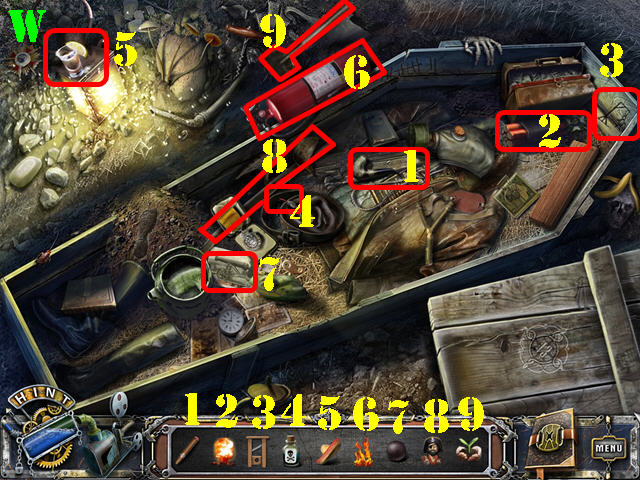
- Play the HOS.
- Put the items in the bottom tray next to their related items on the scene.
- Please look at the screenshot for the solution (1-9).
- The PIN will be acquired.
- Walk down.
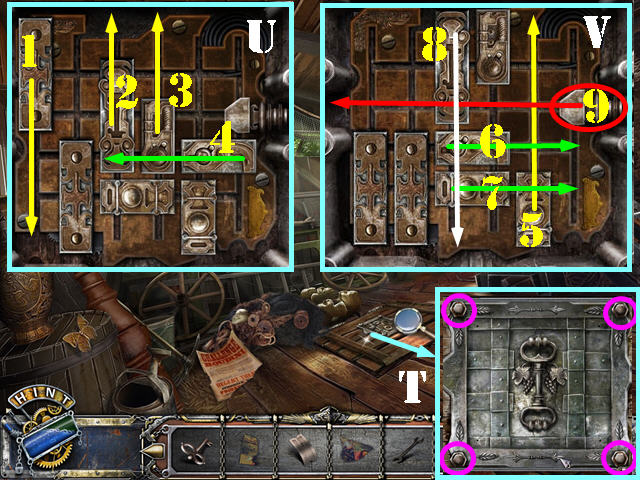
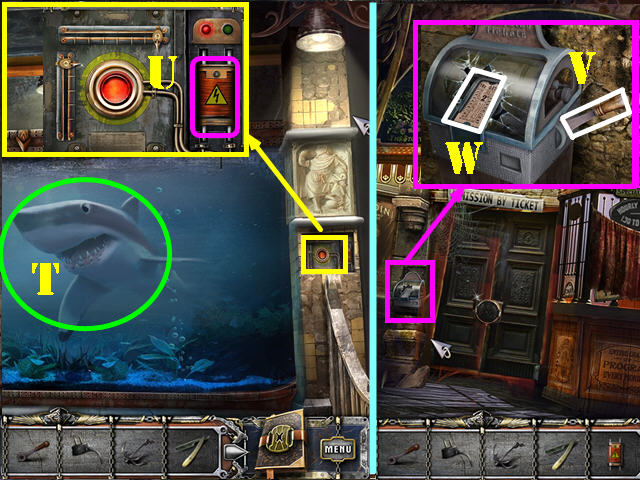
- Zoom into the hatch; remove the 4 nuts with the WRENCH to activate a puzzle (T).
- Move the blocks out of the way to clear the path for the latch.
- Please follow the steps on the screenshot to solve the puzzle (U and V).
- Go down to the cellar.
Chapter 3: Cellar
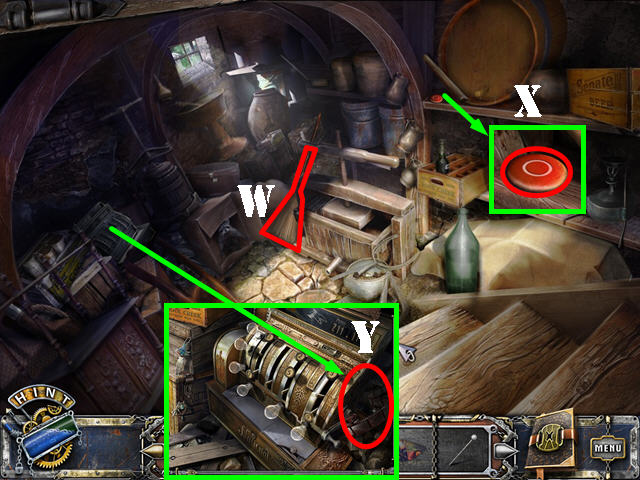
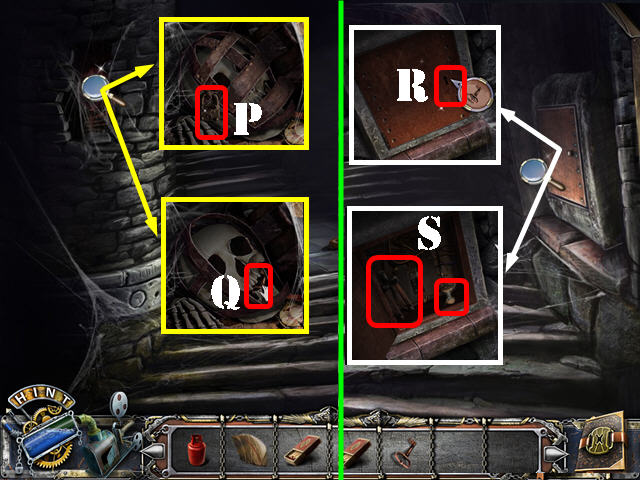
- Grab the BROOM (W).
- Look at the top shelf and take the STOP BUTTON (X).
- Zoom into the cash register; take the PIECE OF FILM (Y).
- Walk down.
- Zoom into the saw; put the STOP BUTTON in the slot (A).
- Press the stop button; open the box, and look at the note (B).
- Take the WOODEN LEVER (C).
- Return to the yard.
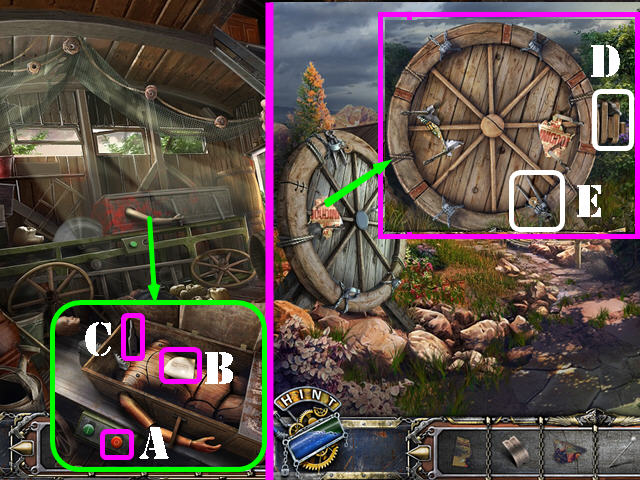
- Zoom into the wheel and put the WOODEN LEVER on it (D).
- Pull the lever.
- Use the PADLOCK KEY in the lock and take the NIPPERS (E).
- Return to the terrace door.
- Play the HOS.
- Put the items in the bottom tray next to their related items on the scene.
- Please look at the screenshot for the solution (1-9).
- The BUTTON #8 will be acquired.
- Go into the cabinet.
- Look under the hutch. Take the second WEIGHT (F).
- Use the PIN in the lock and then move the pin 3 times (G).
- Take the GLUE from inside the suitcase (H).
- Return to the cinema room.
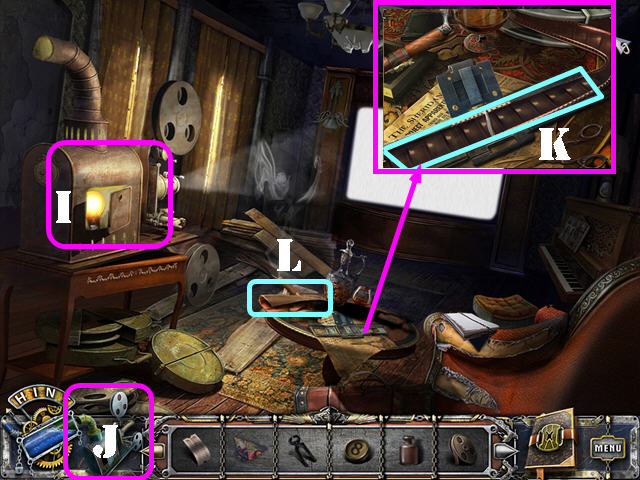
- Put the FILM REEL in the projector (I); watch the movie.
- From now on you can view the film reels you collect in the projector next to the inventory tray (J) or on the projector itself.
- Look at the table; put the PIECE OF FILM in the film splicer. Add GLUE to the film and close the lid. Take the FILM REEL (K).
- Take the third CANVAS PIECE that just fell on the table (L).
- Put the FILM REEL in the projector (J) next to the inventory tray.
- Walk down and go right.
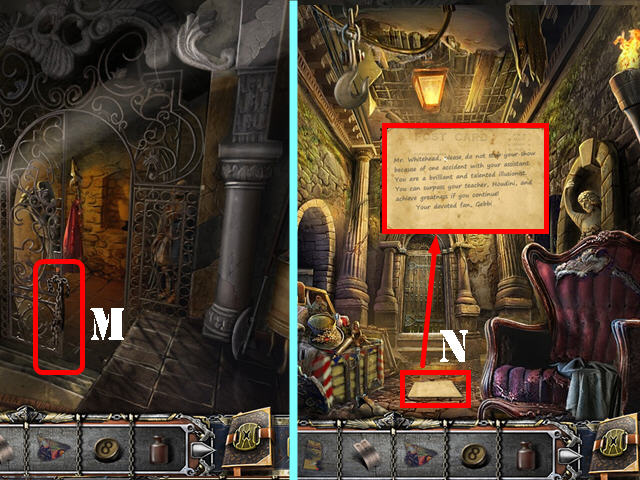
- Cut the chains with the NIPPERS (M).
- Go through the gate to reach the statue and then go straight to the chest hall.
- Look at the postcard on the floor (N).
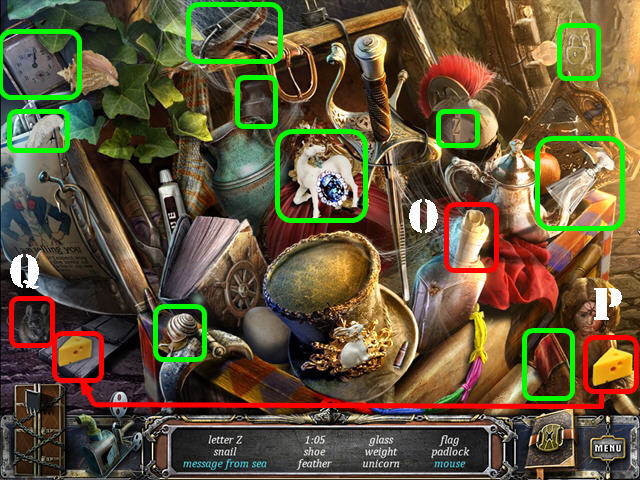
- Play the HOS.
- Remove the cork and take the message from sea (O).
- Put the cheese (P) on the mousetrap; take the mouse (Q).
- The third WEIGHT will be acquired.
- Go forward.
- Take the MEAT (R).
- Go left to the pool entrance.
- Zoom into the valves and take the VIOLET CRYSTAL (S).
- Walk down and go right to the theater lobby.
- Look at the ticket puncher; take the BUTTON #6 (T).
- Walk down 3 times.
- Zoom into the statue and put the 3 WEIGHTS on the shelves (U).
- Place the 3 bottom weights (V) on the scale to balance it out.
- Take the fourth CANVAS PIECE (W).
- Walk down twice to return to the fireplace.
- Zoom into the picture frame and put the 4 CANVAS PIECES on it (X).
- Take the YELLOW LENS (Y).
- Walk down and go right to the bedroom window.
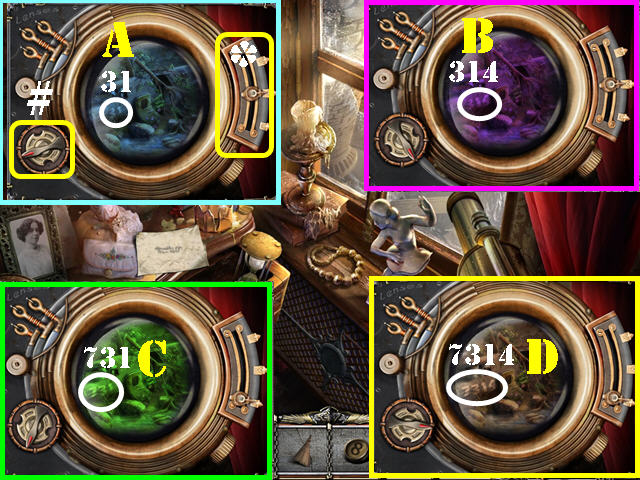
- Zoom into the telescope.
- Put the BLUE LENS, the RED LENS, and the YELLOW LENS on the telescope to activate a puzzle.
- Turn the knob (#) to change the color of the lens. Use the lever on the right (*) to focus the picture.
- Each of the colored lenses shown on the screenshot will show you part of the number (A, B, and C); once you find all the combinations, the complete number, 7314, will be revealed (D). Note the numbers appear randomly, the puzzle may solve faster if you happen to focus on the right numbers first.
- Return to the dungeon door.
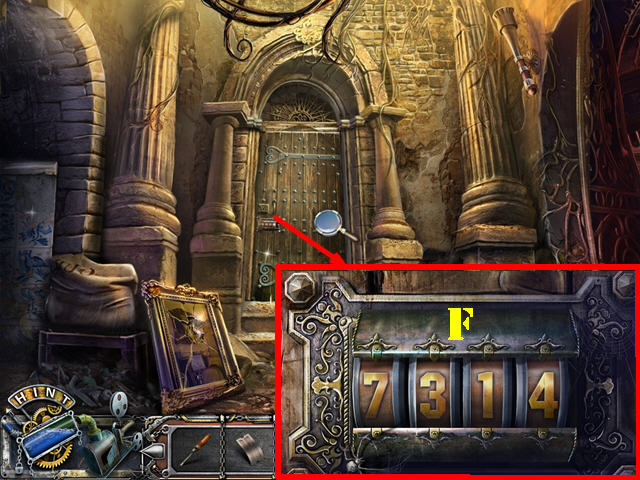
- Zoom into the door and enter the code 7314 (F).
- Go through the door to access the torture room.
Chapter 4: Torture Room
- Take the FILM REEL (@); play it now if you want to.
- Zoom into the torture chair; take the first TV KNOB (G).
- Look at the note (H).
- Look at the brick wall; take the BUTTON #4 (I).
- Return to the cellar in the barn.
- Zoom into the cash register; put BUTTONS #4, #6, and #8 on the register to activate a puzzle.
- Arrange the buttons so each row and column adds up to 15.
- Please look at the screenshot for the solution (J).
- Take the second TV KNOB (K).
- Return to the attic.
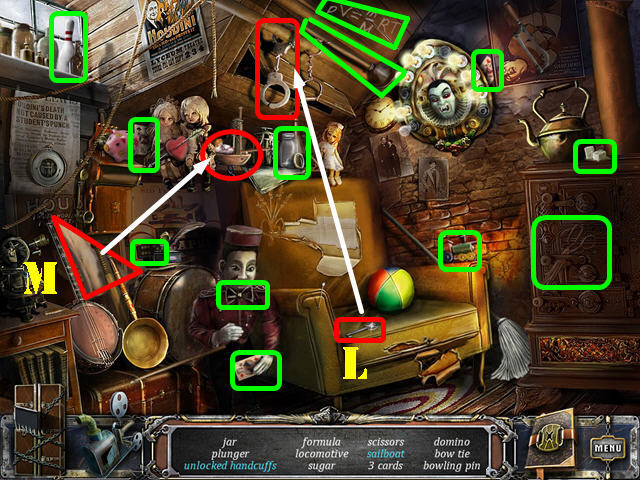
- Play the HOS.
- Drag the key (L) to the handcuff; take the unlocked handcuffs.
- Drag the sail (M) to the ship; take the sailboat.
- The JAR will be acquired.
- Zoom into the TV; add the 2 TV KNOBS to it (red).
- Turn the knobs until the color on both sides of the screen match. To solve the puzzle, turn each knob 3 times.
- Take the LEVER (N).
- Return to the terrace.
- Zoom into the spider web; put the fly in the JAR to get the FLY IN JAR (O).
- Return to the chest hall.
- Play the HOS.
- Put the items in the bottom tray next to their related items on the scene.
- Please look at the screenshot for the solution (1-9).
- The WIRED PLUG will be acquired.
- Return to the pool entrance.
- Put the FLY IN JAR on the spider (P). Clean off the web with the BROOM.
- Go through the door.
- Take the GRAPPLING HOOK (Q).
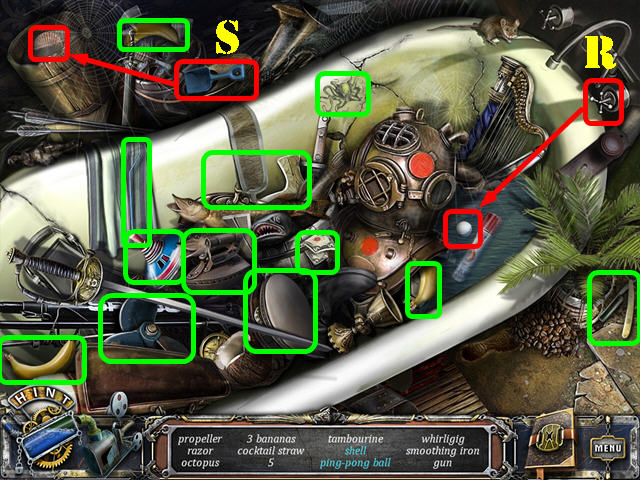
- Play the HOS.
- Turn on the faucet (R); take the ping-pong ball.
- Drag the shovel (S) to the bucket of sand; take the shell.
- The RAZOR will be acquired.
- Take a closer look at the shark tank.
- Give the MEAT to the shark (T).
- Look at the panel; take the EMPTY BATTERY (U).
- Return to the theater lobby.
- Zoom into the ticket machine; put the LEVER on the side (V) and then put the TICKET in it (W). Pull on the lever.
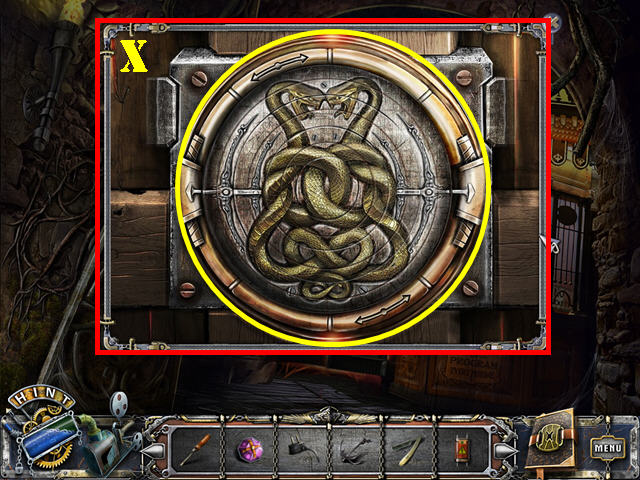
- Zoom into the door to activate a puzzle.
- Rotate the discs until you form the image of 2 snakes.
- Please look at the screenshot for the solution (X).
- Go into the theater.
Chapter 5: The Theater
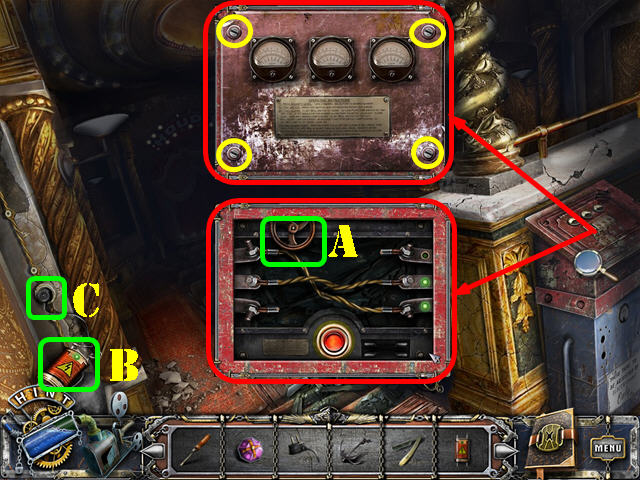
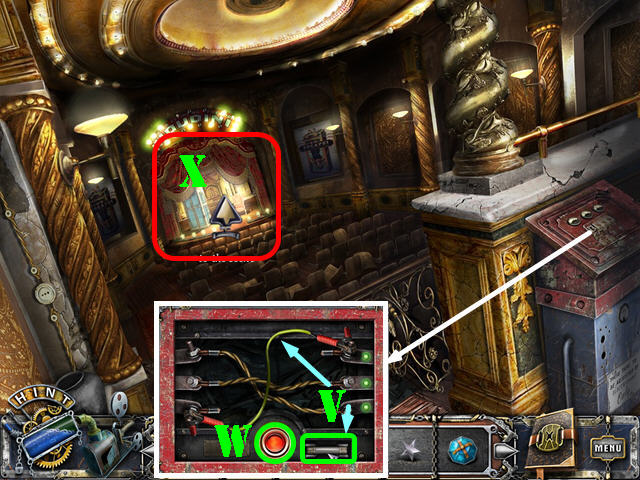
- Zoom into the device; remove the screws (yellow) with the SCREWDRIVER.
- Take the first PIPE VALVE (A).
- Put the EMPTY BATTERY in the holder (B).
- Add the WIRED CORD to the plug (C) and take the CHARGED BATTERY.
- Return to the torture room.
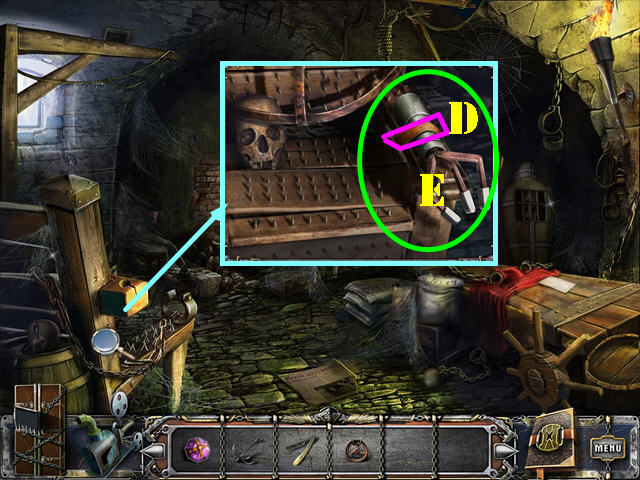
- Zoom into the torture chair; cut the belt with the RAZOR (D).
- Take the ROBOTIC CLAW (E).
- Return to the shark tank.
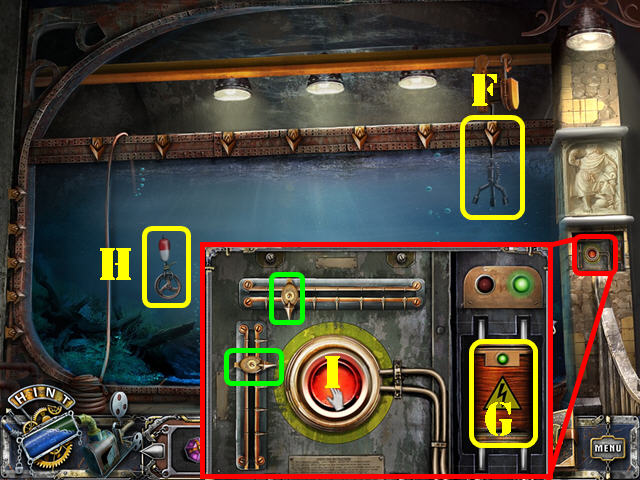
- Give the MEAT to the shark (if you haven’t done so already).
- Put the ROBOTIC CLAW on the hook (F).
- Zoom into the panel; put the CHARGED BATTERY in the slot (G).
- Your goal is to position the claw correctly in order to pick up the pipe valve (H).
- Position the knobs (green) as shown in the screenshot and then push on the red button (I).
- Take the second PIPE VALVE.
- Walk down.
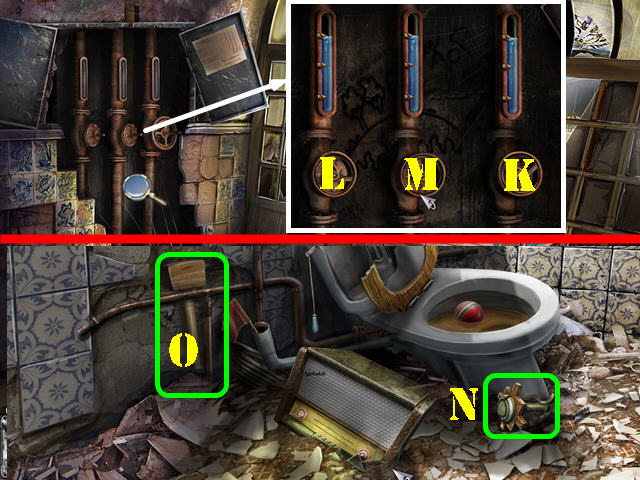
- Zoom into the pipes; put the 2 PIPE VALVES on it to activate a puzzle.
- Turn the valves until the water levels are all equal.
- To solve the puzzle, select the valves in this order: K, L, and M.
- Go back to the pool.
- Zoom into the pool; take the TREE KEY (N) and the WOODEN HAMMER (O).
- Play the HOS.
- Put the items in the bottom tray next to their related items on the scene.
- Please look at the screenshot for the solution (1-9).
- The first STONE FIGURE will be acquired.
- Return the barn.
- Zoom into the barrel; use the WOODEN HAMMER on the block (P).
- Go through the door to reach the hot air balloon (Q).
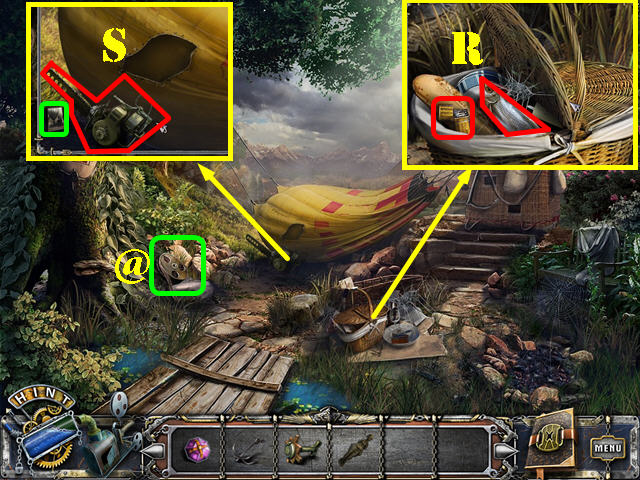
- Take the FILM REEL (@).
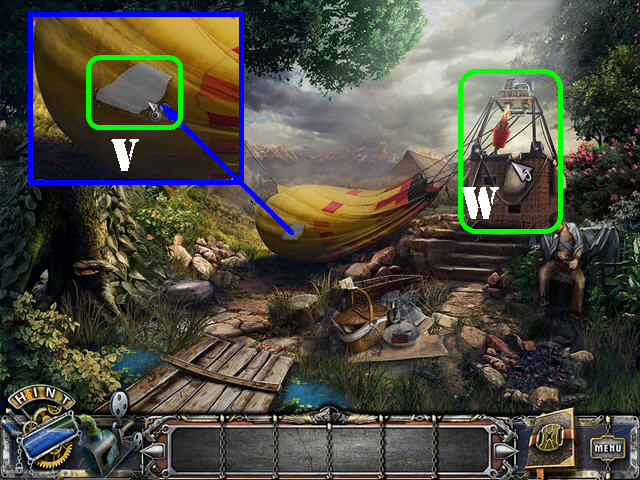
- Look at the basket; open it; take the FISH and the LIGHTER (R).
- Examine the balloon; take the CHAINSAW and the photo (S).
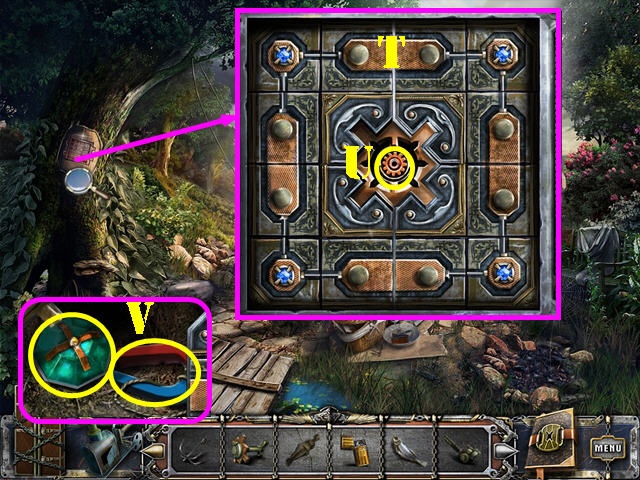
- Inspect the puzzle to activate it.
- Rotate the tiles until they form the image shown in the screenshot (T).
- Insert the TREE KEY in the lock (U).
- Take the TURQUOISE CRYSTAL and the ROPE WITH MAGNET (V).
- Return to the yard.
- Cut the tree with the CHAINSAW (W).
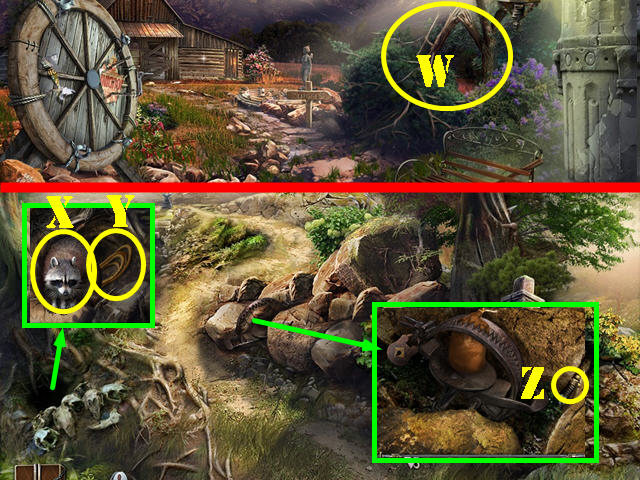
- Go right to reach the road.
- Look at the tree hollow; give the FISH to the raccoon (X) and take the ROPE (Y).
- Look at the stones; take the first SCREW (Z).
- Go forward to the abyss.
Chapter 6: Abyss
- Take the FILM REEL (@).
- Use the ROPE WITH MAGNET to get the KNIFE (A).
- Put the ROPE on the post (B) and then put the GRAPPLING HOOK on it.
- Go into the cave (C).
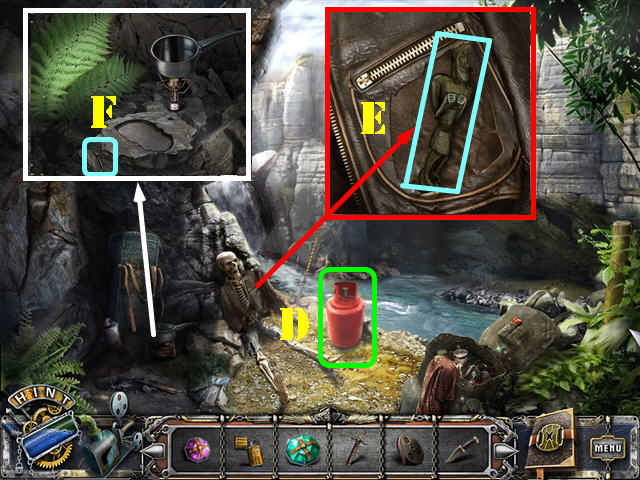
- Take the GAS TANK (D).
- Look at the skeleton; cut the pocket with the KNIFE and take the second STONE FIGURE (E).
- Look at the stone; take the TRAP KEY (F).
- Play the HOS.
- Use the razor to cut the stitches (G); take the hidden money.
- Drag the match (H) to the thermometer; take the +40.
- The SILVER STAR will be acquired.
- Return to the road.
- Zoom into the stones; use the TRAP KEY in the lock (I) and take the POUCH OF PELLETS (J).
- Examine the column; add the 2 STONE FIGURES to it (L).
- Take the BLUE CRYSTAL (M).
- Return to the cave.
- Play the HOS.
- Put the items in the bottom tray next to their related items on the scene.
- Please look at the screenshot for the solution (1-9).
- The WIND-UP KEY will be acquired.
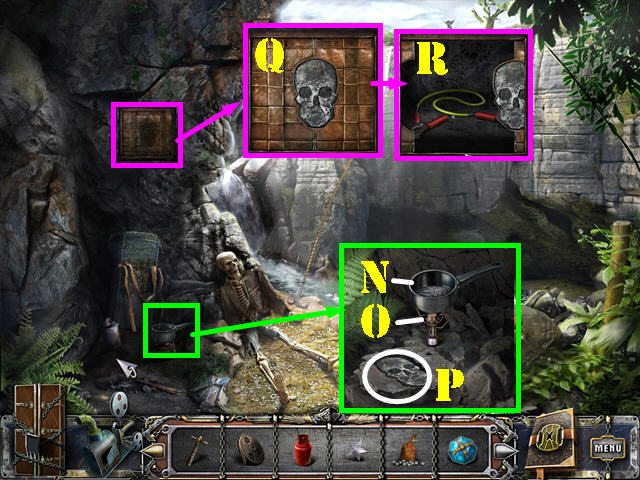
- Look at the pot; put the POUCH OF PELLETS into the pot (N).
- Light the burner with the LIGHTER (O).
- Pour the melted metal into the niche; take the SKULL SYMBOL (P).
- Look at the panel on the wall; put the SKULL SYMBOL on it (Q).
- Take the WIRE (R).
- Return to the theater lobby.
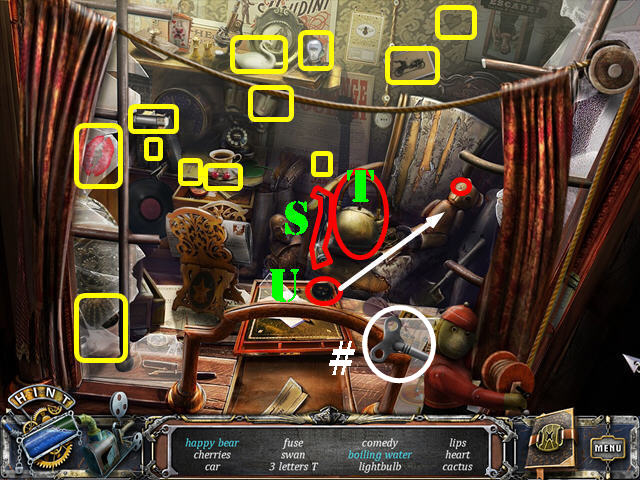
- Zoom into the curtain; put the WIND-UP KEY on the monkey’s back (#) and turn the key to activate a HOS.
- Touch the plug (S) and take the boiling water (T).
- Put the button (U) on the bear’s face; take the happy bear.
- The FUSE will be acquired.
- Go into the theater.
- Zoom into the device; add the WIRE and the FUSE to the panel (V).
- Push the red button (W).
- Go forward to the stage (X).
- Take the FILM REEL (@).
- Look at the right table to activate a puzzle. Rotate the pieces by right-clicking on them and left-click them to put them in place.
- Assemble the picture as shown in the screenshot (Y).
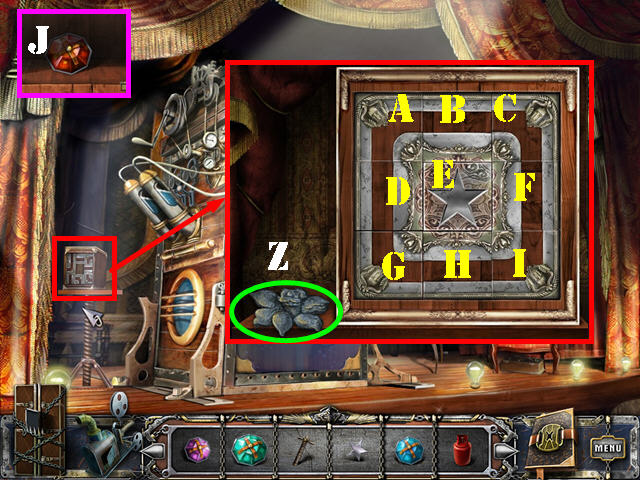
- Look at the box on the left table take the STONE FLOWER (Z).
- Touch the boxes to move them to an empty spot. Keep moving them around until you assemble the image correctly.
- To solve the puzzle, touch the pieces in this order: H, G, D, A, B, C, F, E, D, A, B, C, F, E, H, G, D, E, H, G, D, E, H, I, F, E, D, G, H, I, F, E, H, I, F, and E (the center piece should be blank, the star appears after you solve the puzzle).
- Put the SILVER STAR in the center of the box.
- Take the RED CRYSTAL (J).
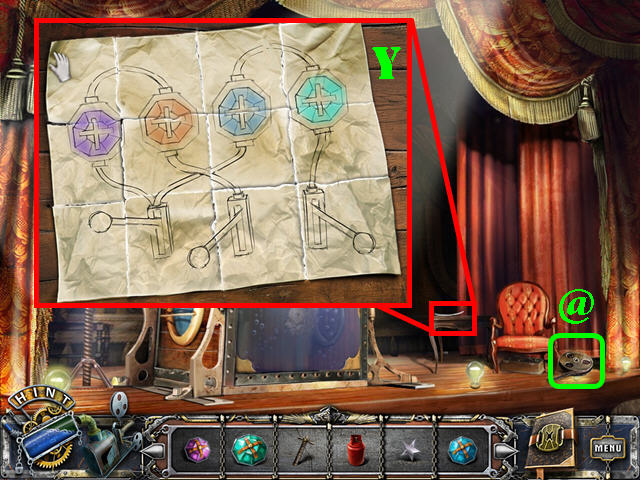
- Zoom into the side of the box; put the VIOLET CRYSTAL, RED CRYSTAL, BLUE CRYSTAL, and the TURQUOISE CRYSTAL (1).
- Press on the last 2 levers (2).
- Go under the box to access Houdini’s room (3).
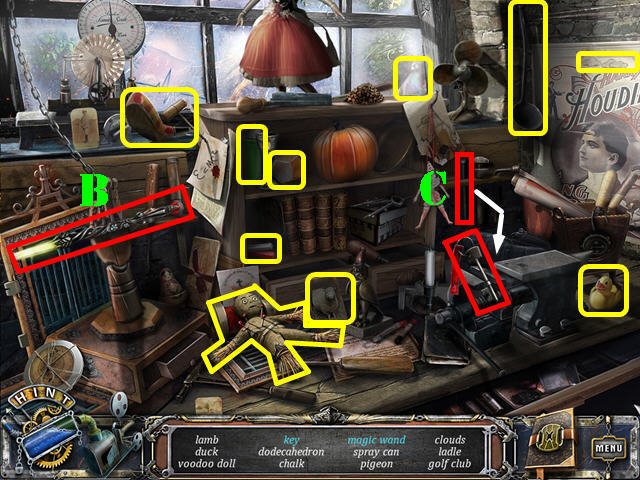
Chapter 7: Houdini’s Room
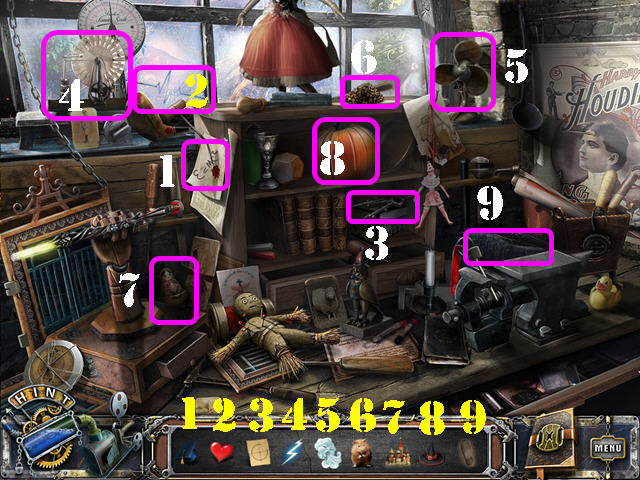
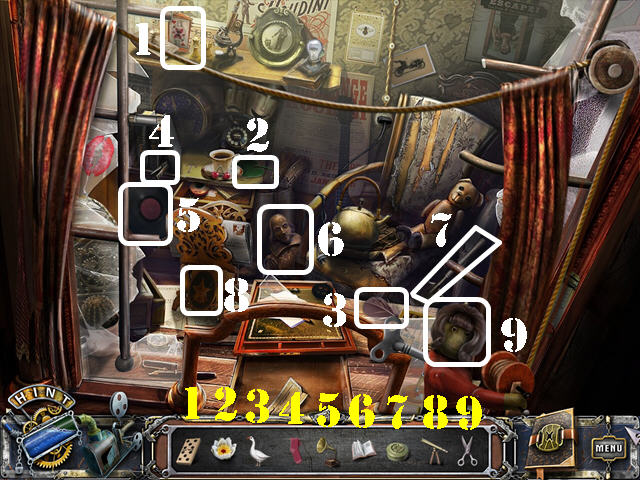
- Play the HOS.
- Put the items in the bottom tray next to their related items on the scene.
- Please look at the screenshot for the solution (1-9).
- The PUMPKIN will be acquired.
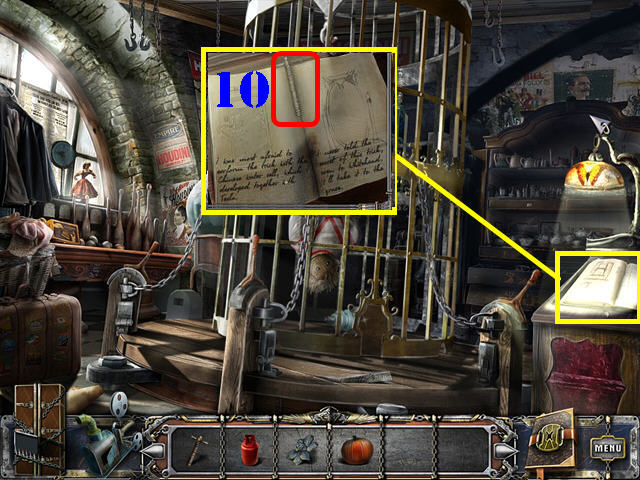
- Take a closer look at the book; take the second SCREW (10).
- Return to the torture room.
- Zoom into the device; put the 2 SCREWS on the side of the device. Pull out all the screws by selecting them in the right order.
- To solve the puzzle, select the screws in this order: A, E, G, A, G, H, E, A, B, A, C, F, D, E, B, G, H, A, C, and G.
- Take the HACKSAW (I).
- Return to the theater lobby.
- Play the HOS.
- Put the items in the bottom tray next to their related items on the scene.
- Please look at the screenshot for the solution (1-9).
- The SHOVEL will be acquired.
- Return to Houdini’s room.
- Zoom into the cell; cut the bars with the HACKSAW and take the ISOLATOR (A).
- Play the HOS.
- Open the hand; take the magic wand (B).
- Put the lever (C) on the vise and then take the key.
- The REVEALING DUST will be acquired.
- Return to the torture room.
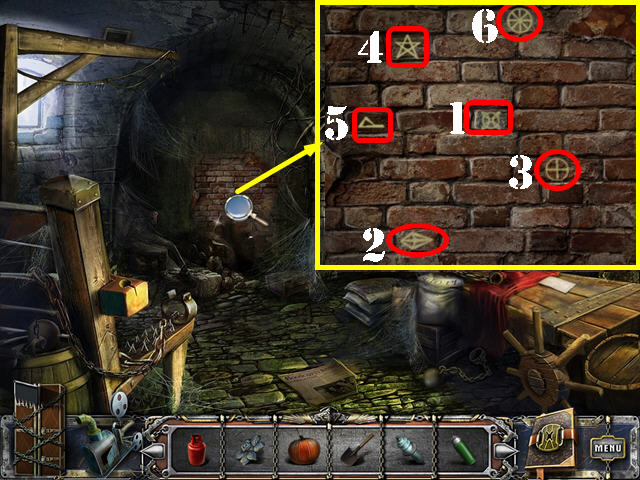
- Zoom into the brick wall; use the REVEALING DUST on it to activate a puzzle.
- Push the bricks in the right order.
- Please look at the screenshot for the solution (1-6).
- Go through the hole in the wall to access the mine entrance.
- Look at the crate and take the BUCKET (D).
- Go left.
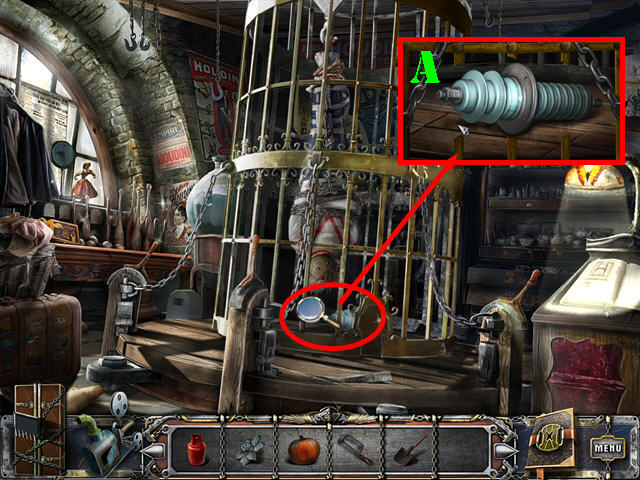
- Take the JACK (E).
- Walk down and go forward to the mine shaft.
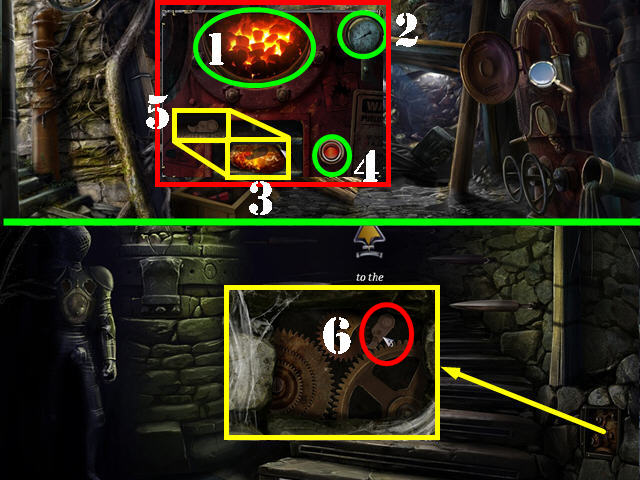
- Look at the cart; take the CROWBAR (F).
- Put the JACK under the cart (G); press on the jack and take the DETONATOR (H).
- Inspect the coals; put down the BUCKET (I).
- Use the SHOVEL in the coals twice and take the BUCKET WITH COAL (J).
- Walk down.
- Zoom into the crate; remove the 4 nails with the CROWBAR (yellow) and take the DYNAMITE (K).
- Go forward.
- Put down the DYNAMITE (L) and the DETONATOR (M).
- Press on the detonator and go forward.
Chapter 8: The Cemetery
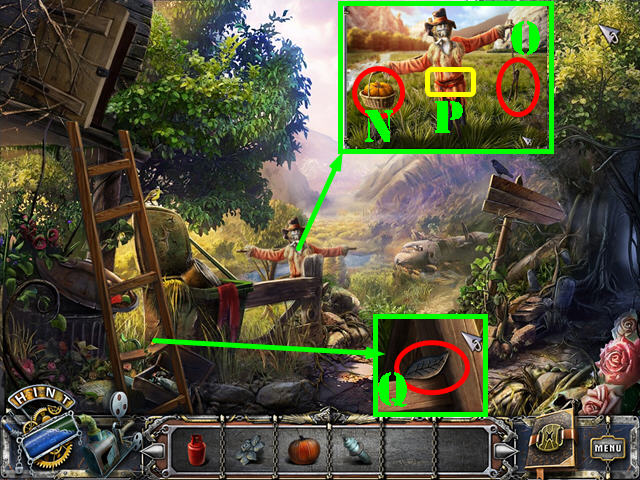
- Zoom into the scarecrow; put the PUMPKIN in the basket (N) and take the NIPPERS (O).
- Grab the BELT around the scarecrow’s waist (P).
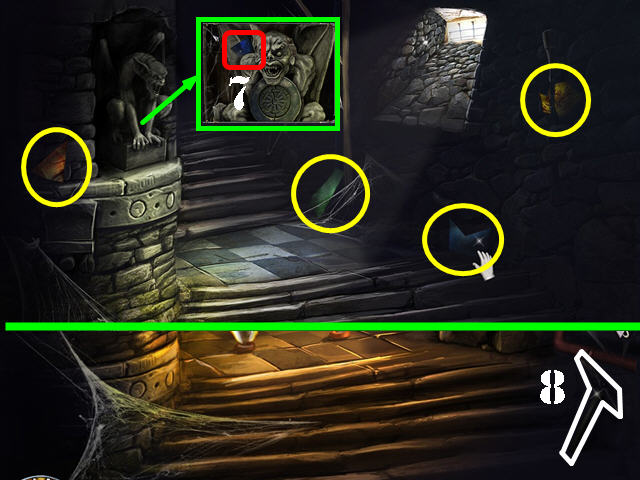
- Look at the ladder; take the STONE LEAF (Q).
- Go right.
- Look at the tombstone; put the STONE LEAF and the STONE FLOWER (R) in the indentations.
- Take the GENERATOR FILTER (S).
- Walk down and go forward.
- Play the HOS.
- Push the button (T) and then take the radio wave (U).
- The HAMMER will be acquired.
- Return to the cemetery.
- Zoom into the casket.
- Use the HAMMER (V) on the casket to activate a HOS.
- Play the HOS (W).
- Put the items in the bottom tray next to their related items on the scene.
- Please look at the screenshot for the solution (1-9).
- The FIRE EXTINGUISHER will be acquired.
- Return to the airplane.
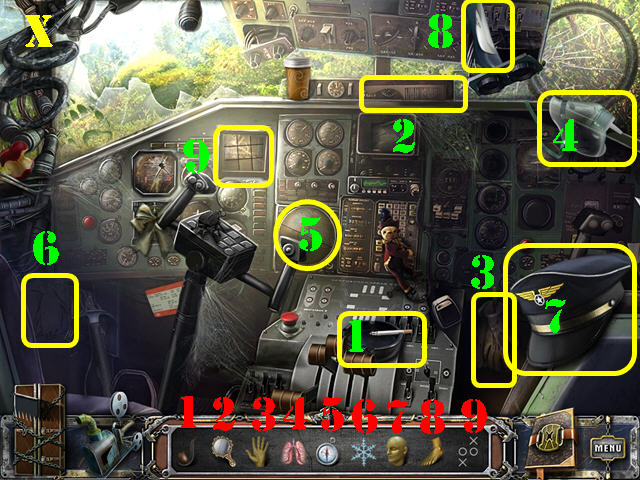
- Play the HOS (X).
- Put the items in the bottom tray next to their related items on the scene.
- Please look at the screenshot for the solution (1-9).
- The GLOVES will be acquired.
- Return to the cemetery.
- Zoom into the ivy bush.
- Use the GLOVES to get the HANDLE (A).
- Walk down 3 times.
- Zoom into the box; cut the chains with the NIPPERS (B).
- Open the doors and take the AX (C).
- Return to the airplane.
- Cut the branch with the AX (D).
- Enter the plane.
- Use the FIRE EXTINGUISHER on the fire (E).
- Take the MONUMENT PART (F) and the first KNIGHT COAT OF ARMS (G).
- Zoom into the suitcase; enter the code 9482 (H).
- Take the WIRE (I).
- Exit the plane.
- Look at the propeller; use the WIRE to get the PARACHUTE PART (J).
- Return to the cemetery.
- Zoom into the base of the statue; put the MONUMENT PART in the indentation (K).
- Take the GENERATOR BELT (L).
- Play the HOS.
- Remove the cork on the gas mask with the corkscrew (M) and take the green gas.
- The WOODEN PLANK will be acquired.
- Walk down.
- Examine the broken ladder; put the WOODEN PLANK on it and then tie the board down with the BELT (N).
- Look in the tree house.
- Take the PENDANT (O) and look at the letter (P).
- Put the HANDLE on the side of the box (Q); take the SENSOR (#).
- Walk down twice and go left.
- Put the GENERATOR BELT (R) and the GENERATOR FILTER (S) on the generator to unlock the left door.
- Go through the left door.
Chapter 9: The Finale
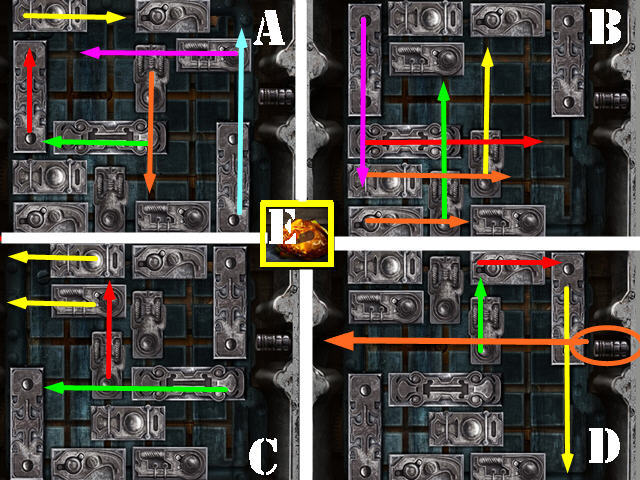
- Look under the stairs to activate a slider puzzle.
- Move the blocks out of the way to clear the path for the latch.
- To solve the puzzle, please follow the arrows in each section (A-D) in this order: Yellow, Red, Green, Orange, Purple, and Light Blue.
- Take the AMBER (E).
- Walk down twice.
- Zoom into the machine on the right.
- Put the BUCKET WITH COAL in (1).
- Put the SENSOR into position (2).
- Put the AMBER in the niche (3).
- Press the button (4) and take the GEAR BLOCKER (5).
- Go left and then through the left door.
- Zoom into the gears; block them with the GEAR BLOCKER (6).
- Go up the steps.
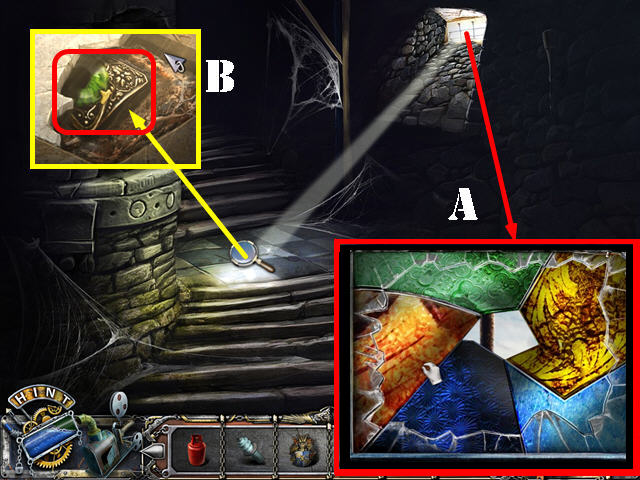
- Take the 1/5, 2/5, 3/5, and 4/5 GLASS PIECES circled in yellow.
- Look at the gargoyle and take the 5/5 GLASS PIECE (7).
- Go forward.
- Take the ICE AX (8).
- Walk down.
- Look at the window; put the 5 GLASS PIECES on it to activate a puzzle.
- Right-click on a piece to rotate it.
- Please look at the screenshot for the solution (A).
- Look at the spot where the light is shining; use the ICE AX on it and take the EYE SYMBOL (B).
- Walk down twice.
- Zoom into the niche; place the EYE SYMBOL in it (C).
- Open the compartment; take the GARGOYLE EAR and the WRENCH (D).
- Return to the gargoyle.
- Zoom into the gargoyle; put the GARGOYLE EAR on its head (E).
- Take the GAS DAMPER (F).
- Go forward.
- Zoom into the pipe; put the GAS DAMPER in the slot (G).
- Go forward.
- Look at the window; take the second KNIGHT COAT OF ARMS and the MATCHES (H).
- Walk down 3 times.
- Zoom into the knight; place the 2 KNIGHT COATS OF ARMS into the slots (I).
- Take the DOOR HANDLE (J).
- Go forward three times.
- Zoom into the door; put the DOOR HANDLE on it (K).
- Go through the door to reach the observatory.
- Look at the cannon; take the ACID JAR (L).
- Use the WRENCH on the bolt and take the ISOLATOR (M).
- Zoom into the mirror; put the PENDANT (N) and the two ISOLATORS into the right spots (O).
- Walk down twice.
- Zoom into the niche; put the ACID JAR on the lock (P).
- Take the KEY (Q).
- Go forward.
- Zoom into the panel; insert the KEY into the lock (R).
- Take the NEEDLE AND THREAD along with the SWITCH (S).
- Go forward.
- Zoom into the panel; put the SWITCH on it and then pull it up (T).
- Take the BURNER (U).
- Return to the barn and go out the door to reach the hot air balloon.
- Zoom into the balloon; put the PARACHUTE PART on it and then use the NEEDLE AND THREAD on the patch (V).
- Put the GAS TANK and the BURNER on the balloon’s basket (W).
- Light the tank with the MATCHES.
- Congratulations, you have completed The Great Unknown: Houdini’s Castle!


 Million Dollar Quest Walkthrough, Guide, & Tips
 Magic Encyclopedia: Illusions Walkthrough, Guide, & Tips
 The Torment of Mont Triste Walkthrough, Guide, & Tips
 Serpent of Isis: Your Journey Continues Walkthrough, Guide, & Tips
 Tiger Eye - Part I: Curse of the Riddle Box Walkthrough, Guide, & Tips