
Welcome to the Time Relics: Gears of Lights Walkthrough
Can you restore the Gears of Light to the Clock Tower to defeat an ancient evil?
Whether you use this document as a reference when things get difficult or as a road map to get you from beginning to end, we’re pretty sure you’ll find what you’re looking for here.
This document contains a complete Time Relics: Gears of Lights game walkthrough featuring annotated screenshots from actual gameplay!
We hope you find this information useful as you play your way through the game. Use the walkthrough menu below to quickly jump to whatever stage of the game you need help with.
Remember to visit the Big Fish Games Forums if you find you need more help. Have fun!
This walkthrough was created by Rebekah, and is protected under US Copyright laws. Any unauthorized use, including re-publication in whole or in part, without permission, is strictly prohibited.

• This is the official guide for Time Relics: Gears of Light.
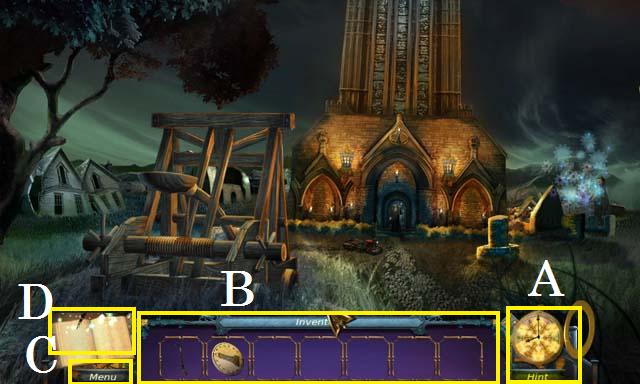
• Use the Hint Button (A) if you need additional help.
• Your Inventory bar (B) will hold items until they are needed.
• Zoom into sparkling scenes to trigger Hidden Object Scenes. In this guide we will use the acronym ‘HOS’ for Hidden Object Scenes.
• Each HOS requires additional actions to unlock all of the items. All hidden objects are marked in green unless otherwise noted.
• Click on the Menu (C) button to exit, pause, or resume the game. You can also adjust your options (sound, music, and screen size).
• Use your Grimoire (D) for additional help with puzzles.
• You will need to collect five Gears of Light, and seven Echo Crystals throughout the game. They are all marked in this guide. You can also collect additional Grimoire pages throughout the game.
• Many of the puzzle solutions are random. The solutions provided in this guide are possible solutions.
• You will not need to follow the exact path of this guide; however, most actions are required before others can be performed.
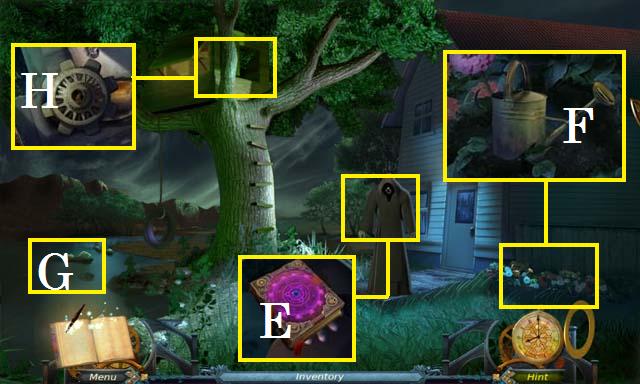
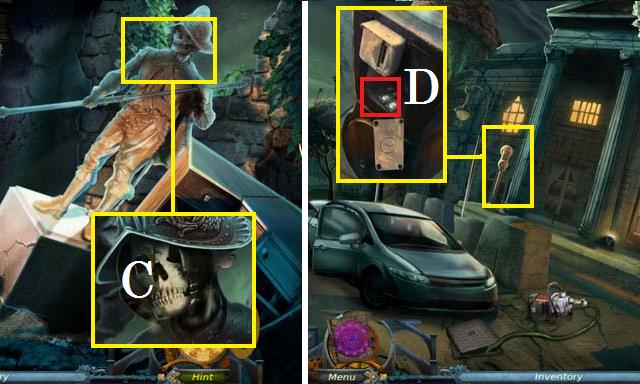
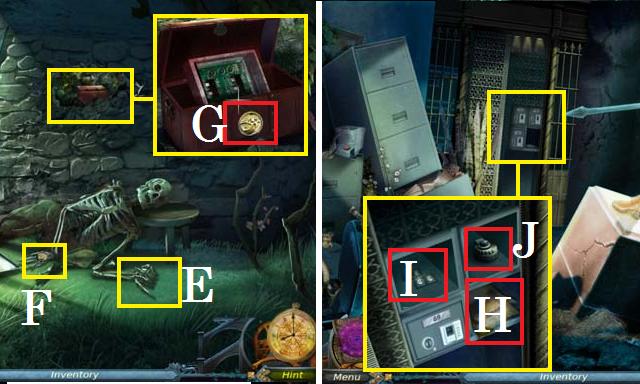
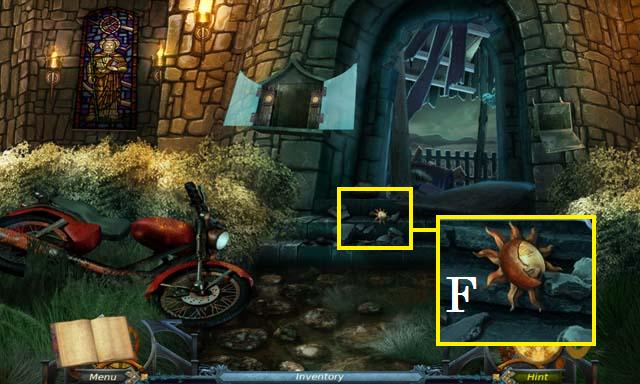
• Zoom into the man; collect the Grimoire (E).
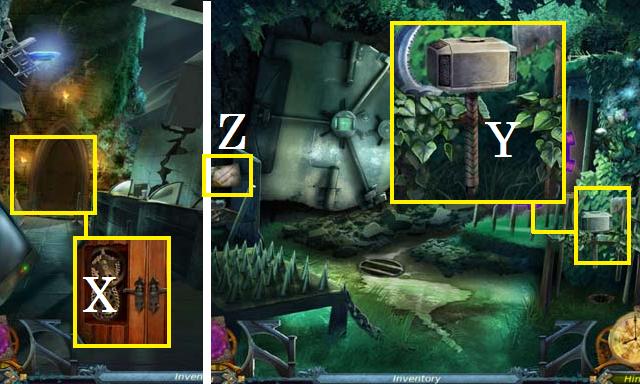
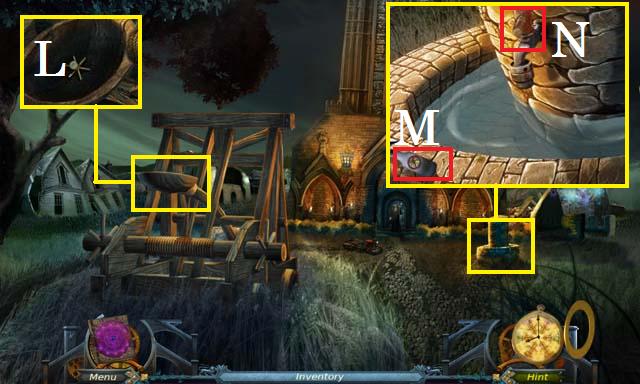
• Zoom into the flowerbed; move the flowers and collect the EMPTY WATERING CAN (F).
• Fill the EMTPY WATERING CAN in the lake (G) to receive the FILLED WATERING CAN.
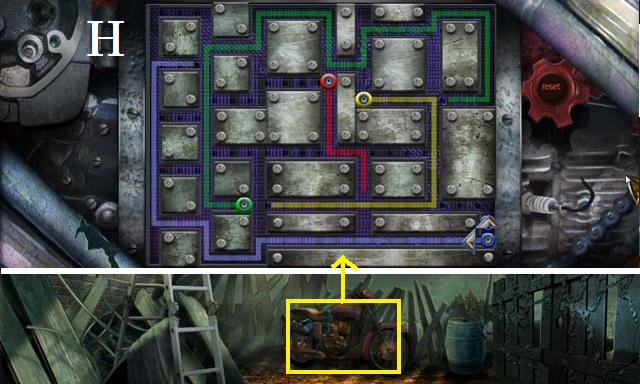
• Zoom into the tree house; pour the FILLED WATERING CAN on the gear and collect the first of the GEARS OF LIGHT (H).
• Enter the house.
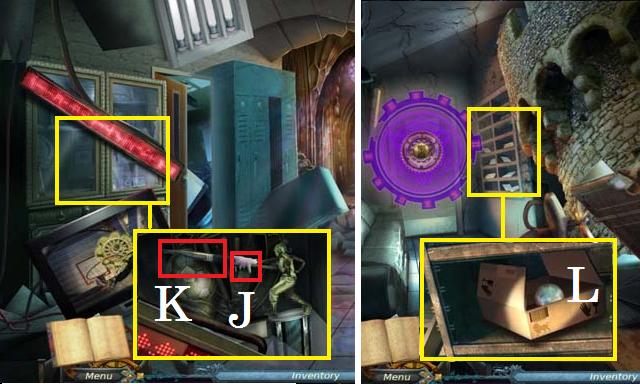
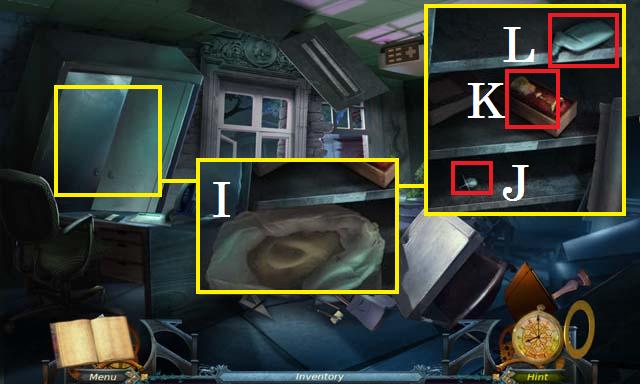
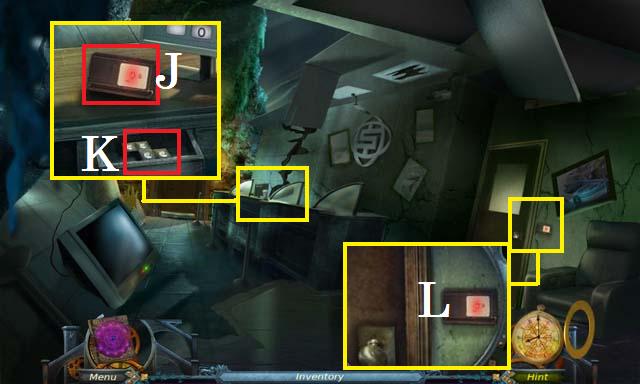
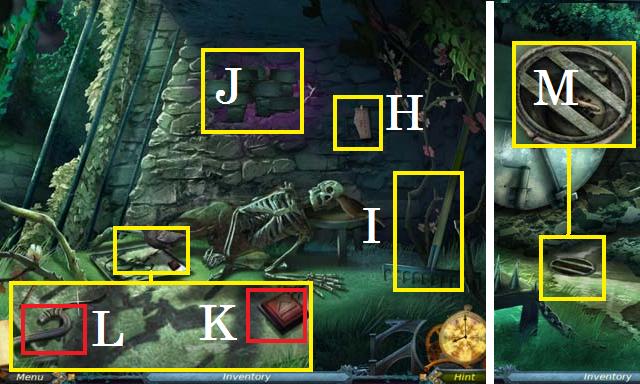
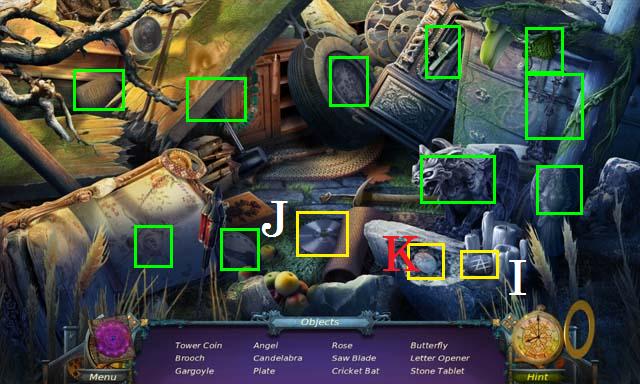
• Collect the first Echo Crystal (I), and the Grimoire page (J).
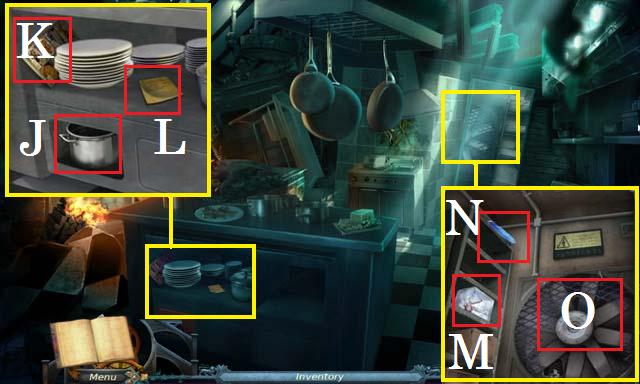
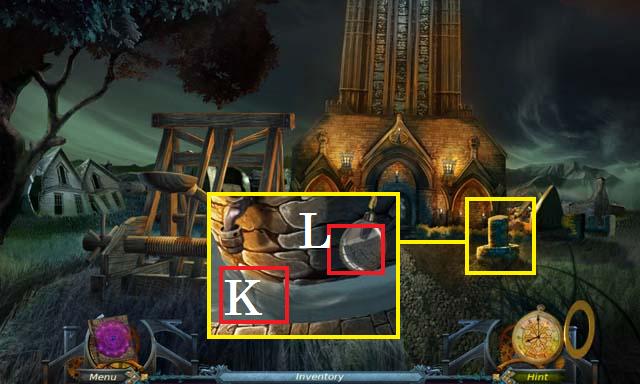
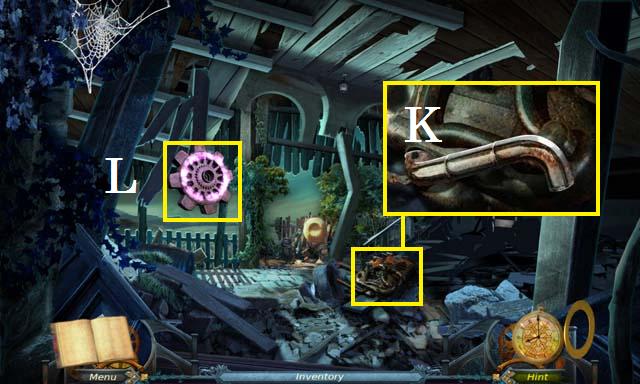
• Zoom into the cabinet and open the door; collect the CIRCULAR PLATE (K) and the MOP HEAD (L).
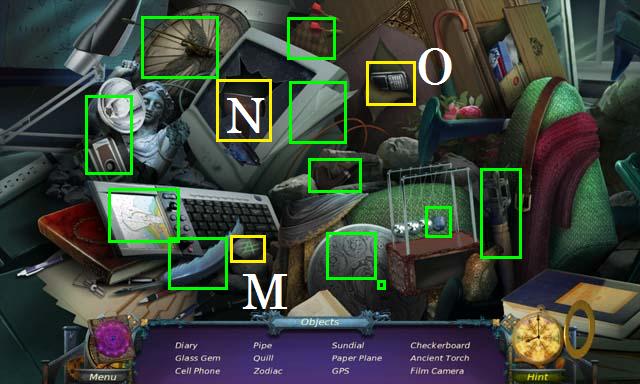
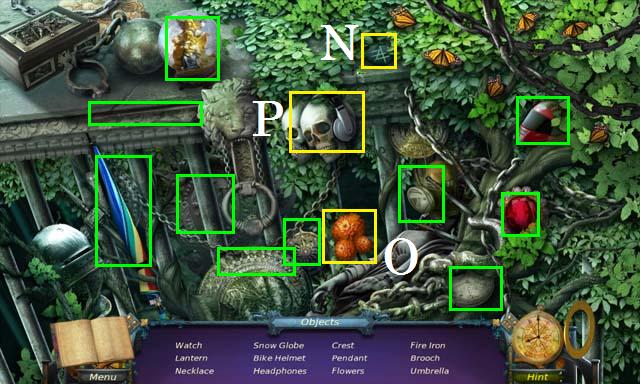
• Zoom into the sparkles to play a HOS.
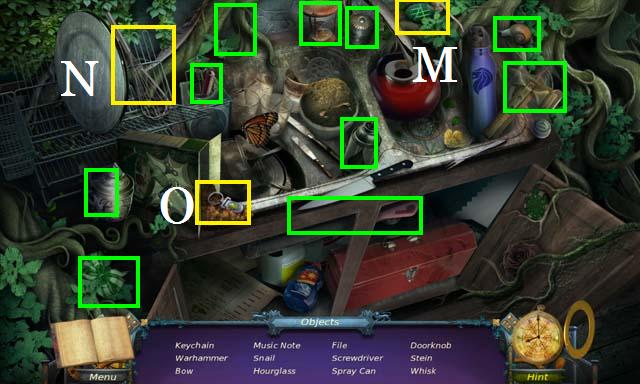
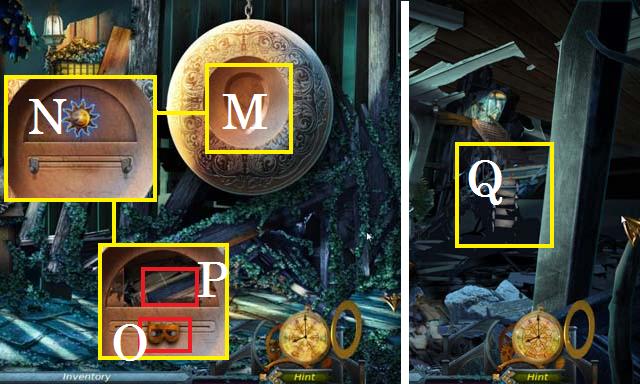
• Collect the Rune (M) to transform the items listed in blue.
• Move the plate to reveal the Whisk (N).
• Open the cereal box to locate the Keychain (O).
• Collect the remaining items, marked in green, to receive the SCREWDRIVER.
• Exit the house.
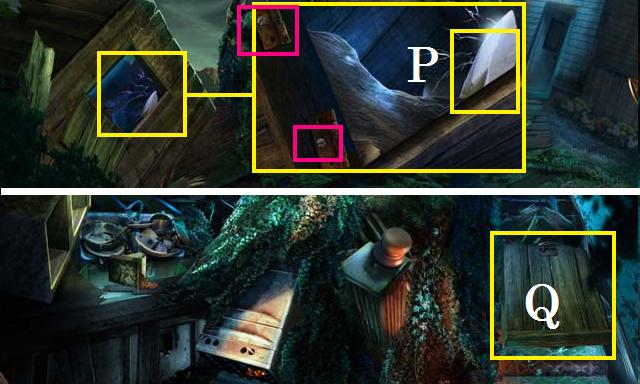
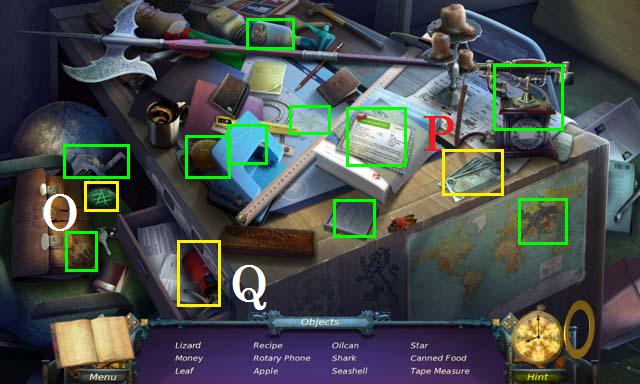
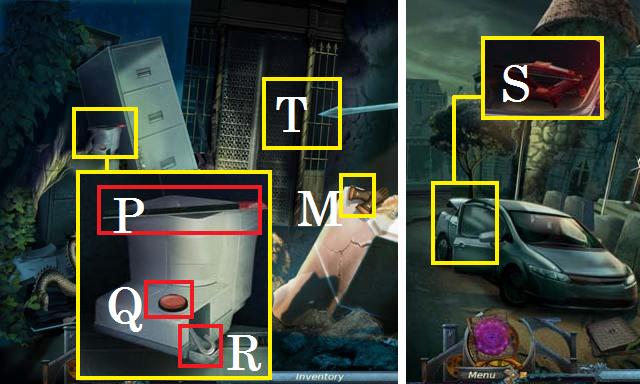
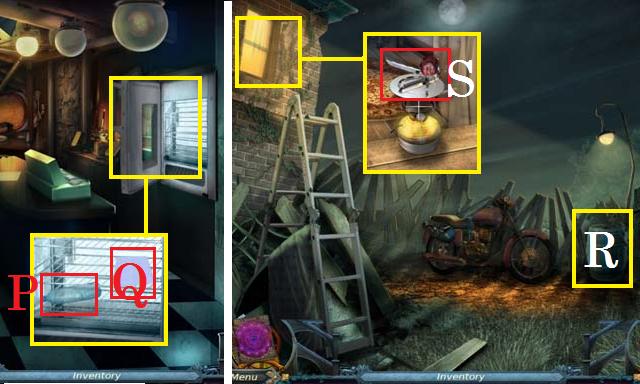
• Zoom into the shed; collect the GARDEN TROWEL (P). Remove the screws (pink) to receive the WOODEN DOOR.
• Enter the house.
• Lay the WOODEN DOOR on the stairs (Q).
• Climb the stairs.
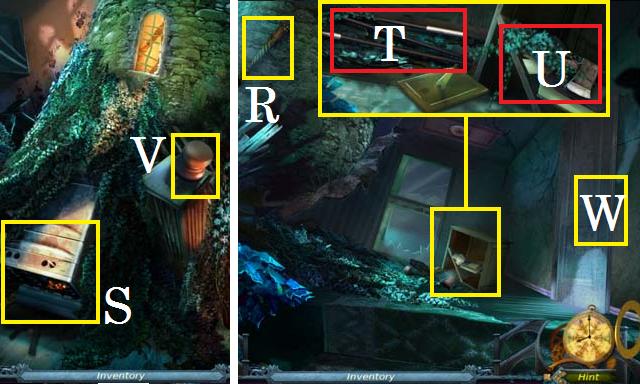
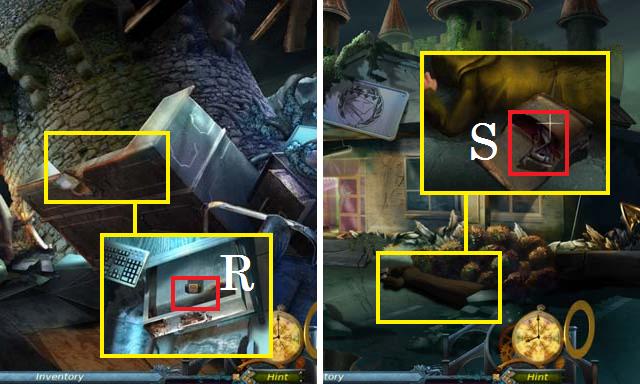
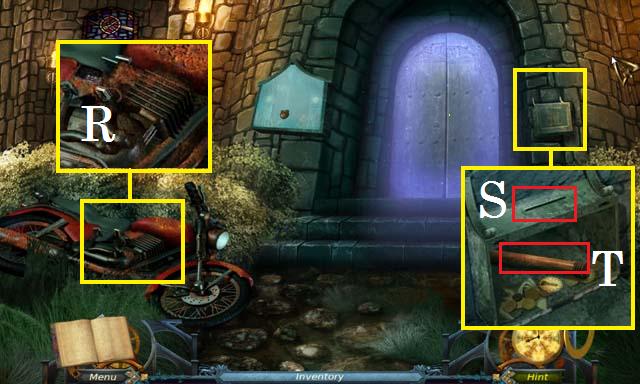
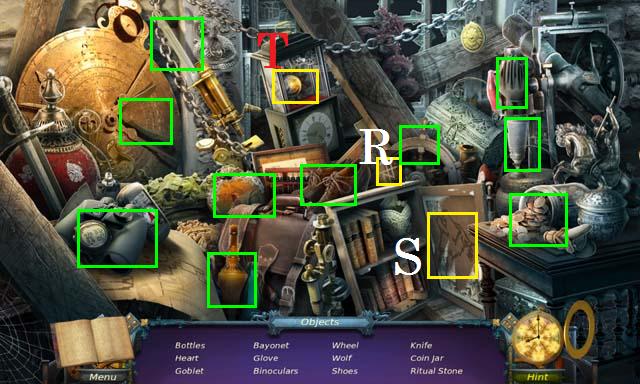
• Collect the ANCIENT TORCH (R).
• Go back downstairs.
• Zoom into the oven (S); light the ANCIENT TORCH on the open flame to receive the LIT TORCH.
• Return upstairs.
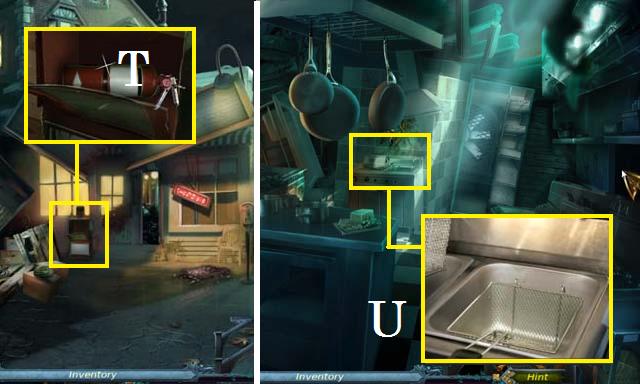
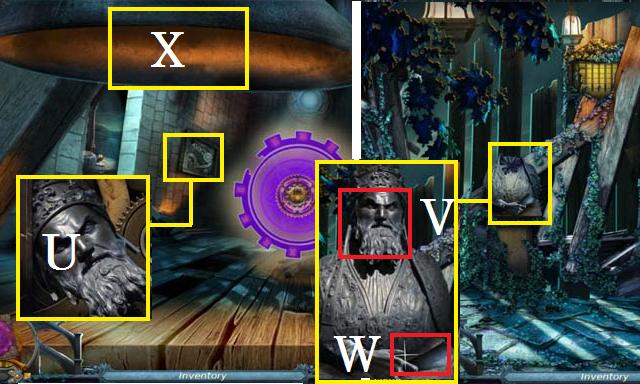
• Zoom into the cabinet; collect the HEAVY TENT POLES (T). Burn the vines with the LIT TORCH and collect the HATCHET (U).
• Return downstairs.
• Using the HATCHET, remove the WOODEN KNOB (V).
• Climb the stairs again.
• Place the WOODEN KNOB on the door (W) and enter the bedroom.
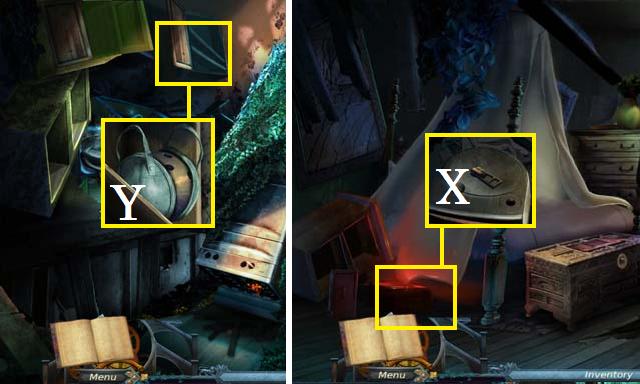
• Zoom into the alarm clock; collect the ZIPPER TAB (X).
• Return to the ground level.
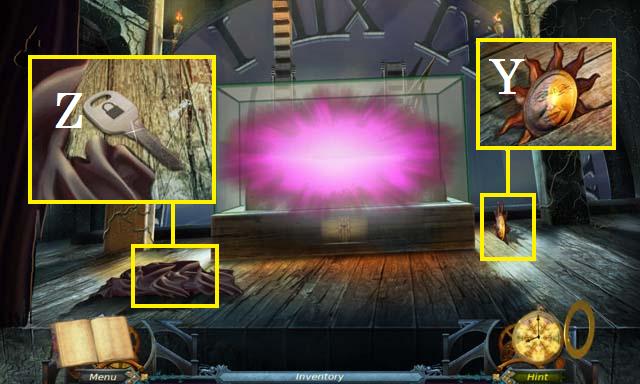
• Zoom into the cabinet; place the ZIPPER TAB on the bag and collect the BOWLING BALL (Y).
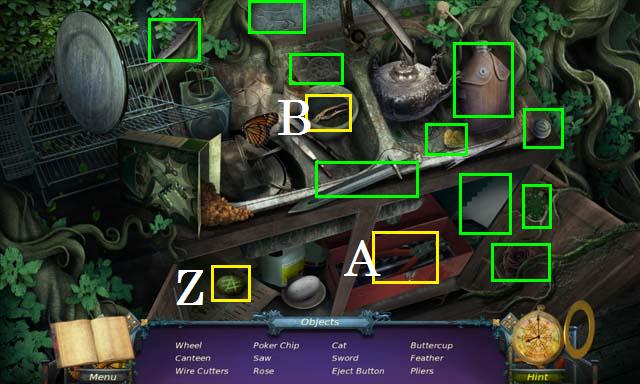
• Zoom into the sparkles to play a HOS.
• Collect the Rune (Z).
• Open the toolbox to reveal the Pliers (A).
• Clear the bowl to find the Wire Cutters (B).
• Collect the remaining items to receive the EJECT BUTTON.
• Return to the upstairs.
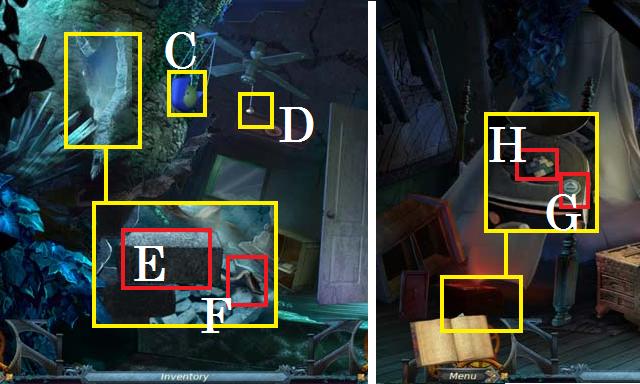
• Place the BOWLING BALL in the hammock (C) and then pull the fan cord (D).
• Zoom into the open hole; collect the STAIR-SHAPED COBBLESTONE (E) and the WOODEN STAFF (F).
• Enter the Bedroom.
• Zoom into the alarm clock; place the EJECT BUTTON (G) and collect the CHECKERED BLOCK (H).
• Exit the house.
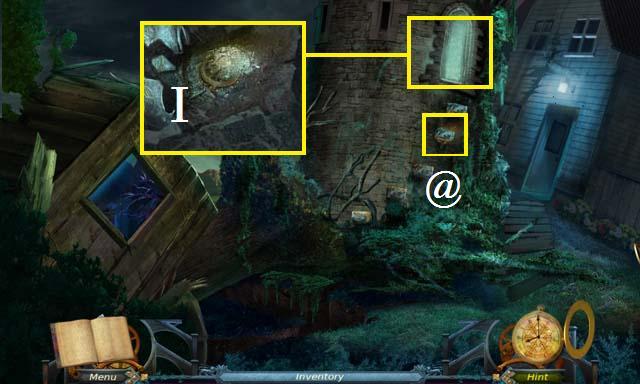
• Place the STAIR-SHAPED COBBLESTONE on the tower (@).
• Zoom into the tower window; using the GARDEN TROWEL, dig out the CIRCULAR PLATE (I) and collect it.
• Enter the house and climb the stairs.
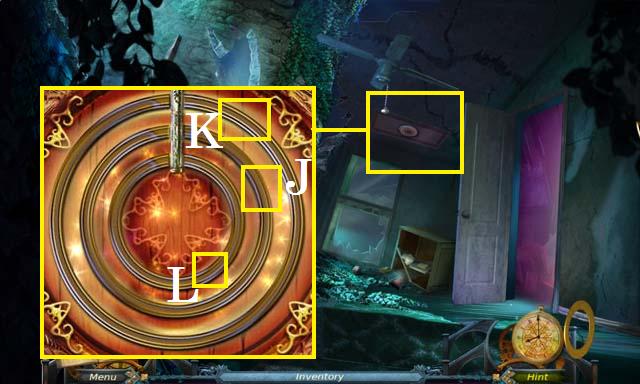
• Zoom into the celling panel; place both CIRCULAR PLATES in the puzzle and spin them as they are shown in the screenshot. Spin the middle ring (J) into position first, followed by the outer ring (K) and finish with the inner ring (L).
• Enter the Attic.
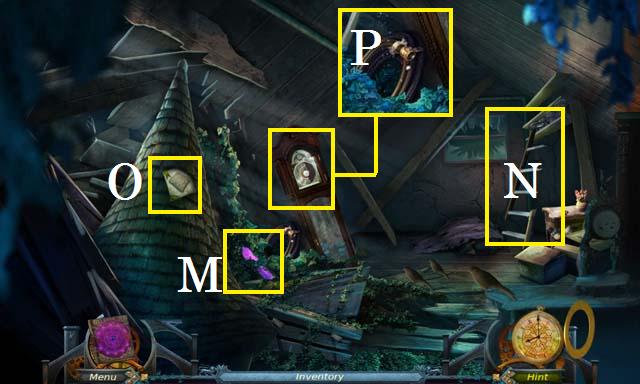
• Collect the second Echo Crystal (M), the BROKEN LADDER (N), and the Grimoire page (O).
• Zoom into the clock; collect the HOSE (P).
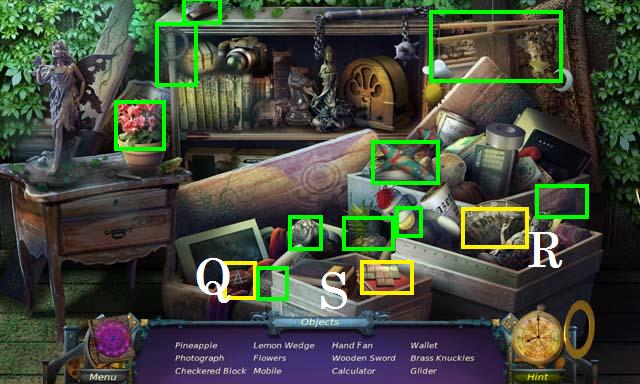
• Zoom into the sparkles to play a HOS.
• Collect the Rune (Q).
• Move the crate lids to reveal the Hand Fan (R) and the Checkered Block (S).
• Collect the remaining items to receive the second CHECKERED BLOCK.
• Return to the Bedroom.
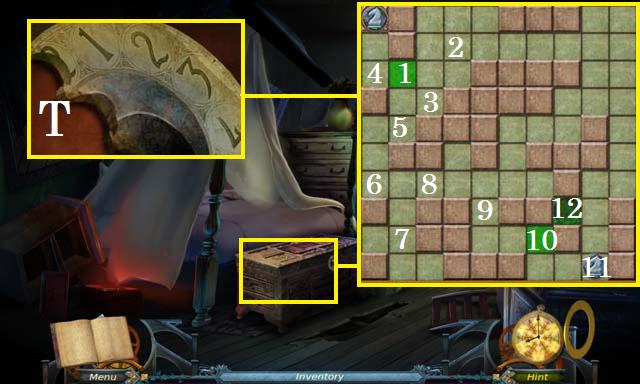
• Zoom into the chest; place both CHECKERED BLOCKS in the puzzle. Follow the path 1- 11 to place the knight in the hole.
• Collect the CLOCK FACE HALF (T).
• Return to the attic.
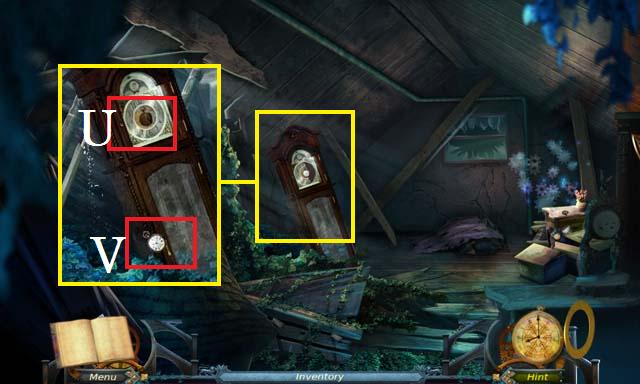
• Zoom into the clock; place the CLOCK FACE HALF on the clock (U) and collect the POCKET WATCH (V).
• Zoom into the sparkles to play a HOS.
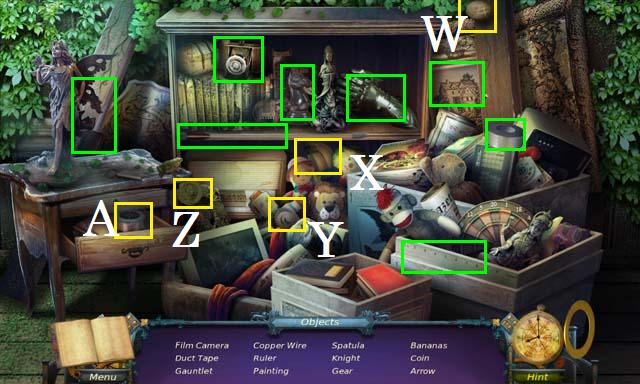
• Collect the Rune (W).
• Move the box lids to reveal the Bananas (X), Gear (Y) and the Coin (Z).
• Open the drawer to reveal the Copper Wire (A).
• Collect the remaining items to receive the DUCT TAPE.
• Return to the Bedroom.
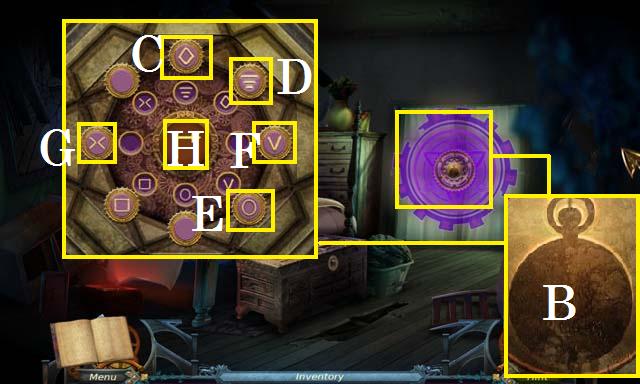
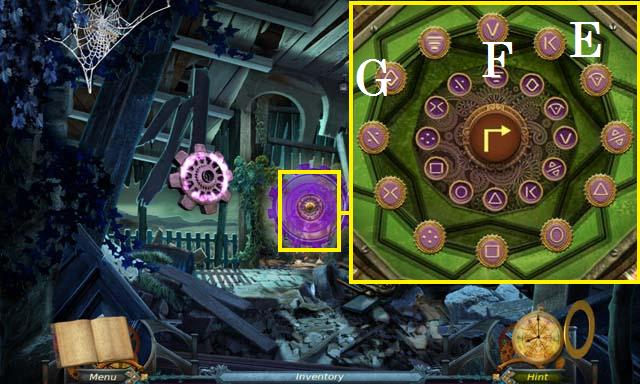
• Zoom into the orb; place POCKET WATCH in the slot (B).
• Begin by jumping the diamond piece (C) over the line piece (D). jump with the O piece (E) followed by the V piece (F) and then the X piece (G). Now that all the pieces are in the correct order, use the arrow button (H) to rotate the board into place.
• Exit out onto the balcony.

• Zoom into the umbrella; collect the UMBRELLA CRANK (J).
• Zoom into the edge of the balcony (K); lay the BROKEN LADDER down followed by the HEAVY TENT POLES and the WOODEN STAFF. Finish fixing the ladder with the DUCT TAPE.
• Climb down from the balcony.
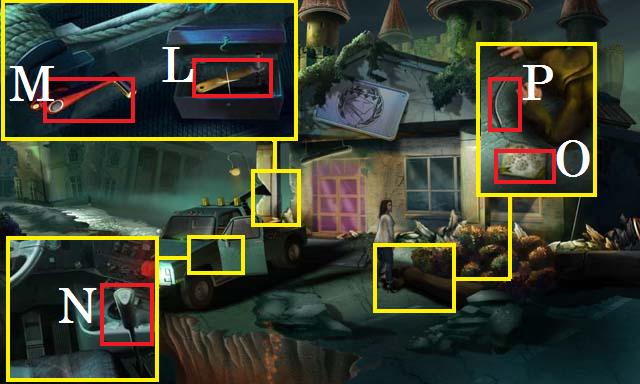
• Zoom into the back of the tow truck: collect the RATCHET (L).
• Place the UMBRELLA CRANK on the wheel (M) and tighten it with the RATCHET.
• Zoom into the front of the truck; pull the shifter (N).
• Zoom into the man; collect the Grimoire page (O) and the first STRANGE TUBE (P).
• Enter the School.

• Collect the HEDGE TRIMMER (Q).
• Zoom into the fallen locker; collect the third Echo Crystal (R).
• Zoom into the trophy case; collect the second STRANGE TUBE (S).
• Exit the school.
• Zoom back into the man; use the HEDGE TRIMMER to remove the branches and collect the STUDENT CARD (T).
• Enter the school.
• Zoom into the office door; use the STUDENT CARD to open the lock (U).
• Enter the office.
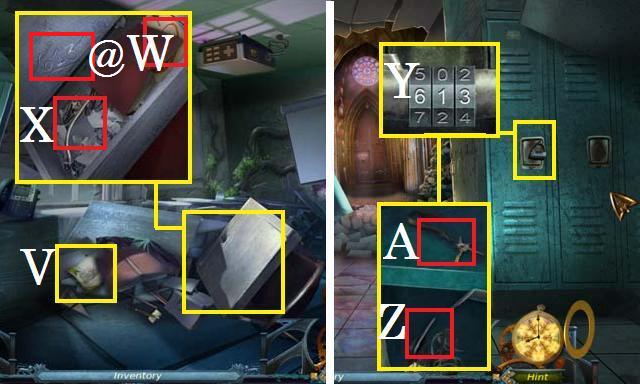
• Collect the Grimoire page (V).
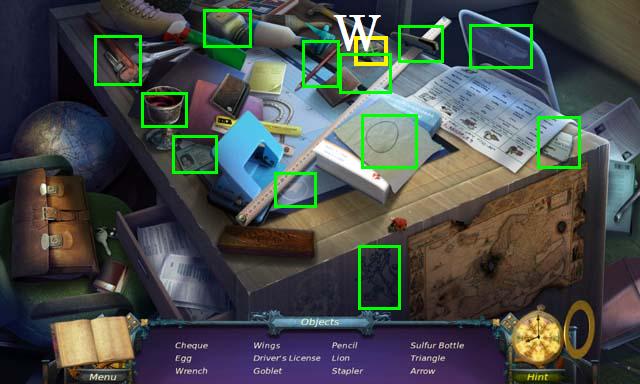
• Zoom into the desk and open the lid; collect the Grimoire page (W) and the third STRANGE TUBE (X). Examine the code (@).
• Exit the office.
• Zoom into the locked locker; set the code to 613 (Y). Collect the fourth STRANGE TUBE (Z) and the CLOSET KEYS (A).
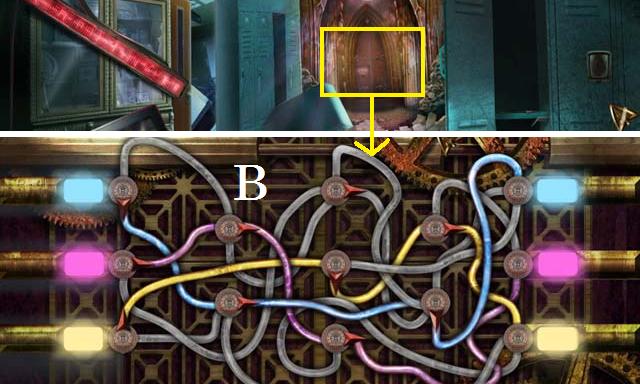
• Zoom into the far door; place the four STRANGE TUBES in the puzzle. You can use the screenshot for a winning combination (B).
• Enter the back room.
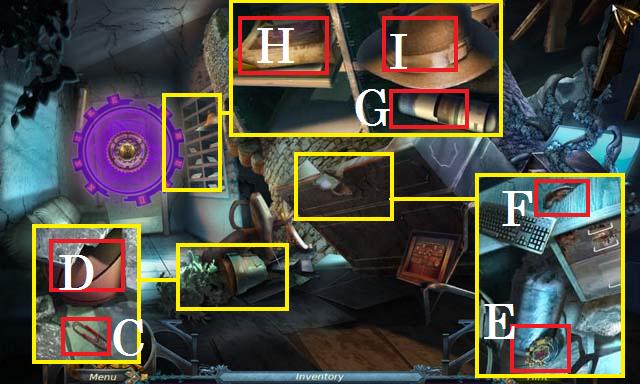
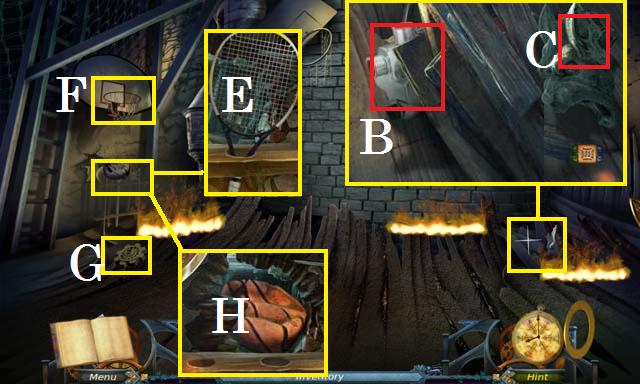
• Zoom into the broken planter; collect the PAPERCLIP (C) and the BASKETBALL (D).
• Zoom into the desk; collect the Crest (E) and the STONE EAR (F).
• Zoom into the shelf; collect the GLUE REMOVER (G) and the Grimoire page (H). Move the hat (I).
• Exit the back room.
• Zoom into the trophy case; use the GLUE REMOVER on the gum (J) and collect the LETTER OPENER (K).
• Return to the back room.
• Zoom into the shelf; open the box with the LETTER OPENER and collect the first GLASS GEM (L).
• Return to the office.
• Open the closet with the CLOSET KEYS.
• Zoom into the shelf; collect the EMPTY GAS CAN (N).
• Zoom into the sparkles to play a HOS.
• Collect the Rune (O).
• Move the paper to reveal the Money (P).
• Open the drawer to locate the Oilcan (Q).
• Collect the remaining items to receive the LUBRICANT.
• Return to the back room.
• Zoom into the desk; use the LUBRICANT on the drawer and collect the first CODE BLOCK (R).
• Exit the school.
• Zoom into the man; open the bag using the PAPERCLIP and collect the HOURGLASS (S).
• Return to the back room.
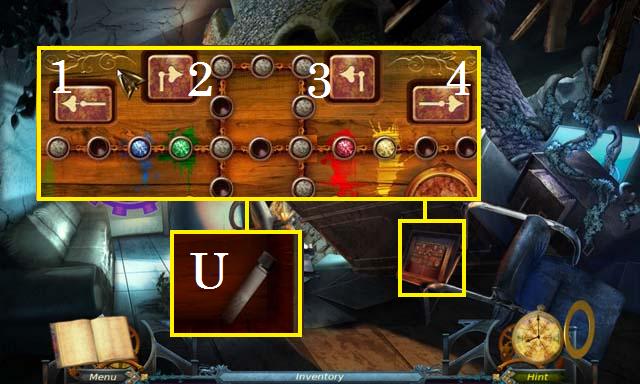
• Zoom into the orb; place the HOURGLASS in the slot.
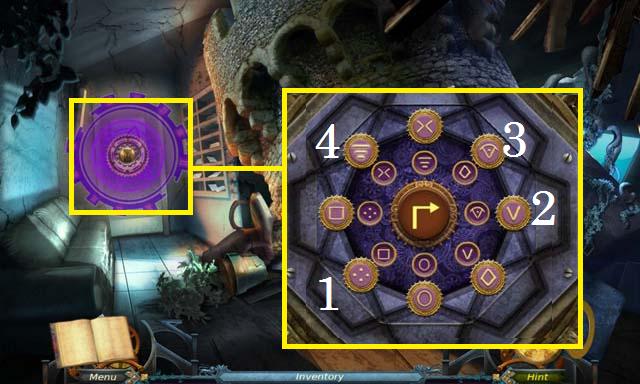
• Move the four dot piece (1), then the V piece (2), and the Symbol (3). Finish by moving the line piece (4). Rotate the board into place.
• Enter the throne room.
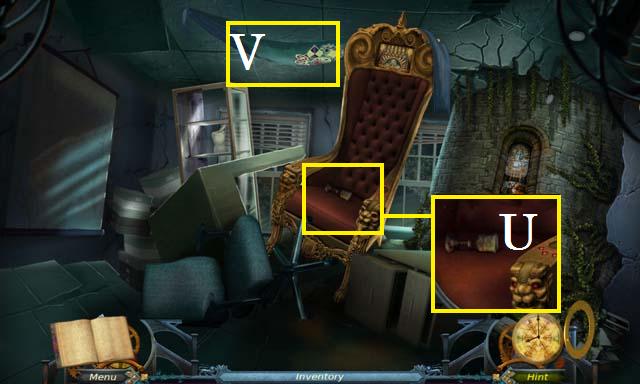
• Zoom into the throne; collect the GRIMY GOLDEN CHALICE (U).
• Collect the PAPER BANNER (V).

• Zoom into the sparkles to play a HOS.
• Collect the Rune (W).
• Open the drawer to reveal the Film Canister (X).
• Open the panel to locate the Light bulb (Y).
• Collect the remaining items to receive the LENS.
• Return to the office.
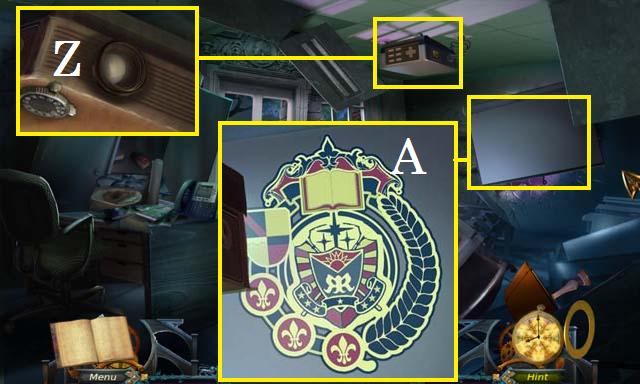
• Zoom into the projector; place the LENS on the projector (Z).
• Zoom into the projection screen; you can use the screenshot (A) for the final image and size of each piece.
• Enter the gym.
• Zoom into the floor; collect the WATER PUMP (B).
• Place the STONE EAR on the statue (C) and receive second CODE BLOCK.
• Zoom into the equipment stand; collect the RACQUET (E).
• Shoot the BASKETBALL into the net (F) to collect the second GEARS OF LIGHT (G).
• Zoom back into the equipment stand and collect the DEFLATED BALL (H).
• Return to the office.
• Zoom into the closet; use the RACQUET in the sand (I) to receive the CHARCOAL.
• Collect the second GLASS GEM (J).
• Place the GRIMY GOLDEN CHALICE in the box (K). Squeeze the cleaner (L) on the chalice and collect it as the SPARKLING GOLDEN CHALICE.
• Return to the throne room.
• Zoom into the sparkles to play a HOS.
• Collect the Rune (M).
• Break the computer screens to reveal the Diary (N).
• Tear the canvas to reveal the Cell Phone (O).
• Collect the remaining items to receive the third GLASS GEM.
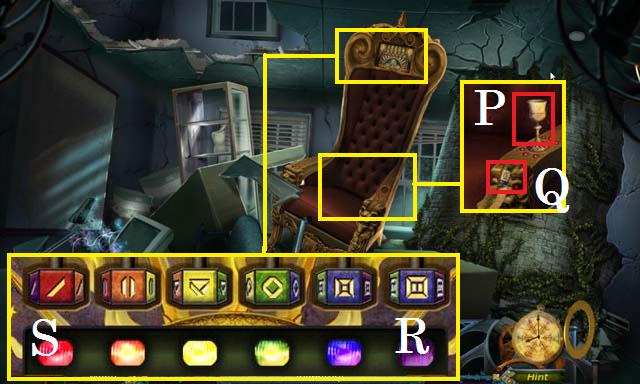
• Zoom into the throne; place the SPARKLING GOLDEN CHALICE in the slot (P) and collect the third CODE BLOCK (Q).
• Zoom into the top of the throne; place the three CODE BLOCKS in the puzzle. Arrange the blocks as they are shown in the screenshot. To set the colors, begin with the far right block (R) and work your way left. Setting the far left block (S) last.
• Receive the ROYAL CREST.
• Return to the entrance outside of the office.
• Zoom into the fallen locker; place the ROYAL CREST in the slot and collect the fourth GLASS GEM (T).
• Return to the back room.
• Zoom into the panel; place the four GLASS GEMS in the puzzle. You can use the following sequence to place the gems correctly: 2, 4, 4, 3, 3, 3, 3, 3, 1, 1, 1, 3, 4, 4, 4, 4, 2, 2, 2, 2, 2, 1, 1, 2, 4, 3, 1.
• Collect the SALTPETER (U).
• Enter the throne room.

• Zoom into the shelf; place the CHARCOAL and the SALTPETER in the mortar (V).
• Return to the office.
• Zoom into the sparkles to play a HOS.
• Collect the Rune (W).
• Collect the remaining items to receive the SULFUR BOTTLE.
• Return to the throne room.
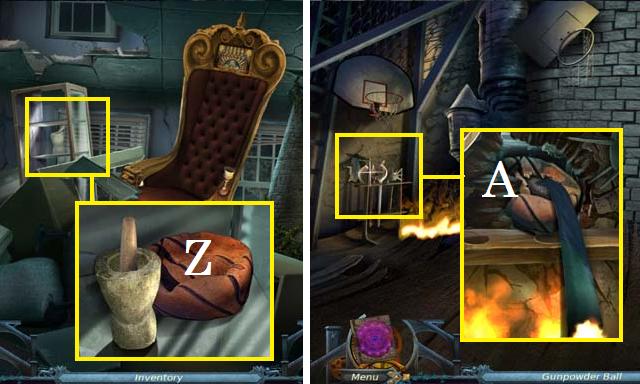
• Zoom into the shelf; place the SULFUR BOTTLE in the mortar and place the DEFLATED BALL on the shelf (Z) to receive the GUNPOWDER BALL.
• Return to the gym.
• Zoom into the equipment stand; place the GUNPOWDER BALL on the rack (A) along with the PAPER BANNER.
• Exit the school through the open hole.
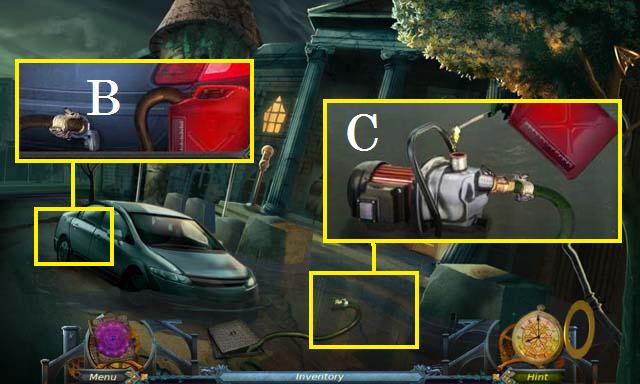
• Zoom into the car’s trunk; place the EMPTY GAS CAN and the HOSE near the gas tank (B) to receive the SYPHONED GAS.
• Zoom into the puddle; place the WATER PUMP next to the hose (C) and fill it with the SYPHONED GAS.
• Enter the bank.
• Collect the fifth Echo Crystal (D).
• Zoom into the desk; move the cup and collect the CAR KEYS (E).
• Exit the bank.
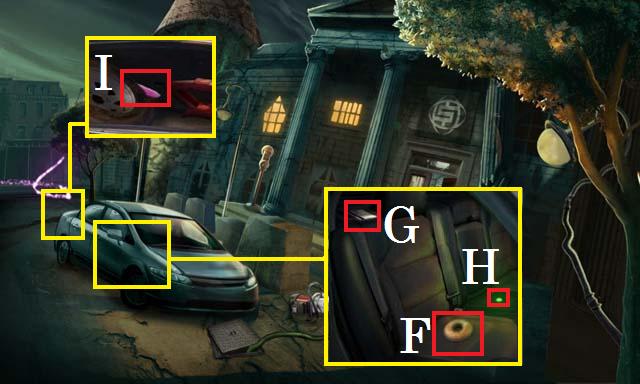
• Zoom into the car door; unlock the door with the CAR KEYS. Collect the BAGELLE (F) and the EMPLOYEE BADGE (G). Press the trunk button (H).
• Zoom into the trunk; collect the fourth Echo Crystal (I).
• Enter the bank.
• Zoom into the desk; slide the EMPLOYEE BADGE over the scanner (J) and collect the first VAULT CORE (K).
• Zoom into the door lock; slide the EMPLOYEE BAGDE over the scanner (L) to unlock the door.
• Enter the bank office.
• Collect the RUBBER GLOVES (M).
• Zoom into the change machine; collect the PNEUMATIC LEVER (P). Press the button (Q) and collect the S HOOK (R).
• Exit the bank.
• Zoom into the trunk; place the PNEUMATIC LEVER with the JACK (S) and collect it.
• Return to the Bank office.
• Use the JACK on the cage door (T).
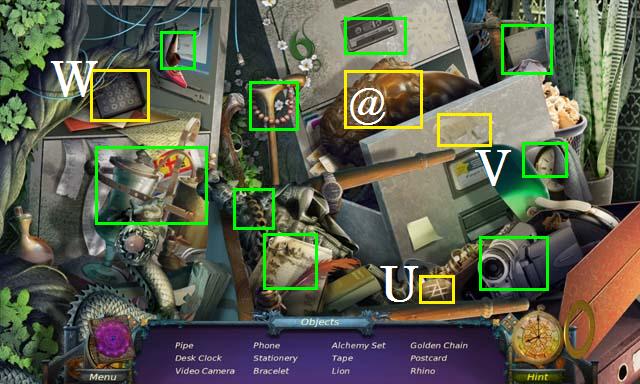
• Zoom into the sparkles to play a HOS.
• Collect the Rune (U).
• Move the blanket to reveal the Rhino (V) and Lion (@).
• Open the drawer to locate the Phone (W).
• Collect the remaining items to receive the GOLDEN CHAIN.
• Exit the bank office.
• Zoom into the vault room door; place the GOLD CHAIN on the gears (X).
• Enter the vault room.
• Zoom into the rack; collect the SLEDGE (Y).
• Collect the Grimoire page (Z).
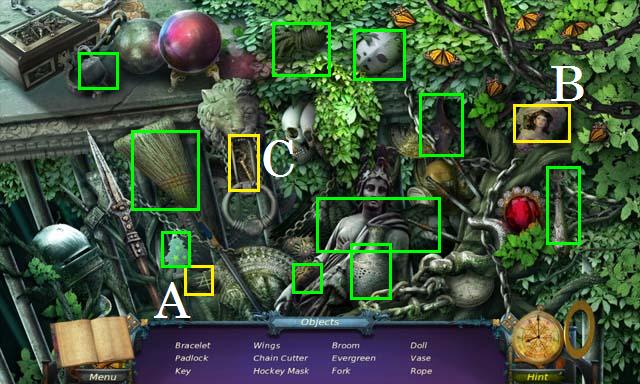
• Zoom into the sparkles to play a HOS.
• Collect the Rune (A).
• Move the leaves to find the Doll (B).
• Open the lion’s mouth to locate the Key (C).
• Collect the remaining items to receive the CHAIN CUTTER.
• Exit the vault room.
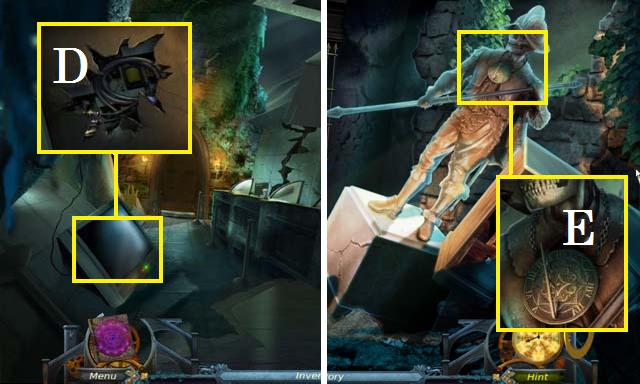
• Zoom into the computer screen; smash the screen with the SLEDGE and collect the ELECTRICAL WIRING (D) using the RUBBER GLOVES.
• Enter the bank office.
• Zoom into the statue; cut the chain (E) with the CHAIN CUTTER to receive the SUNDIAL.
• Return to the vault room.
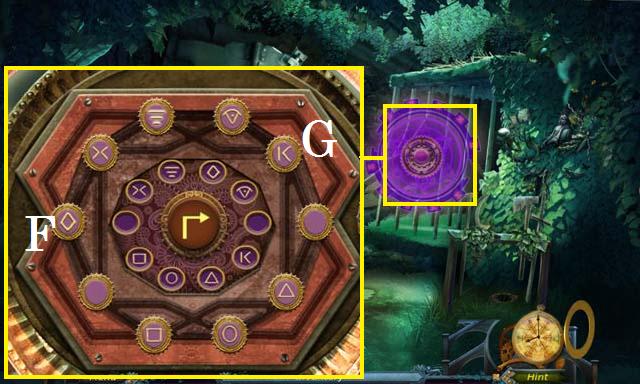
• Zoom into the orb; place the SUNDIAL in the slot. Jump the diamond piece (F) two times. Jump the K piece (G) once and then rotate the board into place.
• Enter the cell.
• Collect the code (H) and the RAKE (I).
• Use the SLEDGE on the wall (J).
• Zoom into the bird; feed the BAGEL to the bird and collect the EJECT BUTTON (K). Place the S HOOK with the line (L) to receive the HOOK LINE.
• Exit back one scene.
• Zoom into the grate; use the HOOK LINE to fish out the KEY 67 (M).
• Zoom into the sparkles to play a HOS.
• Collect the Rune (N).
• Move the statue to find the Flowers (O).
• Move the vines to find the Headphones (P).
• Collect the remaining items to receive the first PENDANT.
• Exit the vault room.
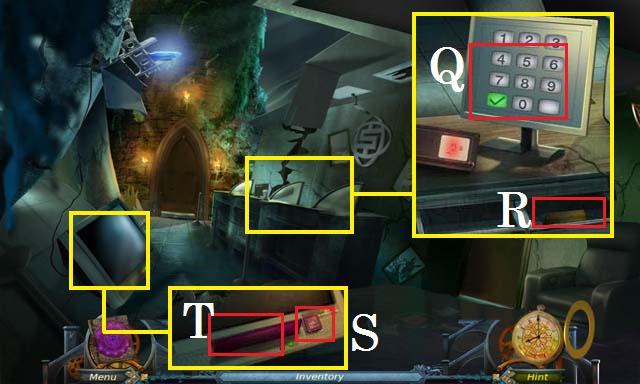
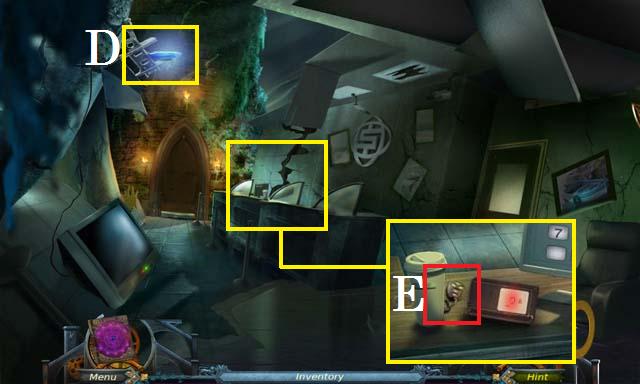
• Zoom into the desk; enter the code 0451 on the keypad (Q) and collect the first COLORED TILE (R).
• Zoom into the computer screen; place the EJECT BUTTON in the slot (S) and collect the second COLORED TILE (T).
• Return to the cell.
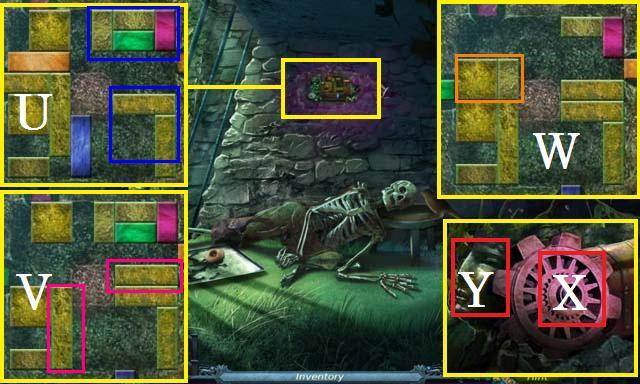
• Zoom into the wall; place both COLORED TILES in the puzzle.
• Move the blocks marked in blue to the positions shown in the screenshot (U). Slide the orange and blue blocks into their matching colored slots. Move the blocks marked in pink to the positions shown in the screenshot (V). Slide the green block into place. Move the blocks marked in orange to the positions shown in the screenshot (W) and slide the pink block into place.
• Zoom into the wall; collect the third GEARS OF LIGHT (X) and the HELMET VISOR (Y).
• Return to the bank office.

• Zoom into the sparkles to play a HOS.
• Collect the Rune (Z).
• Shut the drawer to find the Wallet (A).
• Open the other drawer to find the Globe (B).
• Collect the remaining items to receive the second PENDANT.
• Zoom into the statue; place the HELMET VISOR on the statue’s face (C) to receive the OBTUSE PEG.
• Exit the bank.
• Zoom into the meter; insert the OBTUSE PEG in the lock and collect the second VAULT CORE (D).
• Return to the cell.
• Place both PENDANTS in the skeleton’s hand (E).
• Collect the GOLDEN EYE (F).
• Zoom into the wall; place the GOLDEN EYE in the slot (G) to open the box. Place the ELECTRICAL WIRING in the box.
• Return to the bank office.
• Zoom into the cage door; collect the Grimoire page (H). Open the box with the KEY 67 and collect the third VAULT CORE (I).
• Open the other box and collect the FLINT WHEEL (J).
• Return to the vault room.
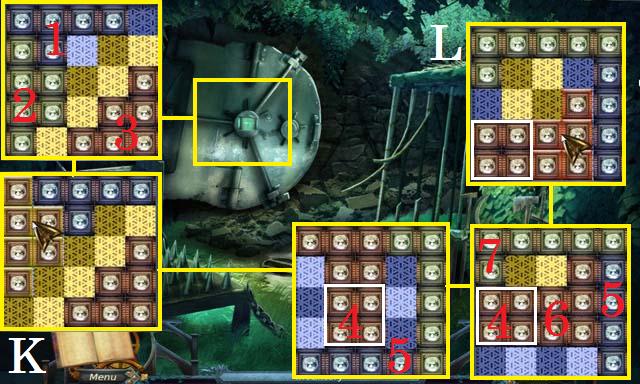
• Zoom into the vault; place the three VAULT CORES in the puzzle. Use the screenshot (K) for the winning positions.
• Hint: grab the (1) piece, flip and rotate it and place it as it is shown in the screenshot.
• Next, move the (2) piece then the (3) piece until you have the arrangement shown in the screenshot. Finish by moving the pieces into the final arrangement.
• See the screenshot (L) for the second puzzle’s winning positions. Hint: move pieces (4) and then (5) to the positions as seen in the screenshot. Next move (4) followed by (6), (7) and then (5) into the positions as seen in the screenshot. Move the last two pieces into the final arrangement.
• Exit through the vault.
• Zoom into the trash cans; collect the BRICK (M).
• Zoom into the gutter; use the RAKE to remove the leaves and collect the TRUCK KNOB (N). Place the FLINT WHEEL on the LIGHTER (O) and collect it.
• Zoom into the truck; place the TRUCK KNOB on the truck (P).

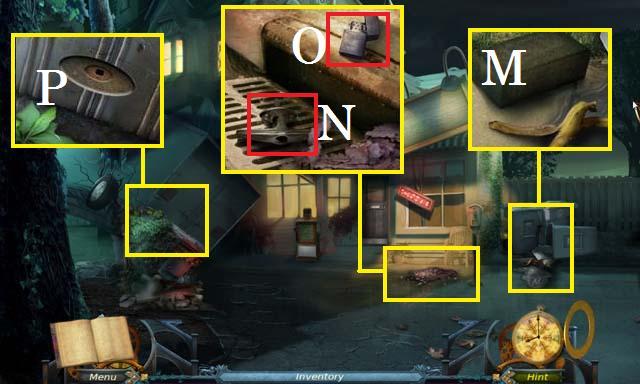
• Zoom into the sparkles to play a HOS.
• Collect the Rune (Q).
• Open the box to locate the Golden Face (R).
• Open the box to locate the Keys (S).
• Collect the remaining items to receive the WOOD CHISEL.
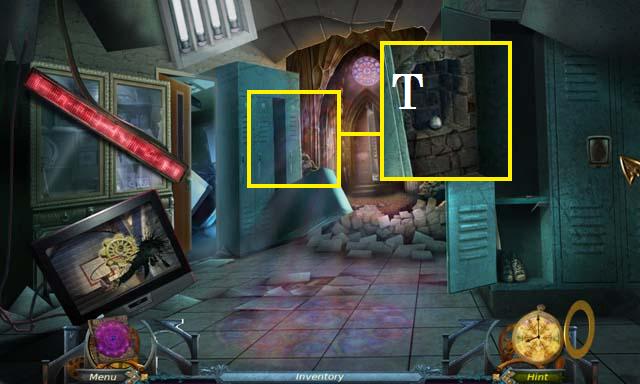
• Zoom into the door; break the window (T) with the BRICK.
• Enter the diner.
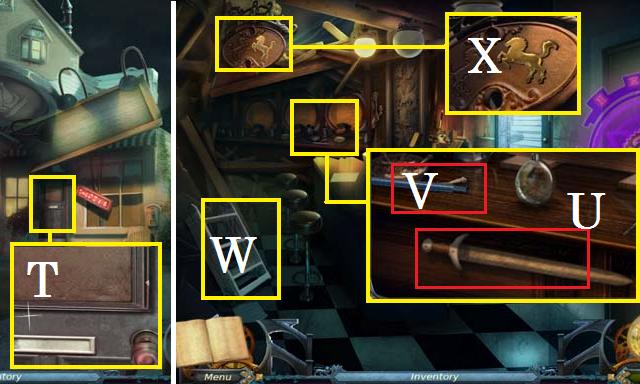
• Zoom into the barrels; collect the WOODEN SWORD (U). Place the MOP HEAD on the handle (V) to receive the MOP.
• Collect the STEPLADDER (W).
• Zoom into the sign; use the WOOD CHISEL to remove the IRON HORSE (X).
• Exit the diner.
• Zoom into the trash cans (Y); clean up the mess with the MOP.
• Move the trash cans and take the path to the back of the diner.
• Place the STEPLADDER under the window (Z).
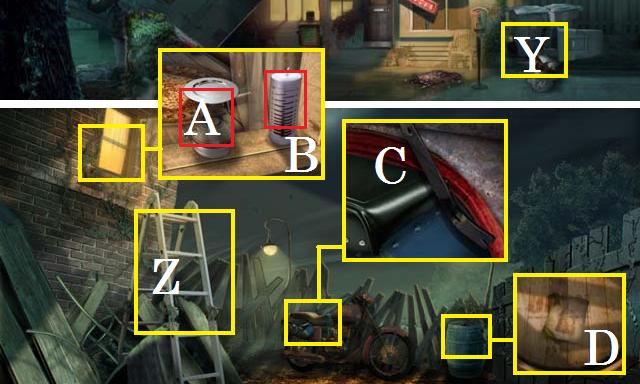
• Zoom into the window; light the burner (A) with the LIGHTER. Collect the CANDLE CLOCK (B).
• Zoom into the motorcycle bag; collect the PRYBAR (C).
• Zoom into the barrel; collect the Grimoire page (D). Use the PRYBAR to remove the lid.
• Return to the diner.
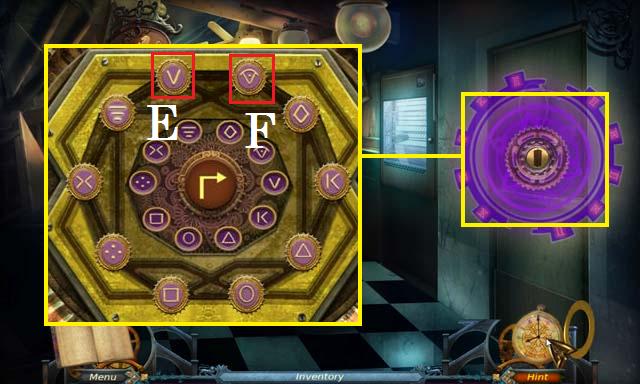
• Zoom into the orb; place the CANDLE CLOCK in the slot. Jump the V piece (E) two times and the symbol piece (F) once. Rotate the board into position.
• Enter the kitchen.
• Zoom into the sparkles to play a HOS.
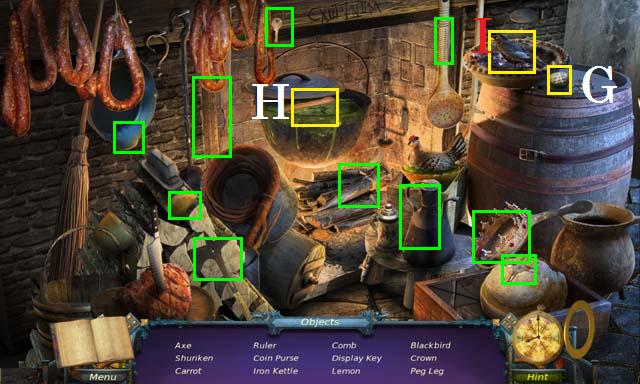
• Collect the Rune (G).
• Move the lid to find the Carrot (H).
• Remove the pie crust to find the Blackbird (I).
• Collect the remaining items to receive the DISPLAY KEY.
• Zoom into the counter; place the IRON HORSE on the panel to reveal the EMPTY POT (J). Collect the first MENU PAGE (K) and the note (L).
• Zoom into the fan; collect the ICE BLOCK (M) and the sixth Echo Crystal (N). Use the WOODEN SWORD to stop the fan (O) and receive the INK REVEALER.
• Exit the kitchen.
• Zoom into the display case; use the DISPLAY KEY to open the door and collect the WATER BOTTLE (P). Pour the INK REVEALER onto the paper (Q) to receive the second MENU PAGE.
• Return to the back of the diner.
• Zoom into the barrel (R); dip the EMPTY POT into the barrel to receive the OIL POT.
• Zoom into the window; place the ICE BLOCK on the burner and collect the TRIGGER (S).
• Back up one scene.
• Zoom into the newspaper machine; use the PRYBAR to open the door. Place the TRIGGER on the fire extinguisher (T).
• Return to the kitchen.
• Zoom into the fryer; pour the OIL POT into the pan (U) and light it with the LIGHTER. Throw the WATER BOTTLE in the burning oil.
• Exit the diner.
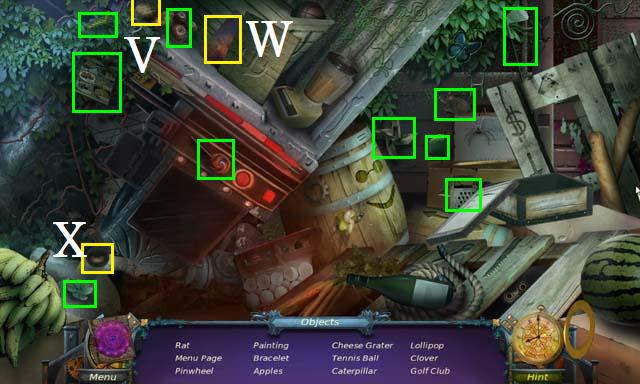
• Zoom into the sparkles to play a HOS.
• Collect the Rune (V).
• Move the board to reveal the Painting (W).
• Open the can to find the Bracelet (X).
• Collect the remaining items to receive the third MENU PAGE.
• Enter the diner.
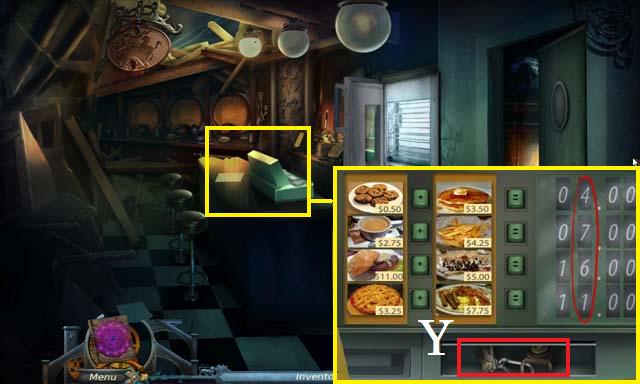
• Zoom into the register; place the three MENU PAGES on the register and arrange them as they are shown in the screenshot.
• Collect the BAG KEY (Y).
• Enter the kitchen.
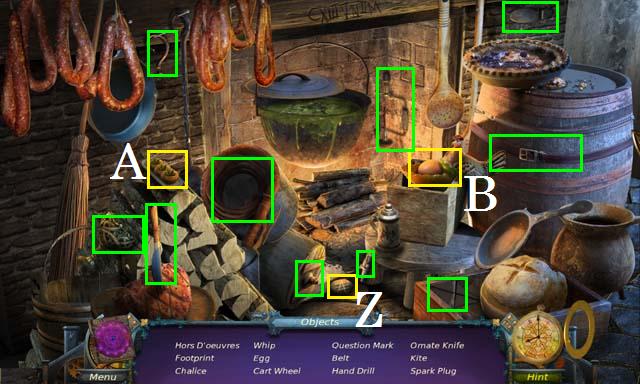
• Zoom into the sparkles to play a HOS.
• Collect the Rune (Z).
• Remove the butter dish lid to find the Hors D’oeuvres (A).
• Open the hen dish to find the Egg (B).
• Collect the remaining items to receive the first SPARK PLUG.
• Return to the back of the diner.
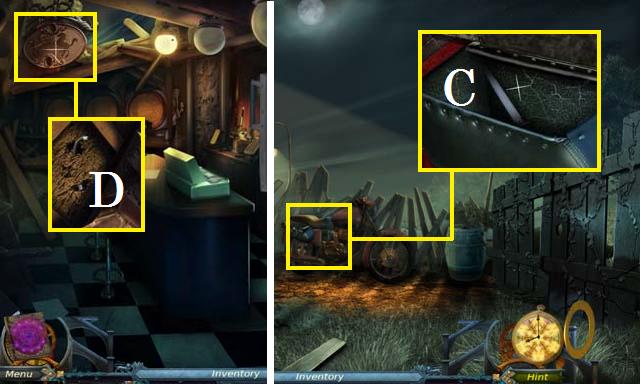
• Zoom into the motorcycle bag; use the BAG KEY to open the bag and collect the SWITCHBLADE (C).
• Return to the diner.
• Zoom into the sign; cut the fabric with the SWITCHBLADE and receive the EXTINGUISHER HOSE (D).
• Exit the diner.
• Zoom into the newspaper machine; place the EXTINGUISHER HOSE on the FIRE EXTINGUISHER (E) to receive it.
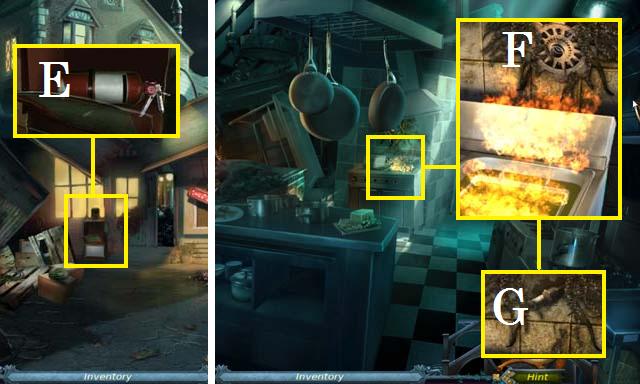
• Return to the kitchen.
• Zoom into the fryer; use the FIRE EXTINGUISHER on the flames and collect the fourth GEARS OF LIGHT (F) and then the second SPARK PLUG (G).
• Return to the back of the diner.
• Zoom into the motorcycle engine; place both SPARK PLUGS in the puzzle. Use the screenshot (H) to see the winning paths.
• Take the open path to the church yard.
• Zoom into the sparkles to play a HOS.
• Collect the Rune (I).
• Move the rug to find the Saw Blade (J).
• Move the rock piece to find the Brooch (K).
• Collect the remaining items to receive the TOWER COIN.
• Zoom into the catapult; collect the TINY GEAR (L).
• Zoom into the fountain; collect the HERBICIDE (M) and the VALVE (N).
• Back up one scene.

• Zoom into the window; place the TINY GEAR on the catapult (O) and collect the WIND-UP ARM (P).
• Return to the diner.
• Zoom into the barrels; place the VALVE on the barrel (Q) to receive the SAND WEIGHT.
• Return to the church yard and move forward to the church door.
• Zoom into the motorcycle; use the PRYBAR to remove the ENGINE BLOCK (R).
• Zoom into the mailbox; place the TOWER KEY in the slot (S) and collect the FIRING LEVER (T).
• Back up one scene.

• Zoom into the catapult; place the ENGINE BLOCK in the basket (U), the WIND-UP ARM on the side (V) and the FIRING LEVER in the slot (W). Pull the firing lever.
• Return to the church door.
• Zoom into the stairs; collect the TOWER CREST (X).
• Enter the church.
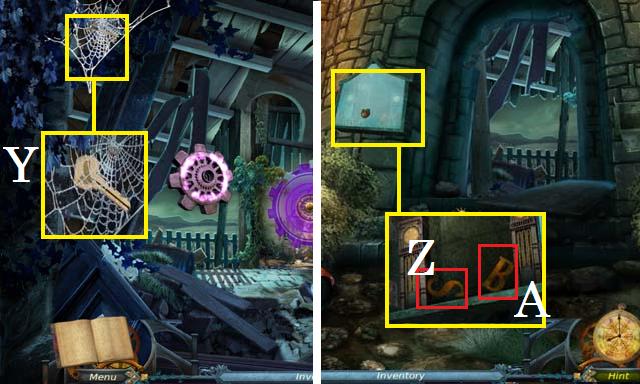
• Zoom into the spider web; collect the SIGN KEY (Y).
• Exit the church.
• Zoom into the sign; open the doors with the SIGN KEY and collect the LETTER S (Z) and the LETTER B (A).
• Exit back one scene
• Zoom into the sparkles to play a HOS.
• Collect the Rune (B).
• Open the panel to find the Wine (C).
• Tear the chair to find the Tiara (D).
• Collect the remaining items to receive the WATER CLOCK.
• Return to the church.
• Zoom into the orb; place the WATER CLOCK in the slot. Jump with the K piece (E) twice, the V piece (F) once, and the diamond piece (G) once. Rotate the board into position.
• Enter the church garden.

• Collect the seventh Echo Crystal (H).
• Zoom into the statue; collect the EMPTY WATER WEIGHT (I).
• Zoom into the ground; collect the SCISSORS (J).
• Exit back to the church yard.
• Fill the EMPTY WATER WEIGHT in the water (K) to receive the WATER WEIGHT. Use the SCISSORS to collect the LEAD WEIGHT (L).
• Return to the church garden.
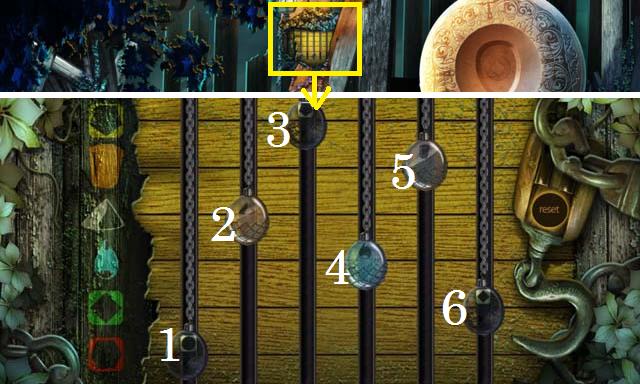
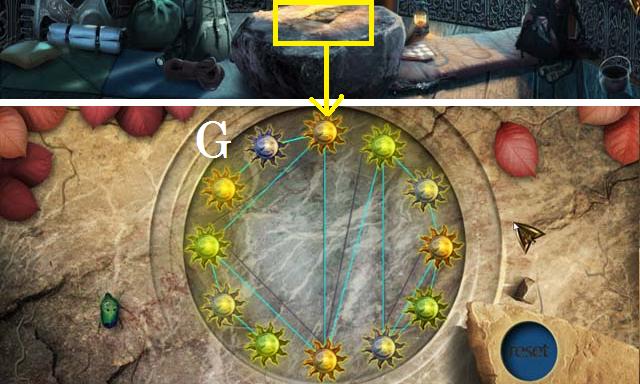
• Zoom into the puzzle; hang the LEAD WEIGHT, WATER WEIGHT and SAND WEIGHT in the puzzle. Set the weights as they are shown in the screenshot in the following order: 6, 4, 5, 2, 3 and 1.
• Zoom into the plate; place the TOWER CREST in the slot (M). Collect the first RITUAL STONE (N). Place the LETTER B on the bars (O) and collect the ROPE LADDER (P).
• Exit back one scene.
• Hang the ROPE LADDER on the stairs (Q) and secure with the LETTER S.
• Climb the stairs to the bell tower.
• Zoom into the sparkles to play a HOS.
• Collect the Rune (R).
• Move the poster to find the Wolf (S).
• Open the clock top to find the Ritual Stone (T).
• Collect the remaining items to receive the second RITUAL STONE.
• Zoom into the panel; collect the STATUE HEAD (U).
• Return to the church garden.
• Zoom into the statue; put the STATUE HEAD in place (V) and collect the BELL CLAPPER (W).
• Return to the bell tower.
• Zoom into the bell (X); hang the BELL CLAPPER to remove the orb.
• Enter the clock room.
• Zoom into the floor; collect the third RITUAL STONE (Y).
• Zoom into the fallen curtain; collect the Grimoire page and move the curtain. Collect the PADLOCK KEY (Z).
• Back up one scene and take a left to the balcony.
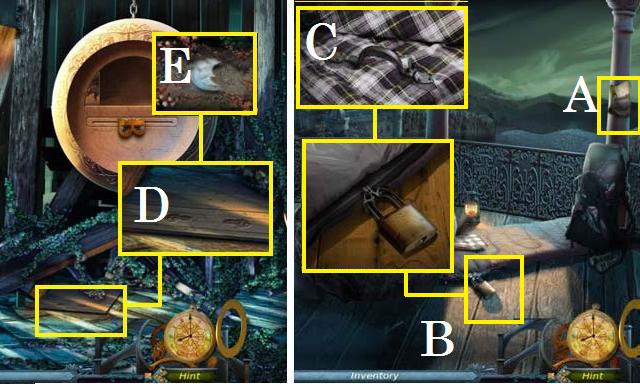
• Collect the Grimoire page (A).
• Zoom into the sleeping bag; unlock the padlock (B) with the PADLOCK KEY. Collect the HATCH HANDLE (C).
• Return to the church garden.
• Zoom into the ground; place the HATCH HANDLE on the door (D). Use the HERBICIDE on the vines and collect the CRESCENT PIECE (E).
• Exit back to the church door.
• Zoom into the steps; place the CRESCENT PIECE on the sun (F) to receive the fourth RITUAL STONE.
• Return to the balcony.
• Zoom into the table; place the four RITUAL STONES in the puzzle. See the screenshot for the winning arrangement (G). Receive the STAFF OF UNWINDING.
• Return to the bell tower.
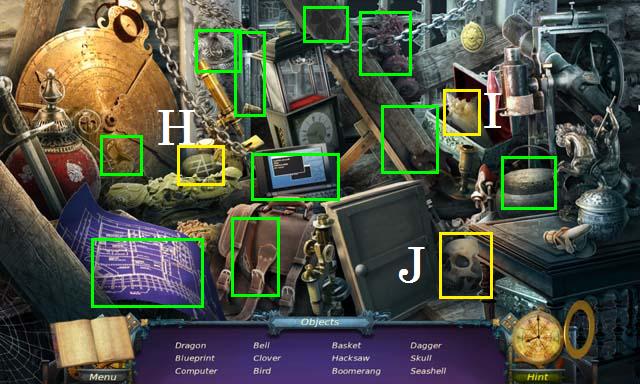
• Zoom into the sparkles to play a HOS.
• Collect the Rune (H).
• Open the box to reveal the Seashell (I).
• Close the door to reveal the Skull (J).
• Collect the remaining items to receive the HACKSAW.
• Descend the stairs.
• Zoom into the engine block; use the HAWCKSAW to remove the CHROME PIPE (K).
• Zoom into the fifth GEARS OF LIGHT (L); use the STAFF OF UNWINDING to disenchant the GEARS OF LIGHT and collect it.
• Return to the bell tower.
• Zoom into the panel; use the CHROME PIPE to stop the gears (M) and receive the PINION.
• Move to the balcony.
• Zoom into the gears; place the PINION on the peg (N) and receive the RAIL TRACK.
• Return to the clock room.
• Hang the RAIL TRACK in place (O).
• Use the STAFF OF UNWINDING on the case (P).
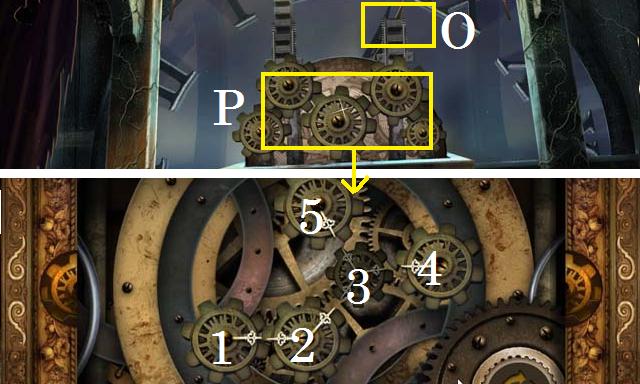
• Zoom into the case; set the (4) gear as sown in the screenshot, by tapping on the (5) gear. Tap the (4) gear so that it will not move and then set the (3) gear.
• Make sure all the gears are moving and set the (1) gear. Disconnect the (1) gear and set the (2) gear.
• Disconnect the (2) gear and set (3) and (4) gears back into the correct position. Disconnect the (3) gear and set the (5) gear. Reconnect the (4) gear to complete this puzzle.
• Use the STAFF OF UNWINDING on the man.
• Congratulations, you have completed Time Relics: Gears of Light!


 Spirits of Mystery: The Dark Minotaur Walkthrough, Guide, & Tips
 Off the Record: Liberty Stone Walkthrough, Guide, & Tips
 European Mystery: The Face of Envy Walkthrough, Guide, & Tips
 Mystery Trackers: Rancliff's Phantoms Walkthrough, Guide, & Tips
 Sprill and Ritchie: Adventures in Time Walkthrough, Guide, & Tips