Maestro: Music from the Void Walkthrough, Guide, & Tips
Maestro: Music from the Void Walkthrough

Welcome to the Maestro: Music from the Void Walkthrough
Eerie music fills the air in Vienna, where shadows terrorize people in the streets. Two musical prodigies have gone missing. Can you save them without striking a single false note?
Whether you use this document as a reference when things get difficult or as a road map to get you from beginning to end, we’re pretty sure you’ll find what you’re looking for here.
This document contains a complete Maestro: Music from the Void game walkthrough featuring annotated screenshots from actual gameplay!
We hope you find this information useful as you play your way through the game. Use the walkthrough menu below to quickly jump to whatever stage of the game you need help with.
Remember to visit the Big Fish Games Forums if you find you need more help. Have fun!
This walkthrough was created by MargieB, and is protected under US Copyright laws. Any unauthorized use, including re-publication in whole or in part, without permission, is strictly prohibited.
General Tips

- This is the official guide for Maestro: Music from the Void.
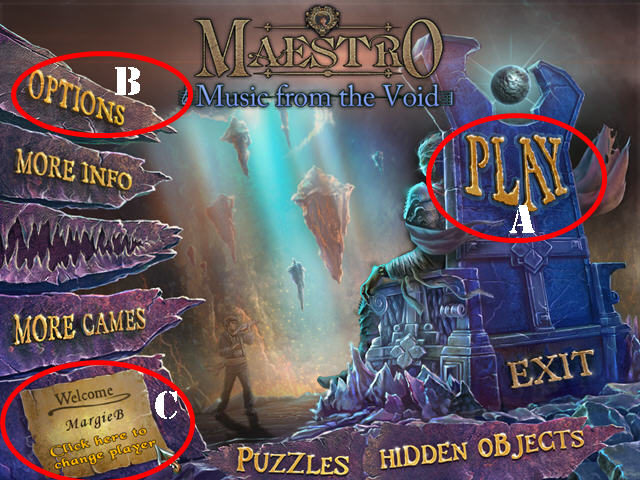
- Select ‘Play’ (A) to begin your adventure.
- The ‘Options’ (B) button allows you to adjust the screen size, music, cursor, and sound.
- The ‘click here to change player’ button (C) can be used to add or delete a player.
- In this guide, we will refer to Hidden-object scenes as ‘HOS’. Hidden-object puzzles will be referred to as ‘HOP’.
- Items written in red in HOS require an additional step.
- You can skip a puzzle once the ‘SKIP’ button fills.
Chapter 1: The Shadows
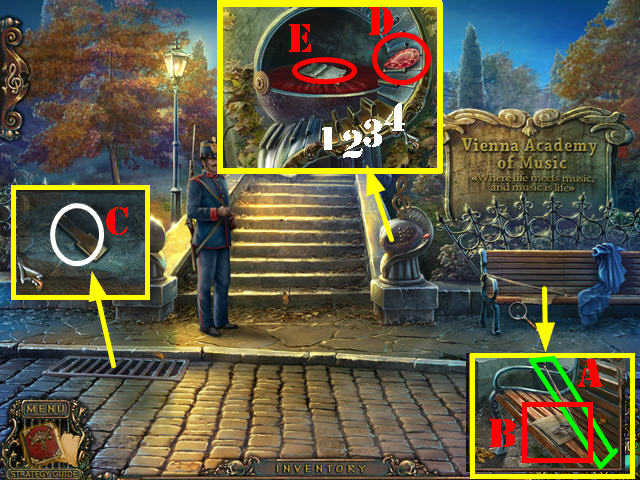
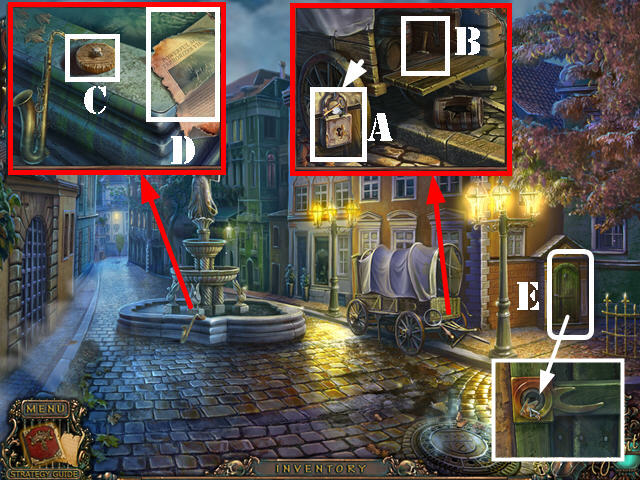
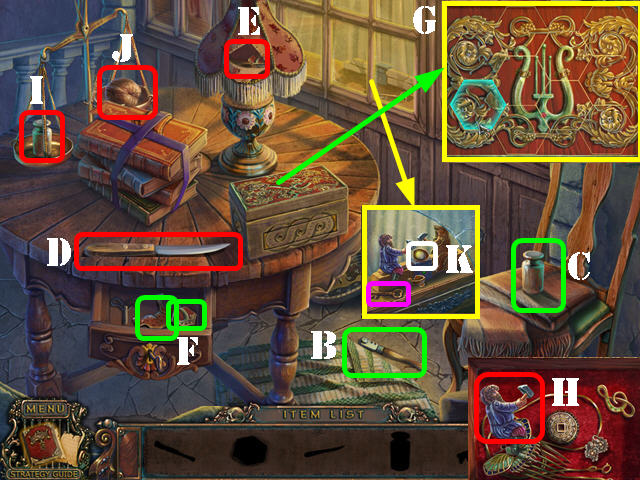
- Zoom into the bench; take the CANE (A) and look at the newspaper (B).
- Zoom into the grate and lift it with the CANE; take the PIANO KEY (C).
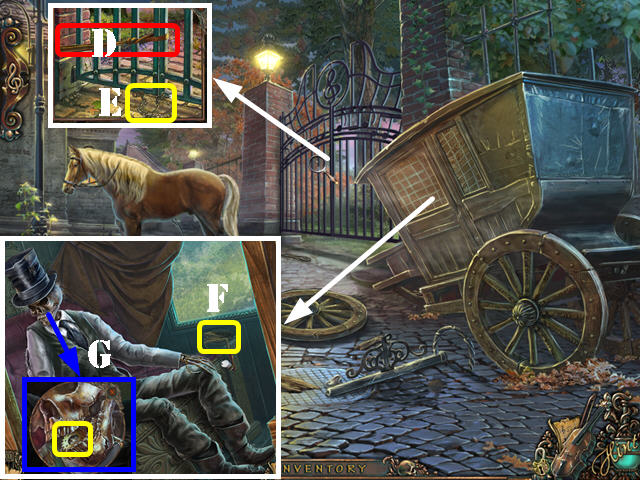
- Look at the railing; take the RUBY (D).
- Place the KEY on the keyboard and select the keys in this order: 4, 2, 3, 1.
- Take the BOOK (E).
- Go up the steps.
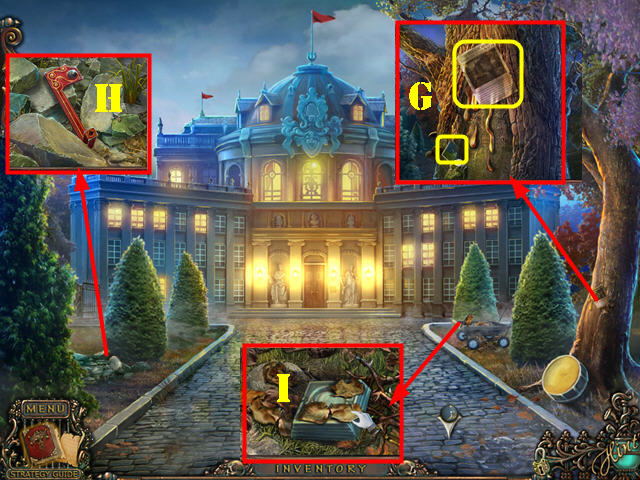
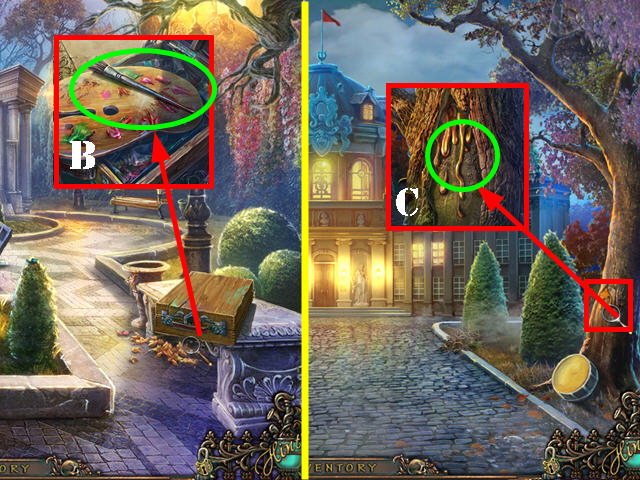
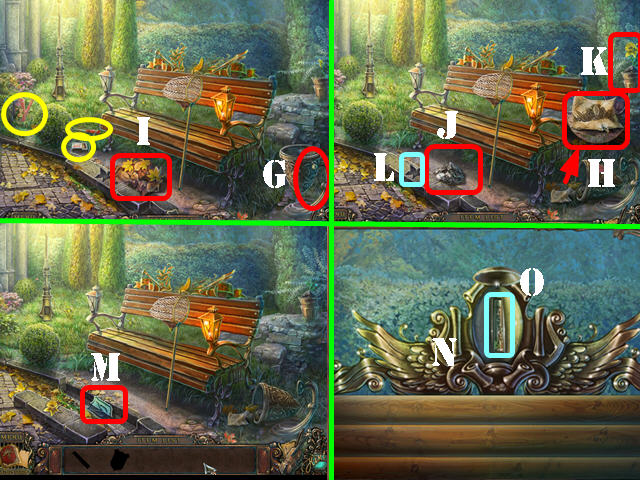
- Zoom into the tree; take the CAT TILE and the note (G).
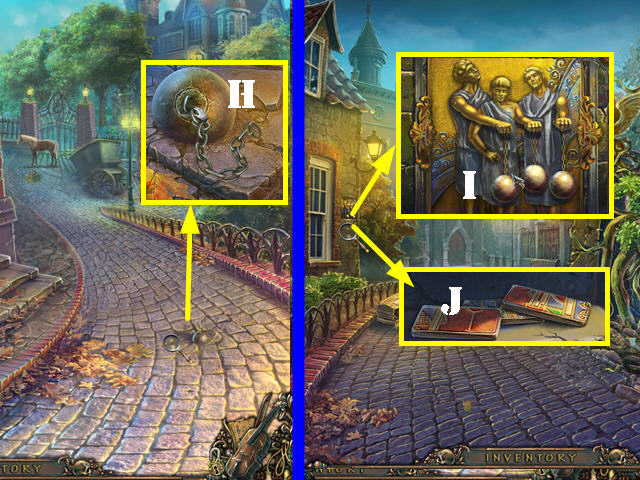
- Zoom into the stones; remove the stones and take the MAILBOX FLAG (H).
- Move the cart and zoom into the ground; take the BUTTON (I).
- Go forward.
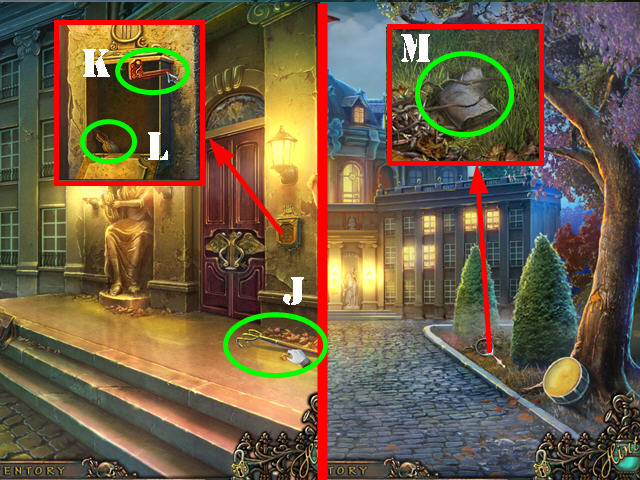
- Take the HAND RAKE (J).
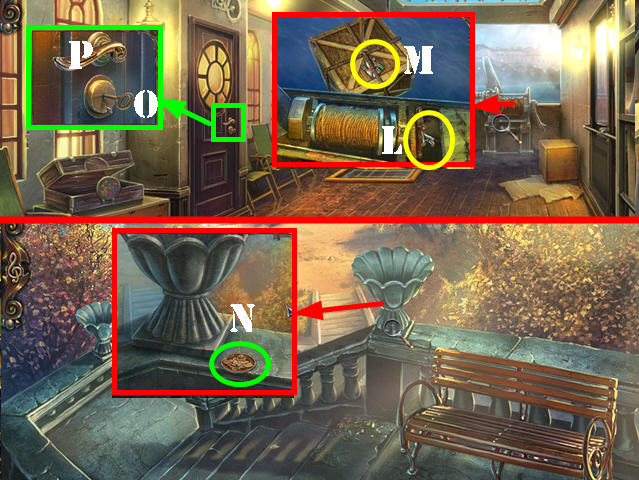
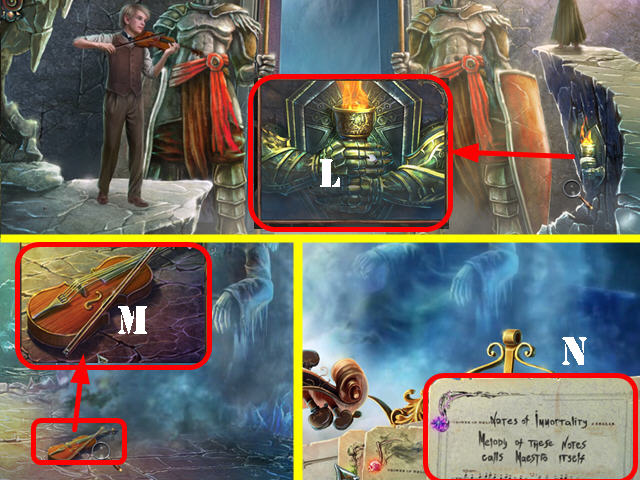
- Zoom into the mailbox; put the MAILBOX FLAG on it and pull it (K).
- Take the VIOLIN CURIO (L).
- Walk down.
- Take a closer look at the leaves; use the HAND RAKE on them and take the STONE ELBOW (M).
- Go forward.
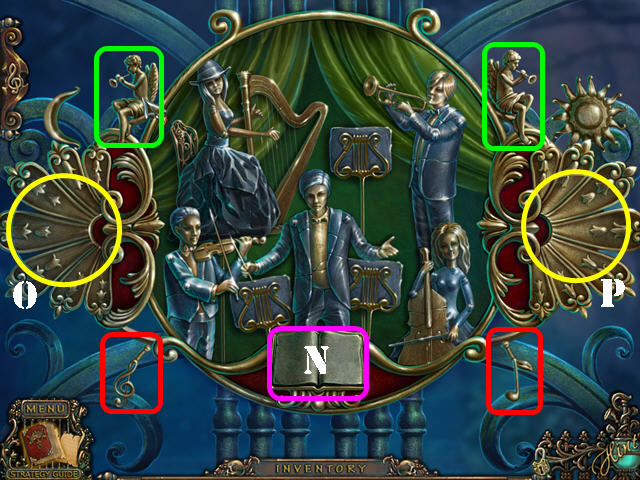
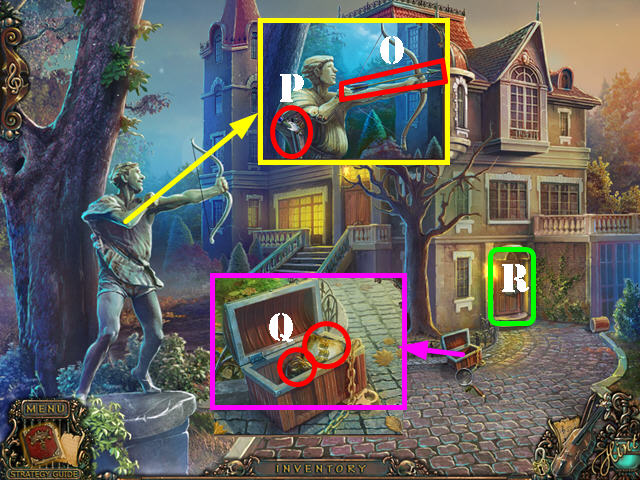
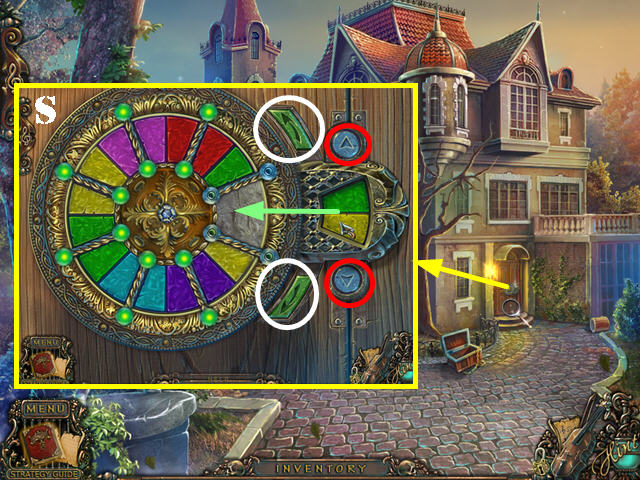
- Zoom into the gate; place the BOOK on the stand to activate a puzzle. Open the curtain. Flip the book page (N).
- Rotate the left rings into place (O).
- Swap the pieces on the right until you’ve formed the right image (P).
- Touch the two rings (O and P).
- Touch the 2 music notes (red).
- Touch the 2 angels (green).
- Go through the gate.
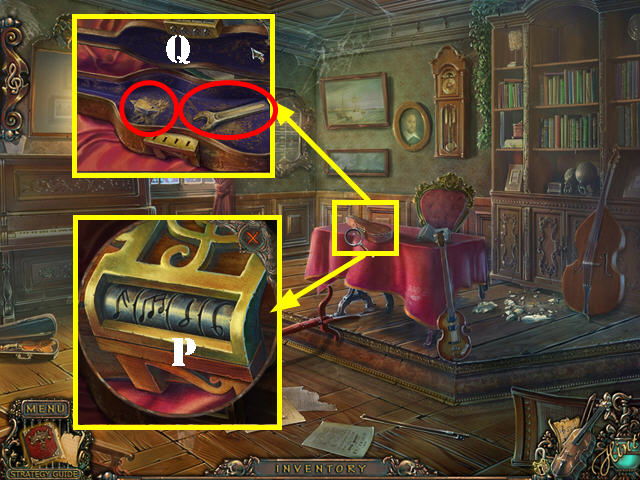
- Play the HOP.
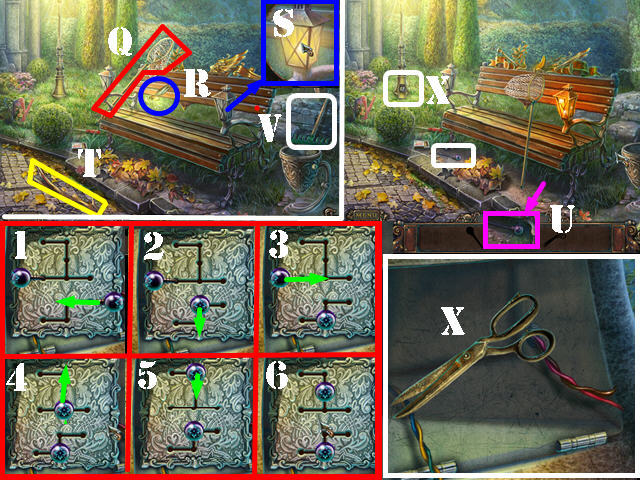
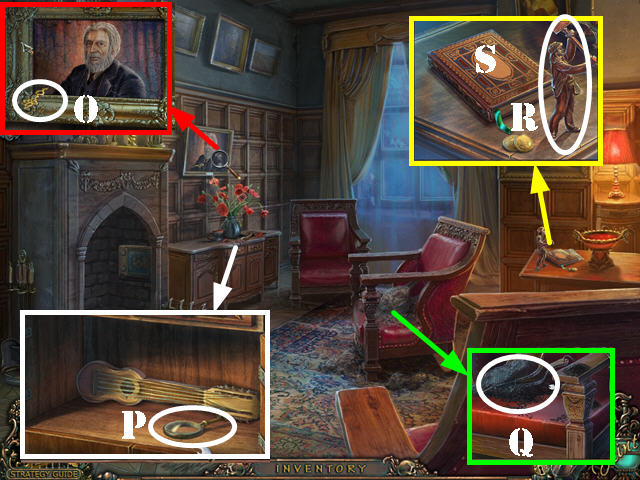
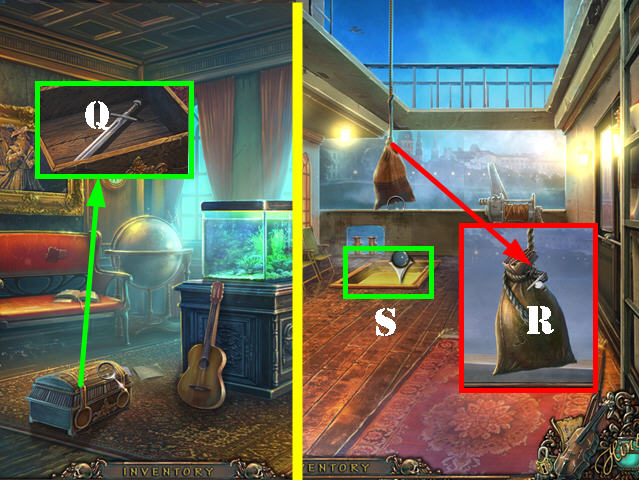
- Take the butterfly net (Q) and use it on the firefly (R).
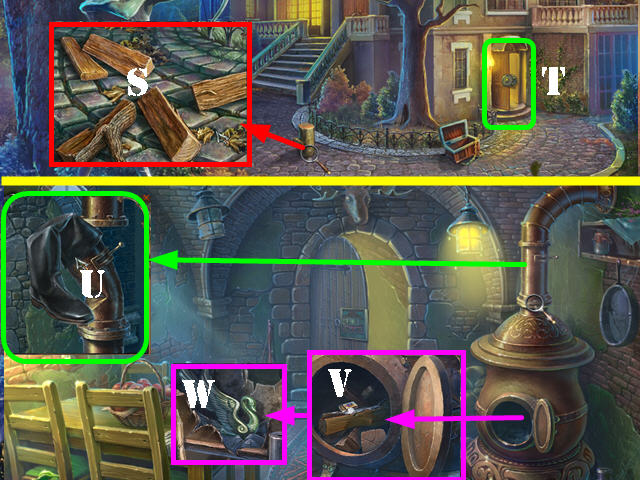
- Take the firefly and zoom into the lamp; place the firefly in it (S).
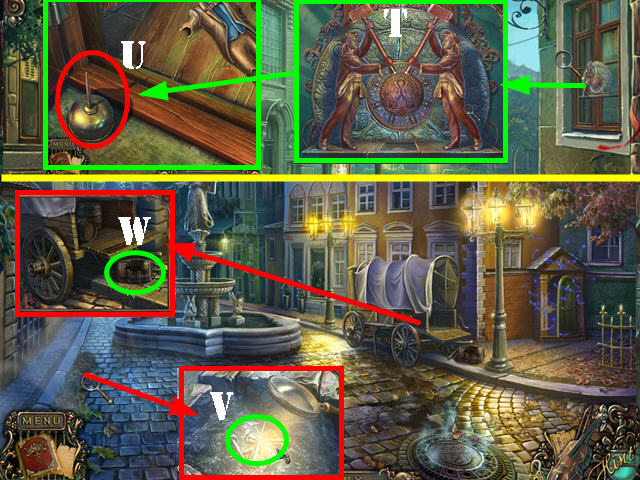
- Take the stick (T) and zoom into the area below the bench; use the stick on the lever. Take the lever (U).
- Take the rake (V) and use it on the leaves; take the lever (W).
- Zoom into the post; remove the leaves and open the cover; place the 2 levers in the slots.
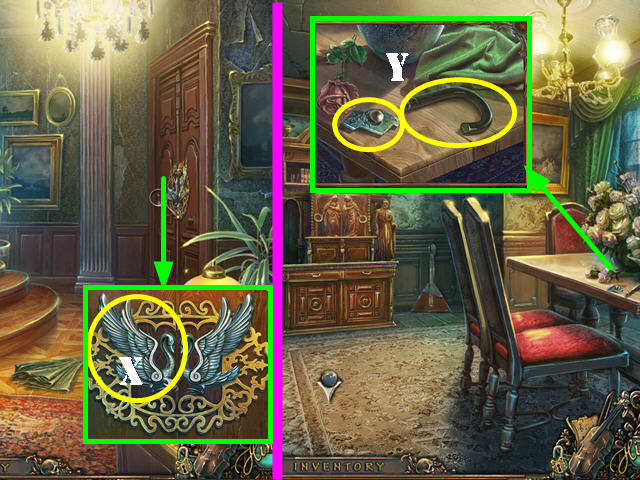
- Move the levers as shown in the screenshot (1-6) and take the SCISSORS (X).
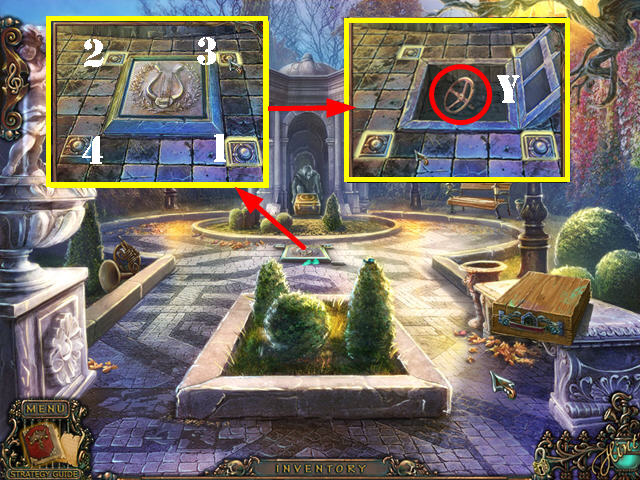
- Zoom into the ground; place the BUTTON in the slot to activate a puzzle.
- Press the buttons in the following order (1-4).
- Take the VALVE (Y).
- Walk down.
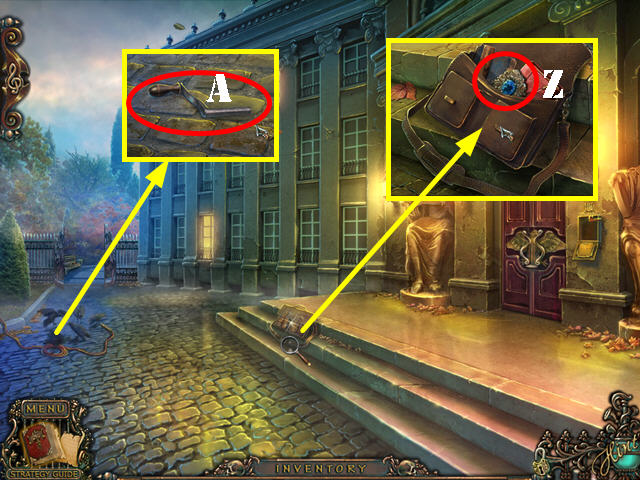
- Zoom into the satchel; cut it with the SCISSORS. Open the bag and take the BROOCH (Z).
- Zoom into the crows; place the VALVE on the hose and take the CRANK (A).
- Go through the left gate.
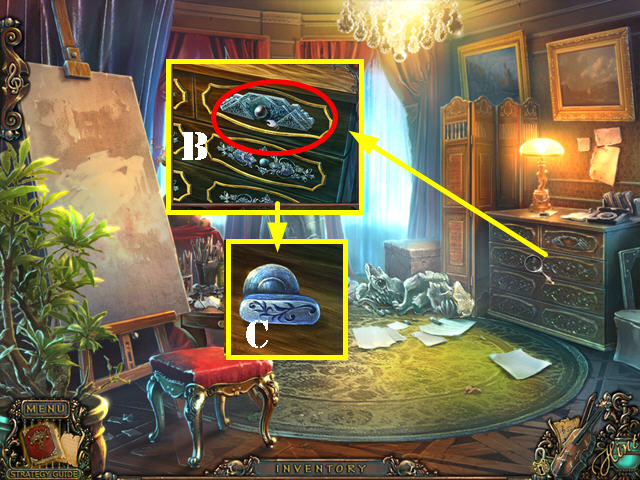
- Zoom into the case; place the BROOCH on the lock and take the BRUSH (B).
- Walk down twice.
- Zoom into the tree; place the BRUSH on the resin and take the RESIN-COVERED BRUSH (C).
- Return to the plaza.

- Zoom into the statue; place the STONE ELBOW on it and the RESIN-COVERED BRUSH on the elbow (D).
- Take the VIOLIN CURIO (E).
- Zoom into the box and turn both locks; insert the two VIOLIN CURIOS into the locks. Take the Violin (F) and the CHIP below it.
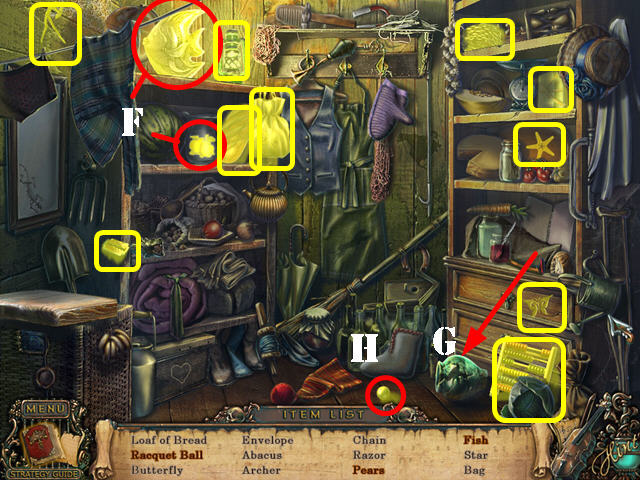
- Play the HOP.
- Take the matches, the screwdriver, and the watering can (yellow).
- Use the screwdriver on the screw attached to the bucket (G). Zoom into the paper and open it (H).
- Burn the leaves (I) with the matches and take the fertilizer (J).
- Use the fertilizer and then the watering can in the pot and take the flower (K).
- Place the flower in the slot (L) and take the shield (M).
- Zoom into the top of the bench and place the shield on it. Arrange the shield pieces as shown in the screenshot (N).
- Take the FLUTE PART (O).
- Walk down.
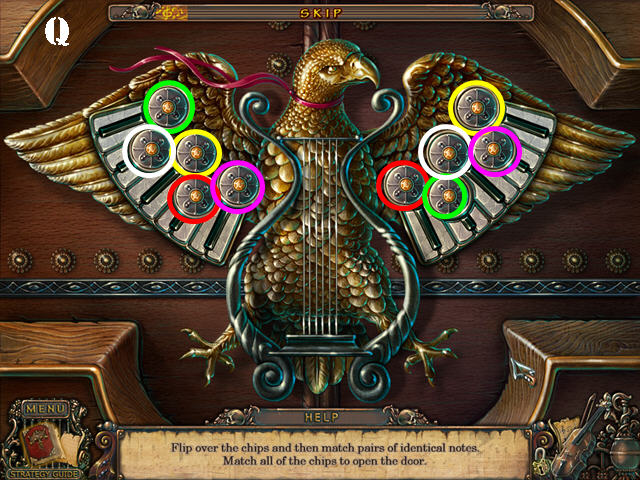
- Zoom into the door and insert the CHIP in the slot to activate a puzzle.
- Flip the coins and match 2 of the same ones.
- Please look at the screenshot for the solution (Q).
- Open the door and go through it.
Chapter 2: Vienna Academy of Music
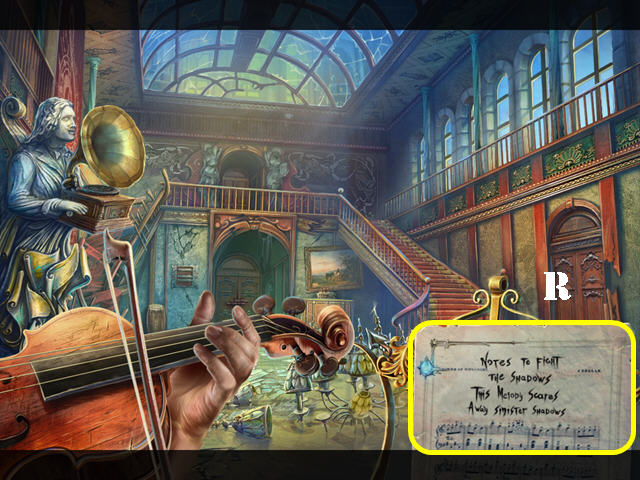
- Touch the violin and then place the ‘Notes to Fight’ sheet on the stand to get rid of the shadows (R).
- Go through the right door.
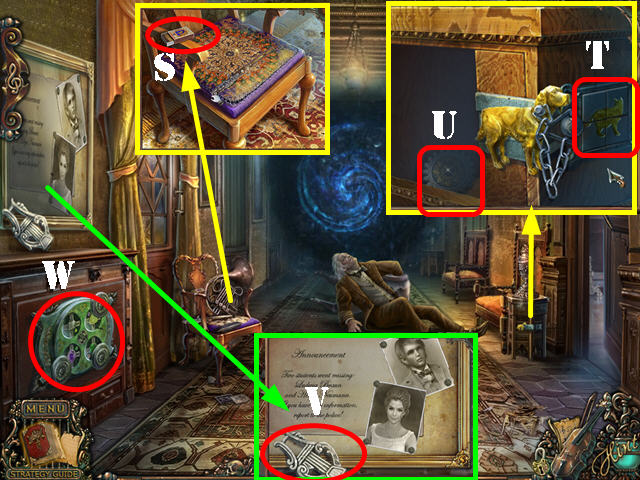
- Look at the chair; take the MATCHES (S).
- Zoom into the side cabinet; place the CAT TILE in the slot. Arrange the tiles as shown in the screenshot (T).
- Take the first GEAR (U).
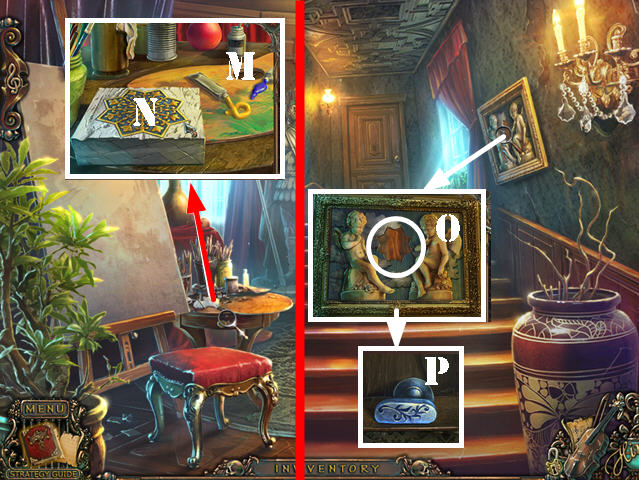
- Zoom into the picture; take the STONE HARP (V).
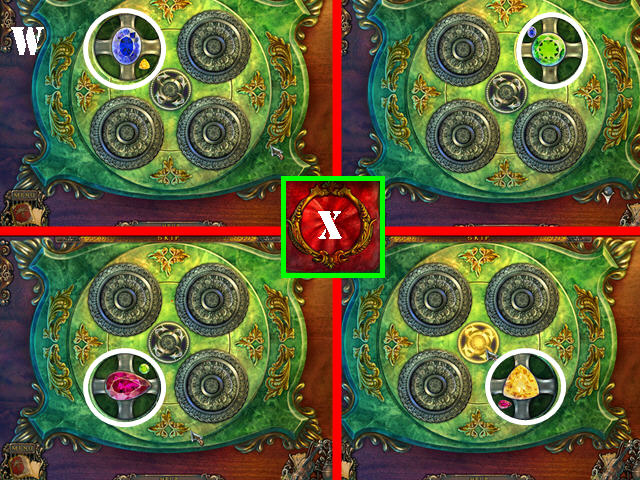
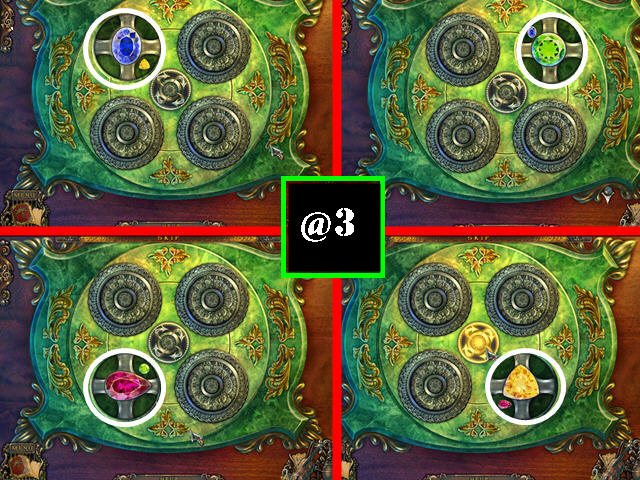
- Zoom into the cabinet (W); place the RUBY on it to activate a puzzle.
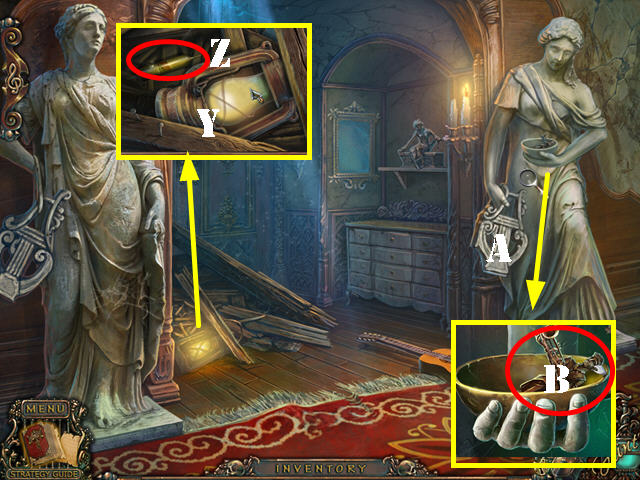
- Zoom into the lantern and use the MATCHES on it (Y) and take the first ROLLER (Z).
- Give the STONE HARP to the right statue (A). Look in the bowl and take the MUSICIAN (B).
- Walk down.
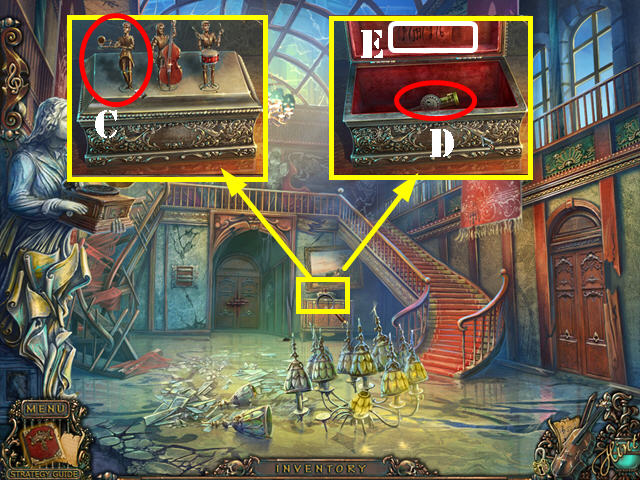
- Zoom into the music box; add the MUSICIAN to it and open the box (C).
- Touch all 3 statues to open the box; take the FLUTE PART (D).
- Note the clue (E) on the box.
- Go through the next 2 right doors.
- Play the HOP.
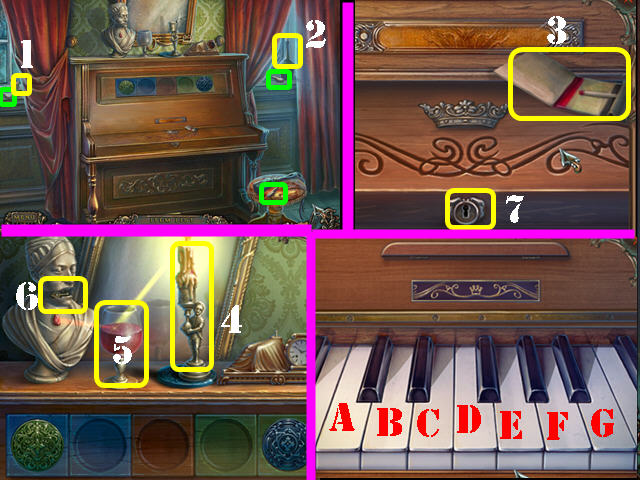
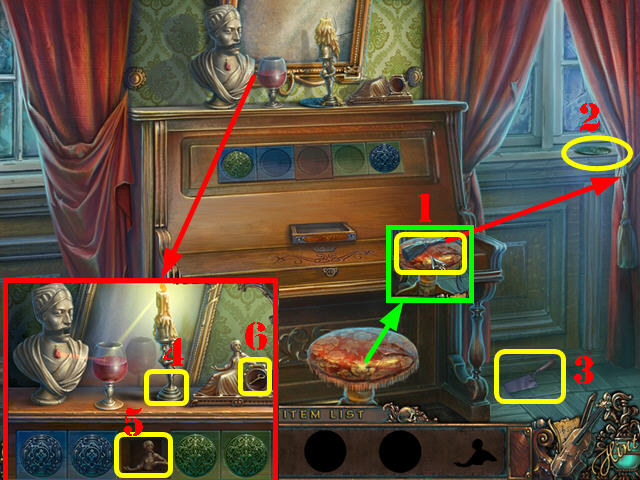
- Open the curtain and take the candle (1).
- Grab the bottle (2). Zoom into the piano and take the matches (3).
- Examine the top of the piano; place the candle in the holder and then light the candle with the matches (4).
- Use the bottle on the glass (5) and take the key for keyboard from inside the statue’s mouth (6).
- Zoom into the piano and use the key on the lock (7).
- Pick up the 3 piano keys (green). Zoom into the piano and place the piano keys on the keyboard.
- Duplicate the key sequence.
- First sequence: A, D, G. Second sequence: A, D, G, E, B.
- Take the RECORD.
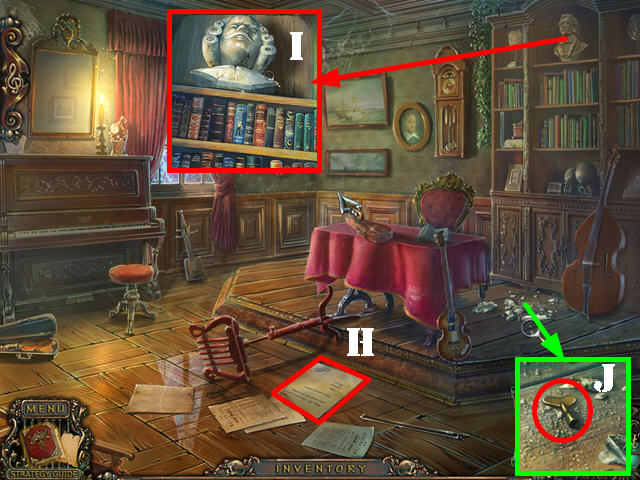
- Take the note (H).
- Zoom into the bust and use the CANE on it (I).
- Zoom into the broken bust and take the TUNING KEY (J).
- Walk down twice.
- Zoom into the gramophone; place the CRANK on the box (K) and the RECORD on the turntable (L).
- Take the TUMBLER (M).
- Go upstairs.
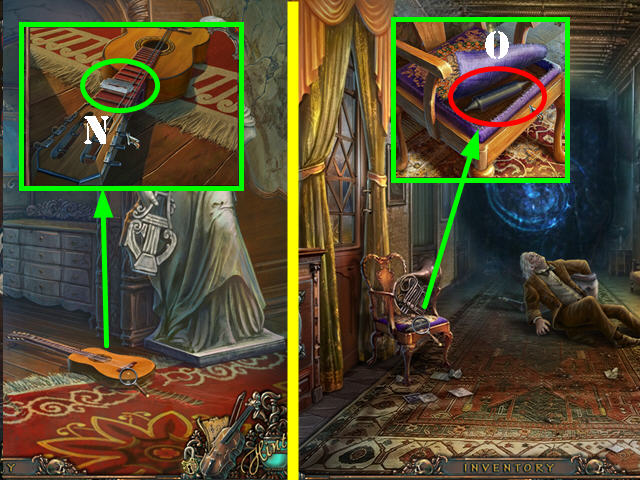
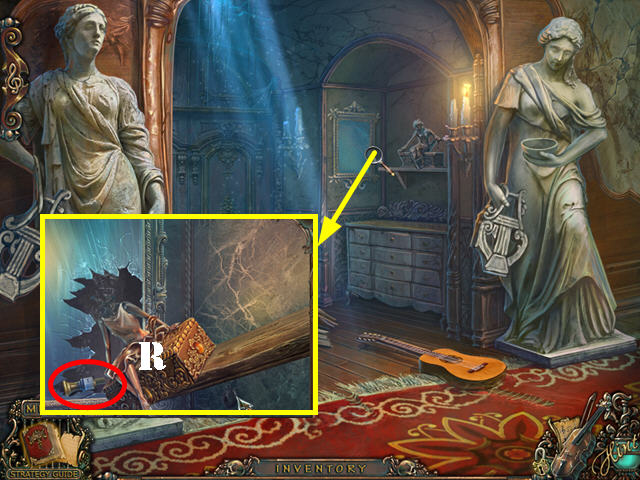
- Zoom into the guitar and use the TUNING KEY on the strings 4 times; take the RAZOR BLADE (N).
- Return to the downstairs hallway.
- Zoom into the chair; cut the seat with the RAZOR BLADE and take the second ROLLER (O).
- Go through the door.
- Zoom into the violin case and then on the tumblers. Place the TUMBLER in the slot.
- Change the symbols as shown in the screenshot (P).
- Take the MINIATURE ANVIL and the WRENCH (Q).
- Return to the upstairs hallway.
- Zoom into the mirror; use the WRENCH on the bolt and take the FLUTE PART (R).
- Return to the music room.
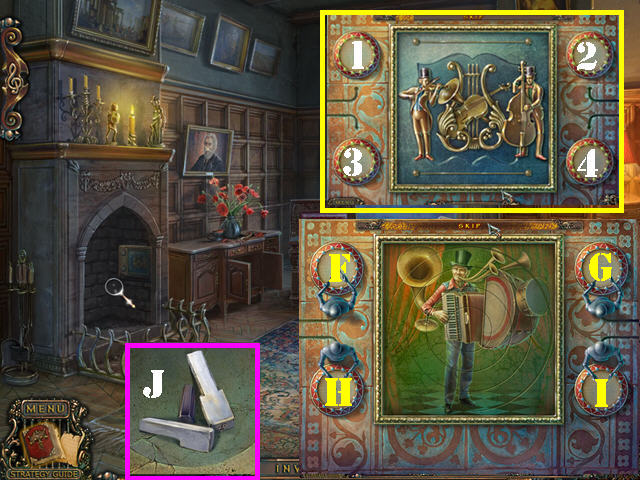
- Zoom into the cabinet by the window and add the 3 FLUTE PARTS to it to activate a puzzle.
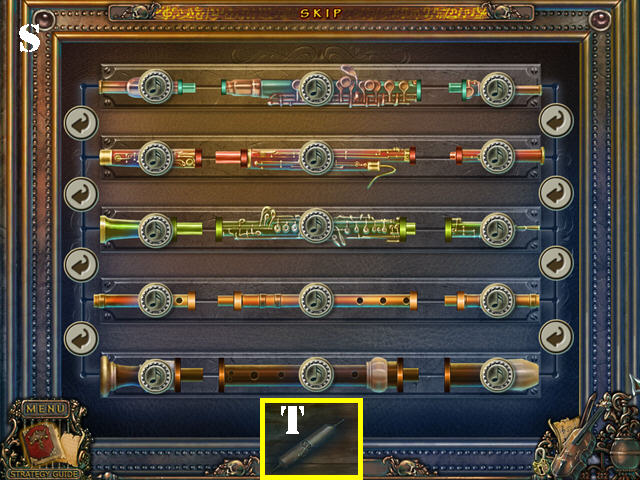
- Select the arrow buttons to swap the left and right flute parts next to the corresponding arrows.
- Touch the buttons on the center flute part to rotate them.
- Once you have all the pieces in the right positions, touch the buttons of the flute parts on the left and right pieces to attach them to the center piece.
- Please look at the screenshot for the solution (S).
- Take the third ROLLER (T).
- Play the HOP.
- Take the curtain tie (1) and use it on the curtain; take the medallion (2).
- Move the stool and take the trowel (3).
- Examine the top of the piano (4); use the trowel on the wax at the base of the statue (not pictured) and take the medallion.
- Place the 2 medallions in the slots. Place the blue medallions on the left and the green ones on the right.
- Take the body (5).
- Place the statue part on the statue and take the KEY (6).
- Walk down twice.
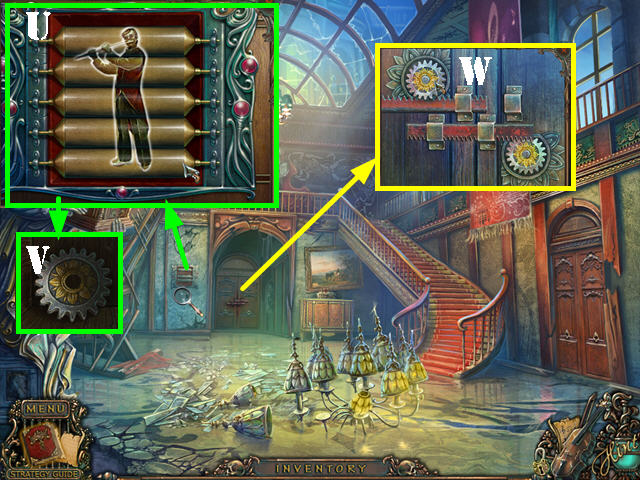
- Zoom into the mechanism and place the 3 rollers in it to activate a puzzle.
- Rotate the rollers until you form the image shown on the screenshot (U).
- Take the second GEAR (V).
- Take a closer look at the back door; insert the 2 GEARS in the lock and touch the 2 gears (W).
- Go through the door.

- Zoom into the base of the tree and take the HAND (X).
- Zoom into the left door; place the CREST PIECE on the puzzle to activate the puzzle.
- Attach the wedges to the correct spots on the center piece. Select the center piece to rotate it and then touch a wedge to attach it to the center piece.
- Attach the pieces in the order shown in the screenshot (1-8) to achieve this solution (Y). Note: make sure to position the center piece as shown in the screenshot before you begin attaching pieces.
- Go through the gate.
Chapter 3: The Square
- Look at the back of the wagon; zoom into the lock. Use the KEY in the lock (A) and take the HAMMER (B).
- Zoom into the fountain; take the WHEEL (C) and the note (D).
- Zoom into the door (E); use the HAND on the lock to activate a HOS.
- Play the HOS.
- Move the shirt; take the fish and the pears (F).
- Knock over the vase (G) and take the racquet ball (H).
- You will receive the CHAIN.
- Go forward and then go towards the right.
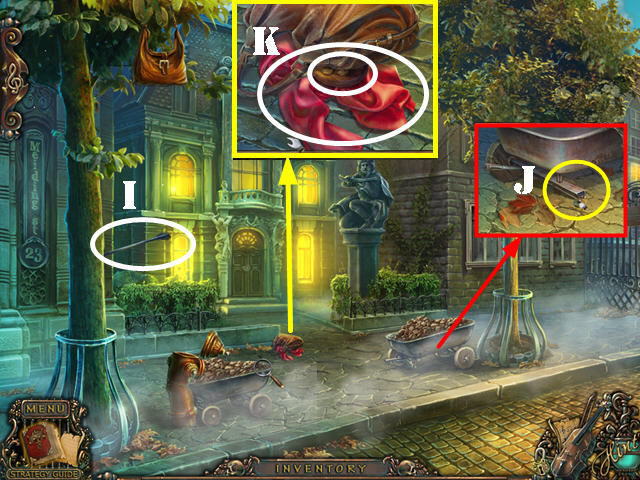
- Take the ARROW (I).
- Zoom into the cart; place the WHEEL on it to knock down the purse (J).
- Zoom into the purse; take the MEDALLION and the SCARF (K).
- Walk down.
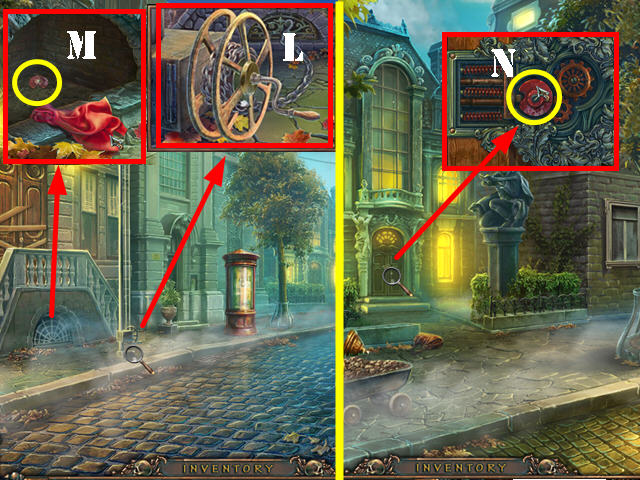
- Zoom into the winch; place the CHAIN on it and turn the handle (L).
- Take a closer look at the niche; put down the SCARF and take the GEAR after the cat moves away (M).
- Go towards the right.
- Take a closer look at the door; touch the handle. Place the GEAR in the lock and go through the door (N).
- Select the violin and put the ‘Notes to Fight’ sheet on the stand to dissipate the shadows.
- Look at the picture and take the CLOCK HAND (O).
- Look in the cabinet; open it and take the MAGNIFYING GLASS (P).
- Take a closer look at the chair; take the BELLOWS (Q).
- Zoom into the table; take the SMITHY FIGURE (R).
- Open the book and take a closer look at the pages (S).
- Walk down twice.
- Zoom into the window; put down the MINIATURE ANVIL and the SMITHY FIGURE (T).
- Zoom into the window again and take the EMPTY OIL CAN (U).
- Exit the window and walk down.
- Zoom into the hole in the street and use the MAGNIFYING GLASS on the ants; take the NAILS (V).
- Zoom into the cart; use the EMPTY OIL CAN on the broken barrel to get the FULL OIL CAN (W).
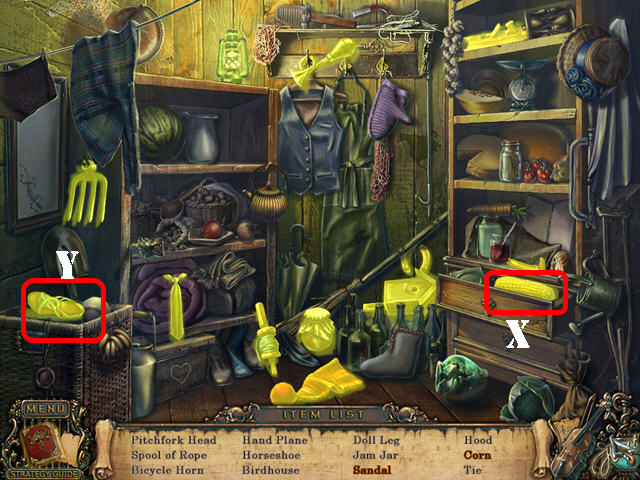
- Play the HOS.
- Open the drawer and take the corn (X).
- Remove the hamper lid and take the sandal (Y).
- You will receive the first DOLL PART.
- Go forward.
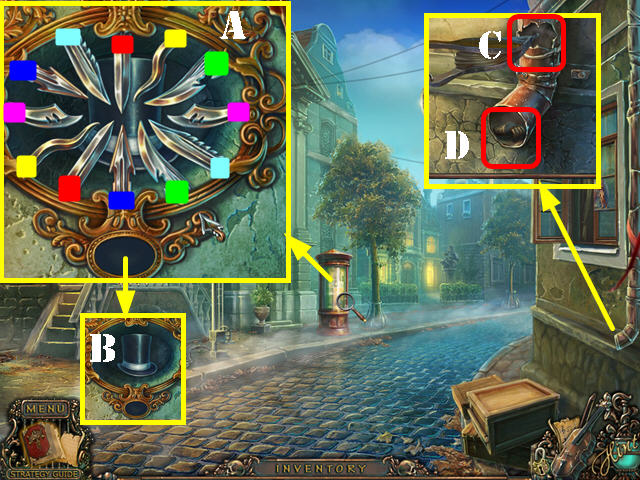
- Zoom into the post; remove the billboard and zoom into it. Use the FULL OIL CAN on the blades to activate a puzzle.
- Select the matching blade pairs.
- Please look at the screenshot for the solution (A).
- Take the DOLL’S HAT (B).
- Zoom into the pipe; use the BELLOWS in the hole and take the second DOLL PART (C).
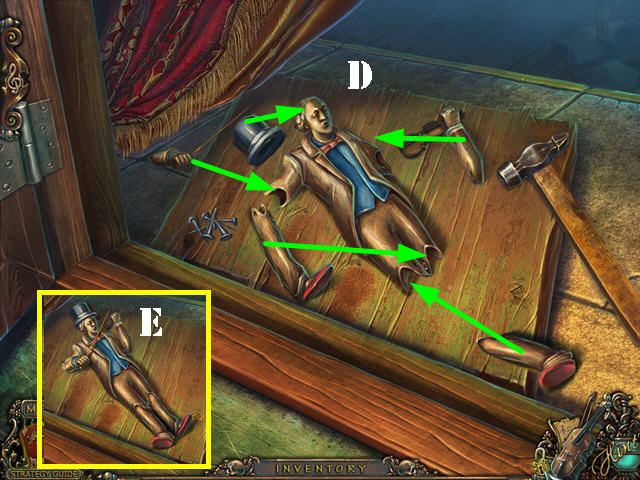
- Zoom into the window; put down the 2 DOLL PARTS, the HAMMER, NAILS and the DOLL’S HAT.
- Attach all the parts as shown in the screenshot (D).
- Place the nails on the doll. Use the hammer on the nails and then take the DOLL (E).
- Return to the house.
- Take a closer look at the right tree.
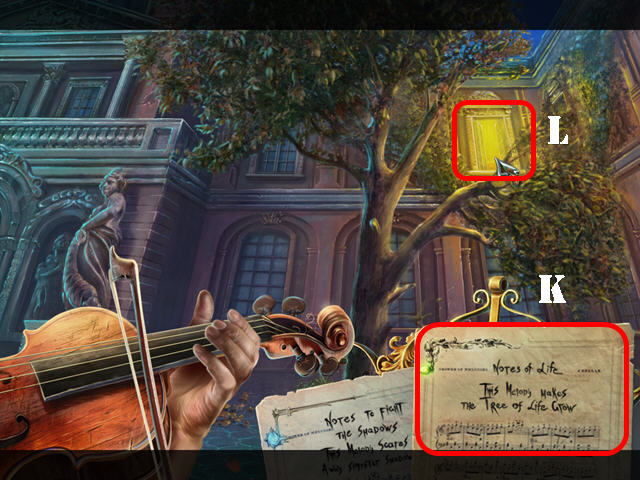
- Select the violin and place the ‘Notes of Life’ on the stand (K).
- Go through the upper right window (L).
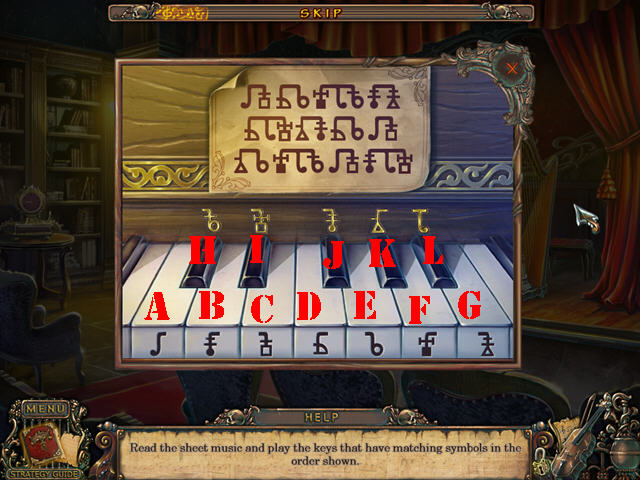
- Take a closer look at the piano and place the PIANO KEYS on it to activate a puzzle.
- Select the right keys using the music sheet as a clue.
- To solve the puzzle, select the keys in this order: A, C, D, E, F, L, H, B, G, D, L, I, K, J, D, E, A, C, K, E, F, L, H, A, C, B, L, and I.
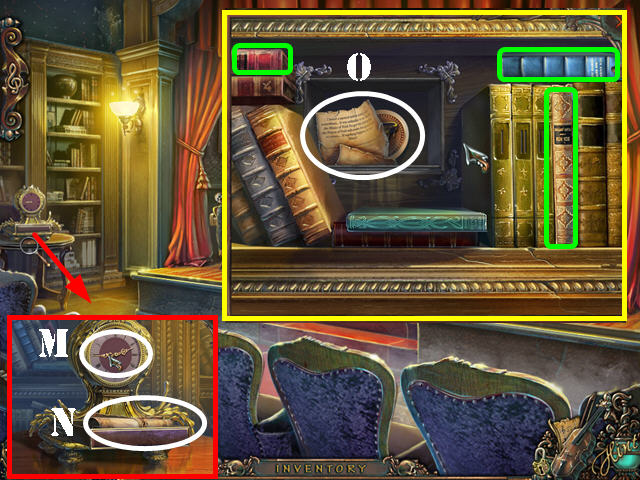
- Take a closer look at the clock; put the CLOCK HAND on it (M).
- Take the note (N) and the first RING below it.
- Zoom into the bookcase; put the books in the right spots (green).
- Place the MEDALLION in the slot. Take the note (O) and the PIANO CHIP below it.
- Walk down.
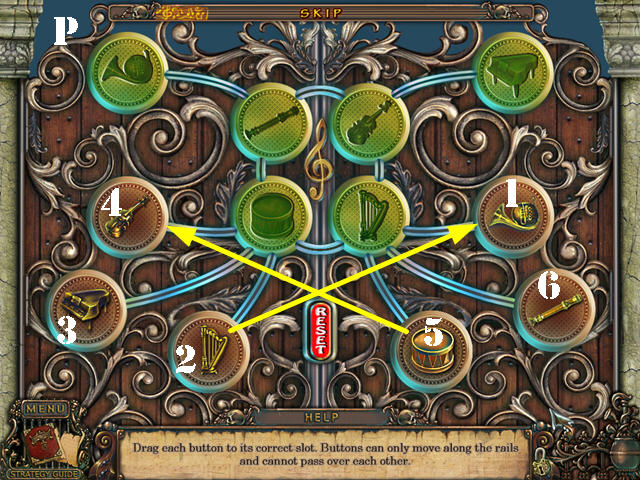
- Zoom into the right door; place the PIANO CHIP on it to activate a puzzle.
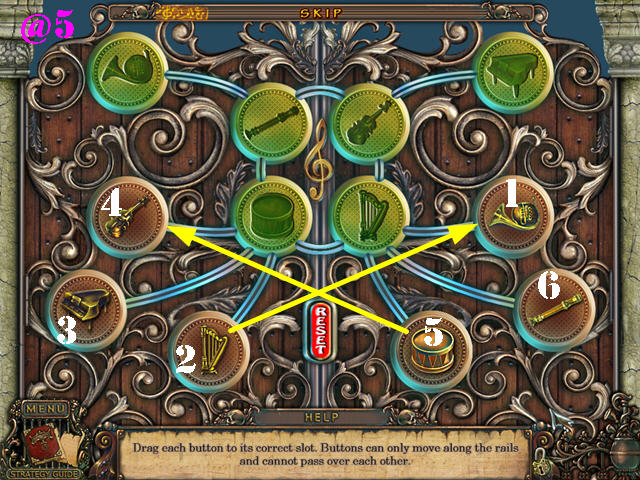
- Place each button in its matching slot.
- Drag the buttons along the rails in the positions shown.
- Using the screenshot (P) as a guide, move the buttons in the following order: move button 1 to its matching slot, move button 2 to where the arrow is pointing, move buttons 3 and 4 to their matching slots, move button 5 to where the arrow is pointing, move button 6 to its matching slot. Move the drum and the harp to their matching slots.
- Go through the door.
Chapter 4: The Tower
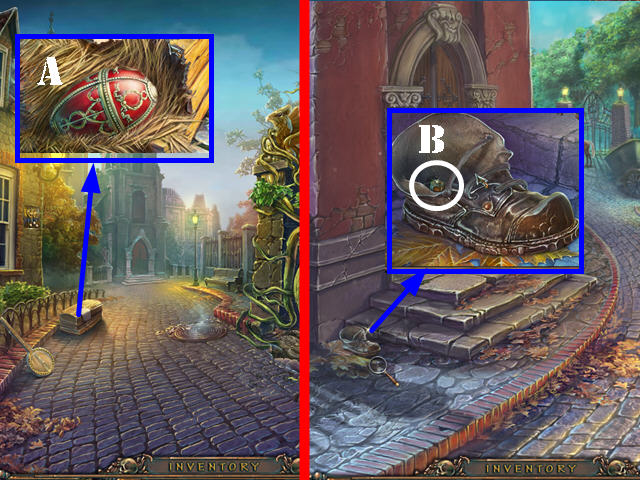
- Look at the crate; touch it and take the FABERGE EGG (A).
- Go forward.
- Look at the shoe; touch it and take the second RING (B).
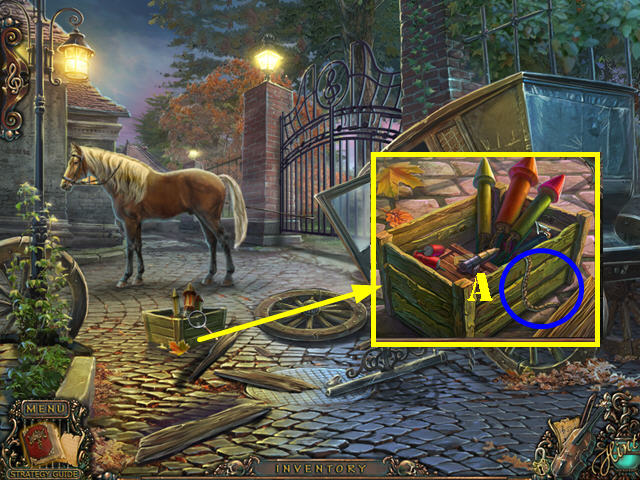
- Play the HOS.
- Open the suitcase to view all available items (C).
- You will receive the LEVER HANDLE.
- Go forward.
- Zoom into the gate; tie the reins to the gate (D) and take the CHAIN (E).
- Open the carriage door and enter the carriage.
- Take the ROPE (F).
- Zoom into the skeleton’s teeth; open them and take the GEAR (G).
- Exit the carriage and walk down.
- Zoom into the ball; put the CHAIN on it and take the BALL AND CHAIN (H).
- Walk down.
- Examine the small statues; use the BALL AND CHAIN on them (I). Touch the 3 hands; open the panel and take the MEDALLION PART (J).
- Go forward.
- Zoom into the left door; place the MEDALLION PART on it to activate a puzzle.
- Select the pieces in the right order to recreate the image.
- To solve the puzzle, select the pieces in this order: A, B, C, D, F, E, H, and G.
- Enter the tower.
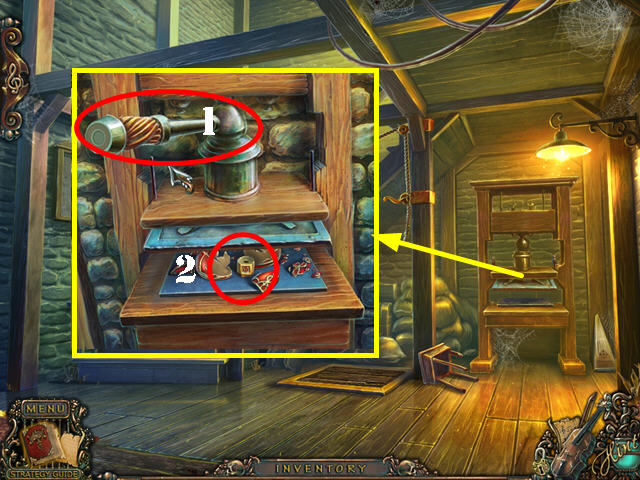
- Zoom into the press and put the LEVER HANDLE on it (1).
- Place the FABERGE EGG on the tray. Press the lever and take the third RING (2).
- Walk down.
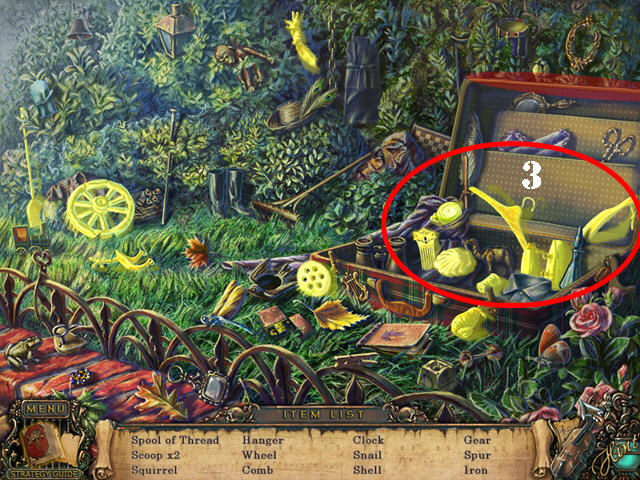
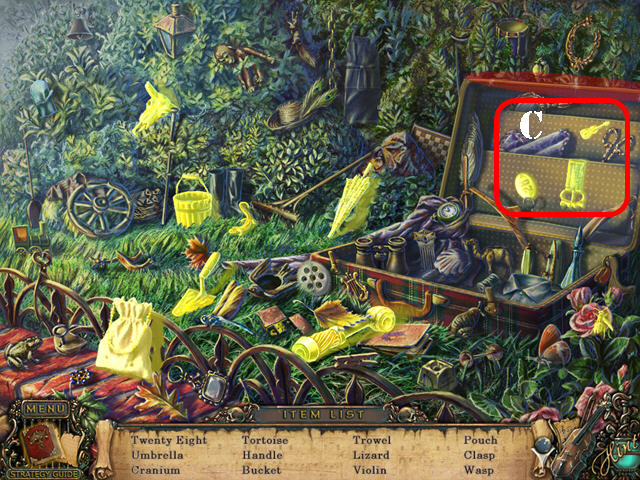
- Play the HOS.
- Find all the items on the list (3).
- You will receive the GEAR.
- Return to the inside of the carriage.
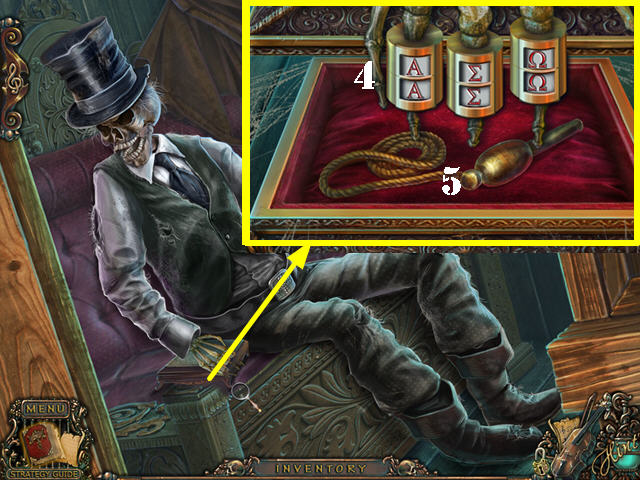
- Zoom into the skeleton’s hand and put the 3 RINGS on the ring to activate a puzzle.
- Rotate the rings until each set has 2 matching symbols.
- Please look at the screenshot for the solution (4).
- Take the BELL CLAPPER (5).
- Return to the tower and go up the steps.
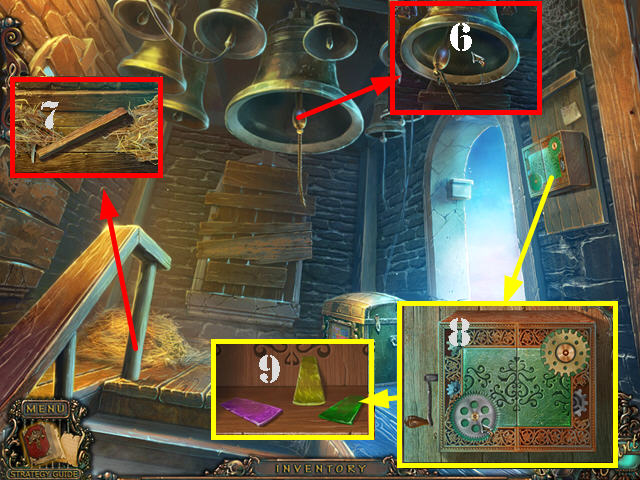
- Zoom into the bell and put the BELL CLAPPER in it (6).
- Zoom into the hay; remove some of it and take the STOOL LEG (7).
- Zoom into the box; put the 2 GEARS on it (8).
- Pull the handle and take the GLASS (9).
- Walk down.
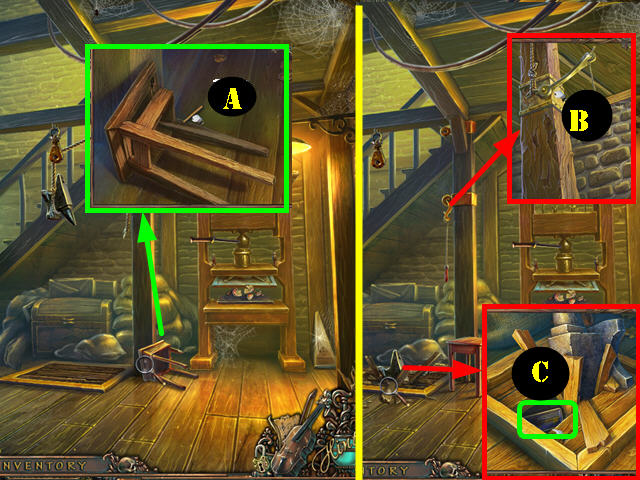
- Zoom into the stool; place the STOOL LEG on it (A).
- Zoom into the lever; place the ROPE on the lever and then pull on the lever (B).
- Look on the ground and take the KEY PLATE (C).
- Go up the steps.
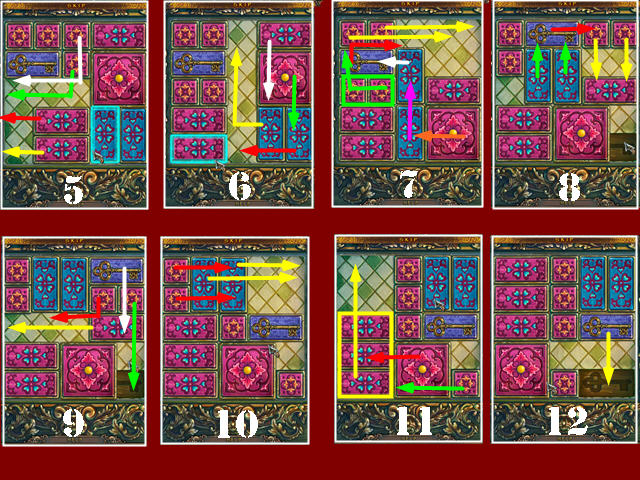
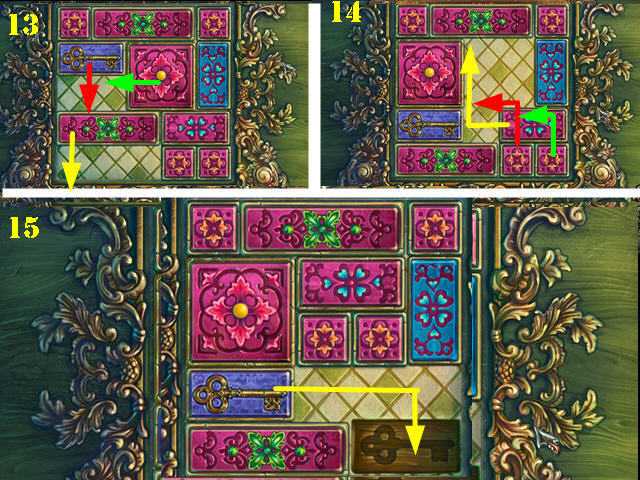
- Zoom into the chest and place the KEY PLATE on it to activate a puzzle.
- Slide the plates out of the way until you can put the key in the slot.
- There are 3 rounds to solve.
- Please look at the screenshots for the solutions and follow the arrows in this order: Yellow, Red, Green, White, Purple, and Orange.
- Take the FUSE.
- Return to the carriage scene.
- Zoom into the fireworks box and use the FUSE on them.
- Use the MATCHES on the fuse (A).
- Go through the gate (make sure you attach the reins to the gate first, otherwise, you will not be able to go through).
- Play the HOP.
- Flip the rug and take the glass cutter (B).
- Remove the hat and take the weight (C).
- Take the knife (D) and use it on the lampshade; take the puzzle piece (E).
- Zoom into the window and use the glass cutter on it. Take the drawer key (purple).
- Use the drawer key on the lock; take the puzzle piece and the bear (F).
- Zoom into the box and place the 2 puzzle pieces on it. Rotate the pieces into place. Please look at the screenshot for the solution (G).
- Take the blacksmith (H).
- Place the weight on the scale (I) and take the nut (J).
- Zoom into the window; place the blacksmith, the bear, and the nut on the block. Take the SUN (K).
- Zoom into the statue; place the ARROW on it (O) and then pull the lever (P).
- Zoom into the chest; take the note and the RABBIT STATUETTE (Q).
- Look at the door (R); place the GLASS on it to activate a puzzle.
- Place the glass pieces next to the ones of the same color.
- Use the green arrows to rotate the wheel (white).
- Use the blue arrows to scroll through all the glass pieces (red).
- Select a glass piece in the window to add it to the wheel.
- Please look at the screenshot for the solution (S).
- Go through the door.
Chapter 5: The Mansion
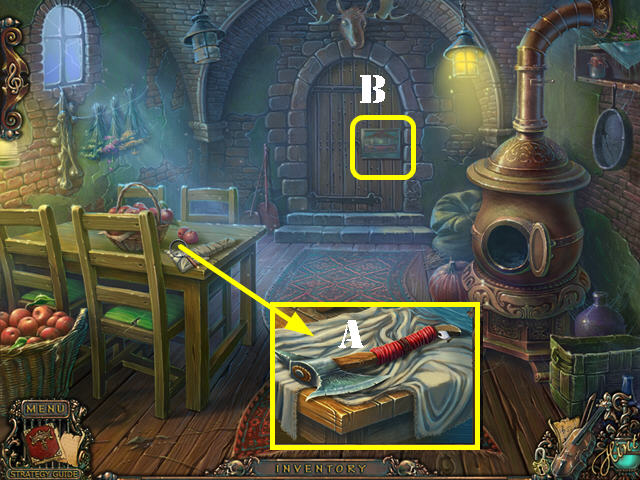
- Take a closer look at the table; unwrap the cloth 3 times and take the AXE (A).
- Look at the back door (B); place the SUN on it to activate a puzzle.
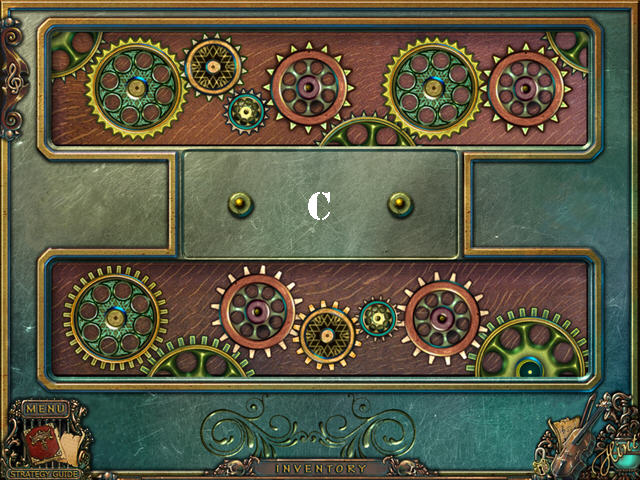
- Place all the gears in the right spots.
- Select one of the two panels to reveal the gears. Move the gears into place.
- Use the pegs in the center as a holding spot for the gears.
- Please look at the screenshot for the solution (C). Note: pay close attention to the shape of the spikes on each gear.
- Go forward.
- Play the HOS.
- Find all the items on the list.
- Open the left door and take the items on your list (D).
- You will receive the SPATULA.
- Go up the steps.
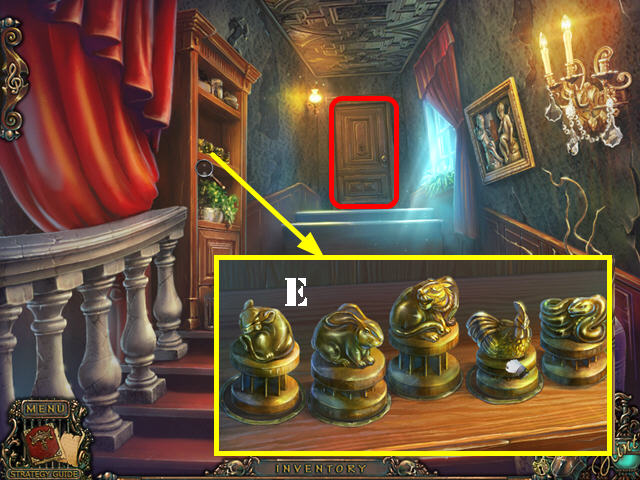
- Zoom into the shelf; put down the RABBIT STATUETTE to activate a puzzle.
- Place the statuettes in the right order according to the clue in your diary.
- Please look at the screenshot for the solution (E).
- Go through the door.
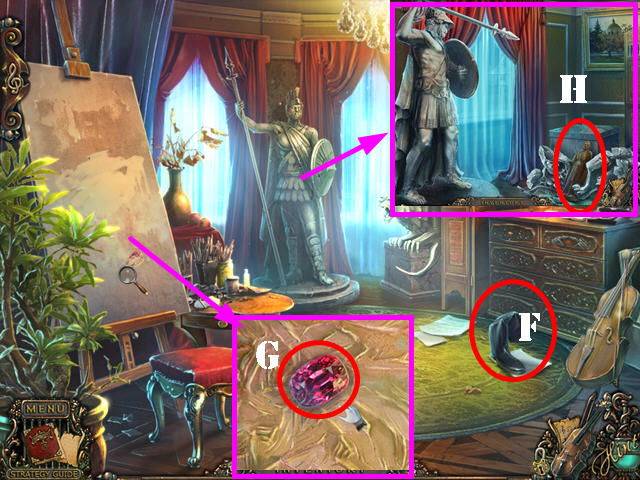
- Grab the BOOT (F).
- Examine the canvas; use the SPATULA on it and take the first RUBY (G).
- Zoom into the statues; touch the violin and place the ‘Notes of Life’ on the stand to dissipate the shadows.
- Take the STATUE (H).
- Walk down 4 times.
- Play the HOP.
- Open the drawer and take the wind-up key (H).
- Look in the box and take the treble clef (I).
- Take the glass shard (J).
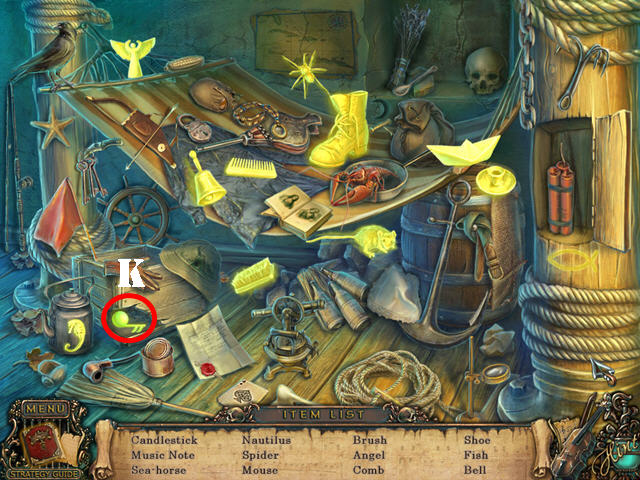
- Cut the ribbon around the books with the glass shard. Place the treble clef in the slot and take the ballerina figure (K).
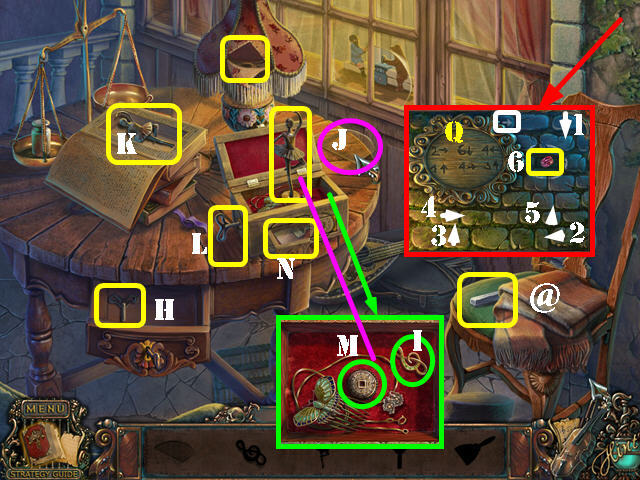
- Move the blanket and take the chalk (@).
- Put the wind-up key on the side of the box (L). Zoom into the box and place the ballerina figure in the slot (M) and take the spatula (N).
- Zoom into the wall and use the spatula to remove the moss and reveal a clue (Q).
- Place the chalk on the wall to activate a puzzle. Using the clue on the board, place the chalk on the right stones.
- Please look at the screenshot for the solution (1-6). Take the second RUBY.
- Zoom into the log and use the AXE on it; take the FIREWOOD (S).
- Go through the door (T).
- Zoom into the pipe; touch it and place the BOOT on it (U).
- Examine the furnace; place the FIREWOOD in it and then light it with the MATCHES (V).
- Zoom into the furnace and take the SWAN HANDLE (W).
- Go forward.
- Zoom into the door; put the SWAN HANDLE on the left side of the lock and touch the swan (X).
- Go through the door.
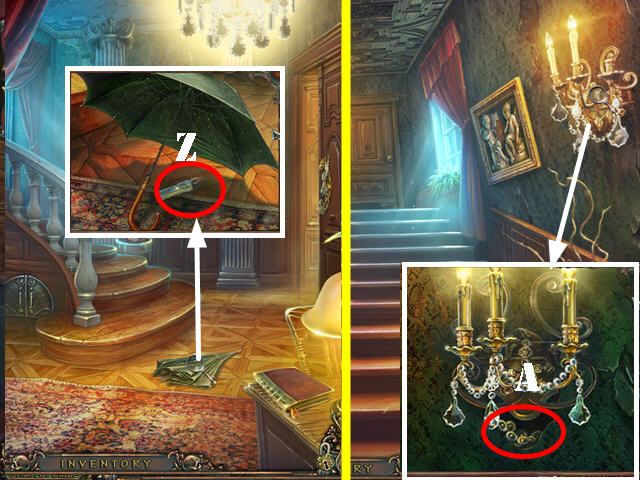
- Take a closer look at the table; take the DECORATIVE PART and the UMBRELLA HANDLE (Y).
- Walk down.
- Zoom into the umbrella; place the UMBRELLA HANDLE on it and then open the umbrella. Take the CANDLE (Z).
- Take the staircase.
- Zoom into the candelabra; place the CANDLE on it and take the BUTTON (A).
- Go through the door.
- Zoom into the dresser drawer; place the DECORATIVE PART on it (B).
- Open the drawer and take the CABINET HANDLE (C).
- Walk down twice and go through the door.
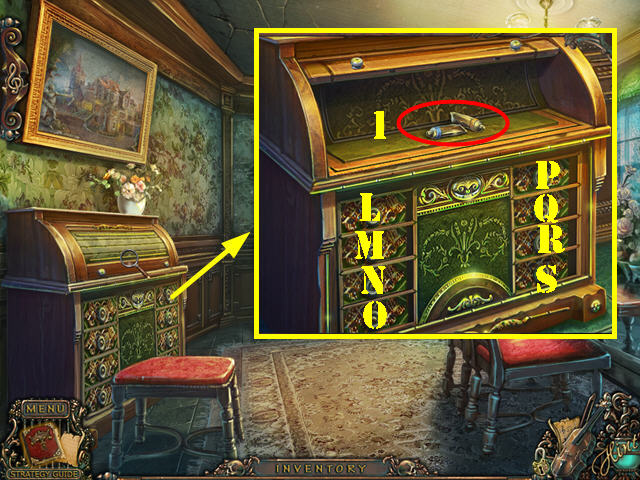
- Zoom into the desk; place the BUTTONS on it to activate a puzzle.
- Select the drawers in the right order until they all remain open.
- To solve the puzzle, please select the drawers in this order: L, P, R, M, Q, and L.
- Take the note and the PAINTS (1).
- Go to the art room upstairs.
- Take a closer look at the table; put down the PAINTS (M).
- Dip the paintbrush in the paints and add them to the piece. Take the PAINTING PIECE (N).
- Walk down.
- Zoom into the painting; place the PAINTING PIECE on it (O) and take the CABINET HANDLE (P).
- Walk down.
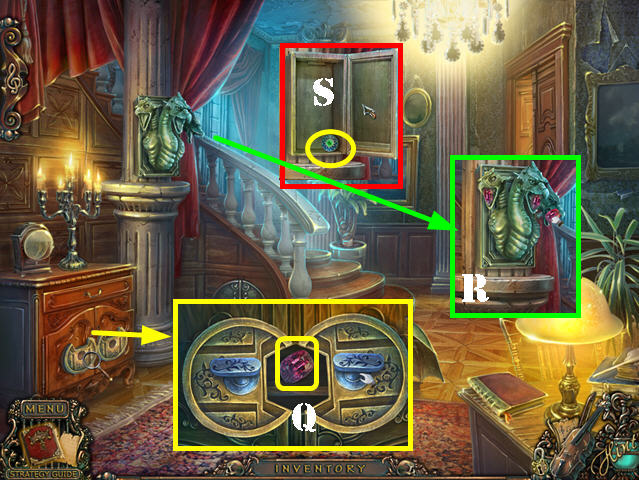
- Zoom into the cabinet; place the 2 CABINET HANDLES on it. Turn both handles and take the third RUBY (Q).
- Take a closer look at the dragons; place a RUBY in each of their 3 mouths (R).
- Take the CHIP (S).
- Go through the door.
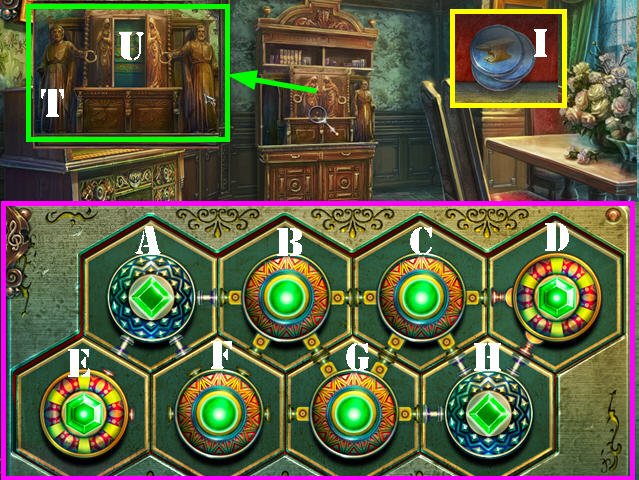
- Zoom into the bookcase; put down the statue (T). Touch the arms of both statues and open the door.
- Zoom into the puzzle and add the CHIP to it (U).
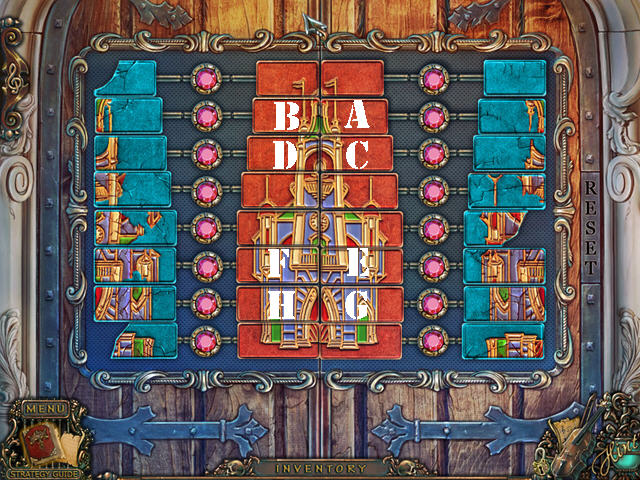
- Place all the buttons in the right spots by swapping the pieces. Swapping pieces will automatically rotate them.
- To solve the puzzle, please follow these steps: A-D, D-B, and E-F.
- Take the ‘Death Notes’ and the SAXOPHONE KEYS behind it (I).
- Walk down.
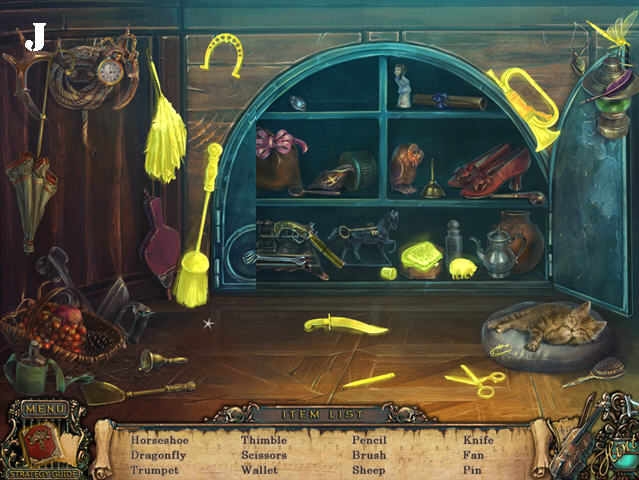
- Play the HOS.
- Find the listed items (J).
- You will receive the LEVER HANDLE.
- Walk down 5 times.
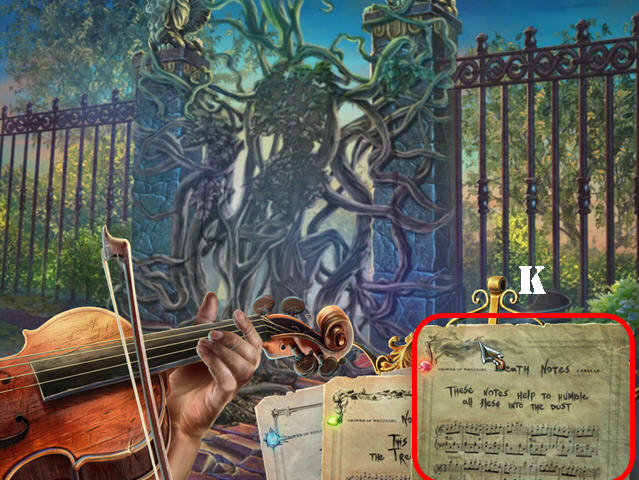
- Zoom into the vines; touch the violin and place the ‘Death Notes’ on the stand (K).
- Go through the gate.
Chapter 6: The Ship

- Zoom into the branches; burn them with the MATCHES (A).
- Take the CHIP and the METAL SCALE (B).
- Go down the stairs.
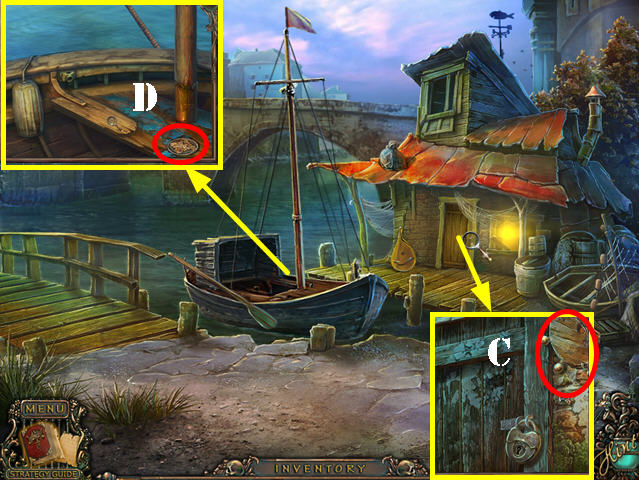
- Zoom into the door; take the WHEEL (C).
- Zoom into the boat; take the MEDALLION (D).
- Go left.
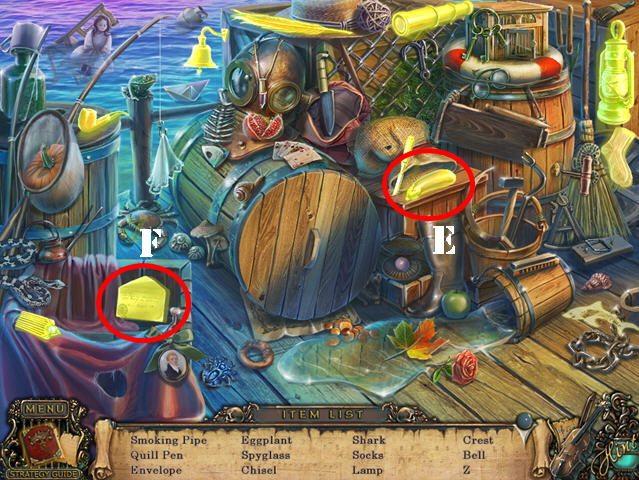
- Play the HOS.
- Tip the sack and take the eggplant (E).
- Remove the cloth and take the envelope (F).
- You will receive the CHISEL.

- Look at the metal fish; place the MEAL SCALE on it (G) and take the KEY (H).
- Go forward.
- Zoom into the box (I) and add the CHIP to it to activate a puzzle.
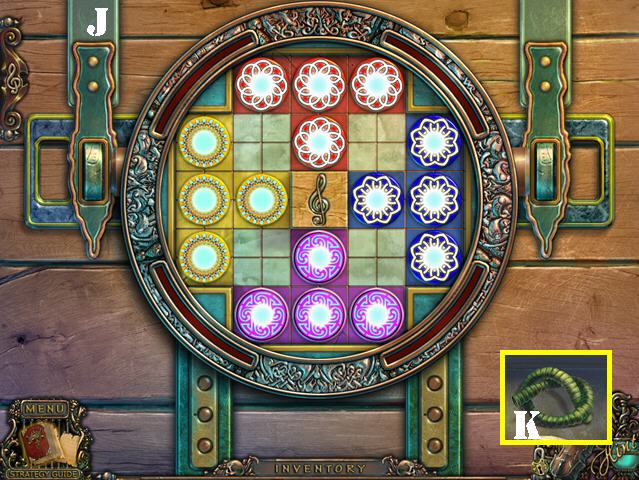
- Move the chips onto the squares of the same color.
- Touch a chip for an arrow to appear, then select the arrow in the direction you want to go in.
- Please look at the screenshot for the solution (J).
- Take the PUMP HOSE from inside the box (K).
- Zoom into the winch; add the WHEEL to it (L); pull on the wheel and take the SHIP MEDALLION PIECE (M).
- Walk down 3 times.
- Zoom into the vase; use the CHISEL on it and take the MEDALLION (N).
- Return to the ship.
- Take a closer look at the door; insert the KEY in the lock (O) and turn the handle (P).
- Go through the door.
- Zoom into the chest; place the 2 MEDALLIONS in the slots. Open the chest and take the SWORD (Q).
- Walk down.
- Zoom into the bag; use the SWORD to cut it down (R).
- Go through the hole in the floor (S).
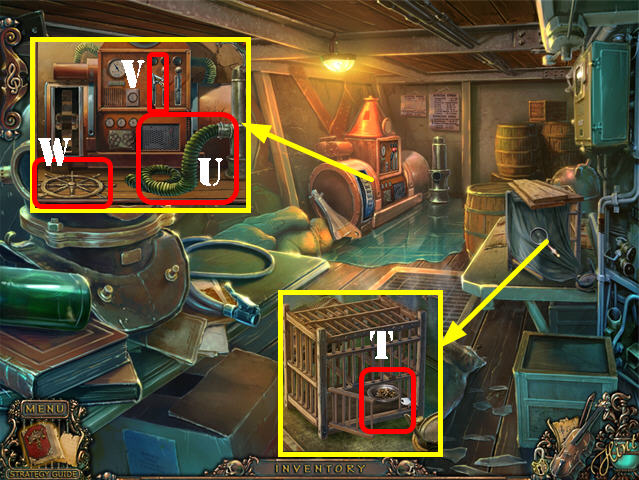
- Zoom into the cage; remove the boards and the sheet; take the FISH FOOD (T).
- Zoom into the pump; place the PUMP HOSE on it (U).
- Pull the lever (V) and take the SHIP’S WHEEL (W).
- Walk down and go through the door.
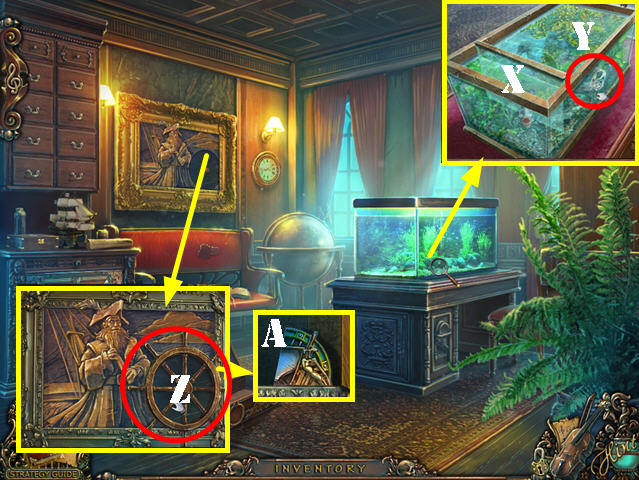
- Zoom into the tank and use the FISH FOOD in it (X).
- Take the DIAMOND RING (Y).
- Examine the picture; place the SHIP’S WHEEL on it (Z). Touch the wheel and take the SHIP MEDALLION PIECE (A).
- Return to the cargo hold.
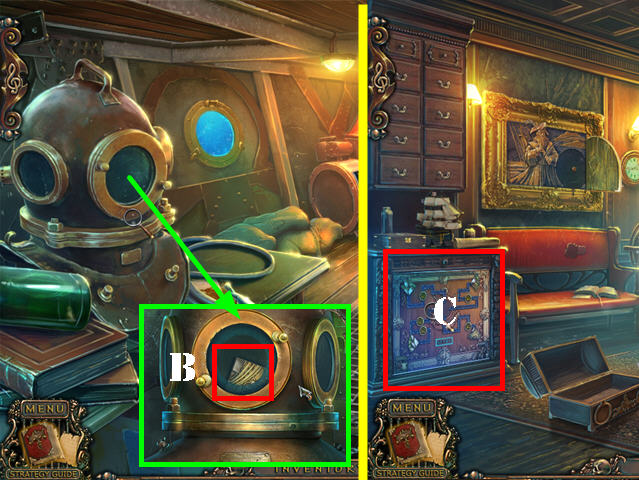
- Zoom into the diving helmet; use the DIAMOND RING on the glass and take the SHIP MEDALLION PIECE (B).
- Return to the office.
- Zoom into the cabinet (C); place the 3 SHIP MEDALLION PIECES on it to activate a puzzle.
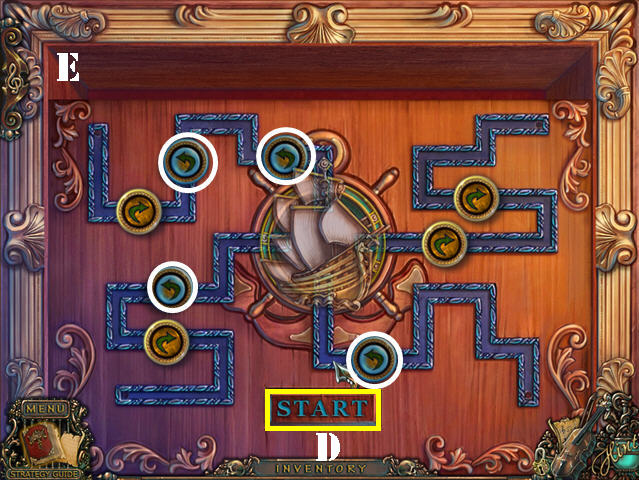
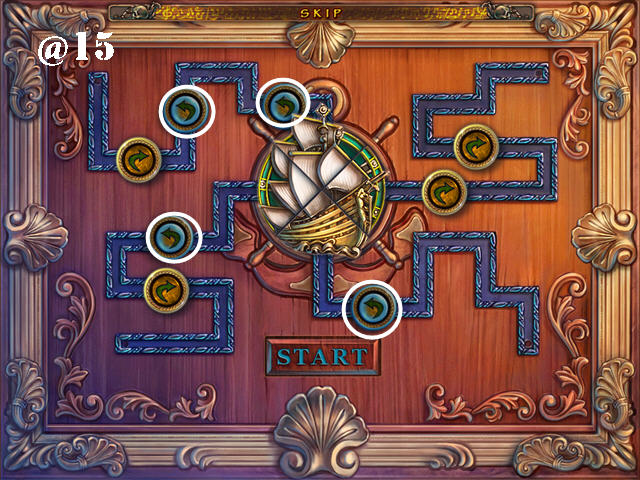
- Select the right combination of arrows so when the medallion parts travel to the center, they end up facing the right way.
- To solve the puzzle, press down on the arrows marked in white and then press start (D).
- Take the KEY and the HOOK AND ROPE (E).
- Walk down twice.
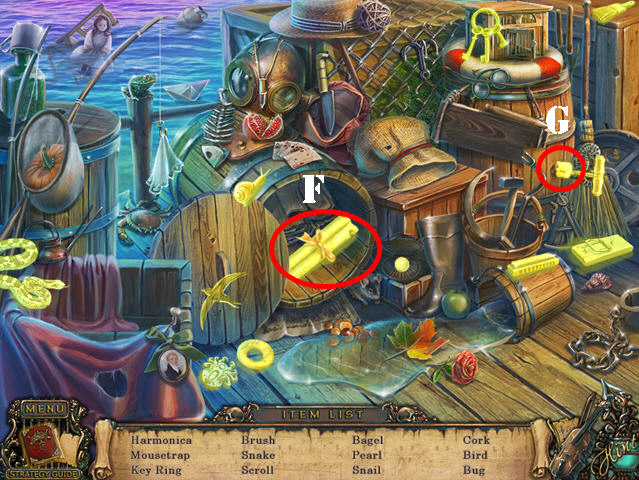
- Play the HOS.
- Open the barrel and take the scroll (F).
- Turn the corkscrew and take the cork (G).
- You will receive the first INSECT EMBLEM.
- Walk down.
- Zoom into the door; use the KEY in the lock (H).
- Open the door and go through it.
Chapter 7: The Finale
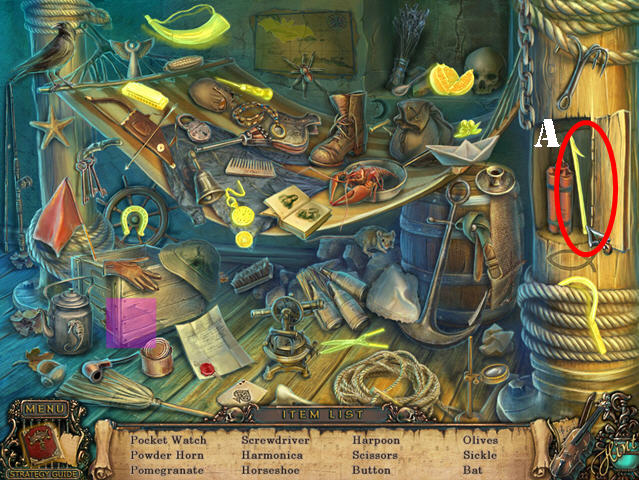
- Play the HOS.
- Open the door and take the harpoon (A).
- You will receive the HARPOON.
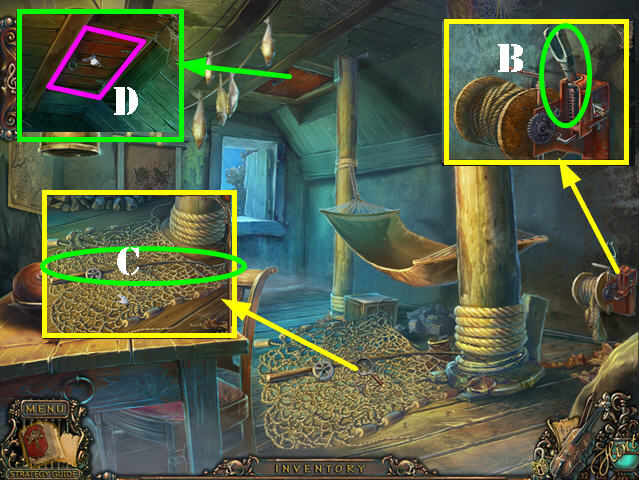
- Zoom into the winch; use the LEVER HANDLE on it (B).
- Examine the net and take the FISHING ROD (C).
- Zoom into the hatch; attach the HOOK AND ROPE to it.
- Go through the hatch (D).
- Select the violin and place the ‘Notes to Fight’ on the stand to dispel the shadows.
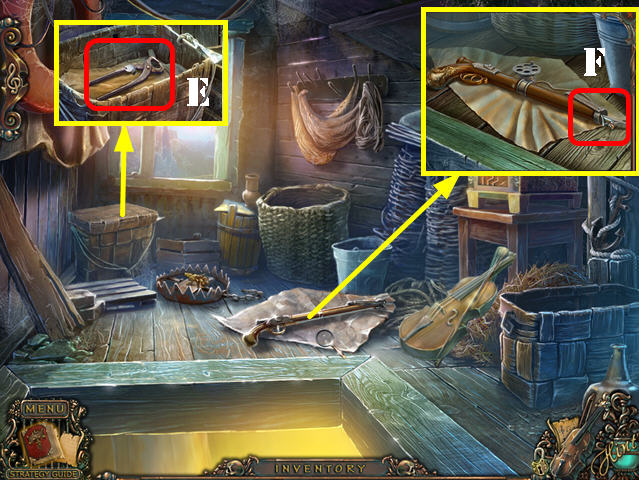
- Zoom into the basket; open it, remove the paper and take the NIPPERS (E).
- Zoom into the gun; place the HARPOON in it and take the HARPOON GUN (F).
- Walk down twice.
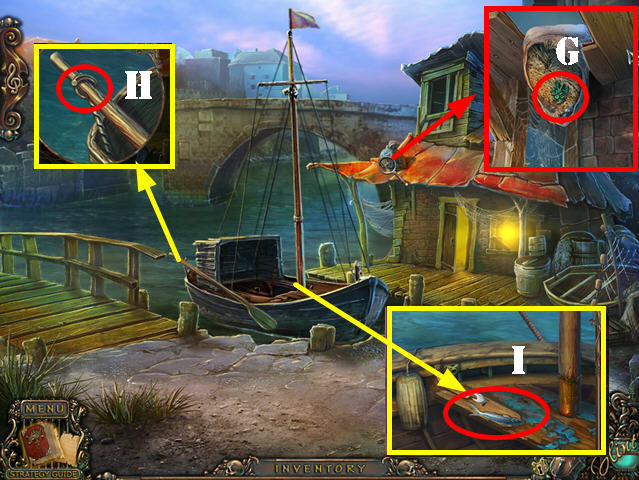
- Zoom into the sack on the roof; use the HARPOON GUN on it and take the second INSECT EMBLEM (G).
- Examine the oar in the boat; use the NIPPERS on the ring and take the PADDLE (H).
- Zoom into the boat; put down the FISHING ROD and take the FISH (I).
- Go left.
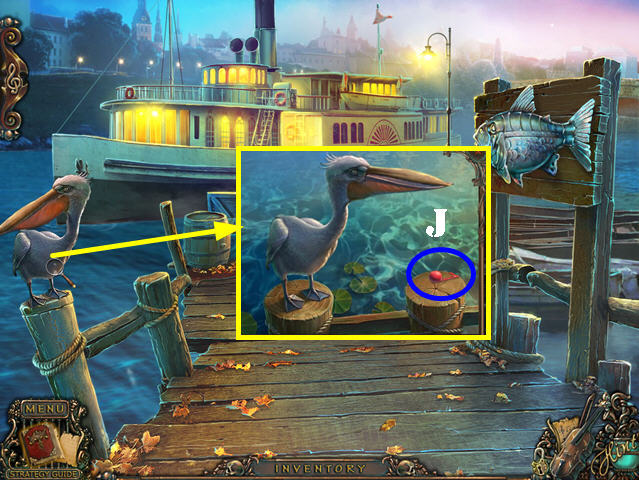
- Zoom into the pelican; place the FISH on the stump and take the first MUSIC NOTE (J).
- Return to the shack.
- Play the HOS.
- Remove the crate piece and take the music note (K).
- You will receive the second MUSIC NOTE.
- Go up to the attic.

- Take a closer look at the trap; place the PADDLE in it and take the third INSECT EMBLEM (L).
- Walk down.
- Examine the wall; place the 3 INSECT EMBLEMS in the slots (M) and take the third MUSIC NOTE (N).
- Return to the attic.
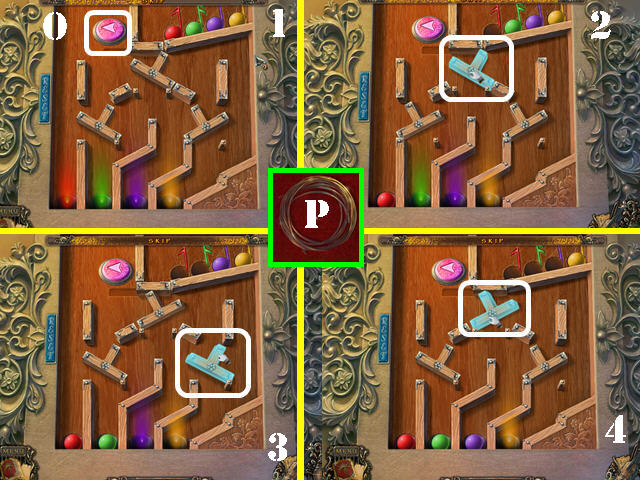
- Zoom into the machine and place the 3 MUSIC NOTES on it to activate a puzzle.
- Adjust the ramps accordingly so the ball falls into the hole of the same color.
- Select a ramp to tilt it; arrange the ramp accordingly and then use the button (O) to release a ball.
- Please look at the screenshot for the solution (1-4).
- Take the HARP STRINGS (P).
- Walk down 5 times and then go through the window by the right tree.
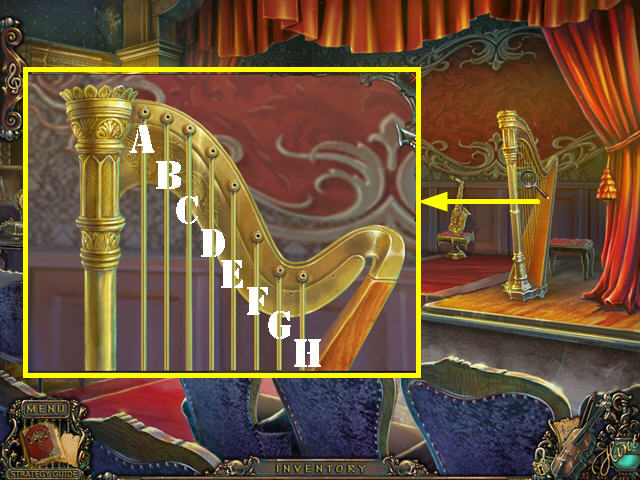
- Zoom into the harp and place the HARP STRINGS on it to activate a puzzle.
- Select the stings in the right order.
- First sequence: A, C, E, G.
- Second sequence: H, B, C, A, B.
- Third sequence: D, A, G, B, H, B.
- Fourth sequence: A, C, B, H, D, A, E.

- Zoom into the saxophone; use the SAXOPHONE KEYS on it to activate a puzzle.
- Select pairs of opposite items to eliminate them from the board.
- Please look at the screenshot for the color-coordinated solution (I).
- Zoom into the ground; take the AWL (J).
- Go forward.
- Zoom into the crystals; use the AWL on them and take the METAL FINGER (K).
- Walk down.
- Zoom into the torch and use the METAL FINGER on the hands. Open the hands and take the torch (L).
- Go forward.
- Zoom into the violin and use the TORCH on it (M).
- Touch the violin and place the ‘Notes of Immortality’ on the stand (N).
- Congratulations, you have completed Maestro: Music from the Void.
Mini-games
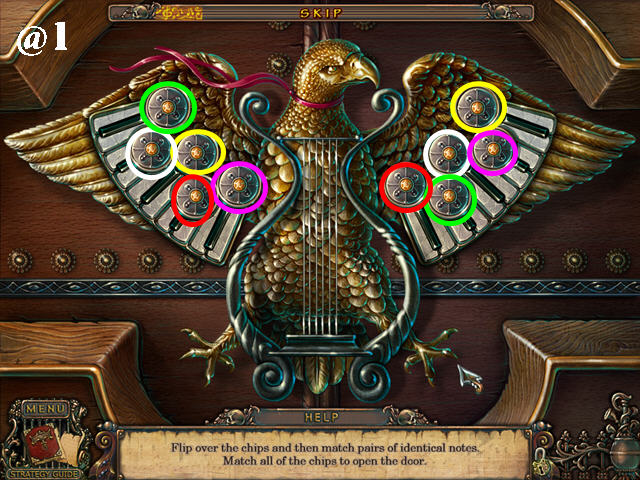
- Flip the coins and match 2 of the same ones.
- Please look at the screenshot for the solution (@1).
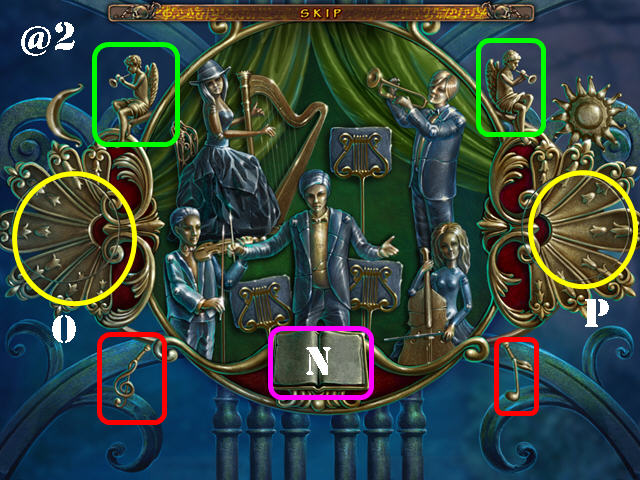
- Open the curtain. Flip the book page (N).
- Rotate the left rings into place (O).
- Swap the pieces on the right until you’ve formed the right image (P).
- Touch the two rings (O and P).
- Touch the 2 music notes (red).
- Touch the 2 angels (green).
- Please look at the screenshot for the solution (@2).
- Select the arrow buttons to swap the left and right flute parts next to the corresponding arrows.
- Touch the buttons on the center flute part to rotate them.
- Once you have all the pieces in the right positions, touch the buttons of the flute parts on the left and right pieces to attach them to the center piece.
- Please look at the screenshot for the solution (@4).
- Place each button in its matching slot.
- Drag the buttons along the rails in the positions shown.
- Using the screenshot (@5) as a guide, move the buttons in the following order: move button 1 to its matching slot, move button 2 to where the arrow is pointing, move buttons 3 and 4 to their matching slots, move button 5 to where the arrow is pointing, move button 6 to its matching slot. Move the drum and the harp to their matching slots.
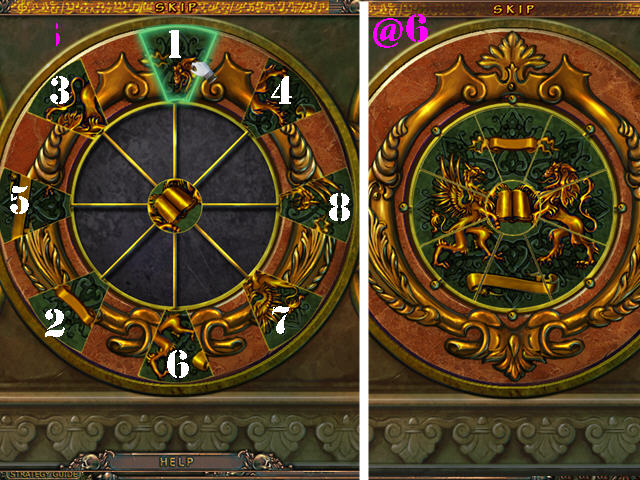
- Attach the wedges to the correct spots on the center piece. Select the center piece to rotate it and then touch a wedge to attach it to the center piece.
- Attach the pieces in the order shown in the screenshot (1-8) to achieve this solution (@6). Note: make sure to position the center piece as shown in the screenshot before you begin attaching pieces.
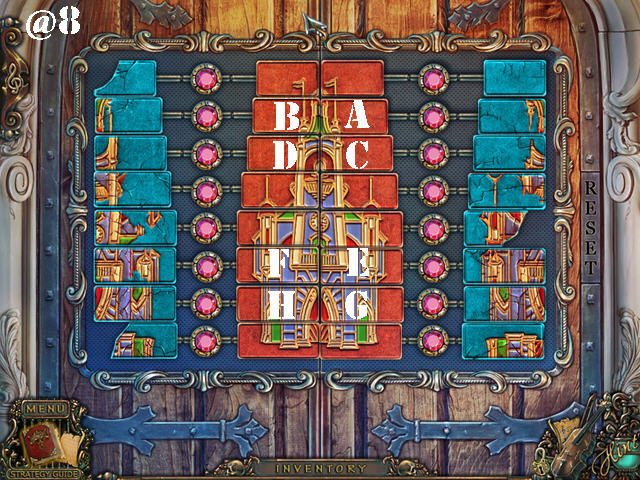
- Select the pieces in the right order to recreate the image.
- To solve the puzzle, select the pieces in this order: A, B, C, D, F, E, H, and G (@8).
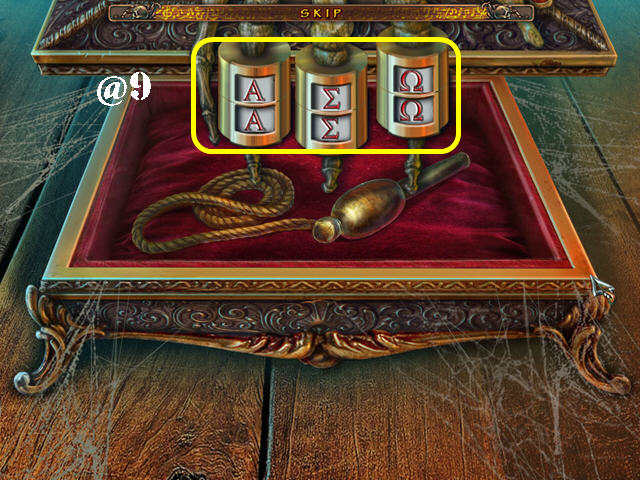
- Rotate the rings until each set has 2 matching symbols.
- Please look at the screenshot for the solution (@9).
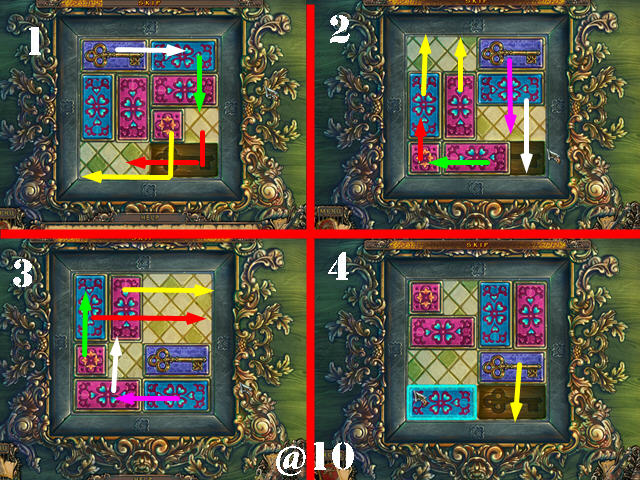
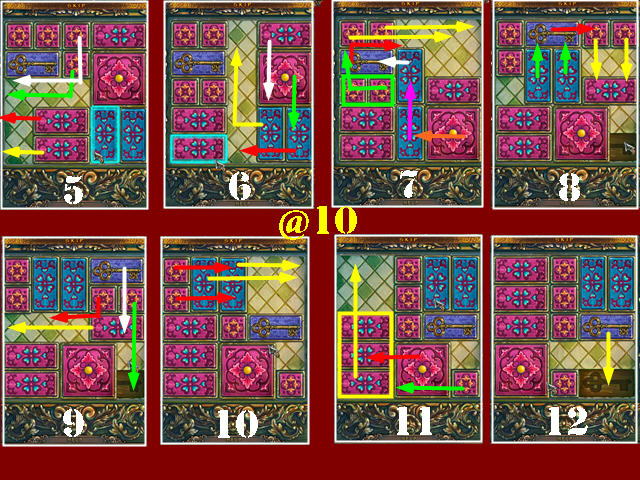
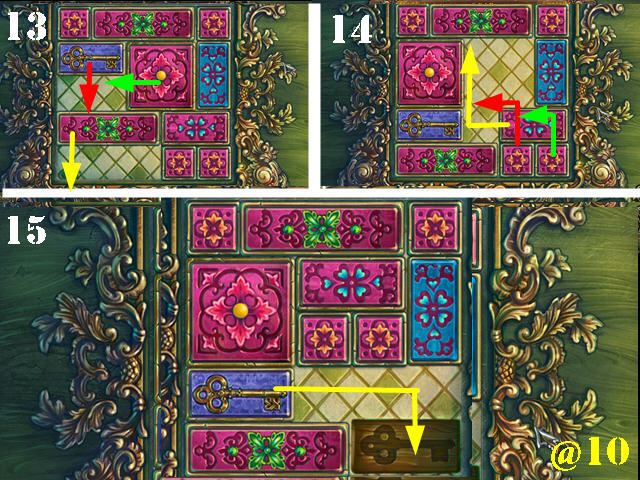
- Slide the plates out of the way until you can put the key in the slot.
- There are 3 rounds to solve (@10).
- Please look at the screenshots for the solutions and follow the arrows in this order: Yellow, Red, Green, White, Purple, and Orange.
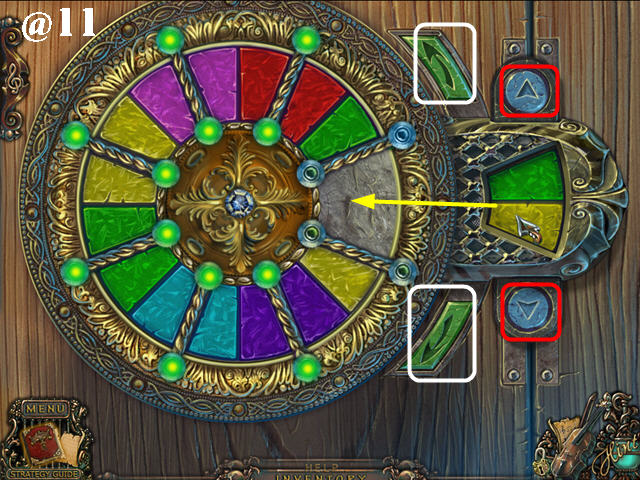
- Place the glass pieces next to the ones of the same color.
- Use the green arrows to rotate the wheel (white).
- Use the blue arrows to scroll through all the glass pieces (red).
- Select a glass piece in the window to add it to the wheel.
- Please look at the screenshot for the solution (@11).
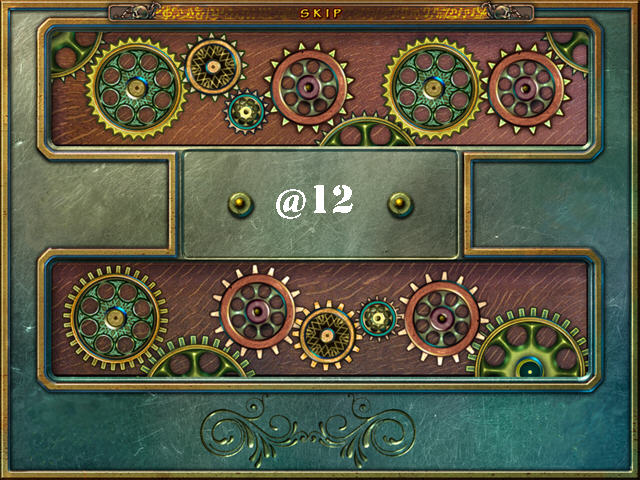
- Place all the gears in the right spots.
- Select one of the two panels to reveal the gears. Move the gears into place.
- Use the pegs in the center as a holding spot for the gears.
- Please look at the screenshot for the solution (@12). Note: pay close attention to the shape of the spikes on each gear.
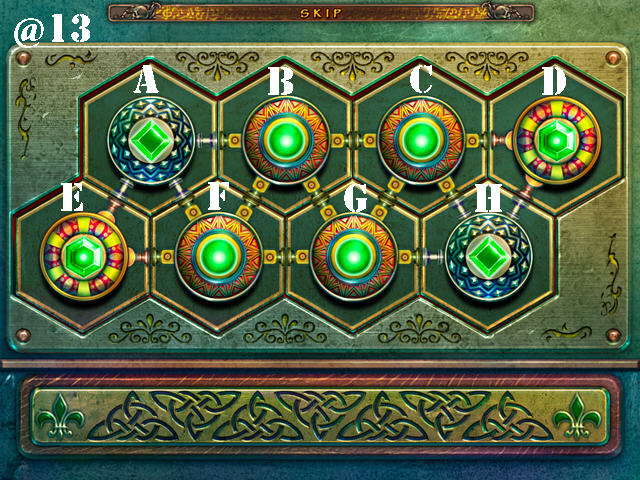
- Place all the buttons in the right spots by swapping the pieces. Swapping pieces will automatically rotate them.
- To solve the puzzle, please follow these steps: A-D, D-B, and E-F (@13).
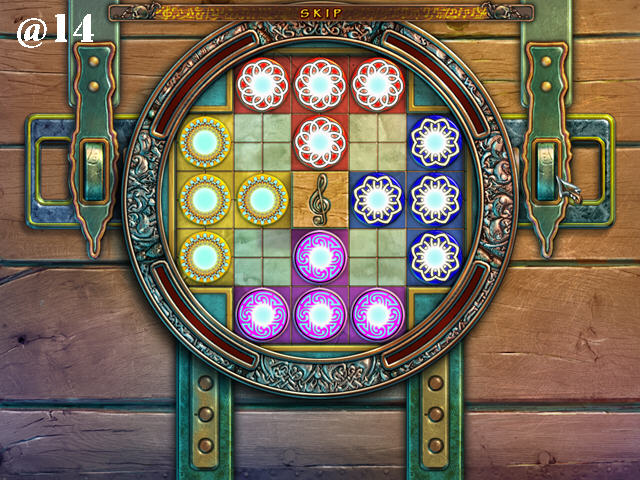
- Move the chips onto the squares of the same color.
- Touch a chip for an arrow to appear, then select the arrow in the direction you want to go in.
- Please look at the screenshot for the solution (@14).
- Select the right combination of arrows so when the medallion parts travel to the center, they end up facing the right way.
- To solve the puzzle, press down on the arrows marked in white and then press start (@15).
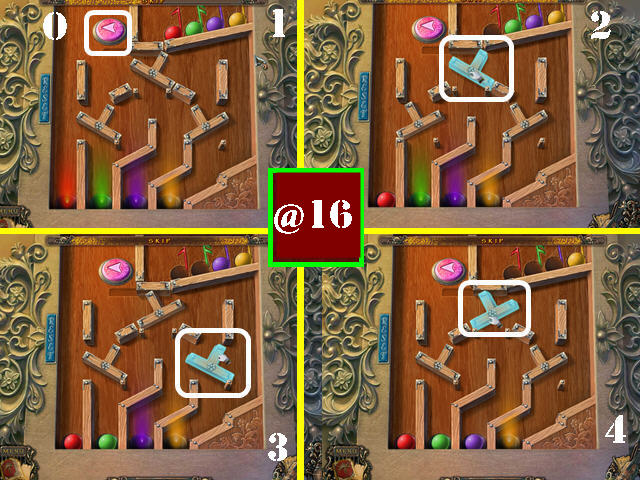
- Adjust the ramps accordingly so the ball falls into the holes of the same color.
- Select a ramp to tilt it; arrange the ramp accordingly and then use the button (O) to release a musical note.
- Please look at the screenshot for the solution (@16).


 Nancy Drew Dossier: Resorting to Danger Walkthrough, Guide, & Tips
 Agency 33 Tips and Tricks, Guide, & Tips
 Redrum: Time Lies Walkthrough, Guide, & Tips
 Mystery Trackers: Silent Hollow Walkthrough, Guide, & Tips
 Myths of the World: The Whispering Marsh Walkthrough, Guide, & Tips