
Welcome to the Apothecarium: The Renaissance of Evil Walkthrough
Discover the city of Apothecarium, where inhabitants are caught in a perilous struggle against a powerful alchemist who is taking the lives of innocent!
Whether you use this document as a reference when things get difficult or as a road map to get you from beginning to end, we’re pretty sure you’ll find what you’re looking for here.
This document contains a complete Apothecarium: The Renaissance of Evil game walkthrough featuring annotated screenshots from actual gameplay!
We hope you find this information useful as you play your way through the game. Use the walkthrough menu below to quickly jump to whatever stage of the game you need help with.
Remember to visit the Big Fish Games Forums if you find you need more help. Have fun!
This walkthrough was created by Space Monkey, and is protected under US Copyright laws. Any unauthorized use, including re-publication in whole or in part, without permission, is strictly prohibited.

• This is the official guide for Apothecarium: The Renaissance of Evil.
• Click Play (A) to open the door and begin or continue the main quest.
• Select Welcome (B) to add, change or delete player profiles. Set a difficulty level that suits your style of play: Casual, Adventure or Challenge. The level may be changed during play by selecting the Menu tab in the lower left corner of a scene and selecting Mode.
• Select Options (C) to adjust the Music, Voice and Sound Effects Volume. You may also select or de-select Full Screen and Custom Cursor.
• Select Puzzles (D) to replay unlocked mini-games, hidden object scenes or surprise chests.
• Open the Store (E) to use collected coins to buy upgrades for game play.
• View Achievements (F) awarded during the game.
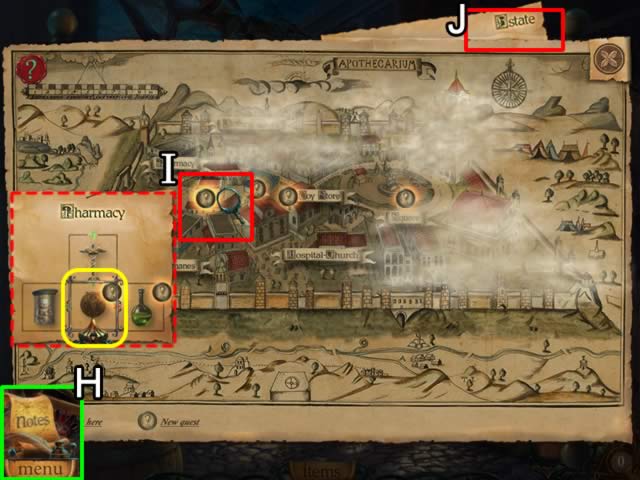
• Open Notes (H) during the game and select the Map tab in the Diary tab to open an interactive map.
• An exclamation mark on an unlocked location indicates a task can be accomplished. Click the location to go directly to it.
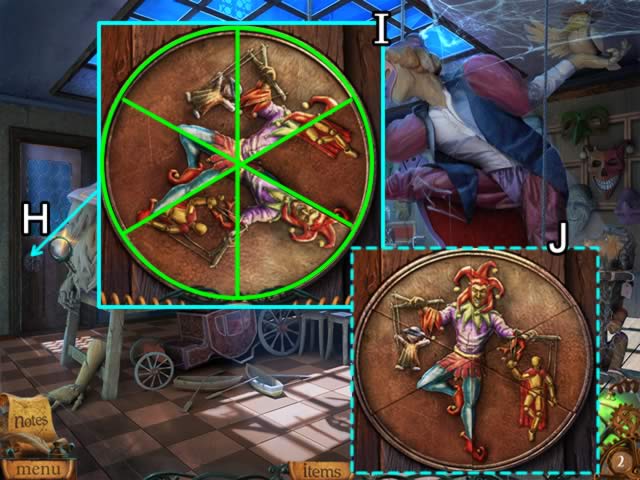
• If a building location has multiple rooms, the cursor changes to a magnifying glass (I). Click to open a room map (dashed red). Click the image associated with a room (yellow) to enter that particular room.
• The Estate tab (J) is a second map for an underground area that is used after completing all of the above-ground locations.
• Main locations mentioned in this guide are the same as those shown on the map.
• Notes also provides Diary information and Tasks status. The Puzzles tab allows replay of unlocked hidden object scenes, mini-games and chest puzzles. The Achievements tab in Notes opens the trophy room.

• Access the Store either from the Main Menu or by clicking the Sack icon in the upper right corner during game play (K). Purchase upgrades for Match 3 play in hidden object scenes or hint and skip options.
• The number of coins available for purchases is shown (L). Accumulate coins by quickly solving hidden object scenes (maximum of three), mini-games (maximum of three) or surprise chests (maximum of three). Additionally, two coins are hidden in each new scene.
• Upgrade purchase options (M) are either One-Time purchases for use only once or Permanent for use during the entire game.
• Place the cursor over an item for its description (N). Use the ‘+’ or ‘-’ signs to adjust the number of one-time items purchased.
• A running total (O) shows the amount of the current items selected for purchase.
• Permanently purchased items have a toggle switch (P) that allows their use to be turned on or off.
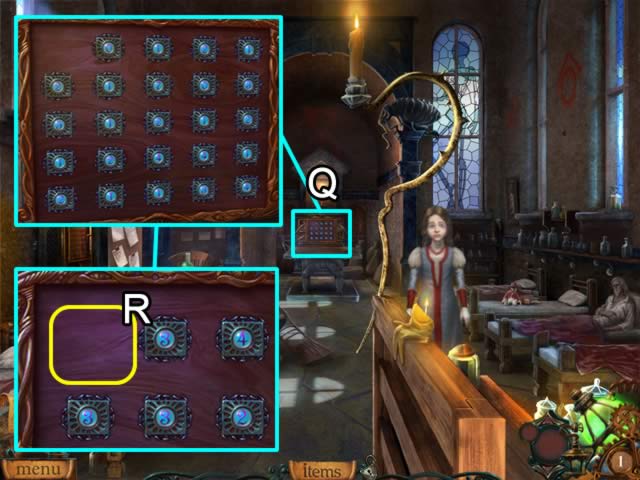
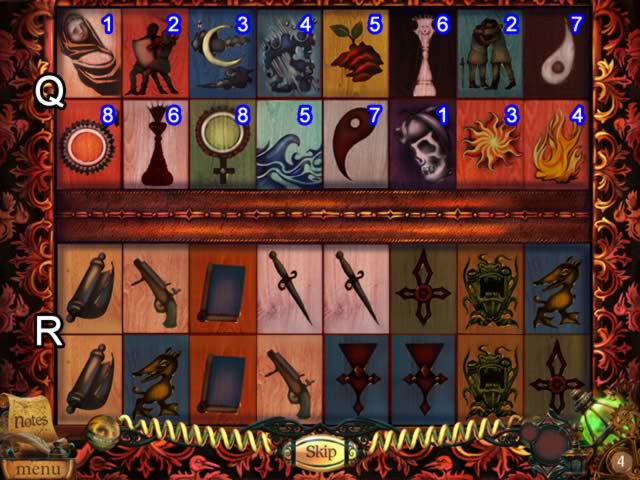
• Purchases are shown on the game screen (Q) next to the Hint machine. Use the up and down arrows above and below the upgrade icon to cycle through the items purchased.
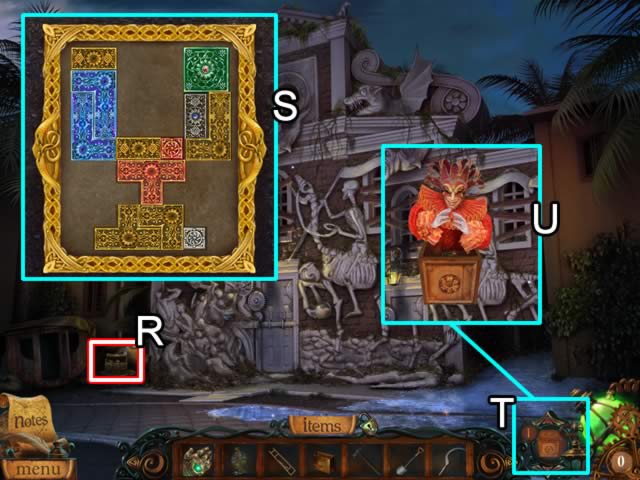
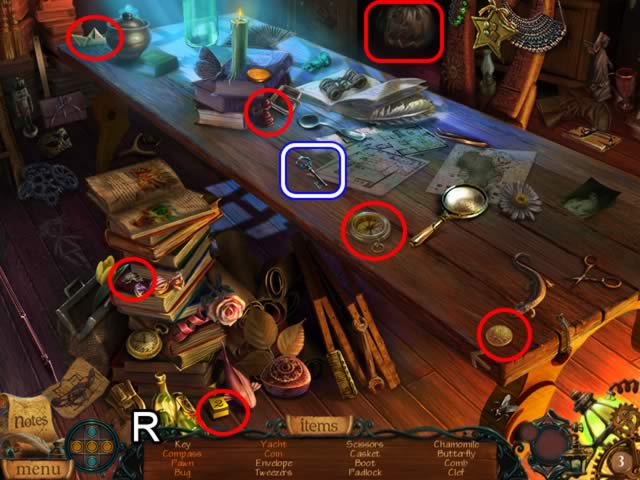
• Look for surprise chests in the scenes (R). They are highlighted in white with a red border.
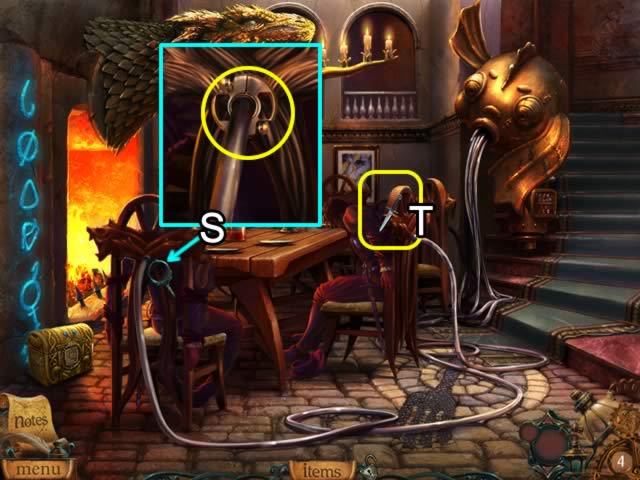
• Each chest contains a puzzle that awards a surprise bonus such as additional coins or extra hints. There are three possible types of puzzles: form fit, slider and shape placement.
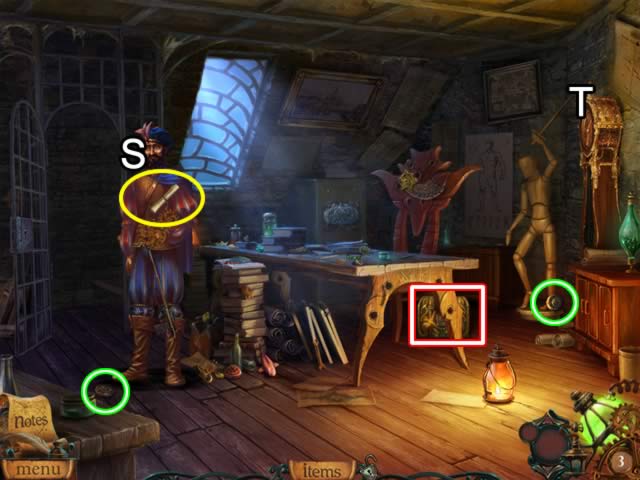
• Solve the puzzle (S) to receive a maximum of three coins and a surprise box added to the bottom right of the screen (T).
• Drag the box onto the scene to open it (U) and receive the bonus award from the jester.
• Unlocked chests may be replayed from the Main Menu or by opening Notes and selecting Chests from the Puzzles tab. Solutions for the surprise chests are shown at the end of this guide.
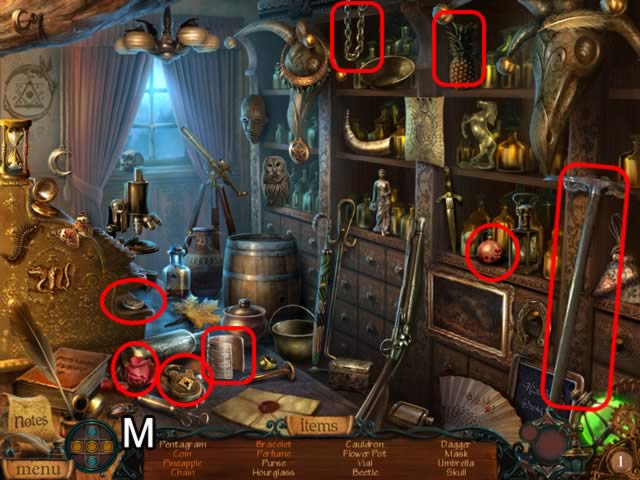
• Hidden Object Scenes are abbreviated as HOS in this guide. The items listed are randomly generated. Items listed in orange are either morphing objects or need an extra step to find them.
• Game play is not linear. This guide attempts to show the most efficient way through the game. Not all inventory items are collected when first encountered. If you are missing an inventory item or cannot complete a scene as indicated in this guide, please check previous entries.
• Speak to the girl (A) to receive story information and to activate this scene.
• Remove the cloth covering the body (B) to trigger a Hidden Object Scene (HOS) on the left.
• A HOS is indicated by rising bubbles (C).
• Play the HOS.
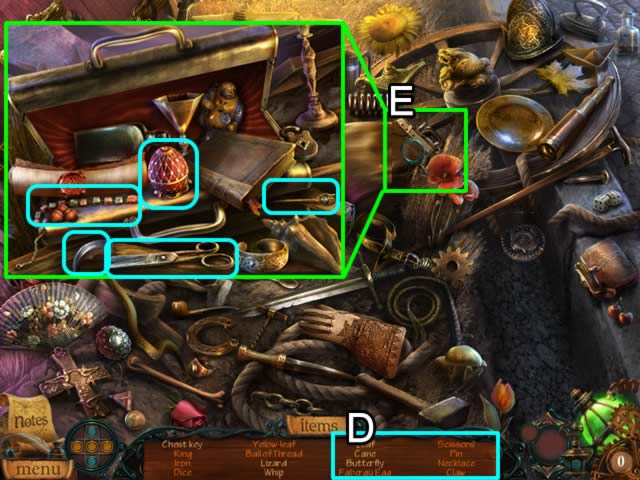
• Objects highlighted in orange and located at the end of the item list (D) indicate an extra step must be taken to find them.
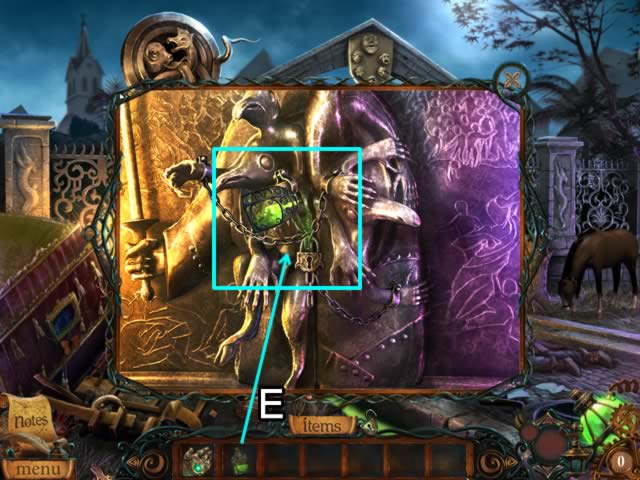
• Open the clasp on the satchel (E) and look closer at the contents.
• Please note: the list of items for each HOS is random. Your list may not agree with the screenshot.
• Looking closely at the scene reveals some objects changing (morphing) into different objects (F).
• Morphing objects are randomly generated as list items. A morphing item is listed in orange.
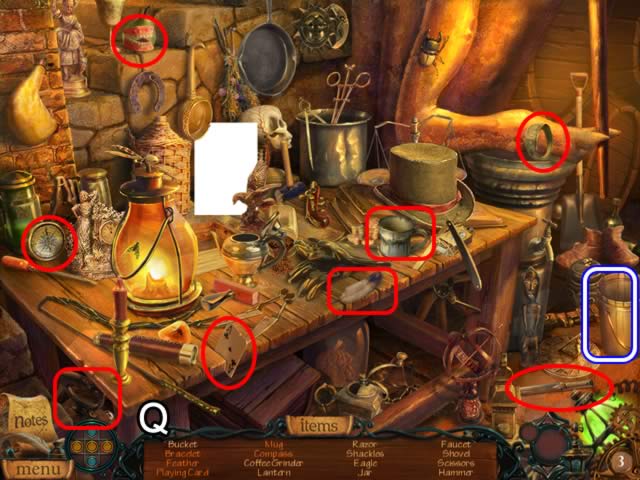
• Because of the random nature of each HOS, only zoom locations, morphing objects and inventory items are highlighted in these scenes. Morphing items are highlighted in red. Inventory items are circled in white with a blue border and CAPITALIZED in this strategy guide.
• The CHEST KEY (G) goes to inventory after all items are found.
• Use the Hint machine (H) to help locate list items.
• An alternate way to eliminate list objects is to play a match 3 game.
• Click the match 3 icon (I) to switch from the HOS to a match 3 board.
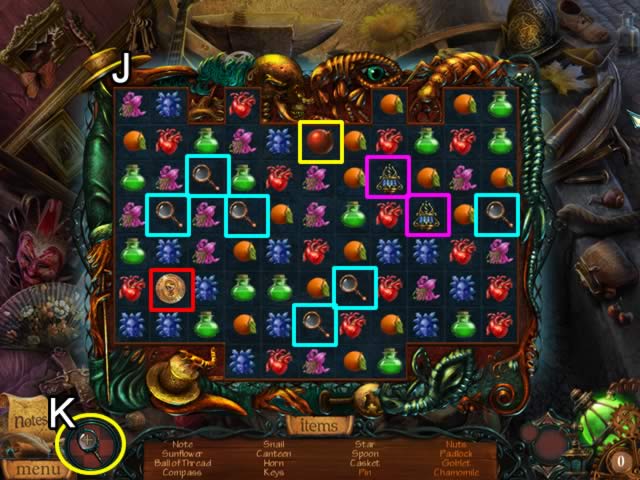
• A match 3 board appears above the items list (J).
• Arrange three or more matching tiles horizontally or vertically to drive the magnifying glass tiles (aqua) off the board and eliminate an item on the list. Each magnifying glass tile removes one list item.
• Click a magic crystal (pink) and an adjacent tile to eliminate that tile.
• Matching three tiles by a bomb (yellow) eliminates tiles around the bomb.
• Receive additional coins by dropping the coin tile (red) off the board.
• Switch back to the HOS by clicking the magnifying glass icon (K) in the lower left corner.
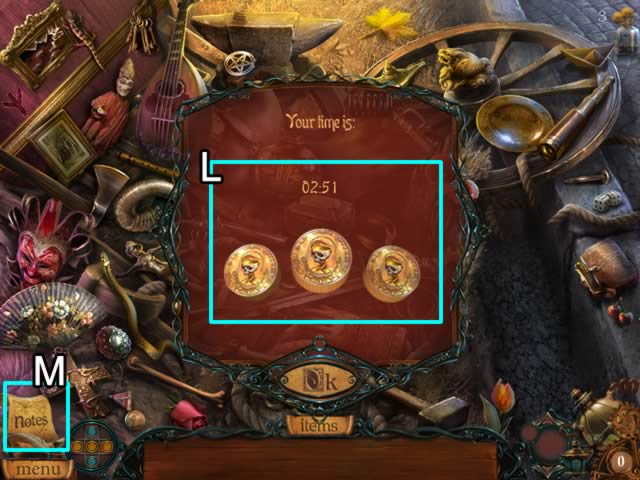
• Completing a HOS or a match 3 game earns coins based on the completion time (L).
• Earn a maximum of three coins for a fast time.
• A scene may be repeated at any time by opening Notes (M) and clicking the Puzzles tab.
• Use the coins in the Store to purchase upgrades for match 3 play in HOS or hint and skip options.
• Please review the General Tips section of this guide for a complete explanation of the Store and collecting coins.
• The ‘Eagle Eye’ achievement trophy is awarded for completing this scene.
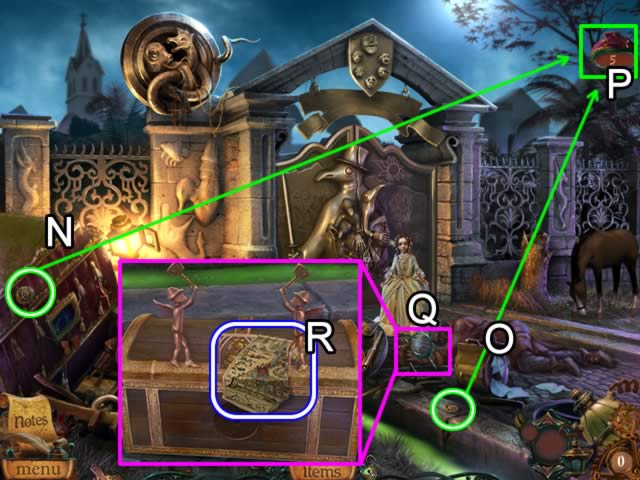
• Pick up the two coins (N) and (O). They are added to the coin sack (P). Click the coin sack at any time to go directly to the Store to purchase game upgrades.
• Coins are highlighted in white with a green border in the scenes.
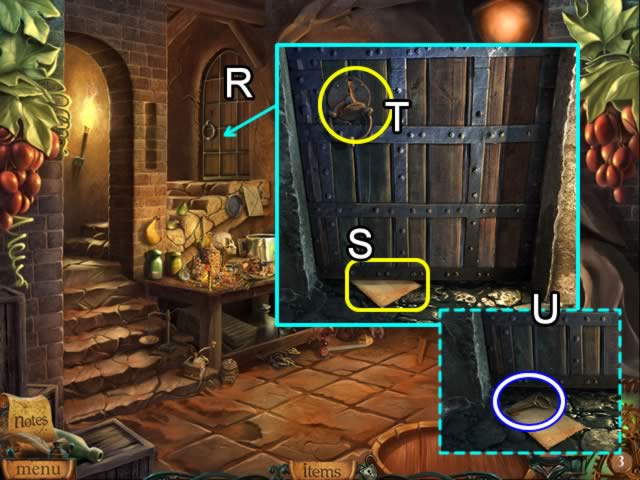
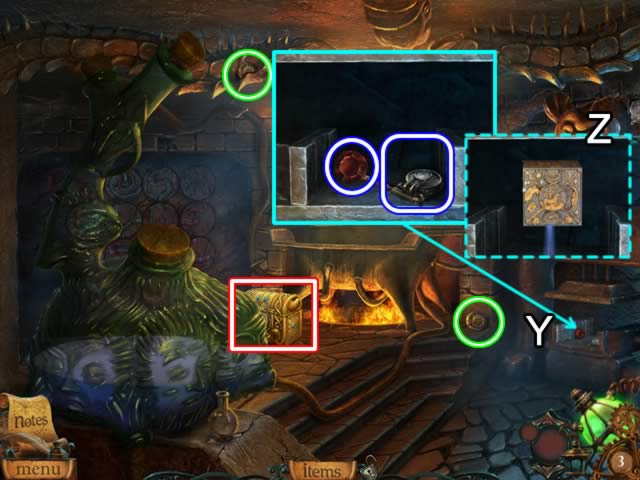
• Look closer at the chest (Q).
• Pick up the MAP-PART 2 piece (R).
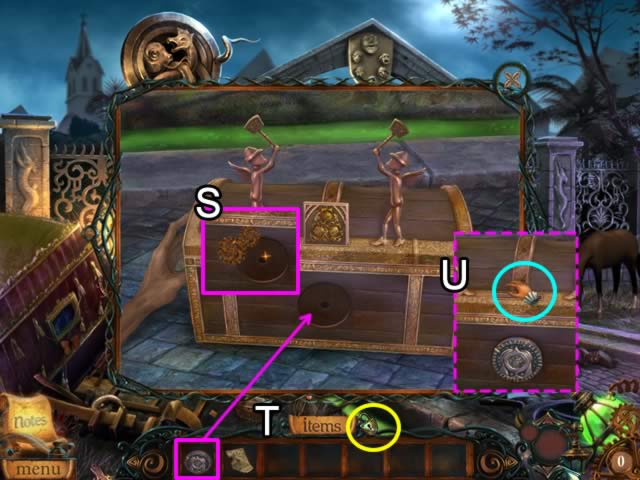
• Examine the inset on the trunk (S). The cursor turns to gears indicating an interactive area.
• Slide the cursor over the Items tab at the bottom of the screen to open the inventory tray (T). Click the padlock (yellow) to keep the inventory tray locked open.
• Take the CHEST KEY from the item tray and place it in the inset. The lock tab is hammered down.
• Click the top of the trunk (U) to open it.
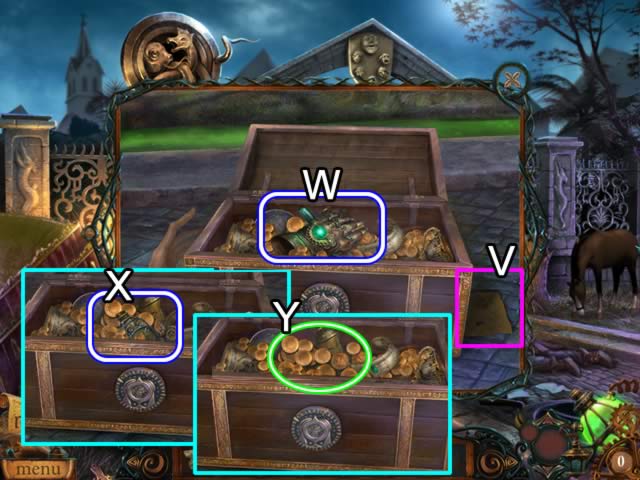
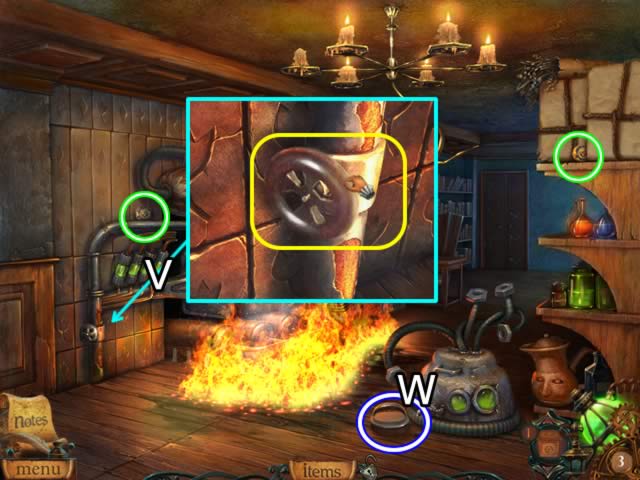
• Examine the piece of paper next to the chest (V).
• Take the ALCHEMIST GLOVE from the trunk (W).
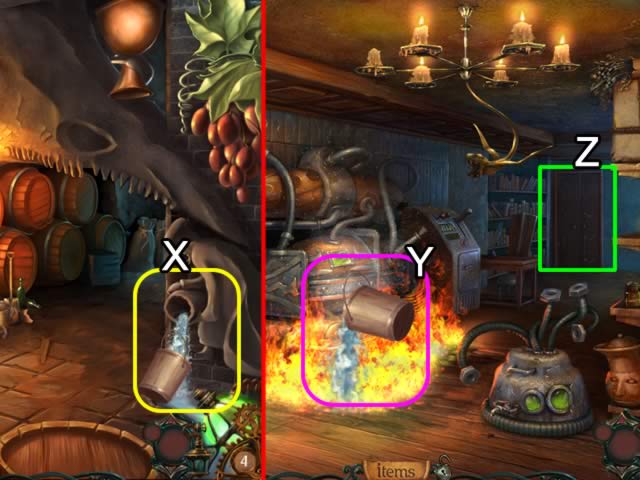
• Pick up the EMPTY FLASK that was hidden beneath of the glove (X).
• Take the pile of coins (Y) for the coin sack.
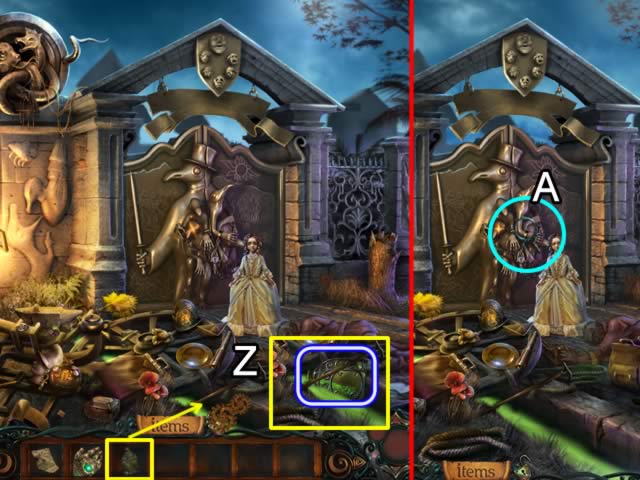
• Place the EMPTY FLASK into the green stream in the gutter (Z).
• Receive a FLASK OF ACID for the inventory.
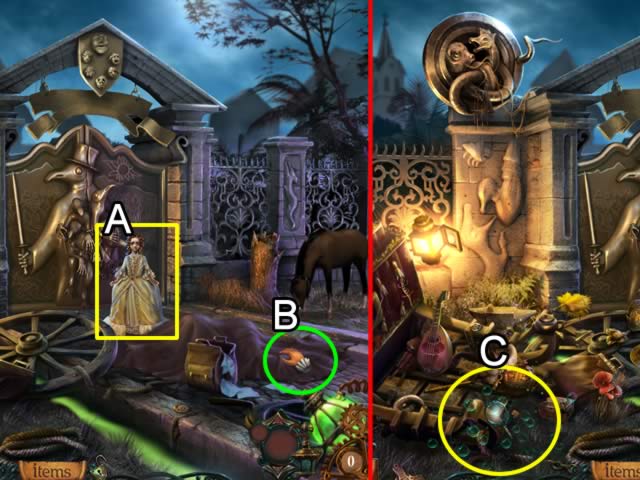
• Look closer at the gates (A).
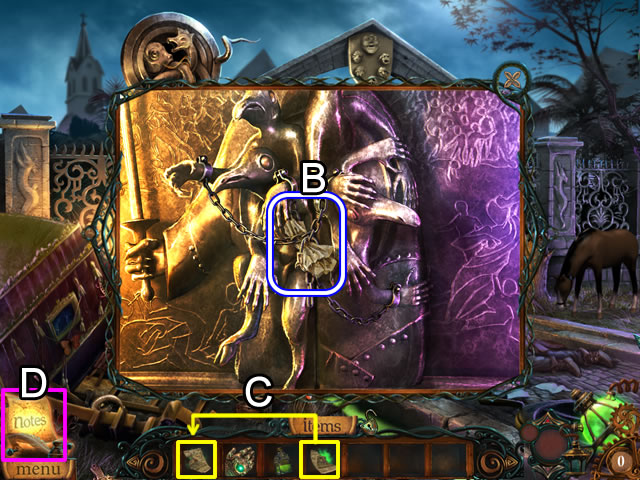
• Remove MAP-PART 1 from the gate chains (B).
• MAP-PART 1 and MAP-PART 2 are glowing in the items tray (C). This means the two inventory items may be combined.
• Drag MAP-PART 1 to MAP-PART 2. They form an interactive Map that is now available in Notes (D). Use the map to move directly to open locations during the game.
• Pour the FLASK OF ACID over the chains (E) to dissolve them.
• Open the gates and follow the girl into the city.
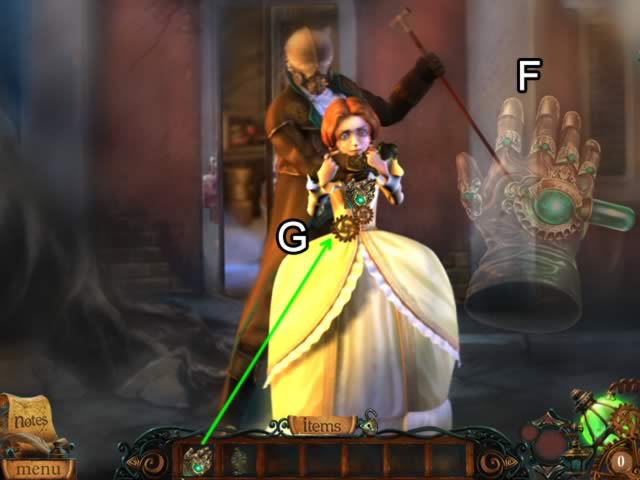
• The glove flashing on a scene (F) indicates the ALCHEMIST GLOVE is needed.
• Place the glove on the girl (G) to free her.
• The glove returns to the inventory after the cutscene.
• Receive the ‘Do-Gooder’ achievement trophy for rescuing the girl.
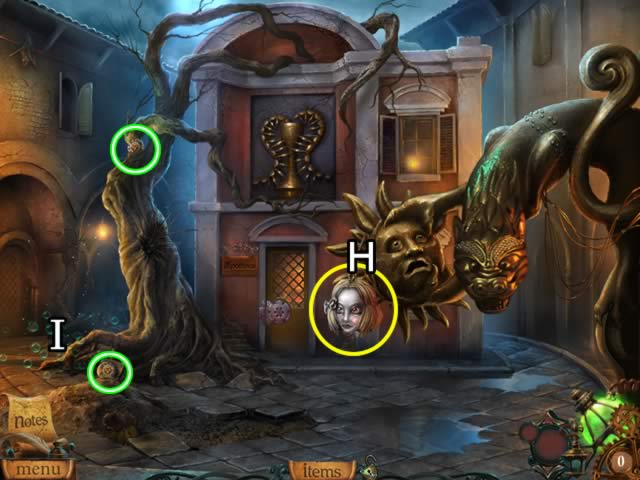
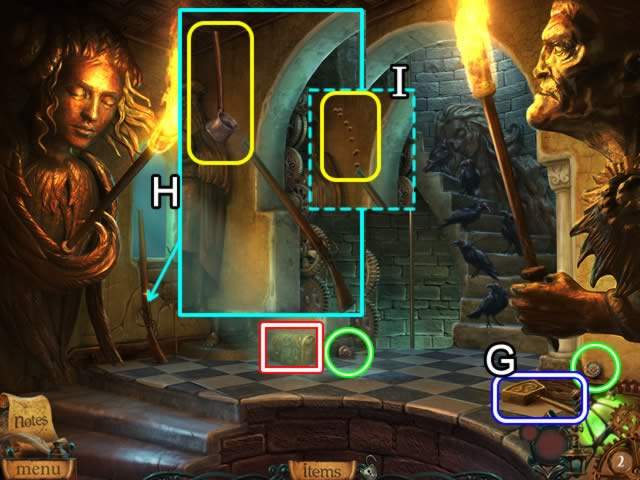
• Attempt to take the puppet’s head (H).
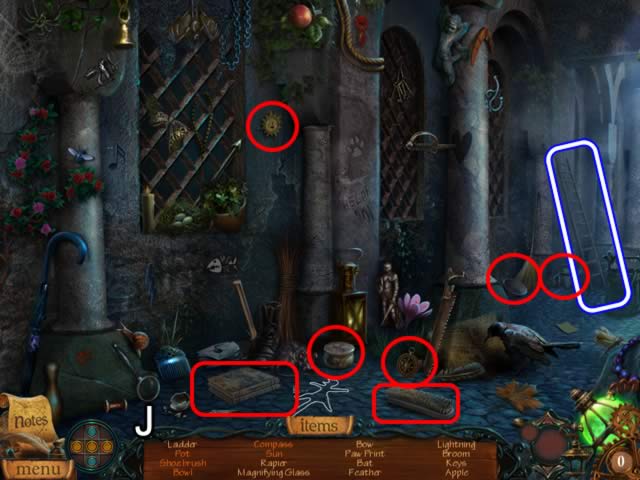
• Play the HOS at the base of the old tree (I).
• Find the items on your list (J).
• Morphing objects are highlighted in red.
• Receive a BROKEN LADDER for your inventory.
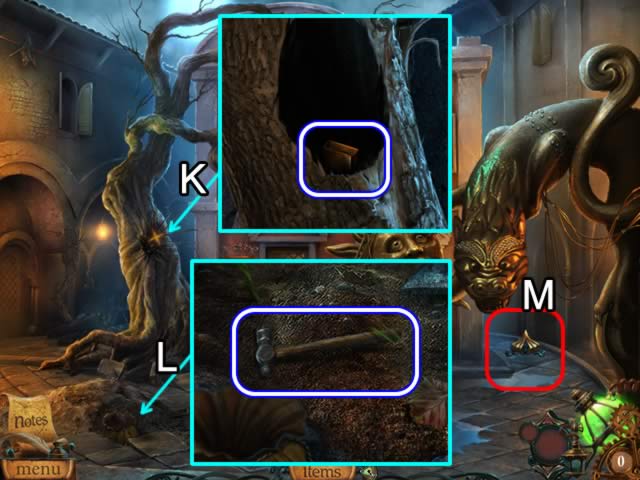
• Look closer at the tree (K); remove the twigs and take the LIGHTER BROKEN .
• Examine the broken paving stones (L); pick up the HAMMER.
• Take the street on the right (M).
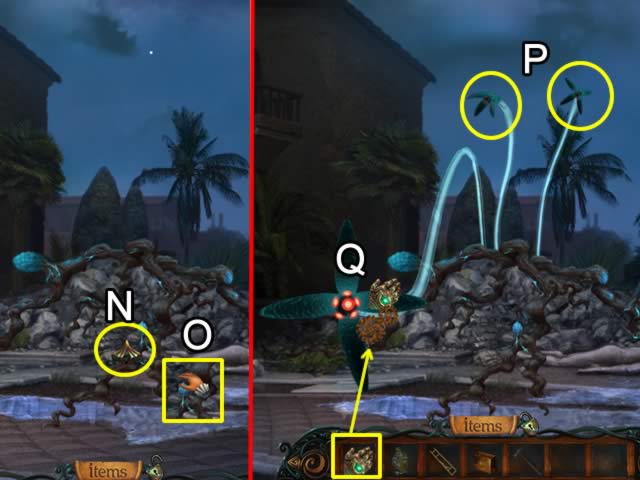
• View the cutscene. Attempt to approach the building rubble (N) and view another cutscene.
• Try to pick up the blue plant (O) to activate the plants.
• Each of the three plant heads (P) comes down to attack.
• Place the ALCHEMIST GLOVE on each plant (Q). It takes several hits to kill the plants. Receive the ‘Monster Slayer’ achievement trophy.
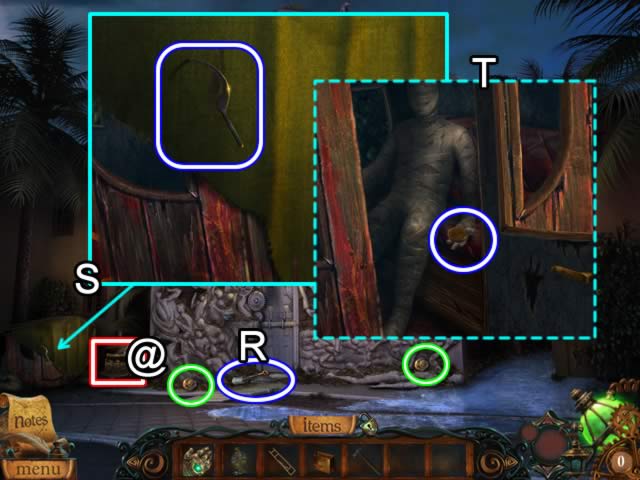
• This is the first scene with a surprise chest (@). Please see the General Tips section of this guide for details on these chests. Solutions for the surprise chests are shown at the end of this guide.
• Pick up the SHOVEL (R) from the steps in front of the newly risen hospital.
• Examine the carriage on the left (S).
• Take the SICKLE BLADE and remove the green cloth covering the carriage.
• Open the carriage door to get the COIN in the wrapped hand (T).
• Go down once.
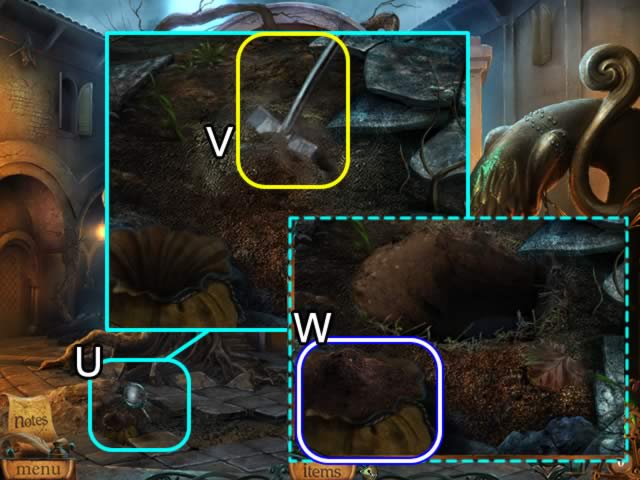
• Look again at the broken paving stones at the base of the tree (U).
• Use the SHOVEL (V) to fill the sack with dirt (W).
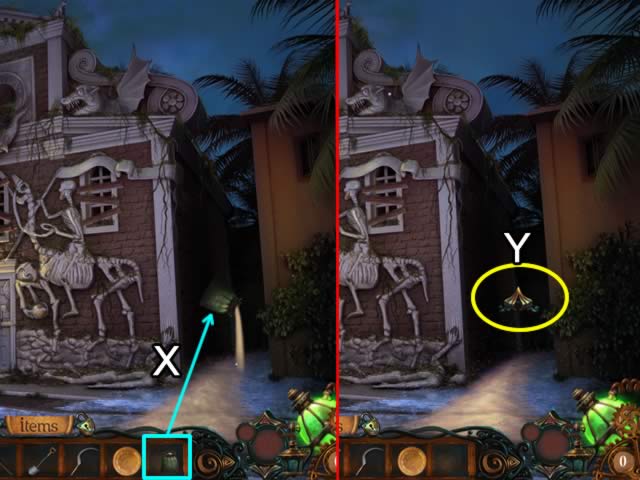
• Take the FULL SACK. Go forward once to return to the hospital.
• Pour the contents of the FULL SACK on the icy backyard(X).
• Go forward on the path between the buildings (Y).
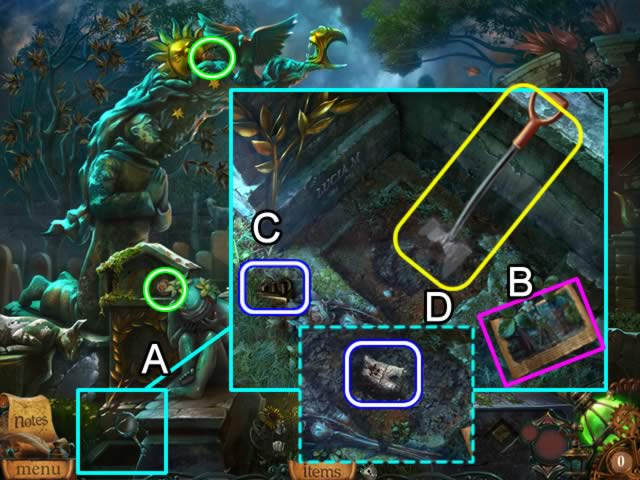
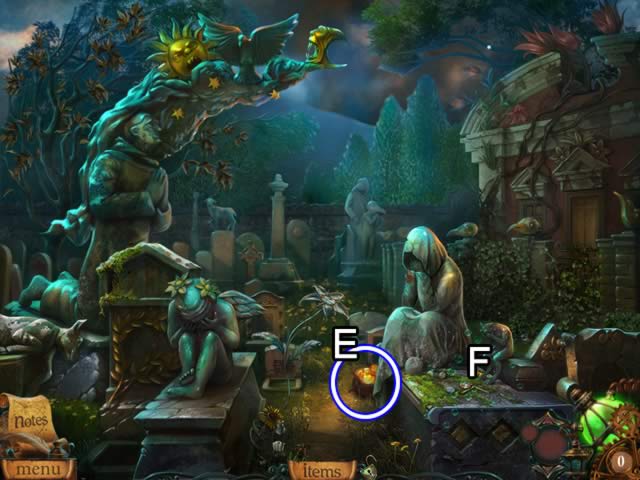
• Examine the grave (A) after the ghost girl disappears.
• Read the paper (B) for story information.
• Pick up the LIGHTER PART (C).
• Use the SHOVEL to uncover the DOLL LOWER BODY part (D).
• Pick up the sack of FIRE FLOWER PETALS (E).
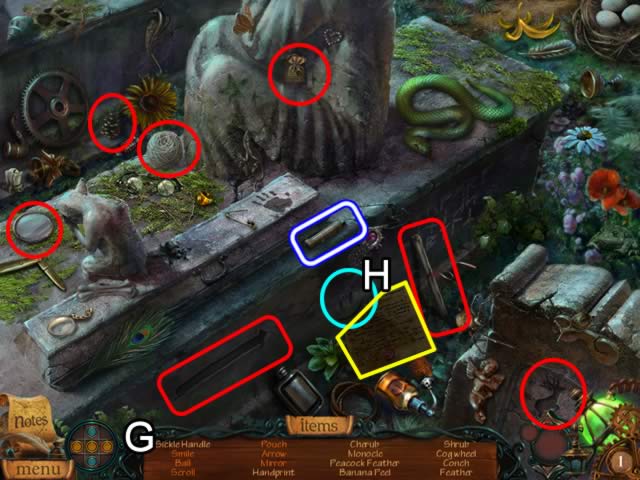
• Play the HOS (F).
• Find the items on your list (G).
• If your list contains a ‘Smile’, tear the piece of paper (H) to find it.
• Morphing objects are highlighted in red.
• The SICKLE HANDLE goes to inventory.
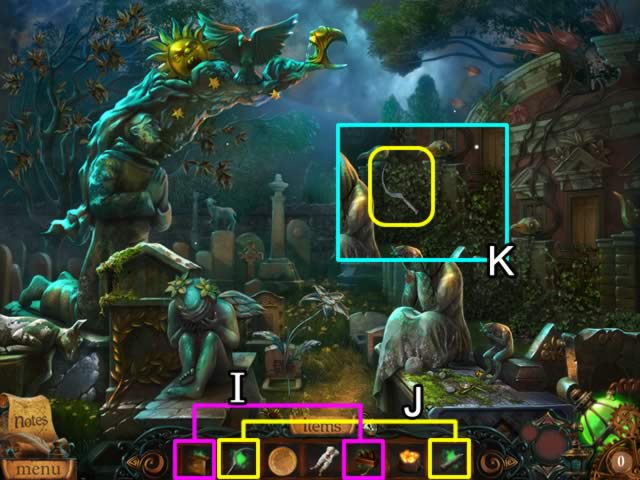
• Combine the LIGHTER BROKEN and the LIGHTER PART (I) to get a LIGHTER.
• Combine the SICKLE BLADE and the SICKLE HANDLE (J) to get a SICKLE.
• Use the SICKLE to remove the ivy covering the gate (K).
• Open the gate and enter the building.
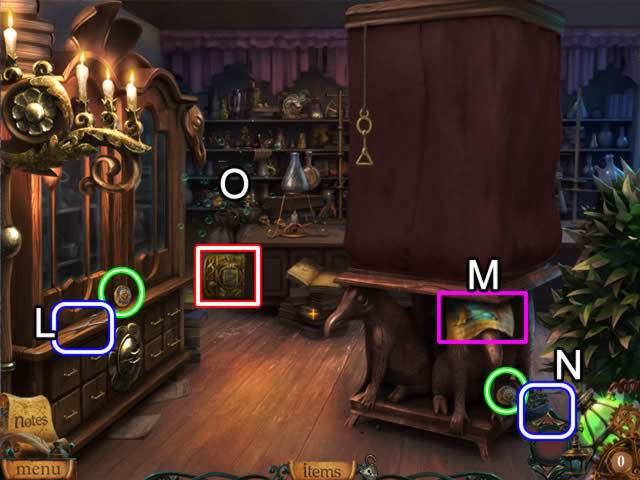
• Pick up the SCISSORS (L).
• Read the paper (M) for Diary information.
• Pick up the MISTLETOE LEAVES (N).
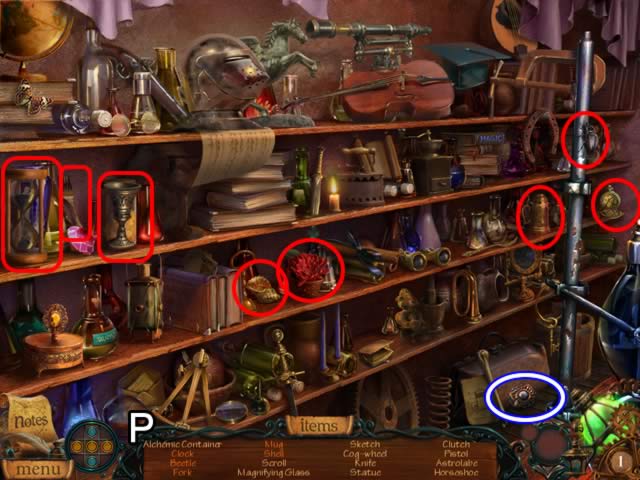
• Play the HOS (O).
• Find the items on your list (P).
• The morphing objects are highlighted in red.
• The ALCHEMIC CONTAINER goes into your inventory.
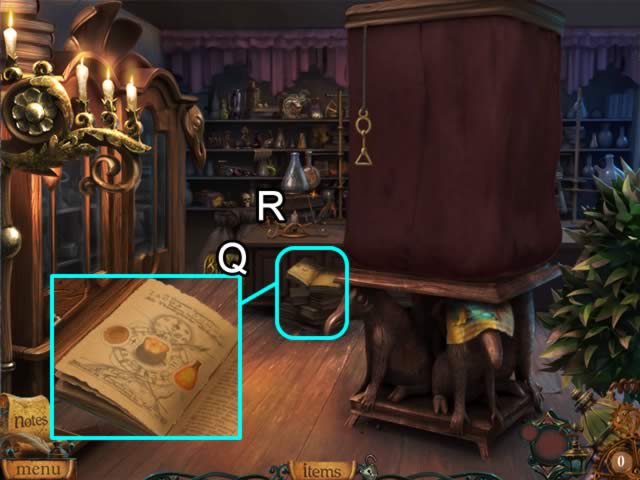
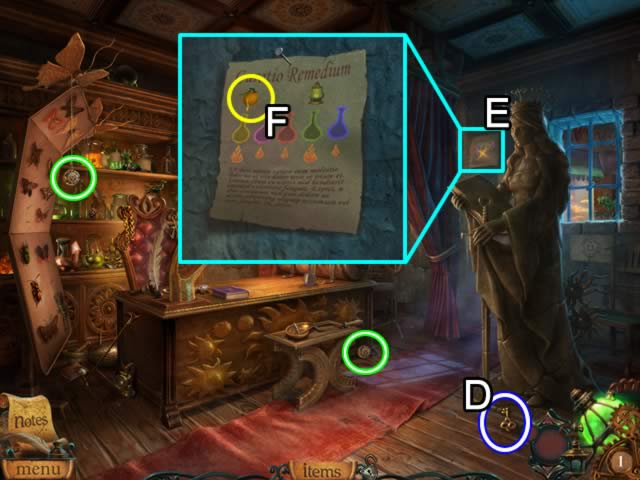
• Look at the pile of books on the floor in front of the table (Q) to see a recipe.
• Zoom in on the table surface (R) to open an interactive area.
• Use the LIGHTER to light the flame on the burner (S).
• Following the directions from the book, add the COIN and FIRE FLOWER PETALS (T) to the beaker.
• Take the beaker of FIRE FLOWER ESSENCE from the burner (U).
• Receive the ‘Apprentice of Alchemy’ achievement trophy.
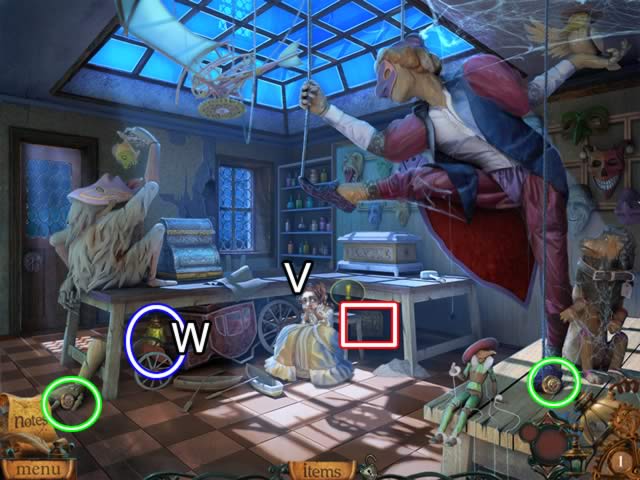
• Pull the cord (V) to open the curtains on the experiment table.
• Zoom in on the beakers.
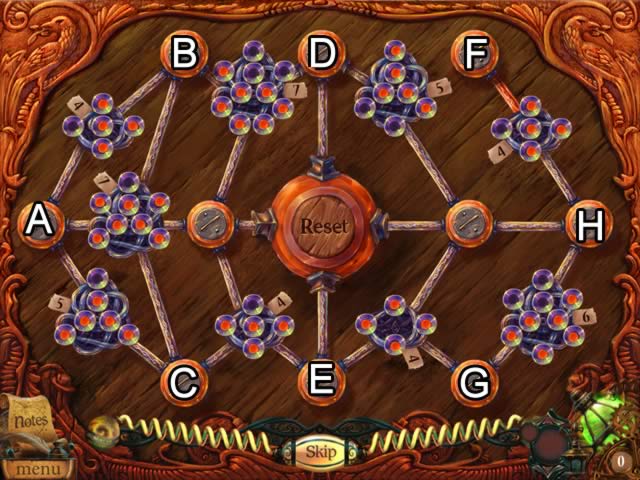
• Place the beaker of FIRE FLOWER ESSENCE in the center of the board (W) to open a puzzle.
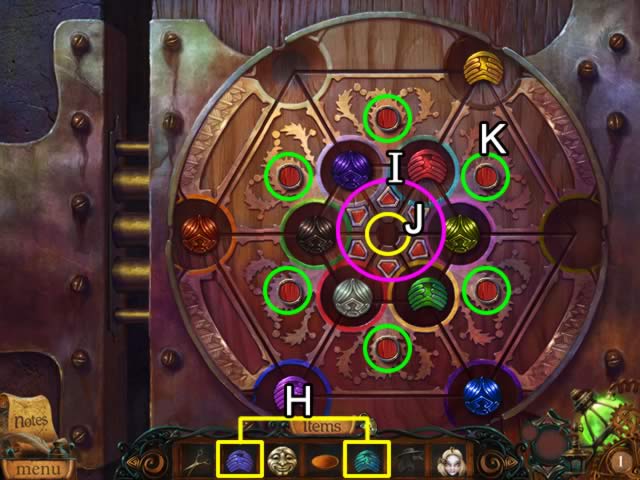
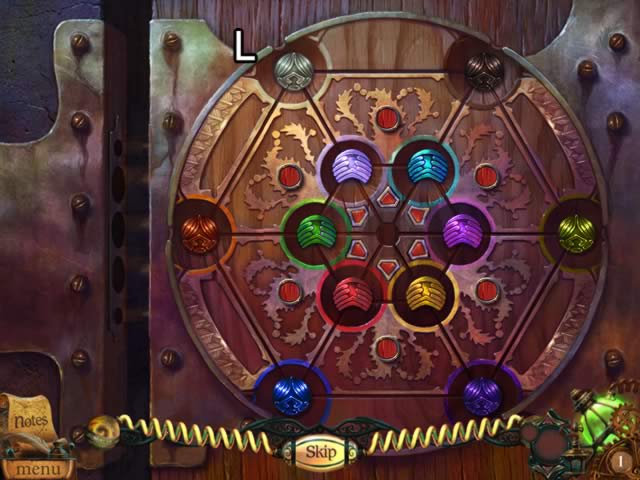
• The goal is to open the lettered valves to fill only the number of flasks indicated.
• Here is one solution: A x 2, B x 2, C x 3, D x 5, E x 1, F x 1, G x 3, H x 3.
• Receive FIRE WATER for your inventory and the ‘Brainiac’ achievement trophy.
• Exit the building to the graveyard.
• Use the SCISSORS to snip the SILVER FLOWER LEAVES (I).
• Go down once.
• Speak to the girl outside the hospital (J).
• Zoom in on the hospital doors (K). Open the locks by pouring the FIRE WATER into the two beakers.
• Enter the hospital and view a cutscene.
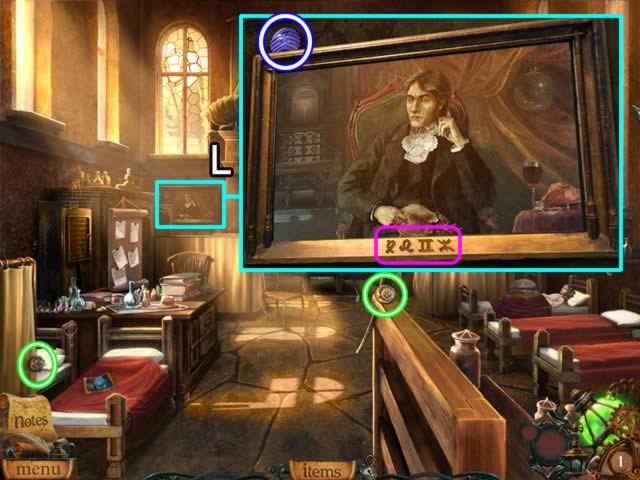
• Examine the picture on the back wall (L).
• Take the PURPLE CHIP from the top of the frame.
• The code along the frame (pink) is added to the Diary.
• The ghost girl appears again. Speak with her and her father.
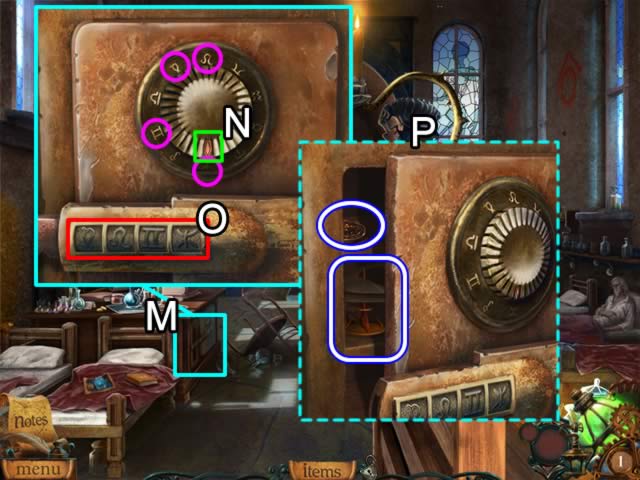
• Look closer at the safe in the lower part of the desk (M).
• The code for the safe was located on the picture frame and was recorded in the Diary.
• Drag the dial with the red arrow (N) to the characters in the correct sequence. The selected character appears in the panel below the dial (O). The correct characters are circled in pink and the correct combination is shown in the panel.
• Take the HAPPY FACE medallion and the da Vinci HELICOPTER from the safe (P).
• Look at the mechanism on the pedestal in the back of the room (Q).
• Zoom in on the panel to enlarge it.
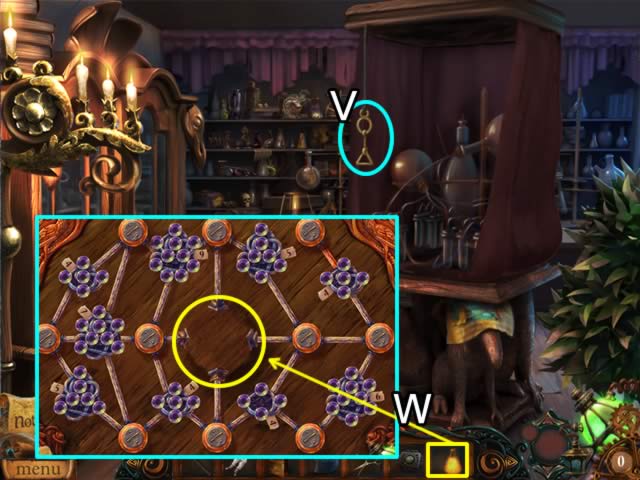
• Place the ALCHEMIC CONTAINER in the empty slot (R) to start a puzzle.

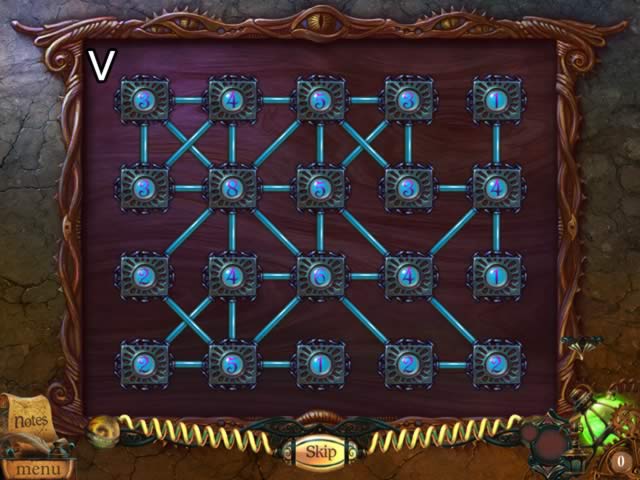
• The goal is to create connections between containers based on the number in the middle of each container. The connections can be made horizontally, vertically or diagonally to adjacent containers.
• Click a container to select it (S). The container glows. Select an adjacent container to complete the connection (T).
• Remove a connection by clicking the tube between two containers (U).
• The numbers in the containers are random so a step-by-step solution cannot be given.
• Screenshot (V) shows a solution to a more complicated puzzle.
• Completing the board opens the door to the mechanism.
• Put the HELICOPTER inside the mechanism to open another puzzle.
• Add the components to the board as follows to begin the puzzle.
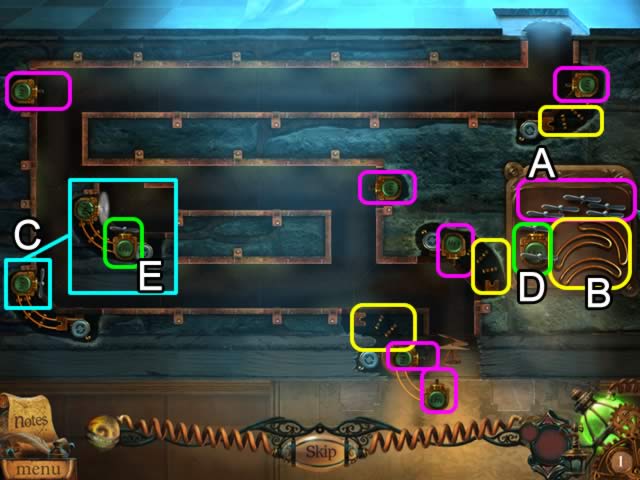
• Place the six fan blades (A) on the pegs attached to each ‘On’ button (pink).
• Put the three tracks (B) on the empty circuits (yellow).
• Press the ‘On’ buttons for all of the fans. One fan switch breaks (C). Attach the button assembly (D) to the track as shown (E).
• The goal is to use the fans to blow the gyrocopter (F) through the maze and out the top.
• Use the arrow buttons on the tracks (yellow) to reposition the fans.
• Click the arrow buttons in the order shown to solve the puzzle.
• Receive the ‘Newbie Pilot’ achievement award.
• A brief cutscene shows the helicopter landing on a lever (G).
• Look towards the rear of the hospital to see that a door (H) to a staircase has opened.
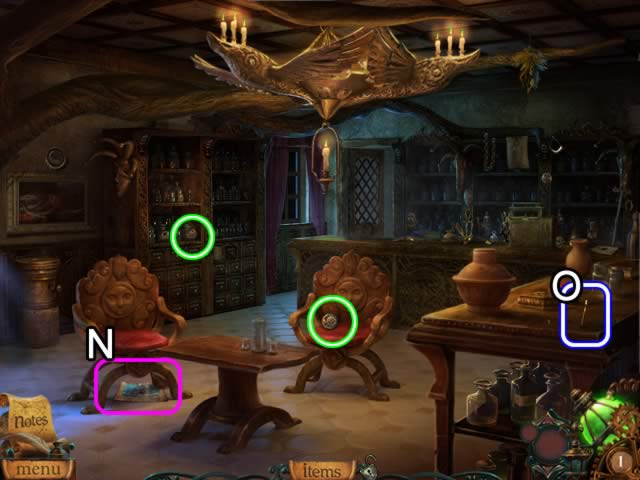
• Enter the room at the top of the stairs.
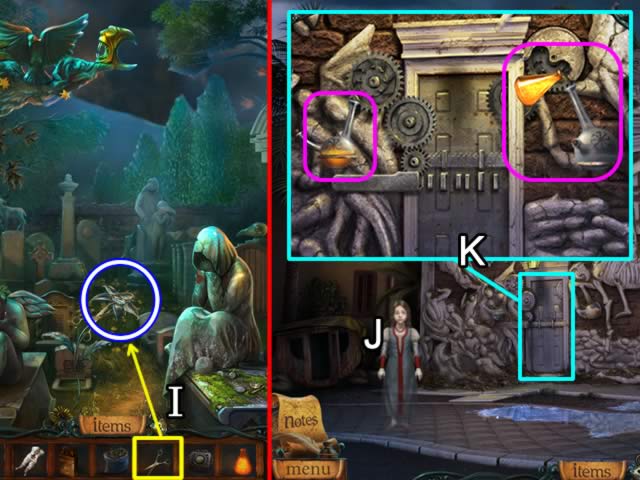
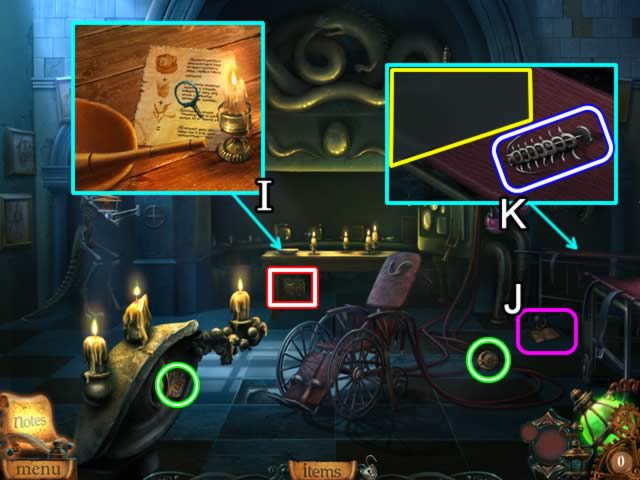
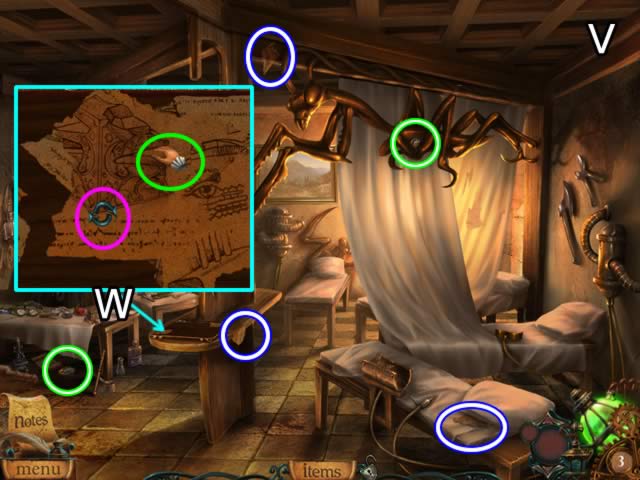
• Zoom in on the table top (I) to view the recipe showing the ingredients necessary to create the Healing elixir.
• Pick up the piece of paper on the floor (J). It illustrates the steps required to grow an orange with healing properties.
• Look at the gurney in the corner (K). Remove the cloth (yellow) to uncover an INJECTOR BROKEN.
• Exit the room.
• Grab the CASE KEY from the bedpost (L).
• Exit the hospital. Go forward twice to the house in the graveyard.
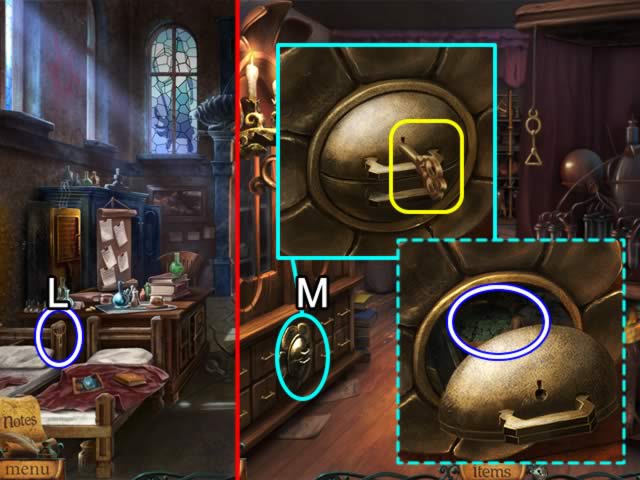
• Use the CASE KEY to open the lock on the bottom drawer of the chest (M); take the BAG OF CLOVER.
• Return to the second floor of the hospital and zoom in again on the worktable.
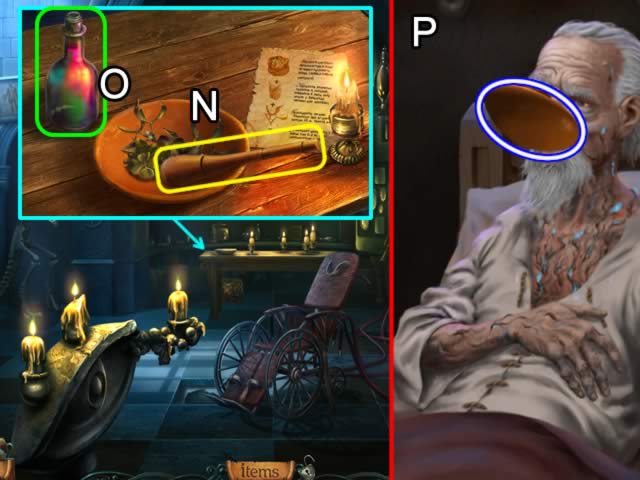
• Add the MISTLETOE LEAVES, SILVER FLOWER LEAVES and SACK OF CLOVER to the bowl (N); grind the ingredients into a power with the pestle (yellow). Pour the liquid (O) into the bowl to finish creating the RENEWAL ELIXIR.
• Receive the ‘Adept at Alchemy’ achievement trophy.
• Go down once.
• Feed the RENEWAL ELIXIR to the old man (P) to receive the SECRET MECHANISM KEY and instructions for its use.
• The emptied PLATE automatically goes to inventory.
• Receive the ‘Apothecary’ achievement trophy for curing the man.
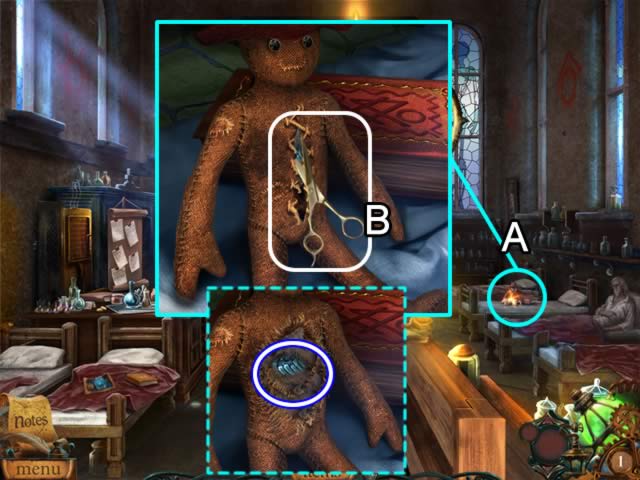
• Examine the stuffed bear on the empty bed (A).
• Use the SCISSORS to cut the stitches (B) and take the GREEN CHIP from the chest cavity.
• Go down three times to return to the city gates.
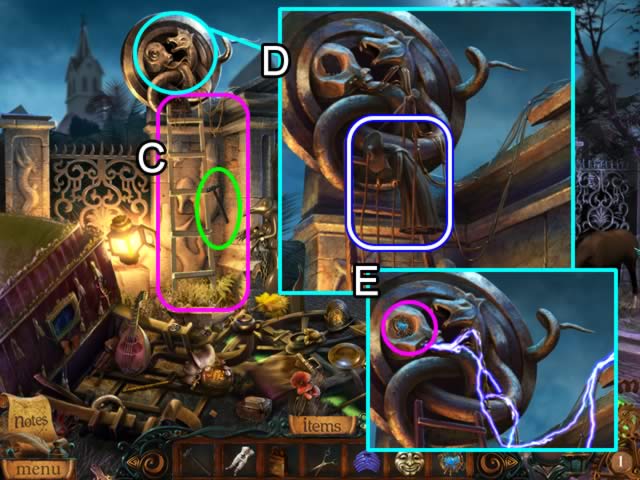
• Lean the BROKEN LADDER against the gate tower (C). Use the HAMMER to repair the ladder.
• Examine the top of the tower (D). Take the DOCTOR DOLL.
• Insert the SECRET MECHANISM KEY in the eye slot (E) to deactivate the metal sculpture outside the pharmacy.
• Go forward.
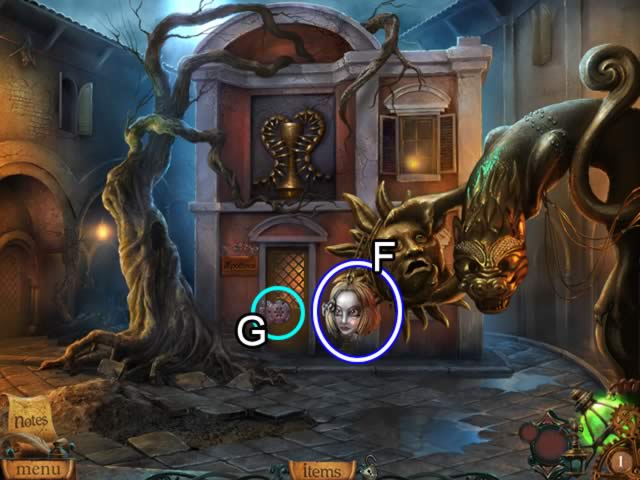
• Take the DOLL HEAD from the sculpture (F).
• Examine the door lock (G).
• Drag the PURPLE CHIP and GREEN CHIP from the inventory items (H) to the board to activate a puzzle.
• The goal is to swap and rotate the tiles into their same-colored slot on the board.
• The position of the tiles on the board is random so a step-by-step solution cannot be given.
• The best strategy is to position the outside tiles first. Use the arrows in the center (I) to swap the tiles into the inner circle (J) to help position them. Rotate the tiles using the outer (green) dots (K), for each quadrant.
• The correct position for each chip is shown (L).
• Enter the shop.
• Play the HOS by the cash register.
• Find the items on your list (M).
• The morphing objects are highlighted in red.
• Receive an ANGRY FACE medallion for your inventory.
• Read the document on the floor (N) for story information.
• Take the INJECTOR NEEDLE from the table (O).
• Combine the INJECTOR NEEDLE and the BROKEN INJECTOR for an EMPTY INJECTOR. Refer to the Diary if necessary for instructions on the use of the injector. Now is a good time to complete the steps to get the orange.
• Exit the pharmacy. Go forward three times to the second floor of the hospital.
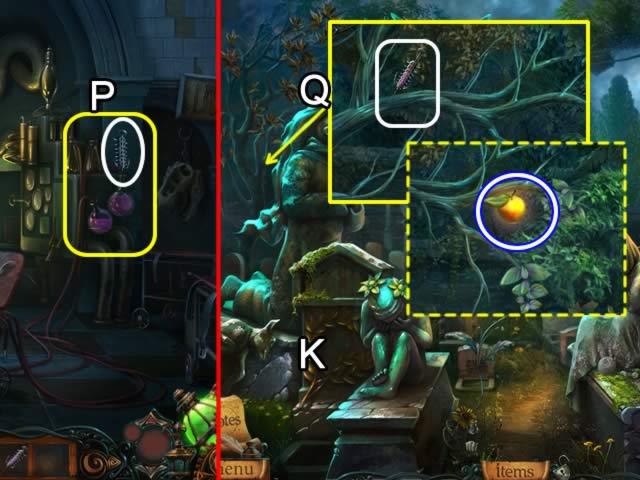
• Insert the EMPTY SYRINGE into the bottle containing pink liquid (P) next to the gurney.
• Receive a FULL SYRINGE.
• Go down twice and forward once to return to the graveyard.
• Zoom in on the tree in the back (Q).
• Inject the tree with the FULL SYRINGE of growth solution; take the ORANGE.
• Go down twice and enter the pharmacy. Go forward through the rear door to the hallway.
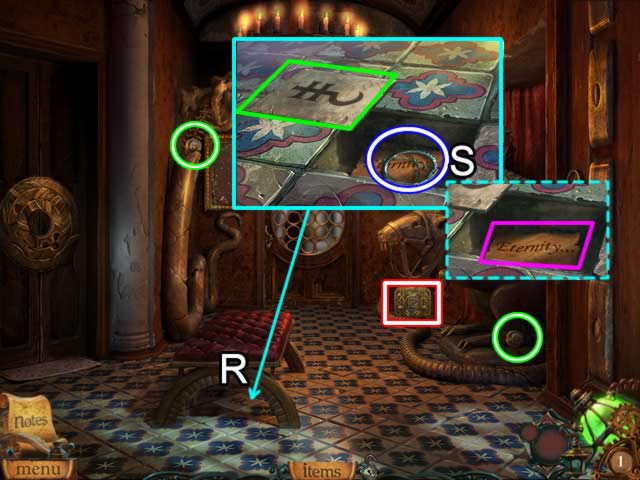
• Examine the area under the bench (R).
• Remove the odd floor tile (green) to reveal a secret compartment (S); take the SNAKE SYMBOL from the compartment.
• Note the word ‘Eternity’ on the piece of paper under the symbol.
• Go down once.
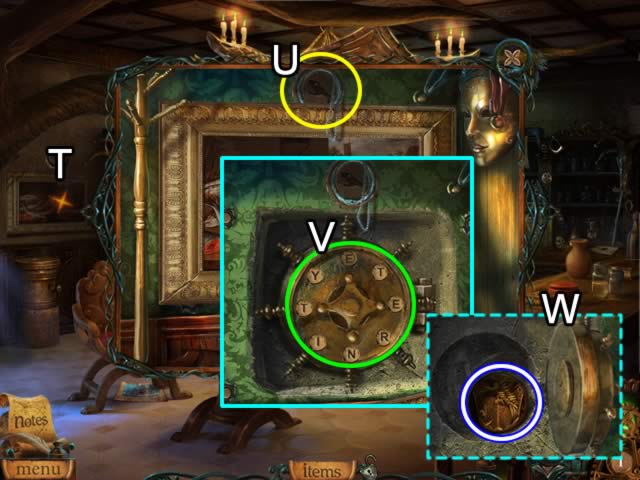
• Look closer at the picture (T).
• Insert the SNAKE SYMBOL in the inset above the picture (U) to reveal a safe.
• Click the toggles on the safe dial until they spell the word ‘Eternity’ (V).
• Take the CIRCLE WITH EAGLE from the safe (W).
• Go forward to the hallway.
• Zoom in on the door on the left (X).
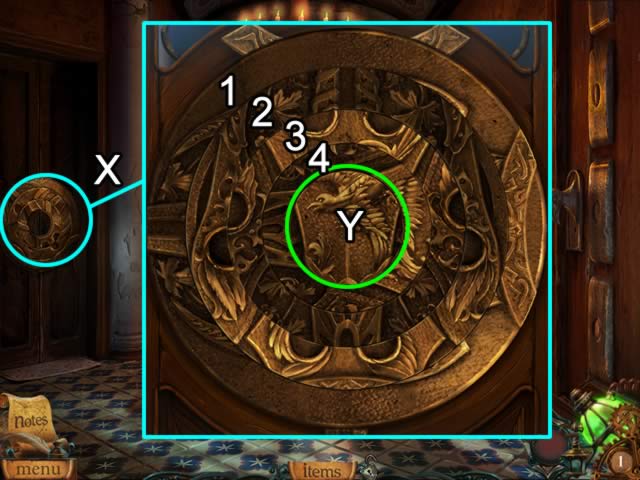
• Insert the CIRCLE WITH EAGLE in the center (Y) to open a mini-game.
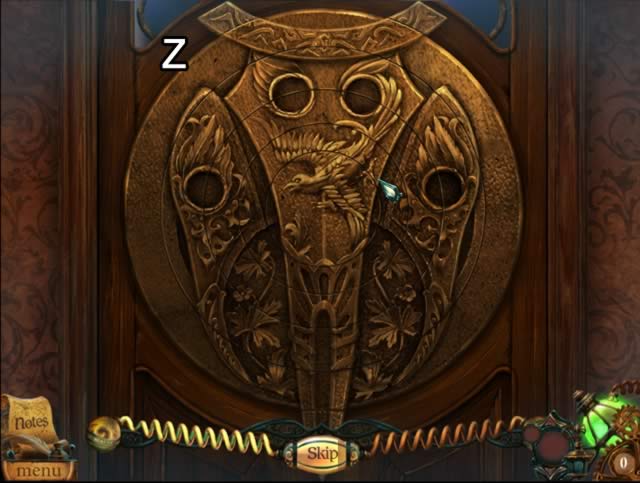
• The goal is to rotate each of the four rings to form a pattern. Each ring affects itself and one other ring. Use the markings on the outside and the fixed center circle for alignment.
• The starting position of the rings is random so a step-by-step solution cannot be given.
• The correct pattern is shown (Z).
• Enter the office.
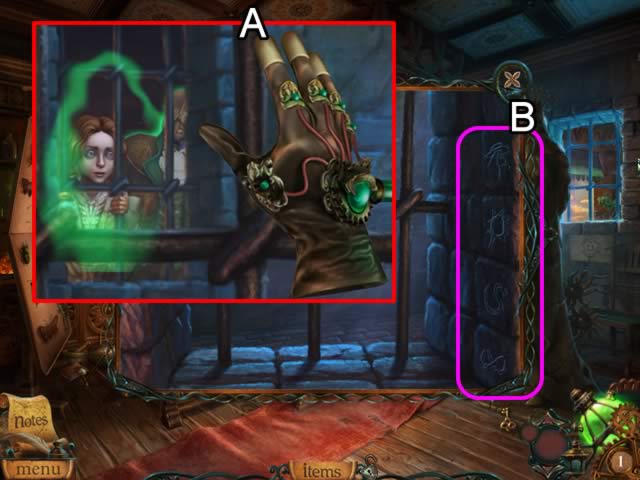
• Use the ALCHEMIST GLOVE in the cutscene (A) to drive away the man.
• Note the symbols (B) on the inside of the window. They are added to the Diary for future use.
• Receive the ‘Defender of the Weak’ achievement trophy.
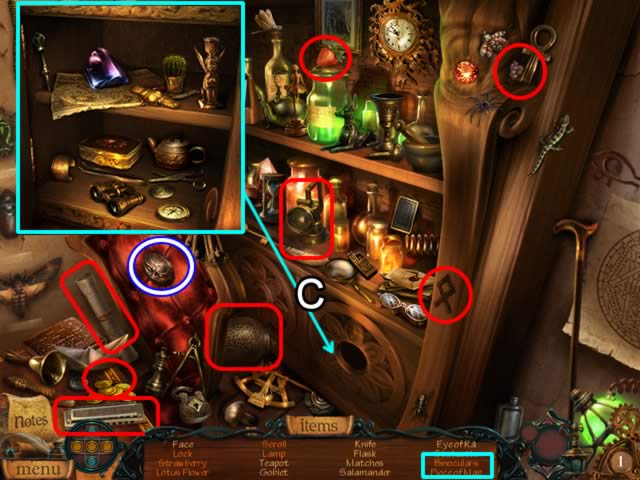
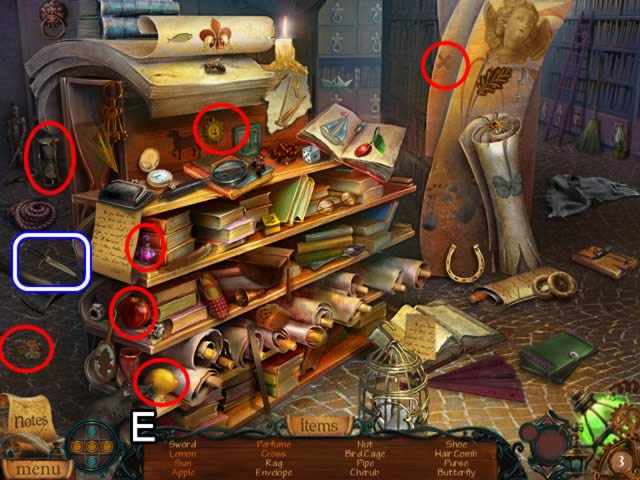
• Play the HOS on the desk.
• Open the cabinet door (C) and zoom in on the area to find the hidden items on your list (aqua).
• The morphing items are highlighted in red.
• Receive an IRON FACE medallion for inventory.
• Pick up the BACKYARD KEY on the floor (D)
• Examine the recipe for the Healing elixir on the wall (E).
• Note that one of the ingredients (F) is the ORANGE retrieved from the cemetery tree with the help of the syringe of growth solution from the hospital.
• Exit the office to the hallway.
• Use the BACKYARD KEY to open the door at the end of the hallway.
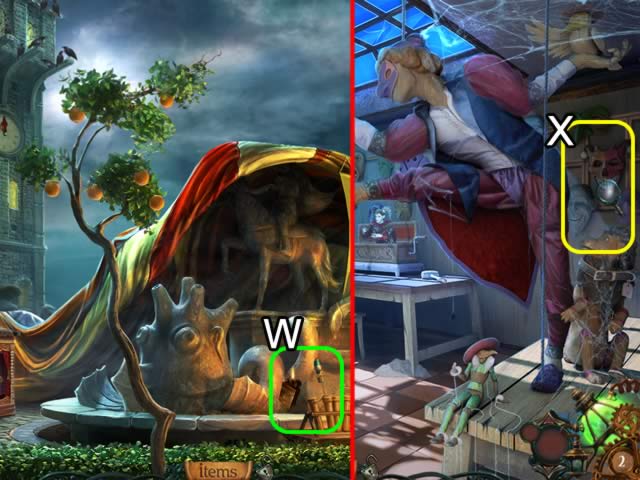
• Examine the window (G); take the DOLL DRESS.
• Pick up the DOLL ARM by the mask (H) and the other DOLL ARM by the large puppet (I).
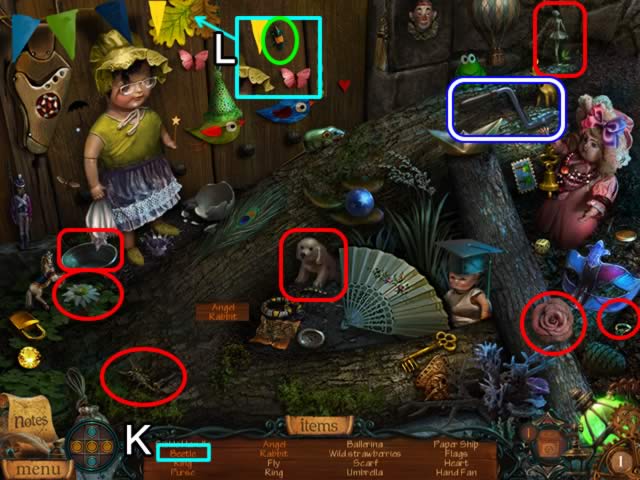
• Play the HOS by the gate (J).
• Find the items on your list (K).
• If your list contains a ‘Beetle’, move the leaves (L) to find it.
• Morphing objects are highlighted in red.
• Receive the HANDLE for inventory.
• Go down twice to return to the pharmacy lobby.
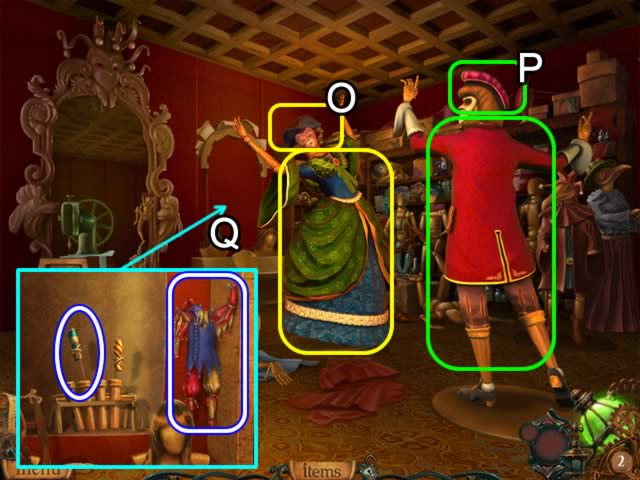
• Zoom in on the table (M).
• Use the inventory scroll buttons (red) to locate the DOLL LOWER BODY, DOLL HEAD, DOLL ARM and DOLL ARM (N).
• Place each part on the table (O).
• Use the needle and thread on the table (P) to assemble the parts.
• Add the DOLL DRESS (Q); take the DOLL (R).
• Receive the ‘Puppet Master’ achievement trophy.
• Go forward two times to the area behind the pharmacy.
• Zoom in on the display window (S).
• Attach the DOCTOR DOLL and the girl DOLL to the wires (T).
• Pull the lever (U) to open the door to the shop.
• Enter the toy store and speak with Lucia (V).
• Take the MANDRAGORA TINCTURE (W).
• Go down twice to return to the pharmacy hallway. Enter the office; approach the curtained area containing the beakers.
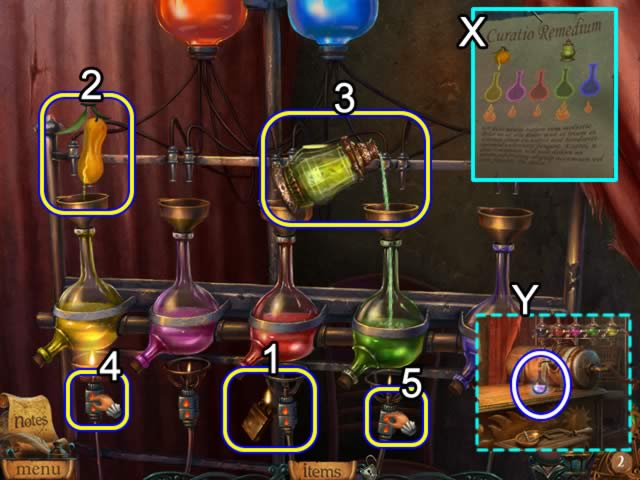
• Refer to the Diary notation or the instructions tacked to the wall of the office to create the Healing elixir (X).
• Use the LIGHTER to ignite the flames (1). Squeeze the ORANGE into the yellow beaker (2); pour the MANDRAGORA TINCTURE into the green beaker (3). Adjust the flame on the yellow (4) and green (5) beakers.
• Pick up the HEALING ELIXIR from the counter (Y).
• Receive the gold ‘Master of Alchemy’ achievement trophy.
• Return to the toy store; give the HEALING ELIXIR to Lucia.
• Receive the ‘Plague Healer’ achievement trophy.
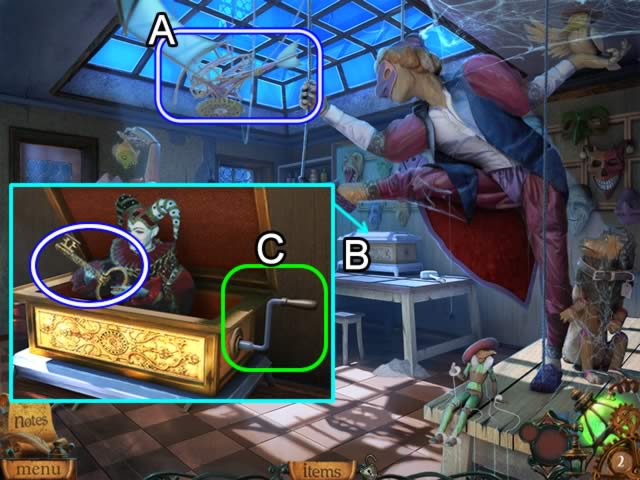
• Remove the AIRCRAFT BROKEN part from the ceiling (A).
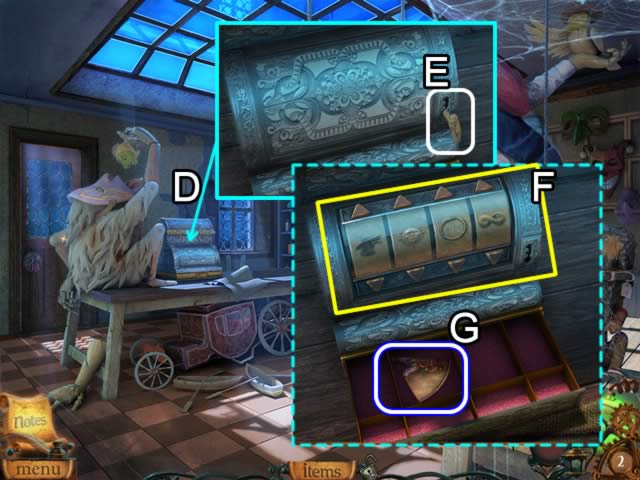
• Zoom in on the chest (B).
• Insert the HANDLE in the slot (C) and crank it to open the box.
• Take the CASH REGISTER KEY from the jester doll.
• Examine the cash register (D).
• Insert the CASH REGISTER KEY in the slot (E) to open the panel.
• Use the arrows to scroll through the symbols until they match those carved in the pharmacy office window (please refer to the Diary notation or inset (F)).
• Take the DRAWING PUZZLE PART from the drawer (G).
• Look closer at the door lock (H).
• Add the DRAWING PUZZLE PART segment to open a puzzle (I).
• The goal is to create a picture by swapping segments of the puzzle; segments may be swapped directly.
• Inset (J) shows the completed puzzle.
• Go through the door.
• Play the HOS outside the door.
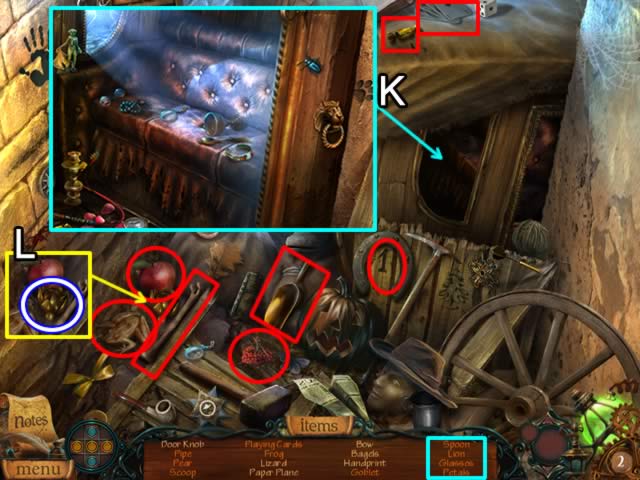
• Lift the cloth and look inside the coach (K) for extra step listed items.
• The locations of the morphing items are highlighted in red.
• Inset (L) is a better view of the DOOR KNOB location.
• Pick up the ROPE BUNDLE (M).
• Zoom in on the door (N) and insert the DOOR KNOB.
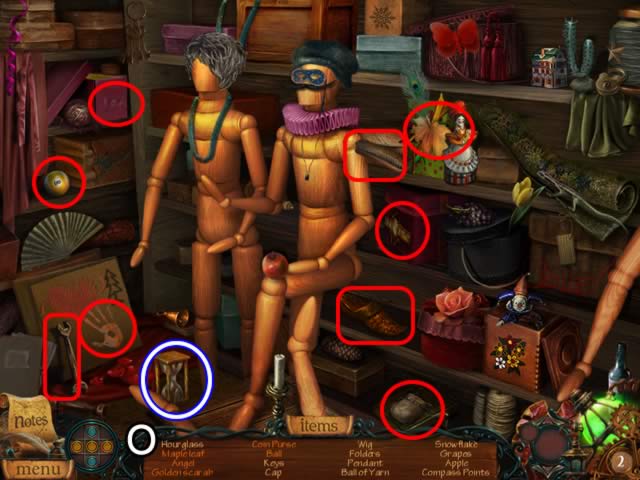
• Enter the store and play the HOS.
• Find the items on your list (O).
• The locations of the morphing items are highlighted in red.
• The HOURGLASS goes into your inventory.
• Exit the store; go right to the square.
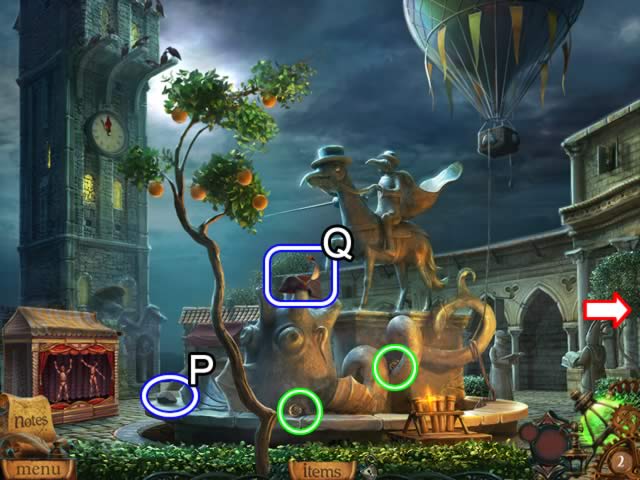
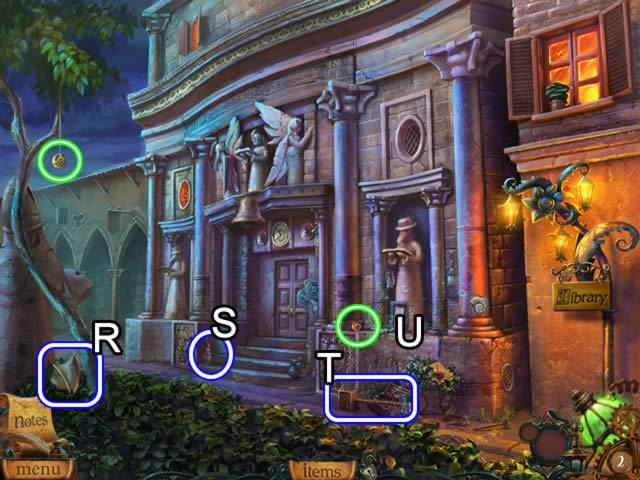
• Pick up the STONE (P) and LADY’S HAT (Q) from the statue area.
• Head right to the library.
• Pick up the AIRCRAFT WING (R) and combine it with the AIRCRAFT BROKEN part collected in the workshop. The DA VINCI’S FLYING APPARATUS is returned to the inventory.
• Get the GLUE (S) and the HAMMER (T).
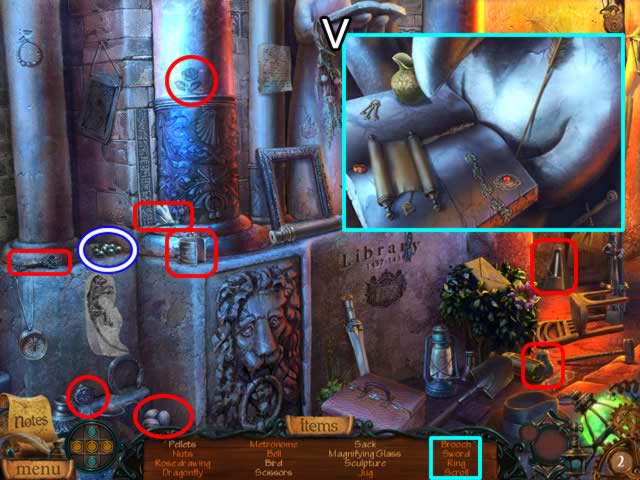
• Play the HOS by the statue base (U).
• Look closer at the book (V) to find the extra step listed items.
• The locations of the morphing items are highlighted in red.
• The PELLETS go into your inventory.
• Go left to return to the square. Go forward to the tower.
• Examine the plate on the statue (W); take the CLOCK HANDLES.
• Pick up the TORN LADY’S DRESS at the statue base (X); grab the EMPTY POWDER CASE (Y).
• Zoom in on the base of the steps (A).
• Take the GIRL OUTFIT (B); insert DA VINCI’S FLYING APPARATUS in the gear base (C).
• Receive the ‘Da Vinci’s Dream’ achievement trophy.
• Get the second HOURGLASS that appears (D).
• Look at the recess for the door.
• Insert an HOURGLASS in each of the two empty slots to open the door.
• Attach the ROPE BUNDLE to the end of the broken rope (E) to fasten the rope to the bell.
• Dip the EMPTY POWDER CASE into the powder barrel (F); receive a FULL POWDER CASE.
• Go up the stairs.
• Pick up the HAMMER (G).
• Pour the contents of the FULL POWDER CASE into the musket (H). Add the PELLETS (I).
• The musket resets into position to fire from the window.
• Zoom in on the musket. Use the LIGHTER to ignite the fuse. Click the musket to fire it.
• Receive the ‘Good Shot’ achievement trophy.
• Go down three times to return to the square.
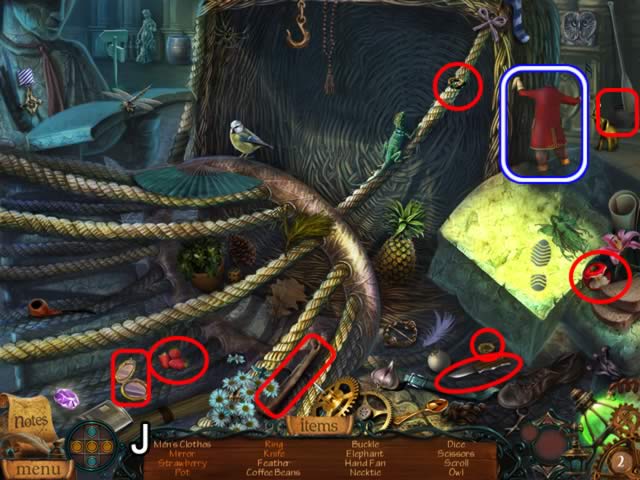
• Play the HOS.
• Find the items on your list (J).
• The morphing items are highlighted in red.
• Receive the MEN’S CLOTHES for inventory.
• Go down once.
• Zoom in on the display window (K).
• Use the STONE to break the glass (L); take the MEN’S CAP (M).
• The STONE automatically returns to the inventory.
• Enter the shop.

• Use the sewing machine (N) to mend the TORN LADY’S DRESS.
• Receive the repaired LADY’S DRESS for inventory.
• Add the LADY’S HAT and LADY’S DRESS to the first mannequin (O).
• Add the MEN’S CAP and MEN’S CLOTHES to the second mannequin (P).
• The fully dressed mannequins open a secret compartment (Q).
• Take the FIREWORK and BOY OUTFIT from the compartment.
• Exit the shop. Go right to the square.
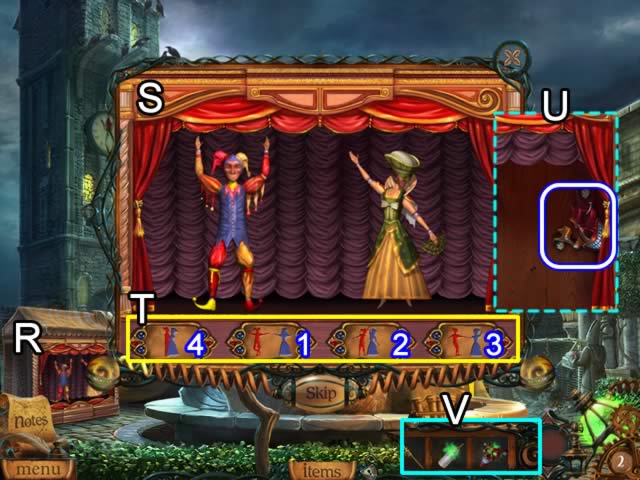
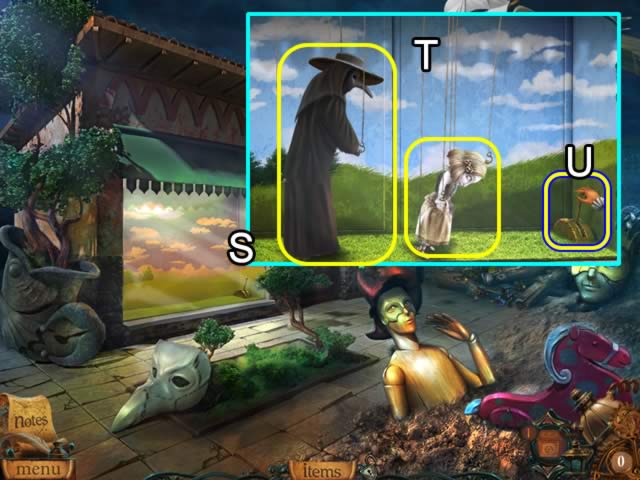
• Zoom in on the puppet theater (R).
• Put the BOY OUTFIT and GIRL OUTFIT on the two puppets (S) to open a mini-game.
• Press the buttons in the order shown in the panel (T) to create the correct dance sequence.
• Take the MASK BROKEN (U).
• Receive the ‘Puppet Master’ achievement trophy.
• Drag the GLUE to the MASK BROKEN in inventory (V) to repair the MASK.
• Insert the FIREWORK in the stand (W).
• Use the LIGHTER on the firework fuse to scare away the birds on the tower.
• Receive the ‘Lord of Birds’ achievement trophy.
• Go down twice to return to the toy store.
• Zoom in on the masks on the back wall (X).
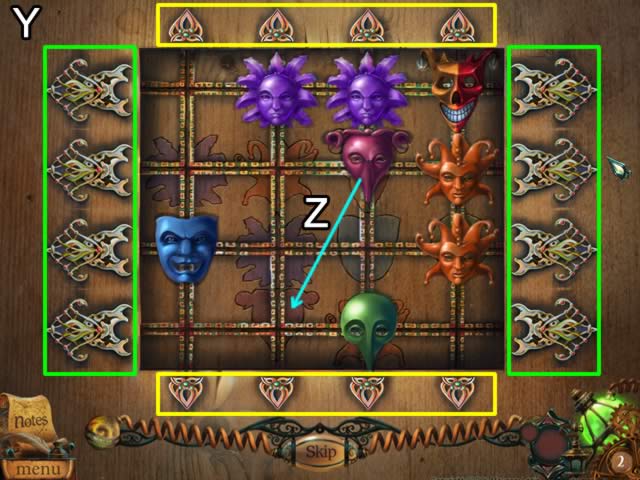
• Add the MASK to open a mini-game (Y).
• The goal is to use the left and right arrows (green) and the up and down arrows (yellow) to position the masks along the tracks. Each mask must match its same shape and color outline on the board (Z).
• The starting positions of the masks are random so a step-by-step solution cannot be given.
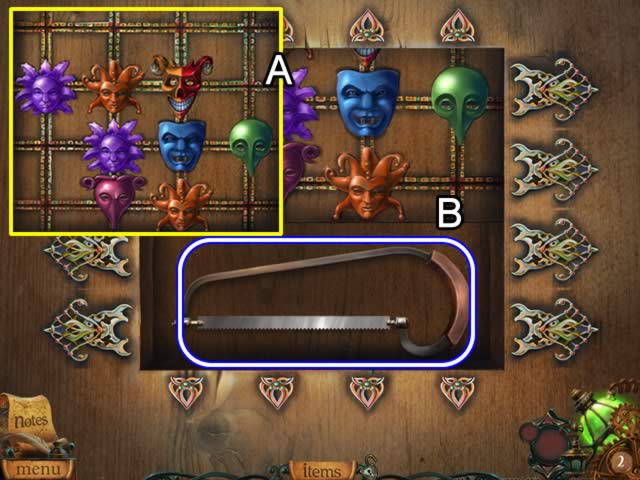
• Inset (A) shows the solution.
• Take the HACKSAW from the compartment (B).
• Go forward and right twice to the front of the library.
• Look closer at the grating (C).
• Use the HACKSAW to remove the cover (D).
• Peer into the compartment (E). Take the OIL CAN.
• Go left and then forward twice to enter the tower.
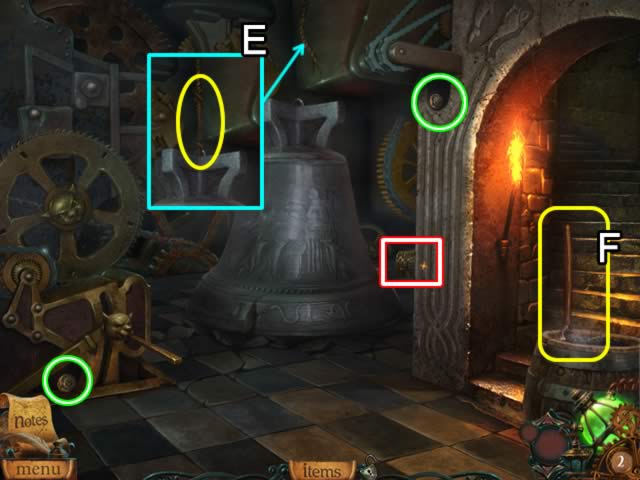
• Zoom in on the rusty gears (F); use the OIL CAN to remove the rust (G).
• Pull the lever (H) to start the machinery.
• Go up the stairs to the top of the tower.
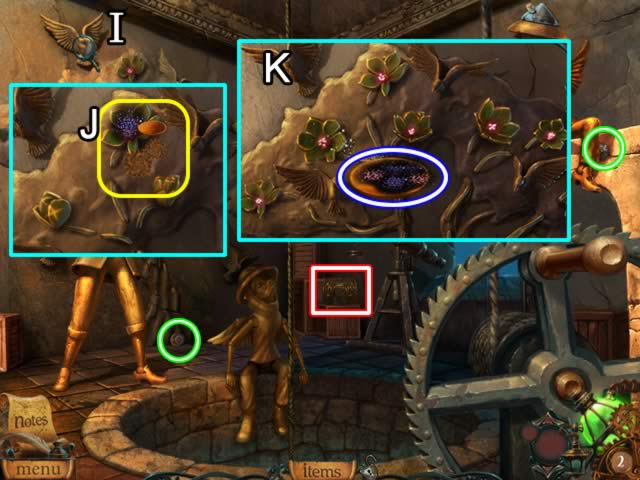
• Examine the top of the flower wall (I).
• Place the PLATE on a flower as it opens (J) and click to collect its pollen. Once the pollen is added to the plate, the flower stays open.
• Collect the FUEL FROM FLOWERS from every flower (K).
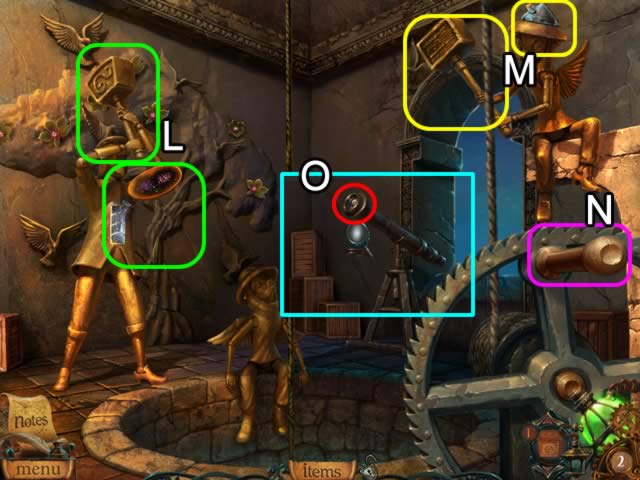
• Give a HAMMER to the first bell ringer (L) and pour some FUEL FROM FLOWERS into its power source.
• Give a HAMMER to the second bell ringer (M) and pour some FUEL FROM FLOWERS into its power source.
• Pull the handle (N) to raise the bell and see the cutscene of the library door opening.
• Receive the ‘Master of Mechanisms’ achievement trophy.
• Zoom in and peer through the telescope (O) to get Diary information for later use.
• Exit the tower, go down to return to the square and go right to the library.
• Enter the library and go forward to the statue room.
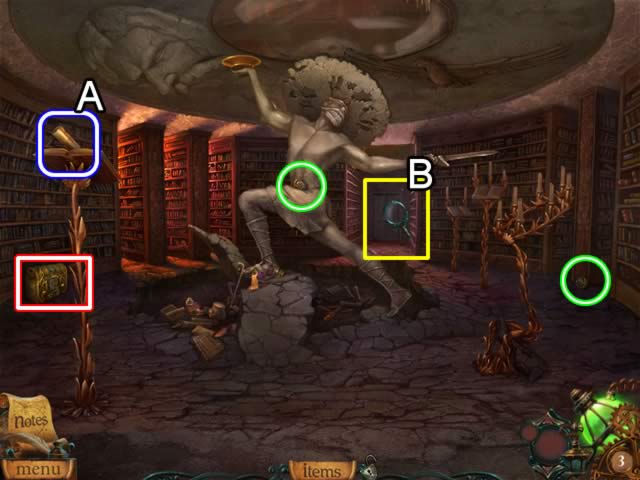
• Pick up the SCROLL from the bookstand (A).
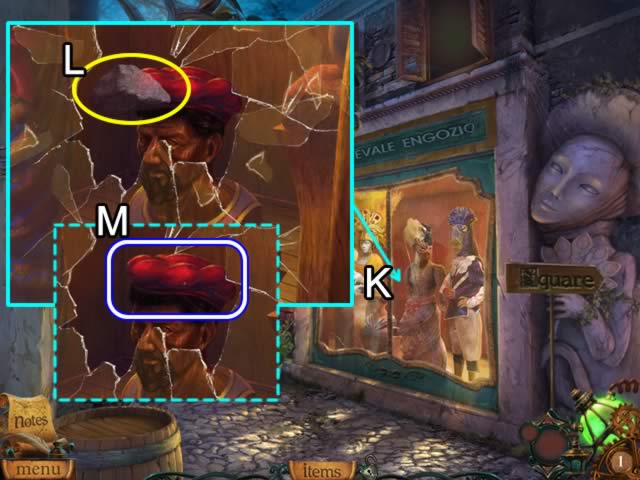
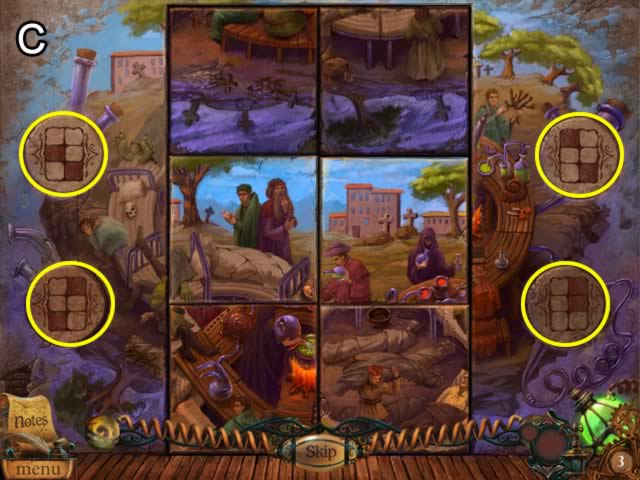
• Look closer at the door (B) to open a mini-game (C).
• Use the buttons on the sides (yellow) to swap the tiles and form a picture. The dark brown squares in the button indicate which tiles are swapped.
• Use the background image as a guide for positioning the tiles.
• Please look at screenshot (D) to view the solution and the order in which to press the buttons.
• Enter the room and play the HOS.
• Find the items on your list (E).
• The morphing items are highlighted in red.
• Receive a KNIFE for inventory.
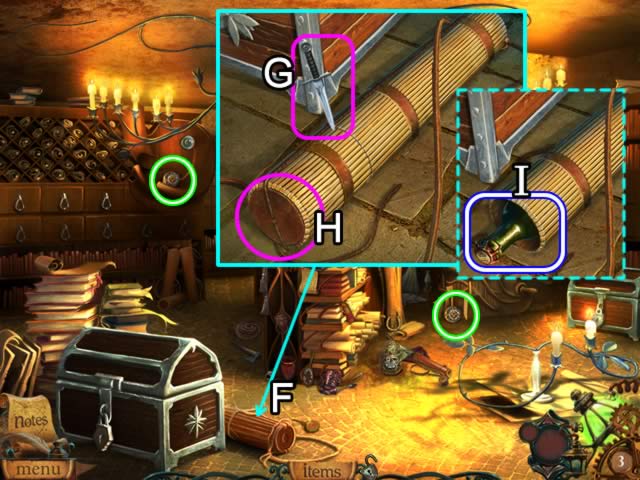
• Examine the tube by the chest (F).
• Use the KNIFE to cut the two side straps (G); remove the top (H).
• Take the BOTTLE OF FLAMMABLE LIQUID.
• Go down once.
• Pour the BOTTLE OF FLAMMABLE LIQUID in the bowl the statue is holding.
• Use the LIGHTER to ignite the liquid and activate a HOS.
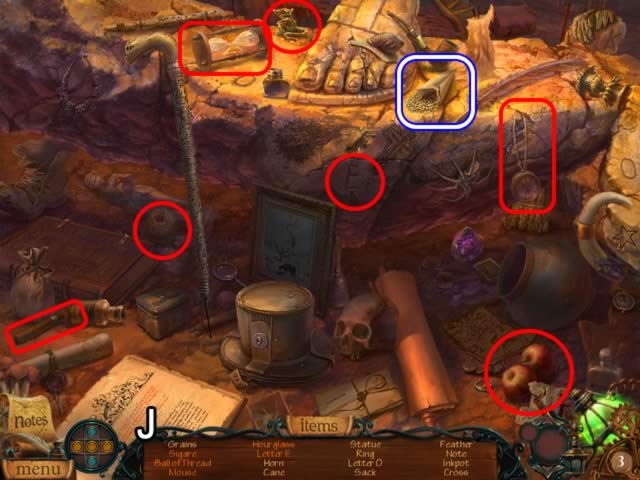
• Find the items on your list (J).
• Morphing items are highlighted in red.
• Receive the GRAINS for inventory.
• Go down once.
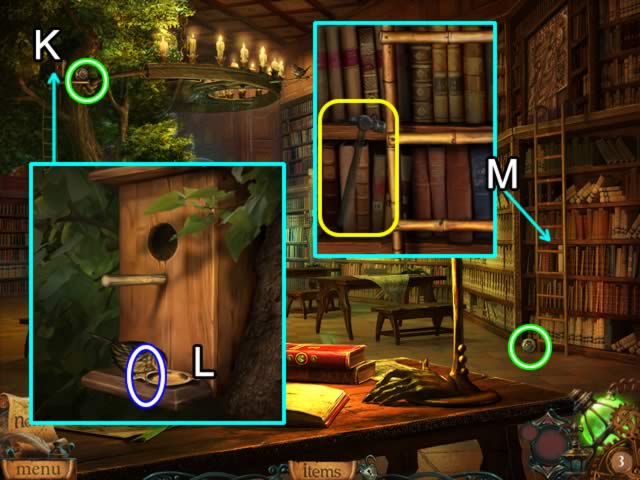

• Zoom in on the birdhouse (K).
• Pour the GRAINS into the empty dish to attract the bird (L); take the SHOWCASE KEY hanging from the bird.
• Use the HAMMER to repair the broken ladder (M).
• Go forward twice to the archive room.
• Use the SHOWCASE KEY to open the padlock (N); take the DRAWING FRAGMENT from the case (O).
• Go down twice.
• Examine the top of the ladder (P).
• Add the DRAWING FRAGMENT to the board to open a puzzle.
• Use the empty square to help slide the tiles around the board to match the pattern under the pieces. Starting tile positions are random so a step-by-step cannot be given.
• Please see screenshot (Q) for the solution.
• Enter the secret room.
• Play the HOS.
• Find the items on your list (R).
• The morphing objects are highlighted in red.
• Receive the CELL DOOR KEY for inventory.
• Use the CELL DOOR KEY to release the scientist.
• Receive the ‘Liberator: Platinum’ achievement trophy.
• Give the scientist the SCROLL (S). Receive CUBE PART 1 for your inventory.
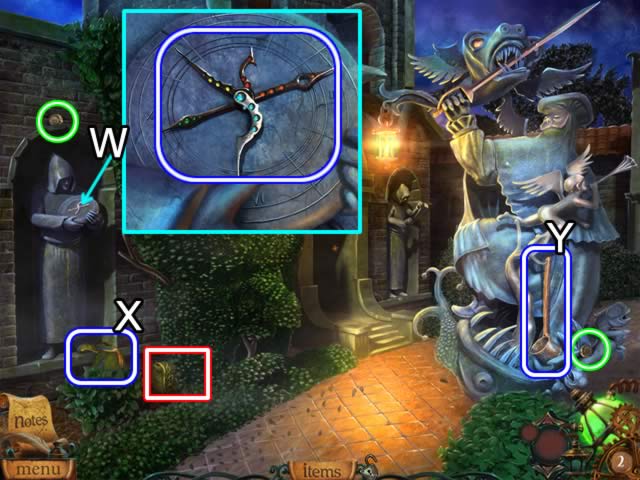
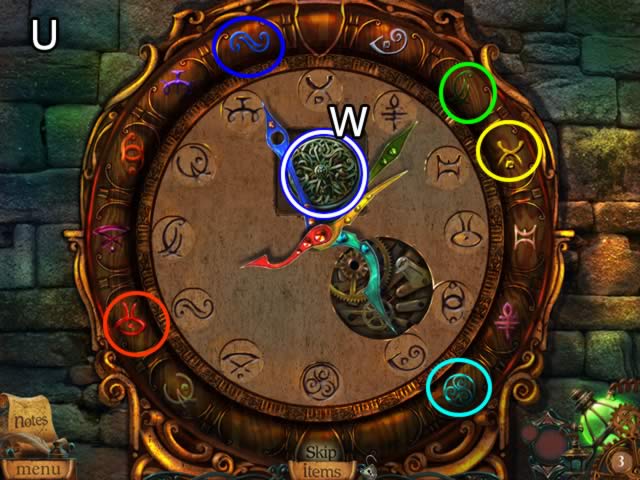
• Examine the clock (T).
• Attach the CLOCK HANDLES to open a puzzle.
• Position the colored hands so they point to the same colored symbol on the clock frame.
• Please see screenshot (U) for the solution.
• Take the BUTTON from the compartment (W).
• Zoom in on the safe behind the desk.
• Add the BUTTON to open another puzzle.
• The goal is to position the buttons so they form the pattern shown in the upper left corner of the puzzle.
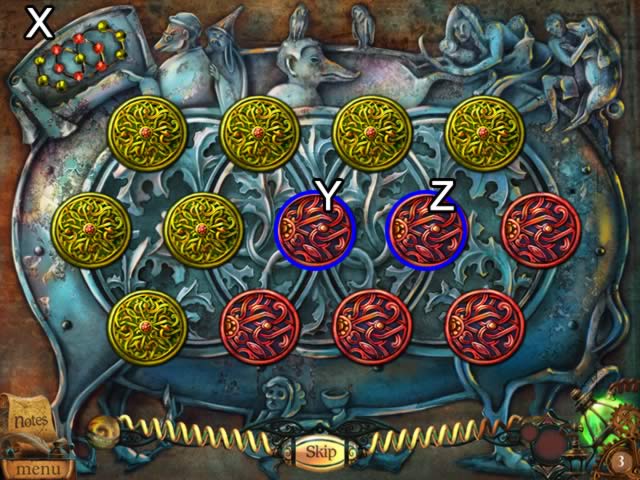
• The starting button positions are random, but here is a partial solution.
• Rotate the buttons until they are in the position shown in screenshot (X).
• Solve the puzzle by clicking the buttons in the following order: Y, Z, Y and Z.
• Take the SAD FACE medallion from the open safe.
• Now is a good time to use the Map. Return to the pharmacy hallway and enter the door on the right.
• Insert the IRON FACE medallion in the chest inset (A).
• Look inside the chest to open a mini-game (B).
• The goal is rotate the tiles so all four tiles with matching background color are in the same quadrant as their colored buttons. Use the center button to rotate the four center tiles.
• Starting position are random so a step-by-step solution cannot be given.
• Please see screenshot (C) for the solution.
• Receive the CUNNING FACE medallion for your inventory.
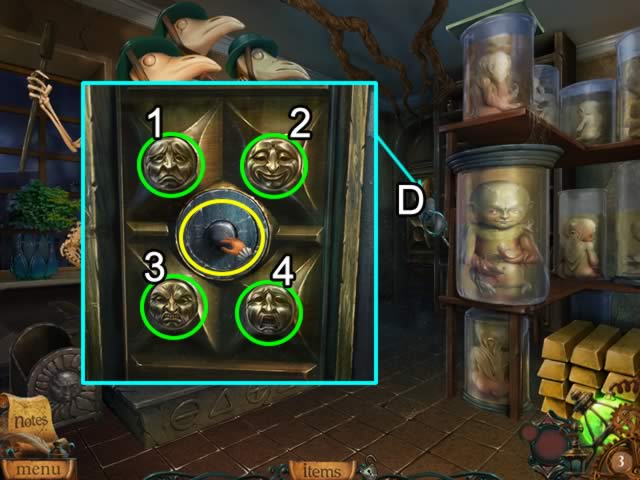
• Zoom in on the door (D).
• Insert the FACE medallions in the slots in the positions shown: 1 – SADNESS, 2 – HAPPY, 3 – ANGER, 4 – CUNNING.
• Click the center button to open the door.
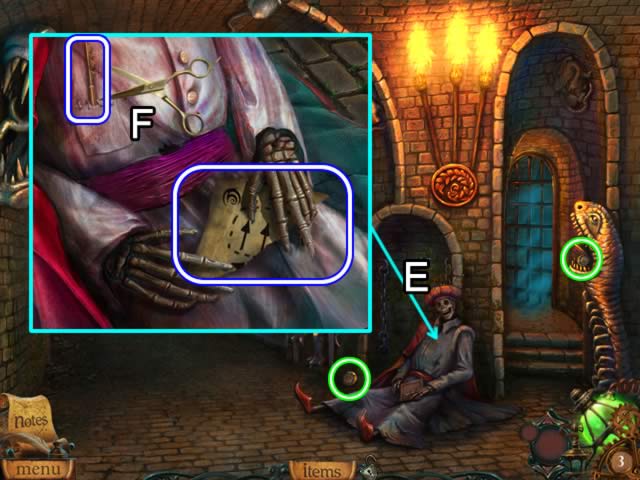
• Look closer at the skeleton (E).
• Use the SCISSORS to snip the threads on the pocket (F); take the LOCK PICK.
• Get the MAP FRAGMENT from the hands.
• Go down once.
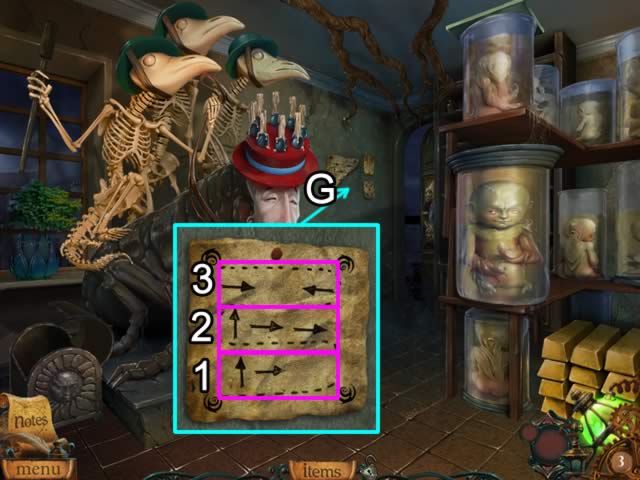
• Attach the MAP FRAGMENT to the incomplete map on the wall (G).
• The completed LABYRINTH MAP goes into your inventory with a note of the directions added to the Diary.
• Interpret the directions in three sections with the bottom section (1) first and the top (3) last. Read the direction arrows from left to right as follows: (1) forward, right; (2) forward, right, right; (3) right and left.
• Go through the door again to enter the labyrinth.
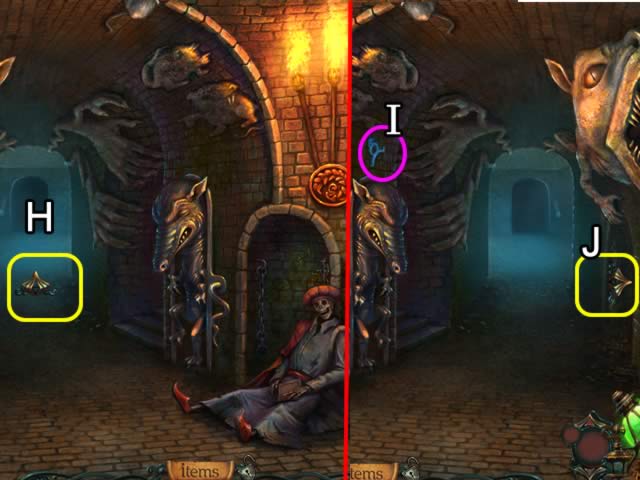
• Step 1 – Go forward (H).
• The blue wall symbols (I) show the number of completed steps.
• Step 2 – Go through the arch on the right (J).
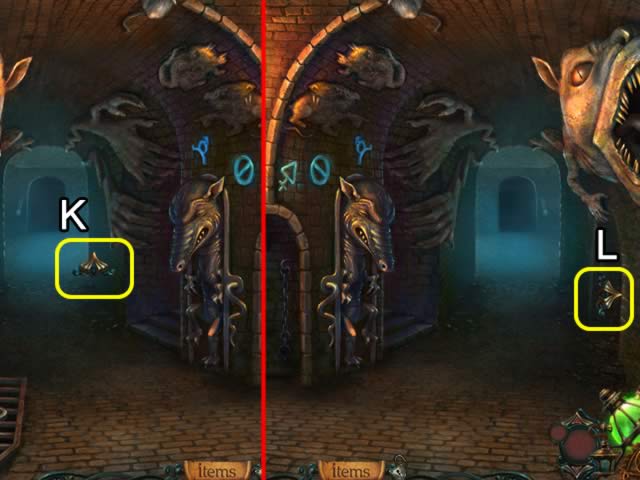
• Step 3 – Go forward (K).
• Step 4 – Go through the arch on the right (L).
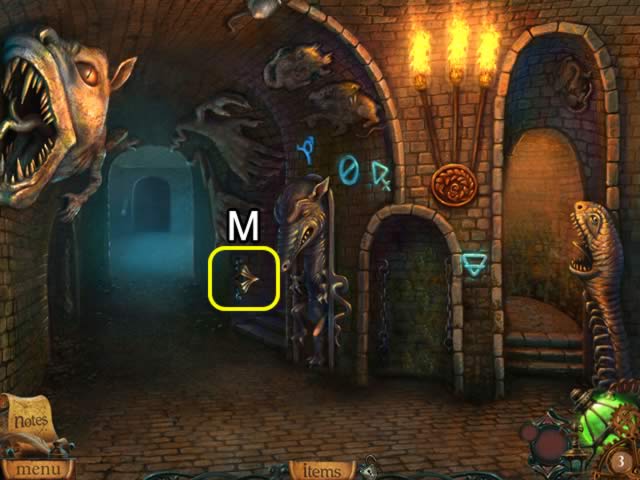
• Step 5 – Go up the steps on the right (M).
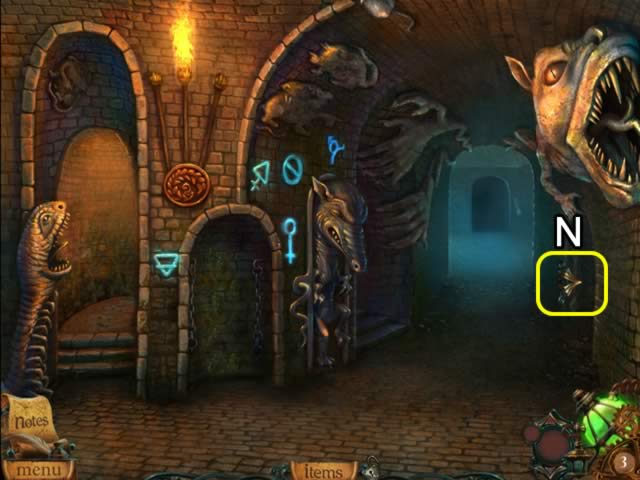
• Step 6 – Go through the arch on the right (N).
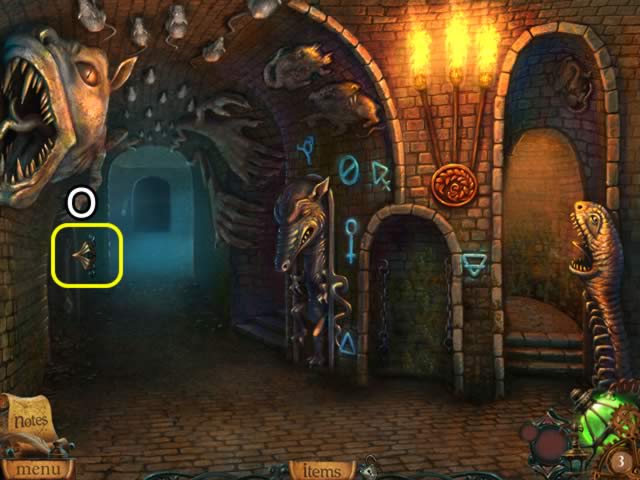
• Step 7 – Go through the door on the left (O).
• Receive the ‘Conqueror of Labyrinths: Silver’ achievement trophy.
• Once the labyrinth has been successfully navigated, the steps need not be repeated to go back and forth.
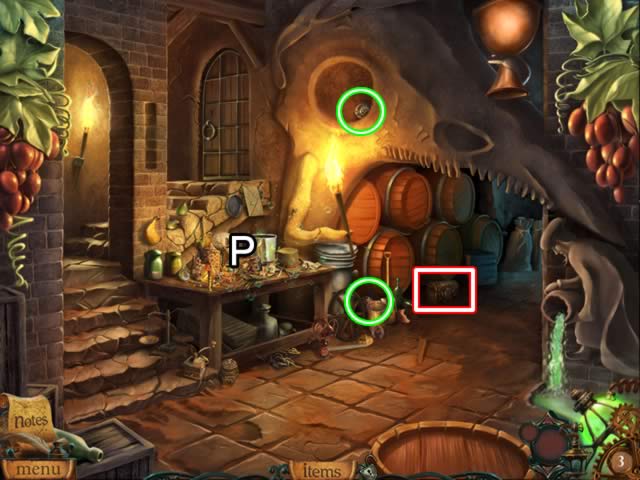
• Play the HOS on the table (P)
• Find the objects on your items list (Q).
• The morphing objects are highlighted in red.
• Receive an EMPTY BUCKET for your inventory.
• Look at the door (R).
• Slide the LABYRINTH MAP under the door (S); insert the LOCK PICK in the jammed lock (T).
• Take the CAGE KEY that falls onto the map (U); insert the key in the lock to open the door.
• Zoom in on the valve (V). Turn the valve to stop the flow of chemicals.
• Pick up the CAP WITH MOON SYMBOL on the floor (W).
• Go down once.
• Dip the EMPTY BUCKET in the water (X) to get a BUCKET OF WATER.
• Go through the door at the top of the stairs.
• Pour the BUCKET OF WATER on the flames (Y).
• Go through the door at the back of the room (Z).
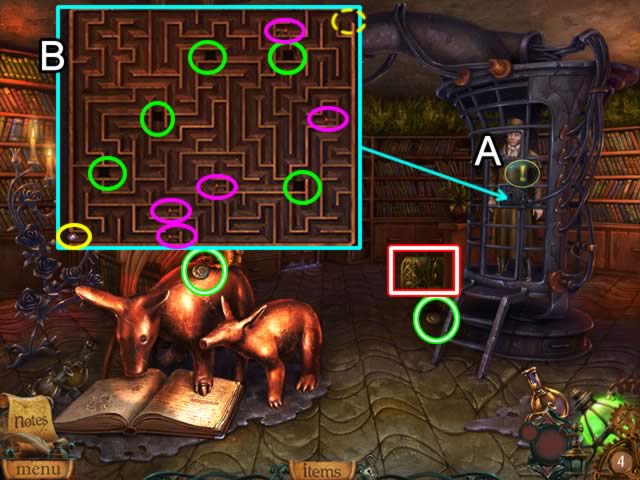
• Speak to the man in the cage (A).
• Examine the lock on the cage (B) to open a puzzle.
• The goal is to drag the ball (yellow) through the maze to the exit in the upper right corner (dashed yellow).
• The puzzle restarts if the ball falls through a hole. Use the plungers (pink) to close the holes (green) along the path.
• Please refer to screenshot (C) and these steps to complete the puzzle:
• Follow the yellow line to depress plungers (1) and (2). Retrace the yellow line to where the pink line begins.
• Follow the pink line to plunger (3). Retrace the pink line to where the white line begins.
• Follow the white line to plunger (4). Retrace the white line to where the aqua line begins.
• Follow the aqua line to the exit (dashed yellow).
• Receive the ‘Conqueror of Labyrinths: Gold’ achievement trophy.
• Open the cell door to free the man; receive CUBE PART 3 for your inventory.
• Receive the ‘Liberator: Bronze’ achievement trophy.
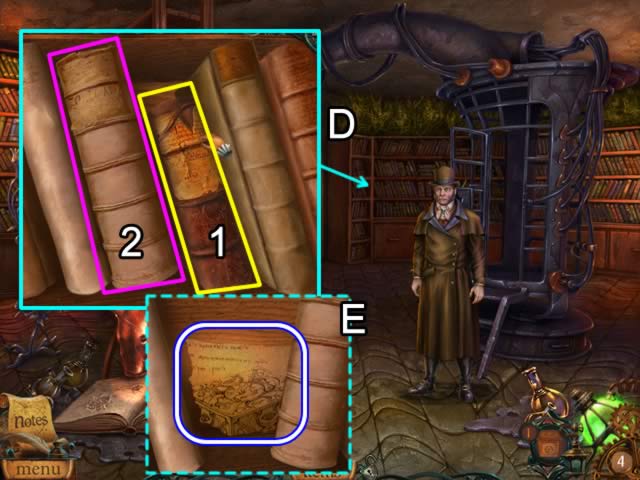
• Look closer at the books (D).
• Remove book (1) and move book (2) to the right.
• Uncover (1/10) DRAWING FRAGMENTS (E).
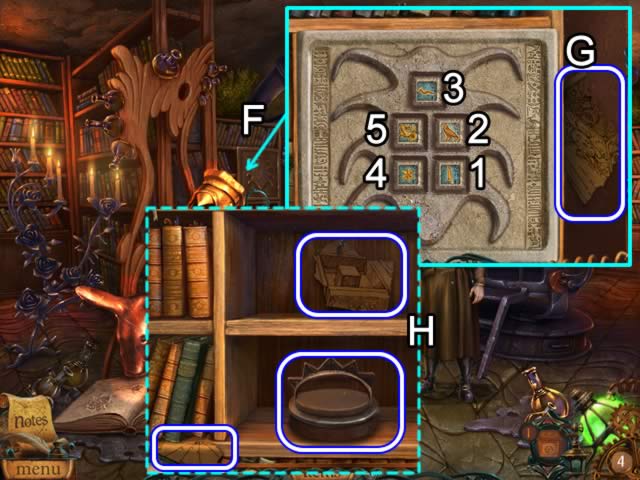
• Look at the panel on the left side of the door (F) to open a puzzle.
• Take the DRAWING FRAGMENTS (2/10) from the side of the safe (G).
• Press the buttons in the order shown to open the safe.
• Take the DRAWING FRAGMENTS (3/10) and the CAP WITH SUN SYMBOL from the safe (H). Take DRAWING FRAGMENTS (4/10) from the books on the lower left.
• Go through the door between the bookcases.
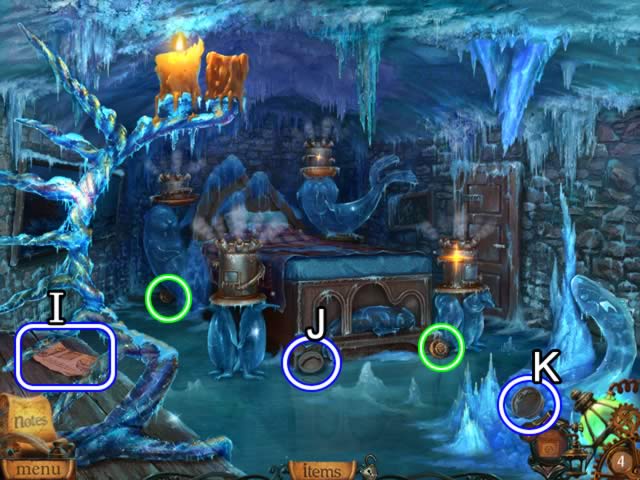
• Take the DRAWING FRAGMENTS (5/10) from the table (I).
• Pick up the CAP WITH SNAKE SYMBOL (J) and CAP WITH HUMAN SYMBOL (K).
• Zoom in on the top left bedpost (L). Insert the CAP WITH SNAKE SYMBOL and twist to open the cylinder and shut off the freezing liquid.
• Look at the top right bedpost (M). Insert the CAP WITH SUN SYMBOL and twist to open the cylinder. Take the CUBE-PART 4 from the post and the DRAWING FRAGMENTS (6/10).
• Examine the lower left bedpost (N). Insert the CAP WITH HUMAN SYMBOL in the cylinder and twist to open the cylinder. Take the DRAWING FRAGMENTS (7/10).
• Insert the CAP WITH MOON SYMBOL in the lower right bedpost (O) and twist to open the cylinder.
• Receive the ‘Conqueror of Eternal Cold’ achievement trophy for shutting down all four cylinders.
• The door on the right opens.

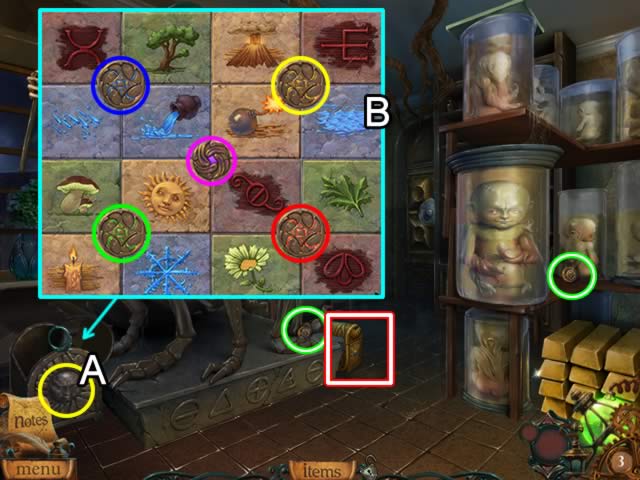
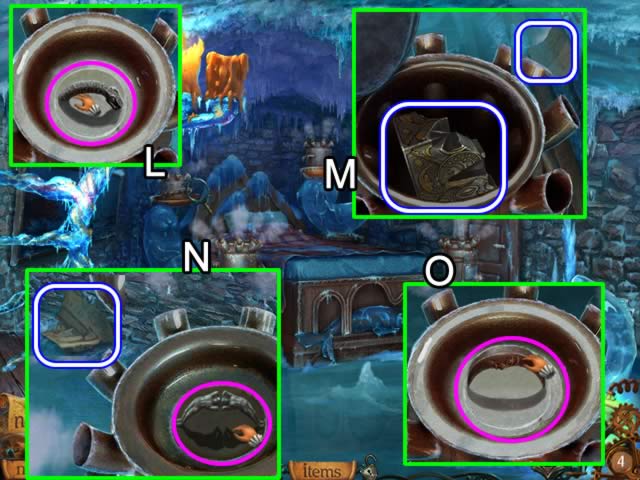
• Zoom in on the control box (P) to open a two-part matching puzzle.
• The tiles flash briefly to show the image locations. The goal is flip the tiles and find the matches.
• Part one (Q) requires finding related images. The numbers on the screenshot show the correct pairs (i.e.: birth [1] / death [1]).
• Part two (R) requires finding matching pairs.
• The image positions are random so your puzzle may not match the screenshots.
• Solving the puzzle releases the hose coupling on the man (S). Click the coupling to remove it.
• Use the KNIFE to cut the ropes (T) and free the survivor; receive CUBE PART 2 from the guard.
• Go up the stairs on the right.
• Play the HOS in the preparation room.
• Find the objects on your item list (U).
• The morphing objects are highlighted in red.
• Receive the STONE SLAB WITH SNAKES.
• Pick up the highlighted DRAWING FRAGMENTS (8/10), (9/10) and (10/10) from the room (V).
• Zoom in on the board (W).
• Place the DRAWING FRAGMENTS on the board to open a jigsaw puzzle.
• Place the cursor over a fragment. A double arrow circle (pink) rotates the piece. A hand (green) selects the piece for movement on the board. A correctly placed piece locks into position.
• Please see screenshot (X) for the solution.
• Completing the puzzle adds Diary information.
• Open the door in the back left wall to enter the first laboratory.
• Examine the press (Y).
• Take the RUBY EYE and ULTRA MAGNIFYING GLASS.
• Put CUBE PART 1, CUBE PART 2, CUBE PART 3 and CUBE PART 4 in the press. Take the assembled LE MARCHAN’S CUBE (Z).
• Look closer at the back wall (A).
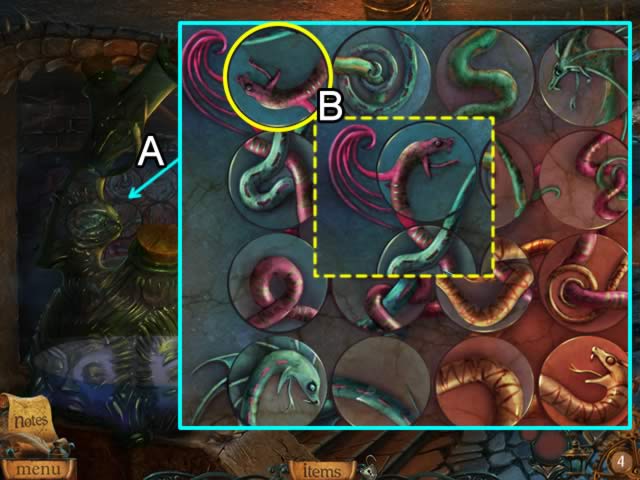
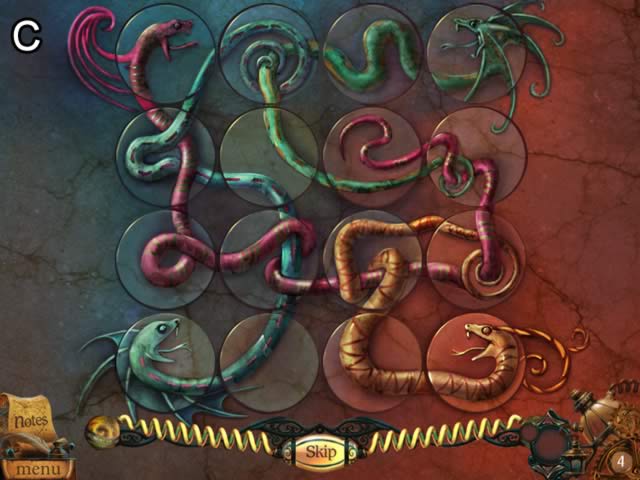
• Insert the STONE SLAB WITH SNAKES in the empty slot to open a puzzle.
• The goal is to rotate the disks to match the snake patterns.
• The best strategy is to start with the four corner disks. Match the disk to the wall pattern (B) for each disk. Align the other disks to the corner disks.
• Please see screenshot (C) for the solution.
• Correctly solving the puzzle opens the wall to reveal the second lab.
• Receive the ‘Super Brain’ achievement trophy.
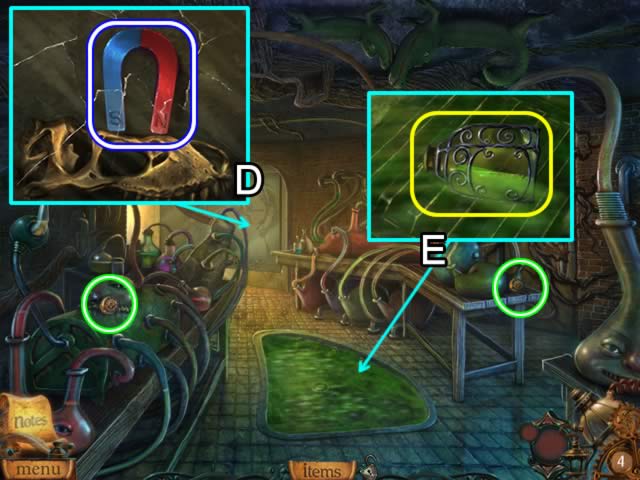
• Use the STONE to smash the glass covering the display case (D); take the MAGNET.
• Dip the EMPTY FLASK in the acid pond (E); get a FLASK OF ACID.
• Go down once.
• Remove the cork from the feeding mechanism. Pour the FLASK OF ACID in the mechanism and view a cutscene of the root system on the door being destroyed.
• Go forward.
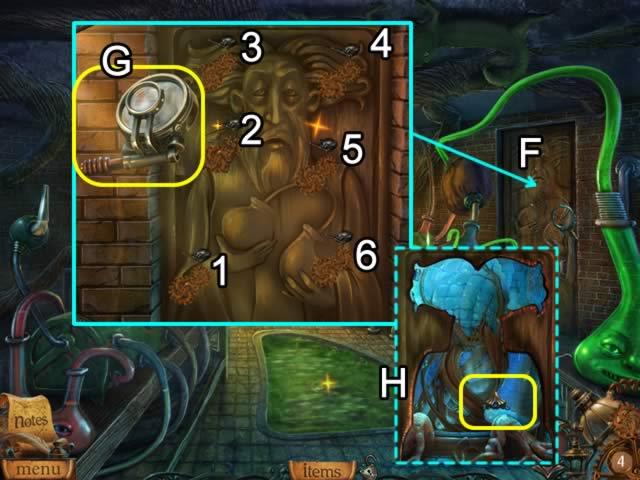
• Examine the root-free door (F).
• Place the ULTRA MAGNIFYING GLASS (G) on the numbered positions to direct a beam of light on the weak portions of the door.
• Go through the silhouette (H) to the egg room.
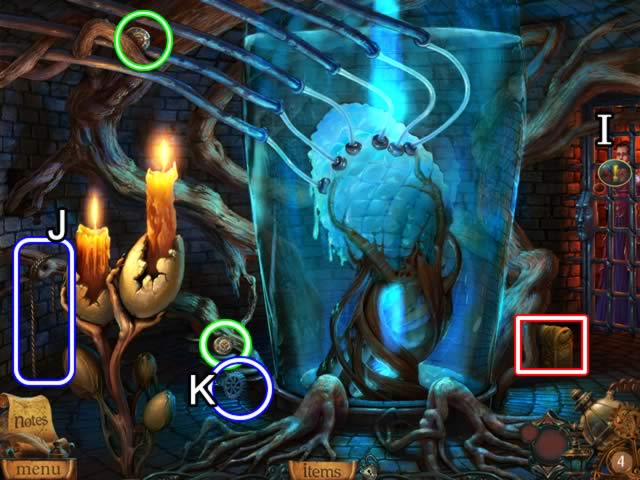
• Speak with Claudia (I).
• Pick up the ROPE (J) and COG WHEEL (K).
• Combine the ROPE and MAGNET in your inventory for a MAGNET INSIDE ROPE.
• Go down once.

• Use the MAGNET ON A ROPE to retrieve the KEY from the pool of acid (L).
• Return to the egg room.
• Smash the container with the STONE (M).
• Insert LE MARCHAN’S CUBE (N) to destroy the egg.
• Receive the ‘Vanquisher of Evil’ achievement trophy.
• Insert the KEY in the mouth of the cell door lock (O) to open the eye compartment.
• Put the RUBY EYE in the empty slot (P) to open a side panel (Q).
• Add the COG WHEEL (pink) to the panel; press the button (yellow) to open the door.
• Receive the BASEMENT KEY for use in the Bonus Game and PLAGUE-HEALING ESSENCE for the final cutscene
• Receive the ‘Liberator: Silver’ and the ‘Live or Die, Make your Choice’ achievement trophies.
• The Bonus Chest is now unlocked in the main menu.
• All solutions for each type of chest puzzle are grouped together in the order they occur in the Puzzles Chests tab. Their game location is also noted.
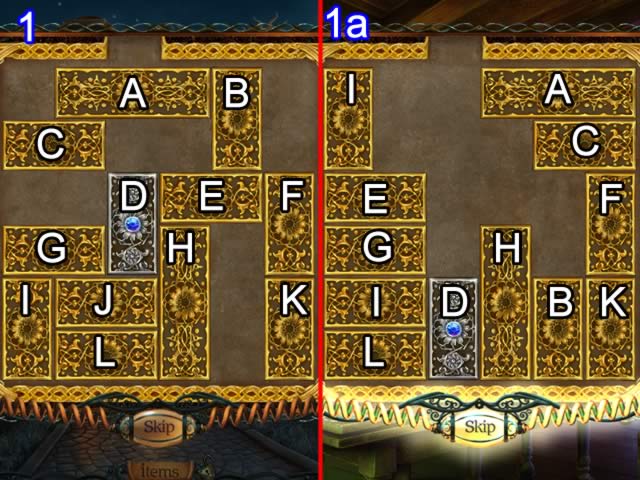
• Sliders
• The goal is to clear a path to the exit at the top of the box and slide the silver bar out.
• Unless otherwise noted, move each bar as far as possible in the direction indicated.
• 1 – Graveyard Building
• D – up; G – right; I – up; F – up; E – right; A – left; H – up; J – left; L – left; G – right; D – down; C – right; I – up; G – left; H – down; A – right; I – up; E – left; B – down; F – down; A – right; C – right; D – up and out.
• 1a shows the ending positions of each bar.
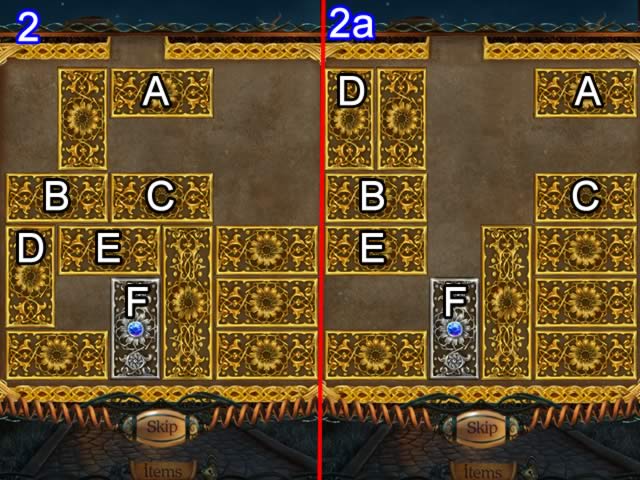
• 2 – Clothing Store
• A – right; C – right; B – right; D – up; B – left; E – left; F up and out.
• 2a shows the ending positions of each bar.
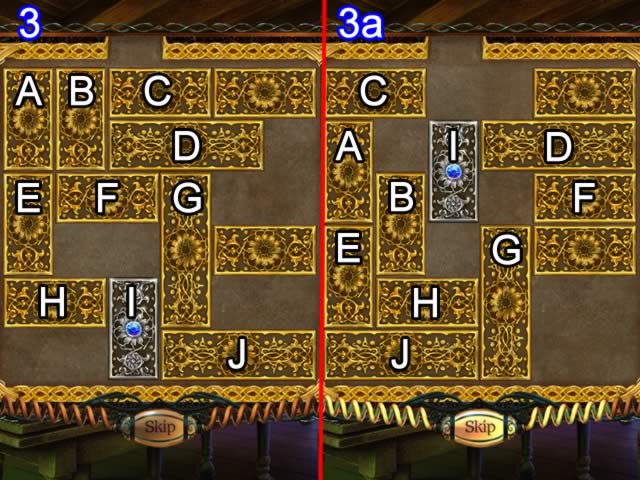
• 3 – Tower – Top Floor
• I – up; J – left; G – down; F – right; D – right; I – up; H – right; E – down; A – down; B – down; C – left; I up and out.
• 3a shows the ending positions of each bar.
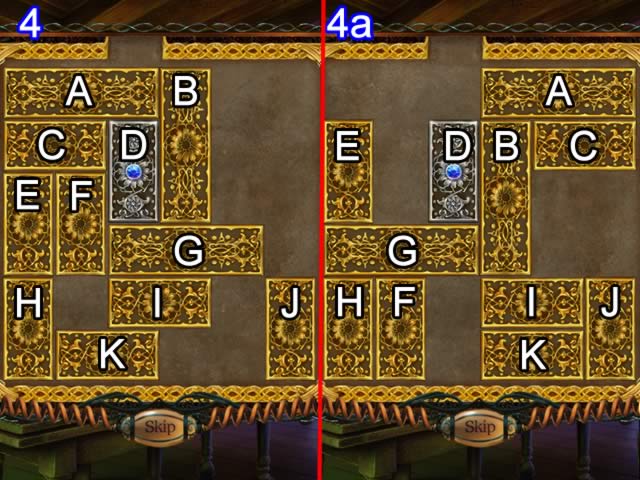
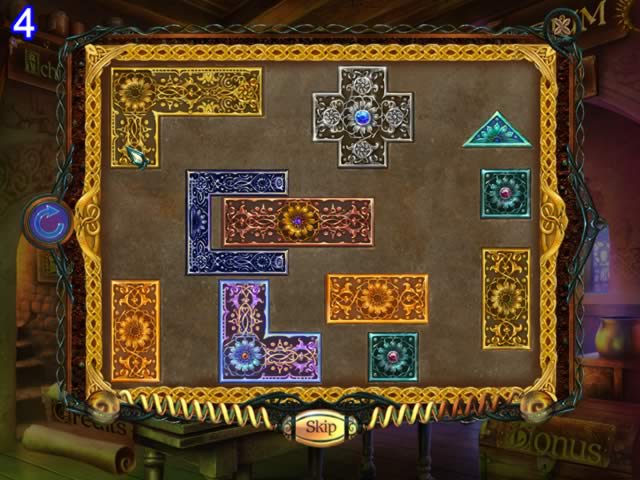
• 4 – Estate – Hall
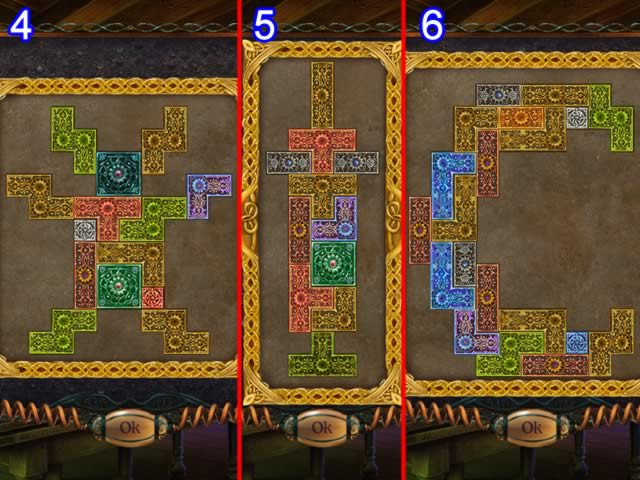
• I – right; K – right; F – down; G – right; D – down; C – right; E – up; G – left; J – up 2; I – right; K – right; B – down; C – right; B – up; I – left; K – left; J – down; G – right; D – up; G – left; B – down; A – right; D up and out.
• 4a shows the ending positions of each bar.
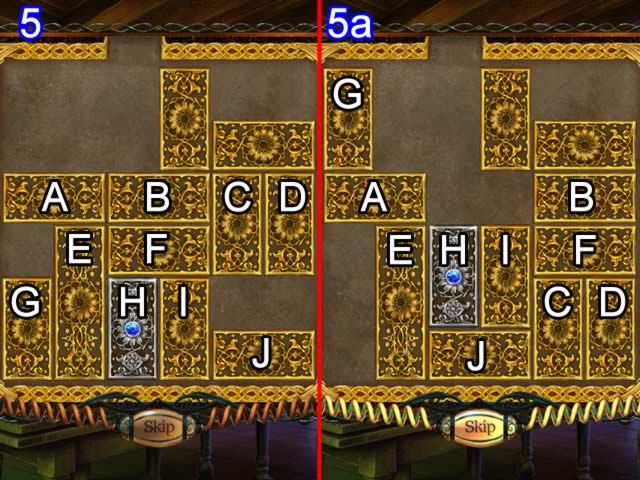
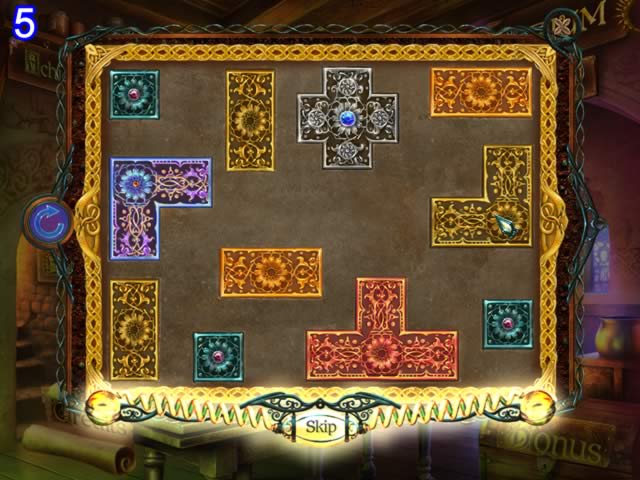
• 5 – Estate – Dining Room
• C – down; D – down; B – right; A – right; G – up; E – up; F – left; H – up; I – up; J – left; H – down; I – down; C – down; D – down; F – right; H – up; I – up; J – right; E – down; A – left; H up and out.
• 5a shows the ending positions of each bar.
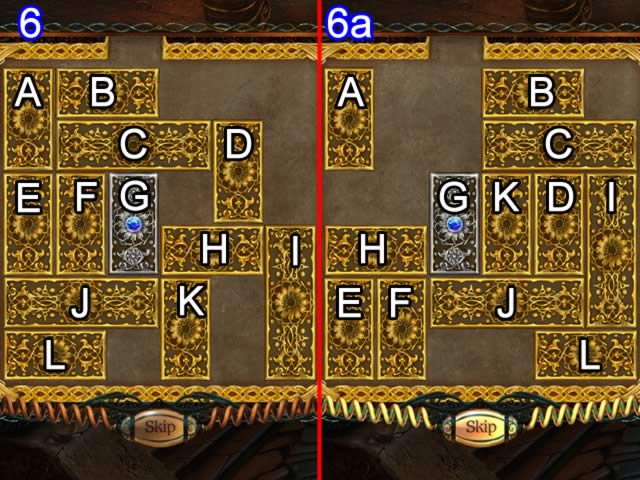
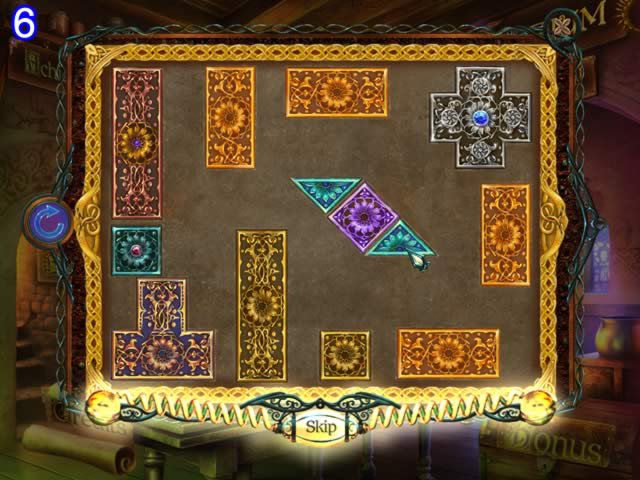
• 6 – Estate – Laboratory
• I – up; H – right; K – up; J – right – L – right; E – down; F – down; G – down; A – down; C – left; K – up; H – left; D – down; K – down; C – right; A – up; B – right; H – left; G – up; J – left; I – down; C – right; G up and out.
• 6a shows the ending positions of each bar.
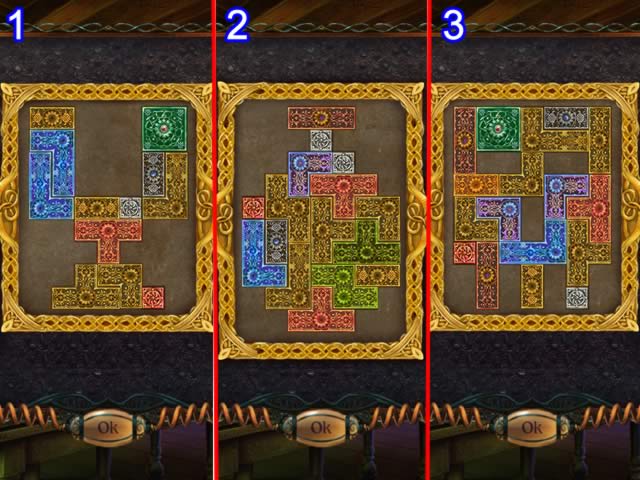
• Outline Forms
• Fit the shapes inside the silhouette so there are no gaps and no overlapping pieces.
• 1 – Hospital Entrance
• 2 – Pharmacy – Hallway
• 3 – Toy Store
• 4 – Tower Entrance
• 5 – Library – Statue Room
• 6 – Estate – Basement
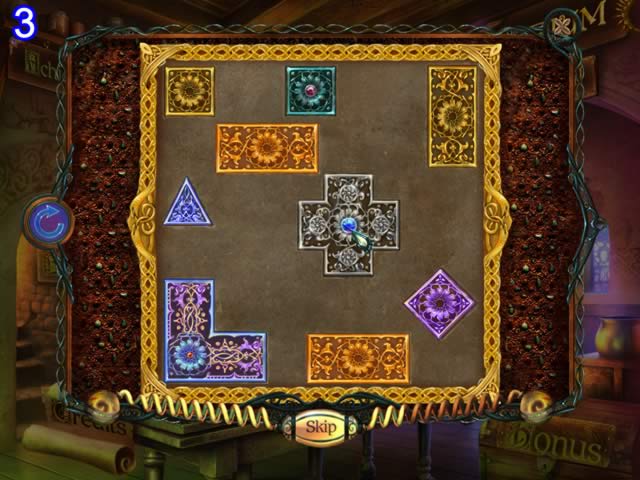
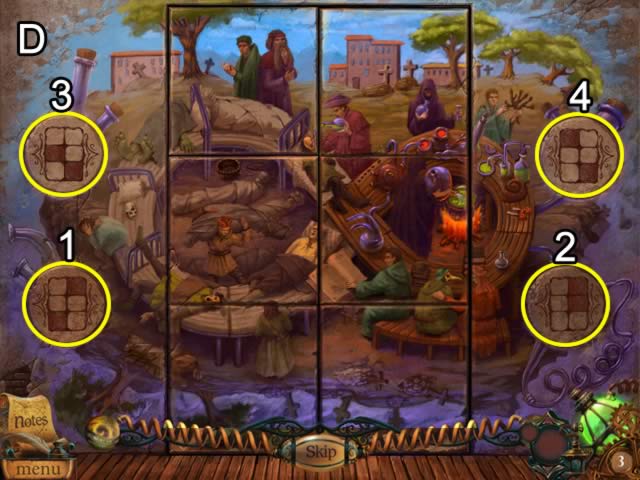
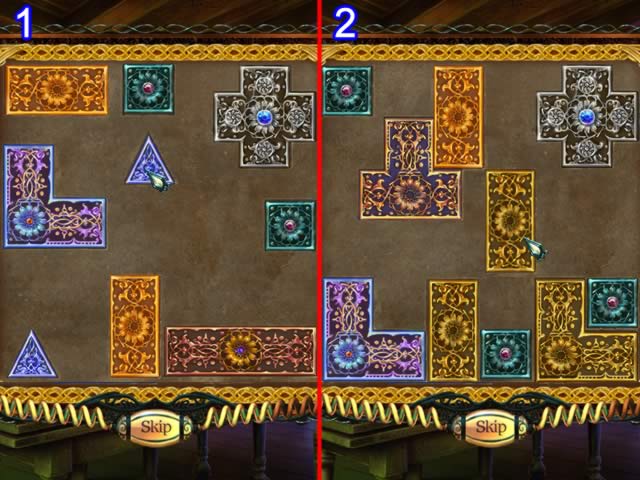
• Shape Placement
• Match the shape to its outline on the board.
• 1 – Hospital – Second Floor
• 2 – Apotheca – Сuriosities Сabinet
• 3 – Tower – First Floor
• 4 – Tower – Second Floor
• 5 – Library – Secret Room
• 6 – Estate – Chamber of Eternal Life
• Congratulations, you have completed Apothecarium: The Renaissance of Evil!


 Haunted Halls: Green Hills Sanitarium Walkthrough, Guide, & Tips
 A Gypsy's Tale: The Tower of Secrets Walkthrough, Guide, & Tips
 The Fall Trilogy Walkthrough, Guide, & Tips
 Mayan Prophecies: Blood Moon Walkthrough, Guide, & Tips
 Cleopatra: A Queen's Destiny Walkthrough, Guide, & Tips