Wanderland Tips and Tricks, Guide, & Tips
Wanderland Tips and Tricks

 Travel through portals of imagination! Fix the broken fairy tales in Wanderland! Restore peace to the land and defeat villains!
Whether you use this document as a reference when things get difficult or as a road map to get you from beginning to end, we’re pretty sure you’ll find what you’re looking for here.
We hope you find this information useful as you play your way through the game. Use the menu below to quickly jump to whatever stage of the game you need help with.

Getting Started
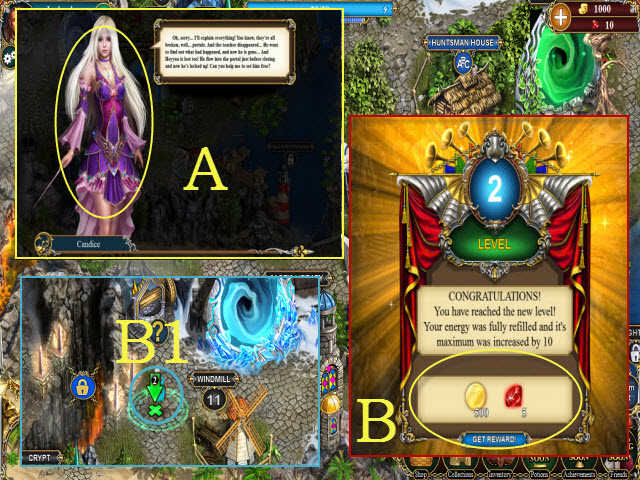
- To begin playing, follow Candice’s instructions (A).
- She will be your guide through the tutorial.
- Gaining levels allows you to unlock new HOPs, Adventure Portals, Bonus Games, and Shrines.
- You gain levels by completing quests.
- Each time you gain a level (B), your maximum energy increases.
- Energy is used for general movement around the map.
- The number on this arrow (B1) indicates how much energy will be spent by moving a given distance.
- Manage your movement wisely.
- Energy will regenerate slowly over time.
Everyday Bonus
- Play every day to receive a special bonus just for playing (B2); collect all of the parts to receive something special.
- If you would like to join in on a discussion about the game or meet other players, please visit the official forum at: http://forums.bigfishgames.com/forums/show/4019.page;jsessionid=05A8E0C3EC606D656724585BF1C3DC2C
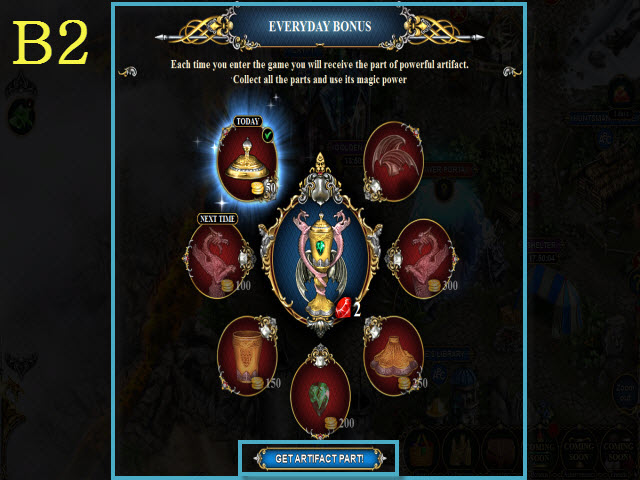
User Interface
- Your level and total experience are shown here (C).
- Access your player profile here to adjust your avatar’s gender, name, and to view your playing statistics (C1).
- This is your total number of coins (D).
- This is your total number of rubies (E).
- Coins and rubies are the main currency in the game; use them to buy items at the shop, to unlock new areas and bonuses, remove curses, or to craft collections.
- Select the plus button (F) to access the bank; coins and rubies can be purchased here at any time.
- Your energy bar and total are displayed here (G).
- Purchase additional energy-consuming items from the mini-shop by selecting the energy bar.
- Your active quests are shown here (H); select them to see additional information for each quest.
- Use the zoom button (I) to zoom in and out of the map.
- Buy useful items at the shop (J).
- Browse your collections here (K).
- Access your inventory here (L).
- Adventure items are displayed here (M).
- Adjust the game settings, change the difficulty level between casual and advanced, and exit the game here (N).
- This is your character (O); select an NPC or location on the map to navigate across the map.
- Select the map area itself and move it around to view the whole world; the numbers indicate the level required to unlock or interact with a portal or scene.
Unlocking New Areas
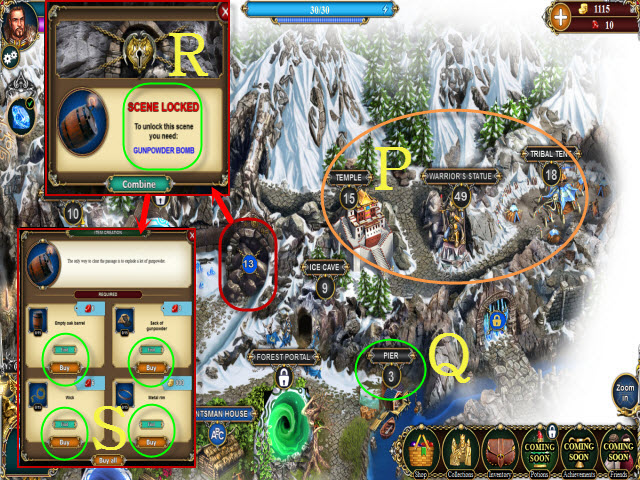
- There are a variety of areas (P) to unlock throughout the game.
- Some of these may be unlocked just by reaching the required level (Q), but others will cost coins or rubies to unlock.
- Some areas may have the option to become unlocked early, for a cost.
- Other areas require special items found in HOPs or from battles, while others must be created.
- Areas become more elaborate to unlock as the game progresses (R).
- To break through into this new area, you will need to buy or find the required items in order to fulfill the requirements (S).
Quests

- Completing quests is the main way you advance through the game; quests are denoted by a question mark (T).
- Quests are also obtained from interacting with the environment, so remember to explore everything.
- When a quest can be completed, there will be an exclamation mark (T1).
- Select a quest to view the quest window (U).
- Some quest items can only be found in HOPs or from doing battles, while others can be created.
- Don’t forget that certain quests require multiples of items for completion; always be sure to check the quantity.
- It’s never guaranteed you will receive the quest item you need; if you get stuck, the find (V) button will direct you towards the item you seek.
- If the find button is grayed out, you can’t access the area for the item you need quite yet.
- The rewards you’ll receive for quest completion are shown here (W); press the accept quest button to start a quest (X).
- Upon completion, you can collect your rewards here (Y).
- If you ever get stuck, review your current quest goals here (Z), but if a quest has a sleep indicator (A) next to it, the step can’t be completed yet.
Hidden-Object Puzzles
- Complete HOPs to find items used for completing quest tasks.
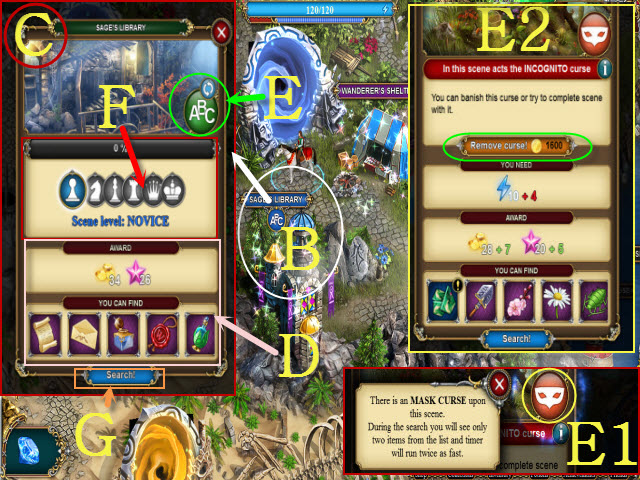
- Selecting a HOP (B) will bring up the HOP window (C).
- This is a list of possible items (D) you can find in the scene, along with the rewards and experience gained.
- This is where the HOP scene mode is displayed (E); the scene mode can also be changed here. Nighttime mode is denoted by a crescent moon; this will make it difficult to see. The butterfly symbol indicates the HOP is a silhouette HOP.
- Scenes can also become cursed.
- Curses are indicated by a special icon (E1); you will be granted greater rewards for beating a HOP in this detrimental state.
- Alternatively, curses can be removed, for a cost (E2).
- This is the current HOP difficulty level (F); when HOPs gain levels they become more challenging, but also yield greater rewards.
- Select the search button to activate the HOP (G).
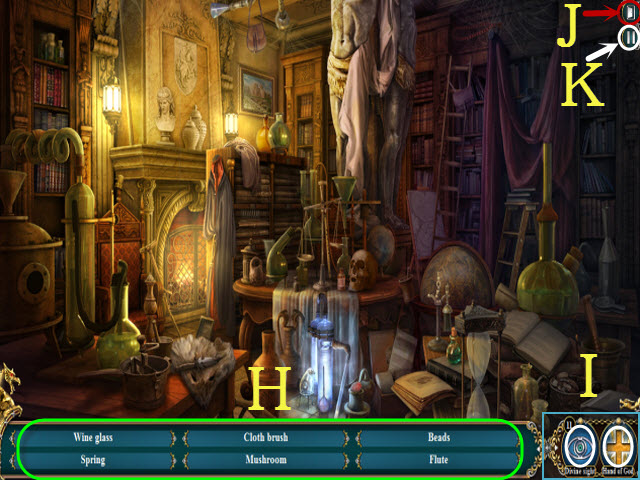
- This is your hidden-object list (H); find them all to complete the HOP.
- HOP power-ups and hints are displayed here (I); if you run out, more can be purchased.
- Only power-ups usable in a given scene will be available.
- Hand of God collects items from the scene automatically.
- Divine Sight unveils a single item temporarily.
- Frosted Time will freeze the HOP timer temporarily. This is very useful at higher HOP ranks because of the increased timer difficulty.
- Light Orb abolishes the darkness.
- Select the back button (J) to exit the HOP; doing so will not restore your expended energy points.
- Press this button (K) to pause the game.
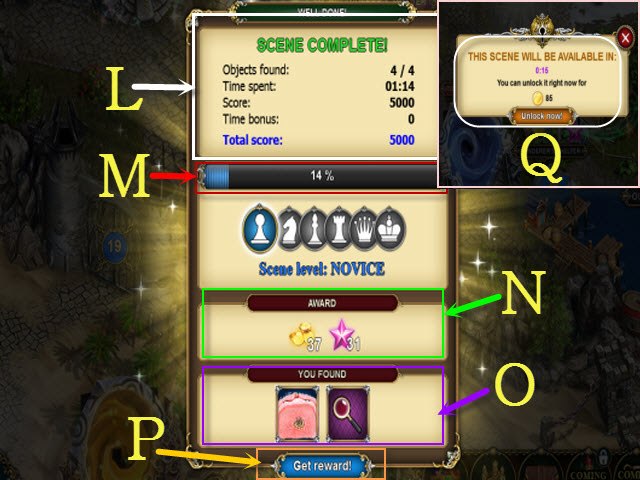
- When you successfully complete a HOP, your statistics will be displayed here (L).
- Your HOP-rank progress is shown here (M); new ranks will grant greater rewards but also increase the difficulty of each HOP. Higher-ranked HOPs will add a timer that gets increasingly lower as ranks increase.
- Your total number of coins and experience gained is shown here (N).
- The items you found are shown here (O).
- Select the get reward button (P) to proceed.
- After completing a HOP, there will be a cool-down timer before playing it again.
- You may reset the timer early, for a cost (Q).
Curses and Gremlin Lures
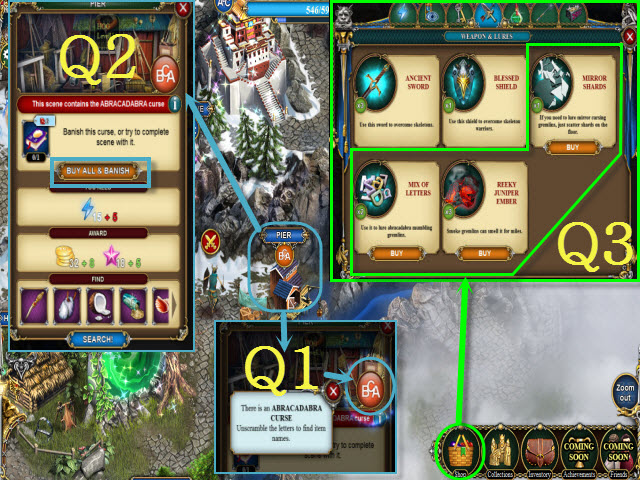
- HOP scenes can become cursed by various effects; view their info here (Q1).
- Curses can be removed for a cost (Q2).
- Mirror mode flips the scene upside down and adds a timer penalty.
- Fog makes it difficult to see the scene and adds a timer penalty.
- Abracadabra scrambles the HOP words.
- Some items can only be found while the scene is cursed.
- To force a curse effect, gremlin lures (Q3) can be purchased from the Shop to add a curse to nearby scenes, but the area needs to be cleared of curses first.
Battles
- In addition to completing HOPs to find items, there are also battles.
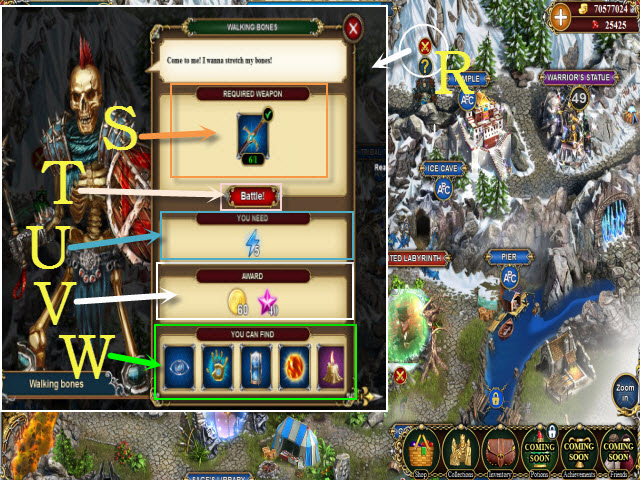
- More adversaries will appear on the map as you advance in levels; they will be denoted by a crossed-swords icon (R).
- Select a creature to see its individual battle requirements (S); if you lack the required items, you can also purchase them.
- If you have the required items, select the battle button (T) to defeat the creature.
- This is the energy cost to fight (U).
- This is the experience and coin reward (V).
- This is a list of all the possible items the creature can drop (W); fighting battles is a great way to find Hint items.
- After winning a battle, the fight will reappear on the map after some time passes. If you can’t find the battle you need, try clearing the current battles to increase the chance that the battle you need will appear.
Portals
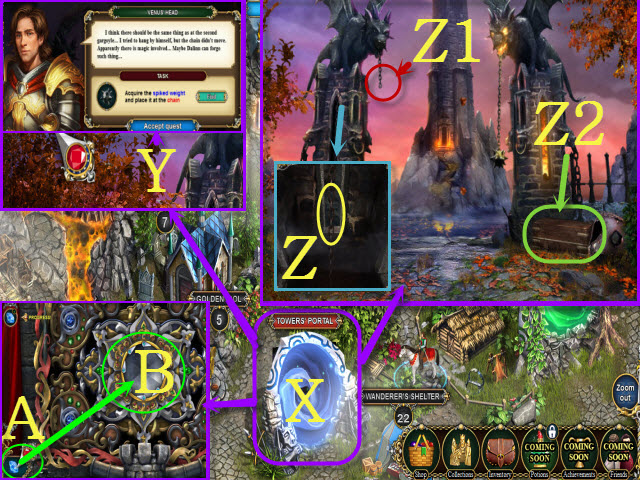
- Adventuring inside portals (X) and completing the objectives inside them is an important part of gameplay advancement.
- Portals are self-contained adventuring areas with new characters and many new quests to complete (Y). New portals unlock as you advance through the game.
- Zoom into an area to investigate it further in order to find new tasks (Z), place inventory items (Z1), and solve mini-games (Z2).
- Place inventory items (A) to interact with other objects (B).
- Complete a set of portal tasks and the area will evolve, unlocking new areas inside it..
Mini-Games
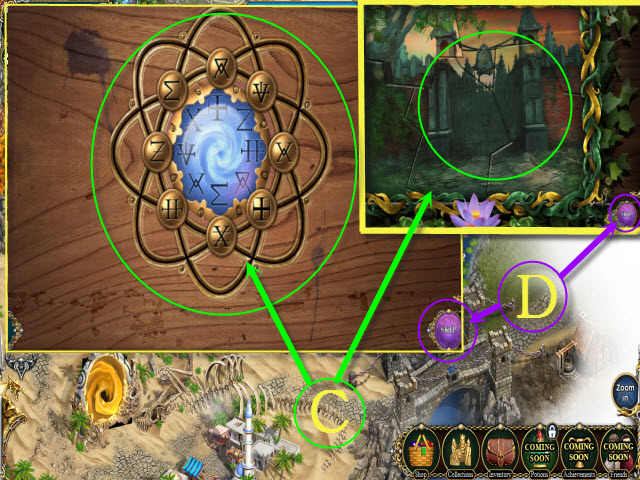
- There are a variety of mini-games and puzzles (C) to solve within the Portals.
- They will sometimes require clues or items found by questing.
- In these cases, place the required clue or item with the mini-game in order to solve it.
- If you do not wish to play the mini-game, press the Skip (D) button for a coin cost to bypass it and continue on.
Inventory
- Access your Inventory here (E).
- The Energy tab (F) holds all of your energy-replenishing items; you will need to use these often.
- The Hints and Timers tab (G) is where HOP hints are held.
- Keys and items used in unlocking scenes are stored here (H).
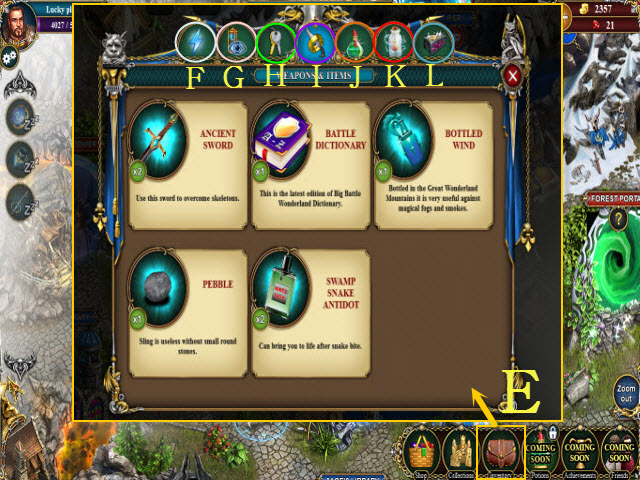
- The Weapons and Lures (I) tab holds all of the necessary equipment used in defeating creatures, as well as items needed to summon curse effects.
- Locate your potions here (J); these have a variety of beneficial effects, but do not last forever.
- The Collection-Activators (K) tab holds all collection-related materials.
- The All tab holds everything (L).
- Be sure to move the window up and down to see all of your items.
The Item Shop
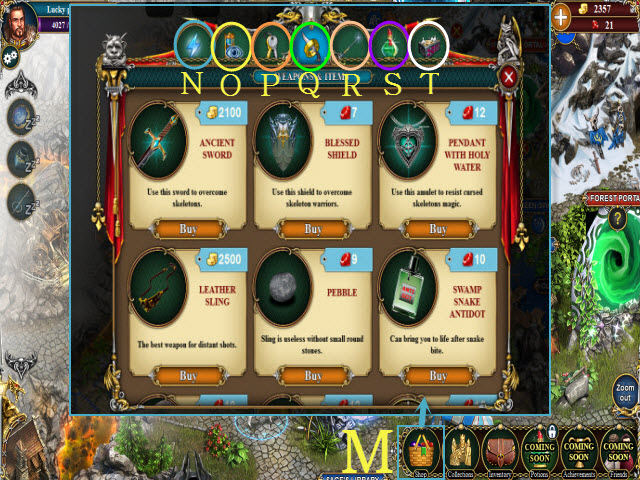
- The Item Shop can be accessed here (M); many items may be purchased here.
- Buy energy-replenishing items from the Energy tab (N).
- The Hints and Timers tab (O) is where HOP hints may be purchased.
- Buy all types of consumable Keys here (P); these are required for exploring specific HOP rooms.
- The Weapons and Lures tab (Q) has items used to vanquish creatures and also items that cause curses on a scene in order to find the right item.
- The Collection-Activators tab (R) holds any collection-related material you might need in order to craft one.
- Potions (S) with a variety of short-duration buffs may be purchased here.
- The All tab (T) shows everything.
- Be sure to move the window up and down to see every item you have access to.
Collections
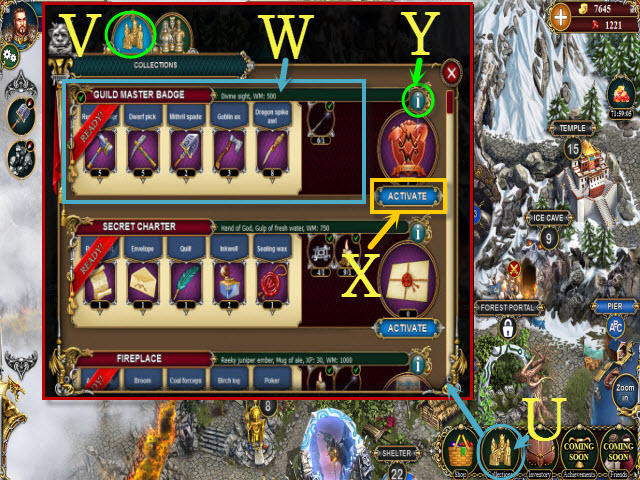
- Access the Collections panel here (U).
- This is your Collections tab (V); standard collections go here.
- Many tasks require collections in order to complete them.
- The components and their respective quantities required to craft a collection are displayed here (W).
- Select the Activate button (X) to create the item and receive it.
- The Information button (Y) will also give additional information about each collection.
The Old Lighthouse
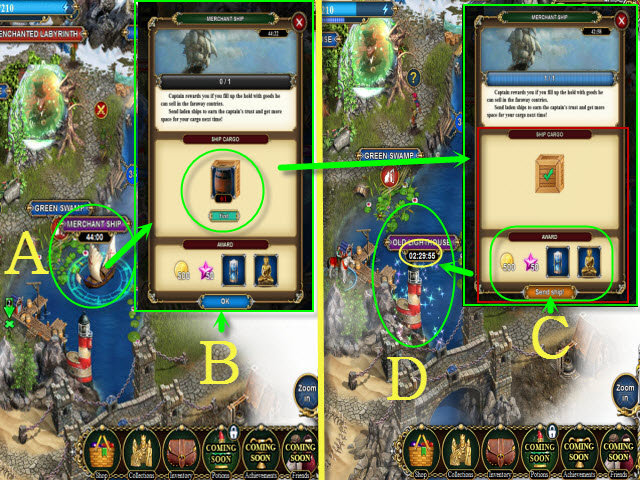
- An old merchant ship appears on the river (A).
- Select the ship and pack it with the required items (B) before the timer reaches zero to receive additional rewards (C).
- There will be a cool-down on the lighthouse (D) before the ship becomes active again.
- Sending shipments is a great way of gaining side rewards while you also work on other tasks.
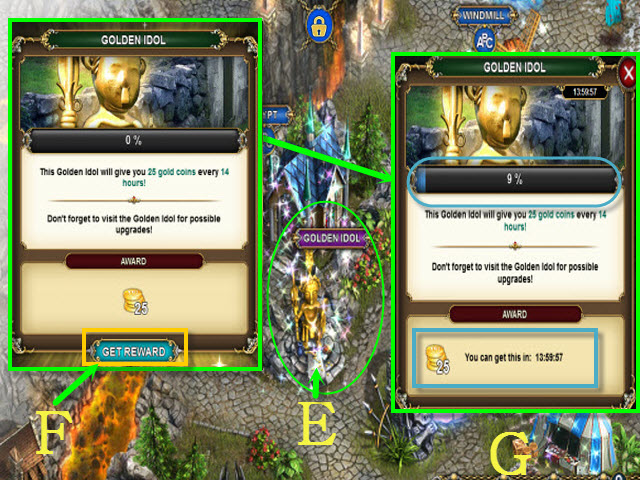
The Golden Idol
- The Golden Idol (E) is available at Level 10.
- Visit the Idol as often as possible to earn some gold (F).
- Once the task bar is filled, the next tier is unlocked for greater rewards, but there will be a cool-down timer (G) until the task can be completed again.
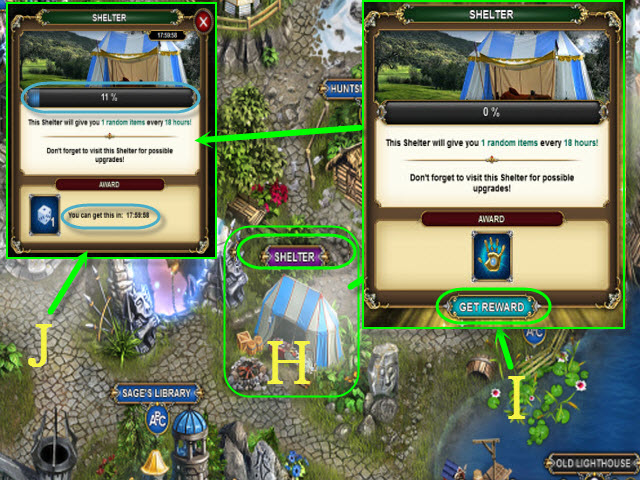
The Shelter
- The Shelter (H) is available at Level 22.
- Visit the Shelter to receive a random item every 18 hours (I).
- Once the task bar is filled, the next tier is unlocked for greater rewards, but there will be a cool-down timer (J) until the task can be completed again.
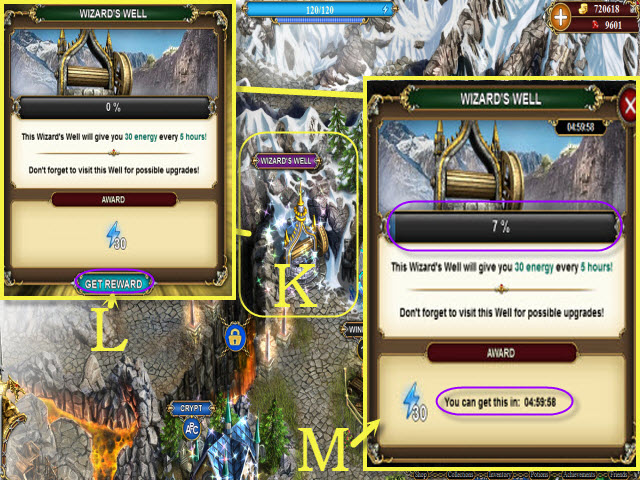
The Wizard’s Well
- The Wizard’s Well (K) becomes available at Level 6.
- Visit the Wizard’s Well every 5 hours to restore some energy (L).
- Once the task bar is filled, the next tier is unlocked for greater rewards, but there will be a cool-down timer (M) until the task can be completed again.
The Warrior’s Statue

- Unlock the Warrior’s Statue (N) at Level 49.
- Visit the Warrior’s Statue every 26 hours to receive a random weapon (O).
- Once the task bar is filled, the next tier is unlocked for greater rewards, but there will be a cool-down timer (P) until the task can be completed again.

 F.A.C.E.S. Walkthrough, Guide, & Tips
 James Patterson's Women's Murder Club: Little Black Lies Walkthrough, Guide, & Tips
 Haunted Hotel: Eternity Walkthrough, Guide, & Tips
 Fear for Sale: City of the Past Walkthrough, Guide, & Tips