Forgotten Kingdoms: Dream of Ruin Walkthrough, Guide, & Tips
Forgotten Kingdoms: Dream of Ruin Walkthrough
Welcome to the Forgotten Kingdoms: Dream of Ruin Walkthrough
Princess Selene’s vivid dreams warn that her marriage foretells disaster – but only you can break the magical spell threatening both your lives!
Whether you use this document as a reference when things get difficult or as a road map to get you from beginning to end, we’re pretty sure you’ll find what you’re looking for here.
This document contains a complete Forgotten Kingdoms: Dream of Ruin game walkthrough featuring annotated screenshots from actual gameplay!
We hope you find this information useful as you play your way through the game. Use the walkthrough menu below to quickly jump to whatever stage of the game you need help with.
Remember to visit the Big Fish Games Forums if you find you need more help. Have fun!
This walkthrough was created by Amanda Barrera, and is protected under US Copyright laws. Any unauthorized use, including re-publication in whole or in part, without permission, is strictly prohibited.
General Tips
- This is the official guide for Forgotten Kingdoms: Dream of Ruin.
- This guide will not show when you have to zoom into a location; the screenshots will show each zoom scene.
- Hidden-object puzzles are referred to as HOPs. This guide will not show screenshots of the HOPs, however, it will mention when an HOP is available and the inventory item you’ll collect from it.
- Use the Map to travel to a location.
Chapter 1: Tida

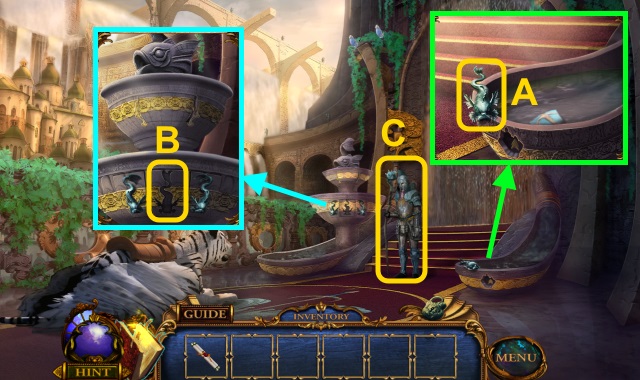
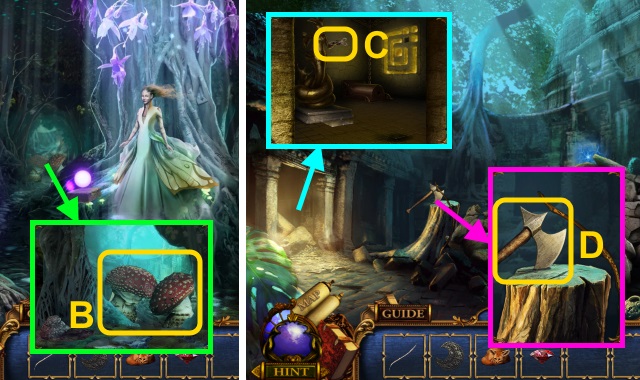
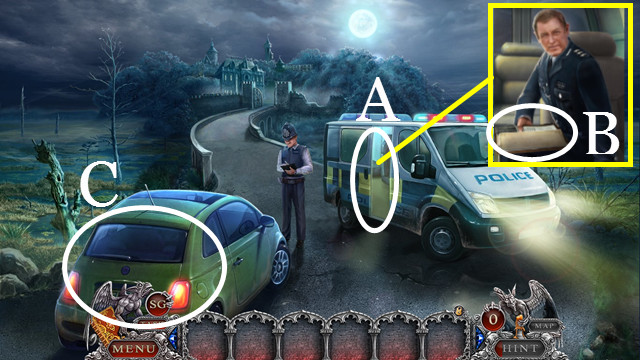
- Take the STONE FISH (A).
- Place the STONE FISH (B).
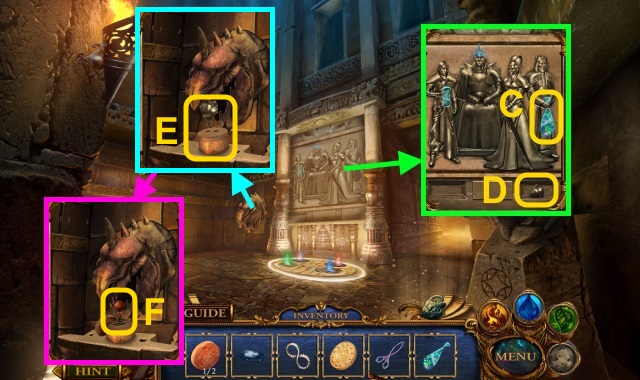
- Talk to the guard (C).
- Walk forward.
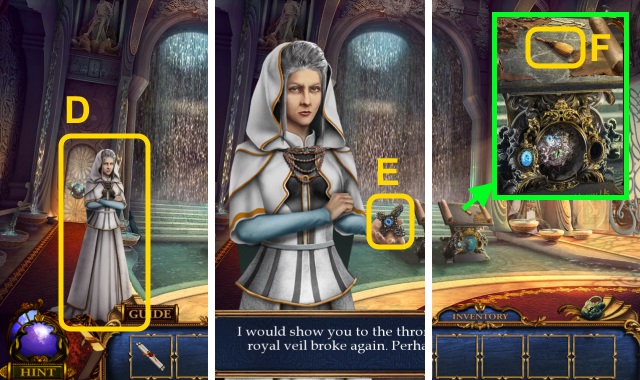
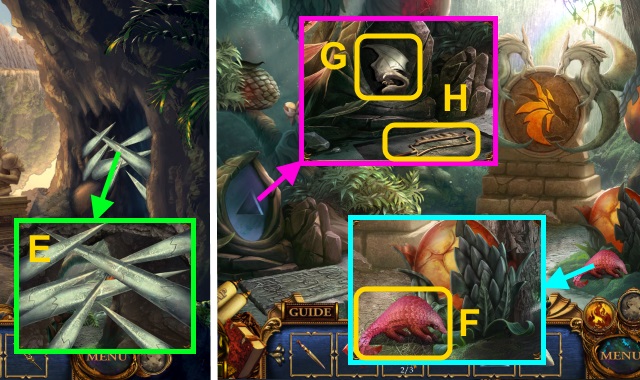
- Talk to the woman (D); take the JEWELED CROSS (E).
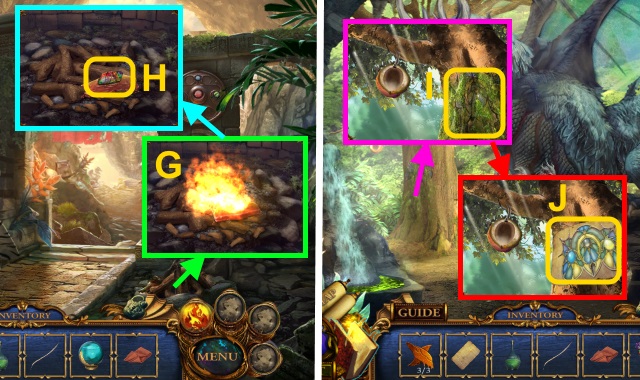
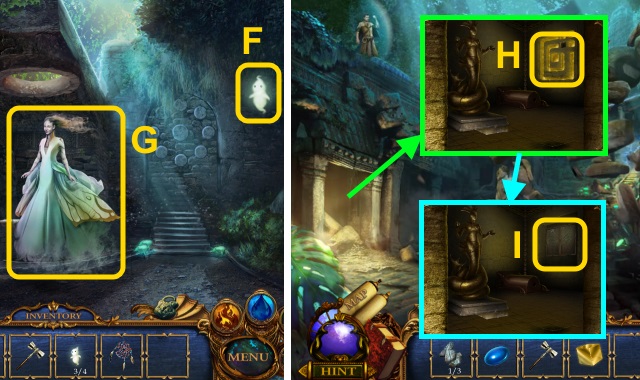
- Take the BRUSH (F).
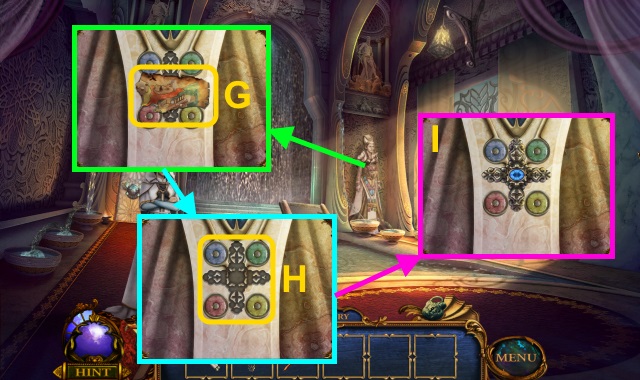
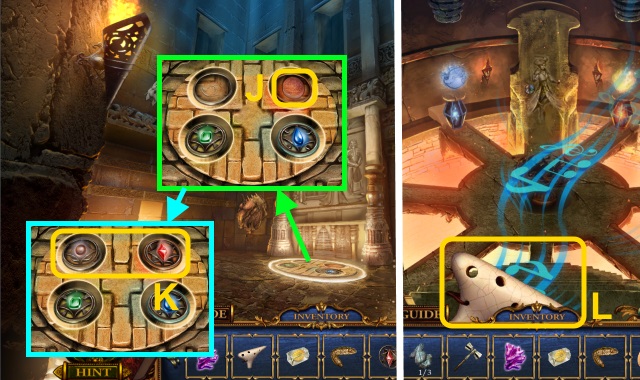
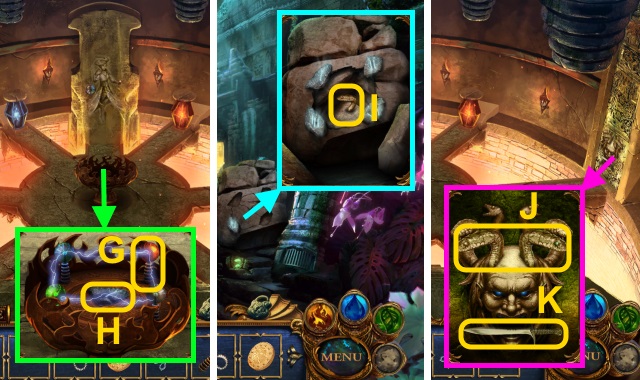
- Take the MAP PIECE (1/3) (G); place the JEWELED CROSS for a mini-game (H).
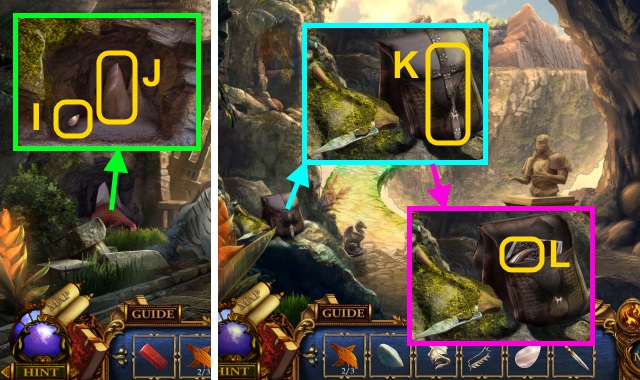
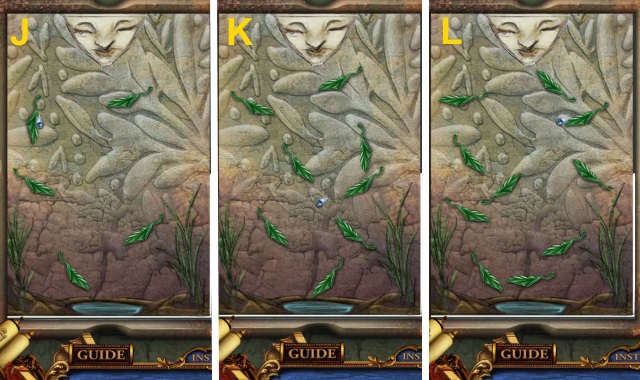
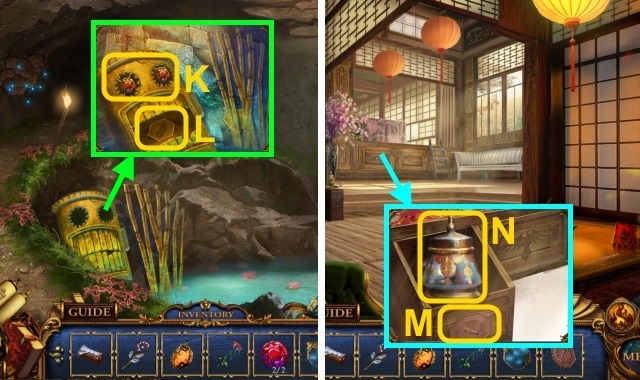
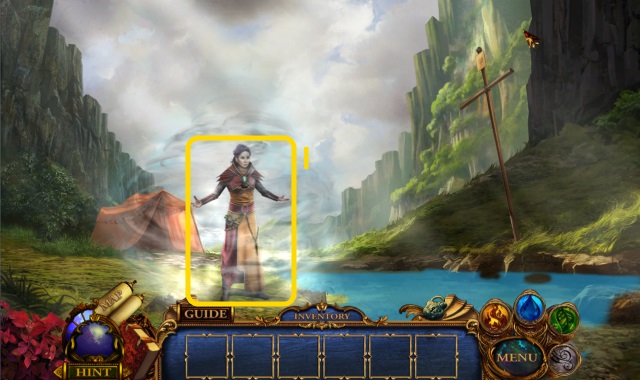
- First solution is random (I).
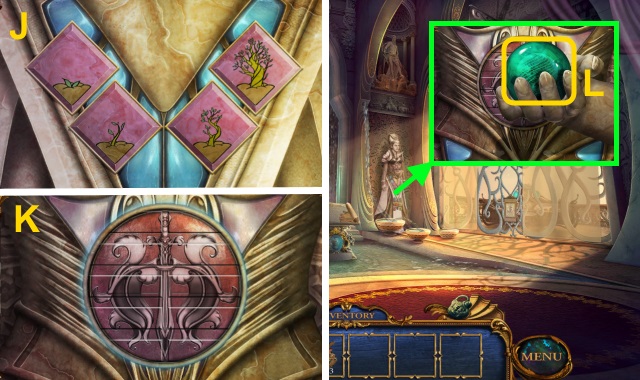
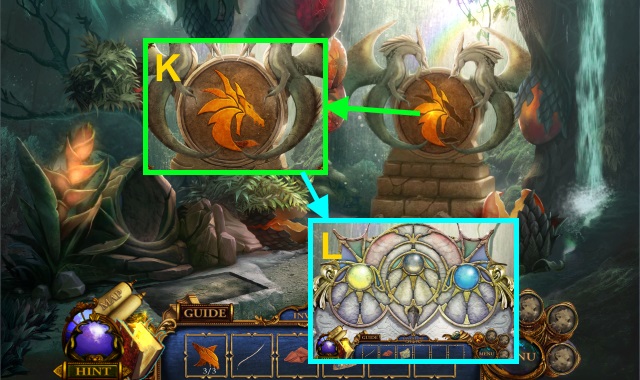
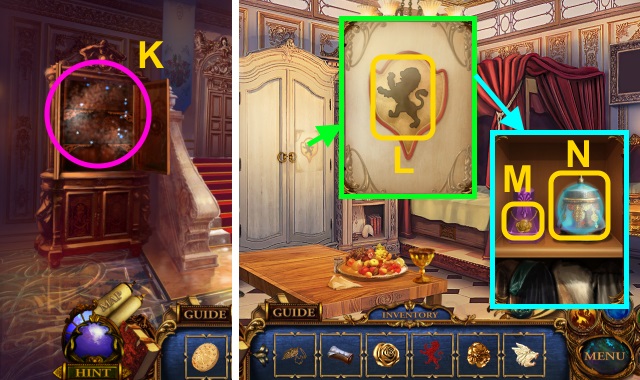
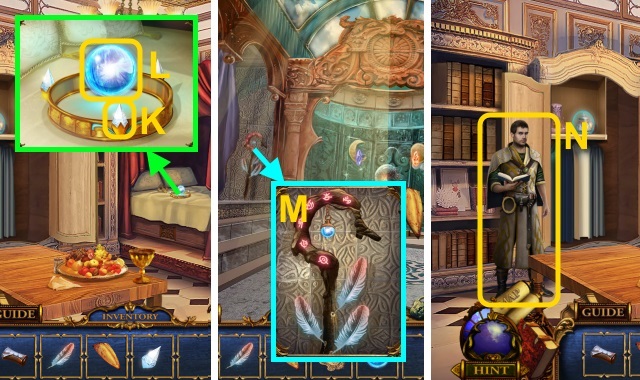
- Solution: (J, K).
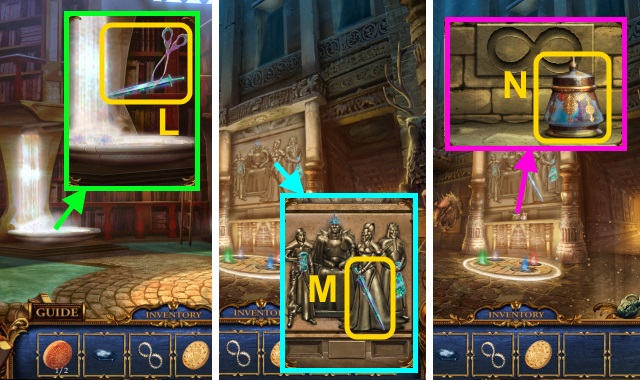
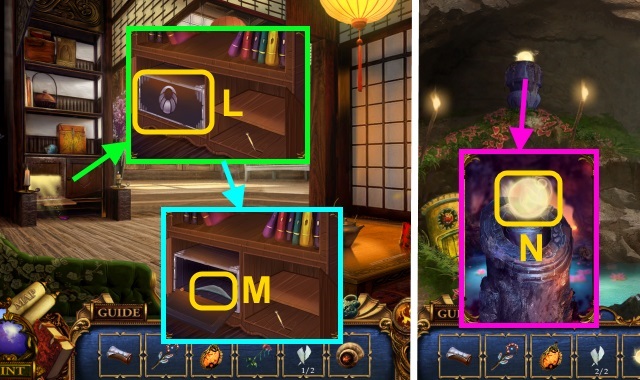
- Press the orb (L).
- Walk forward.
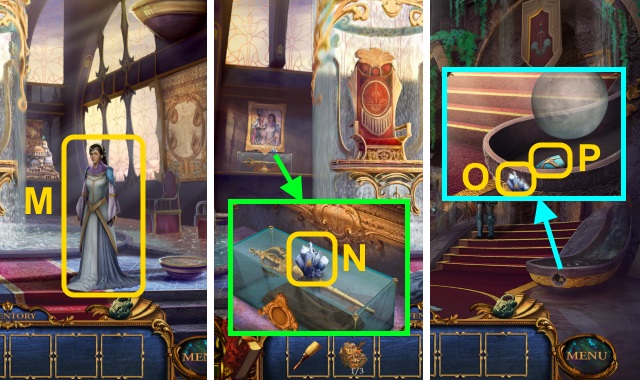
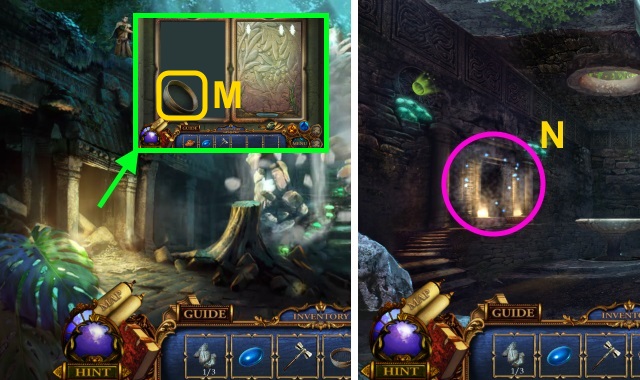
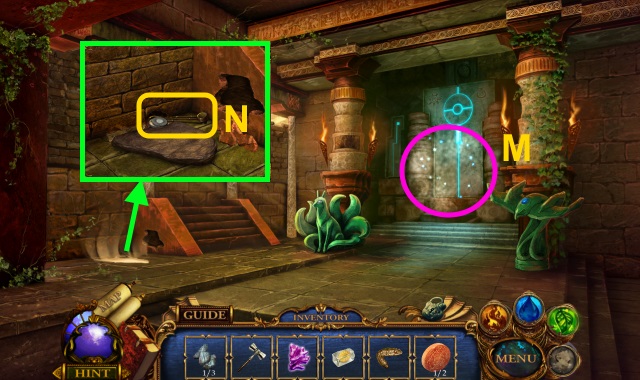
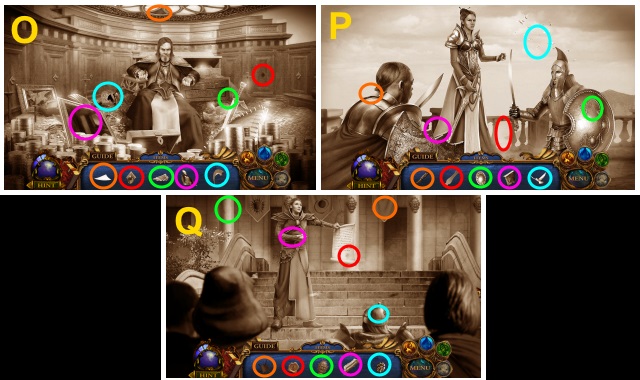
- Give the MARRIAGE PROPOSAL to Selene (M).
- Take the CRYSTAL OF FLOTATION (N).
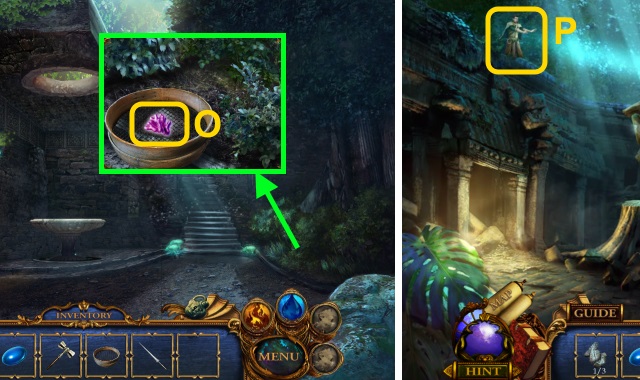
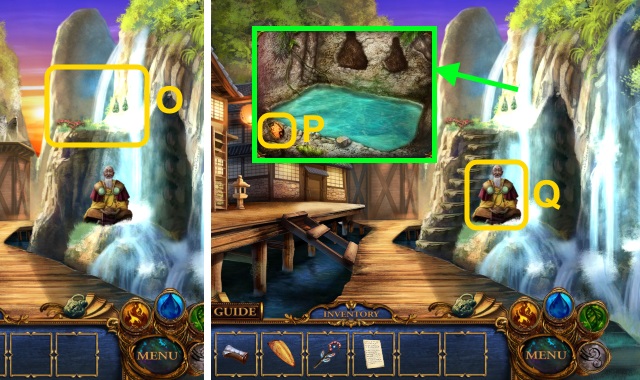
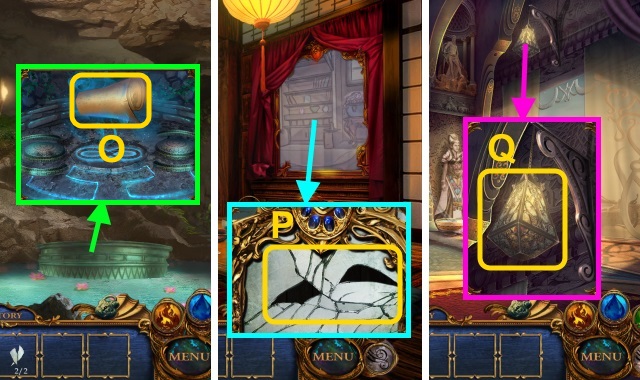
- Walk down twice.
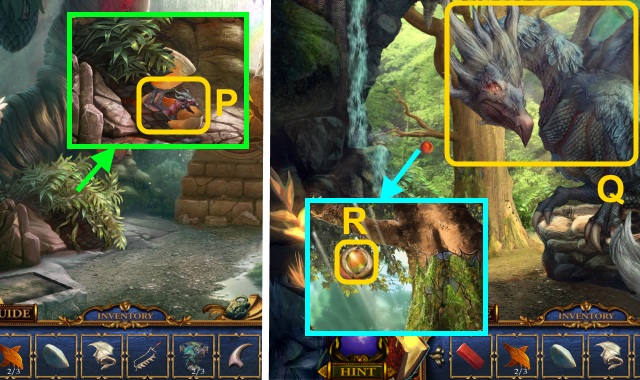
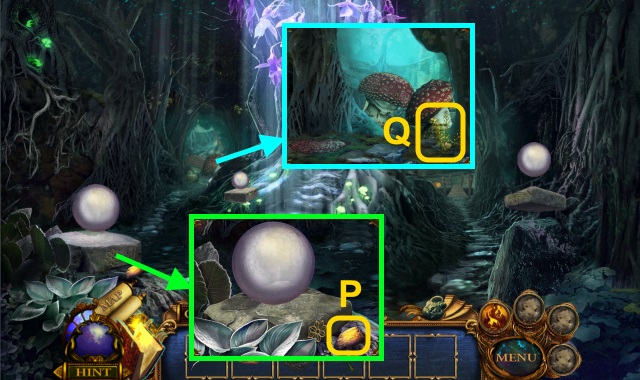
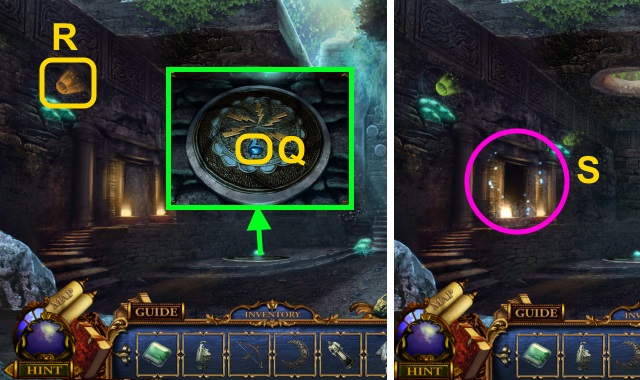
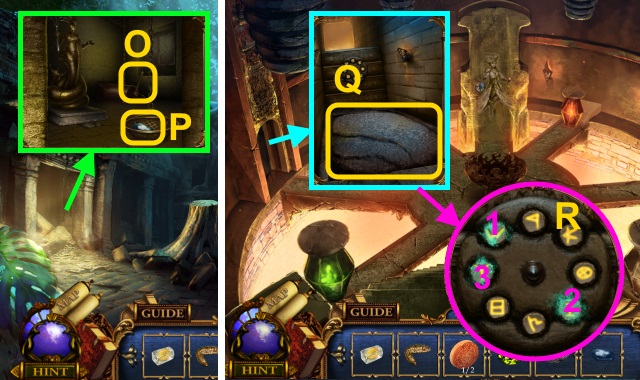
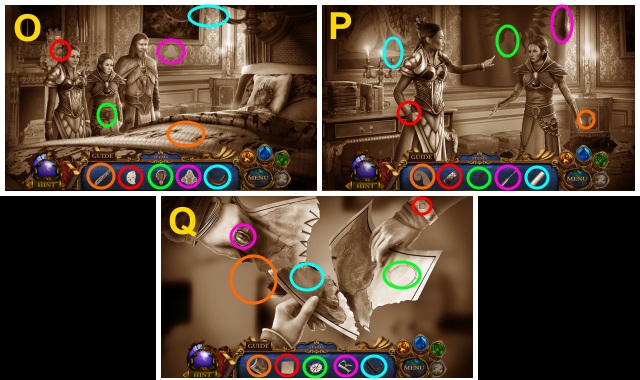
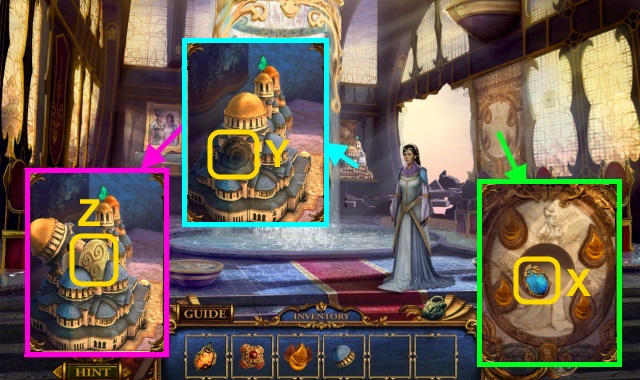
- Place the CRYSTAL OF FLOTATION (O); take the SIGIL PIECE (P).
- Walk forward.

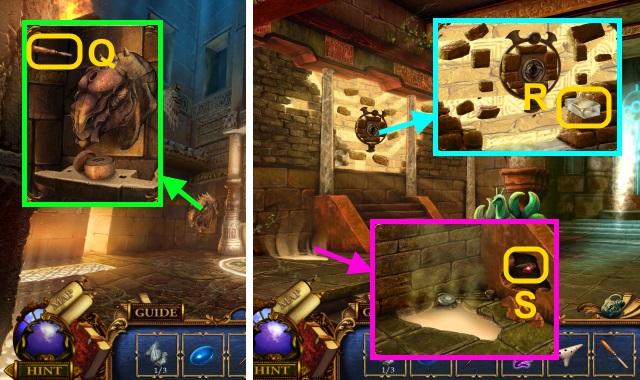
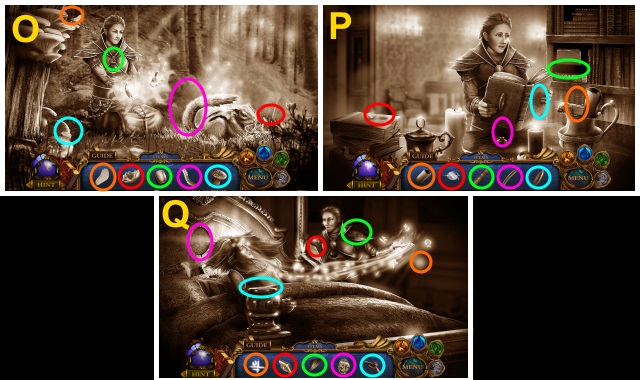
- Place the SIGIL PIECE for a mini-game (Q).
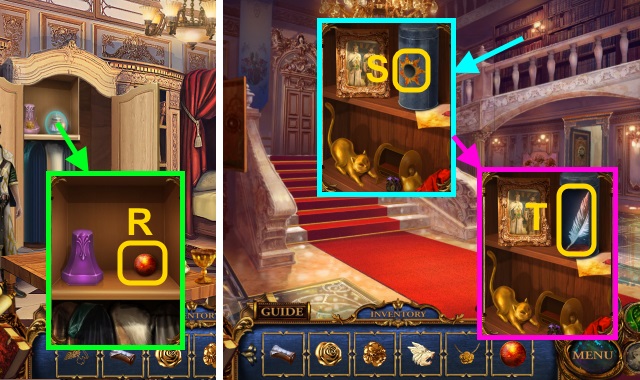
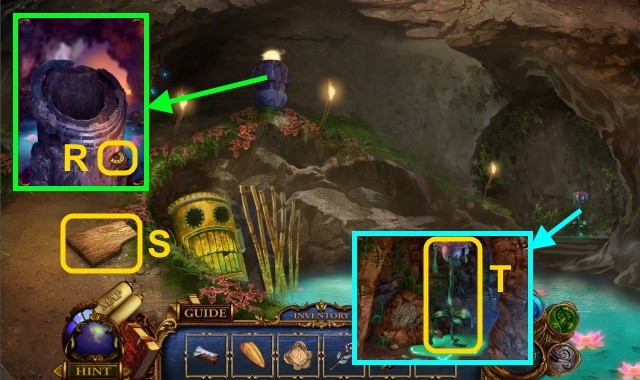
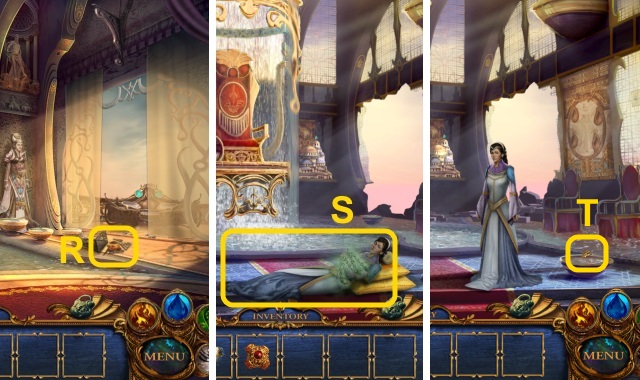
- Solution (R).
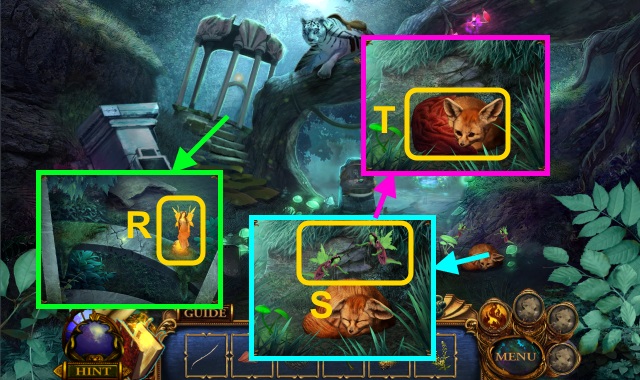
- Walk left.
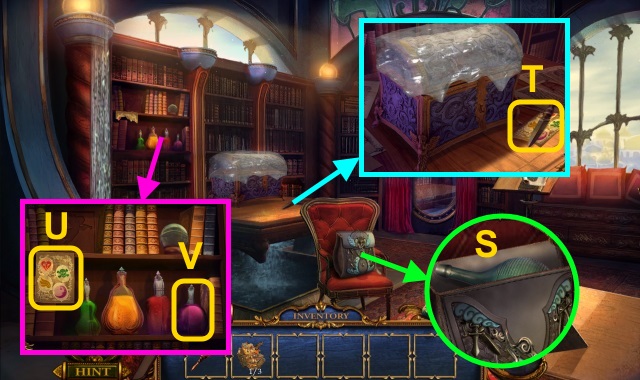
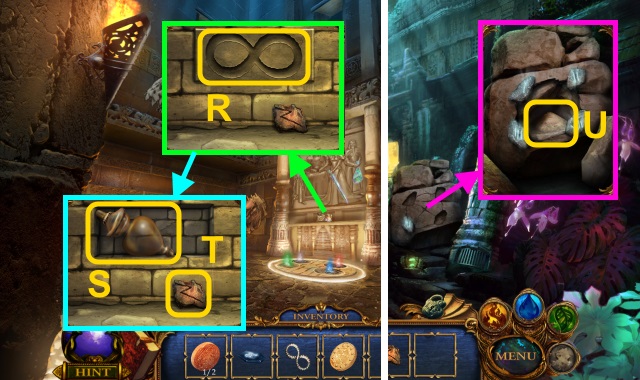
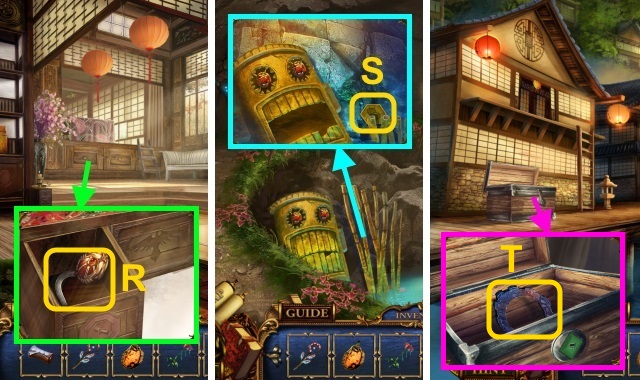
- Open the bag.
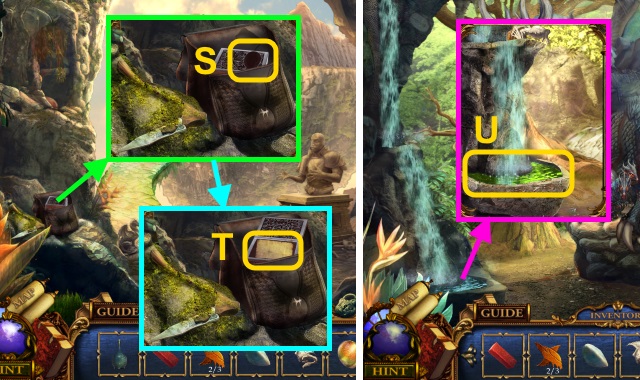
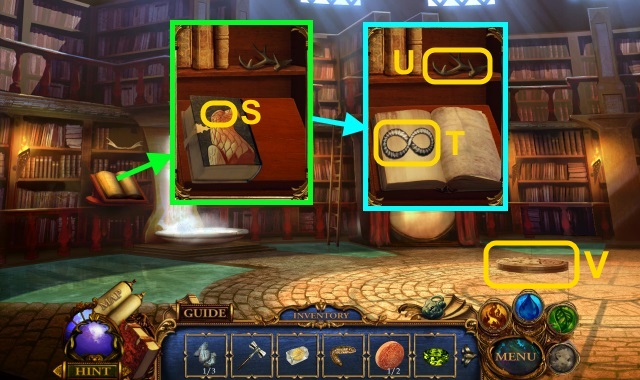
- Take the scroll and EMPTY BOTTLE (S).
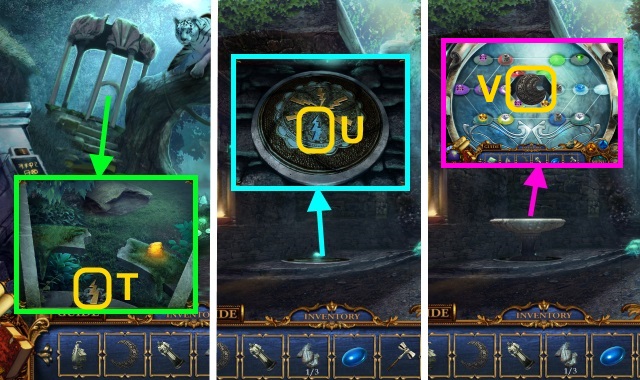
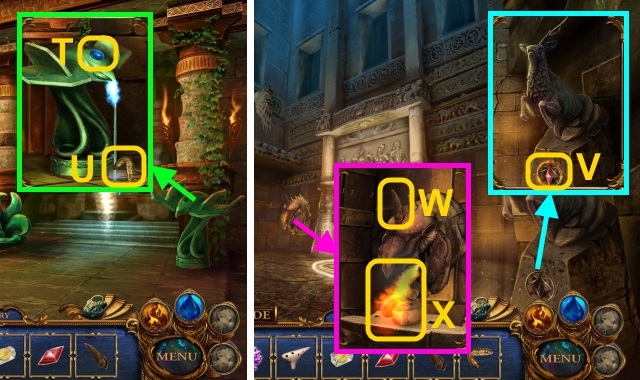
- Take the DULL DAGGER and POTION REFERENCE (T).
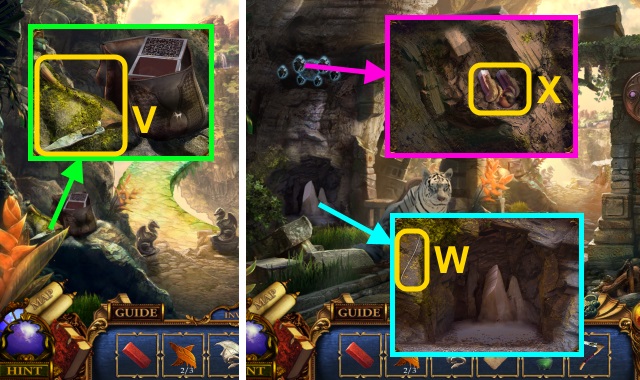
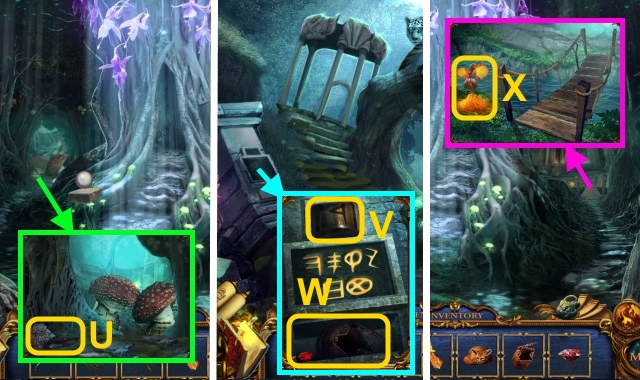
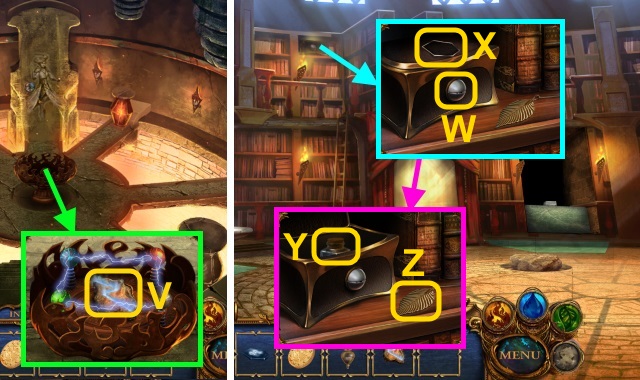
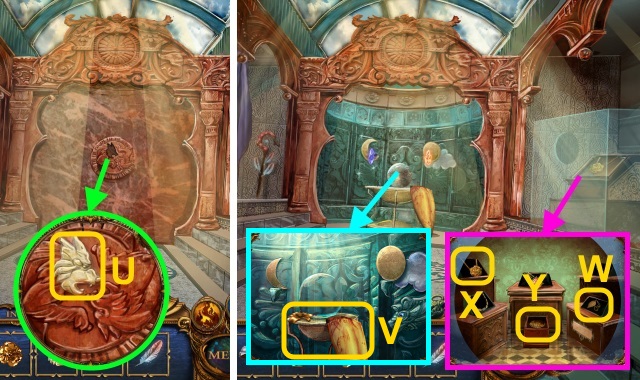
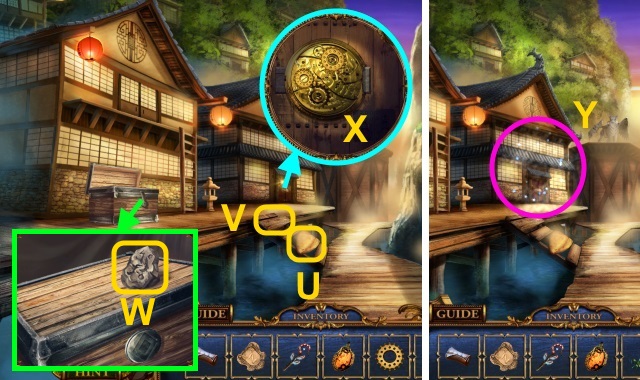
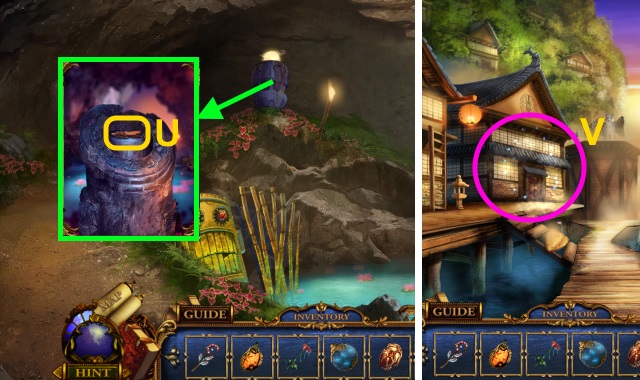
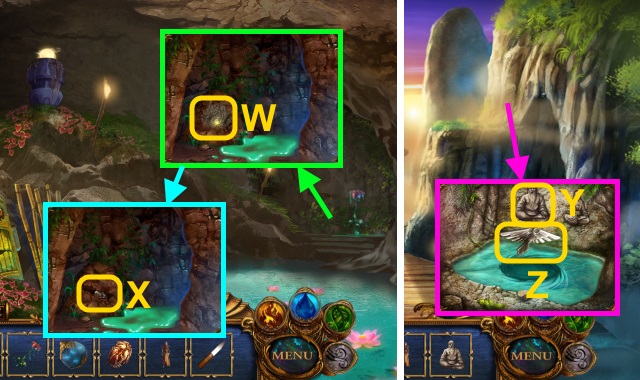
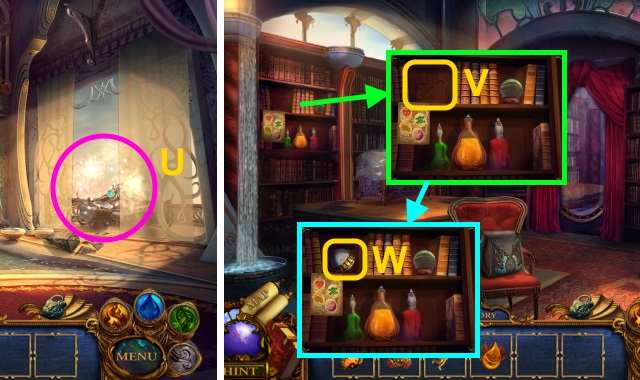
- Place the POTION REFERENCE (U); take the SLEEPING POTION (V).
- Walk down, then forward.
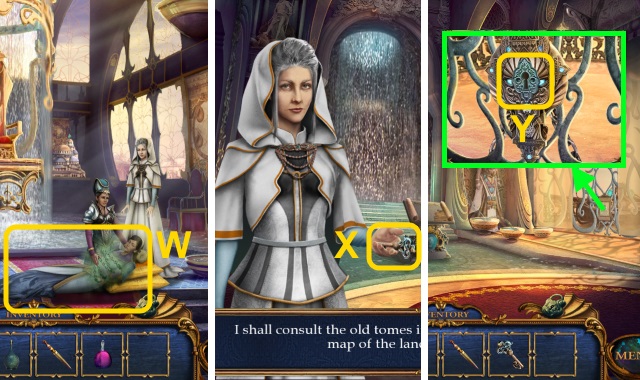
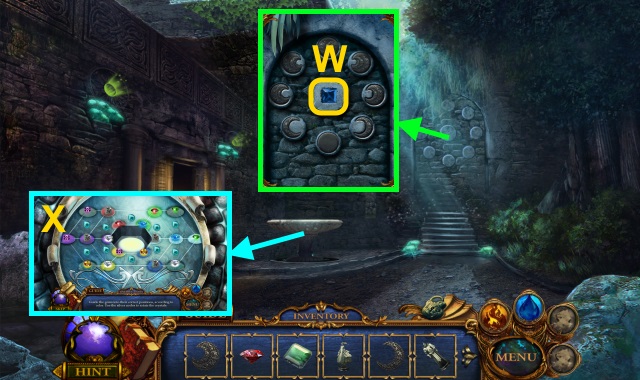
- Give the SLEEPING POTION (W).
- Take the BALCONY KEY (X).
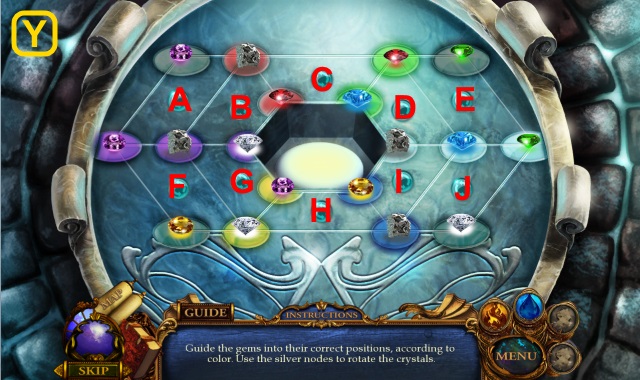
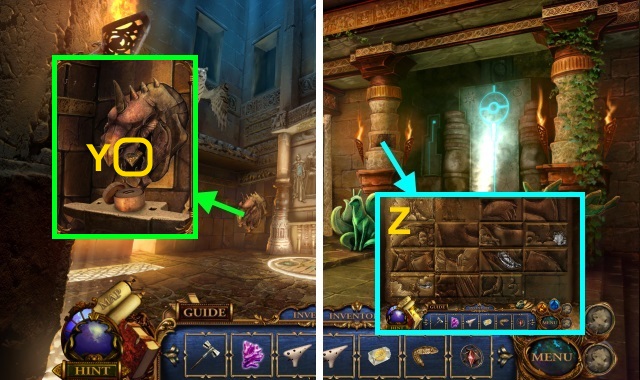
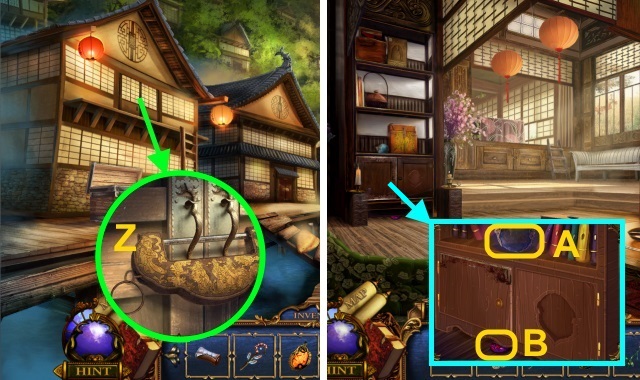
- Move the poster; use the BALCONY KEY (Y).
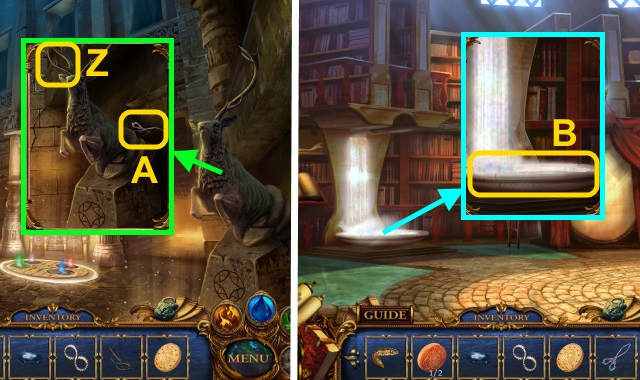
- Play the HOP to receive the INSIGNIA (Z).
- Walk left.
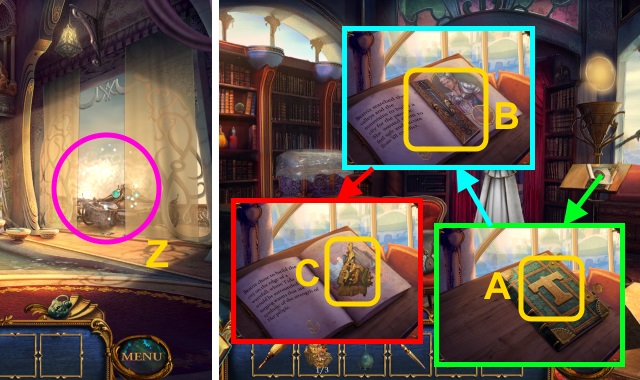
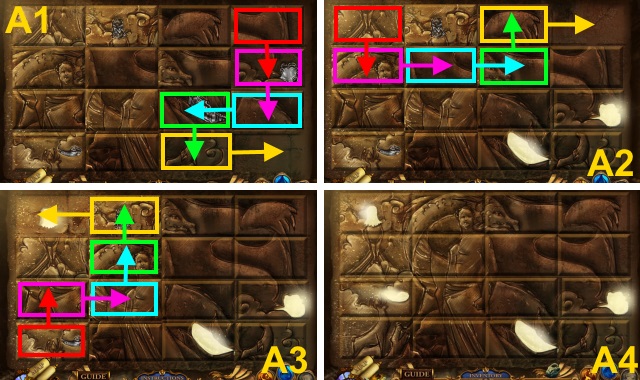
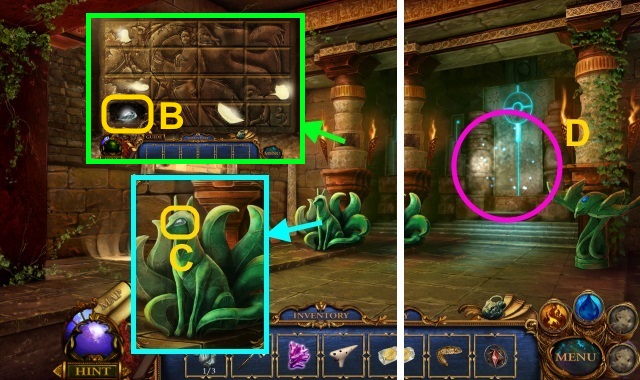
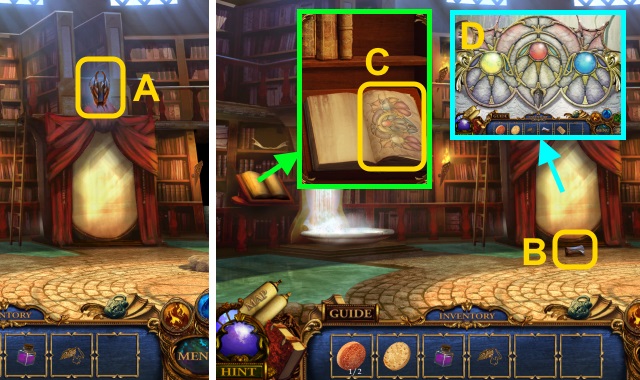
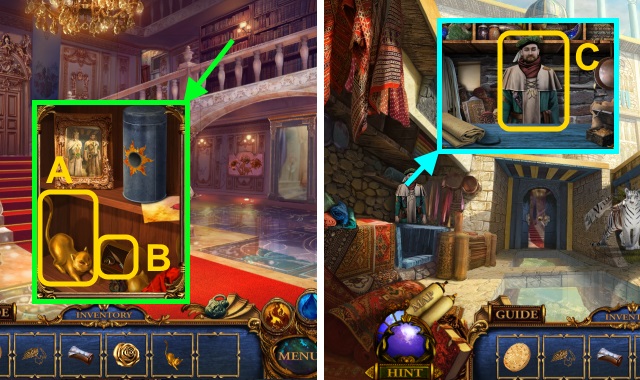
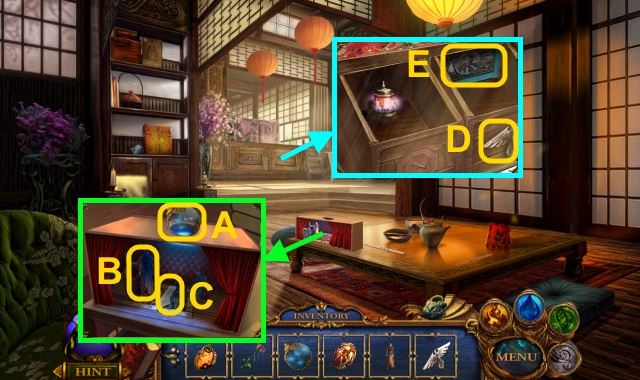
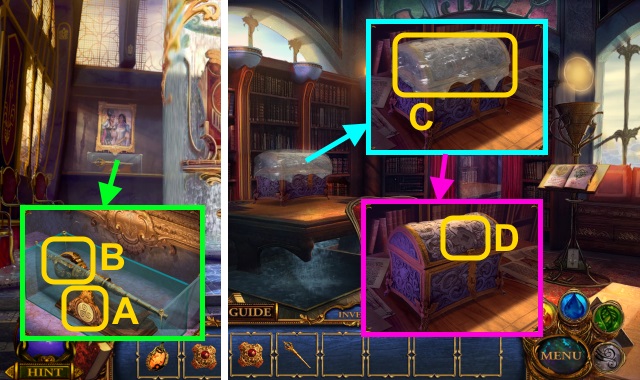
- Read the scroll; place the INSIGNIA (A).
- Open the book; flip the pages.
- Take the BOOKMARK (B).
- Flip the pages; take the MAP PIECE (2/3) (C).
- Walk down twice.
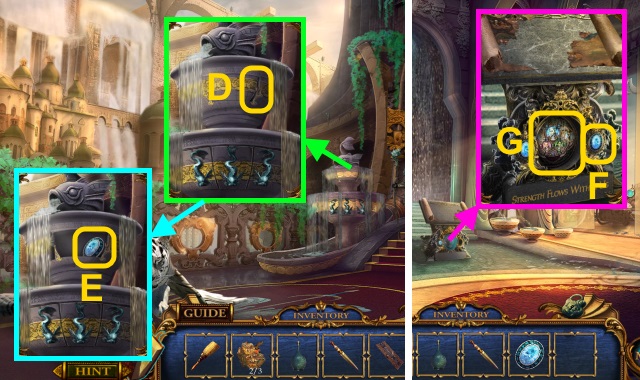
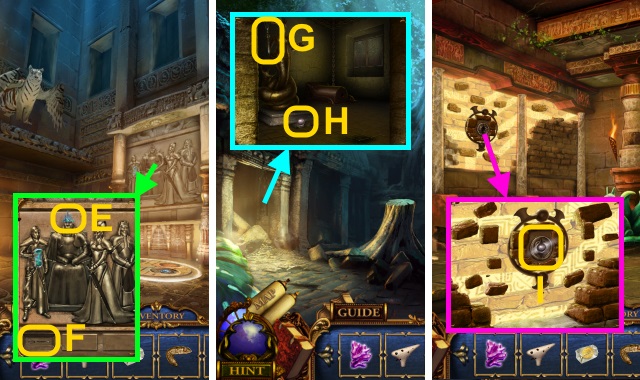
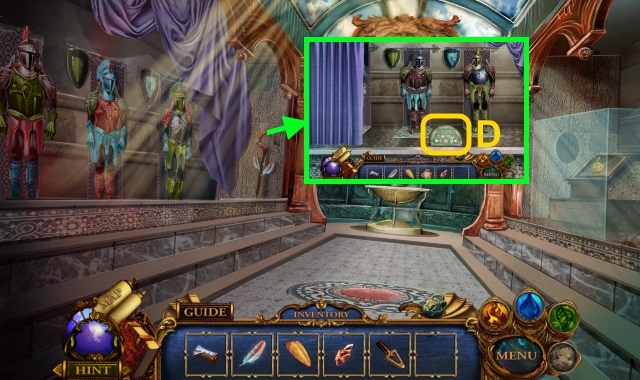
- Use the BOOKMARK (D); take the AQUAMARINE (E).
- Walk forward.
- Place the AQUAMARINE (F).
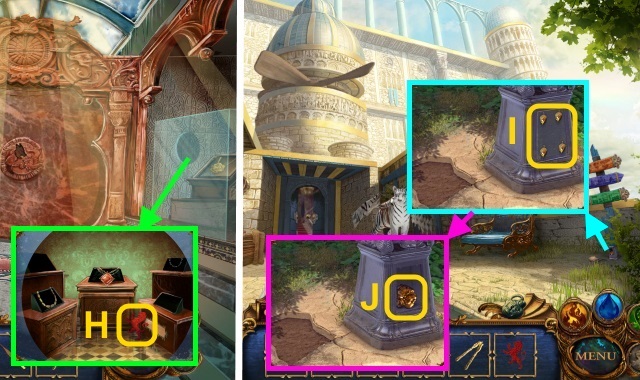
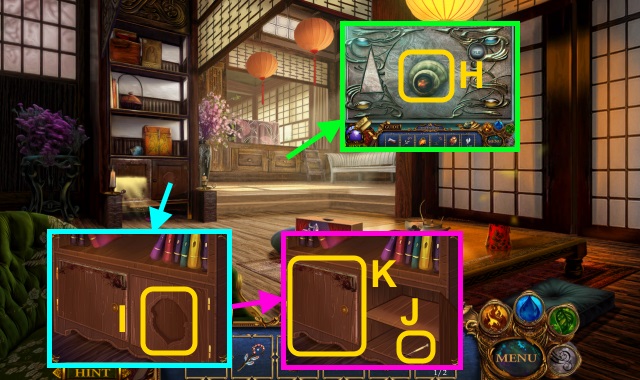
- Examine the plaque for a mini-game (G).

- Solution (H): Bx2, A, Cx2, B.
- Take the BLOCK OF WAX and MAP PIECE (3/3) (I).
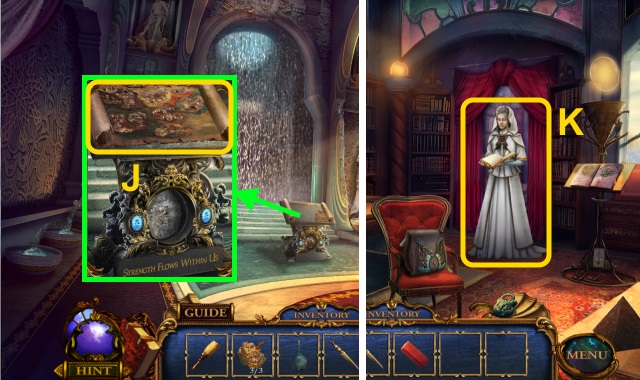
- Place the MAP PIECE (3/3); take the Map (J).
- Walk left.
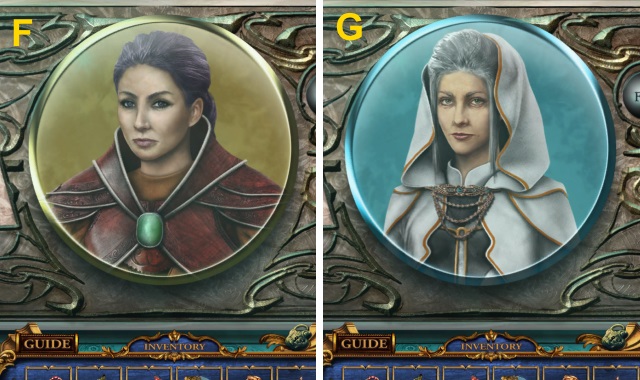
- Talk to Maeria (K).
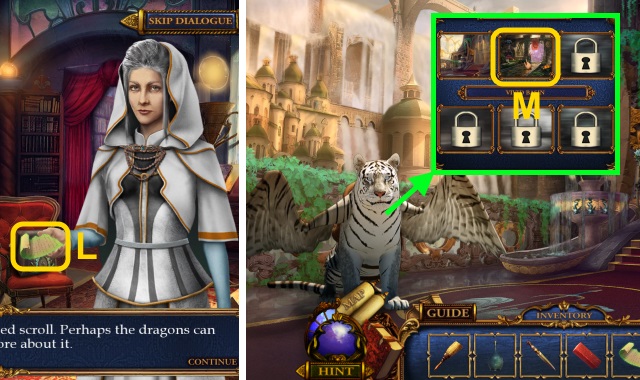
- Take the SCROLL REMNANT (L).
- Walk down twice.
- Go to Vivid Basin (M).
Chapter 2: Vivid Basin
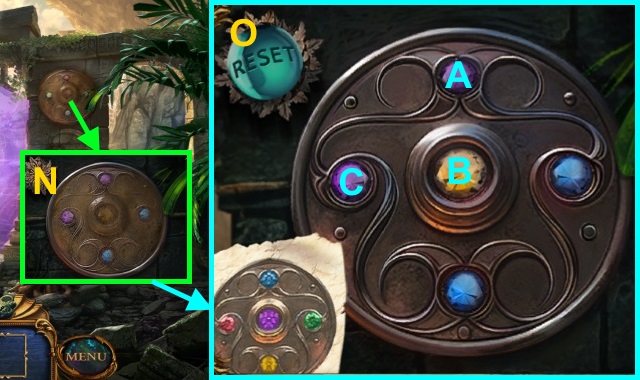
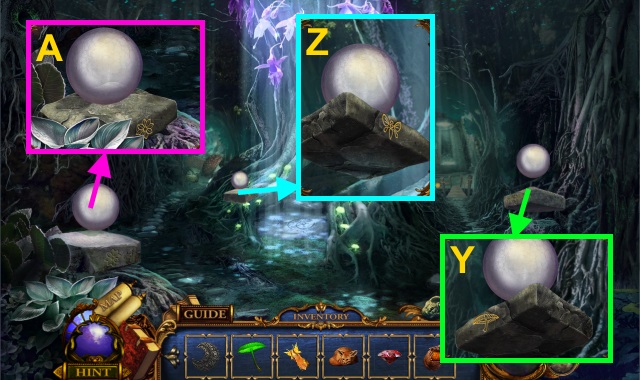
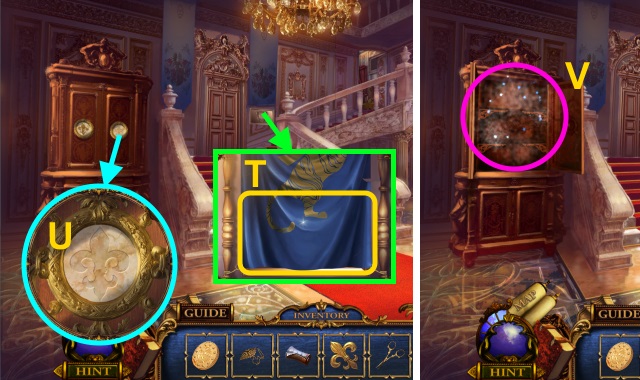
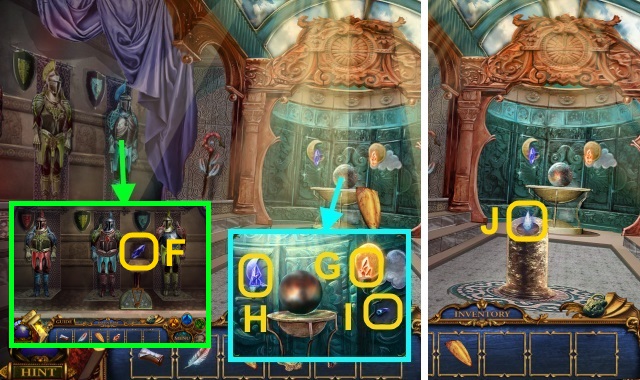
- Use the BRUSH for a mini-game (N).
- Solution (O): A, Bx2, Cx2.
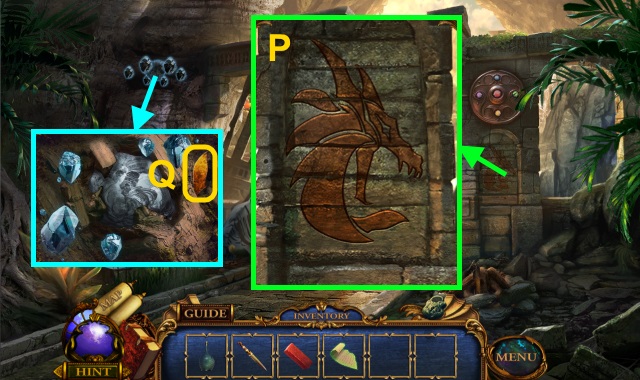
- Match the stones to the flag (P).
- Take the STONE FRAGMENTS (1/3) (Q).
- Walk forward.
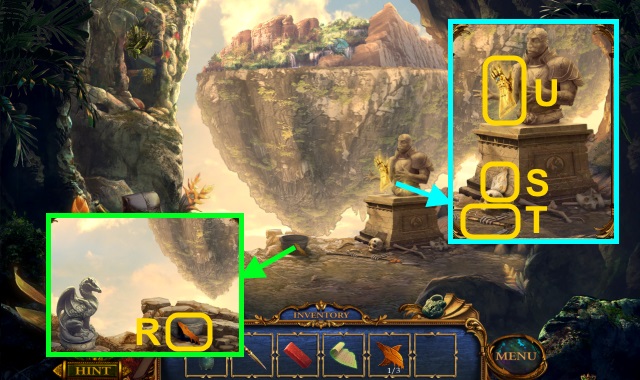
- Take the STONE FRAGMENTS (2/3) (R).
- Take the note (S), STONE HOE (T) and Gauntlet (U).
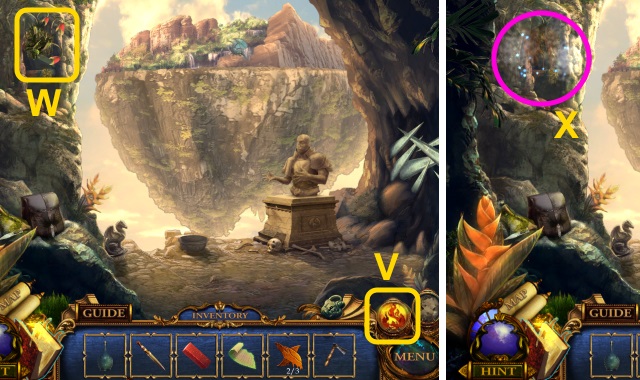
- Use the Fire (V) on the plants (W).
- Play the HOP to receive the GLASS PYRAMID (X).
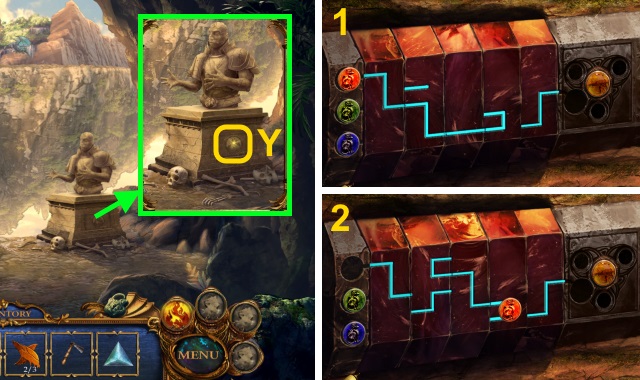
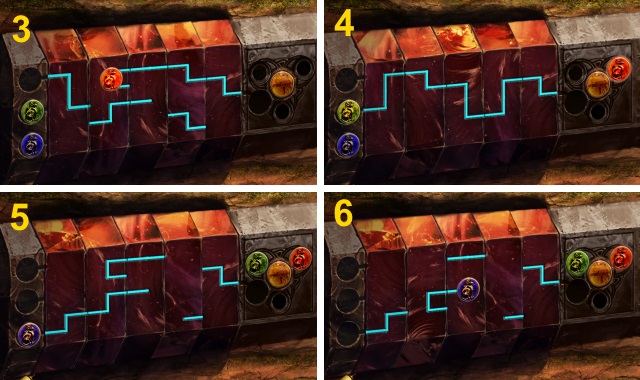
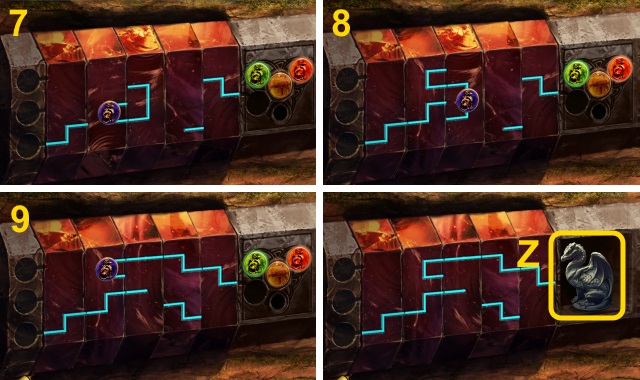
- Use the fire (Y); examine the statue for a mini-game.
- Solution (1-9).
- Take the DRAGON STATUE (Z).
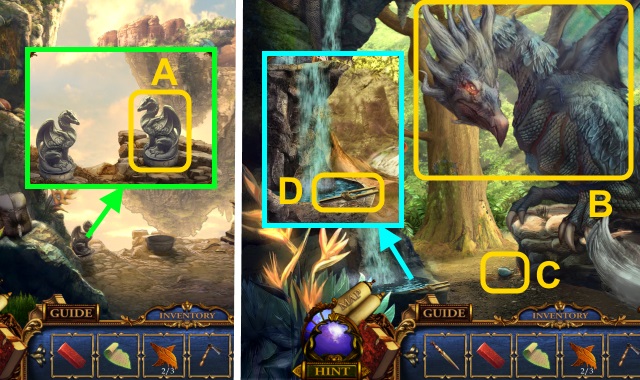
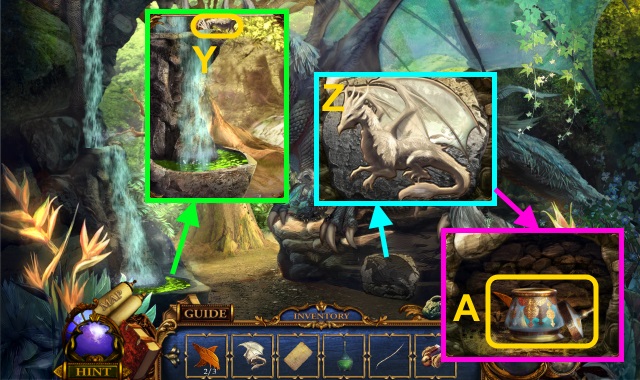
- Place the DRAGON STATUE (A).
- Walk forward.
- Give the SCROLL REMNANT to the dragon (B).
- Take the DRAGON SCALE (C).
- Take the TUNING FORK (D).
- Walk down.
- Use the TUNING FORK (E).
- Walk right.
- Take the FIERY SCALEBACK BABY (F).
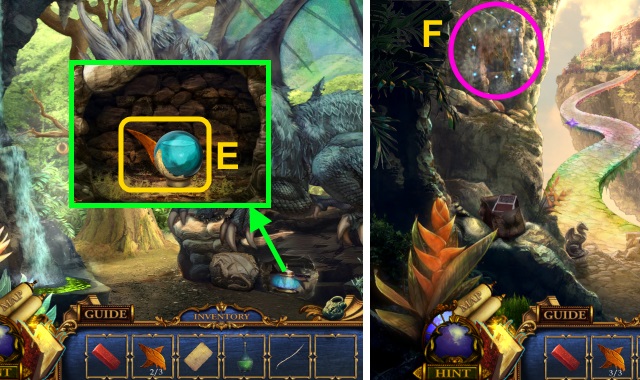
- Place the GLASS PYRAMID in the slot; take the DRAGON HALF (G).
- Use the STONE HOE; take the BONE SAW (H).
- Walk down twice.
- Place the FIERY SCALEBACK BABY; take the MIRROR PETAL (I).
- Use the DULL DAGGER to create the SHARP DAGGER (J).
- Walk forward.
- Use the SHARP DAGGER (K).
- Read the note; take the DRAGON’S TOOTH (L).
- Walk right.

- Place the MIRROR PETAL (M); turn the mirror.
- Use the DRAGON’S TOOTH; take the DRAGON HATCHLINGS (1/3) (N).
- Use the DRAGON’S TOOTH; take the DRAGON HATCHLINGS (2/3) (O).
- Use the fire and DRAGON’S TOOTH; take the DRAGON HATCHLINGS (3/3) (P).
- Walk down, then forward.
- Give the DRAGON HATCHLINGS (3/3) to the dragon (Q).
- Use the BONESAW; take the SHINY SEED (R).
- Walk down.
- Place the SHINY SEED (S); take the BLANK PARCHMENT and ROSE QUARTZ (T).
- Walk forward.
- Use the fire; place the DRAGON SCALE and ROSE QUARTZ (U).
- Use the EMPTY BOTTLE to take the DISSOLVING POTION.
- Walk down.
- Use the DISSOLVING POTION; take the PICKAXE (V).
- Walk down.
- Use the DISSOLVING POTION; take the DRAGON WHISKER (W).
- Use the PICKAXE; take the MAGNET (X).
- Walk forward twice.
- Use the MAGNET to take the DRAGON HALF (Y).
- Place the 2 DRAGON HALVES (Z); open the jar for a mini-game (A).
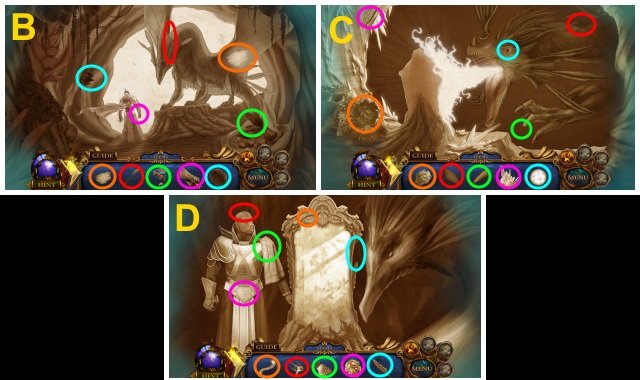
- Examine the jar; take the WATER ORB and STONE FRAGMENTS (3/3) (E).
- Walk down.
- Play the HOP to receive the BLANKET (F).
- Walk down.
- Use the Fire; place the BLOCK OF WAX (G).
- Use the WATER ORB; take the RAINBOW CHALK (H).
- Walk forward twice.
- Use the DISSOLVING POTION (I).
- Place the BLANK PARCHMENT; use the RAINBOW CHALK.
- Take the LUMINA TRACING (J).
- Walk down, then right.
- Place the STONE FRAGMENTS (3/3) (K).
- Use the LUMINA TRACING for a mini-game (L).
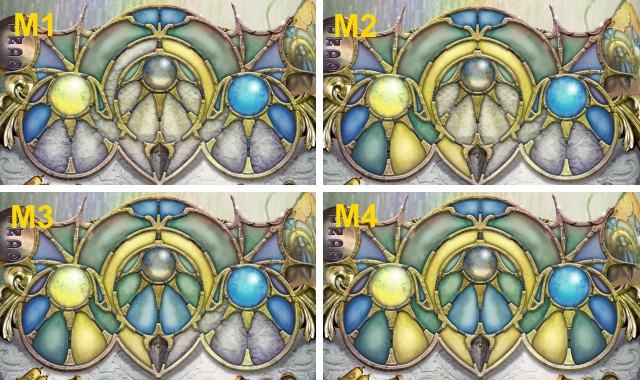
- Solution (M1-M4).
- Go forward.
Chapter 3: Valley of Wisps
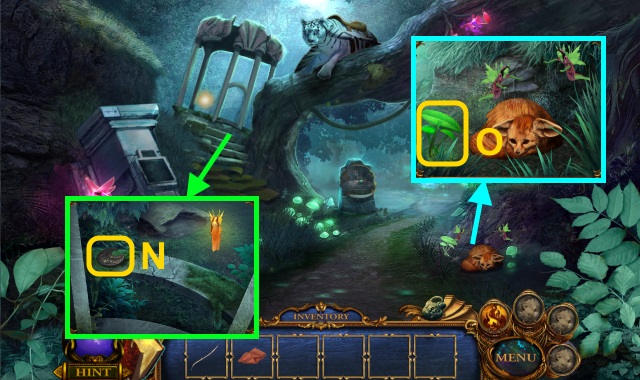
- Take the HALF MOON EMBLEM (N).
- Take the GLOWING MUSHROOM (O).
- Walk forward.
- Take the FAIRY PEBBLE (P).
- Take the STINKWEED (Q).
- Walk down.
- Give the FAIRY PEBBLE; take the FAIRY (R).
- Use the STINKWEED (S).
- Place the BLANKET; take the BURROWING FOX (T).
- Walk forward.
- Use the BURROWING FOX; take the ONYX (U).
- Walk down.
- Place the ONYX (V); take the LEATHER POUCH and MOUNTAIN CRYSTAL (W).
- Walk forward.
- Use the LEATHER POUCH to take the FLOWER DUST (X).
- Use the GLOWING MUSHROOM (Y), FAIRY (Z), AND FLOWER DUST (A).
- Use the Water (B).
- Walk left.
- Take the TONGS (C).
- Take the AXE (D).
- Walk down twice.
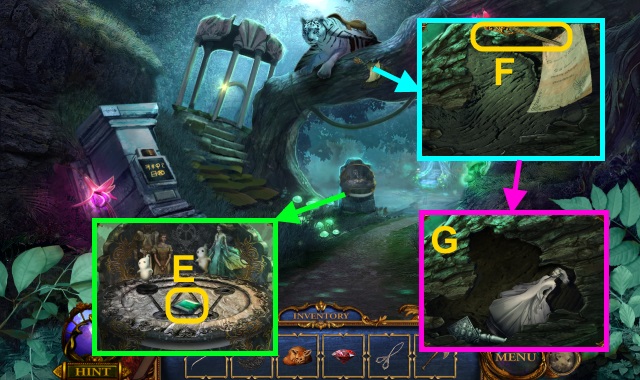
- Use the Water; take the FOREST CRYSTAL (E).
- Read the note; use the TONGS to take the ARROW (F).
- Use the AXE; take the WISP QUEEN STATUE and DIAMOND KEY (G).
- Walk forward then left.
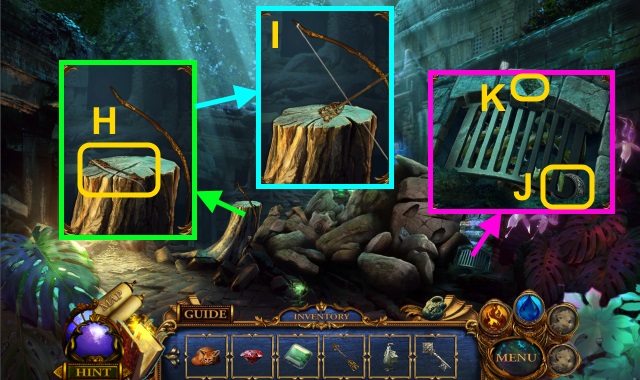
- Place the ARROW and DRAGON WHISKER (H); assemble the bow.
- Take the BOW AND ARROW (I).
- Take the CRESCENT MOON EMBLEM (J); use the DIAMOND KEY (K).
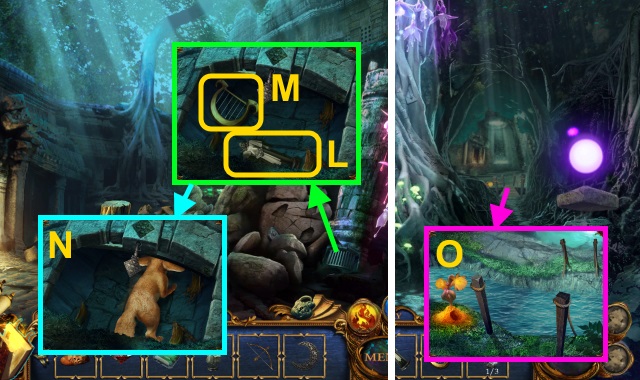
- Use the Fire; take the KING LYREAL STATUE (L) and SIREN’S HARP (M).
- Use the BURROWING FOX to receive the RUNE STONE (1/3) (N).
- Walk down.
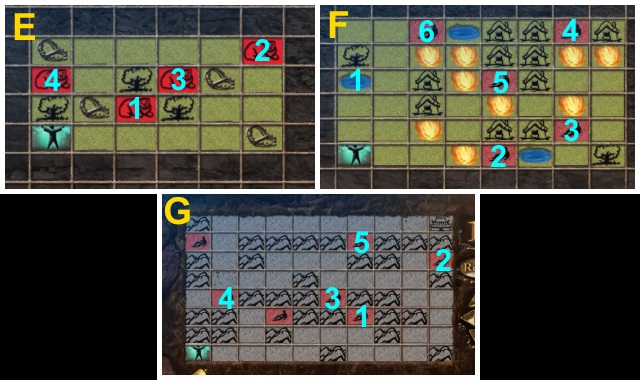
- Try to cross the bridge; use the SIREN’S HARP for a mini-game (O).

- Solution (P) (1-6).
- Walk right.
- Take the SHINY BLUE STONE (Q).
- Use the BOW AND ARROW (R).
- Play the HOP to receive the SILVER HAMMER (S).
- Walk down twice.
- Use the SILVER HAMMER; take the LIGHTNING EMBLEM (T).
- Walk forward, then right.
- Place the LIGHTNING EMBLEM (U).
- Take the QUARTER MOON EMBLEM (V).
- Place the CRESCENT MOON EMBLEM, HALF MOON EMBLEM, and QUARTER MOON EMBLEM; take the OCEAN CRYSTAL (W).
- Place the MOUNTAIN CRYSTAL, FOREST CRYSTAL, and OCEAN CRYSTAL for a mini-game (X).
- Solution (Y): A, Bx3, A, Gx3, B, Fx2, Bx2, Gx2, F, B, Cx3, G, H, Gx3, Hx2, Jx3, D, E, D, E, Ix3, D, Ix2.
- You receive the QUEEN MOA STATUE.
- Walk down twice.
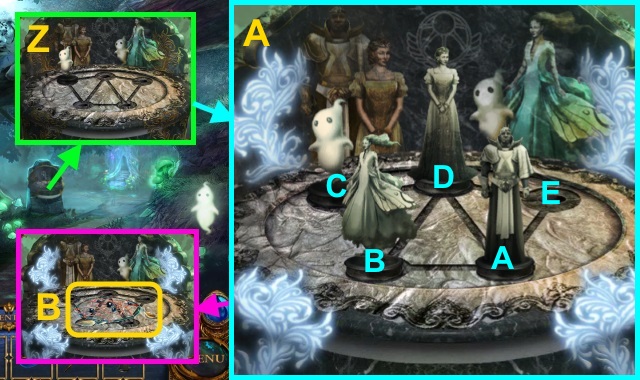
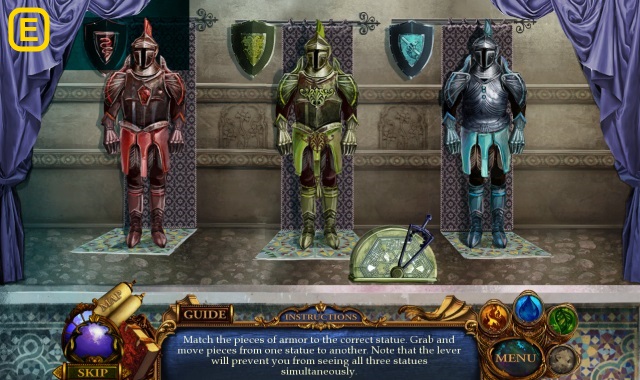
- Place the WHISP QUEEN STATUE, KING LYREAL STATUE, and QUEEN MOA STATUE for a mini-game (Z).
- Solution (A): D, B, A, E, D, C, B, A, D.
- Take the WISP CATCHER (B).
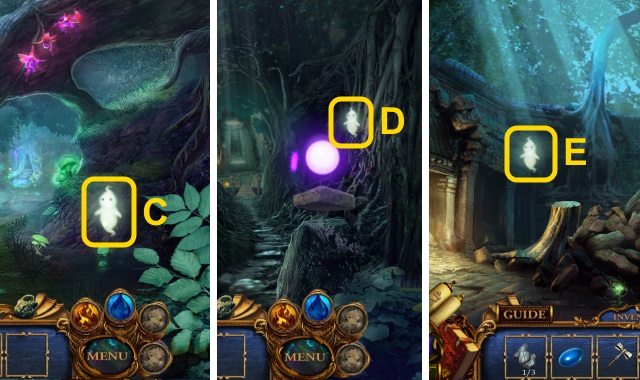
- Use the WISP CATCHER to take WISP (1/4) (C).
- Walk forward.
- Use the WISP CATCHER to take WISP (2/4) (D).
- Walk left.
- Use the WISP CATCHER to take WISP (3/4) (E).
- Walk down, then right.
- Use the WISP CATCHER to take WISP (4/4) (F).
- Give the WISP (4/4) to the Queen (G).
- You receive the GLOWSTONE.
- Walk down, then left.
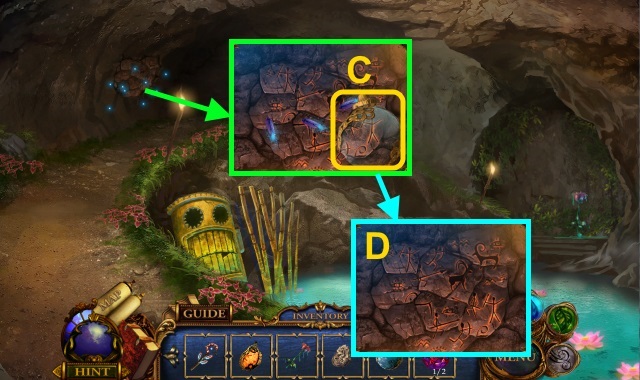
- Place the GLOWSTONE (H).
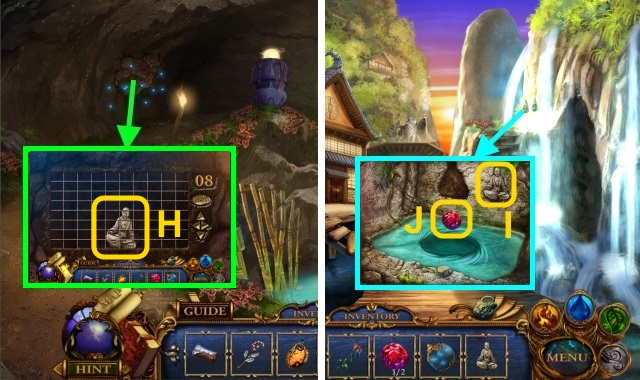
- Examine the stones for a mini-game (I).
- Take the ANCIENT SIEVE (M).
- Walk down, then right.
- Play the HOP to receive the LANCE (N).
- Use the ANCIENT SIEVE; take the GLOWING CORAL (O).
- Walk down, then left.
- Give the LANCE to Armus (P); you receive the OCARINA.
- Walk forward.
Chapter 4: Temple of Elements
- Take the CHISEL (Q).
- Walk left.
- Take the GLASS BLOCK (R).
- Use the CHISEL; take the FIRE GEM and HORN (S).
- Place the SHINY BLUE STONE (T); take the ORNAMENTAL SNAKE (U).
- Walk down.
- Place the FIRE GEM; take the FIRE EMBLEM (V).
- Place the HORN (W); use the Water (X).
- Take the STONE TILE (Y).
- Walk left.
- Place the STONE TILE for a mini-game (Z).
- Take the FOX EYE (B).
- Place the FOX EYE (C).
- Play the HOP to receive the CRYSTAL CROWN (D).
- Walk down.
- Place the CRYSTAL CROWN (E); take the DECORATIVE TRIDENT (F).
- Walk down.
- Place the DECORATIVE TRIDENT (G); take the AIR GEM (H).
- Walk forward, then left.
- Place the AIR GEM (I); you receive the AIR EMBLEM.
- Walk down.
- Take the COPPER PIECE (1/2) (J).
- Place the FIRE EMBLEM and AIR EMBLEM (K).
- Walk right.
- Use the OCARINA (L).
- Walk down, then left.
- Play the HOP to receive the PERIDOT (M).
- Use the Earth; take the POWDER and HANDLE (N).
- Walk down twice.
- Place the HANDLE (O); turn it.
- Take the HEXAGON (P).
- Walk forward, then right.
- Use the Earth (Q).
- Use the POWDER and GLOWING CORAL (R); press the symbols (1-3).
- Go up the stairs.
- Place the PERIDOT (S); take the INFINITY EMBLEM (T) and STONE ANTLER (U).
- Use the Earth (V).

- Take the RUNE STONE (2/3) (W).
- Place the GLASS BLOCK (X); use the SILVER HAMMER.
- Take the LUMINA COIN (Y).
- Walk down twice.
- Place the STONE ANTLER (Z); take the CRYSTAL TONGS (A).
- Walk right, then left.
- Try to take the pouch; use the CRYSTAL TONGS to take the CRYSTAL POUCH (B).
- Walk down twice.
- Place the CRYSTAL POUCH (C); take the STEEL NUGGET (D).
- Place the STEEL NUGGET; close the box (E).
- Use the Fire, then Water.
- Take the STEEL CONDUCTOR (F).
- Walk right.
- Place the STEEL CONDUCTOR (G); take the RUNE STONE (3/3) (H).
- Walk down twice.
- Place the RUNE STONE (3/3); take the ORNAMENTAL SNAKE (I).
- Walk forward, then right.
- Place the 2 ORNAMENTAL SNAKES (J); take the DECORATIVE SWORD (K).
- Walk left.
- Place the DECORATIVE SWORD in the fountain; use the CRYSTAL TONGS to take the CRYSTAL SWORD (L).
- Walk down twice.
- Place the CRYSTAL SWORD (M).
- Open the jar for a mini-game (N).
- Examine the jar; place the INFINITY EMBLEM (R).
- Take the GLASS VIAL (S) and UNCHARGED AMULET (T).
- Walk down.
- Use the GLASS VIAL to make the VIAL OF SAND (U).
- Walk forward, then right.
- Place the UNCHARGED AMULET; take the LIGHTNING AMULET (V).
- Walk left.
- Use the VIAL OF SAND (W); place the HEXAGON (X).
- Take the REVEALING INK (Y) and LEAF NECKLACE (Z).
- Use the LIGHTNING AMULET (A); take the SCROLL OF POWER (B).
- Use the REVEALING INK; take the DIAGRAM (C).
- Examine the mirror; use the DIAGRAM for a mini-game (D).
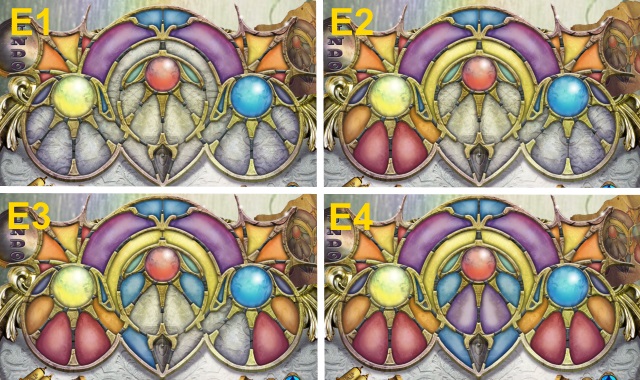
- Solution (E1-E4).
- Walk forward.
Chapter 5: Aeria

- Take the ROUND KNIFE (F).
- Use the ROUND KNIFE (G); take the COPPER PIECE (2/2).
- Try to take the weed killer (H); give the COPPER PIECE (2/2) to the man (I).
- Take the WEED KILLER.
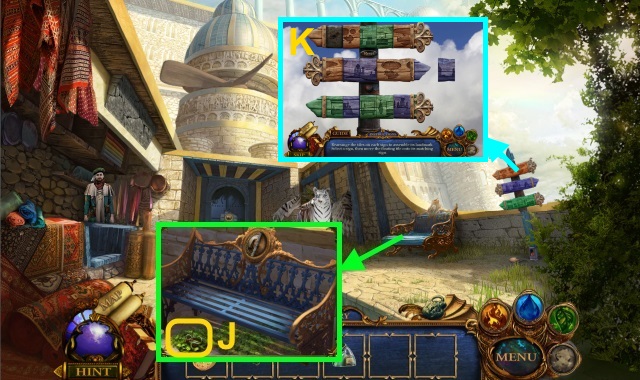
- Use the WEED KILLER (J); take the SIGN TILE.
- Place the SIGN TILE for a mini-game (K).
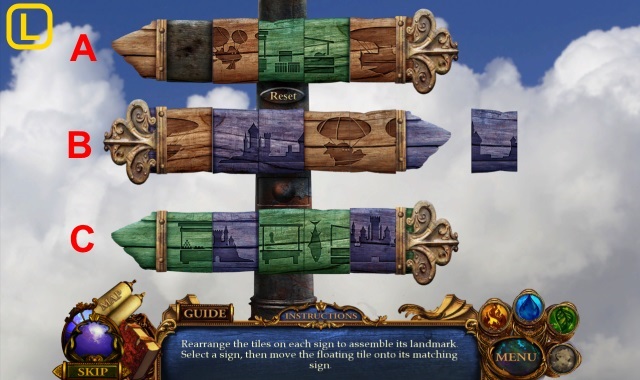
- Solution (L): Cx4, B, Cx2, B, C, Bx3, Ax2, Cx3, A, C, A, C, Ax4, Cx5, A, C, Ax2.
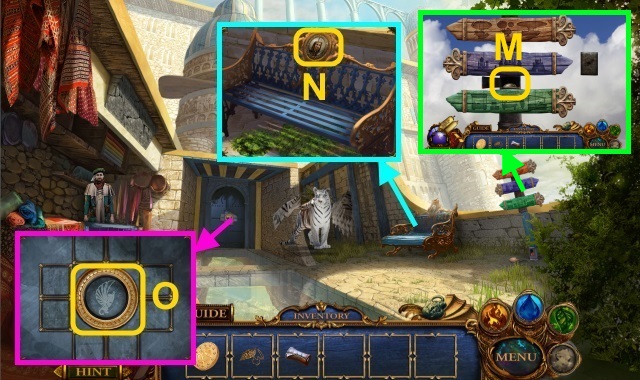
- Take the CAMEO HALF (M).
- Place the CAMEO HALF; take the RIGEL EMBLEM (N).
- Place the RIGEL EMBLEM (O).
- Walk forward.

- Talk to Armus (P).
- Go up.
- Take the SCISSORS (Q).
- Take the FLEUR DE LIS (R).
- Talk to Armus (S).
- Walk down.
- Use the SCISSORS (T); take the CLOTH.
- Place the FLEUR DE LIS (U).
- Play the HOP to receive the TOPAZ (V).
- Go up.
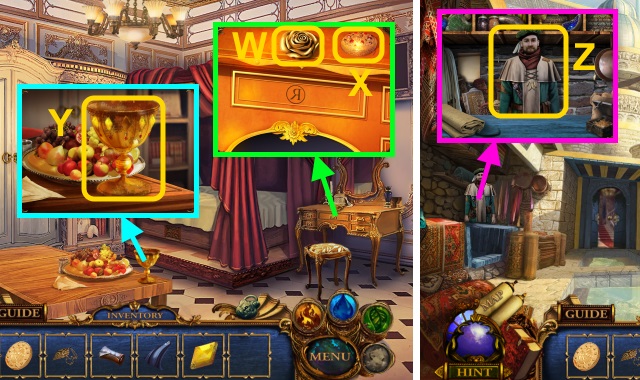
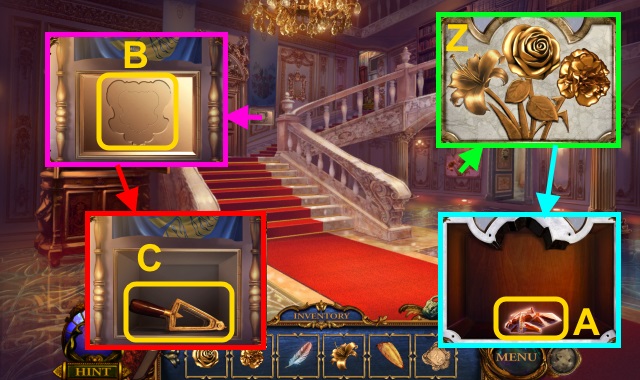
- Take the GOLDEN ROSE (W); use the CLOTH to take the SILVER POLISH (X).
- Use the SILVER POLISH (Y); place the TOPAZ.
- Take the ROYAL GOBLET.
- Walk down twice.
- Give the ROYAL GOBLET to the man (Z); you receive the CAT STATUETTE.
- Walk forward.
- Place the CAT STATUETTE (A); take the SIGNET RING and GLASS CUTTER (B).
- Walk down.
- Use the Water on the man; give him the LUMINA COIN to receive the MAGICAL CHARM (C).
- Walk forward, then up.

- Use the SIGNET RING (D).
- Take the GOLDEN NUTCRACKER (E) and TREASURY KEY (F).
- Walk down.
- Use the TREASURY KEY (G).
- Walk right.
- Use the GLASS CUTTER; take the JEWELED LION (H).
- Walk down twice.
- Use the GOLDEN NUTCRACKER (I); take the GOLDEN CARNATION (J).
- Walk forward.
- Place the HOP to receive the IVORY WOLF (K).
- Walk forward.
- Place the JEWELED LION (L); take the ROSE NECKLACE (M).
- Use the MAGICAL CHARM (N); open the jar for a mini-game.
- Examine the jar; take the SUN STONE (R).
- Walk down.
- Place the SUN STONE (S); take the LUMINOUS FEATHER (T).
- Walk right.
- Place the IVORY WOLF (U).
- Take the GOLDEN LILY and BRONZE SHIELD (V).
- Place the LEAF NECKLACE (W) and ROSE NECKLACE (X).
- Take the COIN EMBLEM (Y).
- Walk down.
- Place the GOLDEN ROSE, GOLDEN CARNATION, and GOLDEN LILY (Z); take the DAWN SHARD (A).
- Place the COIN EMBLEM (B); take the BRONZE LEVER (C).
- Walk right.
- Place the BRONZE LEVER for a mini-game (D).
- Take the DUSK SHARD (F).
- Place the DAWN SHARD (G) and DUSK SHARD (H).
- Pull the lever (I).
- Take the GLASS PRISM (J).
- Walk down, then up.
- Place the GLASS PRISM (K); take the LUMINOUS ORB (L).
- Walk down, then right.
- Place the LUMINOUS FEATHER and LUMINOUS ORB; take the HEALING STAFF (M).
- Walk down, then up.
- Talk to Armus (N); you receive the BOOK PAGE.
- Walk down twice; go to the Sun’s Veil.
Chapter 6: Sun’s Veil
- Use the Earth (O).
- Take the AMBE6R GEM (P).
- Talk to the man (Q); give him the BOOK PAGE.
- Walk right.
- Take the BRASS COG (R).
- Take the WOODEN PLANK (S).
- Take the OIL FLOWER (T).
- Walk down.
- Place the BRONZE SHIELD (U) and WOODEN PLANK (V).
- Take the STONE CARVING (W).
- Place the BRASS COG (X).
- Play the HOP to receive the ROUND KEY (Y).
- Use the ROUND KEY (Z).
- Go up.
- Take the GLASS SPHERE (A) and WOODEN EYE (1/2) (B).
- Walk down, then right.
- Use the GLASS SPHERE to get the LIGHTNING SPHERE (C).
- Place the STONE CARVING; examine it for a mini-game (D).


- Take the PUPIL EMBLEM (H).
- Walk down.
- Place the PUPIL EMBLEM (I); take the WOODEN EYE (2/2) (J).
- Walk right.
- Place the WOODEN EYE (2/2) (K); take the SCROLL EMBLEM (L).
- Walk down, then up.
- Place the SCROLL EMBLEM (M).
- Open the jar for a mini-game (N).
- Open the jar; take the HAND SCYTHE and LUMINA EMBLEM (R).
- Walk down, then right.
- Use the HAND SCYTHE and Air on the reeds; take the CHEST EMBLEM (S).
- Walk down.
- Place the CHEST EMBLEM; take the STONE RING (T).
- Go right.
- Place the STONE RING; take the PUPPET (U).
- Walk down.
- Play the HOP to receive the CARVING KNIFE (V).
- Walk right.
- Use the Water (W).
- Use the CARVING KNIFE (X); take the MASTER EMBLEM.
- Walk down.
- Place the MASTER EMBLEM (Y); take the SILVER FALCON (Z).
- Go up.
- Place the LIGHTNING SPHERE (A) and PUPPET (B); take the MIRROR PIECE (1/2) (C).
- Place the SILVER FALCON (D).
- Examine the drawer for a mini-game (E).
- Take the MAGIC SNARE (H).
- Place the LUMINA EMBLEM (I).
- Turn the pick (J); use the OIL FLOWER (K).
- Use the MAGIC SNARE (L); you receive the ORB OF LIGHT.
- Take the MIRROR PIECE (2/2) (M).
- Walk down, then right.
- Place the ORB OF LIGHT (N).
- Place the HEALING STAFF and SCROLL OF POWER on the stands; take the SCROLL OF HEALING (O).
- Go down, then up.
- Place the MIRROR PIECE (2/2) (P).
- Walk forward, then down.
- Use the Air (Q).
- Take the MEDALLION (R).
- Walk forward.
- Use the SCROLL OF HEALING (S).
- Take the GOLDEN CHERUB (T).
- Walk down.
- Play the HOP to receive the GOLD DROPLETS (U).
- Walk left.
- Place the GOLDEN CHERUB (V); take the CASTLE PIECE (W).
- Walk down, then forward.
- Place the GOLD DROPLETS; take the CYAN GEM (X).
- Place the CASTLE PIECE (Y); take the SPIRAL TOKEN (Z).
- Place the SPIRAL TOKEN (A).
- Place the CYAN GEM and AMBER GEM (B); take the SCEPTER OF SIGHT.
- Walk down, then left.
- Use the Fire (C); place the MEDALLION (D).
- Open the chest; take the BANDAGE (E).
- Use the SCEPTER OF SIGHT (F); take the REJUVENATION POTION.
- Walk down twice.
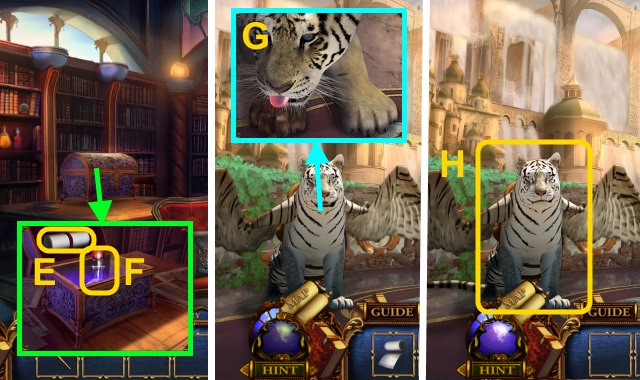
- Use the BANDAGE and REJUVENATION POTION (G).
- Examine the tiger (H).
- Use the Fire, Water, Earth, and Air (I).
- Congratulations! You have completed Forgotten Kingdoms: Dream of Ruin.


 Delaware St. John Volume 3: The Seacliff Tragedy Walkthrough, Guide, & Tips
 Rhiannon: Curse of the Four Branches Walkthrough, Guide, & Tips
 Big City Adventure: Vancouver Collector's Edition Walkthrough, Guide, & Tips
 Amaranthine Voyage: The Living Mountain Walkthrough, Guide, & Tips
 Web of Deceit: Deadly Sands Walkthrough, Guide, & Tips