Grim Tales: The Final Suspect Walkthrough, Guide, & Tips
Grim Tales: The Final Suspect Walkthrough

Welcome to the Grim Tales: The Final Suspect Walkthrough
There’s a corpse in your house, but who killed him?
Whether you use this document as a reference when things get difficult or as a road map to get you from beginning to end, we’re pretty sure you’ll find what you’re looking for here.
This document contains a complete Grim Tales: The Final Suspect game walkthrough featuring annotated screenshots from actual gameplay!
We hope you find this information useful as you play your way through the game. Use the walkthrough menu below to quickly jump to whatever stage of the game you need help with.
Remember to visit the Big Fish Games Forums if you find you need more help. Have fun!
This walkthrough was created by Amanda Barrera, and is protected under US Copyright laws. Any unauthorized use, including re-publication in whole or in part, without permission, is strictly prohibited.
General Tips
- This is the official guide for Grim Tales: The Final Suspect.
- This guide will not show when you have to zoom into a location; the screenshots will show each zoom scene.
- Hidden-object puzzles are referred to as HOPs. This guide will not show screenshots of the HOPs, however, it will mention when an HOP is available and the inventory item you’ll collect from it.
- Use the Map to fast travel to a location.
Chapter 1: The Scene of the Crime

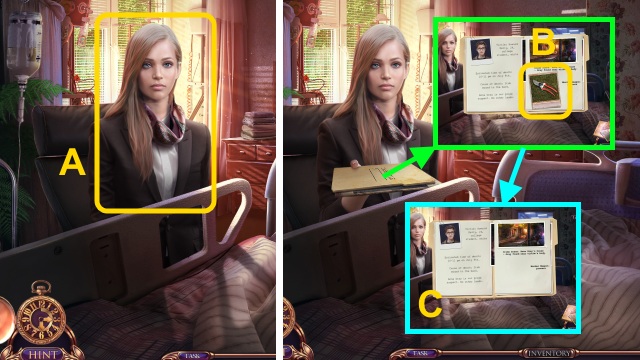
- Talk to Jackie (A).
- Take the file; open it.
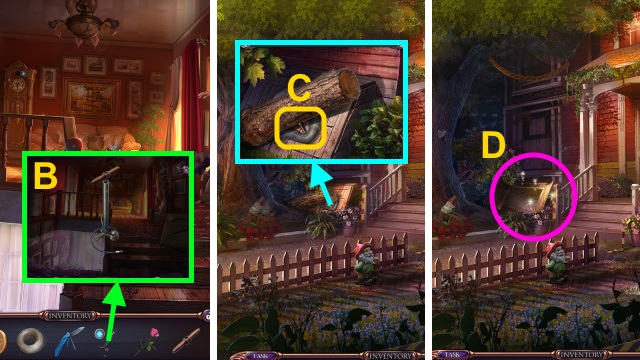
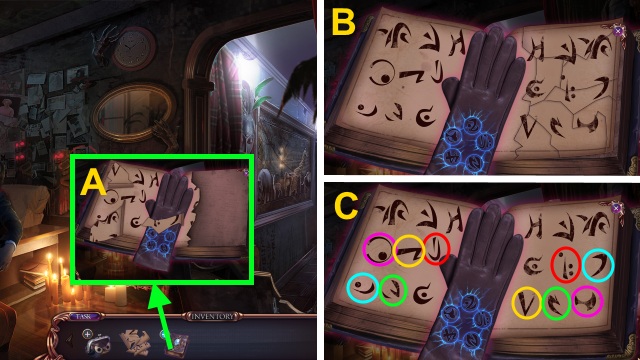
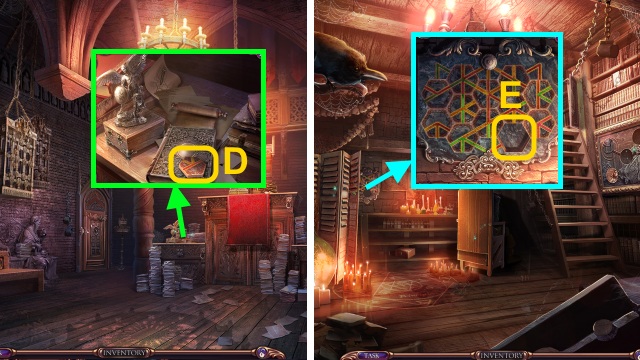
- Examine the files; take the Pruners (B).
- Examine the files for a mini-game (C).
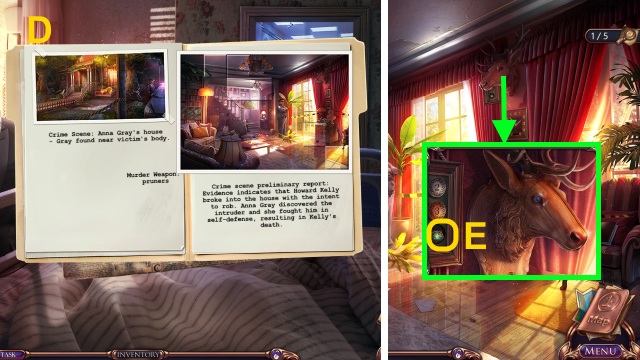
- Solution (D).
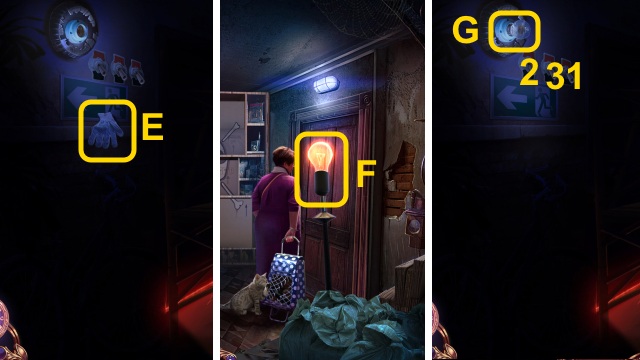
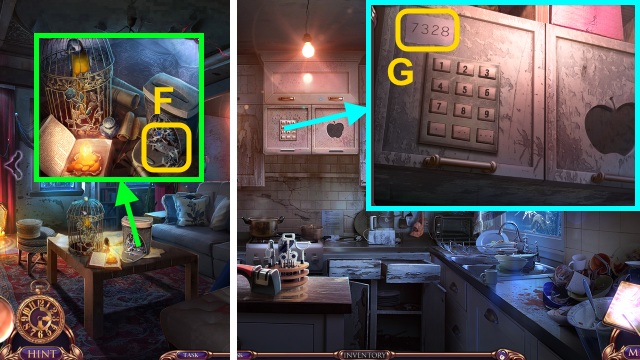
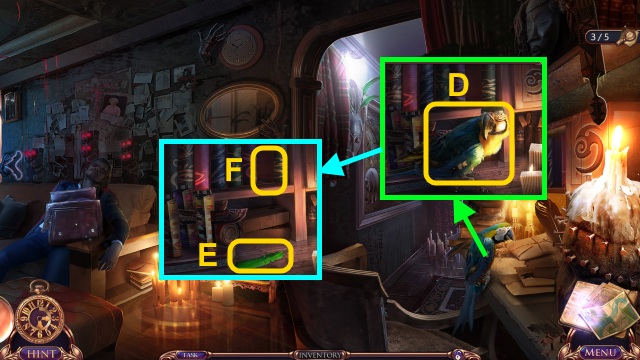
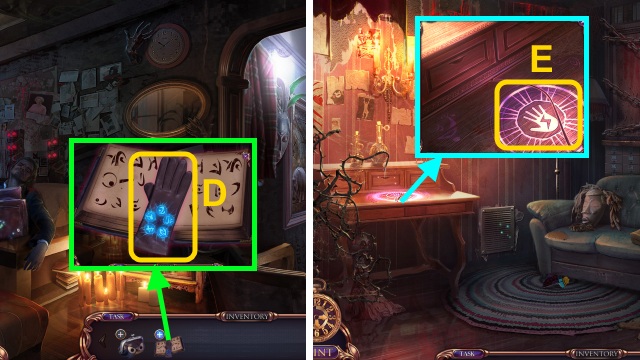
- Take the FAMILY RING (E).
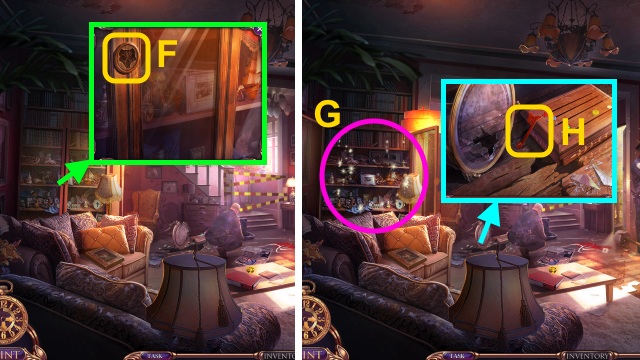
- Place the FAMILY RING (F).
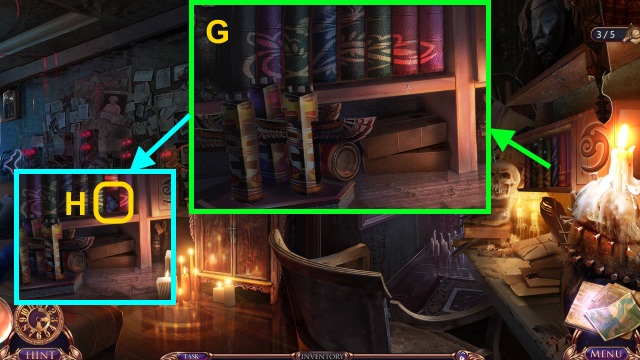
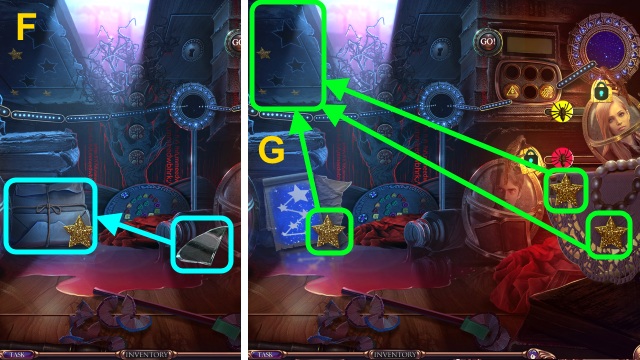
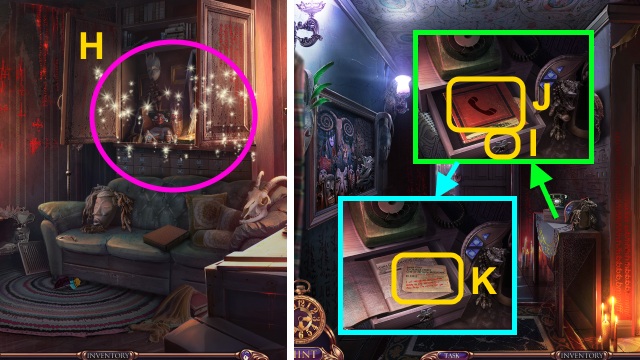
- Play the HOP to receive the LOCKPICK (G).
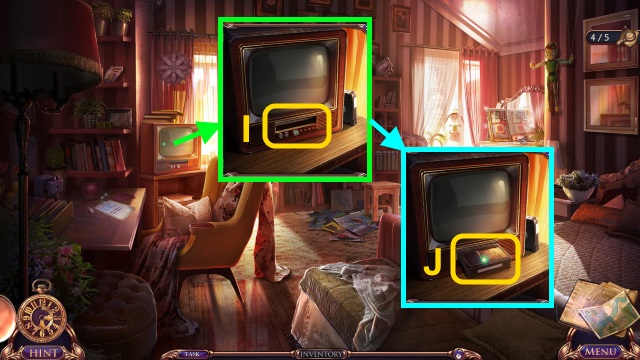
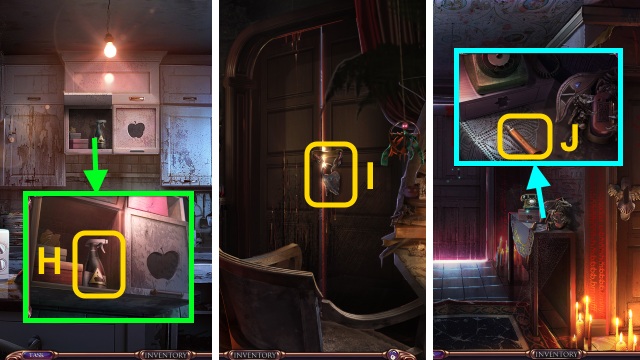
- Take the MAILBOX FLAG (H).
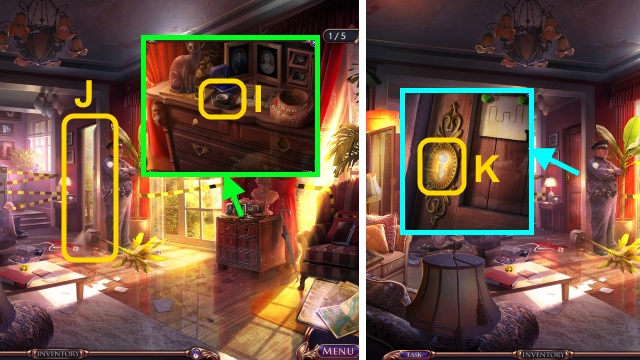
- Take the ELECTRICAL TAPE (I).
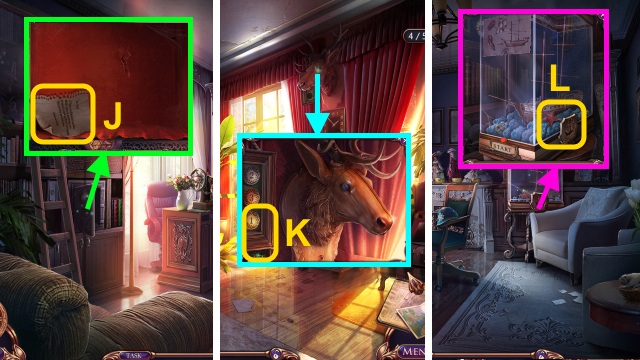
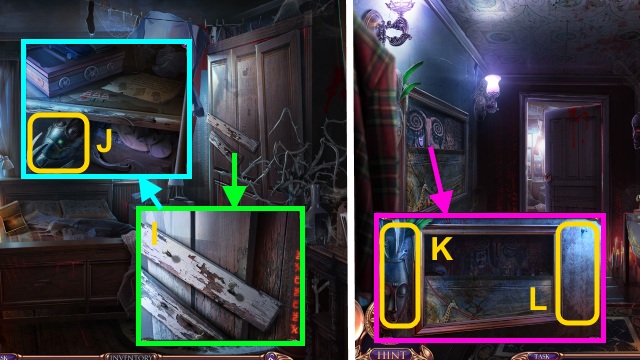
- Try to go through the door (J).
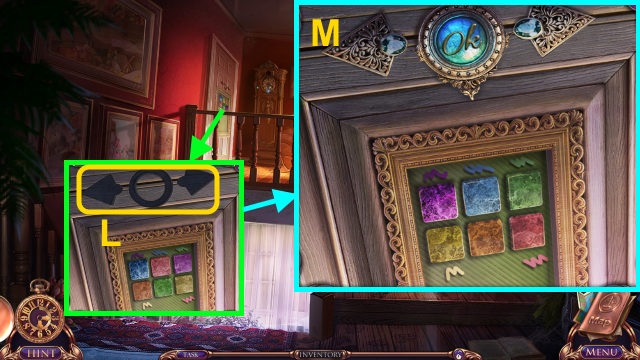
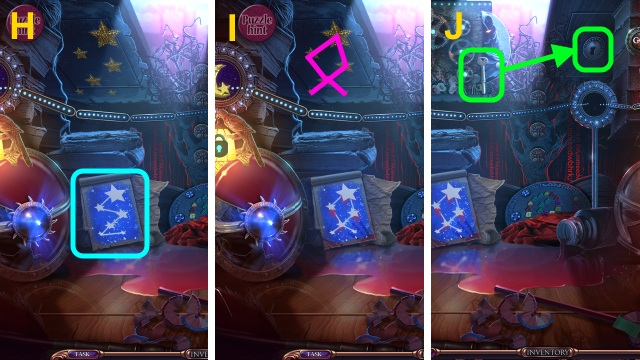
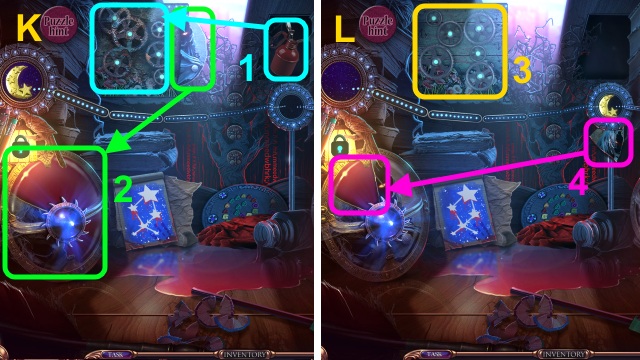
- Use the LOCKPICK for a mini-game (K).
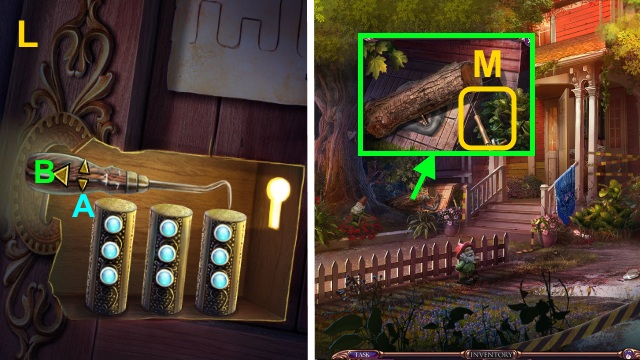
- Solution (L): B, Ax2, B, A, B.
- Walk forward.
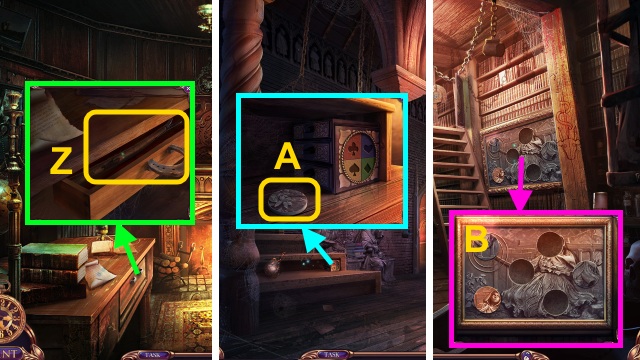
- Take the BROKEN FISHING POLE (M).
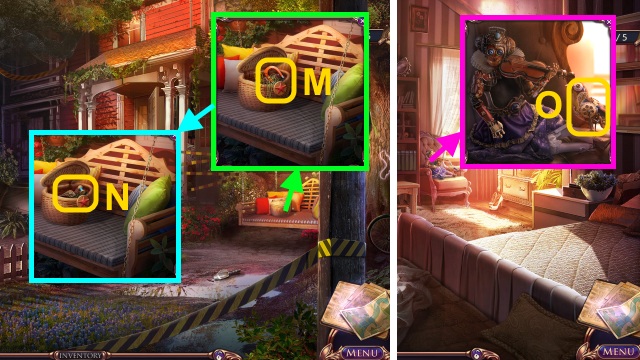
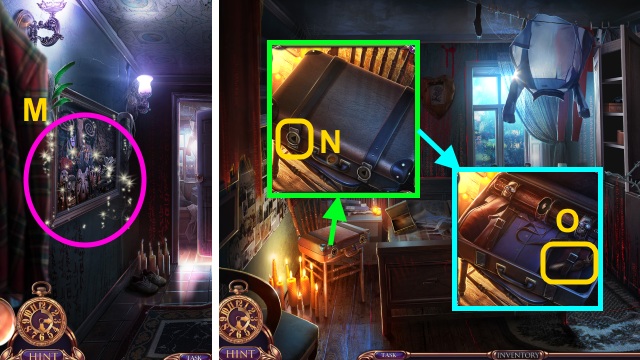
- Scroll left.

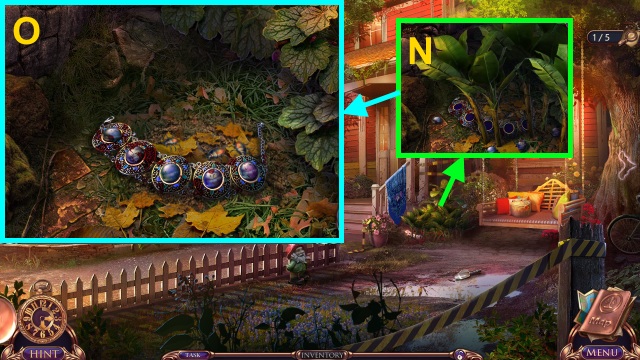
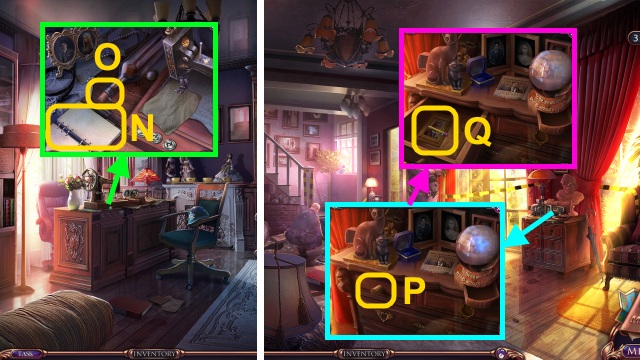
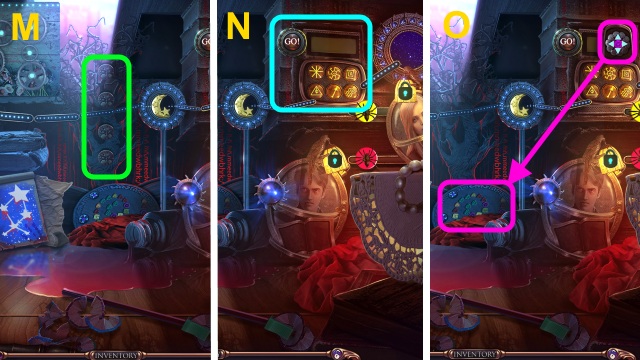
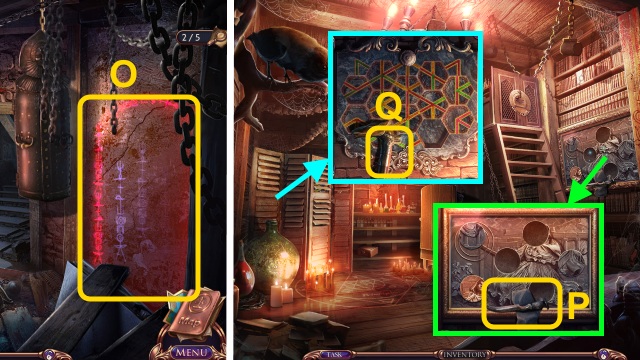
- Place the MAILBOX FLAG (N); pull it.
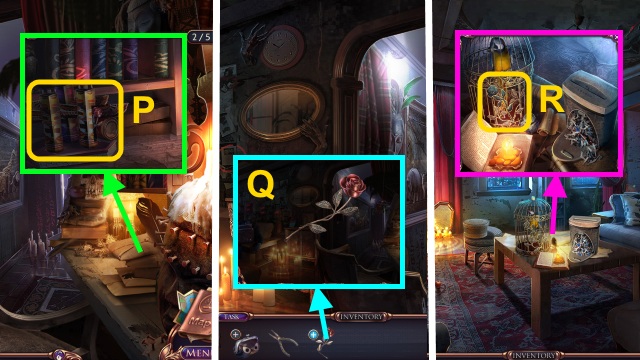
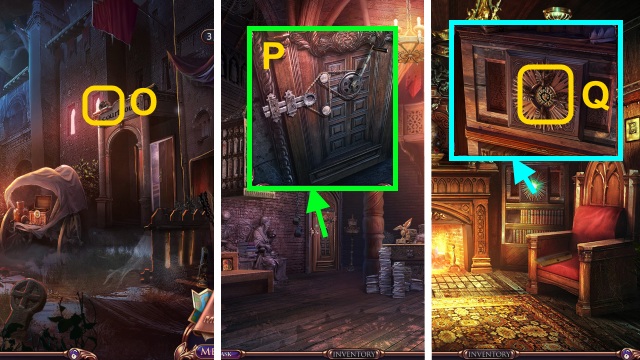
- Move the letters; take the CAT STATUE and LOCKED PACKAGE (O).
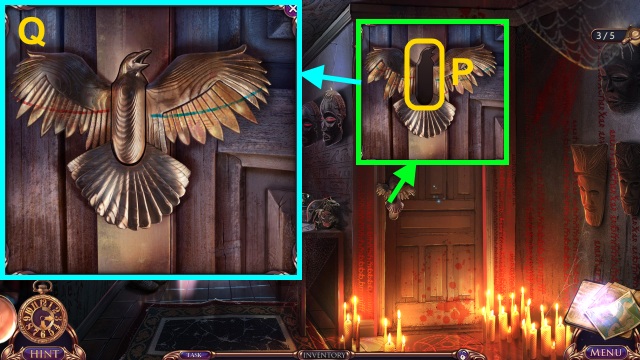
- Go to the Living Room.
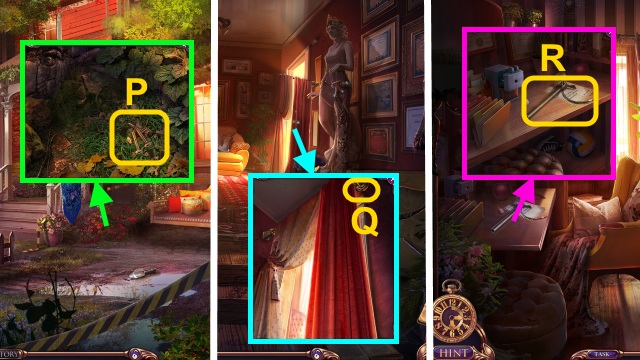
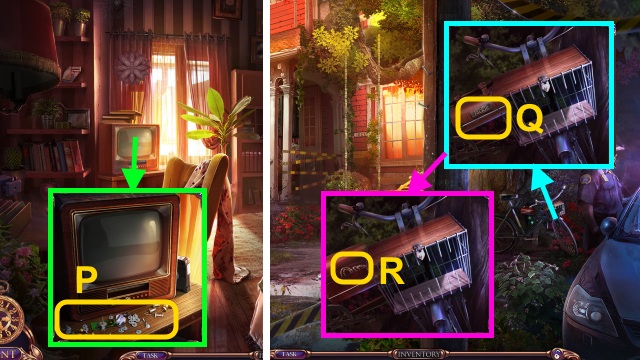
- Place the CAT STATUE (P); take the PERSONAL SEAL (Q).
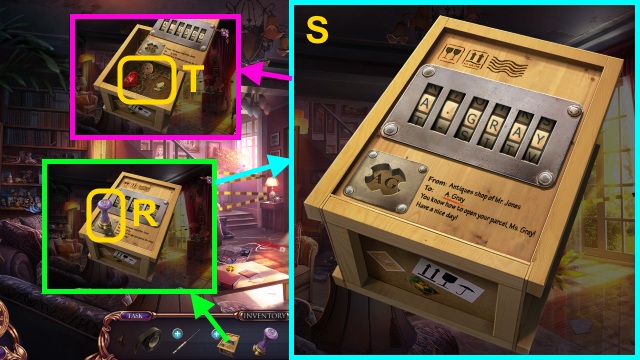
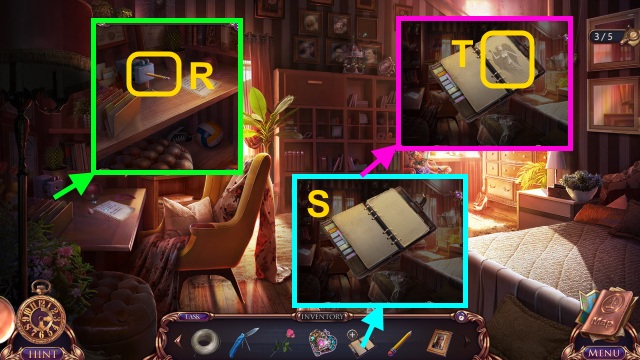
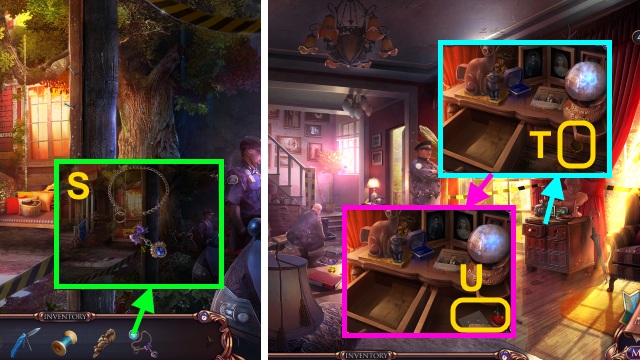
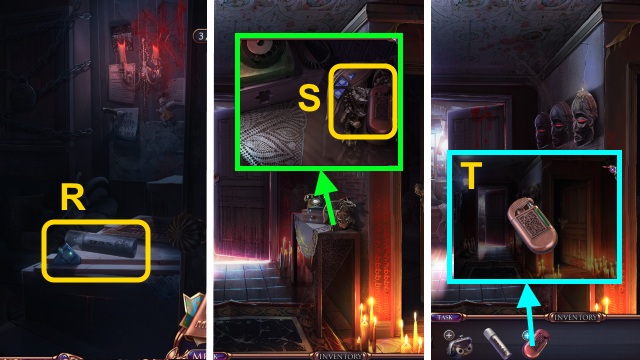
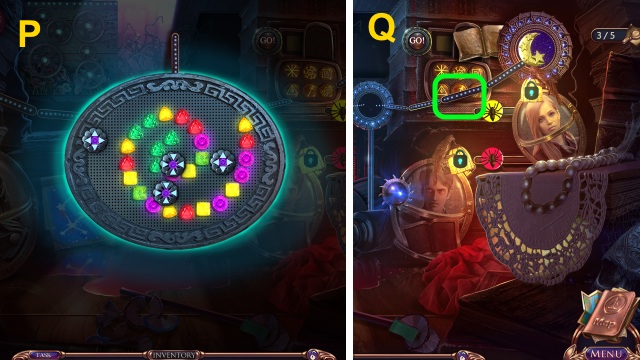
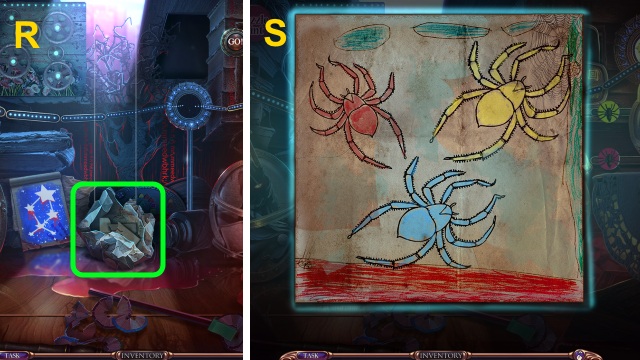
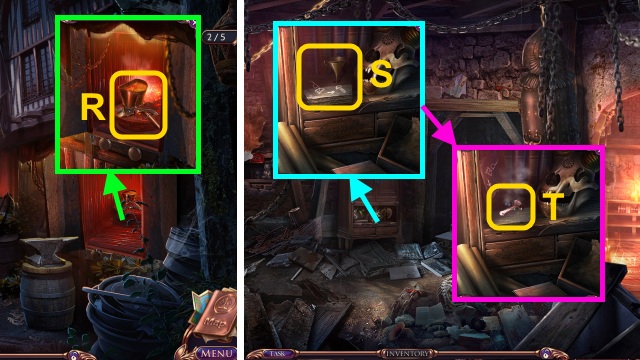
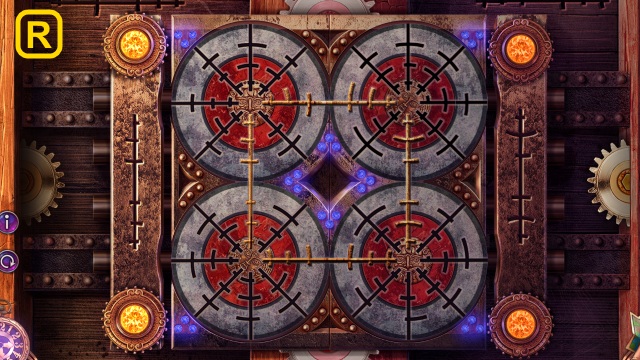
- Use the PERSONAL SEAL on the LOCKED PACKAGE for a mini-game (R).
- Solution (S).
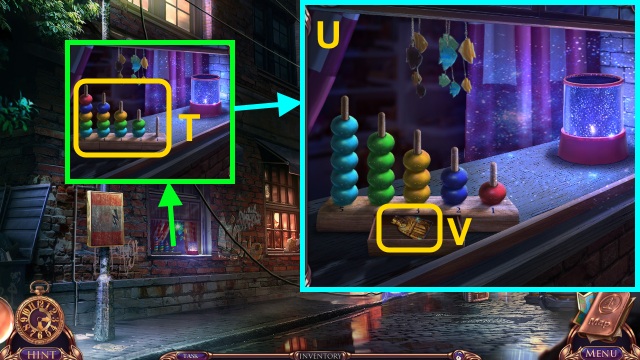
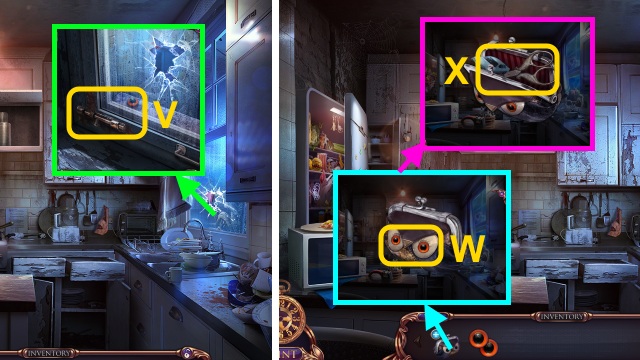
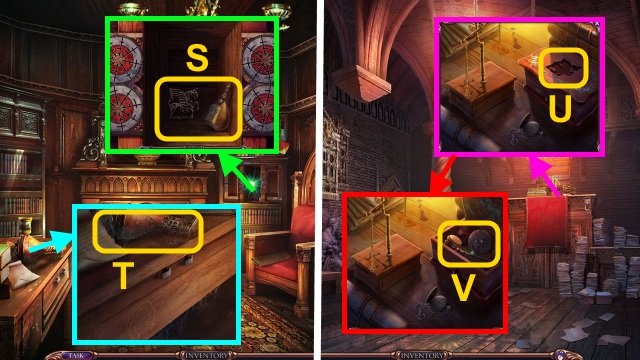
- Take the RUBY, ANCIENT COIN, and FISH BUTTON (T).
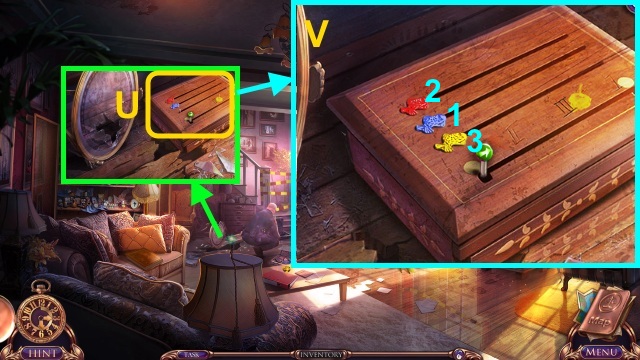
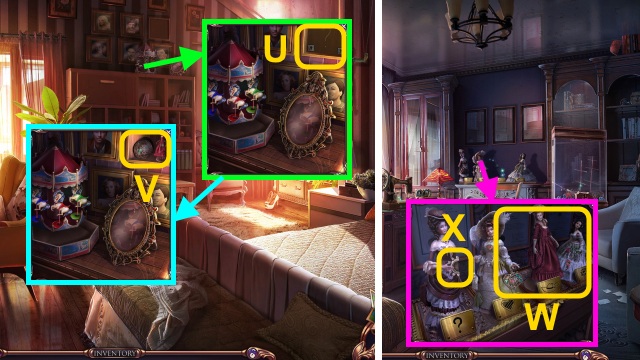
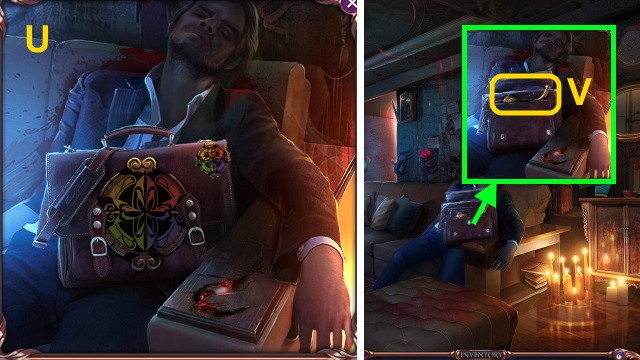
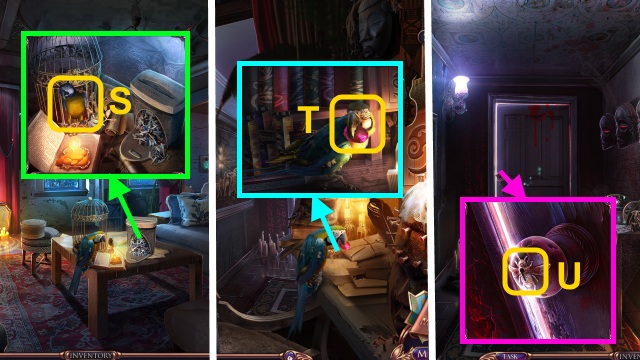
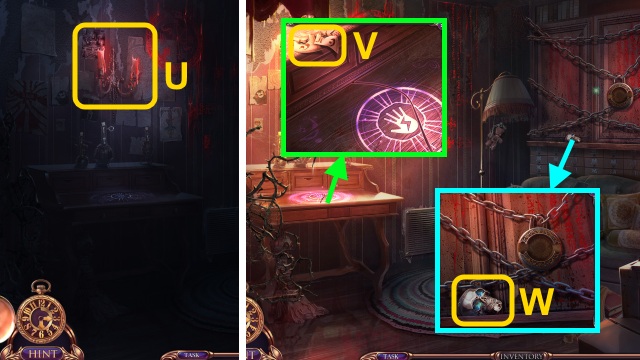
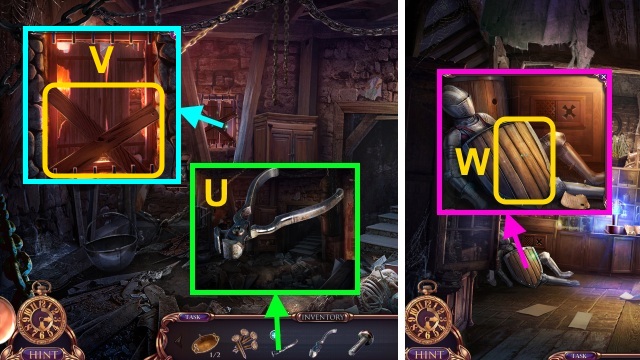
- Place the FISH BUTTON for a mini-game (U).
- Solution (V).
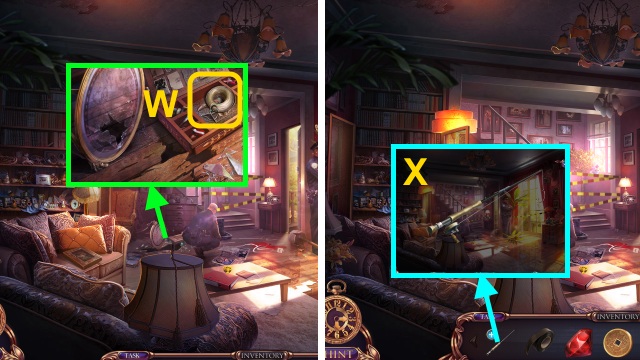
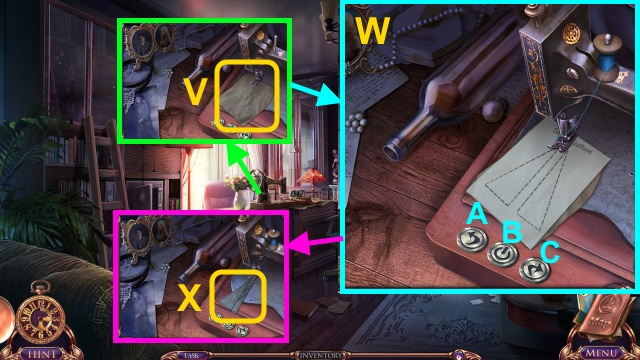
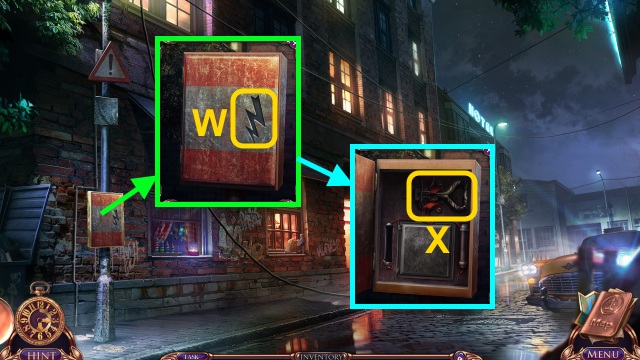
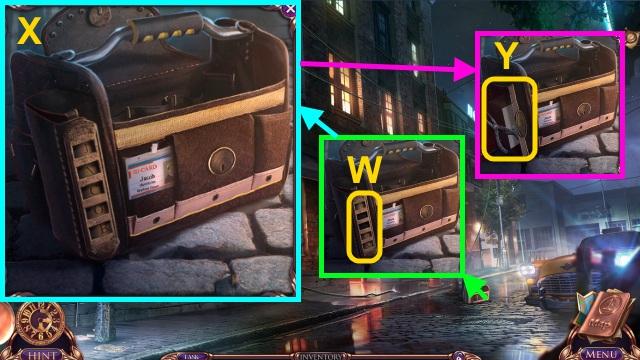
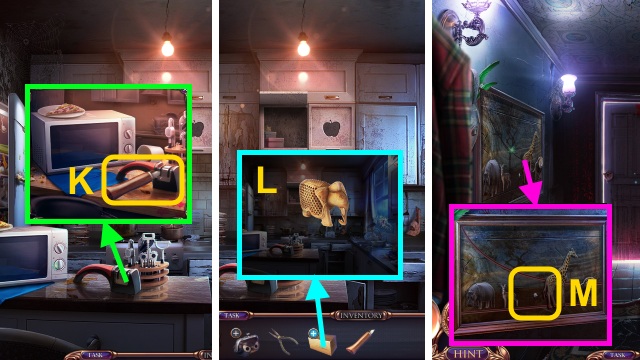
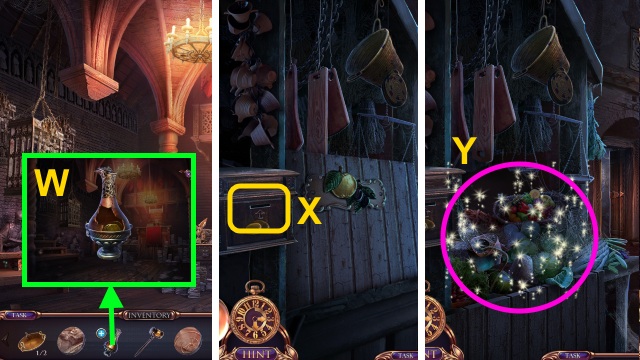
- Take the FISHING LINE and HOOK (W).
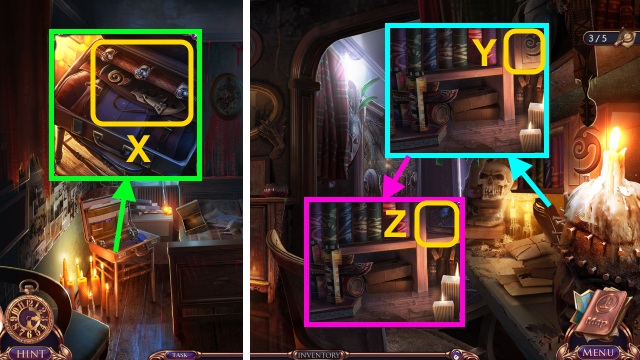
- Use the ELECTRICAL TAPE, FISHING LINE, and HOOK on the BROKEN FISHING POLE; take the FISHING POLE (X).
- Walk forward.
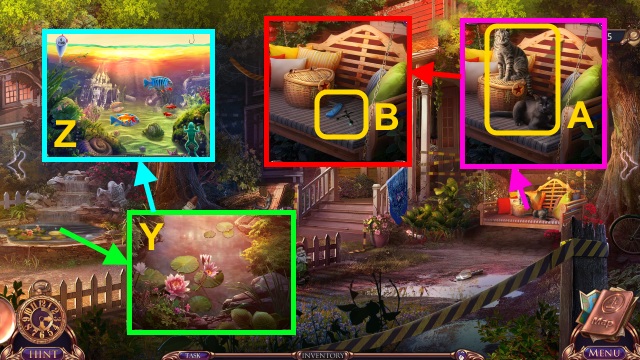
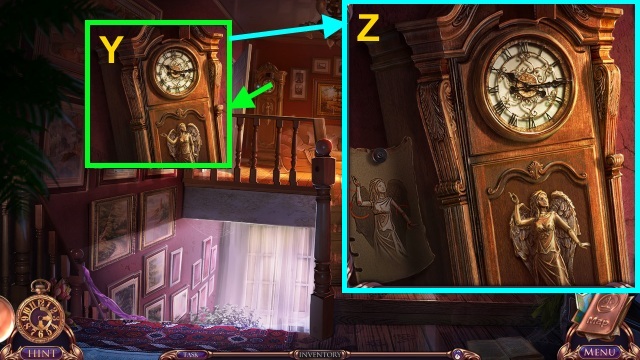
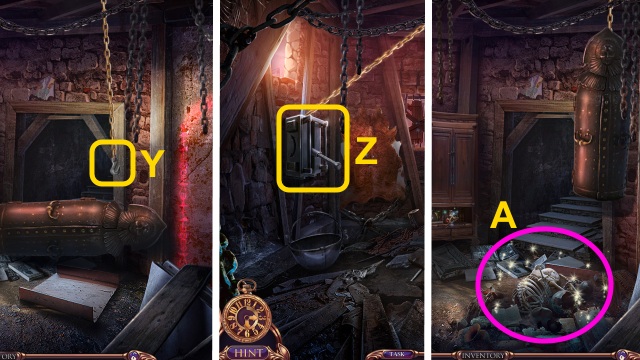
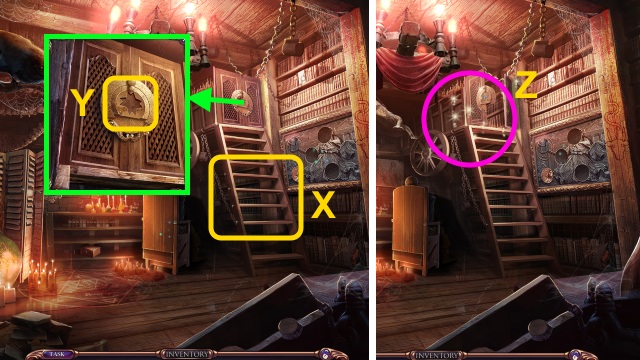
- Use the FISHING POLE for a mini-game (Y).
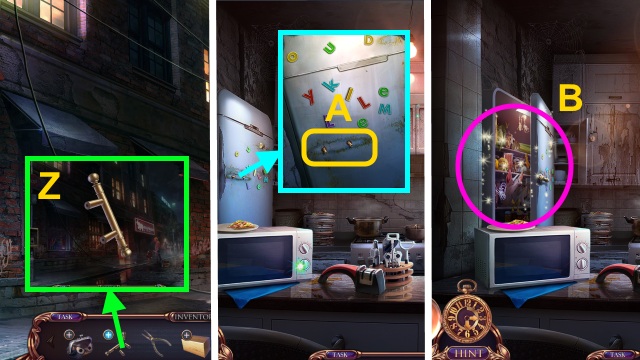
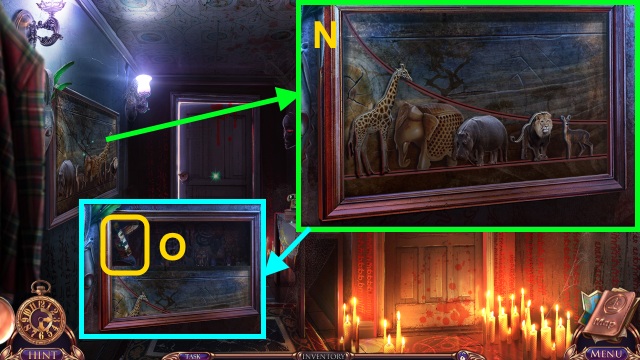
- Use the hook to catch the fish (Z); you receive the FISH.
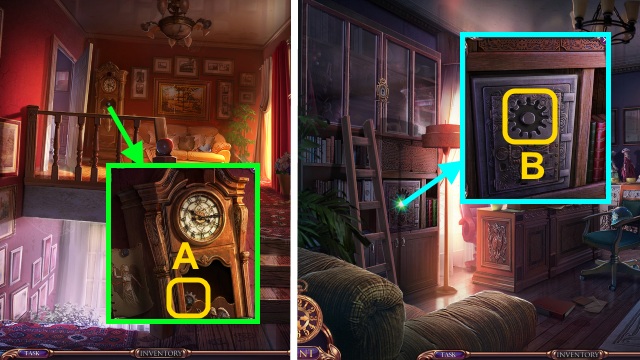
- Give the FISH (A); take the CLOCK HANDS and MULTI-TOOL (B).
- Walk forward.
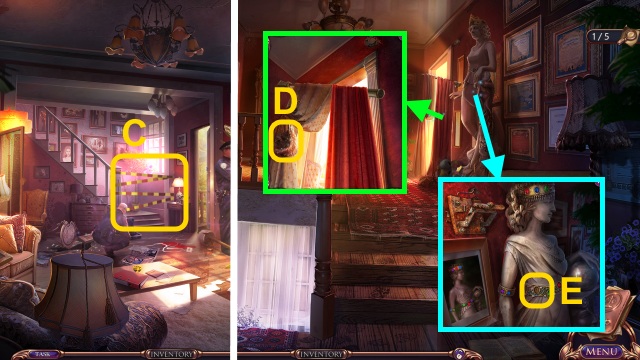
- Use the MULTI-TOOL (C).
- Go up.
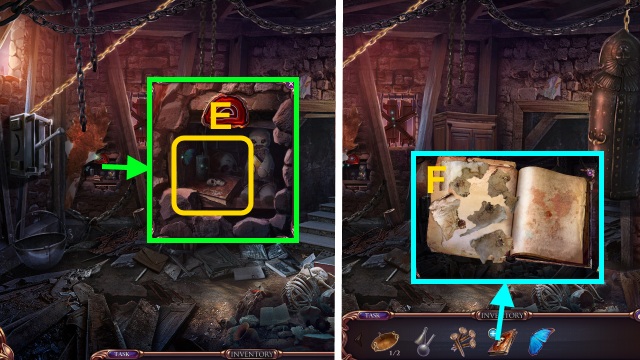
- Take the FEATHER DUSTER (D).
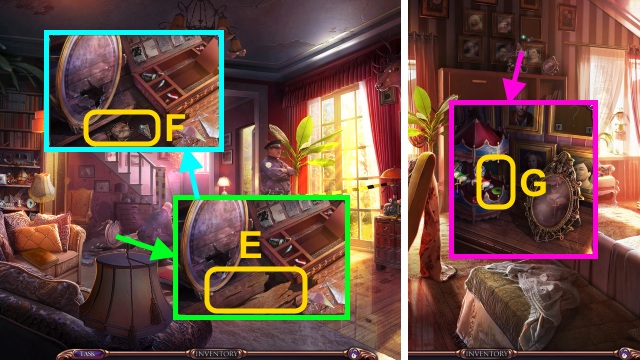
- Place the RUBY for a mini-game (E).
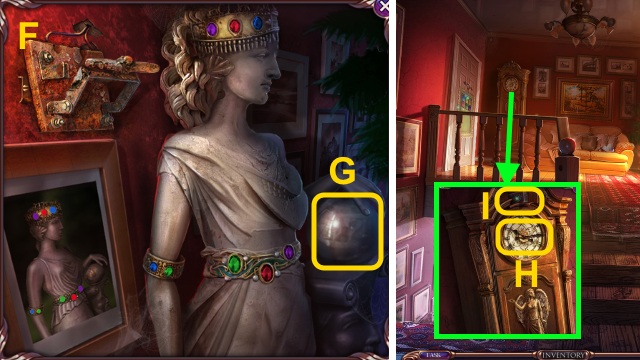
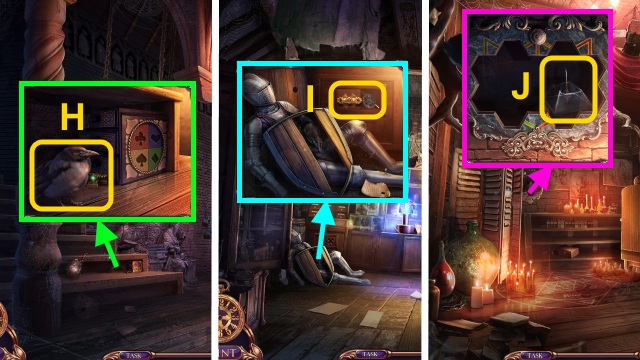
- Solution (F).
- Take the CRYSTAL BALL (G).
- Place the CLOCK HANDS (H); take the VELVET BOX (I).
- Go down.
- Place the CRYSTAL BALL (J); take the CURTAIN ROD BRACKET and METAL FIN (K).
- Place the METAL FIN (L); take the SICKLE (M).
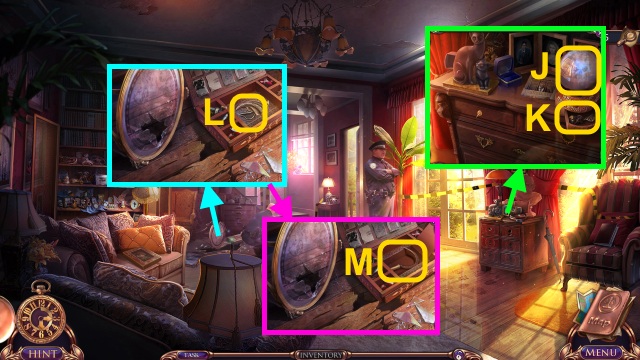
- Walk forward.
- Use the SICKLE for a mini-game (N).
- Solution (O).
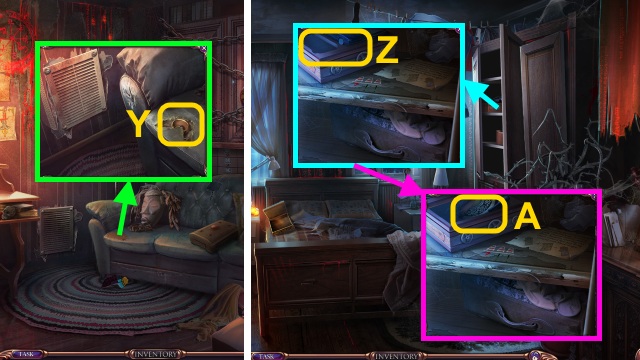
- Take the Bloody Bracelet.
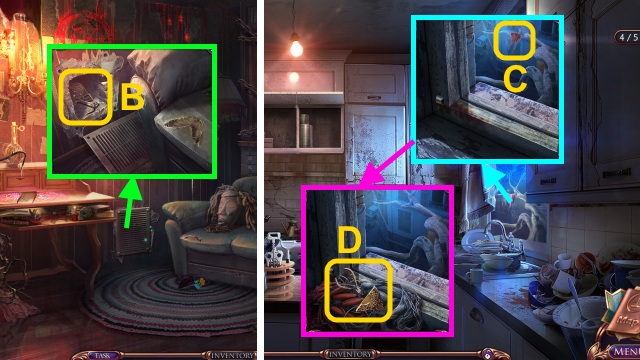
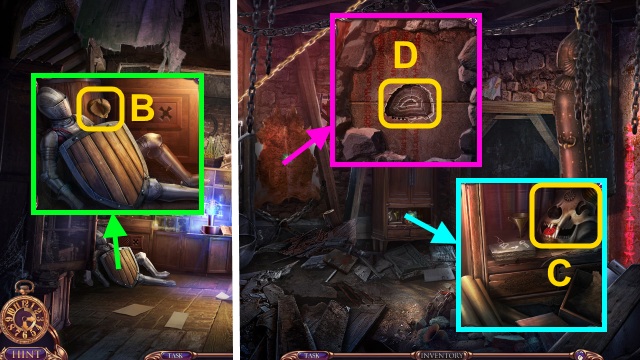
- Use the FEATHER DUSTER; take the SCREWS (P).
- Walk forward, then up.
- Place the CURTAIN ROD BRACKET and SCREWS (Q); use the MULTI-TOOL.
- Walk right.
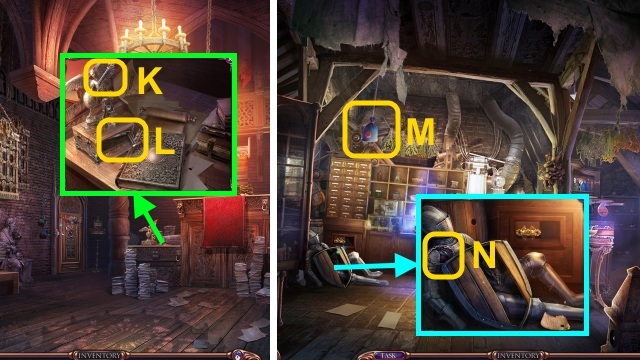
- Take the BROKEN BICYCLE PUMP (R).
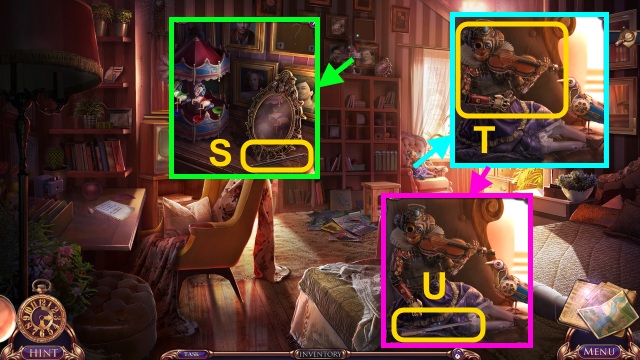
- Take the VIOLIN BOW (S).
- Give the VIOLIN BOW (T); take the FILE (U).
- Go to the Front Yard; scroll right.
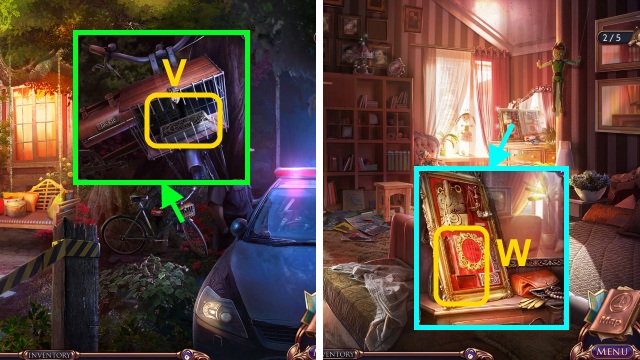
- Use the FILE; take the VELVET BOX (V).
- Go to the Guest Bedroom.
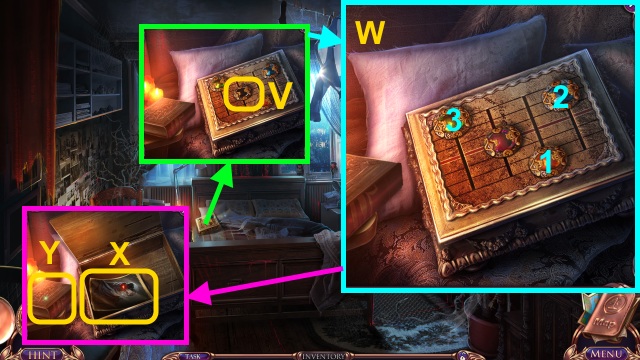
- Place the VELVET BOXES for a mini-game (W).
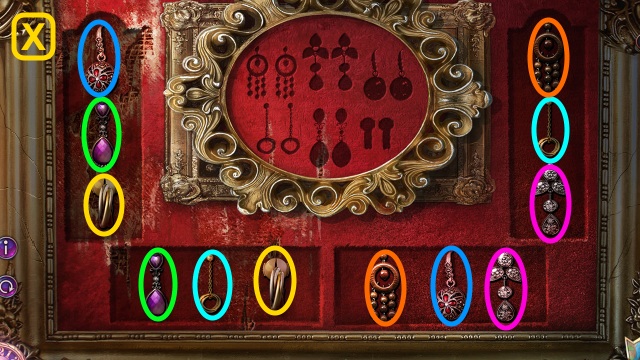
- Solution (X).
- Solution is random (Y).
- Take the RUST-AWAY SPRAY and SILK ROSE (Z).
- Walk down.
- Use the RUST-AWAY SPRAY; take the HANDLE (A).
- Place the HANDLE and ELECTRICAL TAPE on the BROKEN BICYCLE PUMP; take the PUMP (B).
- Go to the Front Yard.
- Use the PUMP (C).
- Play the HOP to receive the CROWBAR (D).
- Walk forward.
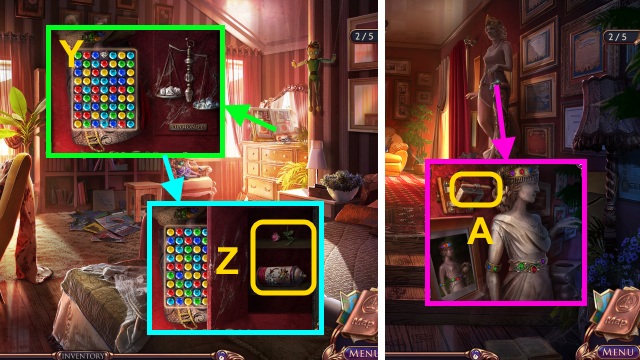
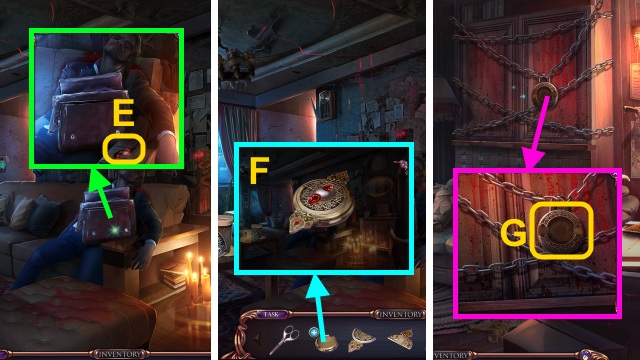
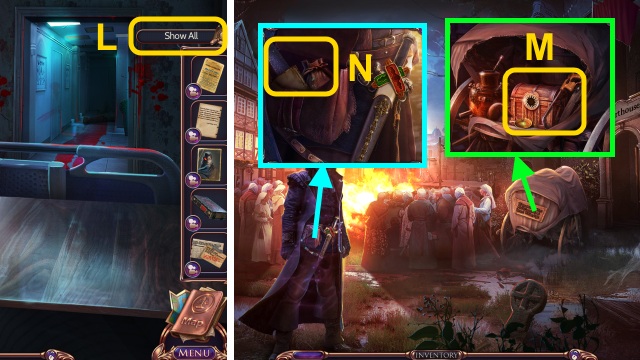
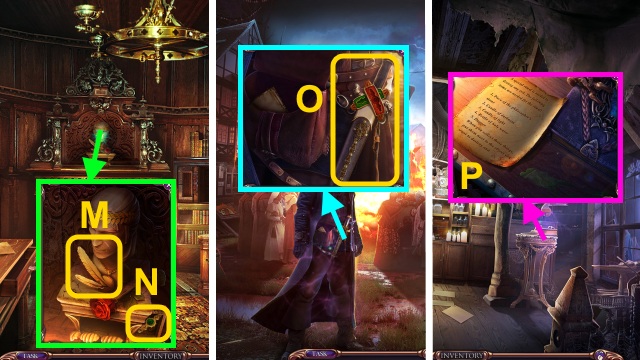
- Use the CROWBAR (E); take the BANK LOCK PART (1/3), Howard’s Glasses, and the CAROUSEL HORSE (F).
- Go to the Guest Bedroom.
- Place the CAROUSEL HORSE for a mini-game (G).

- Solution (H).
- Take the BANK LOCK PART (2/3) and MECHANICAL EYE (I).
- Place the MECHANICAL EYE (J); take the BANK LOCK PART (3/3) and MECHANICAL HEART (K).
- Walk down.
Chapter 2: The Study
- Place the BANK LOCK PART for a mini-game (L).
- Solution (M).
- Walk left.
- Take the NOTEBOOK (N); use the MULTI-TOOL to take the CORK (O).
- Walk down twice.
- Place the CORK (P); take the BLUNT PENCIL and JACKIE’S PORTRAIT (Q).
- Go up, then right.
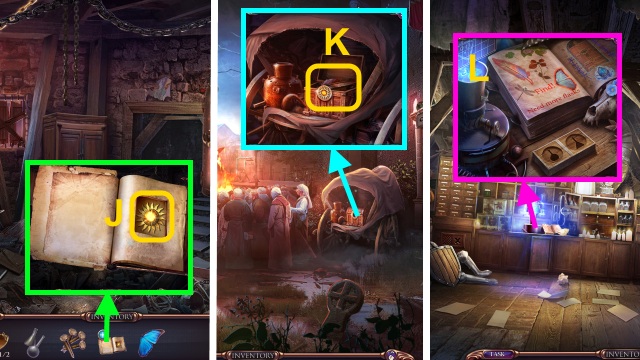
- Use the BLUNT PENCIL to receive the PENCIL (R).
- Use the PENCIL on the NOTEBOOK for a mini-game (S); use the pencil to reveal the image.
- Take the ANGEL SKETCH (T).
- Place JACKIE’S POTRAIT (U); take the SAFE GEAR (1/3) and MARGARET (V).
- Walk down, then left.
- Place the SILK ROSE, MECHANICAL HEART, and MARGARET (W).
- Take the SAFE GEAR (2/3) (X).
- Walk down.
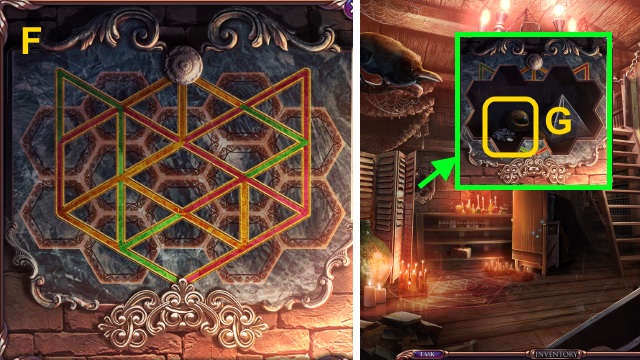
- Place the ANGEL SKETCH for a mini-game (Y).
- Solution (Z).
- Take the SAFE GEAR (A).
- Walk left.
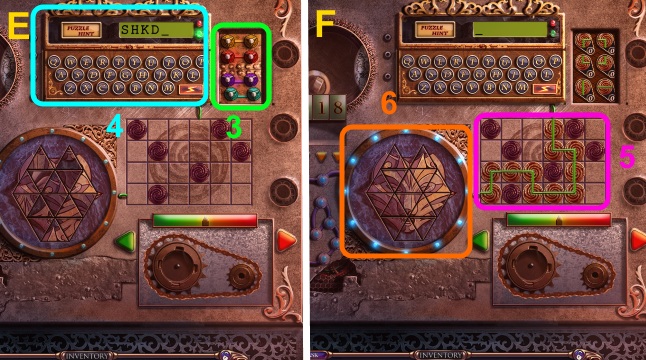
- Place the SAFE GEAR for a mini-game (B).

- Solution (C, D): B, A, Bx5, A, Bx5, A, Bx5, A, Bx5, A, Bx5.
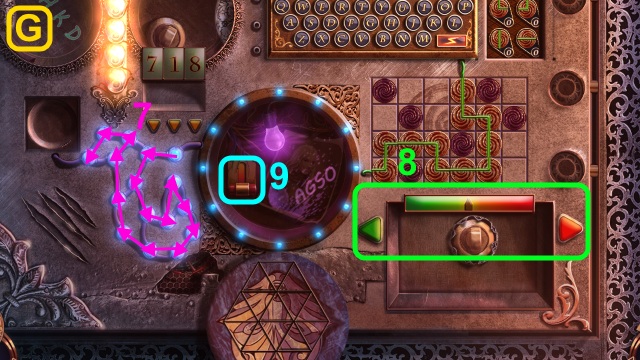
- Solution (G): use the arrows to move the pointer into the yellow section of the bar.
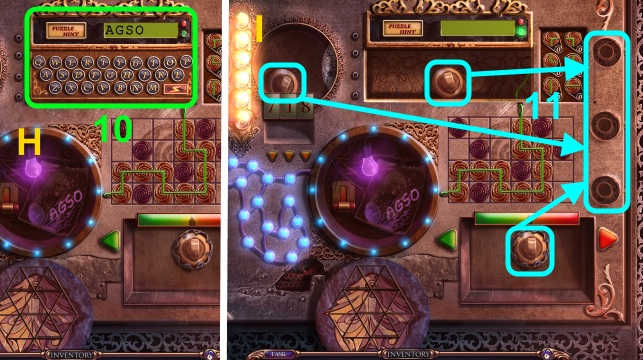
- Take the Letter and AWARD METAL (J).
- Walk down twice.
- Place the AWARD METAL; take the ANCHOR CHARM (K).
- Go to the Study.
- Place the ANCHOR CHARM; take the STARFISH CHARM (L).
- Go to the Front Yard.
- Place the STARFISH CHARM; take the MAGNET (M).
- Use the MULTI-TOOL; take the METAL FEATHER and THREAD (N).
- Go to the Guest Bedroom.
- Place the METAL FEATHER; take the SHIP FIGUREHEAD (O).
- Use the MAGNET; take the ZIPPER PULL (P).
- Go to the Front Yard; scroll right.
- Use the ZIPPER PULL (Q); take JACKIE’S BRACELET (R).
- Examine JACKIE’S BRACELET; undo the clasp (S).
- Take the MINIATURE CHAIN and JACKIE’S PENDANT.
- Walk forward.
- Place JACKIE’S PENDANT (T); move the papers.
- Take the SAIL PATTERN and NEEDLE (U).
- Go to the Study.
- Place the SAIL PATTERN, NEEDLE, and THREAD for a mini-game (V).
- Solution (W): A, B, Cx3, B, Cx2, B, Ax2, B, A, B, Ax3, B, Ax2, B.
- Take the SAILS (X).
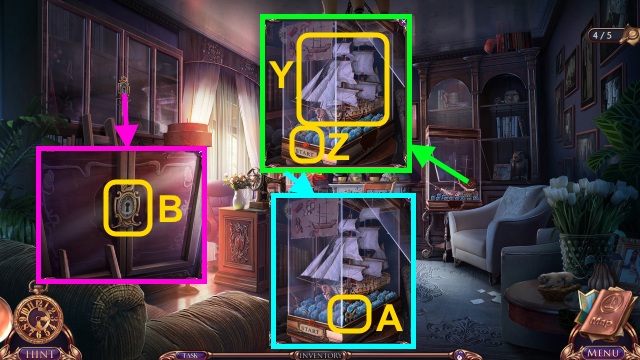
- Place the SAILS, SHIP FIGUREHEAD, FISHING LINE, and MINIATURE CHAIN (Y); press the button (Z).
- Take the BRASS KEY (A).
- Use the BRASS KEY (B).
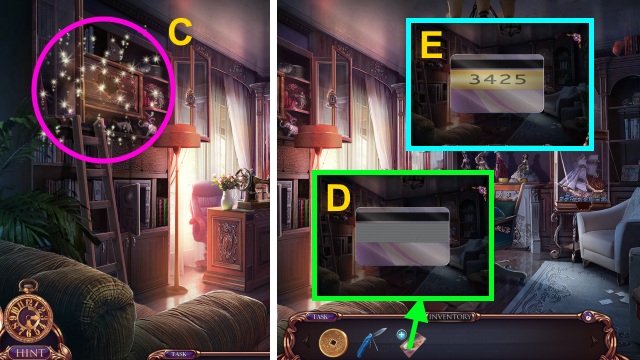
- Play the HOP to receive the CREDIT CARD (C).
- Examine the credit card; flip it for a mini-game (D).
- Scratch the card; take the SECRET CODE (E).
- Walk down twice.

- Open the door; place the SECRET CODE (F).
- Press 3, 4, 2, 5 (G).
- Open the case; take the RECORDING OF MURDER (H).
- Go up, then right.
- Place the RECORDING OF MURDER; press the button (I).
- Take the Videocassette (J).
Chapter 3: Howard’s Apartment
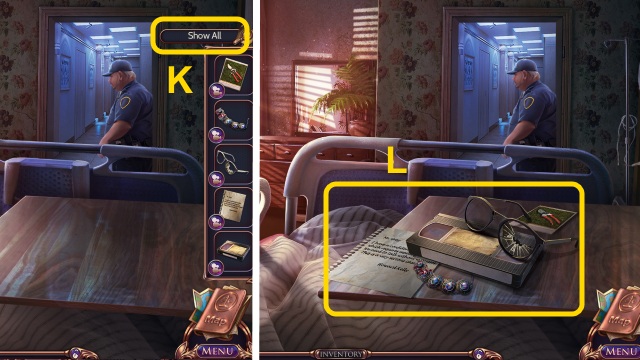
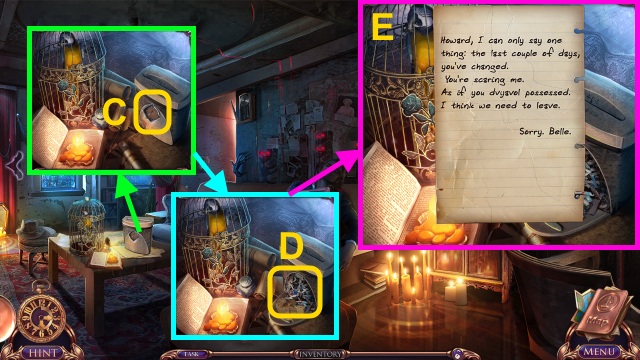
- Place the clues (K); examine them (L).
- Take the bag for a mini-game.
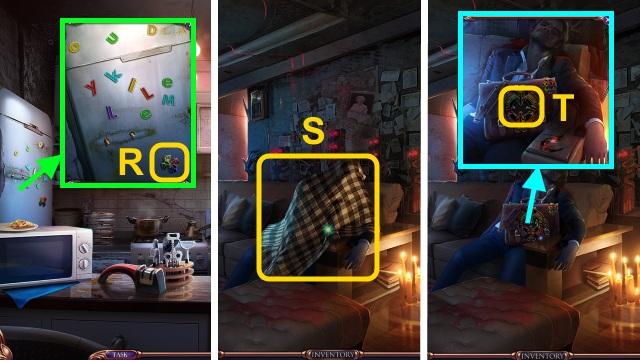
- Move the objects; take HOWARD’S APARTMENT KEY (M).
- Examine HOWARD’S APARTMENT KEY; move the glass (N).
- Take the note.
- You receive HOWARD’S ROOM KEY.
- Take the HAIRCLIP (O).
- Use the HAIRCLIP (P); take the LIGHTNING KEY and WRENCH (Q).
- Use the WRENCH (R); take the DIRTY WALLET and RING FOR PYRAMID (S).
- Place the PYRAMID RING for a mini-game (T).
- Solution (U).
- Take the STATUETTE (V).
- Place the LIGHTNING KEY (W).
- Use the MULTI-TOOL; flip the switch (X).
- Walk left for a mini-game.
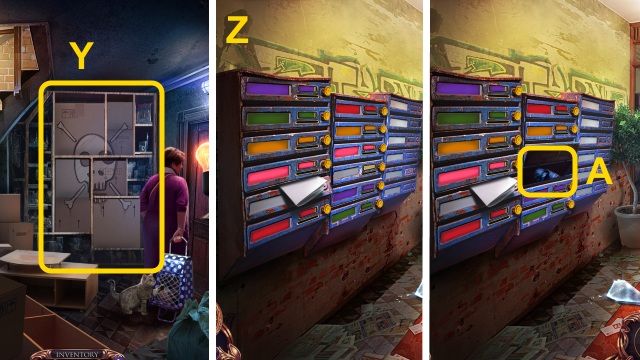
- Solution: Stack the boxes (Y).
- Walk left.
- Match the mailboxes (Z); take the TIE (A).
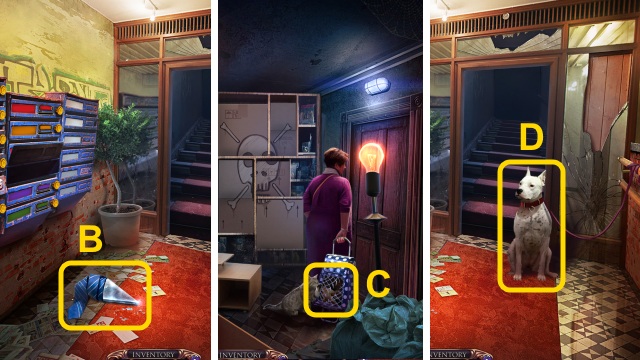
- Use the TIE; take the GLASS (B).
- Walk down.
- Use the GLASS; take the CHICKEN LEG (C).
- Walk left.
- Give the CHICKEN LEG (D).
- Walk forward.
- Take the GLOVE (E).
- Walk down twice.
- Use the GLOVE to take the LIGHT BULB (F).
- Walk left, then forward.
- Place the LIGHT BULB (G); flip the switches in order.
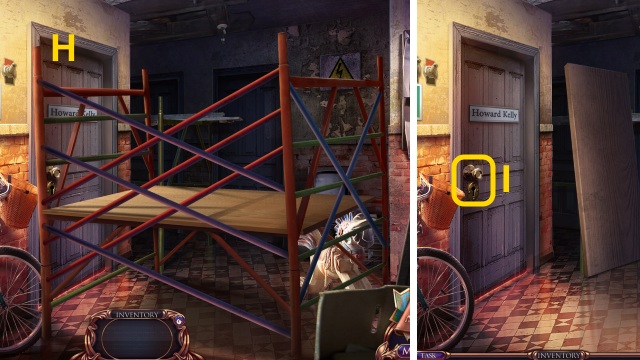
- Move the scaffolding (H).
- Use HOWARD’S ROOM KEY (I).
- Scroll right.
- Take the Library List and DREAM CATCHER (J).
- Scroll left.
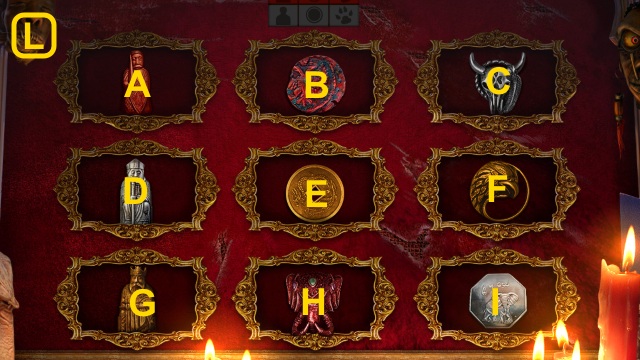
- Place the DREAM CATCHER, ANCIENT COIN, and STATUETTE for a mini-game (K).
- Solution (L): G-D, D-A, E-B, F-C, H-F, H-I.

- Take the SAFETY LOCK (M).
- Move the cloth; take the LETTER WHEEL (1/2) (N).
- Walk down.

- Place the SAFETY LOCK (O).
- Use the MULTI-TOOL; take the PUSH BUTTON (P).
- Walk forward.
- Place the PUSH BUTTON; press it (Q).
- Walk forward.
- Take the BRIEFCASE DISC (R).
- Walk down.
- Move the blanket (S).
- Place the BRIEFCASE DISC for a mini-game (T).
- Solution (U).
- Take the LETTER WHEEL (2/2) and BROKEN HANDLE (V).
- Walk down.
- Place the LETTER WHEEL for a mini-game (W).
- Solution (X).
- Take the PLIERS, WOODEN BAR, and GLUE (Y).
- Use the PLIERS and GLUE on the BROKEN HANDLE; take the FRIDGE HANDLE (Z).
- Walk forward twice.
- Place the FRIDGE HANDLE (A).
- Play the HOP to receive the PAPER SHREDDER PART (B).
- Walk down.
- Place the PAPER SHREDDER PART (C); press it.
- Examine the papers for a mini-game (D).
- Solution (E); take the Letter.
- Move the papers; take the PAPER WITH CODE (F).
- Walk forward.
- Place the PAPER WITH CODE for a mini-game (G).
- Solution: 7, 3, 2, 8.
- Take the ACID (H).
- Walk down; scroll right.
- Use the ACID (I).
- Walk right.
- Take the BLUNT KNIFE (J).
- Go to the Kitchen.
- Use the BLUNT KNIFE to receive the CARVING KNIFE (K).
- Use the CARVING KNIFE on the WOODEN BAR; take the ELEPHANT (L).
- Go to the Corridor.
- Place the ELEPHANT for a mini-game (M).
- Solution (N).
- Take the TOTEM (O).
- Walk down; scroll right.
- Place the TOTEM; take the BENT IRON FLOWER (P).
- Use the PLIERS on the BENT IRON FLOWER; take the FORGED ROSE (Q).
- Scroll left.
- Place the FORGED ROSE (R); open the cage.
- Take the ROOM KEY (S).
- Take the SHINING STONE (T).
- Walk right.
- Use the ROOM KEY (U).
- Walk forward.
Chapter 4: The Attic
- Place the SHINING STONE for a mini-game (V).
- Solution (W).
- Take the Strange Photo (X), APPLE AMULET, and RED SPINE BOOK (Y).
- Go to the Kitchen.
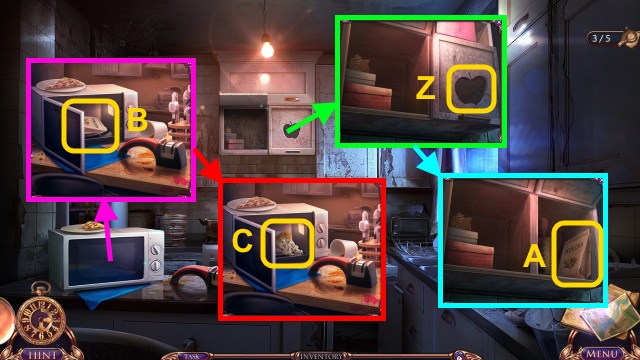
- Place the APPLE AMULET (Z); take the POPCORN (A).
- Place the POPCORN (B); close the door.
- Open the door; take the POPCORN (C).
- Walk down; scroll right.
- Give the POPCORN (D).
- Take the GREEN FEATHER (E); place the RED SPINE BOOK for a mini-game (F).
- Solution (G).
- Take the DRAGON WING (1/2) (H).
- Go to the Bedroom.
- Use the PLIERS (I); take the OLD MASK (J).
- Walk down.
- Place the GREEN FEATHER (K) and OLD MASK (L).
- Play the HOP to receive the SUITCASE BUTTON (M).
- Walk forward.
- Use the SUITCASE BUTTON (N); open the suitcase.
- Take the WISE RAVEN (O).
- Walk down.
- Place the WISE RAVEN for a mini-game (P).
- Solution (Q).
- Walk right.
- Take the DRAGON WING and LIGHTER FUEL (R).
- Walk down.
- Place the DRAGON WING; take the EMPTY LIGHTER (S).
- Use the LIGHTER FUEL on the EMPTY LIGHTER; take the LIGHTER (T).
- Walk right.
- Use the LIGHTER (U).
- Take the SPELL RECIPE PIECES (1/2) (V).
- Take the SKULL (W).
- Walk down, then forward.
- Place the SKULL; take the SECRET SYMBOL and SPELL RECIPE PIECES (X).
- Walk down twice.
- Place the SECRET SYMBOL (Y); take the SPELL BOOK (Z).
- Open the SPELL BOOK (A); place the SPELL RECIPE PIECES for a mini-game.
- Solution (B, C).
- Take the GLOVE (D).
- Go to the Attic.
- Use the GLOVE for a mini-game (E).
- Solution (F, G).
- Solution (H): Pull the paper four times.
- Solution (I, J).
- Solution (M): Press the buttons.
- Solution (N): Arrange the buttons.
- Press GO; solution is random.
- Solution (O).

- Solution (T).
- Take the OIL CAN, Antique Folio, and OWL EYE (1/2) (U).
- Go to the Kitchen.
- Use the OIL CAN; take the OWL EYE (V).
- Place the OWL EYE on the DIRTY WALLET (W); open it.
- Take the CAR and SCISSORS (X).
- Go to the Attic.
- Use the SCISSORS; take the MEDALLION PIECE (Y).
- Walk down, then forward.
- Place the CAR (Z); take the MEDALLION PIECE and SCREWDRIVER (A).
- Walk down, then right.
- Use the SCREWDRIVER; take the HOOKED ROPE (B).
- Go to the Kitchen.
- Use the HOOKED ROPE (C).
- Use the SCISSORS; take the MEDALLION PIECE and CLIPPERS (D).
- Walk down.
- Use the CLIPPERS; take the MEDALLION PIECE (E).
- Place the MEDALLION PIECES on the MEDALLION PIECE; take the CHARMED MEDALLION (F).
- Go to the Attic.
- Place the CHARMED MEDALLION (G).
- Play the HOP to receive the FLOWER DRAWER HANDLE (H).
- Walk down.
- Place the FLOWER DRAWER HANDLE (I); open the book (J).
- Take the Newspaper Clipping (K).
Chapter 5: The Town
- Place the clues (L).
- Examine the scene.
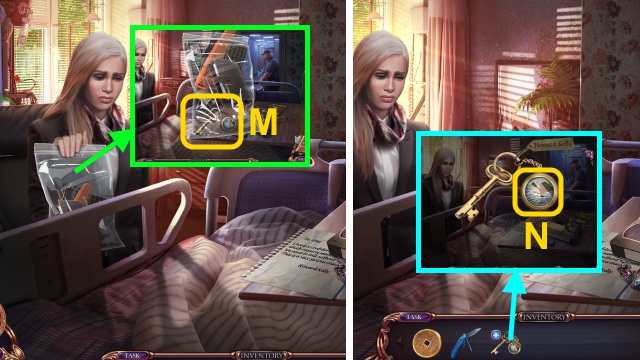
- Use the TOY SCISSORS; take the SCALES PAN (1/2) and SAW PART (M).
- Open the bag; take the PACKAGE and GRINDSTONE (N).
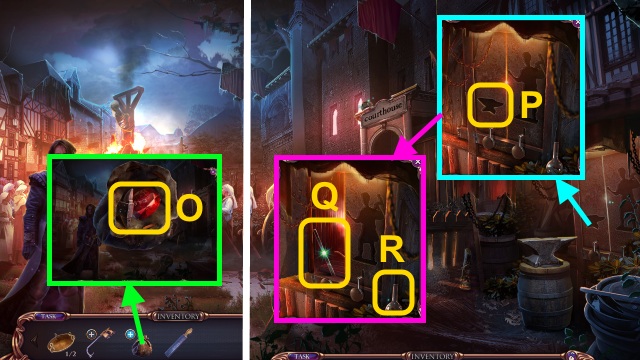
- Open the PACKAGE; take the ANVIL AMULET and Philosopher’s Stone (O).
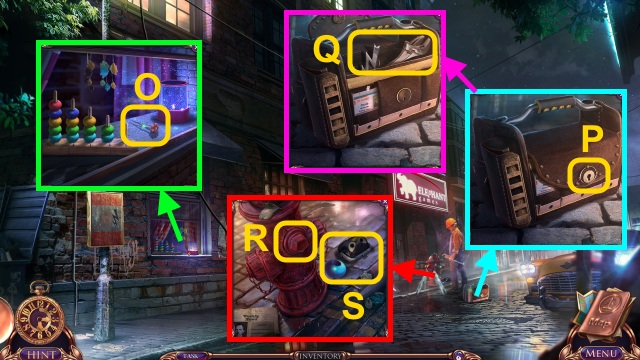
- Scroll right.
- Place the ANVIL AMULET (P); take the SAW BLADE (Q) and FLASK (1/2) (R).

- Use the SAW BLADE and GRINDSTONE on the SAW PART; take the SAW (S).
- Scroll left.
- Use the SAW (T).
- Walk left.
- Use the SAW; take the FLASK and BLACKSMITH AMULET (U).
- Walk down; scroll right.
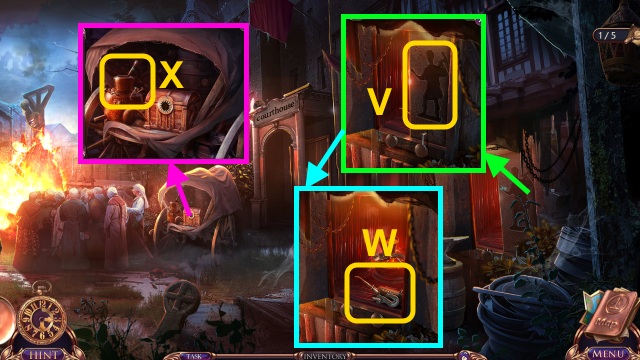
- Place the BLACKSMITH AMULET (V); take the HOOK and OIL CAN (W).
- Use the OIL CAN; take the LEVER and NAILS (X).
- Go to the First Floor.
- Place the HOOK (Y); use it.
- Use the OIL CAN; place the LEVER (Z).
- Pull the lever.
- Play the HOP to receive the GOAT HORN (A).
- Walk forward.
- Read the note; take the GOAT HORN (B).
- Walk down.
- Place the GOAT HORNS; take the BLOODY STONE (C).
- Move the pelt; place the BLOODY STONE (D).
- Take the Candle of Darkness, BUTTERFLY WINGS, and MAGE’S DIARY (E).
- Open the MAGE DIARY for a mini-game (F).

- Take the KEY OF LIGHT (J).
- Walk down.
- Place the KEY OF LIGHT; take the PHOENIX FEATHER (K).
- Go to the Second Floor.
- Place the FLASK, BUTTERFLY WING, and PHOENIX FEATHER for a mini-game (L).

- Solution (M).
- Take the SECRET GLASS (N).
- Walk down.
- Use the SECRET GLASS (O).
- Walk right.
- Take the PINCER’S PART and BLACKSMITH GLOVE (P).
- Move the screen; take the IRONHEAD STAFF (Q).
- Walk down twice; scroll right.
- Use the IRONHEAD STAFF; use the BLACKSMITH GLOVE to take the PINCERS PART and LADLE WITH IRON (R).
- Go to the First Floor.
- Use the LADLE WITH IRON; open the mold (S).
- Take the SCREW (T).
- Place the PINCERS PART and SCREW on the PINCERS PART; take the PINCERS (U).
- Use the PINCERS; take the PLANKS (2/4) and COBBLESTONE (V).
- Walk forward.
- Use the PINCERS; take the PLANKS and STAR (W).
- Walk down, then right.
- Place the PLANKS and NAILS (X); use the COBBLESTONE.
- Place the STAR (Y).
- Play the HOP to receive the TRUNK (Z).

- Open the TRUNK.
- Take the Candle of Light (A).
- Move the scrolls; take the COURTHOUSE KEY (B).
- Walk down twice.
- Use the COURTHOUSE KEY (C).
- Walk right.
- Move the papers; take the HEXAGON (D).
- Go to the Secret Lair.
- Place the HEXAGON for a mini-game (E).
- Solution (F).
- Take the DRAGON RING and PIECE OF CHEESE (G).
- Go to the Courthouse.
- Give the PIECE OF CHEESE; take the RAVEN and BOLT PART (H).
- Go to the Second Floor.
- Place the BOLT PART; take the MECHANISM PART and TUNING FORK (I).
- Walk down, then right.
- Use the TUNING FORK; take the SHARP SPIKE (J).
- Go to the Courthouse.
- Place the SHARP SPIKE (K); take the MECHANISM PART (L).
- Go to the Second Floor.
- Use the RAVEN (M).
- Take the MECHANISM PART (N).
- Walk down twice.
- Use the RAVEN to receive the MECHANISM PART and BAS-RELIEF PIECE (O).
- Walk right.
- Place the MECHANISM PARTS; pull the handle (P).
- Walk forward.
- Place the DRAGON RING for a mini-game (Q).
- Take the GRIFFIN AMULET and Holy Water (S).
- Take the CLAY VESSEL (T).
- Walk down.
- Place the GRIFFIN AMULET (U); take the BAS-RELIEF PIECES and JUDGE’S GAVEL (V).
- Use the JUDGE’S GAVEL on the CLAY VESSEL; take the THREE COINS (W).
- Walk down; scroll left.
- Place the THREE COINS (X).
- Play the HOP to receive the HORSESHOE (Y).
- Go to the Investigation Room.
- Place the HORSESHOE; open the drawer (Z).
- Take the STICK AND HOOK.
- Walk down.
- Use the STICK AND HOOK; take the BAS-RELIEF PIECE (A).
- Go to the Secret Lair.
- Place the BAS-RELIEF PIECES for a mini-game (B).

- Solution (C).
- Take the THINKER’S LAUREL WREATH and SPADES (D).
- Go to the Investigation Room.
- Place the THINKER’S WREATH (E); take the SCALES PAN and HEARTS (F).
- Walk down.
- Place the SCALES PAN; take the TRIANGLE STAMP and CLUBS (G).
- Walk down, then left.
- Use the TRIANGLE STAMP; take the DIAMONDS (H).
- Walk down, then right.

- Place the SPADES, HEARTS, CLUBS, and DIAMONDS (I); take the FILE (J).
- Go to the Secret Lair.
- Move the chair; use the FILE (K).
- Take the SAPPHIRE PATTERN and GILT FEATHER (L).
- Go to the Investigation Room.
- Place the GILT FEATHER (M); take the DIAMOND PATTERN (N).
- Walk down twice.
- Place the DIAMOND PATTERN and SAPPHIRE PATTERN (O); take the Dagger.
- Walk left, then forward.
- Place the Objects (P).
- Congratulations! You have completed Grim Tales: The Final Suspect.


 Botanica: Earthbound Walkthrough, Guide, & Tips
 Legends of the East: The Cobra's Eye Walkthrough, Guide, & Tips
 Danse Macabre: Thin Ice Walkthrough, Guide, & Tips
 Voodoo Chronicles: The First Sign Walkthrough, Guide, & Tips
 Dark Parables: Curse of Briar Rose Collector's Edition Walkthrough, Guide, & Tips