Mystery Crusaders: Resurgence of the Templars Walkthrough, Guide, & Tips
Mystery Crusaders: Resurgence of the Templars Walkthrough

Welcome to the Mystery Crusaders: Resurgence of the Templars Walkthrough
A criminal organization searching for an ancient treasure shot your partner!
Whether you use this document as a reference when things get difficult or as a road map to get you from beginning to end, we’re pretty sure you’ll find what you’re looking for here.
This document contains a complete Mystery Crusaders: Resurgence of the Templars game walkthrough featuring annotated screenshots from actual gameplay!
We hope you find this information useful as you play your way through the game. Use the walkthrough menu below to quickly jump to whatever stage of the game you need help with.
Remember to visit the Big Fish Games Forums if you find you need more help. Have fun!
This walkthrough was created by Laurie Murphy, and is protected under US Copyright laws. Any unauthorized use, including re-publication in whole or in part, without permission, is strictly prohibited.
General Tips
- This is the official guide for Mystery Crusaders: Resurgence of the Templars!
- This guide does not mention each time you have to zoom into a location; the screenshots show each zoom scene.
- Hidden-object puzzles are referred to as HOPs. This guide does not show screenshots of the HOPs, however, it is mentioned when a HOP is available and the inventory item collected.
- This guide gives step-by-step solutions for all puzzles that are not random. Please read the instructions in the game for each puzzle.
Chapter 1: Checking In

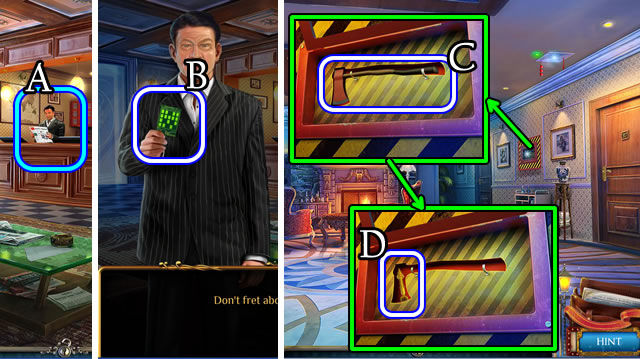
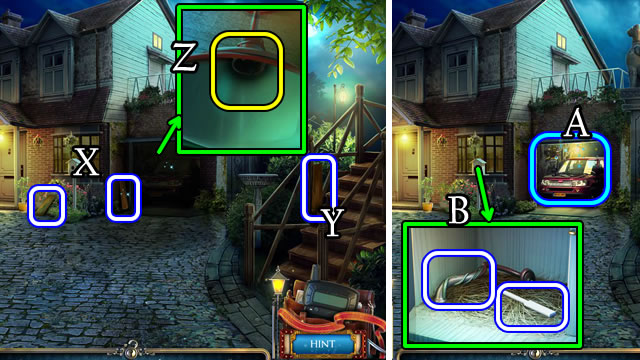
- Speak to the manager (A); take ROOM 313 KEY (B).
- Walk forward.
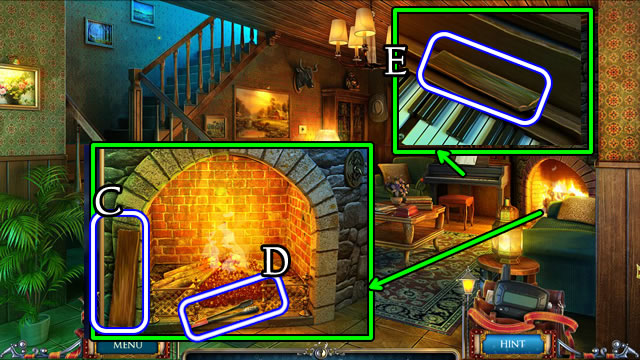
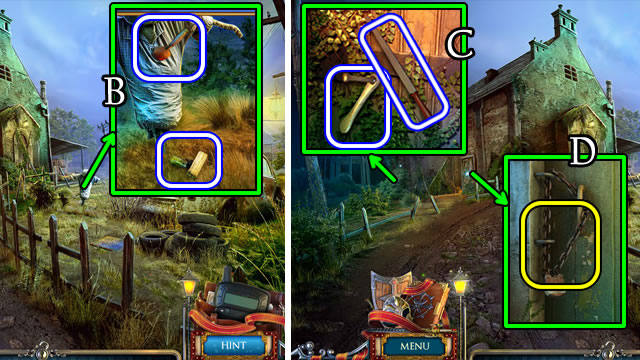
- Open, take the AXE (C) and CLOCK HAND (D).
- Walk down.
- Speak to the manager.
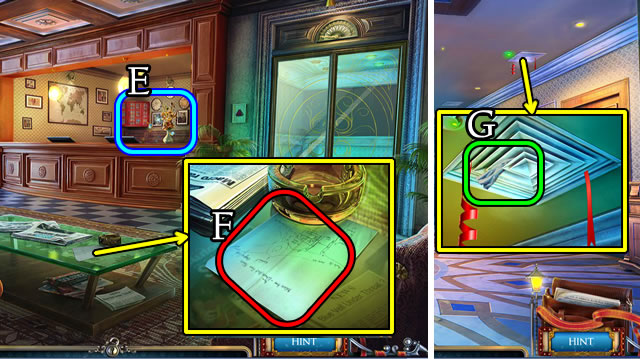
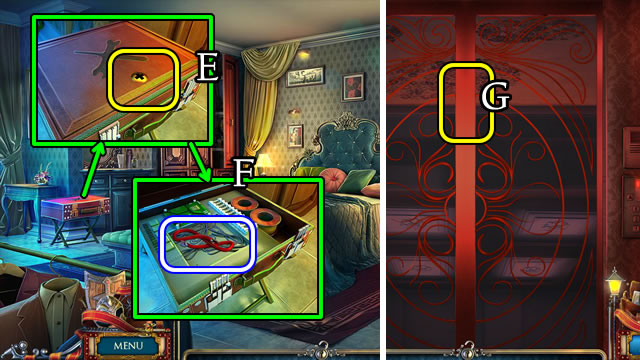
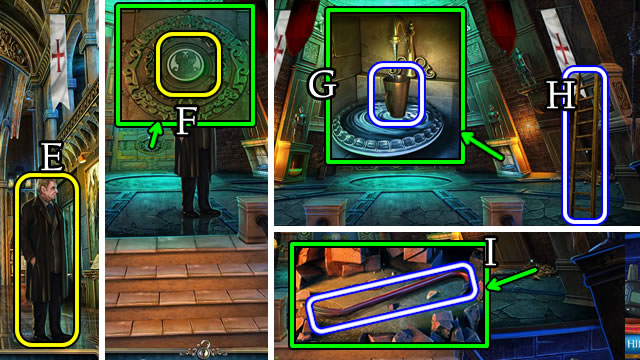
- Play the HOP (E) to receive a LIGHTER.
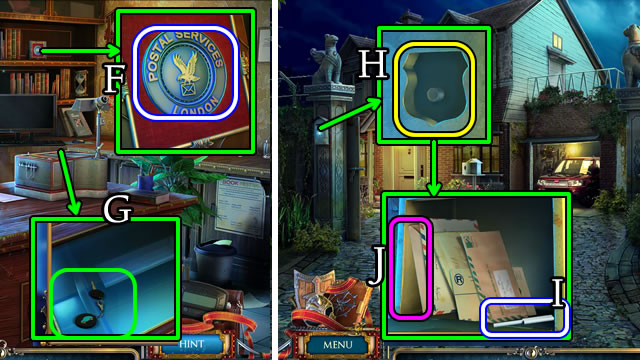
- Select the paper 2x (F) to receive PAPER.
- Walk forward.
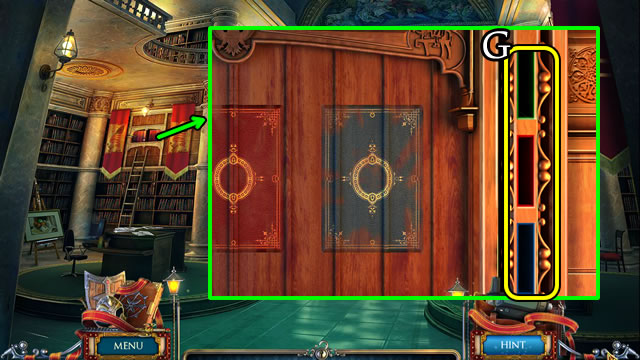
- Place the PAPER (G); use the LIGHTER.
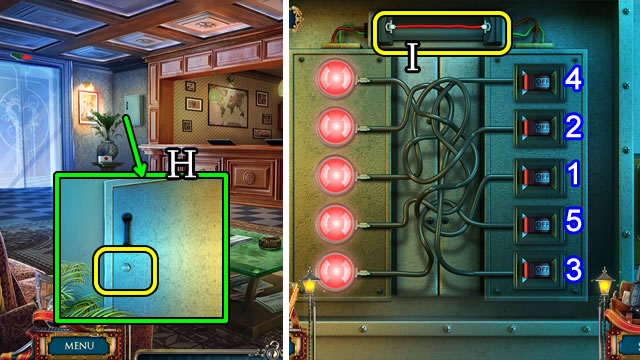
- Walk down.
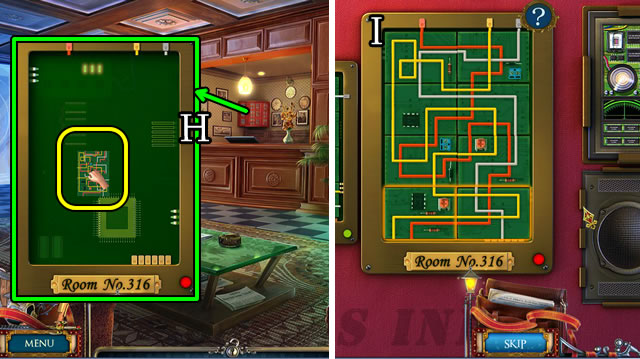
- Place ROOM 313 KEY (H).
- Solution (I).
- Take ROOM 316 KEY.
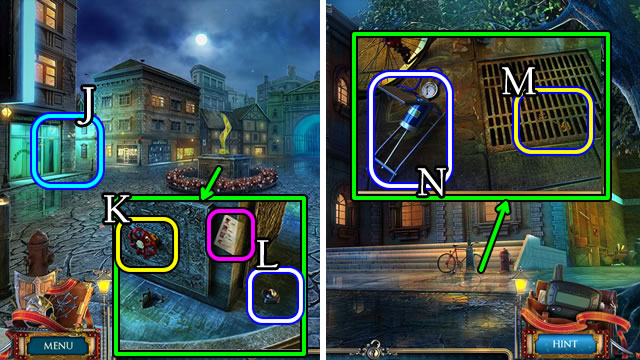
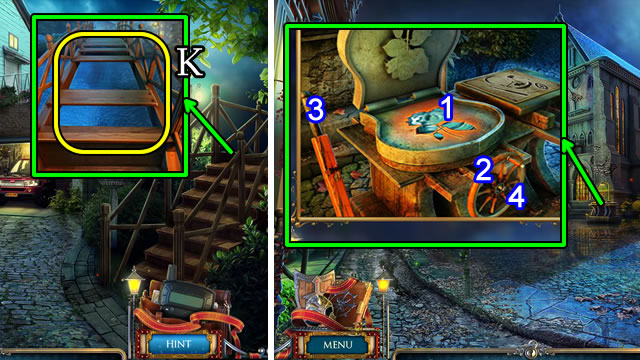
- Walk forward.

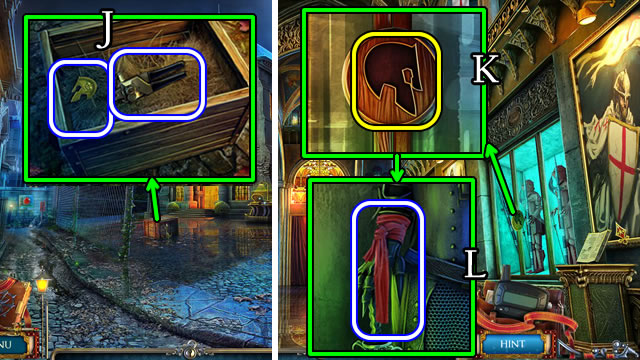
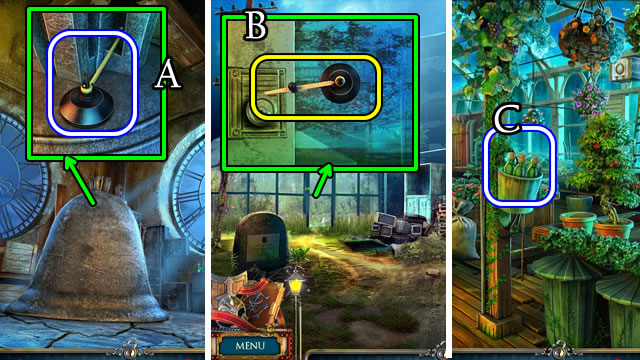
- Place the CLOCK HAND (J); take the TEMPLAR CREST and CROSS TRINKET (K).
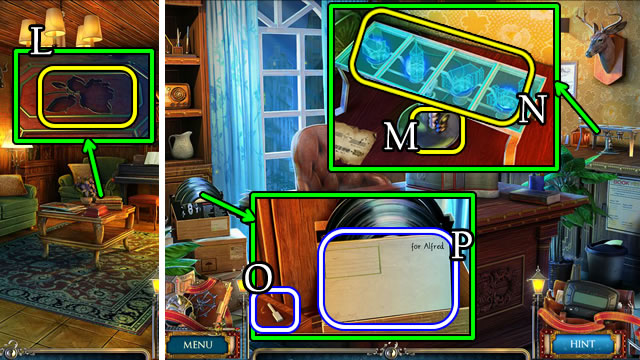
- Use ROOM 316 KEY (L).
- Walk left.
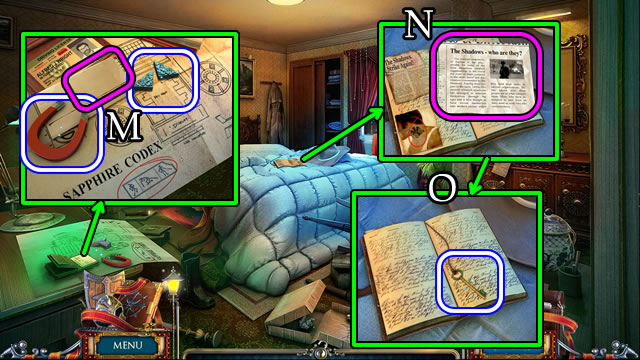
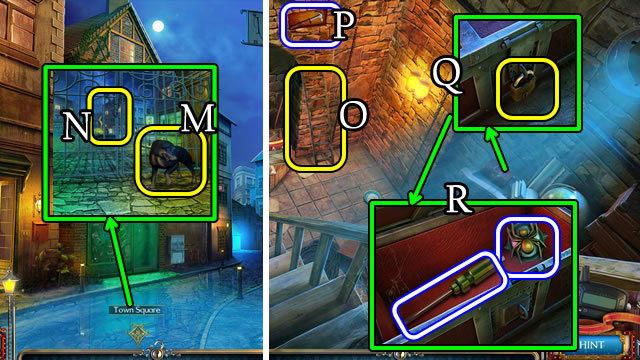
- Take the MAGNET, BUTTONS and letter (M).
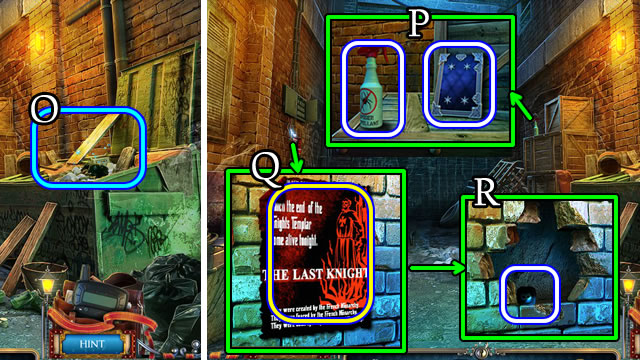
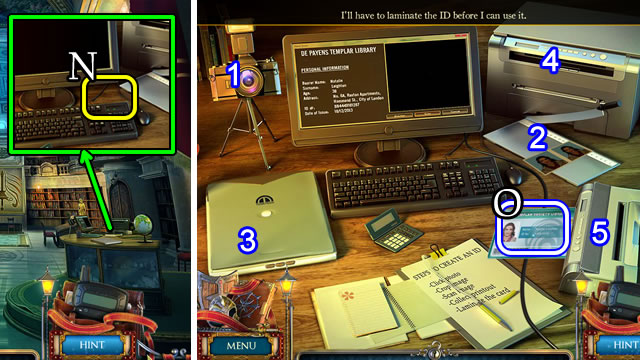
- Take the clipping (N), turn the page and take the BRONZE KEY (O).
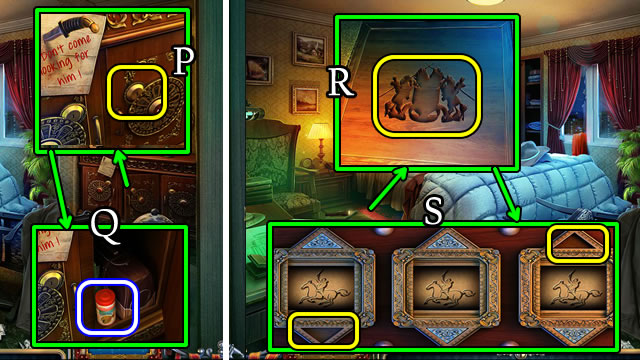
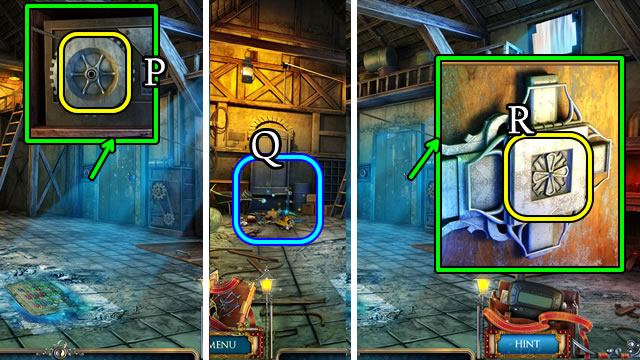
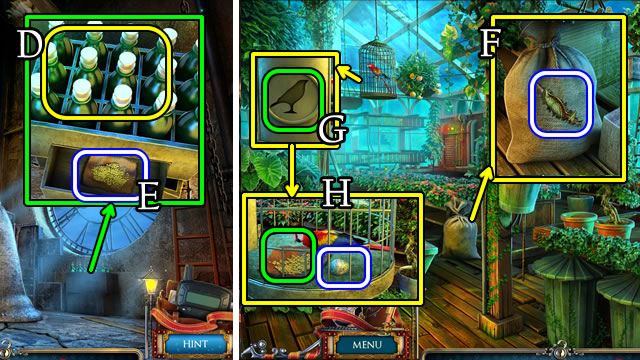
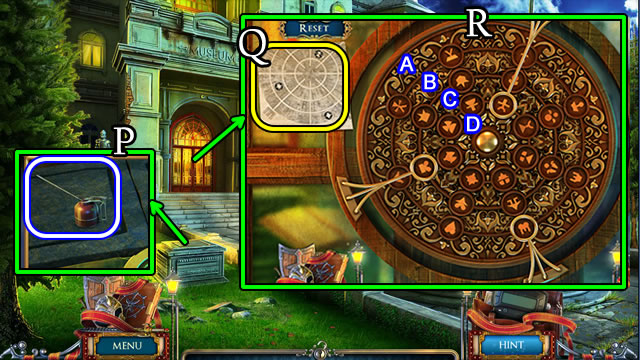
- Use the BRONZE KEY (P); take the FISH FOOD (Q).
- Place the TEMPLAR CREST (R) and BUTTONS (S).
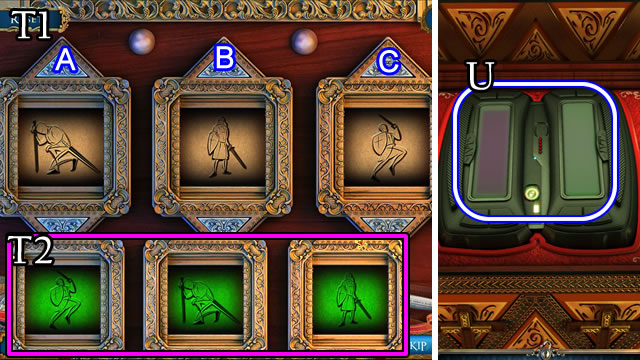
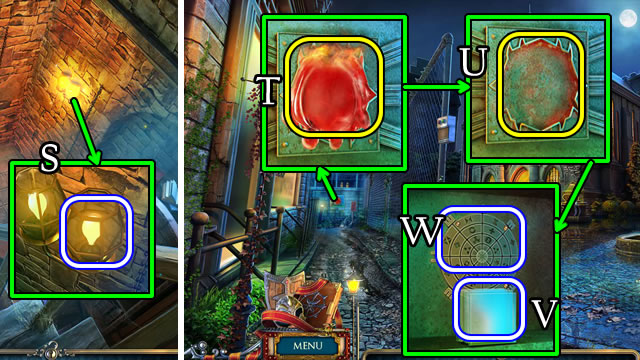
- Solution (T1-T2). Ax2-B-C.
- Take the COMMUNICATOR (U).
- Walk down. Walk right.
- Speak to Sir William.
- Select the COMMUNICATOR (Inventory) for a message.
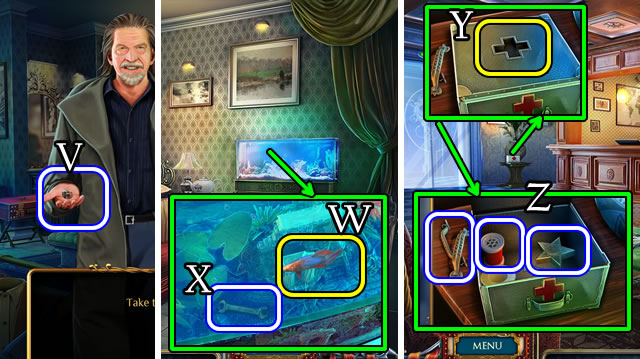
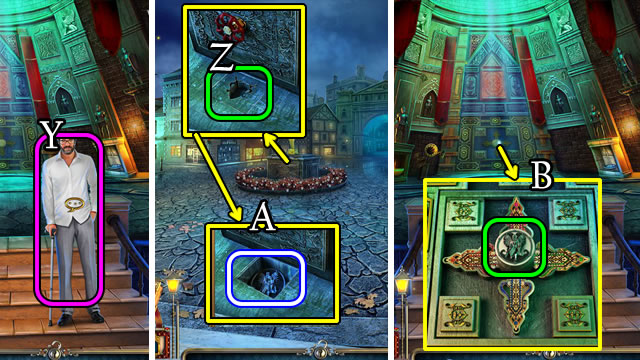
- Speak to Sir William. Take the TEMPLAR RING (V).
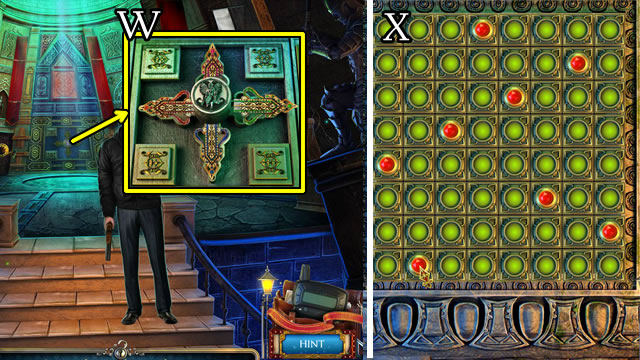
- Use the FISH FOOD (W); take the WRENCH (X).
- Walk down 2x.
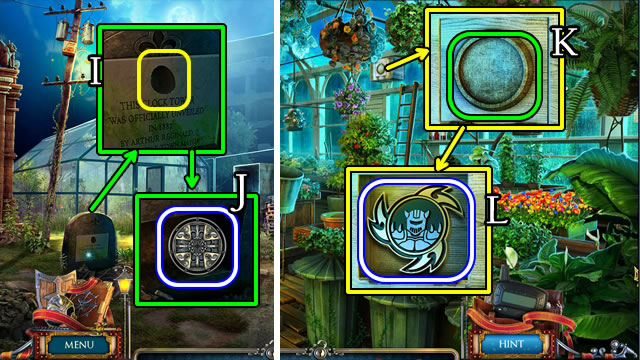
- Place the CROSS TRINKET (Y). Take the THREAD, STAR TOKEN and HANDLES (Z).
- Walk forward and left.
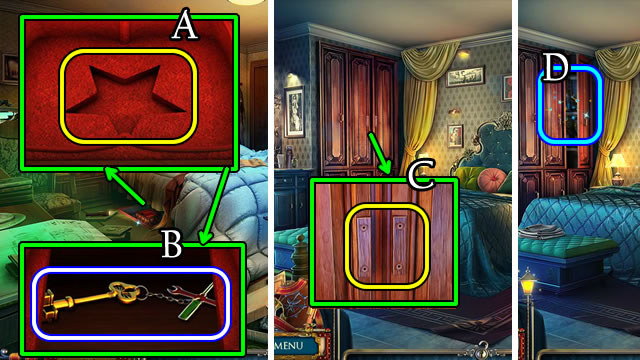
- Place the STAR TOKEN (A); take the TOOLBOX KEY (B).
- Walk down and right.
- Place the HANDLES (C) for a HOP (D). Receive LIGHTER FLUID.
- Use the TOOLBOX KEY (E); take the WIRE (F).
- Walk down 2x.
- Use the AXE (G).
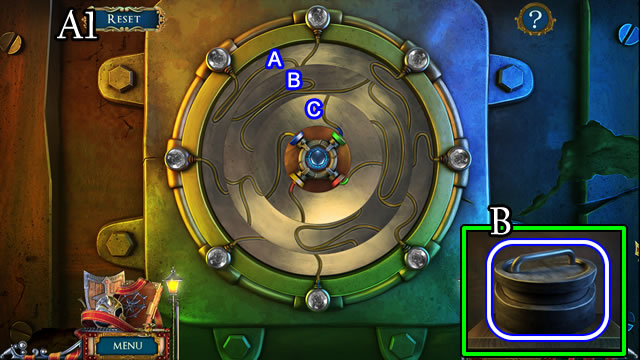
- Use the WRENCH (H); place the WIRE (I).
- Solution. 1-2-3-4-5.
- Walk left.
Chapter 2: Finding Alfred
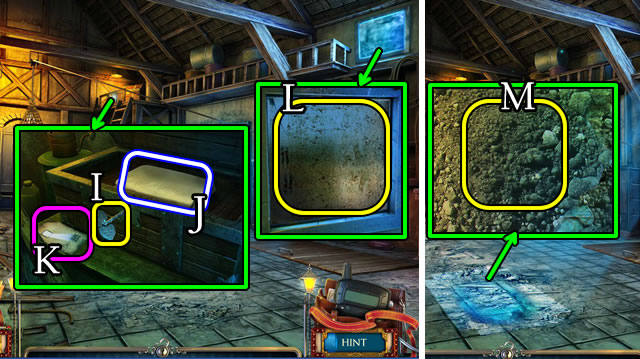
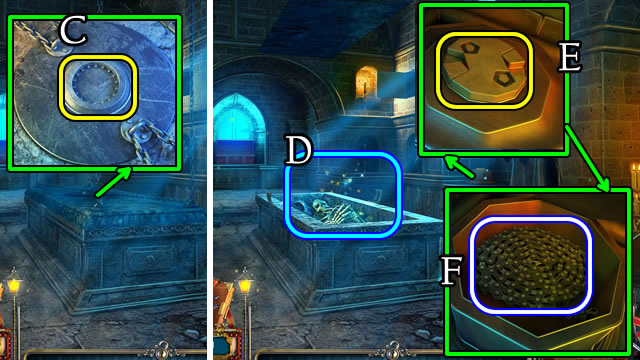
- Play the HOP (J); receive a VALVE.
- Place the VALVE (K); read the note and take NUMBERED BUTTONS 1/2 (L).
- Walk forward.
- Combine the THREAD and MAGNET for a MAGNET ON A STRING (Inventory).
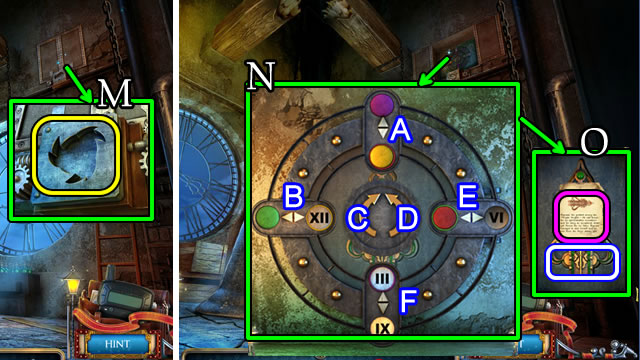
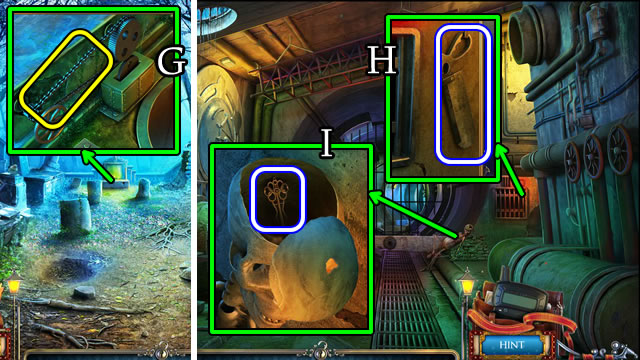
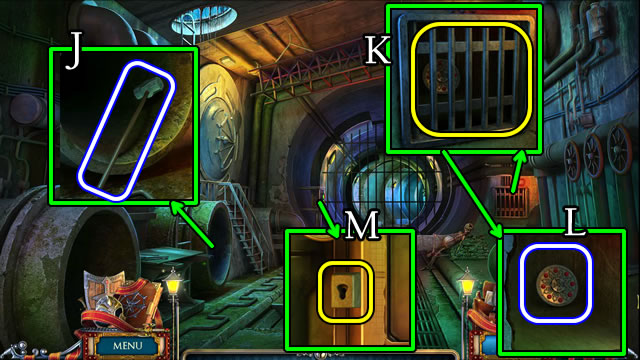
- Use the MAGNET ON A STRING (M) to take CROSS KEYS 1/2.
- Take the FOOT PUMP (N).
- Walk right.
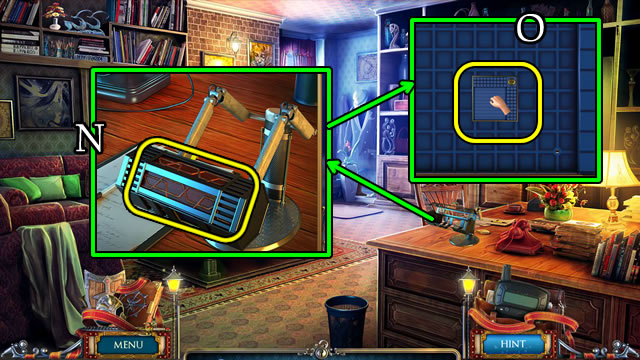
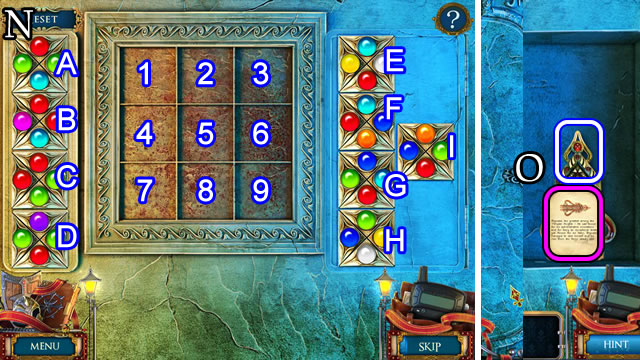
- Play the HOP (O); receive a COIN.
- Take the INSECTICIDE and BOOKS 1/3 (P).
- Select the theater notice 2x (Q); use the AXE; take NUMBERED BUTTONS 2/2 (R).
- Walk down.
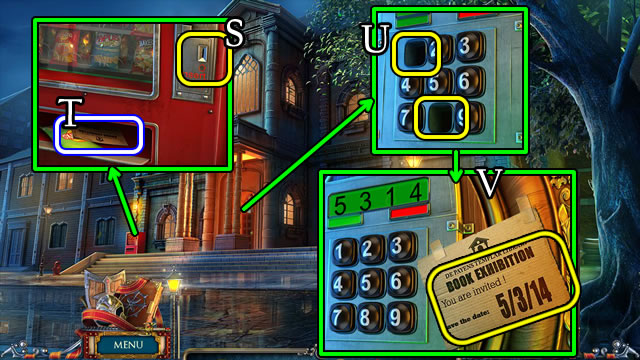
- Use the COIN (S). Take the NOTE (T).
- Place NUMBERED BUTTONS 2/2 (U) and the NOTE. Touch 5-3-1-4 (V).
- Walk forward.
- Take the TACKS (W).
- Use the INSECTICIDE (X); take the FLOWER ORNAMENT and BOOKS 2/3 (Y).
- Grab the FLOWER ORNAMENT (Z).
- Walk down 2x.
- Combine both FLOWER ORNAMENTS for a FLOWER SYMBOL (Inventory).
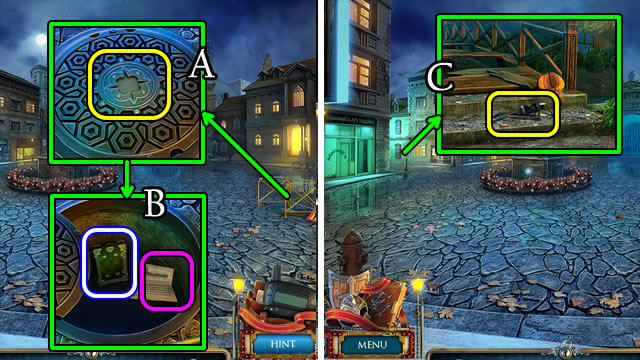
- Place the FLOWER SYMBOL (A). Take the note and BOOKS 3/3 (B).
- Use the FOOT PUMP; take the BASKETBALL (C).
- Return to the Alley.
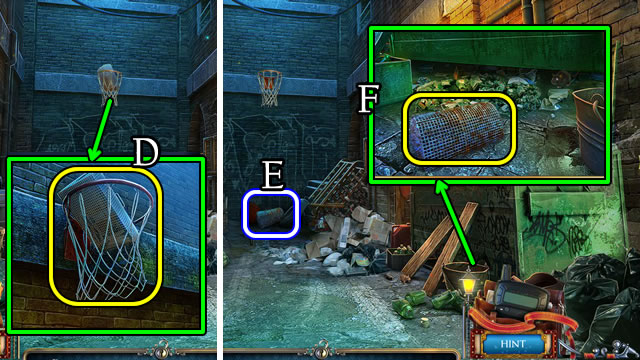
- Use the BASKETBALL (D); take the CAGE (E).
- Place the CAGE (F); take the caged MOUSE.
- Walk down and forward.
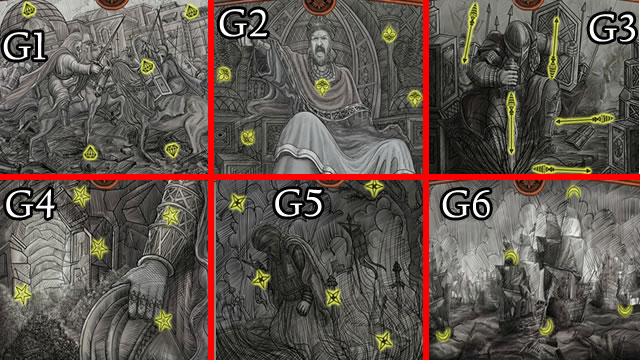
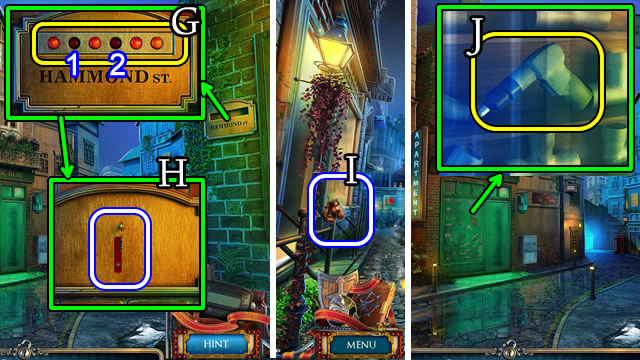
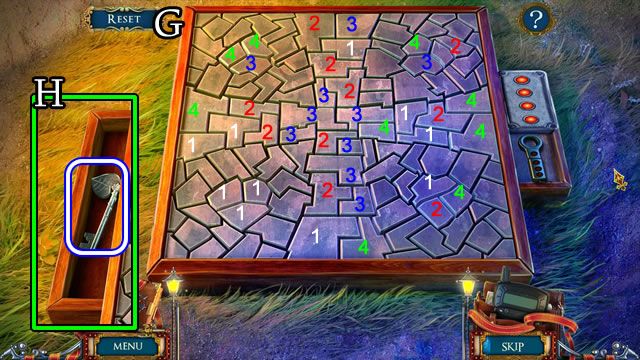
- Solution (G1-G2-G3-G4-G5-G6).
- Take the TAPE STRIP.
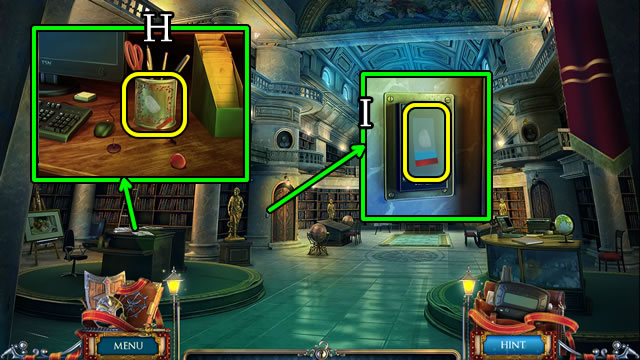
- Place the TAPE STRIP (H) to receive a FINGERPRINT STRIP.
- Place the FINGERPRINT STRIP (I).
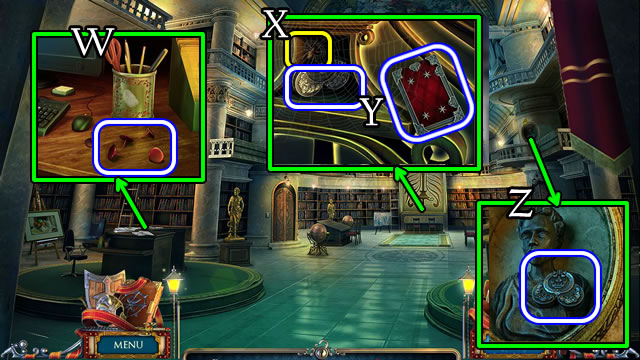
- Walk left.
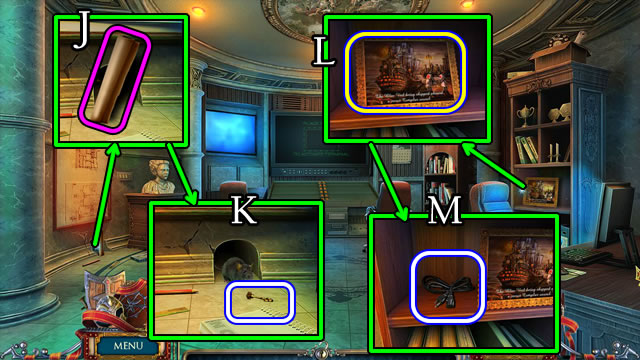
- Take the scroll (J); place the MOUSE; take CROSS KEYS 2/2 (K).
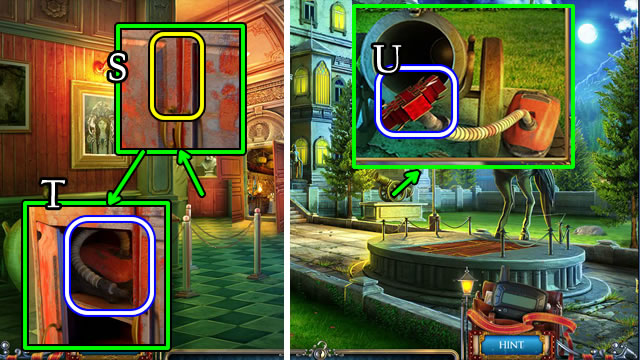
- Select the picture 2x (L); take the POWER CABLE (M).
- Walk down.
- Place the POWER CABLE (N).
- Use the devices 1-2-3-4-5.
- Take the ID CARD (O).
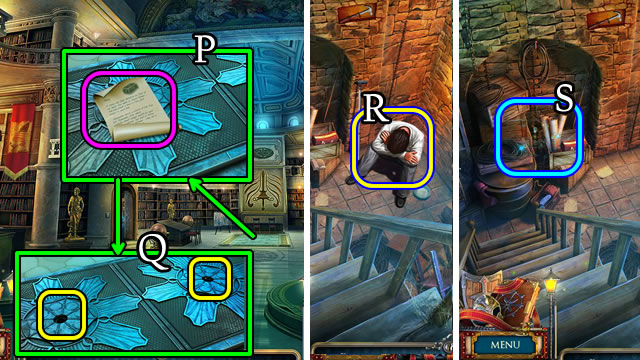
- Take the note (P). Use CROSS KEYS 2/2 (Q).
- Enter the Secret Chamber.
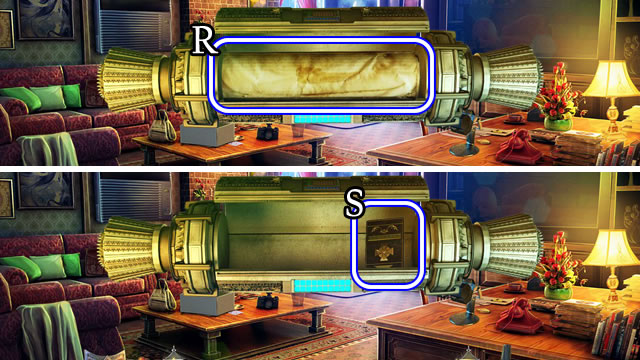
- Speak to Alfred (R) to activate a HOP (S). Receive a TEMPLAR SYMBOL.
- Walk down and left.
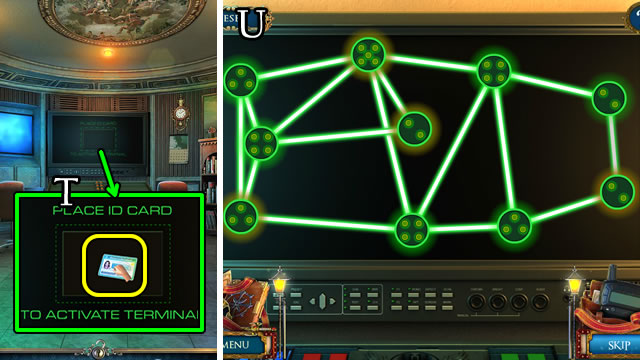
- Place the ID CARD (T).
- Solution (U).
- Combine the TEMPLAR SYMBOL and TEMPLAR RING for a TEMPLAR SOUVENIR (Inventory).
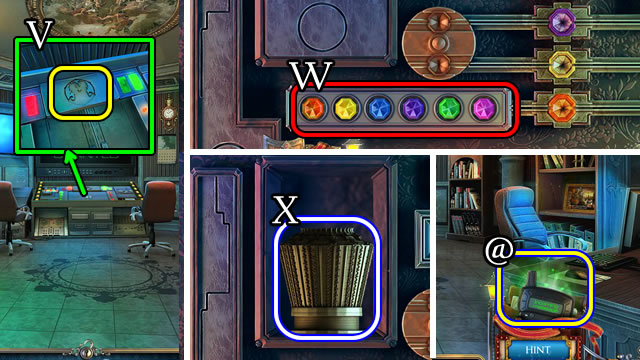
- Place the TEMPLAR SOUVENIR (V).
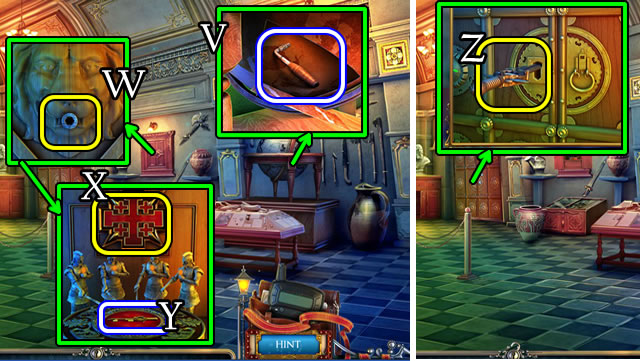
- Solution (W).
- Take the SAPPHIRE CODEX (X).
- Read the incoming message (@).
- Walk down 3x.
Chapter 3: Discovering the Chamber
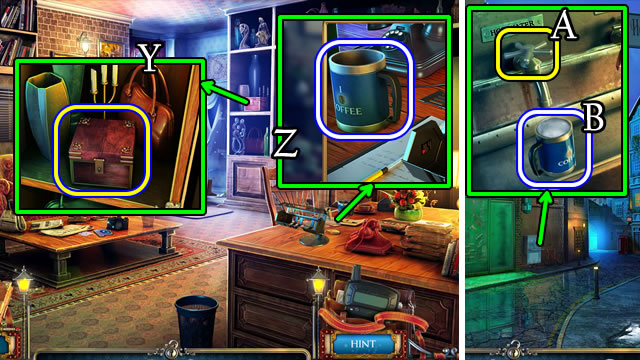
- Open the box (Y); take the FAUCET VALVE.
- Take the COFFEE MUG (Z).
- Walk down.
- Place the FAUCET VALVE (A) and COFFEE MUG. Take the HOT WATER (B).
- Walk left.

- Place the HOT WATER (C).
- Take the PANEL OF BUTTONS (D).
- Take the note (E) and POSTAL BADGE (F).
- Walk down.
- Combine the PANEL OF BUTTONS and TACKS for a PANEL WITH BUTTONS (Inventory).
- Place the PANEL WITH BUTTONS (G); touch the buttons (1-2).
- Take the UTILITY KNIFE (H).
- Walk forward.
- Grab the BOXING GLOVES (I).
- Walk down.
- Use the BOXING GLOVES (J). Take the RIVET GUN.
- Walk left.

- Use the RIVET GUN (K).
- Take the CODED BOX and JASON’S BELONGINGS (L).
- Place JASON’S BELONGINGS. Uncover and take the BOX CHIP (M).
- Place the CODED BOX (N).
- Place the BOX CHIP (O).
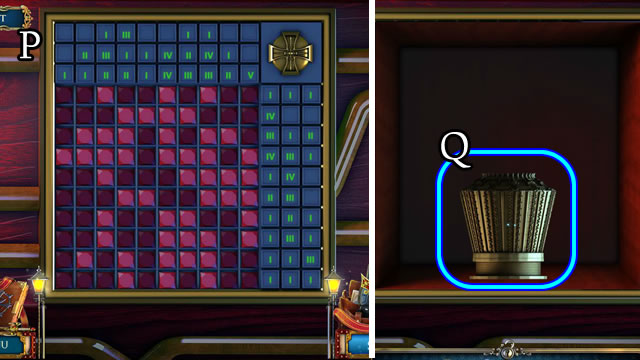
- Solution (P).
- Take the codex part (Q).
- Take the ROLLED MAP (R) and ACCESS CARD (S).
- Walk down and forward.
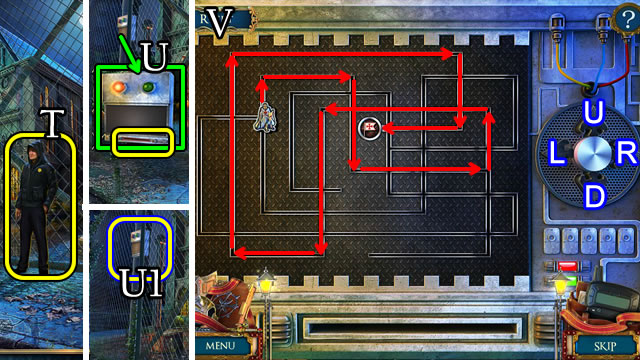
- Give the ACCESS CARD (T); speak to the guard.
- Use the ACCESS CARD (U).
- Select (U1).
- Solution (V): U-R-D-R-U-L-D-L-U-R-D-L.
- Walk forward.
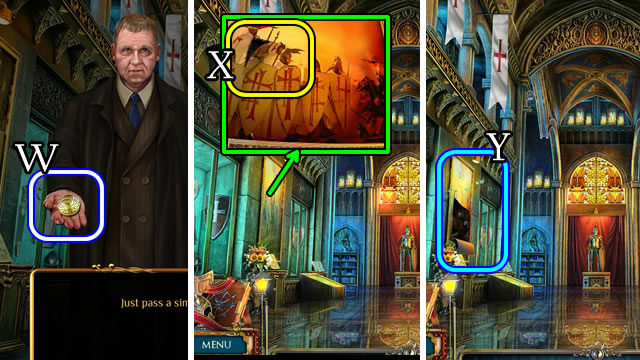
- Speak to the man; take the COINS (W).
- Use the UTILITY KNIFE (X).
- Play the HOP (Y) to receive CANNED MEAT.
- Take the CHAIN CUTTER (A).
- Take the CONTAINER (B).
- Walk down.
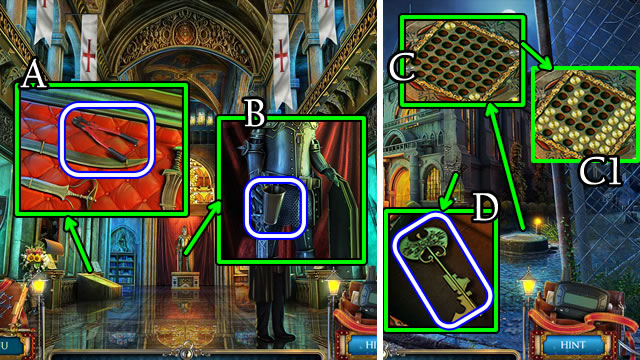
- Place the COINS (C).
- Solution methods vary (C1).
- Take the GOLDEN KEY (D).
- Walk forward.
- Give the GOLDEN KEY (E).
- Place the TEMPLAR SOUVENIR (F).
- Place the CONTAINER (G); receive LIQUID SILVER.
- Take the LADDER (H).
- Uncover and take the CROWBAR (I).
- Walk down 2x.
- Open the crate with the CROWBAR. Take the KNIGHT INSIGNIA and CAN OPENER (J).
- Walk forward.
- Place the KNIGHT INSIGNIA (K). Take the SCARF (L).
- Combine the CANNED MEAT and CAN OPENER to receive MEAT (Inventory).
- Walk down 3x.
- Give the MEAT (M). Use the CHAIN CUTTER (N).
- Return to the Secret Chamber.
- Place the LADDER (O); take the HAMMER (P).
- Use the HAMMER (Q).
- Take the SPIDER MEDALLION and SCREWDRIVER (R).
- Use the SCARF to receive a LIGHTBULB (S).
- Return to Templar Headquarters.
- Use the LIGHTER FLUID (T).
- Place the SPIDER MEDALLION (U).
- Take the GLASS SLIDES (V).
- Use the SCREWDRIVER to take a STENCIL (W).
- Read the incoming message.
- Walk down 2x.
Chapter 4: Creating the Slides
- Take PLANKS 1/5, PLANKS 2/5 (X) and PLANKS 3/5 (Y).
- Place the LIGHTBULB (Z) for a HOP (A). Receive AMMONIA.
- Open and take the RECORD PLAYER PART and PIANO KEYS 1/3 (B).
- Walk forward.
- Take PLANKS 4/5 (C) and the TONGS (D).
- Take PLANKS 5/5 (E).
- Walk left.
- Take the POSTAL BADGE (F).
- Grab the CAR KEY (G).
- Walk down 2x.
- Combine both POSTAL BADGE parts to receive a POSTAL BADGE (Inventory).
- Place the POSTAL BADGE (H).
- Take PIANO KEYS 2/3 (I).
- Uncover and take the note (J).
- Place PLANKS 5/5 (K).
- Return to Templar Headquarters.
- Pour the LIQUID SILVER (1), turn the wheel (2), pull the lever (3) and turn the wheel (4). Use the TONGS to receive a SILVER ROSE.
- Return to the Living Room.
- Place the SILVER ROSE (L). Take the BURNER KNOB.
- Walk left.
- Combine the GLASS SLIDES and AMMONIA to receive TREATED SLIDES (Inventory).
- Place the BURNER KNOB (M). Place the TREATED SLIDES (N). Use the TONGS to receive IMAGE SLIDES.
- Take PIANO KEY 3/3 (O). Uncover and take the VINYL RECORD (P).
- Return to the Chamber Entrance.
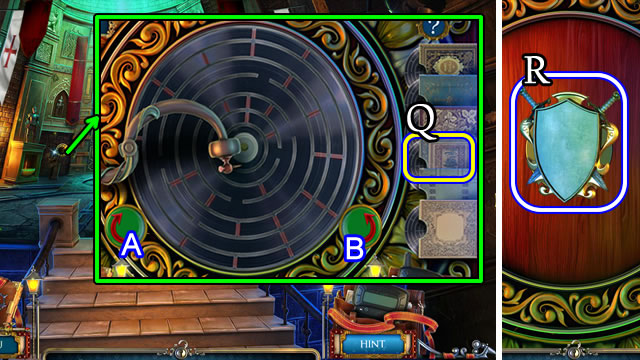
- Place the RECORD PLAYER PART and VINYL RECORD. Select a record (Q).
- Solution. Ax17-Bx6.
- Take the MYSTERIOUS KEY (R).
- Return to the Living Room.
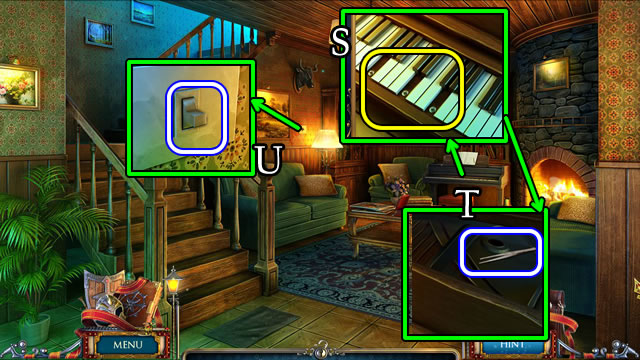
- Place PIANO KEYS 3/3 (S); take the TWEEZERS (T).
- Use the TWEEZERS to receive a LIGHT SWITCH (U).
- Walk left.
- Place the ROLLED MAP and LIGHT SWITCH (V).
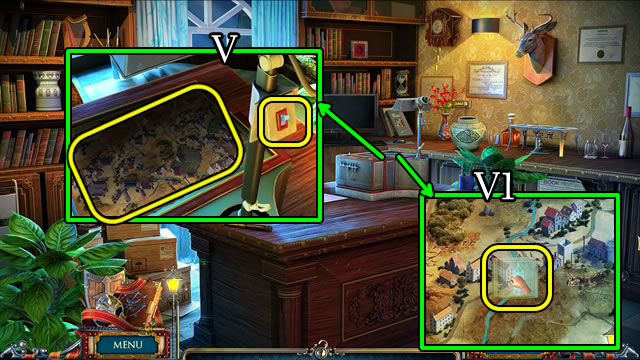
- Place the IMAGE SLIDES (V1).
- Solution (W). A-1, B-2, C-3, D-4.
- Read the incoming message.
- Walk down.
Chapter 5: Finding the Arms
- Use the CAR KEY (X) to play a HOP (Y). Receive CHARCOAL.
- Select the book (Z); place the STENCIL and rotate 7x (A). Use the CHARCOAL; take the DIARY PAGE.
- Grab the GLASS CLEANER and TROWEL (B).
- Uncover and take the FILE and LEVER (C).
- Use the FILE (D).
- Walk forward.
- Take the METAL DETECTOR (E).
- Walk forward.
- Place the METAL DETECTOR (F).
- Solution (G).
- Take the LEAF KEY (H).
- Walk forward.
- Use the LEAF KEY (I), take the SCREEN (J) and read the note (K).
- Use the GLASS CLEANER (L) and place the SCREEN.
- Use the TROWEL (M) to uncover a puzzle.
- Solution (N). 1-I, 2-D, 3-G, 4-B, 5-C, 6-A, 7-F, 8-H, 9-E.
- Take the note and REGINALD’S ARM (O).
- Place the LEVER (P) to play the HOP (Q). Receive an AMULET.
- Place the AMULET (R).
- Walk forward.
- Walk right.
- Take the SEPARATOR TOOL (S).
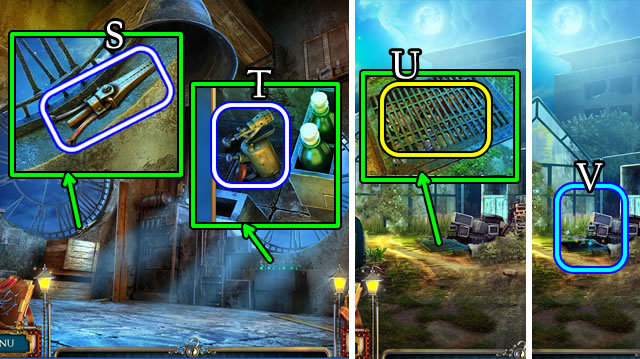
- Take the BLOWTORCH (T).
- Walk down.
- Use the BLOWTORCH (U) for a HOP (V). Receive SHEARS.
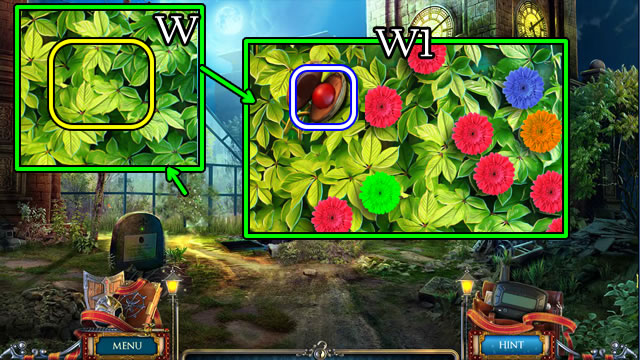
- Use the SHEARS (W) for a puzzle.
- Flower positions are random.
- Take the RUBY (W1).
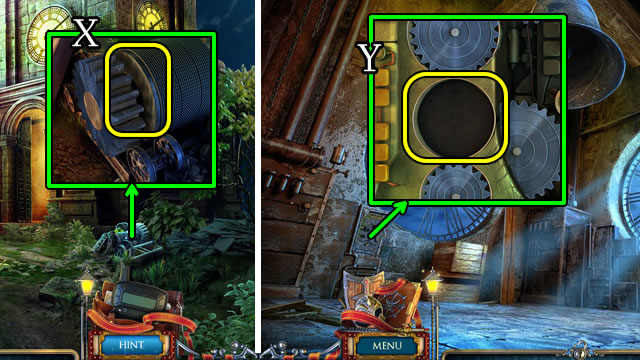
- Use the SEPARATOR TOOL (X); take the GEAR.
- Walk forward.
- Place the GEAR (Y).
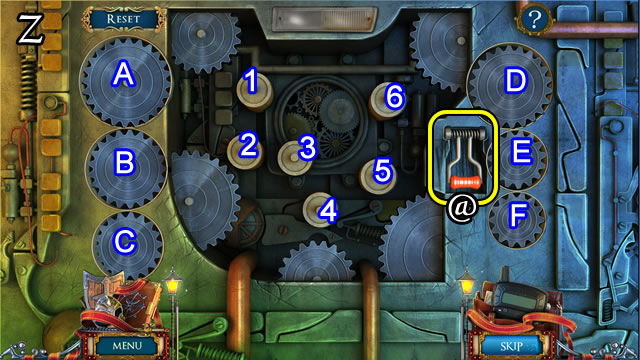
- Solution (Z). 1-D, 2-F, 3-E, 4-C, 5-B, 6-A.
- Lift the handle (@).
- Take the GLASS CUTTER (A).
- Walk down.
- Use the GLASS CUTTER (B).
- Walk left.
- Take the BOTTLES (C).
- Walk down and right.
- Place the BOTTLES (D). Take the BIRDSEED (E).
- Walk down and left.
- Use the UTILITY KNIFE; take the GOLDEN BIRD (F).
- Place the GOLDEN BIRD (G). Give the BIRDSEED; take the MARBLE EGG (H).
- Walk down.
- Place the MARBLE EGG (I). Take the INSIGNIA (J).
- Walk left.
- Place the INSIGNIA (K). Take the KNIGHT EMBLEM (L).
- Walk down and right.
- Place the KNIGHT EMBLEM (M) to open a puzzle.
- Solution (N). C-B-C-B-C-B-F-D-A-E-F-B-D-A-B-F-E.
- Take the note and ARMAND’S ARM (O).
- Read the incoming message.
- Walk down.
- Take the OILCAN (P).
- Place the DIARY PAGE (Q).
- Solution (R). Ax6-Bx7-Cx6-Dx7.
- Walk forward.
- Use the OILCAN (S); take the VACUUM CLEANER (T).
- Walk down.
- Use the VACUUM CLEANER to take the CROSS MEDALLION (U).
- Walk forward.
- Use the UTILITY KNIFE; take the HEX KEY (V).
- Use the HEX KEY (W).
- Place the CROSS MEDALLION (X). Take the SWORD KEY (Y).
- Use the SWORD KEY (Z).
- Walk forward.
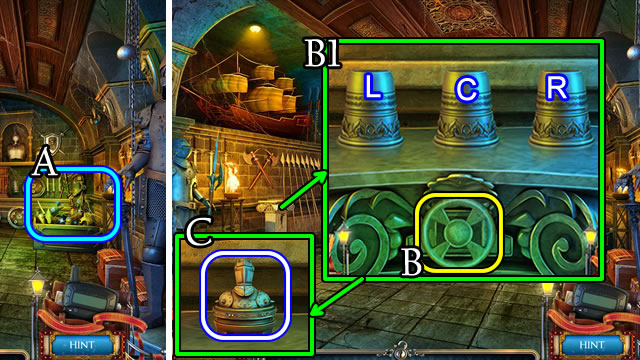
- Play the HOP (A); receive a MARBLE WHEEL.
- Place the MARBLE WHEEL (B) for a puzzle.
- Solution (B1). L-R-L.
- Take the KNIGHT FIGURINE (C).
- Walk down 2x.
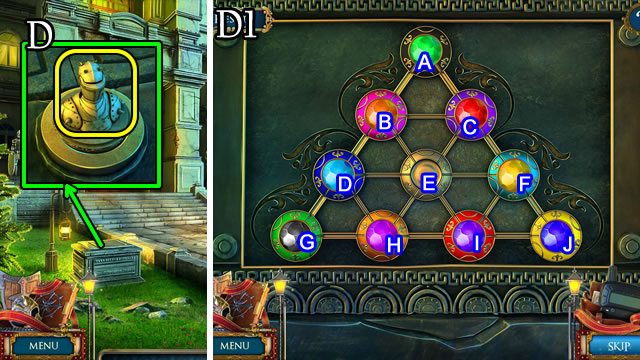
- Place the KNIGHT FIGURINE (D).
- Solution (D1). F-C-E-D-H-I-J-F-C-E-I-J-F-C-B-D-G-H-E-C-A-B-E-C-B-D-G-H-E-C-A-B-D-G-H-E-C-B-E.
- Take the SHIELD.
- Walk forward 2x.
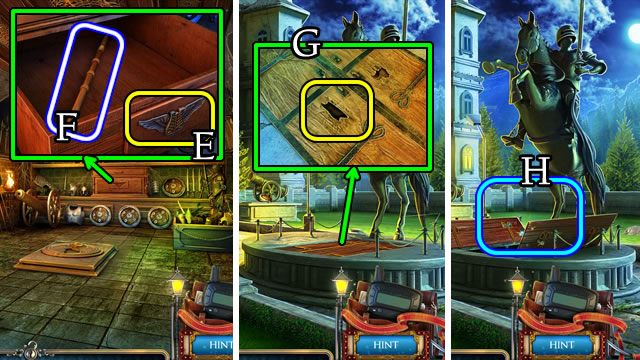
- Place the SHIELD (E); take the HOOK (F).
- Walk down 2x.
- Use the HOOK (G).
- Play the HOP (H) to receive a FLAME AMULET.
- Walk forward 2x.
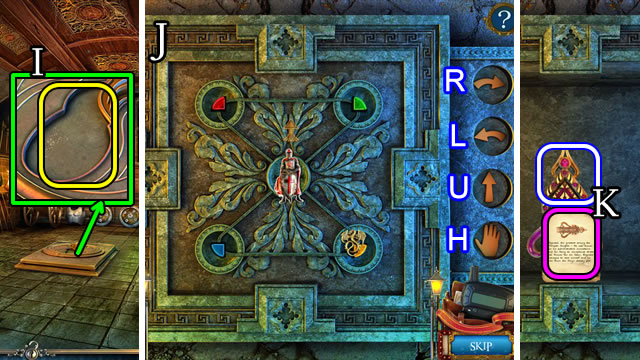
- Place the FLAME AMULET (I) for a puzzle.
- Solution (J). Lx3-U-H-Lx3-U-Lx3-U-H-Lx2-U-Lx3-U-H-Lx3-U-H-U-H-Rx3-U-Rx3-U-H-U-Lx3-U-Lx3-Ux2-Rx3-U-H-Rx3-U-H.
- Take the note and XAVIER’S ARM (K).
- Read the incoming message.
- Walk down 2x.
- Speak to the man.
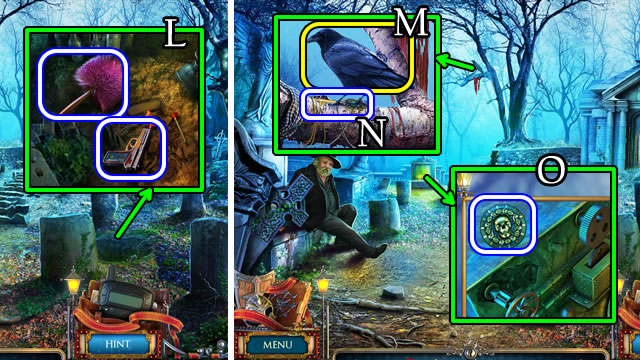
- Uncover and take the DUSTER and TOY GUN (L).
- Use the TOY GUN (M); take the KEY (N).
- Grab the SKULL AMULET (O).
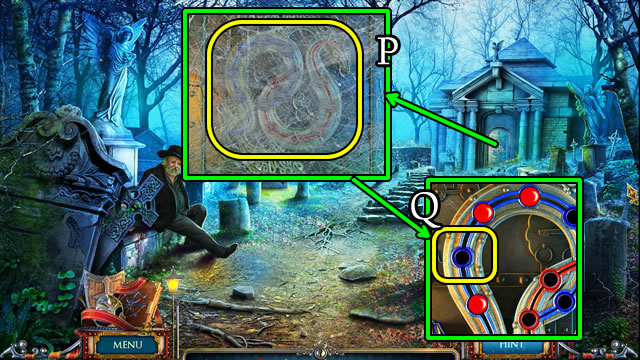
- Use the DUSTER (P).
- Place the RUBY (Q).
- Solution. R1-R2-R3-R4-R5-R6-R7.
- Use the KEY (S).
- Walk right.
- Place the SKULL AMULET (T).
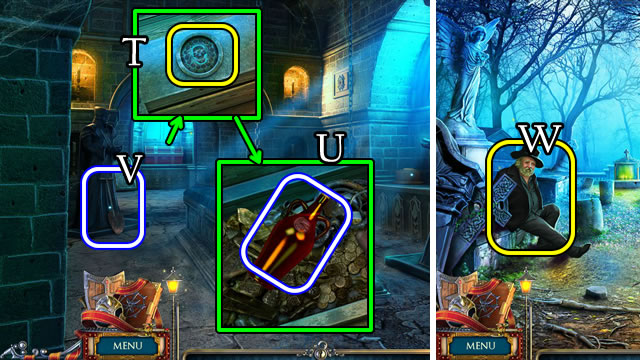
- Uncover and take the BOTTLE OF WINE (U).
- Grab the SHOVEL (V).
- Walk down.
- Give the BOTTLE OF WINE (W).
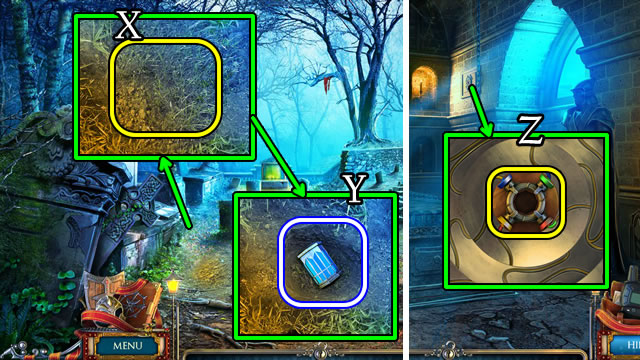
- Use the SHOVEL (X).
- Take the POWER SOURCE (Y).
- Walk right.
- Place the POWER SOURCE (Z).
- Solution (A1). Ax6-Bx5-Cx6.
- Take the TOMB KEY (B).
- Place the TOMB KEY (C).
- Play the HOP (D); receive a HANDLE.
- Place the HANDLE (E); take the CHAIN (F).
- Walk down.
- Place the CHAIN (G). Climb down.
- Take the BONE SAW (H).
- Use the BONE SAW; take the CYLINDRICAL KEY (I).
- Grab the SLEDGEHAMMER (J).
- Use the SLEDGEHAMMER (K); take the TEMPLAR TALISMAN (L).
- Use the CYLINDRICAL KEY (M).
- Solution (N1). J-N, B-F, K-N, M-N, I-N, C-D, E-F.
- Take the ADJUSTABLE WRENCH (O).
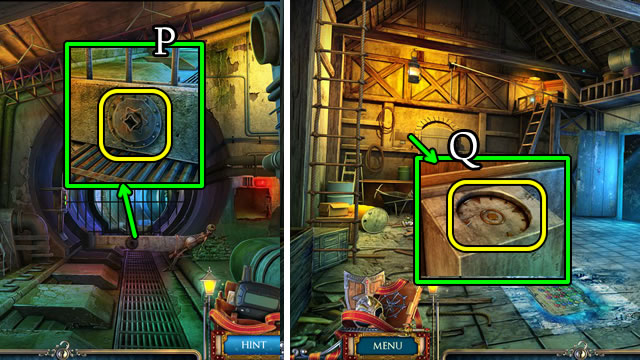
- Use the ADJUSTABLE WRENCH (P).
- Walk forward.
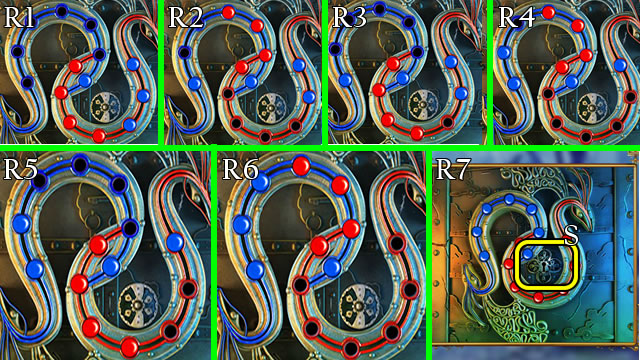
- Place the TEMPLAR TALISMAN (Q) for a puzzle.
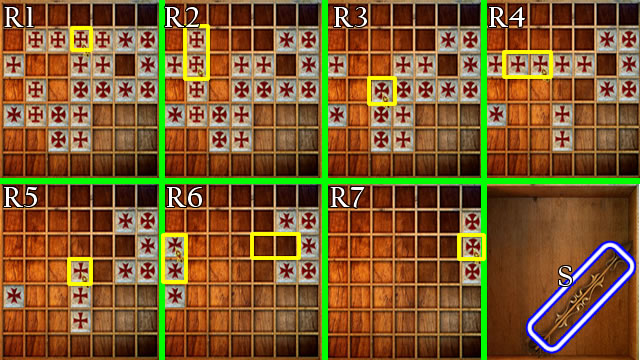
- Solution. R1-R2-R3-R4-R5-R6-R7.
- Take the GOLDEN ARROW (S).
- Walk down the stairs.
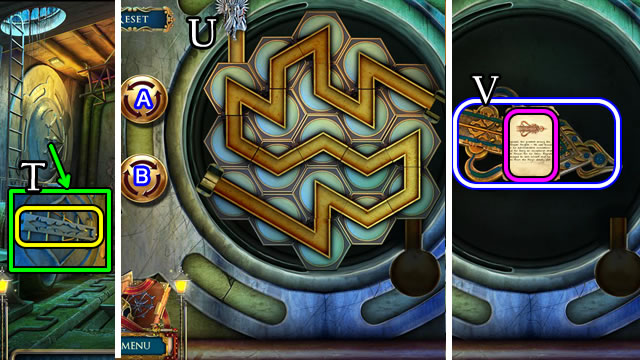
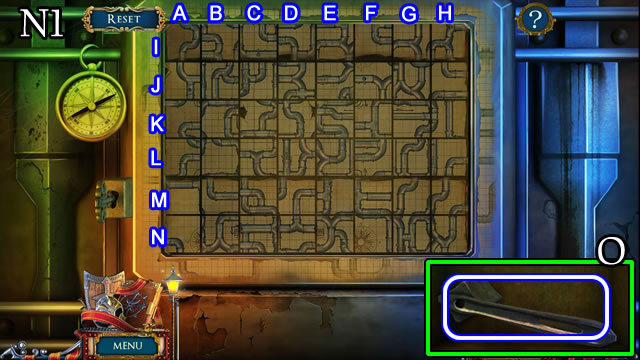
- Place the GOLDEN ARROW (T).
- Solution. Arrange the pipes (U). Rotate Ax2-Bx2-Ax3-Bx3-Ax2-Bx4-A-B-Ax4-Bx2-Ax2.
- Take the note and PHILIP’S ARM (V).
- Read the incoming message.
- Climb the ladder.
- Place PHILIP’S ARM, XAVIER’S ARM, ARMAND’S ARM and REGINALD’S ARM (W).
- Solution (X).
- Speak to Alfred (Y) to receive the SPECIAL KEY SYMBOL.
- Walk down 4x.
- Combine the MYSTERIOUS KEY and SPECIAL KEY SYMBOL for a SPECIAL KEY (Inventory).
- Place the SPECIAL KEY (Z). Take the TEMPLAR TALISMAN (A).
- Return to the Chamber Entrance.
- Place the TEMPLAR TALISMAN (B).
- Congratulations! You have completed playing Mystery Crusaders: Resurgence of the Templars.


 Fierce Tales: Feline Sight Walkthrough, Guide, & Tips
 Creepy Tales: Lost in Vasel Land Walkthrough, Guide, & Tips
 The Keepers: Lost Progeny Walkthrough, Guide, & Tips
 Sarah Maribu and the Lost World Walkthrough, Guide, & Tips
 Grim Legends: The Forsaken Bride Walkthrough, Guide, & Tips