Off the Record: The Final Interview Walkthrough, Guide, & Tips
Off the Record: The Final Interview Walkthrough

Welcome to the Off the Record: The Final Interview Walkthrough
A man is dying, and you’re the prime suspect!
Whether you use this document as a reference when things get difficult or as a road map to get you from beginning to end, we’re pretty sure you’ll find what you’re looking for here.
This document contains a complete Off the Record: The Final Interview game walkthrough featuring annotated screenshots from actual gameplay!
We hope you find this information useful as you play your way through the game. Use the walkthrough menu below to quickly jump to whatever stage of the game you need help with.
Remember to visit the Big Fish Games Forums if you find you need more help. Have fun!
This walkthrough was created by Anita Cule, and is protected under US Copyright laws. Any unauthorized use, including re-publication in whole or in part, without permission, is strictly prohibited.
General Tips
- This is the official guide for Off the Record: The Final Interview.
- This guide will not mention when you have to zoom into a location; screenshots will show each zoom scene.
- The screenshots will show where to play a Hidden-Object Puzzle (HOP) and what inventory item will be received.
- Some inventory items require further actions.
- This guide will give step-by-step solutions for all puzzles which are not random. Read the instructions in the game for each puzzle.
Chapter 1: The Hotel

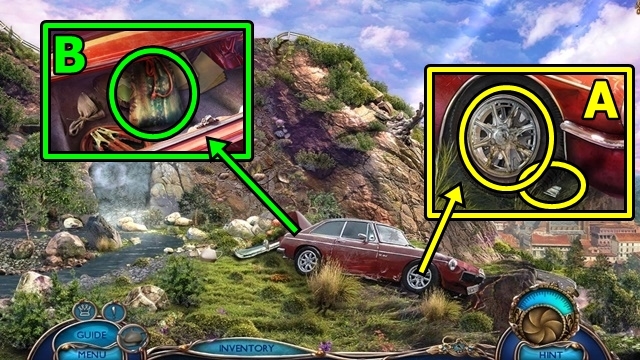
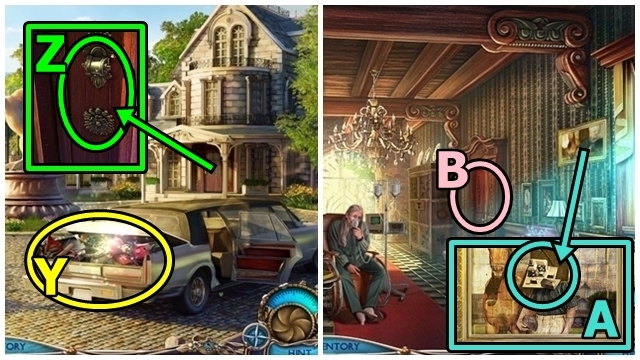
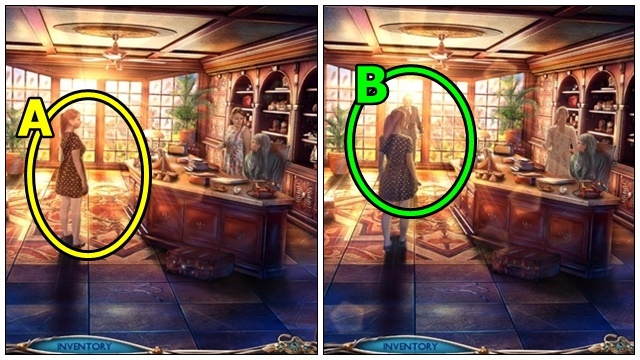
- Remove the tire (A). Take the METAL PIECE.
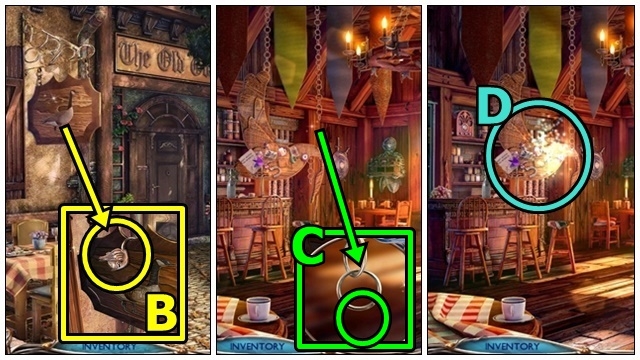
- Take the BAG (B).
- Open the BAG (inventory); read the folder. Move the photographs; take the HORSE FIGURINE. You receive the EMPTY BAG.
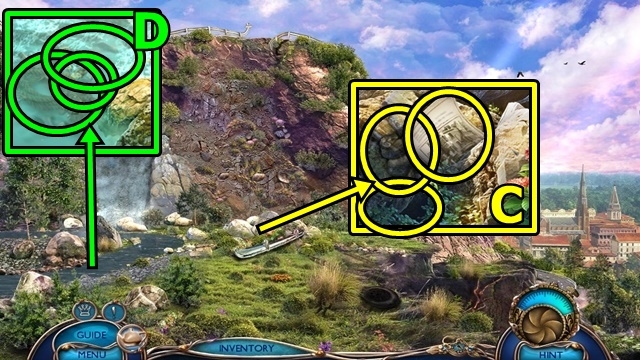
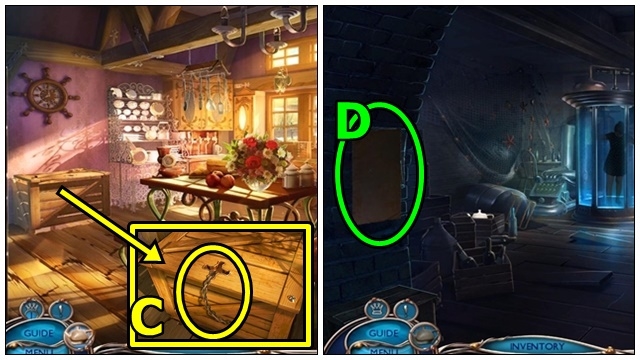
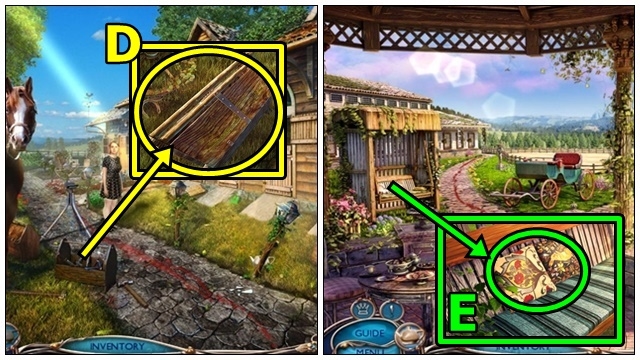
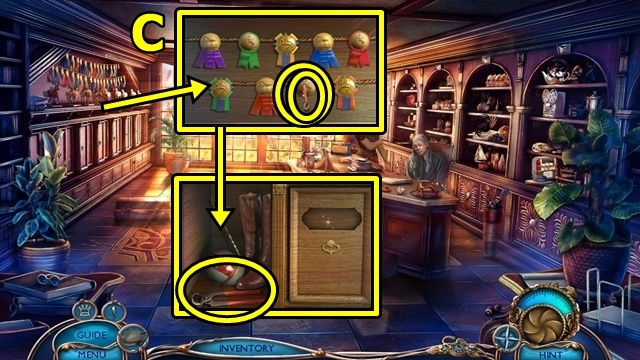
- Take the HOTEL PAMPHLET (C). Use the METAL PIECE. Place the EMPTY BAG; add the rocks; take the BAG WITH ROCKS.
- Place the BAG WITH ROCKS (D). Move the rocks; take the GRAPPLING HOOK.
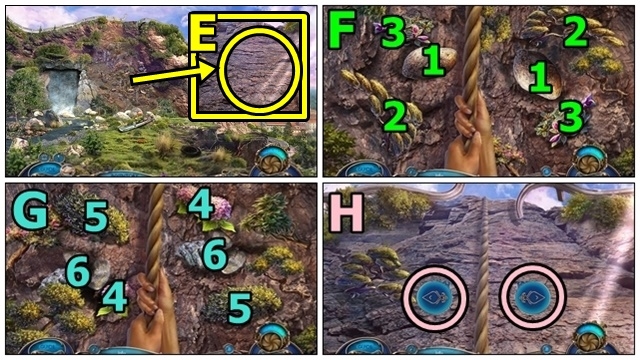
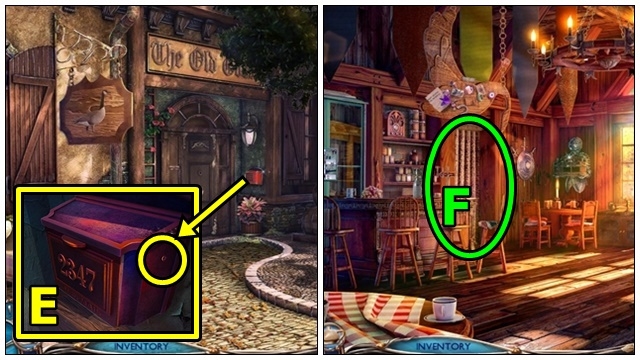
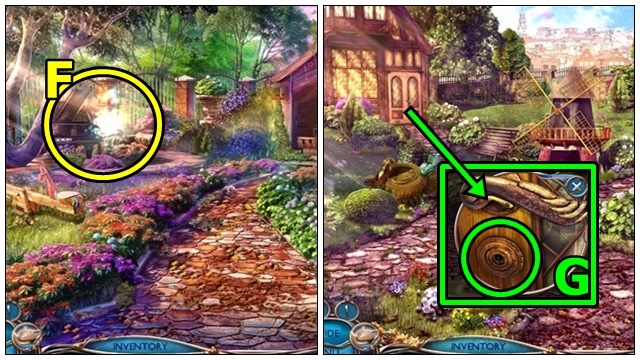
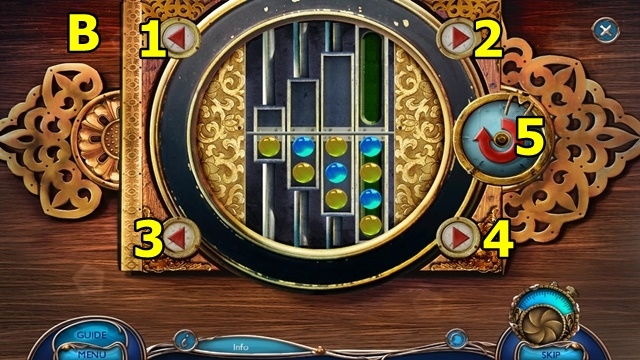
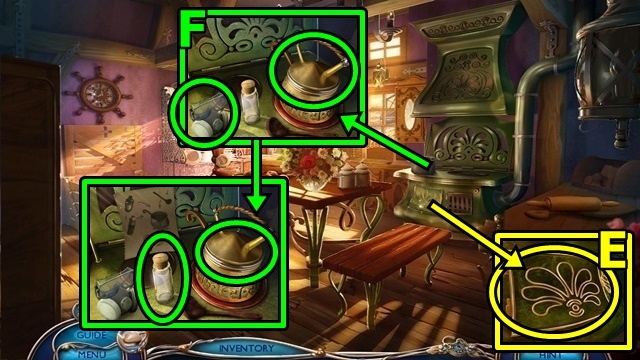
- Add the GRAPPLING HOOK (E). Play the mini-game.
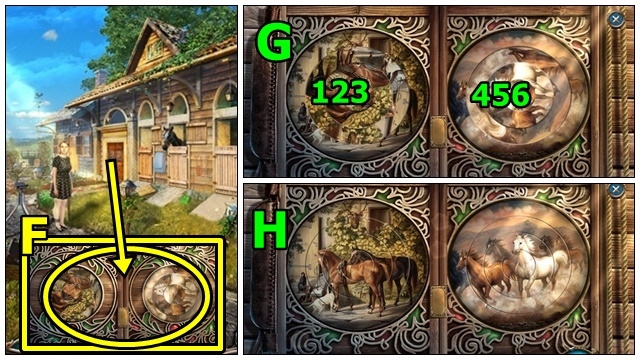
- Solution: Find the matches (F-G), then use the arrows (H).
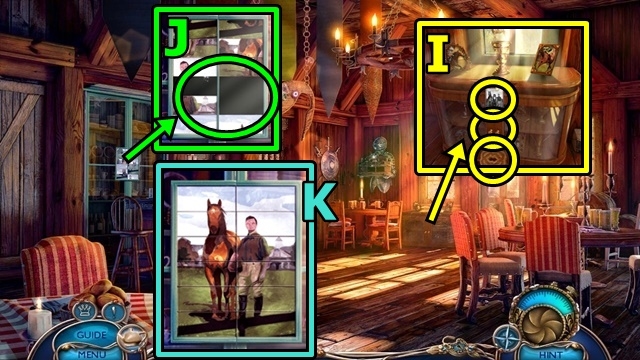
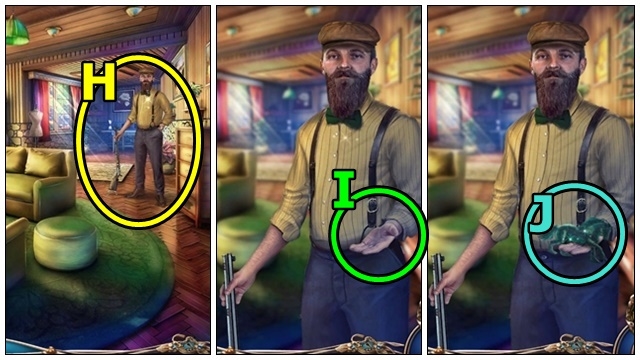
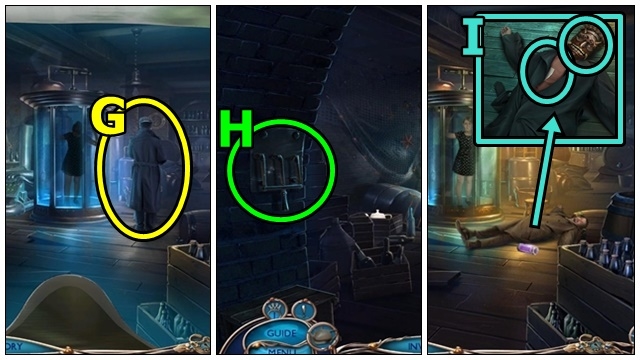
- Go with the Inspector (I).
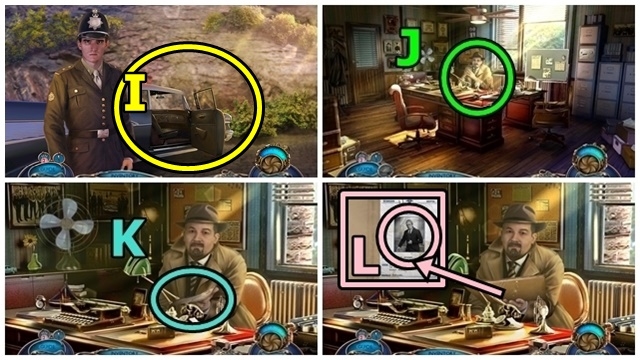
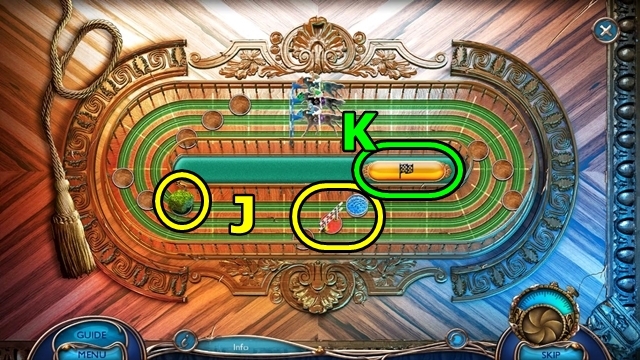
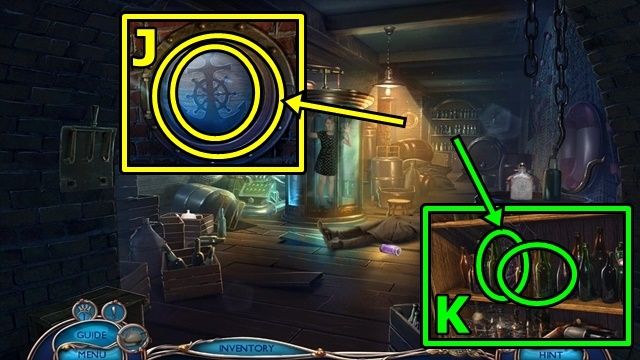
- Talk to the Chief (J).
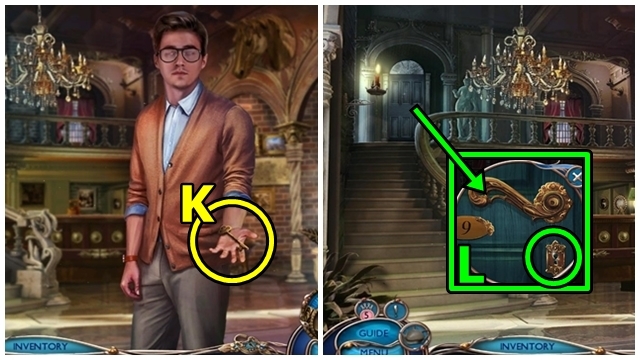
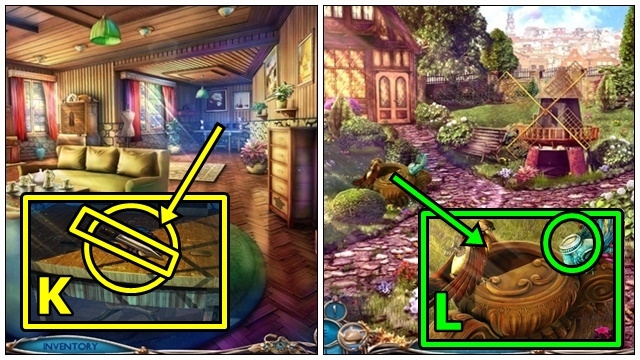
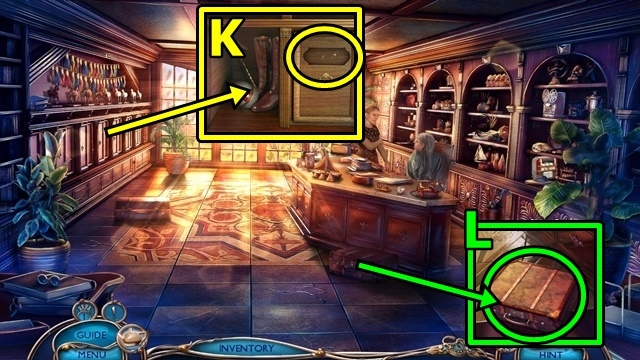
- Give your fingerprints (K).
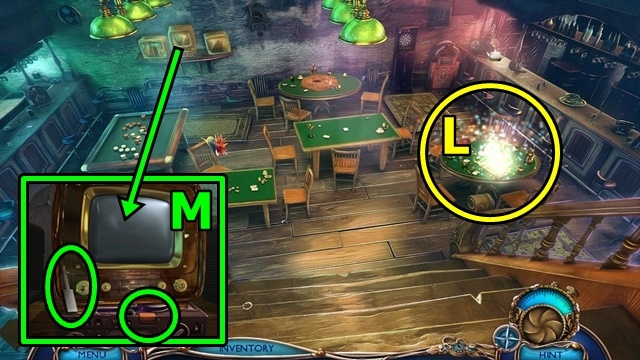
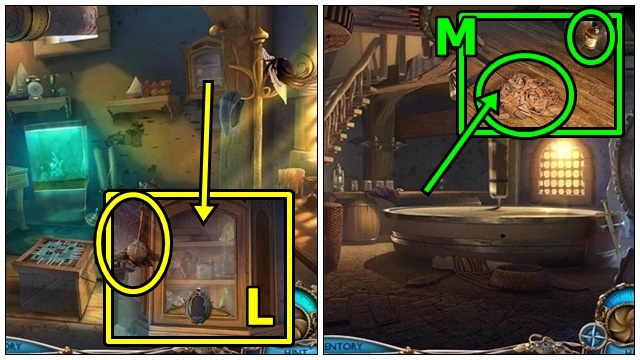
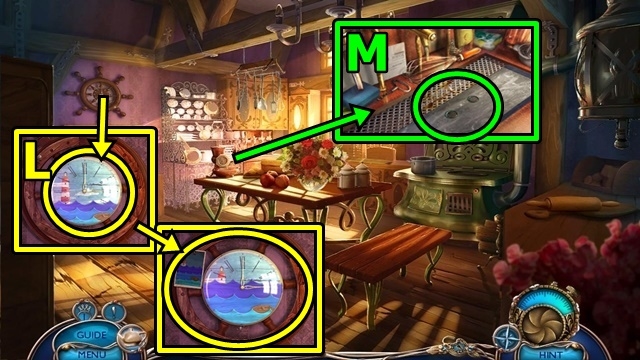
- Read the file (L), examine the picture.
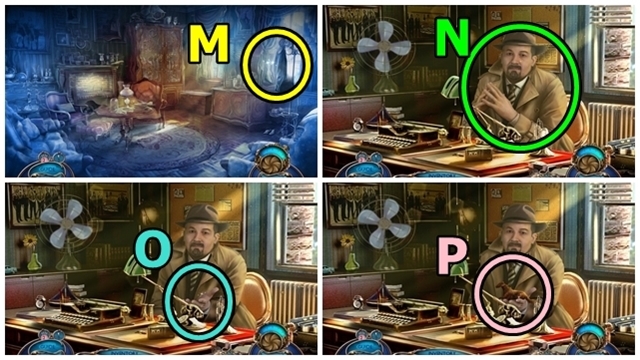
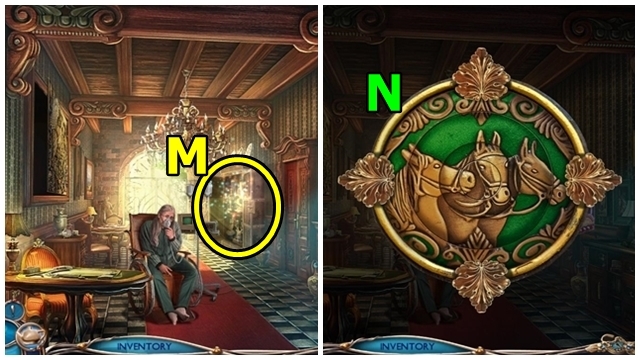
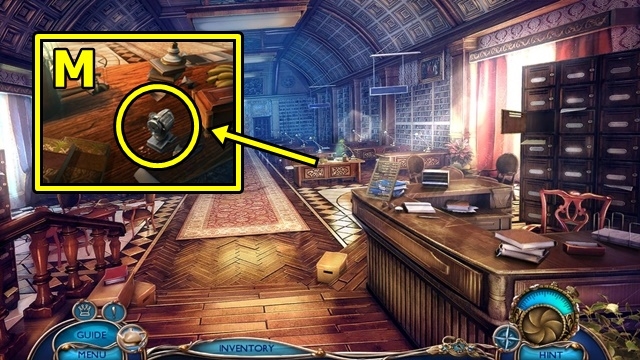
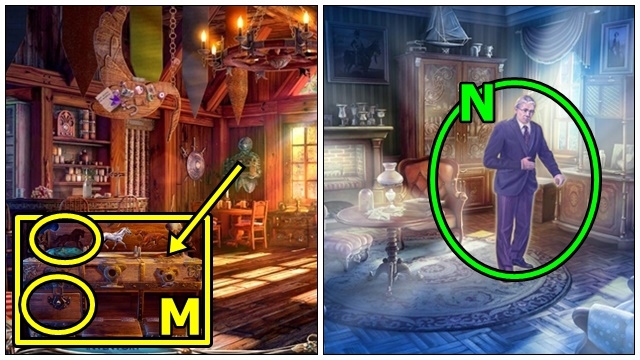
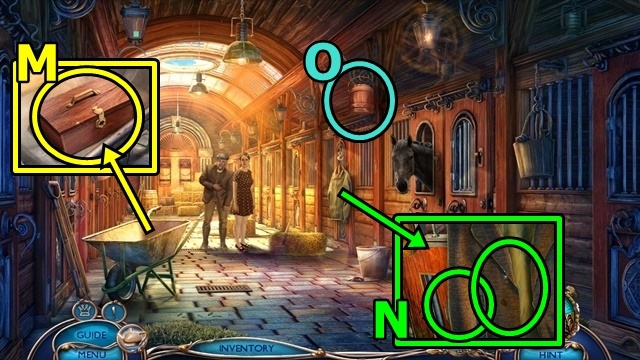
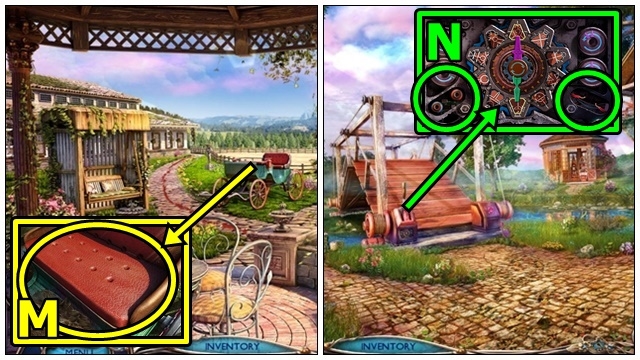
- Examine (M). Examine anywhere to move through the memory.
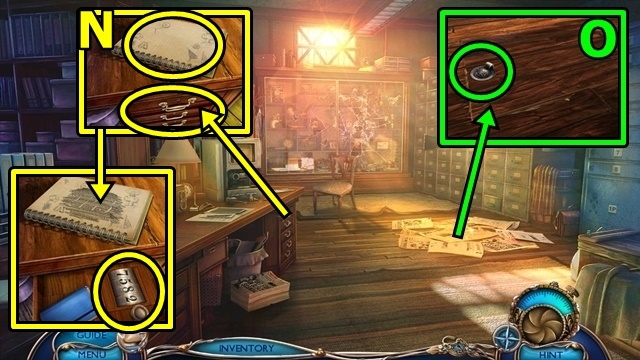
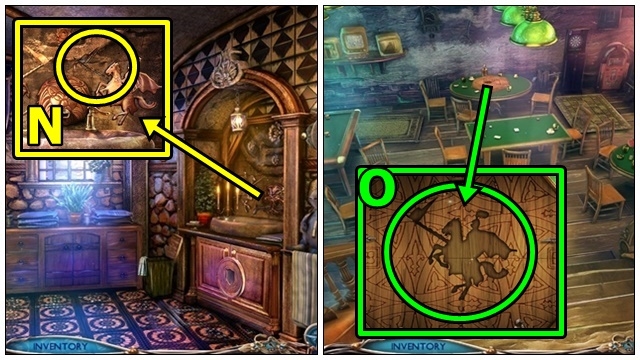
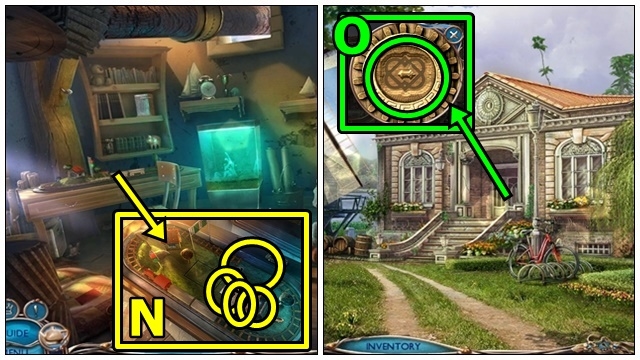
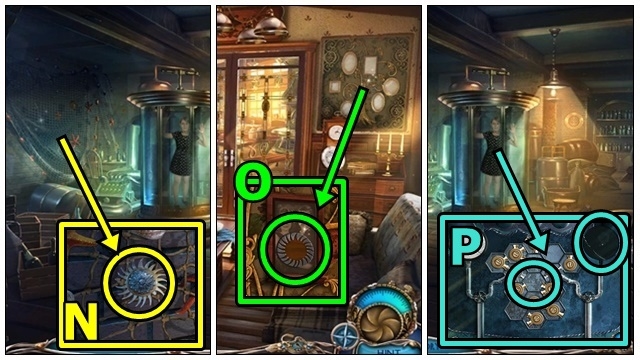
- Talk to the Chief (N).
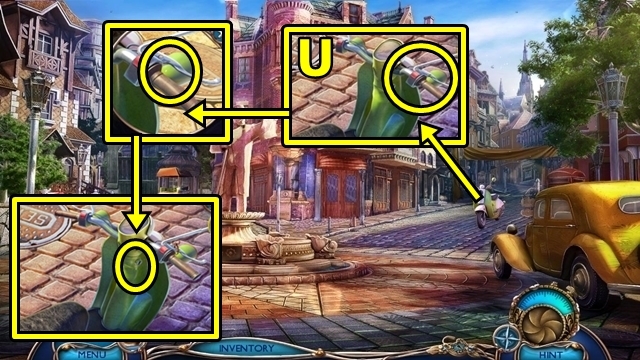
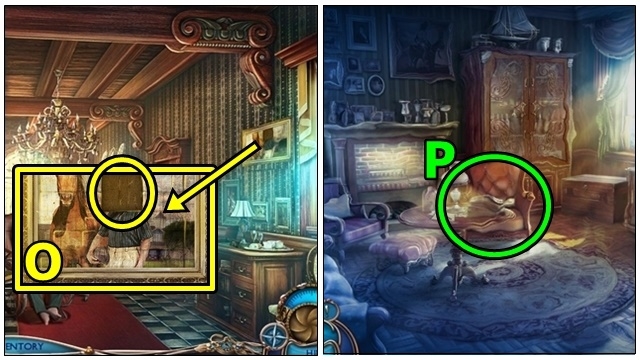
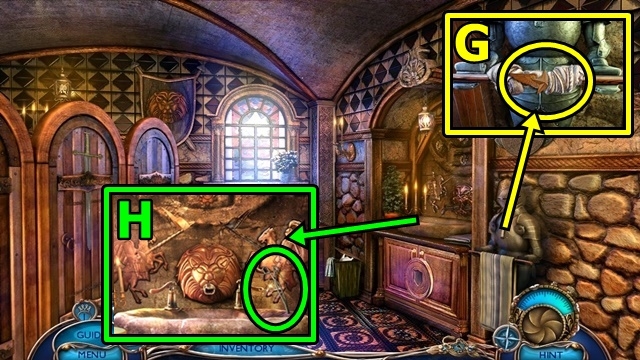
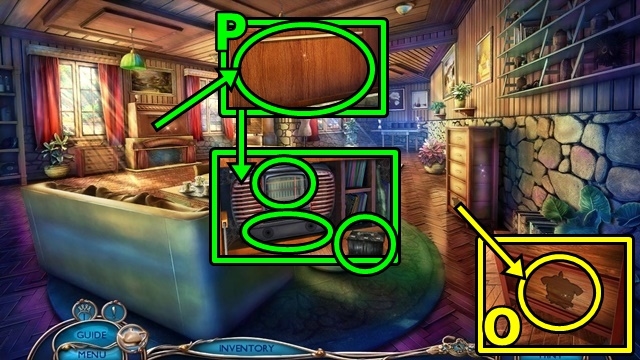
- Offer the HORSE FIGURINE (O).
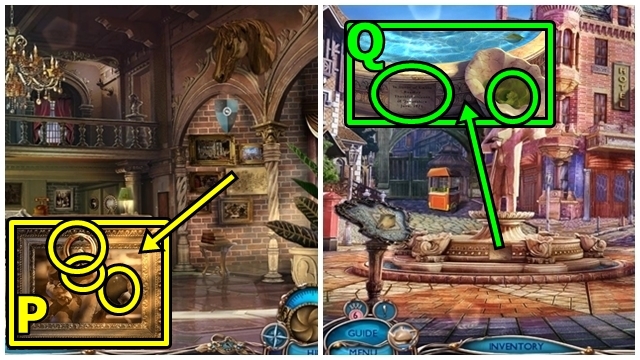
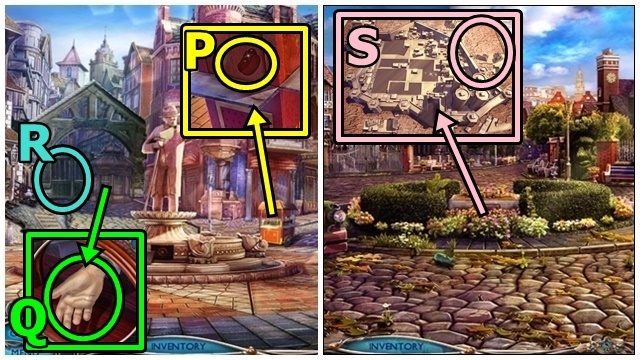
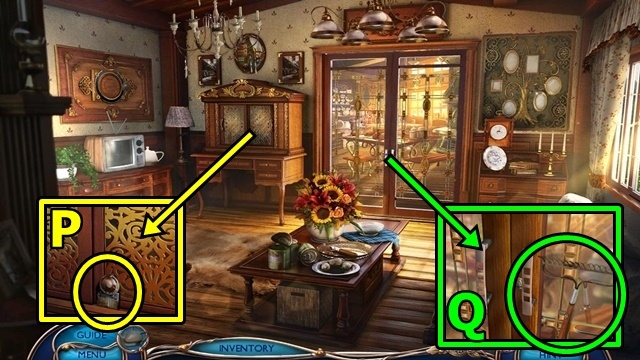
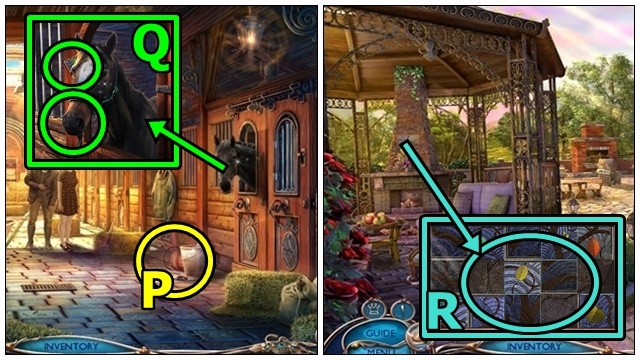
- Take the HORSE FIGURINE (P), then offer the HOTEL PAMPHLET.
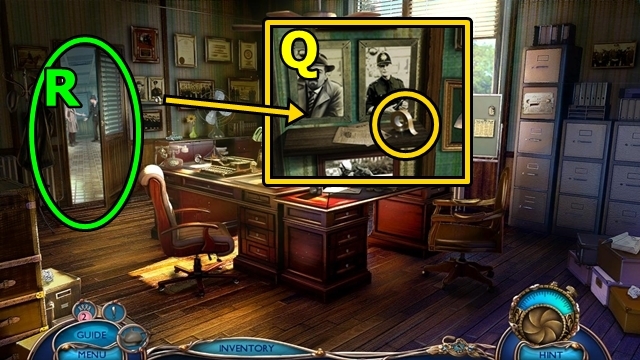
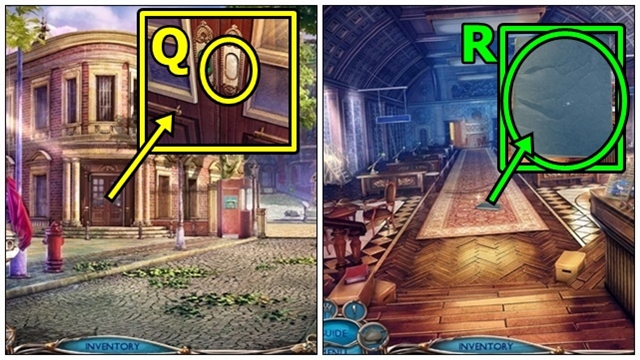
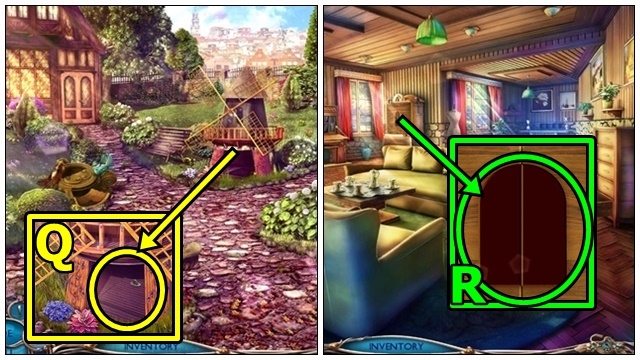
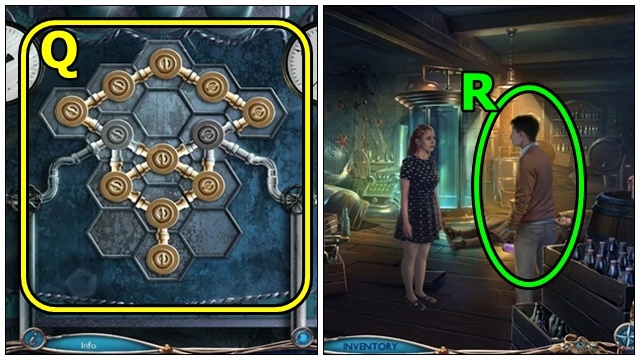
- Take the ADHESIVE TAPE (Q).
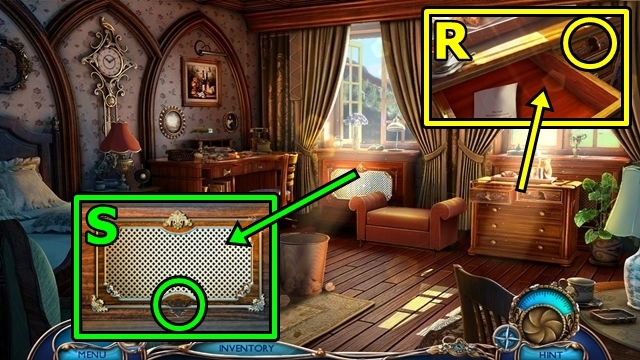
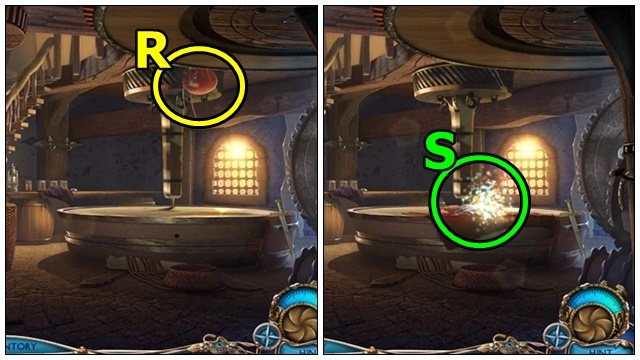
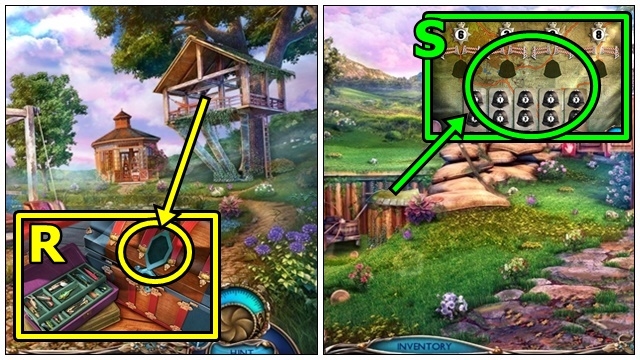
- Exit (R).
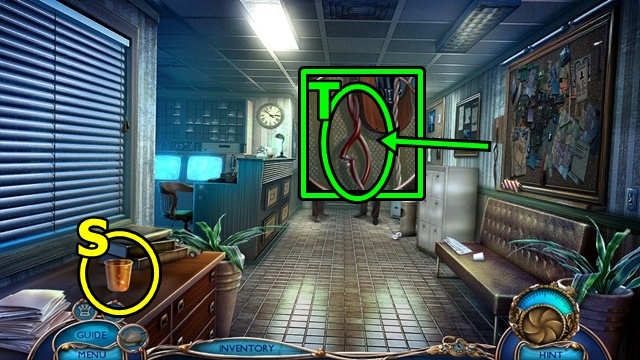
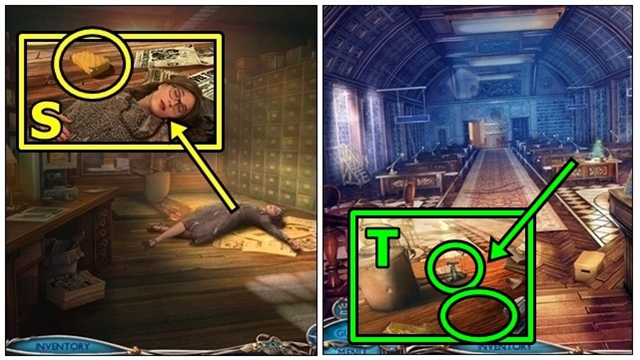
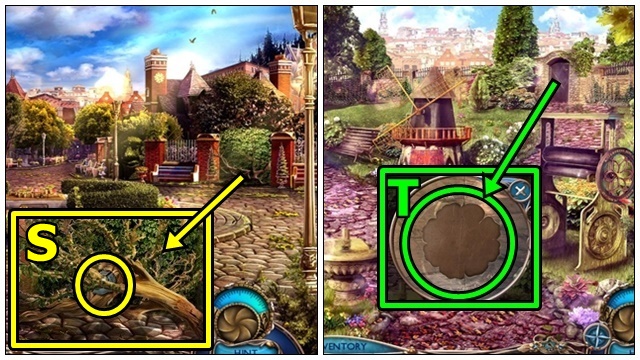
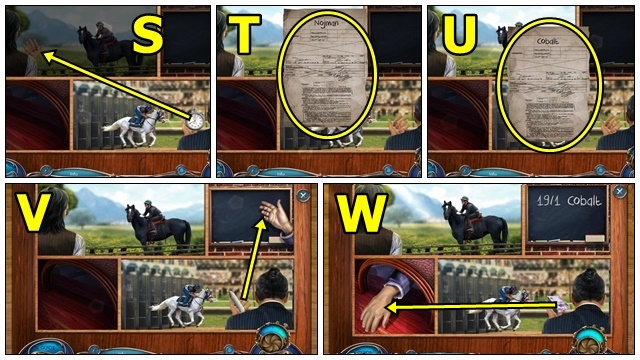
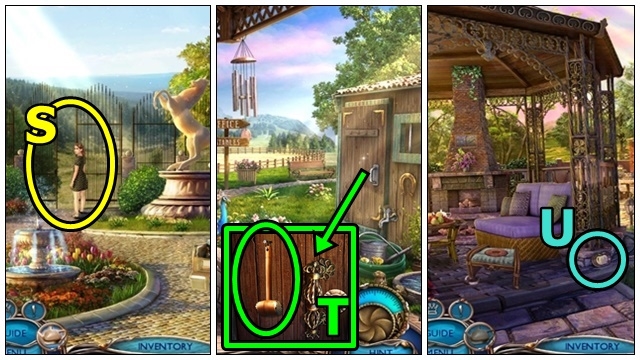
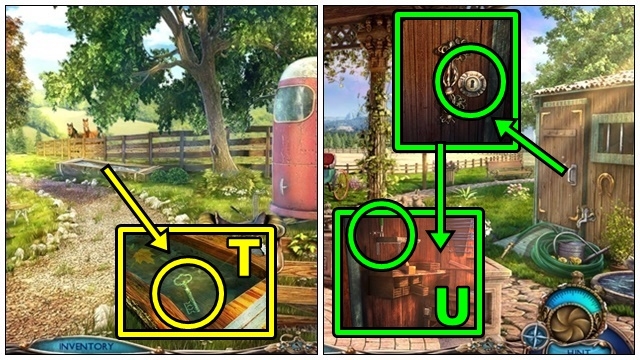
- Take the CUP (S).
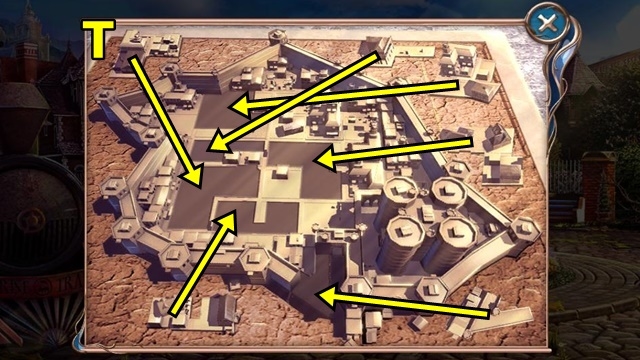
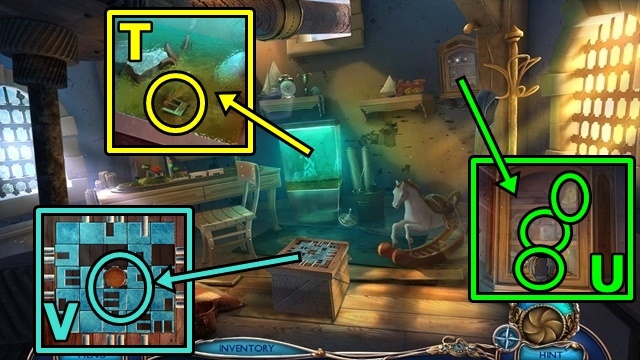
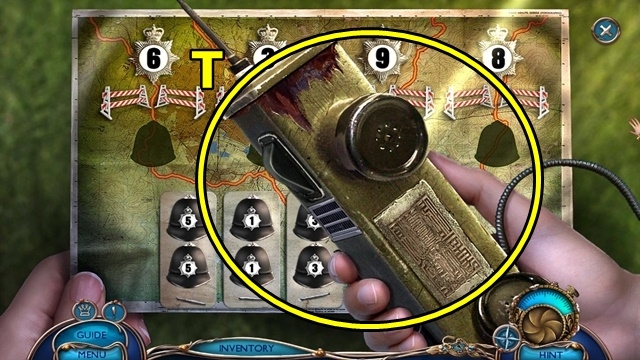
- Use the ADHESIVE TAPE (T).
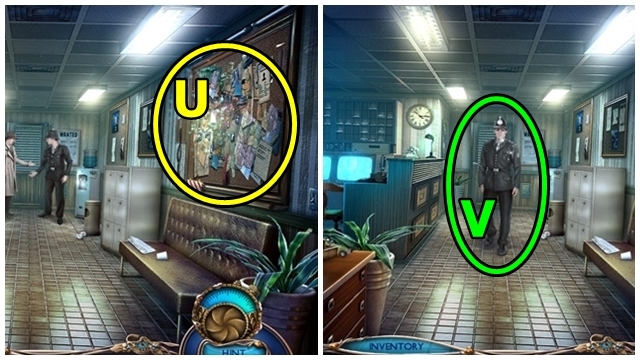
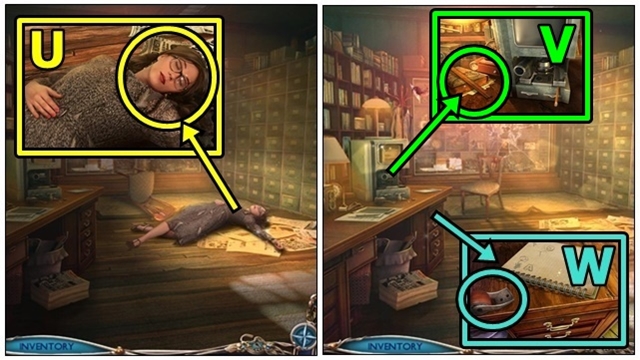
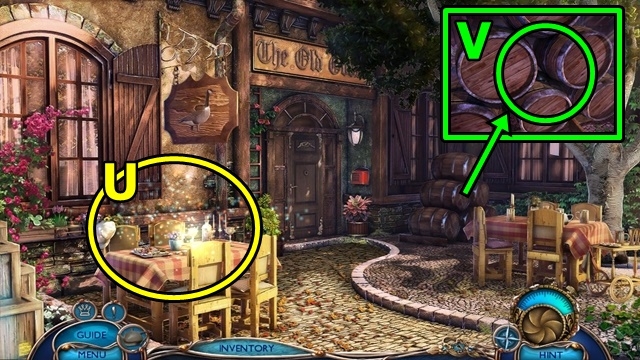
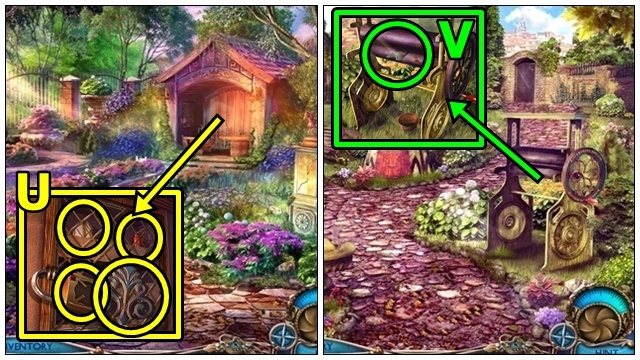
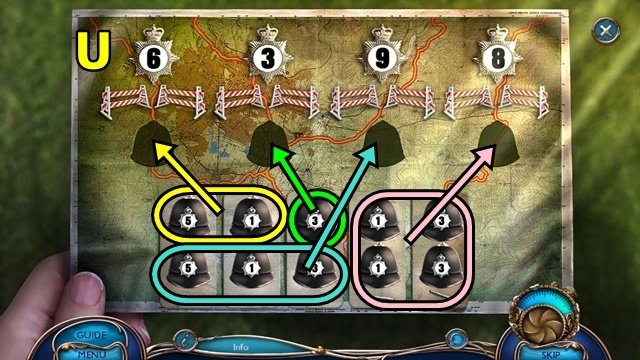
- Play the HOP (U); receive the TRAFFIC ITEM (1/3).
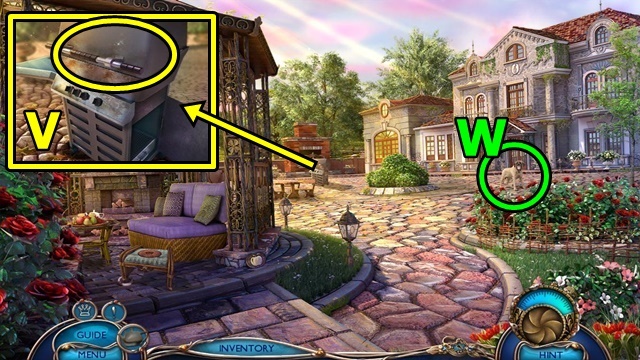
- Talk to the Inspector (V).
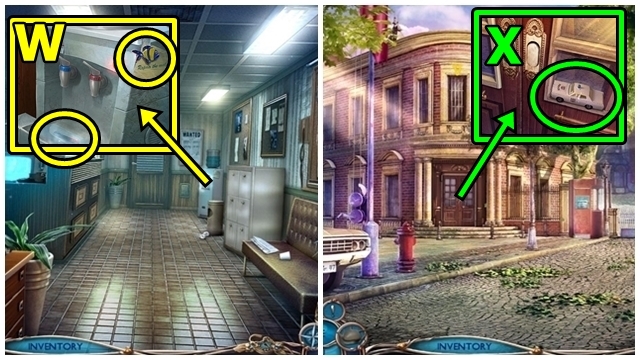
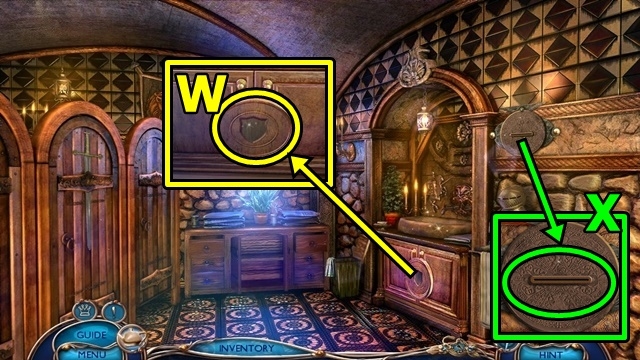
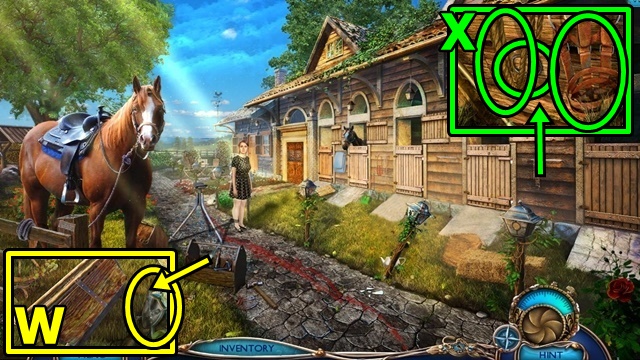
- Take the MAGNET (W). Use the CUP; take the TRAFFIC ITEMS (2/3).
- Move forward.
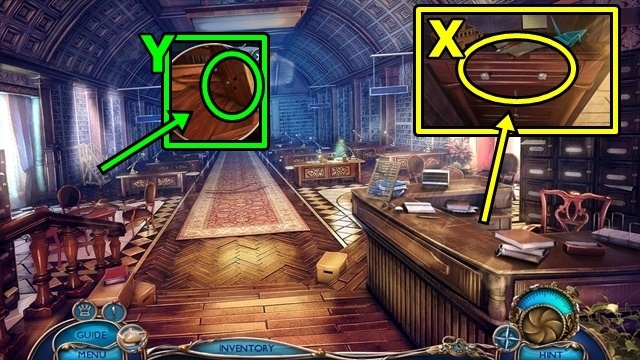
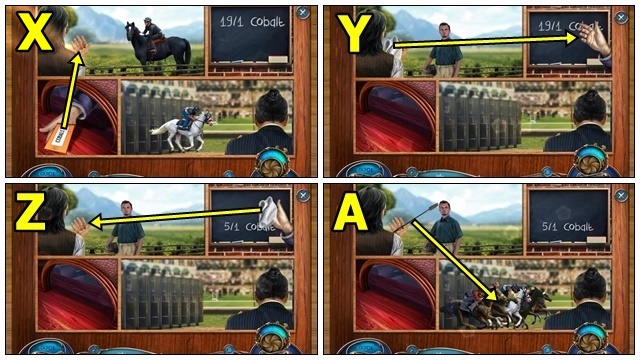
- Take the TRAFFIC ITEMS (3/3) (X).
- Return to the Chief’s Office.

- Add the three TRAFFIC ITEMS (Y). Take the POLICEMAN EMBLEM and PEN.
- Move forward twice.
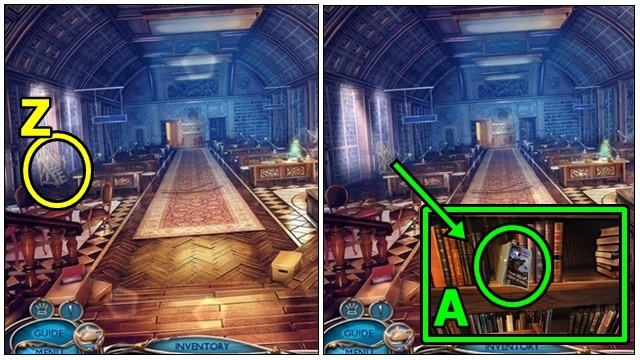
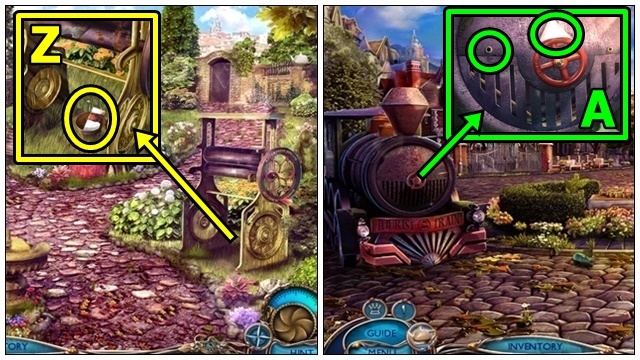
- Use the PEN (Z). Remove the cap, bend the clip, insert the cap, receive the POLICEMAN-EMBLEM PIECE. Take the SNAP HOOK.
- Move down.
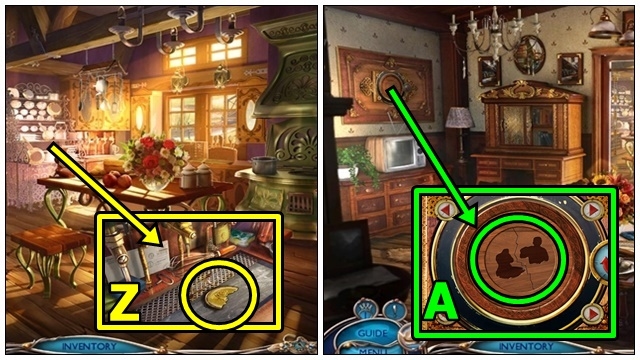
- Insert the POLICEMAN-EMBLEM PIECE into the POLICEMAN EMBLEM (inventory); use the ADHESIVE TAPE. Receive the POLICEMAN EMBLEM.
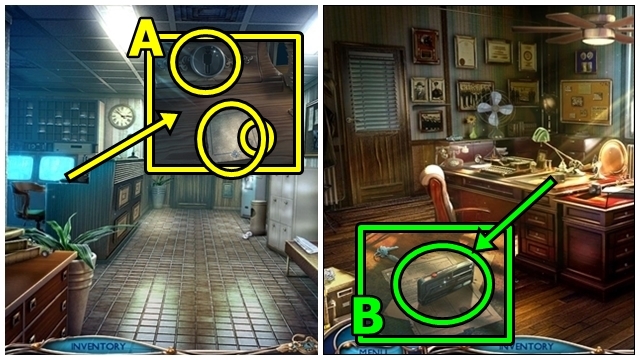
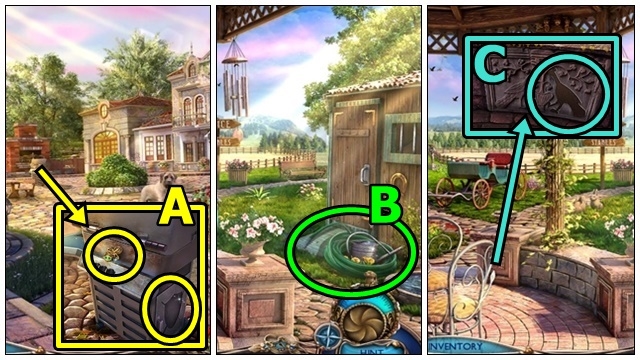
- Read the note (A); take the BATTERIES. Insert the POLICEMAN EMBLEM; take the CASSETTE.
- Move down.
- Insert the BATTERIES (B) and the CASSETTE. Press Play, then take the GATE CODE.
- Move forward twice.
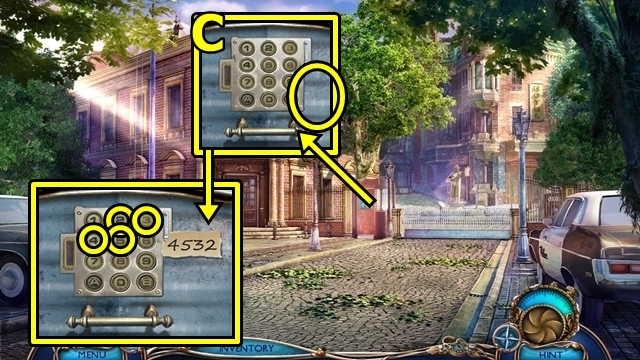
- Place the GATE CODE (C). Press 4-5-3-2. Play the mini-game.
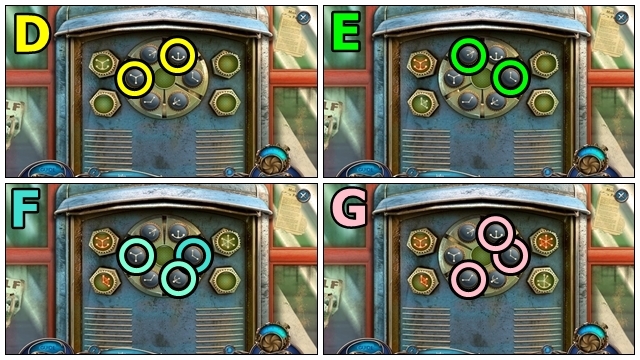
- Solution: (D-G).
- Move forward.

- Read the note (H). Use the MAGNET; take the KING INSIGNIA.
- Lift the seat (I). Take the WIRE CUTTERS and FLORAL ORNAMENTS (1/3).
- Enter the Hotel Reception (J).
- Take the HOTEL-ROOM KEY (K).
- Insert the HOTEL-ROOM KEY (L); turn the key.
- Enter the Hotel Room.
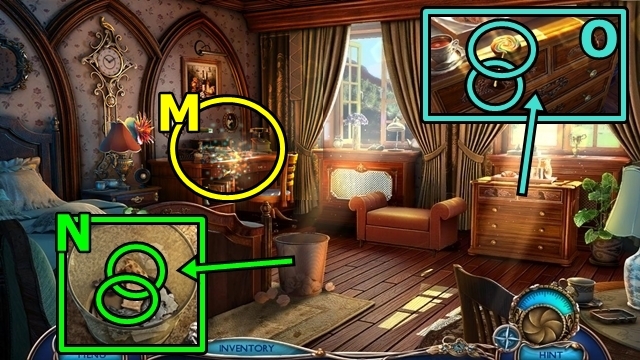
- Play the HOP (M); receive the RACING HELMET.
- Read the note (N); take the HORSE MASK.
- Take the LOLLIPOP (O). Insert the KING INSIGNIA. Read the note; take the VALVE.
- Move down.
- Take the GOLDEN HORSESHOE (P). Insert the RACING HELMET and the HORSE MASK. Read the article; take the FLORAL ORNAMENTS (2/3).
- Move down.
- Remove the plaque (Q). Insert the VALVE; take the QUEEN INSIGNIA.
- Return to the Hotel Room.
- Insert the QUEEN INSIGNIA (R); take the FLORAL ORNAMENTS (3/3).
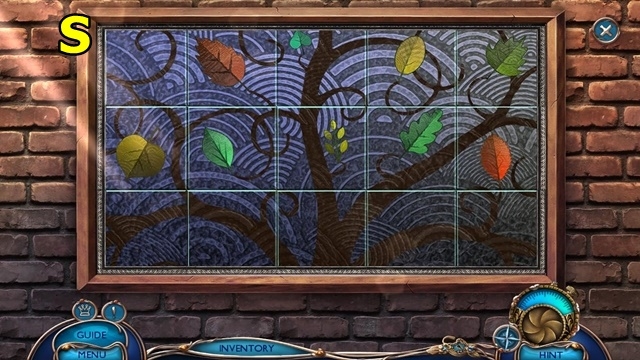
- Insert the three FLORAL ORNAMENTS (S); play the mini-game.
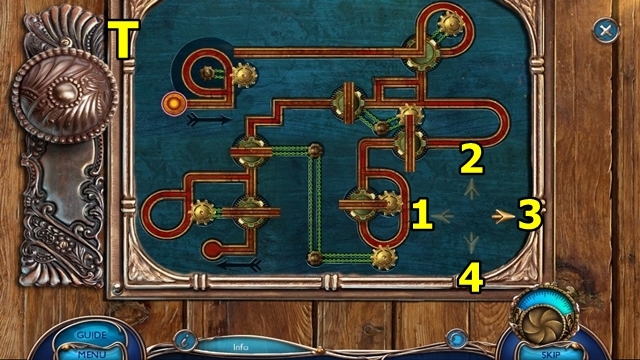
- Solution: 3-2-2-3-3-2-2-4-4-1-2-3-4-3-3-1-4-3-2-2-3-3-1-2-1-4-1-4-1-4-1-4-4-2-3-4-1 (T). Read the note; take the SCOOTER KEYS.
- Move down twice.
- Attach the SNAP HOOK (U). Insert the SCOOTER KEYS. Play the mini-game.
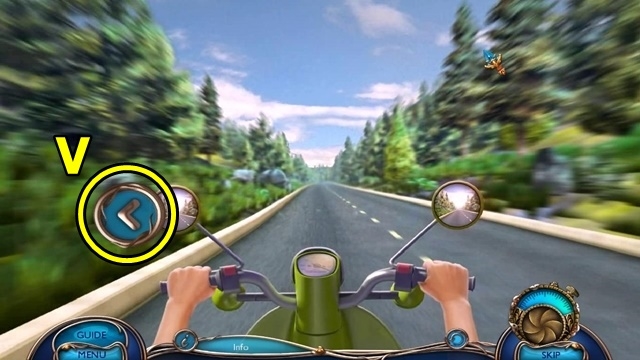
- Solution: Press the arrows to drive (V).
Chapter 2: Reedley Estate
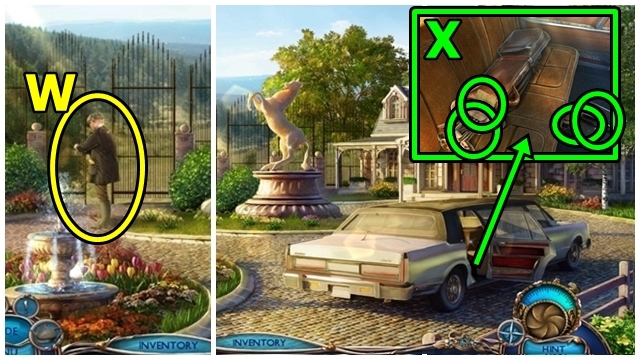
- Talk to Walter (W).
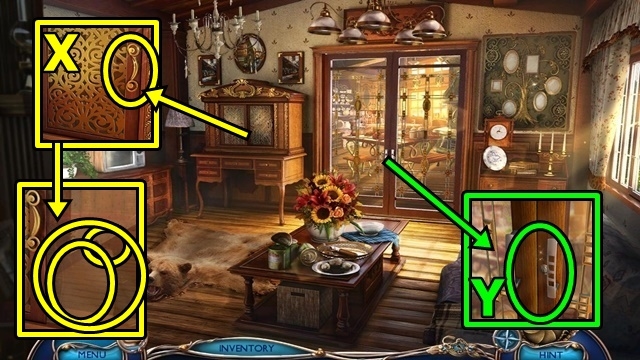
- Read the note (X); take the GOLF CLUB. Remove the lid; use the WIRE CUTTERS.
- Play the HOP (Y); receive the DOOR KNOCKER.
- Insert the DOOR KNOCKER (Z).
- Enter the Foyer.
- Take the TAVERN MODEL (A).
- Enter the Sitting Room (B).
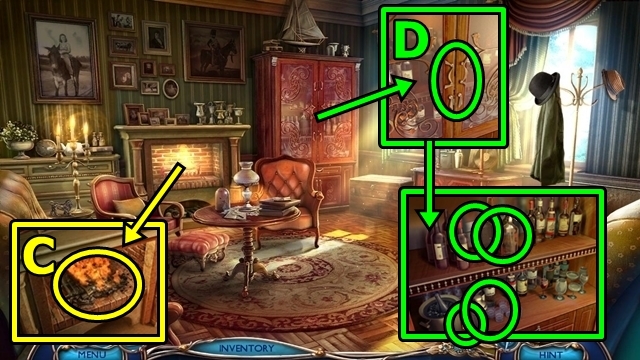
- Use the GOLF CLUB (C); take the JUMPER HORSESHOE.
- Use the LOLLIPOP (D). Move the bottles; open the envelope; read the will; take the JOCKEY FIGURINE (1/2). Move the shaker; take the TURKEY PIECES (1/3).
- Return to the Driveway.
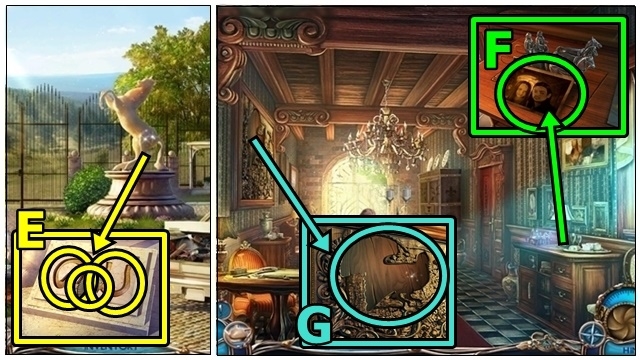
- Take the TURKEY PIECES (2/3) (E). Insert the GOLDEN HORSESHOE; take the SWITCH and CHARIOT HORSE. Insert the JUMPER HORSESHOE; take the JOCKEY FIGURINE (2/2).
- Enter the Foyer.
- Look at the photograph (F); insert the CHARIOT HORSE. Take the TURKEY PIECES (3/3).
- Insert the three TURKEY PIECES (G); take the GOLDEN CUP.
- Enter the Sitting Room.
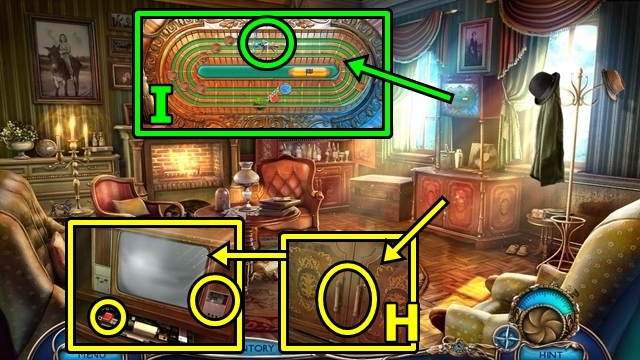
- Open the cupboards (H). Insert the SWITCH, then press Play. Take the SAFE CODE.
- Add the two JOCKEY FIGURINES (I). Play the mini-game.
- Solution: Place the obstacles (J), then press Play (K). Take the TROPHY BASE.
- Move down.

- Place the GOLDEN CUP on the TROPHY BASE (inventory); receive the CHAMPIONSHIP TROPHY.
- Insert the CHAMPIONSHIP TROPHY (L). Add the SAFE CODE. Press 2-5-4-7.
- Play the HOP (M); receive the BOX.
- Examine the BOX (inventory); play the mini-game.
- Solution: (N). Take the PICTURE PIECE.
- Insert the PICTURE PIECE (O). Take the BOOK TOKEN and HORSE FIGURINE.
- Examine (P).
Chapter 3: The Archive
- Insert the BOOK TOKEN (Q).
- Enter the Archive Interior.
- Read the NOTEBOOK (R).
- Move forward.
- Take the SPONGE (S).
- Move down.
- Place the SPONGE (T); turn the valve handle; take the DAMP SPONGE.
- Move forward.
- Use the DAMP SPONGE (U).
- Take the WOODEN RULER (V).
- Take the LADDER WHEEL (W).
- Move down.
- Use the WOODEN RULER (X); play the HOP; receive the SCREWS.
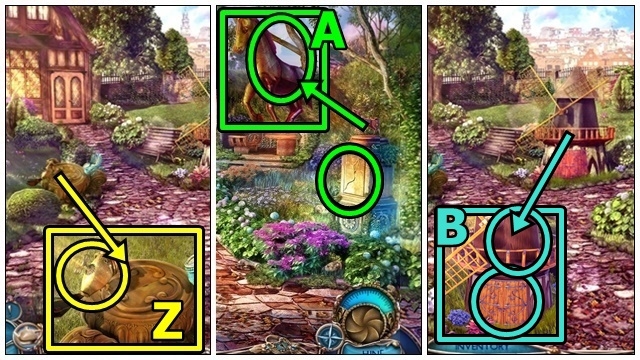
- Attach the LADDER WHEEL (Y) and SCREWS.
- Move the ladder (Z).
- Move the pamphlet (A) and the book; take the PUNCHED PAPER.
- Move forward.
- Add the PUNCHED PAPER to the NOTEBOOK (inventory); receive the FOLDER TAGS.
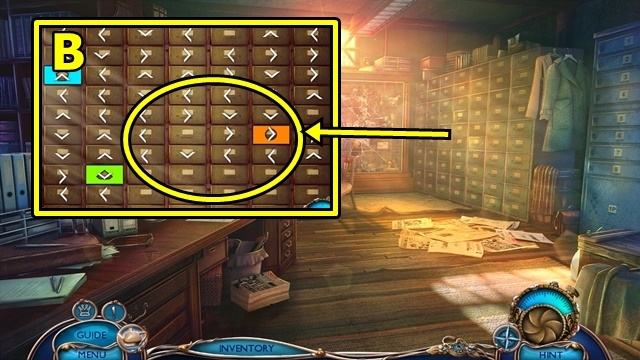
- Add the FOLDER TAGS (B); play the mini-game.
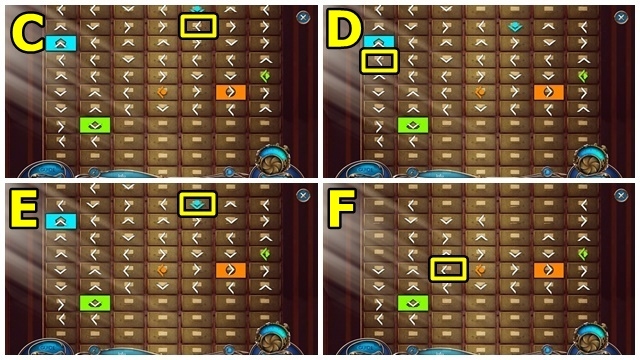
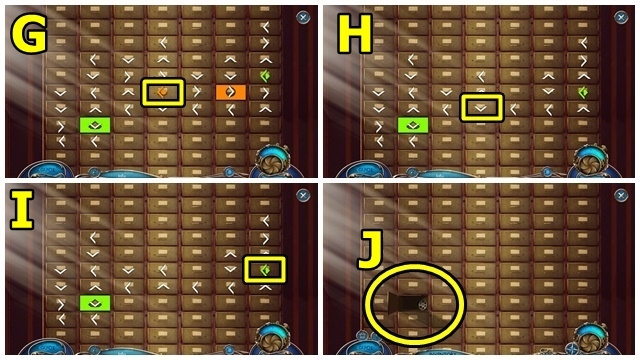
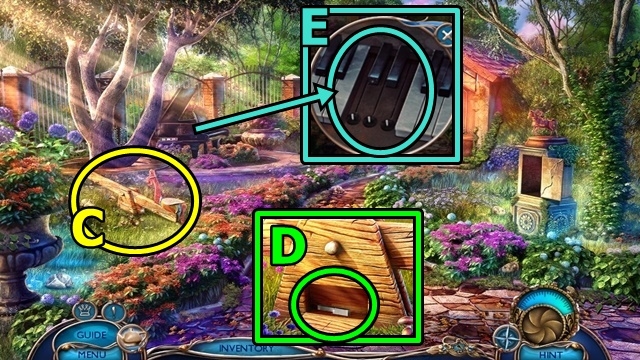
- Solution: (C-I). Take the MICROFILM (J).
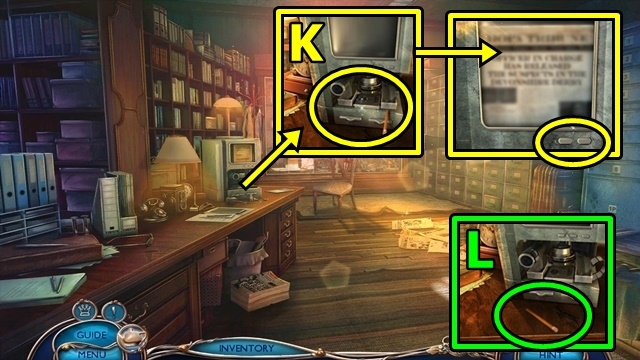
- Add the MICROFILM (K). Press each button, read the article.
- Take the PENCIL (L).
- Move down.
- Insert the PENCIL (M); receive the SHARPENED PENCIL.
- Move forward.
- Use the SHARPENED PENCIL (N). Open the drawer; enter 2-1-4-3. Take the HOT-DOG EMBLEM and METAL RING.
- Move the newspapers (O). Attach the METAL RING; lift the hatch. Take the OLD TOWN PASS.
- Return to the Town Center.
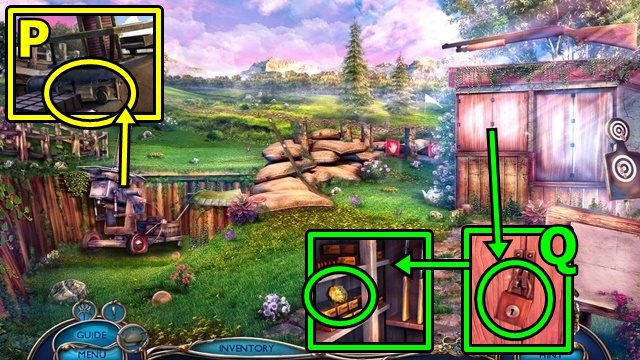
- Insert the HOT-DOG EMBLEM (P); take the KEG PHOTO.
- Place the OLD TOWN PASS (Q).
- Go to the Old Town (R).
- Place the TAVERN MODEL (S); play the mini-game.
- Solution: (T). Take the GARDENING TOOL KIT.
- Move forward.
Chapter 4: Old Goose Pub
- Play the HOP (U); receive the IRON BRUSH.
- Add the KEG PHOTO (V).
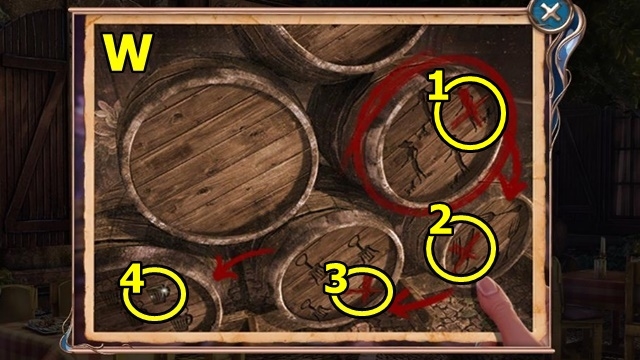
- Examine the kegs in the order shown (W). Take the PICTURE (1/3) and RIDER.
- Enter the Old Goose Pub.
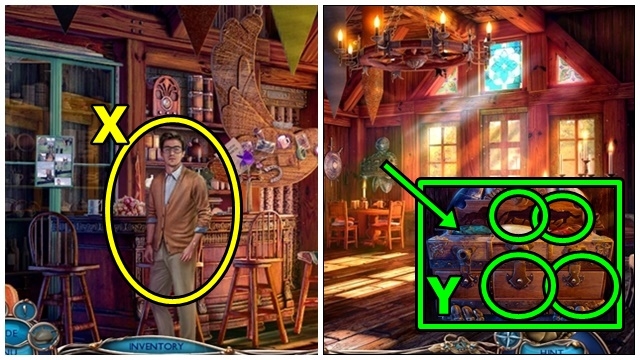
- Talk to Stephen (X).
- Add the HORSE FIGURINE (Y); take the THREATENING NOTE and ALLEN KEY. Add the HORSE FIGURINE; read the note; take the PIANO KEY (1/3).
- Go out to the Pub Backyard.
- Take the PICTURE (2/3) (Z).
- Return to the Old Town.
- Take the PLASTIC FUNNEL (A). Use the ALLEN KEY. Take the DRESSING STICK. Use the IRON BRUSH; take the BLADES.
- Move forward.
- Use the DRESSING STICK (B); receive the LOCK.
- Enter the Old Goose Pub.
- Use the LOCK (C).
- Play the HOP (D); receive the MAILBOX FLAG.
- Move down.
- Attach the MAILBOX FLAG (E). Read the note; open the box, then take the TOOL HANDLES.
- Enter the pub.
- Go into the Pub Bathroom (F).
- Add the BLADES and TOOL HANDLES to the GARDENING TOOL KIT (inventory). Place the items; receive the GARDENING SHEARS.
- Use the GARDENING SHEARS (G); take the WINGED STAR EMBLEM.
- Take the TONGS (H).
- Move down.
- Examine the photograph (I). Take the HEARTS BASE. Insert the WINGED STAR EMBLEM. Open the doors; take the PICTURE (3/3).
- Insert the three PICTURES (J); play the mini-game.
- Solution: (K).
- Enter the Secret Room.
- Play the HOP (L); receive the TOY SPEAR.
- Take the PIANO KEY (2/3) (M); press Play. Examine the screen. Use the TONGS; take the STICKY PLASTIC WRAP.
- Return to the Pub Bathroom.
- Insert the TOY SPEAR (N); take the KNIGHT FIGURINE.
- Return to the Secret Room.
- Insert the KNIGHT FIGURINE (O); take the BATHROOM TOKEN.
- Return to the Pub Bathroom.

- Open the cupboards (P). Take the WINGS (1/2). Move the towels; insert the BATHROOM TOKEN; take the CARDBOARD TUBE.
- Return to the Secret Room.
- Add the PLASTIC FUNNEL and STICKY PLASTIC WRAP to the CARDBOARD TUBE (inventory); receive the STETHOSCOPE.
- Read the note (Q). Place the STETHOSCOPE; play the mini-game.

- Solution: 2-3-2-3-1-3-1-3-2-3-2-3-1-3-1-3-2-3-2-3-1-3-1-3-2-3-2-2-3-1-3-2-3-2-3-1-3-2-3-3-2-3-2-2-3-1-3-2-3-2-3-1-3-2-3-2-3-2-3-1-3-1-3-2-3-2-3-1-3-2-2-3-2-3-1-3-1-3-2-3-2-3-2-3-3-1-3-2-3 (R). Take the BACKYARD-GATE SIGIL.
- Return to the Old Town.
- Use the GARDENING SHEARS (S); take the FIRE-AXE TOKEN.
- Return to the Pub Backyard.
- Insert the BACKYARD-GATE SIGIL (T).
- Go out to the Garden.
- Take the TABLE ORNAMENT (U), then use the FIRE-AXE TOKEN. Take the SHIELD and OILCAN.
- Move down.
- Use the OILCAN (V); take the PUNCH CARD.
- Return to the Pub Bathroom.
- Insert the SHIELD (W); take the WINGS (2/2).
- Insert the PUNCH CARD (X); play the mini-game.
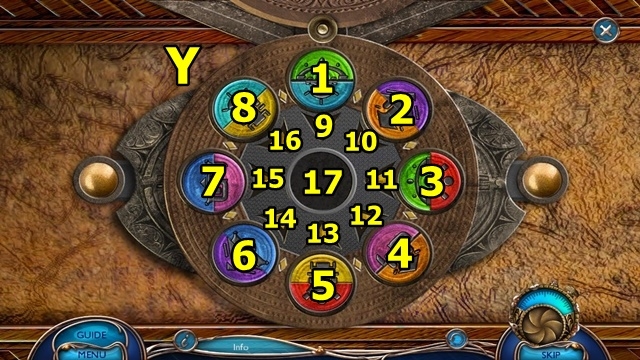
- Solution: 1-9-17×2-3-11-17×2-13-17-10-17×2-8-16-12-17-9-17×2-7-15-17×7-6-14-17×4-10 (Y). Take the RIDER HEAD.
- Return to the Pub Backyard.
- Attach the two WINGS (Z); take the RIDER TORSO.
- Go to the Garden.
- Add the RIDER TORSO and RIDER HEAD to the RIDER (inventory); receive the RIDER STATUE.
- Place the RIDER STATUE (A). Take the WINDMILL BLADE.
- Move down.
- Attach the WINDMILL BLADE (B); take the SEESAW SEAT.
- Move forward.
- Add the SEESAW SEAT (C).
- Take the PIANO KEY (3/3) (D).
- Add the three PIANO KEYS (E).
- Play the HOP (F); receive the CABIN KEY.
- Move down.
- Insert the CABIN KEY (G).
- Enter the Private Cabin.
- Talk to Richard Burkins (H).
- Offer the THREATENING NOTE (I).
- Take the HORSE FIGURINE (J).
- Take the BAYONET (K). Add the TABLE ORNAMENT; take the BIRD HEAD.
- Move down.
- Attach the BIRD HEAD (L); take the RADIO KNOB (1/2).
- Move down.
- Insert the HORSE FIGURINE (M). Read the note; take the GUN SIGN.
- Move through the memory (N).
- Return to the Private Cabin.
- Insert the GUN SIGN (O). Take the JEWEL BOX and RADIO KNOB (2/2).
- Open the panel (P). Take the BATTERY. Add the two RADIO KNOBS. Take the BUTTON HOOK.
- Move down.
- Use the BUTTON HOOK (Q); take the MINIATURE WINDOW.
- Enter the Private Cabin.
- Insert the MINIATURE WINDOW (R); play the mini-game.
- Solution: (S-A). Take the CLOVER EMBLEM.
- Return to the Old Town.
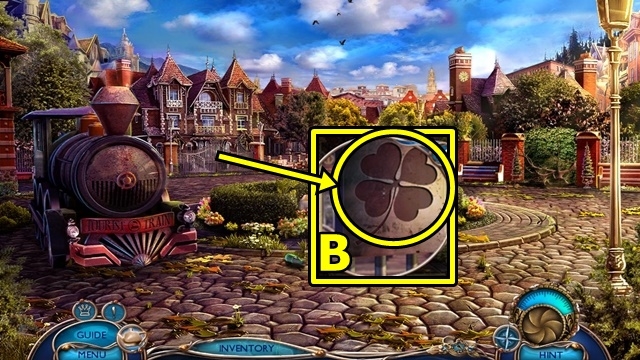
- Insert the CLOVER EMBLEM (B).
- Enter the Front Yard.
Chapter 5: The Farmhouse
- Take the PLANK (1/3) (C).
- Play the HOP (D); receive the STAIRS TOKEN.
- Use the BAYONET (E). Read the note; take the GRAIN SYMBOL and BLEACH.
- Enter the Windmill Ground Floor (F).
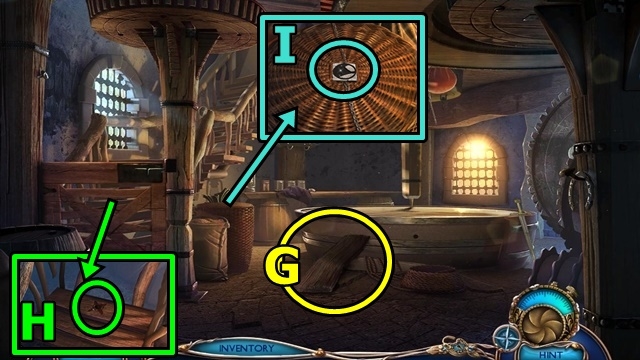
- Take the PLANK (2/3) (G).
- Insert the STAIRS TOKEN (H); take the HAMMER TOKEN and HONEY JAR.
- Insert the GRAIN SYMBOL (I). Lift the lid; take the GOLDEN LION.
- Move down.
- Take the TOOLBOX (J). Place the HONEY JAR; take the PLANK (3/3) and BRICK.
- Enter the Windmill Ground Floor.
- Insert the HAMMER TOKEN onto the TOOLBOX (inventory); take the NAILS.
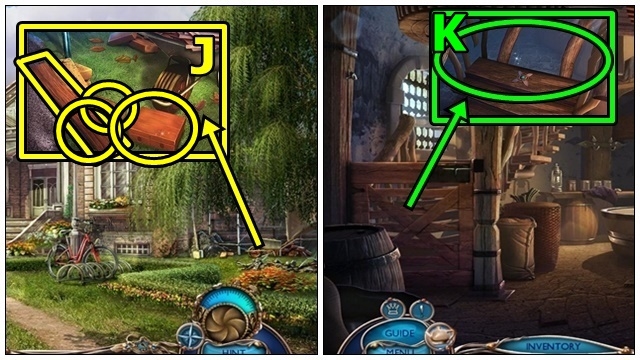
- Place the three PLANKS (K), then the NAILS; use the BRICK.
- Go up to the Windmill Tower.
- Take the DUSTER (L).
- Move down.
- Take the ALCOHOL (M). Use the DUSTER; take the TRAIN RAIL.
- Go up to the Windmill Tower.
- Read the note (N); take the HELMET TOKEN. Insert the BATTERY and TRAIN RAIL. Press the red switch. Take the RED HEART.
- Return to the Front Yard.
- Insert the HELMET TOKEN onto the TOOLBOX (inventory); take the WHITE HEART.
- Add the RED HEART and WHITE HEART to the HEARTS BASE (inventory); receive the DOOR ORNAMENT.
- Insert the DOOR ORNAMENT (O).
- Enter the Farmhouse.
- Take the LOCOMOTIVE TOKEN (P).
- Take the RAKE (Q).
- Return to the Windmill Ground Floor.
- Use the RAKE (R).
- Play the HOP (S); receive the SMALL NET.
- Go up to the Windmill Tower.
- Use the SMALL NET (T); take the BOX TILES (1/2).
- Insert the LOCOMOTIVE TOKEN (U); take the LIGHTER and CABINET TOKEN (1/2).
- Insert the GOLDEN LION on the JEWEL BOX (inventory); take the RIBBON SLOT and BOX TILES (2/2).
- Insert the two BOX TILES (V); play the mini-game.
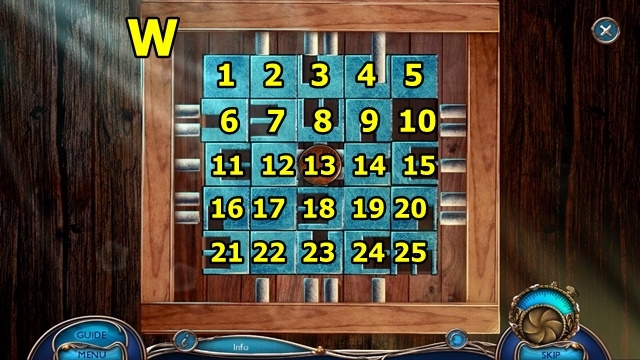
- Solution: 15-14-19-18-17-16-21-22-17-12-11-6-7-2-3-8-9-14-19-24-25-20-19-18-23-24-25 (W). Take the MURAL SEGMENTS (1/2) and TOOLBOX KEY.
- Return to the Farmhouse.
- Insert the TOOLBOX KEY into the TOOLBOX (inventory); take the DIAMOND PENDANT and HAND DRILL.
- Open the panel (X). Use the DIAMOND PENDANT. Read the note; take the ANCHOR EMBLEM.
- Use the HAND DRILL (Y).
- Enter the Kitchen.
- Take the CABINET TOKEN (2/2) (Z).
- Move down.
- Add the two CABINET TOKENS (A); play the mini-game.
- Solution: 2-5-2-5-1-1-5-1-1-5-3-5-2-5-1-5-1-2-2 (B). Take the ACID.
- Enter the Kitchen.
- Pour the ACID (C).
- Go down into the Cellar.
- Take the GAS-BOMB RECIPE (D).
- Move down.
- Open the panel (E). Use the LIGHTER.
- Add the GAS BOMB RECIPE (F); take the safety goggles. Lift the kettle lid, then add the ALCOHOL, then BLEACH. Take the GAS BOMB.
- Return to the Cellar.
- Throw the GAS BOMB (G).
- Lift the switch (H).
- Lift the mask (I). Take SARAH’S PHOTO.
- Open the portal (J); insert the ANCHOR EMBLEM. Read the note; take the SEA PICTURE.
- Move the bottles (K); take the KITCHEN-GRATE HANDLE.
- Move down.
- Add the SEA PICTURE (L). Move the waves to match the picture; take the SEAM RIPPER.
- Add the KITCHEN-GRATE HANDLE (M); lift the panel; play the HOP. Receive the PRESSURE VALVE.
- Return to the Cellar.
- Use the SEAM RIPPER (N); take the SUN CARVING.
- Move down twice.
- Add the SUN CARVING (O); take the PRESSURE GAUGE.
- Return to the Cellar.
- Insert the PRESSURE GAUGE (P) and PRESSURE VALVE; play the mini-game.
- Solution: (Q).
- Talk to Stephen (R).
Chapter 6: The Office
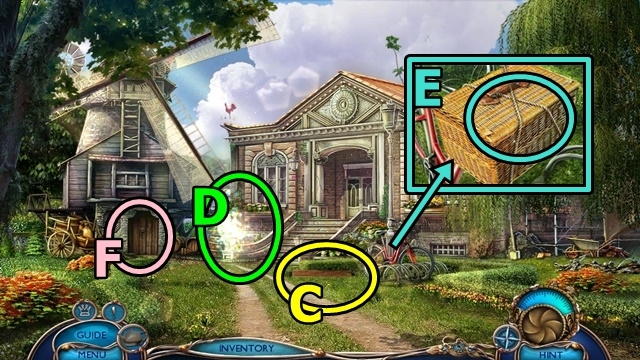
- Go to the Backyard (S).
- Take the KITCHEN MALLET (T).
- Move forward to the Office Entrance.
- Take the APPLE BADGE (U).
- Move down, then go left to Reedley’s Stables.
- Take the BARBEQUE EMBLEM (W).
- Move the rope (X) and harness; add the APPLE BADGE. Take the TRAILER HANDLE.
- Move forward.
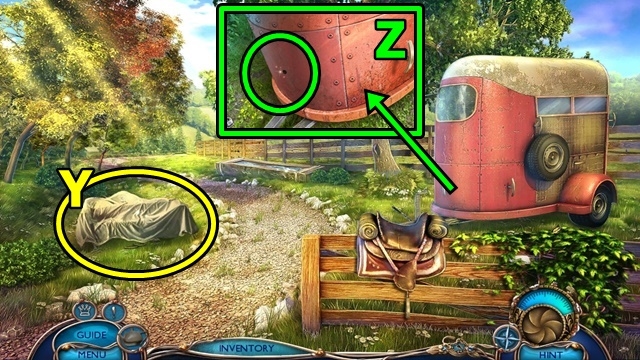
- Remove the sheet (Y); play the HOP. Receive the METAL PIPE.
- Use the TRAILER HANDLE (Z), then the KITCHEN MALLET. Take the PEACOCK TOKEN and SCHEMATIC.
- Return to the Office Entrance.
- Take the BUGGY TOKEN (1/2) (A). Insert the BARBEQUE EMBLEM; take the LEAF TILE (1/3) and HOSE CONNECTOR.
- Move down.
- Attach the HOSE CONNECTOR (B).
- Place the PEACOCK TOKEN (C); take the DEGREASER.
- Go to Reedley’s Stables.
- Open the toolbox (D). Use the DEGREASER; take the HOOF PICK.
- Move down.
- Move the pillows (E). Use the HOOF PICK; take the MURAL SEGMENTS (2/2).
- Return to Reedley’s Stables.
- Place the two MURAL SEGMENTS (F); play the mini-game.
- Solution: 1-2-3-5 (G-H).
- Enter the Stables Interior.

- Talk to Sarah (I).
- Play the HOP (J); receive the HAIRPIN.
- Return to the Training Grounds.

- Pick up the STONES (K). Use the HAIRPIN; take the MEDICAL KIT and NUMBER 5.
- Return to the Stables Interior.
- Offer the MEDICAL KIT (L). Talk to Walter.
- Open the box (M). Take the FORKED ANTLER.
- Move the jacket (N). Insert the NUMBER 5. Take the THICK RUBBER and LEAF TILE (2/3).
- Add the THICK RUBBER and STONES to the FORKED ANTLER (inventory); receive the SLINGSHOT.
- Use the SLINGSHOT (O).
- Take the SUGAR CUBES (P).
- Offer the SUGAR CUBES (Q). Take the LEAF TILE (3/3).
- Return to the Office Entrance.
- Add the three LEAF TILES (R); play the mini-game.
- Solution: (S). Take the CABLE.
- Return to the Training Grounds.
- Put the SCHEMATIC and CABLE in the METAL PIPE (inventory). Receive the CATCHER TOOL.
- Use the CATCHER TOOL (T); take the RUSTY KEY.
- Return to the Backyard.
- Use the RUSTY KEY (U); take the GRILL FORK.
- Return to the Office Entrance.
- Lift the lid (V); use the GRILL FORK; receive the MEAT.
- Offer the MEAT (W).
- Enter the Office.

- Talk to everyone (X).
- Add SARAH’S PHOTO (Y); play the mini-game.
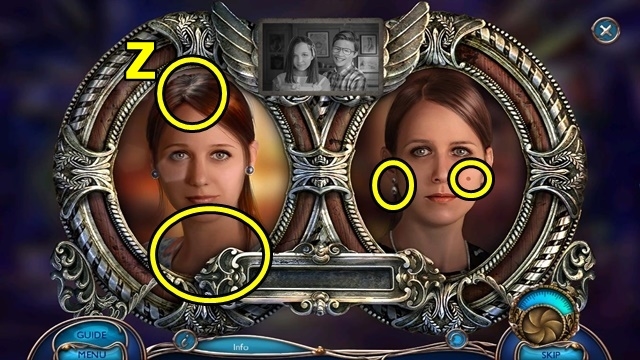
- Take the WIRE (C). Add the RIBBON SLOT. Take the PINCERS.
- Return to Reedley’s Stables.

- Use the PINCERS (D); take the ROSE CARVING.
- Return to the Office Entrance.
- Take the GAZEBO KEY (E). Insert the ROSE CARVING; take the RING.
- Enter the Office.
- Exit to the River Crossing (F).
- Insert the GAZEBO KEY (G).
- Play the HOP (H); receive the RIDING CROP.
- Insert the RING (I); take the METAL PLAQUE.
- Use the RIDING CROP (J); take the BRIEFCASE KEY.
- Move down.
- Insert the METAL PLAQUE (K); take the BUGGY TOKEN (2/2).
- Insert the BRIEFCASE KEY (L); take the FOLDING SAW.
- Return to the Backyard.
- Lift the seat (M). Insert the two BUGGY TOKENS; take the CONNECTORS.
- Return to the River Crossing.
- Insert the CONNECTORS (N) and the WIRE; play the mini-game.
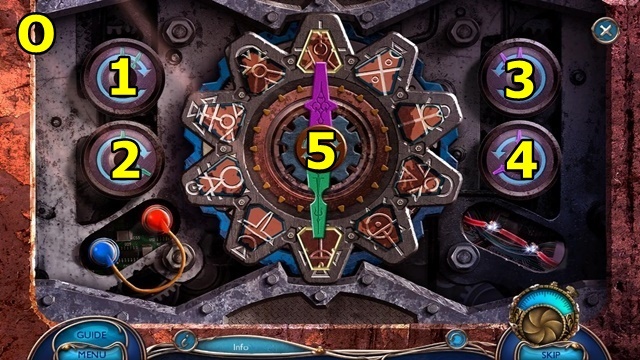
- Solution: 1-2-4×2-5-1-4-5-3-2-5-3-2-5-2-1-4×3-3-5 (O).
- Move forward to the Shooting Range.
- Take the INCOMPLETE WALKIE-TALKIE (P).
- Use the FOLDING SAW (Q); take the LOCK JEWEL.
- Move down.
- Use the LOCK JEWEL (R); take the ANTENNA.
- Move forward.
- Attach the ANTENNA to the INCOMPLETE WALKIE-TALKIE (inventory); receive the WALKIE-TALKIE.
- Add the WALKIE-TALKIE (S).
- Move the walkie-talkie (T); play the mini-game.
- Solution: (U).
- Congratulations! You’ve completed Off the Record: The Final Interview.


 Youda Legend: The Golden Bird of Paradise Walkthrough, Guide, & Tips
 European Mystery: Flowers of Death Walkthrough, Guide, & Tips
 PuppetShow: Mystery of Joyville ™ Walkthrough, Guide, & Tips
 Empress of the Deep: Legacy of the Phoenix Walkthrough, Guide, & Tips
 Mysteries of Magic Island Walkthrough, Guide, & Tips