Dark Parables: Goldilocks and the Fallen Star Walkthrough, Guide, & Tips
Dark Parables: Goldilocks and the Fallen Star Walkthrough

Welcome to the Dark Parables: Goldilocks and the Fallen Star Walkthrough.
Who is trying to destroy the Kingdom of Barsia?
Whether you use this document as a reference when things get difficult or as a road map to get you from beginning to end, we’re pretty sure you’ll find what you’re looking for here.
This document contains a complete Dark Parables: Goldilocks and the Fallen Star game walkthrough featuring annotated screenshots from actual gameplay!
We hope you find this information useful as you play your way through the game. Use the walkthrough menu below to quickly jump to whatever stage of the game you need help with.
Remember to visit the Big Fish Games Forums if you find you need more help. Have fun!
This walkthrough was created by prpldva, and is protected under US Copyright laws. Any unauthorized use, including re-publication in whole or in part, without permission, is strictly prohibited.
General Tips
- This is the official guide for Dark Parables: Goldilocks and the Fallen Star.
- This guide will not mention each time you have to zoom into a location; the screenshots will show each zoom scene.
- Hidden-object puzzles are referred to as HOPs. This guide will not show HOP solutions. It will identify the location of the HOP and the inventory item acquired.
- This guide will show solutions for non-random puzzles. Please read the in-game instructions for each puzzle.
- In this game, you will sometimes have to select the new scene to trigger dialog, cut-scenes, or tasks prior to interacting with the scene.
Chapter 1

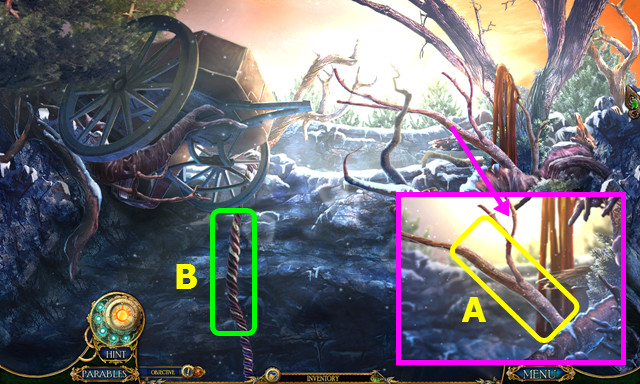
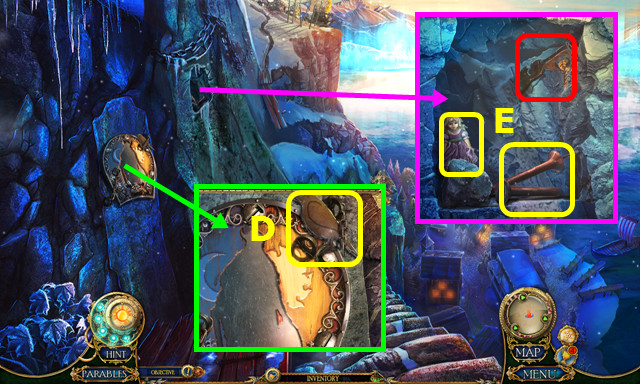
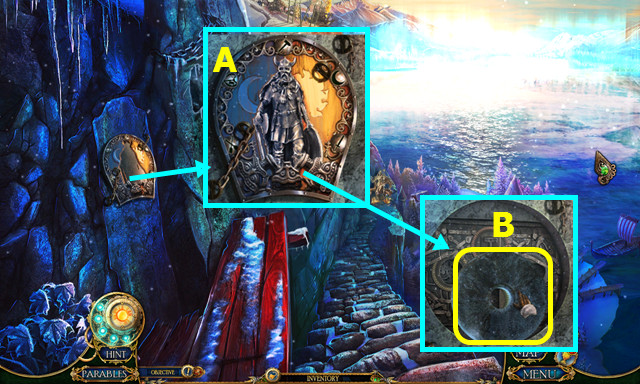
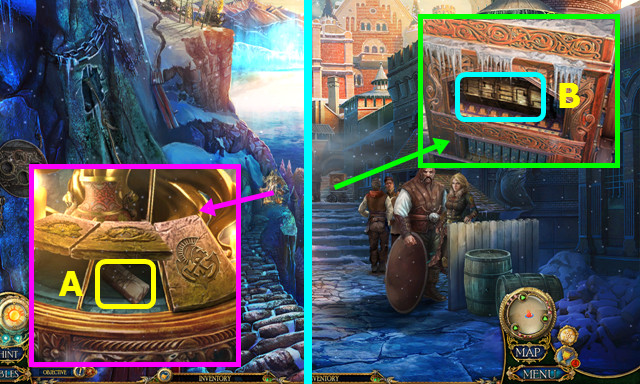
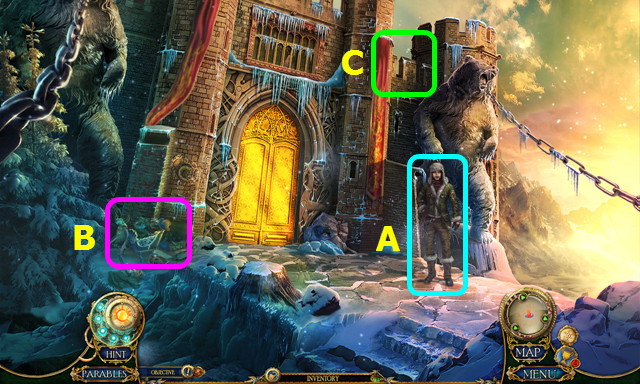
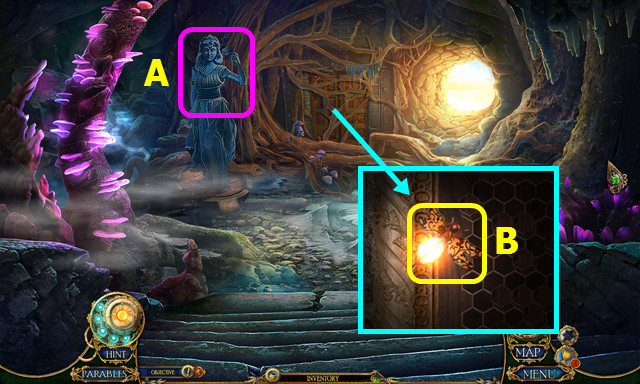
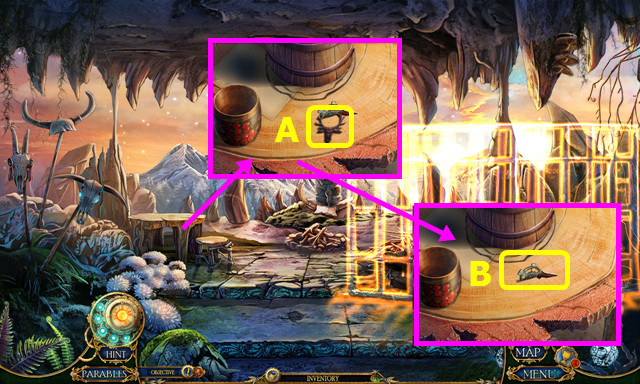
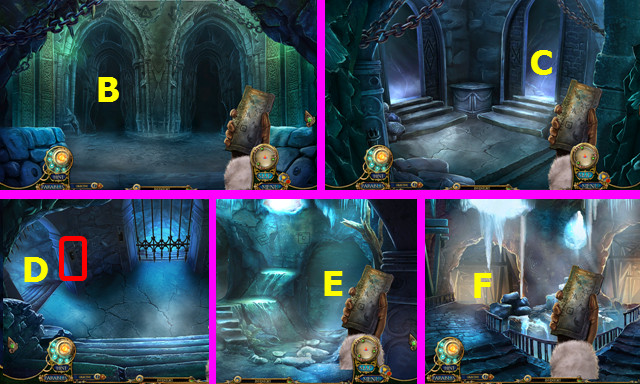
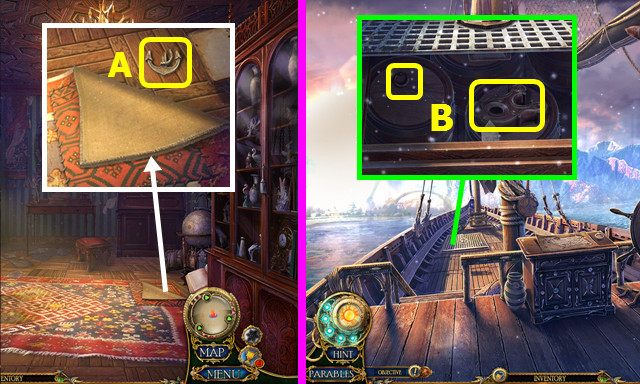
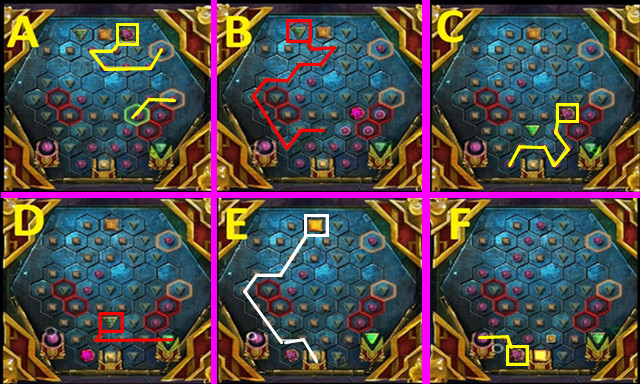
- Take the HOOKED BRANCH (A).
- Use the HOOKED BRANCH (B).
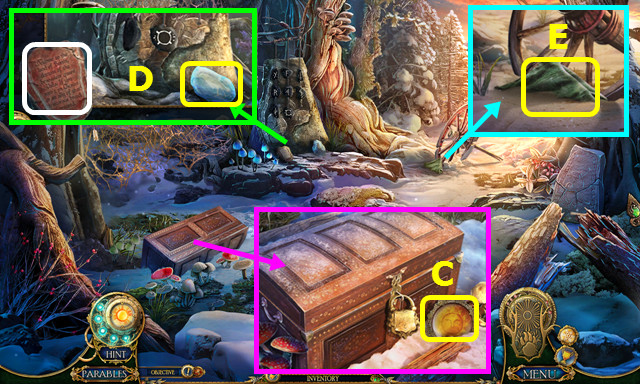
- Right the chest; take the GOLDEN SUN (C).
- Read the plaque; take the FROZEN STATUE (D).
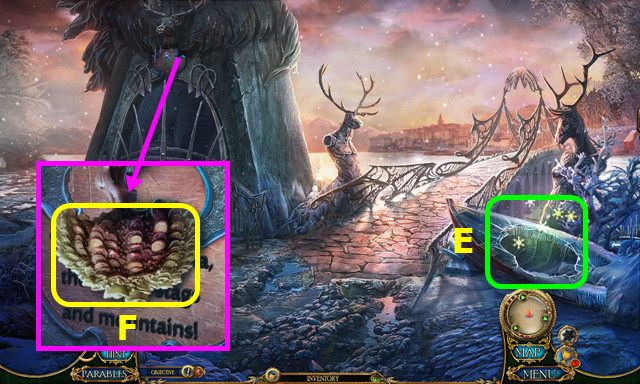
- Take the CLOTH (E).
- Open the CLOTH; take the COPPER PIECES and CLOTH (inventory).
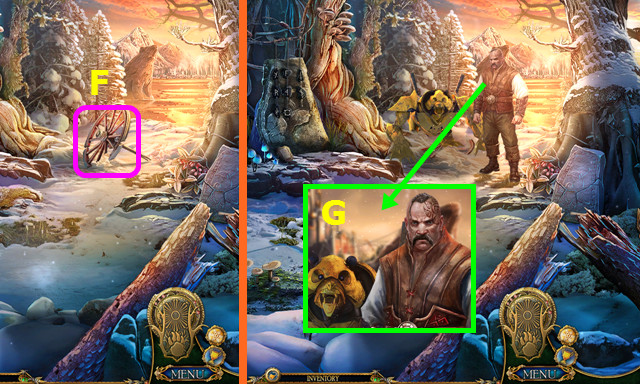
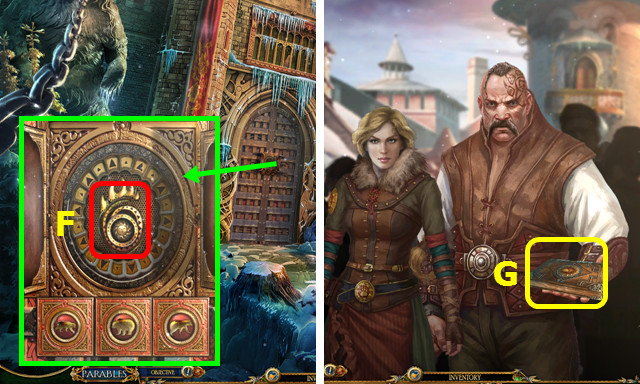
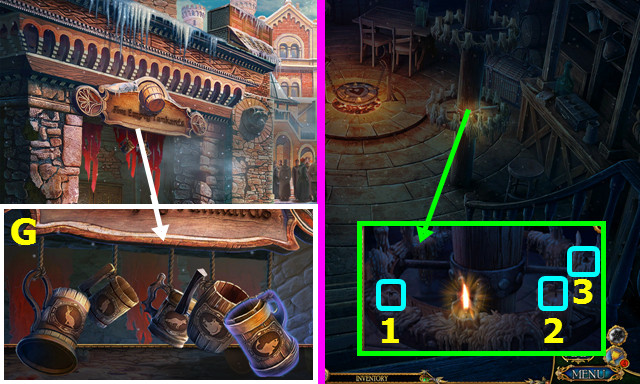
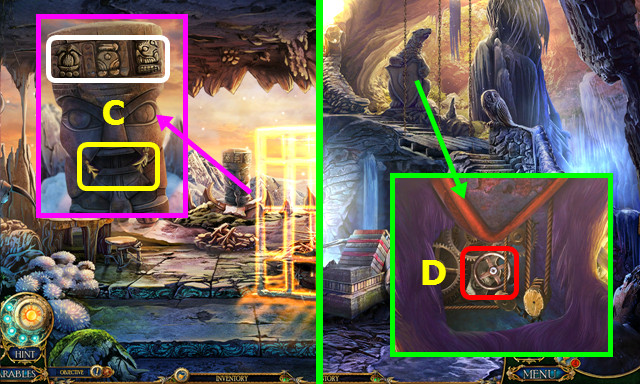
- Touch the wheel (F).
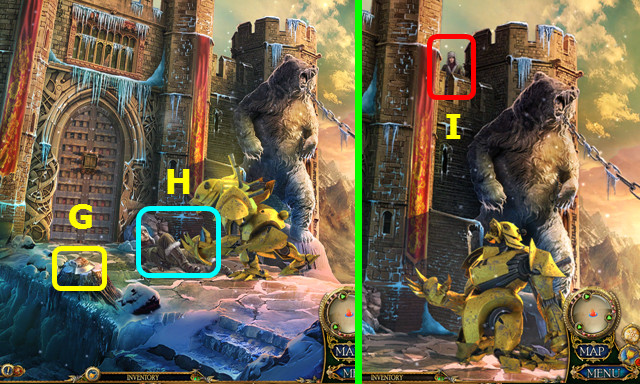
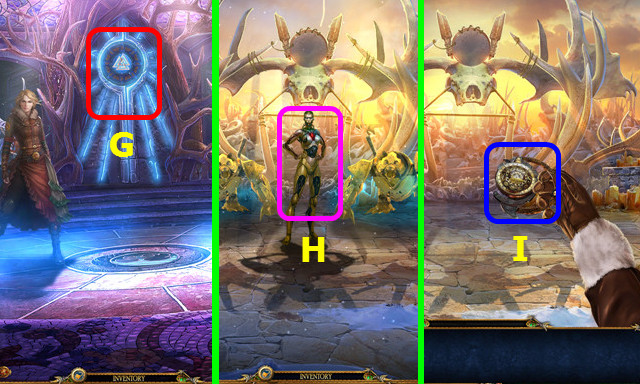
- Talk to the Sentry; show the ARTIFACT (G).
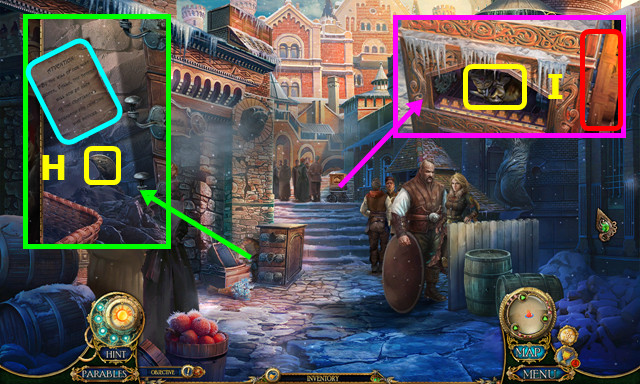
- Walk right.
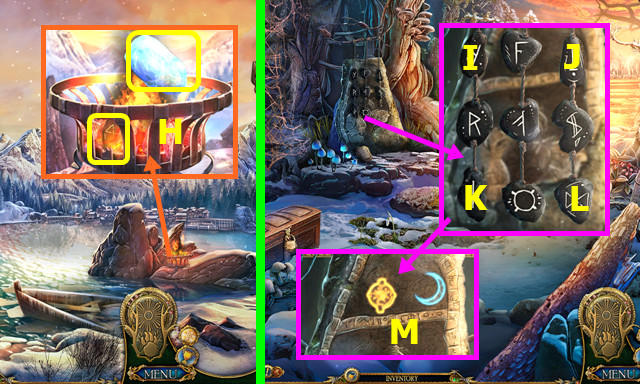
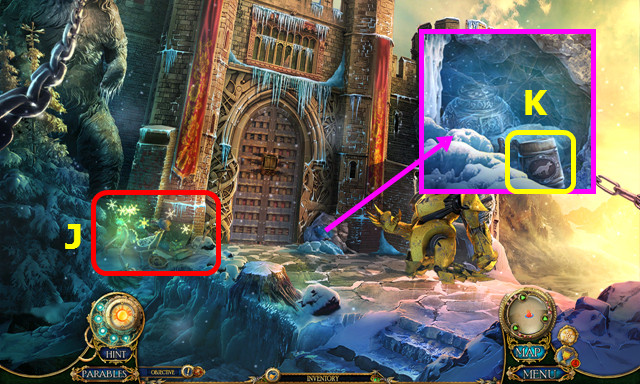
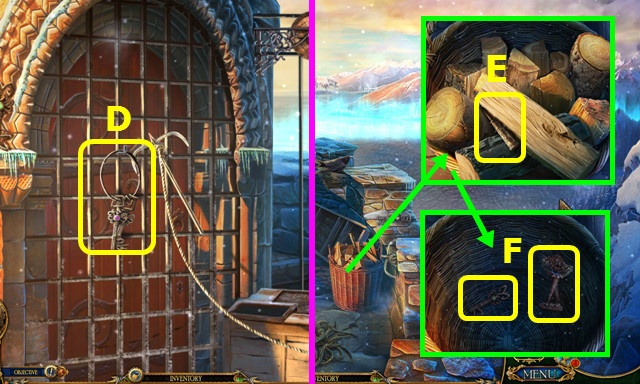
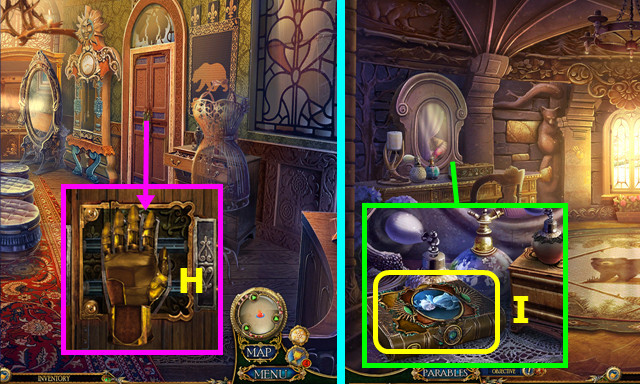
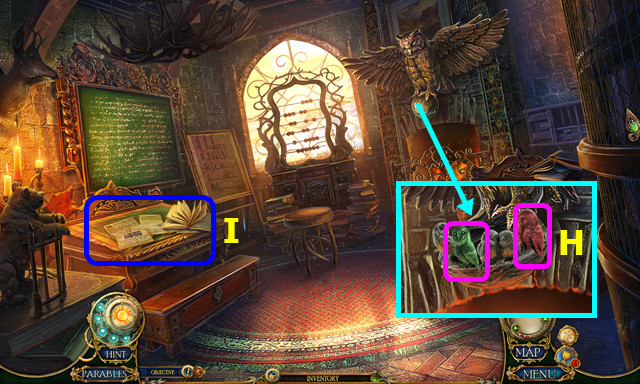
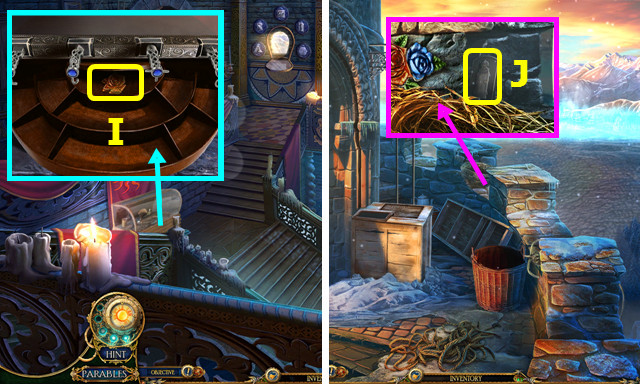
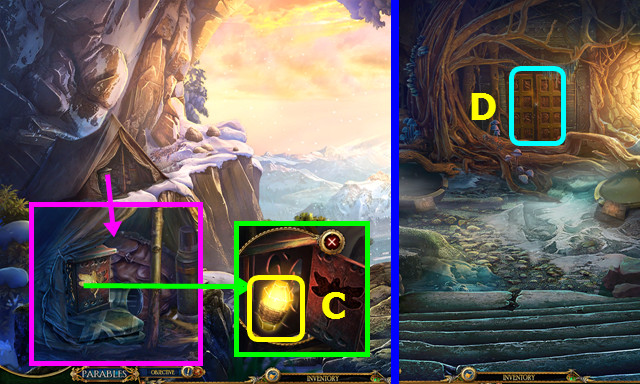
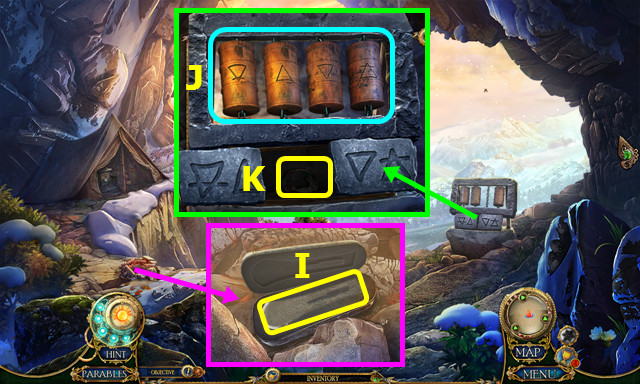
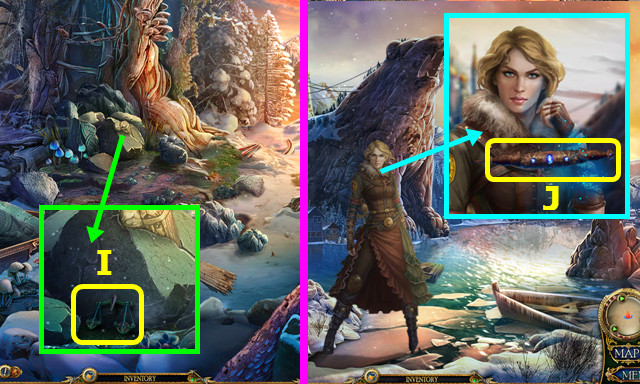
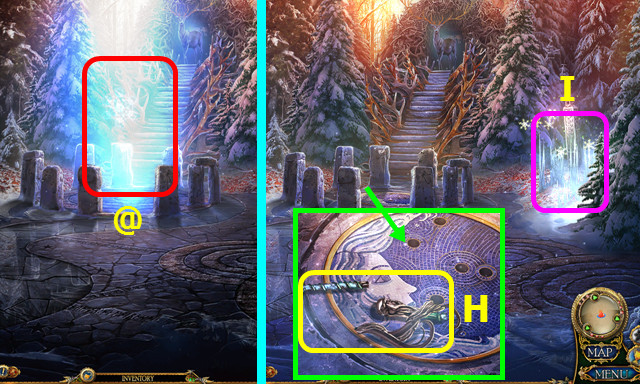
- Use the FROZEN STATUE and earn the METAL RAVEN; use the CLOTH to take the RUNE STONE (H).
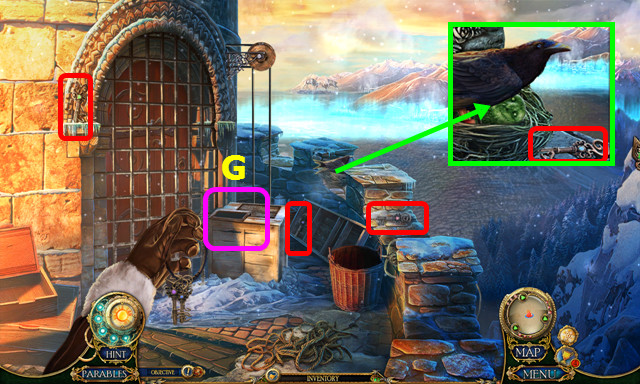
- Walk down.
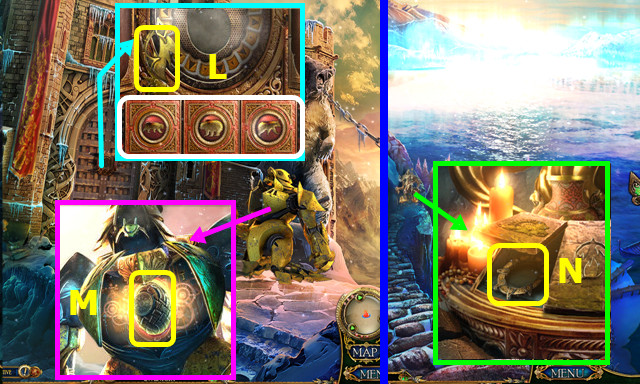
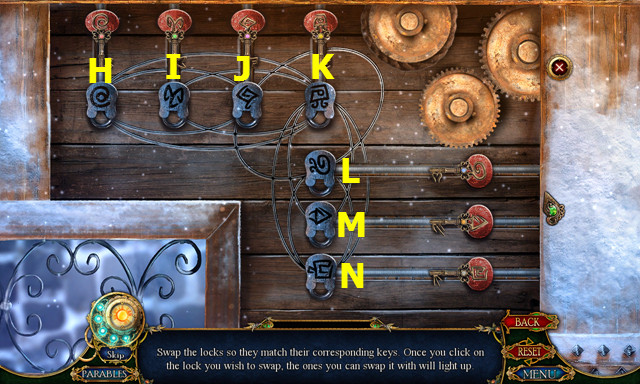
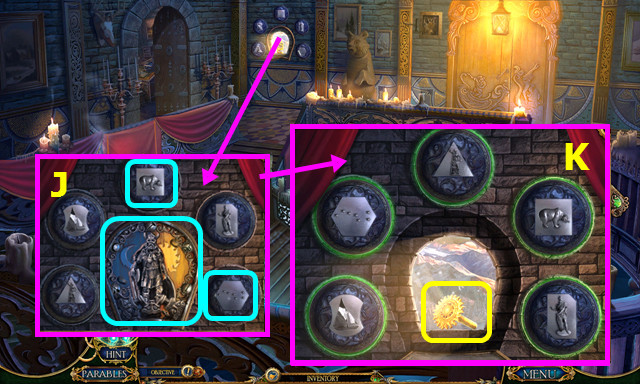
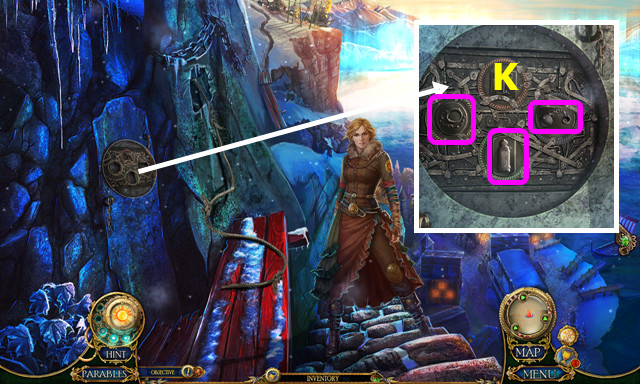
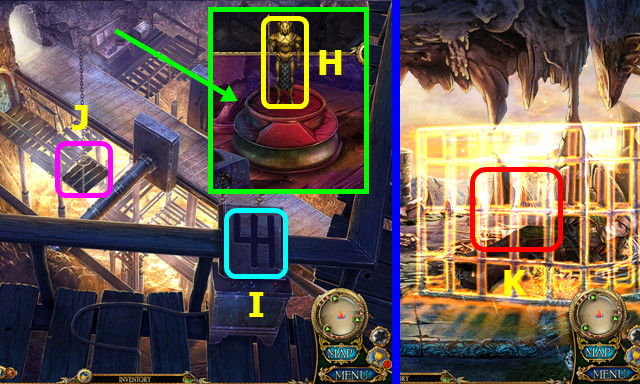
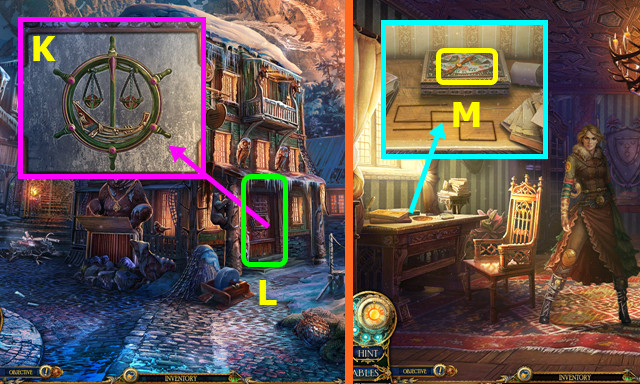
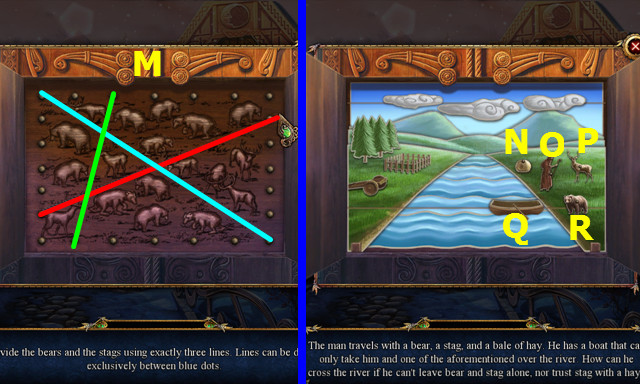
- Place the RUNE STONE; select I-J-K-L.
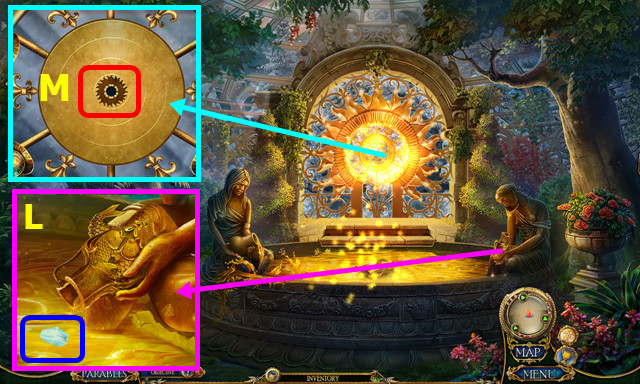
- Select the two glowing symbols, and then select the combined symbol (M).
- Walk left.
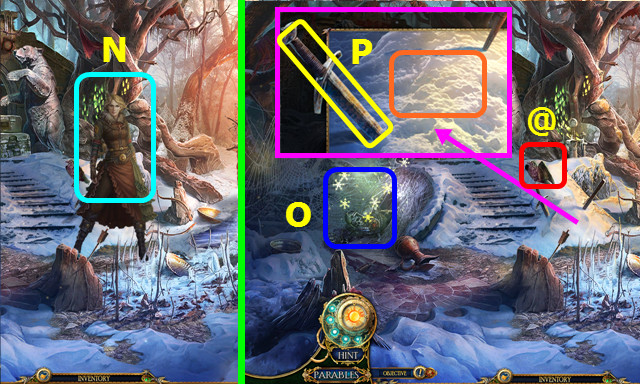
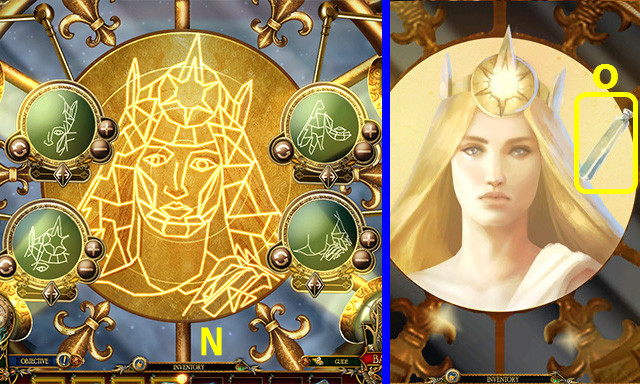
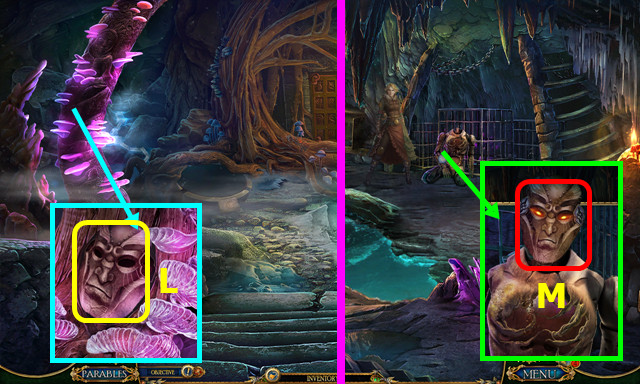
- Talk to Princess Leda (N).
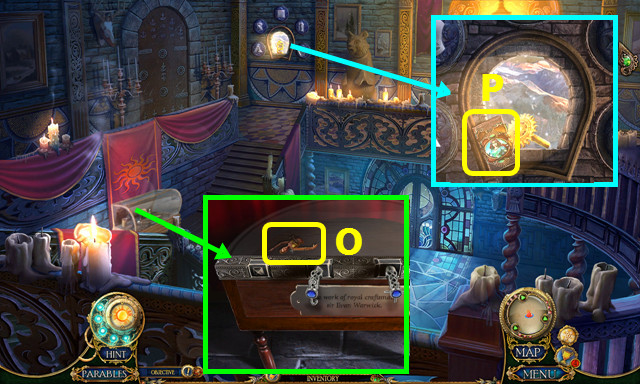
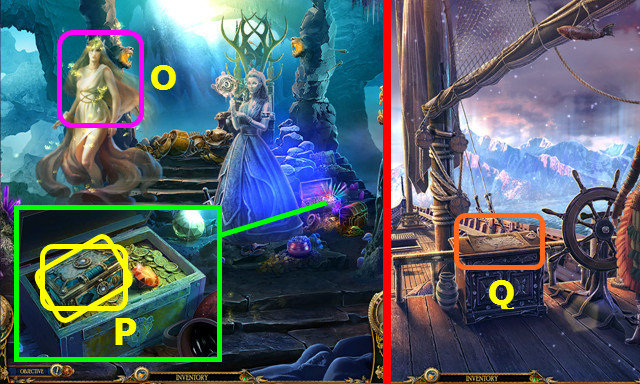
- Play the HOP; earn the HUNTING HORN (O).
- Touch the bird (@).
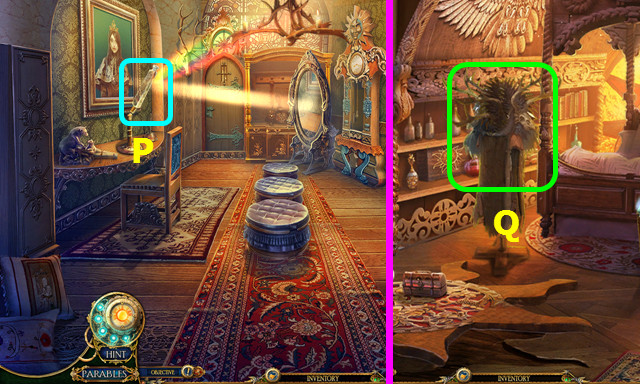
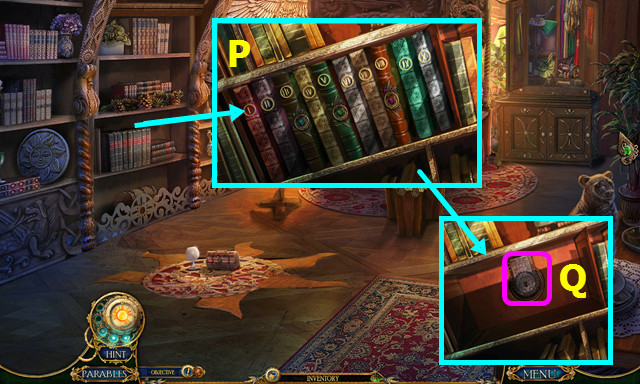
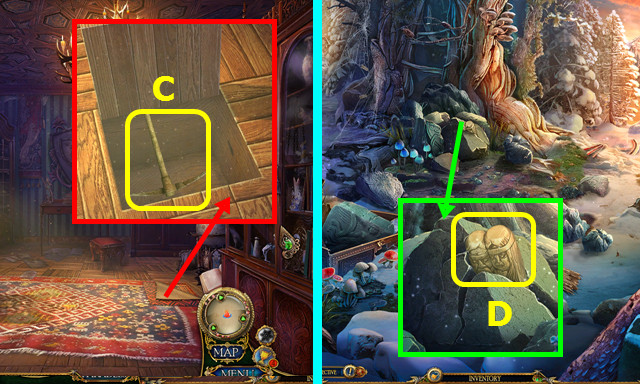
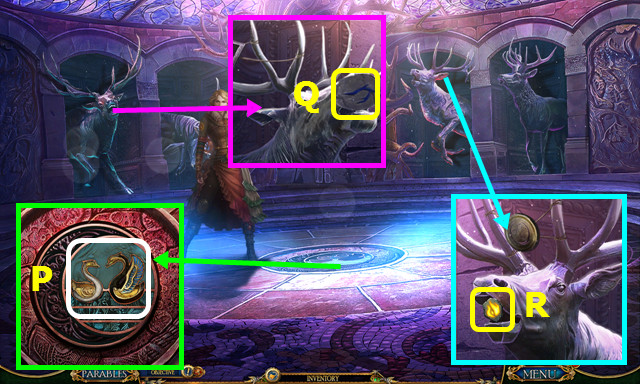
- Take the RUSTY SWORD; move the snow 2x (P).
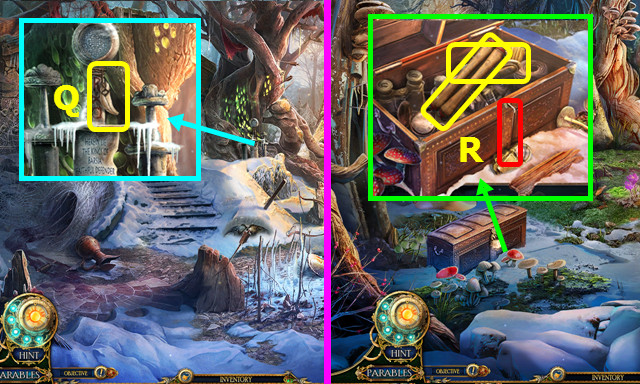
- Take the BEAR TOOTH (Q).
- Walk down.
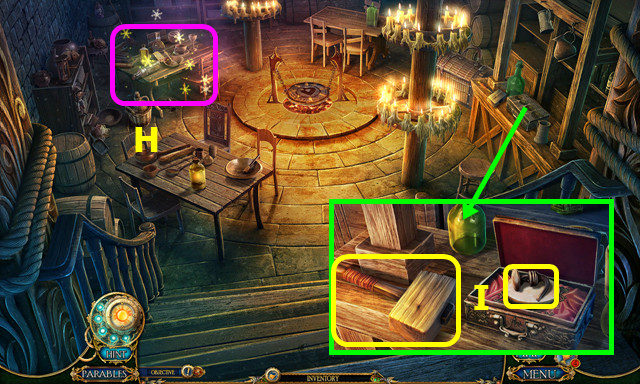
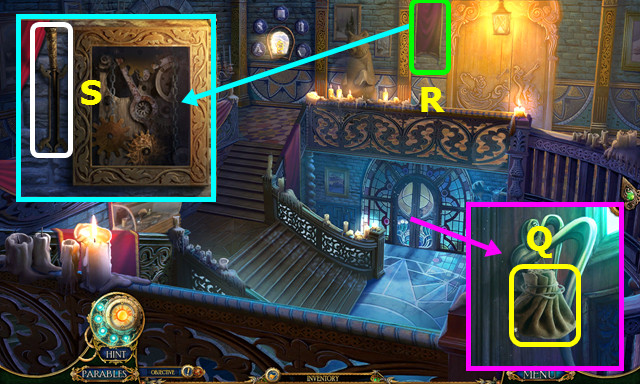
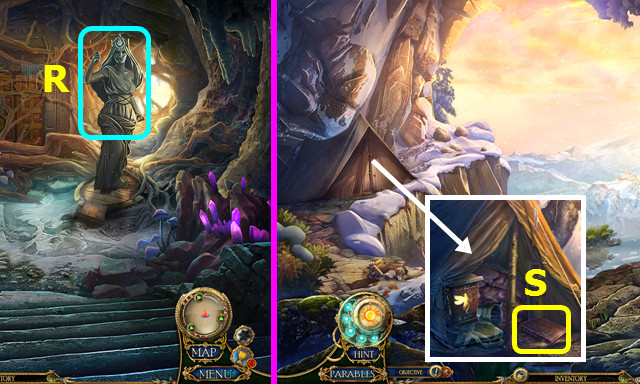
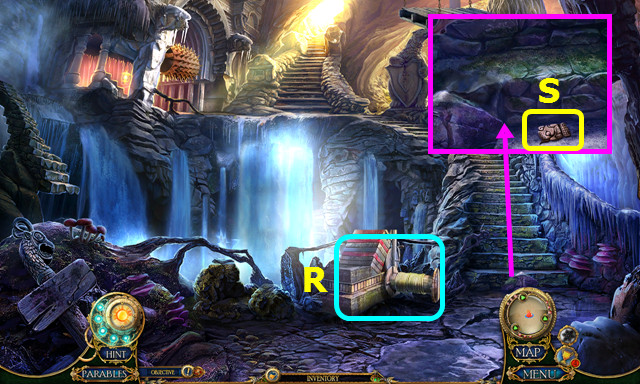
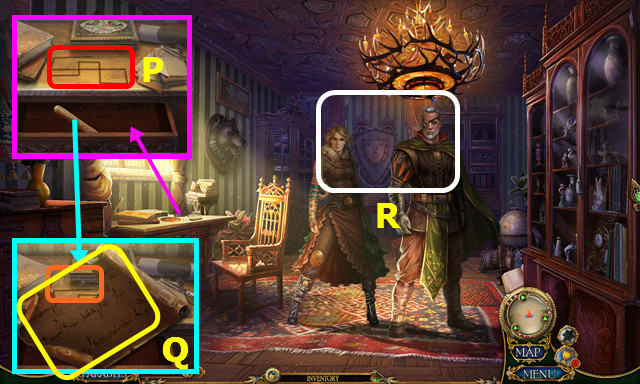
- Use the RUSTY SWORD; take the MAP and BRUSH (R).
- Walk right.
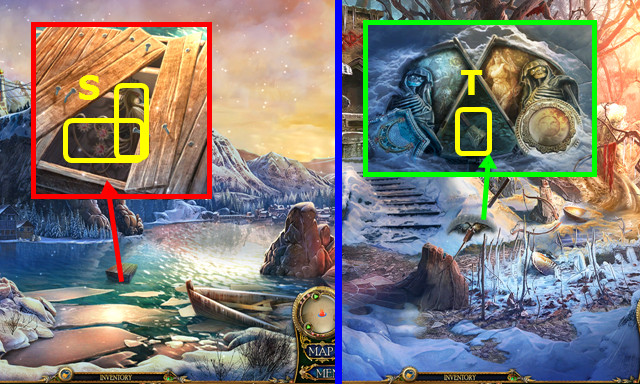
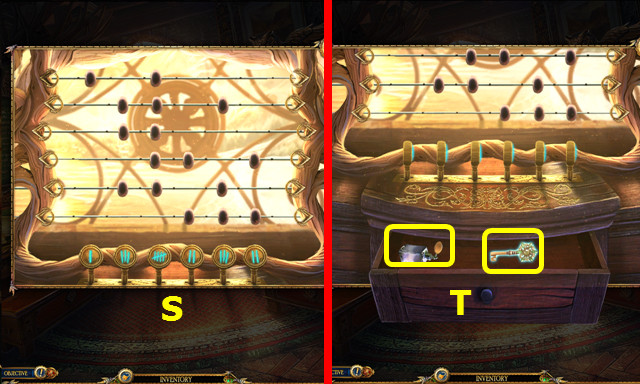
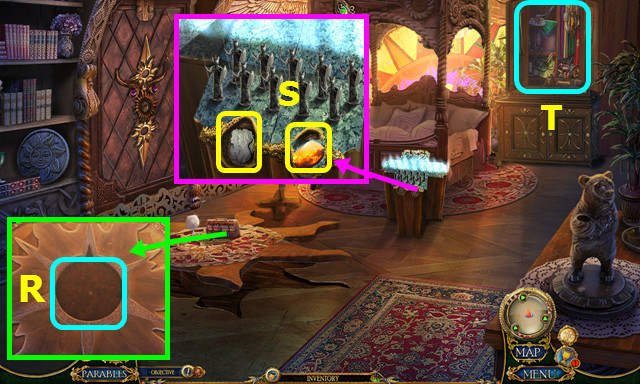
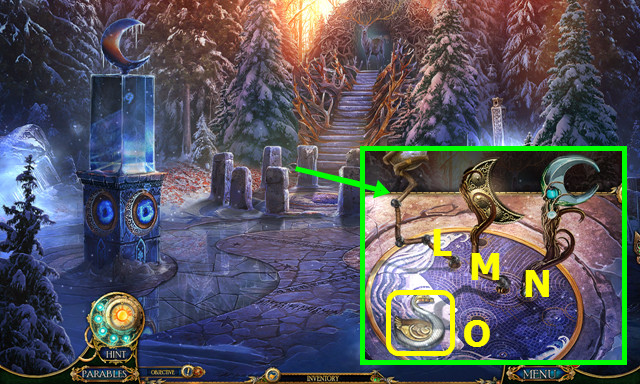
- Use the RUSTY SWORD 2x; take the GOLDEN PHOENIX and SILVER MOON (S).
- Walk down and left.
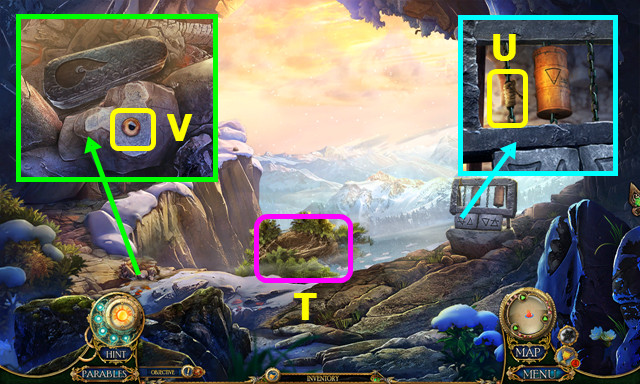
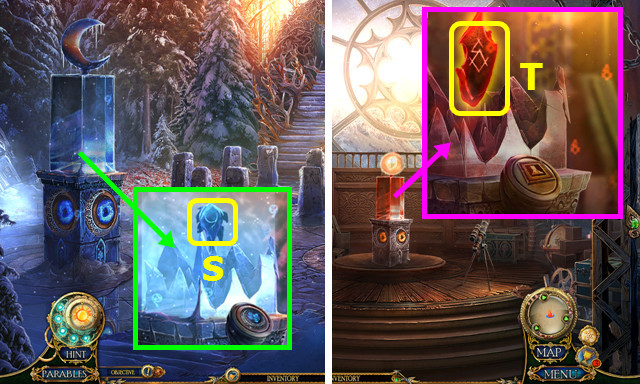
- Place and press the SILVER MOON and GOLDEN SUN; take the HUNTING HORN PIECE (T).
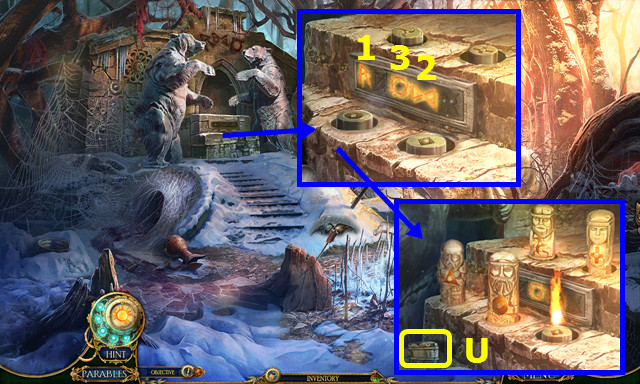
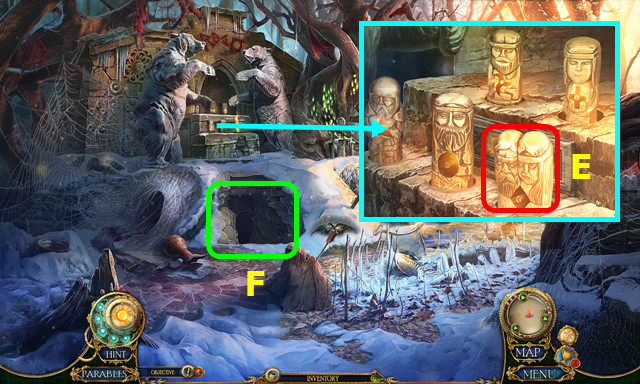
- Use the BRUSH; press 1-3.
- Place the 5 statues; take the HUNTING HORN PART (U).
- Combine the HUNTING HORN, HUNTING HORN PART, and HUNTING HORN PIECE to complete the HUNTING HORN (inventory).
- Walk down and right.

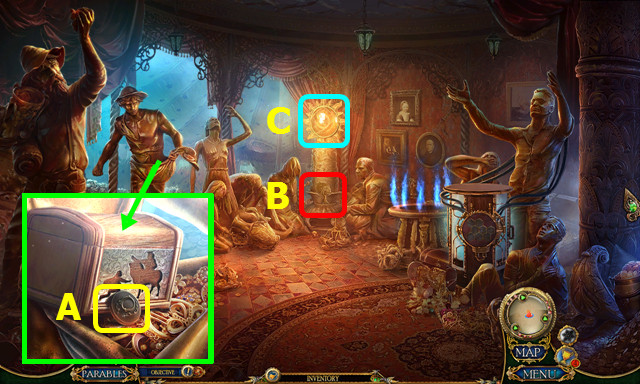
- Use the HUNTING HORN; talk to the Sentry (A).
- Walk left.
- Open the gate (@).
- Take the 1st SOLDIER FIGURINE HALF (B).
- Play the HOP; earn the AXE HANDLE (C).
- Walk left.
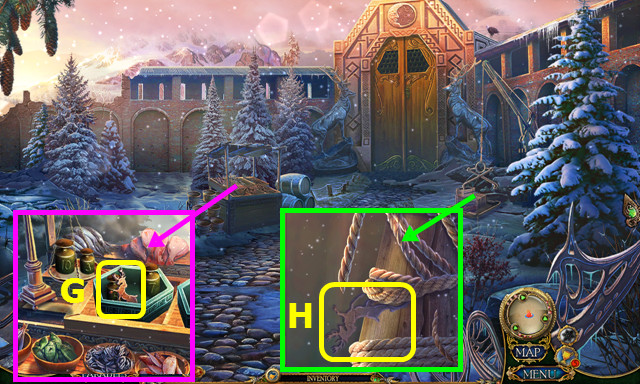
- Take the METAL MOCKINGBIRD (D).
- Take GOLDILOCKS and the SMALL AXLE; remove the rock wedge (E).
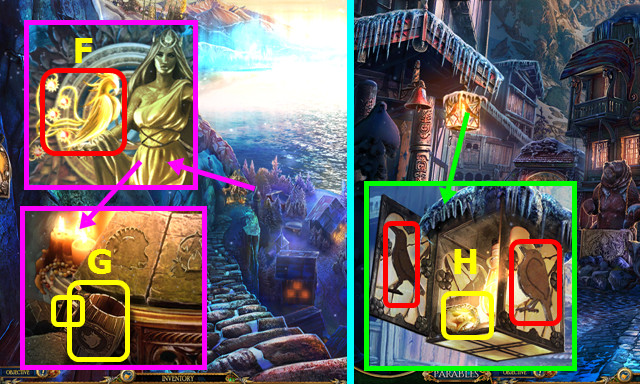
- Place and press the GOLDEN PHOENIX (F).
- Take the BOAR TANKARD and GODDESS’ LOCKET (G).
- Walk down.
- Place the METAL RAVEN and METAL MOCKINGBIRD; take the GODDESS’ PENDANT (H).
- Add the GODDESS’ PENDANT to the GODDESS’ LOCKET (inventory).
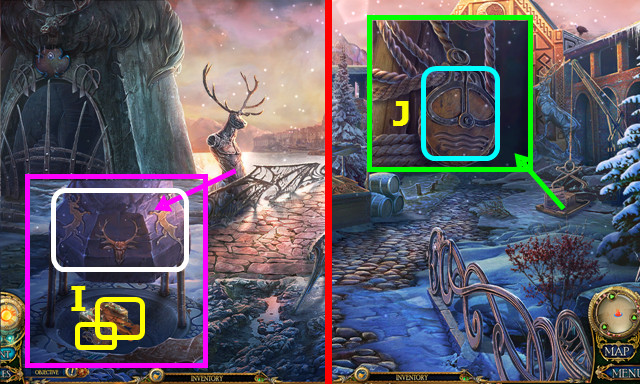
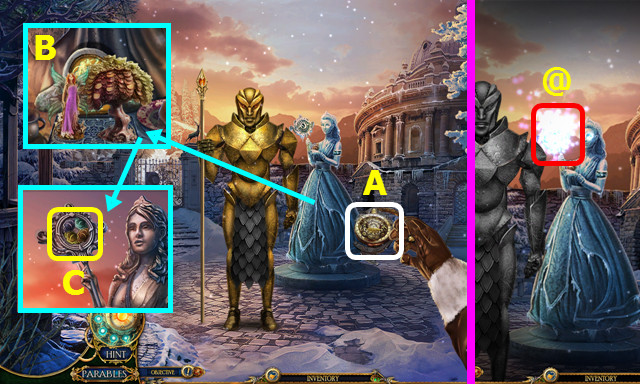
- Place the GODDESS LOCKET (I).
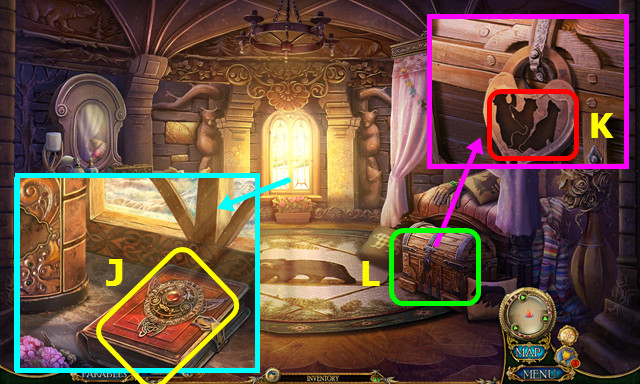
- Take the 2nd SOLDIER FIGURINE HALF and place the BEAR TOOTH (J).
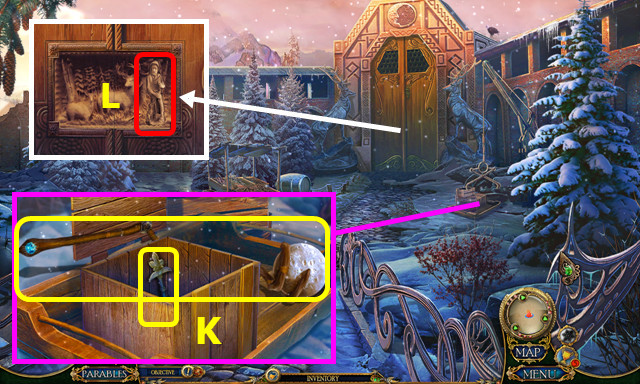
- Take the TWEEZERS and place GOLDILOCKS (K).

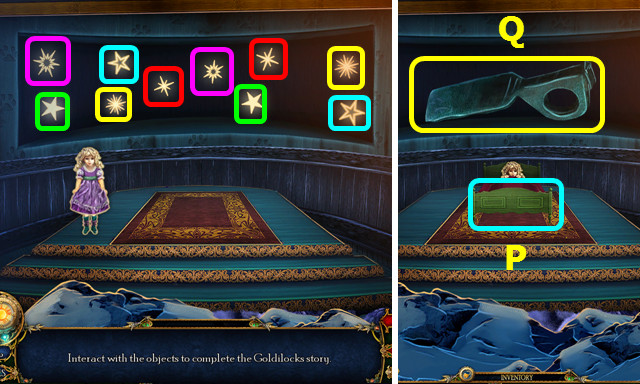
- Open the curtain.
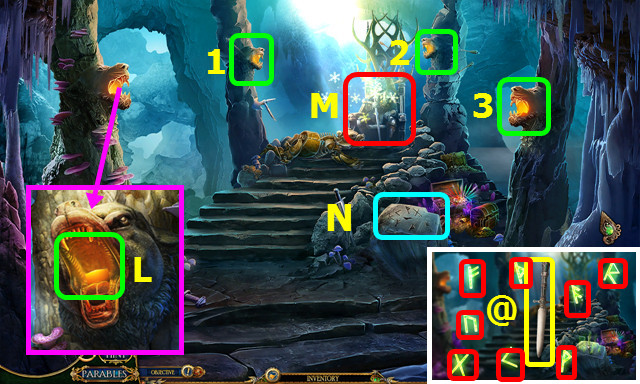
- Select the items in numerical order (1-12).
- Select Lx3-Mx2.
- Play the bears HOPs.
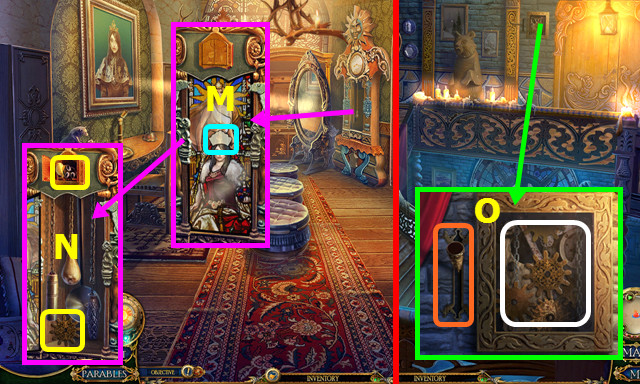
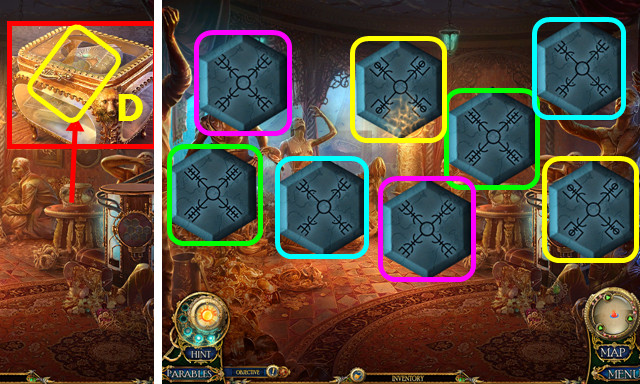
- Remove the lid, move the bowls, and select the smallest (N).
- Change the lock to match the key (O).
- Select pairs (color-coded).
- Select 3x (P).
- Take the ROCK WEDGE (Q).
- Walk left.
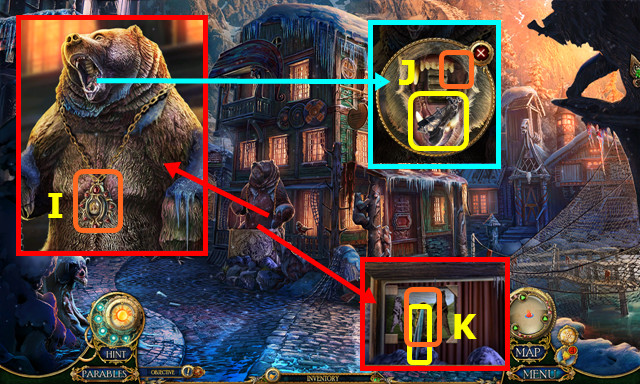
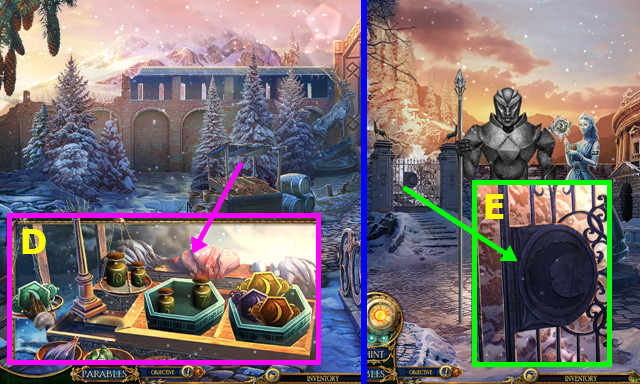
- Place the 2 SOLDIER FIGURINE HALVES; earn the ORNATE SHIELD (A).
- Take the WHETSTONE (B).
- Combine the WHETSTONE and SMALL AXLE to make the WHETSTONE ON AXLE (inventory).
- Walk down.
- Place the WHETSTONE ON AXLE; use the RUSTY SWORD to make the SHARP SWORD (C).
- Use the SHARP SWORD to take the ROPE (D).
- Walk left.
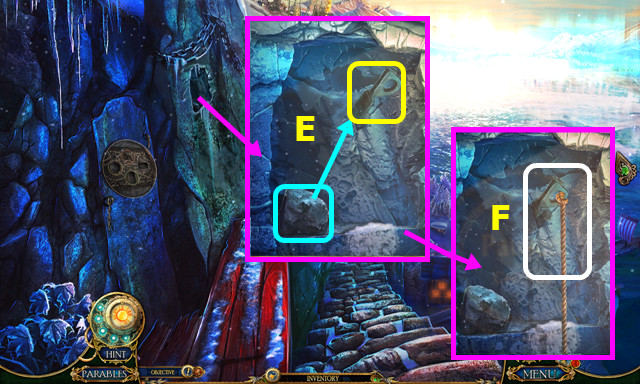
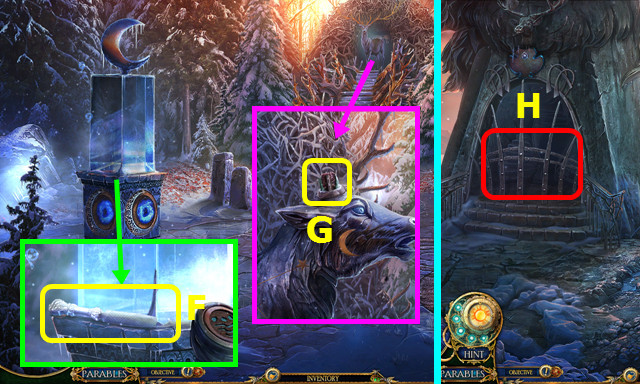
- Place the ROCK WEDGE and use the rock (E).
- Place the ROPE (F).
- Go forward.
- Use the AXE HANDLE to take JACK’S AXE (G).
- Use JACK’S AXE (H).
- Talk to Jack (I).
Chapter 2
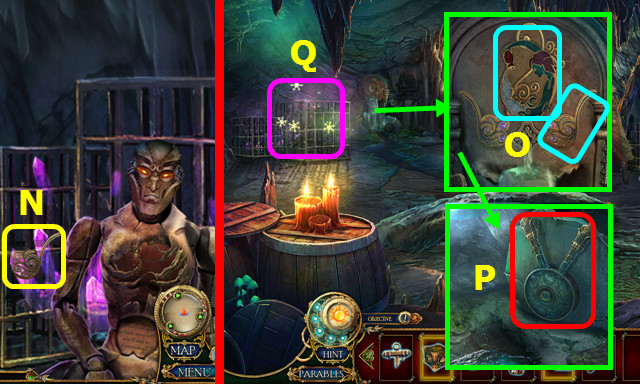
- Play the HOP; earn the THE MARK OF THE GODDESS (J).
- Take the FOX TANKARD (K).
- Change the 3 emblems; take the 1st GODDESS’ MARK PIECE (L).
- Open the chest, press the button, and take the HEART CONTAINER (M).
- Walk down.
- Place the MARK OF THE GODDESS; take the ARTIFACT PART (N).
- Combine the ARTIFACT and ARTIFACT PART; press the center (inventory).
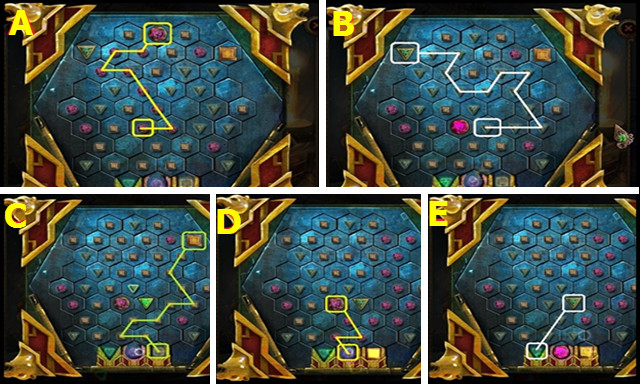
- Move the pieces along the paths A-B-C-D-E.
- Take the BEAR CLAW from the ARTIFACT opening.
- Go forward.
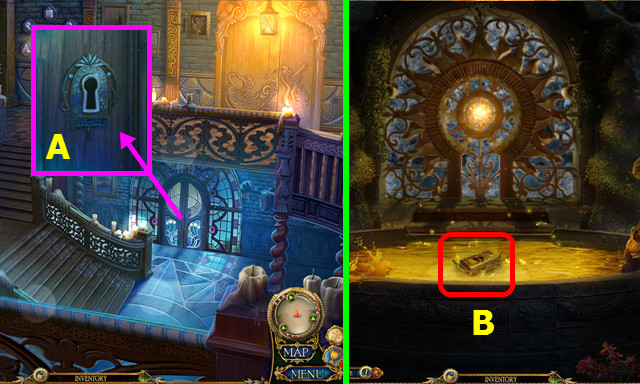
- Place the BEAR CLAW; open the door (F).
- Talk to Princess Leda and the Sentry; read the book (G).
- Use the TWEEZERS to take the OLD COIN; read the note (H).
- Turn the wheel; take THE MASK OF THE GODDESS (I).

- Take the THREE BRASS BEARS (J).
- Walk down.
- Move the banner and place THE MASK OF THE GODDESS; take the 2nd GODDESS’ MARK PIECE (K).
- Walk down.
- Place the 2 GODDESS’ MARK PIECES; take the MUSIC CYLINDER (A).
- Unwrap the MUSIC CYLINDER (inventory).
- Walk forward 2x.
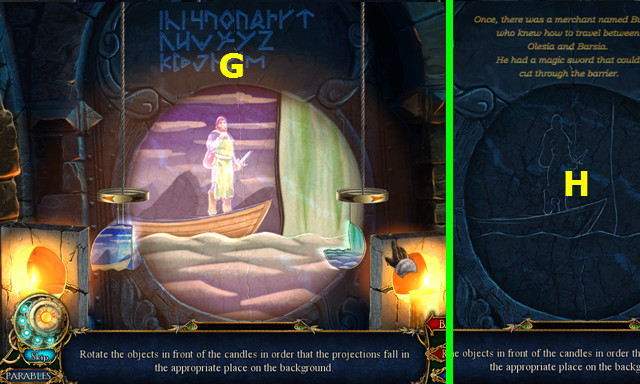
- Place the MUSIC CYLINDER (B).
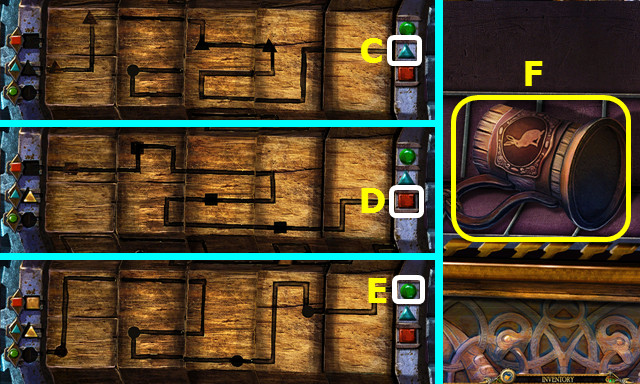
- Set the path shown; select (C).
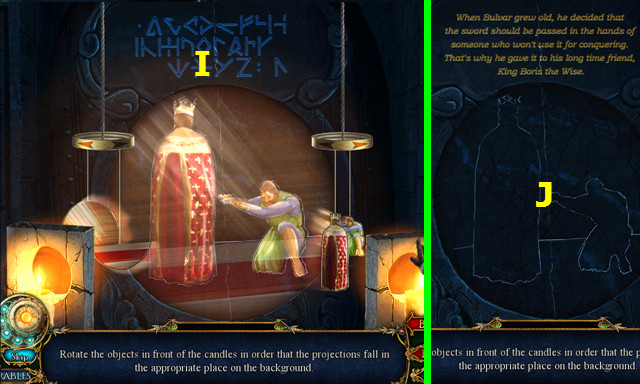
- Set the path shown; select (D).
- Set the path shown; select (E).
- Take the HARE TANKARD (F).
- Place the HARE TANKARD, FOX TANKARD, and BOAR TANKARD; arrange as shown (G).
- Walk left.
- Select 1-2-3.
- Play the HOP; earn the CRAFTSMAN’S EMBLEM (H).
- Place the OLD COIN; take the MALLET and SMALL KNOB (I).
- Walk down.

- Place the CRAFTSMAN’S EMBLEM; take THE MARK OF THE GODDESS (J).
- Use the SMALL KNOB; take the STASH KEY (K).
- Use the MALLET 2x; move the sawdust and take the TIN ORE (L).
- Walk down.
- Touch the ice 4x and use the STASH KEY; take the WOODCARVER’S SIGIL (M).
- Walk down.
- Place THE MARK OF THE GODDESS; take the GOLDEN PISTON (N).
- Walk forward 2x.

- Place the WOODCARVER’S SIGIL; take the ENERGY CORE (O).
- Walk left.
- Place the COPPER PIECES and TIN ORE; remove and take the BRASS HEART (P).
- Combine the HEART CONTAINER, BRASS HEART, ENERGY CORE, and GOLDEN PISTON to make the BEAR’S HEART (inventory).
- Walk down 2x.
- Place and press the BEAR’S HEART (Q).
- Walk forward.
Chapter 3
- Talk to Jack (A).
- Play the HOP; earn the HARPOON (B).
- Use the HARPOON (C).
- Go forward.
- Take the key ring (D).
- Take the LEVER and move the wood 4x (E).
- Take the key and BALLERINA BODY (F).
- Select the 4 keys (red); you earn the TOWER KEYS.
- Select (G).
- Use the TOWER KEYS.
- Solution: NL-LJ-JH-NK-KI-MK-KN-NL-LJ-MK-KN-NL.
- Walk left.
- Take the BALLERINA HEAD (O).
- Combine the BALLERINA BODY and BALLERINA HEAD to make the BALLERINA FIGURINE (inventory).
- Take the MERMAID AND THE PURPLE TIDE (P).
- Take the BIRD SEEDS (Q).
- Remove the banner (R).
- Place and pull the LEVER (S).
- Walk right.
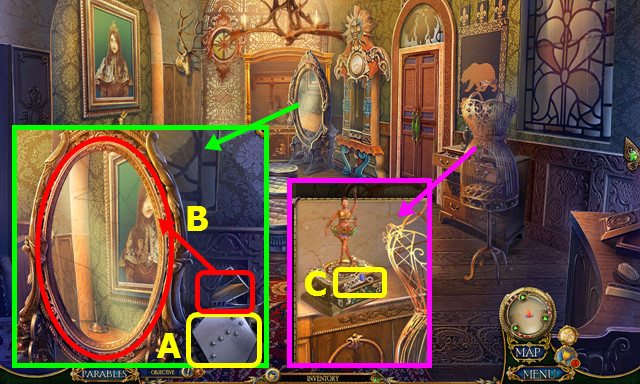
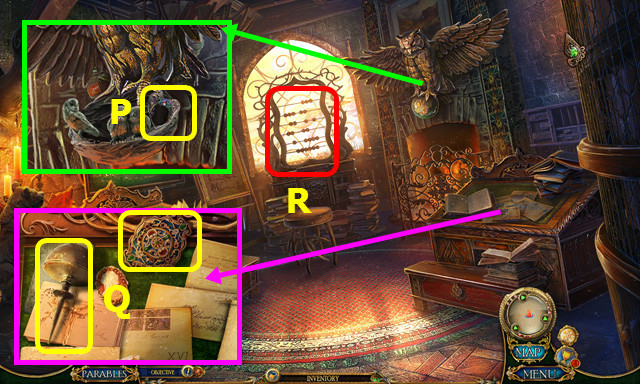
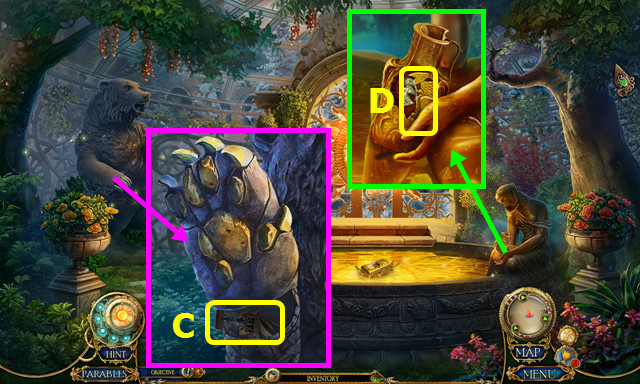
- Take the HEXAGONAL SHIELD ORNAMENT (A).
- Use the pieces to restore the mirror (B).
- Take the PRISON INSIGNIA and place the BALLERINA FIGURINE; take the STAR-SOCKETED LEVER (C).
- Walk down 2x.
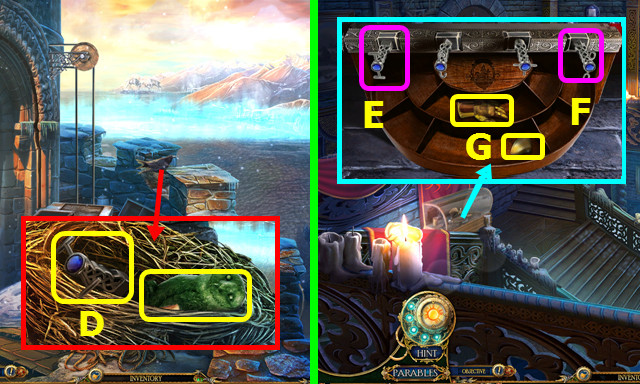
- Use the BIRD SEEDS; take the SQUARE-SOCKETED LEVER and JADE OWL (D).
- Walk left.
- Place the SQUARE-SOCKETED LEVER (E) and the STAR-SOCKETED LEVER (F).
- Take the GOLDEN GLOVE and BEAR CLAW AMULET (G).
- Walk right.
Chapter 4
- Place the GOLDEN GLOVE (H).
- Walk right.
- Talk to Goldilocks.
- Take the RISE OF THE SNOW QUEEN (I).
- Read the book; take the SMALL COG (J).
- Place the THREE BRASS BEARS (K).
- Play the HOP; earn the MINIATURE CROWN (L).
- Walk down.
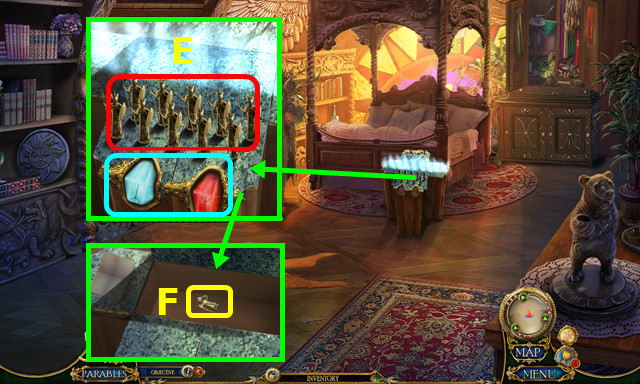
- Place the MINIATURE CROWN (M).
- Pull the chains; take the PART OF ABACUS and ORNATE COG (N).
- Walk down.
- Place the SMALL COG and ORNATE COG; pull the lever (O).
- Walk left.
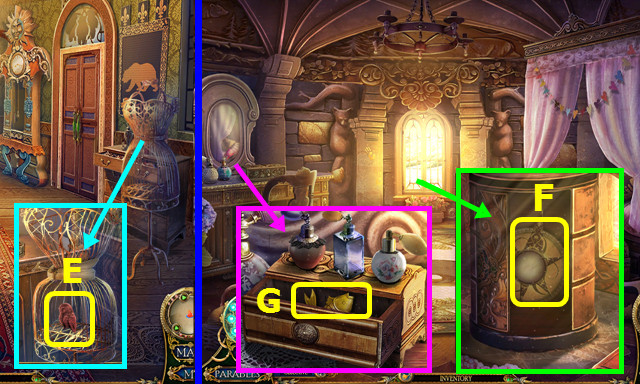
- Take the HEART SHAPED LOCKET (P).
- Take the DRAWER LID and ICE PICK; remove the other items (Q).
- Select (R).
- Place the PART OF ABACUS.
- Solution (S).
- Take the PERFUME BOTTLE and GARDEN KEY (T).
- Walk down.
- Use the GARDEN KEY (A).
- Walk forward.
- Touch (B).
- Place the BEAR CLAW AMULET; take the TOURNIQUET (C).
- Take the PEASANT RELIEF (D).
- Walk down and right.
- Use the TOURNIQUET; take the RUBY OWL (E).
- Walk right.
- Place and press the DRAWER LID; take the GOLDEN STAR (F).
- Place the PERFUME BOTTLE; take the GOLDEN FISH (G).
- Walk down 2x; go left.
- Place the JADE OWL and RUBY OWL (H).
- Play the HOP; earn the SQUARE SHIELD ORNAMENT (I).
- Walk down.
- Place the SQUARE SHIELD ORNAMENT, the ORNATE SHIELD, and the HEXAGONAL SHIELD AMULET (J).
- Swap the amulets as shown; take the SUN SHRINE LOCK PIECE (K).
- Go forward.
- Place the GOLDEN FISH; take the BLESSED STONE (L).
- Use the SUN SHRINE LOCK PIECE (M).
- Solution (N).
- Talk to the Sun Goddess; take the GLASS PRISM (O).
- Walk down and right.
Chapter 5
- Place and select the GLASS PRISM (P).
- Go forward.
- Select (Q).
- Place the GOLDEN STAR (R).
- Take the FIRE GEM and LOCKET CAMEO (S).
- Combine the HEART SHAPED LOCKET and LOCKET CAMEO to make the SISTERS’ LOCKET (inventory).
- Open the doors and play the HOP; earn the TREE OF LIFE (T).
- Walk down 2x; go forward.
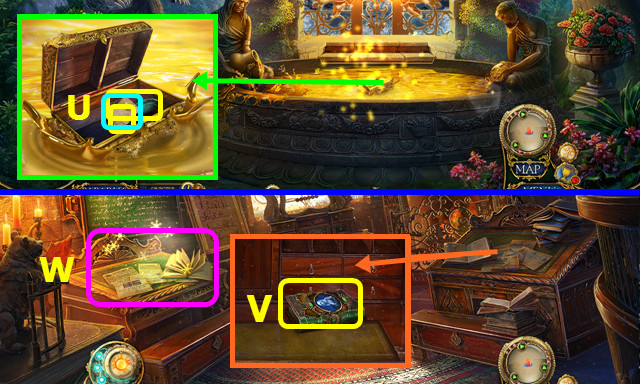
- Place the SISTERS’ LOCKET and read the note; take the ANCHOR PIECE and NOTARY’S SEAL (U).
- Walk down and left.
- Place the NOTARY’S SEAL; take THE FINAL CINDERELLA (V).
- Play the HOP; earn the ARTIFACT PART (W).
- Combine the ARTIFACT and ARTIFACT PART; press the center (inventory).
- Move the token on the paths A-H.
- Take the TREASURY KEY from the ARTIFACT.
- Walk down, right, and forward.
- Place the RISE OF THE SNOW QUEEN, MERMAID AND THE PURPLE TIDE, and THE FINAL CINDERELLA; place the books in order (P).
- Use the TREASURY KEY (Q).
- Walk left.
- Take the SHACKLES INSIGNIA (A).
- Place the TREE OF LIFE (B).
- Use the FIRE GEM (C).
- Use the ICE PICK 3x; read the book and take the CURSED STONE (D).
- Talk to Goldilocks.
- Select the pairs (color-coded).
- Walk down.
Chapter 6
- Place the BLESSED STONE and the CURSED STONE; select the figurines (E).
- Read the note and take the KNIGHT (F).
- Walk left.

- Place the PEASANT RELIEF and the KNIGHT; take the BEAR TOTEM PART and ROOSTER CARVING (G).
- Walk down 2x.
- Place the ROOSTER CARVING; take the 1st BRASS CYLINDER and FORTRESS RELIEF (H).
- Walk down.
- Place the FORTRESS RELIEF; take the ROSEBUD (I).
- Walk down.
- Place the ROSEBUD; take the TORTURE CHAMBER INSIGNIA (J).
- Walk down 2x.
- Place the SHACKLES INSIGNIA, TORTURE CHAMBER INSIGNIA, and PRISON INSIGNIA (K).
- Walk left.

- Take the CHISEL HANDLE (L).
- Select 2x to take the MIRROR (M).
- Talk to Princess Leda.
- Go forward.

- Take the FAIRY FIGURINE (N).
- Take the IMPROVISED CROWBAR (O).
- Walk down.

- Use the IMPROVISED CROWBAR 2x (P).
- Open the cabinet; take the SUN SPEARHEAD (Q).
- Combine the SUN SPEARHEAD and IMPROVISED CROWBAR to make the SUN SPEAR (inventory).
- Walk forward.
- Place the SUN SPEAR (R).
- Walk right.
- Open the flap; take the CRAFTSMAN DIARY (S).
- Combine the CRAFTSMAN’S DIARY and MIRROR; take the BLUE CORE (inventory).
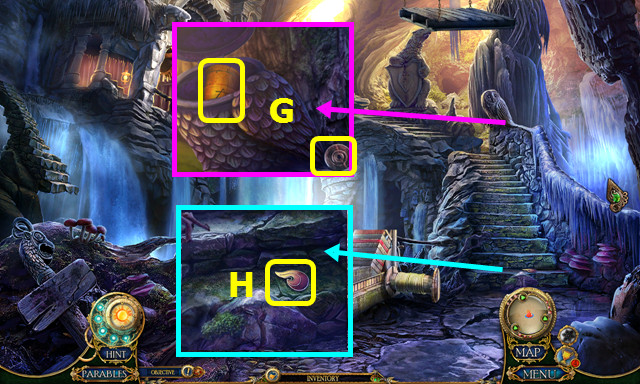
- Move the branches 3x and play the HOP; earn the MOON GODDESS’ STAFF (T).
- Take the TWINE (U).
- Take the OWL’S EYE; move the ashes 3x (V).
- Walk down.
- Place the MOON GODDESS’ STAFF (A).
- Take the FIREFLY (B).
- Walk right.
- Place the FIREFLY; take the ILLUMINATING STONE (C).
- Walk down.
- Select (D).
- Use the ILLUMINATING STONE.
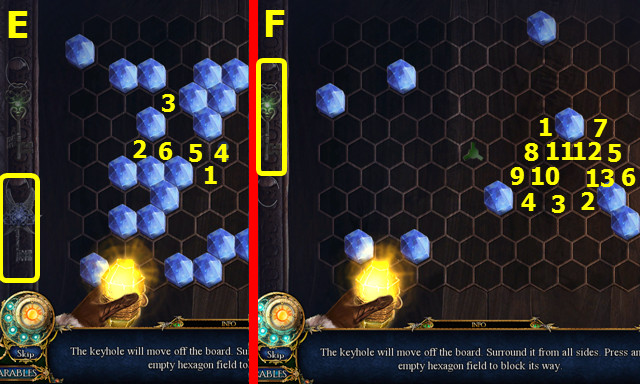
- Select 1-6; select the key (E).
- Select 1-13; select the key (F).
- Walk forward.
- Place the OWL’S EYE; take the 2nd BRASS CYLINDER and CRAFTSMAN’S DIARY COMPONENT (G).
- Combine the CRAFTSMAN’S DIARY and CRAFTSMAN’S DIARY COMPONENT to find the PURPLE CORE (inventory).
- Take the FIRE ORNAMENT (H).
- Walk down and right.
- Place the FIRE ORNAMENT; take the CHISEL BLADE (I).
- Combine the CHISEL HANDLE, CHISEL BLADE, and TWINE to make the CHISEL (inventory).
- Place the 2 BRASS CYLINDERS; change the symbols as shown (J).
- Take the AQUARIUS ORNAMENT (K).
- Walk down.
- Use the CHISEL to take the AUTOMATON HEAD (L).
- Add the BLUE CORE and PURPLE CORE to the AUTOMATON HEAD (inventory).
- Walk down.
- Place the AUTOMATON HEAD (M).
- Talk to the Automaton; take the WAVE ORNAMENT (N).
- Place the AQUARIUS ORNAMENT and WAVE ORNAMENT (O).
- Select (P).
- Play the HOP; earn the ELEGANT CRANK (Q).
- Walk forward 2x.
- Use the ELEGANT CRANK (R).
- Use the CHISEL; take the BIRD TOTEM PART (S).
- Go forward.
- Move the bucket; take the STAG HEAD (A).
- Use the CHISEL to take the CRAFTSMAN’S DIARY COMPONENT (B).
- Combine the CRAFTSMAN’S DIARY and CRAFTSMAN’S DIARY COMPONENT to find the PLANT TOTEM PART (inventory).
- Place the BEAR TOTEM PART, BIRD TOTEM PART, and PLANT TOTEM PART; take the LAUREL WREATH (C).
- Walk down.
- Place the LAUREL WREATH; turn the valve (D).
- Walk left.

- Take the ARTIFACT PART (E).
- Combine the ARTIFACT and ARTIFACT PART; press the center (inventory).
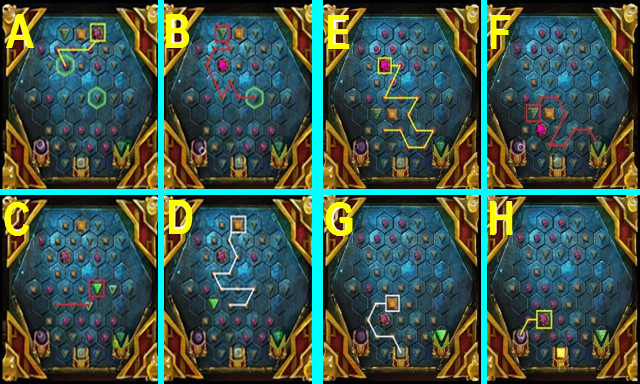
- Move the token on the paths F-L.
- Take the LABYRINTH KEY from the ARTIFACT.
- Use the LABYRINTH KEY (A).
- Select 1-6.
- Go forward.
- Go left (B), go right (C).
- Pull the lever; go left (D).
- Go right (E), go left (F).
- Remove the glass; take the AUTOMATON FIGURINE (H).
- Select (I).
- Play the HOP; earn the STONES OF DARKNESS (J).
- Walk down 2x and forward.
- Select (K).
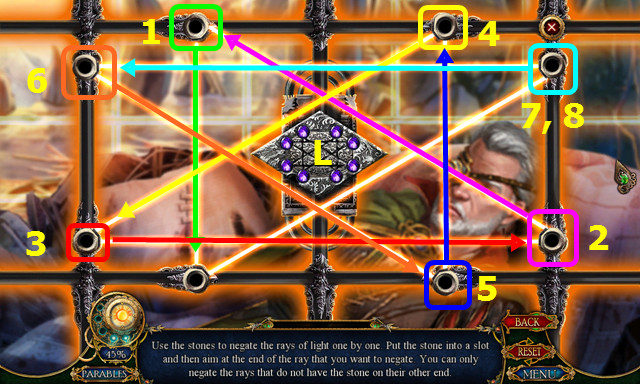
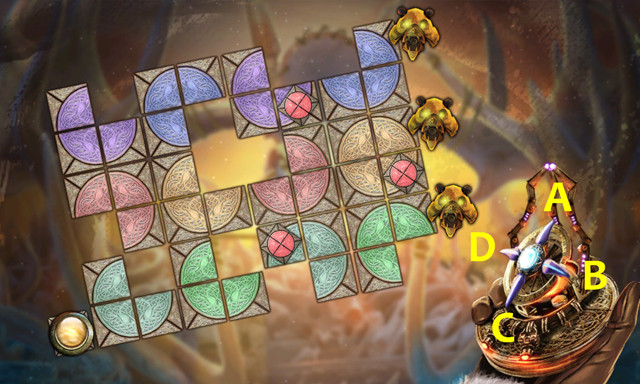
- Place the STONES OF DARKNESS in the center (L).
- Place a stone from the center in a node and select the node in the indicated direction (1-7).
- Place the final stone in (8).
- Talk to the Craftsman and Princess Leda.
Chapter 7

- Move the items; select the knife (A).
- Open the seam; take the RUSTED KEY (C).
- Walk down, left, and forward.

- Use the RUSTED KEY (D).
- Go forward.
- Place the AUTOMATON FIGURINE; take the TOMMY BAR (E).
- Walk down.
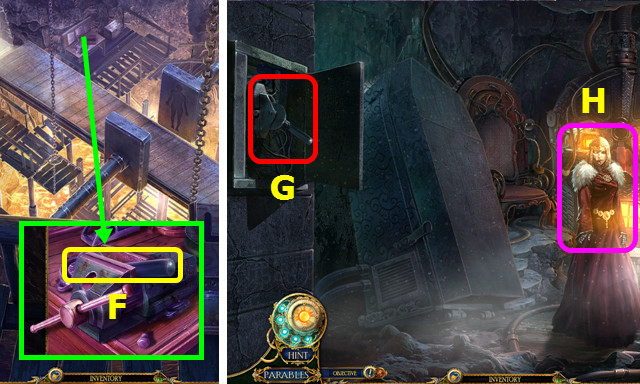
- Place and turn the TOMMY BAR; take the CONTROL ROOM MECHANISM (F).
- Go forward.
- Place and pull the CONTROL ROOM MECHANISM (G).
- Talk to the Queen (H).
Chapter 8
- Take the SCALES EMBLEM (I).
- Walk right.
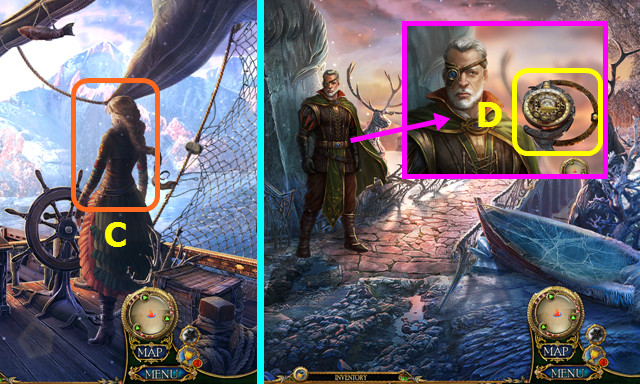
- Talk to Goldilocks; take BULVAR’S NOTES (J).
- Look at BULVAR’S NOTES; take the SHIP EMBLEM and BULVAR’S NOTES PIECE (inventory).
- Walk forward.
- Place the SHIP EMBLEM and SCALES EMBLEM (K).
- Enter Bulvar’s House (L).
- Take the COMPASS NEEDLE (M).
- Walk down and right.

- Place the COMPASS NEEDLE (N).
- Take the FEATHER (O).
- Return to Bulvar’s House.
- Use the FEATHER (P).
- Open the scroll; add the BULVAR’S NOTES PIECE to make BULVAR’S NOTES (Q).
- Give BULVAR’S NOTES (R).
- Move the rug; take the ANCHOR (A).
- Walk down and right.
- Place the ANCHOR and ANCHOR PIECE; take the METAL RING and LAMP OIL (B).
- Go to Bulvar’s House.
- Move the rug and use the METAL RING; take the PICKAXE (C).
- Walk down 3x.
- Use the PICKAXE 3x; take the KING AND QUEEN STATUE (D).
- Walk left.
- Place the KING AND QUEEN STATUE (E).
- Select (F).
- Restore the image (G).
- Select (H).
- Restore the image (I).
- Select (J).
- Restore the image (K).
- Select (X).
- Use the LAMP OIL (L).
- Select 1-3.
- Play the HOP; earn the ANCIENT DAGGER (M).
- Place the ANCIENT DAGGER (N).
- Select all the runes; take the EMPOWERED DAGGER (@).
- Talk to the Goddess (O).
- Take the RELIQUARY and MAP SCROLLS (P).
- Go to the Ship.
- Select (Q).
- Place the MAP SCROLLS.
- Arrange the black runes (A).
- Select (B).
Chapter 9
- Use the EMPOWERED DAGGER (C).
- Talk to the Craftsman; take the CRAFTSMAN’S DEVICE (D).
- Use the PICKAXE 3x and play the HOP; earn the ORNATE LOCK PIECE (E).
- Take the MYSTICAL TREE (F).
- Walk forward.
- Take the METAL STAG (G).
- Take the WOODEN STAG (H).
- Walk down.
- Place the WOODEN STAG, STAG HEAD, and METAL STAG; take the PULLEY and SHEPHERD FIGURINE (I).
- Walk forward.
- Place the PULLEY (J).
- Place the ORNATE LOCK PIECE; take the SANCTUARY SEAL and FULL MOON STAFF (K).
- Place the SHEPHERD FIGURINE (L).
- Solution (M).
- Select P-O-Q-P-Q-N-Q-N-P-Q-P-R-Q-R-Q-P-Q-P-O.
- Go forward.
Chapter 10
- Select 3x (A).
- Take the LIGHTHOUSE INSIGNIA; place the FAIRY FIGURINE and MYSTICAL TREE (B).
- Take the MOON RELIC TOKENS (C).
- Select (@).
- Walk down.
- Place the MOON RELIC TOKENS; move the token and weights as shown (D).
- You earn the MOON TOKEN.
- Combine the RELIQUARY and MOON TOKEN; take the MOON SHRINE KEY (inventory).
- Go forward.
- Use the MOON SHRINE KEY (E).
- Walk left.
- Take the RASP (F).
- Take the WATCHTOWER INSIGNIA (G).
- Walk down 3x.
- Select (H).
- Place the LIGHTHOUSE INSIGNIA and WATCHTOWER INSIGNIA.
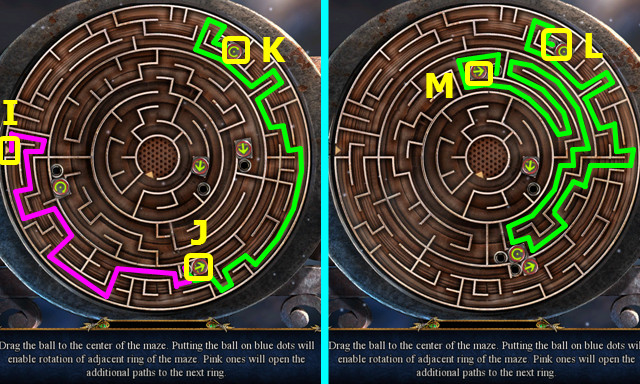
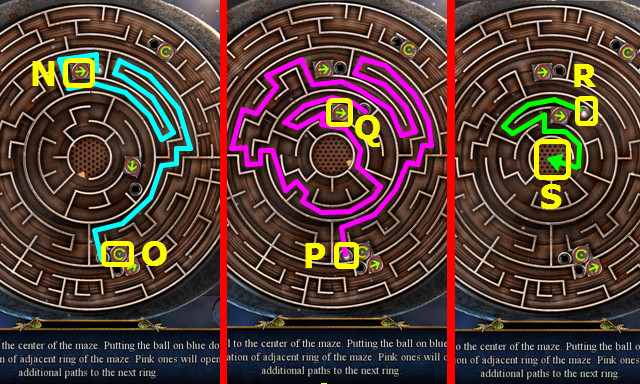
- Drag the ball (I) to (J); press the button.
- Drag the ball to (K); press the button.
- Drag the ball (L) to (M); press the button.
- Drag the ball (N) to (O); press the button.
- Drag the ball (P) to (Q); press the button.
- Drag the ball (R) to (S).
- Walk left.

- Take the CLAMP (A).
- Use the RASP 3x; open the box and take the CRESCENT MOON STAFF (B).
- Take the BLACK SWAN (C).
- Play the HOP; earn the HEART ARROW (D).
- Walk down.
- Use the CLAMP 2x; take the KNOB (E).
- Walk left.
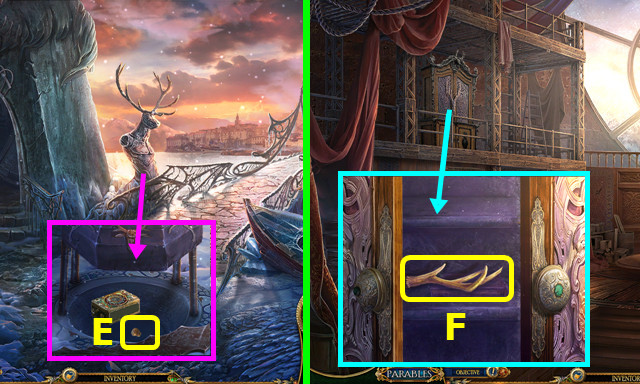
- Use the KNOB; take the ANTLERS (F).
- Walk down; go forward 2x, and then go left.
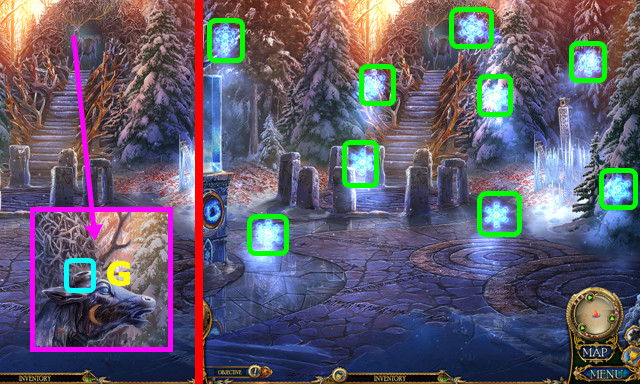
- Place the ANTLERS (G).
- Select the 9 snowflakes (green).
- Select (@).
- Take the CRESCENT MOON STAFF PIECE (H).
- Add the CRESCENT MOON STAFF PIECE to the CRESCENT MOON STAFF (inventory).
- Play the HOP; earn the MOON ARROW (I).
- Walk down.

- Place the MOON ARROW, SANCTUARY SEAL, and HEART ARROW (J).
- Walk forward.
- Take the HALF-MOON STAFF (K).
- Walk down and left.
- Place the FULL MOON STAFF (L), HALF-MOON STAFF (M), and CRESCENT MOON STAFF (N).
- Take the WHITE SWAN (O).
- Walk down and right.
- Place the BLACK SWAN and WHITE SWAN (P).
- Take the VOLCANO RUNE (Q).
- Take the LAKE RUNE (R).
- Walk down and left.
- Use the LAKE RUNE; take the TRANQUILITY STONE (S).
- Walk down 3x; go left.
- Use the VOLCANO RUNE; take the RAGE STONE (T).
- Walk down, go forward 2x, and go right.

- Place the RAGE STONE (U).
- Place the TRANQUILITY STONE (V).
- Take the ARTIFACT PART (W).
- Combine the ARTIFACT and ARTIFACT PART; press the center (inventory).
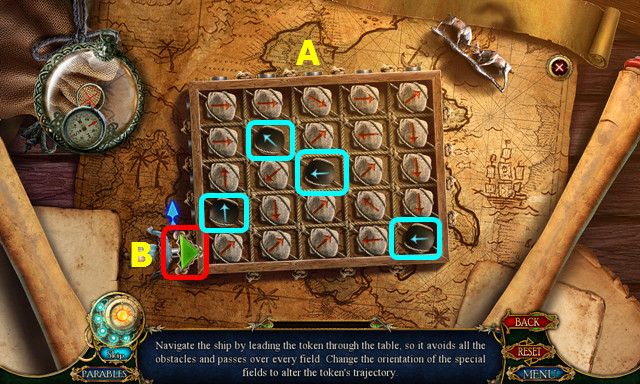
- Move the tokens on the indicated paths (A-F).
- Move across the field using the arrows on the trinket: 1xB-3xA-3xB-1xC-1xB-2xC-4xA-2xB-1xA-1xB-3xC.
- Use the ARTIFACT (G).
- Walk forward.
- Talk to the Queen; use the CRAFTSMAN’S DEVICE (H).
- Final fight not complete.
- Select (I).
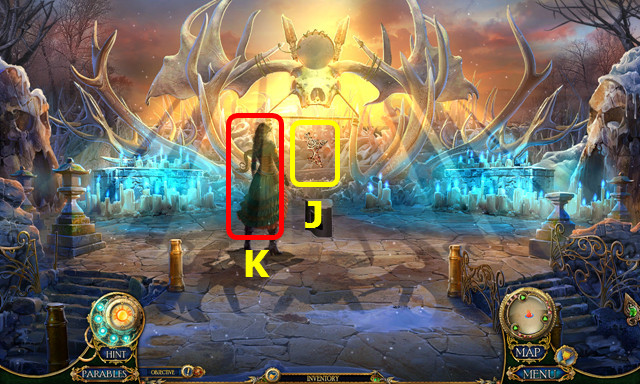
- Use the ARTIFACT; take the FALLEN STAR (J).
- Give the FALLEN STAR (K).
- Congratulations! You have completed Dark Parables: Goldilocks and the Fallen Star!


 Chronicles of Mystery: Tree of Life Walkthrough, Guide, & Tips
 Reincarnations: Uncover the Past Walkthrough, Guide, & Tips
 Chronoclasm Chronicles Walkthrough, Guide, & Tips
 Time Mysteries: The Ancient Spectres Walkthrough, Guide, & Tips
 Enlightenus II: The Timeless Tower Walkthrough, Guide, & Tips