BioWare is a company well known for their popular RPG-based games, such as Knights of the Old Republic, Neverwinter Nights, and the Baldur's Gate series. So when they decided to create an entirely new and original game called Mass Effect, based on the latest version of the Unreal Engine, it's no surprise that soon after its release for the XBox 360 it became a hit. However PC gamers were left out in the cold, and it wasn't until six months later that we've finally been able to get our hands on Mass Effect to see for ourselves what all the fuss is about.
The good news is that, as promised, BioWare has indeed put some effort into making sure that Mass Effect is not just another poor quality console port: the control system and the HUD in particular have been refined to better suit the PC's keyboard and mouse; the graphics have been improved; and most important of all, the performance of the game is excellent - at least for most people. Mass Effect's gameplay has similarities with previous BioWare games, however the combat is much more fluid and more likely to suit FPS gamers. The storyline and atmosphere seem to have a mix of elements from TV shows like the new Battlestar Galactica and Stargate Atlantis, as well as classic movies like Blade Runner and Star Wars. At times it may border a little too closely on simply being an interactive movie, however in general there are enough chances for you to engage in relatively freestyle exploration and combat, so it never really feels like it's on rails, even when it is. Overall the game seems to hit the mark in drawing the player into its intriguing and colorful world, keeping you focused on wanting to learn more about what's really going on, and how you fit into the bigger picture.
However the game's release was not without controversy. A major concern that many people have had with regards to Mass Effect's PC debut is its much-maligned Activation system. As a single-player PC game, EA and BioWare felt that it was necessary to beef up the game's defences against piracy, and as a result Mass Effect verifies itself online the first time it is run, and subsequently whenever you install a new update for it. I won't get into specifics here - refer to page 4 of this guide for all the details of how this system works.
As I noted earlier, for the most part Mass Effect actually performs quite well, as long as you meet the game's minimum requirements. The game is based on the Unreal Engine 3.0, which through various tricks and effects produces an attractive game world without crippling your PC. However I've produced this guide firstly to make sure that everyone understands all the in-game settings, but more importantly, so that all the major advanced tweaks which allow further optimization and customization of both graphics and gameplay can be documented in the one location. The guide is rounded out with a range of troubleshooting tips and other information which should be of great use to Mass Effect players, so give it a run through.
Note: This guide refers to the latest version of Mass Effect, Version 1.02. Make sure to check back regularly for updates.
Before getting into any game-specific settings and tweaks, this section covers the obligatory system optimization information I include in all my guides. If you've followed this advice recently, you can skip this section.
Many people report problems with this game and in almost all cases these are due to general system issues and not the game itself. With that in mind I strongly urge you to take some time and follow the advice below if you truly want this game, and indeed every other game you own, to run at its fastest and most trouble-free.
The place to start is with the TweakGuides Tweaking Companion. It is the complete system optimization guide for Windows users. Designed for novice and advanced users alike, it is written in plain English to help you genuinely understand all aspects of Windows and your PC. The guide covers every major topic, from the correct installation of Windows and critical drivers and software, through to recommendations for every significant setting and feature, all the major performance and convenience tweaks and customizations, as well as detailed troubleshooting advice. There are also links to a range of reliable free applications which can enhance your system and give you viable alternatives to purchasing commercial software. There are separate versions available for Windows XP, Windows Vista and Windows 7.
If you've ever wondered what common graphics and display settings like FPS, VSync, Refresh Rate, Antialiasing and Anisotropic Filtering are, and how they really work, then check out my Gamer's Graphics & Display Settings Guide for all the details in an easy to understand format. The guide also gives you a rundown on exactly how a game goes from a being a set of files on your hard drive to a 3D image on your screen, including relevant performance tips.
Finally, if you run an ATI or Nvidia graphics card, I have written two comprehensive guides which you should check out: the ATI Catalyst Tweak Guide and the Nvidia Forceware Tweak Guide. These guides cover absolutely everything about the latest graphics drivers, how to set them up correctly, as well as advanced tweaking, overclocking and benchmarking tips. They're a must-read for configuring your graphics card correctly.
The above information really will serve you well in the long run, not just in this game. If you don't optimize your system and keep everything updated and maintained correctly you will keep running into "mysterious" problems time and time again. Do yourself a favor and when you get a chance spend an afternoon or two optimizing your machine the right way with the guides above.
The next section goes into more detail about specific troubleshooting tips which address common performance issues with the game.

This section contains specific troubleshooting tips which address many of the common problems experienced by Mass Effect players. I can't stress enough the importance of taking the time to go through the checklist of advice below if you're having a problem with the game.
Official Support: The first place to look for official support details is in the Readme_en.txt file in your \Program Files\Mass Effect\docs directory. Make sure your system meets all the System Requirements, and check all the known issues. If you want to, you can also download a PDF version of the Mass Effect Manual. For more detailed official help, you can visit the Official EA Support Site for various support channels. In terms of community technical support, make sure to check through the Official BioWare Mass Effect Forums. There's plenty of valuable advice out there if you spend some time searching for it.
Config Utility: The Mass Effect Config Utility can be accessed either by selecting the 'Configure' option in the Mass Effect launcher menu, or by directly running the file MassEffectConfig.exe found in the \Program Files\Mass Effect\Binaries directory. This utility has a range of features for configuring the game settings before launching it (e.g. if for some reason you can't access the in-game settings); for Repairing launch icons or Firewall exceptions; and for viewing details about your system. Generally speaking you shouldn't use it unless you experience problems and can't enter the game to alter the settings there.
Installation Issues: The game installer is not connected to the game's Activation system, they are completely separate. However if you are having problems installing the game, follow the procedures detailed here to manually install it.
Patch Issues: For details on the latest patch see page 4, and remember that after the patch you will need to reconfigure many of your settings as it resets them to default. Note that on some systems installing the 1.01 Patch can cause explorer to repeatedly crash and restart - a solution is provided here, and an official fix is also provided as part of the 1.01a patch (see page 4). Most users should instead install the latest 1.02 Patch to prevent any issues.
Activation Issues: Full details of the new Activation system used in Mass Effect are provided on page 4. For most people, the process is quick and painless: you simply launch the game while connected to the Internet, and the first time the game runs, it verifies itself without any prompts or indications, and the game starts normally. However for some people the process may be problematic - you may experience a black screen or a crash at startup, or an error message. If that occurs try the following:
For further help if the above don't work, contact EA Support and provide them with relevant information. Once again, more details about Activation are provided on page 4 of this guide.
The Latest Drivers: Mass Effect generally requires the latest drivers for your various hardware components in order to function properly. Many audio and video-related issues can be completely resolved simply through a driver update. Refer to the Windows Drivers/Driver Installation chapter of the TweakGuides Tweaking Companion for the various links and details required to undertake this step correctly. Note that if there are newer Beta drivers available for your hardware, you may wish to use these as they could contain Mass Effect-specific fixes in them.
Update: BioWare now recommends Nvidia users use the 182.06 or newer Forceware drivers to prevent known General Protection Fault (GPF) issues on GeForce 8 series cards. However note that as covered further below, most GPF issues are not related to software bugs or glitches and are a symptom of an unstable or unoptimized system.
Audio Issues: For specific details on how to troubleshoot and resolve audio-related problems, aside from updating your audio drivers (see above), see the Sound section of the In-Game Settings, as well as the audio-related settings in the Advanced Tweaking section of the guide. There are known problems with the way Mass Effect configures audio on some systems. In particular make sure to install the latest patch as it has audio-related fixes - see Page 4, 6 and 7 for details.
Saved Games: If you are having problems with saving games, this typically occurs if your \My Documents (XP) or \Documents (Vista) directory doesn't exist for some reason, is write-protected, or if it is in some other way non-standard. More details of this problem and other potential workarounds are here. Note however that it is a known issue with pirated versions of the game that the save system may not function correctly; this is intentional.
Update: This issue has been fixed as of the 1.02 Patch.
General Protection Faults: 'General Protection Fault' (GPF), 'Critical Error' or other crashes including general Crashes to Desktop (CTDs) are present in all games based on the Unreal Engine stretching back to the original Unreal game released in 1999, as well as various versions of Unreal Tournament. Essentially it is not a new phenomenon, there is no single specific cause, it is generally caused by an overstressed system becoming unstable. It's not going to get 'patched' out of the game, since it is almost always a symptom of other problems, not a bug in itself. There are ways to minimize or prevent it - GPF crashes are almost always related to sub-optimal system conditions such as one or more of the following: overclocked and/or overheating systems; poorly installed and/or outdated drivers; and systems with various unnecessary programs running in the background. By running through the TweakGuides Tweaking Companion in detail you will be able to fix these issues once and for all - and note that proper optimization fixes stability in many games, not just Mass Effect. Trust me when I say there is no magic fix, and no patch will ever fully resolve it. I've been dealing with this type of error for almost ten years, and the only solid solution ever found has been to optimize your entire machine. I personally have not experienced a GPF in over four years in a range of Unreal Engine-based games, and many hours of testing Mass Effect under various circumstances.
Background Programs: Game developers recommend that you disable all background applications - especially virus, trojan and spyware scanners and messaging utilities - before playing games. These background applications can and do use up valuable CPU resources, take up precious RAM, cause memory conflicts and crashes to desktop, but most importantly they interfere with read/writes to your hard drive effectively slowing it down and causing even more in-game freezes and stuttering. Full instructions on how to identify your startup programs and services and how to correctly disable unnecessary ones are in the TweakGuides Tweaking Companion. This is an important step you should not miss.
Overclocking: As with most games, Mass Effect can be sensitive to overclocking, so if you are experiencing graphical glitches or crashing in the game, set everything back to its default speeds and see if this impacts on the problem. If you don't experience the same problems at default speed, or they're reduced in severity, then your overclock is the primary culprit. Either permanently reduce your overclock and/or increase cooling to regain stability. Don't ever assume that just because some other games or artifical benchmarks or stress tests run with stability at a particular speed that every game will do the same.
These are just the most significant fixes for common problems. If you follow the advice in this guide, as well as the TweakGuides Tweaking Companion, you should be able to play the game more smoothly and with much greater stability. Read the remainder of this guide for specific settings and tweaks which can help improve your performance and resolve any problems. The next section looks at Patches, Activation and mods.
Official Patches
A recent 1.02 Patch has been released for Mass Effect. The patch primarily fixes a range of bugs, including audio-related issues, and also changes the activation procedure slightly - see further below for details. The patch also appears to affect dynamic shadows - see dynamic shadows on the next page for more details. Note that installing the patch may reset all your settings back to the game defaults.
Remember that the installation of any updates for Mass Effect may require that the game be re-activated over the Internet - see below for full details of Activation. Note that I will update this section accordingly with details of any new patches so check back often or keep an eye on the front page of this site.
Copy Protection/Activation
Since Mass Effect is a single-player game with no multiplayer component, and thus is generally more susceptible to piracy, BioWare/EA have decided that the best way to protect it is to incorporate an online verification system into the game. This type of online 'Activation' is similar in theory to that used in both Windows XP and Vista, as well as games like BioShock (details here) and even Valve's Steam content delivery/Digital Rights Management (DRM) platform. The specific protection method used for Mass Effect is based on SecuROM technology, and details of how it works are provided in this Mass Effect Activation FAQ.
Because many people are concerned about Mass Effect's Activation process, below is a step-by-step rundown of how it works:
1. The user installs the game as normal, entering their serial number. At this point no checks are made, so uninstalling and reinstalling the game can be done as many times as desired. Note that installing the game installs SecuROM, however SecuROM is not spyware and does not run in the background when the game is not active.
2. Upon double-clicking on the game's desktop icon, a Launcher initiates, providing a range of options.
3. The very first time the option to Play is chosen from the launcher, or the main MassEffect.exe executable found under the \Program Files\Mass Effect\Binaries directory is run, the game begins the Activation process.
4. The user must be connected to the Internet for the Activation process to succeed. The first time the game is launched it will connect to EA's SecuROM server and verify that the serial number entered during installation is legitimate. No personal information is taken from your computer. There are no prompts or progress indicators - if the process is successful you will eventually arrive at the intro movies and finally the main game menu; note that this may take a minute or two while it appears the game has hung.
5. If the process fails, you may receive an error message, or you may simply see a frozen black screen or get a crash. Typically you must ensure the following:
You have an active Internet connection. Your Firewall is not blocking the game's connection attempts. You do not have more than 3 separate installations of the game at the same time. You are not running the Process Explorer utility from Sysinternals in the background. You are not running any emulation software or software designed to bypass SecuROM. If running under Vista with UAC enabled, try launching the game by right-clicking on the main executable and selecting 'Run as Administrator'.
One major benefit of this process is that due to online verification, BioWare/EA have removed any disk checks for Mass Effect; you do not need to keep your DVD in the drive while playing.
It is important to note that although initially BioWare/EA had planned for regular 10-day Activation checks, this was dropped before release. Instead now Activation only occurs the first time the game is run, and again whenever new content such as a patch is downloaded and added to the game. So the only time you need to have an active Internet connection is the first run of the game and when updating it. At all other times, you can play the game while online or offline and not worry about any checks.
Note however that there is a 3 Activation limit, which essentially limits you to only having 3 concurrent installations of the game. This is not the same as only being able to install the game three times. If you have any problems with Activations, see the FAQ link above, as well as the Troubleshooting Tips section of this guide for more details and links to EA Support resources. For example if you require more than 3 Activations for a legitimate reason, BioWare has said that EA Support will provide you with this.
In terms of concerns over whether EA/BioWare will maintain this protection in the future, and what will happen if they take down their SecuROM servers, it has been hinted quite strongly that they will remove the protection in the future, probably via a patch, if they feel they can no longer support the game. So concerns that you won't be able to play your legitimately purchased game later on appear to be unfounded.
Update: As of the 1.02 Patch the following changes have been made to activation of Mass Effect:
To manually use the SecuROM activation revoke ability, make sure the 1.02 Patch has been installed, then go to the \Program Files\Mass Effect\Binaries directory. You will need to run the command MassEffect.exe -ead_gl_remove to manually revoke an activation. One way to do this is to right-click on MassEffect.exe select Send To>Desktop, then on the Desktop right-click the new MassEffect.exe icon, select Properties, and in the Target box leave one blank space after the last character and add -ead_gl_remove and click Apply, then OK, then launch the icon to revoke the activation. Delete the icon when finished.
Note: There is a known issue where some users will encounter an incorrect error during uninstallation stating "There is a problem with verifying ownership of your game". BioWare recommends that in the majority of cases this error can be ignored as uninstallation will have completed successfully.
Ultimately while this form of DRM might be an annoyance to some users, for the most part it is fairly straightforward and does not require any user input or action to work. The benefits include the removal of the DVD check common to most other games, and the fact that there appears to be no performance impact on the game itself. At least within the first week of release, this protection method was successful in making it difficult for people to play pirated versions without various problems. Hopefully more people have considered actually paying for the games they play as a result, as Mass Effect is definitely worth the purchase price.
Downloadable Content
There is no editing software for Mass Effect, so Mods will be difficult to create and hence download. If any prominent modifications are released I will list them here. For the moment if you wish to modify the gameplay parameters of Mass Effect, look to the Advanced Tweaking chapter of this guide for details of how you can do so.
However Mass Effect owners can download official Downloadable Content (DLC) for the game here. The first DLC is called Bring Down The Sky and is available for free, however note that it requires registration to the BioWare Community Forums and subsequent verification of your CD Key before you then receive a new CD key specifically to be used for installing the DLC. To access and begin the DLC, once in Mass Effect go to the 'Downloadable Content' option in the main menu for instructions.
A second DLC called Pinnacle Station has been released for Mass Effect, however it is not free. It can be found on the Electronic Arts Store site. You will need to install the 1.02 Patch before using the DLC.
The next section begins our detailed look at Mass Effect's in-game settings.
This section contains full descriptions and recommendations for Mass Effect's in-game settings. You can use these to get a good balance between image quality and performance on your machine, however I can't give you specific instructions on what to turn on or off, nor can I provide precise performance impacts. It all depends on your particular hardware combination, and more importantly your personal taste for the trade-off between performance and image quality.
To access the in-game settings, click the Options item in the main menu, then refer to the relevant sections below. Make sure to click the Apply button each time you change any settings, and note that some settings require a restart of the game to be applied properly.
Graphics
Windowed Mode: If set to Yes, the game will run in a window rather than in full screen mode. In general for stability and performance I always recommend full screen mode (i.e. select No here), as there can be memory and resource management issues when a game is run in windowed mode.
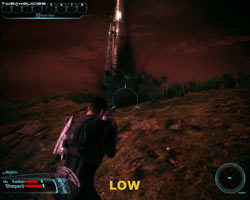

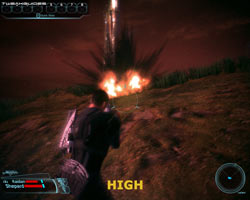
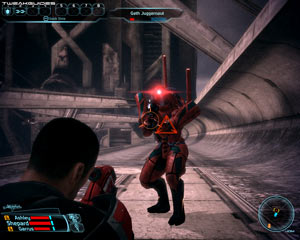
Particle Effects: This setting controls the level of detail on particle effects - that is, special effects composed of smaller individual particles, such as smoke and explosions. The available options are Low, Medium and High. The main performance impact of this setting is felt during combat, and in areas with large clouds of dust, fog or smoke. In practice the performance impact between the three levels seems minimal, and as the screenshot comparison above shows, the visual difference is also not that great. Even at Low, the explosion and subsequent dust cloud seem quite satisfactory; at Medium and High there's a slightly greater volume of dust and a brighter flash.
Gamma: This slider controls the overall brightness of the game, and has no performance impact, so set to suit your tastes.
Resolution: This setting allows you to select the resolution of the game image, measured in pixels wide by pixels high. The higher the resolution, the more detailed the image on screen, and also the less jagged lines there will be (See Antaliasing further below), but the lower your performance. For more details see the Resolution section of the Gamer's Graphics & Display Settings Guide. The number of resolutions available is limited by what both your graphics card and monitor can handle. Resolution has a noticeable impact on performance, so if nothing else works to improve your Frames Per Second (FPS), lower your resolution, or check the ScreenPercentage setting in the Advanced Tweaking section.
Note: Although Mass Effect supports widescreen resolutions, some people may feel that it doesn't do so properly - e.g. see here for more details. If you want to adjust the Field of View, see the FOV console command in the Advanced Tweaking section, however note that using a different Field of View can cause unintended issues.
Antialiasing Support: Just as with other games based on Unreal Engine 3.0, such as UT3 or BioShock, Mass Effect doesn't necessarily allow for normal use of Anti-Aliasing to smooth out jagged lines. There is no in-game Anti-Aliasing option, so at present there are three main ways to apply Anti-Aliasing to the game:
In general, since Antialiasing doesn't seem to completely eradicate all jaggedness and subsequent shimmering in the game, I recommend that before turning to AA you first attempt to raise the resolution and/or consider the use of the Film Grain filter and Motion Blur options where possible, as these can cover up jaggedness with much less of a performance hit.
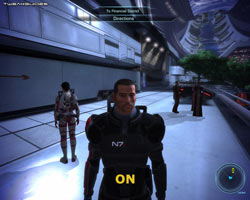

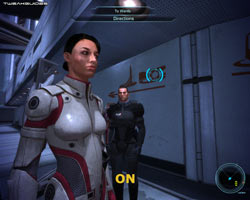
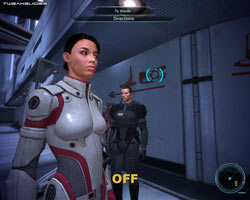
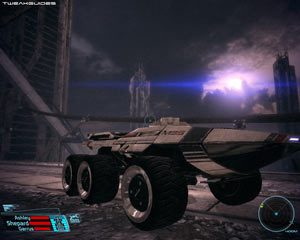
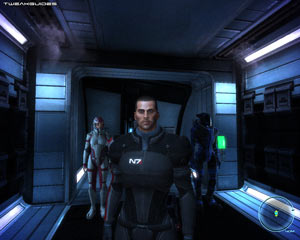
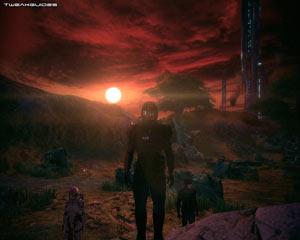
Dynamic Shadows: This setting controls whether interactive objects in the game world, such as characters and vehicles, cast shadows, both on themselves and other surfaces. If set to No, these objects will not cast any dynamic shadows, which can significantly improve performance at the cost of some realism. The first set of screenshot comparisons above demonstrates that when this option is disabled, the shadows cast on the ground by the various people in this shot are all removed, and the shadows on Shepard's face are also reduced. Note however that some shadowing remains - primarily fixed shadows cast by static objects such as buildings, and some general shadow detailing on characters. The second set of screenshots above shows that by disabling Dynamic Shadows you also remove the glitchy shadows which are visible at times when viewing close-ups of people particularly during dialog sequences.
In general, the shadowing in Mass Effect is a source of some complaints, as it can look quite glitchy at times. Rather than disabling Dynamic Shadows, which removes most shadows and thus reduces realism, you can adjust various shadow parameters in the game's BIOEngine.ini file to adjust shadow appearance. This is covered in more detail in the Advanced Tweaking section, see in particular the DepthBias, MinShadowResolution, MaxShadowResolution, bEnableBranchingPCFShadows, ShadowFilterRadius and setting descriptions for more information. Note: the common solution presented for fixing glitchy shadows - namely to set DepthBias=0.030 - doesn't actually work quite as intended; it removes certain shadows rather than fixing glitches. However it's probably the best workaround for removing glitches without completely disabling Dynamic Shadows altogether. Again, refer to the Advanced Tweaking section for details.
Update: As of the 1.02 Patch, Dynamic Shadows may have been disabled because the DepthBias value, as discussed above, now defaults to =0.030. If this is the case on your system, you may wish to reset it back to =0.012, which should return dynamic shadowing - see the Advanced Tweaking section for more details.
Texture Detail: This setting controls the appearance of textures, which are the surfaces of all objects in the game world. The available options are Low, Medium, High and Ultra High. The higher the setting, the more detailed textures will be, but you may experience increased stuttering. To see an animated screenshot comparison click this link: ME_Textures.gif (1.2MB). The most noticeable change in this comparison is on the surface of the rocks in the background - as you can see, there is a slight decline in the surface detail at High, by Medium it's noticeably flatter and undetailed, and by Low a great deal of detail is lost. The detailing on the ground also starts to become noticeably blurry and blocky at Medium and again by Low it is very poor quality. In general unless you have a low-end graphics card with only 256MB of Video RAM and you are also running at a very high resolution, then it is recommended that you leave textures at High or above.
Importantly, the game must be exited and restarted for changes to Texture Detail to be implemented properly. Note further that Mass Effect's UE3.0 engine uses a streaming approach to textures, originally designed for console systems - whenever you load up a saved game or enter a new area, there may be momentary pauses as textures are 'streamed' into view on various surfaces. That is, they start off being flat and undetailed, and it takes a few moments for the full texture detail to be loaded up and shown; this is a normal part of how the Unreal Engine 3.0 works, and unfortunately cannot be disabled or changed.
Filtering Mode: The setting controls the level of filtering used to make textures clearer, especially as they recede into the distance. For more details on how texture filtering works, see the Anisotropic Filtering section of the Gamer's Graphics & Display Settings Guide. The available options here are Point, Linear and Anisotropic, with the higher the level the greater the clarity at the cost of FPS. Point is the most basic, Linear provides a minor improvement, but at Anisotropic the filtering of distant textures visibly improves. Note that when Anisotropic is chosen it actually applies 4x AF to the image by default, however you can manually adjust the precise level of Anisotropic Filtering by altering the MaxAnisotropy variable, as well as the base type of filtering used with the Trilinear variable (in combination with each other), both covered in the Advanced Tweaking section.
The next page continues the In-Game setting descriptions.

Motion Blur: If set to Yes, this option enables Motion Blur, a form of effect most noticeable when you change your view rapidly; the resulting slight blur in the image may improve visual quality and realism for some people, while others may find it distracting. A comparison is provided above however this is a difficult effect to capture in screenshots. Note that enabling Motion Blur does reduce FPS slightly, but ultimately you should decide whether to use it or not based more on how you feel about its visual impact, and bear in mind that it can also help cover up the shimmering from jagged edges in the game.
Wait for Vertical Sync: Vertical Synchronization (VSync) is the synchronization of your graphics card and monitor's abilities to redraw an image on the screen a number of times each second, measured in Hz. It is explained more clearly on this page of the Gamer's Graphics & Display Settings Guide. When VSync is enabled (set to Yes), your maximum FPS will be capped at your monitor's maximum refresh rate at your chosen resolution, and more importantly in some areas your FPS may drop by as much as 50% or more if the graphics card has to wait to display a whole frame. Thus enabling VSync can have a major negative performance impact, and the easiest solution is to leave it disabled. However if you find the image 'tearing' annoying, you can enable VSync and counter the subsequent performance drop by also enabling Triple Buffering - see this page for details of how to enable it properly.
Importantly, the game engine has an FPS cap regardless of whether VSync is disabled or not - by default, the game is capped to a maximum of 62 FPS. This is done by the developers to prevent FPS spikes and thus provide smoother performance, and in general it works quite well, especially since Mass Effect is not a fast-paced shooter. However if you want to remove or alter this FPS cap, see the bSmoothFrameRate, MinSmoothedFrameRate and MaxSmoothedFrameRate variables in the Advanced Tweaking section.
Film Grain: If set to Yes, this option enables a mild grainy overlay. To see an animated screenshot comparison which highlights the impact of the effect, click this link: ME_FilmGrain.gif (317KB). When On, there is a dark grain on the image, most noticeable when contrasted against a lighter background. Film Grain also has tiny swirling motion when viewed on screen, and has a noticeable negative performance impact when enabled. In the end however whether you enable it or not is up to your tastes, as despite the reduction in FPS, it also serves to cover up jaggedness and can make the game much more atmospheric for some people, while others find it annoying.
Sound
Hardware Audio: If ticked, the game will use hardware acceleration which can improve audio quality and performance. I recommend ticking this option in most circumstances, unless you experience audio glitches or other issues. Note in particular that you will need to tick this option if you have a multi-channel audio system and want to use more than 2 channels. Vista users with Creative sound cards in particular should enable this option, as it allows for proper hardware acceleration without the need for ALchemy.
However there are many users experiencing problems with getting full multi-channel hardware surround sound in Mass Effect. First of all, make absolutely certain that your sound card's control panel as well as the Sound properties in the Windows Control Panel are set up correctly to use the number of channels you wish. The game uses Creative's proprietary ISACT OpenAL-based audio system, and this cannot be changed, but there are some issues with the way the game can incorrectly identify audio device capabilities, so if you are still having problems and want proper hardware audio, follow these steps:
1. Go to your \(My) Documents\BioWare\Mass Effect\Config directory and rename the BIOEngine.ini file to something else.
2. Launch Mass Effect without running the Config utility. The game will recreate BIOEngine.ini using default values, and should correctly identify your audio hardware.
3. In the in-game settings Hardware Audio should already be selected - do not change it back to software audio or make any other changes to the Sound settings.
4. If the above steps don't work, follow the additional instructions as described under the [ISACTAudio.ISACTAudioDevice] part of the Advanced Tweaking section of this guide.
To see if your sound hardware is being detected properly at any time, exit Mass Effect and open the MassEffect.log file found under your \(My) Documents\BioWare\Mass Effect\Logs directory with a text editor. Look for the line starting with Init: Audio Device - it should say 'Generic Hardware' or the name of your audio device. The lines above it and below it should also have the correct information, and no audio initialization errors should be showing.
Obviously, as also noted under the Troubleshooting Tips section of this guide, you must ensure that you are running the latest version of the game, as well as the latest drivers for your audio device. You can also try installing the latest version of OpenAL for Windows, available here. Creative sound card owners in particular may find the latest 2.18.0004 X-Fi or 2.18.0001 Audigy drivers might resolve their issues if nothing else does.
Dialog, Sound Effects, Music Volume: These sliders control the volume level for spoken dialog, the various sound effects, and the background music in the game respectively. Set them to suit your preference, as they have no performance impact.
Input
Invert Y Axis: If set to Yes, pushing your mouse forward will make your character look down, and pulling your mouse back will make him look up. Set to suit your taste, has no impact on performance.
Hardware Mouse: When ticked this option uses your graphics card hardware to optimize rendering of the mouse cursor, which should give the best performance and smoothness. With Hardware Mouse enabled, the cursor switches from the standard white Windows mouse arrow to a custom blue outlined graphical arrow. If your cursor disappears when you select this option, restart the game and it should be fixed. If you experience problems with your game crashing during loadup or any mouse-related issues, untick this option.
Mouse Sensitivity: This slider controls how sensitive the mouse will be to your movements. The higher the value, the greater your view movements will be in the game when you move the mouse. If you're experiencing 'mouse lag', that is a feeling of reduced sensitivity or sluggishness in your mouse, regardless of how high you set the mouse sensitivity slider, you should first make sure you are consistently getting sufficient FPS, especially in more complex scenes with lots of effects. Use FRAPS or the Stat FPS console command (see the Advanced Tweaking section) to check your FPS, and keep in mind that typically anything below 15-20 FPS can bring about mouse lag in most any game, so you will have to lower your settings appropriately to prevent this as much as possible. Next, try disabling VSync as not only is it know to cause mouse lag, it also reduces performance which can make mouse lag even worse.
Controls
Here you can adjust all the various keyboard and mouse controls. Note that if you wish to customize these further for any reason, see the Advanced Tweaking section.
Gameplay
Combat Difficulty: In general the enemies in Mass Effect scale upwards to match the player's level. However the available options here can increase or decrease combat difficulty. The initial options are Casual, Normal, and Veteran - each has successively harder enemies, with more protection/immunity. There are two additional difficulty levels called Hardcore and Insanity: you can access Hardcore only after you have completed the game on Normal or Veteran difficulty; you can access Insanity difficulty only after you've completed the game on Hardcore difficulty. Note that changing the difficulty at any time during gameplay can negate proper completion of that difficulty level and relevant achievements, so leave difficulty unchanged for the duration of the game.
Auto Level-Up: This option has an important impact on the RPG aspects of Mass Effect. It determines what happens when your character or any members of your squad gain a level. When set to Off, whenever any squad member gains a level you must manually go into the Squad menu and allocate talent points to various skills for each of the characters in your squad; when set to Squad Only, squad members will automatically level up, and you only have to manually allocate your own character's talent points; when set to Squad and Player, the computer automatically allocates talent points to everyone each time they gain a level, without any user input - this is generally not recommended as it prevents you from customizing your character to suit your individual needs.
Target Assist: This setting controls the degree to which the game assists you when aiming at a target. The available options are Low, Normal and High - the higher the setting, the greater your accuracy when aiming. This setting can affect the overall difficulty of combat in the game, so adjust it in combination with the Combat Difficulty setting above to get the desired effect.
Squad Power Usage: This setting has an important impact on combat strategy. It determines the way in which members of your squad use any powers they have. If set to Disabled, they will not use any powers unless manually assigned by you; if set to Defence Only they will automatically use defensive powers if necessary; and if set to Active they will use both defensive and offensive powers as they see fit. In general it is recommended that you select 'Defence Only', as this allows them to use defensive powers if they're in danger, but prevents them from wasting their offensive powers at inopportune moments.
Subtitles: If set to Yes, text subtitles are shown for spoken dialog. If set to No, subtitles are not shown at first, however in most cases if you wait long enough at a dialog prompt the last piece of dialog will still be shown as subtitled text. Note that if you want to change the color of the subtitles, see the m_colSubtitleColor setting in the Advanced Tweaking section.
Auto Save: If set to Yes, the game will automatically save your progress to a single 'Auto Save' slot at key intervals. This can be useful in case you forget to manually save on a regular basis, however if you don't like the small pauses when the game goes to auto save, then you can set this option to No. Obviously you must then make sure to save regularly, both using the Save option and also the Quick Save (F6) feature, though note that neither of those options overwrite an Auto Save slot if it exists.
Tutorials
Enable Tutorials: This option controls the various tutorial messages which appear throughout the game. You should leave this enabled at first when you begin playing, as the advice can be very helpful. However after the first few hours of gameplay you should be familiar with all the main controls and commands, and thus can disable this option.
The next section looks at the Advanced Tweaking possible in Mass Effect.
Mass Effect is based on the Unreal Engine 3.0, which allows users to access a range of configuration variables and console commands to use for not only altering the way the game looks and performs, but also changing various gameplay parameters. In this section we look at how you can undertake such tweaking and examine all the major variables and commands necessary to do so.
Mass Effect holds all of its main settings in a range of .ini (initialization) files found under your \Documents and Settings\User\My Documents\BioWare\Mass Effect\Config directory in Windows XP, or \Users\[User]\Documents\BioWare\Mass Effect\Config in Windows Vista. These .ini files can be viewed and edited using a text editor like Windows Notepad, but I recommend backing them up before changing any settings. If something goes wrong and you want to return these files to their defaults, simply delete them and they'll be recreated using the original templates (found under \Program Files\Mass Effect\Engine\Config) the next time you start the game. For this reason, don't ever edit or delete the Base .ini files or any other .ini files found under the game's directories; make sure to only edit those under the user directory specified further above.
The main .ini files we will be examining here are BIOEngine.ini which holds your main graphics and audio-related settings; BIOGame.ini which holds various game world parameters; and BIOInput.ini which holds your key bindings. Each config file is covered in separate sections below.
Important - Make sure you understand the following before reading this section:
BIOEngine.ini
[Engine.GameEngine]
bSmoothFrameRate=True
The game engine is capped to a maximum framerate, as determined by the value of the MaxSmoothedFrameRate variable (see below), which is 62 FPS by default. This is done by the developers to prevent FPS spikes and thus provide smoother performance. However, by setting this option to =False, you can completely remove this FPS cap. Keep in mind though that if you then find your framerate varying a great deal and causing jerkiness, this option is best set back to True. Uncapping your FPS doesn't increase overall performance as such, i.e. if you got 35 FPS in certain areas with the cap, you'll still do so without the cap.
MinSmoothedFrameRate=22
MaxSmoothedFrameRate=62
These settings control the framerate range between which the game engine attempts to smooth frames. As covered under the bSmoothFrameRate setting above, if that setting is set to True, the framerate limit specified by the value of MaxSmoothedFrameRate will be enforced. Although you can disable this FPS cap, ideally if you want smooth FPS but don't want the default 62FPS cap, one thing you can do is to set the MaxSmoothedFrameRate to a higher value, e.g. =70 or =85. It's usually best to set your FPS cap to match your Refresh Rate, since even with VSync disabled, any framerate above your monitor's refresh rate will simply be partial frames anyway. There's no reason why uncapping your FPS will necessarily provide you a better gameplay advantage, and in fact it may do the opposite due to greater FPS variability, so experiment to see if simply using a higher framerate cap is actually a better compromise of smoothness and performance.
bUseTextureStreaming=True
The Unreal Engine 3 on which Mass Effect is based uses a streaming approach to loading up textures. Streaming is actually designed more for helping loading times on consoles. However if this option is set to =False, textures won't be streamed in at all, but instead most of the environment will be black due to a lack of textures. Other texture streaming-related variables in the .ini files similarly seem to have no impact on disabling texture streaming properly. It appears that unfortunately texture streaming cannot be properly disabled in UE3.0 games.
bUsePostProcessEffects=True
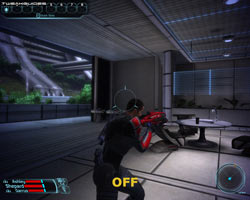
This setting controls a range of 'post processing' effects, namely effects which are overlaid on the main game image - these effects include Film Grain, Motion Blur, Light Bloom and the Depth of Field effects which are visible throughout the game. When this setting =False, all such effects are removed, and the result is a performance improvement, and a very clear though somewhat blander image. Since you can already enable or disable Film Grain and Motion Blur individually from within the in-game settings, and adjust Depth of Field using the DepthOfField settings further below, disabling this setting is generally not recommended unless you are really struggling for FPS and/or want to remove all blur/grain/bloom effects from the game at once. Note that light halos are not affected by this setting.
bEnableBranchingPCFShadows=True
This setting controls a form of soft shadow rendering called Branching PCF. If set to False, it results in the removal of soft filtered/smudged edges for shadows, which in turn may increase performance but can also make shadows seem more blocky.
bUseSound=True
If set to False, this disables all sound in the game. The main use for this setting would be when troubleshooting an issue such as crashes or stuttering, to see if the audio system is the culprit. If disabling sound helps your game performance or stability, see the Sound section of the in-game settings and Troubleshooting Tips section of the guide for more details of how to fix the issue properly.
bUseMusicSound=True
Similar to bUseSound above, this setting disables music in the game if set to =False. However it doesn't disable all music - the menu music and some in-game music can be heard periodically even when this setting is disabled.
bUseBackgroundLevelStreaming=True
This setting is related to the streaming textures in the game, and appears to control whether streaming occurs in the background or not. In my testing setting this to =False seemed to dramatically increase level loading time and then resulted in a crash at the end of loading, so it is not recommended.
ShadowFilterRadius=2.000000
This setting controls the shadow filtering in the engine, basically determining how sharp or dispersed the outlines of shadows appear. The higher the value, the more 'blob-like' and faint shadows become, the lower the value, the less dispersed and sharper the outlines of shadows.
DepthBias=.012000
This setting controls depth calculations for shadows, and effectively determines the way Dynamic Shadows appear. Higher values gradually reduce the number of shadows shown; a value close to 1.0 totally removes dynamic shadows on objects (but leaves static shadows as normal). Lower values increase the number of shadows, however this can also result in glitches. A current workaround to removing some of the glitchy shadows in Mass Effect is to change this setting to =0.030, however note that this removes the glitchy shadows altogether, it doesn't fix them as such.
Update: As of the 1.02 Patch, the DepthBias value may now default to =0.030, which will remove dynamic shadowing. Set it to =0.012 to return shadowing.
MinShadowResolution=32
MaxShadowResolution=512
These two settings appear to determine the minimum and maximum possible values for shadow resolution in the game. The higher the minimum value, the darker and richer shadows should appear; conversely the lower the maximum value, many shadows may appear less distinct and grey. Raising or lowering shadow resolutions may result in an impact on performance, but more importantly, it can also result in visual glitches - for example any values above 512 for MinShadowResolution result in obvious glitches, while very low values for MaxShadowResolution similarly result in glitches. In practice the difference between the default and higher values for these settings is minimal to none, but if you wish to test it for yourself, set the minimum to 512 and the maximum to 2048 or even 4096 and see how it looks for you. You may get missing shadows if the minimum is set higher than 32 however, so it may be best just to raise the maximum value.
ModShadowFadeDistanceExponent=0.200000
This setting controls the distance at which shadows fade into/out of view. The higher the value, the shorter the distance from the object at which shadows fade in/out, and also the fainter all dynamic shadows appear. For example at 0.5 most shadows will be almost invisible, while at 0.0 all shadows will be shown, even at long distances, improving image quality at the cost of some performance.
ShadowVolumeLightRadiusThreshold=1000.000000
This setting controls the way in which lights affect the generation of shadows. Lights which have a radius below this threshold value will not cast a dynamic shadow. In practice changing this value generally appears to have no real impact, except perhaps to cause some lighting glitches.
ShadowVolumePrimitiveScreenSpacePercentageThreshold=0.250000
Any 'primitive' (basic graphical component) which takes up a screen percentage lower than this threshold will not cast a dynamic shadow. In practice altering the value appears to have no visual impact.
[WinDrv.WindowsClient]
Note: Most every setting in this section can be altered using the in-game settings, however several of them are still useful to examine for troubleshooting purposes:
AudioDeviceClass=Class'ISACTAudio.ISACTAudioDevice'
This setting corresponds with Mass Effect using the default proprietary Creative ISACT OpenAL-based Audio System (as shown above), or the more generic OpenAL audio system if =Class'ALAudio.ALAudioDevice'. Unfortunately trying to force the generic OpenAL audio by changing this line to =Class'ALAudio.ALAudioDevice' will result in a crash. ISACT should work fine on all systems, however there is a quirk with the way the engine detects your audio device, and there is a workaround to try to fix this - see the Sound section of the in-game settings along with the [ISACTAudio.ISACTAudioDevice] section further below for details.
StartupResolutionX=1280
StartupResolutionY=1024
These settings control the width (ResolutionX) and Height (ResolutionY) of your game display resolution. While this can normally be adjusted using the in-game Resolution setting, you can use these values in case you can't access the in-game settings, or to try to force a custom resolution.
MinDesiredFrameRate=35.000000
This setting appears designed to attempt to maintain a minimum framerate, possibly by reducing or removing effects on the fly. However in my testing I've found that it seems to have no impact at all both on image quality or FPS, so it is essentially non-functional.
[ALAudio.ALAudioDevice]
As noted in the AudioDeviceClass setting further above, this section can theoretically be used by the game for generic OpenAL audio-related settings if AudioDeviceClass=Class'ALAudio.ALAudioDevice'. However in practice this only results in a crash, so it is essentially a non-functional section of the .ini file and changing anything under it should have no impact whatsoever.
[ISACTAudio.ISACTAudioDevice]
This section relates to the major audio settings in the game, using the Creative ISACT OpenAL-based audio system. Regardless of your sound card and whether you're running XP or Vista, the game will use this audio system - see the Sound section of the in-game settings for more details.
MaxChannels=64
This option controls the maximum number of individual audio channels used for sound in Mass Effect. Almost all modern sound cards support at least 32 channels; Audigy series cards can support up to 64; X-Fi cards support up to 128. If you're having audio problems set this value to the maximum channels supported by your audio device, or to try to improve performance or reduce audio glitches, try a slightly lower value, or just 32 if all else fails. Note though that if set too low you will get missing or glitching sounds.
NoHALSupport0=
There are several lines here which start with 'NoHALSupport'; these indicate specific audio devices for which the game does not provide proper hardware support, even if you select 'Hardware Audio' in the in-game settings. Surprisingly, even Creative's own SoundBlaster Audigy cards are listed here as unsupported, resulting in problems for Audigy and even X-Fi owners who want full working hardware surround sound. The solution to any such problems involves the following steps:
1. You can begin by deleting or renaming your BIOEngine.ini file, and the next time you start Mass Effect the game will recreate a default one, this time it should correctly identify your sound hardware and allow proper Hardware Audio.
2. If the step above doesn't work, add a double // in front of the relevant NoHALSupport line(s) which lists your specific hardware. For example, SoundBlaster Audigy 2 owners should change the following lines to look thusly:
//NoHALSupport3=Sound Blaster Audigy
//NoHALSupport4=SB Audigy
The double // in front of each line tells the game to ignore these lines, although deleting them does the same thing too.
3. If that still doesn't work, adjust the DeviceName= line to be equal to nothing (i.e. just DeviceName=), and set UseEffectsProcessing=False (both described further below).
These steps should resolve problems for most users, however ultimately a patch may be necessary to fix this issue properly for some people. BioWare have said they are aware of this issue.
Update: Aside from Step 1 above, the other steps should not be necessary as of the 1.01 Patch, since the patch removes the NoHALSupport lines, meaning all major audio devices should be capable of hardware audio if detected properly. However it seems that the game's audio hardware detection mechanism is still faulty, and as such certain lines from this section of the .ini file may not be present. In short if you can't get hardware audio (check your MassEffect.log file under your (My) Documents\BioWare\Mass Effect\Logs directory to be sure) then follow Step 1 above, restart the game and don't make any changes to the Sound settings, as otherwise the game appears to totally rewrite this section of the .ini file if you do. If that doesn't work follow Step 3, and if that still doesn't work then you may have to settle for software audio.
DeviceName=Generic Software
This setting appears to determine whether your audio device has been identified correctly, and if so whether Mass Effect uses Generic Software or Generic Hardware based audio. For most standalone sound card owners with the 'Hardware Audio' option enabled in the in-game settings, this line should read DeviceName=Generic Hardware, or the actual name of your device. If you are having audio difficulties, blanking out the contents of this setting (i.e. so it looks like this: DeviceName=) may help resolve issues along with the other steps covered above.
UseEffectsProcessing=True
This setting appears to control whether hardware-based additional audio effects processing is enabled or not. It should be set to True to begin with if you're using Hardware Audio, however if you are experiencing audio problems you can set it to =False to maintain audio quality or for troubleshooting purposes.
Update: As of the 1.01 Patch, the above option may not be available in your .ini file depending on how the engine detects your audio device.
The next page continues our look at Advanced Tweaking.
BIOEngine.ini (Cont.)
[SystemSettings]
StaticDecals=True
Static decals are markings or posters in the game world which are placed on surfaces as decoration by the developers, and are not created by players. Setting this option to False removes these, and depending on the area the visual and performance difference may or may not be noticeable. In general it is not recommended that this be disabled for gameplay purposes.
DynamicDecals=True
Dynamic decals are the marks left by players when using weapons on the surroundings. If this option is set to False, while weapons may show impact effects initially, most weapons will not leave dark scorch marks or bullet holes on scenery. Disabling this option can improve performance in heavy combat, but it also reduces realism.
DynamicLights=True
This setting controls the use of Dynamic Lighting, which is lighting that interacts realistically with the game world. Disabling this setting in Mass Effect results in a range of lighting glitches - wherever dynamic lighting is used objects will appear as flat black, so it is not recommended that you alter this.
LightEnvironmentShadows=True
This setting controls whether the Light Environment, namely the general lighting in a level, such as sunlight, creates shadows. When set to False, it disables many shadows similar to disabling the Dynamic Shadows setting, but it still does not remove the shadows for objects with fixed shadows, such as buildings and terrain. This may improve performance but also reduces realism.
CompositeDynamicLights=False
If set to True, this option appears to enable a less accurate form of dynamic lighting, which may improve performance at the cost of image quality. In practice the visual difference is not noticeable.
ShadowFilterQualityBias=0
This setting appears twice in this section for some reason. In any case it is meant to control the quality of the shadow filtering used (if shadows are enabled). Higher values should provide better quality at the cost of performance, but once again with testing I was unable to note any real differences in shadow quality using this setting.
DirectionalLightmaps=True
This technique allows for improved image quality, as surfaces will have additional depth, bump and detailing. Setting this option to False can increase performance but in Mass Effect simply results in flat black textures wherever the lightmaps were used, so there is no reason to disable it.
DepthOfField=True
This option controls the use of Depth of Field, which is an effect used to simulate the way in which objects within focus are sharper than objects outside our direct field of focus. It's primarily noticeable when zooming in on objects with a sniper rifle - objects in focus will appear crisp, while surrounding objects will be blurred. You can set this option to =False to gain improved performance, or if you just don't like this effect.
Bloom=True
This setting controls the use of Bloom Lighting, which is a form of lighting that exaggerates the brightness and glow of lights, creating a slightly hazy, more atmospheric look. With this option set to False, Bloom is not supposed to be used, however it doesn't seem to affect the lighting at all. If you want to remove Bloom lighting you can set bUsePostProcessEffects to False (See further above), though this removes all post processing effects.
QualityBloom=True
As with Bloom above, this setting controls Bloom lighting effects, and if set to True uses a more accurate form of Bloom. Disabling this may gain additional performance without a noticeable change in image quality. Once again, in practice disabling this and/or the Bloom setting above doesn't actually appear to diminish or remove Bloom lighting.
SpeedTreeLeaves=True
SpeedTreeFronds=True
These two settings are supposed to control how the SpeedTree foliage rendering system works. However in practice if set to False, it doesn't appear as though this has any impact on foliage in most areas.
OnlyStreamInTextures=False
This setting relates to the streaming system used in the Unreal Engine. However it has no impact on texture streaming, so setting it =True should primarily result in audio being preloaded. This may result in a reduction in stuttering throughout the game, however in my testing it had no discernable impact.
LensFlares=True
Lens Flare is an effect seen when staring at a bright light source, such as a Sun, or gun muzzle flashes. There are halo effects or changes in light intensity when this happens. When this option is set to False however these effects are not removed in Mass Effect.
FloatingPointRenderTargets=True
This setting enables or disables Floating Point Render Target technology, which is used to provide certain post processing effects, such as the ability to enable HDR and Anti-Aliasing at the same time. The main impact of setting this option to False is that it can alter the appearance of the game, removing certain post processing effects. However for the most part there doesn't seem to be any benefit to disabling this option.
Trilinear=True
This option controls the use of Trilinear Filtering, which can improve the appearance of textures. Disabling this option may slightly reduce texture clarity but can improve performance. Note that the general appearance of textures is more dependent on the MaxAnisotropy variable, as well as the Texture Detail in-game setting. You can enable Trilinear Filtering with Anisotropic Filtering to get a higher quality of Anisotropic, however this might increase stuttering and/or further reduce performance.
SkeletalMeshLODBias=0
ParticleLODBias=0
LOD Bias affects the clarity of textures and details, by determining how Mipmapped textures appear. Higher positive values make things blurrier and less detailed but can improve performance, while lower values, including negative values, make things clearer at the cost of performance, and can also introduce further aliasing (jaggedness and shimmering) to the scene. The SkeletalMeshLODBias setting relates to animations, while ParticleLODBias relates to particle effects. In practice the impacts of altering either of these settings is not significant, but if you want the best quality try using a negative value for both, such as -1.
MaxAnisotropy=4
If you have Anisotropic selected under the Filtering Mode in-game setting, the setting here controls the actual level of Anisotropic Filtering (AF) used in the game to make distant textures clearer. You can set a sample rate value ranging from 0 (0xAF, or no AF), to 4 (4x AF) which is the default when Anisotropic is used, to 16 (16xAF) which is the maximum possible. The higher the sample rate, the lower your performance in return for crisper, more detailed textures. Note that you can also enable Trilinear at the same time for even higher quality - see the Trilinear setting further above.
ScreenPercentage=100.000000
This setting allows you to control the proportion of the screen in which the main game image is shown. For example a value of 50 for this setting means that the main game image (but not in-game menus) will be reduced to only take up 50% of screen. There doesn't appear to be much of a performance benefit in doing this.
[TextureLODSettings]
TEXTUREGROUP_LightAndShadowMap=(MinLODSize=256,MaxLODSize=4096,LODBias=0)
There are a range of TEXTUREGROUP settings in this section relating to the Level of Detail (LOD) of different aspects of the game world, objects, characters, and lighting among other things. These are essentially supposed to control the level of detail and quality of objects and textures as they recede into the distance. Each has a MinLODSize, a MaxLODSize and LODBias which you can experiment with to alter image quality. By raising MinLODSize as well as MaxLODSize, and lowering LODBias, you should be able to get better image quality. However in practice not only will the game crash if you use certain values, there also appears to be absolutely no improvement in image quality even when correct values are used.
In any case I encourage users to experiment with these, and if you want to know the best possible values for these settings, then refer to the ones provided in this file: ME_TextureLODSettings.zip (1KB), originally tested and provided by Martigen.
[D3DDrv.D3DRenderDevice]
DisableHWShadowMaps=True
This setting should control Hardware Shadow Mapping, which when enabled uses your graphics card to render shadows. When this setting is =True, that means it has supposedly disabled Hardware Shadow Mapping, and thus your CPU may be undertaking shadow calculations. The premise is that by setting this option to =False, those with weaker CPUs but faster graphics cards can get a performance boost. In practice however, having tested this in a range of areas, I found no performance or image quality difference whatsoever, even though I have a relatively weak CPU (X2 4400+) compared to my GPU (8800GTS). However single-core CPU owners and those with low-end Dual Core CPUs may still like to give it a try and see if it makes a difference for them.
[Stats.]
There are a range of sections here starting with [Stats.] - as far as I can tell, these are not gameplay parameters to be changed by users, they are engine statistics. For example changing the line Total Texture Memory=200 MB to =0MB has no impact on the performance of the game.
The next page continues the Advanced Tweaks.
BIOGame.ini
This .ini file has a wide range of gameplay parameters you can experiment with and alter. I only cover what I believe are the most useful of these below:
[Engine.HUD]
bShowHud=true
If set to =False, this option completely removes the HUD, including all text messages, graphical elements and warnings on the main screen - obviously this can place you at a significant gameplay disadvantage. You can still access the main options by pressing ESC, or by pressing the relevant key. It is recommended that you instead use the Showhud console command to toggle the HUD on or off at any time - see the Console Commands section.
[BIOC_Base.BioActorBehavior]
AllowFriendlyCollateral=false
If set to =True, this option allows your squad members to be injured by your fire and vice versa. Enabling this option can make things more realistic but also more difficult in heavy combat.
[BIOC_Base.BioInventory]
m_nMaxCredits=9999999
m_nMaxGrenades=5
m_fMaxSalvage=999
m_fMaxMedigel=5
There are a range of default limits here for maximum number of credits, grenades, salvage (omni-gel) and medigel. You can alter these maximums if you wish, affecting gameplay accordingly.
[BIOC_Base.BioConversation]
m_colSubtitleColor=(R=204,G=255,B=255,A=255)
This setting allows you to change the color of subtitle text in the game (if subtitles are enabled). The values in brackets are in RGB (Red, Green, Blue) and Alpha (transparency) format. You can use this RGB Chart to assign new values. For example to have Navy Blue subtitle text, change the values in brackets to (R=0,G=0,B=128,A=255). To make the text more transparent, lower the A= value. Note that this only affects subtitles, not dialog prompts.
[BIOC_Base.BioPawnBehavior]
m_bAllowPhysicsOnDeadBodies=False
If set to =True, this option allows dead bodies to react with more realistic physics. By default shooting a dead body for example causes no movement, but with this option enabled, shooting a dead body would result in blood and some (minor) corpse movements. This can increase realism, though it may drop performance in heavy combat if there are lots of dead bodies.
[BIOC_Base.BioPawn]
m_fCorpseCleanupFirstAttemptTime=5.0
This setting determines how many seconds the game will wait before attempting to determine whether a corpse can be removed. By raising this value, you can allow more corpses to be displayed in battle at any distance, which can increase realism but may also reduce performance. Note there are other m_fCorpseCleanUp parameters in this section you can also alter, but since the setting above determines when the engine first attempts corpse removal, as long as you raise it to a relatively high value (in seconds - e.g. 600 which equals 10 minutes), it will ensure corpses remain regardless of the other settings.
[BIOC_Base.BioActivePower]
m_bSkipPowerCooldown=False
If set to =True, you can use your powers again without waiting for the cooldown period to expire. This can obviously impact on gameplay, making things much easier.
BIOParty.ini
[BIOC_Base.BioPlayerSquad]
m_nMaxInventoryItems=150
m_nMaxInventoryWarningThreshold=135
The above lines control the maximum number of items you can hold in your party inventory. The m_nMaxInventoryItems variable determines the actual maximum number of items your party can hold, however if you alter it you should also change the m_nMaxInventoryWarningThreshold value to be just below the new maximum you set using the first variable, as it provides a warning when you are getting close to your limit. Of course you can simple set both variables to the same number in case you don't want to receive any warning at all.
BIOInput.ini
[Engine.Console]
ConsoleKey=Tilde
This line doesn't exist by default under this section, however by inserting it as shown above, you will be able to access the in-game command console using the '~' key (the key below ESC on US Keyboards). A full range of console commands you can use in the command console are provided in the Console Commands section further below.
[BIOC_Base.BioPlayerInput]
Bindings=(Name="F6",InputMode=BIO_INPUT_MODE_NONE,Command="QuickSave",Control=False,Shift=False,Alt=False)
For the most part you can alter all of your key bindings using the in-game settings. Here you can see all your key bindings and the commands they invoke. In the example above, you can see that the Function 6 (F6) key has been bound to the command 'QuickSave', which basically means that pressing F6 will quick save your current game. You can edit the line to change the key from F6 to another key for example. Changing and creating complex bindings is beyond the scope of this guide, I encourage you to experiment if you have any specific needs.
Console Commands
By default you cannot access the in-game Command Console in Mass Effect. However if you insert the line ConsoleKey=Tilde under the [Engine.Console] section of BIOInput.ini, you will be able to use the ~ key to open and close the in-game command console at any time - see further above for details.
There are a range of console commands you can use, and below is a list of the most common commands and a brief description for each:
Stat FPS - Toggles the display of your framerate
Fly - Allows your character to fly around, though moving upwards/downwards is not possible
Ghost - Allows your character to move through solid objects
Walk - Switches off Fly and Ghost modes
FOV [degrees] - Changes the Field of View to the specified degrees
Slomo [0.0 - ?] - Alters the speed of the game to the value specified. Values above 1 speed up the game, values below 1 slow it down
Showhud - Tggles whether to display or hide the HUD
Teleport - Teleports the squad to the location under your crosshair
Setbind [Key,Command] - Binds the specified command to the specified key
Shot - Takes a screenshot in .BMP format
Exec [filename] - Executes a specified file under the \Program Files\Mass Effect\Binaries directory
Quit - Exits the game to desktop immediately
SetParagon [value] - Sets player Paragon to specified value
SetRenegade [value] - Sets player Renegade to specified value
GiveXP [value] - Gives specified XP points to player
GiveTalentPoints [value] - Gives specified Talent Points to player
GiveAll - Gives all weapons, mods, omni-tools, bio amps, and grenades to player
GiveAllXMods - Gives all weapon and armor mods
GiveAllArmor [itemname] - Gives armor with the specified name to the player
GiveAllWeapons [itemname] - Gives weapon with the specified name to the player
GiveAllOmniTools [itemname] - Gives omni-tool with the specified name to the player
GiveAllBioAmps [itemname] - Gives bio amp with the specified name to the player
GiveItem [itemname] - Gives specified item to the player
A full list of other commands, and more importantly all the item names and codes you can use for these commands, can be found here.
That concludes the list of all the major .ini variables and console commands. As always, if you are aware of an important omission or error, please Email Me with the details. Please make sure to only provide tested and verified details and not guesses, as there are many non-functional and inaccurate tweaks floating around for Mass Effect at the moment. Keep in mind that the list above is designed to provide commands which will be useful to most players; as noted earlier I've tested most every relevant .ini option and many obscure commands or those which have minimal impact or which can be fully adjusted within the game are deliberately omitted. I will keep this section updated with new commands and tweaks as I learn about them, so check back often.
The next page concludes the guide with some useful tips and information.
The guide is coming to a conclusion, but below are some important performance tips, tweaks and advice which should not be skipped.

Speeding up Startup Time
By default Mass Effect takes a while to reach the main menu. Aside from the launcher menu and intro movies, there is also a period during which the screen may remain black for a while. There are however two main things you can do to decrease the time it takes for you to reach the main Mass Effect game menu:
To start with, if you want to remove all the introductory movies which play before you reach the main menu, first go to the movie files found under your \Program Files\Mass Effect\BioGame\CookedPC\Movies\ directory. The three movies which play at startup are called BWLogo.bik, db_standard.bik and ME_EAsig_720p_v2_raw.bik. You can either rename these movies or move them to another directory, or replace them with blank movies files from here: Skipintro_ME.zip (1KB), and they will be skipped on startup.
Next, instead of using the standard Mass Effect launch icon - which opens the Mass Effect launcher - create a desktop shortcut which directly launches the Mass Effect game executable, bypassing the launcher. To do this go to the \Program Files\Mass Effect\Binaries directory, right-click on the MassEffect.exe file and select 'Send To>Desktop' to create a desktop icon. You can now use this desktop icon to launch the game, and note that it will not have any impact on Activation. Alternatively for Vista users if you want to alter the existing Mass Effect icon in Games Explorer, right-click on it, select Customize, highlight 'Play (Mass Effect)', click Edit, and change the path in the Target box to point to [Drive Letter:]\Program Files\Mass Effect\Binaries\MassEffect.exe.
In terms of the long black screen pause at startup, at the moment I don't believe there is any way to shorten it. It doesn't have anything to do with connecting to the Internet or Activation, since the game only activates the first time you run the game and subsequently only when you patch the game (see page 4 for details). It could possibly be part of a basic SecuROM check, but more likely it seems to be the game initializing the graphics engine. Either way, there is no way around it.
Gameplay & Strategy Tips
Mass Effect can be quite a complex game if you truly want to get involved in the storyline and explore the many opportunities available in the game. To take full advantage of the game, you might want to refer to the Mass Effect Wiki which provides full details of all the characters, classes, equipment, locations and the storyline. There is also a Walkthrough section in case you get stuck.
You can also get additional Mass Effect gameplay tips here, though you may have to register with the Mass Effect Forums to access it all.
Measuring FPS, Taking Screenshots & Videos, & Benchmarking
To measure your FPS in Mass Effect, open the in-game command console (see Advanced Tweaking section for how to enable the console) and type Stat FPS, and a framerate display will appear at the top right of the screen. If you wish to take screenshots at any time, you can bind the shot console command to a key and use that. If you want to take nicer screenshots, you hide the HUD temporarily by using the Showhud console command. Finally, you can use the FRAPS utility to not only measure FPS and take screenshots, but also record in-game movies in .AVI format, such as this one I recently made. FRAPS also allows you to measure performance with its benchmarking feature.
Conclusion
That brings the guide to a conclusion for now, and I hope it improves your experience with an already excellent game. As always, if you find errors or important omissions in the guide, make sure to Email Me with the details so I can keep the guide as accurate and up-to-date as possible. Remember though that unfortunately I can't provide any tech/tweaking support, and I also don't provide permission for the guide to be reproduced or translated elsewhere for several reasons.
Until next time, take care!


 Sleeping Dogs Intro Walkthrough - GamersHeroes
 Assassins Creed Unity General Guide – Cheats, Tips, and Tricks
 Why Shenmue III Should Never Happen
 Black Ops 3 is a sport Im (almost) too old for
 Why am I compelled to rebuy classic games I’ll never actually replay? It’s an addiction