The tier 4 United States Navy battleship Arkansas Beta is a reward battleship for World of Warships closed beta testers who met the required participation criteria. The Arkansas Beta is a Wyoming class battleship that is virtually identical to a stock Wyoming battleship that you can obtain in the regular tech tree. The Arkansas Beta unlike the Wyoming can mount additional equipment that usually is only found on higher tier ships unlike the regular Wyoming. Being a battleship the Arkansas Beta is very durable with very thick armor covering the vital amidships area and focusing primarily around the main turrets and waterline. This World of Warships Arkansas Beta armor guide will break down the battleship according to armor thickness, critical citadel areas, and give you the weak spots to focus on to maximize damage.
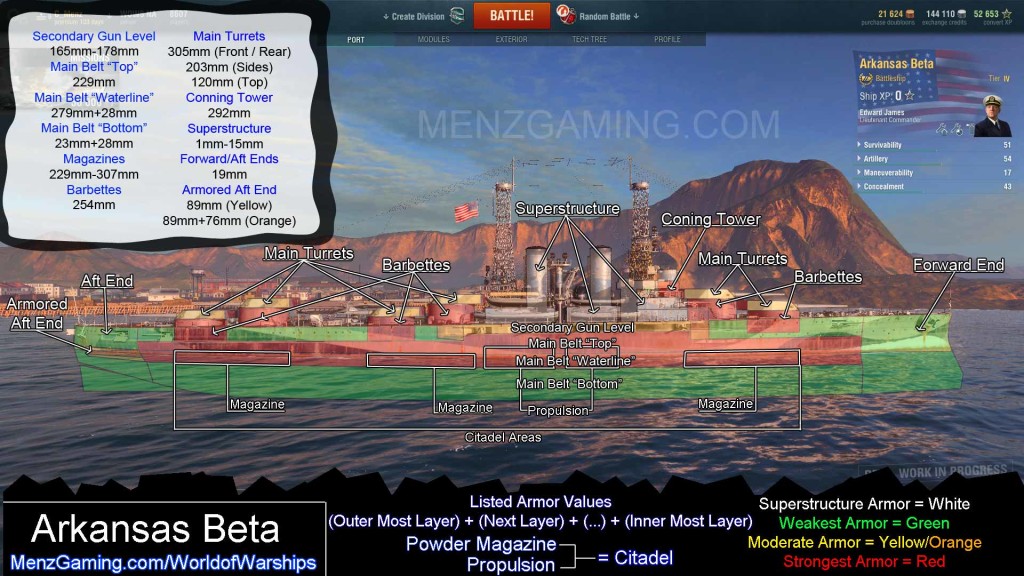
Covering the most vital areas of the Arkansas Beta amidships is the main belt armor that at tier 4 provides excellent protection and makes it difficult to penetrate this area of the ship unless another battleships lands a clean shot. Starting at the upper most section is a small level where the secondary guns are located and this area is protected by armor 165mm thick and at both ends it angles inward(increasing its strength) and is covered by an additional 13mm armor plate. Beneath this starts the thicker main belt armor which is 229mm thick in the main belt “top” area and spans the majority of the length of the Arkansas Beta. This area doesn’t house any critical areas such as the powder magazine or propulsion but penetrating here will do more damage than hitting outside the area marked “citadel areas”.
Above and below the waterline the main belt armor increases to 279mm with an additional armor plate 28mm thick behind it. In this main belt “waterline” area the powder magazines are located beneath the main turrets and the propulsion system is located beneath both smoke stacks visible in the superstructure. Damaging these areas will either set off a magazine detonation or cause massive citadel damage. Located beneath this area the main belt “bottom” area is very weak but is virtually impossible to hit nor does it contain any vital areas.
The remaining vital areas consist of the main turrets and the coning tower. The coning tower is armored by an impressive armor value of 292mm and will be very difficult to damage due to its protection and size. The 6 main turrets are also heavily armored with 305mm on the fronts and rear sections. The sides drop down to 203mm and the roof armor on the main turrets is protected by 120mm. Beneath the turrets the barbettes are armored by armor 254mm thick and extend downwards to the main belt armor. Only 2 barbettes connect to the main belt while the remaining 4 fall short and hitting in these weak spots will be easy to penetrate.
Outside of the areas above the superstructure is extremely fragile and is an excellent place to focus fire with high-explosive shells as it only has 1mm-15mm armor protecting it. The forward and aft ends are protected by 19mm but damage is minimal here due to it being a non-vital part of the Arkansas Beta. The aft end has an armored section that increases to 89mm with an additional 76mm armored plate located behind part of it.

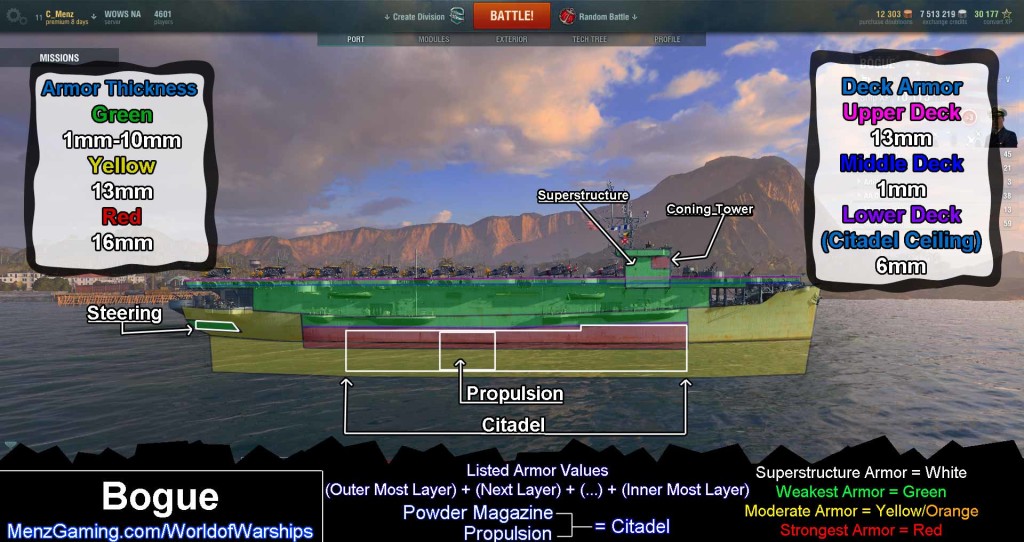 Armor Guide: Bogue - Menz Gaming | World of Warships
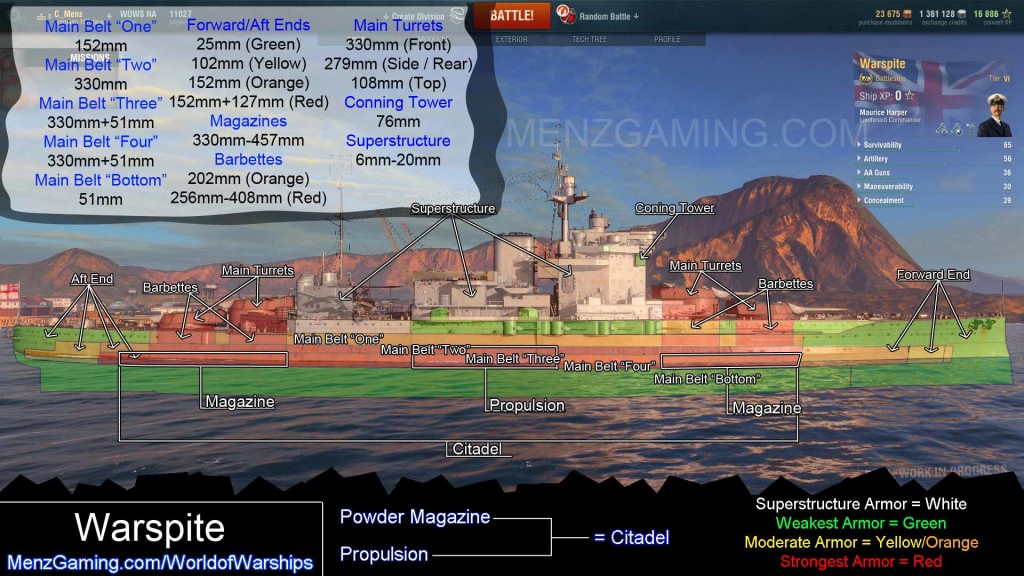 Armor Guide: Warspite - Menz Gaming | World of WarshipsArmor Guide: Farragut - Menz Gaming | World of Warships
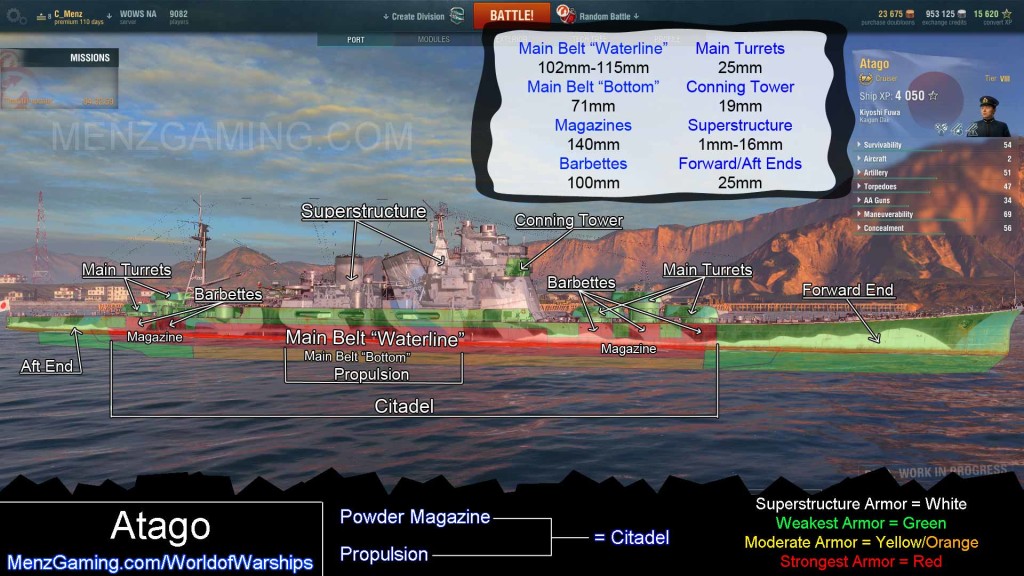 Armor Guide: Atago - Menz Gaming | World of WarshipsArmor Guide: Mahan - Menz Gaming | World of Warships