A guide to SWTOR Advanced Prototype and Pyrotech DPS Specs, updated for for 3.2 and focusing on PvE. Written and edited by Kwerty of The Harbinger.
NOTE: THE 4.0 UPDATE WILL BE DELAYED, THOUGH ROTATIONALLY BOTH DISCIPLINES ARE UNCHANGED
Contents
Sick of having to channel all your abilities on your RDPS toons? Tired of having to stand in melee range and get hit by all the AoE? Sick of being pushed into the tank role?
If any of the above is true, then the Powertech is the DPS option for you!
Taking advantage of being the only mid-range spec in the game, Powertechs bring a number of benefits, such as high mobility, decent range on all their abilities, a number of decent defensive cooldowns, and some of the strongest mechanics negaters in Hydraulic Overrides and Sonic Rebounder.
There are 2 options to choose from:
ADVANCED PROTOTYPE
Advanced Prototype is a very burst oriented spec. Almost all its damage is instant, it has multiple attacks that deal delayed damage or off the GCD damage in order to deal as much damage as possible at once, and it doesn’t have to channel a thing – though in an AoE rotation its a good idea to incorporate Death from Above and Flamethrower for their great AoE damage.
On top of that, it has a huge number of defensive benefits, such as +3% defense chance, 30% damage reduction while stunned, 30% AoE damage reduction, A reduced energy shield cooldown when you are attacked, a damage absorb shield when being attacked, and shoulder cannon can be talented to do a 5% self heal per missile – for a total of 35%. It also has access to 6 seconds of 30% extra defense and resist chance every time you use Sonic Missile.
It does come at a cost, with its resource management being highly dependent on the target having a bleed, but when you can do all your damage without having to stand still in those nasty AoEs while standing at a distance, what is there to complain about?
PYROTECH
Due to the changes that were implemented in patch 3.2, Pyrotech is the uncontested AoE DPS Monster. Combining a DoT spread on Incendiary Missile with the strongest spammable AoE of Flame Sweep, a buffed Flamethrower, and a boost to Death from Above on burning targets, pretty much nothing can stand up to a Pyrotech Powertech in AoE situations.
But AoEs aren’t its only strength. Pyrotech can perform quite well in a sustained situation, as where its not able to keep up to the burst or mobility of Advanced Prototype, it can make up for this through a number of DoTs, and far easier resource management.
With that in mind, have some abilities and utilities available to everyone:


Most of these have been covered, but here’s another quick run down of them. I have emphasised the more useful skills for PvE DPS reasons.
Skillful
Masterful
Heroic
With that ridiculous amount of information covered, its time to look at the actual disciplines.
ACCURACY: You MUST have more than 750 accuracy. This brings you over 100% accuracy rating. You also MUST have the companion accuracy bonus. Otherwise, you will be missing attacks. You don’t want much more than 750 accuracy though, otherwise you are wasting stats (777 would be as high as I’d recommend)
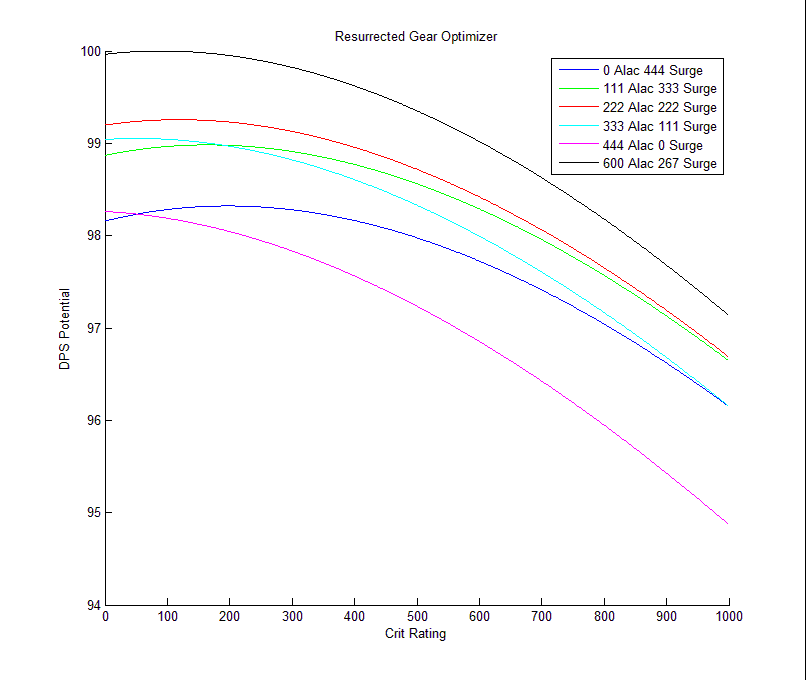
SURGE AND ALACRITY: The only thing you must know here is that Surge should not be lower than Alacrity until about 300 surge, unless you are using the alacrity heavy gearing option. Surge + Alacrity are almost equal in 3.0, though those with higher input latency should put more emphasis on Surge rating. Depending on your surge rating, you want different levels of Crit Rating.
CRIT RATING: Depending on gear levels, you want different amounts of crit rating. Same with how much Surge you are running.
For crit rating, more power makes crit better, so I’ll give 4 different crit levels:
This assumes a 50/50 split of surge to alacrity, favouring surge.
If you are not using a 50/50 split of surge to alacrity, use the following graphs for a good idea of how much crit you want. The values represented by the different colours are the surge, so alacrity would be what is left afterwards. These also assume Power augments, so if you are using Aim ones you would drop crit by about 60.
“What about the black line?” The black line is explained below, in the “Kwerty’s Crazy Gearing Method” section.
Resurrected Gear
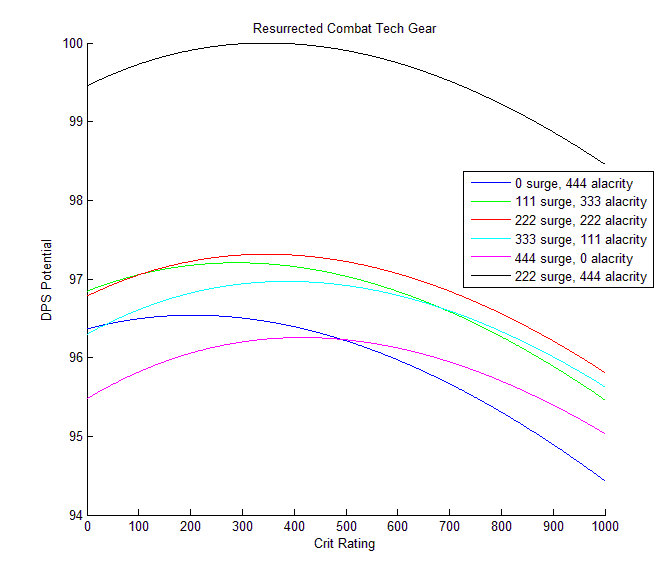
Revanite Gear

Monolith Mainhand, Mix of 198s + 204s
All other secondary stats should be in power
With that out of the way, we want all our augments to be either Aim, or a combination of Power + Crit. The difference between the 2 is so small you will never notice it, though I’m going with power as that way I will spend less time optimizing my gear (Crit drops like crazy from everything, while power already has issues like not existing alongside accuracy on the implants)
We also want to have a Serendipitous Assault relic, and a Focused Retribution relic
Finally, you want to be using the 6-piece Combat Tech’s set bonus, and be running in High Energy Gas Cylinder. The 6-piece combat tech set bonus gives a huge number of benefits such as auto-crits and resource management, while High Energy Gas Cylinder boosts all Kinetic and Energy Damage by 5% and enables all of your procs.
A note on Alacrity Heavy gearing or “Kwerty’s Crazy Gearing Method”
Originally, I had believed that alacrity should not really go above 240 right now, as preliminary testing found it wasn’t getting a DPS improvement. However, with 3.0.2 a lot of the input lag is gone, and with it Alacrity is significantly better. I started investigating this because of reports from Watchman Sentinels of all people, who found that they were getting comparable DPS numbers with full alacrity augments to what they were getting with full Power or Full Might augments. And with that, I modified my stat optimization code to give out optimal stats assuming any augments and any combination of Accuracy/Alacrity/Surge enhancements.
The end result? A method that minimizes the required token drops while pulling superior numbers on a dummy and in a raid.
Basically, you get your Alacrity + Surge values to the values of the black line on the graph above, and once that is done you simply have accuracy in every other piece, and Augment it to 100% accuracy. And thanks to Bioware’s token setup for Vanguards, its actually rather easy to get your Surge/Alacrity into the levels on the graph above. Also note that you can be about 50 rating in either direction and you’ll be fine. Though with 204 rating gear, get the 390 surge. You get more power that way (204 mainhands only provide Power/Surge enhancements)
Reaching the Accuracy Cap should be your highest priority
The DPS bonus given by alacrity is slightly lower on average per point than Surge for current gear levels, though due to diminishing returns you still want alacrity. If you are PvPing you need just over 305 accuracy if you don’t plan on missing rail shot, but after that, you should stop getting surge at about 300 rating and dump the rest into Alacrity.
Due to a 30% surge boost to pretty much everything, crit is very useful for the spec.
Choice of relics should be the Serendipitous Assault and Focused Retribution, though the Boundless Ages relic can be used for when you need burst damage in specific situations, such as the Nightmare Raptus DPS challenge in the Dread Palace operation. You can craft a rating 186 relic if you have an artificer with an RE’d schematic from a vendor, so you have no excuse for not having one.
Get the set bonus as quick as possible. The 2-piece is a 1% DPS boost, the 4-piece makes resource management very nice, and the 6-piece is about a 1.7% DPS boost. 192 Set Bonus armoring is better than 198 non-set bonus armoring.
The Old set bonus should be replaced when possible, but even a rating 146 set bonus will be better than no set bonus.
For Mods, make sure to get mods without a letter in the name – E.g. Advanced Agile Mod 36 instead of Advanced Agile Mod 36A, as these are much better. However, if you are jumping up a tier (e.g. 192 to 198), the A-mod is comparable in stat contribution to the previous tier unlettered mod.
For Enhancements you also want the low endurance version, only the difference is far larger – A crafted rating 186 enhancement is better than one from the Ultimate Comms vendor.
There are a number of procs to track in this spec, as well as one incredibly easy DoT to track. These are:
Proper tracking of these 3 procs, as well as resource management, is the difference between a great parse, and an average one.
There are also 2 debuffs you will want to keep on the target. These are:
New abilities added with 3.0 are highlighted in green
 Rail Shot (RS): Does high ranged weapon damage, and refreshes your Retractable Blade bleed if present as well as venting 5 heat. With the proc Prototype Particle Accelerator, this ability is free, so it is used to vent heat. This ability ignores 90% of the targets armor. Has a 30 meter range. Due to it having a cooldown reset, this should be delayed until you have a free cooldown if necessary (and this does happen)
 Magnetic Blast (MB): Does decent energy damage, and if the lockout is finished will activate Prototype Particle Accelerator. This is your ideal filler as it does not have a cooldown. It also activates your 2-piece and 6-piece set bonuses – the 2-piece increasing damage by 2% for 15 seconds (30 second lockout), and the 6-piece causing your next Energy Burst to automatically crit (60 second lockout). Generates 15 heat and has a 10 meter range, which can be expanded to 15 meters with the utility Muzzle Augs.
 Rocket Punch (RP): Does slightly more energy damage than Magnetic Blast, but also provides an armor debuff and has a natural 5% crit boost. It should be used on cooldown. Generates 15 heat, or 13 heat with the 4-piece set bonus, and is restricted to melee range.
 Thermal Detonator (TD): Does slightly more damage than Rail Shot and has a natural 5% crit boost, though without armor penetration it ends up doing slightly less against most players and against bosses. It has a 30 meter range and generates 15 heat, and a 15 second cooldown. This also provides a tech damage debuff, making it very nice because of 70% of your damage being tech based.
 Energy Burst (EB): Does a very large amount of damage when used at 4 energy lodes, and due to the 6-piece set bonus will crit about 40% of the time automatically. This ability can be delayed due to a lack of cooldown, though it should take priority over Rail Shot, and any Magnetic Blast that will not activate Prototype Particle Accelerator. It should be used about every 24 seconds, and will generate 20 heat.
 Rapid Shots (RpS): Due to how much heat Energy Burst generates, you fill find yourself using Rapid Shots quite often in the spec – about every 15 seconds. Its not that bad though, as the removal of RNG in this spec means you can go RpSx2 -> MB without having to deal with RNG. This ability should be used if your heat is about to spike, or if you are about to do a heavy burn (using Rocket Punch, Thermal Detonator, Magnetic Blast and Energy Burst one after another is an example of this)
") Retractable Blade (RB): This ability should be used minimally – the only time it should be used is when the target doesn’t have a bleed, which is pretty much when you first engage it. Of course, this isn’t always true – mechanics will constantly force you onto a different target or prevent damage on the current target for 15 seconds, which is cause for a refresh of the bleed effect. It will generate 15 heat
Retractable Blade (RB): This ability should be used minimally – the only time it should be used is when the target doesn’t have a bleed, which is pretty much when you first engage it. Of course, this isn’t always true – mechanics will constantly force you onto a different target or prevent damage on the current target for 15 seconds, which is cause for a refresh of the bleed effect. It will generate 15 heat
The Rotation is a priority system of all your different abilities. While I can’t give you the complete rotation (its over 300 ability activations long!), I can give you an opener and a priority list after that opener to work with.
Another thing to note is this changes if you move from single target to AoE, and the AoE rotation is under the normal one.
So, without further ado:
Single Target
OPENER
Preload Shoulder Cannon, Energy Lodes
TD -> RB -> RS -> RP –> MB -> [Adrenal, Relic] EB ->[Explosive Fuel, Start Shoulder Cannon Spam] RS -> MB –> RS -> Priority List
NOTE: ONCE 4.0 DROPS, USE EXPLOSIVE FUEL BEFORE THE ENERGY BURST, AS THE 4.0 CHANGES MEAN EXPLOSIVE FUEL IS +25% CRITICAL DAMAGE TO AUTO-CRITS
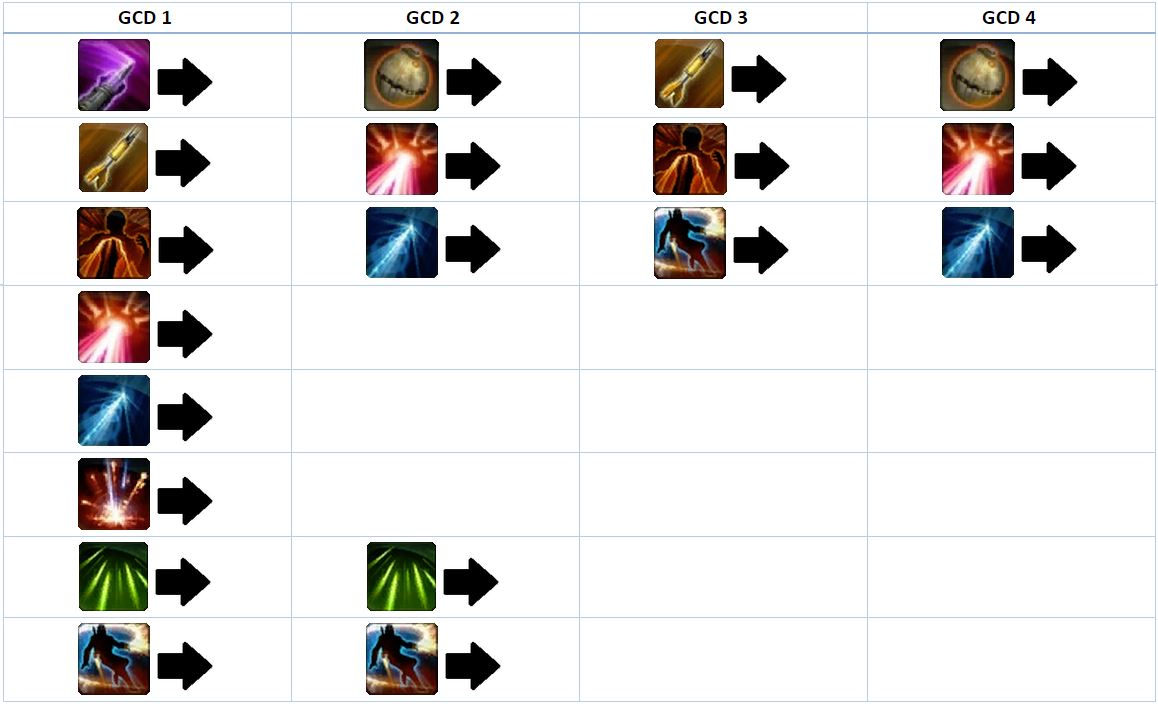
The priority list consists of 4 GCD Blocks, with choices made in each block depending on what cooldowns are available, and how much heat you have built up, as well as if you have resource cooldowns available.
Thermal Sensor Overrides should be used on Death from Above, while Vent Heat should be used at about 70 heat. Try to time your heat so you have about 40 heat when the free Energy Burst is used.
The 4 GCD Block consists of the following:
Filler 1 -> Filler 2 -> Proc Filler -> Filler 3
Due to how the opener was organised, Rocket Punch will only fall into Filler 1 and the Proc Filler, while Thermal Detonator will only ever fall into Filler 2 or Filler 3.
Filler 1 Priority List:
Filler 2 Priority List:
Proc Filler Priority List:
Filler 3 Priority List:
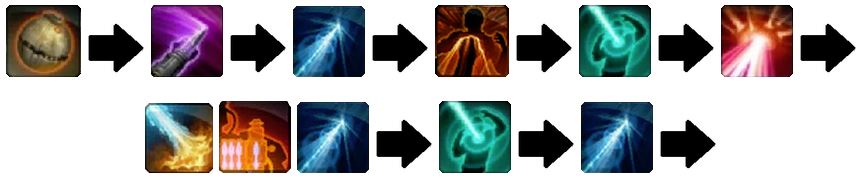
For those who are more visually inclined, heres a picture of said priority list per GCD:

How do I use this priority list? Well, I put this section in as a few people got confused. Its relatively simple.
Look at your abilities available and your heat level as you enter each cooldown. Then, go down the list, and pick the highest ability available to you.
Lets use an example of you have just used Rail Shot and are entering GCD1. The target is bleeding, Rocket Punch is available, Thermal Detonator is 1 GCD away from being off cooldown, and you have 4 energy lodes. With that, you would do the following:
GCD1: Rocket Punch
GCD2: Thermal Detonator
GCD3: Magnetic Blast
GCD4: Energy Burst
and then it moves onto the next set of GCDs, where you would start with Rail Shot in GCD1 and work from there.
Following this priority list should end up with everything on cooldown, with no wasted procs either. The difference between a good powertech and a bad one, is when you can recognise when you need to burn your heat and when you need to go without losing it.
Of course, use Explosive Fuel on cooldown, and make sure to fire off all 7 Shoulder Cannon missiles inside it in order to maximise your damage capabilities.
Finally, a video to show how to do it. Note that as 6 pieces weren’t legacied across, the gear is still terrible (all the acc + surge was on earpiece/implants + mainhand on my main)
AoE
Abilities not mentioned previously
 Explosive Dart (ED) Does decent kinetic damage to 8 targets. This damage does not get a surge boost, and is slightly weaker than Magnetic Blast before crits, but the fact it is hitting multiple targets completely makes up for this. If it hits a bleeding target, that target will have the bleeds duration refreshed back to the full 15 seconds and cause it to tick immediately. This will not spread the bleed effect, only refresh it.
 Flame Sweep (FS) If you are in an AoE fight and are using Flame Sweep, you will want to have Engulfing Flames for the 25% extra damage. Without it, you need 3 targets to justify using Flame Sweep over Magnetic Blast. This should all but completely replace Magnetic Blast in your rotation for AoE situations.
Death from Above (DFA) Difficult to fit into the rotation because of its high heat cost, it does very good damage and in an AoE situation you will not regret using this. You should use Thermal Sensor Overrides on this instead of Energy Burst in an AoE situation
Flame Sweep (FS) If you are in an AoE fight and are using Flame Sweep, you will want to have Engulfing Flames for the 25% extra damage. Without it, you need 3 targets to justify using Flame Sweep over Magnetic Blast. This should all but completely replace Magnetic Blast in your rotation for AoE situations.
Death from Above (DFA) Difficult to fit into the rotation because of its high heat cost, it does very good damage and in an AoE situation you will not regret using this. You should use Thermal Sensor Overrides on this instead of Energy Burst in an AoE situation
OPENER
Preload Shoulder Cannon, Energy Lodes
TD -> RB -> RS -> RP –> MB -> [Adrenal, Relics] EB -> [Explosive Fuel, Start Shoulder Cannon Spam]RS -> ED –> RS -> Priority List
The priority list consists of 4 GCD Blocks, with choices made in each block depending on what cooldowns are available, and how much heat you have built, as well as if you have energy cooldowns available.
Thermal Sensor Overrides should be used on Death from Above, while Vent Heat should be used at about 70 heat. Try to time your heat so you have about 40 heat when the free Death from Above is used.
the 4 GCD Block consists of the following:
Filler 1 -> Filler 2 -> Proc Filler -> Filler 3
Due to how the opener was organised, Rocket Punch and Explosive Dart will only fall into Filler 1 and the Proc Filler and never interfere with each other, while Thermal Detonator will only ever fall into Filler 2 or Filler 3.
Filler 1 Priority List:
Filler 2 Priority List:
Proc Filler Priority List:
Filler 3 Priority List:
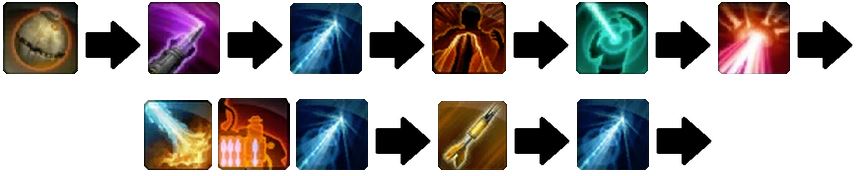
For those who are more visually inclined, heres a picture of said priority list per GCD:
So as you can see, its almost the same – though with Explosive Dart added into the priority list, and Magnetic Blast replaced with Flame Sweep (sure you miss out on the 2-piece and 6-piece benefits, but skilled players can still use a Magnetic Blast every 30 seconds to keep these advantages). It also mixes in Death from Above when possible, which is very difficult to pull off but is worth it when you can.
This section used to be a lot longer, but thanks to Marisi’s great parse analysis tool, Parsely, this section can be cut back on substantially.
In order to have maximum DPS, a dummy parse should have Rocket Punch and Thermal Detonator used on cooldown, Rail Shot’s proc every 4 GCDs, and Energy Burst every 4 Rail Shots.
To see how close you get to this, upload a log to Parsely and click on the “Ability Usage” tab, which shows how often you use each ability.
For example, in the parse below, we can see that I used my abilities more often than their cooldown states! Except… I have like 7% alacrity. So I lost quite a bit of damage in the end.
Rail Shot was used 4% less often than it could have been
Rocket Punch was used 5% less often than it could have been
Thermal Detonator was also used 4% less often than it could have been
Overall, I lost quite a bit of DPS just cause I couldn’t keep my APM up to as high as I would have liked. That, and I zoned out when doing the parse and missed the fact that my recharge abilities had come back.
As for Rapid Shots usage, you want to try to delay the first Rapid Shots as long as possible. I typically don’t need it till ~60-70 seconds into the fight, in which case I’ll only need to use it 5-7 times before the resource cooldowns are back and I can do another minute long resource burn. Ideally, you’ll want 60 seconds with no Rapid Shots uses, followed by 40 seconds of which 5 Rapid Shots are used in, before the cycle repeats itself.
Here’s an example parse of a 1 mill dummy being killed by my powertech. The gear was surprisingly bad, but thats to be expected from 58% surge a ton of missing augments, as well as a 186 mainhand. For a more reasonable expectation of the actual capabilities, look at the parse on the Vanguard guide in the Tactics section. This is what I hit in the video above.
The parse is found here: http://swtor-parser.elasticbeanstalk.com/parser/view/14092/4
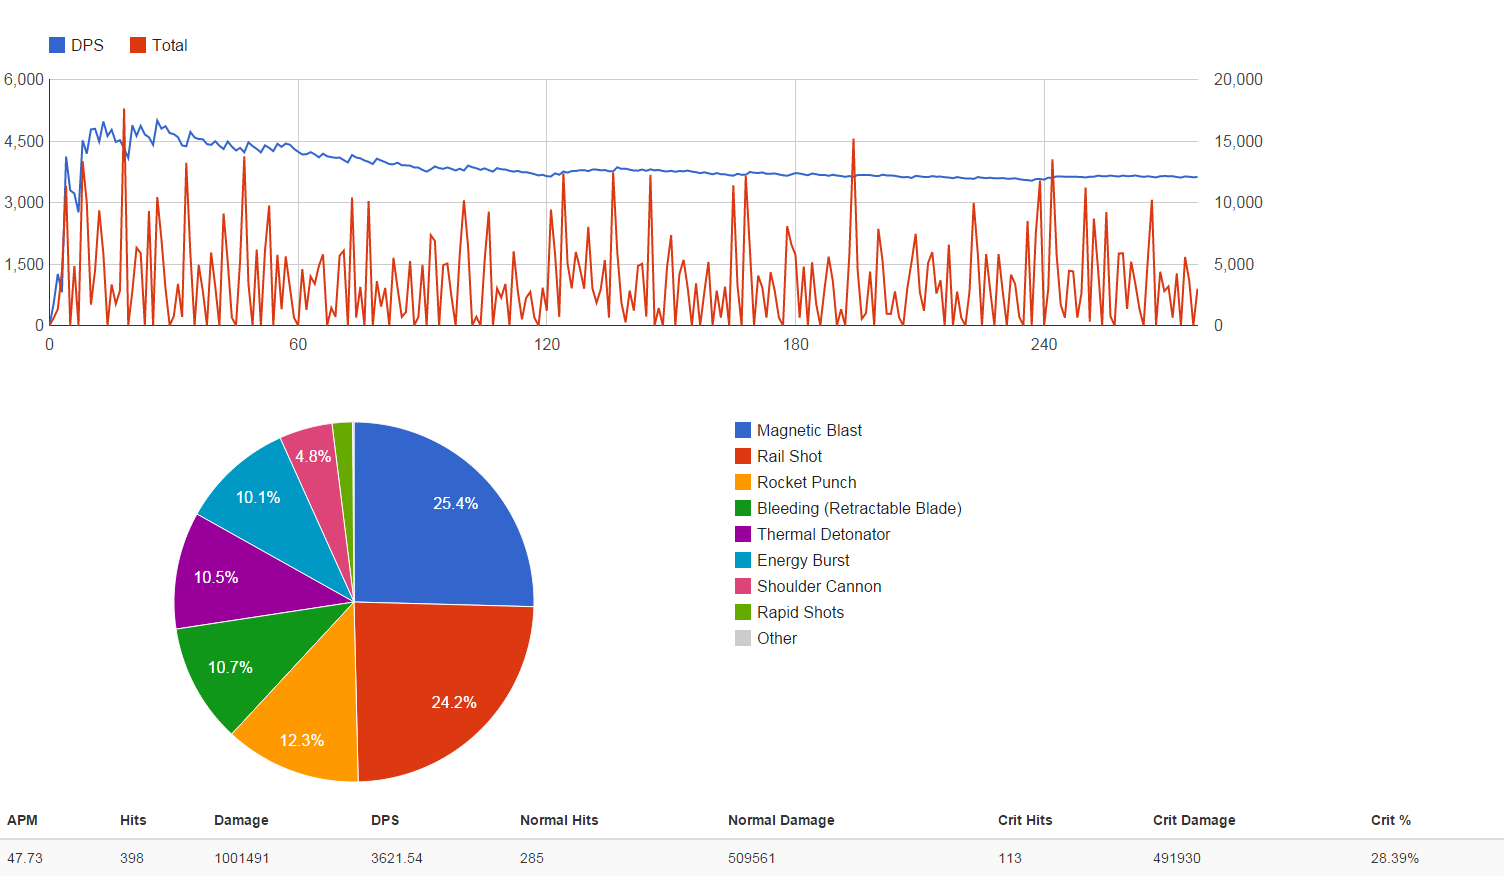

Rail Shot is used 25% of the time, and not surprisingly will do about 25% of all the damage. Note it appears slightly less here because the mainhand is only rating 186 compared to the 198 rating offhand, so the weapon damage attacks are going to do less damage while everything else will appear to do more damage.
After that comes Magnetic Blast, which is used far more often, at about 35% of the time, though it only does ~23% of the damage – its strength is coming from it proccing Prototype Particle Accelerator and not having to worry about a cooldown (as well as activating the set bonus). It did better than rail shot in this example because of its very good crit rate.
Third comes in Rocket Punch – not surprising considering its only slightly stronger than Magnetic Blast on average, though with a 9 second cooldown. It is boosted a little by having a 5% crit boost though, and should do about 13-15% of your damage
After that is Thermal Detonator, which hits by a truck and gets a 5% crit chance boost, but is held back even more by its 15 second cooldown. It should do about 12% of your damage
The 5th place position is usually a tie between Retractable Blade’s bleed effect and Energy Burst, at about 10% each. Retractable Blade’s bleed gets its damage because its ticking more than every 3 seconds, while Energy Burst just hits for such a ridiculous amount it doesn’t matter you aren’t using it more than once every 24 seconds. Energy Burst should also have an unnaturally high crit rate – 40% minimum – due to the set bonus.
Finally, you have shoulder cannon doing about 5% of your damage, and Rapid Shots doing the rest of your damage. Retractable Blade’s initial hit will do either ~1.5k damage or ~3k damage, and should only be used once anyway so the longer the fight goes on, the less you are going to notice it.
ACCURACY: You MUST have more than 750 accuracy. This brings you over 100% accuracy rating. You also MUST have the companion accuracy bonus. Otherwise, you will be missing attacks. You don’t want much more than 750 accuracy though, otherwise you are wasting stats (777 would be as high as I’d recommend)
SURGE AND ALACRITY: The only thing you must know here is that Surge should not be lower than Alacrity until about 300 surge, unless you are using the alacrity heavy gearing option. Surge + Alacrity are almost equal in 3.0, though those with higher input latency should put more emphasis on Surge rating. Depending on your surge rating, you want different levels of Crit Rating.
CRIT RATING: Depending on gear levels, you want different amounts of crit rating. Same with how much Surge you are running.
For crit rating, more power makes crit better, so I’ll give 4 different crit levels:
This assumes a 50/50 split of surge to alacrity, favouring surge.
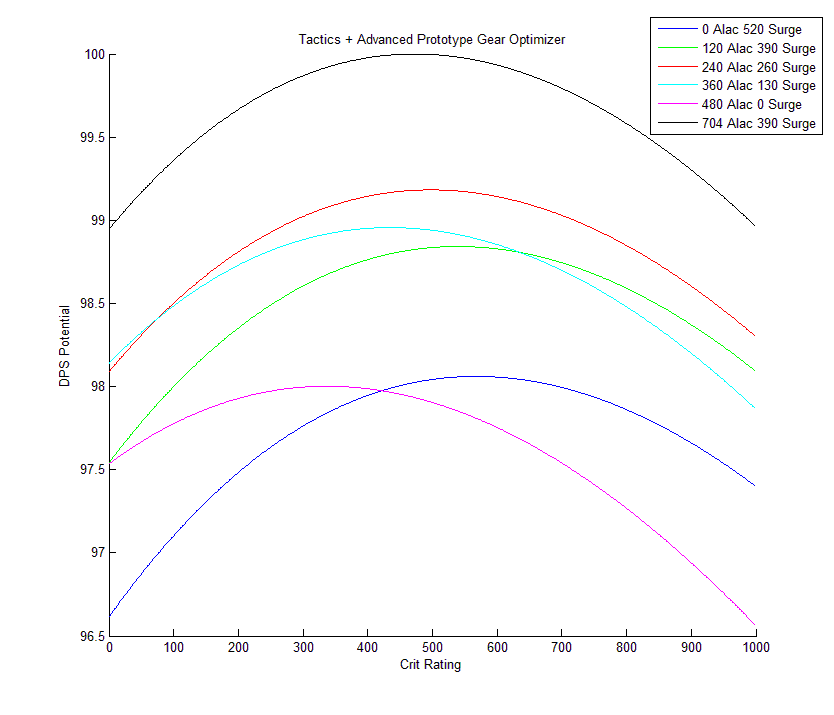
If you are not using a 50/50 split of surge to alacrity, use the following graphs for a good idea of how much crit you want. The values represented by the different colours are the surge, so alacrity would be what is left afterwards. These also assume Power augments, so if you are using Aim ones you would drop crit by about 60.
“What about the black line?” The black line is explained below, in the “Kwerty’s Crazy Gearing Method” section.
Resurrected Gear
Revanite Gear
Monolith Mainhand + Optimized 198s
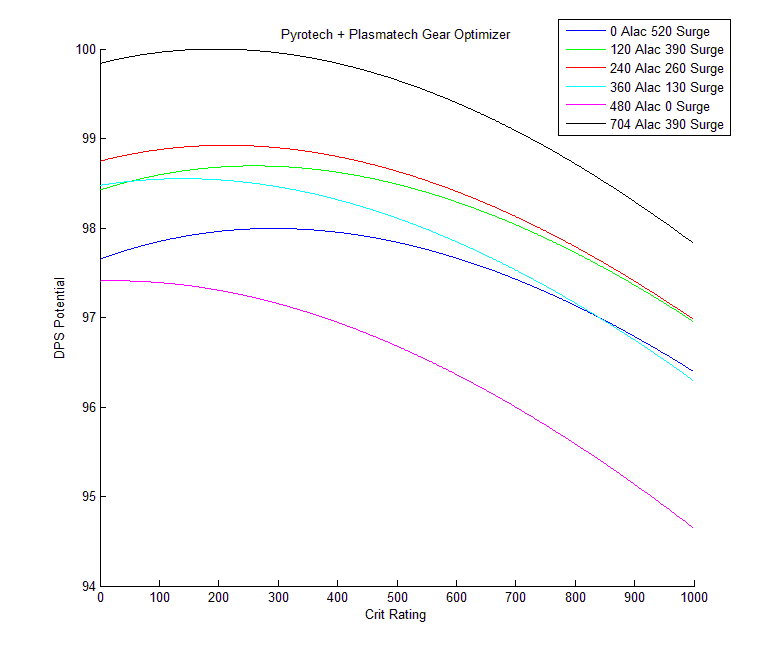
All other secondary stats should be in power
With that out of the way, we want all our augments to be either Aim, or a combination of Power + Crit. The difference between the 2 is so small you will never notice it, though I’m going with power as that way I will spend less time optimizing my gear (Crit drops like crazy from everything, while power already has issues like not existing alongside accuracy on the implants)
We also want to have a Serendipitous Assault relic, and a Focused Retribution relic
Finally, you want to be using the 6-piece Combat Tech’s set bonus, and be running in Combustible Gas Cylinder. The 6-piece combat tech set bonus gives a huge number of benefits such as auto-crits and resource management, while Combustible Gas Cylinder boosts your elemental crit rate by 3% and enables all of your procs, as well as providing a burn to most of your damage. This burn ticks on application too.
A note on Alacrity Heavy gearing or “Kwerty’s Crazy Gearing Method”
Originally, I had believed that alacrity should not really go above 240 right now, as preliminary testing found it wasn’t getting a DPS improvement. However, with 3.0.2 a lot of the input lag is gone, and with it Alacrity is significantly better. I started investigating this because of reports from Watchman Sentinels of all people, who found that they were getting comparable DPS numbers with full alacrity augments to what they were getting with full Power or Full Might augments. And with that, I modified my stat optimization code to give out optimal stats assuming any augments and any combination of Accuracy/Alacrity/Surge enhancements.
The end result? A method that minimizes the required token drops while pulling superior numbers on a dummy and in a raid.
Basically, you get your Alacrity + Surge values to the values of the black line on the graph above, and once that is done you simply have accuracy in every other piece, and Augment it to 100% accuracy. And thanks to Bioware’s token setup for Vanguards, its actually rather easy to get your Surge/Alacrity into the levels on the graph above. Also note that you can be about 50 rating in either direction and you’ll be fine. Though with 204 rating gear, get the 390 surge. You get more power that way (204 mainhands only provide Power/Surge enhancements)
Reaching the Accuracy Cap should be your highest priority
Despite the large number of auto-crits, having a surge boost on some of your biggest abilities makes crit somewhat useful for the spec.
Choice of relics should be the Serendipitous Assault and Focused Retribution, though the Boundless Ages relic can be used for when you need burst damage in specific situations, such as the Nightmare Raptus DPS challenge in the Dread Palace operation. You can craft a rating 186 relic if you have an artificer with an RE’d schematic from a vendor, so you have no excuse for not having one.
Get the set bonus as quick as possible. The 2-piece is a 1% DPS boost, the 4-piece makes resource management very nice, and the 6-piece is about a 1% DPS boost as well. 192 Set Bonus armorings are better than 198 non-set bonus armoring.
The Old set bonus should be replaced when possible, but even a rating 162 set bonus will be better than no set bonus.
For Mods, make sure to get mods without a letter in the name – E.g. Advanced Agile Mod 36 instead of Advanced Agile Mod 36A, as these are much better. However, if you are jumping up a tier (e.g. 192 to 198), the A-mod is comparable in stat contribution to the previous tier unlettered mod.
For Enhancements you also want the low endurance version, only the difference is far larger – A crafted rating 186 enhancement is better than one from the Ultimate Comms vendor.
There are a number of procs to track in this spec and DoTs you have to track when using this spec:
PROCS
DoTs
If you have any of these burns on a target, then Flamethrower will do 10% more damage.
Proper tracking of these 3 procs, as well as DoTs and resource management, is the difference between a great parse, and an average one.
There are also 2 debuffs you will want to keep on the target. These are:
New abilities added with 3.0 are highlighted in green
 Flamethrower (FT): Does very high elemental damage over 3 seconds, and slows the target down. It will also overwhelm the target, making it take 10% more damage from AoE attacks, and thanks to Rain of Fire it will spread incendiary missile to all hit targets so long as one of them has Incendiary Missile. Due to dealing elemental damage, its damage is boosted by 10% on a target below 30% health. 15 second cooldown, and generates 7 heat per tick of damage.
 Rail Shot (RS): Does high ranged weapon damage, and will automatically crit with Charged Gauntlet. This has about a 35% chance to proc Combustible Gas Cylinder and ignores 60% of the targets armor, as well as dealing 5% more damage to a burning target. 15 second cooldown, and uses generates 15 heat
 Flame Burst (FB): Does average elemental damage, its true strength comes from it being free with Flame Barrage, automatically activating Combustible Gas Cylinder, and building a stack of Superheated Flamethrower, while also getting a 10% damage boost on targets below 30% health. When not free, it generates 15 heat, and the ability has a 10 meter range, which can be expanded to 15 meters with the utility Bracer Propellant.
 Flaming Fist (FF): When compared to Rocket Punch, Flaming Fist does about the same kinetic damage, but it also has an elemental chunk of damage added on top. It also activates Combustible Gas Cylinder, makes your next Rail Shot auto-crit, its elemental portion gets boosted when the target is in execute range, its kinetic portion gets a 5% boost when attacking a burning target, and the whole thing gets a nice surge boost. Overall, this ability is great and should be used as close to on cooldown as possible (which ends up being every ~10 seconds). Generates 15 heat (13 with the 4-piece set bonus), and has a 4 meter range. Its cooldown is 9 seconds for if you are doing a Flamethrower free mobile rotation (though honestly, who does that?)
 Incendiary Missile (IMS): Nice and easy DoT to track, use it every 9th attack if using Flamethrower, or every 10th if not. This ability has a 30m range as well so you can use it as you are closing in on the target. Generates 15 heat. When multi-dotting, don’t bother with this one on more than 1 target as Flamethrower can ensure this hits everything you need it on.
 Scorch (SCH): Does a very large amount of elemental damage, only it takes 30 seconds to pull it off. Should the target die with this, it is automatically casted again on a new target for free (doesn’t even need a GCD), so long as the new target is close enough to the dead one. This makes the target take 5% more damage from tech attacks, with the debuff lasting 30 seconds, and because its elemental damage it is 10% stronger on a target below 30% health. It also has a 30% surge boost to make its crits hit a little harder. Generates 10 heat and has a 10m range.
 Immolate (IML): Does a big chunk of elemental damage (about as much as IR does over its duration), while making your next Flame Burst or Flame Sweep free, and it also builds a stack of Superheated Flamethrower. It also deals 10% more damage to a target below 30% health. It only costs 12 heat as well, which is nice. Due to the 6-piece set bonus, 1 in 4 of these should be dealing an automatic critical hit, and its 30% surge boost only sweetens the deal. Finally, it has a 10m range, and a cooldown of 15 seconds, lining up nicely with the rest of the spec.
 Rapid Shots (RpS): While this ability is used quite often, this is for good reason. Similar to how IO Mercsneed to constantly use Rapid Shots twice a cycle when resource cooldowns are not available, so does Pyrotech. And like Innovative Ordinance, this has a 35% chance to activate combustible gas cylinder on the target, and has a 30m range. One other thing about Pyrotech hammer shots is that it deals 5% more damage to a burning target.
Unlike Advanced Prototype, where the rotation is a priority system of all your different abilities. Pyrotech has a rather static rotation. What makes it difficult is trying to squeeze in extra Flame Bursts, and hitting as much stuff as possible with Flamethrower.
So, without further ado:
NOTE: SOME OF THESE 15 SECOND COOLDOWN ABILITIES HAVE A LITTLE WRIGGLE ROOM, SO THIS IS NOT THE ONLY WAY TO PLAY THE SPEC, VARIATIONS TYPICALLY END WITH ABOUT THE SAME DAMAGE ANYWAY
Single Target
OPENER
Preload Shoulder Cannon, Superheated Flamethrower (Spam Flame Sweep)
SCH-> IMS ->FF -> [EF/Relics/Adrenals] FT -> [Shoulder Cannon Spam] RS -> FB -> IML -> FB -> FB –> FF -> IMS -> FB -> FT -> RS -> FF -> IML -> FB -> RS -> Rotation
The rotation isn’t that different from the opener, though it is different in a couple of different situations.
SCH -> IMS -> FF -> FT -> RS -> FILLER -> IML -> FB -> FILLER –> FF -> IMS -> FILLER -> FT -> RS -> FF -> IML -> FB -> RpS –> Repeat
For those who are more visually inclined, here is a picture of said rotation

So, what the hell is FILLER?
Filler is very easy. Every minute, you will gain the 6-piece combat tech’s buff from using Flame Burst. If this is to happen, then the first and third cases of FILLER are to be replaced with Flame Burst. This way, you can get the extra damage from the Flame Bursts under the 2-piece buff, maximizing their contribution. Whats more, is if you are using Vent Heat on that specific cycle, then the second FILLER would be used as Flame Burst. In all other cases, you should use Rapid Shots in the FILLER slot.
Finally, a video to show how to do it. Note that this was done in legacy gear, though the mainhand, relics, earpiece + implants are all crafted 186 gear with no augments (instead of legacy stuff).
AoE
Abilities not mentioned previously:
 Flame Sweep (ES): If you are in an AoE fight and are using Flame Sweep, you will want to have Engulfing Flames for the 25% extra damage. This should all but completely replace Flame Burst in your rotation for AoE situations.
Note that the AoE rotation is significantly different, as we are now prioritising the 3-stack Flamethrower instead of the 10 second Flaming Fists.
OPENER
Preload Shoulder Cannon, Superheated Flamethrower (Spam Flame Sweep)
SCH -> IMS -> FF -> [BF/Relics/Adrenals] FT -> [Shoulder Cannon Spam] RS -> FB -> IML -> FS –> FS -> FF -> IMS -> FS -> FT -> RS -> FF -> IML -> FS –> RpS -> Rotation
The rotation isn’t that different from the opener, apart from a couple of places:
SCH-> IMS -> FF -> FT -> RS -> FILLER -> IML -> FS -> FILLER -> FF -> IMS -> FILLER -> FT-> RS -> FF -> IML -> FS –> RpS -> Rotation
For those who are more visually inclined, here is a picture of said Rotation:

So, what the hell is FILLER?
Filler is very easy. Every minute, you will gain the 6-piece combat tech’s buff from using Flame Burst. If this is to happen, then the first case of FILLER is to be replaced with Flame Burst, with the third being replaced with Flame Sweep. This way, you can get the extra damage from the Flame Sweeps under the 2-piece buff, maximizing their contribution. Whats more, is if you are using Vent Heat on that specific cycle, then the second FILLER would be used as Flame Sweep. In all other cases, you should use Rapid Shots in the FILLER slot.
“So why is Flamethrower delayed a third GCD in both cases?” Its simple. This slightly altered rotation will not only allow for slightly earlier burst compared to the one I was using earlier (as the offensive cooldowns start in GCD 3 instead of GCD 5), but also allows for more APM – If you are skilled enough. By putting a 15 second CD ability after Flamethrower, if you can keep your abilities used as the GCD comes off, you can mash the Rail Shot button while Flamethrower is channeling, and not lose any damage. BE CAREFUL NOT TO CLIP YOUR FLAMETHROWER THOUGH.
Hilariously, if you have the utility Efficient Suit, Carbonize can also be used as an AoE filler (over Rapid Shots) due to its minor elemental damage it deals, but you would need about 4+ targets to justify doing this (unless, of course, they are prone to CC), but doing so requires giving up awesome heroic utilities such as Liquid Cooling or Overdrive.
This section used to be a lot longer, but thanks to Marisi’s great parse analysis tool, Parsely, this section can be cut back on substantially.
In order to have maximum DPS, a dummy parse should have Rail Shot, Immolate and Flamethrower used on cooldown, Incendiary Missile every 15 seconds, Scorch every 30 seconds, and an average cooldown on Flaming Fist of 10 seconds. Flame Burst should also be used every ~9.3 seconds on average (though most of the time it should have a 15 second delay between uses).
To see how close you get to this, upload a log to Parsely and click on the “Ability Usage” tab, which shows how often you use each ability.
For example, in the parse below, we can see that I used my abilities more often than their cooldown states! Except… I have like 7.2% alacrity. So I lost quite a bit of damage in the end.
So here’s an example of the 1 mill dummy being killed by my powertech. Due to the lack of a decent mainhand, relics, implants, earpiece, no stims, no datacrons, and no adrenals, I lost at least 1k DPS on the parse. (the importance of having proper up-to-date gear!). A more reasonable estimation of your actual capabilities can be found on my vanguard guide in the plasmatech section.
The parse is found here: http://swtor-parser.elasticbeanstalk.com/parser/view/26267
With that in mind, here’s a few things to note:
Your most damaging ability is Flamethrower, which does about 19% of your damage.
Next up is Flaming Fist. Despite being delayed in order to avoid delaying Flamethrower, Flaming Fist is still a very powerful move for your rotation, doing things such as activating Combustible Gas Cylinder, hitting harder in the execute range, and outright hitting like a truck. It should do about 14% of your damage
Third place is a tie between everything except Combustible Gas Cylinder, Rapid Shots and Shoulder cannon, with all of them doing about 10% of your damage.
Finally, Combustible Gas Cylinder does about 9% of your damage, and Rapid Shots and Shoulder Cannon make up what is left.
For those who don’t know me, I’m a friendly guy living in Australia, where I comfortably play the game with >180 ping (I laugh every time I see someone complaining about the game being unplayable @ 100 ping). I picked up this game a few years ago, where I leveled a sentinel through the storyline, than left it, thinking “Yeah that was good”, only to come back a year later cause a friend wanted to try it out. One thing led to another and though a number of things, like being moved to the Harbinger and barely touching my sentinel anymore, I picked up a Vanguard, and loved it ever since. I mean sure, I primarily tanked content up until patch 2.6, but when the Hybrid VG DPS spec was removed in that patch, I took it upon myself to figure out how to get the best damage out of Assault spec.
It wasn’t long till I had figured most of it out, and made a guide to help keep track of things, and before I knew it there was a 15 page thread with 2 spinoffs – one for tactics, and one with pictures – and everyone was looking up to me cause I was getting them results. And now, with the complete rework of everything with patch 3.0 including removing Assault because it was so OP (I kid of course) we ended up with what we have now.
If you want PvP advice, know that I have admitted on multiple occasions to sucking at PvP. For PvE though, I’m part of the main progression team of the guild Excession, a great group of people who brought me in as a DPS about a week before the huge buffs were announced for me, and since then have thoroughly enjoyed the game. If you see anyone on The Harbinger with a keyboard-themed name, its probably me (whether its named after a keyboard or just a bunch of letters on the keyboard in a row) and if im not doing anything, I’ll happily help you out.
Enjoy the guide!


 SWTOR 3.0 Saboteur Gunslinger DPS Guide by Camel
 SWTOR 3.0 Deception Assassin DPS Guide by Artorias
 SWTOR 3.0 Focus Guardian DPS Guide by ArtoriasSWTOR 3.0 Mercenary Bodyguard Healing Guide by Orderken
 SWTOR Festival of Splendor Event Guide