SWTOR 3.1.2 Hatred Assassin DPS Guide by Aelanis of The Shadowlands, with contributions from Evolixe.
Contents
Hatred plays very similarly to the old Madness Assassin. Energy Management became somewhat easier outside of execute range, and very tight in the execute range, and the AoE rotation was almost entirely revamped. With the new Leeching Strike, and change of self-heals from triggering on periodic effect critical hits to being simply damage based, we saw a huge increase in self-healing and survivability that has made it the go-to spec for PvP.
Utility selection should go on a boss-by-boss basis, as we have a wide variety of abilities that can make certain situations go from challenging to sleep inducing.
With the loss of damage on Leeching Strike, in combination with the resultant loss of healing and the reduction of life steal from Discharge and Creeping Terror, Hatred has been hit really hard in PvE, to the point where Deception can easily tie, if not beat, Hatred in both damage and survivability. Almost all bosses are better fought in Deception at this point. This is due to Deception’s AoE damage reduction skill and the spike damage prevalent in this tier of Hard Mode Operations forcing healers to keep DPS at near full health, which means they won’t give you the time to let your now fairly meager self heals do their work. Paired with nearly equal damage to Deception, there remains almost no reason to bring a Hatred Assassin to an Operations setting.
Set Pieces
As in RotHC, gearing a DPS character will require grabbing numerous pieces. Below, I have listed below what you want to trade your token for, and why it may be a good choice. Power is rare in our set, and we require much more of it than we do crit, so pick up more of these pieces if you can. We also need a whopping 758 Accuracy rating, so Accuracy/Power pieces are incredibly valuable. Unfortunately, you’ll need to keep your eyes open for other pieces with Accuracy/Power enhancements, since we don’t get even a single one in our set bonus. You may end up getting a lot of Force Master’s boots. One more thing to remember: no offhands/main hands in this entire tier of gear have a color crystal in them, so don’t forget to add your favorite one in!
Piece Name Secondary Stat Tertiary Stat Comment Headgear Stalker’s Headgear Critical Alacrity Set Piece Chest Stalker’s Robe Power Surge Set Piece (Pow/Sur) Gloves Stalker’s Handwraps Critical Accuracy Set Piece(Accuracy) Belt Stalker’s Waistwrap Critical - Set Piece Legs Stalker’s Legwraps Power Alacrity Set Piece(Power) Boots Stalker’s Boots Critical Alacrity Set Piece Bracers Stalker’s Bracers Power - Set Piece Offhand Stalker’s Generator Critical Accuracy Accuracy Main hand Stalker’s Saberstaff Power Surge Only dps staff Implant 1 Stalker’s MK-X Package Power Accuracy Accuracy/Power! Implant 2 Stalker’s MK-V Package Power Surge Surge/Power Earpiece Force Master’s Device Power Accuracy Accuracy/Power! Bonus Force Master’s Boots Power Accuracy Acc/Power enh!!!There are a few utilities that you’re going to want regardless of the fight, and a few that have situational use, but are not always mandatory. Each boss you’ll probably want a different Utility set. However, there are a few you should have for each boss fight, due to them being so strong in general.
That leaves 4 more utilities to choose based on the boss.
 Discharge (D) in Lightning Charge has a different mechanic from Deception, so instead of being an instant damage ability, it deals damage periodically over time. Having Discharge active on a target allows you to trigger your Raze ability, which is a very important part of the spec, and should have as close to 100% uptime as possible. Its duration is 18 seconds, which is important, as will be discussed later.
 Creeping Terror (CT) is your second long duration periodic damage ability. You should keep as close to 100% uptime on the ability as you can. It is your primary choice for long range abilities while gap closing, as it has a 30 meter range and no cooldown. Its duration is also 18 seconds.
 Thrash (T) is your general purpose filler ability, for if you have plenty of Force and nothing else to spend it on. Thrash, with the 6 piece set bonus, will also trigger your Stalker’s Critical Bonus, causing your next Assassinate to critically hit. This plays an important part in the opener, and causes you to use this ability even in the Force starved execute phase.
 Death Field (DF) is an incredibly important ability. It does not hit quite as hard as in 2.10, but still packs quite a punch, and now hits up to 8 targets. It also leaves 15 Death Marks on its targets, and will spread your Discharge and Creeping Terror effects to its targets that are not already affected by them. For single target situations, it is best to use this ability on its 15 second cooldown. With 3.0, this ability causes its targets to take 10% increased area of effect damage.
 Assassinate (A) Should be your top damage contributor. Normally usable only under 30% in the execute phase, Hatred has the Bloodletting ability, that lets you use it on targets of any health, with a 30% trigger chance on any periodic damage effect. Pre-execute phase, it should be used in place of a Thrash only, while it takes priority over everything except Death Field during the execute phase.
 Lacerate is your bread and butter AoE spam move. Use it when you have more than 2 targets in range for better effect, as it costs as much as Thrash, but will do far more damage.
Opening Rotation
The opening rotation is a chance to deal quite a bit of damage in Hatred, as well as set you up for the entire rest of the fight. Start by pre-casting Demolish into: Discharge > Adrenal + Relic + Death Field > Thrash > Assassinate > Creeping Terror > Leeching Strike > Demolish.

This sets you up for a very high damage Assassinate, as the Demolish ticks combined with the Discharge ticks give you a roughly 92% chance of having Assassinate ready to go, and also a slightly higher chance that you have both relics (if not using a click relic) going for the auto-crit for maximum damage. Unfortunately, Leeching Strike does not fit into the opener until later as losing a relic boost on the auto-crit Assassinate is a damage loss over the 2% damage boost.
An opener that does not hurt your Force bar as badly, and lets you open up from further away, would be: Creeping Terror > Adrenal + Relic + Death Field > Discharge > Thrash > Demolish > Leeching Strike > Assassinate. It does not pack the same punch as the first opener, nor does it flow into the normal rotation cleanly, but has a much easier Force recovery phase that follows.

Rotation Strategy
There are two ways to look at the rotation for Hatred: Move Priority and a strict Rotation
Rotation (previously dubbed “DoT Focus Method” by MKnightRider)
This is the method I prefer to use when I play Hatred. It’s a little tricky, but once you get used to it, it is quite easy to follow, and made life before debuff sorting much less of a hassle. Basically, your two 18 second dots will stay fixed at 2 points in your rotation, where nothing should interfere with them. This means you should have perfect uptime on Discharge and Creeping Terror, and they should consume more of your stacks of Death Mark, which is good, since they deal slightly more damage than Demolish per tick. Your rotation framework should look very similar to this:
Discharge > F > M* > F > Creeping Terror > F > M* > F > M* > F > M* > F
Each F is a spot in the rotation where you will have Death Field rotate through, or where other things will happen that I’ll explain later. Death Field has a 15 second cooldown, Raze has a 9 second internal cooldown (a half multiple of 18 seconds), and Discharge and Creeping Terror both have 18 second durations. That means that if you look at the Hatred “rotation” in an 18 second block, Death Field will fall back 2 spaces each rotation. Example (MA = melee attack, De = Demolish):
D > MA > MA > De > CT > DF > MA > MA > MA > De > MA > MA
D > MA > MA > DF > CT > De > MA > MA > MA > De > MA > MA
D > DF > MA > De > CT > MA > MA > MA > MA > De > MA > DF
As you can see, you’ll occasionally delay Demolish in order to not delay Death Field. Previously, this would never happen, due to the 7.5 second lockout on Raze, but it is okay to do it now, because you can safely delay Demolish up to 2 GCDs after its Raze trigger and still not miss out on Demolish uptime. With that part of the rotation explained we go back to the framework:
Discharge > F > M* > F > Creeping Terror > F > M* > F > M* > F > M* > F
Those Fs in there aren’t just for Death Field: you’ll typically use. Demolish will, if you go from the suggested opener, land on the second and fifth F spaces, and once in a while be delayed from the second to the third F space when Death Field passes through. Because of its 12 second cooldown, Leeching Strike, used in the M* spaces, will never interfere with Death Field, Creeping Terror, or Discharge, allowing for perfect usage on cooldown during the pre-execute phase. Assassinate and Thrash will always fall into spaces where nothing else interferes.
The main focus of this method is reapplying DF and CT right away, which you can flow right into from the suggested opener. You want to keep 3 GCDs between those two DoTs. The only time you will let either dot fall off or break your 3 GCD buffer is Assassinate in the execute phase, which has more priority at that point. As MK had said before, prioritizing Assassinate in the execute phase will definitely break the 3 GCD separation, and so at that point this method reverts to a priority method during the execute phase and moves Demolish up the priority. (A = Assassinate, T = Thrash, LS = Leeching Strike, SS = Saber Strike)
Execute Priority:
Priority Method (coined by MKnightRider as well)
Most of this is quoted directly from MK’s old guide, and updated for 3.0. “The only difference in this method is it always prioritizes Demolish reapplication instead of the rigid Discharge and Creeping Terror reapplication. This means it can be a little harder to follow in an actual fight but this priority does flow perfectly into the execute phase and is exactly what you end up doing in the DoT Focus method during the execute phase anyways.
Priority is this:
Openers will be the same as the other method, the differences show up when you get to the second DoT applications and later.
Some extra things to note about Hatred priorities and rotations:
If you mess up: It’s going to cost you a chunk of damage, but freaking out and messing up more will cost you even more. If you accidentally delay an ability (like Death Field) or mess up dot reapplication, do what you need to in order to fix it, even if it means clipping dots on your next application or delaying Death Field by a global to get it back on track. Don’t let things snowball out of control, or your damage will drop sharply.
AoE Rotation (DoTspread explanation and example by Evolixe)
With the advent of 3.0, you can now spread your long duration dots from one target to up to 7 more. You must simply have one target in your Death Field’s range that has one of Creeping Terror or Discharge (or both) applied to it, and up to 7 additional targets will become affected by those dots. With more than 8 targets, the selection becomes random and which ones you hit is out of your control, save for targets that have your Creeping Terror or Discharge already on them. Please note: Demolish will not spread to other targets (which would be hilariously more overpowered), do not waste time applying it before Death Field.
Case 1: You have some number of targets (Evo used 4). You hit one with Discharge and Creeping Terror. After you use Death Field to hit them, all 4 have both dots, because none of them started with it.


Case 2: You have some number of targets (Evo used 4). You hit one of them with Discharge and another with Creeping Terror. After you use Death Field to hit them, all 4 will have both dots, since Discharge will spread to all targets without it and Creeping Terror will spread to all targets without it. This method is a little trickier but a little safer. Instead of risking killing your only “host” (has all the dots) if you crit when they don’t have a lot of health, you have less chance to crit and kill both of two hosts. The spreading works just as well, and it’s slightly less likely to kill low health enemies instead of spreading your dots, it just requires more constrained placement of the Death Field ground target. It’s also less predictable in PvP. It can also ensure that you hit 2 different targets with Death Field that you want to make sure die first (or get more damage dealt to them) by forcing the game engine to select them as targets for Death Field.


After you spread your dots, if there are 3 or more targets, you want to spam. If they all survive for 18 seconds, you can simply repeat this rotation (dot up, Death Field, Lacerate). The only thing you must remember is to let your dots fall off each enemy other than the “host” or else they won’t spread to all targets. In the case that they don’t all survive for 18 seconds, you still have a target with both dots on them and can begin you single target rotation. Some general rules of thumb for AoE: after your first rotation, if all of your targets (2 or more total) have less than ~25,000 health in a flashpoint, ~70,000 health in an 8 man raid, or ~150,000 health in a 16 man raid when Death Field comes off cooldown, don’t bother reapplying dots or delaying Death Field, they won’t survive the group’s AoE damage to make up for the lost damage. This number will go up as your group gets more geared and/or skilled.
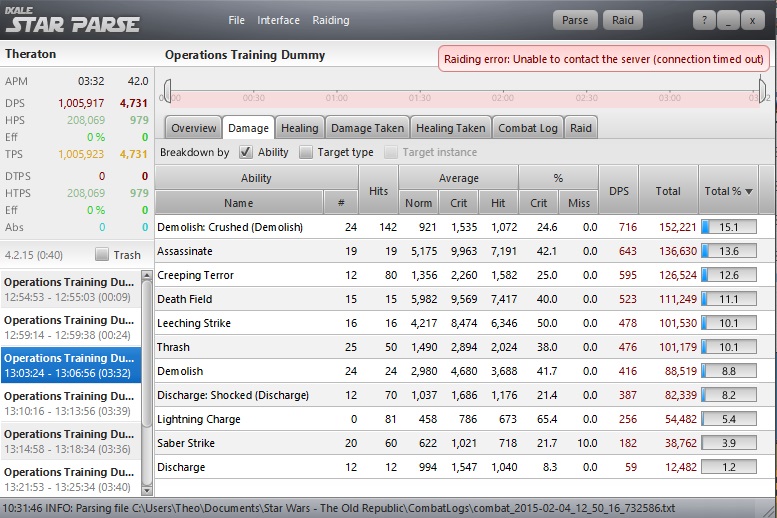
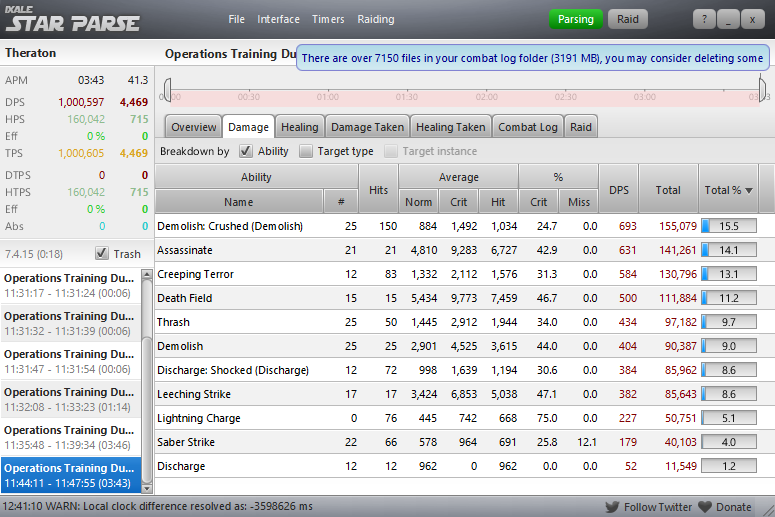
Demolish (dot) should be taking first or second alongside Assassinate. It ticks very quickly, resulting in roughly twice as many times as your other two dots independently. Depending on critical hit luck, they will alternate between parses. Like Assassinate, it’s worth roughly 14-15% of your damage.
Assassinate should be one of the top two damage dealers for Hatred. You use it fairly often, it hits incredibly hard, and you use it an absurd amount in the execute phase. It’s worth roughly 14-15% of your damage.
Creeping Terror takes third place. It receives a lot of damage boosts from the tree, and has very good uptime. It’s worth about 13% of your damage.
Death Field hits particularly hard, and has a very high critical chance thanks to Recklessness. Used on cooldown, it should end up in fourth place. It contributes roughly 11% of your damage.
Fifth place alternates between Thrash and Demolish (initial hit), with Leeching Strike following shortly after. Thrash and Leeching Strike have a high surge bonus, and Leeching Strike hits slightly harder than Thrash, and Thrash is your general filler. The initial hit of Demolish hits decently hard and very often. In total, they’ll be roughly 27% of your damage. Discharge, with its initial hit counted, also hits for around 9-10%
The last 10% is split roughly equally between Lightning Charge and Saber Strike. Despite hitting very often with a very high crit chance, Lightning Charge and Saber Strike just don’t hit very hard.
For damage breakdown, roughly 25% of your damage (Death Field and Creeping Terror) is Internal/Elemental, while the rest is Kinetic/Energy. A further split shows that roughly 64% of your damage is Force damage, while the remaining roughly 36% is melee damage. This goes to show that your dots (and Death Field) are an incredibly important part of your damage. Lastly, that roughly 11% of your damage that Death Field is worth is Area of Effect damage. You can use this information to try to work out with your raid team what debuffs you want to try to include on your team.
Aelanis is an avid forum-goer on the Shadow/Assassin forums, hailing from The Shadowlands. Despite having only raided Nightmare content since 2.8 released, Aelanis has put up very competitive numbers on numerous boss fights and previously held a spot on the World DPS leaderboards. If you play on the Shadowlands, you can reach him on Theraton, in Exit Area on the Imperial side, or Ellendra, in Death Mark on the Republic side.


 SWTOR Festival of Splendor Event Guide
 SWTOR Life Day 2015 Event Guide
 SWTOR 3.0 Defense Guardian Tanking Guide by Artorias
 SWTOR 3.0 Deception Assassin DPS Guide by Evolixe
 SWTOR Bounty Contract Week Henchman Bounty guide