SWTOR 3.1 Kinetic Combat Shadow Tanking guide by Aelanis of The Shadowlands.
Contents
Kinetic Combat is one of the 3 unique tanking specializations in SWTOR. It has, under optimal play, the lowest Damage Taken per Second (DTPS) of any of the three tanks before counting Defensive Cooldowns (DCDs), and brings some nice utility and one of the cheesiest DCDs in the game to the table. To achieve this, though, requires a slightly higher level of awareness and precision than with the other two tanks, as well as having somewhat staccato mobility. Shadow tanks love Absorb, and to a smaller extent Shield, due to the Kinetic Ward ability boosting their shield chance to unreal levels. It has middle of the road DPS compared to the other two but has excellent snap threat, even when your highest threat moves are on cooldown.
Utilities as a Shadow tank, while a little less spectacular than as a DPS, can still offer some reasonably strong options. There are a few I take regardless of the fight, and a few that have very specialized uses. We’ll go over the universally useful ones first.
The following utilities have varied uses, and can make certain fights or phases of fights much easier.
With so many situationally useful choices, the utilities I pick for each fight can vary greatly, and rarely do I have the exact same set of utilities for multiple fights. With that in mind, for each boss, I take:
Ravagers:
Sparky:
Bulo:
Torque:
Master/Blaster:
Coratanni & Pearl/Ruugar:
Temple of Sacrifice:
Malaphar:
Sword Squadron:
Underlurker:
Revanite Commanders:
Revan: (for those masochistic enough to take a non-bounty-hunter into this fight)
Unfortunately, since so many of the utilities we have are only situationally useful in PvE, we see a few fights where there are only 5 truly good utilities to take, and so you have some room for personal preference, though it won’t really make a difference. I like Force Harmonics/Audacity for the little extra threat bump it provides, as well as helping me be less of a slouch in my DPS.
If you wish to gear like Zorz and some other progression tanks do, you’ll want to skip a little bit lower, and be aware that I am no expert in gearing that way, and so what I’ll suggest is a mix of their methodology and Mean Mitigation theory. I have always preferred the mean mitigation method of tank gearing for Assassins up until 3.0. For the mean mitigation theory you’ll want to view this post by KeyboardNinja, an excellent theorycrafter with an excellent program written to calculate gear for the best possible mean mitigation at discrete gear levels. He recently updated this for the Hard Mode versions of the 3.0 Operations, with the help of a few people, so this is a big shout out to him!
For specific gear levels, using all gear at that level, your stat budget will look like:
Resurrected:Defense: 497, Shield: 1526, Absorb: 1716 (Total: 3739)
Those who use the interpolation sheet (below) to check these numbers will notice that they’re not quite perfect. This is simply due to discretization of defensive stats, and not being able to trade stats in single point increments. These values, however, are (about) as close as you can get to the ideal numbers. This is achievable with 7 Absorb Mods, 7 Absorb Enhancements, 6 Absorb Augments, 1 of each Implant, an Absorb Earpiece, 2 Defense Mods, any two relics, an Advanced Anodyne Fortitude Stim, and 8 Shield Augments.
Revanite:Defense: 527, Shield: 1668, Absorb: 1808 (Total: 4003)
Again, this is close to the ideal values, but itemized for available gear. 2 Defense Implants, 9 Shield Augments, 5 Absorb Augments, and everything else Absorb. Again: Defense is not so good in this tier of operations.
Here is a link to a Google Spreadsheet I made to help you out with your gearing. If you enter your total stat budget, with your stim active, into the appropriate cell, it will spit back out at you your ideal mean mitigation budget, based on KBN’s most updated values. Feel free to copy the formulas into your own spreadsheet to keep for yourself, or you can just continue to use this one. Please be considerate of others, though. If the calculations in the sheet can be edited because I messed up the protection settings, please let me know and I will fix that as quickly as I can.
Spike Mitigation
If you favor having some more hit points to take bigger spikes without sacrificing too much in the way of mitigation, you will want to trade away your token mods for the B lettered mods that drop in Operations and come from the Commendations vendors on fleet. Updating the previous values for B mods, you would get:
Resurrected/Massassi: Defense: 481, Shield: 1474, Absorb: 1640(Total: 3595)
This is achievable with 9 Absorb Mods, 5 Absorb Enhancements, 7 Absorb Augments, 2 Absorb Implants, an Absorb Earpiece, 2 Defense Enhancements, any two relics, an Advanced Anodyne Fortitude Stim, and 7 Shield Augments.
Revanite/Deceiver: Defense: 518, Shield: 1564, Absorb: 1759 (Total: 3841)
Follow the exact same strategy as for the Resurrected/Massassi profile for how to achieve this profile. If you literally just upgrade every piece from that profile, you get this profile.
Beyond this, you may wish, at whatever level you are comfortable with, to trade some Defense and Absorb back into Shield in the only way you can, and then trade a little more Defense into Absorb. You want to do this because you’re trying to reduce spikiness in your damage profile. When you have high absorb, but lower shield, you absorb a lot when you shield, and take normal damage when you don’t, resulting in a large difference between shielding and not shielding a hit, and Defense is a bigger culprit, since you take no damage at all from a defended hit. However, if you trade Defense and Absorb for Shield, you will shield more attacks, even if you take more damage when you do, which helps to stabilize your profile, and will help you take the edge off of big hits. However, this causes you to take more damage overall, and will cause a little more stress on your healers since they have to heal you for that extra damage you’re taking.
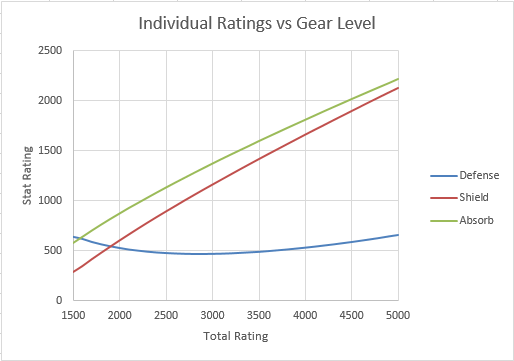
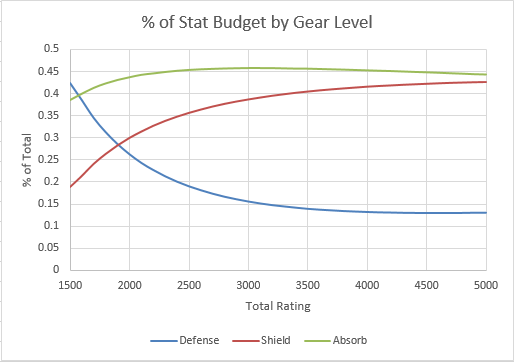
A Visual Representation
The first graph represents how much of each stat you should have, by Mean Mitigation theory, at each gear level, and shows the interpolation between points in KBN’s data. The second shows how much of each stat you should have as a percent of your total gear value.
Accuracy: 10% given from Tank Stance + 1% Companion buff = 101% Melee Accuracy
Armorings: Force Wielder, you need the extra Endurance, which benefits from your 3% boost in your Discipline. Also, all of your set bonus armorings will be of this type anyway.
Mods: For Mean Mitigation Theory, you want unlettered mods. For a strategy that tries to survive spikes, grab those B mods. Either way, if you’re upgrading, and trading away less than 1 point of mitigation per point of Endurance you pick up, carefully consider the trade.
Enhancements: Immunity and Sturdiness enhancements are your bread and butter. Anything else trades away mitigation stats for Endurance at a poor rate. However, if you have the choice between a 186 rated Sturdiness vs. a 198 Bulwark, you should take the Bulwark. As you gear up, always ask yourself: “am I getting more than one point of Endurance for each point of mitigation stat that I trade away?” If you’re comfortable with the trade, then take it.
Implants/Ear pieceThe commendation pieces are actually decent, they trade Endurance at almost a 1:1 rate with Mitigation. Mean Mitigation theory still says to take the token versions, however. Beware, though: the MK-2 versions, which are usually slightly better than the MK-1, are a trap: you lose Endurance AND mitigation over the token versions!! Don’t fall for it!
Set Bonus
Getting the new 6 piece is essential if you want to tank Hard Mode operations in this expansion. However, as you’re gearing up, make sure you keep your old 4 piece bonus, as it’s quite strong.
Bonus Topic: Old Set Bonus vs. New Set Bonus
You might be wondering why I’m advocating the new set bonus when the old set bonus is stronger in terms of overall mitigation. The 2% raw DR from the old 4 piece keeps your DR ahead, even using 4 old 180 armorings, until after the 210 Gear Rating level, and the Shield boost is just gravy on top of that, and you trade that away for a slightly higher time-averaged absorb value, what gives?
The problem with the old set bonus is that you rely so much on keeping Dark Ward up at all times. With the old set bonus, at the Resurrected gear level, if you lose all of your Dark Ward stacks, your effective damage reduction, including defense chance (which doesn’t play into the % extra damage you take), drops 4.9% static, meaning you’re taking a whopping 18.7% more damage from all attacks! Granted, that’s per second, but for the brief time that Dark Ward drops, you become far more likely to die, especially from Force and Tech damage attacks, which a lot of big hits are. Keeping those last few stacks is a big deal, and it just goes to show you how much we rely on Dark Ward.
Unlike the other two tanks, Shadow tanks have to pay close attention to their buffs and ability cooldowns in order to maintain their optimal mitigation, and their threat to less of a degree. They have to build and spend 3 stacks of Harnessed Shadows, manage their Kinetic Ward, and keep up their 2 tank debuffs on the target, which can be tough to get used to for new players. As a reminder, you should always open from stealth as a tank, due to the way the Shadow Wrap talent works.
With the current PTS proposed changes to Shadow tanks, the rotation will largely remain the same, though Force Breach will take a more prominent role.
Abilities in your main rotation:
Situational abilities (out of range or AOE):
Maximum Threat Opener (no new 4 piece)
This rotation has a brief (2 GCD window) where you can lose top threat on the boss to burst dps, but is the best you can do without the new 4 piece set bonus.
Maximum Threat Opener (with new 4 piece)
While you don’t have your threat from Cascading Debris under your second taunt (and multiplied again under your third) you have 18 straight seconds of taunt on the boss with no gaps, and without help from your second tank, who is free to then use their high threat rotation with their triple taunt rotation.
Ability Priority:
In 3.1, Force Breach moved up to 4th in priority, due to the huge damage boost it received, making it a far more valuable move for threat generation.
AoE Rotation & ability priorities:
Make sure to use Force Pull and Force Wave to group enemies up on AoE pulls/phases so that they can be more effectively killed.
Force Potency
Force Potency simultaneously gives you 2 stacks of the Potency buff and a 20 second long, 30% extra Absorb (that’s additive to your value). Unfortunately, you need the extra threat in your opening rotation, and so you’ll use it there, despite its value as a defensive ability. As for what to use it on, your first choice is Cascading Debris, since it does so much damage. For your second move, if you can, you want to use it on a boosted Force Breach, due to the incredible threat it generates, especially in AoE situations, or a Particle Accelerated Project, for the 50% boost to Surge, which is also a nice boost to threat. However, don’t delay Project for Particle Acceleration, as you need to build your Harnessed Shadows stacks as quickly as you can.
Harnessed Shadows
Your mitigation method that shapes your rotation is based around building and spending stacks of the Harnessed Shadows buff, which does nothing on its own, but provides 4% additive DR against all types of attacks when you use the 3 on Cascading Debris to maintain the Shadow’s Protection buff at 4 stacks. A single tick of Cascading Debris is enough to refresh the duration on Shadow’s Protection, but it only lasts 12 seconds. The key to maintaining the buff is to use Project and Slow Time as soon as they come off cooldown. You also want to try to keep from getting stunned or knocked back during your channel, to give you as much time as you can get to use Project and Slow Time again.
Kinetic Ward
Kinetic Ward is, hands down, your best mitigation mechanic. You get pretty good shield and absorb boosts from the discipline, but this ability pushes your shield another 15% higher, so long as you maintain the buff and keep at least 1 stack of the initial 15. It also does not respect the GCD, so you can use it as you use other abilities (aside from Cascading Debris) However, due to the Kinetic Bulwark mechanic, you should only be refreshing Kinetic Ward as it is about to fall off. Depending on the fight, the difference in mitigation between using it on cooldown and only as necessary can be almost as large as letting Shadow Protection fall off. It’s one of the things that separate the excellent from the okay Shadow tanks. To make tracking this buff easier, you can sort your buffs on your buff bar (great 3.0 quality of life change!) by duration, and by your own buffs first, which makes finding the Ward buff much easier to find quickly, so you can get back to paying attention to the fight.
Sample Dummy Parse:

As you can see, Cascading Debris is a massive portion of your threat, even as delayed as it was on this parse. You rely a lot on enemies hitting you to recover your force, and thus on a dummy parse, you see far more Saber Strikes than you would on a real boss fight. Beyond Cascading Debris, Project and Slow Time are going to be your next highest abilities. Slow time has much higher threat, but you can’t use it as often, and the longer cooldown makes you delay it for Project, in order to make sure you can keep your Shadow Protection buff. Shadow Strike is a smaller percentage of my threat than it should have been (again, poor regeneration while not getting attacked), but per use is much higher threat than Double Strike. Spinning Strike, once you reach the execute phase, will take precedence over any move that doesn’t generate Harnessed Shadows stacks, because it just generates so much threat. Force Breach should have been a higher percentage, but with poor Force Regeneration, I could only use it enough to maintain the Unsteady debuff.
Cooldown Usage
Defensive cooldowns are best used to mitigate large hits, or lots of small ones, and to buy the healers some time to get the situation back under control. As a Shadow, you also have an ability (Resilience) that lets you completely negate a large amount of nasty mechanics that other tanks have to deal with, but is mostly useful proactively, when you know the mechanic is coming.
A very important part of learning how to tank is learning how to best use your defensive abilities to survive boss mechanics and which abilities are best against what. Potency and Deflection are very good against a large series of attacks (Deflection only being useful against melee and ranged), whereas Resilience and Battle Readiness are far better for dealing with single, big hits. Battle Readiness is also incredibly good for lots of small hits, but is your only ability that works on all damage types, and so you should always consider that when deciding on whether to use it or not.
Tanking and You & How to Improve
Milas wrote a very good section in his Powertech/Vanguard guide, labeled the same as this section. I suggest that you read it if you are new to tanking, as it’s quite informative, and anything I write here would be parroting him. Vanguard Guide/Powertech Guide
Aelanis is an avid forum-goer on theAssassin/Shadow forums, hailing from The Shadowlands. Despite having only raided Nightmare content since 2.8 released, Aelanis has been playing Shadow tank since 2.0 released and mained a Shadow tank since 2.3.If you play on the Shadowlands, you can reach him on Theraton, in Exit Area on the Imperial side, or Ellendra, in Death Mark on the Republic side.


 SWTOR 3.0 Dirty Fighting Gunslinger DPS Guide by Cloake
 SWTOR 3.0 Sharpshooter Gunslinger Guide by Shulk
 SWTOR 3.0 Rage Juggernaut DPS Guide by Artorias
 SWTOR 3.0 Carnage Marauder DPS Guide by Aria
 SWTOR Festival of Splendor Event Guide