A guide to the SWTOR Bounty Contract Week Kingpin missions. Bounty Contract Week will run be on live servers starting on Aug 13, 2013.
Navigation
- Unlocking Kingpin Bounties
- Hutta: Kingpin Bounty
- Dromund Kaas Kingpin Bounty
- Nar Shaddaa Kingpin Bounty
- Tatooine Kingpin Bounty
- Alderaan Kingpin Bounty
- Voss Kingpin Bounty
- Ord Mantell Kingpin Bounty
- Coruscant Kingpin Bounty
- Henchman Bounties (separate page)
Unlocking Kingpin Bounties
To unlock Kingpin Bounties, you must have 5 Completed Bounty Contract obtained from doing Henchman bounties. These contracts are tradeable so you can mail 5 to one character. You can then purchase the unlock from the vendor near the BBA mission terminals. Kingpin missions are weeklies and only one can be done once per day.
Kingpin bounty unlocks are character specific and does not extend to your entire legacy!

Each Kingpin Bounty also have a level requirement
- Hutta/Ord mantell: Level 15
- Dromund Kaas/Coruscant: Level 15
- Nar Shaddaa: Level 18
- Tatooine: Level 23
- Alderaan: Level 28
- Voss: Level 42
For each Kingpin bounty you unlock on a character, you will also receive a blue rep item as a reward.

Like Henchman bounties, you can only do 1 Kingpin Bounty per day. Once you pick up the Kingpin Bounty for that planet, you cannot do the Henchman bounty for the same planet until you complete & turnin that Kingpin Bounty (or you can just pick another planet to do the Henchman bounty). This was done to prevent you from saving time and picking both Kingpin and Henchman bounty for the same planet at the same time.
Hutta: Kingpin Bounty
Speak to Lor’ta in Hutta
- Same location as before, this time Lor’ta will have a different conversation than with the henchman bounties.
Release Bounty Seeker Probes within Target Region
All you need to do is to click on the Seeker Probes you are provided with once you are in the target area and the mission should update to the next step after a few seconds (if you have the mission tracked, you can just click on the item icon to the top right corner of the screen)


Find and Scan Bounty Seeker Probes: 0/5
- These are not hard to find if you stay in the area and scan. There are more than 5 Seeker Probes available to scan as well. The probe locations are randomized each time.
- You do not need Macrobinoculars as these will be provided for you.


Lure Out and Kill or Capture Grov the Destroyer
- 161k HP, Champion. Immune to stuns. Can be soloed with decent gear.

- Regular attack: Terminate
- Debuffs: Stun you with a green pool and apply the Shock Collar debuff (adds deal more damage to you)
- Shock Collar: You make a tasty target for Grov’s pets. He can also punish you for your disobedience.
- Spawn 3 waves of adds based on a timer
- First Wave: 3x Enslaved Bog Snarler (3.4k HP each)
- Second Wave: 2x Enslaved Chemolizard (9k HP each)
- Third Wave: 1x Enslaved Kintan (24k HP each)


Rewards

- BBA Official Token of Exemplary Achievement (purple rep)
- Bounty Payment Lockbox (very small amount of credits, ~1-2k)
- 3 Basic Commendations (if you are 55)
- Completed Bounty Contract (used to unlock Kingping Contracts)
Dromund Kaas: Kingpin Bounty
Speak to Officer Manus in Dromund Kaas
- Same location as before, this time Manus will have a different conversation than with the henchman bounties.
Release Bounty Seeker Probes within Target Region (Dark Temple)
All you need to do is to click on the Seeker Probes you are provided with once you are in the target area and the mission should update to the next step after a few seconds.

Find and Scan Bounty Seeker Probes: 0/5
- These are not hard to find if you stay in the area and scan. There are more than 5 Seeker Probes available to scan as well. The probe locations are randomized each time.
- You do not need Macrobinoculars as these will be provided for you.


Lure Out and Kill or Capture Lord Trok
- 161k HP, inside the Dark Temple and activated by interacting with the Out of Place Artifact. Can be soloed if you are decently geared. Trok throws out a lot of stuns/CCs, which make this fight fairly annoying.

- Regular Attack: Spinning Blades (AoE) and Force Storm, move away from it as she is rooted when she uses this ability.
- Heal: Dark Heal, heals her for about 2%.


- Debuffs: Periodic AoE damage, stuns/crowd control a lot.
- Adds: At 50%, Lord Trok will use Force Barrier and is immune to all damage for 60 seconds. When this happens, a Sith Spawn add joins the fight with 54k HP. Killing the Sith Spawn will end the Force Barrier. If you fail to kill the Sith Spawn after 60 seconds, Lord Trok will join the fight.

Rewards

- BBA Official Token of Exemplary Achievement (purple rep)
- Bounty Payment Lockbox (very small amount of credits, ~1-2k)
- 3 Basic Commendations (if you are 55)
- Completed Bounty Contract (used to unlock Kingping Contracts)
Nar Shaddaa: Kingpin Bounty
Speak to Otheros on Nar Shaddaa (Upper Promenade)
- Same location as before, this time Otheros will have a different conversation than with the henchman bounties.
Release Bounty Seeker Probes within Target Region (Lower Promenade)
All you need to do is to click on the Seeker Probes you are provided with once you are in the target area and the mission should update to the next step after a few seconds.

Find and Scan Bounty Seeker Probes: 0/5
- These are not hard to find if you stay in the area and scan. There are more than 5 Seeker Probes available to scan as well. The probe locations are randomized each time.
- You do not need Macrobinoculars as these will be provided for you


Lure Out and Kill or Capture Arkan
- 161k HP, inside the Slipping Slope Cantina in Lower Promenade. Activated by interacting with this Jukebox inside the cantina. Has a number of moves that can freeze you briefly and put fire on the ground that you will need to avoid. Can be soloed if you are decently geared.

- Jetpacking: Arkan will jump in the air for 10 seconds and throw down Cryo grenades and fire mines. If you get caught in them, you will take damage and/or get knocked to the ground. He is immune to ballistic damage and controlling effects while he is up in the air. It is best to keep moving during this maneuver to reduce the damage you take. When Arkan jumps down from Jetpacking, he will do a massive knockback so don’t stand next to him.


- Cryo Beam: Beam of cryo that will freeze you for a few seconds at the end of the cast.

- Stealth: Periodically during the fight, Arkan will disappear and all the patrons will gather towards the spot where he disappeared. This is a chance for you to recharge and gain some of the resources back. When he reappears, he will spawn clones of himself that should be killed quickly before they do significant damages to you.

- Healing: Usually at the start of the Heat Beam cast, Arkan will gain 10 stacks of Kolto Shell, which heals him if he takes damage. There isn’t much you can do to avoid it and the healing is minimal so you can usually just burn through it.

Rewards
- BBA Official Token of Exemplary Achievement (purple rep)
- Bounty Payment Lockbox (very small amount of credits, ~1-2k)
- 3 Basic Commendations (if you are 55)
- Completed Bounty Contract (used to unlock Kingping Contracts)
Tatooine: Kingpin Bounty
Speak to Meerko on Tatooine
- Same location as before, this time Meerko will have a different conversation than with the henchman bounties.
Release Bounty Seeker Probes within Target Region (Ridgeside Sentry post/Outpost Largona)
All you need to do is to click on the Seeker Probes you are provided with once you are in the target area and the mission should update to the next step after a few seconds.
Find and Scan Bounty Seeker Probes: 0/5
- These are not hard to find if you stay in the area and scan. There are more than 5 Seeker Probes available to scan as well. The probe locations are randomized each time.
- You do not need Macrobinoculars as these will be provided for you
Lure Out and Kill or Capture Kreegan Ramar
- 161k HP, activated by interacting with the little pad on the box that says Call for Pickup. Can be soloed if in decent gear, bring a healer companion if possible.


- Hit quite hard so make sure to have a healer companion if you are DPS/tank. Also have a couple of attacks that knock you into the air and a red circle rocket attack that you should avoid (No cast time). Don’t fight near the ledge as the knock up can punt you off the cliff.

- Look at his buff icons. Kreegan changes between several stances
- Flechette Rounds – all basic attacks do internal bleeding damage.
- Explosive Rounds – all basic attacks do additional explosive damage.
- Missile Rounds – casts the red circle mentioned above.
- Cryo Rounds – all basic attacks slow you down.
- Adds: Mandalorian Bandits with 24K HP summoned at at a timer. These adds can be crowded controlled but some of them spawn quite close to the ledge making them valuable for a knockback.

Rewards

- BBA Official Token of Exemplary Achievement (purple rep)
- Bounty Payment Lockbox (very small amount of credits, ~1-2k)
- 3 Basic Commendations (if you are 55)
- Completed Bounty Contract (used to unlock Kingping Contracts)
Alderaan: Kingpin Bounty
Speak to Dariana Frayus on Alderaan
- Same location as before, this time Dariana will have a different conversation than with the henchman bounties.
Release Bounty Seeker Probes within Target Region (Outpost Talarn/Fort Aide)
All you need to do is to click on the Seeker Probes you are provided with once you are in the target area and the mission should update to the next step after a few seconds.

Find and Scan Bounty Seeker Probes: 0/5
- These are not hard to find if you stay in the area and scan. There are more than 5 Seeker Probes available to scan as well. The probe locations are randomized each time.
- You do not need Macrobinoculars as these will be provided for you


Lure Out and Kill or Capture Claw
- 161k HP, summoned by interacting with a crashed shuttle that you will need to go around from the scanning area to reach. Can be soloed but you will likely need a healer companion if you are tank/DPS due to the high damage output from Claw and his adds.


- Has a number of attacks typical of Gunslingers, you will want to avoid his Orbital Bombardment attack, which can hurt quite a bit.

- Claw has a special move where he will grapple you to him and then drop a red fire circle directly on top of you before teleporting to somewhere else.

- Summons two Hooligan Outcast adds with around 9k HP. They will heal Claw if not killed quickly. The pair of adds spawn based on a timer (appears to be every 34 seconds).

Rewards

- BBA Official Token of Exemplary Achievement (purple rep)
- Bounty Payment Lockbox (very small amount of credits, ~1-2k)
- 3 Basic Commendations (if you are 55)
- Completed Bounty Contract (used to unlock Kingping Contracts)
Voss: Kingpin Bounty
Speak to Sama Zo on Voss
- Same location as before, this time Sama Zo will have a different conversation than with the henchman bounties.
Release Bounty Seeker Probes within Target Region (Voss-ka)
All you need to do is to click on the Seeker Probes you are provided with once you are in the target area and the mission should update to the next step after a few seconds.
Find and Scan Bounty Seeker Probes: 0/5
- These are not hard to find if you stay in the area and scan. There are more than 5 Seeker Probes available to scan as well. The probe locations are randomized each time.
- You do not need Macrobinoculars as these will be provided for you


Borrow a piece of the Priceless Voss Cultural Artifact
- You will need to jump up on the huge crystal in the middle of the Tower of Prophecy and then click on this small crystal to get the artifact.


Lure Out and Kill or Capture Eryn Talosa
- 161k HP, summoned by interacting with the Artifact Display Stand on the second floor of the Tower of Prophecy. Can be soloed but might be hard without a healer companion. Eryn will slow you quite a lot, which makes it harder to avoid some of her abilities that are hard hitting.


- Eryn constantly apply a slow debuff to her target, which make avoiding her attacks quite difficult. She also have a debuff that prevent you from using high speed movement abilities (i..e Force Speed). The slow and the debuff tend to come together, making it a deadly combo.
- She also have a Reflect ability, if you see her casting reflect shield or something, stop attacking so you don’t kill yourself!
- Pulse Cannon is her conal attack. It is quite easy to avoid as long you are standing away from her. Doesn’t do a lot of damage so it is a non-issue for most melee players as well.

- At 3 stacks of her Shoulder Cannon buff, she will drop a red circle on your feet, which will cause knockdown and quite a bit of damage if you don’t run out of it.
- Eryn’s signature move is High Powered Laser, which is a telegraphed conal attack that does ridiculously amount of damage and cause a knockdown. It is advised to try move out of it (use stun breakers to break out of the slow) or use defensive cooldowns if you are unable to. The conal is longer than the graphic so you may get hit by it even if you are not inside it.
- At 50%, she will summon 3 droids who will rush to the entrance of the room and fire on you. They have ~8k HP each and don’t move so you can AoE them down while staying as far from Eryn as possible to avoid her High Powered Laser attack.

Rewards
- BBA Official Token of Exemplary Achievement (purple rep)
- Bounty Payment Lockbox (very small amount of credits, ~1-2k)
- 3 Basic Commendations (if you are 55)
- Completed Bounty Contract (used to unlock Kingping Contracts)
Ord Mantell: Kingpin Bounty
Speak to Ariavos on Ord Mantell (Oradam Village)
- Same location as before, this time Ariavos will have a different conversation than with the henchman bounties.
Release Bounty Seeker Probes within Target Region (NW of Mannett Point)
All you need to do is to click on the Seeker Probes you are provided with once you are in the target area and the mission should update to the next step after a few seconds.

Find and Scan Bounty Seeker Probes: 0/5
- These are not hard to find if you stay in the area and scan. There are more than 5 Seeker Probes available to scan as well. The probe locations are randomized each time.
- You do not need Macrobinoculars as these will be provided for you


Lure Out and Kill or Capture Brogon
- 161k HP, activated by interacting with the workshop inside the building.. Can be soloed if in decent gear, bring a healer companion if possible.

- Regular attacks are Full Auto and Ambush. Mix between a trooper and a wolverine with a knockback kick.
- Adds: Two Brogon Loyalist spawns frequently (on a timer) with around 4k HP each. If they are not killed quickly, they will increase Brogon’s rage stacks by 2, which give him 20% more damage and a reduction in ability cooldowns. The stacks are reduced to 1 when Brogon uses Ambush.


Rewards
- BBA Official Token of Exemplary Achievement (purple rep)
- Bounty Payment Lockbox (very small amount of credits, ~1-2k)
- 3 Basic Commendations (if you are 55)
- Completed Bounty Contract (used to unlock Kingping Contracts)
Coruscant: Kingpin Bounty
Speak to Tam Daral on Coruscant (Senate Plaza)
- Same location as before, this time Tam Daral will have a different conversation than with the henchman bounties.
Release Bounty Seeker Probes within Target Region (Justicar Territory)
All you need to do is to click on the Seeker Probes you are provided with once you are in the target area and the mission should update to the next step after a few seconds. Note that there are two areas where you can deploy the probes, if one area doesn’t work, try the other.
Find and Scan Bounty Seeker Probes: 0/5
- These are not hard to find if you stay in the area and scan. There are more than 5 Seeker Probes available to scan as well. The probe locations are randomized each time.
- You do not need Macrobinoculars as these will be provided for you


Lure Out and Kill or Capture Samovan Bann
- 161k HP, activated by interacting with the Sturdy Looking Crates in the marked location. Can be soloed if you are decently geared with a good healer or tank companion.

- Hits like a truck and spawn adds that also hit hard so either have a tank companion for healers or bring a geared out healer companion for tank/DPS players.
- Samovan Bann is mostly a melee character and doesn’t have a lot of abilities except for his grapple and knockback combo which is fairly annoying and frequent. It can interrupt your abilities and knock you off the ledge if you are not careful. His other attack with a cast bar is Ravage, which can be interrupted.
- He will spawn 3 Black Sun Gang Member adds on a timer (first set spawns at 89% but rest seems to be on a timer of 1-1.5 minutes). They have around 7.6k HP and tend to spawn on the ledge. This allow to use knockback to get rid at least of one add. Sometimes you may get lucky and your knockback can get more than one.
Rewards

- BBA Official Token of Exemplary Achievement (purple rep)
- Bounty Payment Lockbox (very small amount of credits, ~1-2k)
- 3 Basic Commendations (if you are 55)
- Completed Bounty Contract (used to unlock Kingping Contracts)


 SWTOR 3.0 Dirty Fighting Gunslinger DPS Guide by Cloake
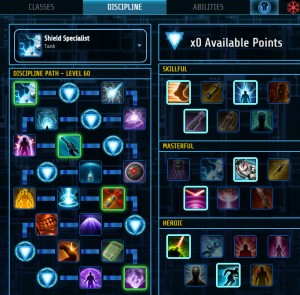 SWTOR 3.0 Shield Specialist Vanguard Tanking Guide by Milas
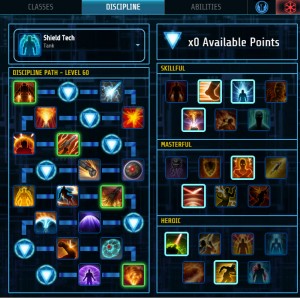
 SWTOR 3.1.2 Serenity Shadow DPS Guide by Aelanis
 SWTOR 3.1 Darkness Assassin Tanking Guide by Aelanis
 SWTOR 3.0 Rage Juggernaut DPS Guide by Artorias