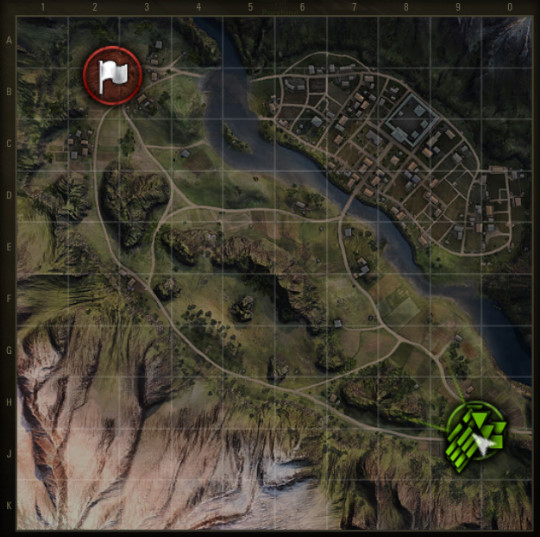
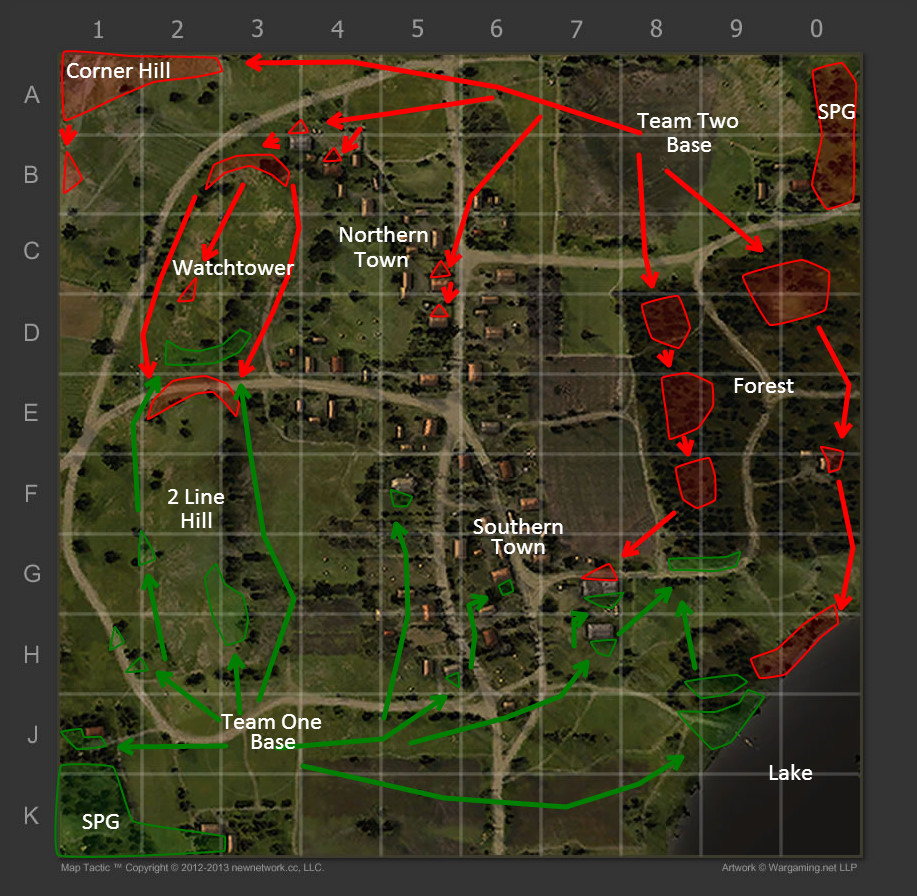
Hidden Village is a recent addition to World of Tanks and although it is new it is very easy to pick up and play. This is due to it having three main “lanes” to go down since the map is divided into the village, central field area, and then the heavy passage(surrounded by rocks/ridges). Each lane provides different gameplay and is focused around a specific play style that heavily favors some tanks over another in specific areas.
The heavy passage as the name might suggest favors tanks that might be a little slower but are more durable and with loads of firepower. The village area is better for tanks with either good camouflage or good mobility since the buildings are destructible and there is not a lot of cover. The village is also a little less important than other sections of the map since the entrances/exits of it are wide open and you have to pass through a wide river. This means that anyone sitting in the heavy passage overlooks and/or central field area can fire on you easily before you can get to cover. The central field area also doubles as a great light/medium tank place for spotting and for tanks with good frontal armor to advance without worrying about being fired upon from at least one flank(the ridge) and their rear(base).
For SPGs your best bet is to start out near the base(as per usual) and then to move to the strongest flank you have whether it is the village or heavy passage. Generally your team will lose either the village or the heavy passage and once that happens the base will be easily spotted(thus you dying).
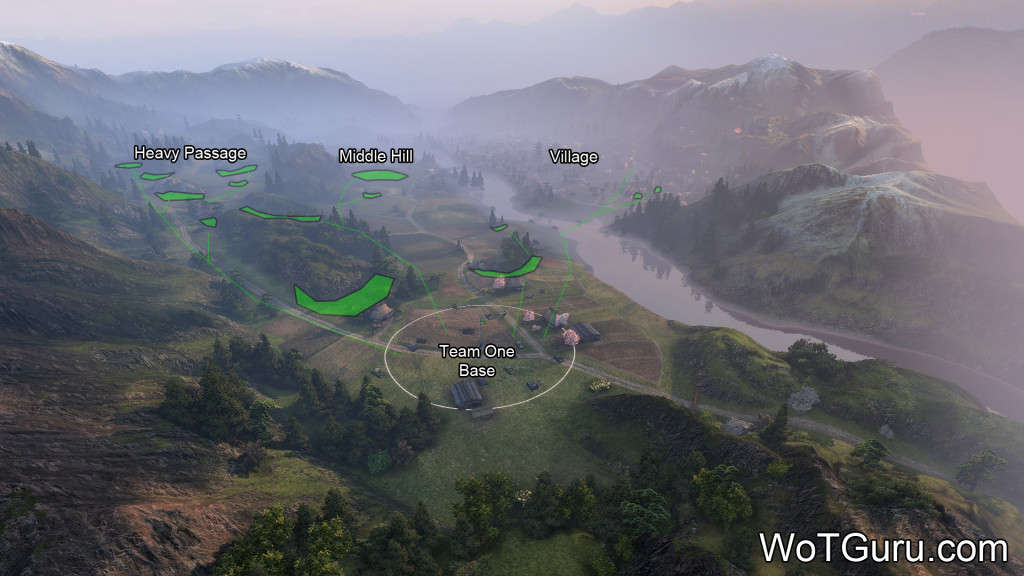
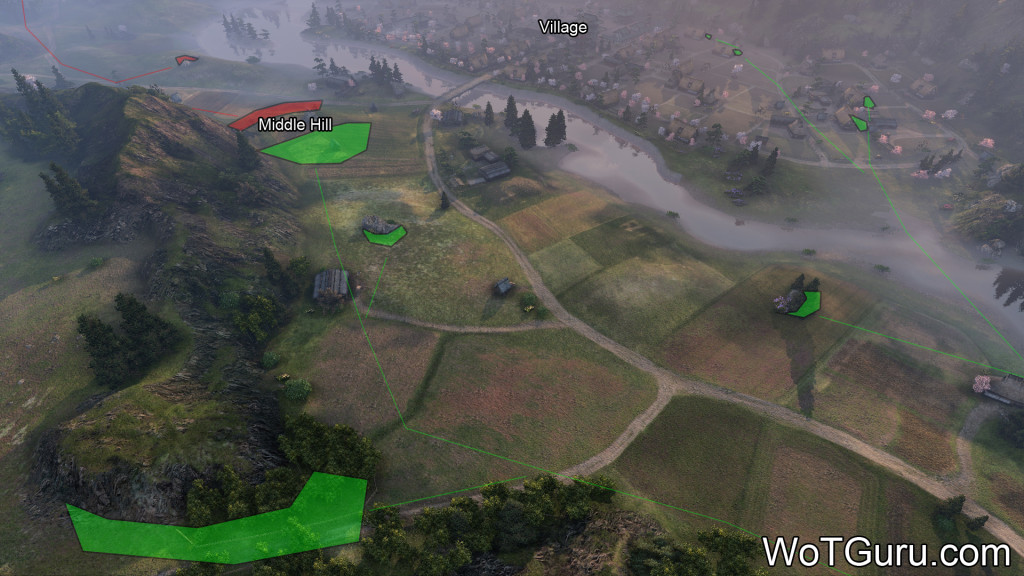
Team one(green side) starts out in the southern portion of Hidden Village around the flag area. Starting out you have three main routes to go down(although the map is very wide open it is rather simple) which are the heavy passage(left from spawn), center hill(fields in the middle of the map), and the village(right from spawn across the river). Slower tanks fair better sticking either in the heavy passage or along the bottom of the ridge heading towards the center hill. More mobile tanks fair very well on the center hill and somewhat ok in the village. The village itself might seem like it provides a lot of cover but in reality the buildings are small, destructible, and there are a lot of gaps. Generally the village is best to largely “ignore” expect for a few tanks to spot/hold easy locations marked on this guide while the locations around the base/center hill can tear into any enemies pushing through the village.
Closest to the base is a small patch of trees with one rock that provides good firing angles on enemies pushing through the village or crossing the center hill. Further up there are two small rocks before you reach the center hill which do not provide cover from artillery but provide enough from enemy tanks. Other areas around the base are the corner that leads up to the heavy passage which functions as a fallback base defense option if your team loses the village/river area and also the passage from the field in front of the base to the heavy passage. This passage is great in that you can support essentially any of the three routes on the map initially and then commit to one later on.
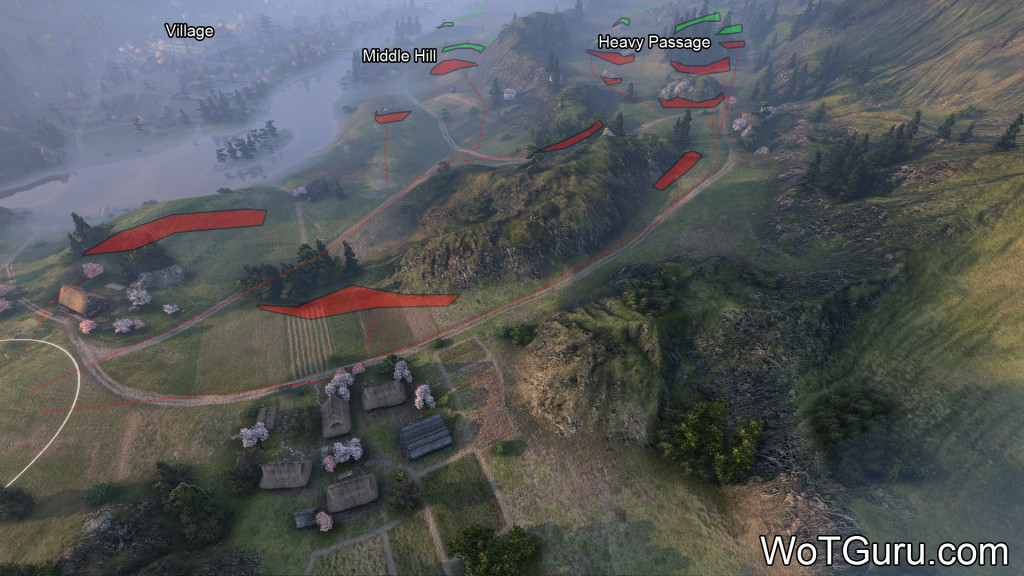
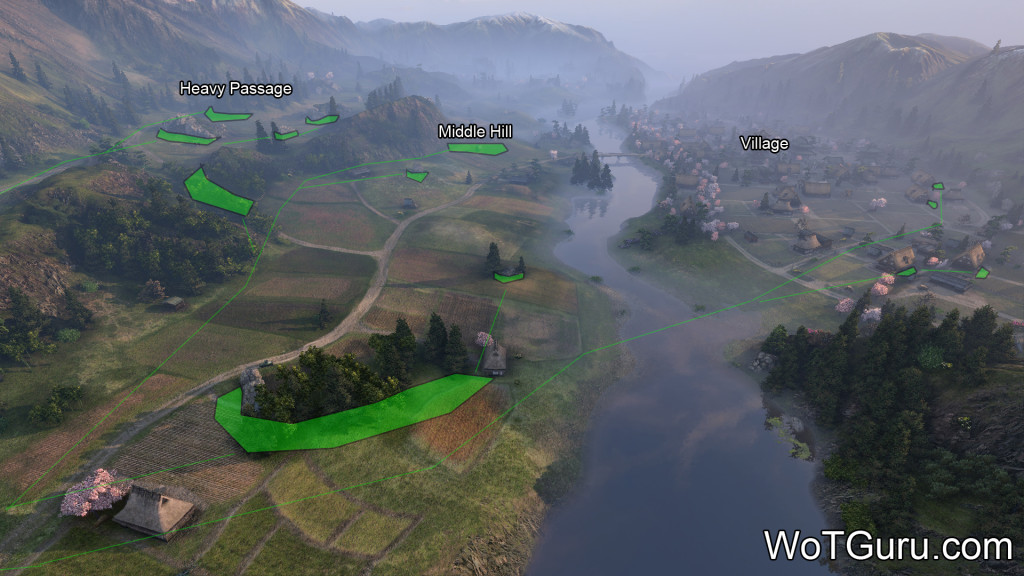
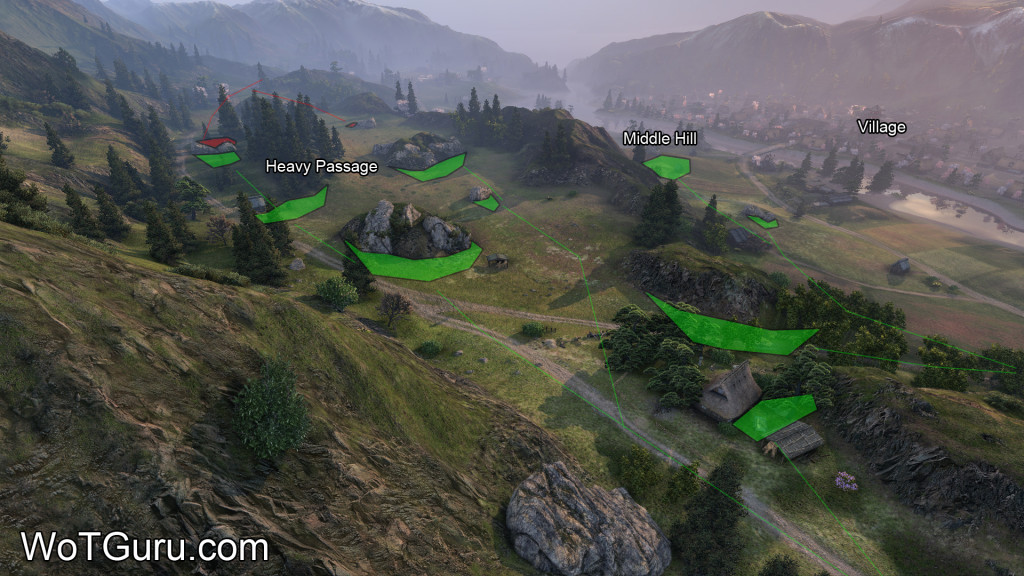
Team two(red side) like team one shares the same three route approach with the village being on your left when you spawn, the center hill/field area direct ahead, and the heavy passage on your right side. The same tactics hold the same as to which tank type each area favors and this leads to Hidden Village playing the same for most battles since generally most tanks end up in areas other than the village.
Around the base area instead of a small patch of trees with a rock you instead have a large hill that provides more hard cover than team one’s base. This hill can be a double edge sword since it also provides enemies more cover pushing across from the village/river compared to team one’s base. The hill does provide very good firing angles into the village and also towards the center hill. Moving forward into the center area you have a rock with small bushes before the center hill that provides slightly more protection from artillery than team one’s rock and is large enough for one tank to set up in.
Moving back closer to the base is the passage that connects the center field/hill area to the heavy passage. This passage is a little less useful than team one’s passage since it does not have the ability to help the heavy passage as well unless you move out of it. It still retains good coverage of enemies pushing across the center hill or through the village. Team two also has the corner near the base that makes a good location to fall back from the heavy passage to defend the base if the village/river area falls.
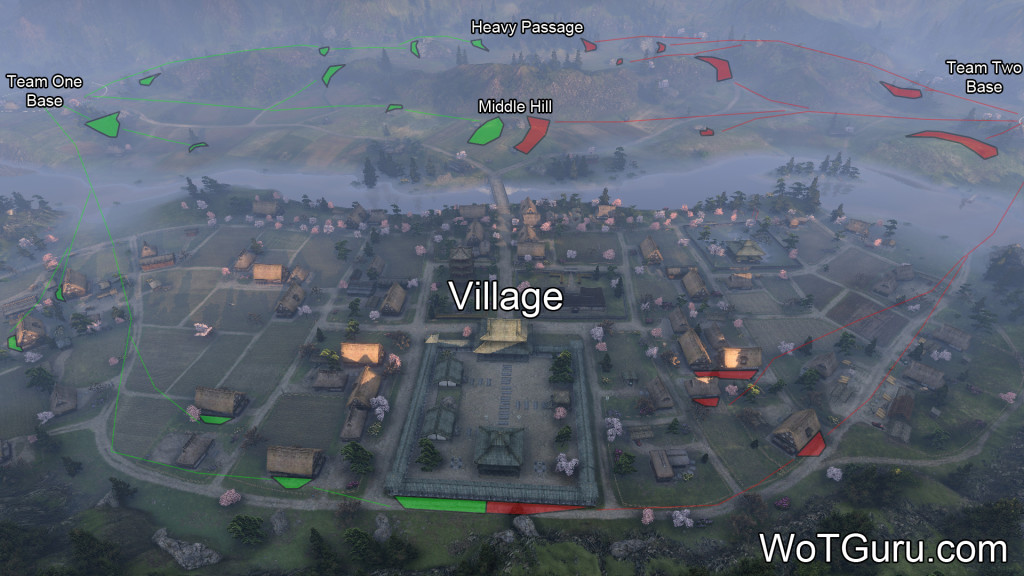
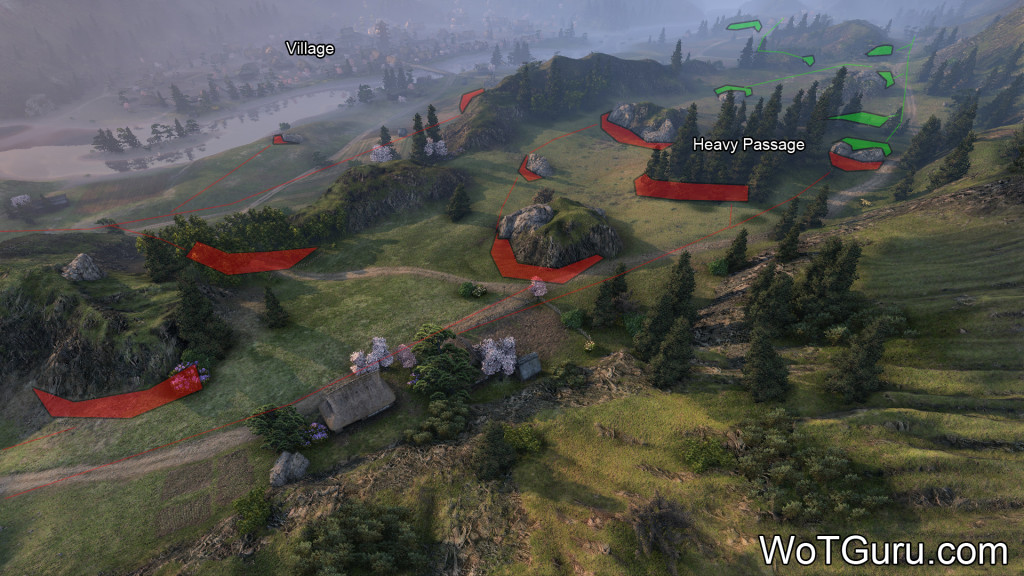
The “hidden” village area of Hidden Village takes up a large chunk of the map but does not play as vital of a role as you might think. The village itself is comprised of mainly destructible buildings and cover. Combine those two things with the shell changes that allows AP shells to destroy cover easier and to penetrate soft cover and possibly go through it means that you are exposed to the center of the map in the village more often than not. There are a few safe buildings to hide behind in the center courtyard area but they are largely useless since once you get behind them you are essentially trapped since leaving will expose you on all sides.
Both sides play the same for the village aside from the different buildings/areas that provide the most cover. Both sides when entering the village follow the same similar path that leads you to the edge of the village furthest away from the center of the map. Here you have buildings capable of breaking sight from the center of the map and will soak up a few shots. If you progress past these buildings to the side of the courtyard you lose some protection since the walls do not provide great cover and you will be pushing into the enemy(with them getting support from their center hill/field area). This makes pushing through the village very difficult especially as you get up in the tiers since tanks get larger and cover works less.
I find that having a small presence in the village to delay/spot enemies pushing through while the main “chunk” of your team covering the area sits protected near the center hill/base area. This causes the enemy to think they have an easy route to the base and instead they push out of the cover on their side of the village and get torn apart while exiting the village. If you decide to push through the village it can work if you do it quickly enough and it also helps that you are attacking from team one since the hill on team two’s side provides better cover exiting the village.
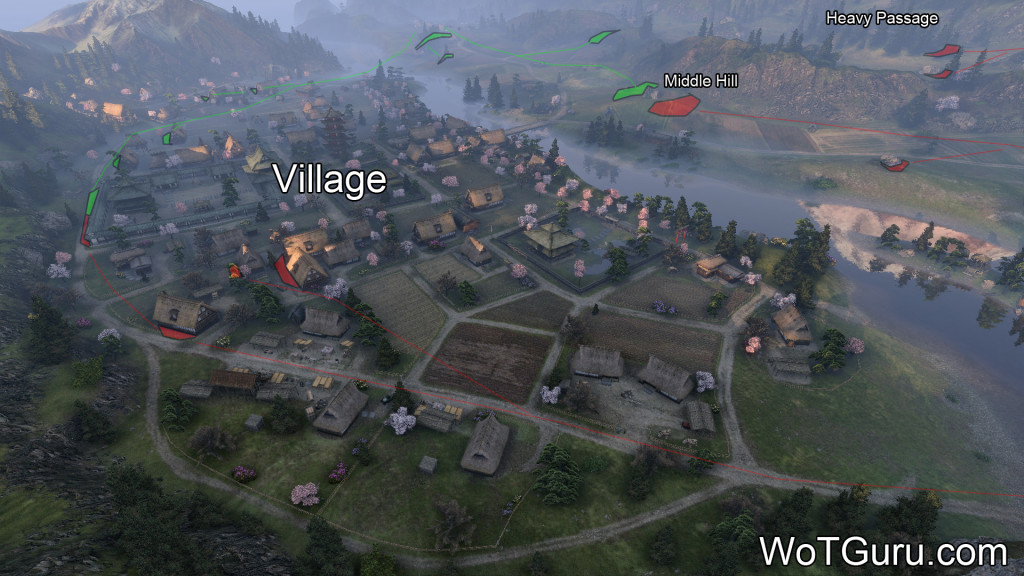
Being in the center of the map the center hill/field area ends up being a very important factor in whether or not your team gets a victory. Not only does it provide a great spotting/scouting location but it also serves as a place to defend the base area(against the village/middle), supporting role with helping the village, support if the heavy passage falls, and/or a flanking option if you push forward to flank behind the enemy in the heavy passage. Both sides have the same general set up and locations with only minor differences when it comes to this area which makes it easy to apply the same tactics no matter where you spawn.
Starting out you have two options if you plan on focusing in this area. You can either sit back near the base and support your tanks that head to the center hill or you can push forward to join them. It does not matter if you are a slow tank but it does matter if you are a slow tank with no frontal armor. If you do not have armor(and are not a light/medium tank) then pushing to the center will only get you killed. This is because you are not 100% safe from artillery and shots coming from the village so having strong armor on the front of your tank if you are slow is crucial. Team two has slightly better protection in the middle against enemy artillery compared to side one simply because of map design. Side one makes up for this by having a slightly better crossover passage that connects the middle to the heavy passage.
The main role of the center hill is to get someone there quick and to spot the enemy first. This allows your team to quickly find out how many will be in the village and possibly deal some cheap damage at the start. After this happens you can support the town without crossing the middle hill, push ahead if the center is left unguarded, or help the heavy passage.
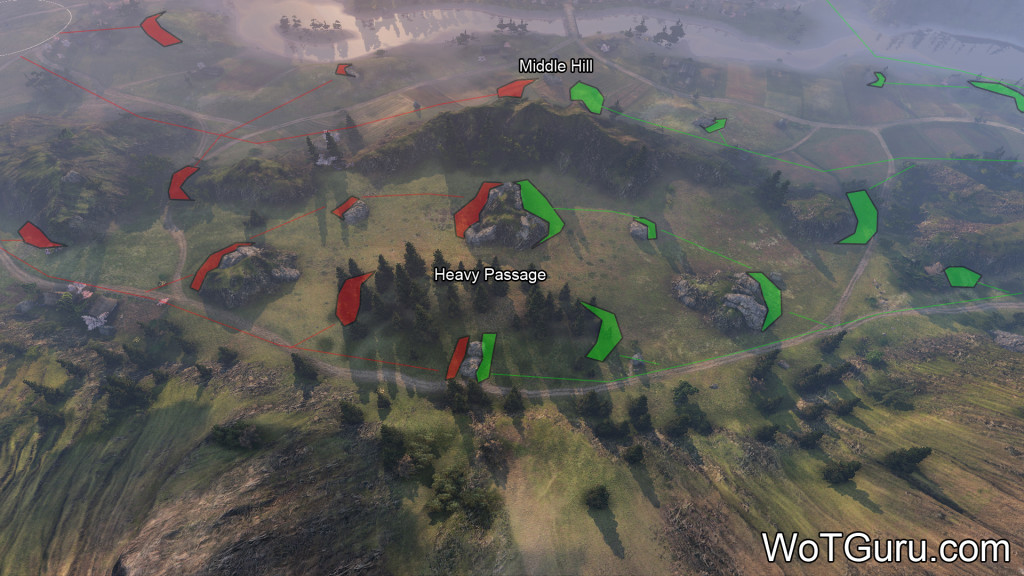
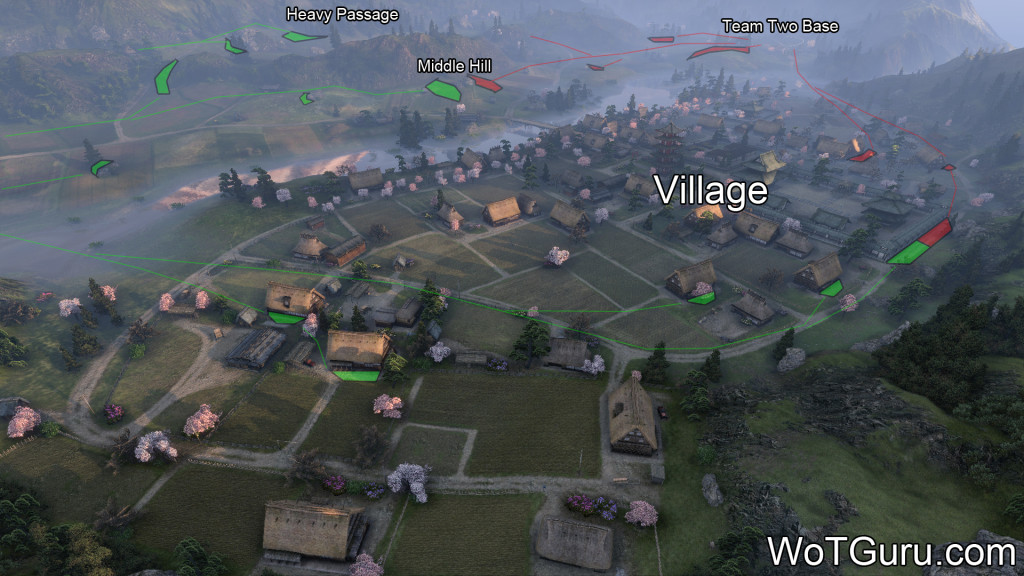
Surprise! The heavy passage again plays out the same for both sides and doesn’t really change depending on which team you are on. Like the rest of the map both sides are given the same layout to work with and to manipulate to their advantage. The heavy passage is generally called this since most heavy tanks/slow tanks head this way since it limits their time out in the open compared to the village/center area. This does not mean that mediums and lighter tanks do not play a vital role here since there is still enough wiggle room in this area to flank effectively.
Looking at this area you will see a small hill(with a split rock) splitting the area closest to the edge of the map. Trees cover the area on the hill which then opens up into an open field with large rocks breaking up the fighting. This hill initially serves as a good place to spot the enemy and “freeze” them. Afterwards you do not want to be up here unless you have superb frontal armor/turret armor since the split rock on the hill provides little protection from tanks and artillery. The backside of the hill here is decent for tanks with less armor since they can support both the small hill and also the open area if enemies advance without being spotted initially.
The open rocky area generally decides which team wins this part of the map. Each team is given an initial large rock with a small rock in between it and the center rock. Simply allowing the enemy to gain control of that center large rock will pin your team into a losing battle since the hill will fall thereafter and then the entire area. This means that having at least one tank behind that center rock is key since it stops the enemy from advancing any further easily. This is also the best area for “brawling” with tanks such as an E-100 or other heavily armored in your face tank since you can dish out damage and get into cover easily.
Playing a slightly lesser role in the fight is the passage way that connects the center hill area to the heavy passage. This passage allows your team to move tanks in or out depending on the scenario at the start of the match. On the other hand it can be a crippling blow if you allow the enemy to break through the middle of the map and flank you from it. This passage is largely overlooked later on in the match but it’s importance only grows the longer the match plays out.
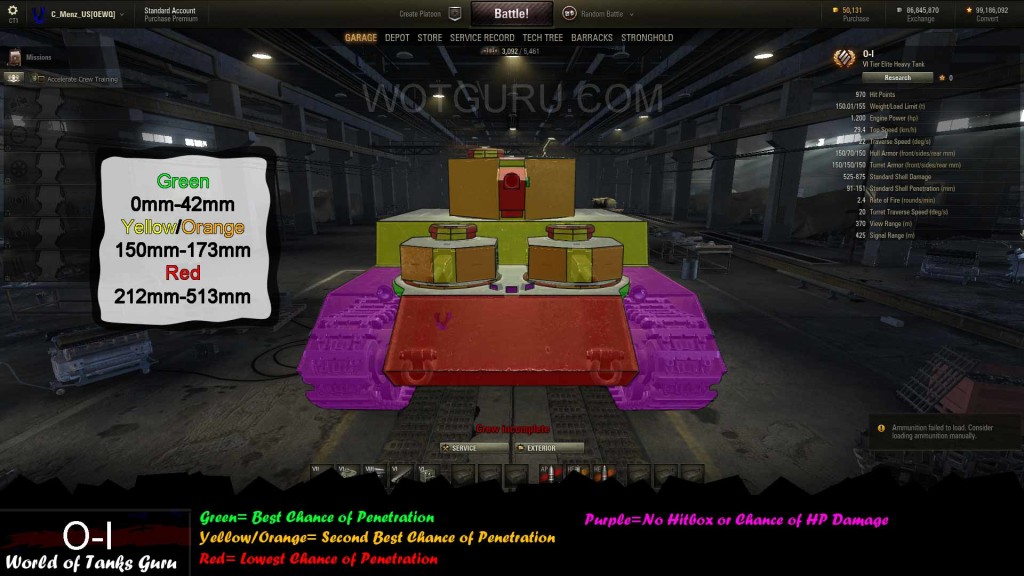 Weak Spot Guide: O-I - World of Tanks Guru
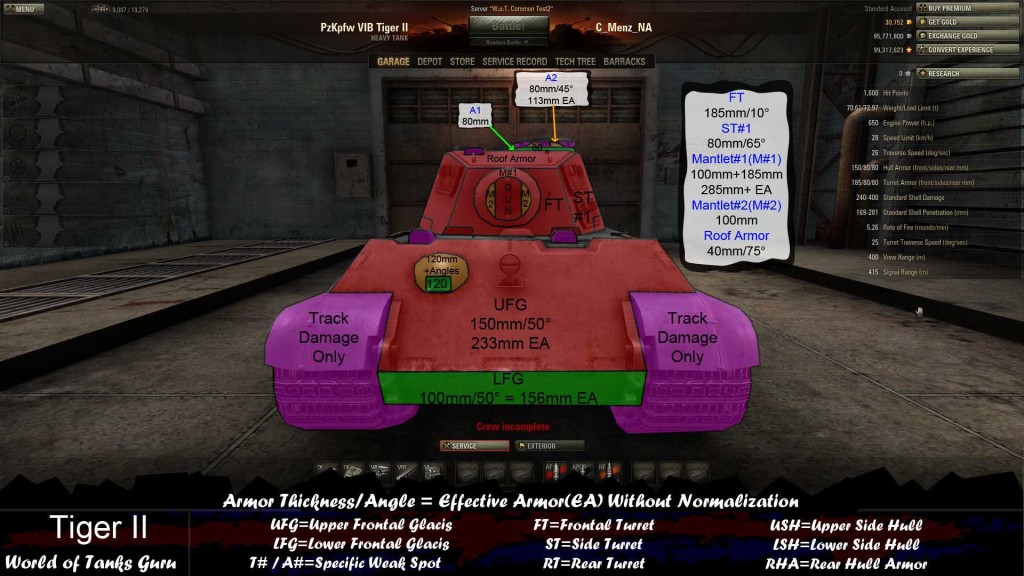 Weak Spot Guide: PzKpfw VIB Tiger II - World of Tanks
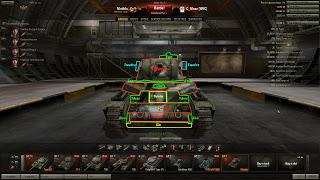 Weak Spot Guide: Matilda - World of Tanks Guru
 Weak Spot Guide: VK 72.01 (K) - World of Tanks Guru
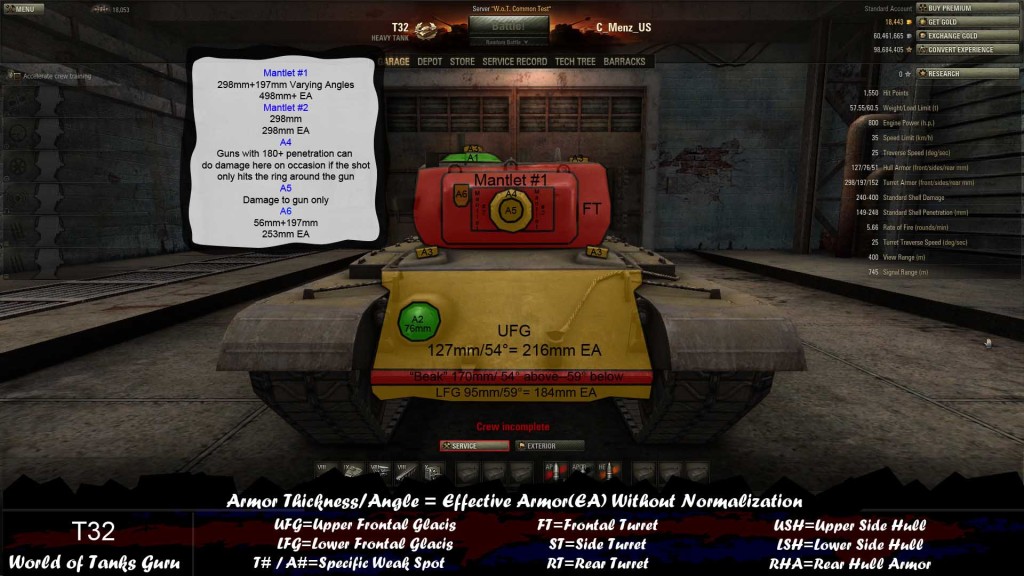 Weak Spot Guide: T32 - World of Tanks Guru