The Room Three Walkthrough – Chapter Four
Chapter 4 – The Forge
Continuing our journey, we find ourselves back in the Grey Holm study. We’ve still got more questions than answers though.
- You’ll find that you’ve been returned to the study. Make your way back out to the area where you inserted the last two PYRAMIDS.
- Place the PYRAMID you just got into the middle of the table and take the OPTICAL DEVICE that comes out of the table when you do so.
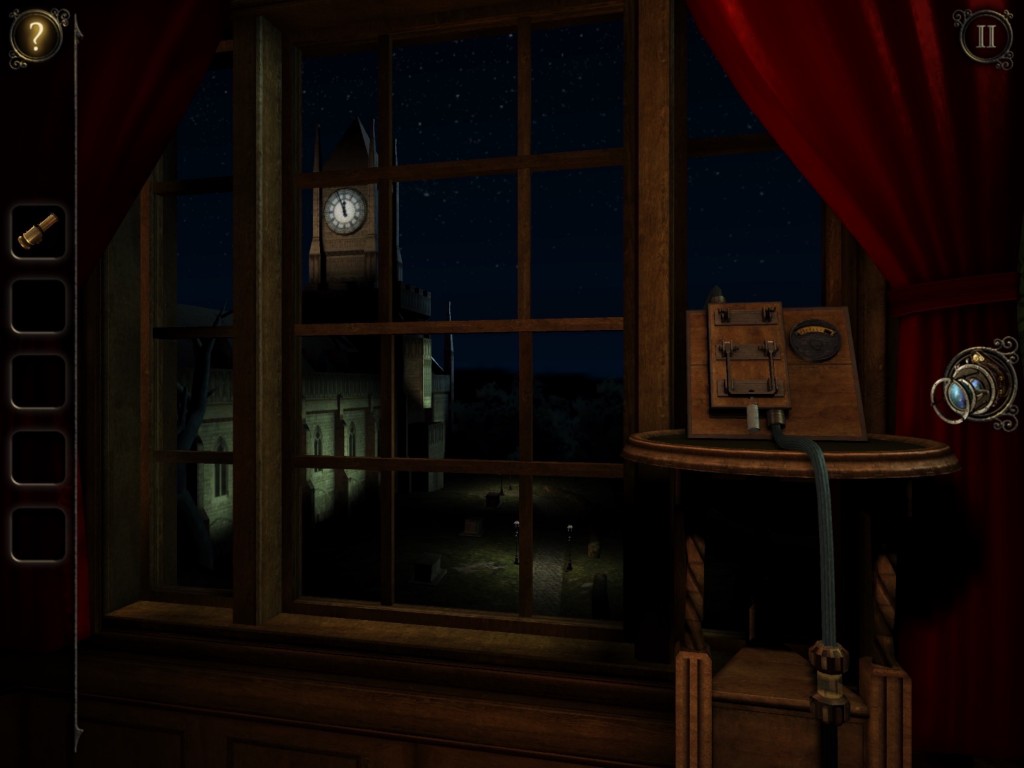
- Zoom out and look around the room. You’ll see a door with a bronze colored circle inset into it. Zoom in on it.
OPTICAL DEVICE Puzzle
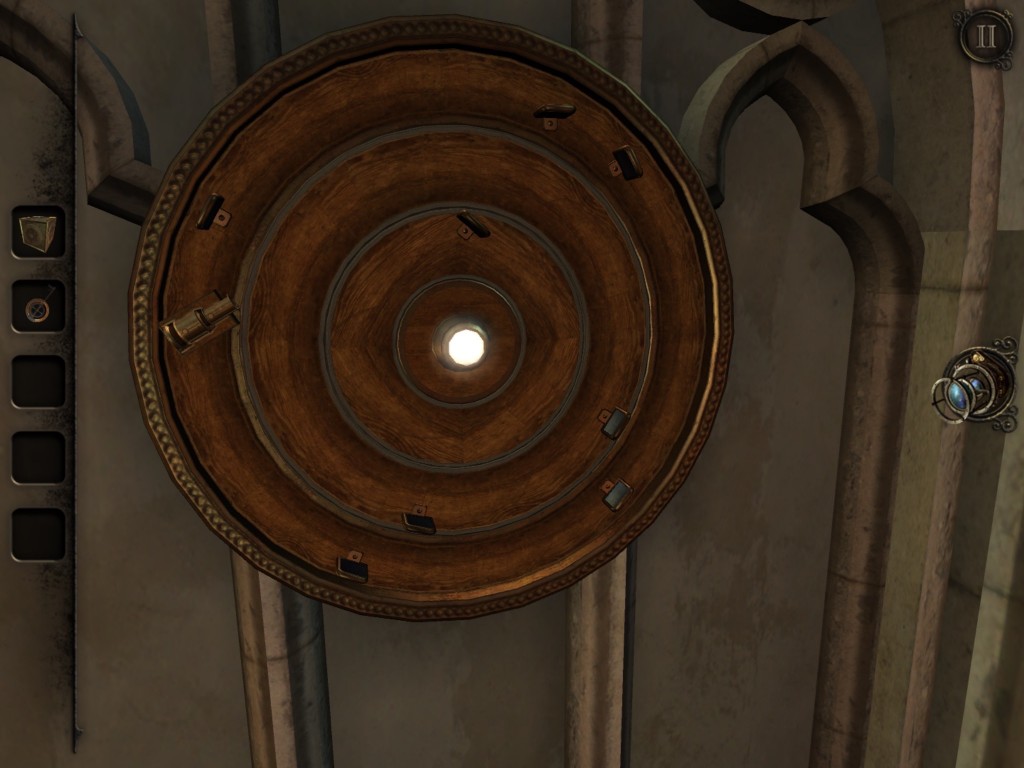
- Place the OPTICAL DEVICE into the slot on the left of the bronze disk.
- Rotate the mirrors to reflect the beam of light into the gemstone.
- When you’ve completed the puzzle, the door will open.
- Go through the door and proceed forward until you’re in a room with another fusebox.
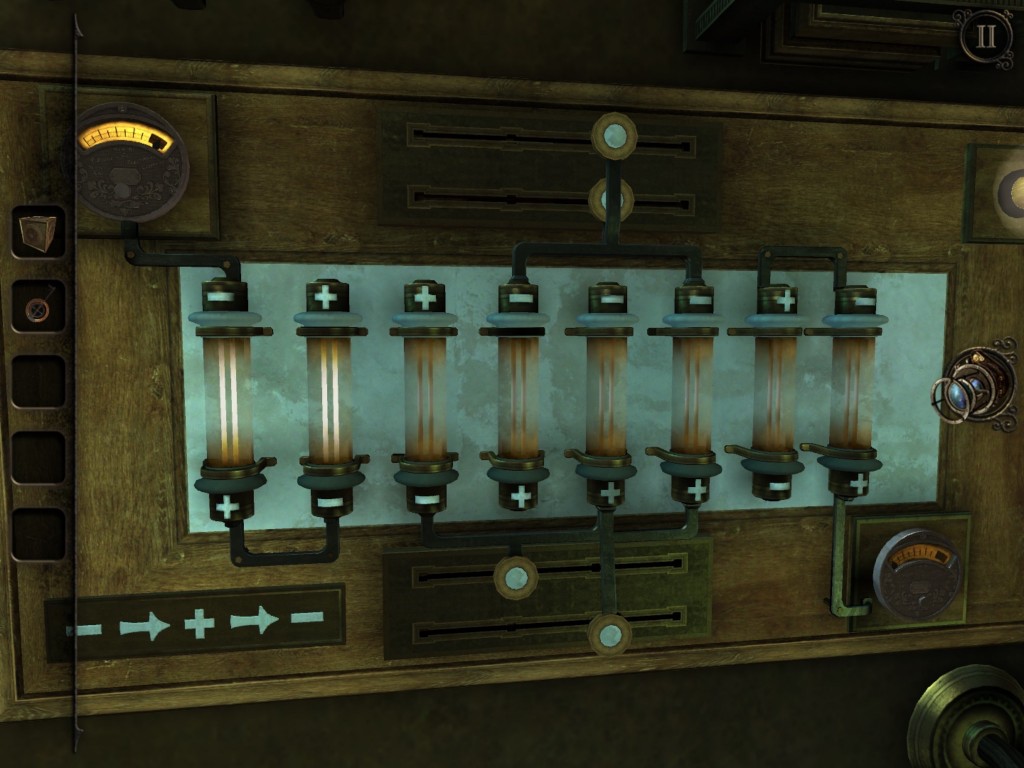
- Remember to use the metal sliders to connect the negative positions to the positive positions to make each fuse light up.
- Once you’ve solved the puzzle, the cord coming out of the fuse box will be powered.
- Follow the cord to the switch and flip it, you’ll see a building light up in the distance.
- Follow the cord further and you’ll see another box with four switches on it. Flip them and press the button that appears.
- Proceed to the now powered-up oscilloscope.
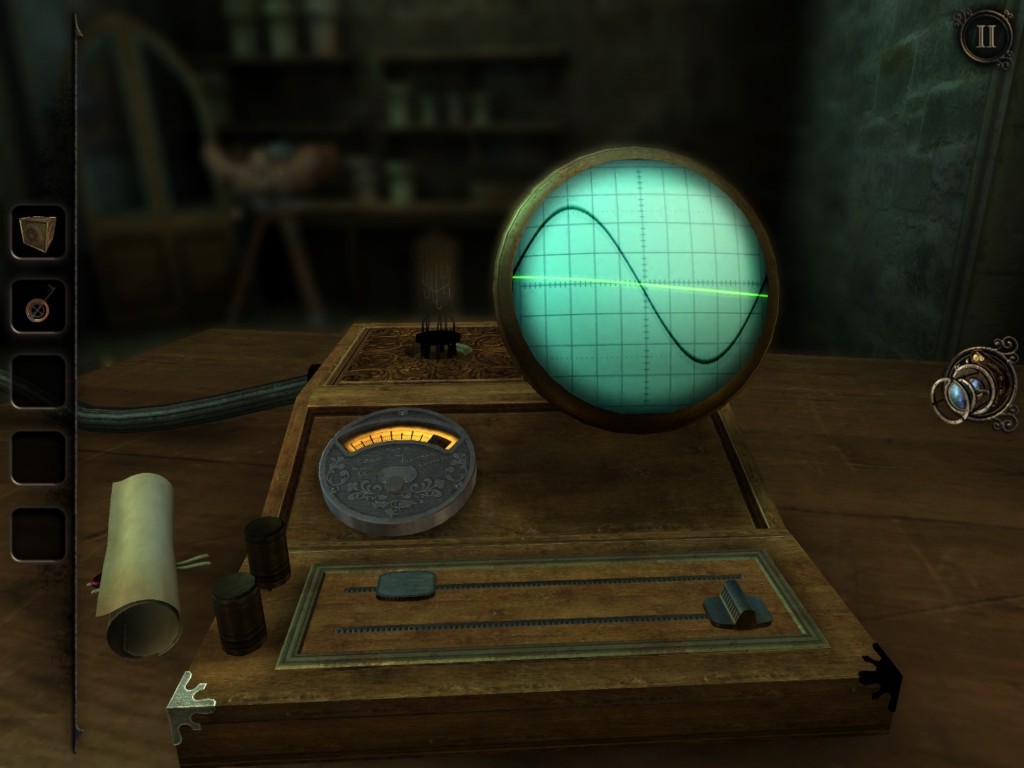
- The trick to this one is to match the pace of the moving slider at the top with the slider on the bottom.
- Move the bottom slider in parallel to the top slider to match the pattern on the screen and a beam of light will shoot out of the box opening a door. Proceed through the door and you’ll find yourself in the forge.
The Forge
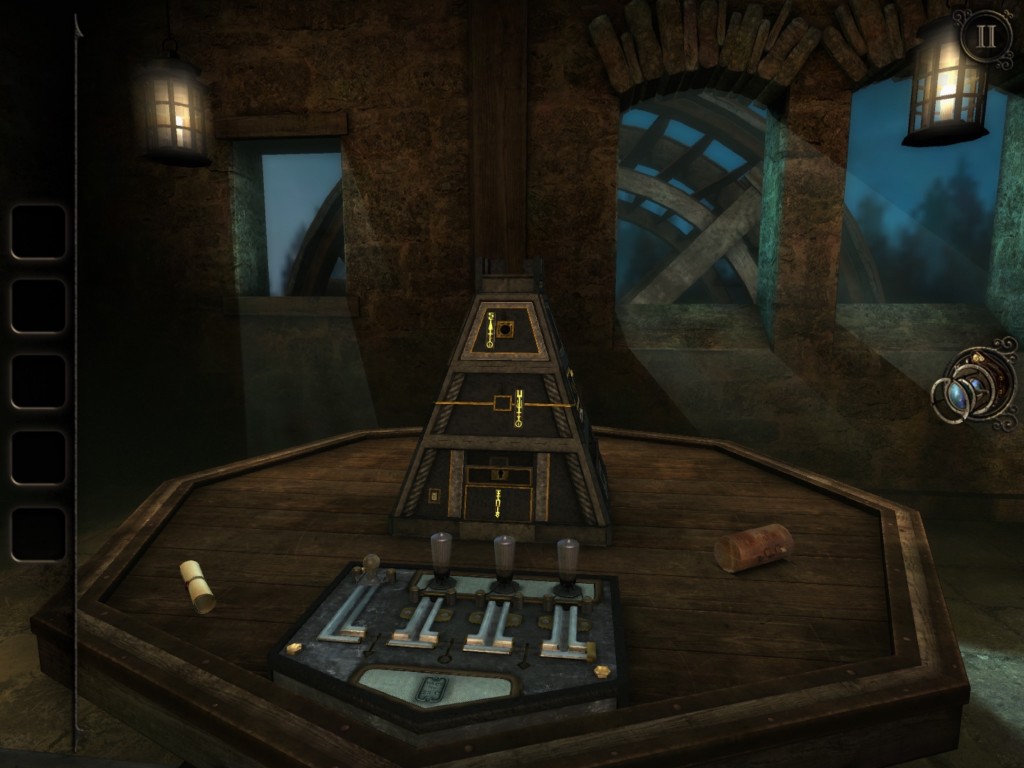
- Zoom in on the table holding the pyramid-shaped structure and read The Craftsman’s letter.
- Take the LEATHER CASE off the table and look at it in your inventory.
- You can slide a pin holding the case closed to open it.
- Once you do, look inside and take the KINDLING.
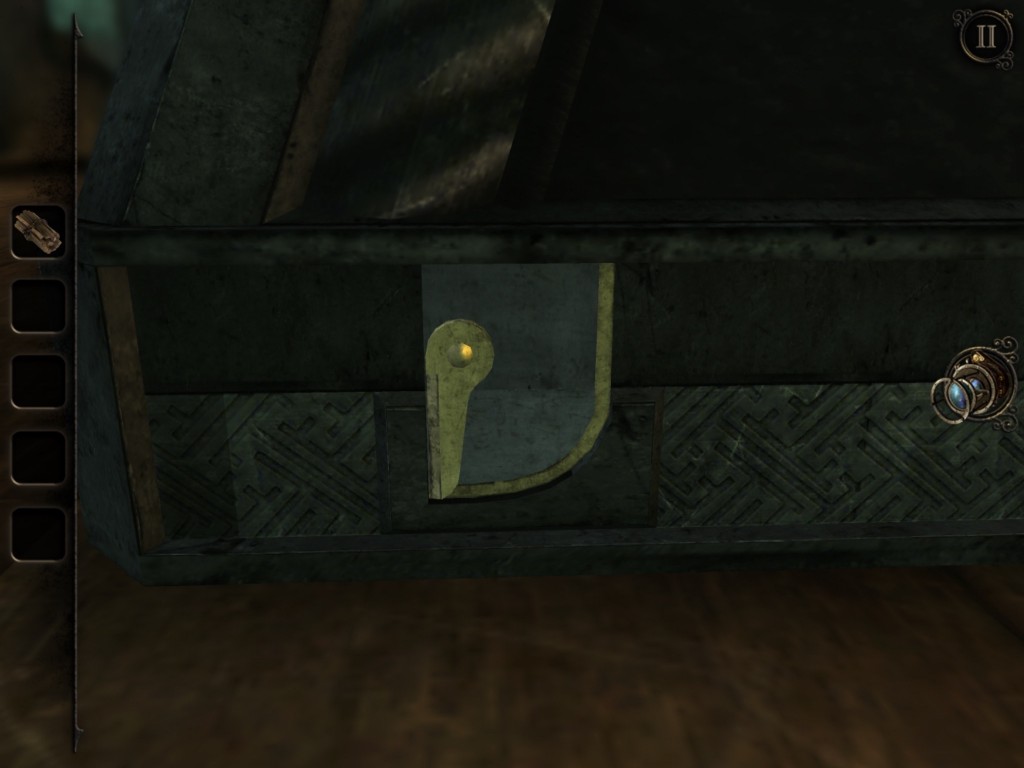
- Zoom in on the bottom of the pyramid puzzle box and press the button to the left of the golden symbol. This will open a drawer on the left side of the pyramid.
- Take the FLINT from the drawer and then rotate to the left side of the pyramid.
- On each of the bottom corners is a small latch. Rotate them both up and a drawer will slide out containing a puzzle.
Gems in Drawer Puzzle
- In this puzzle, the objective is to match the gem in each row to the gem at the bottom of the drawer.
- When you tap on a gem, it will move towards the side it needs to be on. You can jump the gems over each other like checker pieces, but you have to have an empty spot on the other side of a gem if you want to jump it.
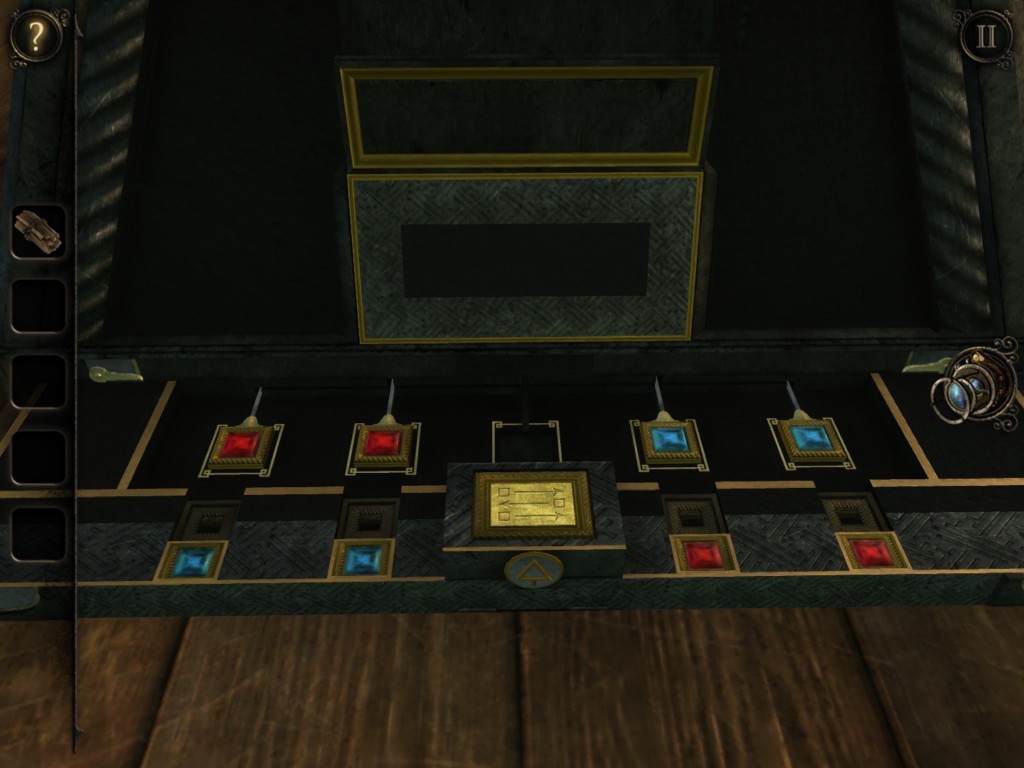
- If you get stuck, the button in the middle of the drawer resets the gems positions.
- Once you solve the puzzle, a small compartment will open containing a METAL CASTING.
- Rotate to the front of the pyramid and zoom in on the plate with the three vacuum tubes on it.
- If you notice, the METAL CASTING you just found has a symbol on it that matches the first empty spot on the plate. Place the METAL CASTING this spot.
- Slide the piece to the first vacuum tube and a section of the gears under the table will start moving.
- Zoom out from the pyramid table and look your left. Zoom in on the pedestal and take the KEY.
- In the right-upper corner of the room, there is a trapdoor. Lift the metal flap covering the keyhole on the padlock and use the KEY you just got to unlock it.
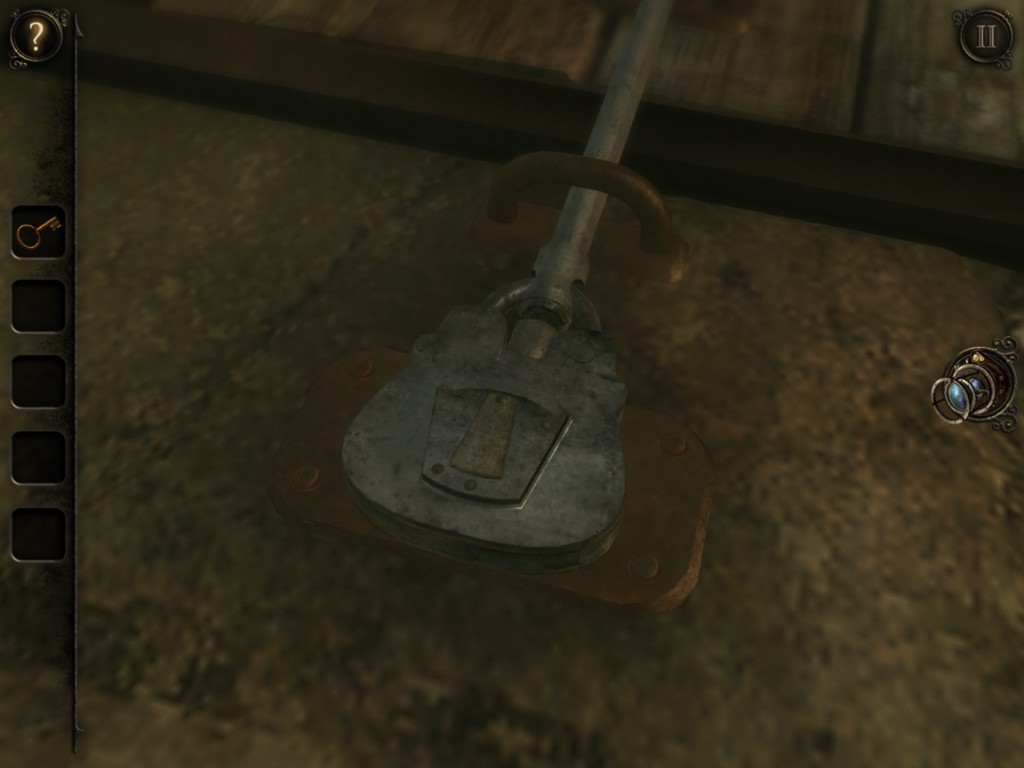
- Take the METAL ROD and open the trap door.
- Pull the lever and the rushing water will be diverted to the water wheel outside the forge.
- Go back to the pedestal where you found the key for the padlock and place the METAL ROD in the “+” shaped slot.
Sandbag Puzzle
- You can now use these controls to move the sandbag that is suspended in the left corner of the room.
- Put on your EYEPIECE and you’ll see plates with symbols on them towards your left. Move the sandbag to the first one by sliding the “+” shaped control left.
- When the sandbag is over the first plate, pull down on the left control and the first section of the door ahead of you will unlock.
- Do the same to the second plate and the door will open.
- Go through the door and grab the CHESS PIECE off of the lathe to the left. Look to the small hatch to the right of the table saw. Unlatch the hatch and open it.
- Go back to the sandbag controls and move it through the newly opened hatch.
- Go back to the table saw and you’ll see the sandbag hanging above it. Slice it open with the saw and grab the METAL BAR.
- Exit this room and move to the forge in the corner opposite the trapdoor with the water running beneath it.
- Zoom in on the top right of the forge and open the tinderbox on the left. Place the TINDER in this box and close it.
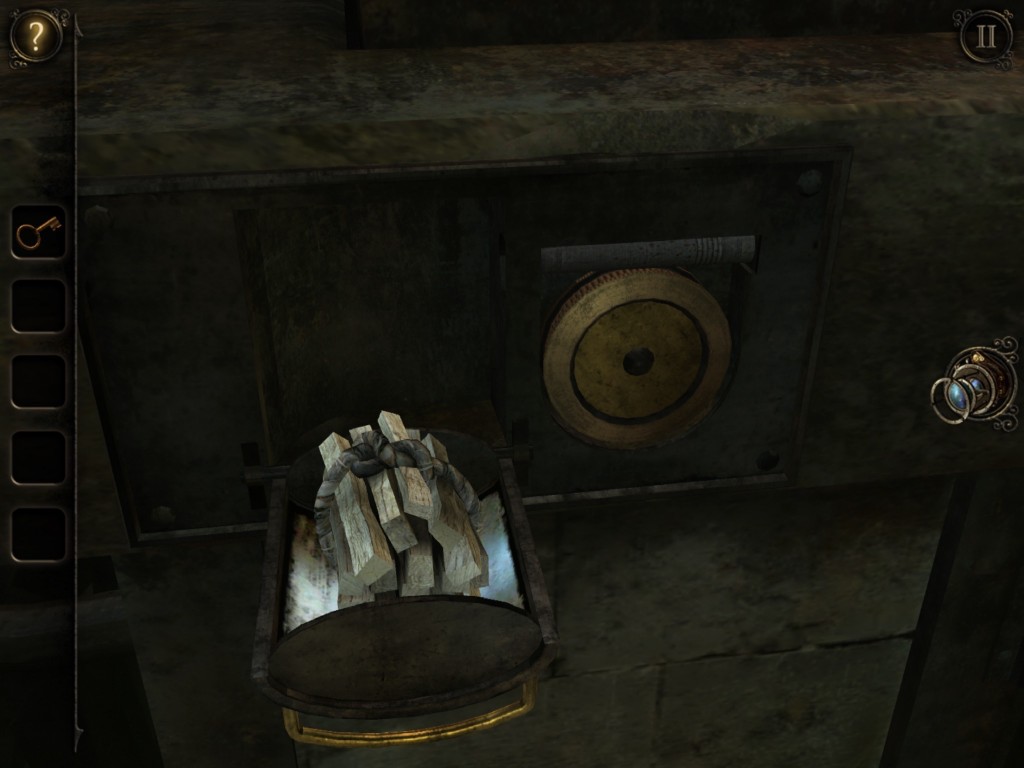
- Place the FLINT on the gold wheel on the right.
- Spin the wheel to light the tinder and move to the right and pull the handle there.
- Pulling the handle opens a funnel. Place the METAL BAR in the funnel and close it.
- Below the funnel is three molds you can spin. On the pyramid box, there is a keyhole on the bottom segment in the front. Match the symbols on the molds to match the one by the keyhole.
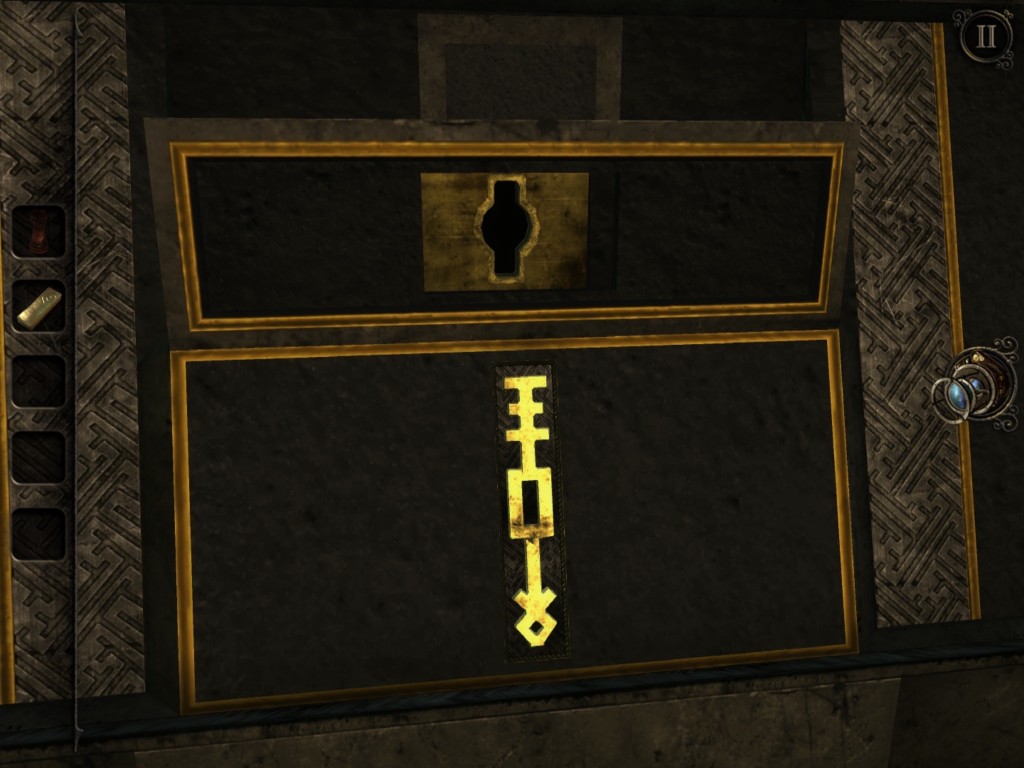
- Zoom in on the bellow and work it up and down and the METAL BAR will be melted into a KEY.
- Use the KEY on the keyhole on the bottom of the pyramid-shaped box.
- A slider will pop out. Slide it to the left and look at the left side of the pyramid. Take the SMALL CONNECTOR from the compartment there.
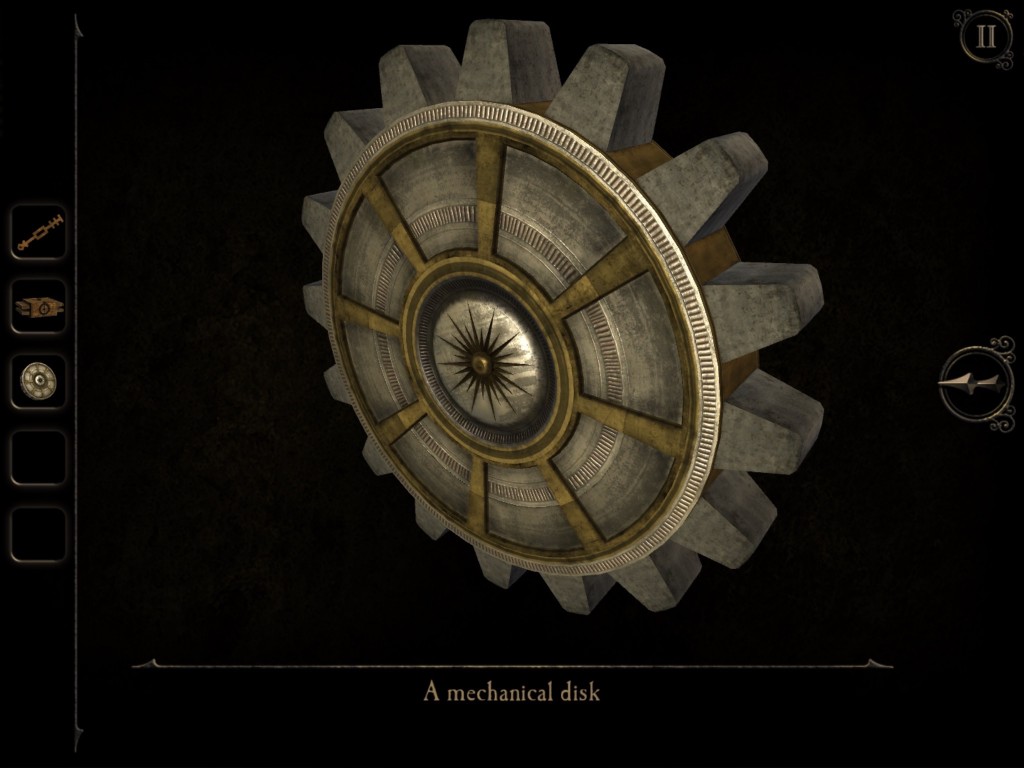
- Move to the right side of the pyramid and place the SMALL CONNECTOR on the pegs there. Spin the disk to make the pegs lower and take the MECHANICAL DISK.
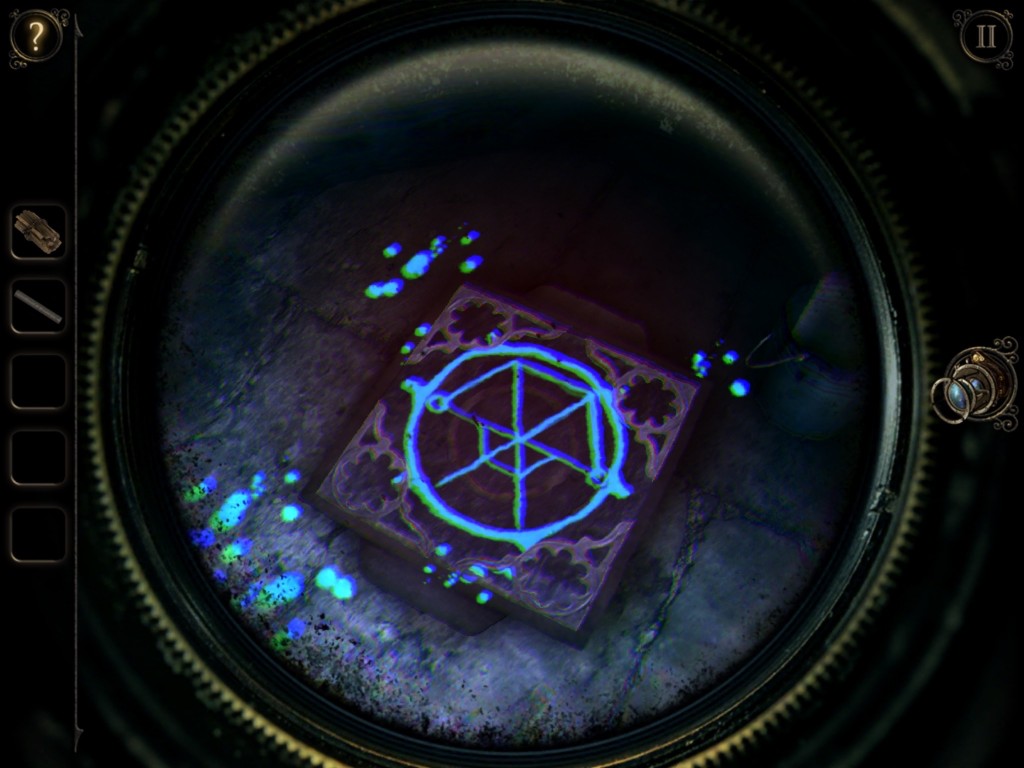
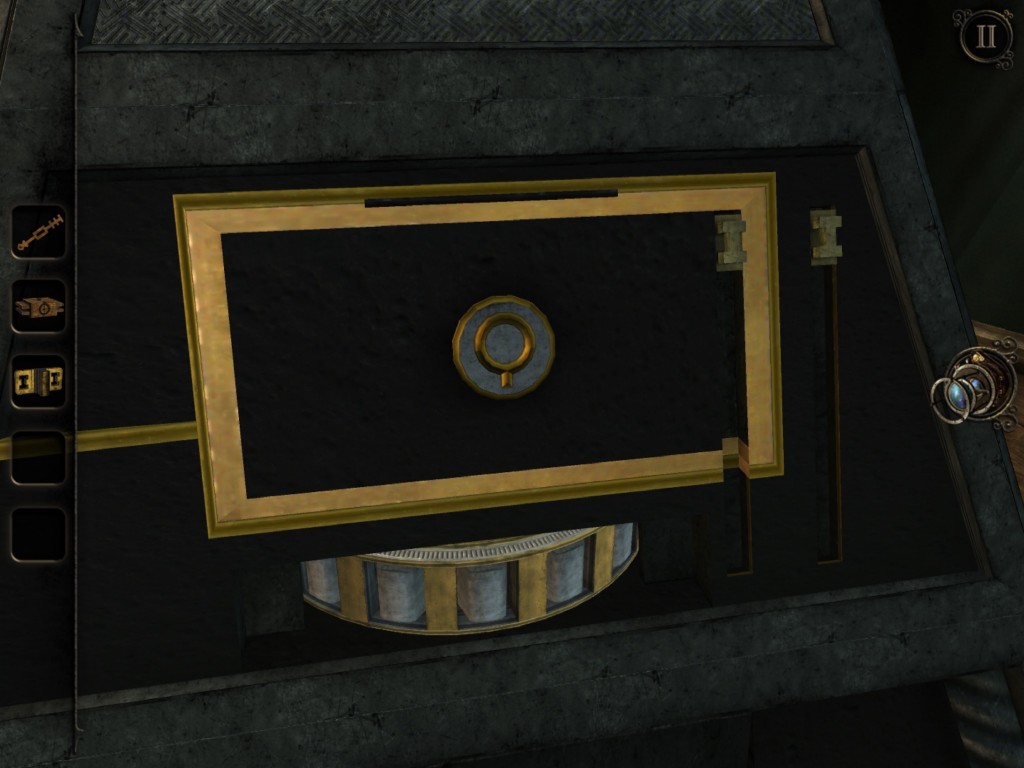
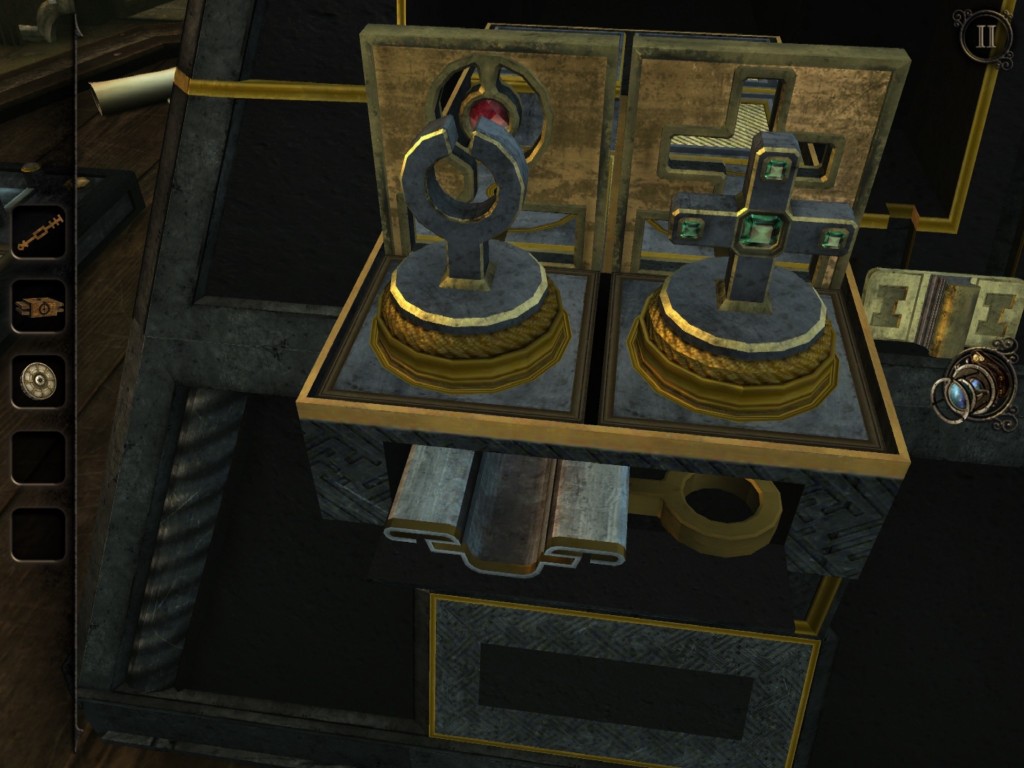
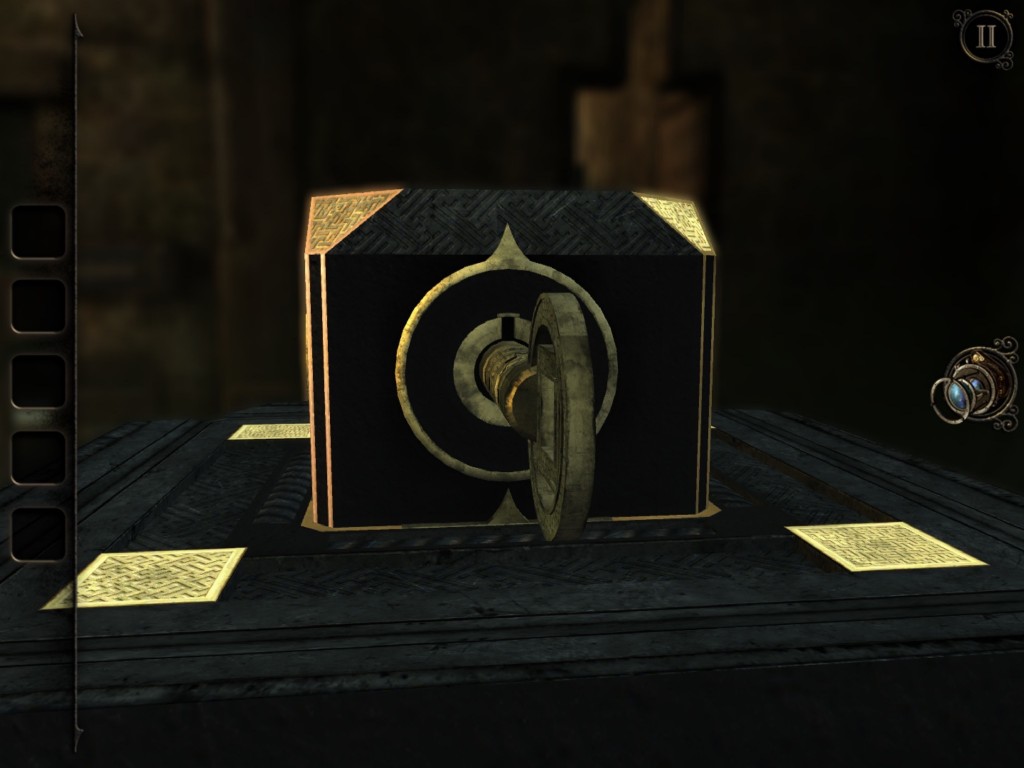
- Open the flap and you’ll see two small statues behind a circle and cross-shaped hole.
- The objective here is to line the correct statue up with each shape. Slide the boxes and statues until they’re in front of the shape they match.
- Take the METAL CASTING. Zoom in on the plate in front of the pyramid and place the METAL CASTING in the middle slot.
- Move the piece along the track to the second vacuum tube. More gears will start working.

- Return to the pyramid and zoom in on the slider we unlocked earlier.
- Move it to the right and zoom to the right side of the pyramid.
- Return to the room with the saw and lathe and examine the MECHANICAL DISK in your inventory.
- Spin the center and it’ll turn into a gear.
- Place it in the lathe on the left and it will move forward, but it’s still missing the piece to make the lathe work properly.
- Take the BELT off the ground and use it to attach the two pieces of the lathe. The lathe then will release a second CHESS PIECE.
- Move back to the pyramid and rotate to the side that has two holes at the bottom of a square. Place the CHESS PIECES in both holes.
- Use your EYEPIECE and you’ll see a house in the square.
- Turn the waterwheel on the house until it lines up with the pieces that make it whole.
- Then slide the gear with belt up which unlocks the roof. Press the button on the roof and four mirrors will pop out of the pyramid.
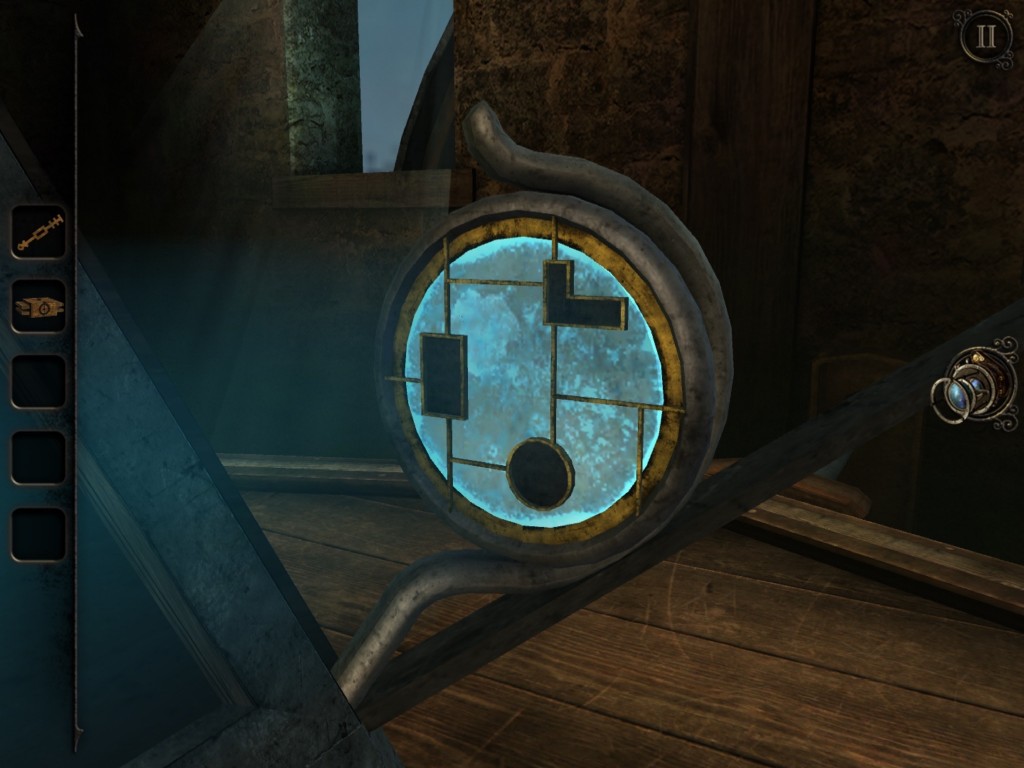
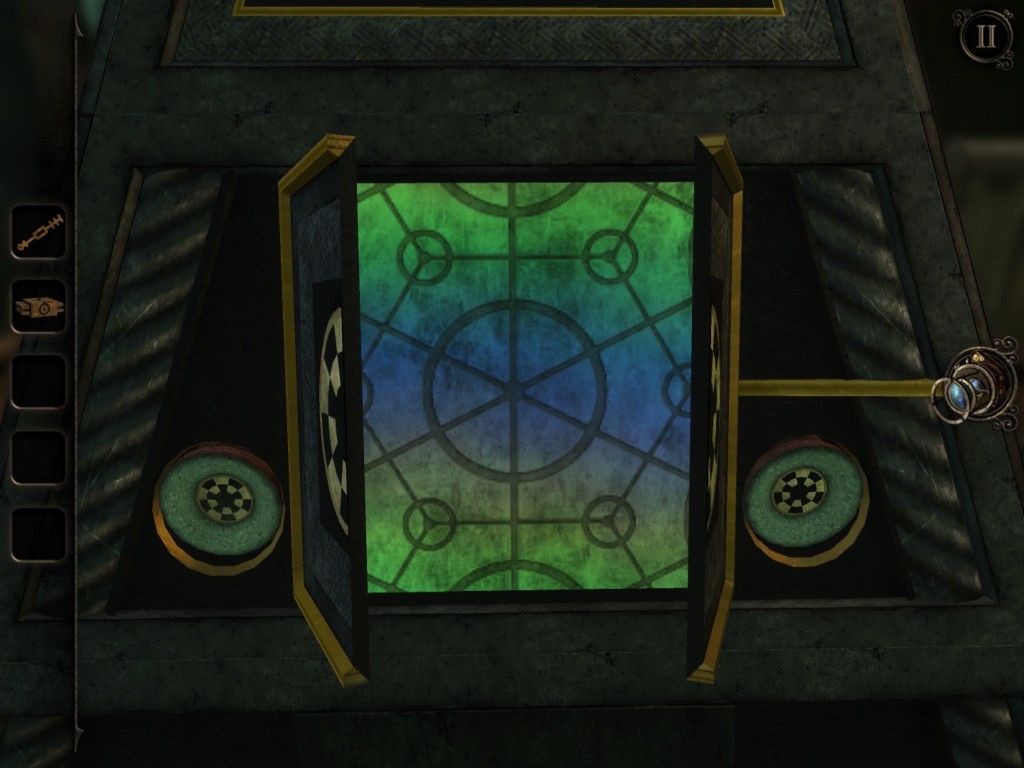
- One of the mirrors has a button on it, press it and a beam of light will project from it.
- Looking at the last mirror, you’ll see an outline of shapes. Rotate the other two mirrors so that the shapes on the last mirror are displayed in the correct places.
- This will unlock a keyhole on the front of the pyramid.
- Remember the design next to the new keyhole and move back to the forge.
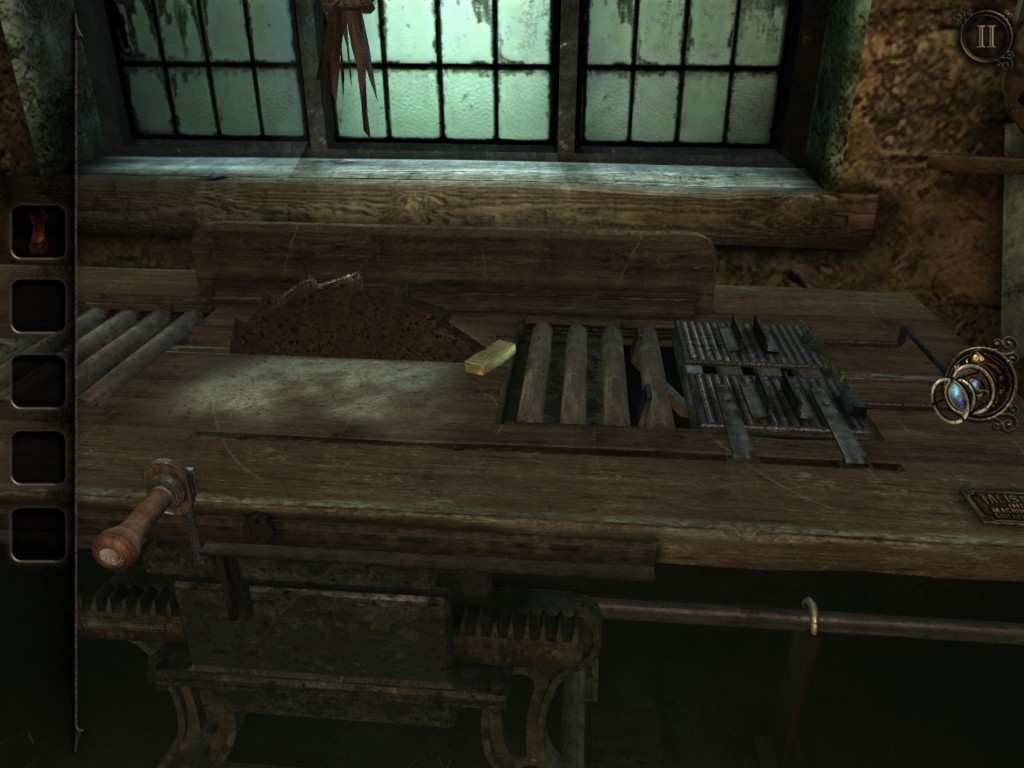
- Take the HOLLOWED OUT WOODEN BLOCK and place it in the slot below the other three molds.
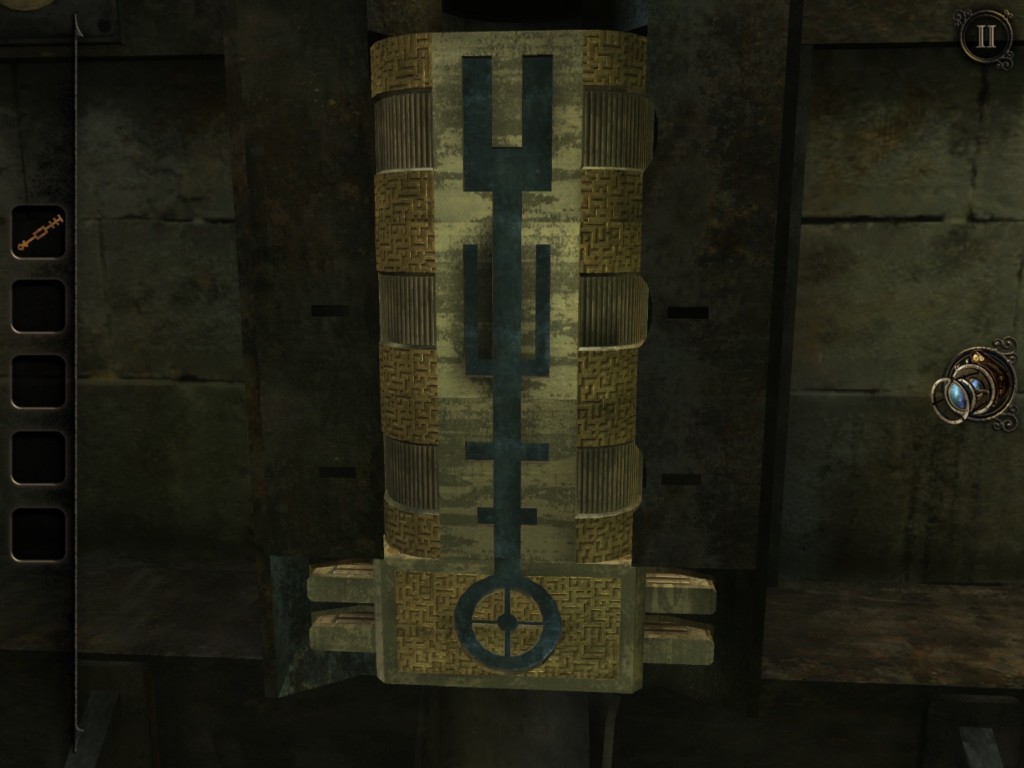
- Arrange the molds in the correct shape to match the symbol by the keyhole and pull out the funnel above them again.
- Place the KEY into the funnel and close it, then, again, use the bellows and a new key will be produced.
- Use the KEY in the second keyhole on the pyramid and you’ll unlock a puzzle.
- Use the wheels to rotate the cube so that the colored slot aligns with the gem that matches it. When the slot and gem are lined up, tap on the gem, and it will be set in the slot.
- Placing all the gems in their rightful place unlocks the bars on the cube.
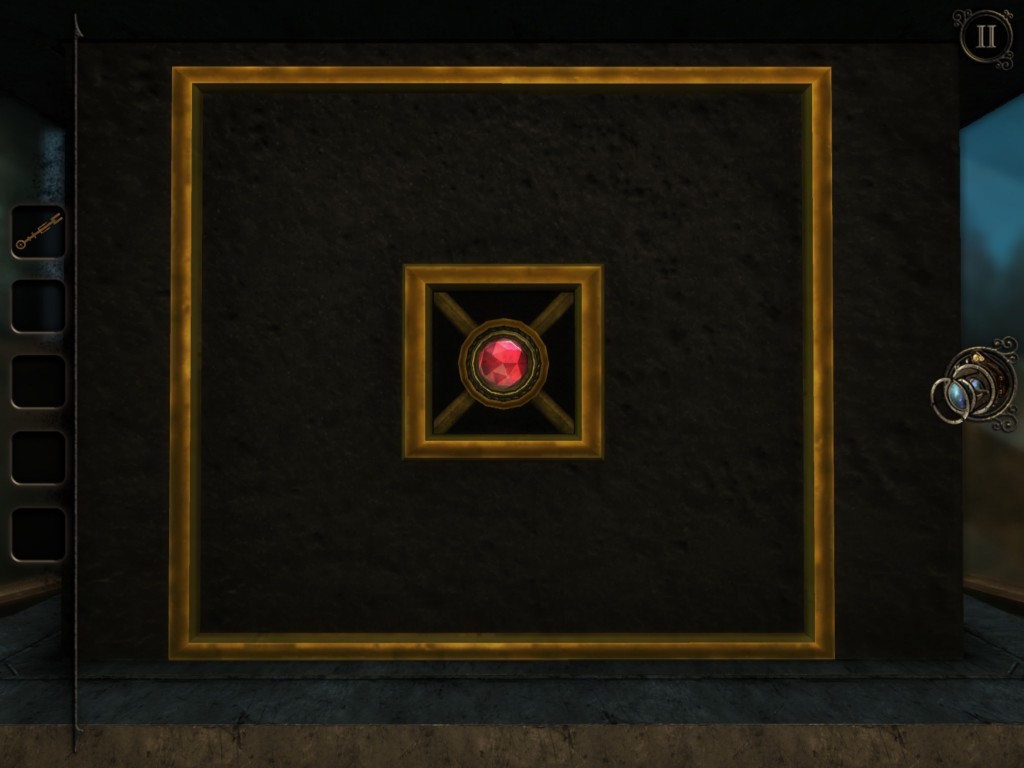
- Take the GEM and place it in the hole on the front of the pyramid near the top. Once you do so, a keyhole will be revealed.
- Once again, memorize the symbol by the keyhole and return to the forge.
- Match the symbol on the molds to the one by the keyhole and make one more key.
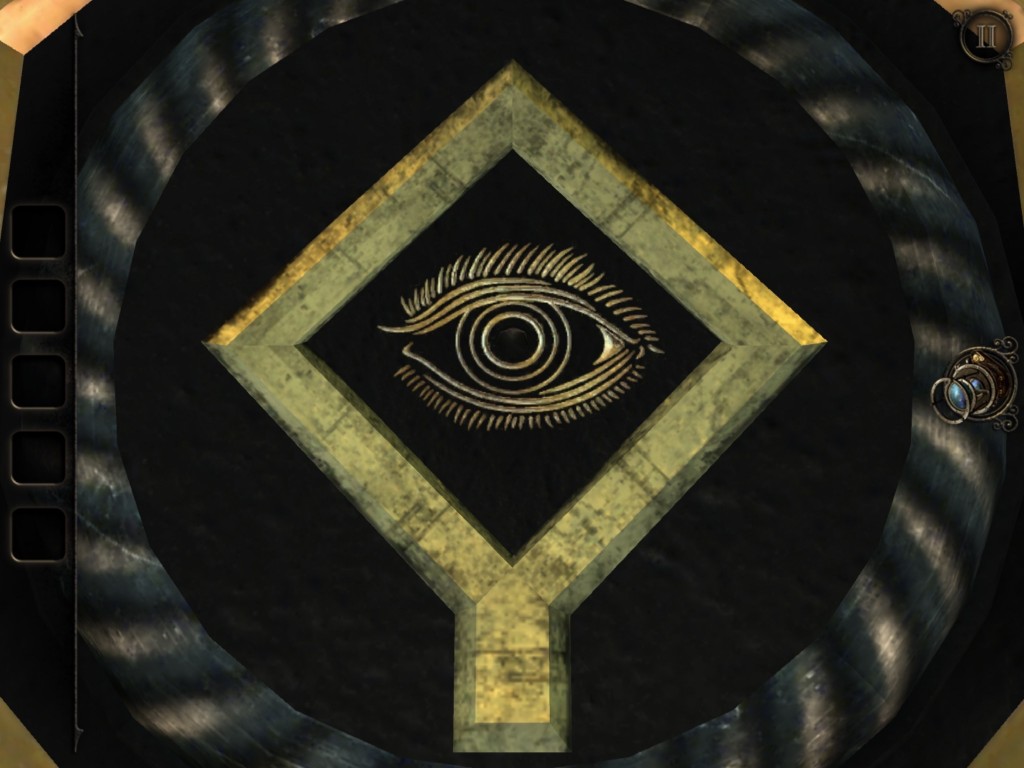
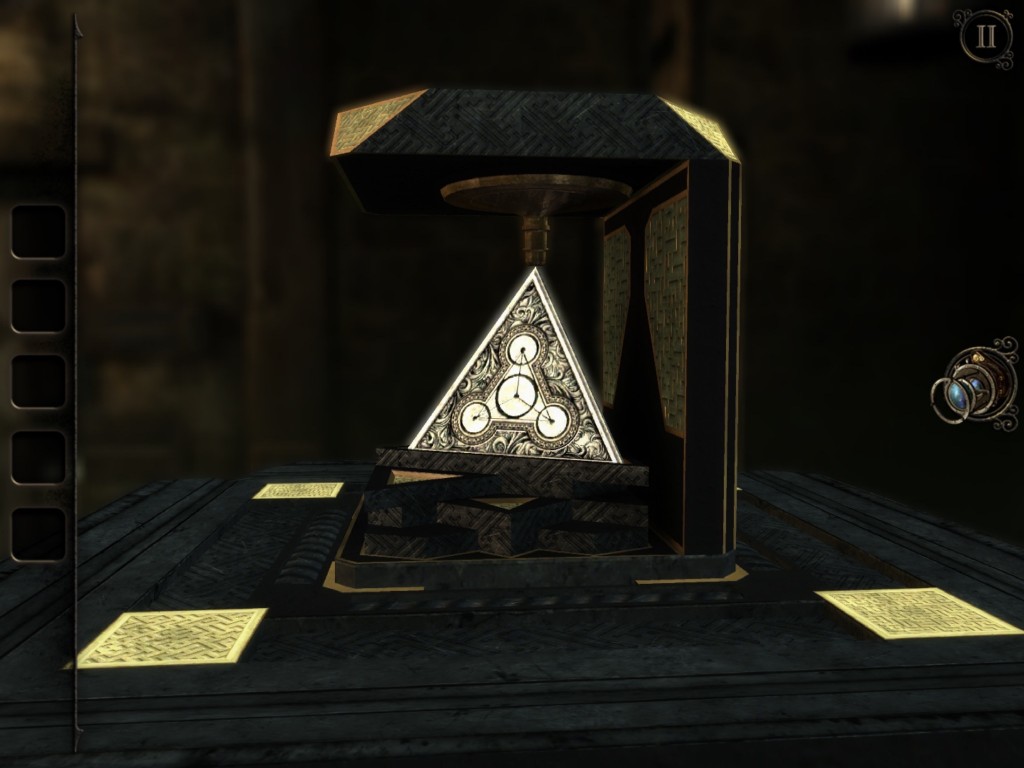
- Use the key on the last keyhole and the pyramid’s top will open revealing a symbol with an eye on it.
- Use your EYEPIECE and tap on the particles to be taken to a puzzle.
The Rotating Gem Puzzle
- Each gem needs to line up at the bottom.
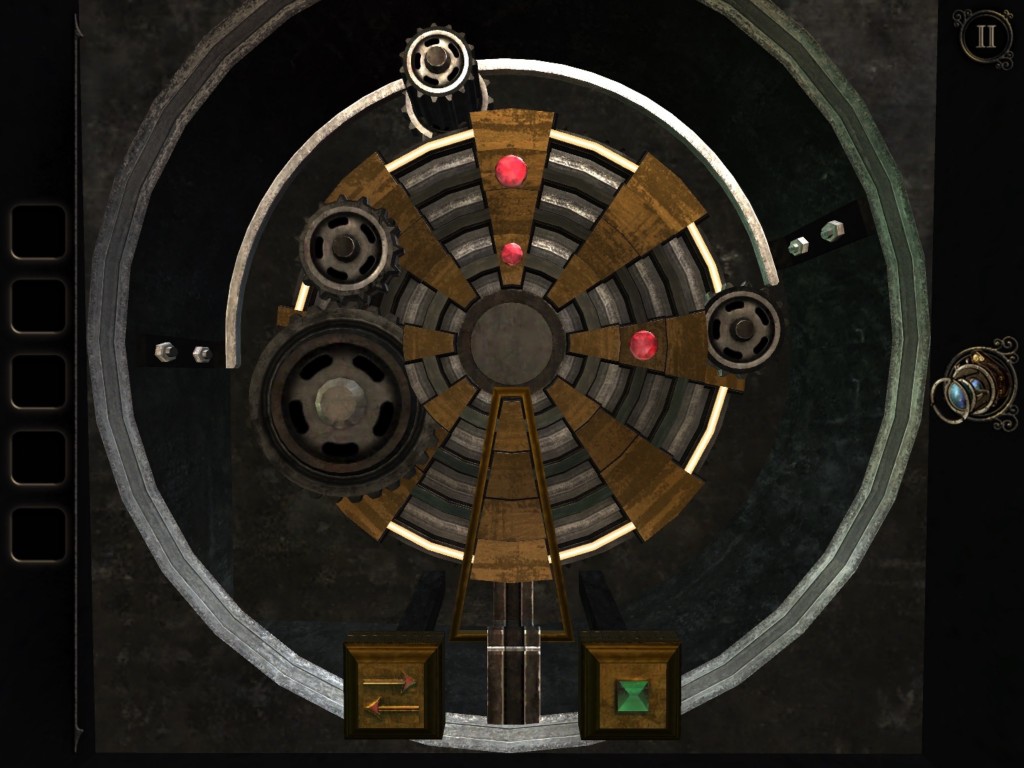
- Use the buttons at the bottom to rotate the gems into the bracket at the bottom and take the last METAL CASTING.
- Move to the plate at the front of the pyramid and place the METAL CASTING in the last empty slot.
- A door will open, go through it.
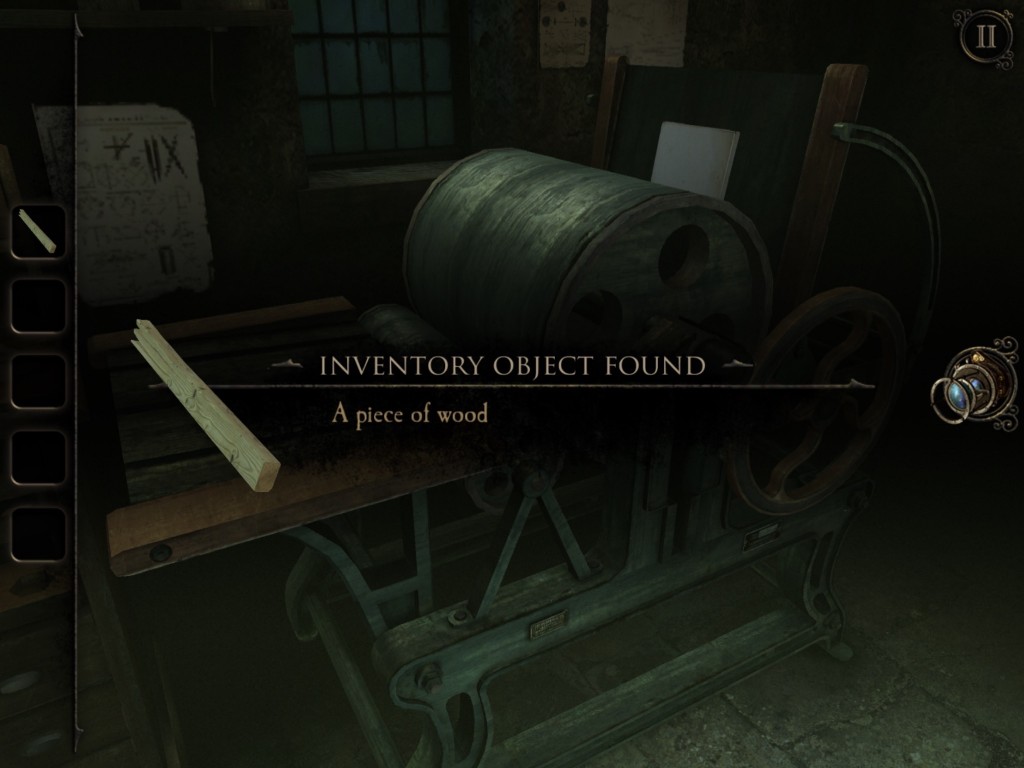
- There is a printing press here. When you try and use the handle, it breaks off. Pick the PIECE OF WOOD on the tray of the printing press.
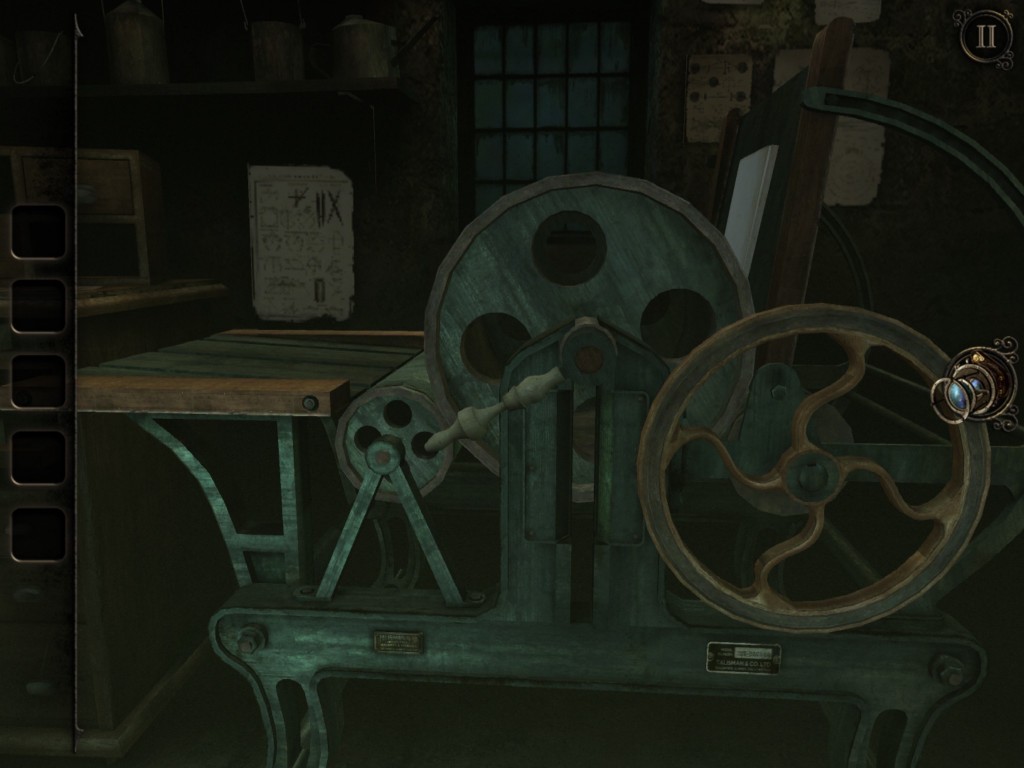
- Go to the saw in the other room and use it to cut the PIECE OF WOOD half and take the SMALL PIECE OF WOOD to the lathe.
- Place it in the lathe and it will carve a LATHED PIECE OF WOOD.
- Use this on the printing press to replace the handle and crank it. A printed sheet about a mechanical arm will be copied. Return to the area by the forge and zoom in on the mechanical arm there.
- Note the patterns on the lid of the mechanical arm and return to the printed sheet.
- Use your EYEPIECE and match the symbols with the ones you saw on the mechanical arm by the forge.
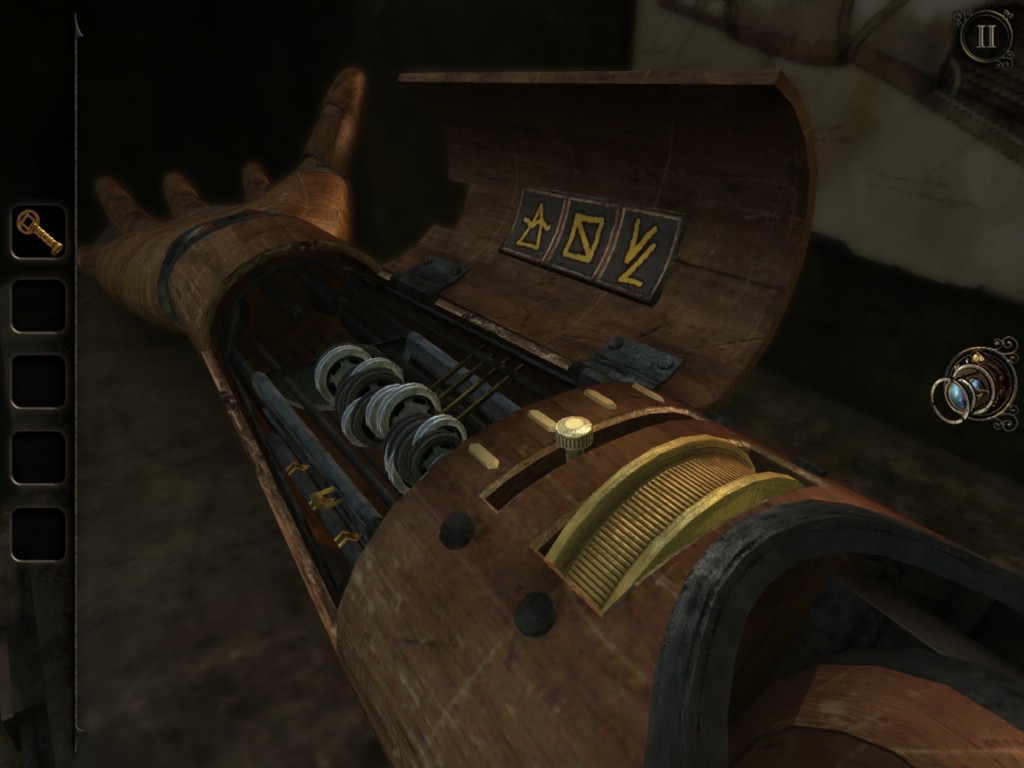
- You’ll be rewarded with the CAMSHAFT. Take it the real mechanical arm and place it in the compartment.
- Put the peg in the second position and spin the wheel to receive the STRANGE KEY
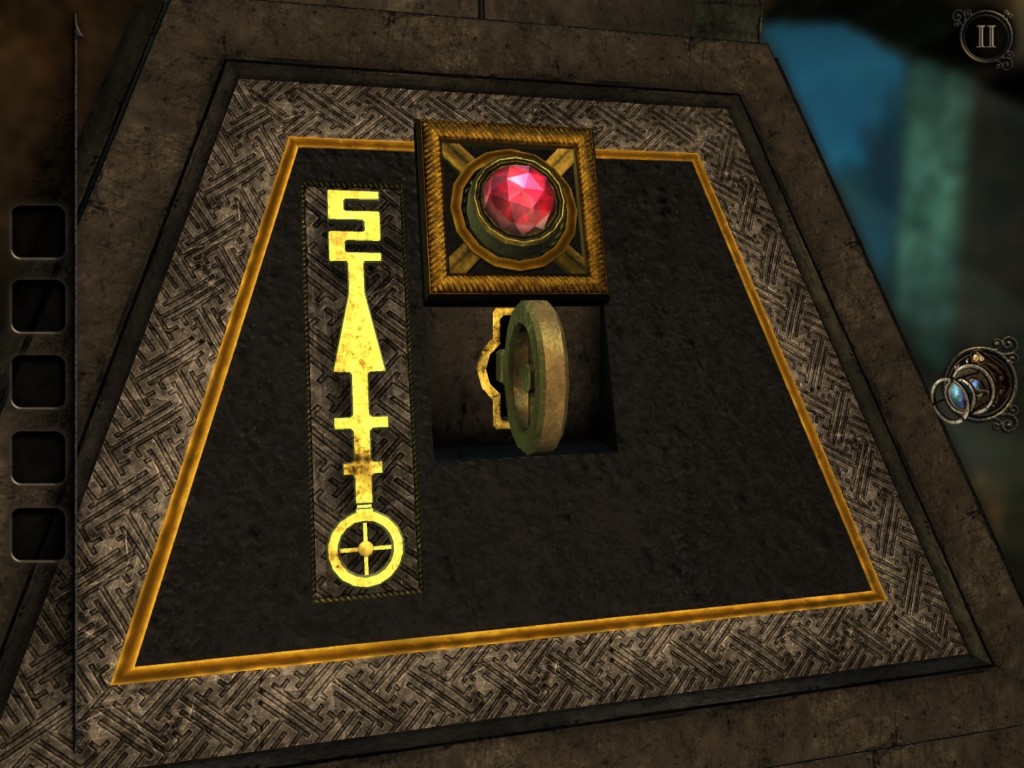
- The box at the top of the pyramid has three separate locks.
- For the lock with four pins sticking out. Look at the STRANGE KEY in your inventory and make sure the four holes in the side of the key are lined up. Once they are you can unlock the first lock.
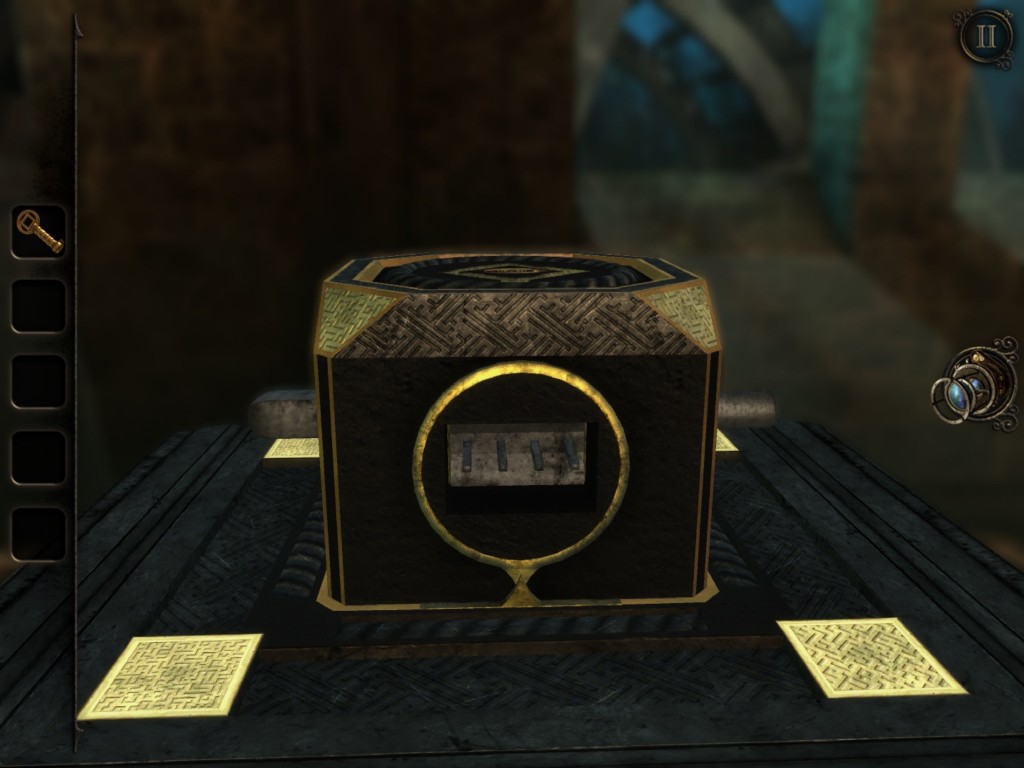
- For the square shaft, simply use the key and rotate it open.

- For the last lock, rotate the second open hole on the key’s shaft to where it doesn’t line up with the other four and unlock the lock.
- The box will open, and you can finally grab the fourth PYRAMID!
End of Chapter 4


 How to solve the case - The Trace walkthrough for Chapter 3, The Diner
 Math Academy Now It Get Interesting Answers
 Coco Wedding Cheats & Hack for Dresses, Balls & Accessories - AppGameCheats.com
 100 Pics Star Santa Answers Levels 1-100
 Word Academy Cowboy Answers