There are several
Kingdom Rush fans in the
PG team. And pretty much all of us share the following view of the sequel
Kingdom Rush: Frontiers - it's more of the same, and thank goodness for that.
This is another impeccably polished, multi-layered, steadily unfolding tower defence game. It's casual strategy with a hardcore sensibility.
Because of that, it's a tough nut to crack - or at least to master. This is a game in which you'll be compelled to replay levels until you ace them with three stars. Believe me.
Hopefully, these general tips and pointers will help you on your way to
Kingdom Rush: Frontiers survival.
General advice
 Balance is needed:
 In each level, the AI will throw a variety of enemies of all shapes and sizes at you. Some will be biased towards a certain type, necessitating a shift in emphasis from magic to physical attacks, but you should never go for all of one kind.
Having said that...
Archers are best: Taking our advice for a balanced, varied defence into account, archers are plainly the most powerful and versatile units - that is, they provide the widest spread of benefits. They're cheap and they're effective against a variety of enemies. Plus, as soon as you start upgrading them, they pack a heck of a punch.
Levelling-up: There's no absolute wrong way to level-up your towers and abilities in
Kingdom Rush: Frontiers, and all areas should be addressed at some point.
However, given the importance of the archer units, we recommend prioritising them, followed by Mage Towers. Rain of Fire is handy, but should probably be further down your priority list when it comes to upgrades thanks to its relatively slow recharge rate.
Of course, don't treat any of that as gospel - different levels will benefit from different upgrades. With that in mind, don't forget that you can shuffle around your acquired recharge points at will. So, if you're stuck on a level, try altering the balance.
Call waves early: If your defences have mopped up a wave nice and quickly, or if they clearly have the situation in hand, call the wave early for some valuable extra coins. This is particularly useful early in rounds when the challenge is low and money is hard to come by.
Tactics
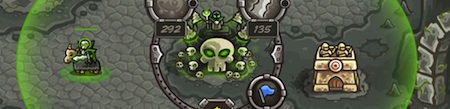 Create kill zones:
 Your aim in each level should be to create choke points that hold up enemy forces while enabling you to hit them from multiple points with a variety of units.
This typically means setting up a barracks in a key traffic point, then positioning at least one of each of the others - archers, barracks, mages, artillery - within striking range of this position.
Major junction points should ideally be overlooked by multiple combinations of Mage and Archer Towers.
Doubling up barracks: Some advanced players like to double up their barracks in key strangle points. This involves positioning two Militia Barracks close to each other and aligning the flag rally points to effectively double up on strength and attack power.
This is a viable tactic on some levels in which enemy waves are funnelled through key points, but we find that it can often waste a key tower slot right where you need your serious firepower. Our preference is to go with one barracks. Eventually, you'll have the resources to level them up for better resilience. Until then, you can support them with reinforcements.
Upgrade barracks mid-battle: When you're really being overwhelmed and your barracks soldiers are about to die, upgrade them. Not only will your instantly retrained soldiers be tougher, but they'll also appear with full health.
Use reinforcements: Speaking of reinforcements, use them often! They're not especially tough, but their true strength is in their mobility - you can dump them down anywhere, so they should be your first call when an enemy breaks through your final line or you want to hold a particularly tough enemy up at a very specific point. They also recharge very quickly, so there's no point holding back with them.
Keep soldiers away from Parasytes: Otherwise, you're just giving them food to grow into horrible Reapers.
Tower guide
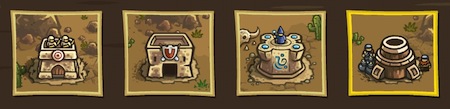 Archer Tower:
 As I've mentioned, the Archer Tower is the most useful of all. It's cheap, quick firing and - when upgraded - reasonably powerful.
Advanced: Both of these advanced options are extremely useful. The crossbow fort is a rapid-fire delight, with the Falconer special bolstering the power and range of neighbouring towers and the Barrage literally bringing out the big guns. Tribal axethrowers, meanwhile, are excellent at nullifying powerful magical enemies like the Earth Shaman with their Totem of Spirits special.
Militia Barracks: Vital for creating choke points and 'setting up' the other units. You should nonetheless use Militia Barracks far more sparingly than the others.
Advanced: While the Assassins are powerful and useful for taking out armoured enemies - as well as for pinching a little extra gold (both with specials) - we tended to go with the Knights Templar option for their resilience and consistent hitting power.
Mage Tower: The yin to the Archer Tower's yang. You ideally need to pair up the two for a comprehensive defence against any composition of enemy wave. Also essential for cutting through armoured enemies.
Advanced: The Archmage Tower is the absolute peak of the Mage Tower format and packs a real wallop. The Necromancer Tower, however, is something else entirely. It's less potent by default, but its attacks frequently turn enemies into skeletons to fight for you. This mixture of magical and physical attacks makes it one of the most useful units in the game. Summoning a fully upgraded Death Rider (special), meanwhile, is the next best thing to a hero on the direct confrontation front.
Dwarven Bombard: Given this artillery unit's explosive nature, its strengths are surprisingly subtle (at least until you get to the advanced models). Lacking the instant punch of the other ranged towers, it's all about crowd control, chipping away at large groups of enemies simultaneously, and softening them up for the others. It also has the best range of all, so you can position it away from the front line.
Advanced: The Dwaarp is somewhat understated, but it's extremely useful for slowing whole groups of enemies down. The Furnace Blast special adds fire damage to the formula. By contrast, the Battle-Mecha T200 is extremely flamboyant yet arguably less useful overall. Its main strength is that you can position the towering robot like a barracks soldier, thus increasing its effective range.


 Reveal 2 Geeks VS Nerds Pack Answers
 How to plumb the depths - our guide to Dungelot on Android and iOS
 Math Academy Four Fours Answers
 How to find the 9 golden carrots - Ferris Muellers Day Off complete walkthrough (Part 1)
 Who’s the Celeb? Answers Level 51-100