This is a game guide to Unmechanical - nice puzzle platformer. It contains a complete walkthrough of all levels. You'll find here all the information needed to solve puzzles contained in the game.
Artur "Arxel" Justynski ()
Translated by Maciej "Elrond" Myrcha
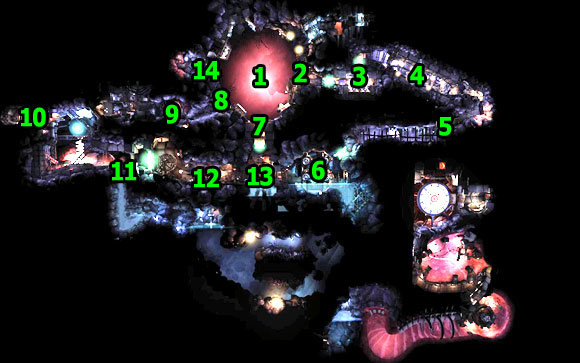
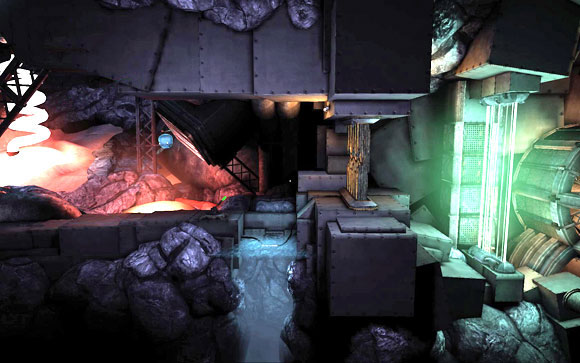
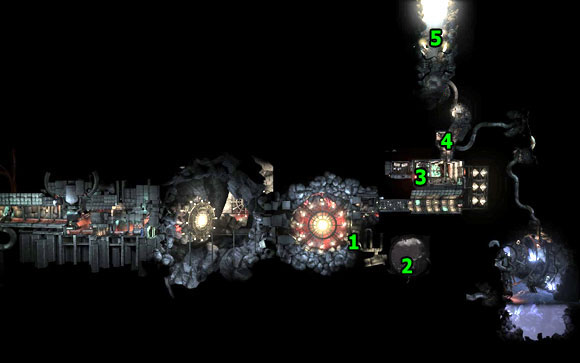
 Illustrative map of level
You start the game with a short movie showing a small robot being dragged underground. Once you gain control over the main character [#1] you'll also receive information about hints system. F1 key activates a small bubble which contains a small hint on actual puzzle (you have to be close to the puzzle; otherwise you'll see a question mark). Keyboard controls are quite modest - you control your robot with WASD keys, while tractor beam is activated with one of following: LMB, RMB, [SPACEBAR], and [CTRL].
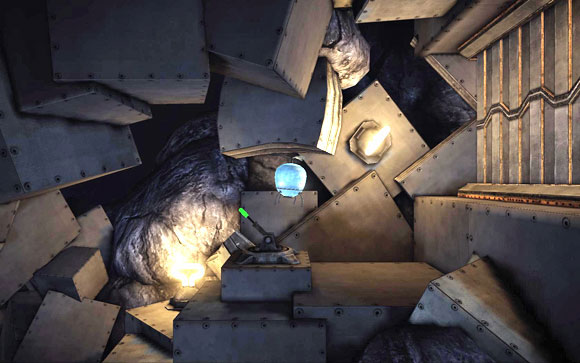
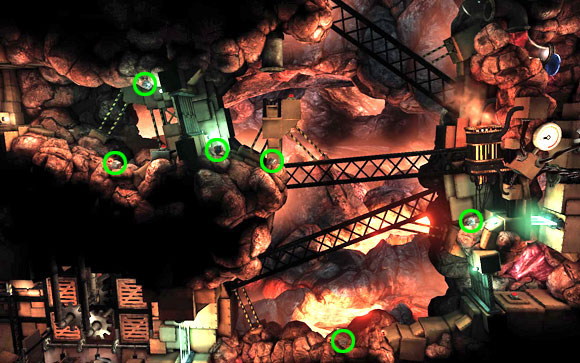
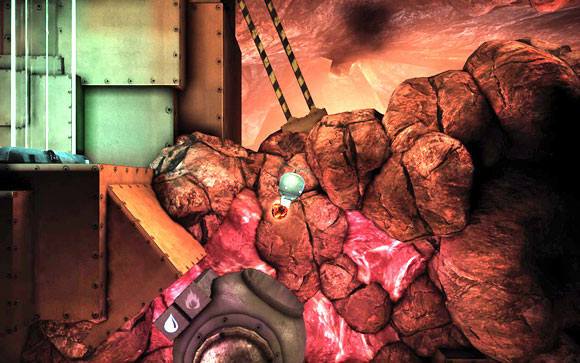
![Ascend and fly up until you get to the first obstacle [#2] - rocks - Underground - Walkthrough - Unmechanical - Game Guide and Walkthrough](https://game.lhg100.com/Article/UploadFiles/201512/2015121717135483.jpg)
Ascend and fly up until you get to the first obstacle [#2] - rocks. Use the tractor beam to grab rocks and then throw them away to clear the path. You could also try to ram the pile of rocks and force your way through.
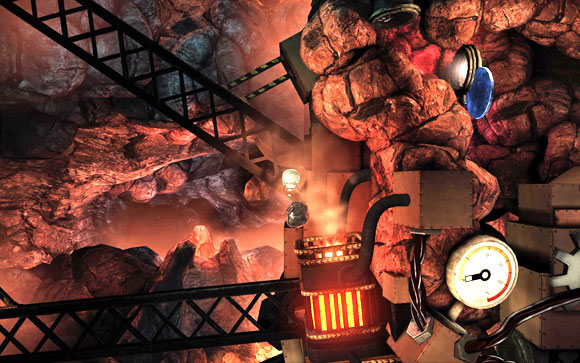
No need to fly down because you won't be able to unlock a passage there. On the other hand, you'll find closed gate [#3] at the top. In order to open it you just have to move a lever to the right or to the left (use the tractor beam or push the lever with robot).
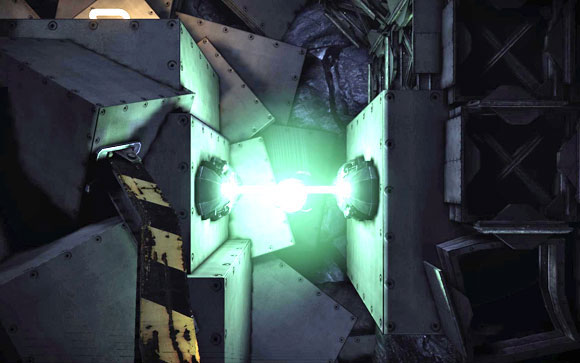
Fly further until you reach a force field. As a reminder for future - you can't transport anything through it, even a tiny pebble.
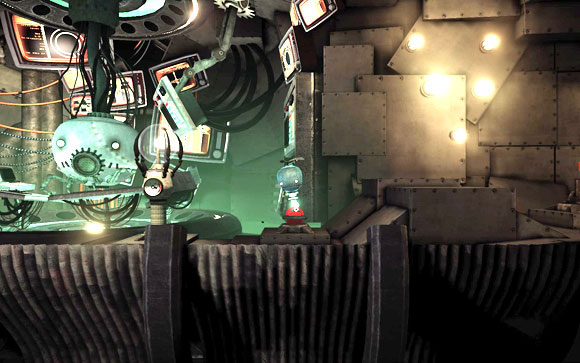
![Next youll reach another closed gate [#4] - Underground - Walkthrough - Unmechanical - Game Guide and Walkthrough](https://game.lhg100.com/Article/UploadFiles/201512/2015121717135506.jpg)
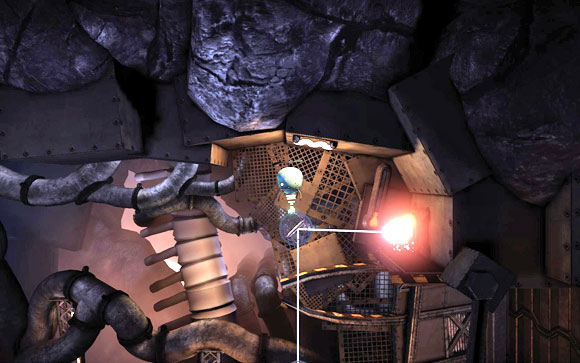
Next you'll reach another closed gate [#4]. It opens only when the button is pressed. Obviously you're not able press the button and fly further at the same moment, so you could use a help of some stone. There are several of them to the left - use the tractor beam to grab one of them and put it on the button. Once the gate is open - move forwards.
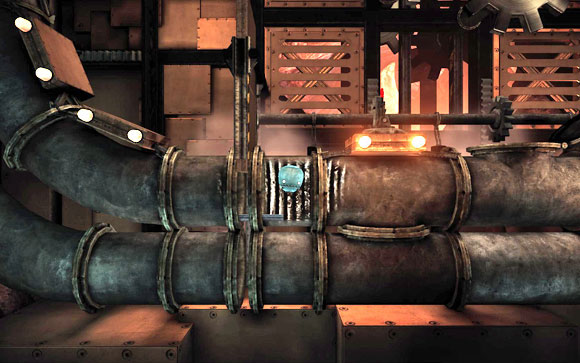
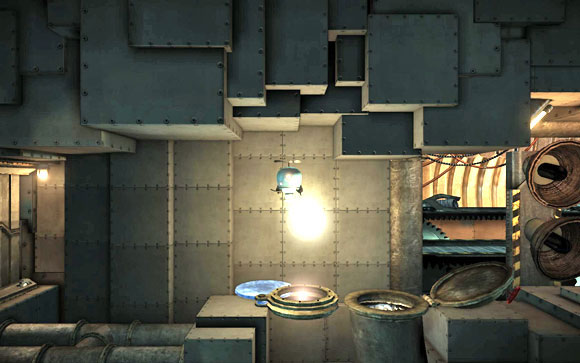
![A bit further youll encounter a dead end to the right [#5] and sewer manhole - Underground - Walkthrough - Unmechanical - Game Guide and Walkthrough](https://game.lhg100.com/Article/UploadFiles/201512/2015121717135634.jpg)
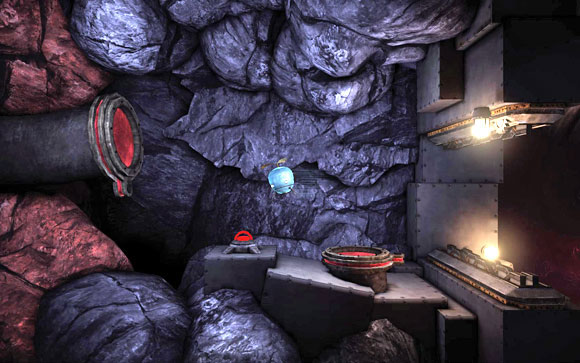
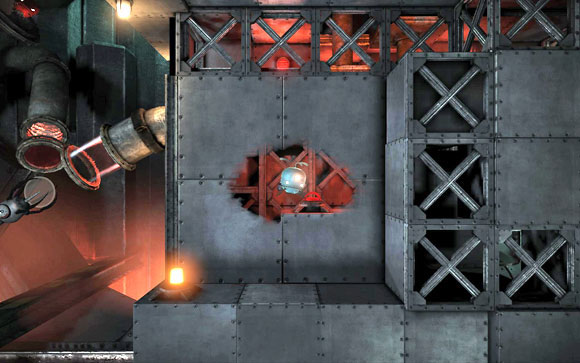
A bit further you'll encounter a dead end to the right [#5] and sewer manhole. Use the tractor beam to open the manhole and fly through the tunnel [#6].
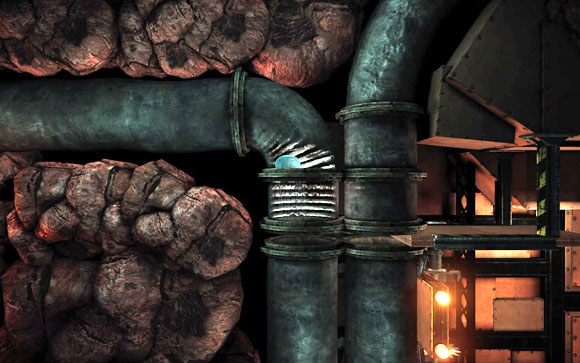
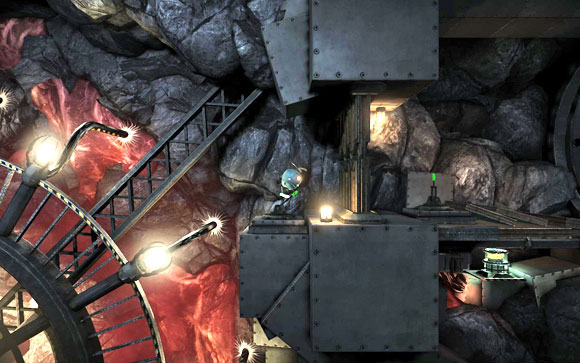
![Youll reach the next part of location [#7] - Underground - Walkthrough - Unmechanical - Game Guide and Walkthrough](https://game.lhg100.com/Article/UploadFiles/201512/2015121717135613.jpg)
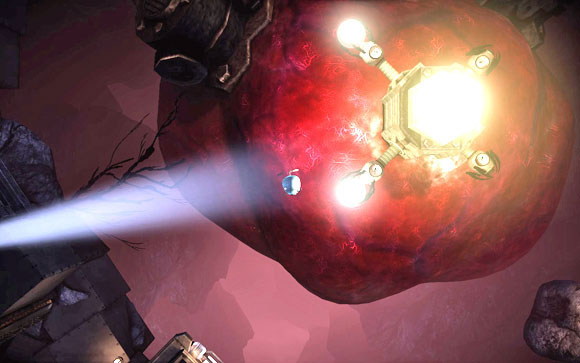
You'll reach the next part of location [#7]. Fly further to the left, where you'll encounter another closed gate [#8]. When you pull the piston, a small sphere will be shot - unfortunately it will fall into the second tunnel. You have to block it.
One the left you'll find some stones. Take one and place it next to the tunnel on the right. When you pull the piston again, the sphere will hit the stone and thus you'll be able to get it.
The last step is to put the sphere on the button (because only the sphere fits into a thin gap). Take all stones which block the gap and then throw the sphere into it - the gate should be open.
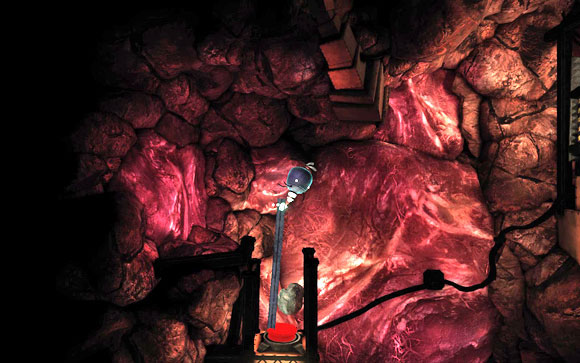
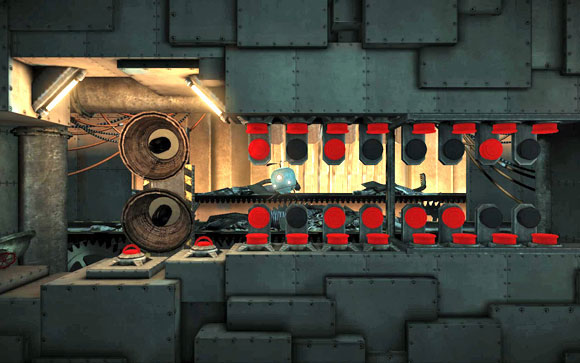
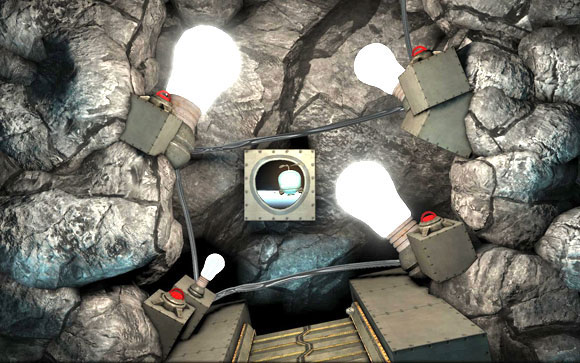
![Fly down until you get to four colored light bulbs [#9] - Underground - Walkthrough - Unmechanical - Game Guide and Walkthrough](https://game.lhg100.com/Article/UploadFiles/201512/2015121717135819.jpg)
Fly down until you get to four colored light bulbs [#9]. This puzzle tests your memory and unfortunately it is random. Your task is to repeat the sequence of lighting bulbs three times. Once you pull the piston in the center, three random bulbs will light up. You have to repeat that action. If you fail, you'll get brand new sequence. The second time four bulbs will light up, while at the third time you'll have to deal with five bulbs. Mistake doesn't reset your progress; you'll have just to repeat a given test.
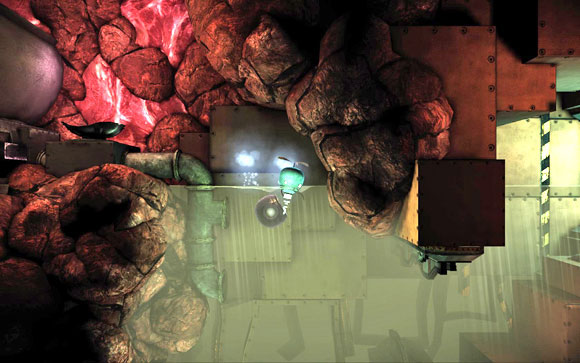
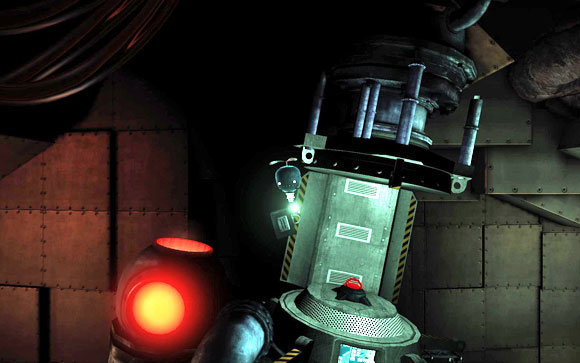
![Right after the gate you'll find a shiny sphere [#10] - in order to free it, pull the piston - Underground - Walkthrough - Unmechanical - Game Guide and Walkthrough](https://game.lhg100.com/Article/UploadFiles/201512/2015121717135822.jpg)
Right after the gate you'll find a shiny sphere [#10] - in order to free it, pull the piston. Now you have to keep the sphere with you all the time! Try not to forget about it.
Move to the right. You should pass by another manhole [#11] - open it and this time push a shiny sphere inside it. Keep flying to the right (you'll fly through the force field, so you couldn't get a sphere with you anyway.
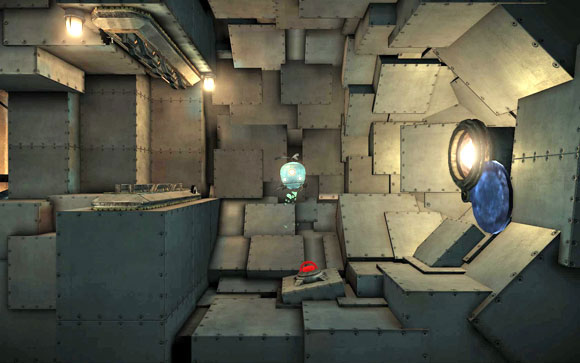
![The next puzzle [#13] is quite easy - Underground - Walkthrough - Unmechanical - Game Guide and Walkthrough](https://game.lhg100.com/Article/UploadFiles/201512/2015121717135996.jpg)
The next puzzle [#13] is quite easy. You have to press three out of four buttons to guide the shiny sphere through the tunnel. One of blockades is open, so you have to find the button which operates it (it is not pressed) - it is mostly second or third button from the left.
![Bit earlier [#12] (on the right) you can find three bricks - use two of them and put them on appropriate buttons - Underground - Walkthrough - Unmechanical - Game Guide and Walkthrough](https://game.lhg100.com/Article/UploadFiles/201512/2015121717140025.jpg)
Bit earlier [#12] (on the right) you can find three bricks - use two of them and put them on appropriate buttons. Then place the bar on the bricks horizontally, thus pressing buttons. The shiny sphere will fly out. Take it and move further.
![Once the next gate opens, move further until you reach the last puzzle of this level [#14] - Underground - Walkthrough - Unmechanical - Game Guide and Walkthrough](https://game.lhg100.com/Article/UploadFiles/201512/2015121717140039.jpg)
Once the next gate opens, move further until you reach the last puzzle of this level [#14]. Your task is to put three parts together, so they can fit into a hole in the background.
Assuming that we number three moving parts as follows: 1 (closest to the screen), 2 (the middle one), 3 (rear), the three pistons work as follows (all parts are revolving in clockwise direction):
Piston on the left: 1 - once, 2 - twice, 3 - four times;
Piston in the middle: 1 - once, 2 - twice;
Piston on the right: 1 - twice;
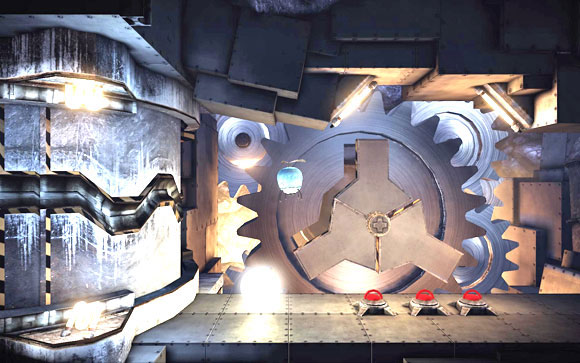
In order to put all parts in correct configuration, you have to pull twice the middle piston.
![Once the last passage is opened, move the shiny sphere to the opened tunnel [#15] - Underground - Walkthrough - Unmechanical - Game Guide and Walkthrough](https://game.lhg100.com/Article/UploadFiles/201512/2015121717140223.jpg)
Once the last passage is opened, move the shiny sphere to the opened tunnel [#15]. Once it gets sucked inside, another manhole will be opened. It leads to the next level.
 Illustrative map of level
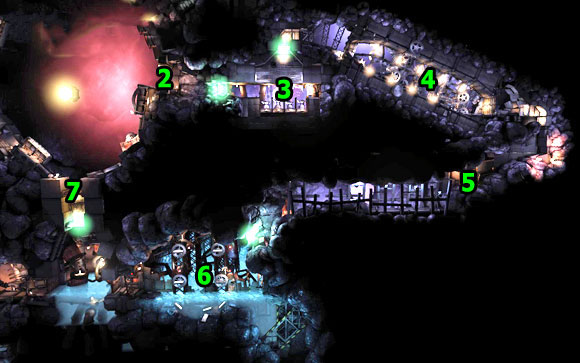 Pacemaker - tunnel 1
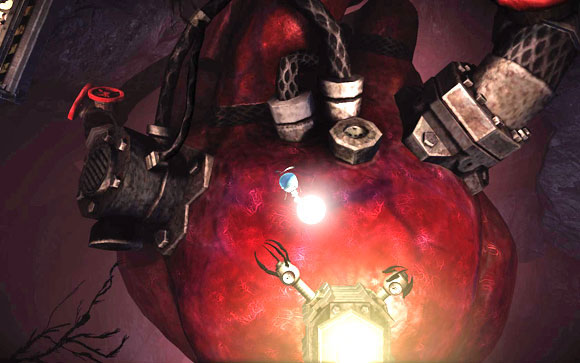
Before you go any further, do not forget to take the shiny sphere with you. Additionally it will light up a short way leading to the Pacemaker [#1]. Enter the sphere to the gripper, thus unlocking the first gate [#2].
![The first puzzle in this level [#3] is about appropriate order of weights in four scales - Pacemaker part 1: Map - Tunnel 1 - Walkthrough - Unmechanical - Game Guide and Walkthrough](https://game.lhg100.com/Article/UploadFiles/201512/2015121717140474.jpg)
The first puzzle in this level [#3] is about appropriate order of weights in four scales. The corresponding blockades are marked on the above screen. Each time this puzzle is generated differently, so there is more than one possible solution. So you have to think carefully which weights go to which scales. In the example shown above you can drop the weight from the first scale and put some more on the second and the fourth scales. There are four sizes of blocks described on the above screen.
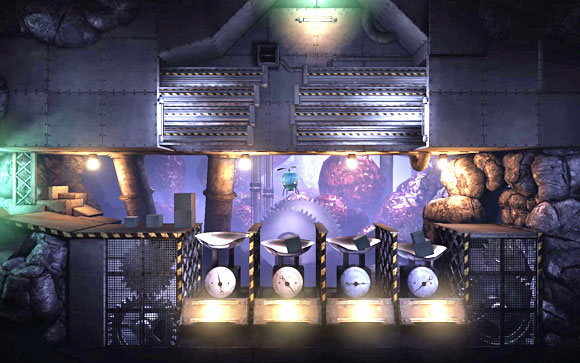
Solution 1:
Scale 1: empty
Scale 2: 3
Scale 3: 2
Scale 4: 1 + 3
Solution 2:
Scale 1: 3
Scale 2: 2 + 4
Scale 3: 1 + 4
Scale 4: 1 + 2 + 3
Once you set all weights correctly, fly further through the created gap.
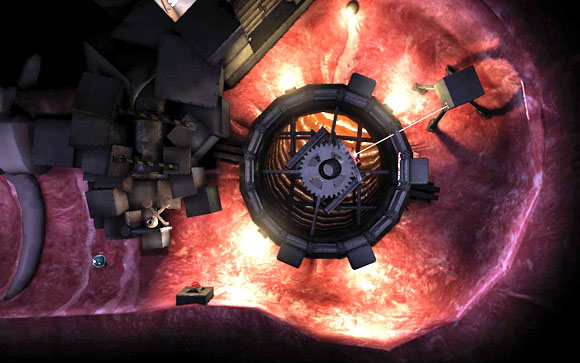
![The next gate is closed [#4] and the lever which opens it is damaged - Pacemaker part 1: Map - Tunnel 1 - Walkthrough - Unmechanical - Game Guide and Walkthrough](https://game.lhg100.com/Article/UploadFiles/201512/2015121717140460.jpg)
The next gate is closed [#4] and the lever which opens it is damaged. Next to the gate you'll find a rock. Use the tractor beam to pick it up and move it to the very beginning, throwing it under the revolving gearwheel. As a result the gearwheel will explode and will be torn out from the mechanism, ramming the gate. You can move further.
If any of gate pieces blocks you the way, just remove it. Then fly through a small gap. You'll reach next gate [#5]. In order to open it, you have to use the tractor beam on the red sphere. Just keep doing so until you hear that the gate blocks itself. You can stop using the beam now - the gate won't close again.
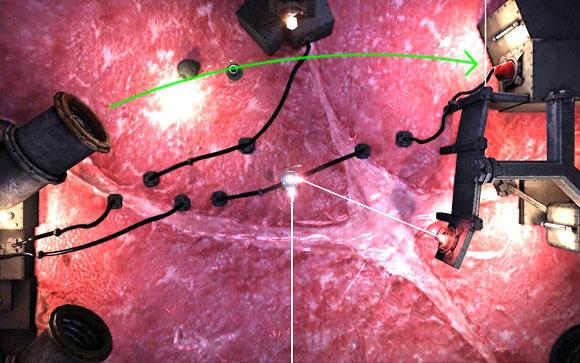
![The next puzzle [#6] is about rearranging mirrors, so the laser beam hits dodecahedron under the gate - Pacemaker part 1: Map - Tunnel 1 - Walkthrough - Unmechanical - Game Guide and Walkthrough](https://game.lhg100.com/Article/UploadFiles/201512/2015121717140632.jpg)
The next puzzle [#6] is about rearranging mirrors, so the laser beam hits dodecahedron under the gate. Once it charges, the gate will open. The correct solution can be found on the above screen - you have to arrange mirrors 2 and 3.
Move further. You'll encounter two more dodecahedrons and a shiny sphere, which you have to catch. Unfortunately you can't solve this puzzle now, so move further [#7].
 Pacemaker - tunnel 2
![Another tunnel is already open [#8] - Pacemaker part 1: Map - Tunnel 2 - Walkthrough - Unmechanical - Game Guide and Walkthrough](https://game.lhg100.com/Article/UploadFiles/201512/2015121717140663.jpg)
Another tunnel is already open [#8]. Fly inside, moving through the pipe [#9]. You'll reach a large room.
![A lever which opens the next gate [#11] is unfortunately down due to a broken cable - Pacemaker part 1: Map - Tunnel 2 - Walkthrough - Unmechanical - Game Guide and Walkthrough](https://game.lhg100.com/Article/UploadFiles/201512/2015121717140794.jpg)
A lever which opens the next gate [#11] is unfortunately down due to a broken cable. In order to unlock the passage you have to raise the water level, allowing the flow of electric current through the cable. To do so, just throw nearby large stones into water.
You'll notice that this is not enough - you have to find more objects. So move up heading to the small room [#10]. Inside you'll find some heavy objects. Take them all and throw them into water.
Once the water level rises, the gate will open and you'll be able to fly further. Unfortunately you can't take anything with you because you'll fly through the force field.
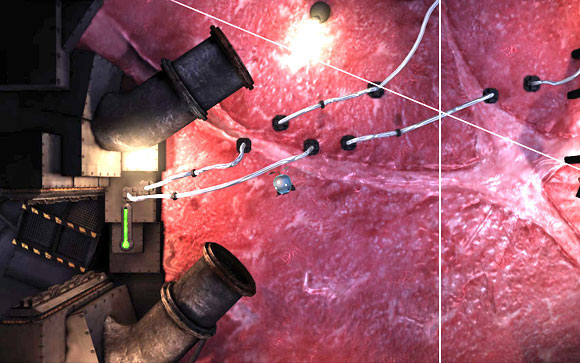
![Bit further you'll encounter another puzzle with lasers and dodecahedron [#12] which has to be charged - Pacemaker part 1: Map - Tunnel 2 - Walkthrough - Unmechanical - Game Guide and Walkthrough](https://game.lhg100.com/Article/UploadFiles/201512/2015121717140847.jpg)
Bit further you'll encounter another puzzle with lasers and dodecahedron [#12] which has to be charged. On the above screen you can see a first part of the correct solution of this puzzle. Put the bricks on the laser's path and then place one of mirrors on it (the one which will direct the laser beam to the right). Then do the same thing right next to the dodecahedron, this time taking another mirror (since you have two same mirrors, it doesn't matter which one you select).
The second part of the task is more difficult. Take the remaining mirror and place it on the laser path, so the beam goes to the desired object. The difficulty is that the gravity will keep pulling you down so you have to ascend from time to time.
![After you unlock the gate, it is time to solve the puzzle which you had to skip before [#13] - Pacemaker part 1: Map - Tunnel 2 - Walkthrough - Unmechanical - Game Guide and Walkthrough](https://game.lhg100.com/Article/UploadFiles/201512/2015121717140979.jpg)
After you unlock the gate, it is time to solve the puzzle which you had to skip before [#13]. This task is about combining two laser beams in order to direct them to two independent dodecahedrons. A key role here is played by a bricks which will "carry" the mirror on the left. On the right you have to place the lower mirror, so the laser beam can go further to the left. The highlight of the puzzle is to set one of the mirrors in such a way that it reflects both laser beams as it is shown on the above screen.
Thanks to that you'll unlock another shiny sphere, which has to be entered to the next gripper. In order to continue, you have to fly through the tunnel [#14] to Mines level (pull the piston to unlock the manhole). Later on you'll return to this level - chapter Pacemaker part 2.
 Illustrative map of level
![Right after the start [#1] fly along the pipe - Mines - Walkthrough - Unmechanical - Game Guide and Walkthrough](https://game.lhg100.com/Article/UploadFiles/201512/2015121717141122.jpg)
Right after the start [#1] fly along the pipe. You should reach first closed gate [#2]. Use the piston to release a bomb. Catch it with your tractor beam and place next to a small organ near the passage. The bomb won't harm you, even if you gold it during the explosion. Explosion will damage the organ and the passage will open.
Fly along the pipe. You'll get to the large open space. On the left you'll encounter another mechanism which releases bomb [#3] and on the left you can see a kind of boiler [#4]. Your task is to put six pieces of coal inside the boiler. Four of them can be found in this part of the lever. Rest two can be reached later. A screen above illustrates locations of all coal pieces.
In order to pull them out, you have to use the bomb again. Throw each coal piece inside the boiler to increase temperature. It will be useful later on.
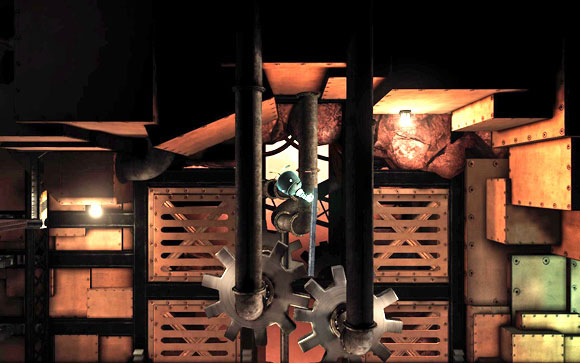
Once you add four coal pieces to the boiler, it is time to get another two. Fly down and head left [#5]. You'll reach a mechanism with two gears. First, you have to stop them, which will result in opening the manhole leading to the pipe. In order to do this, pick up the metal bar lying on the ground and place it between gears (from above).
The manhole should be unlocked - you can open it now. Set the lever in such position, that the first blockade moves on the top (it should left the passage inside pipes). Now catch the bar again and fly with it inside the pipe, placing it on the blockade path.
Return to the surface and switch the lever. The first blockade should leave the lower pipe unlocked and the second blockade will unlock a further way.
![You'll get to the further part of this level [#6], where you'll fly through the force field - Mines - Walkthrough - Unmechanical - Game Guide and Walkthrough](https://game.lhg100.com/Article/UploadFiles/201512/2015121717141479.jpg)
You'll get to the further part of this level [#6], where you'll fly through the force field. At start pick up the bar, which will be useful in a moment - place it on the button [#7] which will unlock a passage. The button must stay pressed because otherwise the trapdoor closes.
![Another puzzle [#8] requires some skill - Mines - Walkthrough - Unmechanical - Game Guide and Walkthrough](https://game.lhg100.com/Article/UploadFiles/201512/2015121717141465.jpg)
Another puzzle [#8] requires some skill. Use the bomb, which you can require by pressing the piston, to damage all five organs. As result they will raise trapdoors. The problem is that each trapdoor has different rate of descend so you have to do that in correct order. The solution is shown on the above screen.
Once you successfully fly through trapdoors, press the button on the other side - trapdoors will stay as they are. Fly down, where you'll encounter yet another trapdoor and the lever on the other side of the obstacle [#9]. Do not try to push the stone on the other side. Take it with you and fly back to the button, on which you've left the bar [#7]. Replace the bat with the stone.
![Take the bar and once again fly to the obstacle [#9] - Mines - Walkthrough - Unmechanical - Game Guide and Walkthrough](https://game.lhg100.com/Article/UploadFiles/201512/2015121717141529.jpg)
Take the bar and once again fly to the obstacle [#9]. You have to put the bat in a narrow gap, thus switching the lever and unlocking further way.
![Another gate [#10] can be opened by pressing the piston - Mines - Walkthrough - Unmechanical - Game Guide and Walkthrough](https://game.lhg100.com/Article/UploadFiles/201512/2015121717141633.jpg)
Another gate [#10] can be opened by pressing the piston. You'll find here also two missing coal pieces. You can now use the bomb to pull them out from rocks. A coal piece at the top can be also pulled out with tractor beam as shown on the above screen.
Once you throw last two coal pieces into the boiler, a puzzle will activate in further part - go there now. Fly to the very bottom where you can see larger metal boiler [#11]. Next to it you'll find a jar. The boiler has two markings on it - fire and water. The further part of this level is blocked (you can't swim), so you have to Lower the water level.
You can do it using the boiler. The only thing you have to do is to add water to it twice. You'll get water with the jar. Then you have to add fire - look at volcanic rocks which are throw out from small volcanoes.
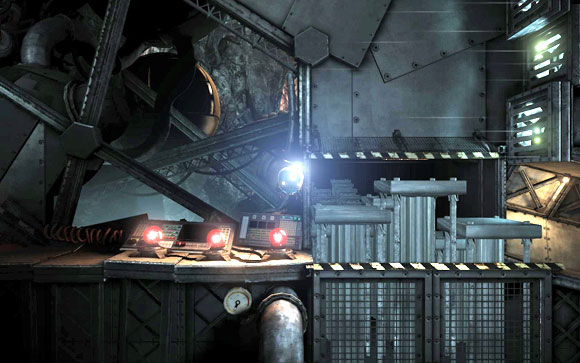
Once the water level drops, move further unlocking the door by using the piston. Bit further you'll be scanned by a camera - another door will be opened. You'll get to some kind of monitoring center [#12]. Use the piston to the old, barely glowing sphere.
![Use the lever to open another gate and then push the used sphere to the open pipe on the right [#13] - Mines - Walkthrough - Unmechanical - Game Guide and Walkthrough](https://game.lhg100.com/Article/UploadFiles/201512/2015121717141753.jpg)
Use the lever to open another gate and then push the used sphere to the open pipe on the right [#13]. After a moment you should get a brand new, shiny sphere. Take it and place it into gripper. After few moments a gate leading up should be opened.
It is time to upgrade your robot. You'll receive a swimsuit. There is a box floating in the water [#14]. Use the tracking beam to pick it up and place it in the large cauldron. Now pull the piston. The swimsuit will be installed and from now on you'll be able to swim underwater.
![So swim to the next, two-phase puzzle [#15] - Mines - Walkthrough - Unmechanical - Game Guide and Walkthrough](https://game.lhg100.com/Article/UploadFiles/201512/2015121717141888.jpg)
So swim to the next, two-phase puzzle [#15]. Your task is to move the shiny sphere to the other side, by activating and deactivating large magnets. The first part is quite easy and you shouldn't have problems with it. Just remember that once you deactivate magnets, the gravity will work again. When the sphere touches magnets, you'll be moved back to the start.
![The second part [#16] is more difficult - Mines - Walkthrough - Unmechanical - Game Guide and Walkthrough](https://game.lhg100.com/Article/UploadFiles/201512/2015121717141805.jpg)
The second part [#16] is more difficult. First you have to release the sphere, so it can start falling down. Before it gets to the bottom, activate magnets for very short moment. Before it reaches the bottom, do the same action. This task is really difficult because it depends on player's skill and it is hard to say when you should activate magnets.
When the sphere gets to the end, go to the left and catch it. You have to direct it to the tunnel above. Then go to the bottom, use the piston to unlock the gate and return to the beginning of this level [#1] - it is best to go along the tunnel.
The sphere should be already there. Use the piston to move it further. Another tunnel will open. It will take you back to the Pacemaker level.
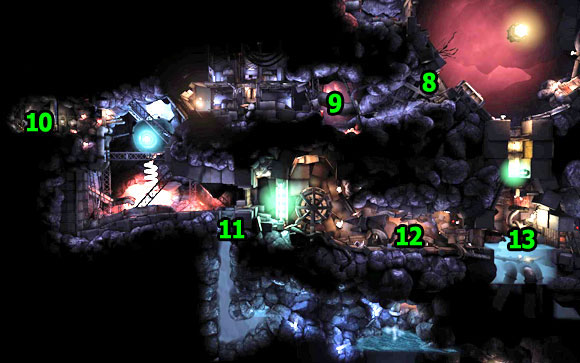
 Illustrative map of level
 Pacemaker - 3rd part of level
![Once you get back from mines, take the shiny sphere and place it in the third gripper in center of the location [#9] - Pacemaker part 2: Map - Tunnel 3 - Walkthrough - Unmechanical - Game Guide and Walkthrough](https://game.lhg100.com/Article/UploadFiles/201512/2015121717142076.jpg)
Once you get back from mines, take the shiny sphere and place it in the third gripper in center of the location [#9]. Time to get fourth, last sphere. Since you have a swimsuit you can go to the only place where it can be usable. So head to the tunnel [#1] leading to the place, where you were throwing objects to water in order to raise its level [#2].
![Fly into water and go to the very bottom [#3] - Pacemaker part 2: Map - Tunnel 3 - Walkthrough - Unmechanical - Game Guide and Walkthrough](https://game.lhg100.com/Article/UploadFiles/201512/2015121717142107.jpg)
Fly into water and go to the very bottom [#3]. You should find objects dropped there. Important: it would be good to take one of stones with you, so you won't have to get back here.
![Stay at the bottom all the time, until you reach the tunnel [#4] with button next to it - Pacemaker part 2: Map - Tunnel 3 - Walkthrough - Unmechanical - Game Guide and Walkthrough](https://game.lhg100.com/Article/UploadFiles/201512/2015121717142143.jpg)
Stay at the bottom all the time, until you reach the tunnel [#4] with button next to it. The manhole opens only when the button is pressed, so place the stone you took from previous location on it and then fly into the tunnel.
Move further. Fly up from the tunnel. You should find yourself in some kind of guts. Ultimately you should reach the next puzzle [#5] with revolving laser. The piston releases the bomb. Your task is to get the bomb and reach the gate with nearby organ. You have to damage it. Watch out for the laser, because if it touches the bomb, the bomb will explode. If you fail to get there in one attempt, you should consider hiding behind the metal box in the right upper corner (at two o'clock more or less). Try to fly with them bomb in a moment when laser passes you by.
![The next puzzle has three phases and it depends on your skill a little [#6] - Pacemaker part 2: Map - Tunnel 3 - Walkthrough - Unmechanical - Game Guide and Walkthrough](https://game.lhg100.com/Article/UploadFiles/201512/2015121717142291.jpg)
The next puzzle has three phases and it depends on your skill a little [#6]. First take a bomb and throw it to one of channels marked on the above screen. Once the bomb start to fall quickly cut the laser beam so the bomb can reach the next tunnel. You have to determine correct height - it can't be done too low!
Once the bomb flies over you, quickly fly to the place where two laser beams intersect, so the bomb can reach the organ.
Once the bomb explodes, go to the gate. It is open only for limited time.
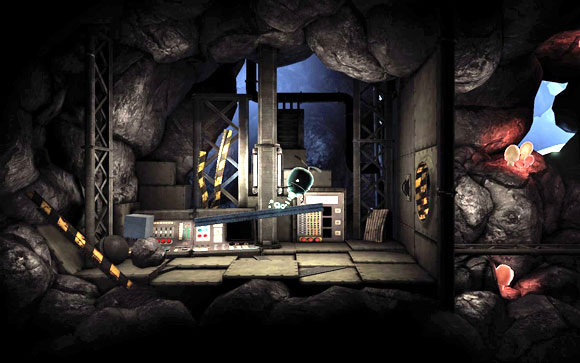
![Before you get the last shiny sphere, it is time for more difficult puzzle [#7] - Pacemaker part 2: Map - Tunnel 3 - Walkthrough - Unmechanical - Game Guide and Walkthrough](https://game.lhg100.com/Article/UploadFiles/201512/2015121717142390.jpg)
Before you get the last shiny sphere, it is time for more difficult puzzle [#7]. And once again, there is more than one solution. Initial arrangement of colors is shown on the above screen.
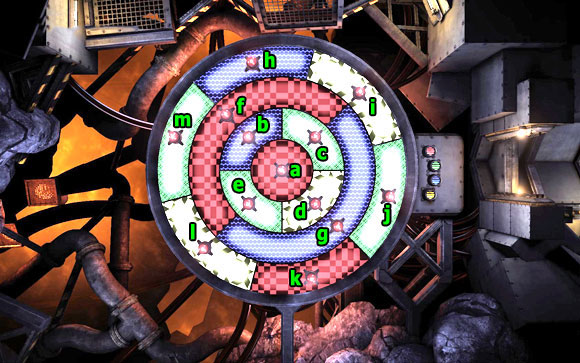
The task is to arrange colored textures that two parts in direct contact have different colors. On the screen above you can see one of possible solution. Below you'll find description on how many times you should switch particular part (from the initial arrangement of colors!) to get the above solution:
B: 1
D: 2
F: 1
G: 3
I: 1
J: 3
K: 2
L: 1
M: 3
Once the gate is open, move further. Use the piston [#8] to get the shiny sphere from the gripper and then fly with it into the open channel.
![Place the sphere in the fourth, last Pacemaker's gripper [#9] - Pacemaker part 2: Map - Tunnel 3 - Walkthrough - Unmechanical - Game Guide and Walkthrough](https://game.lhg100.com/Article/UploadFiles/201512/2015121717142472.jpg)
Place the sphere in the fourth, last Pacemaker's gripper [#9]. After a moment shiny spheres without shield will appear. You have to arrange them in such way, that they are in range of generators which power their bulbs. A correct arrangement of the spheres is shown on the above screen.
![A massive gate [#10] should be opened now, thus allowing you to get to the next location - Pacemaker part 2: Map - Tunnel 3 - Walkthrough - Unmechanical - Game Guide and Walkthrough](https://game.lhg100.com/Article/UploadFiles/201512/2015121717142527.jpg)
A massive gate [#10] should be opened now, thus allowing you to get to the next location. Use the piston to open the manhole.
 Illustrative map of level
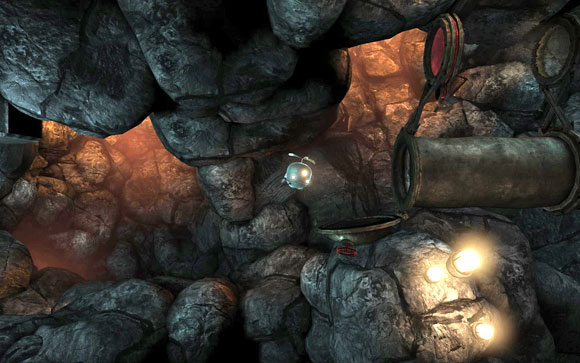
Start flying to the right. You'll reach the first tunnel. Fly inside it [#1].
![Prepare for the memory puzzle at the top [#2] - it consists of two phases - Factory - Walkthrough - Unmechanical - Game Guide and Walkthrough](https://game.lhg100.com/Article/UploadFiles/201512/2015121717142653.jpg)
Prepare for the memory puzzle at the top [#2] - it consists of two phases. In both phases you have to remember and replay sounds produced by two speakers. In the first phase there are four sounds, in the second phase - eight. Unfortunately sounds are generated randomly, so there is no one correct solution. Once you press the piston next to speakers, they will start playing. Notice which speaker plays (or maybe both) and if there is any pause between sounds. In the first phase, you have to do it twice. Use buttons to play the sounds. When you're sure that you set everything correctly, pull the second piston. If you fail, the sound will be played endlessly - you can change button during the game or you can replay the original sound.
The second phase is more difficult, because you have 8 bits instead of 4. The rules are the same. Use the piston to start playing sounds and use another to play sounds set by you with proper buttons.
If you succeed and complete the second phase, the gate will be opened. Get inside and use the piston to pull out the shiny sphere [#3]. Take it with you.
Throw the sphere to the channel on the left. Fly inside the right channel to get down.
![Push the sphere to the gripper, thus powering three bulbs [#4] - Factory - Walkthrough - Unmechanical - Game Guide and Walkthrough](https://game.lhg100.com/Article/UploadFiles/201512/2015121717142700.jpg)
Push the sphere to the gripper, thus powering three bulbs [#4]. Your task is to raise the energy to indicated level. In order to do this, light up bulbs indicated on the above screen: 1 and 3.
The gate should be open now. Before you go any further, do two things: switch the lever to transport energy further and turn off bulbs! The only thing you have to do now is to turn on all four bulbs down. Another gate should be opened.
![The next puzzle is quite easy - the only thing required is good memory [#5] - Factory - Walkthrough - Unmechanical - Game Guide and Walkthrough](https://game.lhg100.com/Article/UploadFiles/201512/2015121717142862.jpg)
The next puzzle is quite easy - the only thing required is good memory [#5]. First fly to the gate on the right. The janitor should close it right before you can get inside. Once he flies away, you'll be able to pull the piston. When you do that, all metal boxes will disappear and there will be strips on monitors on the bottom row. You have to remember how many stripes are on each monitor (from 1 to 5). Then your task is to place numbered boxes under these monitors, which initially had the same number of stripes (as on the box). Eventually you should create the same pattern with three bottom rows filled completely. Finally pull the piston to open the gate.
![Further way is easy and doesn't require any skills [#6] - Factory - Walkthrough - Unmechanical - Game Guide and Walkthrough](https://game.lhg100.com/Article/UploadFiles/201512/2015121717142816.jpg)
Further way is easy and doesn't require any skills [#6]. Fly to the right.
![You should get to the lever, which unfortunately is broken [#7] - Factory - Walkthrough - Unmechanical - Game Guide and Walkthrough](https://game.lhg100.com/Article/UploadFiles/201512/2015121717142868.jpg)
You should get to the lever, which unfortunately is broken [#7]. In this moment a manhole in the ground will open so you can fly down.
![You'll reach few large moving pistons - you have to fly between them [#8] - Factory - Walkthrough - Unmechanical - Game Guide and Walkthrough](https://game.lhg100.com/Article/UploadFiles/201512/2015121717142806.jpg)
You'll reach few large moving pistons - you have to fly between them [#8]. But do not worry - they can't crush you.
The next puzzle requires some skill. You can see moving platforms [#9]. Using 3 spheres you have to arrange them in such way, that you can get to the other side. Unfortunately there are powerful fans over platform, so you can't make any step forward. You can try to do it without any changes but if you have problems, you could try to arrange platform as shown on the above screen - it should make it easier. You might also try it by yourself to find the best solution. The most important thing is to start flying to the right just after the first platform starts going down.
Once you made it through fans, go to the right. You should reach the elevator [#10], which will take you up.
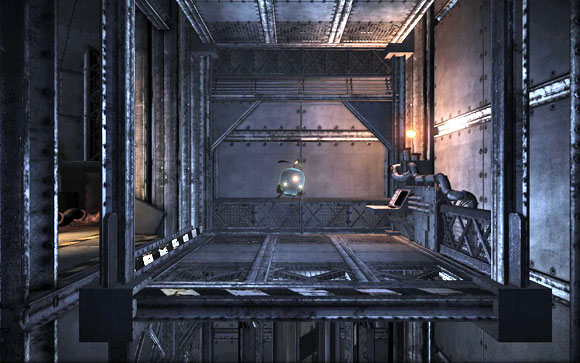
![When the elevator stops, fly to the channel on the right [#11] - Factory - Walkthrough - Unmechanical - Game Guide and Walkthrough](https://game.lhg100.com/Article/UploadFiles/201512/2015121717142935.jpg)
When the elevator stops, fly to the channel on the right [#11].
![You'll reach a large cauldron [#12] - Factory - Walkthrough - Unmechanical - Game Guide and Walkthrough](https://game.lhg100.com/Article/UploadFiles/201512/2015121717143072.jpg)
You'll reach a large cauldron [#12]. Notice strange objects falling inside and generating light. Unfortunately the lever at the bottom is broken, so you have to find another way to get further. Move the red clothing and press the button.
A passage will be unlocked. Fly inside it. Pull the piston - two pistons above you will change positions. Return to the main room and again press the red button. It will unlock the passage through the channel at the top between two pistons.
![In the next room [#13] use the piston, thus opening the manhole - Factory - Walkthrough - Unmechanical - Game Guide and Walkthrough](https://game.lhg100.com/Article/UploadFiles/201512/2015121717143174.jpg)
In the next room [#13] use the piston, thus opening the manhole. Fly inside the channel and continue forward.
You should find yourself in the room with a large wheel in the center. There are some glowing spheres around [#14]. Go to the other side, to the lever at the top. Unfortunately, in the moment you try to switch it, an alarm is triggered, informing about malfunction.
![Emergency exit will open at the bottom [#15] - Factory - Walkthrough - Unmechanical - Game Guide and Walkthrough](https://game.lhg100.com/Article/UploadFiles/201512/2015121717143264.jpg)
Emergency exit will open at the bottom [#15]. Use it to get to the tunnel leading to the next room.
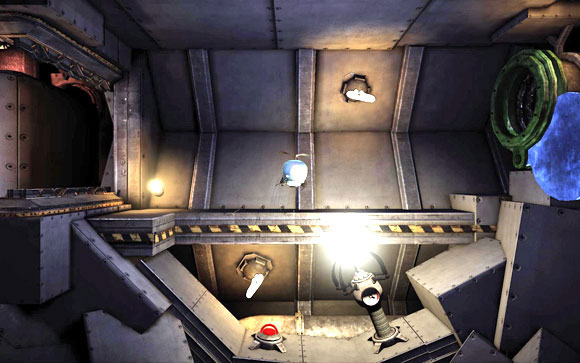
![Inside you'll find three large plugs [#16] - Factory - Walkthrough - Unmechanical - Game Guide and Walkthrough](https://game.lhg100.com/Article/UploadFiles/201512/2015121717143218.jpg)
Inside you'll find three large plugs [#16]. Pull them out with tractor beam. Once you complete the action, everything will start falling apart. The janitor will appear. He will save you, but finally you'll be sucked in by one of pipes.
![You'll fall into water [#17] but after a moment you'll regain a control over the main character - Factory - Walkthrough - Unmechanical - Game Guide and Walkthrough](https://game.lhg100.com/Article/UploadFiles/201512/2015121717143312.jpg)
You'll fall into water [#17] but after a moment you'll regain a control over the main character. Quickly fly up. Wait until the manhole opens and fly inside the tunnel. You should see an outer world for a moment - this is a proof that you're closer and closer to the exit.
![You'll reach the place with massive, quadruple gate [#18] - Factory - Walkthrough - Unmechanical - Game Guide and Walkthrough](https://game.lhg100.com/Article/UploadFiles/201512/2015121717143340.jpg)
You'll reach the place with massive, quadruple gate [#18]. Fly down and then turn left, passing by large cauldron. In a small room you'll find battery [#19]. Take it with you and go to the right.
![You should reach the place where the failure occurred [#14], but this time from another side of the gate - Factory - Walkthrough - Unmechanical - Game Guide and Walkthrough](https://game.lhg100.com/Article/UploadFiles/201512/2015121717143323.jpg)
You should reach the place where the failure occurred [#14], but this time from another side of the gate. You have to replace the used battery with the one you just have found. First remove metal plates, which block an access to the battery. They pull out used battery and replace it with the new one. Remember - place the green battery inside. The gate should open now.
Now it is time for the last step, leading to the game end. It depends only on you, which game ending you choose. A more detailed description can be found in the next chapter.
There are two endings in the game, but there is no problem to see them both, because after completing the game you can select Continue and the last save game will be loaded (before the final decision is made).
 Illustrative map of last part of level
![Once the gate is open, fly again into emergency shaft [#1] - Ending 1 - Endings - Unmechanical - Game Guide and Walkthrough](https://game.lhg100.com/Article/UploadFiles/201512/2015121717143450.jpg)
Once the gate is open, fly again into emergency shaft [#1]. You'll get to the damaged room.
![You'll find there [#2] massacred janitor - Ending 1 - Endings - Unmechanical - Game Guide and Walkthrough](https://game.lhg100.com/Article/UploadFiles/201512/2015121717143534.jpg)
You'll find there [#2] massacred janitor. Grab him with tractor beam and take with you.
![Fly along with janitor to the large cauldron [#3] and throw him inside - Ending 1 - Endings - Unmechanical - Game Guide and Walkthrough](https://game.lhg100.com/Article/UploadFiles/201512/2015121717143558.jpg)
Fly along with janitor to the large cauldron [#3] and throw him inside. A green color should appear. Once you use the piston, a cabin closes and the game ends. After credits you'll fly out as a ... janitor. Congratulations, you've saved the robot!
![Same as previously, once the gate is open, fly inside the emergency shaft [#1], leading to the damaged room with the massacred janitor [#2] - Ending 2 - Endings - Unmechanical - Game Guide and Walkthrough](https://game.lhg100.com/Article/UploadFiles/201512/2015121717143630.jpg)
Same as previously, once the gate is open, fly inside the emergency shaft [#1], leading to the damaged room with the massacred janitor [#2].
![Take it and return up but this time, instead of throwing it to the cauldron, fly upper [#4] and throw it on the plate - Ending 2 - Endings - Unmechanical - Game Guide and Walkthrough](https://game.lhg100.com/Article/UploadFiles/201512/2015121717143626.jpg)
Take it and return up but this time, instead of throwing it to the cauldron, fly upper [#4] and throw it on the plate. When you pull the piston, a camera will show up. It will scan the janitor and massive gate will be open.
Press the button to open the manhole and then fly into the tunnel. Once you get to the other side, fly up heading to the exit. Congratulations, you got out of the underground!