
This guide of the quick leveling-up for TERA includes all of the information, necessary for quick and unproblematic reaching the highest of the 60 experience levels. The hints included in the guide are aimed at the players who prefer the solo play to team play.
The contents of this guide:
()
The terminology in TERA is quite different than one you can encounter in the other MMOs, which is why it is worthwhile, at the very beginning, to explain some of the terms that you will, undoubtedly, come across in the game, and whose understanding may make things easier:
NPC - characters just like yours, controlled by the computer, which you receive quests from, with whom you barter etc.
Mob - is nothing else than any enemy that you encounter in the game, be it a beast, an undead or hostile NPCs.
BAM - short for Bad Ass Monster, that can be simply explained as mini-bosses. These monsters are much stronger, bigger that have much more health points than the regular monsters - at the same time, for defeating them, you are usually rewarded with many experience points, and often, a rare item.
Instance - a generated are which cannot be accessed by anybody that does not belong to your team (you also cannot access one generated for another team), where you fight mobs (usually much stronger than on the regular maps)
Instance Matchmaking - the system of putting random players into teams; these teams are then teleported into one of the selected instances; for completing an instance, with the team created via matchmaking, you receive an additional reward.
Battleground - grounds on which two teams, of 20 players each, face each other. You gain access to these after you reach a certain experience level and, for completing them (winning or losing) you are rewarded with experience and random items (only after you win).
Charm - these are special items activated near campfire that enhance, for some time (ranging between 15 and 30 minutes) certain statistics of your character. For a more detailed description, see further in this guide.
Combo - is a process of combining individual skills into strings. The result is that they are activated one right after the other. You can find the list of skills that react with the other skills after accessing the skill card (K) and the chained skills tab.
Stamina - is expressed by means of the number directly under your character's healthbar. It can assume a value between 0 and 120 (135 in some cases). It is on the amount of stamina that your health and mana, as well as strength of your attacks depend (if it reaches a very low level).
Below, you will find a handful of hints, which you will find handy, regardless of whether you want to gain each and every experience level thanks to quest, or the arduous grind.
1. always try to keep your stamina levels above 100% - the best solution is to keep it as high as possible, at all times, because this increases the pool of your health points and mana. Never get into a fight if your stamina level drops below 80-90% because, below this value, also the value of damage will be lower.
2. on the 20th and the 30th experience level, from the supply crate, you will draw an item called Extensive Alkahest. It is used for the final enhancement of items and, since you are not going to be using it any time soon, you should sell it at the Trade Broker. The price of one such item easily goes above 200 gold pieces and, since you are getting 55 of these, you should easily earn way over 10,000 gp - this should solve your problems with gold!
3. Every several levels, you should check up with the Trade Broker in search of better equipment. You should never allow a situation in which you fight monsters using old and weak equipment - this is especially useful while grinding of mobs, because this directly translates into how fast you are capable of killing them.
4. Always canny bandages around (the best ones that you can use) and use them between fights (if you do not play as a healer or you do not have one on your party) - this will facilitate things and you will not have to wait for the process of spontaneous regeneration to replenish your health. Just remember that, unlike potions, bondages can be used only if you are not in a fight at the moment. If you feel that you are losing and that you may die, walk away, from your enemy, for a dozen-or-so seconds - you will then exit the fight and you will be able to use the bondage.
5. While fighting MOBs (especially the BAMs and bosses) you should pay attention to the animation the presents the mob's eyes glowing red - if it appears, this means that it is preparing for a powerful attack and that you need either to dodge it or block it (fortunately enough, such attacks are quite slow) . You should never take on the attacks, especially if it is launched by a BAM - they can really deal a lot of damage and often impose DoT on you.
You should watch your enemies and learn their patterns (this especially concerns the BAMs) - by recognizing attacks and expecting a specific attack, you can easily defeat mobs, even if they are several levels higher than you. At the same time, if you cannot control the situation, it is possible that a BAM several levels lower than you, will kick your butt.
7. When you log off the game, try to do that in a city or in an outpost - after you log on again, you will receive an experience bonus (represented by the blue fragment of the experience bar) for killing mobs.
8. If you are in a team, play as a member of the team - if you are a tank, you should draw mobs away from the rest of your party, if you are support, you should not be the first to launch into battle. Remember to maintain communications with the rest of the party.
In TERA there are several types of items that are very useful during the game and that can considerably speed up the process of gaining experience. These are: charms, boosts, potions and scrolls.
Charms are a kind of items that you activate at the campfire. For the duration of 15 (or 20, depending on the campfire) minutes, they enhance the specific statistics, which considerable buffs your character. There is a wide variety of charms, whose effects differ, and so do their level of advancement (ranging from the weakest, to the ones that provide a huge bonus). Charms are divided into 3 groups:
For the majority of the game, you will not afford to buy the advanced versions of charms (you buy them at the Specialty Store and you will also get some for completing quests) and you will have to use the ones that monsters drop (Onslaught, Ethereal, Sanguine, of levels between I to IV). You cannot rely on them too much, though, because their effect is random (this is also true for the level of this effect). When you already have hard cash amounting to several hundred/thousand gp (see: general hints) you should turn your interest to the three kinds of charms:
Each one of these charms is 8 gp (so a set that lasts for 15 minutes is going to cost you 24gp) but the effect that they offer is entirely worth this price. If you do not want to pay as much, you should invest in the charms without the "Greater" in front of the name - it costs you 1 gp a piece and the effect is the same, but they raise the statistics by a random value.
Always try to keep the effects of charms on you, and especially when you encounter a BAM or a boss.
These are all kinds of enhancements which, for a specific period of time increase:
The duration of boosts ranges from an hour to several hours. You cannot obtain them in a way any other than be completing a quest, for completing a battleground or at the Auction House. Some eboosts (e.g. the one that raises the amount of experience points received from killing a mob) cost a lot of gold and you should consider whether to buy one or not. If you plan on using a boost, do it at the moment at which you are sure that you will be able to profit from it - do not waste it when you are staying at the city, looking for new equipment.
Apart from potions that replenish health, mana and stamina, in TERA there also are potions that reduce cooldown times for skills. There are two kinds of these: potions that reduce cooldown times for short and long range skills - from the kind of the potion that you are going to be using, depends what character class you are playing as.
It may seem that reducing cooldown times by several percent may be not worth the several gold pieces that the potion costs, but this could not be further from the truth! This is especially useful while fighting a BAM, where replenishing a dodging or healing skill, a half of a second earlier, may save your life. Therefore, you should obtain these potions on a regular basis and use the, at least before fights with BAMs - and if you have enough gold, also before each major battle.
You can obtain scrolls by buying them at the Auction House or by creating them yourself, using Alchemy. The effect that you receive from your scrolls, usually, hold up for 3 minutes. There are the following kinds of scrolls:
Everyone is sure to find something for himself but, the easiest way is to use the Scroll of Savagery, because it is, simply put, the most effective and it drastically increases the damage dealt by you.
If the thought of slaying hundreds of mobs turns you off, then this way is probably a better choice for you. Although gaining new levels be completing quests is slower than through grind (although this also depends on the experience level and the class of your character), it is much more fun, because you do not have to stay in one place and find mobs over and over again.
Completing quests in TERA is trivial, due to the fact that, in the descriptions of the quests, the places where you are supposed to complete them, or enemies that you are supposed to kill, have been provided (this is marked at the bottom of the quest description, in blue print). Additionally, on the global map, each area has a suggested experience level at which you should go there. For that reason, the below chapters will focus mainly on general hints, rather than detailed descriptions of the places where you are supposed to do your job.
Finally, several tips that may prove useful and speed up the process of winning experience:
1. Always accept all the quests available in a given area - you cannot allow the situation in which you need to run across a half of the map to kill a mob, and return the same way to take another quest (which has been available from the very beginning), whose aim is to get to the place that you have just been to. By playing this way, you will waste a lot of time.
2. Avoid doing quests that you will not profit too much from, at the cost of lots of time or work. If a quest requires you to take a long trip, or eliminate enemies scattered all around the map, and the reward is only a small amount of experience (you will be able to tell that by the other quests) then you can simply ignore this one and not bother about it anymore. The amount of experience required to level up can be checked by rolling the moue onto the bar at the bottom of the screen.
3. If your experience level is too high for the place that you are in (e.g. you are at the 30th level and the monsters around at 24-25th), you should ignore completing quests here and go to an area with higher level (levels of monsters can be looked up on the world map). Even if quests offer a good reward, killing monsters a few levels weaker than yourself, comes with low amount of experience points that you receive - yes, your aim is to win experience by completing quests but, remember that you can also receive it from killing monsters.
4. You should avoid quests that consist in escorting (apart from the storyline quests) - they usually offer little experience, are frustrating (your VIP gets between groups of mobs) and are time-consuming.
If, next to a quest, you can see an icon of a small man, with number 5 next to it, this means that it is a group quest that requires a party to perform it (you simply will not be able to handle it on your own, unless your level is a few notches higher than that required by the quest). Usually, this quests are completed in a specific instance - simply use Instance Matchmaking (by selecting the required instance), for the system to create, automatically, a party with which you can easily complete this quest.
6. If you already have lots of gold, always keep several scrolls of teleportation to the city, in which you are currently taking quests (and the cities that you visit often, e.g. Velika or Kaiator) - instead of getting there on foot, you can simply teleport there.
7. Try to complete all storyline quests
Areas to visit: Island of Dawn, Fey Forest, a part of the Oblivion Woods and the Valley of Titans.
This stage is easy, due to the fact that the enemies that you encounter pose no threat at all. To all intents and purposes, this is a kind of tutorial, where you learn about the mechanics of the game - levels fly by quickly and with a sleight of hand.
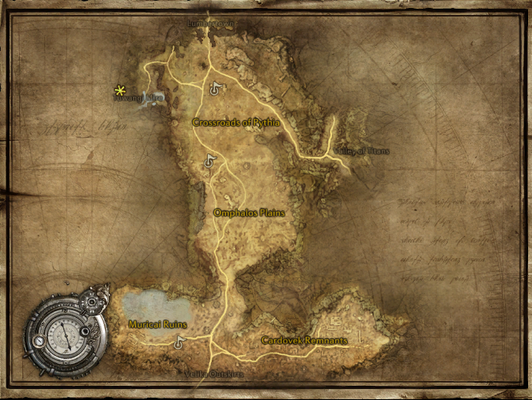
 The location where you start.
For the first several levels, simply complete the quests that you receive (follow the storyline until you reach a side-quest). Around the 10th experience level, you are up for your first boss battle with Karascha. He is an easy enemy to beat (although he has a lot of health points, especially in comparison with the enemies that you have so far dealt with) - an additional facilitation is the allied mercenary who will be healing you during the fight.
 Fey Forest
Shortly after your first boss battle, you will make it into one of the three capital cities I the game - Veliki. Get to know the city, because this is not the last time that you visit it, and go to Lumbertown (in the Arcadia district) - this is where you will receive your first mount (a steed, simply put), thanks to which you will be able to move around much faster (unfortunately, you cannot use it while in fight and in rooms). After you complete the quests in Fey Forest (which is located in Lumbertown), travel to the Oblivion Woods.
 Oblivion Woods
Here, apart from different scenery, you are up for the same thing as in the previous area, i.e. completing quests and elimination of easy mobs. In the upper-right corner of the Oblivion Woods, in the Bestial Vale, there are the first BAMs in the game - do not go there, though, because you do not stand a chance, at your current level. After you complete all of the quests (and especially the storyline quests), travel to the Valley of Titans and complete quests there (and also admire the sights). After you attain level 20, jump to the next chapter of this guide.
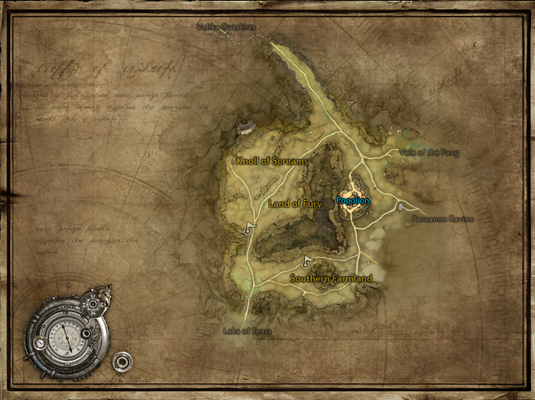
Areas to visit : Tuwangi Mire and/or Bastion of Lok (an instance in the Oblivion Woods)
 Tuwangi Mire - an optional location
Unlike at the previous stage, you can choose here, where you want to complete your quests - you can take them in Tuwangi Mire or go to the first instance available for you - Bastion of Lok (where you should have storyline quests). Completing quests in Tuwangi Mire is very time consuming and, simply put, boring. On the top of that, there are no storyline quests here so, the best decision is to leave for BoL, best by using Instance Matchmaking.
 Bastion of Lok - the first instance in the game!
Apart from lots of experience points for killing bosses and completing quests (which are very simple here) also the simple killing of mobs rewards you with lots of experience points - each one of them should provide you with several times more experience points, than the regular mobs that you have been, so far, killing. Due to the fact that it is the first instance in the game available for you, mobs that you encounter here are not too demanding (but you should be able to notice the difference , in comparison with the regular monsters) - still, you should watch out because each of the bosses, and especially the last one, can deal a lot of damage to an inconsiderate player.
You can do this instance several times, until you reach the 22-23rd experience level - this should not be difficult, because, each time you enter, you should receive, at least, a half of the experience bar and finding a team thanks to Instance Matchmaking, is as easy as pie. As you wait for the party, you can take up on the nearby BAMs (Basilisk) - they are not too demanding and they reward you with a hoard of experience. Once you have reached level 22-23, skip to the next chapter in this guide.
Areas to visit : Celestial Hills, Cliffs of Insanity, Vale of the Fang and Sinestral Manor (instance) or Paraanon Ravine.
 Celestial Hills.
After you complete the storyline quest in Bastion of Lok, you will take up another one, in the Celestial Hills. In this area, you will be receiving your first quests that concern the elimination of BAMs - Naga (in several variations) and Kumas. They are not too demanding, but you need to watch out for the moment at which they enter the enrage state (a kind of fury) in which their attacks are faster, stronger and much more unpredictable. Also, they often endow you with the DoT (Damage over Time) effect, which can claim quite a lot of health points. Additionally the Kumas take some time to get back on their feet and start fighting - sometimes, this takes them so much time that they die before they getting up.
 Cliffs of Insanity.
After you comb through the Celestial Hills, go to Cliffs of Insanity, located in the new province of Poporia (you can get there by teleporting to Popolion). There are no difficult enemies here so, you should be able to deal very quickly with the quests that you receive here (remember simply to follow the main storyline and you will get to the moments where you will be able to take side-quests). After you have dealt with everything, go to the Vale of the Fang.
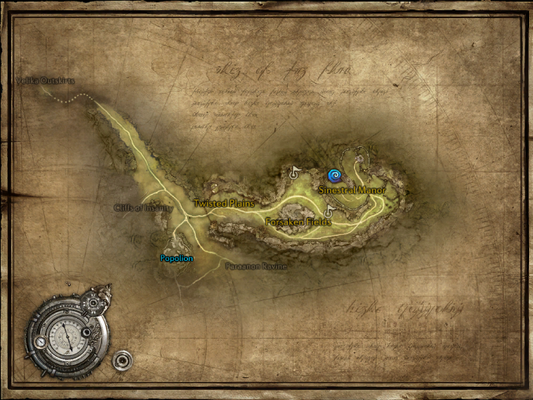 Vale of the Fang and the entrance to the Sinestral Manor instance.
Apart from another serving of quests, you will also visit the second instance here - the Sinestral Manor. You can enter it after you reach level 26 (again, best through the Instance Matchmaking, to receive additional rewards and make it easier for you to find a party). Unlike in BoL, the local mobs are the real threat for a careless player which is why, if you are not the tank in your party, you should not be the first one to attack mobs. There is no solution, or a catch, for any of the bosses here. A bit of team coordination and you should be able to get the job done. Mobs in this location reward you with quite a lot of experience so, enter several times to reach the 28th experience level.
 The Sinestral Manor instance.
Instead of going to the Sinestral Manor, you can go to another location - Paraanon Ravine. There are quite a few quests here and the beasts that you encounter there are not too demanding but, f you are bend on quick experience, you should rather go to the Sinestral Manor instance - after you enter the SM for several times, you should have a set of rare items on you. After you reach level 28 (or higher), skip to the next chapter.
Areas to visit : Basilisk Crag, Tenebrous Mines, Freeholds and Corsairs' Stronghold.
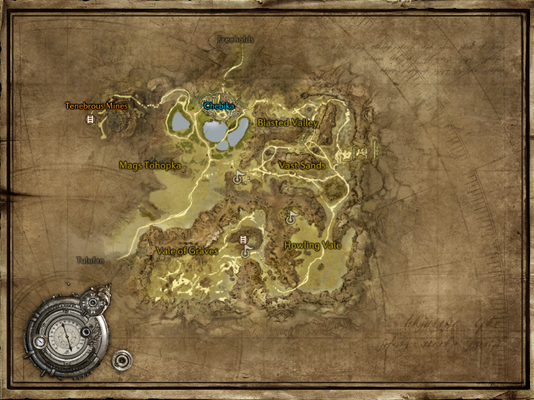 Basilisk Crag, with Tenebrous Mines on top.
To make it over to the next are, teleport to Chebiki (a teleport scroll can be bought from a regular merchant). After you complete several quests, you will receive a quest to get to Tenebrous Mines. It is a location that can be simply described as a multistory cave- the arrows on the map simply let you know where you are supposed to climb down (red arrow) and up (blue arrow).
 A fragment of the Tenebrous Mines.
In Tenebrous Mines there are a plethora of quests for you to complete - on each of the three levels, there are, from a dozen-or-so to several tens of quests (plus the storyline quests), which is why you should prepare to spending several tens of minutes under the ground, during which you will slay hundreds of monsters and lose your way, many times, in the sinuous tunnels of the mine.
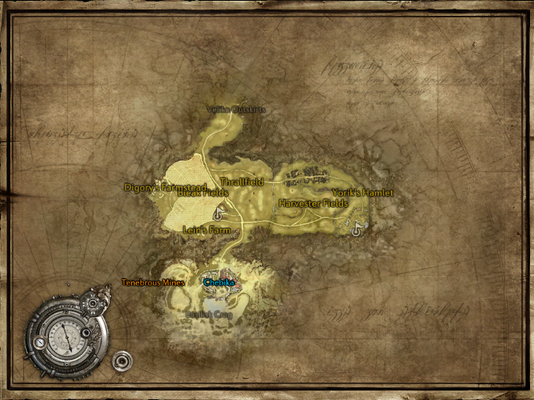 Freeholds.
There is a high probability that, before you descend to the mine for good, you will have reached level 32 (and probably even higher), which is why you can ignore the Freeholds and the rest of the Basilisk Crag (obviously, apart from storyline quests), because they are not as effective, when it comes to winning experience (you will have to spend some time walking) and on the 32nd level, you can travel to the next area. Either way, when you attain level 32, skip to the next chapter in this guide.
After you reach level 30, you will also be able to take part in PvP skirmishes (Player versus Player) in the Corsairs' Stronghold arena. It is a very effective way to gain experience because, even if you lose a fight, you receive the amount of experience that corresponds to completing several quests. When you win, you receive even more experience (at higher levels, you receive an additional bonus of experience points, corresponding to your level) - taking part in the CS events is a perfect solution when you are lacking quests to complete and you still have not achieved the higher experience level. Additionally, once a day, you can complete a Daily Quest connected with the CS. It is enough for your party to win the challenge and after you exit the arena, you will be able to claim a generous reward (in Velika) - several tens of gold pieces, lots of experience points and a random item which you can use or sell at the Auction House for a good price. Additionally, for taking part in the fights, you receive special points for which, in Velika, (next to the person that you return the Daily Quest to), you can buy items for the 60th level. Regardless of whether you want to level up this way, try to win one skirmish a day to win the Daily Quest.
Areas to visit : Jagged Coast, Mistmoor Island, Ascension Valley (especially Azarel's Labyrinth) and Pirate Grotto.
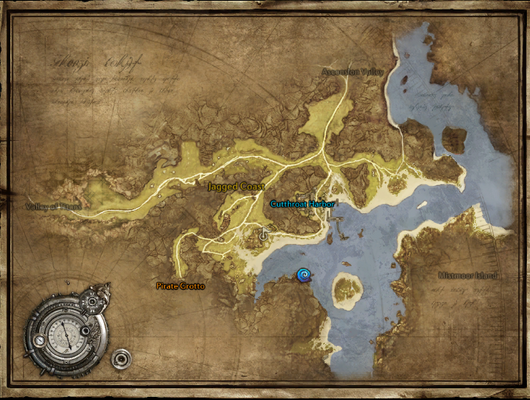 Jagged Coast and the climatic pirate city of Cutthroat Harbor.
The storyline quests will lead you through the locations listed above (with the exception of the
Pirate Grotto) so, is nothing else to do but visit them in this order. The Jagged Coast does not stand out with anything in particular, apart from the fact that you will be doing the majority of the quest within a close distance of the Cutthroat Harbor city - the enemies here are not too demanding and you are not going to fight any BAM here(when it comes to the quests, that is).
ADDITIONAL INFORMATION FROM THE AUTHOR: for some uncanny reasons, this location (Jagged Coast, and especially the city of Cutthroat Harbor) overloads the computer. That is why, you should not be surprised if the frame rate , which has so far been high, drops to, around, 15 fps and the gameplay will be unbearable. The only solution to this problem (as of now) is to decrease the amount of details , which is when things return to normal. There is a chance that the game will run smoothly on your computer (this does not matter how strong your computer is, the game is simply poorly optimized) - in which case you should ignore this memo.
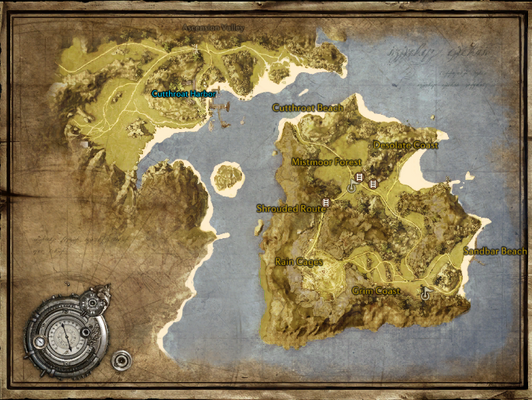 Mistmoor Island - a den of lots of Nag BAMs.
In Mistmoor Island, apart from completing the successive quests, you should also note the BAMs that roam this area (Nags), which resemble huge crabs. If you run out of quests and you still have not achieved the next level (or you simply want to have some fighting) Nags are a perfect candidate for your sparring partner, and a source of lots of experience - killing them is as easy as pie because they are very slow and their attacks are predictable (the only danger here is the jumping attack, which deals AoE damage and endows you with DoT, but you can simply skip away before the crab falls down). Apart from the considerable amount of experience points,, Nags also drop a lot of gold and valuable items (among others, crystals which, in some variants, can be sold at the Auction House for several tens of gold) - it is worthwhile to turn your attention to them.
 Ascension Valley and the Azarel's Labyrinth.
After that, go to Ascension Valley and keep completing quests until you reach the Azarel's Labyrinth. This place resembles the Tenebrous Mines which you visited earlier- it is a multistory cave overflowing with quests and BAMs (they have quests connected to them). They are not too dangerous - what is, is the confined space over which you can move (a round, tight chamber), which is why you need to watch out and not let yourself be pushed against the wall, without the possibility to escape.
 Pirate Grotto.
After you have cleared the labyrinth, you can go to the Pirate Grotto - another multilevel location with lots of quests - if you have not yet managed to reach level 35 (or even 36). If you have achieved your goal, and have the required level, ignore this place because it does not offer that much experience and, additionally, moving around the cave is an arduous task. After you have done everything, skip to the next chapter of this guide.
Areas to visit : Lake of Tears, Eldritch Academy Grounds, Colossal Ruins and Aurum Road.
 Lake of Tears.
You return to the Poporia, district, to the Lake of Tears. There is nothing of interest here, when it comes to quests or enemies, and the only problem here may be the BAM that stays here (Fangspawn) - it is one of the most irritating enemies, his attacks are unpredictable, is highly mobile and deals a lot of damage (especially at this stage into the game and in comparison with the earlier enemies). Since, you complete quests connected with him, in case of problems with eliminating this mob, you can do either of the following: either join a party to deal with it (this guide assumes that you play solo) or ignore this quest and continue on your path.
 Eldritch Academy Grounds.
Next, go to the Eldritch Academy Grounds - another multistory location. Again, there are a plethora of quests and additionally, mobs occur here in big groups so, quests are fast and nice to complete. The mobs in this location are quite weak (and when you consider Fangspawn in the earlier location - unbelievably weak) but due to their numbers, they can be dangerous, if you take on too many of them at a time.
Colossal Ruins.
After you have cleared the academy, you will have to visit a quite difficult location: Colossal Ruins. The reason for which it is difficult is that, for some uncanny reason, mobs are unbelievably strong her, which is why you should try eliminating them one by one. Apart from the strength of the mobs, there is nothing special about this location. That is why, after you have cleared it, travel to the neighboring Aurum Road.
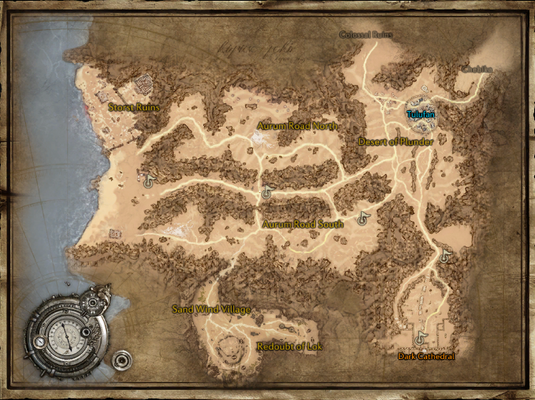 Autumn Road.
In spite of the fact that the levels of the mobs here are the same as of the mobs in the previous location, they are very weak (although they provide just as much experience), which is why you can approach them at ease. Soon, you should receive a storyline quest (on level 38), which will take you to the Dark Cathedral - another multistory location. At the end of this location, you will find an entrance to another instance - Cultist's Refuge.
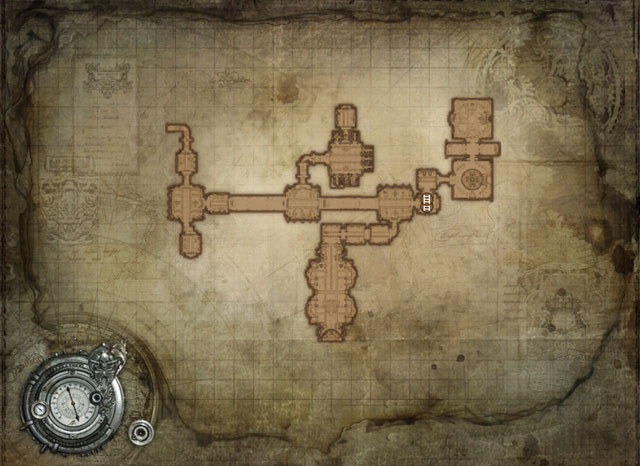
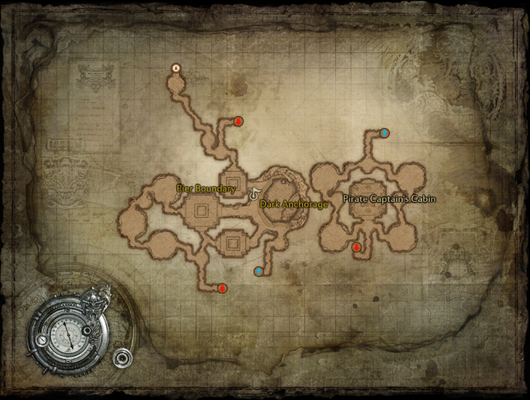
 The Cultist's Refuge Instance29315.
Judging by this instance, you can tell that the action is getting heated - mobs are not so much stronger as they are several times tougher than their regular counterparts. Your party (or you, if you are trying this one solo) needs to watch out for one thing - in some of the chambers, at the exit, there is a single mob. If it is attacked, all other mobs from this area launch at you -which is why you need to clear the entire chamber first and take to this one afterwards. The bosses in this instances are easy to defeat, apart from the additional one (that is not required by the storyline) - while fighting, note the moment when the boss is trying to reach the center of the chamber. If you do not stop it (by stunning or putting to sleep) the boss will multiply after several seconds. If this happens, you need to stop attacking him and stay in motion at all times, because each of the copies deals AoE damage. After several seconds, the copies will disappear and you will be able to continue your fight. This instance is rewarded with a lot of experience (due to the quests that you can take over and over again) and due to the experience that you get from killing the mobs and the bosses), but it takes some time to complete it because you will be doing quite a lot of running back and forth. Complete this instance, at least once, and if you want to, complete it several times - additionally, you should obtain a couple of valuable items.
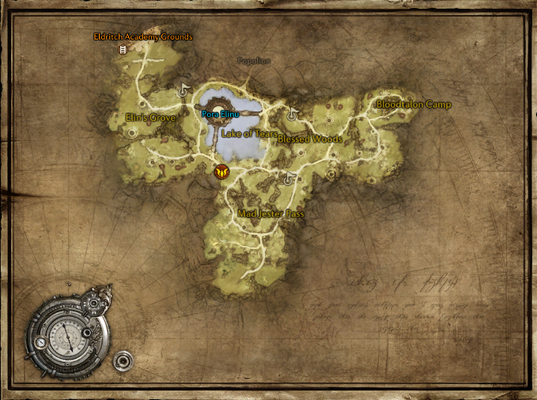
Areas to visit : Essenian Crest, Blightwood, Timeless Woods and Blessing Basin
 Essentia, where all the above-mentioned areas are located.
This stage of the game is quite linear, because you do not have many options (or you should not, at least) to complete quests in the order different than the above - you will be led through all of them (apart from the Blessing Basin) by the storyline quests.
At this point, there is nothing here that would be attention-worthy or too challenging enemies - all of what you see here, are variants of mobs that appeared earlier in the game, with the exception that they deal more damage and have more health points. At level 41, you will gain access to another instance - Necromancer Tomb, but in comparison with the previous ones, it does not offer too much experience (or, better put, the speed of gaining it, when compared to completing quests). When it comes to the quests in the instance, you will receive them only after you reach level 43 - until then, you should better withhold and complete some other quests.
You might have noticed that, for some time now, you have been receiving quests concerned with the elimination of BAMs in every camp that you visit (usually, it is 3 BAMS). This kind of quests provide a lot of experience, and often, also rewards in the form of items (too bad they often are of medium quality). The downside, however, is their difficulty level- elimination of BAMs is not the easiest thing you can imagine (each class can deal with BAMs better or worse than the other) but you should be doing it because, apart from obtaining rewards for the completion of quests, you also get the opportunity to learn the patterns of attacks of individual BAMs (which you should be doing anyways) - in the future, this knowledge may prove to be much more useful than you might think.
If you find it difficult to complete the quests concerned with BAM elimination, you should find someone to join your party (or join an existing one - sometimes you can find one where several players slay BAMs at a mass scale) - when it comes to this, you can also ignore these quest in order not to waste time and not to stress yourself.
Once you reach level 43, you can skip to the next chapter in this guide - if you complete all quests there are, and you still have not reached that level, or can't handle some of the quests, use the Corsairs' Stronghold arena mentioned in the previous chapter.
Areas to visit : Tempest Reach, Mount Tyrannas, Citadel of Torment, Frost Reach, Quarantine Zone, Arachnea, Feral Valley and Temple of Dagon
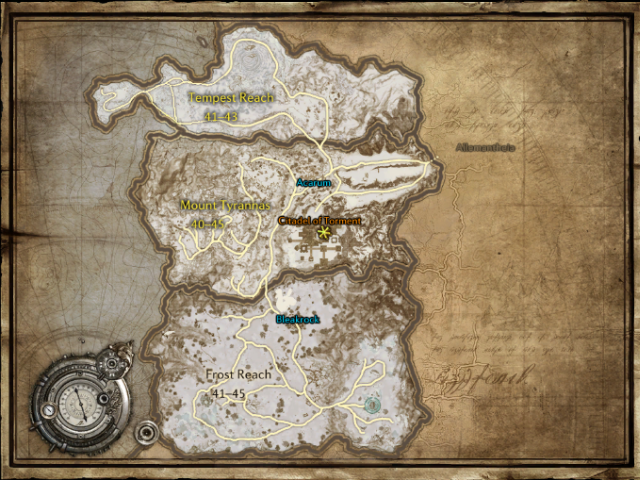 Westonia - here you will find Tempest Reach, Mount Tyrannas, Citadel of Torment and Frost Reach.
At this stage, you will visit quite a lot of interesting locations and there will be two instances unlocked for you, but more about this later. The first two of the mentioned locations are no different from the places that you have already visited - there is a lot of running around, slaying mobs and completing dozens of quests involved. There also are no difficult enemies here, when it comes to the regular mobs, at least.
From now on, you should also watch out for BAMs because they are quite a jump, when it comes to the challenge that they pose - all of the BAMs are stronger, tougher and they have new, even more unpredictable attacks. You need to start paying attention to their attack patterns - if you learn them, you will find out that fighting BAMs is often easier than fighting the regular mobs, because you can dodge most of their attacks. For defeating them, you are rewarded with an absurd amount of experience points, when compared to the regular opponents.
Citadel of Torment is another multistory location. Completing of quests is quick, easy and pleasurable there, because the location is quite small and overflowing with monsters - you should be able to deal with monsters there really quickly.
 Quarantine Zone and Arachnaea above.
The next two locations (Frost Reach and Quarantine Zone) do not stand out with anything special again. Arachnaea (located in the Quarantine Zone) is another multistory location that is overflowing with monsters. You should experience no difficulties here, when it comes to the regular mobs, but the BAMs are very strong here, which is why I recommend that you find someone to help you while completing quests connected with them.
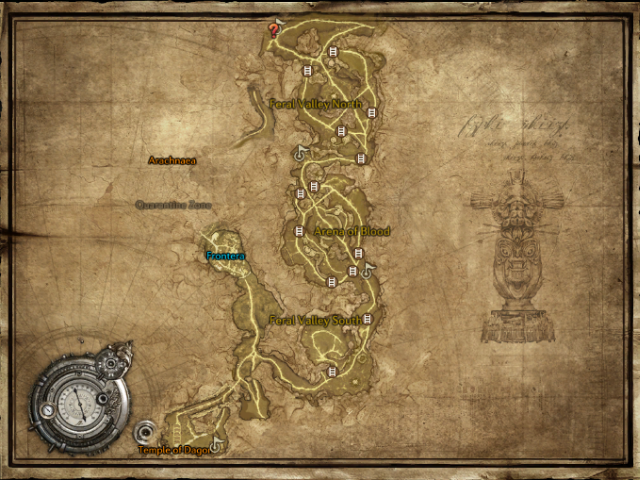 Feral Valley and the Temple of Dagon at the bottom.
Things are similar with the Feral Valley and the Temple of Dagon there - there is nothing serious here, regular mobs should not pose any threat to you and, when it comes to the BAMs, you would have already learned attack patterns of most.
At level 48, you will unlock two new instances: Golden Labyrinth and Akasha's Hideout. At this experience level, however, you will have no quests there, so withhold with paying a visit there, until your level reaches 50. Remember that you should first go to the Golden Labyrinth, because you need to item that drops there ( a potion) to fight at the Akasha's Hideout comfortably (there are several potions dropping out of each boss in GL) - although you can, of course, fight without them, but you are up for an ordeal with a curse on your character then, which will lower your statistics. Completing these instances at large scale, just to get experience, is a bad idea, because this is a slow process there - it is much more effective to complete quests. Go to both of them, once per each is the best idea, to see them. Then, you can forget all about them. After you reach level 48, skip to the next chapter in this guide.
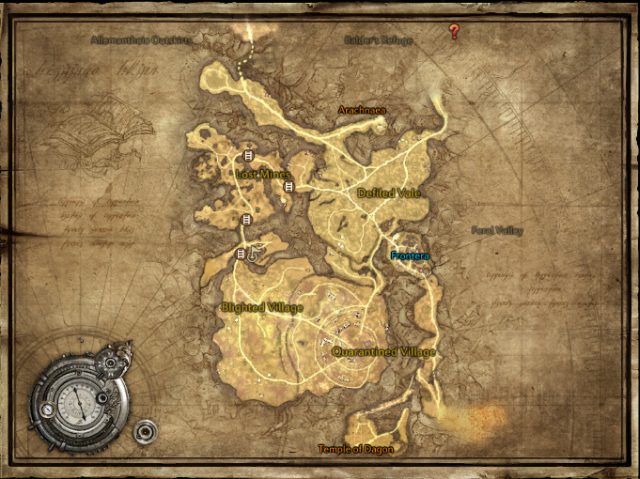
Areas to visit : Hungry Caverns, Frymount, Serpentis Isle, Darkquaver Woods, Susurrus Woods and Amena Quatla
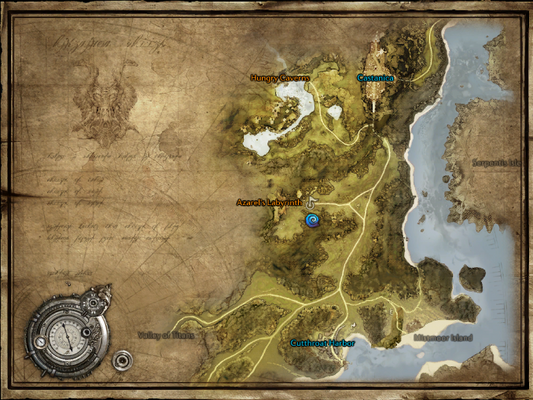 Ascension Valley - you return, this time to visit the Hungry Caverns.
At this stage, there is a wide span of levels and several quite big locations, but it is probably the most linear one in your journey, until you reach level 60. There are no difficult quests here, nor monsters and the only problem that you may encounter is fighting with the BAMs. They are getting more and more demanding and any mistake that you make, while fighting them, is more and more severely punished. Therefore, you need to watch yourself and try to predict their attacks (again, recognition of patterns will come in handy).
 Serpentis Isle is full of Nag BAMs.
Until you complete your quests at the Serpentis Isle you should acquire, at least, level 48. If this is did not happen, and you are stuck at level 47, and there are no more quests to complete, you can get busy eliminating the local BAMs: Nag. These are one of the easiest BAMs to defeat, because they are slow and their attacks are highly predictable. Each one of them should reward you with quite an amount of experience points.
 The Sylvanoth province.
After you have reached level 48 travel to the province of Sylvanoth, where there are the rest of the locations named above. Here, you are up for the very same thing that you have been doing in the previous locations: even more monsters to slay and trivial quests to complete. If you have been trying to complete most of the quests at this stage, then you should have reached level 53 towards the end. After you have done everything, skip to the next chapter in this guide.
Areas to visit : Tor Exsul, Doomcrypt, Wyrmgorge, Sienna Canyon, Plain of the Damned, Vale of Spires and Seeliewood
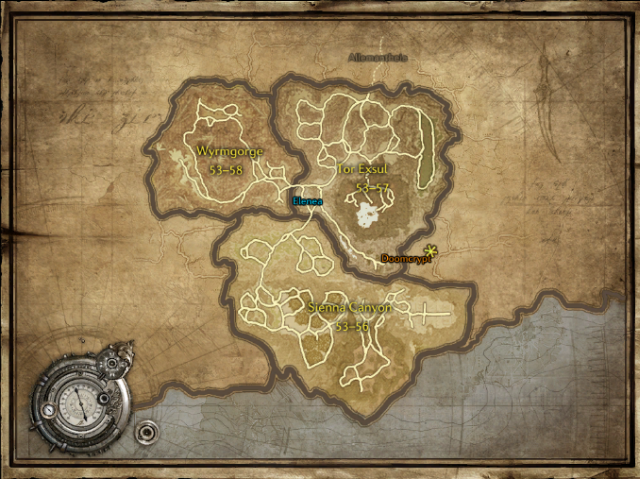 The Val Elenium province.
The first location (Tor Exsul) means several quick quests, which should, eventually, lead you to the Doomcrypt. It is a huge system of caves overflowing with dozens of quests and monsters to eliminate, where you gain experience very quickly. This is due to the fact that between the successive groups of enemies and quests, distances are small. After you exit the crypt, the chances that you already are at level 55, are high. Go to Wyrmgorge, and then to Sienna Canyon.
 The Lorcada province.
After you have cleared all of these places, of the worthwhile quests,, you should have, at least, the 56th experience level - in this case, go to the next province : Lorcada. Here, there are two further locations to be cleared, which should not be too much of a problem to you. After that, you should go to Seeliewood - after you complete the quests here, you should easily have reached level 58. Just two more and your journey (when it comes to experience, at least) will be over!
 The Saleron's Sky Garden instance.
Additionally, at level 53, you should gain access to the next instance (Saleron's Sky Garden) but, to be able to receive quests there, you need to wait until you reach level 55. This instance is very nice, the enemies that you meet are neither too strong or tough and it offers a lot of experience points. The best thing is, however, that you will encounter one of the bosses that you have already defeated, here (not counting the last one) so, your party should have no problems dealing with it.
After you have reached level 58, skip to the next chapter in this guide, the last one concerned with completing quests.
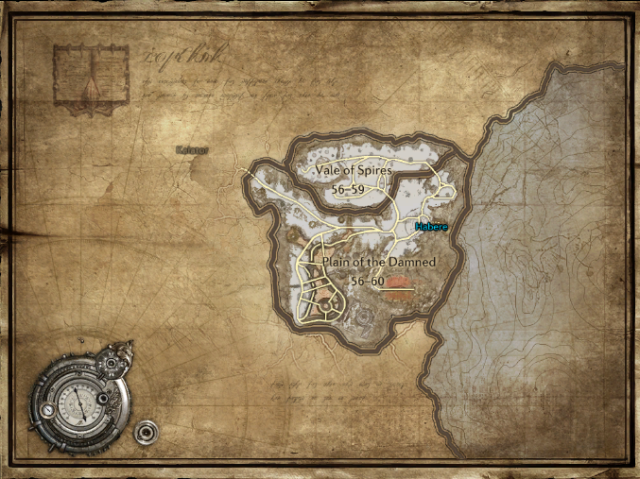
Areas to visit : Tirkai Forest, Thrallhold, Three Towers, Balder's Refuge, Khanover Front, Argonea and Granarkus
 The Val Tirkai province, where there are the Thrallhold and Tirkai Forest.
This is a stage where you will be led by your hand, while completing storyline quests. There is a high probability that you will not need to visit all of the locations named above, because you will have attained level 60 earlier.
Start from Tirkai Forest and Thrallhold, which are located near the city of Pathfinder Post. The mobs that you kill here(and in general, mobs above the level of 55-56) provide an absurd amount of experience - the difference is so huge that, sometimes after you kill a group of mobs, you can expect experience amounting to hundreds of thousands. Due to the fact that mobs cannot reach above level 60, they should not surprise you with anything new. You only need to watch out for BAMs - if you encounter any at the level of 58, you should be prepared for a fight to the death, because the mobs of this kind are stronger than the ones several level earlier.
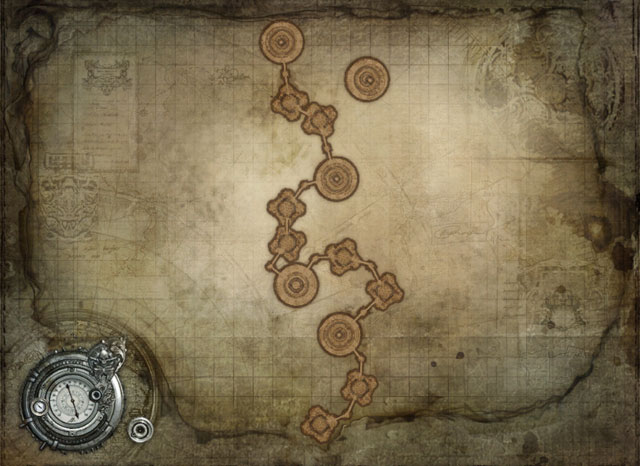
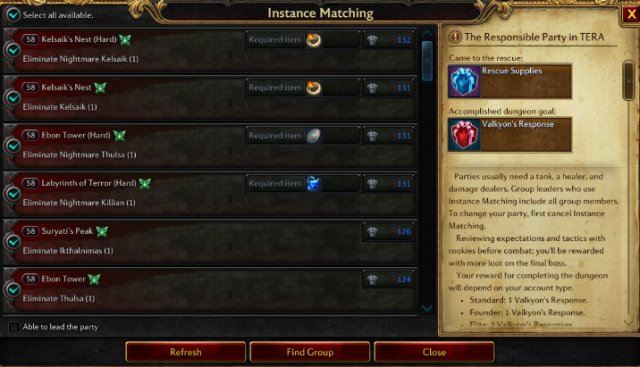 An incomplete list of instances that unlock after you reach the 58th experience level.
After you reach level 58, a whole lot of instances will unlock which you can visit via the Instance Matchmaking. They do not offer too much experience, but you can visit them for your own pleasure. If it is possible, you can also find a player at the 60th experience level, who is killing time by eliminating BAMs, in order to gather more gold and items. If you go to the right player, you may enter his party and simply leech for experience - he will be gathering items, and you will be gaining experience at a mass scale.
A very effective way to reach level 60 is by entering the Corsairs Stronghold battleground- for winning, you will win several million experience points so, you should not hesitate to go for this method.
If you have already reached level 60, congratulations are in order! This, however, does not mean that the game is over at this point - quite the opposite, just like any MMORPG, it has only started! You can now join a guild (if you still haven't) and let yourself be soaked in by end-gaming, i.e. PvP and PvE. However, description of this is going to be included in a different guide.
If you have decided to level-up in this way, you need to be prepared for hours, upon hours of arduous eliminating of monsters, who are often strong and present the pain in the neck attitude. As a reward for going into so much trouble, you will receive experience much faster than you otherwise would have, by doing the story mode, and probably better drops. Unfortunately, you are up for a lonely game, probably, because a companion will not be cooperating tightly, and will only lag behind.
There are several things that you need to note, before you go down your path:
1. If you want to level-up through grind, never fight with monsters that are weaker than you - you will then receive much less experience. Fight only with monsters at the level the same as yours, or higher by one or two levels - the fight is then more demanding (and at the same time more interesting), but it is fully paid for in terms of more experience points.
2. Make sure that your equipment is always up-to-date. You cannot allow a situation, in which you are at level 20, and half of your equipment still remains at level 20. Use the Trade Broker t obtain valuable items (but you should not exaggerate with the price, because there is no point in investing hundreds of gold pieces into equipment that you will replace after several hours anyways).
3. If you get the opportunity (i.e. if the items that you are using are right) always enchant (upgrade) them, and especially your weapon. Enchanting an item to the level of +6 does not cost a fortune, and the results you achieve will surely astonish you. There is no point in enchanting above +6, because it is costly and you will replace the equipment that you are using pretty quickly, as soon as you gain a few additional levels.
4. Read through the hints contained at the beginning of this guide, and also in the section concerned with questing - you will find there information that may prove useful.
5. If you decide to fight with a BAM, do not push it and do not engage more than ONE at a time - fighting two BAMs that are at your level, or higher, requires learning these opponents well (each BAM type requires a different tactic) and good control over your character. If you decide to fight two, or more, BAMs, without being well-prepared for that, it will surely end in your death and loss of time.
6. Boost on the experience that you gain from killing mobs. These boosts are very expensive, if you want to buy them at an auction, but they make gaining experience much faster. You can ignore them, throughout the first several dozens of levels, but after you reach, around, level 45, try to use them at all times.
Areas to visit: Island of Dawn, Fey Forest, a part of the Oblivion Woods and Valley of Titans.
The best way to attain the first twenty levels is to complete quests )which has been described in the chapter concerned with leveling-up through completing quests), because they provide a lot more experience than killing mobs, for the same duration of time.
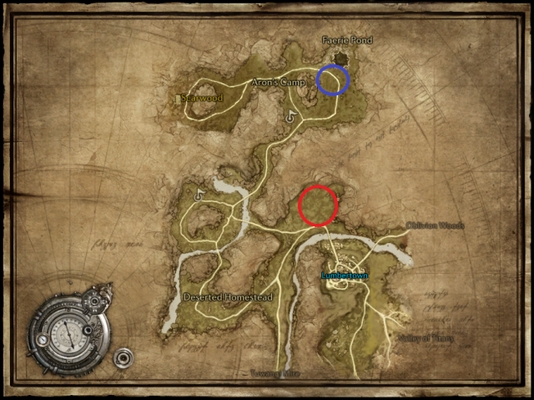
Still, if you do not want to complete quests until you reach level 20, after you reach the Lumbertown (you should then be around the 11-12th level) go to the North of the city and start eliminating mobs (Warthog), and keep doing so until you reach level 15. Then, travel to the North again (the blue marker above) and kill the mobs there (Unicorns) until you reach level 16.
The net step are mobs (Devan Mob) located to the North of Crescenti (a city in Oblivion Woods). Until you reach level 20, you should be occupying yourself with these mobs.
As it has already been mentioned, at the beginning of this chapter, the faster way to reach level 20 is to complete quests, but there is nothing to prevent you from occupying yourself with grind, right from the beginning of the game. After you reach level 20, skip to the next chapter.
Areas to visit : Oblivion Woods (with the Bastion of Lok instance), Celestial Hills, Cliffs of Insanity, Vale of The Fang.
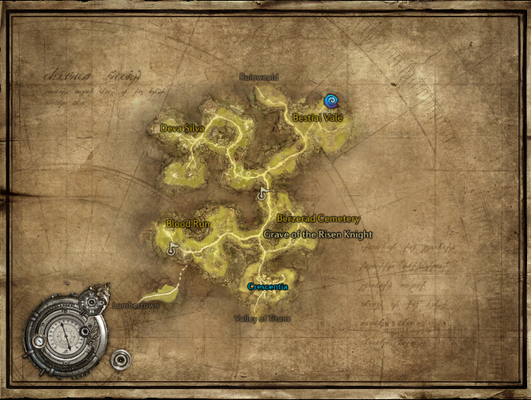
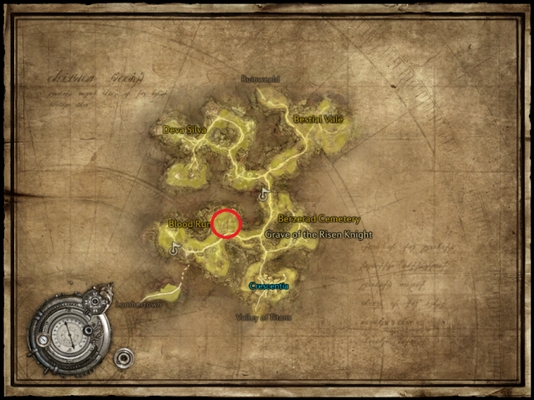
Go Northwards, to Bestial Vale (the red marker above) and deal with the first group of BAMs that you encounter there (Basilisk). After you kill one of them, you will realize why it is grind that is the superior method for leveling-up in TERA.
At level 20, you will gain access to your first instance (Bastion of Lok), which you should use to gain experience - you can get there through Instance Matchmaking. Use the BoL as often as you can - kill time in-between by dealing with BAMs.

After you reach level 23, travel to Celestial Hills and deal with the two kinds of BAMs here: Kumas and Naga. Both mobs provide the same amount of experience so, the choice of either is restricted to your preference. The entire Celestial Hills literally swarms with these two BAMs so, you should not have any problems finding them.
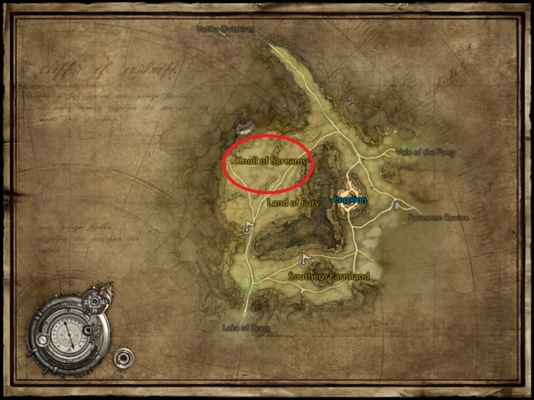
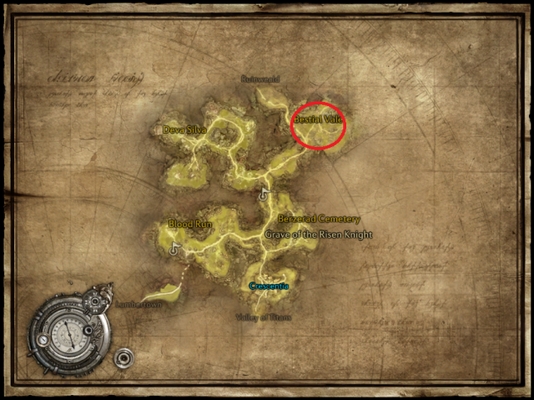
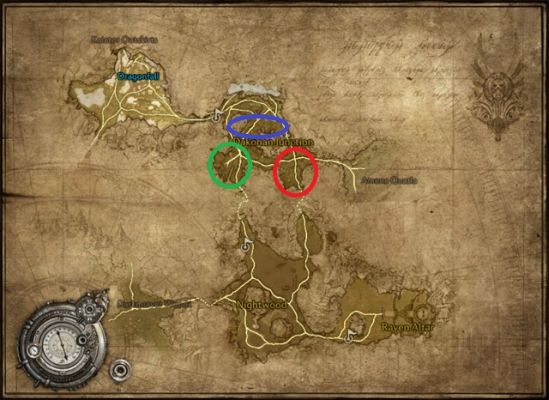
The next stop (after you reach level 26) is Cliffs of Insanity (in the Poporia province), in the Knoll of Screams (the red marker above). You should find there another kind of BAMs (Fimbrisk), which you should be dealing with, until you reach level 29.
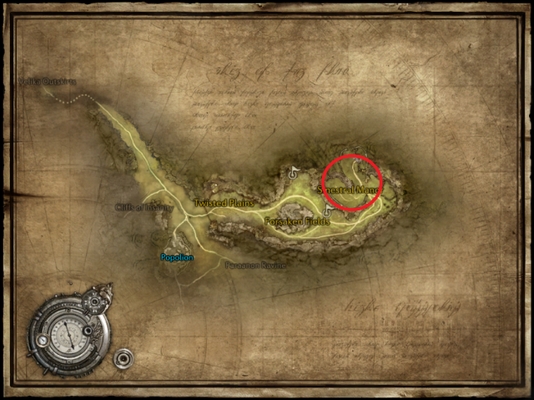
The last two locations in this chapter are Vale of The Fang (travel there after you reach level 29). There are two paths of leveling-up here: through the Sinestral Mannor instance and through elimination of the local BAMs (Ovolith). Try out both options and see for yourself which is more rewarding, in terms of experience. If you are capable of completing the instance solo, or you have an ally with you, who also is bent on time and effectiveness of gaining experience, the Sinestral Mannor may ensure a quick influx of experience. Otherwise, it is better to start eliminating BAMs. After you achieve level 32, skip to the next chapter.
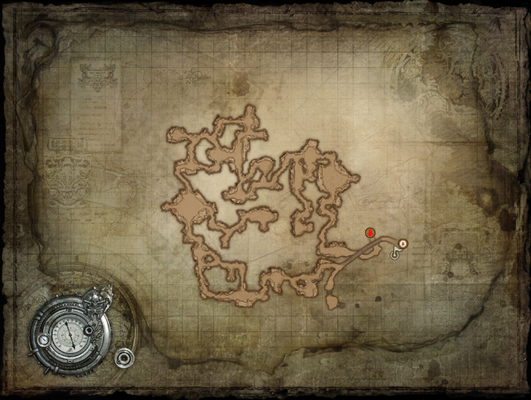
Areas to visit : Colossal Ruins.
Between levels 32 and 40, the only place worth recommending is the Colossal Ruins. There (the red marker above), you will find a camp full of mobs (Desert Fire X). Due to their high population, you should use your mount, gather a big group together (not larger than 15-20, because you will run into trouble otherwise) and eliminate them quickly. By themselves, the mobs do not offer too much but, if eliminated such groups, you should receive large amounts of experience.
Unfortunately, as has been pointed out earlier, at this level of experience, there are no other attention-worthy alternatives, which is why, it is here that you will spend the next several dozens of minutes. After you reach level 40, skip to the next chapter.
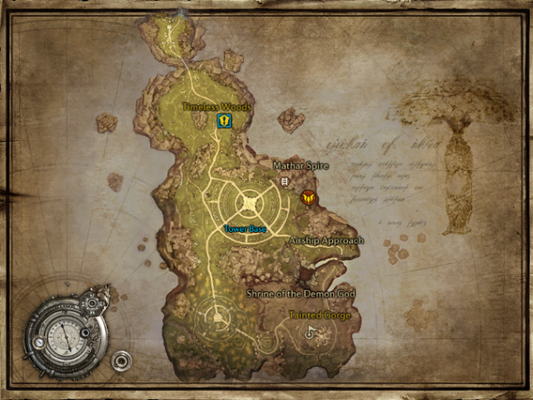
Areas to visit : Timeless Woods,
Travel to the Timeless Woods (in the Essenia province) and, to the North-east (the red marker above) you should find the BAMs that you are looking for (Vulcan Dreadnaught). Keep killing them for as long, as you reach level 42. If, for some reason, this kind of BAMs is too difficult for you, explore the entire Timeless Woods and find an opponent that suits your taste more - there are several kinds of BAMs here.
After you reach level 42, skip to the next chapter.
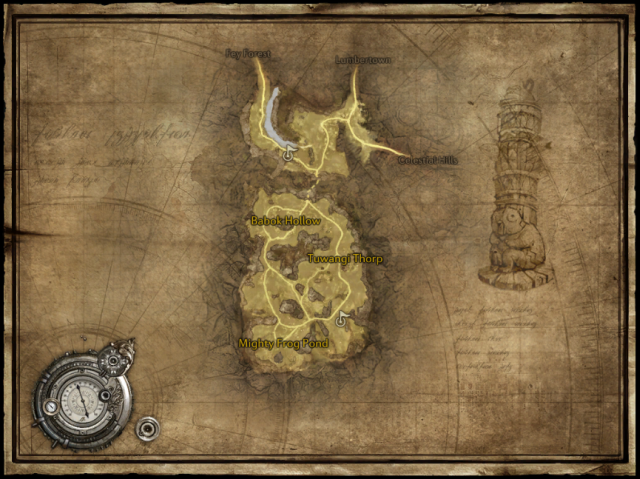
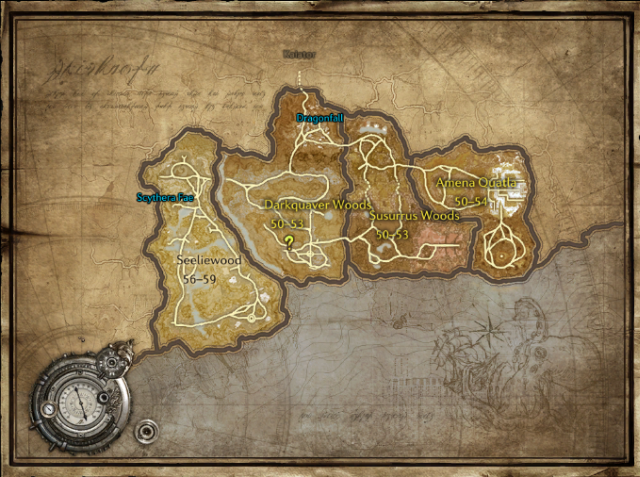
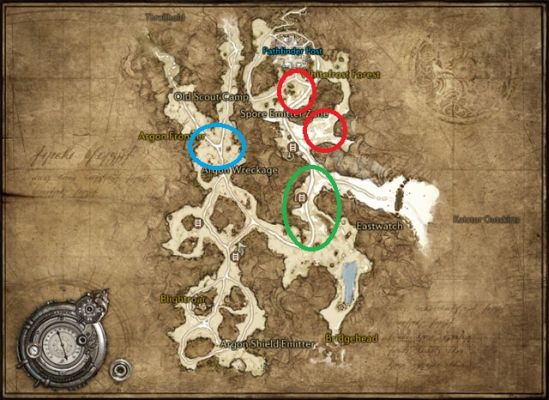
Areas to visit : Susurrus Woods
There are 3 types of mobs to choose from:
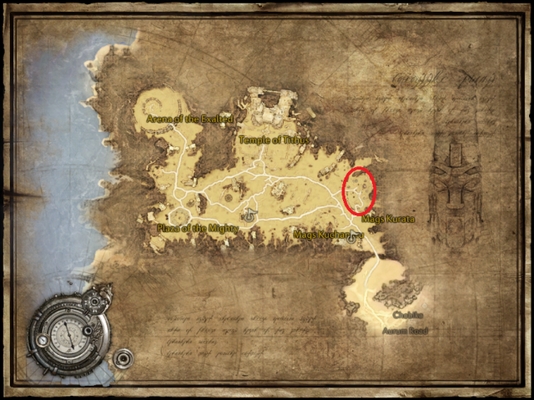
The selection of place depends on you only and on your preferences (and also on the character class that you are playing as). The recommended area to hunt for experience is the area marked with the red marker. Apart from the regular mobs, you can also encounter there an unique mob (Mystic Tyrant). You will be rewarded if you kill it (beside the large amount of experience) with the item called Game Hunter's Boon, which increases the experience that you gain by 3%, for the next several minutes - that any item which increases the inflow of experience is worth its weight in gold, does not need to be explained to anybody.
You will have time to learn this place well, because you should be fighting in the Susurrus Woods until you reach level 54 - after that, skip to the next chapter.
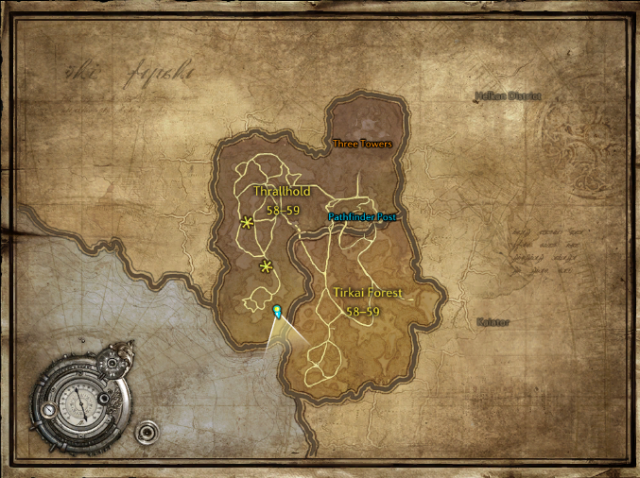
Areas to visit : Tirkai Forest
The last location that you visit, along your way to level 60, is the Tirkai Forest, in the Val Tirkai province. Again, there are three paths to choose from, when it comes to selecting the mop and the way to gain experience:
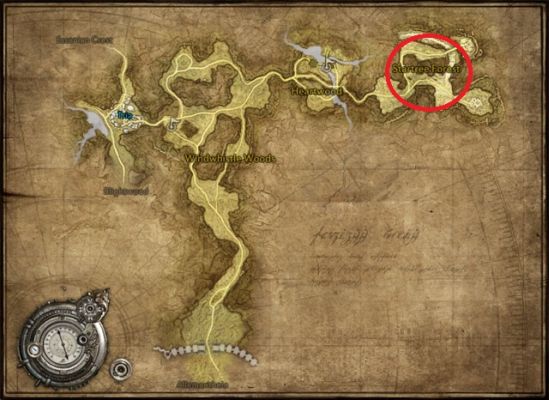
I would recommend that you reach the area of the green marker and take it out on the Argonomorph Mugatos, because they are more plentiful than the rest of the mobs, But this also lures the other players and you may have problems getting any mobs, as a result.
Since the amount of experience that you gain in all three places, go to gain experience wherever there are less players and travel elsewhere when it becomes too crowded.
You can remain in the Tirkai Forest up until you reach level 60, but it is a better idea to travel to the city of Kaiator and start the storyline quests there (Argonea) - the rewards for completing them are the gigantic amounts of experience points and lots of gold so, you should not pass on that. If you want to complete these quests, use the last chapter concerned with gaining experience through completing quests, which is included in this guide. But the decision is, as always, yours.


 The Elder Scrolls V: Skyrim - Dawnguard Game Guide & WalkthroughTest Drive Unlimited Game Guide & Walkthrough
 The Bureau: XCOM Declassified Game Guide & Walkthrough
 The Amazing Spider-Man 2 Game Guide & WalkthroughThe Next Big Thing Game Guide & Walkthrough