
Might & Magic: Heroes VI - Danse Macabre Adventure Pack walkthrough consists of:
To make the text more "user-friendly" following colors are used:
Additionally, each map has been described the following way:
Similar marks are used for maps occurring in the second mission.
Locations are marked with numbers on each map. Therefore, e.g. M1/6 means a given location or object carries no. 6 on a mission map. While M3/24 means the described event or object is marked with number 24 and can be found on a surface map related to resources (mines, etc.).
Konrad "Ferrou" Kruk
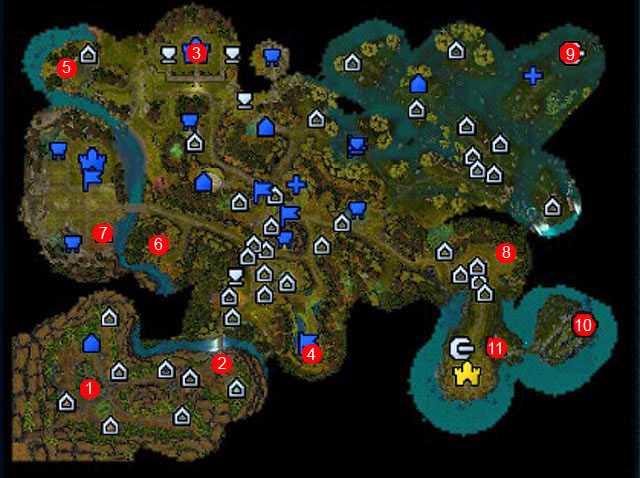
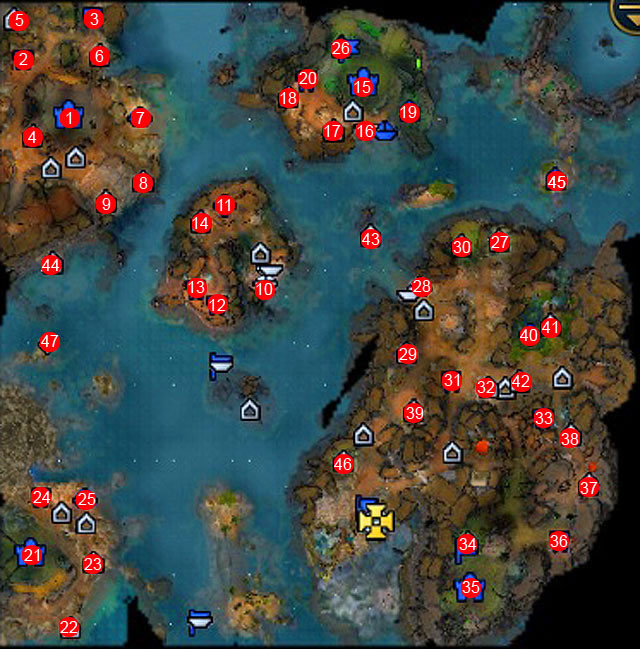
1 - Fort (start location)
2 - Lucretia (hero)
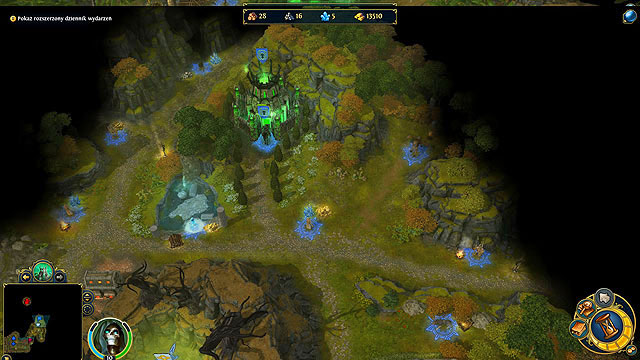
3 - La Segadora castle (you have to defeat a hero called Giovanni)
4 - Magic Menagerie (side quest)
5 - Alma's tomb (side quest)
6 - Ruins with Dragon Eye Pendant
7 - Artifact Merchant (side quest)
8 - Ruins with Dragon Eye Pendant
9 - Ghost gate (entrance)
10 - Ghost gate (exit)
11 - Underground entrance
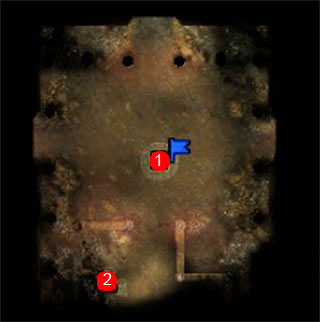
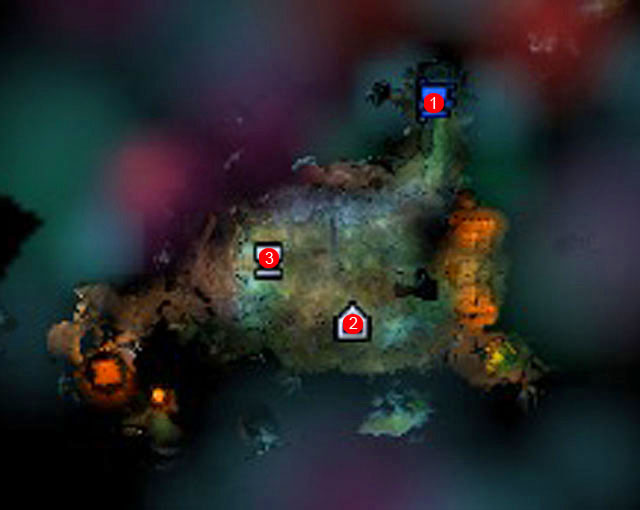
1 - Staff of the Netherworld (Dynasty Weapon)
2 - Exit
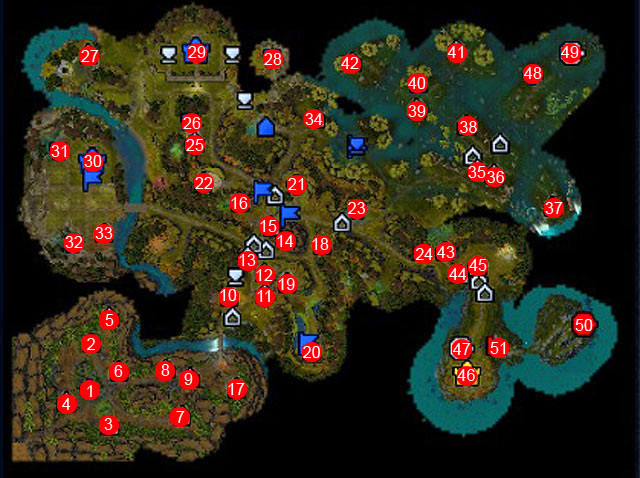
1 - Fort
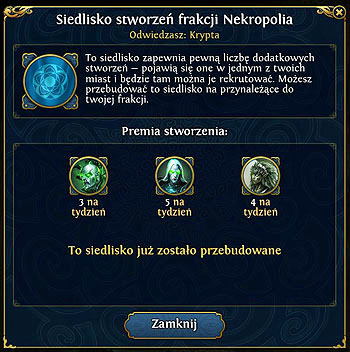
2 - Tomb (allows for recruiting Skeletons, Ghouls and Ghosts)
3 - Armorsmith (+1 to defense; you can visit it only once)
4 - Weaponsmith (+1 to attack; you can visit it only once)
5 - Centaur statue (+5 move points, damage cast by units using distance weapon increases by 10%; you can visit it once a week)
6 - Mother Earth Shrine (10% more health for your army; you can visit it only once before the battle)
7 - Crystal of Revelation (+1 to protection against magic; you can visit it only once)
8 - Stables (+5 move points; you can visit it once a week)
9 - Stone of Enlightment (+2,500 XP; you can visit it only once)
10 - Stables (+5 move points; you can visit it once a week)
11 - Crystal of Revelation (+1 to protection against magic; you can visit it only once)
12 - Angelic Shrine (+5 to magic and morale until the end of week; you can visit it once a week)
13 - Stone of Enlightment (+2,500 XP; you can visit it only once)
14 - Gold mine (500 gold daily)
15 - Weaponsmith (1 to attack; you can visit it only once)
16 - Mother Earth Shrine (+10% more health for your army; you can visit it only once before the battle)
17 - Crystal of Power (+1 to might; you can visit it only once)
18 - Arcane Library (select: +1-3 to magic/protection against magic; you can visit it only once)
19 - Crystal of Power (+1 to might; you can visit it only once)
20 - Magic Menagerie (allows for recruiting Timber Wolves, Dire Wolves and Mermaids)
21 - Fort
22 - Keep
23 - Crystal mine (crystals - one per day)
24 - Portal exit (Ghost Gate)
25 - Griffin statue (20% more health for flying units; you can visit it once a week)
26 - Sawmill (two units of wood per day)
27 - Angelic Shrine (+5 to magic and morale until the end of week; you can visit it once a week)
28 - Ore pit (two units of ore per day)
29 - La Segadora castle
30 - Corvino castle
31 - Sawmill (two units of wood per day)
32 - Ore pit (two units of ore per day)
33 - Artifact merchant
34 - Blind Maiden (+5 to destiny; you can visit her once before a battle)
35 - Knight Shrine (+1 to units' move points and +5 to morale until end of week; you can visit it once a week)
36 - Dragon Vein (refills all the mana points)
37 - Ice Pearl Shrine (+10 to initiative until the end of week; you can visit it once a week)
38 - Enlightenment Stone (+2,500 XP; you can visit it only once)
39 - Crystal of Revelation (+1 to protection against magic; you can visit it only once)
40 - Dwelling of basic units
41 - Blind Maiden (+5 to destiny; you can visit her once before a battle)
42 - Crystal of Power (+1 to might; you can visit it only once)
43 - Mother Earth Shrine (+10% more health for your army; you can visit it only once before a battle)
44 - Stone of Enlightment (+2,500 XP; you can visit it only once)
45 - Angelic Shrine (+5 to magic and morale until the end of week; you can visit it once a week)
46 - Cornadora castle
47 - Portal entrance (Ghost Gates)
48 - Fort
49 - Portal entrance (Ghost Gates)
50 - Portal exit (Ghost Gates)
51 - Entrance to underground
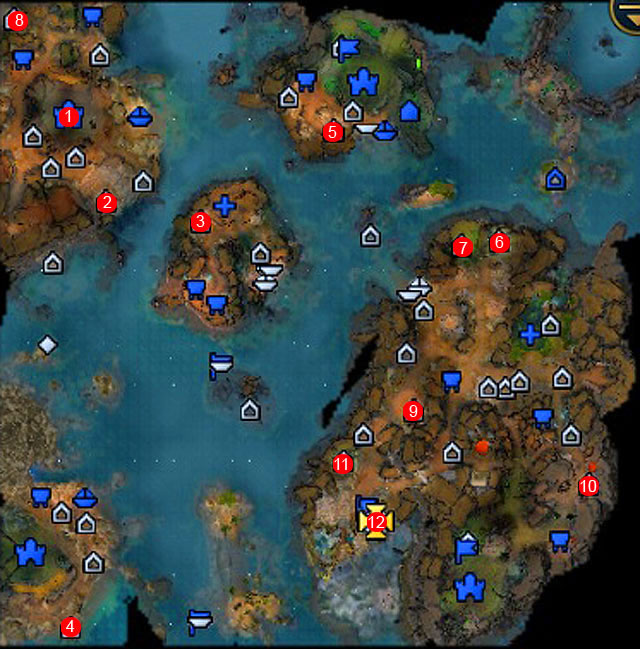
1 - Alma-Zeri castle (start location)
2 - Crystal of Power
3 - Dragon Nexus
4 - Crystal of Power
5 - Crystal of Power
6 - Crystal of Power
7 - Pyramid (side quest)
8 - Arcane library (side quest)
9 - Arcane library (side quest)
10 - Arcane library (side quest)
11 - Souls Well
12 - Portal to Unrepentant Kingdom
1 - Portal exit
2 - Enlightenment Stone (+2,500 XP; you can visit it only once)
3 - Mask of the False Face
1 - Alma-Zeri Castle (start location)
2 - Sawmill (two units of wood per day)
3 - Ore pit (two units of ore per day)
4 - Stone of Enlightment (+2,500 XP; you can visit it only once)
5 - Arcane Library (select: +1-3 to magic/protection against magic; you can visit it only once)
6 - Artifact merchant
7 - Shipyard (allows for building ships; cost: 2,500 gold, 10 units of wood)
8 - Blind Maiden (+5 to destiny; you can visit her once before the battle)
9 - Crystal of Power (+1 to might; you can visit it only once)
10 - Shipyard (allows for building ships; cost: 2,500 gold, 10 units of wood)
11 - Fort
12 - Crystal mine (crystals - one per day)
13 - Crystal mine (crystals - one per day)
14 - Dragon Nexus (doubles maximum of mana points; you can visit it once a week)
15 - Telal-Gamil Castle
16 - Shipyard (allows for building ships; cost: 2,500 gold, 10 units of wood)
17 - Crystal of Power (+1 to might; you can visit it only once)
18 - Stone of Enlightment (+2,500 XP; you can visit it only once)
19 - Crypt
20 - Ore pit (two units of ore per day)
21 - Barra-Nadin Castle
22 - Crystal of Power (+1 to might; you can visit it only once)
23 - Stone of Enlightment (+2,500 XP; you can visit it only once)
24 - Sawmill (two units of wood per day)
25 - Shipyard (allows for building ships; cost: 2,500 gold, 10 units of wood)
26 - Magic Menagerie (allows for recruiting Timber Wolves, Dire Wolves and Mermaids)
27 - Crystal of Power (+1 to might; you can visit it only once)
28 - Shipyard (allows for building ships; cost: 2,500 gold, 10 units of wood)
29 - Magrod Ruins (award for defeating Sanctuary)
30 - Pyramid (award for defeating Necropolis)
31 - Ore pit (two units of ore per day)
32 - Centaur statue (+5 move points, damage cast by units using distance weapon increases by 10%; you can visit it once a week)
33 - Crystal mine (crystals - one per day)
34 - Demonic Shrine (+5 to attack and destiny until the end of week; you can visit it once a week)
35 - Ninurta-Sin Castle
36 - Sawmill (two units of wood per day)
37 - Arcane library (select: +1-3 to magic or +1-3 protection against magic; you can visit it only once)
38 - Sigil of Arkath (+5 to defense and protection against magic until the end of week; you can visit it once a week)
39 - Arcane library (select: +1-3 to magic or +1-3 protection against magic; you can visit it only once)
40 - Fort
41 - Reverie Shrine (+10 to initiative and +5 to attack during the next battle)
42 - Lighthouse (increases morale before the battle; you can visit in once before each)
44 - Angelic Shrine (+5 to magic and morale until the end of week; you can visit it once a week)
45 - Lighthouse (more move points while on sea)
46 - Souls Well (+10 to magic until the end of week; you can visit it once a week)
47 - Shipwreck (award after defeating Ghosts)
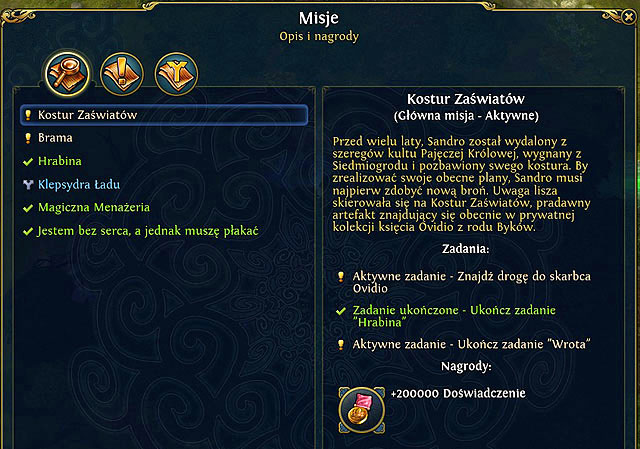
Aim: Find way to Ovidio's vault
Reward: 200,000 XP
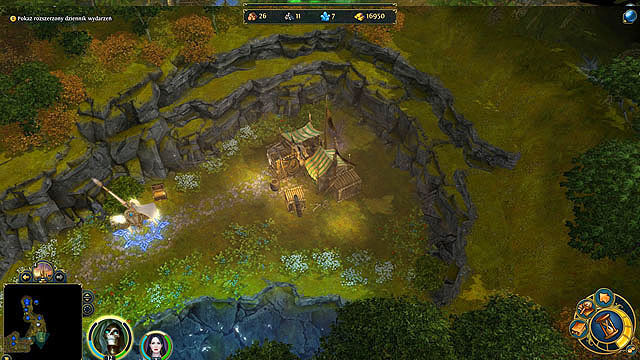
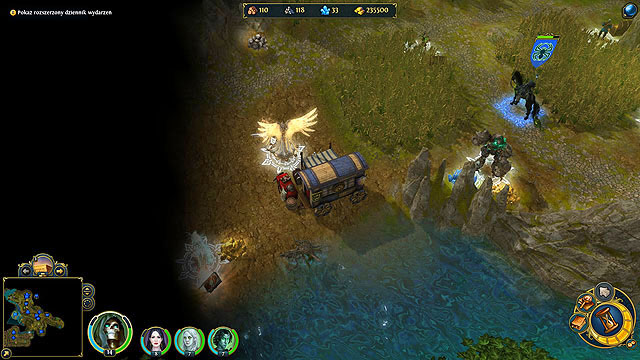
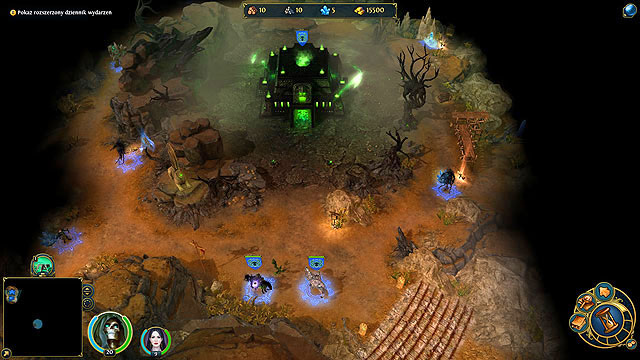
Your adventure starts in Kingdom of Bull in the south-west part of a map (M1/1). Your main task is to find the Staff of the Netherworld - a mighty weapon used by necromancers. It seems that Duke Ovidio may have it. Gather your army as quickly as possible and pay him a visit. Unfortunately, at the beginning you do not have a castle, but only a Fort (with several units of Liches, Skeletons and Ghouls). Recruit them and go north where you will find a Tomb (M3/2). It is protected by several Vampires. When you defeat them, some Skeletons, Ghouls and Ghosts will join you (you can recruit them every week). With stronger army, you may start exploring the area around your Fort. You will find there some resources such as wood and ore. These will be useful later.
 Start of a campaign is as always very optimistic
Then move east where, after several fights with local creatures, you will face a hero (M1/2). It will be Lucretia, Duchess De La Segadora coming from a castle located north. She will tell you, that her father, the king Ovidio is dead - his heir has accused her of killing him, has banished her and has taken away her title and power. Moreover, you will not find Ovidio in La Segadora castle but only one of his men. Lucretia will help you and show you the location of the castle if you promise to "scare" the Ovidio's man (M1/3). Sandro believes he can find there information about the Staff of the Netherworld. A new quest, "Duchess", will show up in your journey. If you want to go further, your army should have at least 20 Ghosts, 22 Ghouls, 24 Skeletons and 5 Liches. Of course you can wait one week and recruit new forces, but remember that your opponent will do exactly the same.
Aim: Take La Segadora
Reward: 100,000 XP, 30 Vampires, Boots of the Living Dead (Great Lich's Set)
This quest is related to "Staff of the Netherworld" quest. Additionally, its result determines the success of the first mission.
 Duchess is willing to help
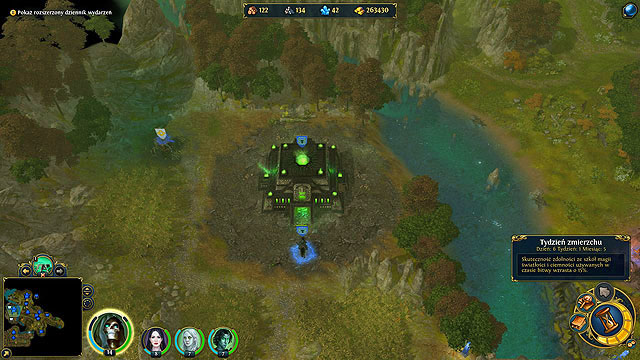
Talk to Lucretia (M1/2) and go north, not attacking anyone. When you reach the crossroad, go east and pass a Gold mine (M3/14). At next crossroad go south (only attack creatures standing on your way). You will get to Magic Menagerie (M1/4, M3/20). You can recruit there neutral creatures such as Mermaids, Timber and Dire Wolves. Although you will not recruit many of them (12, 27 and 15 respectively) they will be a great asset, therefore come back here every week until the mission's end (especially for Mermaids). With a bigger army, go north and visit Arcane Library (M3/18). Do not change the direction and you will see the Haven's Fort (M3/21) with no owner but defended by a small number of the Sun Riders. You need to take that building and turn it into Necropolis to be able to recruit more of your creatures.
 This Fort is crucial for the mission therefore you cannot lose it
Go west because you have to reach the Keep (M3/22) as fast as possible. This building allows you to recruit elite units of Haven fraction. These are not particularly suiting you, therefore after defeating several Marksmen (they should surrender), change it into a Crypt. And now you can use that Fort to recruit Vampires, Liches and Lamasu.
Now, return to Fort (M3/21) and wait for a new week. In the meantime, Eileen (Cleric, level 7) will show up. She is a hero leading a small army from La Segadora castle. Do not panic, she will not come after you (she is not a threat anyway). In order not to waste time waiting for a new week, exterminate enemies around the Fort (if they do want to surrender, retreat), collect some resources and visit a Weaponsmith (M3/15).
NOTE! Do not go for the Crystal mine (M3/22) which is located east from the Fort. If you try to get it, Eileen will show up again, and you will have to fight her. In result, another hero will appear before you reach La Segadora.
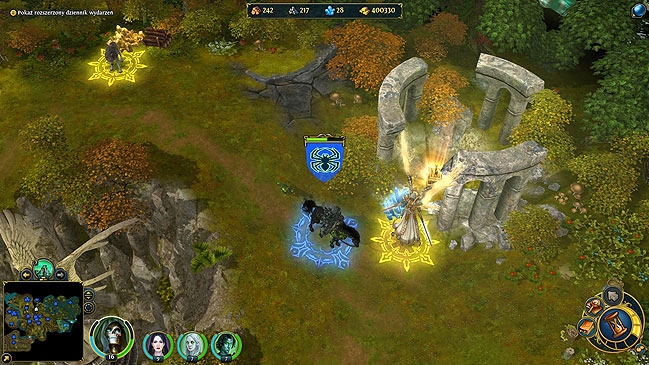
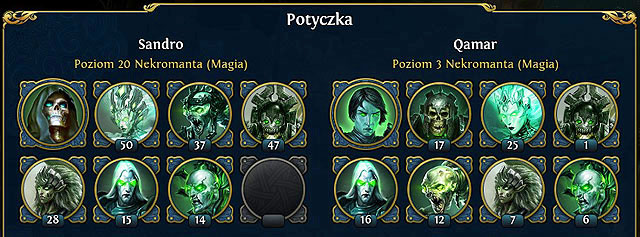
New week means recruiting new creatures such as Liches, Vampires and Lamasu. Due to lack of space, you have to remove two units. Leave Skeletons at Fort. Though they use range weapon, its effectiveness, especially during a siege, is far from perfect. Also, leave Ghouls. When your army is completed, rush to La Segadora castle (M1/3). Stop near the Crypt (M3/22) and wait for Eileen. Attack her.
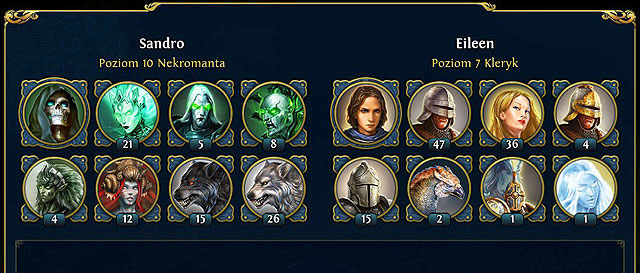
You should not have any problems with defeating her, but beware of her Fireball, Fire bolt or Burn ability decreasing number of your troops. Luckily your magic is effective as well. Use Mass Agony and Life Drain to defeat Eileen. Now it is time for Giovanni.

Despite walls, Giovanni should not be a problem. Now La Segadora is yours. Finally, you own a castle, but the most important award is the Boots of the Living Dead, first part of a six-part Great Lich's Set. 30 Vampires will join you, as well as Lucretia.
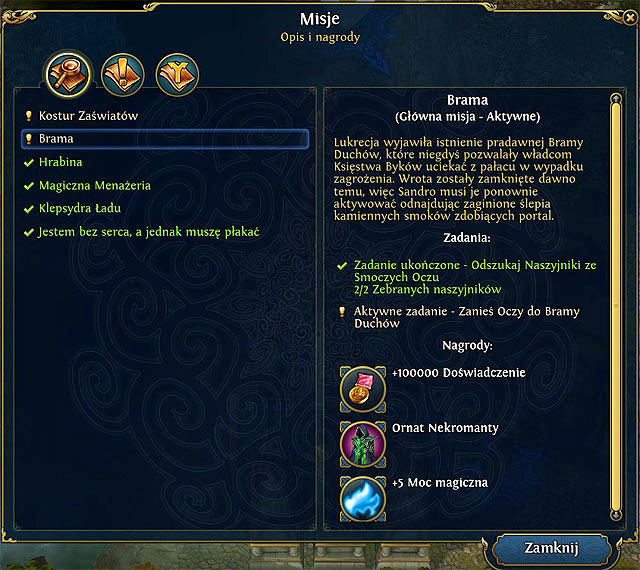
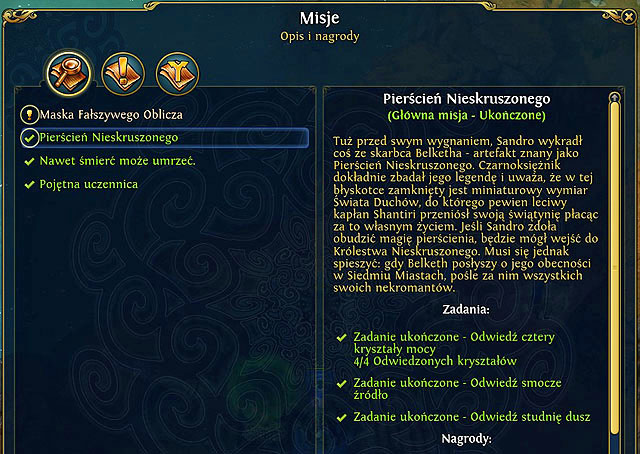
Aim: Find Dragon Eye Pendant (0/2)
Reward: 100,000 XP, Necromancer's Chasuble (Great Lich's Set), +5 to magic
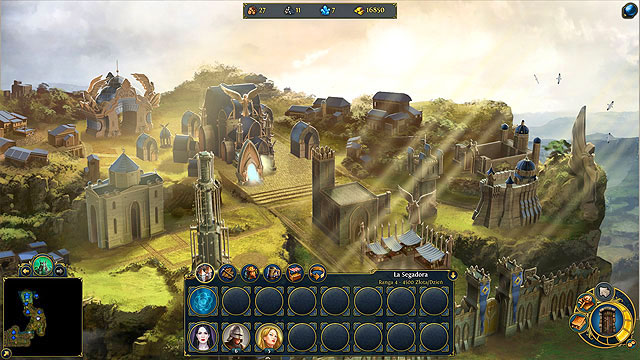
La Segadora castle (M1/3) is taken! Unfortunately Haven cannot be transformed into Necropolis. But there is no reason to be worried. The castle is well developed, and your new hero, Lucretia, represents its strength. Later, she will become a guardian of your Fort (M3/21).
 La Segadora
Lucretia after cutting off from her family, decides to help you once again. She thinks that an escape tunnel used by La Segadora's rules may lead to Duke Ovidio's vault. The problem is the closed gate at the tunnel's end. It seems you need Dragon Eye Pendant to open it. You have to find them as it is your next task.
Therefore, the main task will look as follows:
Before you hit the road, build Capitol. It will give you 4,000 gold per day. To provide a constant flow of gold, get the Gold mine (M3/14) and the Crystal mine (M3/23). Better stay near the Fort (M3/21), as it will take Eduardo (level 11, Cleric) from Duke's Guard only 4 turns to show up near La Segadora (M1/3). He is not a threat, but he will try as hard as he can to get the Fort. If that happens, he will pack it with Celestials (i.e. upgraded Seraphs) and it will be impossible to take it back. Before you head for Dragon Eye Pendant, you have to recruit creatures from your Fort and Magic Menagerie (M1/4, M3/20), keep Eduardo's armies at bay (they come through the portal - M3/24), expand La Segadora and gather an army there. Lucretia, along with a huge army, will guard the Fort for you.
 Constantly increasing Eduardo's armies will be an obstacle during the whole mission. Unfortunately, you cannot take his castle.
Another opponent may appear - Rosalie (level 10, Cleric). Her army is slightly stronger than Eduardo's, but still you can defeat her. When Lucretia's army will be powerful enough (Praetorians, Marksmen, Imperial Griffins, Vestals, Blazing Glories and Sun Crusaders) and at least four times bigger than Eduardo's, you can head to Fort (M3/21). Hire a new hero. His/her task will be providing backup for Lucretia from La Segadora. Destroy all creatures within your sight as Sandro and recruit units from your Fort. Remember about the other one located in starting point (M1/1, M3/1) and its increasing population of Skeletons, Ghouls and Ghosts. Hire another hero in La Segadora (M1/3) and take him/her there, to recruit a substantial number of Ghosts. Add them to Sandro's army. At the same time, the newly "hired" hero will provide "weekly shipment" of units from Magic Menagerie to Fort (M3/21). This way Sandro will strengthen his army. Remember about backup for Lucretia (who protects an important facility) from La Segadora (M1/3). Also, remember about further development of the castle.
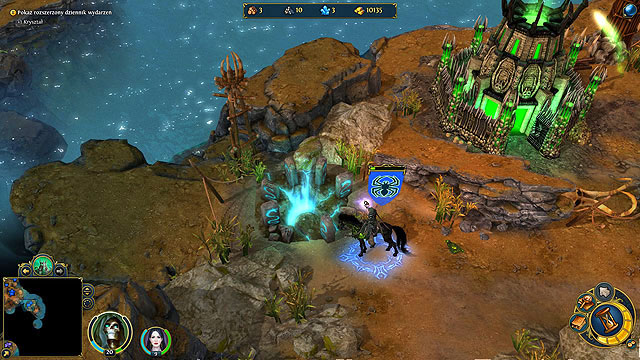
When you defeat local creatures, collect resources and level-up your hero, you can head for Dragon Eye Pendant. Therefore go west (path near a Gold mine [M3/14]). The first item is hidden in ruins next to the path (in front of the bridge) (M1/6). It is guarded by a group of Darkness Elementals.
They will not be a problem. And half of the task is completed!
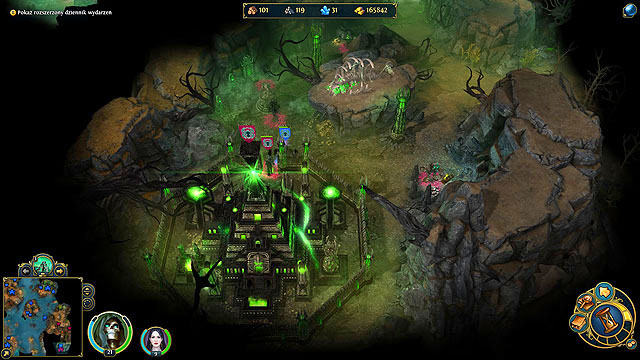
Before you continue the search for Pendant, check the west part of the map. You will find there a very useful object. It is a neutral city Corvino (M3/30). Although it is Haven, you can transform it into Necropolis. At last you will be able to upgrade your units and gather a decent undead army.
Unfortunately, your new Necropolis needs a lot of work. To gain access to elite units as fast as possible forget about Graveyard (Skeletons) or Crypts (Ghouls). Start with City Hall. Your castle has higher level and you can build Sepulcher (Liches) as well as Pestilent Tomb (Lamasu) and Vampire Mansion (Vampires) in next rounds. It is recommended to change mentioned buildings into: Pestilent Catacomb (Putrid Lamasu), Mausoleum (Archliches), Vampire Palace (Vampire Lord). You can build other dwellings later. Nevertheless, the core of your army should be 2nd level units. Take the "courier" hero to Necropolis. His/her task will be recruiting undead units and bringing them to Sandro. It is worth building Town Portal and Advanced Town Portal. It will allow you to move between your castles. The moment you overtake the new Necropolis, La Segadora (M1/3) should be almost fully developed and should offer a wide range of Haven's units (from Praetorians, through Imperial Griffins to Celestials).
After collecting a decent number of Necropolis's units, head for the Dragon Eye Pendant. It is in ruins located on east (M1/8) and protected by several Celestials.
Take the artifact when you defeat them.
Your journal is updated, therefore take the Dragon Eye Pendants to the right place.
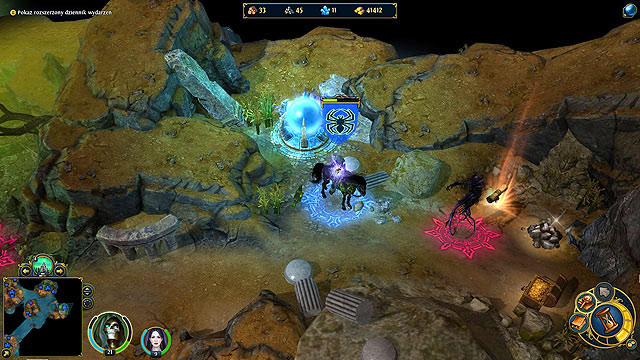
Ghost Gate in the right upper corner (M1/9). You will pass a neutral Haven's Fort (M3/48). Attack it, but you do not have to change it into Necropolis. When you get to Ghost Gate, Sandro will say:
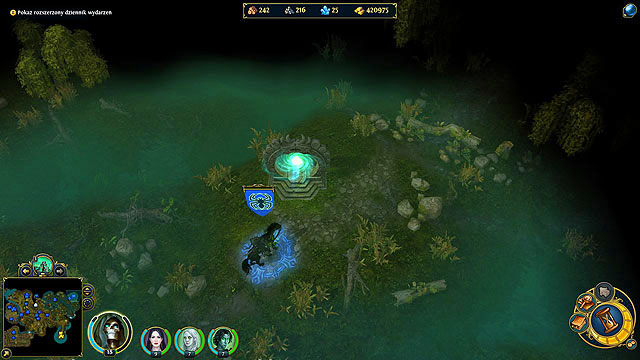

The portal is open, and additionally, you will receive the Necromancer's Chasuble (piece of Great Lich's Set).
The task is complete. Your journal has been updated. Go to Ovidio's Vault to get the Staff of the Netherworld!

Aim: Find a way to Ovidio's vault, and get the Staff of the Netherworld
Reward: 200,000 XP, Staff of the Netherworld (Dynasty Weapon)
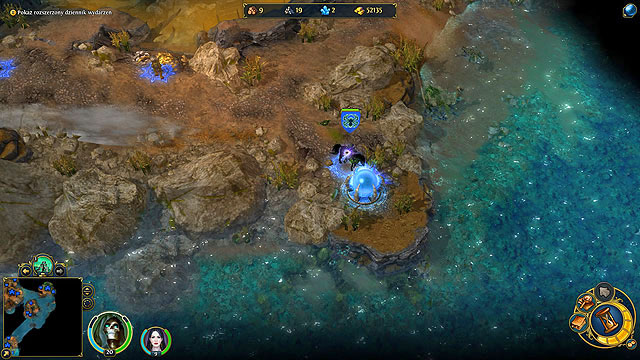
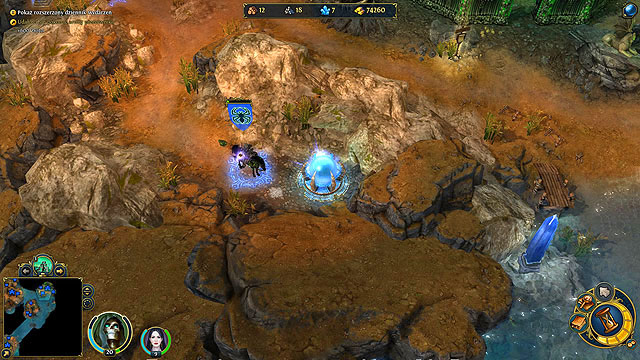
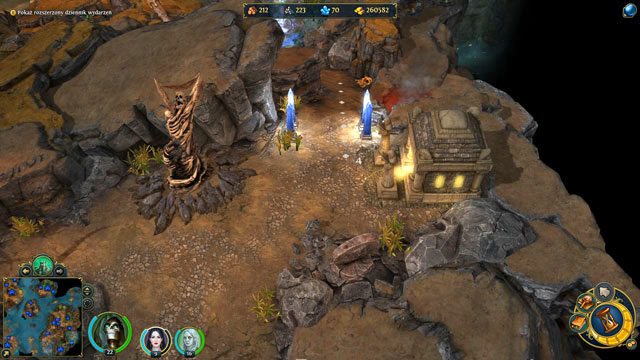
When you enter the Ghost Gate (M1/9), you will be teleported to a rocky peninsula in the lower right corner of the map (M1/10).
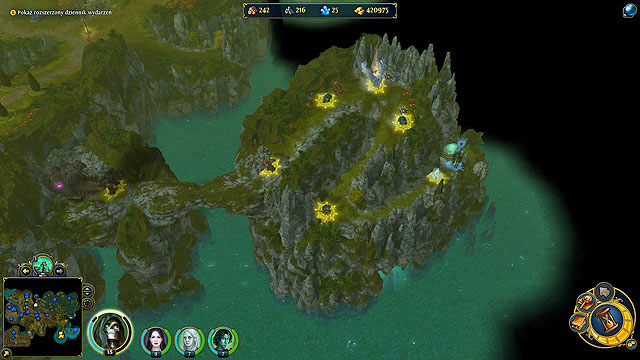
Take the twisted path and defeat faced creatures (e.g. Kappas, Phoenixes, Shark Guards and Earth Elementals) to get to the entrance to the underground (M1/11).
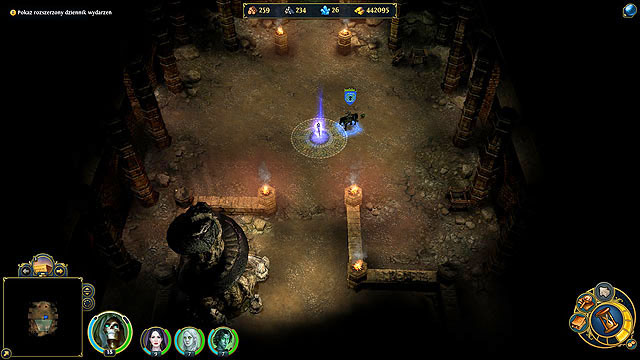
You are in the Ovidio's vault. Find a shining, colorful item. It is the Staff of the Netherworld (M2/1).
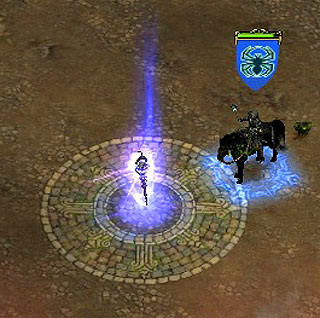
What are you waiting for? Take it!
Your presence has been detected. And you are not welcomed.

When Ovidio and Lucretia discuss some personal issues, Sandro decides to interrupt:

The final battle begins!
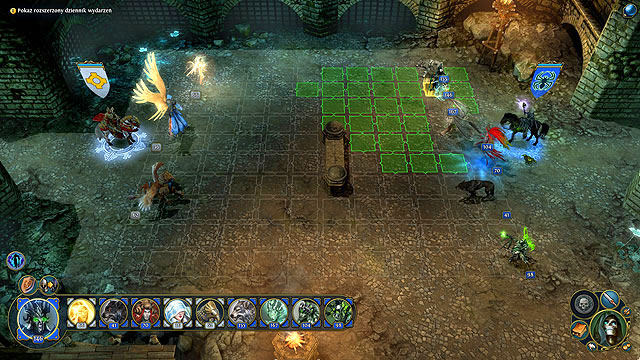
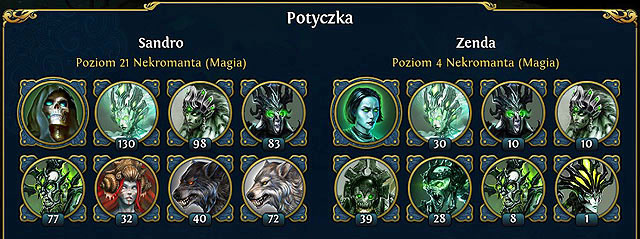
Ovidio (Executioner, level 18) has a large army with more than 30 Seraphs as well as more than 60 Imperial Griffins and Blazing Glories. Despite numerous units, he should not be dangerous. To support your army, summon Darkness Elemental and cast the Agony spell. Then, the Staff of the Netherworld is yours. Mission accomplished.
Aim: Find Magic Menagerie
Reward: 40,000 XP, +2 protection against magic
This task is available in your journal from the very start. The Magic Menagerie (M1/4, M3/20) allows for recruiting neutral units such as Timber and Dire Wolves, and Mermaids.
Timber Wolf
Dire Wolf
Mermaid


Aim: Find Lonely Tomb
Reward: 40 000 XP, +150 to path of tears, +5 to protection against magic
On his way to La Segadora castle, Sandro will think of an old tomb located somewhere near the castle.
The tomb is located west from La Segadora (M1/5). The graveyard is protected by only a few Celestials. But to enter the tomb, you have to fight Celestials and Praetorians.
It turns out that Sandro wanted to visit a tomb of a person carrying the same name as his crow.
Aim: Find the Artifact Merchant, defeat troops sent to retrieve the Enchanted Hourglass
Reward: 40,000 XP, 25 Liches, Enchanted Hourglass (Great Lich's Set)
Next side quest is available at the start of the campaign. The Artifact Merchant can be found on the west part of the map (M1/6, M3/33).
It turns out that Sandro is not the only one interested in the Enchanted Hourglass.
You have to defeat troops standing next to the Artifact Merchant. The opponent is not a threat.

When you win, 25 Liches will join you, and you will receive the Enchanted Hourglass, a part of the Great Lich's Set.
Aim:
Reward:
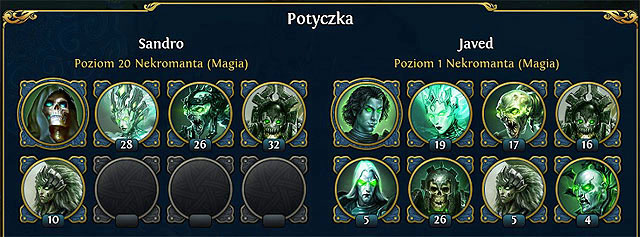
The mission starts in north-west part of the map, on an island located in the left upper corner. Sandro should have following abilities:
Combat:
Magic:
Luck is on your side, Alma-Zeri (M1/1, M3/1) is yours. Though it is a first-level castle, it is always better than nothing. As usually, you cannot waste time. You have to upgrade it as soon as possible and recruit your army. You have to defeat three castles and take a sea trip. But your are not alone. Your new apprentice, Lucretia will help you.
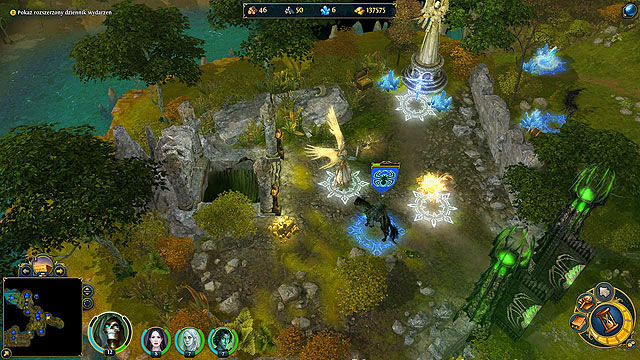
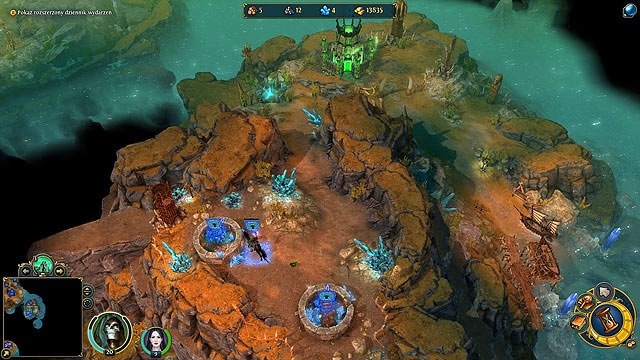
First of all, build Ruined Tower (Ghosts) and recruit the troops. Now start defeating enemy creatures. It should not be a problem. You will get some crystals, wood and ore. Although the island has a Sawmill (M3/2) and Iron ore (M3/3) it will be not enough. Build Marketplace (it gives extra 500 gold) to purchase missing resources, but the high price is not encouraging at all. Upgrade your castle to third level (City Hall giving you 2,000 gold per turn). This will give you 2,500 gold every day.
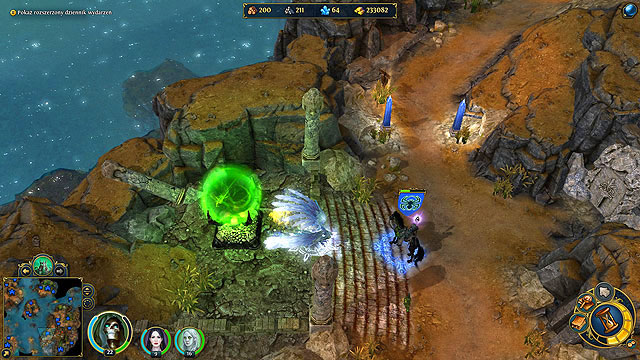
It turns out that first of the Crystals of Power is on your island (M1/2, M3/9).
The rest of them are unfortunately somewhere else. Before you start looking for the Ring of the Unrepentant, you need to stabilize your military-economic situation. A small island located south-east will help you with that. You will find there a Stronghold's Fort (M3/11) and two Crystal mines (M3/12, M3/13). When you leave the island, you should have Skeletal Spearmen (about 30), Ravenous Ghouls (about 30), Specters (about 30) and Lamasu (about 10). Build your ship (M3/7) and get to the mentioned island. Collect some items on your way and land on the beach. Defeat enemies protecting camp of Orcs (several Centaurs and Panther Warriors).Take the Fort and change it into Necropolis. Defeating Cyclops accompanied with Harpies will not cause any problems. Besides next to the Fort you will find Dragon Nexus (M1/3, M3/14). It is protected by a group of Water Elementals. Defeat them and claim your prize.
Now your mana points double and your journal updates.
Find two Crystal mines (M3/12, M3/13) and take them. The whole island is yours.
In the meantime, a rival hero will come to the island (Necromancer, level 1). He wants to take your Fort (M3/11). You have no choice but to attack.
At the same time build Vampire Mansion (Vampires) in your capital city. You will not have any problems with the enemy. Leave the island and go north where you will find the defeated army's base.
The enemy's base is very close to the beach, therefore you can attack it right after getting there. Defeat the hero and troops left in the building.
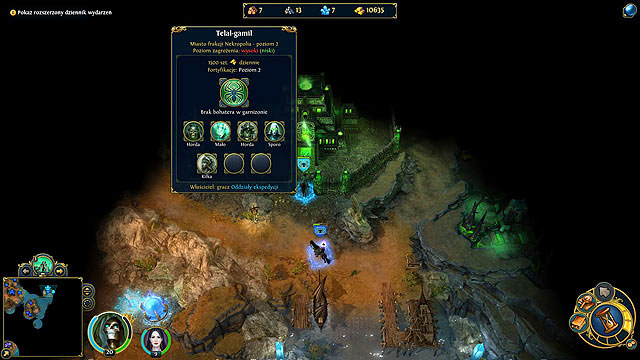
At the first sight it seems that your chances are rather low, but in fact Sandro is stronger. The castle does not have fortifications. Besides your hero is more experienced (has more abilities used also by his army). You attack, therefore the first move is yours. Sandro is not the best man to besiege any building. In fact, it is an advantage. The fortifications keep the enemy's army at bay. Make use of the Summon Darkness Elemental spell. Let the creature between enemy troops and attack (I recommend Skeletons or Skeletal Spearmen). The computer does not act very wisely. Our enemy wants to get rid of your Darkness Elemental and gathers his troops around it. It is perfect moment to use another spell, Lightning Chain. Complete magic attacks with the ordinary ones. You will win the castle mostly thanks to your spell book. The only think you will lose are your mana points. Win, and another Necropolis will become yours. Telal-gamil (M3/15) is an average developed castle. But the most important are dwellings supplying you with troops. Therefore it can become a base for further expansion. Unfortunately, you cannot explore the map, so go back to Alma-zeri (M1/1, M3/1). The haste is caused by another enemy, a hero coming from Barra-nadin castle (M3/21) - another Necropolis located in lower left corner of the map. Your opponent (Necromancer, level 3) will move towards your Fort (M3/11). When you are on your way back, build Capitol (4,000 gold per turn) in your first castle and Sepulcher (Liches) in the other one. Also build one in Alma-zeri after building Capitol first (M1/1, M3/1). Now, when you can recruit Liches, build Haunted Tower (Specters) in Tetal-gamil (M3/15). When you get to start location, Lucretia will supply you with new troops. Take the ship and head to the next island. The enemy will withdraw. Turn around and go back to take more troops. With greater army including Liches and Vampires go near Fort to attack the Barra-nadin representative (M3/21). You will catch the enemy army at the sea.
This easy win should make the other necromancer think for a while. In the meantime build Vampire Mansions (Vampire Lord) in both castles. Then build City Hall (level 3) in your newly gained castle and Mausoleum in both of them (Archliches). But your opponent is trying to steal your Fort (M3/11) from you! Though you cannot improve your Liches or Vampires, you have to draw her into a sea fight.

After an easy win, it is time to get another castle. Build Town Portal in both your castles. Head for your enemy's base.
You will defeat him easily. Now Barra-nadin is yours (M3/21). Additionally, you will find another Crystal of Power (M1/4, M3/17).
The island is not very big. You will find there another Sawmill (M3/24). Take the resources, defeat local creatures, build Vampire Mansion (Vampire Lord) and recruit troops from your new castle. Go back to Telal-gamil (M3/15). Now, with Barra-nadin (M3/21) everything will become slightly easier. The computer will not attack you so often. You can explore the land, including the island with Telal-gamil. When you are on your way back, build Pestilen Catacomb (Putrid Lamasu) there. Now you can change your Liches into Archliches and Lamasu into Putrid Lamasu. You will find another Ore pit (M3/20) and one more (third) Crystal of Power (M1/4, M3/22) protected by some Water Elementals.
That is not all, as you will find the Magic Menagerie in the neighborhood (M3/26). It allows for recruiting Timber and Dire Wolves as well as Mermaids.
Leave Skeletal Marksmen and Ravenous Ghouls (e.g. in a castle) and recruit creatures from Magic Menagerie. In the meantime develop your castles and explore the map, especially its east part. There must be the objects you are looking for.
The beach is on south-east from Telal-gamil (M3/15). Go east, not south. You will find there the last Crystal of Power. It is guarded by numerous Earth Elementals.
Eliminate the enemies and touch the crystal to update your journal.
Move on. Now you have to find the Souls Well. Go south. It seems you are not alone here. You will see an army belonging to another Necropolis. If you see any opponents, eliminate them.
The enemy's base in the central-south part of the map. It is Ninurta Sin (M3/35).
The castle is very well developed (level 4) and, besides fortifications, has many upgraded units.

But it is not a problem for Sandro and you will take the last stronghold belonging to a computer. Now you can feel calm. Explore the whole map. But remember, you have to find the Souls Well. It is located on the west bank of the island (M1/11, M3/46). It is protected by a group of Phoenixes accompanied by Earth Elementals.
Defeat the guards and head to the Souls Well. Sandro knows he is very close.
At last, the last element of the Great Lich's Set, the Ring of the Unrepentant is yours!
Summary
Locations:
Crystals of Power: (M1/2), (M1/4), (M1/5), (M1,6)
Dragon Nexus: (M1/3)
Souls Well: (M1/11)
Updated tasks:
Aim:
Reward: 200,000 XP, +5 to Destiny
When you found the Souls Well (M1/11) it turned out that the Ring of the Unrepentant was in fact a key opening a passage to a place called the Unrepentant Kingdom where another powerful artifact had been hidden.
Head south towards the ruins. A portal will appear.
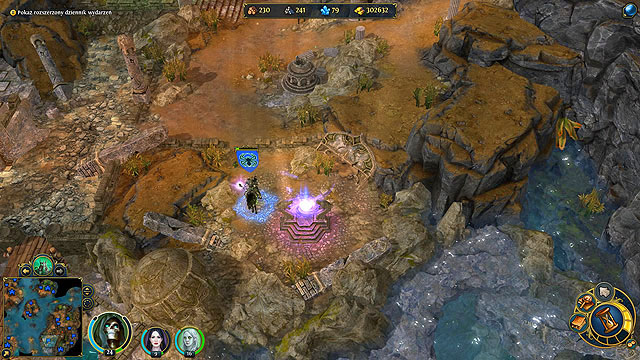
The host of the land is not happy about entering his premises.
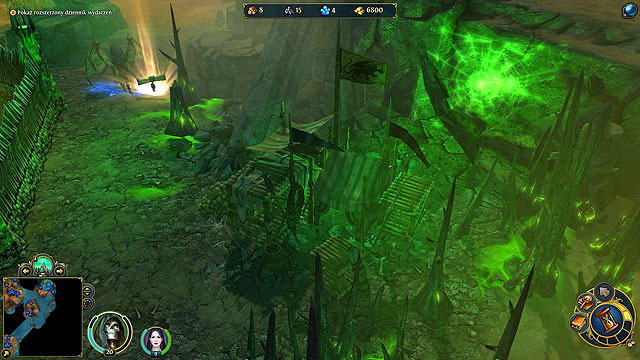
Now you are underground. It turns out that the portal was a one-way door... The place is not large, in fact the ruins are surrounded by limbo. The Mask of the False Face is in front of you. But it is protected by Darkness, Water, Air and Light Elementals.

When you defeat the enemies, take the artifact.
At last, Sandro has found what he had been looking for!
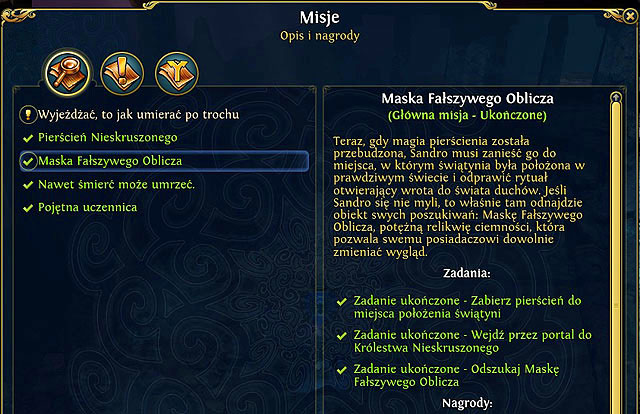
Aim: Leave the Unrepentant Kingdom
With the Mask of the False Face in your hands, you can leave the Unrepentant Kingdom. The portal will send you up.

But something has gone wrong.
Near the entrance to the Unrepentant Kingdom your archenemy, Belkreth, has shown up. He should be blamed for the attacks. He is the main dark mage taking on the Dragonwraith form. But the worst news is, he killed Lucretia.

You have no choice, so fight!
Notice, that your army has been replaced with other troops. The Dragonwraith has enormous number of 70,000 HP. Fortunately, at the beginning of the battle it has "only" half of them. To make the task even more difficult, it is protected by eight groups of Liches, each having 300 units!
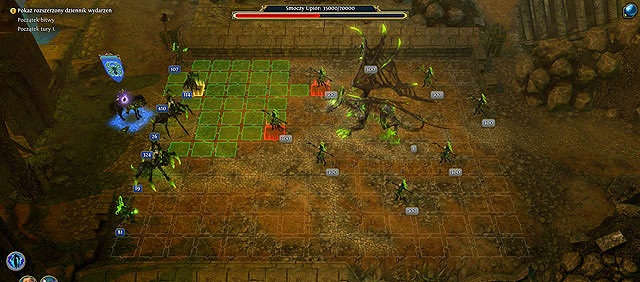
To defeat the demon, you have to eliminate Liches, otherwise they will heal their master. What is even worse, they will try to restore its maximum HP, i.e. 70 000 points. Therefore do not attack the demon until you kill all Liches.
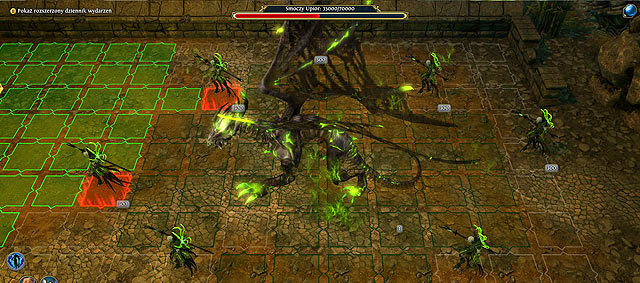
To defeat the "healers" summon Darkness Elemental. Send Vampires and summoned support to close range attacks. Additionally, attack the Liches with other your units, i.e. Liches, Archliches, Fate Spinners, Fate Weavers and Skeletal Marksmen, and with spells such as Lightning or Implosion. The Dragonwraith will attack using its abilities. Each spell will cast damage, and the Curse of Dragonwraith will make your units heal it instead of hurting it. To avoid such situation the cursed unit should skip the turn. In the end, Vampires with Darkness Elementals and your units using distant weapon will defeat the demon.
Then Sandro "resurrects" Lucretia and turns her into Necromancer. The Mask of the False Face is used to form his own army and to get to the Holy Empire. Perhaps we will hear more about Sandro in the future.
Aim: Take the Libram of Last Rites (Great Lich's Set) from the Pyramid
Reward: 40,000 XP, Libram of Last Rites, +5 to Destiny
This task is available in your journal from the very start. Sandro is interested in finding some artifact hidden in ruins of the ancient city of Shantiri. The only thing that survived is the Pyramid. You will find it in the west part of the map (M1/7).
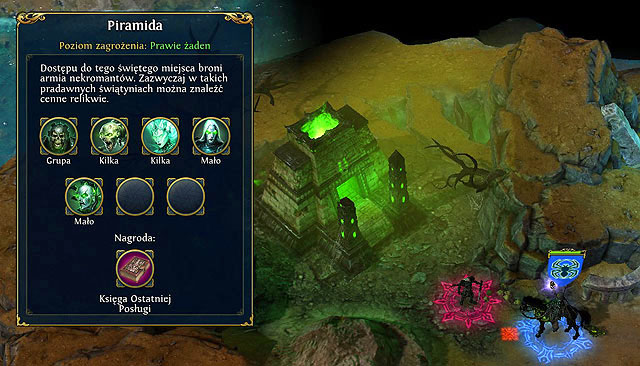
The entrance to the Pyramid is protected by dozens of Vampires, while inside beware of Skeletons, Ghouls, Ghosts, Vampires and Liches. Defeat them and take the Libram of Last Rites, being a part of the Great Lich's Set.
Aim: Take Lucretia to three Arcane Libraries
Reward: 20,000 XP, 50 Liches, Cloak of the Lich (Great Lich's Set)
When you reach the first level of Path of Tears, Sandro will tell Lucretia to find three Arcane Libraries.
Arcane Library no. 1 (M1/8, M3/5)
Arcane Library no. 2 (M1/9, M3/37)
Arcane Library no. 3 (M1/10, M3/39)
Thanks to Lucretia, you will receive the Cloak of the Lich.
NOTE!
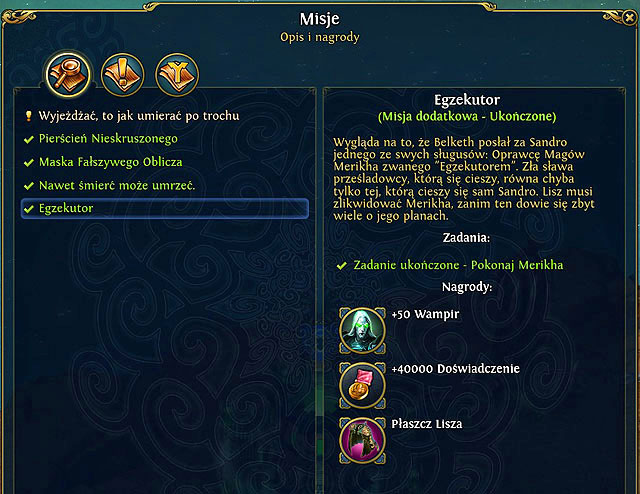
There is an alternative for the Skilful apprentice quest. When Sandro reaches the first level of Blood Path, a side quest Executioner will appear. Meet Merikh, the Necromancer (Death Knight, level 20) sent to kill you. He will show up with his army near Barra-nadin (M3/21).
Aim: Defeat Merikh
Reward: 40,000 XP, 50 Vampires, Cloak of the Lich
You will have it when you complete Sandro's campaign. Each mission offers three parts of the set.
Artifact
Location
Properties

Boots of the Walking Dead
Feet
+1 to move point on land
+1 to initiative of friendly creatures

Necromancer's Chasuble
Torso
+1 to protection against magic
+20 to mana

Enchanted Hourglass
Neck
+3 to morale for all units per turn

Ring of the Unrepentant
Finger
+5 to magic power

Libram of Last Rites
Left hand
+5 to protection against magic
Enemy creatures have 5% penalty to healing effects

Back
+3 to Destiny
-3 to morale for all enemy creatures
Depending on number of artifacts, various bonuses are granted:
Number of artifacts
Bonus
2
-2 for enemy's creatures initiative
4
-4 to enemy's creatures morale
6
+8 to magic power
This weapon is the aim of the first Sandro's mission.

Dynasty weapon level
Bonus
1
+3 to magic power
2
Shadow Tunnel: steals 2 mana points per turn
3
Shadow Venom: ads 260 damage points (Elemental Magic) each three turns. Your units may be affected as well if are too close.
4
Trammeling Seal: - 10 to initiative for all enemy creatures
5
Stronger Shadow Venom: lasts for three turns and the venom may attack units standing next to the infected one at the beginning of each turn.
Danse Macabre offer a new neutral building and three new creatures to recruit.
Magic Menagerie: allows for recruiting Timber Wolves, Dire Wolves and Mermaids.
Once a week you can recruit 9 Timber Wolves

Once a week you can recruit 5 Dire Wolves

Once a week you can recruit 4 Mermaids

Captain Hack, protagonist of Pirates of the Savage Sea had Young Thunderbird. The raven called Alma is Sandro's companion.

The pet has a special ability.

It is called the Raven Eye and allows for discovering a piece of map once a week. The ability can be found in the spell book.


 Mortal Kombat Game Guide & Walkthrough
 Might & Magic: Clash of Heroes Game Guide & WalkthroughMagrunner: Dark Pulse Game Guide & Walkthrough
 Mass Effect 2 Game Guide & Walkthrough
 Might & Magic: Heroes VII Game Guide & Walkthrough