Life is Strange game guide represents a complete collection of all the available episodes. In each one of them you will find a detailed walkthrough, containing explanation of every single important choice that the game puts the player against. As in other adventure games, the choices and decisions you make will have a significant impact on the future events, and the consequences of each one of them were listed in separate chapters for each episode. The guide presents a collection of decisions and the places in which they are made in such a way, so that the player can easily find them. Additionally, the guide contains a list of all the collectibles in the game, such as photographs. The chapter with the photographs contains all the places in which they can be taken, as well as the information needed to reveal some of them.
The French DONTDOD studios, known for the Remember Me game, in association with Square Enix, decided to follow in the footsteps of the Telltale studios, after their extremely successful series of adventure games and created a game telling the story of a high school student, Max, wielding unusual powers. The female protagonist struggles with everyday hardships of high school, when one day she discovers her supernatural powers enabling her to go back in time. You won't always be able to use your time-manipulating powers, meaning that you will have to rely on your own abilities as well. During your adventures, a girl friend named Chloe will accompany you, supporting you in your quest to resolve all the riddles placed in front of you. The way in which you make your choices will have a significant influence on the ending of the game.
Life is Strange was divided into five episodes:
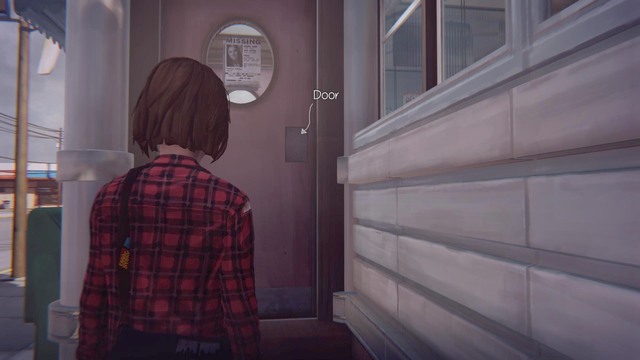
Chrysalis is the first episode of the DONTNOD studio's adventure game, which was made in cooperation with Square Enix. This guide will help you go through the storyline and will focus on the most important issues of the game. You will also find a detailed description of the important choices and their probable consequences. The gem of this guide is a list of all of the photos that you can collect during the game. You will play as a eighteen year old girl named Max, who is struggling with the everyday life of a teenager. During the game you will discover supernatural abilities, such as travelling back in time, which will enable you to manipulate the decisions and events, over which you didn't have control before. During the first episode you will be introduce to the world created by the authors of the game and you will get to know the basics of the game, what is more, you will get to know you peers, who go to the same school as you.
The guide to the Chrysalis, the first episode of the Life is Strange game, contains:
Jacek "Ramzes" Winkler ()
Icon
Function

Moving of the character

Running / Hold with the Right Mouse Button: Fast time rewinding

Interaction with the surroundings

Time rewinding

Stop the video

Menu

Journal

Rewinding time to the moment set by the game
In this guide there are used some color markings, such as:
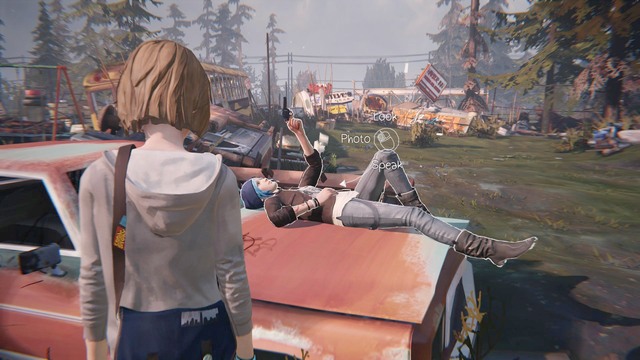
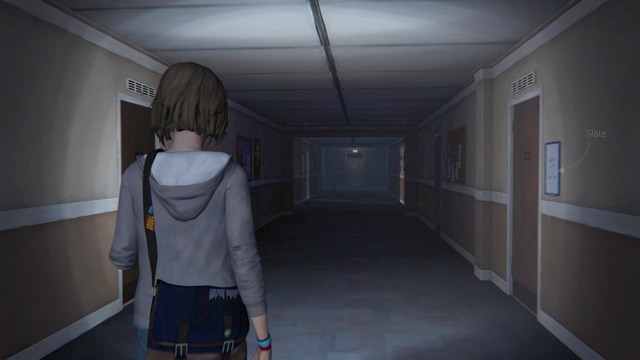
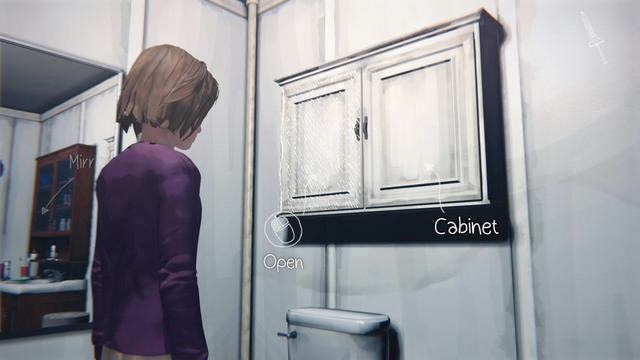
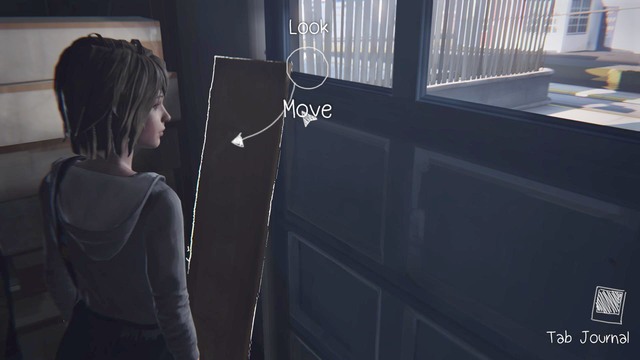
After gaining back the control over the character move forward and go up the hill (it is the only possible way so it is impossible to get lost). The game will show you the controls, so it is a good time to get to know the basic mechanics of the game.
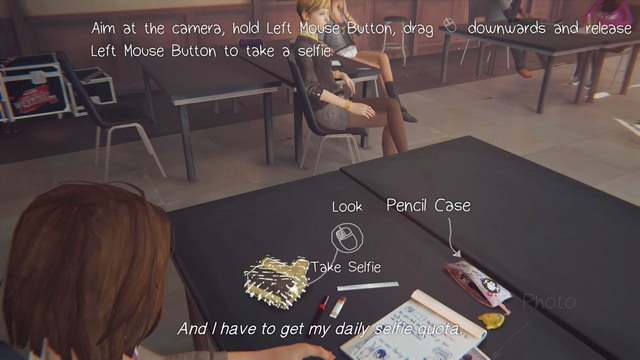
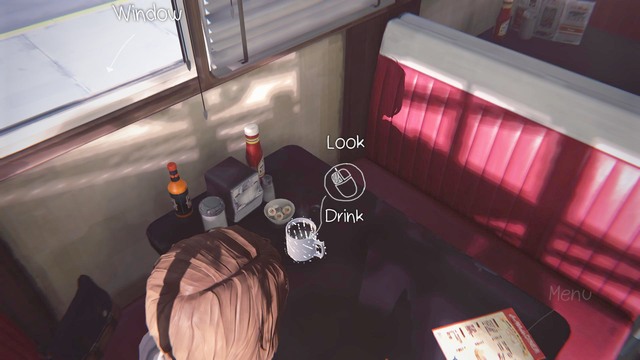
your character comes back to life take a look around the surrounding. You will find yourself in the classroom during the lecture, on your desk there will be some items which will need to be examined. It is the next mechanic of the game, which will be introduced to you. The Look interaction relates to people or items, which the character will be able to comment on. Use is an interaction relating to the items, which you can use to solve the mystery. Photo (take a photo) relates to the situations which are worth to be captured. Interactions are assigned to the collections, which you can find in your journal. After you've had a look on the surrounding click on the camera and take selfie. After you've done that a professor Mark Jefferson will talk to you.
1.) You're asking me ?
2.) I did know...
You can leave the classroom right after the conversation. But, before you leave, take a look at the surrounding and you will find some interesting things.
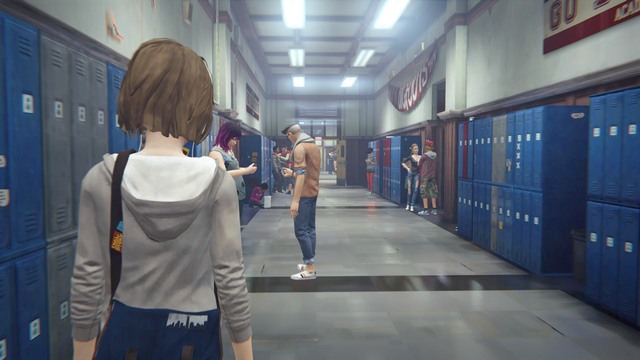
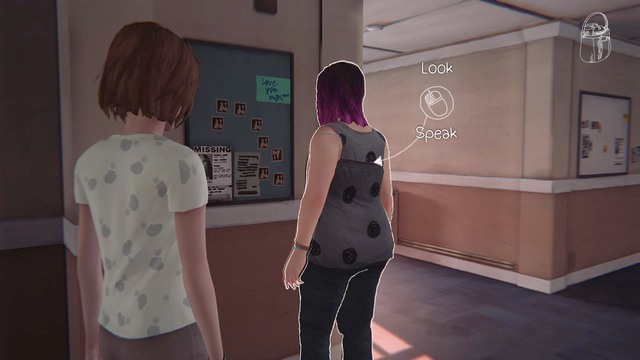
After leaving the classroom take a look around the hall and have a conversation with your peers. After you've checked every corner of it go to ladies room. In the ladies room go to faucet and wash your face (Faucet - Use). When a butterfly gets to the toilet get close to it and take a photo of it (butterfly - Take photo). After that watch a cut scene which will introduce you to the next mechanic of the game - travelling back in time.
After watching how Nathan kills the girl you will Wake up in the classroom again. To reconstruct the plot you need to take a selfie again (camera - take selfie) and talk to professor Jefferson once more.
1.) I feel sick
2.) I have to use the bathroom
Both of the above answers will be incorrect so the game will show you a special icon in the top left corner. If you see one, it means that the game is giving you a possibility to travel back in time with all current knowledge that you have and to change the course of events. The game will take you back to the conversation with Jefferson, but this time you will know the correct answer.
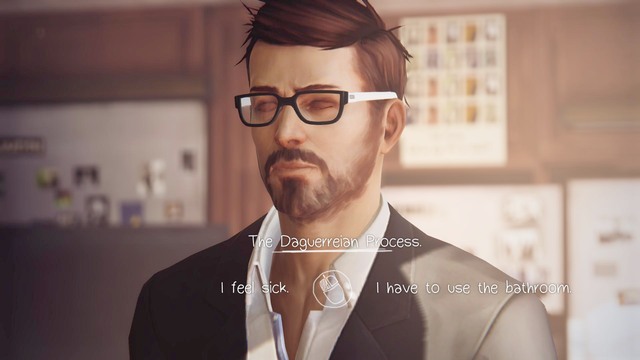
1.) I feel sick
2.) I have to use the bathroom
3.) The Daguerreian Process
After giving the answer, the class will end. Go to Jefferson and talk to him and repeat the travelling back in time action. During the conversation the game won't give you the answer when you don't know it, so you have to try to do something and only later you can rewind the time.
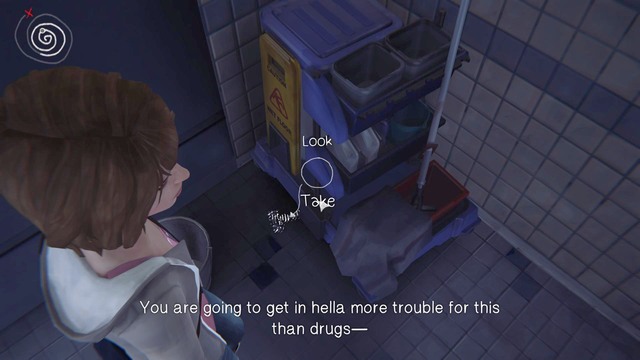
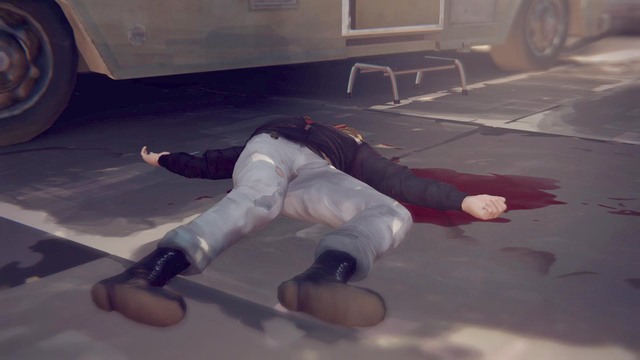
After the conversation with Jefferson get out of the classroom and go to the ladies room and help the girl. When you get there do all the steps that you know already. To save the girl you need to use the alarm that is on the wall. In order to us it, you need to break the glass with a small hammer which is under the cart (Move). After the interaction with the alarm and the homicide go back to the very beginning and the only action that you've made will be getting the hammer (otherwise you will not make it on time to save the girl).
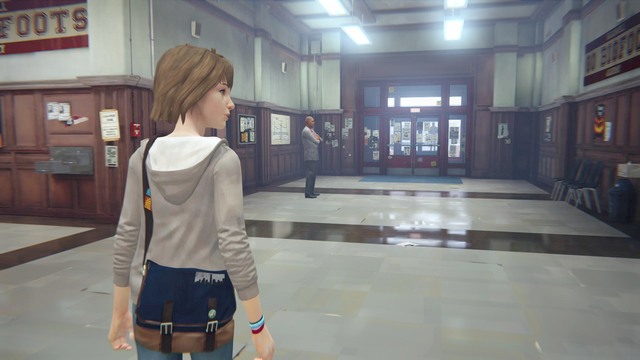
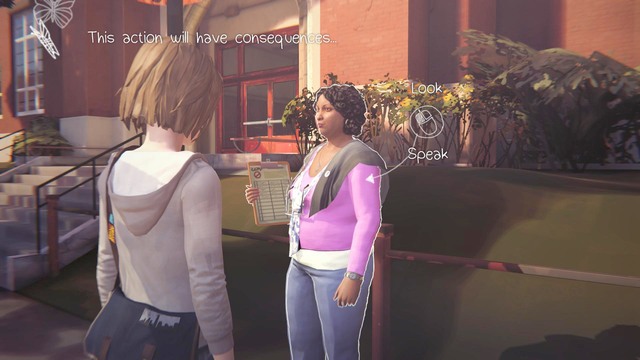
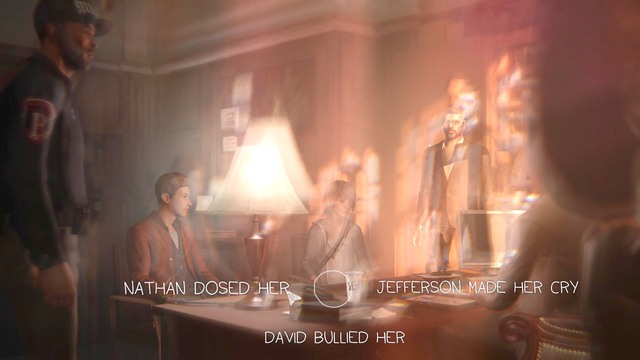
After seeing the events you can move to the hall where the principle will be waiting for you. During the conversation the game will give a choice, it is the first important choice in this episode.
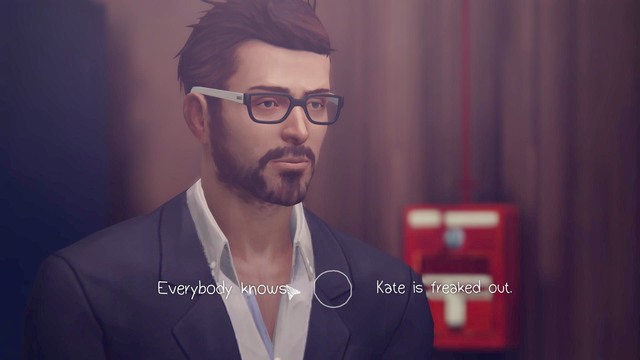
1.) Report Nathan
Report Nathan to the principle and tell him what happened in the ladies room
2.) Hide the truth
Hide the information from the principle and you don't tell him what happened
After talking to the principle go to the door and go outside.

After getting outsider look around. You can talk to all of the peers and the teacher. In the middle you will find a statue, you can take a photo of it to your journal.

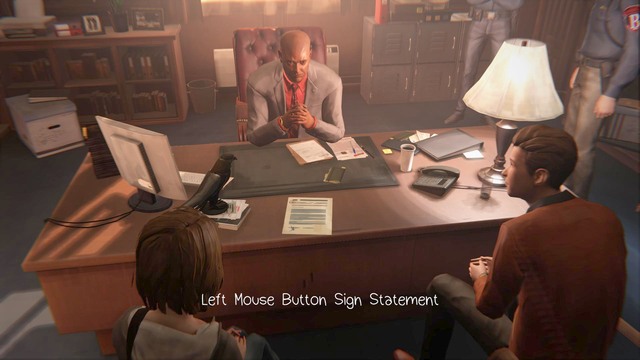
The teacher will be the first person to talk to, she will have a petition against the monitoring. You can go either for Sign or against it Don't Sign. Your decision will have a reflection in your later doings.
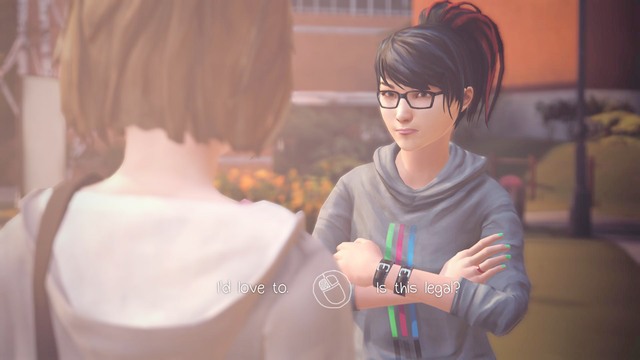
During the conversation with Brooke you will be able to get closer to her. To do that you need to get closer to her bag pack and get an information about her drone. You will need to choose a correct answer, That's a HiFly Drone, to fly it and to get in touch with her. It will be available only after you've acquired some information about it. If you started talking with Brooke before getting the information about the drone, you will need to travel back in time.
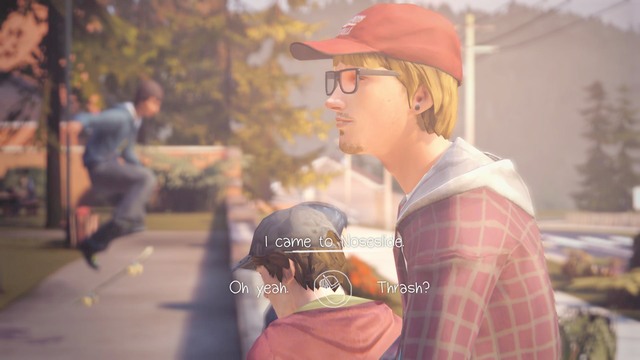
After talking to Brooke go and talk with Justin. During the conversation with him you can gain some information to get closer to him. It is enough to travel back in time and talk with him again. I came to Noseslide will be the correct answer. When Justin asks which trick you want his friend to show you, you can choose whichever answer you want.
Attention! If you want to take all the pictures needed to your journal, you will need to choose the Tre Flip answer. Next Justin's friend will show you a trick and then he will fall, and then you will be able to take a picture of him.

The next person who you will have to get to know closer will be Daniel. You will let him draw a picture, which he will, or won't, post it later onto his website. That choice will reflect later in the future.

After talking to Daniel go to the last person Hayden. To get closer to him and to get the access to his portfolio you need to answer the question. The correct answer is Robert Capa. After a short exploration and short talks you can go to the dormitory.
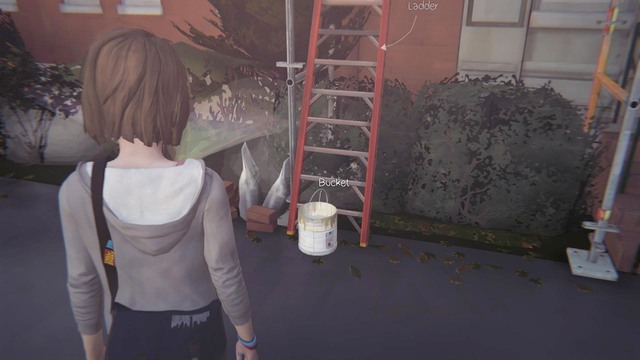
After getting there go and talk with Victoria. You will find out that she won't let you in. Therefore, you need to come up with a plan how to get her out of the stairs. Go left where you will find a door to a small closet. You'll be able to turn up the water-sprinkles when the time comes. Next go back to Victoria and make an interaction with the bucket of paint. When the janitor takes the bucket upstairs go to the water-sprinkles and turn them up.
After getting to the dormitory you will see Victoria covered with paint and the game will give you a choice.
That choice will have serious consequences in the future.
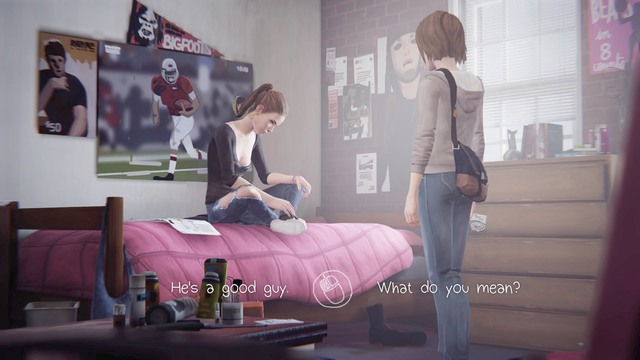
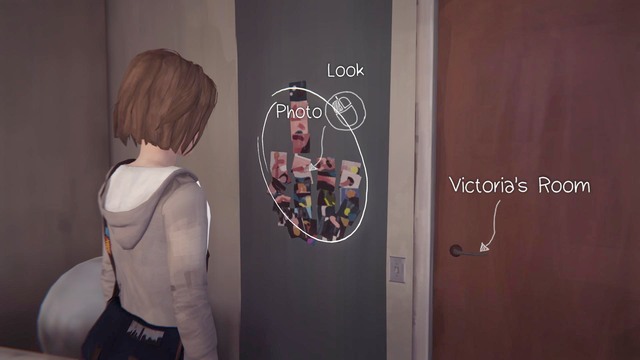
After getting to the dormitory look around the hall. You need to get to the end of it and then turn right to get to your room. When you get there you can make an interaction with some objects to get the Max comment. To move the plot forward go to the desk and use the yellow card (it is right next to the laptop). You will find out that your friend has your flash drive Flash. Go to the hall and towards the main door, where you will find Juliet. She will lock up your friend, who took your flash drive and you will have to help her. She was accused of "sexting" with Juliet's boyfriend, also you will find out that she Got that information from Victoria. To clear Dany of charges you need to go to Victoria's room and find some evidence.
After getting into Victoria's room take a look to the right, where you will see some pictures of her. If you want to get the access to all of the pictures in the journal you need to mix them and capture that moment. In the laptop there is the evidence that Dany is innocent. To take it you need to print the e-mail and take it with you. When you've done that go back to Juliet and choose Juliet - E-mail to give her the document.
After getting to Dany's room you can talk with her.
1.) Victoria is not nice
2.) Juliet gets her rage on
1.) He's a good guy
2.) What do you mean ?
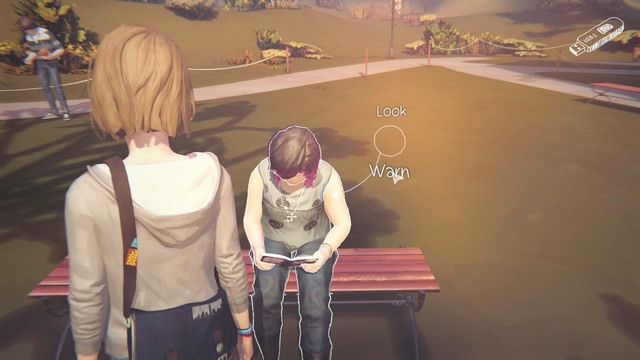
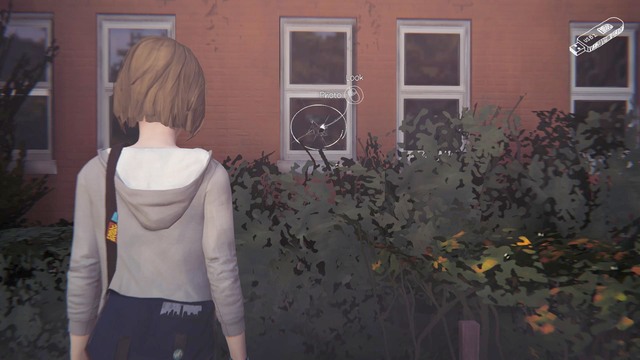
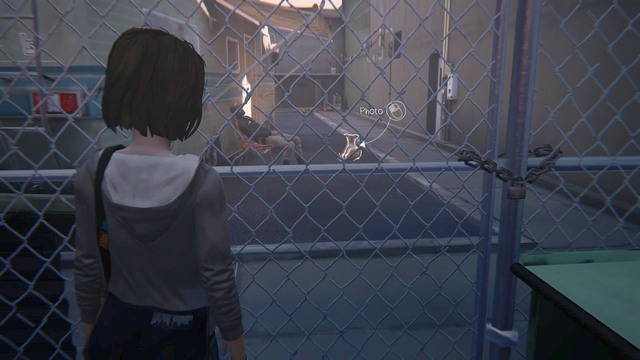
After the conversation take the USB out of the laptop. Having the flash drive you can go to the parking, where Warren is waiting for you. Go out of the dormitory, outside you will see Alyssa who is sitting on the bench, and Logan who is throwing a ball at her. To save Alyssa from that you can get close to her, travel back in time to the very beginning of that situation and warn her (Alyssa - Warn). Logan will break the windowpane, you can take a photo of that to your journal. Go to the broken windowpane and take a photo (Window - Photo). Next go to the gate, where you will see a strange situation.
You will see security guard who is mistreating Kate. You can either intervene (Intervene) or take a photo. Whichever you choose go towards the steps to get to the parking.
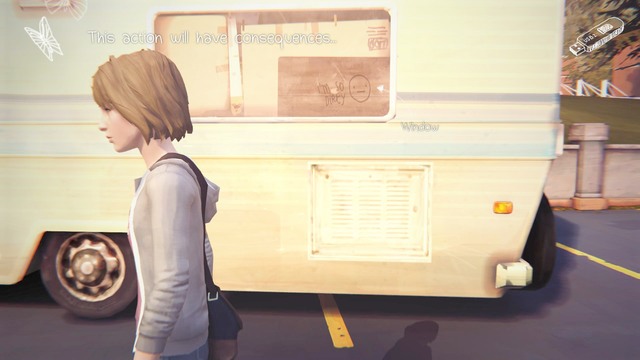
After getting to the parking go left, where you will find a van. Take a look onto its side window, you can write something on it. Next take a photo of it (Window - Take Photo). Then go to Warren and talk to him.
1.) Daniel posted it online ?
2.) You can draw ?
1.) Yeah, thanks
2.) I've been busy
1.) Seen it
2.) No fucking way
1.) How so?
2.) Not at all
1.) I need to talk
2.) Don't want to speak about it

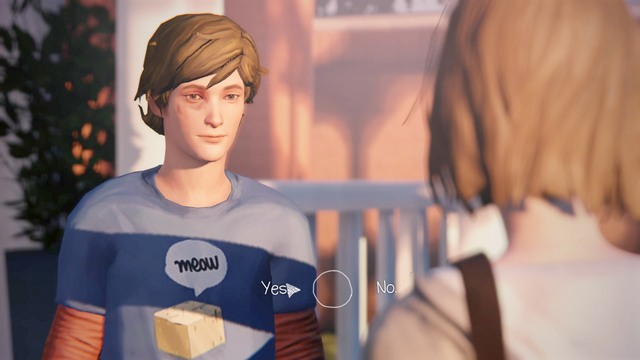
Nathan (the same Guy who had a gun in the ladies room) will attack you during your conversation with Warren. He will ask you about what you've told the principle, only if you told him the truth.
1.) I told him the truth
2.) What are you talking about ?
1.) Take a step back
2.) I could call the police
Warren will attack Nathan Turing your conversation with him, and you will be saved by Chloe, the same girl who you saved in the ladies room. You will talk over what happened in the car.
1.) Hopefully nothing
2.) I have no idea
1.) I guess
2.) No
1.) Of course
2.) Only for Mark Jefferson
1.) I wanted to
2.) Give me a break
3.) I'm sorry
1.) Party all night
2.) I don't feel grown up
3.) Not much
Chloe will not be happy with any of the answers after this dialog. You can o back in time to the beginning of it to chose the correct answer. The forth answer - I Take Photos is the correct one.

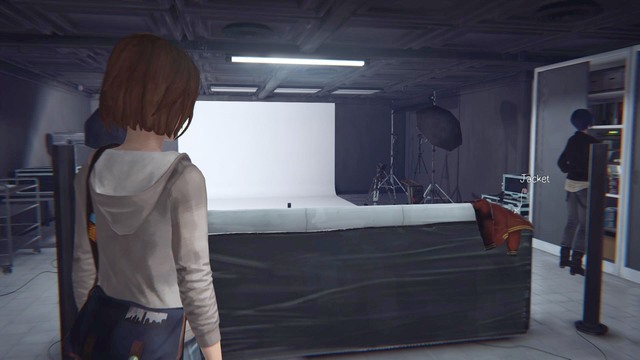
Chloe will ask you to find a CD and turn on the music. You will find it in the box seen on the picture. After taking it out of the box, some other items will fall out of it, the photo of Rachel Amber being one of them.
1.) That's Rachel Amber
2.) So who is she ?
1.) So Rachel took my place
2.) I never forgot
1.) So what happened ?
2.) I see why
3.) What about your mom?
1.) How do you know ?
2.) What about her parents ?
Next go to the right wall in the place of the TV you will find the surge strip. Turn it on to get the power to the music centre. Next go to stereo and choose the HiFi - CD option to turn on the music for Chloe.
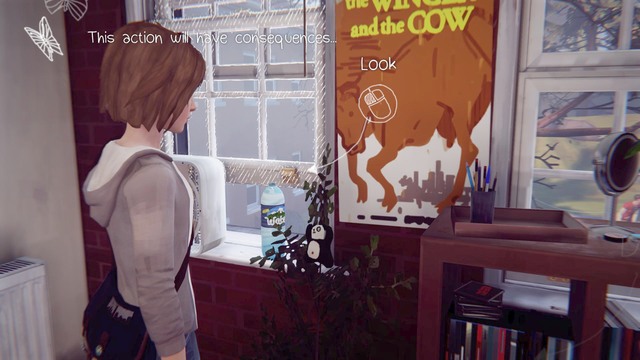
After turning the music on Chloe will let you go downstairs and search for some tools, that will help to mend your camera. Before you do that, though, you can check on the different rooms around to get the Max comments. There you will find out that Chloe's stepfather is the security guard from school, also you will get the opportunity to save a bird on a sill. After you've searched every corner of that floor go downstairs to the garage. Here, again you can look around other places to get the Max comment.
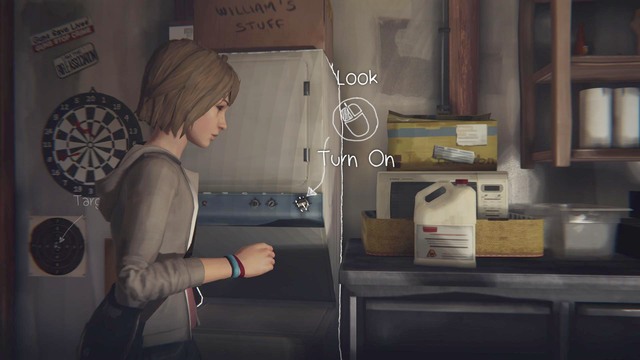
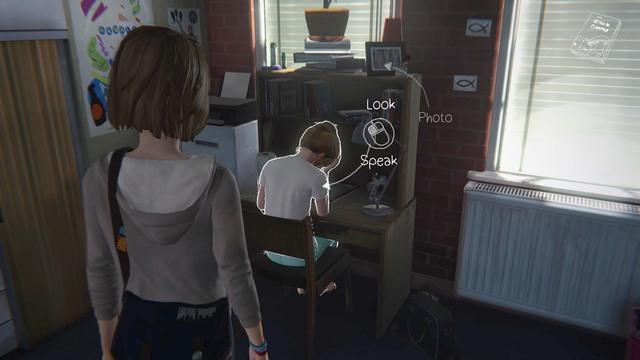
When you get to the garage go to the cabinet on the right hand side and get the access to the files (Files - Use). The documents will fall onto a stain of oil, therefore, you need to go back in time in order not to leave any tracks. Before you do that though, check what's in the file. Then go to the left side and open a right cabinet. You will find a TV in it, and also you will discover that the Chloe's house is constantly monitored by her stepfather. To get the access to the tools go to the washing machine on the left hand side and turn it on. The tools will fall on the floor and under the cabinet, so go back in time to the suitable moment, and before you turn on the washing machine, take a look down and use a cartoon which is over there (Push). Next you can turn on the washing machine and this time you'll get a full access to the tools. Get them and go to Chloe's room, go to the desk and use the tools (Use). Next you'll have a short conversation with Chloe.
1.) I was there
2.) I wasn't there
1.) I wasn't sure
2.) Not at all
1.) Just a bit
2.) Not really
1.) Absolutely!
2.) Like who?
After you finished talking Chloe will turn the volume up and she will ask you to take a photo of her. Get closer to her and choose the option (Chloe - Take Photo). Chloe's stepfather will get back home during that party, and he will try to get to her room. Your main task is to find a hiding place. If not the story will go as it follows, her stepfather will the marihuana and you will face a serious dilemma.
After making that decision you need to leave Chloe's house. Go to the window and sneak out of there before her step father notices you. After you gain the control over your character you will find yourself in the same place as you were in your dream at the beginning of the game. Before you go up turn back and go to the beginning of the place. There you will find a bird on a rock, which is in the middle of the road. Take a photo to your collection. Next go up the hill. Before you talk to Chloe stand behind her back and take the second photo of her. You can also look around to get some additional Max comments. Whenever you are ready, sit beside Chloe and talk to her (Chloe - Speak).
1.) You're in a good mood
2.) My pleasure
1.) He freaked out on Kate
2.) I should've taken his photo
1.) What's Nathan's secret ?
2.) Even yours ?
1.) What about Nathan ?
2.) How much ?
1.) That is fucked up
2.) I am so furious
1.) He's still dangerous
2.) Let's call the police
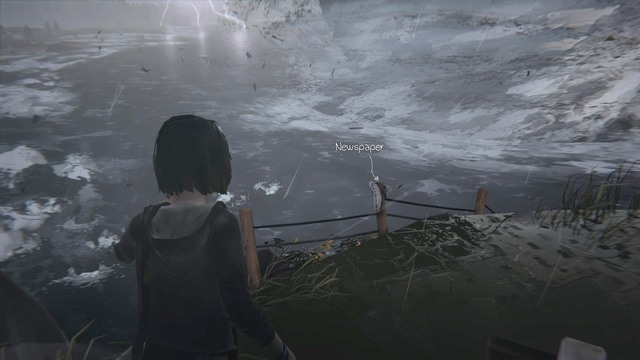
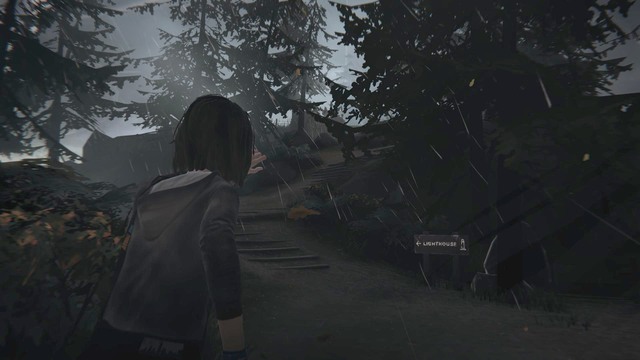
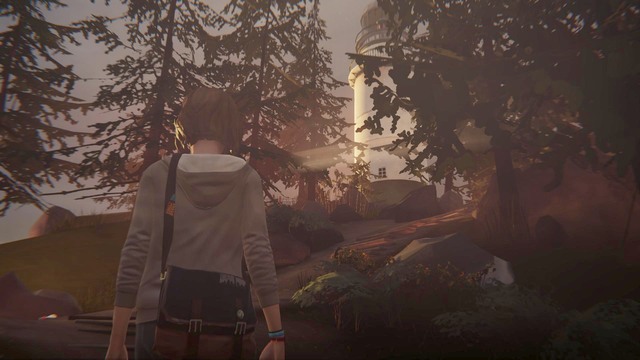
During the conversation you will be surprised, and it won't be a nice surprise. You'll go back to your nightmare from the beginning of the game. You need to go to the upper floor, next to the lighthouse. This time, be very careful not to get hit by rocks and trees. Go right to miss the first obstacle. After few steps into the road the tree will fall. To go pass it you need to get as close to it as possible and go back in time. That way, you'll have some time to pass it. Go up and try to pass all the obstacles by. If you won't do it on time you can go back in time and try again. Go to the picture seen on the screen and get t he access to the newspaper which is over there (Newspaper - Use). In that way you will end the first episode of the Life is Strange game.
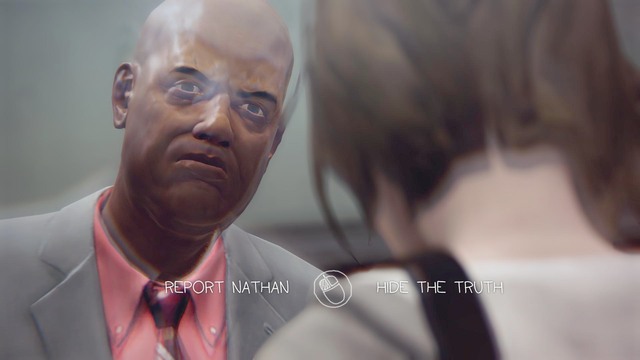
The first important choice that you have to make is at the beginning of the game. You need to decide whether to report Nathan or to hide the truth. The consequence of this decision is the moment when Nathan approaches you on the parking.
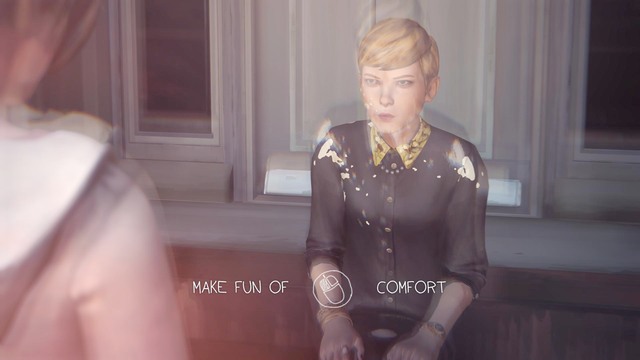
In the second chapter of this episode you will find the second very important choice. It is the moment when you have to decide whether to make fun of Victoria or to comfort her. That choice has no consequences in this episode of the game.
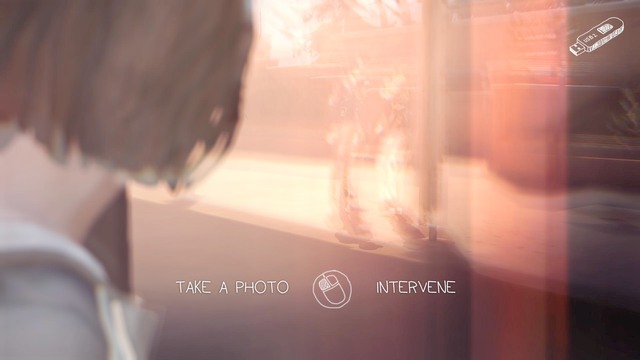
third one is in the Chapter 3. It concerns the situation when you see the security guard (Chloe's stepfather) mistreating Kate. The consequences of that choice is the tone in which Chloe's stepfather will talk to you.

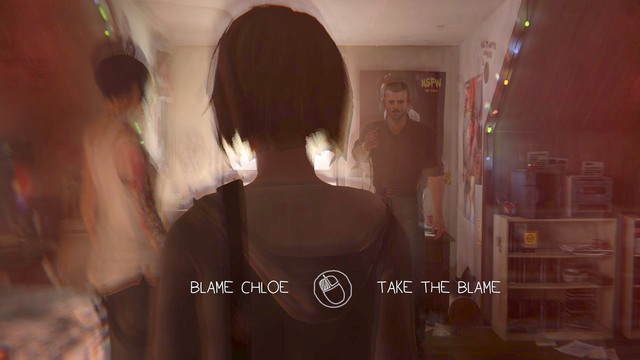
The forth one is in chapter 4. You can either blame Chloe or take the blame on yourself. That decision has no consequence in this episode of the game.
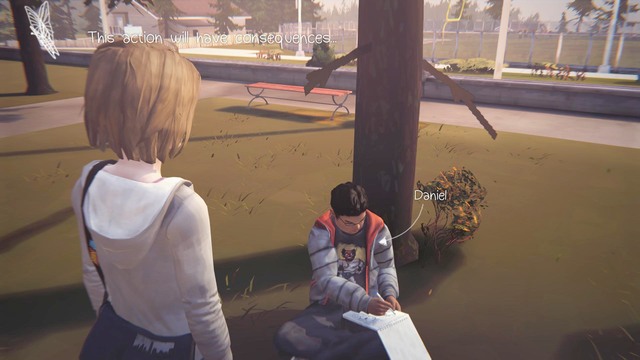
The first decision is in the moment of your conversation with Daniel. You can either let him draw the picture of you or not. That decision has no consequence in this episode, but it can in the future.
The second one is in the moment of your talk with the teacher Ms. Grant. You can either sign in the petition that will enable Chloe's stepfather introduce the rigorous monitoring in school. No consequences in this episode.
The third one is the one when you either are giving Alyssa a warning about a ball coming towards her or you can go forward without saying anything. No consequences in this episode.
The next one is the moment in the dormitory. Namely, the situation in which you have the possibility to get rid of the offensive picture next to the entrance to Kate's room. No consequences in this episode.
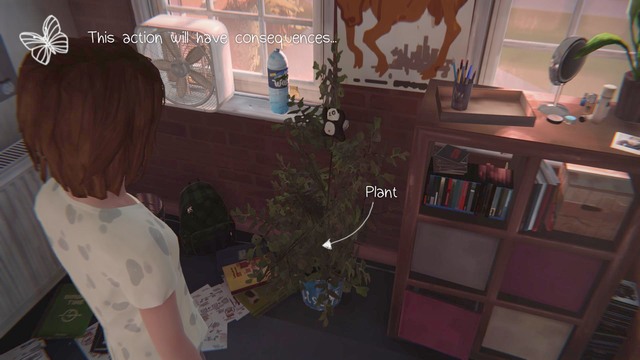
The next one is in your room in the dormitory. You can either water your plant or not. No consequences in this episode.
The next decision is the moment when you are in Dany's room. You will find a pregnancy test, which you can see. The consequence of that decision will be Dany's comment that you are nosy.
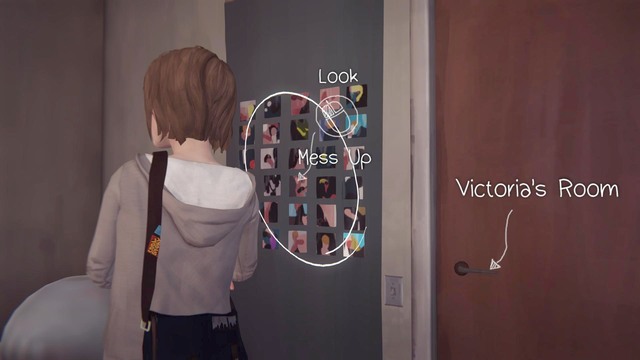
The next decision concernes the moment when you are in Victoria's room and pictures on the wall. If you want to collect all of the photos to your journal you need to mess up the photos on the wall and take a photo of them. No consequences in this episode.
The eighth decision is the moment when you can draw something on the window of the van. You need to do that to collect all of the photos to your journal. No consequences in this episode.
The next one is when you are searching through Chloe's house. You need to get to her parent's room to get the access to the window, You will find a bird on a sill, you can either save it by opening a window or not. No consequences in this episode.
You will come cross this decision Chile searching through Chloe's room. You will find a box in a closet, taking it out will end in breaking the crystal ball. You can change that by going back in time.
The last but one decision in this episode is the moment of searching through the garage. You'll find some files there which will fall into an oil stain. You can change that by going back in time.
The last decision is during the searching the Chloe's garage. You'll find there the same files which were mentioned in the decision #11. You need to decide whether to see what's written in them or to go back in time with no knowledge about their content. Reading them will unblock additional line in the conversation that you'll have on the bench with Chloe.
You can find the first one at the beginning of the game, in the classroom. It is enough to take a look at your desk to see a writing and the possibility of taking a photo.
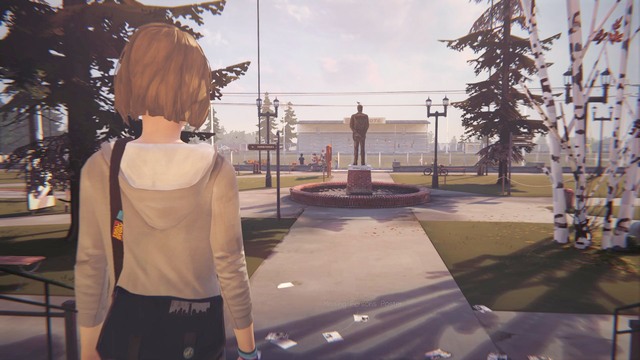
While being outside get close to the statue and take a photo of it.
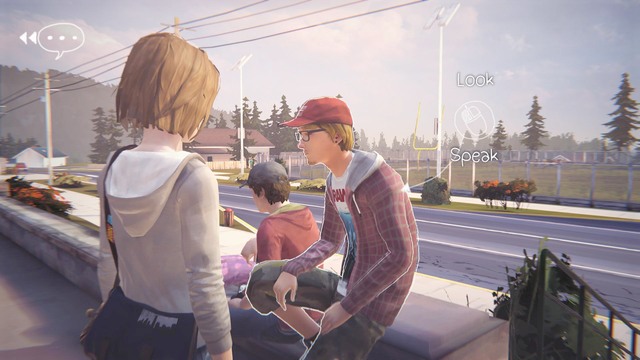
You can take the third picture while Justin's friend is showing you a trick. Before he does that, though, you have to go through a few steps. The first one is talking to Justin and answering, correctly, to some question of his. You need to go back in time during that conversation to get the answer correctly. Next, choose the Tre Flip option, so that Justin's friend does the trick. After he falls you need to go close to him and take a photo of him.
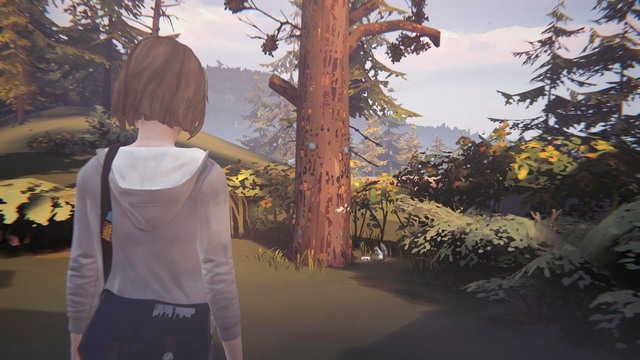
You can take the next one when Victoria and her friends are in your way to the dormitory. Go left. You'll see a tree and squirrel next to it. Take a photo of it and it will join your collection.
Take the fifth photo in your room in the dormitory. Stand in front of the mirror and take a photo of yourself to add it to your collection.
The next one can be taken in Victoria's room. Get close to the wall and mess up the pictures which are on it and then take a photo of that.
Take the next one when you warn Alyssa about the ball which is coming her way. After you've done that, get close to the broken window and take a photo of that.
Take the eighth photo on the parking. Draw something on the window of the van and take a photo of that drawing.

You'll find the last but one photo Chile running away from Chloe's house. Before going to the lighthouse turn around and take a photo of a big rock on the path. You'll find a bird on it, you can also take a photo of that bird.
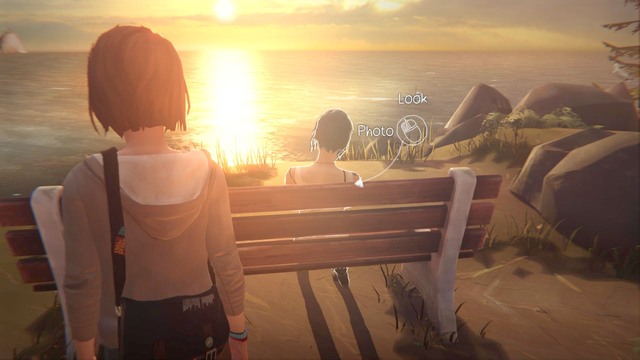
You can take the last photo, of Chloe, when she is sitting next to the lighthouse. Stand behind her back in order to take the photo.
Life is Strange is an episodic game released by Square Enix and made by the French DONTNOD studio, who are also known as the makers of the Remember Me game. You play the game as an eighteen year old girl, whose name is Max, and who is struggling with daily life of a random teenager. Life is Strange doesn't use any advanced graphic effects, which you can find in other products of this kind, therefore, the PC requirements are not high. The DONTNOD studio decided not to use the Unreal Engine, which is very popular and widely known. The game is perfectly optimized and it has much better audiovisual setting than for example games from Telltale studio. Even though the game is using the DirectX 9 libraries only, you can see some filters added to the game which makes it better. The guide to Chrysalis, the first episode of the Life is Strange, was made on the computer with Intel Core i5 4690k processor, MSI Radeon R9270x graphic and 8GB RAM. The computer had no problems with the game, whatsoever, and it did not lose its 60 frames per second, there also was not a single moment when the game lost on its efficiency.
The guide to Life is Strange - Chrysalis was made on a PC platform with a configuration as follows:
The game Works with no problems on the configuration above. There were no graphic errors or loses of the efficiency.
Out of Time is the second part of the episodic adventure game from the DONTNOD studios, made in cooperation with Square Enix. You play as a eighteen years old girl named Max, who is facing her everyday problems of a high school student. During the gameplay you, as Max, will awaken the supernatural powers to reverse time, which will allow you to manipulate the decisions and events which you would normally have no control over. The first episode will introduce you to the world created by the authors of the game, you will learn about the basic mechanics governing the gameplay, and you will meet your fellow students attending the same school as the main character. The following guide will help you get through the story and will focus on explaining the most important issues you may stumble upon during your journey. Additionally, here you can find a detailed description of every possible decision you can make, and their eventual consequences. The culmination of this guide is a list of all the photos you can gather throughout your journey.
Out of Time, the second episode of Life is Strange contains:
Jacek "Ramzes" Winkler ()
Icon
Function
Moving of the character
Running / Hold with the Right Mouse Button: Fast time rewinding
Interaction with the surroundings
Time rewinding
Stop the video
Menu
Journal
Rewinding time to the moment set by the game
In this guide there are used some color markings, such as:

To wake up, you must mouse over the circle titled "Snooze" and then press and drag the cursor outside the circle. To get up, press the button displayed on the screen. Right now, you will have to make your very fist decision. Get close the plant, next to the window, and water it. After you've done it, approach the closet to collect the cosmetics from it.
After collecting them, leave your room and head towards showers. On your way you will be passing by Kate's room - it's worth to wipe the insult written on the plate next to the door. After crossing the corridor, you will notice that someone tosses a roll of toilet paper and hits Alyssa in the head with it. You can warn her about the incident by going back in time and selecting the Alyssa - Warn option.

After you've done it, head towards the bathroom and use the middle shower. After seeing a series of cut scenes, leave the shower and approach the mirror with the website address written on it. If you want to help Kate, you can get rid of the address by pressing the Erase option.
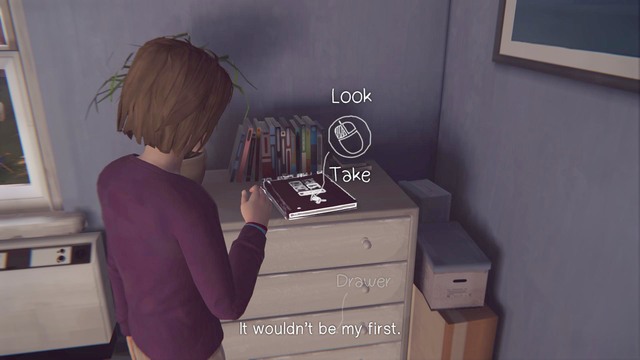
Afterwards, check your phone and you will learn, that, among others, Kate needs a certain book, that she lent you some time ago. The book can be found in your room - leave the bathroom and head towards it. Wipe the insult on the tablet next to the doors before entering your room.
After entering it, look around the room. On the left side, next to your bed, you will find a table with the mentioned book lying on top of it. After spilling the coke, you will have to go back in time and move the glass away before taking the book (Move).
As soon as you get the book, approach the cabinet, get dressed and leave the room and go to Kate's room. After entering it, you will be able to take a picture of the bunny in the cage. It will be the first of the many pictures you will make. Afterwards, you can go and speak with Kate. Regardless of the course of the discussion, you will have to leave the book next to her bag, which is lying on the ground. Approach it and insert the book inside the bag. After you've done it, you will be faced with a consequential choice. You can either advise Kate to go to the police right away, or tell her to hold off until you are able to gather enough evidence.
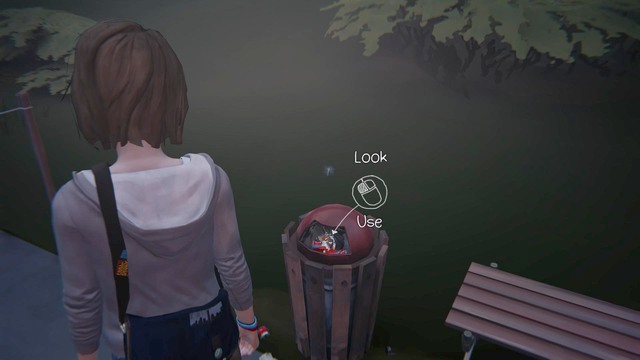
Regardless of the choice you've made at the end of the previous chapter, the course of the game will be the same. Leave Kate's room and go to the dormitory's backyard. Before you go any further, approach the bench on the right side - next to it you will find a trash bin, with a piece of a candy bar inside. Take the candy from it and put it on the bench. Move away slightly so that a squirrel will approach the food you've prepared. As soon as the furry begins the feast, approach it and take the second photo for your journal collection.
After you've taken the photography, you can go to the janitor break room, where you can find a couple of interesting things (like Rachel's photos). You can ask the janitor, who is sitting on the bench and feeding birds, about it.
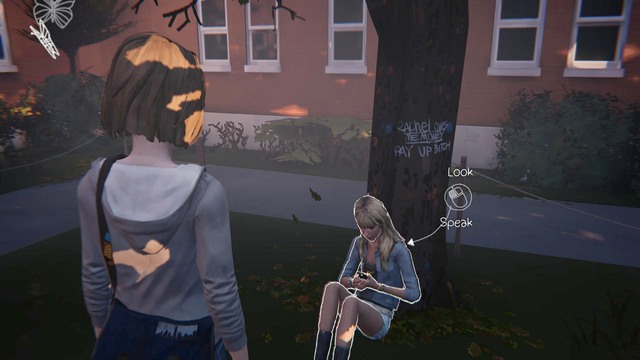
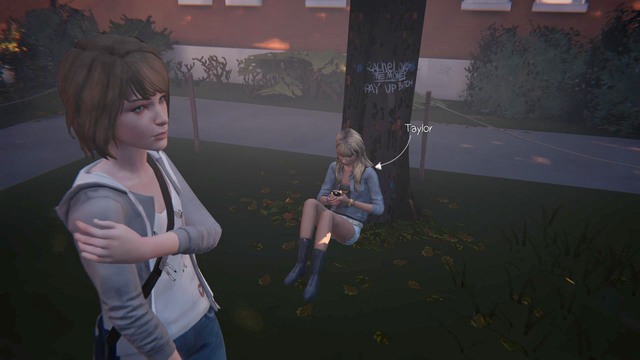
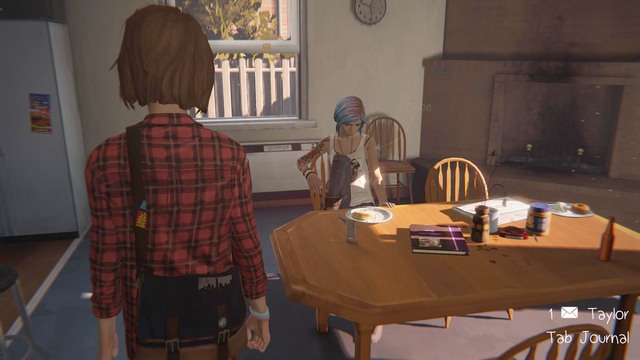
Approach Taylor, who is sitting by the tree and speak with her if you want to get another journal entry. Regardless of the choices you make during the conversation, you won't get a "friendly for Taylor" status in the journal. You will have to wait until she speaks about her mother and then go back in time and use the freshly acquired knowledge to surprise her. After going back in time, you will just have to select the "About your mom" dialogue option to get a positive entry in your journal.
After the conversation, head towards the dormitory exit and speak with Warren. You can either "go on a date" with him (movie), or decline. Regardless of your choice, the conversation will continue in a same manner. Afterwards, head towards the exit to watch a cut scene.

After arriving at the place, look around the area before you enter the bar. Go to the parking lot where you will find a trailer. A man and a guard tog will be sitting behind it - the dog will prevent you from talking with the man. Additionally, you must take a photo here if you want to complete your collection. In order to do that, circle around the building (bar) and enter the back alley. By following it, you will get to the fence, from where you will be able to see both the dog and the man. Here you can take your photo. Another photography can be taken in front of the bar entrance. Look at the signboard above the entrance (whale) and take the photo (Sign - Photo).
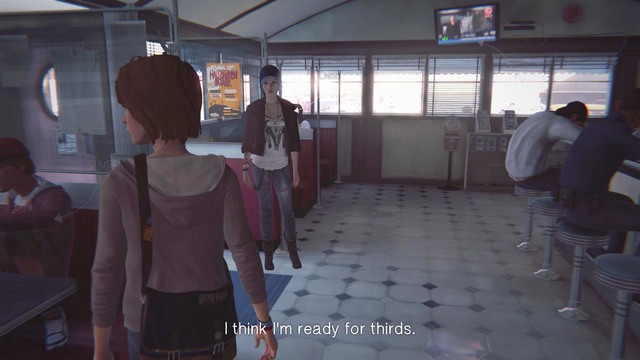
After you've made those two shots, enter the bar and head towards the toilet. Inside, there will be a graffiti on the mirror - take a last photo for your collection here. Go to the other side of the bar and sit at the box - soon the waitress will approach you. Talk to her for a short while and order one of the two dishes. After making your order, wait for the waitress to come back with the breakfast - in the meantime you can look around the room and drink your coffee.
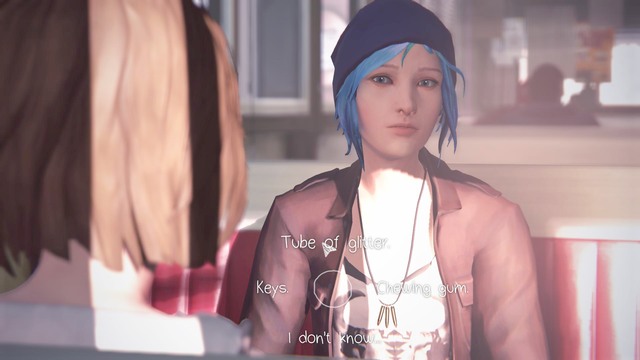
As soon as Chloe comes back, she will start a conversation about your supernatural abilities. You will be faced with quite a difficult test - all of the tasks will depend on your perception. Chloe will order you to guess what is inside her pockets. In order to do so, you will first have to answer her questions incorrectly and wait for her to show what is inside them. Before you go back in time, you must memorize all the details about every single thing. Afterwards, Chloe will ask you the very same questions. The questions, and the answers to them, are as follows:
Another test will also depend on your observation skills. You will have to look around the room and memorize all the events you will be a witness of in the next dozen or so seconds. Afterwards, speak with Chloe and reveal all the details about every single one of them. The correct answers are:
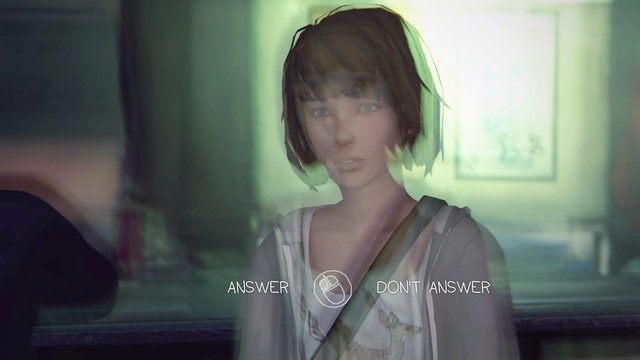
At the end of the chapter you will be faced with a final and a consequential decision. Kate will call you and whether you answer the phone or one will have an impact on the future events. Answering the phone will help you significantly at the end of the episode, so it's worth to choose the Answer option.
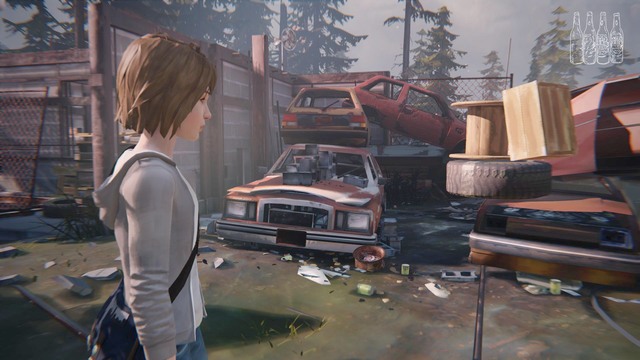
Chapter 3 starts at the garbage dump. It's worth to look around the area, because you can take a couple of photos here. That is why you should approach the place shown on the above screenshot and take your position on the left side of the bus. Here you will be able to take your first photo in this chapter.
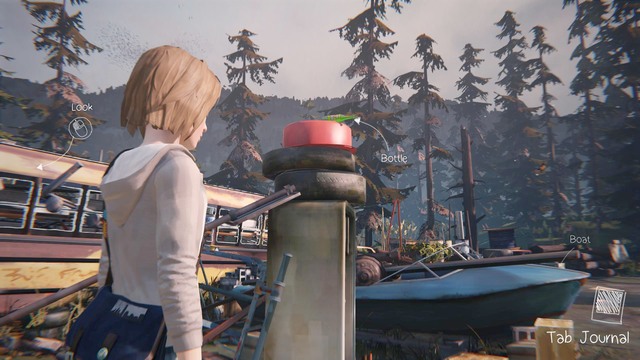
After the conversation with Chloe, you will have to find five green bottles. The first one is located on the elevation near the yellow bus, which you just took a photo of. You must first try to collect the bottle, and then, after completing the activity, rewind the time and move the box, lying on the right side. After moving the box, you won't break the mentioned bottle.
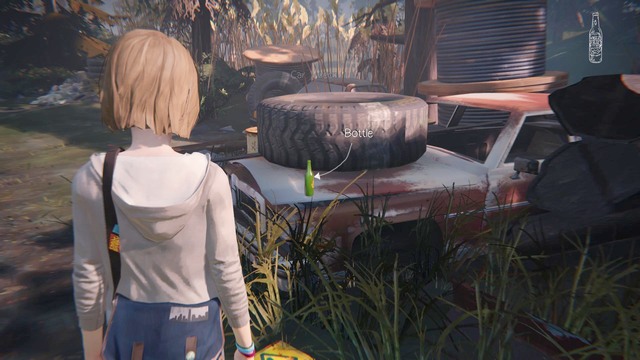
Go to the other side of the garbage dump (to the opposite of the location in which you found the first bottle) where you will get the second bottle. It will by lying on a car wreck shown on the above screenshot.
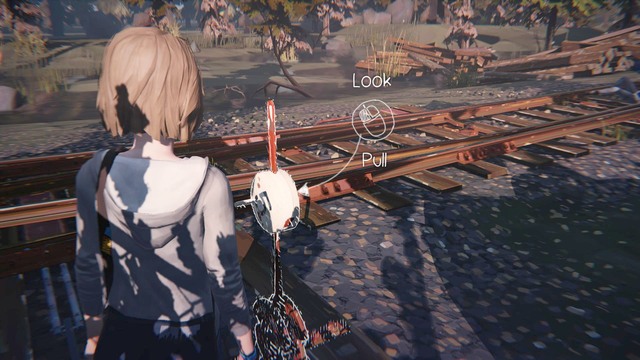
Cross to the left side - a deer can be found here. You can take a photo for your journal here. As soon as you do so, head towards the railroad tracks, where you will find a small room with the third bottle inside.
The penultimate bottle is a very difficult one to get, because you will not locate it so easily. Leave the room and go back to the railroad tracks. Look in the direction of the room you just left - on the right side there will be a crossing made of car wrecks. Inside you will find a campfire, with the mentioned bottle next to it.
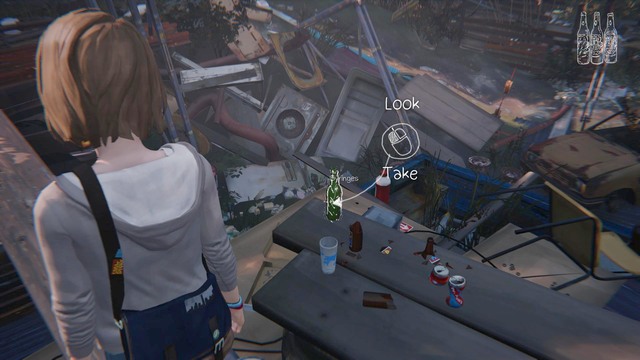
Right next to Chloe, on the left side, you will find a passageway leading to an elevation, from where you will be able to get the last bottle. To get to the shipwreck, you have to move the plank shown on the screen and then cross it. You will find the last bottle on the shipwreck. Pick it up, go back to Chloe and start a conversation with her.
After a short talk, Chloe will start shooting at the bottles, and your task will be to aim her so that she will be able to hit them. During the last shot, use the option to shoot at the car tire (Tire -Shoot), to knock it off the elevation.

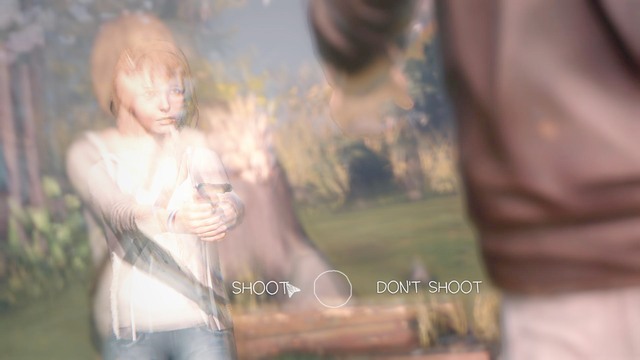
As soon as Chloe starts lying on the car, refrain from talking with her. Instead, take a position on her left side and take a photo for your collection. Afterwards, you can start the conversation with the girl. A consequential decision will await you at the end of this chapter. You can either try to shoot the aggressor, or refrain from doing so. Regardless of your choice, the game will go on in the same manner, because your gun will not be loaded and the assailant will just leave.
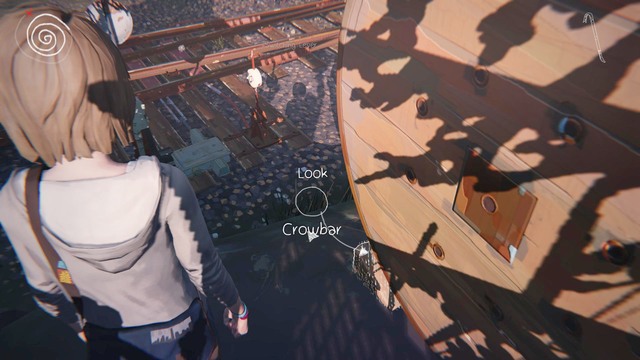
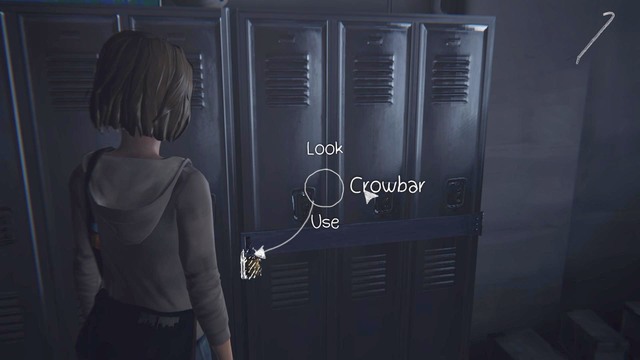
Chapter four starts with the conversation with Chloe. After a short while, her leg will get stuck in the railroad tracks. Your task is to find a way out of this critical situation as soon as possible. Naturally, you can use your time-manipulation abilities here. Get on the elevation beside Chloe - you will find a crowbar next to hut. Approach the wiring, extract a brick blocking the whole thing with the crowbar (Crowbar - Use) and push the whole thing on the railroad tracks. Afterwards, run all the way back to Chloe and help her get out. If you run out of time during all those things (which will surely happen), you must use your abilities and go back in time to try to rescue Chloe one more time.
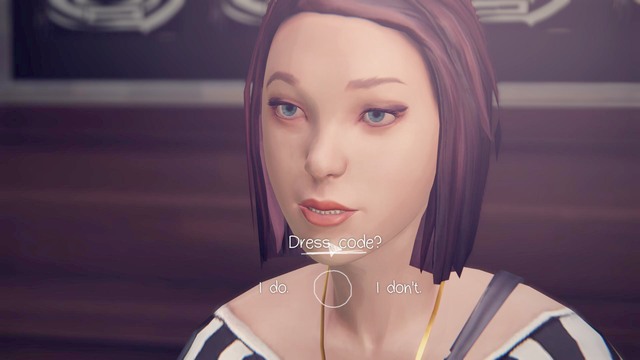
After you've done it, you will go back to school - you can head to classes now. Before you enter the corridor, approach the girl that is distributing leaflets and try to sign up on an event. The girl will refuse, so in order to get a positive entry to your journal you will have to convince her to change her mind. Rewind the time and start the conversation again - you will now have access to a new dialogue option (Dress Code?).
Before entering the main hall, you can take your time to look around the area and speak with the principal, as well as the guard. Unfortunately, you won't learn about anything useful, so you can just go straight to your class. While going through the hall, you will get a text massage from Warren. Head towards science class to speak with him.
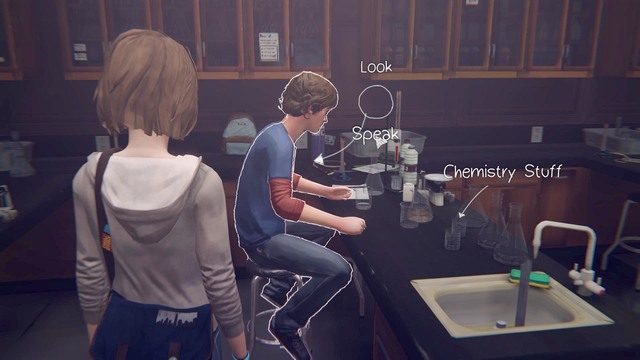
Warren will ask for your help with mixing some chemicals. Regardless of your choices (sodium, or potassium), the game won't note it in your journal as help. To get such an entry, you will have to rewind the time, approach the teacher and ask her about the experiment. She will tell you that the best one to use is chlorine. Get back to Warren and start the conversation again. During it, a third dialogue option will appear (Chlorine). Afterwards, the experiment that Warren conducts will be successful, and you will be able to take the last photo for your collection. Additionally, you will get a journal entry about helping Warren.
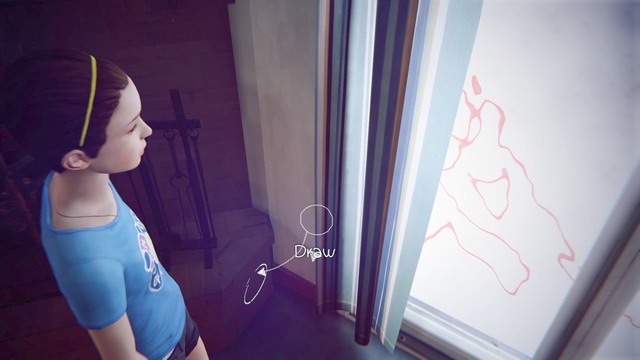
Leave the class now and head towards Jefferson. You can speak with him about Kate and then head to your desk. Before you sit down, however, get closer to Alyssa and take a photo of her back. After you take place at your desk, you will be able to draw on a blank sheet of paper and look around the area. After a short while, one of the students will charge into the class with shocking news and the whole class will follow him into the dorm.
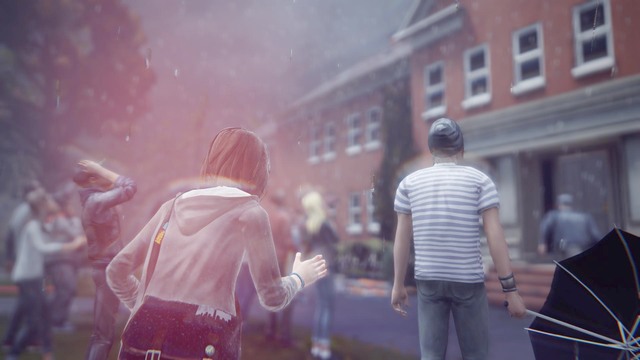
The fifth chapter is the final, as well as the most important one of the second episode. Future events will depend on the decisions you will make here (as well as several consequential choices you've made earlier). You will get to a moment in which the game will offer various, different endings. To start the event, approach the group of people visible on the above screenshot. In the distance, you will notice Kate, who is trying to commit suicide by jumping off the roof. On your way there, Kate will jump, forcing you to use your time-manipulating abilities to get back in time a couple of times. After several tries, the time will stop completely - use this window of time and approach the door leading to the dormitory. Get on the roof and start a conversation with Kate.
Dialogue #1:
Dialogue #2:
Dialogue #3 - If, during the first consequential decision, you decided to tell Kate to refrain from going to the police because you needed more proof:
Dialogue #4:
Dialogue #5:
There are couple of things that should be noted about this chapter. The first one is the moment in which you decided to answer the phone from Kate (Chapter 2). The second one is the moment in which you stood up for Kate when she was interrogated by the guard (Chapter 1). The last one is the event in which you erased the abusive writing on the sign next to the entrance to Kate's room in the dorm.
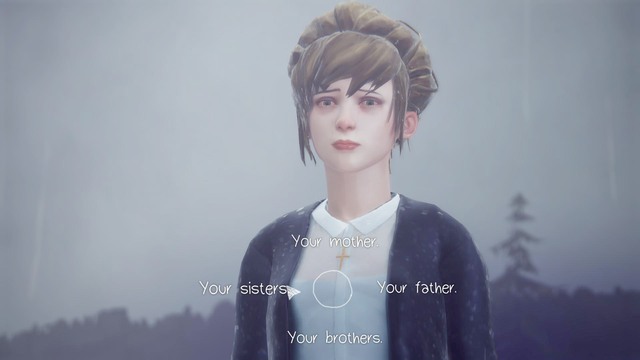
After saving (or not, if you made some wrong decisions) Kate, the game will go on. You will be questioned in the principal's office. You can now point the one responsible for the whole accident:
Regardless of the choice, you won't know about the consequences during this episode.

The first important choice in this episode is the moment shown in the first chapter, or to be more exact, the conversation with Kate.
The second consequential choice, happening at the end of second chapter of this episode. It has its consequences in the climax of the game.
The third important choice can be found in the third chapter of the game, during the assault on Chloe. You can make two choices here, to either shoot the assailant, or refrain from doing so. Your choice has no impact on the third episode, as the gun had no bullets left, so you were unable to make the shot.
The fourth important choice can be found in the last chapter of the game. Your decision, or rather a series of decisions, will affect the outcome of the event - whether you save Kate or not.
One of the possibilities leading to saving Kate can be achieved by leading the conversation in such manner:
Dialogue #1:
Dialogue #2:
Dialogue #3 - If, during the first consequential decision, you decided to tell Kate to refrain from going to the police because you needed more proof:
Dialogue #4
Dialogue #5
A thing to note, is the fact that in order to make the whole conversation work, you will have to make at least two positive choices shown in the important choices 1-3 in order to save Kate.
The last important choice can be found in the last chapter of this episode, in the final moments of it to be more specific. You will have to point the one who you think is responsible for the whole suicidal attempt. The choice has no consequences in this episode.
The first important decision can be found in the first chapter of the game. You can decide whether to water the plant or not.

The second important decision can also be found in the first chapter o the game. You can either warn Alyssa about the roll of toilet paper, or refrain from doing it.
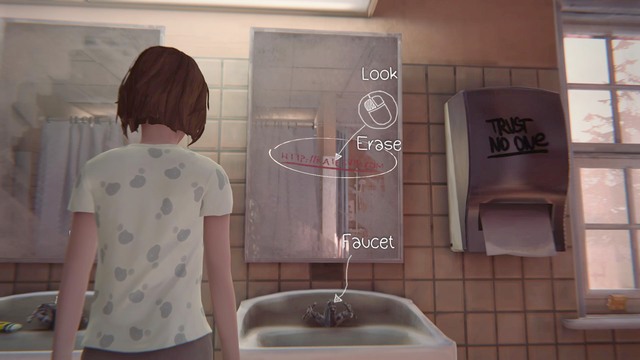
The third decisions refers to the situation from the bathroom. After leaving the shower, you can make a decision that has a significant impact on the events in the last chapter of this episode. You can either erase the address to Kate's recording located on the mirror, or leave it intact.
The fourth decision is associated with the event shown in the second chapter of this episode. You can either be friendly towards Taylor, or not. The decision requires you to speak with her, go back in time, and start the conversation again in order to be able to use the right answer.
The fifth decision is connected with the conversation with Warren during the second chapter of this episode. You can either accept his invitation, or decline it.
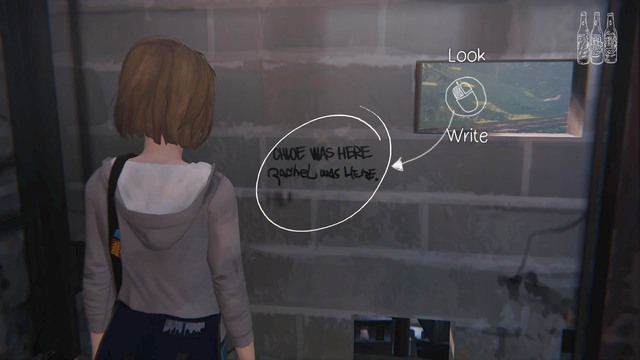
This decision can be made during the third chapter of this episode. Enter the building on the garbage dump and write a "Max was here" text on the wall, or refrain from doing so.
This decision can be made during the third chapter of this episode, when you have to save Chloe from the incoming train. You can either try to do so by tinkering with the railroad tracks, or refrain from doing so.
This decision is associated with the Vortex club entry. During the fourth chapter, approach the girl at the table and speak with her. Use your time-manipulating abilities to rewind the time and answer her question correctly in order to get an invitation to the club.

The ninth decision can be found in the fourth chapter of this episode. You can either help Warren with his experiment, or refrain from doing so. In order to help him, you will have to complete a series of steps. Warren will ask you to help him in mixing some chemicals. Regardless of your choice (sodium, potassium), the game won't note it as helping Warren. To get such an entry, you have to approach the teacher (after you've gone back in time, of course) and ask her about the experiment. She will tell you that it's best to use chlorine. Go back to Warren and speak with him again. The third dialogue option will appear (chlorine). After selecting it, the experiment will be a success, and you will be able to take the last photo for your journal collection. Additionally, you will get a journal entry about helping Warren.
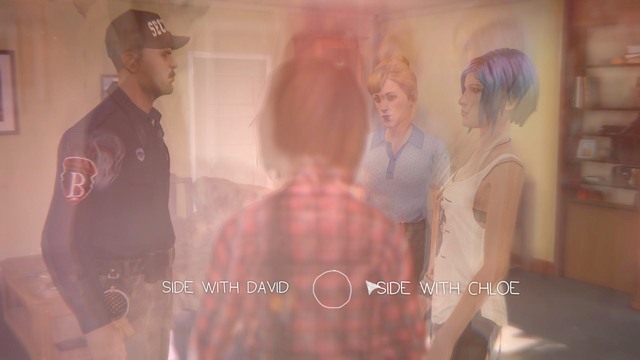
The last decision can be made during the conversation with Jefferson, in the fourth chapter of this episode. You can either tell him about David, who is abusing Kate, or refrain from doing so.
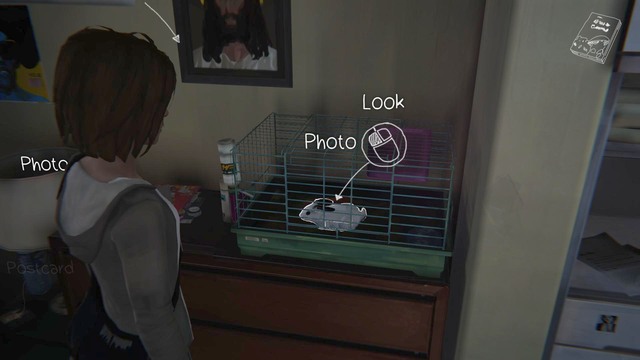
The first photo can be taken during the first chapter of the game, when you are in Kate's room. Approach the bunny cage and take the shot.
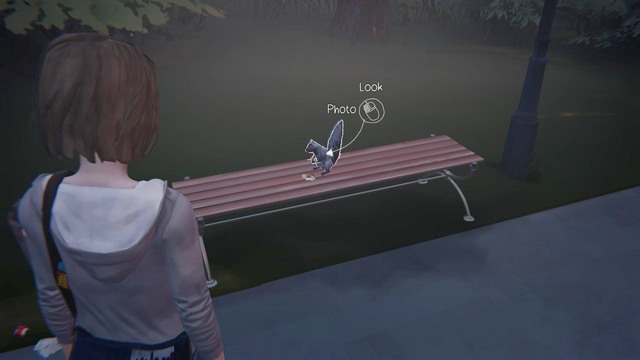
The second photo can be taken after you've left the dormitory. Approach the bench on the right side and locate the trash bin next to it - inside you will find a piece of a candy bar. Put the candy on the bench and move to a safe distance. After a short while a squirrel will be attracted to the food you've left - all you have to do now is to get a little closer and take your shot.
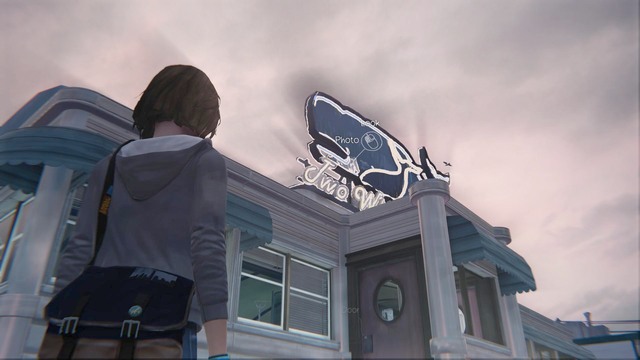
The third photo can be made in the second chapter of this episode. After arriving at the bar, you must get closer to the entrance and take a photo of the signboard hanging above the entrance. A whale sign cannot be missed.
Go to the parking lot where you will find a trailer. A man and a guard tog will be sitting behind it - the dog will prevent you from talking with the man. Additionally, you must take a photo here if you want to complete your collection. In order to do that, circle around the building (bar) and enter the back alley. By following it, you will get to the fence, from where you will be able to see both the dog and the man. Here you can take your photo.
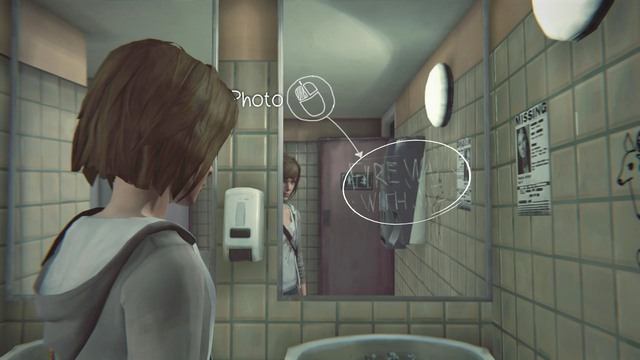
The fifth photo can be taken when inside the bar. Enter the toilet and look at the mirror. You will find a note, which you can take a photo of.
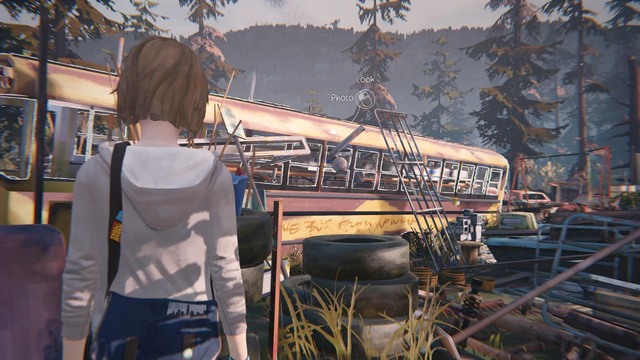
This photo can be taken during your "adventure" on the garbage dump. Approach the school bus from the left side, where you will be able to take your shot.
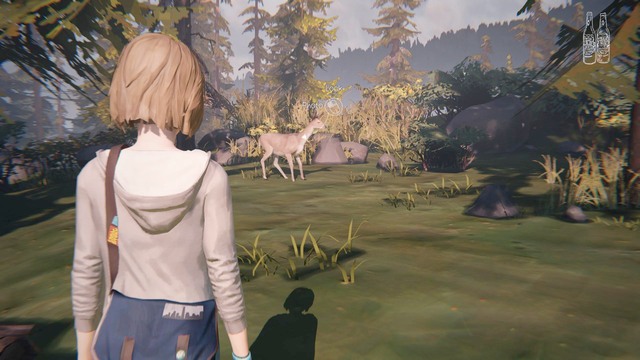
This one can be taken by going to the back of the school bus. There you will find a small glade, as well as a deer - take the photo of the animal.
This photo can be taken after the series of shots made by Chloe. As soon as she lays on the car hood, approach her from the left side - you can now take your shot.

The penultimate photo can be taken during your school classes. Approach Warren to help him with his experiment. In order to do so, you will have to complete a series of steps. Warren will ask you to help him in mixing some chemicals. Regardless of your choice (sodium, potassium), the game won't note it as helping Warren. To get such an entry, you have to approach the teacher (after you've gone back in time, of course) and ask her about the experiment. She will tell you that it's best to use chlorine. Go back to Warren and speak with him again. The third dialogue option will appear (chlorine). After selecting it, the experiment will be a success, and you will be able to take the last photo for your journal collection. Additionally, you will get a journal entry about helping Warren.
The last photo in this episode can be taken when you are in the class. Approach Alyssa and take a shot of her back in order to complete your collection.
Chaos Theory is the third episode in an adventure game developed by DONTNOD studio in cooperation with Square Enix. In the game you play as an 18-year-old girl named Max, who struggles with everyday school life. During the game you will discover her supernatural power of time reversal, which lets her alter decisions and events, otherwise unchangeable. The third episode further unfolds the story according to your previous choices. This guide will help you walk through the story and explains the most essential issues. Here you will also find detailed descriptions of important choices and their consequences. The whole thing is complemented with a list of all collectible photos.
The guide for Chaos Theory, the third episode of Life is Strange, contains:
Jacek "Ramzes" Winkler ()
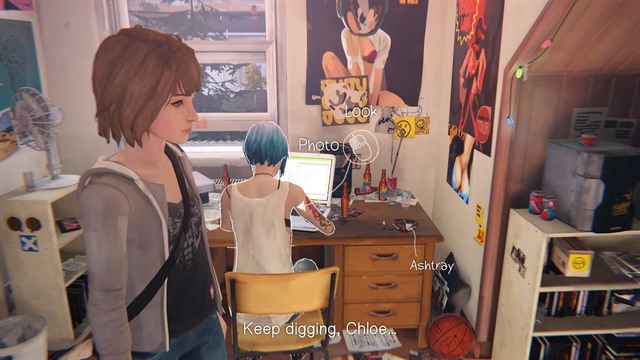
Once you can control your character, look around Max's room. Here you will find a couple of interesting items, first and foremost, the plant that you can water. After doing this leave the room and head left. Follow the corridor to the restroom. In the restroom you will meet Taylor, whom you can talk to. On selecting dialogue option "Comfort Her" she will reveal a secret to you. Finally, you may promise her to keep that secret to yourself.
After the conversation with Taylor leave the restroom and head to Dana's room. You can talk to her about what happened to Kate. The conversation goes differently, depending on whether or not you let Kate commit suicide in the previous episode. During the conversation Dana asks you to find the person behind Kate's decision, and you may assure her you will.
After the conversation with Dana leave the dormitories and head toward the parking lot. On your way you will encounter the headmaster, who is drunk, making it impossible for you to walk forward unnoticed. In order to sneak past him, you have to approach the place shown in the picture and rewind time as much as you can. After doing this you will notice the headmaster trying to open the door, facing you away. Now you can walk toward the exit.
The next chapter starts with a brief conversation with Chloe, in which she reveals you her secret plan of breaking in to the headmaster's office. Follow her to that place.
Getting inside the office is not so easy, as you have to solve a logic puzzle. Look around the room and try to find something that may help you open the door. Approach the wall on the right to find keys hanging there. Unfortunately, the key you are looking for is not among them, so you have to open the door in some other way. After betting Chloe you will find the way inside first, leave the room and head to the corridor on the right.
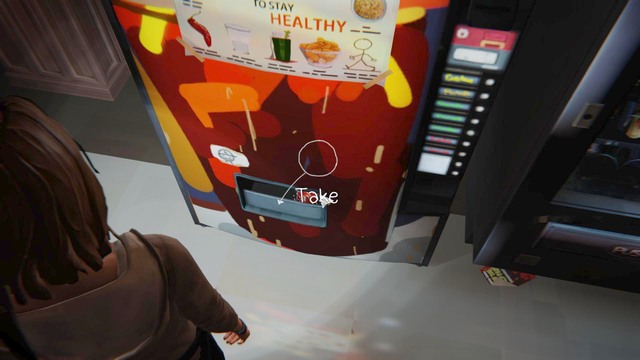
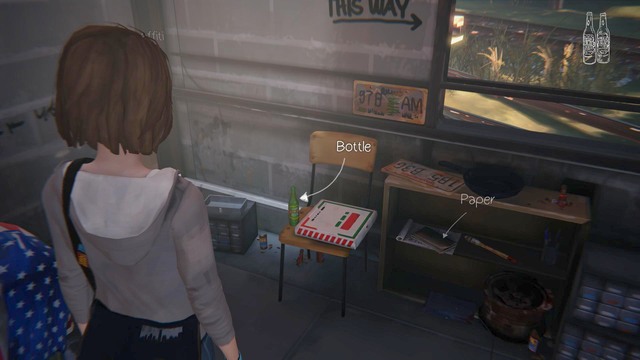
You have to make a bomb, as suggested in the text message from Warren. In order to do that you need several things: soda water (coke will do, as shown in the picture), sticky tape, sugar, and sodium chlorate. The first item, the coke, can be found in the corridor. Just use the vending machine, as shown in the picture.

The second item, sugar, is in the chemistry lab. It is on the teacher's desk. Before moving on, go to the far end of the classroom, and next to the skeleton you find some sodium chlorate. This is actually Weed killer, which is standing on the closet.
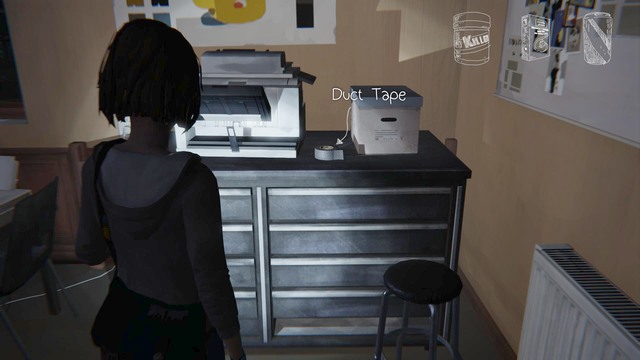
The last item is in Mr. Jefferson's classroom (the photographer). Approach the far end of the classroom to find Duct Tape next to the printing machine. Having collected all the items, go back to Chloe by the headmaster's office and try talking to her using Pipe Bomb dialogue option. After the explosion get inside the headmaster's office and rewind time to just before the explosion. Now you can just open the door for Chloe from the inside.
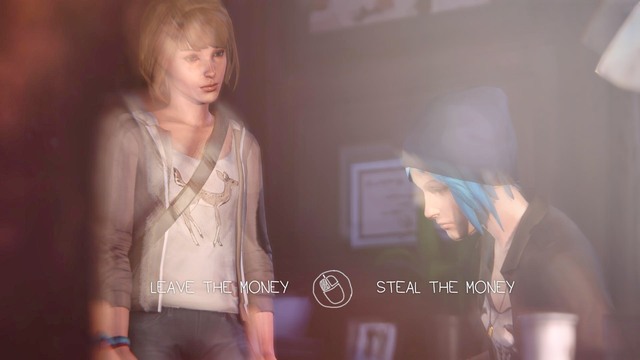
After the conversation with Chloe start searching the headmaster's office. Approach closets and shelves to find all the documents you need. Two files are on shelves and one is on the desk. When you find them all, talk to Chloe. During the conversation, Chloe will find a large sum of money in the headmaster's drawer, which she intends to steal. Now you face the first important choice in this episode.
Regardless of your decision, head to the swimming pool with Chloe.
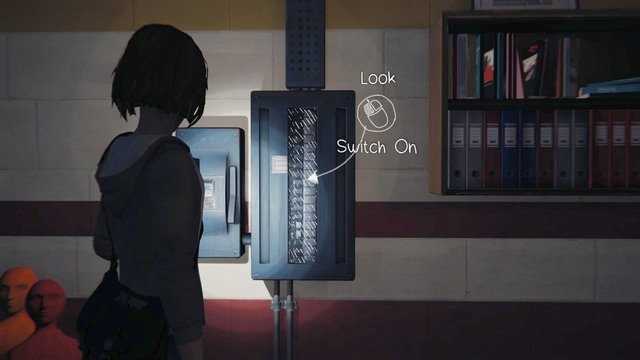
In the swimming pool talk to Chloe. It does not matter whether you choose boys' or girls' locker room (if you choose boys', Chloe will call you a "perv"). Go to the main hall, and from there head to the office. You will see a distribution board on the wall, approach it and turn on the power.
After turning on the power leave the room and go to Chloe. Undress and jump into the water, then talk to her. While talking to Chloe the security guards will enter the building and start looking for you. Get out of the water, get dressed, and head to the locker room with Chloe.
In order to sneak past the guard you have to wait for the moment when he is facing you away. The above picture shows a situation, in which you hide behind lockers and the flashlight shows the direction the guard is facing. When the security leaves the room, go back to the pool and head to the main exit after the guards.

After the escape from the school and the following wake-up call pick up the camera from the floor and take a selfie. Talk to Chloe and look around her room. In the wardrobe you will find clothes that once belonged to Amber. After getting changed talk to Chloe again, and you will face another important choice:
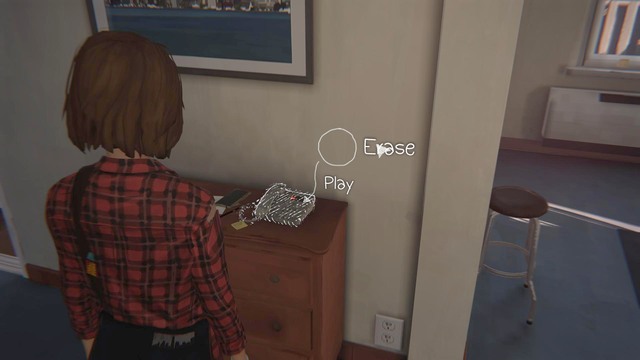
After going downstairs, approach the telephone, as seen in the picture, and hear the recorded message. You can also delete it right away, without having to rewind time. If you play the message, you will hear another reprimand on Chloe, which her mother will also hear. In order to save the girl potential troubles rewind time (before the mother has heard it) and erase the message.
Once you are done looking for anything interesting, talk to Chloe's mother. You will be offered a choice on what to have on breakfast, but you will need the ingredients. Milk is on the table in the dining room, whereas eggs are by the main door, in the shopping bag. After collecting these go back to Joyce and talk to her. Regardless of how the conversation goes, go to the dining room, sit by the table, and wait for Chloe's mom to serve you breakfast. During the argument between Chloe and Joyce, you can leave the room to look for evidence in the garage.

Your task is to get to Chloe's stepfather computer. In order to do this, you need to get the password that is protecting the computer. In the garage you can find a car. Inside the car, behind the sun visor you can find a receipt. On the back side of this receipt there is a date that is a password to the computer. Once you view the item in the Family section of the interface, you will unlock the proper password. The password is 11-27-08. While trying to guess the password, the computer may lock down after several failed attempts - rewind time if it happens.
After that go back to Chloe and talk to her. During the argument between David and Chloe you will face another important choice.
Regardless of the choice, the story unfolds the same way. Approach Chloe by the main door and talk to her, then leave the house and go with her to the next location.
After getting there talk to Chloe, then figure out how to get inside the RV on the parking lot. In order to do this go to the diner and talk to people there. First, talk to the police officer sitting by the counter. On selecting Nathan Prescott dialogue option, the policeman will reveal to you his secret that you can use against the man. In order to get more information from him rewind time and select the underlined option Prescott Deal.
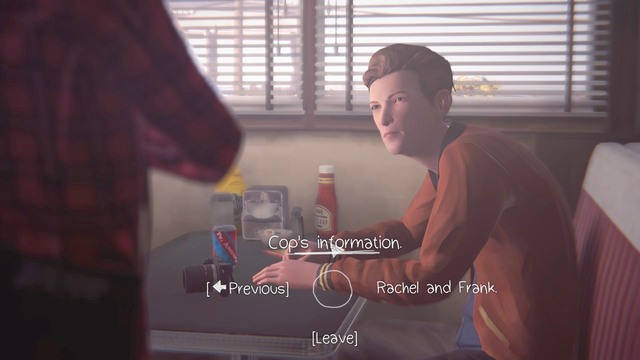
You can use the knowledge from the police officer in the conversation with Nathan. Simply select Cop's information option while talking to him. He will reveal a secret about Frank, the Blood Oath.
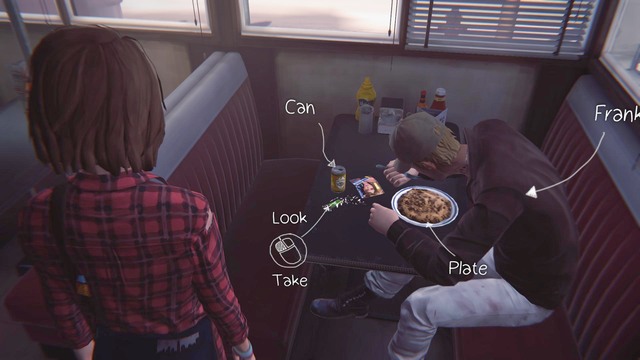
After the conversation with Nathan try talking to Frank. First use Nathan's information, the Blood Oath, and when he reveals his secret use Rachel's Photo option. At this point Frank will take out his belongings from his pocket, including the keys. Now just take the keys from the table and rewind time. After doing so the keys will be in your possession and Frank will suspect nothing.
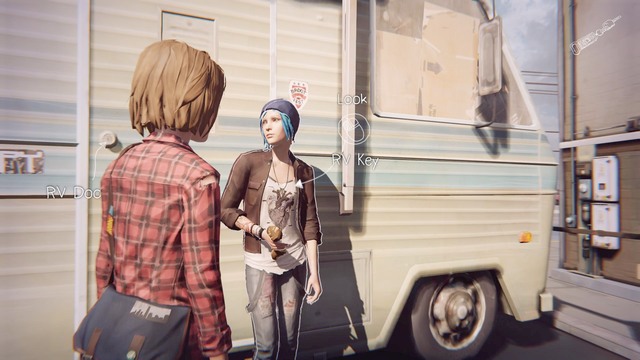
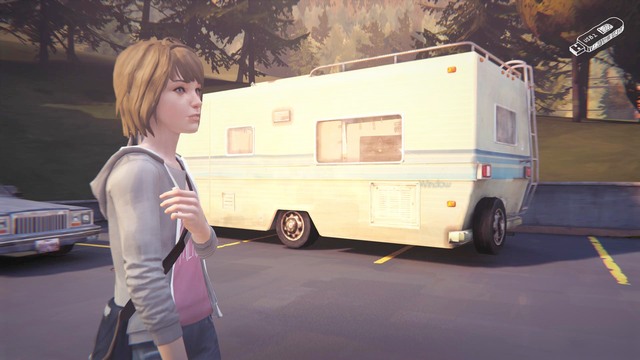
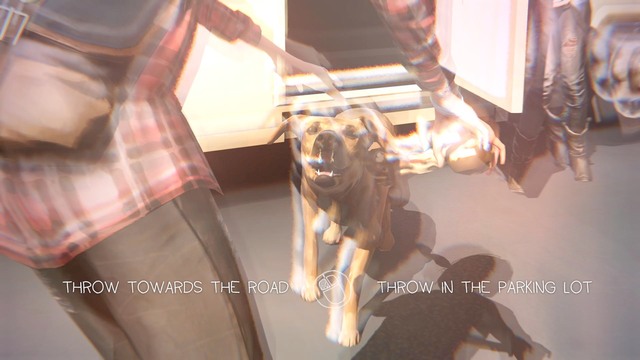
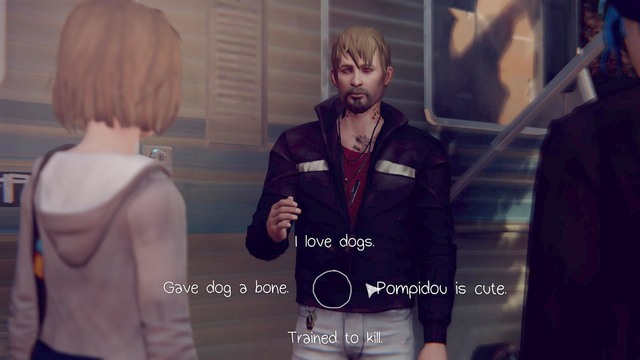
Leave the bar and return to Chloe by the RV, and select the RV Key option. On opening the door you will be attacked by a dog, and you will have to throw it a bone. You have two options:
Regardless of the choice, get inside the RV with Chloe, and look for evidence.
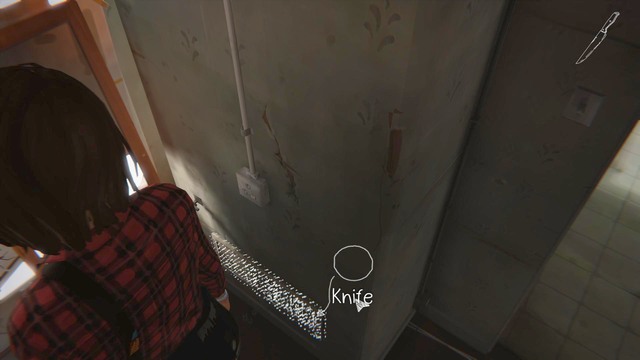
In order to find the evidence you have to go to Frank's bedroom and check the ventilation shaft. You need a tool to pry it open. There is a knife on the kitchen worktop, which will be just perfect for this. When you open the vent shaft, pick up the notebook lying there in order to learn some interesting facts about Amber and Frank. Tell Chloe of your findings.
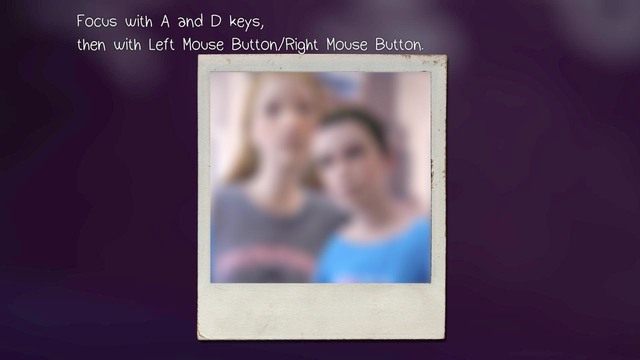
After the conversation and examining the photo, you will discover something interesting in it. The above picture shows the situation in which you have to set the right focus on the photo. In order to do that use the pairs of buttons as prompted on screen. First, adjust the picture with A and D keys, then with Left and Right Mouse Button for the maximum focus.
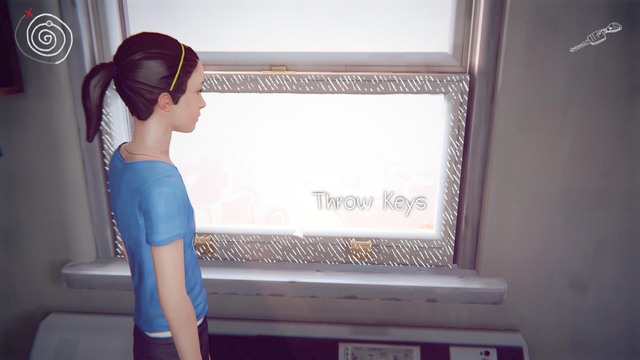
You will wake up as a 11-year-old Max, when you can alter the events that led to the death of Chloe's father. In order to do this, take the keys lying on the table next to the TV, and throw them out the window. After doing so, just watch the ending and learn that because of your interference in the past, instead of Chloe's father, Chloe herself had an accident.
 Important choice #1
The first important choice is in the first chapter of the episode. You have to chose whether to steal the money from the headmaster's office or not.
In this episode you will experience no real effects of this choice, let alone several changes in a conversation with Chloe. It is clear, at the moment, that the theft would later bring confrontation with the law, so it is better to leave the money.
 Important choice #2
The second important choice is whether to kiss Chloe.
Regardless of your choice, later events go on exactly the same way, there are no consequences of this choice.
 Important choice #3
The third important choice is during the argument between Chloe and David - you have to side with either of them.
Regardless of your choice, later events go on exactly the same way. The only difference is apparent in the conversation with Chloe.
 Important choice #4
The next important choice is the quick decision on where you throw the bone for Frank's dog. This choice is important, as one of the options results in dog becoming seriously injured.
 Important choice #5
The last important choice is in the last chapter of the episode, while searching Frank's RV.
In the RV you find a gun belonging to David. There are no consequences of the choice in this episode.
 Decision #1
The first decision, or rather the effect of your previous actions, is whether your plant survives or not. If you watered it in both the first and the second episode, the plant dies. In order for it to survive, you have to water it in only one episode.
 Decision #2
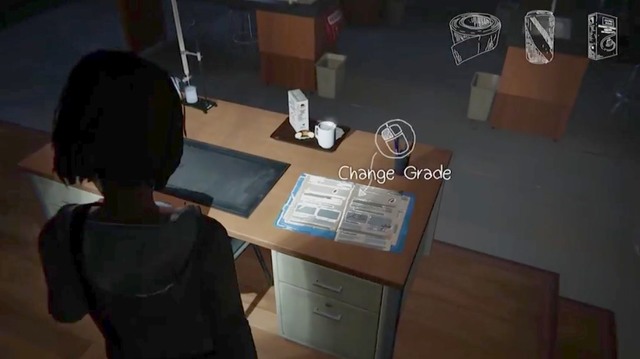
The second decision is when you are looking for ingredients for the bomb. While in the chemistry lab, approach the desk and search through the tests, as seen in the picture. You can find out about Warren's bad grade and change it.
 Decision #3
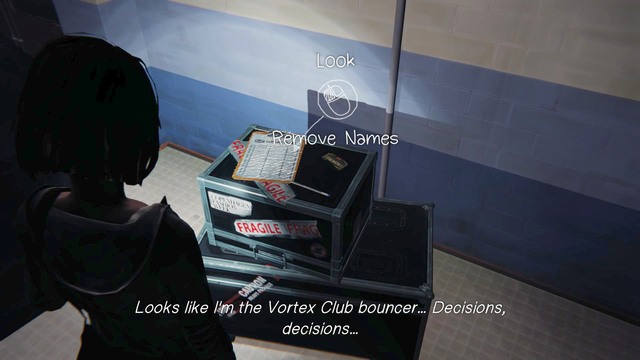
The next decision is about removing a couple of names from Vortex club invitations and putting your own there. You make this decision in the swimming pool. It is important not to talk to Chloe in the swimming pool before finding the boxes seen in the picture.
 Decision #5
Another decision is about the recorded message from a police officer in Chloe's house. The message will inform David that Chloe's car was seen in front of the swimming pool and that she is responsible for the break-in. Simply erase the message in order to spare her troubles. Playing the message also bears consequences. If you do that before erasing the message, you will have to rewind time, as Chloe's mom, Joyce, will hear it.
 Decision #6
Another decision is in the parking lot. You can again warn Alyssa against a danger. In order to do this you have to approach her so to see the Warn option. Right after she is splashed by a car, rewind time as much as you can and quickly select this option. You will only have a second or so to do this, so you might fail at the first time.
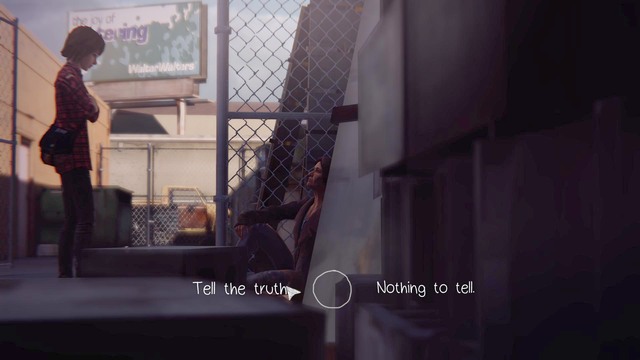
Decision #7In order to encounter the next decision you have to walk around the diner. Here you will find a homeless woman, whom you can tell the truth (warn her) or just ignore her.
 Decision #8
Another decision is in the moment shown in the picture, in the last chapter. You can take a picture of Chloe and her dad or not. To do this, approach the camera lying next to Chloe and take a picture.
 Decision #9
The last decision is whether or not you draw something on the fireplace. Approach it on the right side (as shown in the picture) to see this option.
 Photo #1
The first photo can be taken in the first chapter of the episode. Enter Victoria's room and approach the phosphorescent figurine standing on the dresser. Take a picture of the figurine to add the first photo to your collection.
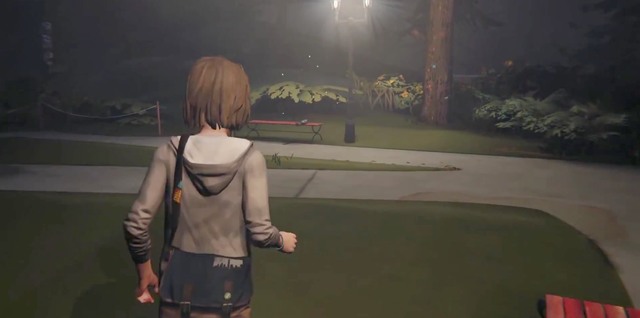 Photo #2
The second photo can be taken in the first chapter. Right after leaving the dormitories head toward the bench, as shown in the picture. You will find the familiar squirrel. In order to take a photo of it you have to approach the bench and rewind time. This way the squirrel will not have run off, letting you take the photo.
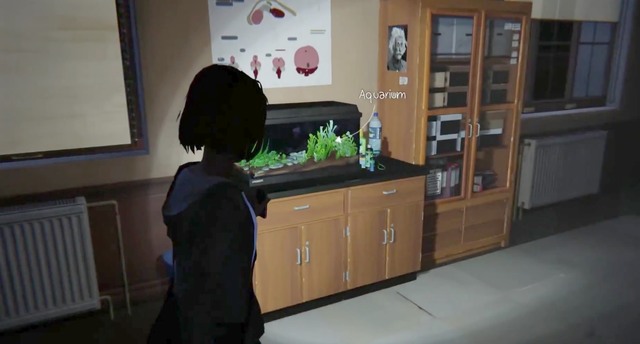 Photo #3
The third photo situation is in the second chapter. While in the chemistry lab, approach the aquarium shown in the picture, and turn its light on. The take a photo option will appear right after doing that.
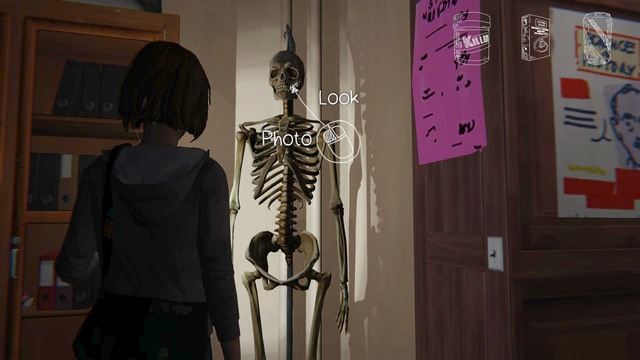 Photo #4
The fourth photo is in the chemistry lab. Right next to sodium chlorate that you find on the closet, there is a skeleton, as shown in the picture. Approach it to take a photo of it and expand your collection.
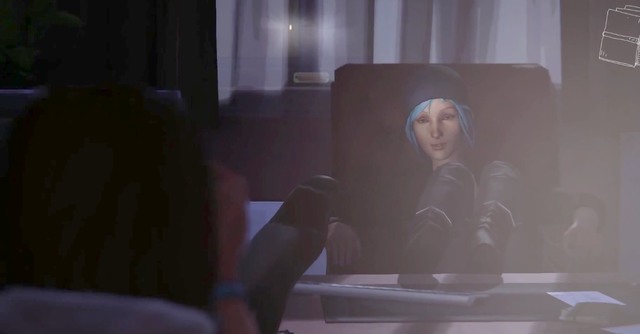 Photo #5
The fifth photo is in the headmaster's office. First, look at the bronze statue on the desk, and then look at Chloe to see the option of taking a photo of her.
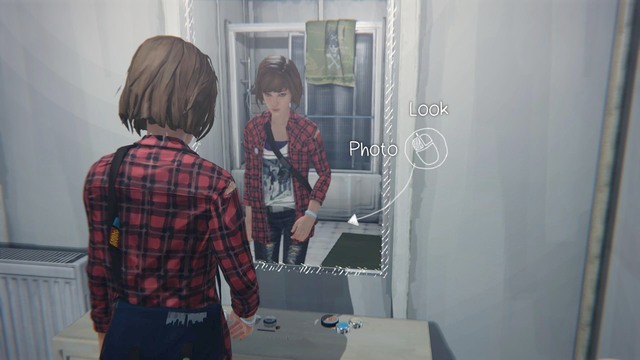 Photo #6
The next photo can be taken in Chloe's house. Right after leaving her room, instead of going downstairs, head to the bathroom and look in the mirror. You will be able to take the sixth photo.
 Photo #7
Another photo is a tricky one. In order to take it you have to perform a series of steps. Right after going down to the kitchen and meeting Joyce, open the window and scare off the bird sitting on the fridge on the left from the window. After scaring the bird away, approach the cabinet next to the TV and do the same. The next step is to scare it away from the fire place, so it finally flies outside through the window. Go outside to the yard and approach the place shown in the picture. This is where you can take a photo of the bird.
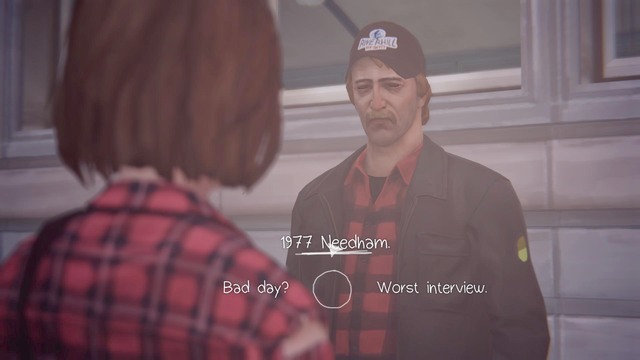 Photo #8
When you get to the diner, talk to the truck driver standing by the building. No matter which dialogue option you choose, he does not want to talk to you. Rewind time and use his words against him by selecting option 1977 Needham. Stunned, the driver will let you take a photo of his truck, so turn around to find the vehicle on the other side of the road.
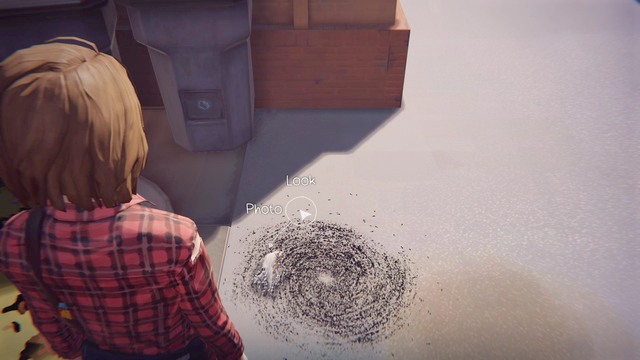 Photo #9
The last but one photo is in the last chapter. Walk around the diner to find an ant whirlpool. Approach it to take a photo of it.
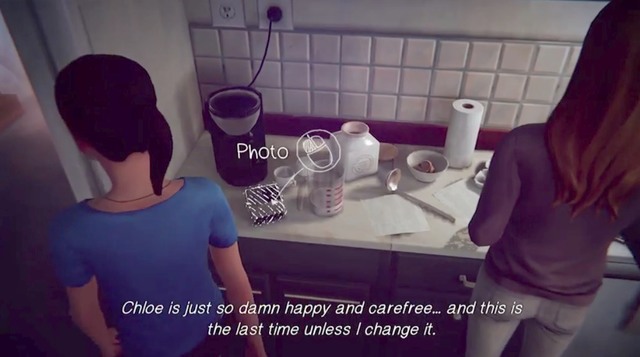 Photo #10
The last photo is in the last chapter. Approach Chloe to find a camera lying on the kitchen worktop on her left. You will see the option of taking the last photo to your collection.
This guide to the fourth episode of Life is Strange named Dark Room will help you get through the storyline and will focus on explaining the most important matters of the game. Inside you will find detailed description of important choices and their potential consequences. In the final part of the guide you will find a list of all photos that you can collect during the game. In this episode you will focus mostly on solving the riddle of the mysterious disappearance of Rachel Amber and you will learn who is responsible for it. The decisions you made in previous episodes will have a large impact on the story and they will be described here. Dark Room is the fourth episode of episodic adventure game of DONTNOD studios which has been made in cooperation with Square Enix. In the game you control eighteen year old girl named Max who struggles with everyday teenage life. During the game you will learn that you have paranormal powers that will allow you to travel back in time. Those powers will allow you to manipulate the decisions and events on which you wouldn't have impact otherwise. The fourth episode focuses on developing the storyline and will point you to the path picked during the previous episodes.
The guide to Dark Room, fourth episode of Life is Strange contains:
Jacek "Ramzes" Winkler ()
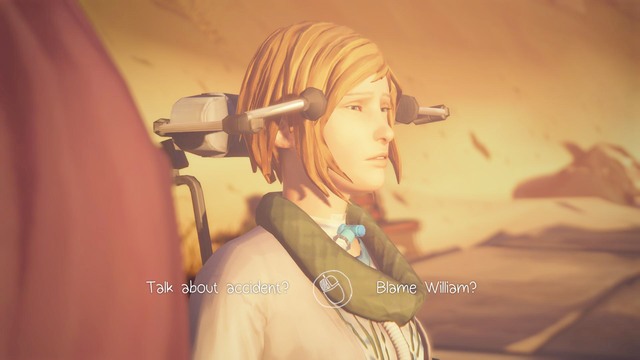
You start the episode where you ended the previous one. Due to traveling back in time and changing the events, Chloe had accident due to which her body is paralyzed. She is now using a wheelchair and the episode starts with a conversation at the sunset.
Talk about accident?
Blame William?
You mean Rachel?
What missing girl?
It might be
You think?
Don't say that
After reaching Chloe's house, walk to her bed and try to talk with her. She will ask you to give her water. The mug with it can be found on the drawer on the right side of the bed.
What do you remember?
You're right
Seems like yesterday
Which friends?
You have me
Are you lonely?
Are they okay?
They love you
I bet
Can they pay?

Chloe will ask you to watch a movie together. The disk with the movie can be found in the left drawer under the TV. Once you pick it up, select the DVD in the player shown on the picture above.
Kind of
No way
Too busy
Not really
That's okay
How is William?
After waking up, talk with Chloe. She will tell you that she has another headache and that she needs morphine that is hidden in the bathroom on the floor. Leave her room and go to the first floor. Once you reach the bathroom, walk towards the cabinet shown on the picture above and take the morphine. Then go back to Chloe and select the Morphine option.
After a short conversation Chloe will ask you to watch some old photos with her. The photo album can be found on the closet next to the window. After taking the album, go back to Chloe and pick the Photo Album option. While watching the photos, turn the pages until you reach the first important choice in this episode. Chloe will ask you to end her suffering by injecting her with the lethal dose of the morphine.
The choice might seem to be one of the most important ones but in fact it isn't. You can kill her or refuse but it will have no impact on the story. After a short cutscene, look at the photo in the album and try to get focus on it. To do it, press the direction buttons with the action buttons assigned to them (right to the right, left to the left).
After another change of the events, Chloe will come back as the girl known from the previous episodes (before the change of the events). Now you can take your first photo to the collection. Stand in the place shown on the picture above and select Chloe - Photo. After you look around her room, leave it and walk down.
IMPORTANT! Depending on decisions made in previous episode (about David), the situation in the garage will differ. In both cases you must get to David's locker and get information from inside.
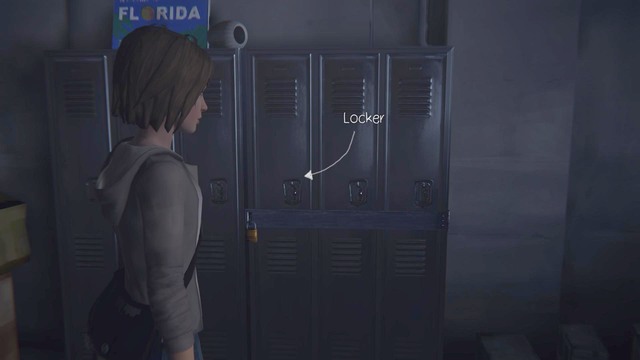
Situation in which David has been abandoned by Chloe's mom, Joyce, has been shown on the picture above. The locker can be opened in two ways. First one is using the crowbar that is lying on the shelf. All you need to do is destroy the lock and you will get inside. Second way is entering the code to the padlock. The code could have been found in the third episode of the game, when you were looking for the password to David's computer. The same (opened) padlock was lying on the shelf next to the computer with the code 7171 entered.
Situation in which David hadn't been abandoned by Joyce is similar, but the second solution is different than the one previously described. In order to open the locker you must obtain David's key. Sadly, you will have to trick him as he is standing next to them. In the room with the locker, on the other side, you will find a fuse box. Take one of the fuses out to get David's attention. Walk to the other side with the door and take the key from the shelf. You can also move back in time and take the keys before David enters the garage.
IMPORTANT! The description contains events in which Kate has been saved by you and she didn't commit suicide. If you haven't saved her, the part below won't appear in your game and immediately after leaving Chloe's house you will go together to the dormitory.
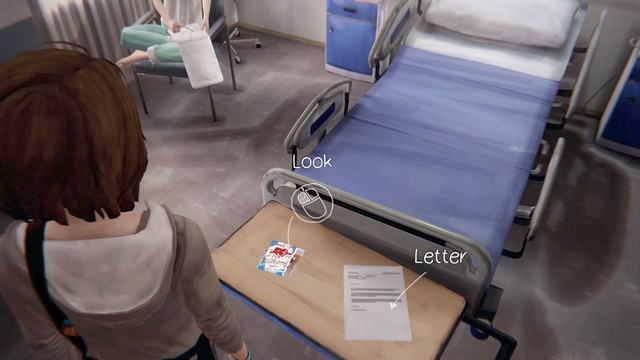
After obtaining the needed information, go back to Chloe and together you will go to hospital to visit Kate. Walk to the table shown on the picture above and read the letter lying next to the bed. After you read it, a new dialogue option will appear in conversation with Kate (pick the "Victoria" entry for Kate to help you in identifying the number of Nathan's room). After picking the "Victoria" entry, select "Nathan" and then "Vortex Club". Due to this you will obtain another ally in your investigation.
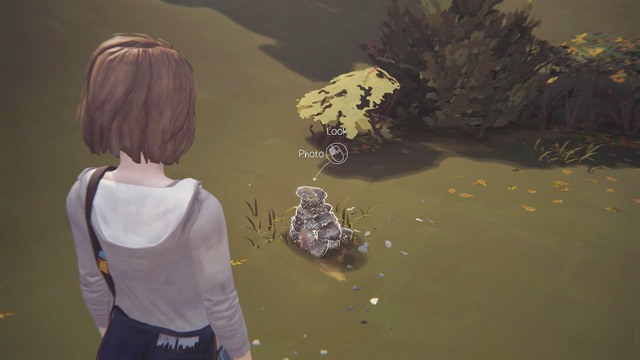
Once you reach the dormitory, your task will be to obtain information about Nathan's whereabouts. But before you do that, take the opportunity to collect all the photos to the album. First one can be found next to the totem. Walk towards the rocks shown on the picture and select the Photo option.

The second photo shows two squirrels. Walk towards Samuel and talk with him about the changes in Arcadia Bay. Pick Squirrel from the dialogue options to remind him that he must feed the animal. After he throws the food, one of the squirrels will run towards it and the second one will stand behind the fence. To take the photo you must lure the second squirrel with the food lying next to the Samuel (select the Lure option).
Talk with the teacher sitting next to Samuel after taking the photos. Select Nathan and You Know Him Better from the dialogue options to learn some interesting things. Once the conversation ends, walk towards Chloe and together enter the dormitory.
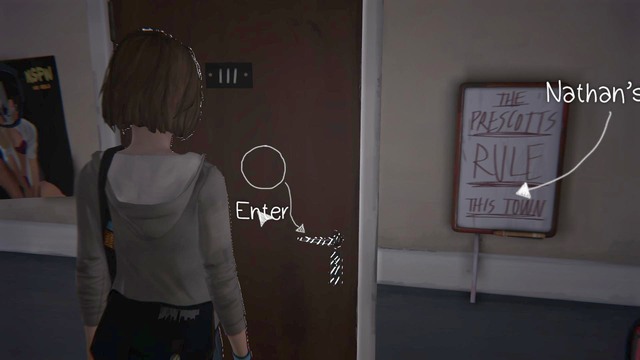
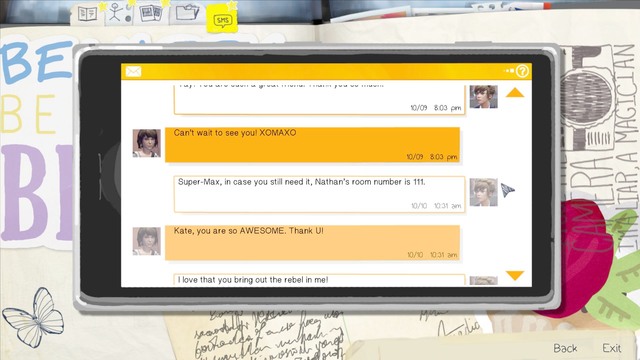
If you have saved Kate from the suicide attempt, she will text you the Nathan's room number. The room will be 111 shown on the picture above, you will find it on the left side of the hall. You must find Nathan's phone after entering the room.
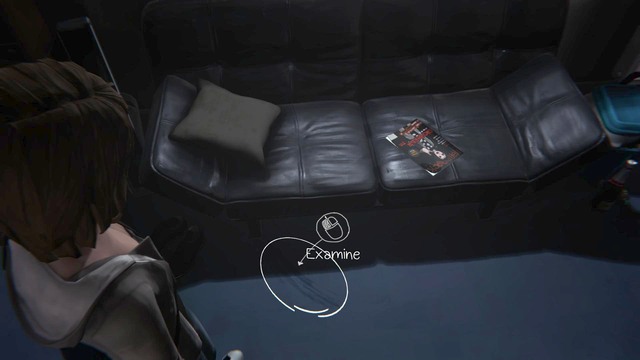
Walk towards the couch shown on the picture and you will find some tracks on the ground. Select Examine and, after marking the couch, select the Move option. After taking the phone, go back to Chloe and leave the dormitory.
Nathan himself will assault you. Warren will stand in your defense and will start attacking Nathan. Now you will have to make the second important decision:
No matter the choice, the game will go the same. You and Chloe will leave the dormitory.

After leaving the dormitory, you and Chloe will go to Frank. Before you knock to the door, walk towards the whales and take a photo to your collection. Once you're ready, go to Chloe.
IMPORTANT! Further part shows you three different endings (described in the important choices). What you say will determine which ending of the chapter you will receive.
1.) To receive the worst ending (Frank dies), you must select the following dialogue options:
2.) To receive the second ending (Frank is wounded), you must pick during the conversation with Chloe:
2.2) During the conversation with Frank:
3.) To receive the best ending (no one gets hurt, select the option with Chloe:
3.2) During the conversation with Frank select:
The situations described above create a whole as an important choice.
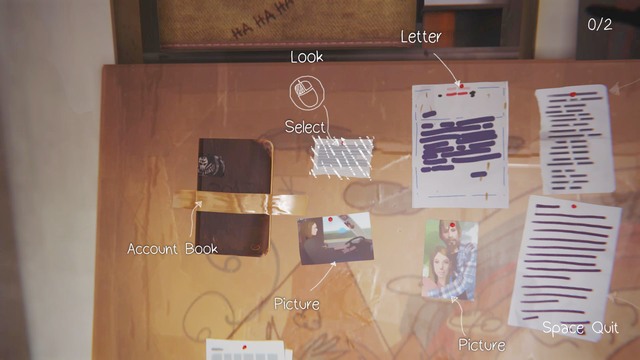
No matter how the situation at Frank's ended, you and Chloe will return home. You will have to connect all the gathered clues into one logical whole. First set has been shown on the picture above. Mark the Account Book that can be found on the left side and the Paper on the right.
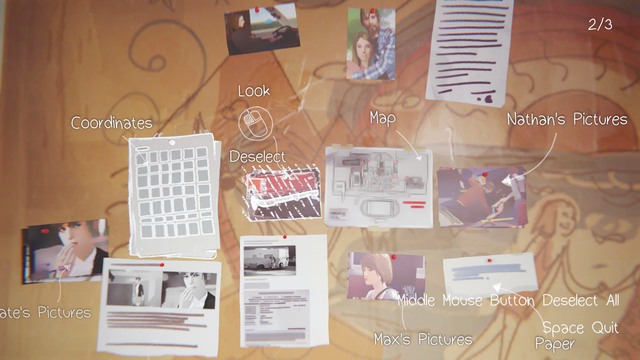
Second set of the clues is shown on the picture above. Select the shown paper pages (white paper shows the proper marking)
In the next clue you must mark three clues. First one are the coordinates, second the photo at the back of Nathan's car and third is Nathan's photo.
Next clues are about David. Mark the paper in the bottom right corner, the photo of a red car shown from the side and the second photo that shows its back (on the right side).
As for Nathan clues, mark the part of the paper inside, SIM card, phone and the paper on the left side.
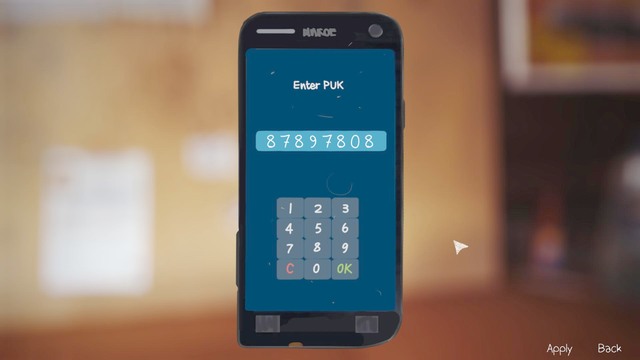
Next task will be unlocking Nathan's phone. You can type the proper PIN found in the clues (more specifically in Nathan's school documents, it is number 0829) or the PUK found on SIM card. If you make mistake three times when entering PIN, enter the PUK shown on the picture.
After unlocking Nathan's phone you must conclude all the gathered information. Select Investigate from the board on the right side and mark the three required clues. First one will be the middle paper in the first row. Second the paper shown on the picture and the third will be the paper in the lower row (second from the right side).

You and Chloe will go to the mysterious place found in the clues. Before you start looking for the alternative entrance to the shed, go left and take another photo to your album. If the bird shown on the picture will fly away before you take the photo, go back in time.
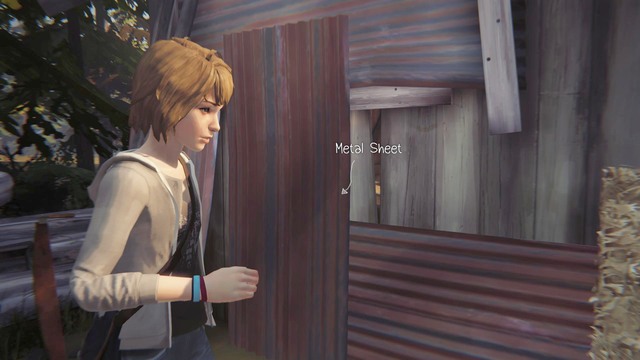
After taking the photo, turn around and walk towards the side wall of the shed. Here you will find a metal cover, use the Move command on it. Once you get inside, look around for something suspicious.
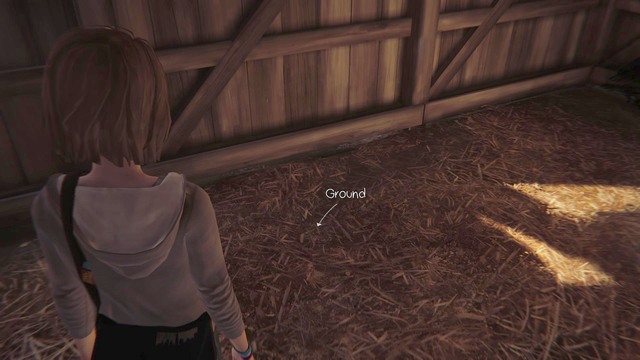
You will walk on the hay while exploring the shed. However, in some places you will hear a metal cover under your feet. Walk towards the wall shown on the picture and uncover the entrance to the basement. Once you uncover the entrance, you will see a padlock.
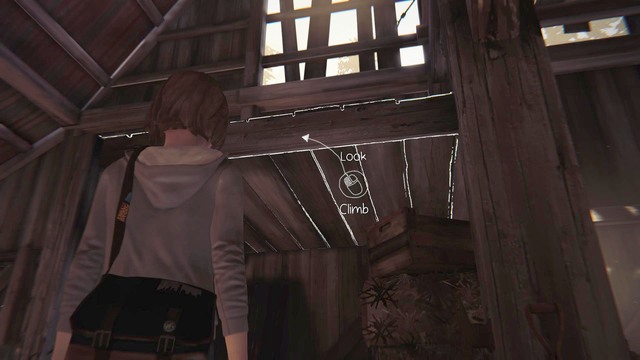
After an unsuccessful attempt at opening the padlock, walk towards the higher ledge shown on the picture and climb on it. Above, use the old engine to reach the first floor. Once you're there, you will find an owl, you can take a picture of it to your collection.
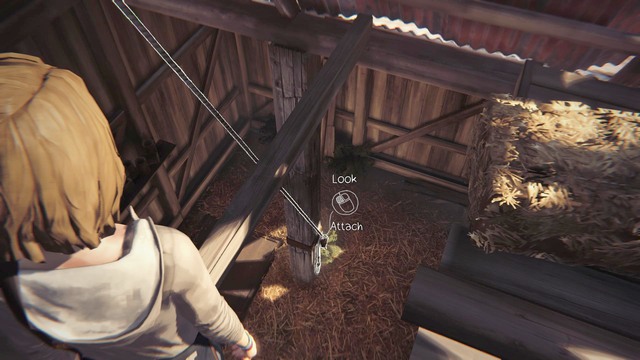
During the exploration, Max will decide to use the lever, rope and the old engine in order to open the hatch in the ground. Walk down and towards the hook shown on the picture. Attach it to the padlock and go back to the top. The old engine that allowed you to walk up will be perfect for lifting the hook on the hatch. Go back to the time when the engine was standing above, attach the rope and pull it down.
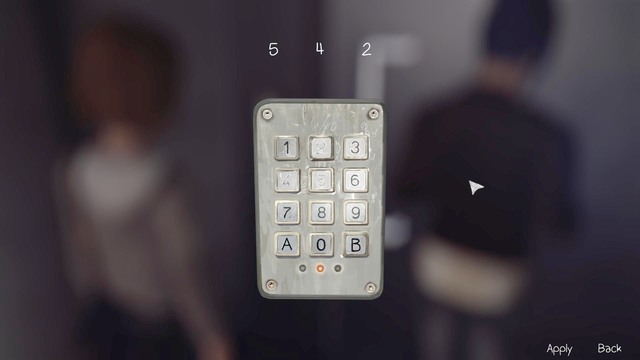
After getting to the basement you will see a technologically advanced bunker. You will have to guess the numerical password that protects the access inside. Max will inform you that some of the numbers are erased and that the password must be guessed by the method of attempts and failures. If you were observant, you should remember that the number was in Nathan's school documents (marked in red). The number is 542. After entering three wrong numbers the mechanism will block and you will have to go back in time.
After entering the bunker you will see a prepared photo shooting plan. You will find some clues that Kate and Rachel, under some strong narcotics, were forced to pose. Some information, including the photos, will be found in the computer. To find the rest you must walk towards the drawer next to Chloe and take the photo album set.
After escaping from the bunker, you and Chloe will go to the party in Vortex Club. After walking through the gates, walk towards the trampoline and look right. You will be able to take the last photo to your collection.

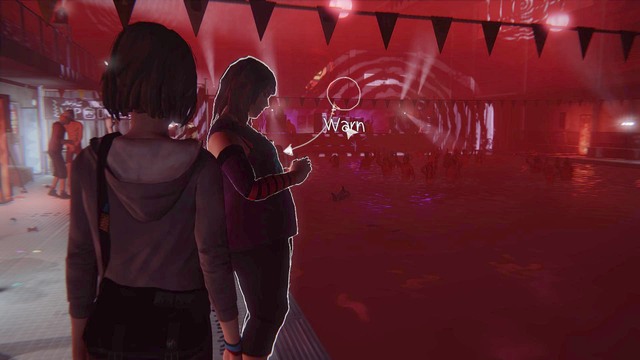
Go left, on the road to VIP section you will find Alyssa shown on the picture. Once again, you can warn her about the incoming danger. Once you reach the destination, talk with the girl about getting to the closed part of the party. After she refuse, you will have to find other way to get to the VIPs.
To get there through other way, walk to the other side of the pool and pull the blockade shown on the picture above. After getting to the other side, reverse the time so that everything will go back to normal.
Walk towards Victoria in the VIP section and talk with her about Nathan. During the conversation you can warn her about the bunker and that she will probably be the next victim or ignore it completely. Depending on the decisions made in previous episodes (the ones about being mean to Victoria), she can believe you and thank for the warning or ignore it. No matter the choice, go back to Chloe, leave the party together and go to the burial site of Rachel Amber.
Once you reach the destination, follow Chloe. While exploring, you will be assaulted by the enemy who will inject you with a drug and will kill Chloe. You will learn that your enemy isn't Nathan but Mr. Jefferson.
 Important choice #1
You will face the first important choice in this episode during the first chapter of the game. You will have to decide whether to kill Chloe (she asks you to do it) or refuse her.
The choice might seem to be important but in fact it isn't. You can kill her or refuse but the story will go exactly the same. The game will continue from the moment when you tried to change the course of events in the previous episode.
 Important choice #2
Second important choice can be found in the second chapter of the game. You will have to decide whether you will stop Warren from attacking Nathan or will you let him mercilessly beat him.
No matter the choice, the game will go as usual. You and Chloe will leave the dormitory.
 Important choice #3
The third important choice can be found in the third chapter of the episode. The choice is divided into three main parts and each of them has different ending that might have great consequences in the next episode. It's also the most expanded choice that you have faced in the game.
1.) To receive the worst ending (Frank dies), you must select the following dialogue options:
2.) To receive the second ending (Frank is wounded), you must pick during the conversation with Chloe:
2.2) During the conversation with Frank:
3.) To receive the best ending (no one gets hurt), select the option with Chloe:
3.2) During the conversation with Frank select:
The situations described above create a whole as an important choice.
 Important choice #4
Fourth and the last important choice can be found in the fourth chapter of the game. You will have to decide whether you warn Victoria from what you have seen or you ignore it and not tell her anything.
You won't find any consequences of your choice in this episode.
 Decision #1
First decision takes place during the moment shown on the picture in Chloe's home. If you open the window, the bird will survive. Otherwise it will die.
 Decision #2
Second decision is whether you will leave the bird nest uncovered after you take the photo in the garage. If you won't move the desk after taking the photo, you will receive the "You disturbed the bird's nest" option.
 Decision #3
Another important decision will be the method of opening David's locker. You can use the crowbar or enter the four digit code to the padlock. The code could have been found in the third episode of the game, when David's padlock was lying on the table. The code is 7171.
 Decision #4
Another decision is related to the events of first episode. If you have saved Kate from the suicide and asked for Victoria and Nathan in the hospital, she will help you in identifying the Nathan's room number.
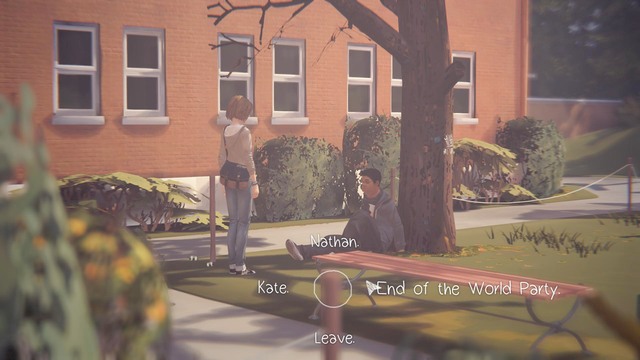 Decision #5
Another decision will be whether you will motivate Daniel to go to the party in Vortex Club. To do it, you must talk with him about the "End of the World Party" and then encourage him by selecting the "Go to the party" option.
 Decision #6
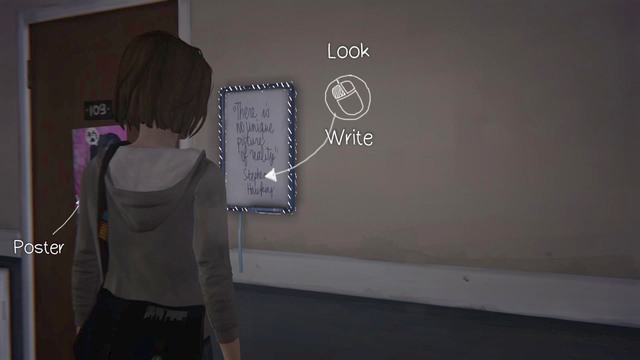
You will face another decision in the dormitory. You can draw something on Warren's plate or leave it as it is. Warren's room is marked with number 109.
 Decision #7
Seventh decision is made during the hacking of Nathan's phone. You can enter the PIN which has been placed in Nathan's school documents or PUK which can be found on SIM card.
 Decision #8
Eighth and last decision can be made during the party in Vortex Club. You can warn Alyssa again or completely ignore her suffering. If you won't be fast enough to warn her, travel back in time.
 Photo #1
The first photo can be taken in the second chapter of the game. After waking up, get off the bed and walk towards the back of sitting Chloe.
 Photo #2
Second photo can be taken in David's garage. Walk towards the desk protecting the nest at the gate of the garage and move it. After moving the desk you will be able to take the photo of the bird nest.
 Photo #3
Third photo shows rocks. You will find them in front of the dormitory, near the statue.
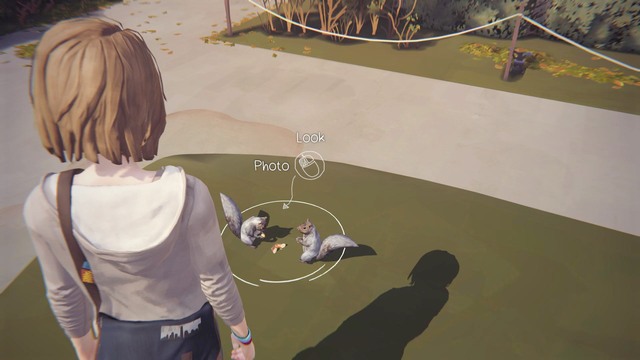 Photo #4
Walk to Samuel and talk with him about the changes in Arcadia Bay. Pick "Squirrel" from the dialogue options to remind him that he must feed her. After he throws the food, one of the squirrels will run towards it and the second one will stand behind the fence. To take the photo you must lure the second squirrel with the food lying next to Samuel (select the "Lure" option).
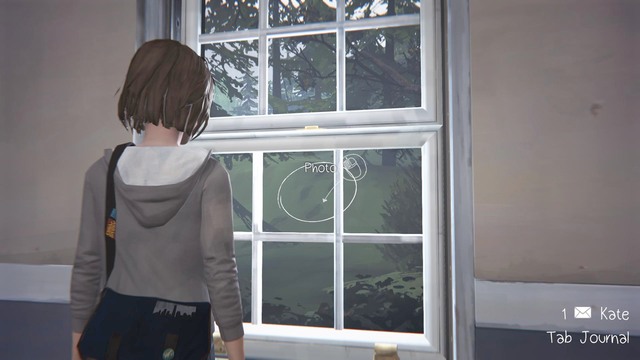 Photo #5
The fifth photo can be taken in the dormitory. Instead of going to Nathan's room, turn right and walk towards the window shown on the picture.
Photo #6Sixth photo can be taken in the third chapter. Before going to Frank's camping, walk towards the barrier and take the photo of dead whales.
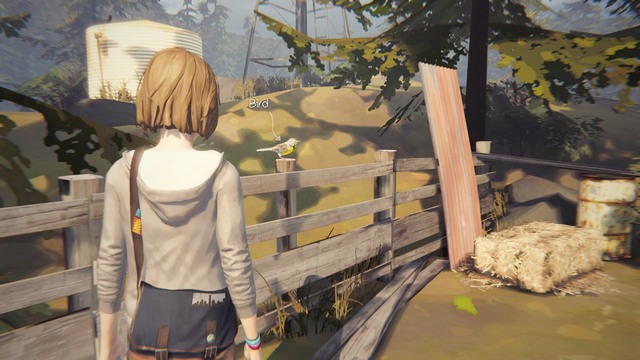 Photo #7
Photo number 7 can be taken before entering the shed. If the bird shown on the picture flies away before you take the photo, walk to the required distance and go back in time.
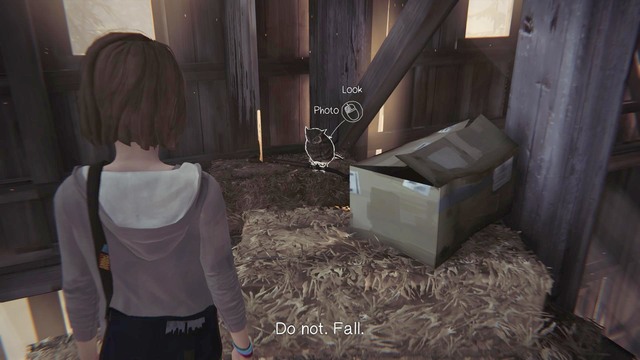 Photo #8
Eighth picture can be taken on the first floor in the shed. When you're above, walk towards the sleeping owl and take its picture.
 Photo #9
The penultimate photo can be taken at the beginning of Vortex Club party. After entering the room, walk towards the trampoline and look right. After positioning yourself properly you will be able to take the photo.
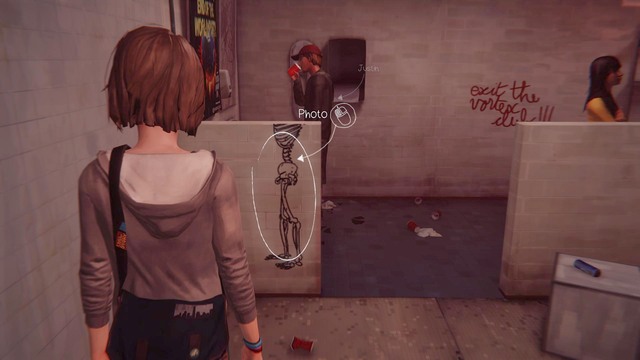 Photo #10
Last photo can be taken in the bathroom, on the party in Vortex Club. The bathroom can be found on the left side from the entrance to VIP section.
Polarized is the fifth and final episode of the adventure game developed by DontnoD studio. This guide will help you in completing the storyline and riddles hidden in the game. Here you will find a detailed walkthrough for all chapters with explained differences between choices from previous episodes. The guide also contains detailed descriptions of important choices and their consequences. Here you will also find information about the endings of the game. The final part of the guide is a chapter about collectibles. In the last episode you will focus on solving the riddle from the previous episodes.
Polarized is the fifth and final episode of the episodic adventure game developed by DONTNOD studio in cooperation with Square Enix. In the game you play as eighteen year old girl named Max who faces everyday teenage life. During the game you discover that you possess paranormal abilities that allow you to travel back in time. This allows you to manipulate decisions and events on which you earlier had no influence.
The guide to Life is Strange: Polarized contains:
Jacek "Ramzes" Winkler ()
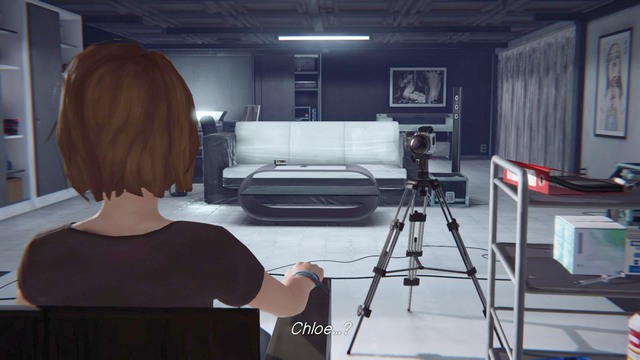
After waking up in the "dark room", look around. You can try to release yourself from the chains. In order to do it, look on your right foot and select Detach. After freeing the right foot, look at the trolley and pull it to yourself. Your photo will be laying on the right side of the trolley. Select the Photo - Look option and try to set the sharpness of the photo by clicking the proper buttons.
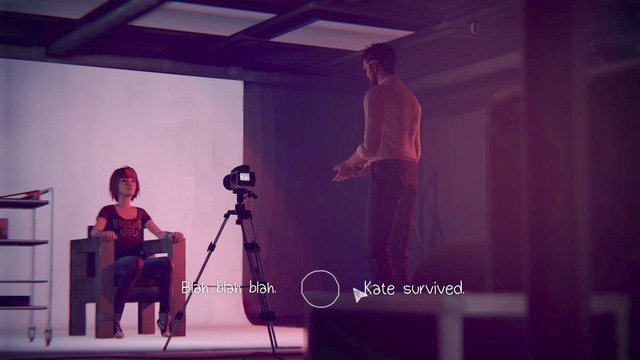
Talk with Jefferson after moving to different reality. No matter how the conversation will go, once it is over look at the journal on the left side. Once you hear Max's commentary, look at Jefferson and try to talk with him. From all the answers to his question, select the underlined option My Diary. The next step will be adjusting the sharpness on the picture in the journal.
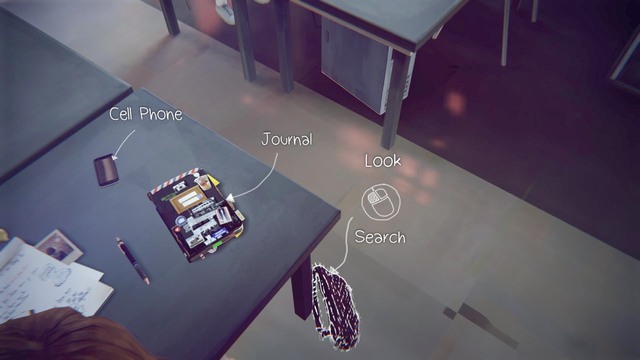
After adjusting the sharpness, you will wake up in the classroom, in the place and time that you should know very well. As you know from the previous episodes, the correct answer to Jefferson's question is Daguerreian Process. You must warn David about what Jefferson is planning. In order to do it, you must search for his number in the bag that is lying on your right side. In order to get the number, you must turn the page while reading the book. Now you can also take the first photo to your album. Walk towards Kate and select the Comfort Her option. Look at her again after a short conversation and you will be able to take the picture. Walk towards Jefferson after that and sign to the contest by giving him your picture: Jefferson - Photo.
After you do it, you will change the time and place again. You will find yourself in a plane, on your way to the gallery. After talking with the director and landing, look around through the gallery. On the lower floor you will find a woman with her back turned on you. You can take a picture of her to your collection. After that, go to the upper floor and look at your picture. After you receive an alarming call from Chloe, go back to the upper floor, walk towards your photo and adjust its sharpness. The visitors will be interrupting you few times, repeat the process until you succeed. Once you appear in your room, look at the picture you just took and tear it.
After another change of time and place, you will return to the "dark room". This time David will come to your aid. For David to defeat Jefferson you must do certain activities in the right order. First, ask Jefferson for water - Some Water?. Second, when Jefferson is taking the tripod, you must warn David at right time. In order to do it, look at Jefferson and select the Warn option. It is important to select this option once Jefferson is standing near the door. Otherwise, Max will be knocked down. The next step, when Jefferson and David start fighting, is looking at the table on the right side and selecting the Pull option. Last step will be selecting the Table - Warn option. The table with which you must interact is located in front of the coach. If you failed to do any of the steps, you must go back in time and try again. After David disarms Jefferson, walk towards him and talk to Chloe's stepfather. No matter how the conversation will go, you will be forced to make an important choice. You can tell David the truth about Chloe or keep it to yourself. If you tell the truth, David will kill Jefferson. Deciding not to tell the truth will have an opposite effect. Jefferson will be arrested and David will calmly return to his job.
After receiving the message, you will go to Warren for the pictures. You will find Joyce's bar and its surroundings in complete ruins. You will have to decide whether you will help the townsfolk or run straight for the pictures. These decisions will be noted in the journal. The first one is saving the truck driver. Walk towards him and select the Help option. Do the same with Evan. If you were a witness to his death, go back in time and warn him. Alyssa can be found on the right side of the location. Walk up and talk with her. Then look left and use the board to help her escape. On the opposite side from the place with Alyssa, you will find the main entrance. Use it and activate the sprinklers. This action will kill the man imprisoned there, so walk towards him and turn back the time. After that, talk with him and help him escape. When the man will leave the room, activate the sprinklers again.
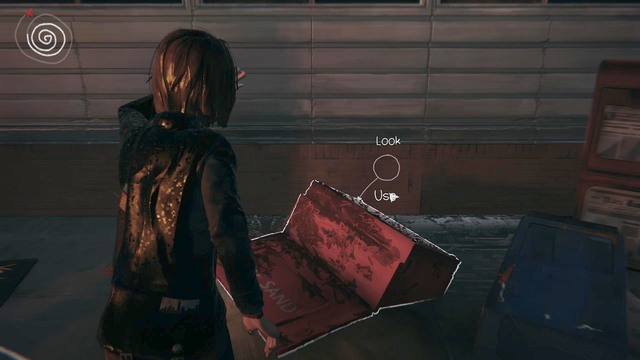
Once you put the fire down, you can walk outside the building through the window. Walk towards the bar and wait until it explodes. Then go back in time and walk towards the sand next to the bar. Use it and then look left where you will notice a dead whale. You can take a picture of the animal to your collection. Before you enter the bar, stop near the car hanging on the roof. Once you position yourself properly, you will be able to take another picture for the journal. Inside the bar you can talk with Joyce, this will unlock another choice in your journal. How you will speak about David will determine Joyce's opinion. You can convince her to David or ignore it completely. After the conversation, walk towards Warren and ask him to give you the photo. During the conversation you can tell him the truth about your abilities. The final part of the conversation will be an important choice. You can hug Warren, kiss Warren or show him no affection at all and leave. No matter the choice, look at the picture lying on the table and try adjusting its sharpness.
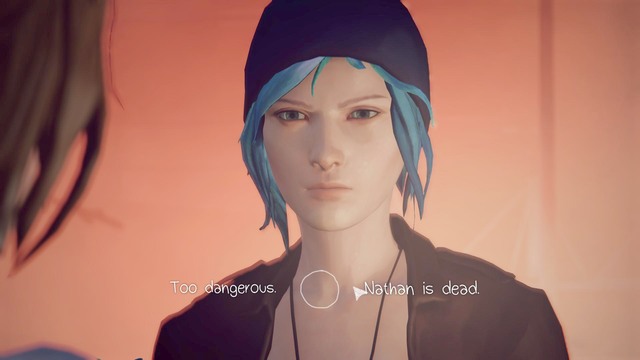
The last action in this chapter will be a conversation with Chloe. You will have to convince her to believe you and make her not go to the Vortex Club party. First answer will be Nathan is Dead. Second, Jefferson hurt me. Third will be Terrible choice and fourth, David saved me. If you fail to convince Chloe, all you need to do is go back in time.
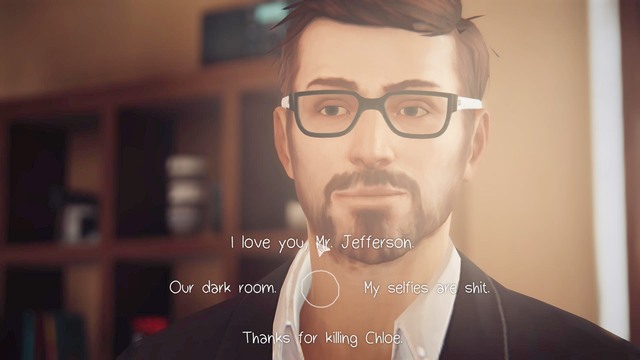
The whole chapter three consists of Max's nightmare. First walk towards the table with writing. After you interact with it twice, the text will change into Chloe 4life. You can take a picture of it to your collection. Once you do it, walk towards the door and try to leave the classroom. Jefferson will stop you, you will have to answer his question. Select any option you want and use the exit door again.
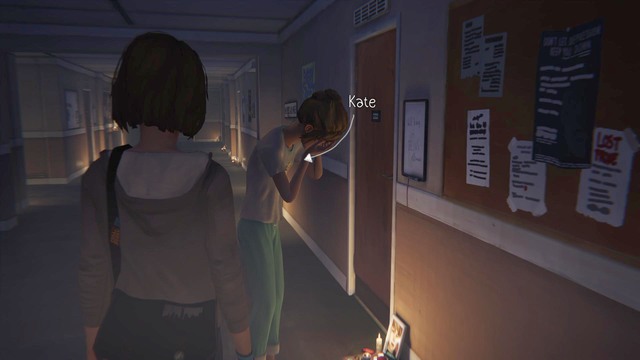
The next sequence takes place in the dormitory. First walk towards the crying Kate and listen to what she has to say. Once Kate will jump through the door, use them as well in order to get to the next corridor. Now your objective is to find the correct door. First however, you must walk towards the table on the right side and take the key to room 218. Use the door to room 218 and you will get to another corridor. Once again, you must find the correct room. To do it, you must listen to the voice of the girl that is talking to you. The girl will be Amber, so walk to the map on the right side and find her room. It will be room 224, walk inside in order to get to the next corridor. Now you will become Victoria. Find your (Victoria's) room on the map and walk through the door (room 221). In the final phase you will be Max again. Go to your room. However, before you do it, walk to the table on which the key was lying earlier. Take the picture of the squirrels seen outside the window.
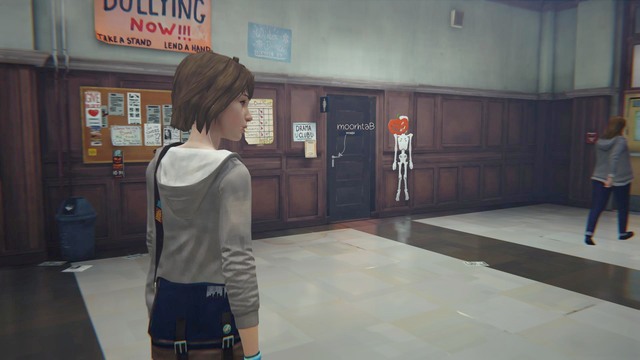
The next sequence will be played backwards. You must get to the room shown on the picture - the bathroom. Before you do it, first take a picture of the skeleton which you will find on the opposite wall. To do it, you must stand in front of it and go back in time.
Chapter four is also a nightmare of unconscious Max. You must sneak through the whole path and avoid the light. The lighthouse will show you the direction.
After walking to the next section, you can find your locker. While still avoiding the light, go to the right side and hide in the small passage. On your right side you will find a small path which will lead you to the corner of the location. There you will find the locker and inside an item needed for the picture: Locker - Open.
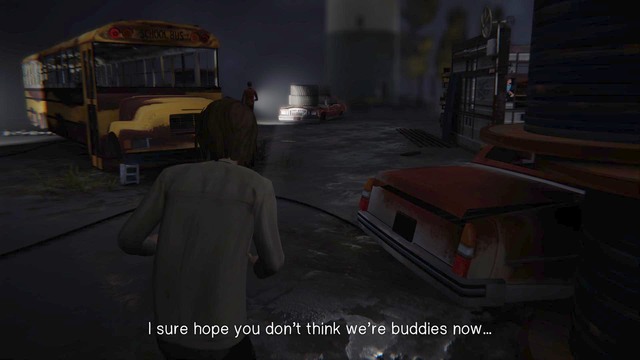
On the garbage dump you can collect five bottles that are required for taking another photo. The bottles are placed in four corners, on the red cars. The last bottle is in a small room with a chair. After collecting all five bottles, go towards the lighthouse and place them on the ledge. Once you take the picture, sit on the bench near the lighthouse. You will reach the next section.
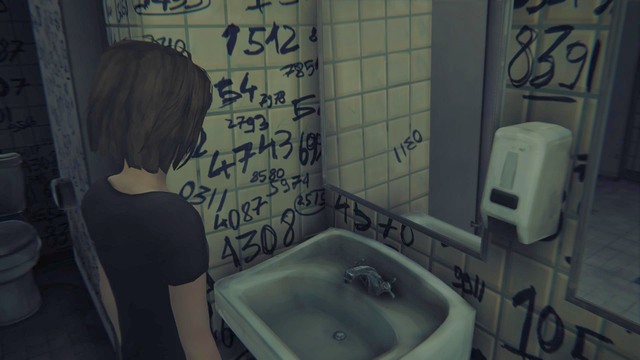
This sequence is one of the harder ones. First use the keyboard at the door and enter any code. After entering bad code, numbers will appear in the bathroom. You will have to find the correct one, which is pretty well hidden. If you are perceptive, you will notice that only one code is reflected in the mirror (look at the picture). The proper code in this case is 0311. After typing it you will get to Joyce's bar. Walk towards Max and try talking with her. No matter how the conversation will go, you will find yourself in a surreal gallery of your own memories. Keep going towards the lighthouse.
The last action that you must do will be making the most important decision in the game. You will have to choose whether to sacrifice Chloe life in order to save Arcadia Bay or save Arcadia by killing Chloe.
Life is Strange offers few dozens of choices while playing the game. You could assume that at least few of those "important choices" will reflect in the game's finale. Unfortunately, that is not the case here. The only difference between the two available endings is a short cutscene which practically ignores everything that you encountered during the playthrough. It doesn't matter if you saved Kate, who wanted to commit suicide. It doesn't matter if you helped Alyssa to avoid accidents. It doesn't matter how you acted in regards to other characters in the game. The only thing that matters are the final minutes of the last episode during which you make your last and "the only important" choice.
The choice obviously refers to whom you want to sacrifice at the end of the game. After a series of surreal scenes made by the creators you talk to Chloe and you find out that the only choice is the choice between her and Arcadia Bay. The endings are neither "good" nor "bad" (you could even say that the best ending is the one in which you sacrifice Chloe because it has the best soundtrack during the cutscene).
Ending 1 - Sacrifice Chloe
The first ending - Sacrifice Chloe - results in sacrificing your friend in order to save Arcadia Bay from a catastrophe - a tornado. Because of the way the creators presented this ending, you might think that it is the "worse" choice, the sad one.
Ending 2 - Sacrifice Arcadia Bay
The second ending - Sacrifice Arcadia Bay - results in sacrificing the whole city with all its inhabitants just to save your best friend Chloe. The choice might seem to be the worse one because of the number of casualties and damage to the city. However, that is not the case. The creators presented it in such a way that you see yourself and Chloe leaving the destroyed Arcadia Bay in peace.
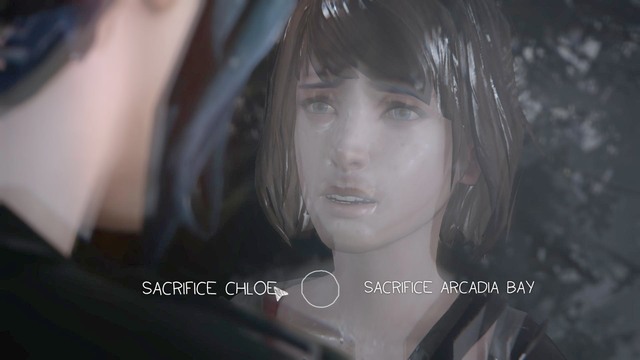 The only important choice in the game
First, and at the same the last, important choice in the game is decision about who you want to sacrifice. You will make this choice in the last minutes of the episode.
Depending on the choice you make, the game will show you adequate final cutscene that will sum up the whole game.
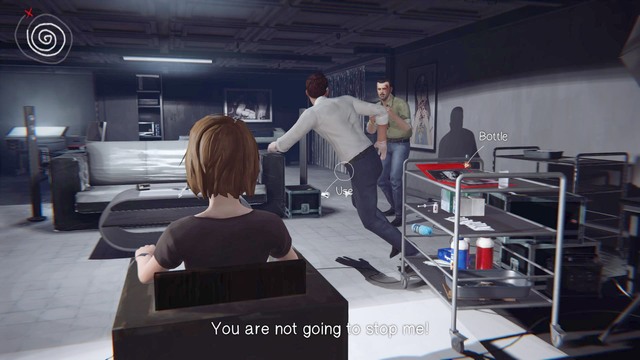 Decision #1
First decision is related to the situation shown in the "dark room". You can protect David from being killed and receiving damage. You must perform few actions in such order so that David will defeat Jefferson. First, ask Jefferson for water - Some Water?. Then, when Jefferson is taking the tripod, you must warn David at the right time. Simply look at Jefferson and select the Warn option. It is important to do it at the right time, once Jefferson is standing next to the door. Otherwise Max will be knocked down. The next step is looking at the table on the right side and selecting the Pull option during the fight between Jefferson and David. The last step is selecting the Table - Warn option. This table is located in front of the coach. If you failed to do any of the steps, you will have to go back in time and try again.
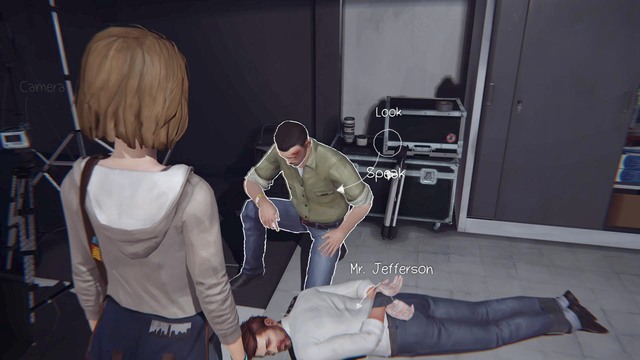 Decision #2
Decision #2 is related to the events after being saved by David. If during the conversation you will tell David the truth, he will kill Jefferson. If you will lie, Jefferson will live.
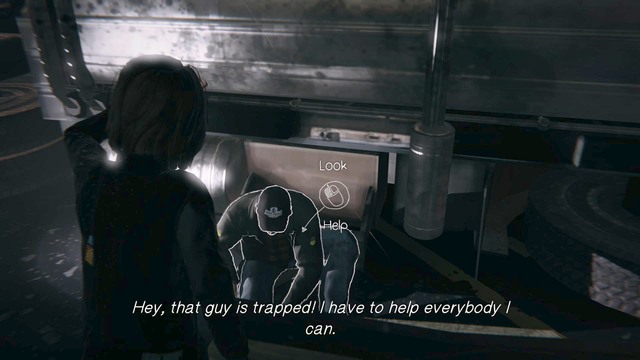 Decision #3
Decision #3 is the time when you can help the people you know near Joyce's bar. Walk towards the truck driver and help him or ignore him completely.
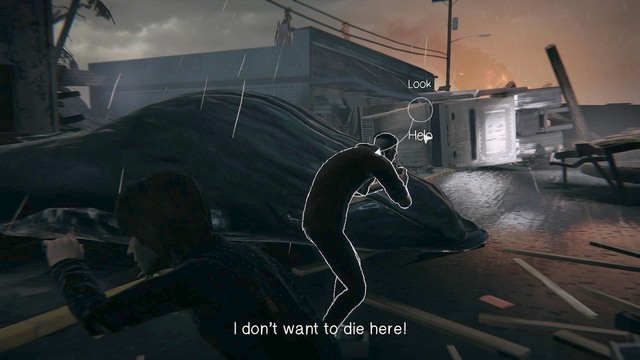 Decision #4
The next decision is related to helping Evan. If you witnessed his death and you want to save him, go back in time and select the Help Evan option.
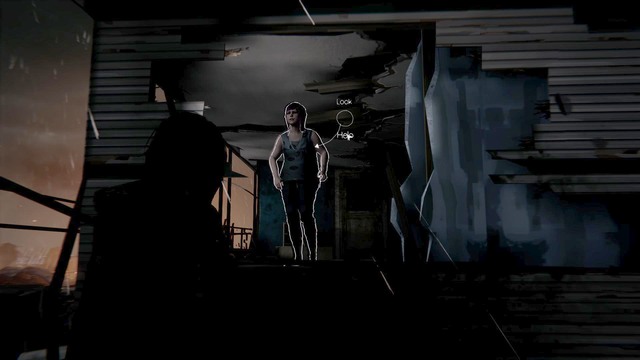 Decision #5
Another decision is related to Alyssa's situation. If you want to save her, walk towards her and use the board located on the left side. This will allow her to safely get out.
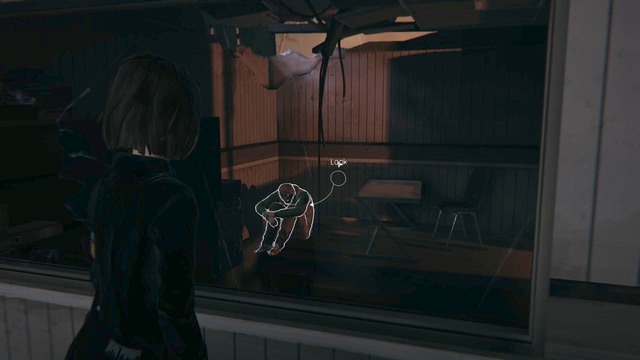 Decision #6
Another decision is related to situation of the fisherman. In order to save him, first you must electrocute him by activating the anti fire system. After activating it, the fire that blocks the way to the fisherman will be put off. Go to that room. After you do it, go back in time and help the man.
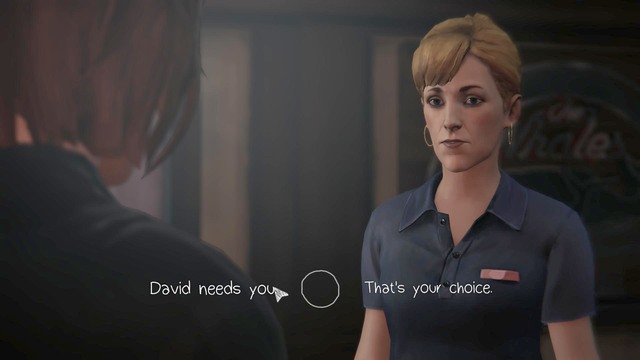 Decision #7
Decision number 7 is related to the conversation with Joyce. You can decide whether you want to convince her to forgive David or completely ignore it.
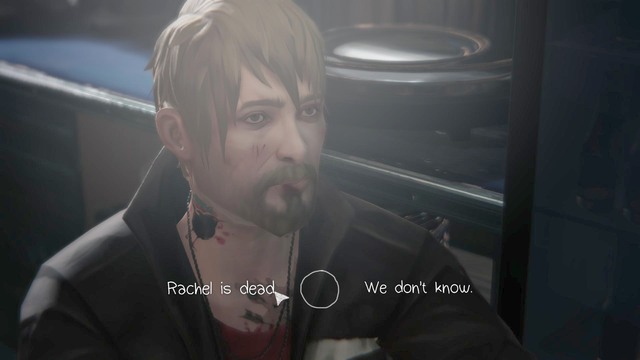 Decision #8
Eighth decision is related to conversation with Frank. You can decide whether you tell him the truth about the vanishing of Rachel Amber or you lie to him.
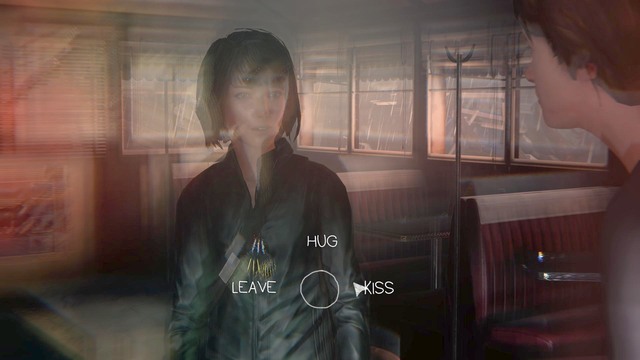 Decision #9
The last decision is related to showing your affection to Warren. You can kiss him, hug him or leave without doing anything.
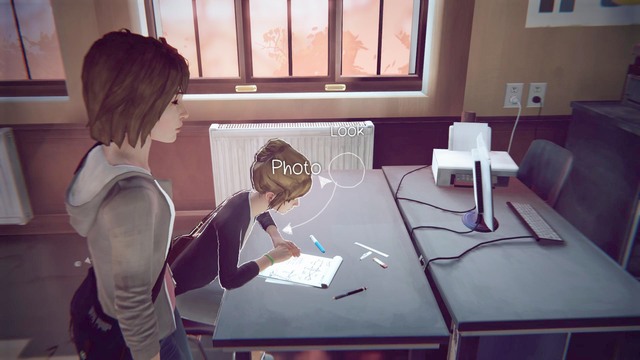 Photo #1
You can take the first picture after waking up in Jefferson's classroom. Walk towards Kate and select the Comfort option. After a short conversation you will be able to take a picture of her.
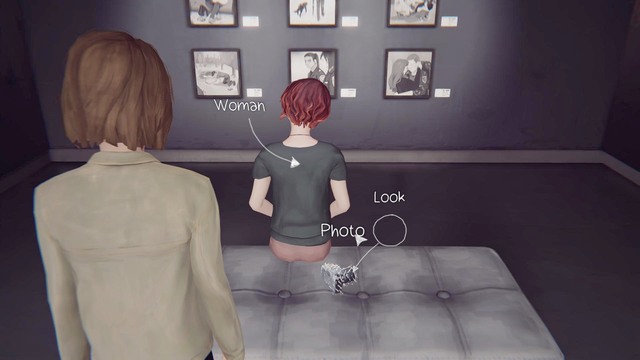 Photo #2
You can take the second picture to your collection when you're in the gallery. Walk to the lower level and towards the women sitting with her back turned on you. Look at the camera lying next to her and take the picture.
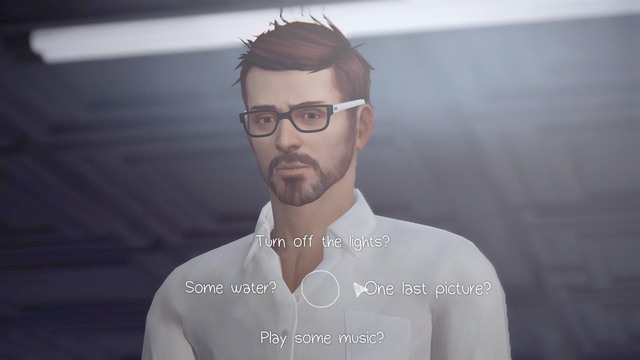 Photo #3
You will take the third picture to your collection thanks to the conversation with Jefferson. In order to gain access to the photo you must select the One last picture? option.
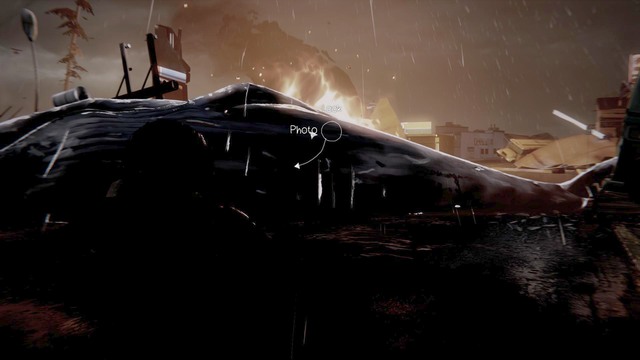 Photo #4
You will take the fourth picture of a dead whale lying next to the entrance to Joyce's bar. First you must stop the fire, only then you will have the option to take the picture.
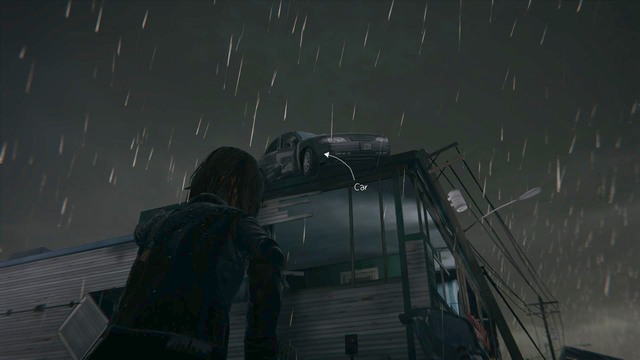 Photo #5
The fifth photo can be taken next to the entrance to Joyce's bar. Look at the roof of the nearby building where a car will be hanging.
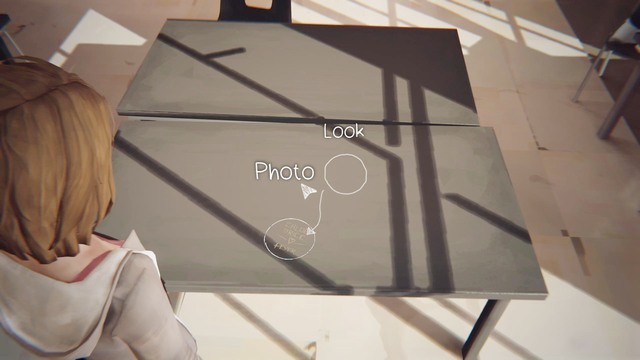 Photo #6
After waking up in Jefferson's classroom, walk towards the table in the middle of the room and change the text to Chloe 4 Life and then take the picture.
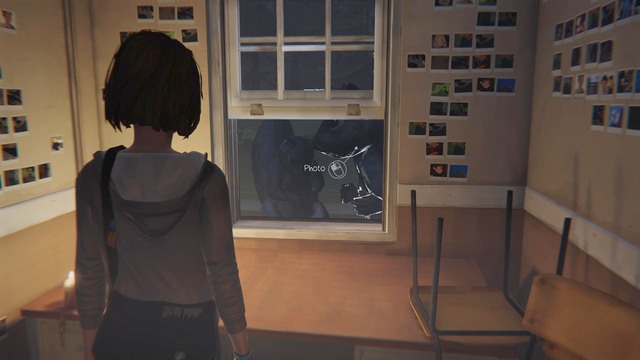 Photo #7
You will take the seventh picture during the nightmare dream. In the fourth phase (as Max), walk towards the window on the right side of the corridor. There you will find two squirrels, take a photo of them.
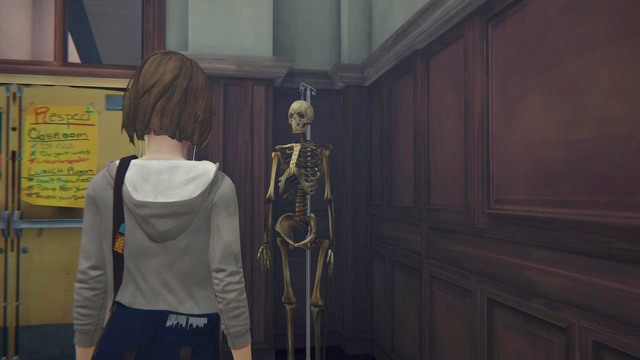 Photo #8
You will take the eighth picture after leaving Jefferson's classroom. Before you go to the bathroom, turn right and stand in front of the skeleton shown on the picture. In order to gain access to the photo, you must go back in time to the right moment.
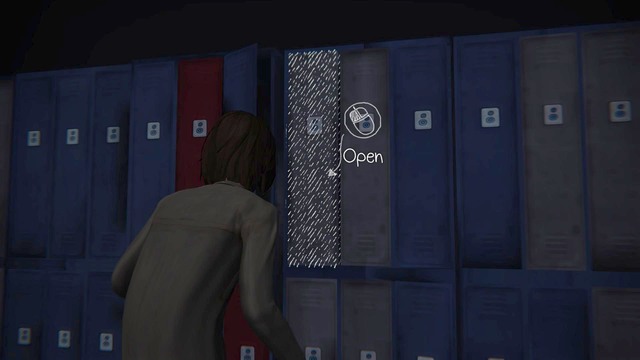 Photo #9
You will take the ninth picture during the sequence with school lockers. Go to the right side, there you will reach a passage to Max's locker. After opening it you will be able to take the picture.
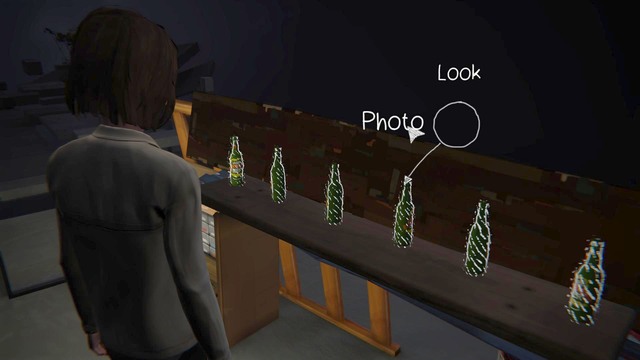 Photo #10
You will take the last picture after collecting five bottles on the garbage dump. Four of them can be found on the orange cars in each corner of the location. The fifth one will be in a room with a chair.


 LEGO Batman 3: Beyond Gotham Game Guide & Walkthrough
 Legends Of Dawn Game Guide & Walkthrough
 LEGO The Lord of the Rings Game Guide & WalkthroughLife is Strange Game Guide & Walkthrough
 Lost Planet 3 Game Guide & Walkthrough