Welcome to the unofficial guide to "Just Cause", one of the most playable action games of this year. Before we'll proceed to the main part of this guide, you should know a few things. "Just Cause" is a fairly long game. You will have to spend at least 20-25 hours in order to finish it. Thankfully, the game's not too complicated. Most of the actions you will have to take are very obvious. I will try and concentrate all of my efforts on those things that are most important during the game. My guide consists of three major chapters. The first chapter is by far the largest and the most important one. Here you will find a complete walkthrough of the entire game. "Just Cause" offers 21 primary missions. Additionally, you will be presented with a lot of bonus tasks. Most missions will require you to visit a new territory on the map. I will help you out with that, mostly by saying what can be done and where you will have to go. It is a very important thing, because you can easily get lost. There are also a lot of small hints in this chapter. Some of them will prepare you for the next missions of the game.
The second chapter of this guide displays a full list of hideouts. These places have to be used during the game. You can acquire new hideouts on two different ways. The first option is more obvious. New hideouts will become available, as soon as you've completed some of the main missions. Alternatively, you can advance in ranks of two different organizations - The Guerrillas and The Riojas. All hideouts (even those which aren't available at the moment) are displayed on your personal map. You can find it in your PDA. The same goes with small packages (similar to those from "GTA" games). As a result, I won't say how you can reach them, because you will be able to do it on your own. This chapter also says a lot about the organizations. You should know that they will reward you for your efforts. I've displayed all of these things in my guide. Thanks to that, you will now exactly what types of bonuses will be unlocked.
The final chapter consists of several useful hints. They will come in handy during the game, so you should take a closer look at them. These hints are most useful during the fights. You will also find out more about using the vehicles or saving your game progress. Less experienced players will surely find something interesting here. As it goes for the rest, I'm sure that some of these hints will also become helpful to you, even in a small way.
Have fun playing the game!
This is the most important aspect of the entire game. You must save your progress, whenever this is possible. Sadly, "Just Cause" doesn't offer a possibility of making quick saves. You will only be able to do this, once you're close enough to one of the previously unlocked safehouses. If you want to know where they here, go ahead and check the second chapter of my game guide. You can find the safehouses almost everywhere. You shouldn't also have any problems using them, however you must remember that some fights will take place in less populated areas. As a result, reaching one of the nearby hideouts will be a lot more difficult. Make sure that you don't attack anyone unless you really have to. Unlike "GTA" games, you won't be able to escape police or other hostile forces that easily. Furthermore, later during the game you will also have to watch out for enemy gunships. In most cases, you would have to spend at least a few minutes in order to reach a nearest safehouse. It's not that easy as it seems, especially if everyone's shooting at you. Before you decide to create a new savegame, make sure that you've replenished your ammo supplies. You should also use the medical station. Remember that all those things are done for free.
The only exception are the main missions of the game. Every time you end one of these, a small menu will appear on the screen. You will have an opportunity to save up your progress. Make sure that you take advantages of these kinds of opportunities! This is even more important if you've managed to end of the more difficult missions of the game.
Taking an appropriate equipment is also very important. In most cases, an outcome of more difficult missions will depend on this. Let's start with the weapons. I'd strongly recommend to choose at least ONE decent MACHINE GUN. You will be using these weapons all the time, mostly to eliminate enemy soldiers. A machine gun will allow to take out almost everyone, whether it's a single unit or a small group of soldiers. If you come across a much larger squad, it would be best to use something else to take care of this problem. Grenades are very useful throughout the entire game. Additionally, you won't have any problems finding them. Most of the killed soldiers will leave interesting items. You will acquire new grenades, as well as medical kits and ammunition. You have to be careful, though. The grenade must land exactly where you planned if you want this type of action to succeed. Thankfully, even you won't be able to kill some of the soldiers, they will most likely be stunned for a few seconds. Make sure that you take advantage of this. Grenades become less powerful later during the game. I would recommend that you replace them with a rocket launcher. Grenade launcher also seems like a good idea, although you might have some problems finding this weapon. You will have to be on a look out. Make sure to check what exactly did the killed soldiers left behind. As for the rocket launcher, you'll be using it mostly against armored vehicles, gunships and barricades (liberation missions). Make sure to get a hold of it as soon as possible.
Choosing a correct vehicle for the mission is equally important. In this case, it all depends on a type of mission. If you have to catch someone, it would be best to a choose a fast car, that's also quite stable. Only then you will be able to end the whole mission without having to worry about anything else. As for the helicopters, I would recommend that you choose well armed gunships. Most of them will offer miniguns, as well as standard rockets. You will also be able to steal a lot of interesting machines once a mission has already started, however you shouldn't forget about your hideouts. Most of them have a lot of interesting machines to offer.
You shouldn't have any problems with your enemies. "Just Cause" (for the most of the time) is not a difficult game. Just make sure that you stick close to my instructions and your character should be just fine. Most of the enemies will not use any vehicles. As a result, it's very easy to take them out. Just make sure that they're in your sight. You will also have to move a lot. Some soldiers may carry heavier weapons or even rocket launchers. You must watch out for them. Make sure that they die in the first place. You should also be using a lot of grenades. Most of your enemies will remain in the same place, so there's a huge probability that a successful throw will kill them. Additionally, you will find a lot of grenades along the way. As a result, you will always have at least a few of them to use. I should also warn you about a few other things. You will have to avoid explosions. They will occur very often, especially if there are some tanks or vehicles in the area. Make sure that you keep a safe distance, so you don't lose a lot of health by accident. Some of the larger explosions could even kill you.
Most cars are even more deadly. If they hit you, it's almost certain that your character will die, even if it's a fairly small vehicle. Sadly, you won't be able to predict many of these accidents, especially if you're trying to liberate large cities or army bases. Losing your character would of course be equal to an instant failure, so you will have to avoid these actions at all costs. The most important thing here is to make sure that you're not standing in a middle of the road. You should also look around a lot, so you won't be surprised by anything. Some of the vehicles will also be armed. Thankfully, you won't have to be worried about that. Most of the enemy soldiers will decide to leave the vehicle, instead of using a heavy machine gun post.
I would recommend that you also read the fifth section of this chapter. There are a lot of additional challenges (you won't have to complete them) waiting for you. It would be best to take a closer look at some of them. These missions weren't described in the first chapter of this guide, mostly because they will be very random. Each time you decide to start a mission, something new should be waiting for you. Thankfully, these missions are very simple. You shouldn't have any troubles finding out what needs to be done. For the most of the time, you will have to collect certain objects - briefcases, cars or something else. There are also a lot of assassination missions ahead of you. Some of them will involve taking out a single target, however in rare cases you will have to take care of an entire group of enemy units. You should also know that completing these missions is worth the risk. Each time you do this, you will be rewarded with a certain amount of Prestige Points. This will allow you to advance in the ranks of both organizations. As a result, you will unlock new hideouts, cars or better weapons. Make sure that you read the second chapter of the guide. You'll find more info there.
I guess I should also tell you more about liberating new provinces. This isn't a complicated process, although you should know how this is all organized. First of all, you have to take a closer look at your PDA. You will find two different maps in it. Make sure that you choose the political map. As you've probably noticed, there are a lot of different types of sectors here. Blue provinces can't be accessed at this time. It means that even if you manage to find one of the rebels, you won't be able to start the liberation mission. This is only possible in those provinces which have been designated with the red color. In order to take a full control over an entire sector, you will have to liberate several villages, towns or army bases. Liberating each of these settlements will also be rewarded with Prestige Points. You should take a look at the red bar. In most cases, taking control over two settlements should be enough to liberate a whole province. Liberated sectors are displayed in green. Additionally, you won't be able to lose them in the future, so you don't have to worry about that.
Taking control over new provinces has its advantages. First of all, you will be much safer in these areas, however this doesn't mean that you can kill everyone you meet! A lot of these sectors have an army base. Make sure that you take a closer look at these settlements. You can find a lot armored vehicles, gunships or even planes here. You will also be rewarded with new hideouts (check out the second chapter of this guide). Most of them are quite useful, especially if you plan on conquering all of the surrounding areas. You should also know that you won't have to take control of a province the moment it's unlocked. You can leave it for later. New provinces are being unlocked each time you successfully end one of the main missions of the campaign mode.
Mission objectives: You will have to perform a successful landing on the El Rosario Beach. Once you're there, you will have to help your friend Sheldon. He's going to be attacked by a large group of enemy troops. After that, you will have to reach your first hideout.
Difficulty: easy
Complete walkthrough:
You will start the game in a rather unusual way. You will have to make an air drop (#1). Get used to these types of actions, as they will come in handy in some of the future missions. You can use the movement keys in order to correct the flight. Don't worry. You won't have to make an exact drop on the beach. You can make a landing anywhere you want to. I would recommend that you use the parachute (#2), however this is not necessary. You can hit the water without any problems. It won't kill your character!
![1 - [Mission 01] Devil's Drop Zone - Walkthrough - Just Cause - Game Guide and Walkthrough](https://game.lhg100.com/Article/UploadFiles/201512/2015121610231452.jpg)
![You'll probably end up somewhere in the water (#1) - [Mission 01] Devil's Drop Zone - Walkthrough - Just Cause - Game Guide and Walkthrough](https://game.lhg100.com/Article/UploadFiles/201512/2015121610231475.jpg)
You'll probably end up somewhere in the water (#1). You could swim to your destination, however there is a better way. Wait for one of the surrounding boats to get here. This is a once in a lifetime opportunity, so don't get used to it. ;-) Enter the boat and start moving towards the designated area (#2). Don't worry about the boat itself. You can enter the beach inside it, without having to worry about some kind of explosion.
![2 - [Mission 01] Devil's Drop Zone - Walkthrough - Just Cause - Game Guide and Walkthrough](https://game.lhg100.com/Article/UploadFiles/201512/2015121610231588.jpg)
![Exit the boat and get your guns ready (use the mouse wheel) - [Mission 01] Devil's Drop Zone - Walkthrough - Just Cause - Game Guide and Walkthrough](https://game.lhg100.com/Article/UploadFiles/201512/2015121610231549.jpg)
Exit the boat and get your guns ready (use the mouse wheel). You've probably noticed that the pistols have an unlimited ammo supply, so you can use them without any problems. Start shooting at the visible enemy units (#1). I would recommend that you keep running all the time. Thanks to that, you will avoid being hit. More vehicles will arrive on the beach very shortly (#2). Make sure that none of them hits your character, because that would be equal to an instant death. Keep shooting at your enemies.
![3 - [Mission 01] Devil's Drop Zone - Walkthrough - Just Cause - Game Guide and Walkthrough](https://game.lhg100.com/Article/UploadFiles/201512/2015121610231544.jpg)
![Once you've disposed of the militia units, check your surroundings - [Mission 01] Devil's Drop Zone - Walkthrough - Just Cause - Game Guide and Walkthrough](https://game.lhg100.com/Article/UploadFiles/201512/2015121610231584.jpg)
Once you've disposed of the militia units, check your surroundings. It would be best to pick up all visible objects. Some of them will be new guns. First aid kits are also very important. Sheldon is waiting for you in his humvee. Go there now (#1). Press the correct key in order to mount a heavy machine gun. As you've probably suspected, you will be eliminating enemy units. This is a very relaxing and not too challenging segment. At first, you'll be shooting at the military jeeps (#2). You can also try and take out single soldiers, however this is not necessary. Make sure that the cross-hair turns red every time you want to destroy something bigger!
![You should be able to reach a small roadblock in just a few seconds (#1) - [Mission 01] Devil's Drop Zone - Walkthrough - Just Cause - Game Guide and Walkthrough](https://game.lhg100.com/Article/UploadFiles/201512/2015121610231532.jpg)
You should be able to reach a small roadblock in just a few seconds (#1). You will have to exit the vehicle in order to take it out. There are some new soldiers in this area, however you won't have to kill them. Choose a better gun (revolver or a machine gun) and start shooting at one of the red barrels. As a result, the object will explode (#2). Get back to Sheldon's car. You may proceed to the next section of the map.
![You will have to deal with at least two helicopters along the way (#1) - [Mission 01] Devil's Drop Zone - Walkthrough - Just Cause - Game Guide and Walkthrough](https://game.lhg100.com/Article/UploadFiles/201512/2015121610231589.jpg)
You will have to deal with at least two helicopters along the way (#1). Concentrate all of your efforts on destroying them, as they pose a quite serious threat. Just as before, make sure that the cross-hair turns red. Allied units should appear on the map very shortly. Wait for them to destroy all of the remaining enemy vehicles (#2). After that, this mission will come to an end.
![6 - [Mission 01] Devil's Drop Zone - Walkthrough - Just Cause - Game Guide and Walkthrough](https://game.lhg100.com/Article/UploadFiles/201512/2015121610231591.jpg)
![Important - [Mission 01] Devil's Drop Zone - Walkthrough - Just Cause - Game Guide and Walkthrough](https://game.lhg100.com/Article/UploadFiles/201512/2015121610231505.jpg)
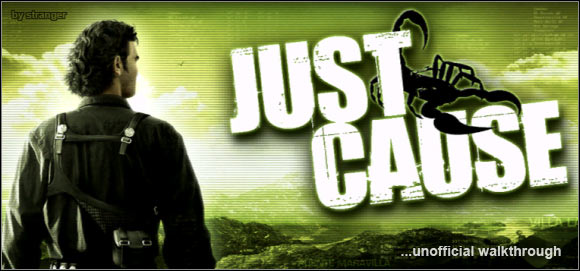
Important! Once you've completed this mission, you will find yourself by the first hideout (Agency 01). I should remind you that you can only save your current progress in these kind of places. The only exception are the main missions. The game will offer you to make an additional save at the end of each level. The next mission of the singleplayer campaign is very simple, so you don't have to do anything in particular to get ready for it. I would recommend that you ignore all of the additional challenges and hidden packages for the moment. It's mostly because you will have to unlock some of the new features in the upcoming missions. One of the most important things will involve liberating villages and towns. Once you feel you're ready, head on to the designated spot (a large trailer). I should tell you that in future missions briefing areas won't be located near your hideouts, so this is one of the exceptions. If you want to travel quickly, you can use the Extraction option (PDA). It will allow you to reach a briefing area or one of the unlocked hideouts.
Important! Don't forget to regenerate your health. You mustn't also forget about ammo supplies. Don't worry, all hideouts offer these kind of bonuses.
Mission objectives: During this mission you will have to rescue one of the rebel leaders, a man named Jose Caramicas. He is currently being held in a large fort El Grande, that now is used as a prison. You will have to enter the fort, locate Caramicas and extract him to a safe place. After that, you must return to one of the rebel camps.
Difficulty: easy
Complete walkthrough:
Important! The game has a nonlinear structure. You can finish missions using a lot of different strategies. Some of them will include using other vehicles or approach tactics. This mission will also give you a lot of choices. I will try and do my best to show you the most efficient paths.
You could take a silenced heavy machine gun with you, however this won't be necessary. There aren't many guards in the fort, so you don't have to worry about them too much. There's a motorcycle here. Use it (#1) and start moving towards your destination. I would recommend that you activate your personal map for a few seconds. Take a closer look at it. You'll probably notice a small black dot (#2). It means that there's something interesting there, that may become very useful. You will have to go there now.
![1 - [Mission 02] Breakout - Walkthrough - Just Cause - Game Guide and Walkthrough](https://game.lhg100.com/Article/UploadFiles/201512/2015121610231649.jpg)
![Head on to a small pier - [Mission 02] Breakout - Walkthrough - Just Cause - Game Guide and Walkthrough](https://game.lhg100.com/Article/UploadFiles/201512/2015121610231636.jpg)
Head on to a small pier. You should be able to find a fast boat here (Trireme - RC Athena), that surely may come in handy. Use it (#1). Start moving towards the fort. You will have to reach it from the left side. Once you're there, a game will create a checkpoint area (#2), so you won't have to repeat the whole mission from the start. Get ready!
![2 - [Mission 02] Breakout - Walkthrough - Just Cause - Game Guide and Walkthrough](https://game.lhg100.com/Article/UploadFiles/201512/2015121610231667.jpg)
![Get closer to a small platform - [Mission 02] Breakout - Walkthrough - Just Cause - Game Guide and Walkthrough](https://game.lhg100.com/Article/UploadFiles/201512/2015121610231623.jpg)
Get closer to a small platform. You will have to make a single jump in order to reach it (#1). I would recommend that you go ahead and try a stunt manoeuvre, so you don't end up in the water. You should also be quick about it, mostly because enemy boats are patrolling this entire area. Start moving forward. Kill anyone that stands in your way (#2).
![3 - [Mission 02] Breakout - Walkthrough - Just Cause - Game Guide and Walkthrough](https://game.lhg100.com/Article/UploadFiles/201512/2015121610231650.jpg)
You will have to use a metal platform in order to reach one of the upper levels of the complex (#1). Be careful. There are some guards in your vicinity. Thankfully, you won't be attacked by anyone else (including the helicopters). You should be able to find a small entrance that leads to the main prison complex. Go there now. Turn right and keep moving forward. You will have to locate a small staircase. Use it to get down to the lower level of the prison (#2).
![4 - [Mission 02] Breakout - Walkthrough - Just Cause - Game Guide and Walkthrough](https://game.lhg100.com/Article/UploadFiles/201512/2015121610231659.jpg)
![Use the stairs once again - [Mission 02] Breakout - Walkthrough - Just Cause - Game Guide and Walkthrough](https://game.lhg100.com/Article/UploadFiles/201512/2015121610231688.jpg)
Use the stairs once again. The objective is to reach the lowest level of this complex. Head on to your destination (#1). You shouldn't have any problems locating it. Be careful, though. There are some additional guards here. You will have to take care of this small problem. Make sure that you take their equipment - better guns, ammunition, grenades and first aid kits. You should be able to reach the place where Caramicas is being held. A short cut-scene will appear on your screen (#2).
![5 - [Mission 02] Breakout - Walkthrough - Just Cause - Game Guide and Walkthrough](https://game.lhg100.com/Article/UploadFiles/201512/2015121610231704.jpg)
![Now for the second part of this mission - [Mission 02] Breakout - Walkthrough - Just Cause - Game Guide and Walkthrough](https://game.lhg100.com/Article/UploadFiles/201512/2015121610231713.jpg)
Now for the second part of this mission. You will have to go back to the highest level of the prison complex (#1). Don't worry about Caramicas. He should be just fine. Just make sure you reach your destination. Head on towards previously explored passageway. A new cut-scene will appear on your screen (#2). Caramicas will thank you for rescuing him. The good thing is you won't have to worry about him anymore. There's only one more thing for you to do. You must escape to one of the rebel camps.
![6 - [Mission 02] Breakout - Walkthrough - Just Cause - Game Guide and Walkthrough](https://game.lhg100.com/Article/UploadFiles/201512/2015121610231766.jpg)
![I'd strongly recommend that you go back to the metal platform (the same one you have used before) - [Mission 02] Breakout - Walkthrough - Just Cause - Game Guide and Walkthrough](https://game.lhg100.com/Article/UploadFiles/201512/2015121610231756.jpg)
I'd strongly recommend that you go back to the metal platform (the same one you have used before). You should find a patrol boat here (Triton - patroller; #1). It would be best to steal it. Bear in mind, however, that there are a lot of enemy units in the area. You will have to escape them. Start heading towards a known pier (#2). Once you're there, ignore it and keep moving straight (stay close to the shore).
![7 - [Mission 02] Breakout - Walkthrough - Just Cause - Game Guide and Walkthrough](https://game.lhg100.com/Article/UploadFiles/201512/2015121610231767.jpg)
![Get closer to the rebel camp - [Mission 02] Breakout - Walkthrough - Just Cause - Game Guide and Walkthrough](https://game.lhg100.com/Article/UploadFiles/201512/2015121610231732.jpg)
Get closer to the rebel camp. Leave the boat and go to the nearest road. You will have to steal a new car (#1). I would recommend taking one of the police vehicles, so you won't have to worry about being attacked all the time. Start moving towards the rebel camp. You will have to use a dirt road in order to reach it (#2). Make sure that you don't fall off the cliff. The road is very narrow, so you should be careful.
![8 - [Mission 02] Breakout - Walkthrough - Just Cause - Game Guide and Walkthrough](https://game.lhg100.com/Article/UploadFiles/201512/2015121610231703.jpg)
![You shouldn't have any major problems with reaching the rebel camp (#1) - [Mission 02] Breakout - Walkthrough - Just Cause - Game Guide and Walkthrough](https://game.lhg100.com/Article/UploadFiles/201512/2015121610231758.jpg)
You shouldn't have any major problems with reaching the rebel camp (#1). If your vehicle gets damaged along the way, make sure that you perform a stunt and take something else. An army jeep seems like a good idea. Once you've reached your destination, an interesting movie will appear on the screen. This is the end of this mission.
![Important - [Mission 02] Breakout - Walkthrough - Just Cause - Game Guide and Walkthrough](https://game.lhg100.com/Article/UploadFiles/201512/2015121610231870.jpg)
Important! Once again, I would recommend that you ignore all of the optional challenges. Concentrate only on your next main mission. It's very important, because completing it will unlock a lot of new interesting features. You won't have to go anywhere else, because the third mission of the campaign will begin automatically, right after you move forward. Thankfully, you don't have to worry about the ammunition. You will have an opportunity to rearm during the mission itself.
Mission objectives: You will have to help the rebels to liberate two of the surrounding villages. Both settlements are located inside the Aguilar province. Once you've liberated the first village, you will receive the location of the second one. Additional rebel units will provide much needed help.
Difficulty: Easy
Complete walkthrough:
Like I've said before, you will have to make a few steps forward in order to start this mission. The first objective will require you to liberate the Los Mirasoles village. There aren't any vehicles in your vicinity, so you may consider putting a request. You will have to use your PDA. At the moment there's only one option - a motorcycle (#1). Once you've got it, start moving towards your destination. There is going to be a rebel there (#2). Leave the bike and talk to him.
![1 - [Mission 03] Freedom Fighters - Walkthrough - Just Cause - Game Guide and Walkthrough](https://game.lhg100.com/Article/UploadFiles/201512/2015121610231834.jpg)
![The liberating mission will begin here - [Mission 03] Freedom Fighters - Walkthrough - Just Cause - Game Guide and Walkthrough](https://game.lhg100.com/Article/UploadFiles/201512/2015121610231833.jpg)
The liberating mission will begin here. It would be best to rearm yourself. You shouldn't have any problems finding the crates (#1). It's very important, because you'll need a lot of ammunition and grenades during these fights. You should also know that you will be able to take part in very similar bonus missions in the near future. As a result, it's good to know what exactly has to be done. Start off by shooting at the nearby enemy units (#2). Keep moving forward. Make sure you don't hit any of the friendly soldiers, because they would probably turn against you.
![2 - [Mission 03] Freedom Fighters - Walkthrough - Just Cause - Game Guide and Walkthrough](https://game.lhg100.com/Article/UploadFiles/201512/2015121610231827.jpg)
![A short cut-scene should appear on your screen in just a few seconds (#1) - [Mission 03] Freedom Fighters - Walkthrough - Just Cause - Game Guide and Walkthrough](https://game.lhg100.com/Article/UploadFiles/201512/2015121610231885.jpg)
A short cut-scene should appear on your screen in just a few seconds (#1). The game is trying to tell you what has to be done here. You will have to take out these kinds of roadblocks. You don't have any rocket launchers at the moment, so you will have to use grenades (#2). There are three roadblocks for you to destroy during each of the liberating missions. Don't forget about the enemy soldiers. You must be killing them as well. Furthermore, many of them will leave valuable objects (ammunition, grenades, first aid kits) behind!
![3 - [Mission 03] Freedom Fighters - Walkthrough - Just Cause - Game Guide and Walkthrough](https://game.lhg100.com/Article/UploadFiles/201512/2015121610231894.jpg)
![Once you've destroyed all three roadblocks, you will have to reach a small flag (#1) - [Mission 03] Freedom Fighters - Walkthrough - Just Cause - Game Guide and Walkthrough](https://game.lhg100.com/Article/UploadFiles/201512/2015121610231869.jpg)
Once you've destroyed all three roadblocks, you will have to reach a small flag (#1). This object should be marked on your map, so you won't have any problems finding it. Get closer to the flag and press a correct button in order to secure this area. Congratulations! You've liberated the first village (#2)! You will receive a small reward for this - 30 Prestige Points for the Guerrilla organization. Consult the second chapter of this game guide, if you want to know more.
![4 - [Mission 03] Freedom Fighters - Walkthrough - Just Cause - Game Guide and Walkthrough](https://game.lhg100.com/Article/UploadFiles/201512/2015121610231866.jpg)
![You should receive a second objective in just a few seconds - [Mission 03] Freedom Fighters - Walkthrough - Just Cause - Game Guide and Walkthrough](https://game.lhg100.com/Article/UploadFiles/201512/2015121610231957.jpg)
You should receive a second objective in just a few seconds. You will have to liberate a new village - Merecure (#1). It would be best to put a request for a motorcycle. Alternatively, you could steal one of the passing cars (there's a small road nearby). Either way, start moving towards the new destination. Once you're there, head on to the rebel soldier (#2).
![5 - [Mission 03] Freedom Fighters - Walkthrough - Just Cause - Game Guide and Walkthrough](https://game.lhg100.com/Article/UploadFiles/201512/2015121610231954.jpg)
![You will receive an opportunity to use explosive devices during this liberating mission, however you may as well ignore them - [Mission 03] Freedom Fighters - Walkthrough - Just Cause - Game Guide and Walkthrough](https://game.lhg100.com/Article/UploadFiles/201512/2015121610231950.jpg)
You will receive an opportunity to use explosive devices during this liberating mission, however you may as well ignore them. Grenades are just fine. Start a new rebellion. Before you proceed any further, make sure that you take the ammunition. Once again, you will have to destroy three different roadblocks (#1). There are also other objects in this area. One of them is the ammo depot (#2). You may destroy it as well, however you won't receive any reward for that. As a result, it's best to ignore these objects. Concentrate only on your current objectives.
![6 - [Mission 03] Freedom Fighters - Walkthrough - Just Cause - Game Guide and Walkthrough](https://game.lhg100.com/Article/UploadFiles/201512/2015121610231978.jpg)
![You might want to familiarize yourself with the explosives (#1) - [Mission 03] Freedom Fighters - Walkthrough - Just Cause - Game Guide and Walkthrough](https://game.lhg100.com/Article/UploadFiles/201512/2015121610231972.jpg)
You might want to familiarize yourself with the explosives (#1). Be careful, though. You will only have FIVE seconds to get back to a safe distance. Once you've destroyed all roadblocks, head on to the flag (#2). You shouldn't have any problems reaching it. As a result, you will liberate the second village. Additionally, this mission will come to an end.
![7 - [Mission 03] Freedom Fighters - Walkthrough - Just Cause - Game Guide and Walkthrough](https://game.lhg100.com/Article/UploadFiles/201512/2015121610231966.jpg)
![Important - [Mission 03] Freedom Fighters - Walkthrough - Just Cause - Game Guide and Walkthrough](https://game.lhg100.com/Article/UploadFiles/201512/2015121610231938.jpg)
Important! The most interesting thing is that you will be rewarded with a new hideout - Guerrilla 01. Sadly, you won't be able to use all of its advantages just yet, mostly because you haven't advanced in the Guerrilla ranks. As a result, I would recommend that you complete some of the side challenges. You should explore this entire island. You won't be able to liberate any new villages at the moment. Thankfully, there are many other things for you to do. Here are my recommendations:
1) collecting packages - this is a very simple task. There are a lot of packages in your vicinity (the first island). I would recommend that you collect all of them. Thanks to that, you should be able to advance in the Guerrilla ranks. You will also score some of the first Prestige Points for the Riojas cartel.
2) completing side missions - at the moment only Guerrilla missions are fully active. These challenges are randomly selected. You should also know that they aren't too difficult. You should be able to complete each mission in about three to five minutes.
Important! You can use different types of vehicles in order to explore the entire area, however I'd personally recommend helicopters and planes. You should be able to find some of them on this island. A plane can be found by the airfield. This area is located on your map, so you really can't miss it. Alternatively, you could go to one of the purple villages (use the map). You can't take full control of these settlements just yet, however this doesn't mean that you can't use the helicopters (Mullen H45 Dragonfly). They are located on roofs of the villas. Before you decide to proceed to the next mission of the campaign, it would be wise to save your current progress. Guerrilla 01 hideout seems like a good idea. You should also take some of the unlocked weapons. You've probably acquired a revolver and a standard machine gun.
Mission objectives: This is a fairly simple mission. You will have to kill one of the famous drug dealers, a man named Franco Alifano. Thanks to that, you will be able to take his identity. You will then have to meet with one of the leaders of the Rioja cartel, pretending to be Alifano. The main goal is to gain a strong ally for the upcoming battles.
Difficulty: easy
Complete walkthrough:
Like I've said before, you probably won't have any problems with this mission. It's very simple and quite short. The first objective will require you to kill Franco Alifano. He will be arriving here by plane. Don't worry, you won't have to be in a lot of hurry. Steal a car and start moving towards the designated area (#1). It's an airport. You will be using a lot of small roads along the way. Avoid larger trees and rocks if you don't want any trouble. You must get closer to the airfield (#2). I should also tell you that you've been provided with a grappling hook. It's an interesting tool, however you won't have to use it during the course of this mission.
![1 - [Mission 04] The San Esperito Connection - Walkthrough - Just Cause - Game Guide and Walkthrough](https://game.lhg100.com/Article/UploadFiles/201512/2015121610231969.jpg)
![Once you get close enough to the airport, a small convoy will start moving towards a nearby town (one limousine and two armored vehicles) - [Mission 04] The San Esperito Connection - Walkthrough - Just Cause - Game Guide and Walkthrough](https://game.lhg100.com/Article/UploadFiles/201512/2015121610231992.jpg)
Once you get close enough to the airport, a small convoy will start moving towards a nearby town (one limousine and two armored vehicles). Thankfully, you won't have to be in a lot of hurry. Try getting closer to the limousine, because that's where you'll find the drug dealer. Avoid getting hit by the armored vehicles. I would recommend that you press the stunt button (#1). Now you will have to jump over to the roof of the limo. Press the new button in order to take out the driver of the limousine (#2).
![2 - [Mission 04] The San Esperito Connection - Walkthrough - Just Cause - Game Guide and Walkthrough](https://game.lhg100.com/Article/UploadFiles/201512/2015121610232080.jpg)
![As you've probably noticed, your target has also left the limousine - [Mission 04] The San Esperito Connection - Walkthrough - Just Cause - Game Guide and Walkthrough](https://game.lhg100.com/Article/UploadFiles/201512/2015121610232012.jpg)
As you've probably noticed, your target has also left the limousine. You will have to take care of that problem (#1). It would be best to hit him using the limo (#2). One successful bump should be enough. Make sure that the dealer's dead. Thankfully, armored vehicles probably won't interfere with that. You might as well ignore them.
![3 - [Mission 04] The San Esperito Connection - Walkthrough - Just Cause - Game Guide and Walkthrough](https://game.lhg100.com/Article/UploadFiles/201512/2015121610232024.jpg)
![Now for the easy part - [Mission 04] The San Esperito Connection - Walkthrough - Just Cause - Game Guide and Walkthrough](https://game.lhg100.com/Article/UploadFiles/201512/2015121610232032.jpg)
Now for the easy part. Start moving towards your new objective (#1). It's going to be a small town area. Sooner or later, armored vehicles will drop the chase, so don't worry about them too much. Head on to a designated building (#2). Leave the car (it doesn't have to be a limo) and enter a small passageway. Thanks to that, you will complete this simple mission.
![4 - [Mission 04] The San Esperito Connection - Walkthrough - Just Cause - Game Guide and Walkthrough](https://game.lhg100.com/Article/UploadFiles/201512/2015121610232081.jpg)
![Important - [Mission 04] The San Esperito Connection - Walkthrough - Just Cause - Game Guide and Walkthrough](https://game.lhg100.com/Article/UploadFiles/201512/2015121610232017.jpg)
Important! Completing this mission will unlock a new safehouse - Rioja 01. Additionally, you will be able to take side missions from the cartel. As for now, I would recommend that you take control over this entire island. In order to do that, you will have to liberate a few additional settlements (villages and towns). Some of them have been previously inactive. Check the political map if you want to find out which areas can be occupied. You should also take a look at the second chapter of this game guide. If you're lucky, you will unlock two new hideouts. Rioja 02 safehouse will become available once you've advanceed to the higher level. Taking control of the largest city of the region will unlock Guerrilla 02 safehouse. There are two provinces here for you to conquer - de La Cruz and Aguilar. Make sure you have them. Just as before, it would be best to use helicopters. You will find them on roofs of Rioja villas.
Important! Taking control over the Rioja settlements is a little bit different. The first part of these missions is very similar. You will have to destroy three roadblocks and kill a lot of enemy soldiers. The final part, on the other hand, is different. Instead of going to the flag, you will be taking out leaders of the Mendoza cartel. It would be best to use grenades and heavier guns during these fights. Later in the game, rocket launchers are also very helpful.
Important! Before you decide to proceed to the next mission of the campaign, I'd strongly recommend that you take better guns. You should also save your current progress in the Rioja 01 hideout.
Mission objectives: You will have to prove to the Riojas that you're loyal to them. The mission will require you to do two things. Your first objective will involve using explosives. Silos, on the other hand, are the target. You will have to place the C4 in the designated areas. The second part is about stealing a truck full of cocaine. Once you've got it, you will have to reach a nearby safehouse.
Difficulty: easy
Complete walkthrough:
This is a very simple mission, so you don't have to be worried about anything. Once again, I would recommend that you use the black dots. They will be visible on your map. Start off by leaving this area (#1). There's only one road, so you can't miss it. Take a look at the map. You will have to make a turn. Start moving towards the beach. You should be able to find a raft (with an engine) here. Use it.
![1 - [Mission 05] Test of Loyalty - Walkthrough - Just Cause - Game Guide and Walkthrough](https://game.lhg100.com/Article/UploadFiles/201512/2015121610232008.jpg)
![Start heading towards the second black dot (it's on the left island) - [Mission 05] Test of Loyalty - Walkthrough - Just Cause - Game Guide and Walkthrough](https://game.lhg100.com/Article/UploadFiles/201512/2015121610232084.jpg)
Start heading towards the second black dot (it's on the left island). Keep moving forward and you should be just fine. Once you're there, leave the raft and start walking towards your target (#1). You will come across a small gas station. There's a large truck parked here (#2). Get closer to it.
![2 - [Mission 05] Test of Loyalty - Walkthrough - Just Cause - Game Guide and Walkthrough](https://game.lhg100.com/Article/UploadFiles/201512/2015121610232056.jpg)
![The truck driver is loyal to the Riojas cartel, the same one that you're working for - [Mission 05] Test of Loyalty - Walkthrough - Just Cause - Game Guide and Walkthrough](https://game.lhg100.com/Article/UploadFiles/201512/2015121610232117.jpg)
The truck driver is loyal to the Riojas cartel, the same one that you're working for. As a result, you shouldn't even think about killing him. Get closer to the truck. Use the passengers seat (#1). The truck will start moving. You will have to wait for it to reach the corn field. Go ahead and look around (#2)... you've got plenty of time!
![3 - [Mission 05] Test of Loyalty - Walkthrough - Just Cause - Game Guide and Walkthrough](https://game.lhg100.com/Article/UploadFiles/201512/2015121610232169.jpg)
![It will take about two minutes to reach the mission area - [Mission 05] Test of Loyalty - Walkthrough - Just Cause - Game Guide and Walkthrough](https://game.lhg100.com/Article/UploadFiles/201512/2015121610232181.jpg)
It will take about two minutes to reach the mission area. Once you're there, wait for the truck driver to leave the vehicle. You may take the wheel (#1). Start moving towards the nearby silos (they're on your right). In order to reach the new area, you will have to destroy a small metal gate (#1). Be careful, though! This will raise the alarm in the entire facility. You will have to be very careful. Pull over and leave the truck.
![4 - [Mission 05] Test of Loyalty - Walkthrough - Just Cause - Game Guide and Walkthrough](https://game.lhg100.com/Article/UploadFiles/201512/2015121610232171.jpg)
![Start moving towards one of the objectives - [Mission 05] Test of Loyalty - Walkthrough - Just Cause - Game Guide and Walkthrough](https://game.lhg100.com/Article/UploadFiles/201512/2015121610232198.jpg)
Start moving towards one of the objectives. It doesn't really matter which objects you decide to choose first. They are going to be destroyed anyway. I would recommend that you use different kinds of explosives. They are triggered with a detonator. You received these objects at the start of the mission. You should place the bombs in designated areas. After that, move back to a safe distance. Use the detonator (#2).
![5 - [Mission 05] Test of Loyalty - Walkthrough - Just Cause - Game Guide and Walkthrough](https://game.lhg100.com/Article/UploadFiles/201512/2015121610232142.jpg)
![Once you've dealt with the first problem, you should receive some new orders (#1) - [Mission 05] Test of Loyalty - Walkthrough - Just Cause - Game Guide and Walkthrough](https://game.lhg100.com/Article/UploadFiles/201512/2015121610232189.jpg)
Once you've dealt with the first problem, you should receive some new orders (#1). You will have to steal a truck filled with cocaine crates. It's located in a nearby warehouse. Start running towards it (#2). You won't have to use any cars at the moment, because your target is on the other end of this field.
![6 - [Mission 05] Test of Loyalty - Walkthrough - Just Cause - Game Guide and Walkthrough](https://game.lhg100.com/Article/UploadFiles/201512/2015121610232102.jpg)
Get closer to the hangar (#1). You should notice a truck inside it. Before you decide to steal the truck, make sure that the area is clear. The whole field is being patrolled by vehicles with heavy machine gun posts mounted on them. It would be best to wait for the cars to leave this area. Enter the truck. You will have to reach the main gate in order to leave this area (#2). Once you're there, take a closer look at the map. I would recommend that you use a large road that leads straight to a safehouse.
![7 - [Mission 05] Test of Loyalty - Walkthrough - Just Cause - Game Guide and Walkthrough](https://game.lhg100.com/Article/UploadFiles/201512/2015121610232182.jpg)
![There are a lot of cocaine crates on the truck - [Mission 05] Test of Loyalty - Walkthrough - Just Cause - Game Guide and Walkthrough](https://game.lhg100.com/Article/UploadFiles/201512/2015121610232237.jpg)
There are a lot of cocaine crates on the truck. In order to finish up with this mission objective, you will have to bring at least two of them to the safehouse. Don't worry about the crates that are located on the top, because you'll lose them very soon (#1). Thankfully, other objects should remain on the truck. Keep moving towards your current destination (#2).
![8 - [Mission 05] Test of Loyalty - Walkthrough - Just Cause - Game Guide and Walkthrough](https://game.lhg100.com/Article/UploadFiles/201512/2015121610232267.jpg)
![Try keeping a steady line, so the crates stay where they should be - [Mission 05] Test of Loyalty - Walkthrough - Just Cause - Game Guide and Walkthrough](https://game.lhg100.com/Article/UploadFiles/201512/2015121610232277.jpg)
Try keeping a steady line, so the crates stay where they should be. Additionally, the game will make it a lot easier for you, because you won't encounter any traffic along the way. Once you're closer to the safehouse, make a right turn. You'll find yourself on a small dirt road (#1). You will have to get closer to a large warehouse (#2). That's all!
![9 - [Mission 05] Test of Loyalty - Walkthrough - Just Cause - Game Guide and Walkthrough](https://game.lhg100.com/Article/UploadFiles/201512/2015121610232219.jpg)
![Important - [Mission 05] Test of Loyalty - Walkthrough - Just Cause - Game Guide and Walkthrough](https://game.lhg100.com/Article/UploadFiles/201512/2015121610232269.jpg)
Important! As you've probably suspected, some of the upcoming missions will take place on this new larger island. It would be best to spend some time exploring it. You should start off by collecting all of the surrounding packages. Sadly, there are only a few of them here. Next, you should take control of all of the villas for the Rioja cartel. Remember that you'll find a helicopters there, so it would be best to use them whenever it's possible. As for the Guerrilla villages, you will have an opportunity to take control of the northern part of the island. One of the most difficult liberation missions will take place in a large city. Thankfully, liberating this settlement will be rewarded with a new, useful hideout.
Important! Don't forget about the possibility of saving your progress. Before proceeding to the next mission, you should also rearm yourself, however it's not that important. I would recommend that you use the Rioja 02 hideout.
Mission objectives: You will have to get on board of a large yacht. Next, you have to locate and assassinate police chief, because he's under influence of the president. Once you've completed this task, you will have to join Kane and escape from this hostile territory as soon as possible.
Difficulty: easy
Complete walkthrough:
This is a rather simple mission. Additionally, you won't have to spend a lot of time here. You don't have to prepare a lot for this mission, because you will only kill a few enemy soldiers. Your first task will require reaching a small hut (#1). That's where you'll be briefed. You could use the Extraction feature, if you don't want to go there by car. Once you've regained a full control over your character, start moving towards the large yacht (#2). It should be located in front of you.
![1 - [Mission 06] Good Cop, Bad Cop - Walkthrough - Just Cause - Game Guide and Walkthrough](https://game.lhg100.com/Article/UploadFiles/201512/2015121610232222.jpg)
I would recommend that you stay close to the water. Keep moving forward (#1). You should come across a small pier. That's where you should find your boat (#2). Use it. Make a turn and start moving towards your target. You shouldn't have any problems locating it.
![2 - [Mission 06] Good Cop, Bad Cop - Walkthrough - Just Cause - Game Guide and Walkthrough](https://game.lhg100.com/Article/UploadFiles/201512/2015121610232234.jpg)
![Get closer to the large yacht (#1) - [Mission 06] Good Cop, Bad Cop - Walkthrough - Just Cause - Game Guide and Walkthrough](https://game.lhg100.com/Article/UploadFiles/201512/2015121610232392.jpg)
Get closer to the large yacht (#1). You shouldn't be attacked by anyone, so you don't have to be worried about that. Exit the boat and start swimming. You will have to find stairs here. They lead to the main deck of the ship (#2).
![3 - [Mission 06] Good Cop, Bad Cop - Walkthrough - Just Cause - Game Guide and Walkthrough](https://game.lhg100.com/Article/UploadFiles/201512/2015121610232394.jpg)
![Start moving upwards - [Mission 06] Good Cop, Bad Cop - Walkthrough - Just Cause - Game Guide and Walkthrough](https://game.lhg100.com/Article/UploadFiles/201512/2015121610232369.jpg)
Start moving upwards. You will come across a silenced machine gun along the way, however I wouldn't recommend using this weapon. Reach the deck and locate your target (#1). Start shooting at the police chief. You'll also be attacked by a few other soldiers. Take them out quickly. Once they're gone, get closer to the police chief. Keep firing at him (#2). Use more powerful guns and grenades to take him out swiftly.
![4 - [Mission 06] Good Cop, Bad Cop - Walkthrough - Just Cause - Game Guide and Walkthrough](https://game.lhg100.com/Article/UploadFiles/201512/2015121610232371.jpg)
![Once the police chief is gone, a short cut-scene should appear on your screen - [Mission 06] Good Cop, Bad Cop - Walkthrough - Just Cause - Game Guide and Walkthrough](https://game.lhg100.com/Article/UploadFiles/201512/2015121610232307.jpg)
Once the police chief is gone, a short cut-scene should appear on your screen. You will have to kill several other soldiers (#1). Locate a small boat. Kane is waiting for you there. Get closer to a small rail and make a single jump (#2). You'll find yourself in the water.
![5 - [Mission 06] Good Cop, Bad Cop - Walkthrough - Just Cause - Game Guide and Walkthrough](https://game.lhg100.com/Article/UploadFiles/201512/2015121610232332.jpg)
![You'll have to swim closer to the rear end of the boat (#1) - [Mission 06] Good Cop, Bad Cop - Walkthrough - Just Cause - Game Guide and Walkthrough](https://game.lhg100.com/Article/UploadFiles/201512/2015121610232355.jpg)
You'll have to swim closer to the rear end of the boat (#1). There's a heavy machine gun here. You will have to use it. Press a correct button in order to get on board. You will have to repel all kinds of attacks. Your boat will be attacked mostly by other vessels (#2). Remember to aim at them correctly. A red cross-hair is what you're looking for.
![6 - [Mission 06] Good Cop, Bad Cop - Walkthrough - Just Cause - Game Guide and Walkthrough](https://game.lhg100.com/Article/UploadFiles/201512/2015121610232311.jpg)
Additionally, a few helicopters will appear in your vicinity (#1). You must concentrate all of your efforts on destroying them quickly. It's mostly because they pose a very serious threat. You will have to spend about two-three minutes on the boat. After that, the enemies will stop attacking you (#2). Wait for the game to end this simple mission.
![7 - [Mission 06] Good Cop, Bad Cop - Walkthrough - Just Cause - Game Guide and Walkthrough](https://game.lhg100.com/Article/UploadFiles/201512/2015121610232374.jpg)
![Important - [Mission 06] Good Cop, Bad Cop - Walkthrough - Just Cause - Game Guide and Walkthrough](https://game.lhg100.com/Article/UploadFiles/201512/2015121610232475.jpg)
Important! Completing this mission will allow you to use a new agency hideout (Agency 02). It's one of the best safehouses in the entire game, at least in my personal opinion. Furthermore, you'll have a lot of new additional challenges ahead of you... that is, if you want to take on these types of missions. I would recommend that you go back to the previous island first, because you'll be able to take full control over it. In order to do that, you will have to liberate one of the largest cities of the area. Additionally, you will be able to unlock some new hideouts. Sadly, you won't be using them too often. As for this new island, at the moment you will only have an opportunity to liberate a few villas for the Rioja cartel. You can also try and pick up all of the surrounding packages.
Important! At least two of the packages are very well guarded. As a result, you'll have a lot of problems collecting them. You would have to escape military forces, including the helicopters. If you decide to take them now, try moving to one of the nearby hideouts. Agency 02 seems like a good idea. Alternatively, you could ignore the packages for the moment and collect them later (after taking full control of this island).
Mission objectives: During the course of this mission you will have to hunt down and kill general Jose Durango. He is loyal to president Mendoza. Durango likes to speed his free time in a club that's located on the top of a large mountain. You will have to check a limousine first. If Durango isn't there, you will proceed to the bar.
Difficulty: medium
Complete walkthrough:
Start off by going to the briefing area (#1). It will be visible on your map. I would recommend that you take a good look around, because you will have to return here in the future. Once you've watched the briefing, you can either choose a motorcycle (#2) or put a request for a small humvee (it's been provided by the Agency). I'd personally recommend having a car. Thanks to it, taking control of the limousine (your first target) will be very easy.
![1 - [Mission 07] Some Like it Hotter - Walkthrough - Just Cause - Game Guide and Walkthrough](https://game.lhg100.com/Article/UploadFiles/201512/2015121610232484.jpg)
![I have to warn you about something - [Mission 07] Some Like it Hotter - Walkthrough - Just Cause - Game Guide and Walkthrough](https://game.lhg100.com/Article/UploadFiles/201512/2015121610232425.jpg)
I have to warn you about something. This mission is much more difficult than the previous ones. You will have to be very careful, especially later when you will try to reach the top of the mountain. You have to go to a nearby army base (#1). The route is rather obvious. Once you're close enough (#2) you should accelerate a little, because you'll trigger a new part of the mission. You will have to catch an enemy convoy.
![2 - [Mission 07] Some Like it Hotter - Walkthrough - Just Cause - Game Guide and Walkthrough](https://game.lhg100.com/Article/UploadFiles/201512/2015121610232433.jpg)
![Start chasing Durango's limousine (#1) - [Mission 07] Some Like it Hotter - Walkthrough - Just Cause - Game Guide and Walkthrough](https://game.lhg100.com/Article/UploadFiles/201512/2015121610232461.jpg)
Start chasing Durango's limousine (#1). This is a very similar segment to one of the previous missions of the game. I would recommend that you try and get closer to the limo. Once you're there, activate the stunt mode in order to take full control of the new vehicle (#2). You will have to avoid armored vehicles while doing this. There are also a few enemy soldiers in the vicinity, however you can ignore them.
![3 - [Mission 07] Some Like it Hotter - Walkthrough - Just Cause - Game Guide and Walkthrough](https://game.lhg100.com/Article/UploadFiles/201512/2015121610232487.jpg)
Once you're inside the limo, it turns out that Durango isn't there. You will have to get to the top of the nearby volcano in order to finish this once and for all (#1). There's only one road leading to your destination (check the map). Furthermore, it's very narrow, so you have to be very careful. Your vehicle is going to be attacked by a lot of police and military units. You must avoid all of these attacks. It would be best to stay in the limousine as long as possible, mostly because the vehicle has an additional armor. Head on to the only road and start moving upwards (#2).
![4 - [Mission 07] Some Like it Hotter - Walkthrough - Just Cause - Game Guide and Walkthrough](https://game.lhg100.com/Article/UploadFiles/201512/2015121610232451.jpg)
![You should be quite safe inside the limousine - [Mission 07] Some Like it Hotter - Walkthrough - Just Cause - Game Guide and Walkthrough](https://game.lhg100.com/Article/UploadFiles/201512/2015121610232518.jpg)
You should be quite safe inside the limousine. I would recommend that you stick close to it until it's completely destroyed. If you lost this car somehow, you may proceed to one of the unlocked safehouses (#1). You'll find a monster truck there (#2). Sadly, this vehicle isn't that good, so it would be best to load one of the previous checkpoints in order to try again with the limo.
![5 - [Mission 07] Some Like it Hotter - Walkthrough - Just Cause - Game Guide and Walkthrough](https://game.lhg100.com/Article/UploadFiles/201512/2015121610232593.jpg)
![Keep moving towards the top of the volcano (#1) - [Mission 07] Some Like it Hotter - Walkthrough - Just Cause - Game Guide and Walkthrough](https://game.lhg100.com/Article/UploadFiles/201512/2015121610232548.jpg)
Keep moving towards the top of the volcano (#1). The most important thing here is not to stop. Otherwise you would have to deal with the surrounding vehicles. An enemy chopper will appear on the map very shortly (#2). You will have to avoid its attacks. Sadly, it's not that easy as it seems, especially since you don't have any rocket launchers with you. As a result, don't even think about shooting it down.
![6 - [Mission 07] Some Like it Hotter - Walkthrough - Just Cause - Game Guide and Walkthrough](https://game.lhg100.com/Article/UploadFiles/201512/2015121610232553.jpg)
![The final part of the approach (#1) will be more difficult - [Mission 07] Some Like it Hotter - Walkthrough - Just Cause - Game Guide and Walkthrough](https://game.lhg100.com/Article/UploadFiles/201512/2015121610232578.jpg)
The final part of the approach (#1) will be more difficult. You have to be careful, because the road is very narrow here, so it's easy to make a mistake. Try using the limousine as long as possible. If you decide to leave the car, make sure you move back to a safe distance. The gunship will probably use rockets to destroy it. You could lose a lot of health here. Choose a new car and keep moving forward. You should be able to reach your destination very soon (#2). Start heading towards a large entrance of the club. There's only one road leading to it, so you can't really miss it.
![7 - [Mission 07] Some Like it Hotter - Walkthrough - Just Cause - Game Guide and Walkthrough](https://game.lhg100.com/Article/UploadFiles/201512/2015121610232529.jpg)
![Once you're there, exit the vehicle and start moving towards your target - [Mission 07] Some Like it Hotter - Walkthrough - Just Cause - Game Guide and Walkthrough](https://game.lhg100.com/Article/UploadFiles/201512/2015121610232574.jpg)
Once you're there, exit the vehicle and start moving towards your target. You must be quick about it, because you'll be under constant fire. I would recommend that you kill a few soldiers along the way (#1). One of them should drop a medical kit. Pick it up. Keep moving towards the general (#2). He's trying to escape. Thankfully, he can't leave this place.
![8 - [Mission 07] Some Like it Hotter - Walkthrough - Just Cause - Game Guide and Walkthrough](https://game.lhg100.com/Article/UploadFiles/201512/2015121610232597.jpg)
![The general will probably try to climb up a little - [Mission 07] Some Like it Hotter - Walkthrough - Just Cause - Game Guide and Walkthrough](https://game.lhg100.com/Article/UploadFiles/201512/2015121610232515.jpg)
The general will probably try to climb up a little. Use your machine gun to take him down (#1). Thankfully, he's not a strong opponent, so you should be able to kill him without any other delays. Wait for the FMV to show up. After that, the mission will come to an end.
![Important - [Mission 07] Some Like it Hotter - Walkthrough - Just Cause - Game Guide and Walkthrough](https://game.lhg100.com/Article/UploadFiles/201512/2015121610232621.jpg)
Important! Sadly, there's not much to do here. I would recommend that you take control of the northern part of this island. There's a new province here for you to take - Provincia de los Bravos. You will have to liberate two random settlements. You will also unlock a new safehouse, however I didn't find it to be useful, especially since there's a better hideout nearby - Agency 02.
Important! For the first time during the game, you will have an opportunity to liberate an army base instead of an usual town or a village. This is a more difficult task. You will be encountering well equipped soldiers. There are also a lot of helicopters and armored vehicles here. Choose your targets carefully. You may also consider stealing one of the tanks. Watch out for random explosions!
Mission objectives: You will have to help one of the rebel soldiers in a planned arms deal. Your goal will be to protect your female ally and ensure that everything goes smoothly. If any unforeseen circumstances occur (count on that!! ;-)) you will have to get the money back, track down arms dealers and kill all hostile units.
Difficulty: easy
Complete walkthrough:
Thankfully, this mission is much easier than the one you've just finished. Start off by heading to the same beach as before. Enter the trailer in order to activate the briefing. Once you've regained full control over your character, head on to a small helicopter (#1). You won't have any problems finding it. Get the machine in the air. You will have to reach a new target (#2). Check the map to know exactly where you are going.
![1 - [Mission 08] Brothers in Arms - Walkthrough - Just Cause - Game Guide and Walkthrough](https://game.lhg100.com/Article/UploadFiles/201512/2015121610232609.jpg)
![You will have to reach small crossroads - [Mission 08] Brothers in Arms - Walkthrough - Just Cause - Game Guide and Walkthrough](https://game.lhg100.com/Article/UploadFiles/201512/2015121610232613.jpg)
You will have to reach small crossroads. Once you're there, try landing safely. You won't need the helicopter anymore. Go ahead and talk to Esperanza (#1). You will have to assist her in an arms deal. Head on to the nearby truck (#2). Enter it and start moving towards your new destination point.
![2 - [Mission 08] Brothers in Arms - Walkthrough - Just Cause - Game Guide and Walkthrough](https://game.lhg100.com/Article/UploadFiles/201512/2015121610232603.jpg)
![I would recommend that you avoid hitting objects along the way - [Mission 08] Brothers in Arms - Walkthrough - Just Cause - Game Guide and Walkthrough](https://game.lhg100.com/Article/UploadFiles/201512/2015121610232624.jpg)
I would recommend that you avoid hitting objects along the way. Thanks to that, you won't be disturbed by anything during the second part of this mission. There's only one small road here, so you can't get lost (#1). Once you've reached your target, a new cut-scene should appear on the screen (#2).
![3 - [Mission 08] Brothers in Arms - Walkthrough - Just Cause - Game Guide and Walkthrough](https://game.lhg100.com/Article/UploadFiles/201512/2015121610232654.jpg)
![Sadly, it turns out that all of this was a trap (#1) - [Mission 08] Brothers in Arms - Walkthrough - Just Cause - Game Guide and Walkthrough](https://game.lhg100.com/Article/UploadFiles/201512/2015121610232625.jpg)
Sadly, it turns out that all of this was a trap (#1). Arms dealers not only took the money, but they also want to kill you. Thankfully, you won't have to worry about Esperanza anymore. She can handle the situation on her own. You, on the other hand, will be granted with a new task. You have to hunt down and kill Sanchez (one of the arms dealers). Use a nearby truck (#2).
![4 - [Mission 08] Brothers in Arms - Walkthrough - Just Cause - Game Guide and Walkthrough](https://game.lhg100.com/Article/UploadFiles/201512/2015121610232663.jpg)
![Get ready for a new chase scene - [Mission 08] Brothers in Arms - Walkthrough - Just Cause - Game Guide and Walkthrough](https://game.lhg100.com/Article/UploadFiles/201512/2015121610232797.jpg)
Get ready for a new chase scene. Sanchez is moving quite fast, so you can't make any major mistakes along the way. You will also have to watch out for other members of his gang. It would be wise to choose several shortcuts along the way (#1). Make sure you approach them correctly, so you won't hit anything. Try getting closer to the designated vehicle (#2).
![5 - [Mission 08] Brothers in Arms - Walkthrough - Just Cause - Game Guide and Walkthrough](https://game.lhg100.com/Article/UploadFiles/201512/2015121610232776.jpg)
![It would be best to wait for Sanchez to make some kind of mistake (#1) - [Mission 08] Brothers in Arms - Walkthrough - Just Cause - Game Guide and Walkthrough](https://game.lhg100.com/Article/UploadFiles/201512/2015121610232727.jpg)
It would be best to wait for Sanchez to make some kind of mistake (#1). There's a lot of civilians cars here, so he'll probably crash into something very soon. Once he's done that, get closer to his car and perform a successful stunt (#2). Thankfully, you won't have to worry about soldiers who are helping him at the moment. They won't pose too much of a threat.
![6 - [Mission 08] Brothers in Arms - Walkthrough - Just Cause - Game Guide and Walkthrough](https://game.lhg100.com/Article/UploadFiles/201512/2015121610232720.jpg)
![There's only one more thing for you to do here - you must kill Sanchez (#1) - [Mission 08] Brothers in Arms - Walkthrough - Just Cause - Game Guide and Walkthrough](https://game.lhg100.com/Article/UploadFiles/201512/2015121610232732.jpg)
There's only one more thing for you to do here - you must kill Sanchez (#1). Just as before, one successful hit should be enough. Once he's gone, a new cut-scene will appear on the screen. This is it for this mission.
![Important - [Mission 08] Brothers in Arms - Walkthrough - Just Cause - Game Guide and Walkthrough](https://game.lhg100.com/Article/UploadFiles/201512/2015121610232747.jpg)
Important! There will be a lot of new opportunities waiting for you this time. One of the most important things will involve this new island. As you've probably noticed by now, it's very large, so I'd strongly recommend using helicopters or planes all the time. Rioja 04 hideout is one of the best hideouts in the entire area, mostly because you'll find a gunship here. Furthermore, there are a lot of packages in the mountains. You'll only be able to get them by using the helicopter. It would be best if you had collected all of them. There are also a lot of villas in the area. Riojas would be very greatful if you had helped them in these fights. You should be able to earn a lot or Prestige Points by doing that. You'll also unlock a lot of new hideouts, weapons and vehicles.
Important! Liberating all kinds of settlements is going to be much more difficult from now on. The most important thing is that you'll have to watch out for enemy gunships. They will take part in most of these fights. Thankfully, pilots won't use any rockets. The only exception are the vehicles, so it would be best to avoid them at all costs. Try and take full control of the new province. You should also collect all of the surrounding packages. Some of them may be hidden in the water, so make sure you're using a fast boat to get them.
Mission objectives: You will have to go and check what is happening by the Cocodrilo Pereziso river. There's a small station there. Mendoza's cartel is using it to ship all kinds of illegal materials. Today's one of the biggest shipments. If you locate something of high value, you will have to destroy it. The last objective will require you to return to a nearby safehouse.
Difficulty: easy
Complete walkthrough:
For the most of the time, you will stay on the water. Thankfully, the mission itself is quite simple. You'll be using a futuristic boat that's equipped with heavy machine guns. You've probably tested it before (you could find it by the Agency 02 hideout). You will have to leave the boat for later during this mission. Start off by going to the briefing area. Once it's over, enter the boat (#1). Start moving forward (#2). I would recommend that you use the map. Check where you will need to go.
![1 - [Mission 09] River of Blood - Walkthrough - Just Cause - Game Guide and Walkthrough](https://game.lhg100.com/Article/UploadFiles/201512/2015121610232708.jpg)
![Head on to a large river (#1) - [Mission 09] River of Blood - Walkthrough - Just Cause - Game Guide and Walkthrough](https://game.lhg100.com/Article/UploadFiles/201512/2015121610232738.jpg)
Head on to a large river (#1). You shouldn't have any problems steering the boat. Just make sure you're not moving too fast. Otherwise you may end up somewhere you don't belong. ;-) A timer will appear on your screen. Don't worry about it. You will have plenty of time to reach your next destination. You will be able to perform small jumps along the way (#2), however I wouldn't recommend doing that, because it's a little risky. Try and avoid all visible objects. You will encounter a lot of wooden structures and boats.
![2 - [Mission 09] River of Blood - Walkthrough - Just Cause - Game Guide and Walkthrough](https://game.lhg100.com/Article/UploadFiles/201512/2015121610232704.jpg)
![You should be getting close to your next target very soon (#1) - [Mission 09] River of Blood - Walkthrough - Just Cause - Game Guide and Walkthrough](https://game.lhg100.com/Article/UploadFiles/201512/2015121610232814.jpg)
You should be getting close to your next target very soon (#1). It turns out that there's a train here, loaded with rocket fuel. You will have to destroy three main tanks. Get closer to the shore. I would recommend that you move closer to the front of the train. Use the boat guns in order to kill some of the visible enemy soldiers. They shouldn't even retaliate.
![3 - [Mission 09] River of Blood - Walkthrough - Just Cause - Game Guide and Walkthrough](https://game.lhg100.com/Article/UploadFiles/201512/2015121610232859.jpg)
![Try moving closer to the first fuel stank - [Mission 09] River of Blood - Walkthrough - Just Cause - Game Guide and Walkthrough](https://game.lhg100.com/Article/UploadFiles/201512/2015121610232844.jpg)
Try moving closer to the first fuel stank. You will have to start shooting at it (#1). Thankfully, these objects will explode without any major delays (#2). Make sure you're in a safe distance. You have to be quick with two of the remaining tanks, because the train will start moving in a short while. You can't let it get away!
![4 - [Mission 09] River of Blood - Walkthrough - Just Cause - Game Guide and Walkthrough](https://game.lhg100.com/Article/UploadFiles/201512/2015121610232896.jpg)
![One of the enemy soldiers should be carrying a rocket launcher - [Mission 09] River of Blood - Walkthrough - Just Cause - Game Guide and Walkthrough](https://game.lhg100.com/Article/UploadFiles/201512/2015121610232858.jpg)
One of the enemy soldiers should be carrying a rocket launcher. I'd STRONGLY recommend that you kill him and take his weapon. You'll going to need it in the future. Use the rocket launcher to dispose of the remaining tanks (#1). Once they're gone, turn around and start running towards your boat (#2). Staying here isn't a good idea, especially since the area is crawling with enemy troops. Furthermore, enemy gunships will arrive here very soon!
![5 - [Mission 09] River of Blood - Walkthrough - Just Cause - Game Guide and Walkthrough](https://game.lhg100.com/Article/UploadFiles/201512/2015121610232897.jpg)
![Enter the boat - [Mission 09] River of Blood - Walkthrough - Just Cause - Game Guide and Walkthrough](https://game.lhg100.com/Article/UploadFiles/201512/2015121610232898.jpg)
Enter the boat. You will have to make a quick and very precise turn. Start moving forward. You may consider using your guns to destroy some of the enemy boats, however this is not necessary (#1). The most important thing at the moment is NOT to stop. You're being chased by enemy gunships. Take a look at your map. You will have to reach a small safehouse. Keep going straight. There are a lot of obstacles along the way. Avoid them at all costs, especially metal bars sticking out of the water (#2).
![6 - [Mission 09] River of Blood - Walkthrough - Just Cause - Game Guide and Walkthrough](https://game.lhg100.com/Article/UploadFiles/201512/2015121610232812.jpg)
![There's going to be a small bay on your right (#1) - [Mission 09] River of Blood - Walkthrough - Just Cause - Game Guide and Walkthrough](https://game.lhg100.com/Article/UploadFiles/201512/2015121610232885.jpg)
There's going to be a small bay on your right (#1). You will have to slow down a little in order to enter it without any problems. Otherwise you would have ended by the shore. Try moving closer to a small hut (#2). The mission will end in just a few seconds.
![7 - [Mission 09] River of Blood - Walkthrough - Just Cause - Game Guide and Walkthrough](https://game.lhg100.com/Article/UploadFiles/201512/2015121610232999.jpg)
![Important - [Mission 09] River of Blood - Walkthrough - Just Cause - Game Guide and Walkthrough](https://game.lhg100.com/Article/UploadFiles/201512/2015121610232956.jpg)
Important! Completing this mission will give you a full access to a new agency safehouse (Agency 03). Sadly, this hideout isn't as useful as its predecessors. As a result, you probably won't be using it that often. Rioja 05 is a much more interesting hideout, mostly because it has a Rioja settlement nearby. Thanks to it, you won't have any problems getting new helicopters. For the moment, I would recommend that you explore this entire island. You will have an opportunity to take control over several new villas for the Rioja cartel. New provinces are also very important. There are two sectors for you to conquer - de San Mateo and de El Oro. You should liberate these regions as soon as possible. There's a large town here. It would be a good idea to liberate it. You'll receive more Prestige Points for that. The second province, on the other hand, offers two small settlements. They are close to each other, so you won't have to travel so much. I should warn you, though. One of these settlements is an army base!
Important! Remember to use the newly acquired rocket launcher. It's a very powerful weapon. You should be using it during all of the liberating missions. Having a rocket launcher will allow you to destroy blockades without any problems. You will also have an opportunity to take down enemy gunships and armored vehicles.
Mission objectives: This time you will have to destroy one of the largest cocaine fields in the area. Thanks to that, you will improve Riojas position and once again prove that you're a worthy ally.
Difficulty: easy
Complete walkthrough:
This is a very simple mission. The only thing is you must know what exactly needs to be done. If you decide to follow my instructions, you should be able to end this level without having to rearm. Otherwise you'd have some serious problems with the fields. Start off by going to the briefing area (#1). This time it's located on the top of the large hill, so it would be best to use the Extraction feature. Once you've been briefed, head on to the nearby parking lot. You should notice a large helicopter here (#2). You will have to use it.
![1 - [Mission 10] Field of Dreams - Walkthrough - Just Cause - Game Guide and Walkthrough](https://game.lhg100.com/Article/UploadFiles/201512/2015121610232943.jpg)
![You've probably noticed that this helicopter doesn't have any rockets on it - [Mission 10] Field of Dreams - Walkthrough - Just Cause - Game Guide and Walkthrough](https://game.lhg100.com/Article/UploadFiles/201512/2015121610232908.jpg)
You've probably noticed that this helicopter doesn't have any rockets on it. The only weapon is the minigun. That's not good enough! Thankfully, there is an alternative. Take a closer look at the map. Start flying towards a single black dot (#1). You'll find it near the cocaine fields. Once you're there (#2), try landing inside a small complex area. It's very important because these buildings are surrounded with a large fence.
![2 - [Mission 10] Field of Dreams - Walkthrough - Just Cause - Game Guide and Walkthrough](https://game.lhg100.com/Article/UploadFiles/201512/2015121610232981.jpg)
![There is a second gunship here (#1) - [Mission 10] Field of Dreams - Walkthrough - Just Cause - Game Guide and Walkthrough](https://game.lhg100.com/Article/UploadFiles/201512/2015121610232985.jpg)
There is a second gunship here (#1). You will be able to steal it without raising any alarms. The most important thing about this helicopter are its rockets. Enter the gunship and start moving towards one of the cocaine fields (#2).
![3 - [Mission 10] Field of Dreams - Walkthrough - Just Cause - Game Guide and Walkthrough](https://game.lhg100.com/Article/UploadFiles/201512/2015121610232920.jpg)
![I would recommend that you move a little bit closer to the ground - [Mission 10] Field of Dreams - Walkthrough - Just Cause - Game Guide and Walkthrough](https://game.lhg100.com/Article/UploadFiles/201512/2015121610232965.jpg)
I would recommend that you move a little bit closer to the ground. Thanks to that, you won't have any problems spotting next targets. Ready your guns. You will have to stop here for a few seconds and start shooting at one of the corn fields (#1). Remember that you have an unlimited supply of rockets. Once you've destroyed the field, you'll be informed about that.
![4 - [Mission 10] Field of Dreams - Walkthrough - Just Cause - Game Guide and Walkthrough](https://game.lhg100.com/Article/UploadFiles/201512/2015121610233014.jpg)
![Go ahead and destroy two other fields using a similar method (#1) - [Mission 10] Field of Dreams - Walkthrough - Just Cause - Game Guide and Walkthrough](https://game.lhg100.com/Article/UploadFiles/201512/2015121610233017.jpg)
Go ahead and destroy two other fields using a similar method (#1). It would be best to stay away from the ground. Otherwise you would have been shot down. There are also a lot of big trees here. Once you've destroyed the third corn field, you're going to be warned about something. There's an enemy gunship in the vicinity. You will have to deal with this problem.
![5 - [Mission 10] Field of Dreams - Walkthrough - Just Cause - Game Guide and Walkthrough](https://game.lhg100.com/Article/UploadFiles/201512/2015121610233032.jpg)
![Turn around IMMEDIATELY - [Mission 10] Field of Dreams - Walkthrough - Just Cause - Game Guide and Walkthrough](https://game.lhg100.com/Article/UploadFiles/201512/2015121610233056.jpg)
Turn around IMMEDIATELY. Use your rockets in order to dispose of the enemy gunship (#1). You have to be quick about it. You can't let it open fire. Thankfully, you will be able to use homing rockets in order to shoot it down more efficiently. Get back to your main objective (#2). You will have three more corn fields to destroy.
![6 - [Mission 10] Field of Dreams - Walkthrough - Just Cause - Game Guide and Walkthrough](https://game.lhg100.com/Article/UploadFiles/201512/2015121610233063.jpg)
![You shouldn't have any other problems with the remaining fields - [Mission 10] Field of Dreams - Walkthrough - Just Cause - Game Guide and Walkthrough](https://game.lhg100.com/Article/UploadFiles/201512/2015121610233065.jpg)
You shouldn't have any other problems with the remaining fields. Once you've completed this mission objective, a second gunship will arrive in the area (#1). You will have to shoot it down as well. You should know exactly what has to be done here. Start moving towards your final objective (#2). You won't encounter any other units along the way.
![7 - [Mission 10] Field of Dreams - Walkthrough - Just Cause - Game Guide and Walkthrough](https://game.lhg100.com/Article/UploadFiles/201512/2015121610233060.jpg)
![You will have to go back to the previously explored bar, that's located on the top of a large mountain - [Mission 10] Field of Dreams - Walkthrough - Just Cause - Game Guide and Walkthrough](https://game.lhg100.com/Article/UploadFiles/201512/2015121610233020.jpg)
You will have to go back to the previously explored bar, that's located on the top of a large mountain. Make sure you land there safely. Exit the gunship and move closer to the main entrance (#1). That's where this mission will end.
![Important - [Mission 10] Field of Dreams - Walkthrough - Just Cause - Game Guide and Walkthrough](https://game.lhg100.com/Article/UploadFiles/201512/2015121610233094.jpg)
Important! Just as before, you will presented with a lot of interesting opportunities. There are many types of additional challenges waiting for you. One of the most important things are the new provinces. This time you will be able to conquer FOUR new sectors - Los Hidalgos, Isla Alegre, Provincia La Perla and Las Crucitas. It would be best if they were under your full control. As for the tactical approach... make sure that you attack all of the army bases. They are located in all four sectors. Taking control over an army base is very simple. You will have to hijack one of the tanks or armored vehicles. Use its guns in order to kill enemy soldiers. You will also be able to destroy blockades. Liberating these kinds of settlements will be rewarded with 50 (instead of 30) Prestige Points. Once you've taken control of the army base, liberate a small village. Some of these settlements are located near hideouts, so I'd recommend making a correct choice. In most cases, you will only have to liberate two settlements to take full control of an entire province.
Important! Additionally, you should go and check one of the nearby islands. That's where the next campaign mission will start. Sadly, you won't have much to do here, however make sure that you've liberated all of the surrounding villas for the Rioja cartel.
Mission objectives: Once again, you'll be working with Jose Caramicas (you've saved him in one of the previous mission of the campaign). This time you will have to escort him to a nearby broadcast station. Once you're there, you will have to ensure that he makes a speech to the people. The last mission objective will require you to destroy a large antenna, so the president won't be able to respond in front of the public.
Difficulty: easy
Complete walkthrough:
This is another simple task, however you shouldn't get used to it, because most of the future missions are going to be much more difficult. In order to begin this mission, you will have to locate a briefing area (#1). Head on to a large trailer. Make sure that you understand what has to be done. There's a quad vehicle parked nearby. You will have to use it (#2) in order to reach the main mission area. You could also ask the Agency for a humvee, however this is not necessary, because you won't be doing any stunts here.
![1 - [Mission 11] Broadcast News - Walkthrough - Just Cause - Game Guide and Walkthrough](https://game.lhg100.com/Article/UploadFiles/201512/2015121610233039.jpg)
![You might want to consider taking a closer look at the black dot along the way (#1) - [Mission 11] Broadcast News - Walkthrough - Just Cause - Game Guide and Walkthrough](https://game.lhg100.com/Article/UploadFiles/201512/2015121610233140.jpg)
You might want to consider taking a closer look at the black dot along the way (#1). You'll find a crashed plane here, along with some additional equipment. There's nothing of interest here, so you might as well skip it. Keep moving towards the broadcast station (#2). I would recommend that you don't crash into anything, so you won't be attacked by the military.
![2 - [Mission 11] Broadcast News - Walkthrough - Just Cause - Game Guide and Walkthrough](https://game.lhg100.com/Article/UploadFiles/201512/2015121610233161.jpg)
![Once you've reached your destination, exit the vehicle and talk to Caramicas (#1) - [Mission 11] Broadcast News - Walkthrough - Just Cause - Game Guide and Walkthrough](https://game.lhg100.com/Article/UploadFiles/201512/2015121610233153.jpg)
Once you've reached your destination, exit the vehicle and talk to Caramicas (#1). He is standing by one of the small buildings. You will have to protect him, so he'll able to reach the broadcast station building. You will have to there right now (#2). The entrance is being guarded by a large group of enemy soldiers. I would recommend that you use the grenades in order to kill them without any other delays. Make sure that no one attacks Caramicas!
![3 - [Mission 11] Broadcast News - Walkthrough - Just Cause - Game Guide and Walkthrough](https://game.lhg100.com/Article/UploadFiles/201512/2015121610233152.jpg)
![Wait for the Caramicas to show up here - [Mission 11] Broadcast News - Walkthrough - Just Cause - Game Guide and Walkthrough](https://game.lhg100.com/Article/UploadFiles/201512/2015121610233149.jpg)
Wait for the Caramicas to show up here. You will have to escort him to a front door (#1). You must ensure that he enters the building safely. Now for the second part of the mission. You will have to defend the broadcast station against enemy attacks. This is a very simple task. You will only have to deal with several waves. Furthermore, these groups will be rather small. You'll also know from where the enemies are coming from. The first group will appear by the rear gate. You will have to go there now. Follow some of the allied rebels if you're confused (#2).
![4 - [Mission 11] Broadcast News - Walkthrough - Just Cause - Game Guide and Walkthrough](https://game.lhg100.com/Article/UploadFiles/201512/2015121610233168.jpg)
![Turn left - [Mission 11] Broadcast News - Walkthrough - Just Cause - Game Guide and Walkthrough](https://game.lhg100.com/Article/UploadFiles/201512/2015121610233110.jpg)
Turn left. Start shooting at the visible enemy soldiers (#1). There's going to be only a few of them, so you won't have to use any grenades. The second group will appear near the front gate. You've used it before, so you should know where you have to go (#2).
![5 - [Mission 11] Broadcast News - Walkthrough - Just Cause - Game Guide and Walkthrough](https://game.lhg100.com/Article/UploadFiles/201512/2015121610233175.jpg)
![Once you've taken care of this group, you will have to go back to the rear gate - [Mission 11] Broadcast News - Walkthrough - Just Cause - Game Guide and Walkthrough](https://game.lhg100.com/Article/UploadFiles/201512/2015121610233267.jpg)
Once you've taken care of this group, you will have to go back to the rear gate. There's going to be more enemy soldiers this time (#1), however it won't make a huge difference. You will only have to make sure that no one gets closer to the main building. The last wave will appear by the side entrance. Take a look at the red arrows if you don't know where it its (#2). I'd recommend that you use a couple of grenades here. Thanks to that, you won't be surprised by anything.
![6 - [Mission 11] Broadcast News - Walkthrough - Just Cause - Game Guide and Walkthrough](https://game.lhg100.com/Article/UploadFiles/201512/2015121610233298.jpg)
![Wait for Caramicas to end his speech (#1) - [Mission 11] Broadcast News - Walkthrough - Just Cause - Game Guide and Walkthrough](https://game.lhg100.com/Article/UploadFiles/201512/2015121610233218.jpg)
Wait for Caramicas to end his speech (#1). Thankfully, you won't be escorting him anymore. Instead, you'll receive some new orders. You will have to blow up a huge antenna. Thanks to that, president Mendoza will not be able to organize his speech. Start moving towards your new objective. There are some additional enemy units in this area. You should be using your rocket launcher (#2), as you won't need it anymore.
![7 - [Mission 11] Broadcast News - Walkthrough - Just Cause - Game Guide and Walkthrough](https://game.lhg100.com/Article/UploadFiles/201512/2015121610233294.jpg)
![Keep moving towards the big antenna - [Mission 11] Broadcast News - Walkthrough - Just Cause - Game Guide and Walkthrough](https://game.lhg100.com/Article/UploadFiles/201512/2015121610233264.jpg)
Keep moving towards the big antenna. A second jeep will arrive here shortly (#1). Use the rocket launcher to take it out from a safe distance. You've probably noticed a large entrance nearby. It leads to the lower level of the complex (#2). Kill all of the surrounding soldiers. Thankfully, they won't be hard to kill. Head on to a new passageway.
![8 - [Mission 11] Broadcast News - Walkthrough - Just Cause - Game Guide and Walkthrough](https://game.lhg100.com/Article/UploadFiles/201512/2015121610233287.jpg)
![Get closer to the big antenna - [Mission 11] Broadcast News - Walkthrough - Just Cause - Game Guide and Walkthrough](https://game.lhg100.com/Article/UploadFiles/201512/2015121610233236.jpg)
Get closer to the big antenna. You will have to place a C4 charge here (#1). I'd personally recommend choosing a triggered mechanism. This will allow you to move back. Return to the main building area. Use the detonator to blow up the antenna (#2). Once the FMV has ended, this mission will come to an end.
![9 - [Mission 11] Broadcast News - Walkthrough - Just Cause - Game Guide and Walkthrough](https://game.lhg100.com/Article/UploadFiles/201512/2015121610233261.jpg)
![Important - [Mission 11] Broadcast News - Walkthrough - Just Cause - Game Guide and Walkthrough](https://game.lhg100.com/Article/UploadFiles/201512/2015121610233375.jpg)
Important! Once again, you will have an opportunity to take control over several new provinces. The game will unlock three new sectors - La Perdida, El Crucero and Isla Maria Dolorosa. You shouldn't have any problems with the first province. Furthermore, you will be able to liberate it as soon as you've finished the main mission. You will end up near a large city. It would be best to talk to one of the rebels in order to start this side mission. Taking control over the city should be enough to liberate a whole sector. As for the rest, I'd recommend that you don't change anything. Start off with the army base, followed by one of the available villages. Make sure that there's a hideout nearby, so you'll be able to use it right away.
Important! You should be able to unlock several other safehouses. Some of them are quite useful. You will also be granted a full access to a fourth Agency hideout. Before you decide to proceed with the next mission, make sure that you've familiarized yourself with the new island. There are also some new villas here. Try liberating them for the Riojas.
Mission objectives: You will have to go and check some of the nearby mountains (Mount Teleno and Mount Gabriel). There's should be a medical facility in that area, however the rebels suspect that the buildings are being used for some other purposes. You will have to reach the complex by air. If it turns out that it's a secret army base, you will have to infiltrate it and destroy several important objects.
Difficulty: medium
Complete walkthrough:
This is a much more difficult mission. You may have some serious problems finishing it. The whole mountain area is crawling with enemy troops. You will have to be ready for that. Thankfully, there aren't any gunships in the area, so you will be able to focus only on enemy soldiers. Start off by visiting a small tent (#1). Once you've been briefed, head on to a large helicopter (#2). You shouldn't have any problems locating it.
![1 - [Mission 12] Love Is in the Air - Walkthrough - Just Cause - Game Guide and Walkthrough](https://game.lhg100.com/Article/UploadFiles/201512/2015121610233377.jpg)
![Get the machine in the air - [Mission 12] Love Is in the Air - Walkthrough - Just Cause - Game Guide and Walkthrough](https://game.lhg100.com/Article/UploadFiles/201512/2015121610233370.jpg)
Get the machine in the air. Start flying towards your new target (#1). You won't encounter any hostile gunships, so you can only concentrate on reaching your current goal. Once you're there, it turns out that the whole area has been occupied by hostile units (#2). I'd strongly recommend that you keep moving all the time, because some soldiers may be equipped with rocket launchers. You might want to consider killing them, however they would soon be replaced by someone else.
![2 - [Mission 12] Love Is in the Air - Walkthrough - Just Cause - Game Guide and Walkthrough](https://game.lhg100.com/Article/UploadFiles/201512/2015121610233388.jpg)
![Wait for the new mission objectives to show up on your screen - [Mission 12] Love Is in the Air - Walkthrough - Just Cause - Game Guide and Walkthrough](https://game.lhg100.com/Article/UploadFiles/201512/2015121610233365.jpg)
Wait for the new mission objectives to show up on your screen. Your first goal is quite simple. You will have to place three satellite beacons. Start off by heading towards the structures located on the top of this mountain (#1). Sadly, you will have to leave the helicopter. It would be best to use the parachute after a short flight (#2), because you won't be able to perform a safe landing.
![3 - [Mission 12] Love Is in the Air - Walkthrough - Just Cause - Game Guide and Walkthrough](https://game.lhg100.com/Article/UploadFiles/201512/2015121610233373.jpg)
![Try landing on the top of the large structure (#1) - [Mission 12] Love Is in the Air - Walkthrough - Just Cause - Game Guide and Walkthrough](https://game.lhg100.com/Article/UploadFiles/201512/2015121610233350.jpg)
Try landing on the top of the large structure (#1). Thanks to that, you won't have to use the ladder to climb up here. Go to a designated spot. You will have to place the first beacon here. Go back to the ground. It's a good idea to use a parachute during these risky jumps. Before you decide to move on any further, you will have to take care of the nearby soldiers (#2).
![Now you will have to leave this small camp in order to get to the second building complex - [Mission 12] Love Is in the Air - Walkthrough - Just Cause - Game Guide and Walkthrough](https://game.lhg100.com/Article/UploadFiles/201512/2015121610233325.jpg)
Now you will have to leave this small camp in order to get to the second building complex. Head on to the left path. Get closer to a huge gap. Your next target should be located on your right (#1). You could choose a nearby path, but there's a quicker way to get there. I would recommend making a jump (#2). Don't worry... you'll be just fine.
![5 - [Mission 12] Love Is in the Air - Walkthrough - Just Cause - Game Guide and Walkthrough](https://game.lhg100.com/Article/UploadFiles/201512/2015121610233427.jpg)
![Use the parachute as soon as you're in the air - [Mission 12] Love Is in the Air - Walkthrough - Just Cause - Game Guide and Walkthrough](https://game.lhg100.com/Article/UploadFiles/201512/2015121610233454.jpg)
Use the parachute as soon as you're in the air. You will have to steer it properly. You should be able to land on the top of the second structure (#1). Once you're there, start moving upwards. You will have to use some crates along the way. There's also a ladder here (#2).
![6 - [Mission 12] Love Is in the Air - Walkthrough - Just Cause - Game Guide and Walkthrough](https://game.lhg100.com/Article/UploadFiles/201512/2015121610233405.jpg)
![You will have to reach the top of this building - [Mission 12] Love Is in the Air - Walkthrough - Just Cause - Game Guide and Walkthrough](https://game.lhg100.com/Article/UploadFiles/201512/2015121610233437.jpg)
You will have to reach the top of this building. Head on to the designated spot. You must place a second beacon here (#1). There's only more building left. Go ahead and make a jump. You will have to use the parachute in order to reach the ground safely (#2). Start moving towards your last objective.
![7 - [Mission 12] Love Is in the Air - Walkthrough - Just Cause - Game Guide and Walkthrough](https://game.lhg100.com/Article/UploadFiles/201512/2015121610233465.jpg)
![You will probably come across several enemy vehicles along the way (#1) - [Mission 12] Love Is in the Air - Walkthrough - Just Cause - Game Guide and Walkthrough](https://game.lhg100.com/Article/UploadFiles/201512/2015121610233404.jpg)
You will probably come across several enemy vehicles along the way (#1). Go ahead and use the rocket launcher to destroy them. You won't need this weapon during the final part of this mission. Get closer to the cliff and make a new jump. This time you will have to try landing inside a small camp (#2). This whole area is surrounded by a large fence, so you must be quite precise. Be careful, though. There are a lot of enemy soldiers in the vicinity!
![8 - [Mission 12] Love Is in the Air - Walkthrough - Just Cause - Game Guide and Walkthrough](https://game.lhg100.com/Article/UploadFiles/201512/2015121610233490.jpg)
![If you haven't landed on top of the structure, you will have to locate small stairs (#1) - [Mission 12] Love Is in the Air - Walkthrough - Just Cause - Game Guide and Walkthrough](https://game.lhg100.com/Article/UploadFiles/201512/2015121610233476.jpg)
If you haven't landed on top of the structure, you will have to locate small stairs (#1). Use them to get to the upper level. You will have to reach the opposite end of this structure. You shouldn't have any problems finding the correct stop. Place a last beacon here (#2). Now you will have to wait for the new instruction to show up. There's also going to be a short cut-scene. Your final objective will be to reprogram one of the missiles in order to prevent a large catastrophe from happening. Don't worry, you'll have plenty of time to reach your final goal.
![9 - [Mission 12] Love Is in the Air - Walkthrough - Just Cause - Game Guide and Walkthrough](https://game.lhg100.com/Article/UploadFiles/201512/2015121610233588.jpg)
![As you've probably suspected, you will have to go back to the top structure - [Mission 12] Love Is in the Air - Walkthrough - Just Cause - Game Guide and Walkthrough](https://game.lhg100.com/Article/UploadFiles/201512/2015121610233549.jpg)
As you've probably suspected, you will have to go back to the top structure. There's only one small road leading to it (check your map for directions). Thankfully, it's not too difficult. I would recommend that you start off by stealing one of the army vehicles. It may even be a small jeep (#1), however later during this segment you should exchange it for something bigger (#2). You will be attacked by small groups of soldiers. There are no gunships in the area, so you don't have to worry about anything in particular.
![10 - [Mission 12] Love Is in the Air - Walkthrough - Just Cause - Game Guide and Walkthrough](https://game.lhg100.com/Article/UploadFiles/201512/2015121610233579.jpg)
![Remember that there's only one road leading to our current destination, so you can't get lost - [Mission 12] Love Is in the Air - Walkthrough - Just Cause - Game Guide and Walkthrough](https://game.lhg100.com/Article/UploadFiles/201512/2015121610233595.jpg)
Remember that there's only one road leading to our current destination, so you can't get lost. Watch out for a sharp left turn, though (#1). You can easily make a mistake here, especially if you're being chased by few other vehicles. Destroy a small barricade and enter a camp area (#2).
![11 - [Mission 12] Love Is in the Air - Walkthrough - Just Cause - Game Guide and Walkthrough](https://game.lhg100.com/Article/UploadFiles/201512/2015121610233539.jpg)
![Once you've reached your new destination, you will only have 60 seconds to reprogram the missile - [Mission 12] Love Is in the Air - Walkthrough - Just Cause - Game Guide and Walkthrough](https://game.lhg100.com/Article/UploadFiles/201512/2015121610233512.jpg)
Once you've reached your new destination, you will only have 60 seconds to reprogram the missile. Start off by leaving your car (you won't need it anymore). There are some enemy soldiers here. Try killing most of them. Next, you will have to enter a small bunker (#1). You will find a computer station here (#2). Use it.
![12 - [Mission 12] Love Is in the Air - Walkthrough - Just Cause - Game Guide and Walkthrough](https://game.lhg100.com/Article/UploadFiles/201512/2015121610233503.jpg)
![Wait for the light to turn green - [Mission 12] Love Is in the Air - Walkthrough - Just Cause - Game Guide and Walkthrough](https://game.lhg100.com/Article/UploadFiles/201512/2015121610233598.jpg)
Wait for the light to turn green. Now you will have to make a last jump. Exit the bunker quickly and head on to a nearby cliff (#1). Once you've made the jump, you will complete this mission. Additionally, a cool cut-scene will appear on your screen (#2).
![13 - [Mission 12] Love Is in the Air - Walkthrough - Just Cause - Game Guide and Walkthrough](https://game.lhg100.com/Article/UploadFiles/201512/2015121610233560.jpg)
![Important - [Mission 12] Love Is in the Air - Walkthrough - Just Cause - Game Guide and Walkthrough](https://game.lhg100.com/Article/UploadFiles/201512/2015121610233600.jpg)
Important! You won't have much to do here. There are only two new provinces for you to conquer. You'll be able to liberate Durango and Provincia Quesada sectors. They are on the previous island, so you will have to get back there. Alternatively, you could use the Rioja 04 hideout. There's an excellent gunship there, remember? You would be able to travel quickly if you decide to use it. The bigger of the two provinces has an army base, so you should conquer it in the first place. Once it's yours, liberate one of the remaining villages. You will also unlock a couple of new safehouses.
Important! Before you decide to start a new mission of the campaign mode, make sure that you've cleared out this entire island. I would recommend that you use the Agency 02 hideout. You should also take some of the best weapons, including the rocket launcher! You're going to need it!
Mission objectives: You will have to destroy several important objects. San Pedro power plant is your main objective. All of these buildings can be found on a well guarded island. You will have to reach it, infiltrate the complex, take care of the designated buildings and then organize an escape.
Difficulty level: hard
Complete walkthrough:
This is one of the most challenging missions of the game. I'm sure that you're going to have a lot of problems with it. One of the most important things are the enemy gunships. You'll be under a constant fire. Furthermore, destroying a gunship won't solve the problem, because a new helicopter will arrive in its place. This mission is also quite long and there are only a few checkpoints out there. You have to be very careful. Start off by visiting Kane and Sheldon (#1). They will tell you what exactly has to be done once you've successfully infiltrated the complex. I would recommend that you get there by plane. Take a look at your map. You should notice a small airfield nearby. Go there now (#2).
![1 - [Mission 13] I've Got the Power - Walkthrough - Just Cause - Game Guide and Walkthrough](https://game.lhg100.com/Article/UploadFiles/201512/2015121610233640.jpg)
![As you've probably suspected, you will have to use a small plane that should be waiting for you here (Huerta SPA Ocelot; #1) - [Mission 13] I've Got the Power - Walkthrough - Just Cause - Game Guide and Walkthrough](https://game.lhg100.com/Article/UploadFiles/201512/2015121610233684.jpg)
As you've probably suspected, you will have to use a small plane that should be waiting for you here (Huerta SPA Ocelot; #1). Enter the plane. It would be best if you had practiced steering it before starting this mission, mostly because you can't afford making any major mistakes. Start flying towards your first objective (#2). It'll be located on your left.
![2 - [Mission 13] I've Got the Power - Walkthrough - Just Cause - Game Guide and Walkthrough](https://game.lhg100.com/Article/UploadFiles/201512/2015121610233658.jpg)
![Once you've crossed an invisible line, you'll activate a maximum pursuit level (#1) - [Mission 13] I've Got the Power - Walkthrough - Just Cause - Game Guide and Walkthrough](https://game.lhg100.com/Article/UploadFiles/201512/2015121610233650.jpg)
Once you've crossed an invisible line, you'll activate a maximum pursuit level (#1). There are going to be a lot of hostile gunships and even jets in the area, so you can't stay aboard the plane for too long. Make sure that you're closer enough to the power plant. Exit the plane and after a short flight use the parachute (#2).
![3 - [Mission 13] I've Got the Power - Walkthrough - Just Cause - Game Guide and Walkthrough](https://game.lhg100.com/Article/UploadFiles/201512/2015121610233627.jpg)
![I hope that you had enough training with the parachute - [Mission 13] I've Got the Power - Walkthrough - Just Cause - Game Guide and Walkthrough](https://game.lhg100.com/Article/UploadFiles/201512/2015121610233614.jpg)
I hope that you had enough training with the parachute. It would be best if you had landed on top of one of the two big tanks (#1). It's very important, because your first mission objective is nearby. Head down to a lower platform. Place the C4 charge in a designated spot (#2). I'd strongly recommend choosing manually triggered explosives instead of the usual ones. Thanks to that, you will be able to move back to a safe distance.
![4 - [Mission 13] I've Got the Power - Walkthrough - Just Cause - Game Guide and Walkthrough](https://game.lhg100.com/Article/UploadFiles/201512/2015121610233652.jpg)
![You've probably noticed by now that you're being attacked by an enemy gunship - [Mission 13] I've Got the Power - Walkthrough - Just Cause - Game Guide and Walkthrough](https://game.lhg100.com/Article/UploadFiles/201512/2015121610233626.jpg)
You've probably noticed by now that you're being attacked by an enemy gunship. You may consider using the rocket launcher for the first time (#1), however you must conserve your ammo supplies, because you'll need a lot of rockets in the future. Jump down to the ground. Move back and detonate the first charge (#2).
![5 - [Mission 13] I've Got the Power - Walkthrough - Just Cause - Game Guide and Walkthrough](https://game.lhg100.com/Article/UploadFiles/201512/2015121610233738.jpg)
![Head on to the second objective - [Mission 13] I've Got the Power - Walkthrough - Just Cause - Game Guide and Walkthrough](https://game.lhg100.com/Article/UploadFiles/201512/2015121610233799.jpg)
Head on to the second objective. You may place the C4 by the small barrier (#1). Furthermore, a standard C4 charge is good enough. You'll have plenty of time to escape the explosion. Be careful, though. There are a lot of enemy soldiers here (#2). It would be best if you had avoided most of them. You shouldn't be fighting them, especially that there's probably a new gunship in the air. If you decide to kill someone, be on a look out for additional first aid kits. You'll need a lot of them if you want to survive here.
![Head on to the third objective - [Mission 13] I've Got the Power - Walkthrough - Just Cause - Game Guide and Walkthrough](https://game.lhg100.com/Article/UploadFiles/201512/2015121610233729.jpg)
Head on to the third objective. Sadly, it's located on the other end of this road. Once you're there, turn right and keep moving straight. You will have to locate some new stairs (#1). They will lead you to a small metal platform. Your third objective is on top of a large tower. Before you decide to get there, use the rocket launcher once again (#2). Thanks to that, you'll have about 15-20 seconds to reach your objective.
![7 - [Mission 13] I've Got the Power - Walkthrough - Just Cause - Game Guide and Walkthrough](https://game.lhg100.com/Article/UploadFiles/201512/2015121610233787.jpg)
![You will have to locate a ladder (#1) - [Mission 13] I've Got the Power - Walkthrough - Just Cause - Game Guide and Walkthrough](https://game.lhg100.com/Article/UploadFiles/201512/2015121610233709.jpg)
You will have to locate a ladder (#1). You should be able to climb up to the top of the tower without any other problems. Place an explosive charge here (#2). It doesn't really matter which one you choose. Make a jump and use the parachute in order to reach the ground safely. Now for the hard part. Take a look at the map. You will have to reach a second main objective. Sadly, there's a large distance separating you from it. Start off by taking out the third chopper. Make sure that you leave at least two rockets for later!
![8 - [Mission 13] I've Got the Power - Walkthrough - Just Cause - Game Guide and Walkthrough](https://game.lhg100.com/Article/UploadFiles/201512/2015121610233733.jpg)
![I would recommend that you wait for enemy vehicles to show up here - [Mission 13] I've Got the Power - Walkthrough - Just Cause - Game Guide and Walkthrough](https://game.lhg100.com/Article/UploadFiles/201512/2015121610233790.jpg)
I would recommend that you wait for enemy vehicles to show up here. Steal one of the armored cars (#1). I wouldn't recommend taking a jeep, because it would have been destroyed very soon. You will have to go to a small gate. Once you're there, start moving forward. You'll find yourself in a forest (#2). DON'T STOP. Try moving as fast as possible. You should know that enemy gunships will use rockets to stop you! Avoid these attacks at all costs!
![9 - [Mission 13] I've Got the Power - Walkthrough - Just Cause - Game Guide and Walkthrough](https://game.lhg100.com/Article/UploadFiles/201512/2015121610233742.jpg)
![Avoid hitting other cars (#1), because it would probably slow you down - [Mission 13] I've Got the Power - Walkthrough - Just Cause - Game Guide and Walkthrough](https://game.lhg100.com/Article/UploadFiles/201512/2015121610233875.jpg)
Avoid hitting other cars (#1), because it would probably slow you down. As a result, enemy gunships would be able to destroy your vehicle. You might also consider taking a shortcut through the jungle, however this is very risky, mostly because hitting larger objects will destroy your car. If that happens, leave the vehicle and start moving (on foot) towards nearby structures (#2). As you've probably noticed, gunships won't use rockets against you, so you should be just fine.
![10 - [Mission 13] I've Got the Power - Walkthrough - Just Cause - Game Guide and Walkthrough](https://game.lhg100.com/Article/UploadFiles/201512/2015121610233867.jpg)
![You should be able to reach a small bridge very soon (#1) - [Mission 13] I've Got the Power - Walkthrough - Just Cause - Game Guide and Walkthrough](https://game.lhg100.com/Article/UploadFiles/201512/2015121610233848.jpg)
You should be able to reach a small bridge very soon (#1). If you don't have a car with you, make sure that you steal a random vehicle (#2). I wouldn't recommend staying here for too long. Don't forget that there are enemy gunships in the air. They won't hesitate to kill you!
![11 - [Mission 13] I've Got the Power - Walkthrough - Just Cause - Game Guide and Walkthrough](https://game.lhg100.com/Article/UploadFiles/201512/2015121610233862.jpg)
![Once you've reached the new area, keep moving forward (#1) - [Mission 13] I've Got the Power - Walkthrough - Just Cause - Game Guide and Walkthrough](https://game.lhg100.com/Article/UploadFiles/201512/2015121610233860.jpg)
Once you've reached the new area, keep moving forward (#1). Your next target should be located on your left. Make sure that you make a stop by the trees. There are some stairs here (#2), as well as the motorcycle. You will have to use it in a few minutes. Use the stairs in order to get to a large metal platform.
![12 - [Mission 13] I've Got the Power - Walkthrough - Just Cause - Game Guide and Walkthrough](https://game.lhg100.com/Article/UploadFiles/201512/2015121610233888.jpg)
![You will probably have to deal with several soldiers along the way - [Mission 13] I've Got the Power - Walkthrough - Just Cause - Game Guide and Walkthrough](https://game.lhg100.com/Article/UploadFiles/201512/2015121610233873.jpg)
You will probably have to deal with several soldiers along the way. Some of them will be standing on the ground. Use your grenades to take these guys out. Furthermore, I'd strongly recommend that you use the rocket launcher once again (#1). This will allow you to use one of the nearby ladders (#2). Make sure that you've reached the top safely.
![13 - [Mission 13] I've Got the Power - Walkthrough - Just Cause - Game Guide and Walkthrough](https://game.lhg100.com/Article/UploadFiles/201512/2015121610233896.jpg)
![Take a look at your map - [Mission 13] I've Got the Power - Walkthrough - Just Cause - Game Guide and Walkthrough](https://game.lhg100.com/Article/UploadFiles/201512/2015121610233826.jpg)
Take a look at your map. You will have to reach a small console. It shouldn't be guarded by anyone, so you don't have to worry about that. Make sure that you place a C4 charge here (#1). It must be activated with a detonator! Otherwise you wouldn't have enough time to escape. Now you will have to get back to the ground. You may consider destroying one of the last gunships. Head on to the previously used stairs. There's a motorcycle here, remember (#2)? Use it.
![14 - [Mission 13] I've Got the Power - Walkthrough - Just Cause - Game Guide and Walkthrough](https://game.lhg100.com/Article/UploadFiles/201512/2015121610233954.jpg)
![The objective is to move closer to the shore - [Mission 13] I've Got the Power - Walkthrough - Just Cause - Game Guide and Walkthrough](https://game.lhg100.com/Article/UploadFiles/201512/2015121610233969.jpg)
The objective is to move closer to the shore. After using the detonator, you'll only have 60 seconds to escape from this island. You wouldn't be able to make it from the top (you could use the parachute, however this is very risky). Head on to the cliff and start moving carefully (#1). Try to not hit anything. Stop the bike once you have left the mountain area (#2). Detonate the charge. Like I've said before, you will have to escape this island before the huge explosion occurs.
![15 - [Mission 13] I've Got the Power - Walkthrough - Just Cause - Game Guide and Walkthrough](https://game.lhg100.com/Article/UploadFiles/201512/2015121610233991.jpg)
![Get back to the bike and keep moving forward (#1) - [Mission 13] I've Got the Power - Walkthrough - Just Cause - Game Guide and Walkthrough](https://game.lhg100.com/Article/UploadFiles/201512/2015121610233975.jpg)
Get back to the bike and keep moving forward (#1). I guess I don't have to tell you that you can't stop at anything. Thankfully, you should be able to reach the shore within just a few seconds (#2). Use the boat or make a jump towards the water. Start swimming. An interesting cut-scene will appear on your screen. Congratulations! You've finished this mission!
![16 - [Mission 13] I've Got the Power - Walkthrough - Just Cause - Game Guide and Walkthrough](https://game.lhg100.com/Article/UploadFiles/201512/2015121610233973.jpg)
![Important - [Mission 13] I've Got the Power - Walkthrough - Just Cause - Game Guide and Walkthrough](https://game.lhg100.com/Article/UploadFiles/201512/2015121610233976.jpg)
Important! There are A LOT of new opportunities waiting for you. Start off by taking full control over new provinces. There are two large sectors for you to conquer - Isla San Cristobal and Provincia del Rosario. These provinces are located in the southern part of the previously explored island. It's the same area where you had started the main mission. You shouldn't make any unnecessary changes in your approach. I'd also recommend that you take a closer look at the new large island. That's where the next mission of the campaign will start. Sadly, you won't be able to do a lot of things here. Make sure that you liberate all of the surrounding villas for the Rioja cartel. Sadly, there aren't many hideouts here, so you won't be using the villas to acquire new helicopters. You could also wait with these actions for later, because completing the next mission will grant you access to several interesting provinces. There are also a few packages in the area. Make sure that you collect all of them. Most of the packages are located inside a largest city. I would recommend that you use the helicopter to get them, mostly because some of the packages are well hidden.
Important! You should know that some of the Rioja liberating missions (taking control over villas) might become more difficult from now on. Enemy soldiers are more aggressive. Some of them will also be using heavy machine gun posts. You have to be ready for that!
Important! You don't have to prepare yourself for the next mission, because you won't leave a helicopter at any time. I would recommend, on the other hand, that you save your progress in one of the nearby hideouts - Rioja 06 or Rioja 07.
Mission objectives: There are two main objectives of this mission. Your primary goal will be to destroy a train that's transporting rocket parts to one of the nearby military bases. You will have to take care of that problem. Furthermore, you will only have a few minutes to do that. Once the train reaches a tunnel, you won't be able to attack it anymore. The second goal is less complicated. You will have to hunt down and kill doctor Otto Kleiner. He is one of top scientists working for Mendoza. You will use the helicopter in order to reach the train.
Difficulty level: hard
Complete walkthrough:
This is a rather short mission, however I suspect that you're going to have A LOT of problems with it. You will be using a large helicopter all the time. Sadly, it's not equipped too well. You will also have to watch out for other gunships. As a result, you won't be allowed to make any mistakes. You should also learn doing sudden turns and avoiding larger trees. Start off by heading towards the briefing area. There aren't any objects here, so you will only have to step up to the designated zone (#1). Wait for an allied helicopter to arrive (#2).
![1 - [Mission 14] Guadalicano Choo Choo - Walkthrough - Just Cause - Game Guide and Walkthrough](https://game.lhg100.com/Article/UploadFiles/201512/2015121610233946.jpg)
![Step up to the helicopter (#1) and press a correct key in order to proceed with the main part of this mission - [Mission 14] Guadalicano Choo Choo - Walkthrough - Just Cause - Game Guide and Walkthrough](https://game.lhg100.com/Article/UploadFiles/201512/2015121610233910.jpg)
Step up to the helicopter (#1) and press a correct key in order to proceed with the main part of this mission. A short cut-scene will appear on your screen. Get ready, because you'll receive full control over the gunship in just a few seconds. Make sure that you check your personal map. Start heading towards your current objective (#2). You should also be moving a little bit higher, because there's a lot of hills ahead of you.
![2 - [Mission 14] Guadalicano Choo Choo - Walkthrough - Just Cause - Game Guide and Walkthrough](https://game.lhg100.com/Article/UploadFiles/201512/2015121610234003.jpg)
![You should be getting closer to your target - [Mission 14] Guadalicano Choo Choo - Walkthrough - Just Cause - Game Guide and Walkthrough](https://game.lhg100.com/Article/UploadFiles/201512/2015121610234016.jpg)
You should be getting closer to your target. Make a slight left turn (#1). Thanks to that, you should be able to catch the train a little bit quicker. Position yourself correctly and start firing at the visible carriages (#2). It all has to go very smoothly. Make sure that your targets explode after you hit them with a few rockets. I guess I don't have to remind you that you only have a few minutes to destroy them. Additionally, make sure that you don't leave any carriages behind. You won't have enough time to return to them later.
![3 - [Mission 14] Guadalicano Choo Choo - Walkthrough - Just Cause - Game Guide and Walkthrough](https://game.lhg100.com/Article/UploadFiles/201512/2015121610234035.jpg)
![There's a slight right turn ahead of you - [Mission 14] Guadalicano Choo Choo - Walkthrough - Just Cause - Game Guide and Walkthrough](https://game.lhg100.com/Article/UploadFiles/201512/2015121610234052.jpg)
There's a slight right turn ahead of you. I guess that you've probably destroyed at least 7-8 rocket parts by now (#1). You should be getting close to a small bridge very soon. Keep firing at your targets. Be careful, though. You will receive a warning that there's an enemy gunship in this area. Ignore the carriages for now, and make a sudden turn. You have to be quick about it. Otherwise you wouldn't be able to shoot down an enemy helicopter, because it's much more agile. Use the rockets to take care of this problem (#2). Additionally, make sure you're not hit! You're going to need this helicopter for a few more minutes.
![4 - [Mission 14] Guadalicano Choo Choo - Walkthrough - Just Cause - Game Guide and Walkthrough](https://game.lhg100.com/Article/UploadFiles/201512/2015121610234091.jpg)
![Go back to the train as soon as possible - [Mission 14] Guadalicano Choo Choo - Walkthrough - Just Cause - Game Guide and Walkthrough](https://game.lhg100.com/Article/UploadFiles/201512/2015121610234072.jpg)
Go back to the train as soon as possible. Keep firing at your targets (#1). Like I've said before, you must do this without any additional delays. Once you've destroyed 18-20 rocket parts, a second gunship will arrive in this area. Sadly, you won't be able to shoot it down at this particular moment. As a result, you will have to avoid its attacks (#2). Try and shoot at the rocket parts AT THE SAME TIME. It's quite difficult, although if you had practiced these types of moves before you should be just fine. Just make sure that you don't hit any trees or bridges along the way!
![5 - [Mission 14] Guadalicano Choo Choo - Walkthrough - Just Cause - Game Guide and Walkthrough](https://game.lhg100.com/Article/UploadFiles/201512/2015121610234057.jpg)
![You'll probably have some problems with a few of the final rocket parts (#1) - [Mission 14] Guadalicano Choo Choo - Walkthrough - Just Cause - Game Guide and Walkthrough](https://game.lhg100.com/Article/UploadFiles/201512/2015121610234055.jpg)
You'll probably have some problems with a few of the final rocket parts (#1). It's because that these carriages have an additional armor. Keep firing at them. Make sure that you're dodging enemy attacks at the same time. Once you've destroyed all designated targets, a short cut-scene will appear on your screen (#2). It turns out that Kleiner has an experimental flying machine and he'll use it to get away. Ignore him for the moment. You will have to take care of the gunships first.
![6 - [Mission 14] Guadalicano Choo Choo - Walkthrough - Just Cause - Game Guide and Walkthrough](https://game.lhg100.com/Article/UploadFiles/201512/2015121610234062.jpg)
![There are two enemy helicopters for you to destroy (#1) - [Mission 14] Guadalicano Choo Choo - Walkthrough - Just Cause - Game Guide and Walkthrough](https://game.lhg100.com/Article/UploadFiles/201512/2015121610234083.jpg)
There are two enemy helicopters for you to destroy (#1). If you're lucky, you should be able to take them out during a single attack. Once they're gone, make a new turn and start chasing doctor Kleiner (#2). Thankfully, he shouldn't be too far, so it'll only take you a few seconds to catch up to him.
![7 - [Mission 14] Guadalicano Choo Choo - Walkthrough - Just Cause - Game Guide and Walkthrough](https://game.lhg100.com/Article/UploadFiles/201512/2015121610234103.jpg)
![Kleiner is using a small and fairly slow machine - [Mission 14] Guadalicano Choo Choo - Walkthrough - Just Cause - Game Guide and Walkthrough](https://game.lhg100.com/Article/UploadFiles/201512/2015121610234148.jpg)
Kleiner is using a small and fairly slow machine. Furthermore, he's unarmed. As a result, you may start shooting at him right away (#1). He's not making any sudden moves, so it shouldn't be much of a problem. You will have to hit him at least ten times in order to destroy his flying machine (#2). Thanks to that, you will complete this mission.
![8 - [Mission 14] Guadalicano Choo Choo - Walkthrough - Just Cause - Game Guide and Walkthrough](https://game.lhg100.com/Article/UploadFiles/201512/2015121610234191.jpg)
![Important - [Mission 14] Guadalicano Choo Choo - Walkthrough - Just Cause - Game Guide and Walkthrough](https://game.lhg100.com/Article/UploadFiles/201512/2015121610234185.jpg)
Important! Once you've finished the mission, you will be able to perform several additional challenges. Sadly, there aren't too many of them. Start off by taking control over new provinces. The game will unlock two new sectors - Provinicia de Osvaldo Guzman and Provincia de Cordoba. You don't have to modify your current approach in any way. You should start with an army base, followed by one of the nearby villages. Remember to choose settlements located near hideouts. Thanks to that, you will be able to use them right away. You shouldn't have any problems with these challenges. You'll also unlock several new hideouts. They may come in handy in the future, so it would be best if you had familiarized yourself with their locations.
Important! I'd strongly recommend that you get ready for your new mission. Once again, you're going to need a rocket launcher. Additionally, choose one of the better machine guns, as you will have to kill several well equipped soldiers.
Mission objectives: Your first mission objective is going to be quite simple. You will have to kill one of the pilots. Thanks to that, you will be able to steal his gunship. Next, you must attend to an army parade. It's being organized by the national airport. You will have to land there and locate Luisa and Tomaso, sons of the president. You must eliminate them and escape to a designated safehouse.
Difficulty: easy
Complete walkthrough:
This is a much easier mission, especially if you compare it to the previous ones. It doesn't mean, however, that you'll end it without any problems. Thankfully, you'll only need to know what exactly has to be done. If you'll follow my instructions correctly, you won't even have to repeat anything. Start off by visiting your agency colleagues (#1). Once you've been briefed, head on to a parked car (#2). You will have to use it.
![1 - [Mission 15] Some Enchanted Evening - Walkthrough - Just Cause - Game Guide and Walkthrough](https://game.lhg100.com/Article/UploadFiles/201512/2015121610234144.jpg)
![You have to get back to a main road - [Mission 15] Some Enchanted Evening - Walkthrough - Just Cause - Game Guide and Walkthrough](https://game.lhg100.com/Article/UploadFiles/201512/2015121610234182.jpg)
You have to get back to a main road. Thankfully, you won't have any problems finding it (use the map). Your first target (one of the pilots) is using a jeep (#1). You will have to move up closer to his car. He won't be going too fast, so it shouldn't be much of a problem. Perform a stunt. Alternatively, you could push him off the road. After that, use the machine gun in order to kill him (#2). The choice is yours. Killing the pilot is the only thing that really matters.
![2 - [Mission 15] Some Enchanted Evening - Walkthrough - Just Cause - Game Guide and Walkthrough](https://game.lhg100.com/Article/UploadFiles/201512/2015121610234106.jpg)
![Steal one of the nearby cars and start moving towards a new objective (#1) - [Mission 15] Some Enchanted Evening - Walkthrough - Just Cause - Game Guide and Walkthrough](https://game.lhg100.com/Article/UploadFiles/201512/2015121610234149.jpg)
Steal one of the nearby cars and start moving towards a new objective (#1). You shouldn't be attacked by anyone, so it would be best to not hit anything (especially other cars). Once you're there, exit the vehicle. There's a beautiful gunship here (#2). Make sure that no one's chasing you before you decide to use it.
![3 - [Mission 15] Some Enchanted Evening - Walkthrough - Just Cause - Game Guide and Walkthrough](https://game.lhg100.com/Article/UploadFiles/201512/2015121610234143.jpg)
![Enter the gunship and get the machine in the air - [Mission 15] Some Enchanted Evening - Walkthrough - Just Cause - Game Guide and Walkthrough](https://game.lhg100.com/Article/UploadFiles/201512/2015121610234231.jpg)
Enter the gunship and get the machine in the air. Start flying towards your next objective (#1). It's going to be a huge airport. Make sure you're not attacking any of the other gunships or planes. You should be able to reach the airport within just a few seconds (#2). DON'T use your guns! Thanks to that, you will be able to surprise your targets in a little while.
![4 - [Mission 15] Some Enchanted Evening - Walkthrough - Just Cause - Game Guide and Walkthrough](https://game.lhg100.com/Article/UploadFiles/201512/2015121610234222.jpg)
![It's very important that you land in a designated spot (#1) - [Mission 15] Some Enchanted Evening - Walkthrough - Just Cause - Game Guide and Walkthrough](https://game.lhg100.com/Article/UploadFiles/201512/2015121610234293.jpg)
It's very important that you land in a designated spot (#1). It's a little complicated, but thankfully you won't be rushed by anyone. Once the gunship has landed, leave it and use the stairs to get back to the ground floor (#2). Make sure you're not attacking anyone. Now you will have to wait for the brothers to show up. Start moving towards them. I would recommend that you get your machine gun ready. You're going to need it!
![5 - [Mission 15] Some Enchanted Evening - Walkthrough - Just Cause - Game Guide and Walkthrough](https://game.lhg100.com/Article/UploadFiles/201512/2015121610234230.jpg)
![You should be able to spot your targets very quickly - [Mission 15] Some Enchanted Evening - Walkthrough - Just Cause - Game Guide and Walkthrough](https://game.lhg100.com/Article/UploadFiles/201512/2015121610234240.jpg)
You should be able to spot your targets very quickly. There's a lot of different ways to solve this problem. You can zoom in the view (#1), throw a couple of grenades at them, or even use a rocket launcher. One successful hit from this weapon should be enough. There's one important thing for you to remember. You can't let them get closer to any of the nearby armored vehicles! Eliminate both targets in order to finish up with this mission objective (#2).
![6 - [Mission 15] Some Enchanted Evening - Walkthrough - Just Cause - Game Guide and Walkthrough](https://game.lhg100.com/Article/UploadFiles/201512/2015121610234217.jpg)
![The final part of this mission is going to be more difficult - [Mission 15] Some Enchanted Evening - Walkthrough - Just Cause - Game Guide and Walkthrough](https://game.lhg100.com/Article/UploadFiles/201512/2015121610234294.jpg)
The final part of this mission is going to be more difficult. You will have to reach one of the nearby safehouses. I'd recommend that you use the same gunship as before. Bear in mind, however, that there are a lot of soldiers in the area (#1). You will have to kill most of them. There's also an enemy gunship in the air (#2). Thankfully, it won't be replaced by a similar unit if you actually decide to shoot it down.
![7 - [Mission 15] Some Enchanted Evening - Walkthrough - Just Cause - Game Guide and Walkthrough](https://game.lhg100.com/Article/UploadFiles/201512/2015121610234273.jpg)
![Get back to your gunship - [Mission 15] Some Enchanted Evening - Walkthrough - Just Cause - Game Guide and Walkthrough](https://game.lhg100.com/Article/UploadFiles/201512/2015121610234299.jpg)
Get back to your gunship. Use the stairs and enter the helicopter (#1). Get the machine in the air. There aren't any new units in the vicinity, however you can't stay here for too long (SAM's on the ground). Start flying towards your last objective (#2).
![8 - [Mission 15] Some Enchanted Evening - Walkthrough - Just Cause - Game Guide and Walkthrough](https://game.lhg100.com/Article/UploadFiles/201512/2015121610234308.jpg)
![You shouldn't be attacked on your way over to the safehouse, however I'd strongly recommend that you keep a straight line and stop at nothing (#1) - [Mission 15] Some Enchanted Evening - Walkthrough - Just Cause - Game Guide and Walkthrough](https://game.lhg100.com/Article/UploadFiles/201512/2015121610234303.jpg)
You shouldn't be attacked on your way over to the safehouse, however I'd strongly recommend that you keep a straight line and stop at nothing (#1). Once you're closer to the hideout, exit the helicopter (#2). You won't have to use the parachute, because a cut-scene will appear on your screen in a short while. This is it for this mission.
![9 - [Mission 15] Some Enchanted Evening - Walkthrough - Just Cause - Game Guide and Walkthrough](https://game.lhg100.com/Article/UploadFiles/201512/2015121610234336.jpg)
![Important - [Mission 15] Some Enchanted Evening - Walkthrough - Just Cause - Game Guide and Walkthrough](https://game.lhg100.com/Article/UploadFiles/201512/2015121610234343.jpg)
Important! There's a whole bunch of new challenges ahead of you. It would be best if you had completed all of these side missions. One of the most important things is your new Agency hideout. It'll be very useful and you'll find an excellent gunship here. You will also have an opportunity to put a request for a small gyrocopter from the Agency Extraction screen. This is a very useful machine. Thanks to it, you'll be able to travel very quickly. My guess is that you'll be using it all the time, especially while exploring jungles and mountain areas. As always, you'll have an opportunity to conquer new provinces. There are FIVE new sectors waiting for you this time - Encarnacion, Provincia de Las Palmas, Provincia Caballeros, Costa Verde and Provincia de Castillo. Despite having to conquer all of them, you'll be surprised by some of the new features. Sadly, most of them will make the game even harder. For example, during most of the liberating missions you will have to watch out for army gunships. As a result, you will have to shoot them down and sooner rather than later. Most of these new sectors will allow you to conquest an army base AND a large town. Thanks to that, you will earn 100 Prestige Points instead of 80.
Important! It would be wise to explore the remaining areas of the map, especially the south-western corner. There are a lot of interesting things for you to do here. You should be able to collect some additional packages. Sadly, there aren't too many of them. You will unlock very interesting hideouts. There are also a few villas in the vicinity. Capture them for the Rioja cartel. Before you decide to proceed to the next mission, head out to the Rioja 07 hideout.
Mission objectives: You will have to steal an armored truck. This vehicle is being used to transport money from the national bank to a secret hideout. Once you've acquired this vehicle, you will have to deliver it to a nearby safehouse. Army forces will try to stop you from doing this.
Difficulty: easy
Complete walkthrough:
This is a simple mission, especially if you decide to follow my instructions. Second part of the mission will be more difficult, mostly because you will have to avoid a lot of hostile units. You were taking part in several tough chases before, so I'm sure you'll be just fine. In order to proceed with this mission, you will have to get to the lower part of the city (#1). Once you've been briefed, start running towards a nearby street (#2).
![1 - [Mission 16] Streets of Fire - Walkthrough - Just Cause - Game Guide and Walkthrough](https://game.lhg100.com/Article/UploadFiles/201512/2015121610234389.jpg)
![You shouldn't stay here for too long, because you will only have a few minutes to reach your current goal - [Mission 16] Streets of Fire - Walkthrough - Just Cause - Game Guide and Walkthrough](https://game.lhg100.com/Article/UploadFiles/201512/2015121610234346.jpg)
You shouldn't stay here for too long, because you will only have a few minutes to reach your current goal. Steal one of the passing cars (#1). It doesn't really matter which one is it... as long as it's fast. Your objective will be to reach the bank as soon as possible. Start moving towards it (check your map for directions). I would recommend using one of the larger streets, so you won't have to make any sudden turns along the way (#2). You will have to reach the upper part of the city.
![2 - [Mission 16] Streets of Fire - Walkthrough - Just Cause - Game Guide and Walkthrough](https://game.lhg100.com/Article/UploadFiles/201512/2015121610234397.jpg)
![Once you've reached the new district, you will have to choose one of the side roads (#1) - [Mission 16] Streets of Fire - Walkthrough - Just Cause - Game Guide and Walkthrough](https://game.lhg100.com/Article/UploadFiles/201512/2015121610234351.jpg)
Once you've reached the new district, you will have to choose one of the side roads (#1). The most important thing here is that you keep moving. Make sure that you don't hit anything along the way. Otherwise the armored car would have already left the bank. The only way to get it back would be to perform a successful stunt. I'd recommend that you avoid doing that. Make sure that you're there on time. You will have to locate a small entrance (#2) that leads to an underground parking lot.
![3 - [Mission 16] Streets of Fire - Walkthrough - Just Cause - Game Guide and Walkthrough](https://game.lhg100.com/Article/UploadFiles/201512/2015121610234354.jpg)
![Enter the bank - [Mission 16] Streets of Fire - Walkthrough - Just Cause - Game Guide and Walkthrough](https://game.lhg100.com/Article/UploadFiles/201512/2015121610234461.jpg)
Enter the bank. Go ahead and kill a few soldiers along the way (#1). Make a stop here. Leave the car and start running towards your current target. You will have to get rid of the driver (#2). It shouldn't be much of a problem. Take his place and start moving towards the exit.
![4 - [Mission 16] Streets of Fire - Walkthrough - Just Cause - Game Guide and Walkthrough](https://game.lhg100.com/Article/UploadFiles/201512/2015121610234466.jpg)
![You have to take a closer look at your map - [Mission 16] Streets of Fire - Walkthrough - Just Cause - Game Guide and Walkthrough](https://game.lhg100.com/Article/UploadFiles/201512/2015121610234476.jpg)
You have to take a closer look at your map. Your goal is on the other end of the city (#1). You will have to get there safely. This isn't a difficult segment of the mission, however you will have to remember about several important things. Just as before, you can't make any unplanned stops! That would make you a very easy target. You should also notice that your car has a special energy bar. As a result, you will have to avoid hitting cars or other larger objects (#2)!
![5 - [Mission 16] Streets of Fire - Walkthrough - Just Cause - Game Guide and Walkthrough](https://game.lhg100.com/Article/UploadFiles/201512/2015121610234483.jpg)
![I would recommend that you go back to one of the previously used roads - [Mission 16] Streets of Fire - Walkthrough - Just Cause - Game Guide and Walkthrough](https://game.lhg100.com/Article/UploadFiles/201512/2015121610234468.jpg)
I would recommend that you go back to one of the previously used roads. It would be best to move in a straight line (#1). You will be attacked by large groups of military units. There are also army vehicles in the area (#2). They will try to hit you. Make sure you avoid most of these attacks. Try moving closer to larger poles and other similar objects. If you're lucky, your opponents will crash at some point of the chase.
![6 - [Mission 16] Streets of Fire - Walkthrough - Just Cause - Game Guide and Walkthrough](https://game.lhg100.com/Article/UploadFiles/201512/2015121610234428.jpg)
![You should be able to reach the lower part of the city without any major problems - [Mission 16] Streets of Fire - Walkthrough - Just Cause - Game Guide and Walkthrough](https://game.lhg100.com/Article/UploadFiles/201512/2015121610234422.jpg)
You should be able to reach the lower part of the city without any major problems. Once you're there, I would recommend that you head on to one of the smaller alleys, located between buildings (#1). You will have to reach a small entrance that leads to a parking lot (#2). Enter it. The mission will end in just a few seconds.
![7 - [Mission 16] Streets of Fire - Walkthrough - Just Cause - Game Guide and Walkthrough](https://game.lhg100.com/Article/UploadFiles/201512/2015121610234484.jpg)
![Important - [Mission 16] Streets of Fire - Walkthrough - Just Cause - Game Guide and Walkthrough](https://game.lhg100.com/Article/UploadFiles/201512/2015121610234538.jpg)
Important! Once you've finished the mission, I would recommend that you leave this city. The main reason is that you can't use any Agency features (Extraction, vehicle request) here. Head on to one of the nearest hideouts. There are some interesting vehicles there, however you can also ask for a gyrocopter from the Agency. As always, you will be able to accomplish several bonus tasks. The game should unlock two provinces for you - Provincia Octava and Resolucion. Make sure that you take care of the army base while trying to conquer the upper sector. The second province is much more difficult to liberate. You will have to take control of the northern part of the city. Make sure that you're using armored vehicles. Avoid staying in the open, because you may be hit by one of the passing cars. You should also prepare yourself for the next mission. Make sure that you have a good machine gun. You're going to it!
Mission objectives: You will have to help both Guerrillas and the Riojas in a major strike against the government. There's a secret police station in the lower part of the city. You will have to go there and eliminate police chief Carmona. Additionally, you will save some of the captured rebels. You should know that the whole area is heavily guarded by the military forces.
Difficulty: medium
Complete walkthrough:
This is a quite difficult mission. Furthermore, it's longer than most of the previous ones. You might have some problems finishing it, especially in its final phase. Thankfully, you won't be bothered by any gunships. If you're lucky, you won't even have to repeat anything. Start off by heading towards a briefing area (#1). I would recommend that you have a car with you, because you won't receive any other vehicles. Once you've been briefed, start moving towards your next target (#2). It would be best to not hit anything along the way. Thanks to that, you won't be attacked by any other enemy units.
![1 - [Mission 17] Dismissed Without Honors - Walkthrough - Just Cause - Game Guide and Walkthrough](https://game.lhg100.com/Article/UploadFiles/201512/2015121610234547.jpg)
![It would be best if you had stayed on one of the larger roads - [Mission 17] Dismissed Without Honors - Walkthrough - Just Cause - Game Guide and Walkthrough](https://game.lhg100.com/Article/UploadFiles/201512/2015121610234522.jpg)
It would be best if you had stayed on one of the larger roads. Thanks to that, you will be able to reach your destination much quicker. The police station should be located on your left (#1). Keep heading towards it. You're going to be attacked by a few soldiers along the way. Ignore them for now. Once you've reached your destination, exit the vehicle and talk to Immaculada (#2). She will ask you to assist in a full scale assault.
![2 - [Mission 17] Dismissed Without Honors - Walkthrough - Just Cause - Game Guide and Walkthrough](https://game.lhg100.com/Article/UploadFiles/201512/2015121610234514.jpg)
![You will have to follow Immaculada to your next target (#1) - [Mission 17] Dismissed Without Honors - Walkthrough - Just Cause - Game Guide and Walkthrough](https://game.lhg100.com/Article/UploadFiles/201512/2015121610234588.jpg)
You will have to follow Immaculada to your next target (#1). There is a large road that leads to your current destination. Once you're there, make sure that you had killed all of the nearby soldiers (#2). Some of them may be hiding, so you should be very careful. There are a few gunships in the air, however they shouldn't be attacking you, so it would be best to ignore them.
![3 - [Mission 17] Dismissed Without Honors - Walkthrough - Just Cause - Game Guide and Walkthrough](https://game.lhg100.com/Article/UploadFiles/201512/2015121610234539.jpg)
![Keep heading towards the main gate (#1) - [Mission 17] Dismissed Without Honors - Walkthrough - Just Cause - Game Guide and Walkthrough](https://game.lhg100.com/Article/UploadFiles/201512/2015121610234587.jpg)
Keep heading towards the main gate (#1). It leads to the police station area. As you've probably noticed, the gate is closed. You will have to do something about it. The best way to solve this small problem would be to use one of the carried grenades (#2). Wait for the explosion to occur. There should be a large hole here. Use it to enter the police station.
![Start shooting at the visible enemy soldiers (#1) - [Mission 17] Dismissed Without Honors - Walkthrough - Just Cause - Game Guide and Walkthrough](https://game.lhg100.com/Article/UploadFiles/201512/2015121610234563.jpg)
Start shooting at the visible enemy soldiers (#1). You could also use the grenades, however this is not necessary. A short cut-scene should appear on your screen. It turns out that Esperanza (you helped her in one of the previous missions) has been captured. You will have to reach her cell. Keep heading towards the opposite end of this square (#2). There are some cars parked here. You will have to use one of them in a few minutes.
![5 - [Mission 17] Dismissed Without Honors - Walkthrough - Just Cause - Game Guide and Walkthrough](https://game.lhg100.com/Article/UploadFiles/201512/2015121610234639.jpg)
![Make sure that you're using longer bursts - [Mission 17] Dismissed Without Honors - Walkthrough - Just Cause - Game Guide and Walkthrough](https://game.lhg100.com/Article/UploadFiles/201512/2015121610234668.jpg)
Make sure that you're using longer bursts. Thanks to that, you won't have any problems with your opponents. You should also be on a look out for any additional medkits. There's a small staircase here (#1). You will have to get to the upper level. Be careful, though. This area is crawling with enemy troops (#2). You might consider using a rocket launcher, mostly because you won't need this weapon for any other purposes.
![6 - [Mission 17] Dismissed Without Honors - Walkthrough - Just Cause - Game Guide and Walkthrough](https://game.lhg100.com/Article/UploadFiles/201512/2015121610234687.jpg)
![You should be getting closer to your current destination - [Mission 17] Dismissed Without Honors - Walkthrough - Just Cause - Game Guide and Walkthrough](https://game.lhg100.com/Article/UploadFiles/201512/2015121610234609.jpg)
You should be getting closer to your current destination. Make sure that you've taken care of all nearby soldiers. Some of them will be guarding Esperanza (#1). Kill them and go talk to your rebel friend (#2). Now you will have to go back to the big square. Reload your weapon and start moving.
![7 - [Mission 17] Dismissed Without Honors - Walkthrough - Just Cause - Game Guide and Walkthrough](https://game.lhg100.com/Article/UploadFiles/201512/2015121610234656.jpg)
![You will probably encounter at least four new soldiers along the way (#1) - [Mission 17] Dismissed Without Honors - Walkthrough - Just Cause - Game Guide and Walkthrough](https://game.lhg100.com/Article/UploadFiles/201512/2015121610234646.jpg)
You will probably encounter at least four new soldiers along the way (#1). Thankfully, they won't pose as a serious threat. Go ahead and use the rocket launched or some of the carried grenades to get them. Once you've reached your new target, a new objective will appear on your screen. It turns out that the police chief is trying to escape. You will have to catch him. Use the nearby stairs. Head on to one of the parked cars. Make sure that Immaculada and Esperanza join you (#2). Additionally, Immaculada will be using the heavy machine gun post.
![8 - [Mission 17] Dismissed Without Honors - Walkthrough - Just Cause - Game Guide and Walkthrough](https://game.lhg100.com/Article/UploadFiles/201512/2015121610234657.jpg)
![This is the most difficult part of the mission, however you shouldn't feel intimidated by it - [Mission 17] Dismissed Without Honors - Walkthrough - Just Cause - Game Guide and Walkthrough](https://game.lhg100.com/Article/UploadFiles/201512/2015121610234622.jpg)
This is the most difficult part of the mission, however you shouldn't feel intimidated by it. You will have to be careful, though. Exit the prison area. You must use the small gap. Now you will have to try and get closer to your target. Police chief is using a humvee instead one of the fast cars, so it shouldn't be much of a problem (#1). Just make sure you stop at nothing. You must avoid enemy soldiers and military vehicles. Once you get closer to your target, Immaculada will start shooting at it (#2).
![9 - [Mission 17] Dismissed Without Honors - Walkthrough - Just Cause - Game Guide and Walkthrough](https://game.lhg100.com/Article/UploadFiles/201512/2015121610234794.jpg)
![Stay close to your target (#1) - [Mission 17] Dismissed Without Honors - Walkthrough - Just Cause - Game Guide and Walkthrough](https://game.lhg100.com/Article/UploadFiles/201512/2015121610234725.jpg)
Stay close to your target (#1). Immaculada will be using the heavy machine gun. Don't forget that there are a lot of enemy vehicles in the area. They will try to push you off the road. Avoid these types of attacks! Your target will catch on fire after a short while (#2). After that, the car is going to explode. There's an interesting cut-scene ahead of you. Once it has ended, you will complete this mission.
![10 - [Mission 17] Dismissed Without Honors - Walkthrough - Just Cause - Game Guide and Walkthrough](https://game.lhg100.com/Article/UploadFiles/201512/2015121610234742.jpg)
![Important - [Mission 17] Dismissed Without Honors - Walkthrough - Just Cause - Game Guide and Walkthrough](https://game.lhg100.com/Article/UploadFiles/201512/2015121610234761.jpg)
Important! Once again, you will be granted with several new side missions. You should know exactly how to react in these kinds of situations. Start off by leaving the city. Thanks to that, you will be able to use the Extraction feature. I would recommend that you choose one of the nearby hideouts. Rioja 07 seems like a good idea. You could also put a request for a gyrocopter. I hope that you still remember about this useful tool. There's only more package in this area, so I'd recommend that you pick it up right away. You should also capture a few villas for the Rioja cartel. If you've done everything correctly, they should all be under your control. There are also new provinces for you to conquer. The game will unlock two large sectors - Provincia Mendoza City and Provincia Los Islas. I would recommend that you start off with the second one, mostly because you'll be using a very useful hideout. Taking control of the lower part of the city is much more difficult. One of the most interesting things here is the flagpole. It's well hidden, so you may have some problems finding it. Make sure that you go back to the prison area. You've been there in the previous mission, so you should remember exactly where it is. You will have to use the stairs in order to reach the upper level. Flagpole is going to be located on your left. Before you proceed with the next mission, it would also be wise to finish some of the side missions. This will allow you to advance in the Guerrilla and/or Rioja ranks. Hopefully you'll unlock some of the new weapons. They will come in handy.
Mission objectives: This time you will have to sink one of the most valuable tools of president Mendoza - his personal destroyer ship. There are three nuclear warheads onboard. You will also have to disable them. The problem is that you will have to get the correct codes for the warheads. Thankfully, there's an army base in the area. You will have to enter it and retrieve three different briefcases.
Difficulty: hard
Complete walkthrough:
This is a very challenging mission. I guess that you'll have a lot of problems getting aboard the destroyer. There are also a lot of gunships in the area, so you will have to avoid their attacks all the time. Start off by going to the briefing area. You will have to talk to Sheldon (#1). Once you've been properly briefed, head on to a small boat (#2). It should be located in front of you.
![1 - [Mission 18] Sink the Buccaneer - Walkthrough - Just Cause - Game Guide and Walkthrough](https://game.lhg100.com/Article/UploadFiles/201512/2015121610234729.jpg)
![You don't have to make any turns along the way - [Mission 18] Sink the Buccaneer - Walkthrough - Just Cause - Game Guide and Walkthrough](https://game.lhg100.com/Article/UploadFiles/201512/2015121610234772.jpg)
You don't have to make any turns along the way. Your current objective is located in front of you. There's also a first black dot in this area (#1). You could go there right now, however this is not necessary. I will explain this in a short while. Make sure that you've reached the shore. Exit the boat and try getting closer to the entrance (#2). The briefcases are inside. You will have to get there somehow...
![2 - [Mission 18] Sink the Buccaneer - Walkthrough - Just Cause - Game Guide and Walkthrough](https://game.lhg100.com/Article/UploadFiles/201512/2015121610234768.jpg)
![You will be able to solve this problems using many different approach methods - [Mission 18] Sink the Buccaneer - Walkthrough - Just Cause - Game Guide and Walkthrough](https://game.lhg100.com/Article/UploadFiles/201512/2015121610234735.jpg)
You will be able to solve this problems using many different approach methods. I will try to show you two of them. The most obvious way in would be to use a parachute. Start off by stealing a random motorcycle. Start moving towards the gate (#1). Once you're close enough, perform a stunt in order to activate the parachute. Thanks to that, you will be able to land inside the camp. Alternatively, you could go back to the black dot. You will find a monster truck here. Use it. Start moving towards a camp. There's a large hill here. Thanks to it, you'll be able to perform a huge jump (#2).
![3 - [Mission 18] Sink the Buccaneer - Walkthrough - Just Cause - Game Guide and Walkthrough](https://game.lhg100.com/Article/UploadFiles/201512/2015121610234812.jpg)
![There are enemy soldiers in the camp - [Mission 18] Sink the Buccaneer - Walkthrough - Just Cause - Game Guide and Walkthrough](https://game.lhg100.com/Article/UploadFiles/201512/2015121610234816.jpg)
There are enemy soldiers in the camp. I would recommend that you ignore most of them. This will allow you to maintain a lower pursuit level. There are also some armored vehicles here (#1). You may consider taking one of them. Now you will have to find all three briefcases. Head on to one of the warehouses (the one on the right). There's a briefcase here (#2).
![4 - [Mission 18] Sink the Buccaneer - Walkthrough - Just Cause - Game Guide and Walkthrough](https://game.lhg100.com/Article/UploadFiles/201512/2015121610234803.jpg)
![The second object can be found between two tents (#1) - [Mission 18] Sink the Buccaneer - Walkthrough - Just Cause - Game Guide and Walkthrough](https://game.lhg100.com/Article/UploadFiles/201512/2015121610234857.jpg)
The second object can be found between two tents (#1). They are located near the front gate. The last briefcase is on the other side of the camp. Be on a look out for a small green building (#2). Before you decide to pick up the item, make sure you that you're prepared for the next part of the mission. First of all, use your rocket launcher (only once!!) to destroy one of the enemy gunships. You should also steal a new armored vehicle. It would be best if it was equipped with a minigun. Once you've done those things, pick up the briefcase.
![5 - [Mission 18] Sink the Buccaneer - Walkthrough - Just Cause - Game Guide and Walkthrough](https://game.lhg100.com/Article/UploadFiles/201512/2015121610234853.jpg)
![The second part of this mission is going to be much more difficult - [Mission 18] Sink the Buccaneer - Walkthrough - Just Cause - Game Guide and Walkthrough](https://game.lhg100.com/Article/UploadFiles/201512/2015121610234837.jpg)
The second part of this mission is going to be much more difficult. I would recommend that you stick closely to my instructions. Exit the base. You shouldn't have any problems destroying a small gate. Turn left (#1). You will be using this road to reach a small harbour area. Be careful, though. There are at least two new gunships in the air. It would be best if you had destroyed them. You won't have to use the rocket launcher. Make sure you've got a minigun (#2). Use it to take care of the helicopters. The vehicle you're currently using must remain intact. You'll need for a few more minutes.
![You should be able to reach your new target without any major problems (#1) - [Mission 18] Sink the Buccaneer - Walkthrough - Just Cause - Game Guide and Walkthrough](https://game.lhg100.com/Article/UploadFiles/201512/2015121610234831.jpg)
You should be able to reach your new target without any major problems (#1). There are some enemy vehicles in the area, however you may ignore most of them. Thanks to that, you should be able to maintain fourth (instead of fifth) level of pursuit. Once you've reached your destination, a short cut-scene should appear on your screen (#2). President Mendoza has already left the destroyer. Don't worry. We'll get him soon. Now you will have to focus only on destroying the ship.
![7 - [Mission 18] Sink the Buccaneer - Walkthrough - Just Cause - Game Guide and Walkthrough](https://game.lhg100.com/Article/UploadFiles/201512/2015121610234896.jpg)
![Start off by eliminating all of the nearby helicopters (use the minigun) - [Mission 18] Sink the Buccaneer - Walkthrough - Just Cause - Game Guide and Walkthrough](https://game.lhg100.com/Article/UploadFiles/201512/2015121610234931.jpg)
Start off by eliminating all of the nearby helicopters (use the minigun). Once again, you will have be able to choose on how to get to the destroyer. The game will suggest that you use a second black dot. You would have to step up to a small console and press a button (#1). Thanks you that, you would be given a very small, underwater scooter (#2). You could then use it to get closer to the destroyer.
![8 - [Mission 18] Sink the Buccaneer - Walkthrough - Just Cause - Game Guide and Walkthrough](https://game.lhg100.com/Article/UploadFiles/201512/2015121610234959.jpg)
![I wouldn't recommend choosing this approach method - [Mission 18] Sink the Buccaneer - Walkthrough - Just Cause - Game Guide and Walkthrough](https://game.lhg100.com/Article/UploadFiles/201512/2015121610234970.jpg)
I wouldn't recommend choosing this approach method. There are a lot of mines in the area (#1). You would have avoid them. Additionally, enemy gunships would be using rockets in order to stop you. There is a better way to reach your goal. Wait for one of the patrol boats to get here. Take out the shooter and start swimming towards the boat. Enter it. You will have to make a turn (#2). Head on to the destroyer. Watch out for nearby mines, though!
![9 - [Mission 18] Sink the Buccaneer - Walkthrough - Just Cause - Game Guide and Walkthrough](https://game.lhg100.com/Article/UploadFiles/201512/2015121610234952.jpg)
![You will have to be quick about it, because more gunships will arrive here very soon - [Mission 18] Sink the Buccaneer - Walkthrough - Just Cause - Game Guide and Walkthrough](https://game.lhg100.com/Article/UploadFiles/201512/2015121610234914.jpg)
You will have to be quick about it, because more gunships will arrive here very soon. You wouldn't be able to defend yourself against their attacks. Make a jump (or perform a stunt) in order to reach the main deck of the destroyer (#1). Now for the much easier part. You will have to find three consoles. Head on to your closest target. It turns out that each console has a metal cover. You will have to use the C4 in order to destroy it (#2).
![10 - [Mission 18] Sink the Buccaneer - Walkthrough - Just Cause - Game Guide and Walkthrough](https://game.lhg100.com/Article/UploadFiles/201512/2015121610234984.jpg)
![Make sure that you have moved back to a safe distance - [Mission 18] Sink the Buccaneer - Walkthrough - Just Cause - Game Guide and Walkthrough](https://game.lhg100.com/Article/UploadFiles/201512/2015121610234946.jpg)
Make sure that you have moved back to a safe distance! Once the explosion has occurred, return to the console. You will be able to use it (#1). Thankfully, you won't be entering any codes by yourself. It's all done automatically. You should be careful. There are a few enemies in the vicinity (#2), however you shouldn't have any problems with them. Furthermore, they won't be replaced by anyone else.
![11 - [Mission 18] Sink the Buccaneer - Walkthrough - Just Cause - Game Guide and Walkthrough](https://game.lhg100.com/Article/UploadFiles/201512/2015121610234988.jpg)
![There are two more consoles for you to find - [Mission 18] Sink the Buccaneer - Walkthrough - Just Cause - Game Guide and Walkthrough](https://game.lhg100.com/Article/UploadFiles/201512/2015121610234948.jpg)
There are two more consoles for you to find. A second object is located on the opposite side of the ship. It would be wise to take care of an enemy gunship first (#1). You will also come across several new soldiers. You don't have to conserve your ammunition anymore. Step up to the metal cover and blow it up by using the C4 charge (#2). After that, enter the second code.
![12 - [Mission 18] Sink the Buccaneer - Walkthrough - Just Cause - Game Guide and Walkthrough](https://game.lhg100.com/Article/UploadFiles/201512/2015121610235070.jpg)
![There's only one more console remaining - [Mission 18] Sink the Buccaneer - Walkthrough - Just Cause - Game Guide and Walkthrough](https://game.lhg100.com/Article/UploadFiles/201512/2015121610235042.jpg)
There's only one more console remaining. You will have to reach the opposite end of the ship. Start moving forward (#1). Be careful, though (#2). Some of the soldiers will try to surprise you. Additionally, take down enemy gunships. You should have enough rockets to deal with them. Step up to the designated spot and use the C4.
![13 - [Mission 18] Sink the Buccaneer - Walkthrough - Just Cause - Game Guide and Walkthrough](https://game.lhg100.com/Article/UploadFiles/201512/2015121610235001.jpg)
![Wait for the last explosion to occur (make sure that you're not standing too close to the metal cover) - [Mission 18] Sink the Buccaneer - Walkthrough - Just Cause - Game Guide and Walkthrough](https://game.lhg100.com/Article/UploadFiles/201512/2015121610235091.jpg)
Wait for the last explosion to occur (make sure that you're not standing too close to the metal cover). Use the console in order to enter the code (#1). You will receive an information that the ship is going to be destroyed in 20 seconds. Don't worry... you won't have to do anything in particular. Jump over the balustrade, so you'll find yourself in the water. An interesting cut-scene will appear on the screen (#2). After that, this mission will come to an end.
![14 - [Mission 18] Sink the Buccaneer - Walkthrough - Just Cause - Game Guide and Walkthrough](https://game.lhg100.com/Article/UploadFiles/201512/2015121610235047.jpg)
![Important - [Mission 18] Sink the Buccaneer - Walkthrough - Just Cause - Game Guide and Walkthrough](https://game.lhg100.com/Article/UploadFiles/201512/2015121610235036.jpg)
Important! Get ready for the grand finale! Before you decide to proceed with three final missions of the game, make sure that you take full control of the entire map. The game will unlock all of the remaining provinces for you (except for one small island). You will be able to liberate three sectors - Provincia de Don Ernesto, Provincia de Don Velasco and Costa Brava. You should know exactly what has to be done. Make sure that you attack an army base first. After that, liberate one of the nearby villages. You'll also unlock several interesting hideouts. I'd strongly recommend that you try and advance to the highest rank of the Guerrilla organization. Thanks to that, you'll unlock a lot of interesting toys, including an excellent machine gun.
Mission objectives: President Mendoza has escaped to his very own island. As you've probably suspected, this entire area is heavily guarded. You will have to infiltrate it and locate the president. There are a lot of Black Hand units there. You will have to deal with some of the leaders of this elite organization. Both Guerrillas as well as Riojas will provide much needed help during this mission.
Difficulty: hard
Complete walkthrough:
This is by far the most difficult mission of the entire game. I'm almost certain that you won't finish it without having to repeat most of its segments. Additionally, some of your victories may be accidental, mostly because you won't be able to know in what way will the mission progress. You should also know that the game will create only a few necessary checkpoints. As a result, you will have to repeat a lot of difficult fights. I will try and show you one of the safest routes, that should allow you to finish this mission without any unwanted delays.
Make sure that you're well armed before you decide to proceed with the mission! You must have a rocket launcher with you, as well as a machine gun. Start off by going to the briefing area (#1). Once again, you won't find anything of interest here. Press the correct button and wait for the allied helicopter to show up (#2). Get inside the gunship. Sadly, you won't be able to control where you are going. A new cut-scene should appear on your screen. Listen closely to what Sheldon and Kane have to say.
![1 - [Mission 19] Taking Out the Garbage Vol. 1 - Walkthrough - Just Cause - Game Guide and Walkthrough](https://game.lhg100.com/Article/UploadFiles/201512/2015121610235020.jpg)
Once you've been briefed, you should notice that you're still in the air. Sadly, you won't be able to use this helicopter. The only thing left to do here is to make a jump (#1). You don't have to use the parachute. Either way, you'll end up in the water. I would recommend that you put a request for a boat (#2). You will have to use the Agency screen in order to do that. You should also be in a lot of hurry, because enemy gunships are patrolling this entire area. If you lose too much health, make sure to go back to the previous checkpoint and try again.
![2 - [Mission 19] Taking Out the Garbage Vol. 1 - Walkthrough - Just Cause - Game Guide and Walkthrough](https://game.lhg100.com/Article/UploadFiles/201512/2015121610235060.jpg)
![Your first main objective will be to reach Mendoza's palace - [Mission 19] Taking Out the Garbage Vol. 1 - Walkthrough - Just Cause - Game Guide and Walkthrough](https://game.lhg100.com/Article/UploadFiles/201512/2015121610235011.jpg)
Your first main objective will be to reach Mendoza's palace. Sadly, it's located in the central part of the island, so it won't be easy. Use the boat to get closer to the island. You will also have to pick a correct spot from where you'll proceed to the main land (#1). You'll find yourself in the woods. Make sure you're running towards a nearby road (#2). You will probably encounter a few soldiers along the way.
![3 - [Mission 19] Taking Out the Garbage Vol. 1 - Walkthrough - Just Cause - Game Guide and Walkthrough](https://game.lhg100.com/Article/UploadFiles/201512/2015121610235169.jpg)
![As you've probably noticed, Guerrillas and Riojas are fighting with Black Hand units (#1) - [Mission 19] Taking Out the Garbage Vol. 1 - Walkthrough - Just Cause - Game Guide and Walkthrough](https://game.lhg100.com/Article/UploadFiles/201512/2015121610235149.jpg)
As you've probably noticed, Guerrillas and Riojas are fighting with Black Hand units (#1). I guess I should warn you about something. There are a lot of helicopters and fighters in the air. You should be very careful. Most of the jets will fire rockets against you, even if you're not using any vehicles at the time. As a result, you will have to try to avoid most of these attacks. Make sure you use trees and other large objects (except cars) for much needed cover. You will have to steal one of the armored trucks. Make sure that the vehicle is well equipped (#2). You might also consider shooting down some of the gunships first, so you won't be attacked after stealing one of the vehicles.
![4 - [Mission 19] Taking Out the Garbage Vol. 1 - Walkthrough - Just Cause - Game Guide and Walkthrough](https://game.lhg100.com/Article/UploadFiles/201512/2015121610235115.jpg)
![Now you will have to start driving towards the palace - [Mission 19] Taking Out the Garbage Vol. 1 - Walkthrough - Just Cause - Game Guide and Walkthrough](https://game.lhg100.com/Article/UploadFiles/201512/2015121610235188.jpg)
Now you will have to start driving towards the palace. Make sure that you're moving FAST enough. You CAN'T stop at nothing. Otherwise your vehicle would have been probably destroyed. You should also avoid other vehicles, as well as larger groups of enemy soldiers. You could try and kill some of your opponents (#1), however this is very risky. Make sure that you reach the palace as soon as possible (#2).
![5 - [Mission 19] Taking Out the Garbage Vol. 1 - Walkthrough - Just Cause - Game Guide and Walkthrough](https://game.lhg100.com/Article/UploadFiles/201512/2015121610235186.jpg)
![You will have to get closer to the main gate - [Mission 19] Taking Out the Garbage Vol. 1 - Walkthrough - Just Cause - Game Guide and Walkthrough](https://game.lhg100.com/Article/UploadFiles/201512/2015121610235121.jpg)
You will have to get closer to the main gate. Once you're there, turn left and enter the palace area (#1). Make sure that you don't hit anything along the way. You will receive some new orders in just a few seconds. You must destroy one of the enemy tanks. It's being occupied by a commander of the Black Hand units. Start moving towards your new target (#2). Also, make sure that you don't get hit by any of the missiles. You'll need this vehicle in the future!
![6 - [Mission 19] Taking Out the Garbage Vol. 1 - Walkthrough - Just Cause - Game Guide and Walkthrough](https://game.lhg100.com/Article/UploadFiles/201512/2015121610235116.jpg)
![You will have to destroy this tank (#1) - [Mission 19] Taking Out the Garbage Vol. 1 - Walkthrough - Just Cause - Game Guide and Walkthrough](https://game.lhg100.com/Article/UploadFiles/201512/2015121610235156.jpg)
You will have to destroy this tank (#1). Remember that you have to keep moving. Otherwise you will surely be hit, either by the tank crew or one of the helicopters. You should also position yourself correctly. Rear side of the tank has a much weaker armor. Thanks to that, you will be able to destroy it much faster. You will have to get rid of this problem in order to proceed to the next section. A short cut-scene should appear on your screen (#2). President Mendoza has left the palace. He is now hiding in a nearby villa. You will have to go there. The game will create a checkpoint here. Make sure that you're inside an armored vehicles when that happens.
![7 - [Mission 19] Taking Out the Garbage Vol. 1 - Walkthrough - Just Cause - Game Guide and Walkthrough](https://game.lhg100.com/Article/UploadFiles/201512/2015121610235110.jpg)
![This is the most difficult part of this mission - [Mission 19] Taking Out the Garbage Vol. 1 - Walkthrough - Just Cause - Game Guide and Walkthrough](https://game.lhg100.com/Article/UploadFiles/201512/2015121610235208.jpg)
This is the most difficult part of this mission. I would recommend that you choose my path to the villa (#1). It doesn't mean, however, that you'll be able to reach it without any problems. You must avoid all types of attacks. There are a lot of armored vehicles, fighters and helicopters in this area. First of all, you will have to exit the palace. Turn left and start moving forward. Ignore EVERYTHING that happens around you. DON'T even think about stopping. Shoot only at these units that will actually try to destroy you.
![8 - [Mission 19] Taking Out the Garbage Vol. 1 - Walkthrough - Just Cause - Game Guide and Walkthrough](https://game.lhg100.com/Article/UploadFiles/201512/2015121610235270.jpg)
![I should tell you that there's ONLY ONE path leading to your destination - [Mission 19] Taking Out the Garbage Vol. 1 - Walkthrough - Just Cause - Game Guide and Walkthrough](https://game.lhg100.com/Article/UploadFiles/201512/2015121610235278.jpg)
I should tell you that there's ONLY ONE path leading to your destination. You have to choose it correctly (be sure to check the map often). Otherwise you would have to go back, because you wouldn't even be able to climb up to your target. Make sure that you don't miss it (#1). There are some new vehicles here (#2). Thankfully, you should be able to avoid most of them. Concentrate only on reaching the villa safely.
![9 - [Mission 19] Taking Out the Garbage Vol. 1 - Walkthrough - Just Cause - Game Guide and Walkthrough](https://game.lhg100.com/Article/UploadFiles/201512/2015121610235216.jpg)
![Watch out during the final phase of your approach - [Mission 19] Taking Out the Garbage Vol. 1 - Walkthrough - Just Cause - Game Guide and Walkthrough](https://game.lhg100.com/Article/UploadFiles/201512/2015121610235298.jpg)
Watch out during the final phase of your approach. The road gets very narrow here (#1), so it easy to make a mistake. You must stay on this road at all costs. Also, watch out for any larger objects - trees or even rocks. You should be able to reach the villa in a few minutes. There's a small road here. Use it to get to the top (#2).
![10 - [Mission 19] Taking Out the Garbage Vol. 1 - Walkthrough - Just Cause - Game Guide and Walkthrough](https://game.lhg100.com/Article/UploadFiles/201512/2015121610235284.jpg)
![A new cut-scene should appear on your screen (#1) - [Mission 19] Taking Out the Garbage Vol. 1 - Walkthrough - Just Cause - Game Guide and Walkthrough](https://game.lhg100.com/Article/UploadFiles/201512/2015121610235259.jpg)
A new cut-scene should appear on your screen (#1). Mendoza will escape you once again. As a result, you won't be able to kill him during this mission. Exit the vehicle quickly. Step up to the huge cliff and make a jump. Once you're in the air, use your parachute (#2). Start heading towards your final target.
![11 - [Mission 19] Taking Out the Garbage Vol. 1 - Walkthrough - Just Cause - Game Guide and Walkthrough](https://game.lhg100.com/Article/UploadFiles/201512/2015121610235295.jpg)
![You will have to use the directional buttons in order to steer the parachute correctly (#1) - [Mission 19] Taking Out the Garbage Vol. 1 - Walkthrough - Just Cause - Game Guide and Walkthrough](https://game.lhg100.com/Article/UploadFiles/201512/2015121610235341.jpg)
You will have to use the directional buttons in order to steer the parachute correctly (#1). Your objective is a nearby airfield. Make sure to use the upper movement key, so you'll accelerate a little. It's very important, because there are a lot of enemy gunships in the area. They will try to kill you. Make sure that you land safely (#2). You will have to reach a designated area of the airfield. After that, this mission will come to an end. You should also know that you won't have an opportunity to rest here, because the next mission of the campaign will begin automatically.
![12 - [Mission 19] Taking Out the Garbage Vol. 1 - Walkthrough - Just Cause - Game Guide and Walkthrough](https://game.lhg100.com/Article/UploadFiles/201512/2015121610235368.jpg)
![Important - [Mission 19] Taking Out the Garbage Vol. 1 - Walkthrough - Just Cause - Game Guide and Walkthrough](https://game.lhg100.com/Article/UploadFiles/201512/2015121610235366.jpg)
Important! I guess I should warn you that two of the remaining missions won't allow you to visit any of the surrounding hideouts. As a result, you will have to be very careful, mostly because you probably lost a lot of health in the previous mission.
Mission objectives: Before your characters deals with the president, there is one more objective for you to take care of. President Mendoza has launched a few nuclear missiles. They are heading towards the main land. You will have to use a fighter that's been provided by the Agency and destroy these objects. I guess it's fairly obvious that the missiles can't reach any of the nearby settlements. There are additional enemy units in the air. You will have to avoid them.
Difficulty: medium
Complete walkthrough:
This is a very short mission. This doesn't mean, however, that you'll be able to finish it without any problems. There are several important things that you should know about. Start off by watching an interesting movie. Once you've regained full control over your character, head on to the fighter (#1). Get this machine in the air (#2). You will have to destroy several rockets before they reach populated areas.
![1 - [Mission 20] Taking Out the Garbage Vol. 2 - Walkthrough - Just Cause - Game Guide and Walkthrough](https://game.lhg100.com/Article/UploadFiles/201512/2015121610235372.jpg)
![There are two groups of missiles for you to destroy - [Mission 20] Taking Out the Garbage Vol. 2 - Walkthrough - Just Cause - Game Guide and Walkthrough](https://game.lhg100.com/Article/UploadFiles/201512/2015121610235380.jpg)
There are two groups of missiles for you to destroy. Head on to the group that's located closer to your position. You will have to use your own rockets in order to destroy all objectives (#1). As always, make sure that the cross-hair turn red. You shouldn't have any other problems with these missiles (#2). Just make sure you don't spend much time here.
![2 - [Mission 20] Taking Out the Garbage Vol. 2 - Walkthrough - Just Cause - Game Guide and Walkthrough](https://game.lhg100.com/Article/UploadFiles/201512/2015121610235370.jpg)
![I have to warn you about something - [Mission 20] Taking Out the Garbage Vol. 2 - Walkthrough - Just Cause - Game Guide and Walkthrough](https://game.lhg100.com/Article/UploadFiles/201512/2015121610235379.jpg)
I have to warn you about something. A lot of enemy fighters will appear near your position. You won't have enough time to engage them, so I'd recommend that you focus on your current objectives. The only exception is when one of these units gets in front of your fighter (#1). Head on to the second group of missiles. You won't have much time to reach them. Thankfully, they won't be too hard to destroy (#2).
![3 - [Mission 20] Taking Out the Garbage Vol. 2 - Walkthrough - Just Cause - Game Guide and Walkthrough](https://game.lhg100.com/Article/UploadFiles/201512/2015121610235313.jpg)
![There's only one more thing for you to do here - [Mission 20] Taking Out the Garbage Vol. 2 - Walkthrough - Just Cause - Game Guide and Walkthrough](https://game.lhg100.com/Article/UploadFiles/201512/2015121610235498.jpg)
There's only one more thing for you to do here. You will have to reach a designated area of the map (#1). Once you're there, this mission is going to end (#2). It's time for the big finale!
![4 - [Mission 20] Taking Out the Garbage Vol. 2 - Walkthrough - Just Cause - Game Guide and Walkthrough](https://game.lhg100.com/Article/UploadFiles/201512/2015121610235424.jpg)
![5 - [Mission 20] Taking Out the Garbage Vol. 2 - Walkthrough - Just Cause - Game Guide and Walkthrough](https://game.lhg100.com/Article/UploadFiles/201512/2015121610235449.jpg)
Mission objectives: Mendoza is trying to escape from his country. You will have to catch him. Sadly, is not as easy as it sounds. You won't be able to shoot down his plane. You will have to face the dictator in a direct battle.
Difficulty: hard
Complete walkthrough:
This is a rather challenging mission. First of all, at some point you will have to perform a very difficult stunt. Only then you'll be able to reach Mendoza. You should also remember that you have limited health. You start off inside your jet (#1). Make a turn and start moving towards the main airport (#2). That's where you will find Mendoza, however you should know that he will board a plane very soon.
![1 - [Final Mission] Taking Out the Garbage Vol. 3 - Walkthrough - Just Cause - Game Guide and Walkthrough](https://game.lhg100.com/Article/UploadFiles/201512/2015121610235439.jpg)
![Once again, you will have to deal with several enemy fighters (#1) - [Final Mission] Taking Out the Garbage Vol. 3 - Walkthrough - Just Cause - Game Guide and Walkthrough](https://game.lhg100.com/Article/UploadFiles/201512/2015121610235415.jpg)
Once again, you will have to deal with several enemy fighters (#1). It would be best if you had avoided most of their attacks. You don't have enough time to take out all of these units (#2). Furthermore, even if you had shot down some of them, new fighters would appear in this area. As a result, it would be best to concentrate only on reaching your current mission objective. Don't worry about your jet. Even if you get hit several times, you should still be able to fly this thing.
![2 - [Final Mission] Taking Out the Garbage Vol. 3 - Walkthrough - Just Cause - Game Guide and Walkthrough](https://game.lhg100.com/Article/UploadFiles/201512/2015121610235407.jpg)
![As you've probably noticed, Mendoza's plane has already left the airport - [Final Mission] Taking Out the Garbage Vol. 3 - Walkthrough - Just Cause - Game Guide and Walkthrough](https://game.lhg100.com/Article/UploadFiles/201512/2015121610235455.jpg)
As you've probably noticed, Mendoza's plane has already left the airport. Thankfully, your fighter is much faster, so you should focus only on chasing your target (#1). You will be getting closer to Mendoza's plane (#2). Make sure that you perform a lot of dodge moves, as you're going to have a lot of hostile units on your tail.
![3 - [Final Mission] Taking Out the Garbage Vol. 3 - Walkthrough - Just Cause - Game Guide and Walkthrough](https://game.lhg100.com/Article/UploadFiles/201512/2015121610235474.jpg)
![I would recommend that you try and position yourself over the left wing of the large plane (#1) - [Final Mission] Taking Out the Garbage Vol. 3 - Walkthrough - Just Cause - Game Guide and Walkthrough](https://game.lhg100.com/Article/UploadFiles/201512/2015121610235521.jpg)
I would recommend that you try and position yourself over the left wing of the large plane (#1). There is a very difficult stunt ahead of you. Press the correct stunt button in order to leave the cockpit of the jet (#2). Now you will have to use the SPACE key. Press a new key quickly in order to catch the new plane. If you've done everything correctly, the game will begin loading a new area (interior of the plane).
![4 - [Final Mission] Taking Out the Garbage Vol. 3 - Walkthrough - Just Cause - Game Guide and Walkthrough](https://game.lhg100.com/Article/UploadFiles/201512/2015121610235517.jpg)
![You will find yourself inside Mendoza's plane - [Final Mission] Taking Out the Garbage Vol. 3 - Walkthrough - Just Cause - Game Guide and Walkthrough](https://game.lhg100.com/Article/UploadFiles/201512/2015121610235589.jpg)
You will find yourself inside Mendoza's plane. Sadly, before you'll be able to confront him, you will have to dispose of an elite Black Hand unit. Remember that you have limited health supplies, so you must be very careful. It would be best to start off with a rocket launcher. You could also use some of the carried grenades (#1). Don't worry - you can't damage the plane. Once these objects are gone, start using the machine gun (#2). Make sure you're using nearby crates for cover. You should be able to kill all members of the Black Hand squad.
![5 - [Final Mission] Taking Out the Garbage Vol. 3 - Walkthrough - Just Cause - Game Guide and Walkthrough](https://game.lhg100.com/Article/UploadFiles/201512/2015121610235557.jpg)
![Start moving towards the opposite end of this corridor - [Final Mission] Taking Out the Garbage Vol. 3 - Walkthrough - Just Cause - Game Guide and Walkthrough](https://game.lhg100.com/Article/UploadFiles/201512/2015121610235561.jpg)
Start moving towards the opposite end of this corridor. You will find a small door here (#1). Get close to it. A new cut-scene should appear on your screen (#2). This isn't over. You will receive your last objective in a short while. Get ready!
![6 - [Final Mission] Taking Out the Garbage Vol. 3 - Walkthrough - Just Cause - Game Guide and Walkthrough](https://game.lhg100.com/Article/UploadFiles/201512/2015121610235549.jpg)
![You'll end up in the air (#1) - [Final Mission] Taking Out the Garbage Vol. 3 - Walkthrough - Just Cause - Game Guide and Walkthrough](https://game.lhg100.com/Article/UploadFiles/201512/2015121610235503.jpg)
You'll end up in the air (#1). As you've probably noticed, Mendoza is also here. He is trying to escape (#2). This is a rather challenging mission. You will have to get closer to the dictator. Make sure you're not activating a parachute, because you'll be just fine without it. You will have to use directional keys (mostly the upper cursor) correctly.
![7 - [Final Mission] Taking Out the Garbage Vol. 3 - Walkthrough - Just Cause - Game Guide and Walkthrough](https://game.lhg100.com/Article/UploadFiles/201512/2015121610235598.jpg)
![Keep moving towards Mendoza (#1) - [Final Mission] Taking Out the Garbage Vol. 3 - Walkthrough - Just Cause - Game Guide and Walkthrough](https://game.lhg100.com/Article/UploadFiles/201512/2015121610235672.jpg)
Keep moving towards Mendoza (#1). You should be able to master this after a short practice. Once you're close enough, a very interesting cut-scene will appear on your screen (#2; #3; #4). As a result, you won't have to worry about Mendoza anymore. :-) Congratulations! You've just finished the last mission of the game!!
![8 - [Final Mission] Taking Out the Garbage Vol. 3 - Walkthrough - Just Cause - Game Guide and Walkthrough](https://game.lhg100.com/Article/UploadFiles/201512/2015121610235639.jpg)
![9 - [Final Mission] Taking Out the Garbage Vol. 3 - Walkthrough - Just Cause - Game Guide and Walkthrough](https://game.lhg100.com/Article/UploadFiles/201512/2015121610235611.jpg)
![10 - [Final Mission] Taking Out the Garbage Vol. 3 - Walkthrough - Just Cause - Game Guide and Walkthrough](https://game.lhg100.com/Article/UploadFiles/201512/2015121610235649.jpg)
![Important - [Final Mission] Taking Out the Garbage Vol. 3 - Walkthrough - Just Cause - Game Guide and Walkthrough](https://game.lhg100.com/Article/UploadFiles/201512/2015121610235680.jpg)
Important! Similar to the "GTA" games, finishing the last mission of the game doesn't mean the end of your journey. You will be transported to Mendoza's palace. From here, you can explore the entire map. You will be able to finish all of the remaining challenges. It's all up to you... have fun and congratulations on finishing the game!
Here you will find a complete list of available safehouses. You can find these places on the main map that's located in your PDA. Check the screen on the right if you don't know where it is. The left screen shows the hideout itself. Additionally, I will tell you whether the safehouse is interesting and when you'll be able to unlock it.
AGENCY 01
You can unlock this hideout automatically by finishing the first main mission of the campaign mode (Devil's Drop Zone). This is the first place in the entire game that will allow you to save your progress and replenish current resources. You will find two silenced weapons here (Gallini M39 "Husher" pistol and Nova 9 machine gun) at the start game. Sadly, they won't come in handy, mostly because you won't have to hide in the shadows and organize surprise attacks. There's also a motorcycle here. You'll be able to put requests for these objects later during the game. You should be using the bike very often. It's fast and it will let you to stay off the main roads.
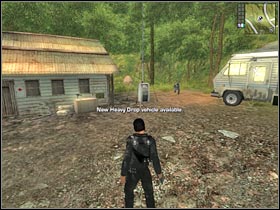

AGENCY 02
You can unlock this hideout automatically by finishing the sixth main mission of the campaign mode (Good Cop, Bad Cop). I'm sure that you'll be using this safehouse all the time. The most important thing is that it's located in a very suitable spot. You will be able to explore all of the surrounding areas from here. Sadly, you will have to reach one of the nearby roads on foot. Alternatively, you could put a request for a motorcycle or a humvee (you will unlock it along with the hideout). There's also a futuristic boat here (Bald Eagle - Persuader). You will also be using it quite frequently. The boat is fast and even has some machine guns. You will have an opportunity to use them. Thanks to that, you'll destroy other boats or objects located near the shore.


AGENCY 03
You can unlock this hideout automatically by finishing the tenth main mission of the campaign mode (River of Blood). Sadly, it's not that useful as you might have probably suspected. You will only find one interesting challenge here - a race side mission. Other than that, you won't be using this safehouse. There's a vehicle here (Fukuda Bucksin Trapper), although it's quite difficult to steer, so you should ignore it and put a request for something else. It would be best if you had ignored this place. Rioja 05 safehouse is much more interesting.
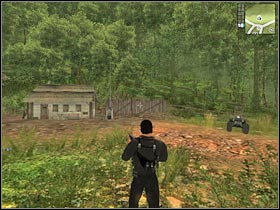
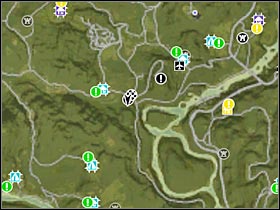
AGENCY 04
You can unlock this hideout automatically by finishing the eleventh main mission of the campaign mode (Broadcast News). This object is very similar to Agency 03 hideout - you won't be using it, unless you want to save your game quickly. You could start some of the side missions here, however I wouldn't recommend doing that.
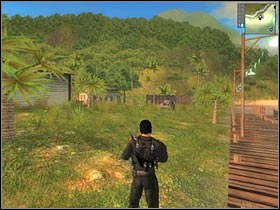
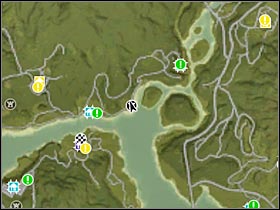
AGENCY 05
You can unlock this hideout automatically by finishing the fifteenth main mission of the campaign mode (Some Enchanted Evening). Thankfully, this is a much more interesting safehouse. The most important thing is that you will be able to explore all of the nearby islands from here. There are some interesting challenges waiting for you there. Furthermore, you will find an armored helicopter here. You should be using it all the time!
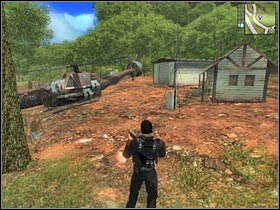
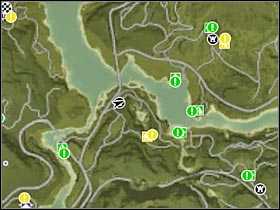
GUERRILLA 01
You can unlock this hideout automatically by finishing the third main mission of the campaign mode (Freedom Fighters). You should know that you won't be able to use all of its features right away. You will have to advance in the ranks of the Guerrillas. Thanks to that, you will unlock new vehicles and weapons. You should be using this hideout in the early part of the game. An important mission starts in this area, so I'm sure it'll come in handy.
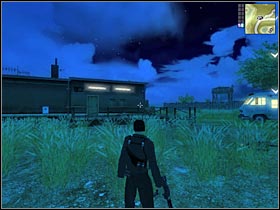
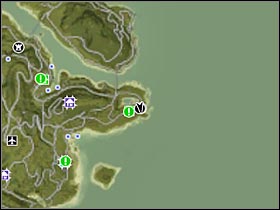
GUERRILLA 02
You can unlock this hideout by liberating a nearby settlement (a small town). As a result, it's not connected to Guerrilla Prestige Points in any way. You should also know that this safehouse isn't too useful. You will only find a liberated settlement in this area.
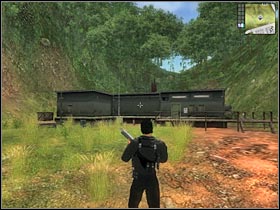
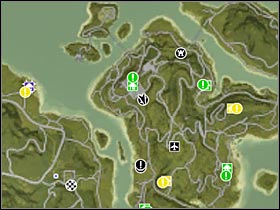
GUERRILLA 03
You can unlock this hideout by liberating a nearby settlement (a small town). You should take a closer look at this safehouse, mostly because it's located quite nicely. You will find a town here (make sure that you had collected all of the packages). There are also two villas in this area. Once you've taken control over these regions, you can forget that this hideout ever existed.
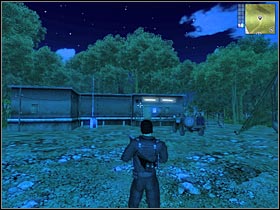
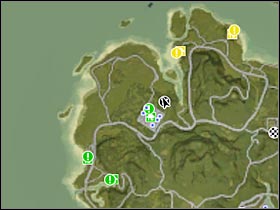
GUERRILLA 04
You can unlock this hideout by liberating a nearby settlement (a small town). Sadly, you won't be using during the game. There isn't much to do here. You will be able to participate in race challenges, however you could also use the Rioja 02 hideout in order to reach these spots safely.
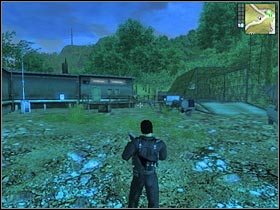
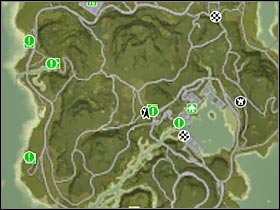
GUERRILLA 05
You can unlock this hideout by liberating a nearby settlement (a small village). I guess you won't be using it too often. There are only two Guerrilla settlements in this area (interesting if you want to take on some of the side missions). You should be using the Agency hideout (Agency 02), mostly because it has more interesting features.
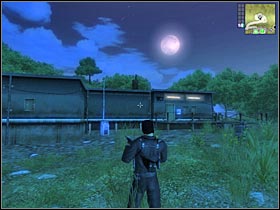
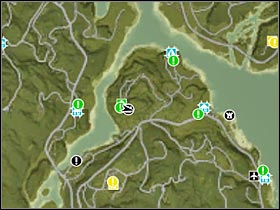
GUERRILLA 06
You can unlock this hideout by liberating the entire province. Sadly, you won't find anything of interest here. As a result, you shouldn't be using it. There is a Rioja village nearby, however it would be best to use the main road in order to reach it. You won't be rewarded with any helicopters or other interesting vehicles.
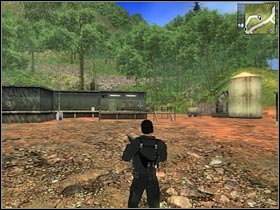
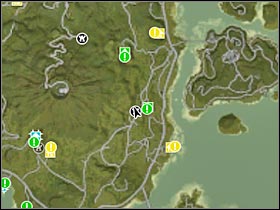
GUERRILLA 07
You can unlock this hideout by liberating the entire province. There's not much to say about it. You won't be able to use any gunships or armored vehicles, however there is a Rioja villa nearby. You could use it to get a new helicopter whenever you want to, especially if you're planning on exploring some of the surrounding areas. You can use this safehouse, however you'll find more interesting hideouts later during the game.
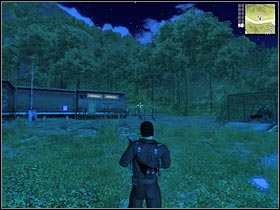
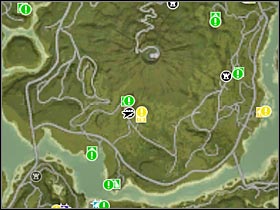
GUERRILLA 08
You can unlock this hideout by liberating a nearby settlement (a small village). As you've probably noticed, it's located near the water, however you won't be able to take advantage of that. This is a closed reservoir. As a result, you may as well ignore this safehouse. There are a lot of better hideouts in this area.
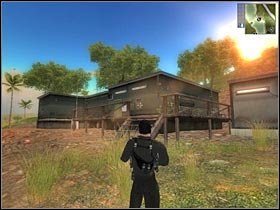
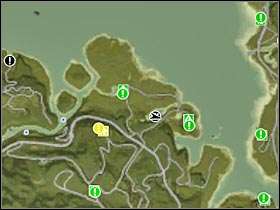
GUERRILLA 09
You can unlock this hideout by liberating the entire province. I have to say that it's quite interesting and it may come in handy. First of all, there's a well equipped gunship here. You'll be able to use it to explore this entire area. The location is also very interesting. You will be able to travel to several important provinces. There are also a lot of interesting side challenges here, including a few villas.
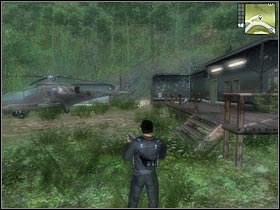
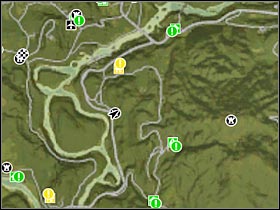
GUERRILLA 10
You can unlock this hideout by liberating a nearby settlement (a small village). Sadly, it won't be of any use to you. The only exception are the Rioja villas, however you would have to spend a lot of time to reach them. As a result, it's best that you ignore this safehouse.
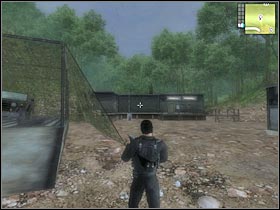
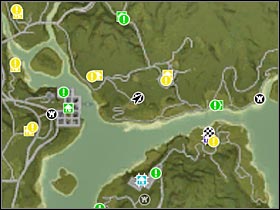
GUERRILLA 11
You can unlock this hideout by liberating the entire province. The location of this safehouse seems to be very interesting. There's a small airfield not far away from here. I'd strongly recommend that you take a closer look at it. You'll find an interesting plane there. You will be able to use it without any problems. I have to warn you, though. Steering the plane is not an easy task. The same goes with putting it back on the ground.
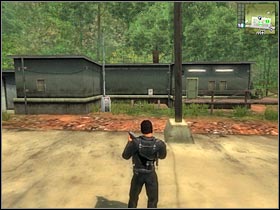
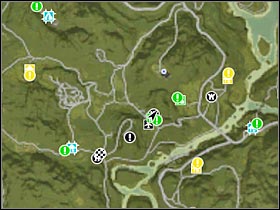
GUERRILLA 12
You can unlock this hideout by liberating the entire province. If you've taken a close look at the map, I guess you already know that there's only one more settlement in this area. It's an army base (you could steal one of the military vehicles), however you would have to spend a lot of time reaching other populated areas. As a result, ignore this place, as you will find better safehouses on this island.
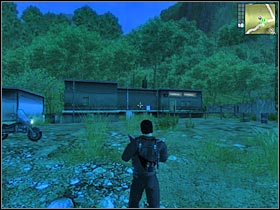
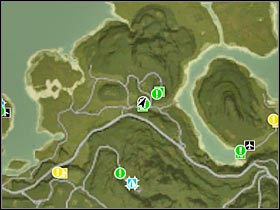
GUERRILLA 13
You can unlock this hideout by liberating the entire province. This is a quite interesting safehouse. You should consider using it from time to time. There's a villa nearby (you can liberate it for the Riojas). Thanks to that, you won't have any problems getting new helicopters. Make sure that you use this hideout if you're planning on taking control over the western part of this island.

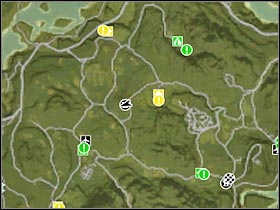
GUERRILLA 14
You can unlock this hideout by liberating the entire province. The safehouse itself seems quite interesting. There's even an armed gunship for you to take. Sadly, this hideout is located on the edge of the map. You would have to travel a large distance in order to reach one of the more populated areas. There aren't any interesting side missions here, except for the villa.
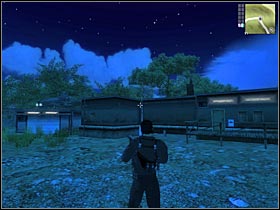
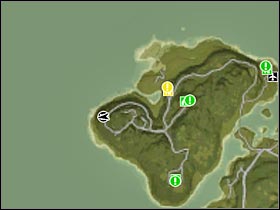
GUERRILLA 15
You can unlock this hideout by liberating the entire province. Similar to one of the previous Guerrilla safehouses, this object is located by the water. You will have an opportunity to use a small boat. You probably tested it before, so you should already know that it may come in handy. I have to warn you, though. You won't find any flying machines here. You aren't rewarded with any helicopters and you would have to travel a long way in order to reach a closest villa.
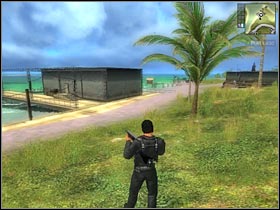
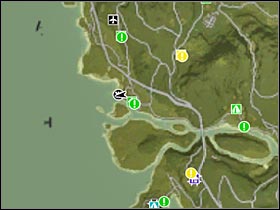
GUERRILLA 16
You can unlock this hideout by liberating the entire province. You should definitely take a closer look at this safehouse. The most important thing is the location. You will be able to reach a lot of important areas of the map, without having to travel for too long. There are a lot of side missions and villas in this area. You will also find a Jackson Z-19 Skreemer attack gunship on a nearby landing pad. Make sure that you're using it all the time. It's one of the best helicopters in the entire game.
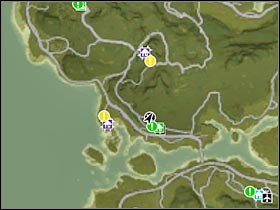
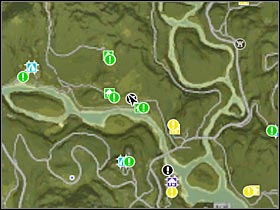
GUERRILLA 17
You can unlock this hideout by liberating the entire province. This safehouse is located on the beach. Just as before, you will have an opportunity to use different types of boats. Sadly, the game won't offer you anything, so you will have to steal a boat on your own. As a result, you might consider searching for some better safehouses in this area of the map.
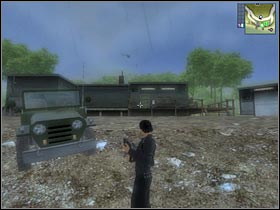
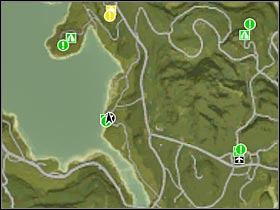
GUERRILLA 18
You can unlock this hideout by liberating a nearby settlement (a large town). You might think that this safehouse is located in a very suitable spot, however you will have to know about a few things. First of all, there aren't any helicopters here. You will find a villa in this area of the map, although you will have to choose a longer path in order to be able to reach it. It's best if you had left this place as soon as possible.
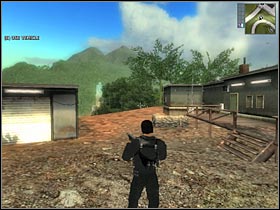
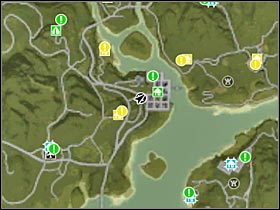
GUERRILLA 19
You can unlock this hideout by liberating the entire province. There are two villas in this area. It would be best if you had liberated these settlements. Thanks to that, you will be able to steal helicopters without any problems. Other than that, there's nothing unusual about this hideout.
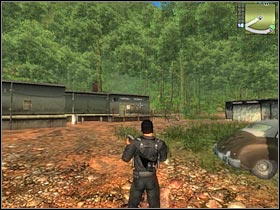
GUERRILLA 20
You can unlock this hideout by liberating the entire province. This is a quite interesting safehouse. You will find a small airport here. You don't even have to use a car to get to it. Just make sure you use the front entrance. You will have an opportunity to steal a very useful plane - McKenzie-Fergusson F2 Victor. As always, it won't be easy to manoeuvre it, however this machine is faster than a standard helicopter. If you're using parachutes frequently - this is exactly what you've been looking for!
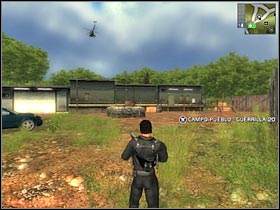
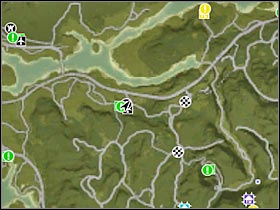
GUERRILLA 21
You can unlock this hideout by liberating the entire province. Once again, you will be rewarded with a small house that's located on the beach. As a result, you won't be using any helicopters. There is a small airport in this area, however you would have to spend at least a minute of your time to get to it. Ignore this hideout, especially since there's only one small settlement in this area.
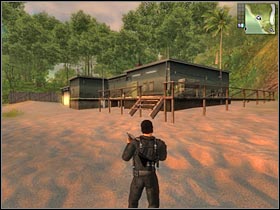
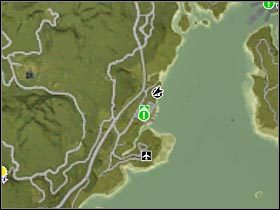
GUERRILLA 22
You can unlock this hideout by liberating the entire province. You may not like this safehouse at first glance, however I can assure you that it's very useful. You will find an excellent helicopter here. Go ahead and use it to explore this entire area. You should be able to reach a small island that's located east of your current position.
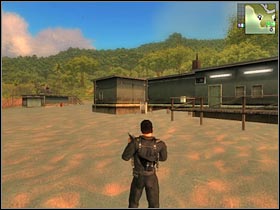
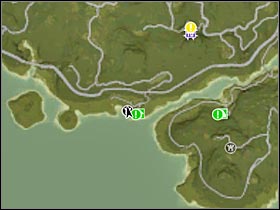
GUERRILLA 23
You can unlock this hideout by liberating the entire province. You'll find a very useful safehouse here. There are a lot of small islands around your current position. You'll be able to use the gunship in order to travel to some of the nearby villas. There's also an army base to your south. As a result, make sure that you'll start using this safehouse as soon as possible.
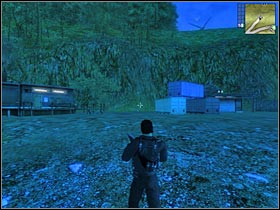
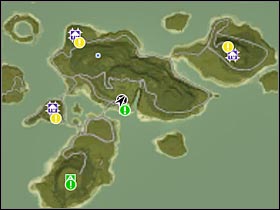
GUERRILLA 24
You can unlock this hideout by liberating the entire province. I recommend that you take a closer look at some of the things that this safehouse has to offer. You will have an opportunity to use an armed gunship. Make sure that you take full control over this entire sector. There are a lot of side challenges waiting for you.
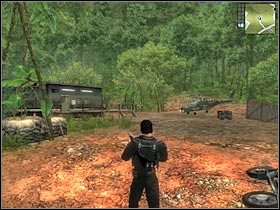
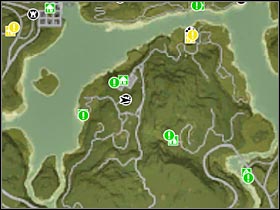
GUERRILLA 25
You can unlock this hideout by liberating a nearby airport. As you've probably suspected, it's located in a very suitable place. You will be able to use different kinds of flying machines without any problems. There's even a huge military plane (Alexander AX-14) waiting for you there. The only problem is that you'll only be able to reach the airport if you go back to the main gate, however I'm sure that you'll get used to it very soon.
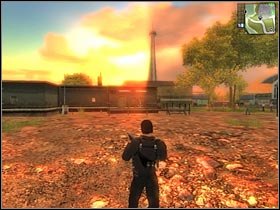
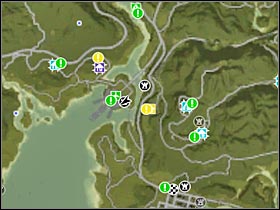
GUERRILLA 26
You can unlock this hideout by liberating the entire province. The main disadvantage is that you won't be rewarded with helicopters or any other helpful means of transportation. This safehouse is also in the middle of nowhere, so you would have to spend a lot of time in order to reach one of the nearby settlements. Ignore this hideout, as there are more interesting safehouses in this region.
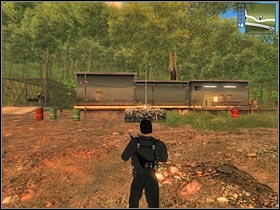
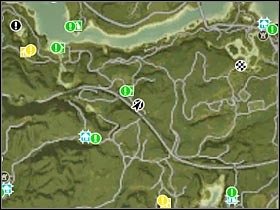
GUERRILLA 27
You can unlock this hideout by liberating the entire province. This is a much more interesting safehouse. Take a closer look at your personal map. As you've probably noticed by now, there's a small airport in this area. You will be able to use its advantages, however this safehouse will only be useful when you plan on taking control over the surrounding areas. You can forget about it later during the game.
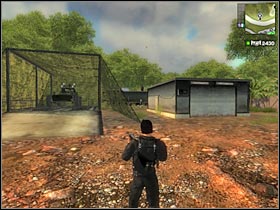
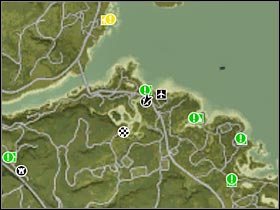
GUERRILLA 28
You can unlock this hideout by liberating the entire province. This safehouse won't be of any use to you, at least in my personal opinion. You should be able to find AT LEAST two better hideouts in this area. One of them will belong to the Riojas, so you will have to earn a lot of Prestige Points if you plan on using it.
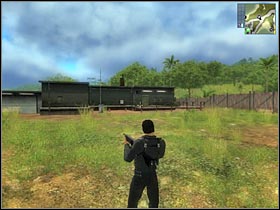
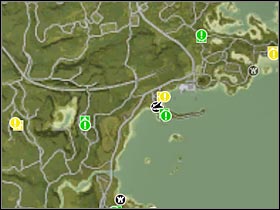
GUERRILLA 29
You can unlock this hideout by liberating the entire province. You shouldn't be too interested in using it, especially if you can't put a request for a gyrocopter. Thanks to it, you could scan the entire area without any problems. Otherwise, leave this place, because you won't find anything of interest here.

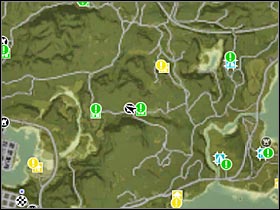
GUERRILLA 30
You can unlock this hideout by liberating the entire province. If you take a close look at your map, you'll probably notice that this safehouse has been located in a very difficult spot. You can't reach the biggest city fast enough and there's only one villa in this area. Additionally, you won't be rewarded with any helicopters. Skip it and let's move on to the next hideout.
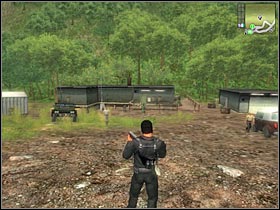
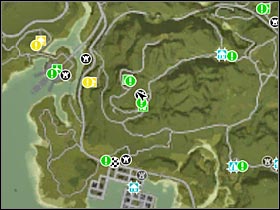
GUERRILLA 31
You can unlock this hideout by liberating the entire province. Once again, you will be operating on a beach. As you've probably suspected, you will have an opportunity to use boats. This safehouse may come in handy during the last missions of the campaign mode.
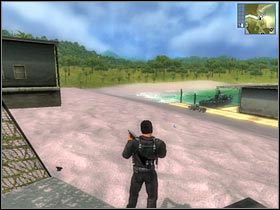
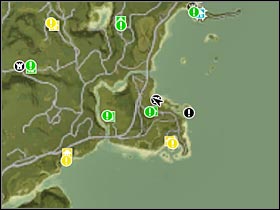
GUERRILLA 32
You can unlock this hideout by liberating a northern part of the large city. This is a VERY useful safehouse. First of all, it's well located. You will be able to enter the city without any major delays. There are a few main missions in this area, so it will come in handy. There's also a gunship here. You will be using all the time, especially since it's equipped with very powerful weapons.
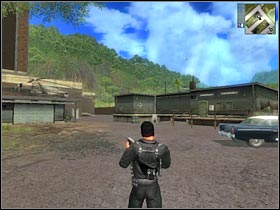
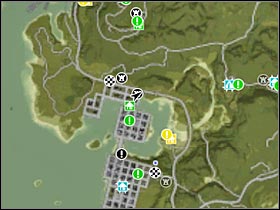
GUERRILLA 33
You can unlock this hideout by liberating a southern part of the large city. Sadly, this safehouse is far worse than the previous one. If you don't have any important missions in this area, you may as well skip it, especially since there no helicopters here. Remember that you can't put any requests within the city limits. You'd have to go to one of the nearby safehouses (Rioja 06 or Rioja 07)!
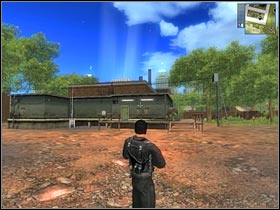
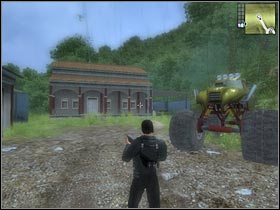
RIOJA 01
You can unlock this hideout automatically by finishing the fourth main mission of the campaign mode (The San Esperito Connection). Alternatively, you could try and gather 100 Prestige Points for the Rioja cartel, although this is less likely to happen. This is a quite interesting safehouse. You will be able to travel to a lot of interesting provinces from here. There's also a Rioja villa nearby. You should be using it, especially in the early part of the game.
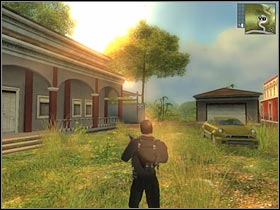
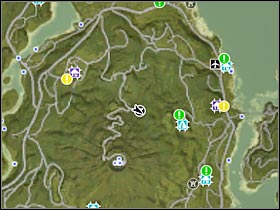
RIOJA 02
You can unlock this hideout by scoring 200 Prestige Points for the Rioja cartel. This safehouse has been located in a very interesting place. You will find a large town nearby. There are a lot of challenges waiting for you there, including collecting the packages. It would be wise to unlock this hideout as soon as possible.
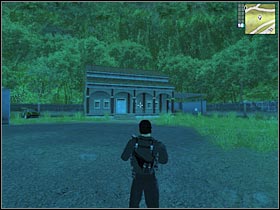
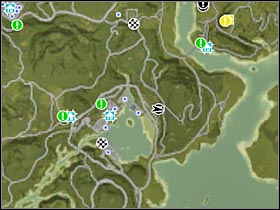
RIOJA 03
You can unlock this hideout by scoring 300 Prestige Points for the Rioja cartel. Sadly, I'm afraid you won't be using it at all. This safehouse has been located in the middle of nowhere. The only settlement in this area is the bar on the top of the volcano. You will have to go there during one of the main missions, however even then Rioja 03 hideout won't come in handy.
RIOJA 04
You can unlock this hideout by scoring 500 Prestige Points for the Rioja cartel. This is definitely one of the most useful safehouses in the entire game. First of all, it's located in the central part of this island. There's also a gunship here (one of the first armed helicopters you will be rewarded with). You will be able to use it to travel quickly to other settlements. You should also take a closer look at your personal map. There are a lot of packages here. Make sure that you pick them all up.
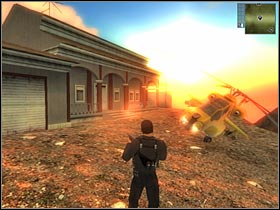
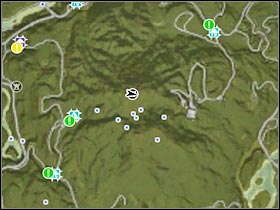
RIOJA 05
You can unlock this hideout by scoring 700 Prestige Points for the Rioja cartel. It's also located in a very suitable place. There's a villa nearby, so you won't have any problems getting new helicopters. You will be able to use them to explore some of the nearby settlements. I recommend that you use this safehouse to take full control over the entire sector of the map.
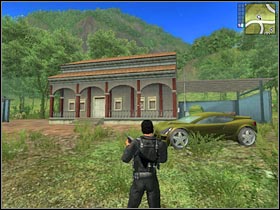
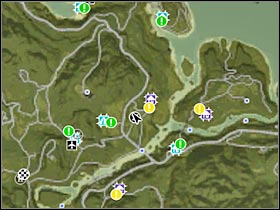
RIOJA 06
You can unlock this hideout by scoring 1100 Prestige Points for the Rioja cartel. This is a quite interesting safehouse. First of all, it's well located. You will be able to use different kinds of boats (the game will provide one for free). There's also a huge airport nearby. You could use one of the available cars in order to get to it.
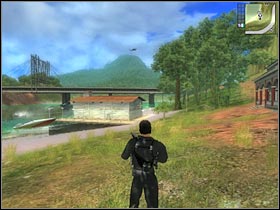
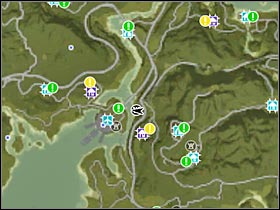
RIOJA 07
You can unlock this hideout by scoring 1500 Prestige Points for the Rioja cartel. You should definitely take a closer look at what this safehouse has to offer. You will be rewarded with an ARMORED VEHICLE (Ballard M5B1 Scout). Make sure that you take it with you, especially if you plan on conquering one of the districts of the city. You should be using this hideout later during the game, mostly because a few important missions will take place in this area.
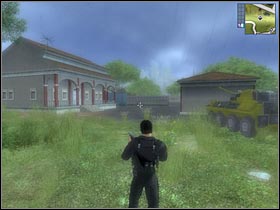

RIOJA 08
You can unlock this hideout by scoring 2100 Prestige Points for the Rioja cartel. The only advantage of this safehouse is that it's located near the southern part of the city. It also means that you won't be able to put requests for vehicles or Extractions. As a result, I would recommend that you start looking for something else. Rioja 07 hideout is much more useful.
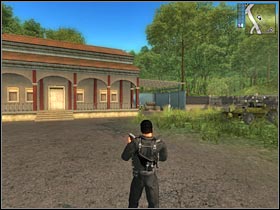
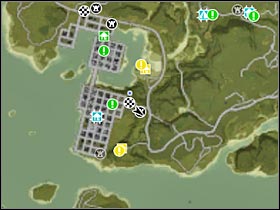
RIOJA 09
You can unlock this hideout by scoring 2700 Prestige Points for the Rioja cartel. If you take a look at your personal map, you'll probably notice that there's nothing interesting around your current position. You could visit one of the nearby settlements, however this is not necessary. You will find more interesting hideouts in the area, especially if you move on to the large island that's located to the north.
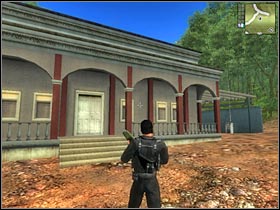
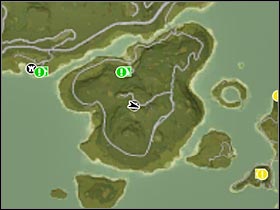
RIOJA 10
You can unlock this hideout by scoring 3700 Prestige Points for the Rioja cartel. This is a more interesting hideout than the previous one. As you've probably noticed, it's located by the water, so you could consider using boats. There are also a lot of interesting settlements here, including a Rioja village. As a result, you should definitely take a closer look at this safehouse. It has a lot to offer.
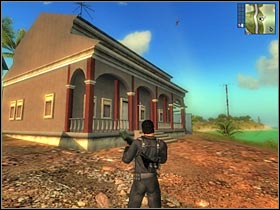
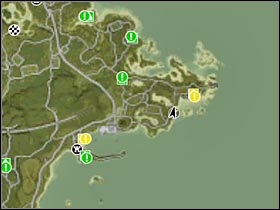
Here's a complete list of all unlockable ranks in this organization. Make sure that you advance to the highest level before you decide to proceed with the final missions of the game!
LEVEL 1 - Soldado
Required number of points: 100
Unlocks: Car: Baxter Petit (This is a very small car. It' s also quite slow. I don't think you'll find it to be very useful, especially since you can steal better cars without any problems); Weapons: Harker 357 Sawback Revolver (A typical revolver. You might consider using it to take out single opponents).
LEVEL 2 - Cabo
Required number of points: 200
Unlocks: Car: Scando 700 Sedan (One of the more interesting vehicles, especially in the early part of the game. Scando Sedan is quite fast, so it might come in handy during most of the chase missions. You will have to be careful, though. This car may very easily be destroyed).
LEVEL 3 - Sargento
Required number of points: 300
Unlocks: Car: Shimizu Tumbleweed (This is a very useful pick-up truck. Having it will allow you to move safely around the entire map); Gun: Aviv Panthera (One of the most powerful machine guns. Make sure that you start using it right away).
LEVEL 4 - Brigada
Required number of points: 500
Unlocks: Boat: Jaeger SFJ 7 (This a pontoon rather than a normal boat. You've probably been using it before, so you should know it quite well. Jaeger SFJ 7 is fast and it handles very nice. Sadly, you will have to avoid all enemy units, because it's very easy to destroy this boat).
LEVEL 5 - Subteniente
Required number of points: 700
Unlocks: Motorcycle: Apache Army Model 842 (This is a standard chopper. As you've probably noticed, some of the military units are using these motorcycles, so you don't have to get to excited about this reward. You might as well steal it from one of the police officers); Gun: Adler FF M-72 (A very decent machine gun. Make sure that you use it as your standard weapon. Thankfully, you'll unlock even more powerful guns in the near future).
LEVEL 6 - Alferez
Required number of points: 1100
Unlocks: Gunship: Jackson Z-19 Skreemer (You've probably been using this helicopter in the past. One of these machines can be found by the Rioja 04 hideout).
LEVEL 7 - Teniente
Required number of points: 1500
Unlocks: Car: Wallys GP (This is a standard military jeep. Enemy soldiers will be using these vehicles, so you could also steal it from them. Wallys has a very decent armor, however you will have to avoid larger groups of enemy soldiers); Gun: Mako Ocra (If you haven't acquired this weapon earlier in the game, now's your chance. This is a VERY useful rocket launcher. You should DEFINITELY take it with you. Thanks to that, you won't have any problems with most of the available missions).
LEVEL 8 - Capitan
Required number of points: 2100
Unlocks: Car: Stinger Buggy (This is one of the worst vehicles of the game. First of all, it's very hard to drive. You will have to be gentle with the steering wheel, even if you're using standard roads. Stinger also has a weak armor, so you couldn't use it during most of the fights).
LEVEL 9 - Comandante
Required number of points: 2700
Unlocks: Car: Emvee Armadillo (Once again, you shouldn't be surprised with this reward. This a standard humvee vehicle. You've probably seen a lot of these during some of the liberation missions. I'd recommend that you start using it. Emvee is stable and quite fast, especially if you consider how big it is).
LEVEL 10 - Coronel
Required number of points: 3700
Unlocks: Car: Harlan OTWV-2 (One of the best armored vehicles in the entire game. You've probably stole a few of these while exploring some of the army bases); Helicopter: Delta MAH-15 Chimaera (This gunship appears later during the game. You will also find a similar machine by the fifth Agency hideout. Nonetheless, you should be very excited with this reward); Boat: Pequod Harpoon PC 350 (One of the most useful patrol boats. The only bad thing about it is that in order to use the heavy machine gun post you would have to stop the boat and move to a new position); Gun: Mako Hammerhead (This is the best machine gun you could ever get, however you shouldn't get too excited about it. Mako Hammerhead would probably replace your rocket launcher, so you would have to find some other RPG weapons. As a result, stick close to the rocket launcher, as you're going to need it during most main missions of the game).
Here's a complete list of all unlockable ranks in this organization. In this case, you won't have to advance to the highest level, mostly because your reward aren't that interesting.
LEVEL 1 - Soldado
Required number of points: 100
Unlocks: Hideout: Rioja 01; Car: Chevalier Supernova (This is a very quick coupe. Furthermore, you shouldn't have any problems driving it. Make sure that you're using it frequently, especially while trying to explore the first island. The only bad thing about this car is that it's got a weak armor).
LEVEL 2 - Cabo
Required number of points: 200
Unlocks: Hideout: Rioja 02; Car: Fukuda Tournament (Fukuda is one of the fastest cars that you'll be able to unlock. As you've probably suspected, this makes it VERY difficult to drive. You would even have problems to keep a straight line...).
LEVEL 3 - Cabo Primero
Required number of points: 300
Unlocks: Hideout: Rioja 03; Car: Vampire (This is a very unusual vehicle. You will be rewarded with a... monster-truck! Sadly, you won't be using it too often. A monster-trucks comes in handy during one of the main missions of the game, however you wouldn't have to go back to the safehouse in order to get it).
LEVEL 4- Cabo Mayor
Required number of points: 500
Unlocks: Hideout: Rioja 04; Gunship: Jackson Z-19 Skreemer (Make sure that you advance to this level as soon as possible. This is a very interesting helicopter. Skreemer is fast, manoeuvrable and it's well equipped. You'll be using miniguns, as well as powerful rockets).
LEVEL 5 - Sargento
Required number of points: 700
Unlocks: Hideout: Rioja 05; Car: Garret Paladin 5-56 (This is a quite interesting vehicle. Garret Paladin can be used during all race challenges, mostly because you wouldn't have any problems driving it. It's also equipped with a MACHINE GUN. You will be able to use it without having to worry about current ammunition supplies).
LEVEL 6 - Subteniente
Required number of points: 1100
Unlocks: Hideout: Rioja 06; Boat: Trireme - RC Athena (You've probably used this boat before, so you should know what to expect... it's fast and easy to steer. Make sure you choose it if you plan on using boats instead of helicopters or planes).
LEVEL 7 - Capitan
Required number of points: 1500
Unlocks: Hideout: Rioja 07; Car: Ballard M5B1 Scout (This is one of the many armored vehicles the game has to offer. Thanks to it, you won't have any problems eliminating enemy soldiers. You should also use it against jeeps and other "standard" vehicles).
LEVEL 8 - Comandante
Required number of points: 2100
Unlocks: Hideout: Rioja 08; Car: Stinger Buggy (You've probably unlocked this car a little while ago. Guerrillas will reward you with it. Like I've said before, it's a total waste of time. Ignore it).
LEVEL 9 - Consejero
Required number of points: 2700
Unlocks: Hideout: Rioja 09; Gunship: Jackson Z-19 Skreemer (There isn't much to say about it. I'm sure that you're already using these types of gunships).
LEVEL 10 - Sub-Jefe
Required number of points: 3700
Unlocks: Hideout: Rioja 10; Gunship: Delta MAH-15 Chimaera (You've received this gunship along with the last Agency hideout. Additionally, you could advance to the highest rank in the Guerrillas ranks. The choice is yours).
 Jagged Alliance: Back in Action Game Guide & WalkthroughJagged Alliance: Crossfire Game Guide & WalkthroughJust Cause 3 Game Guide & WalkthroughJust Cause Game Guide & Walkthrough