Guide to the Jagged Alliance: Crossfire is illustrated walkthrough, which helps taking over enemy's territory. Besides that you'll find here:
Crossfire is a standalone expansion to the Jagged Alliance: Back in Action. Game links elements of strategy and RPG. Expansion gives you a new land, Khanpaa, which you have to liberate from the hands of Bolazwen. Add-on offers new mercenaries, weapons and enemies, thanks to which conquering another locations gives new experience.
Michal Rutkowski
Brown: color used for weapons which should be used or can be found on the map.
Blue: mercenaries you're already using.
Green: secondary missions.
Orange: NPC connected with the secondary mission.
Bold: region's names.
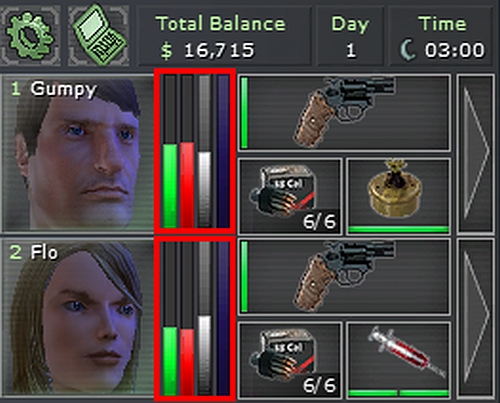
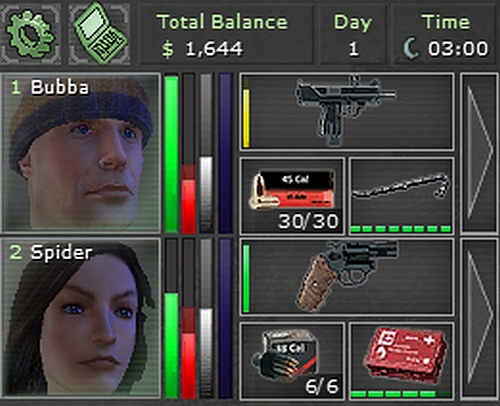
Bars by the mercenary's photo: you can see four vertical bars which stand for:

Health (green bar): hit points of your character. When mercenary starts bleeding (red blood drop), you have to use bandages to stop it. In case of wound (red cross), the med kit is required (if you have enough medical skills).
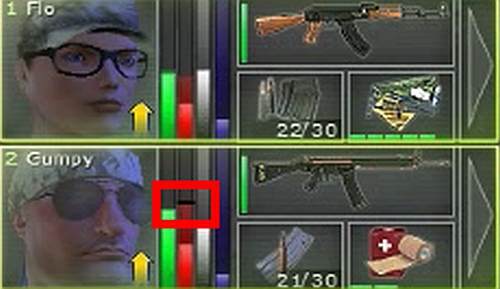
Energy (red bar): points you use during moving. Before the battle wait until energy recovers. It is also used while you're travelling on the main map. Sometimes after too long march maximum energy is decreased (black line). In such case you have to feed your mercenary.
Visibility (white bar): chance to be discovered by enemy. Staying in the shadow decreases visibility. It's also important to adjust clothes to the conditions, what increases camouflage.
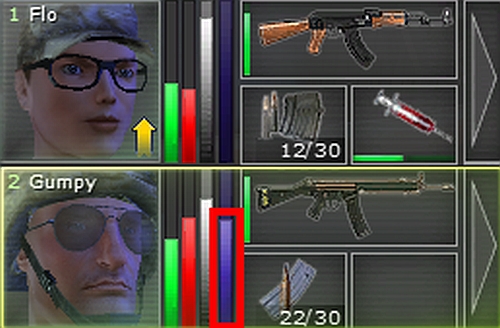
Noise level (violet bar): level of noise made by the mercenary during moving. If you're close to the enemy, it's worth to crouch.
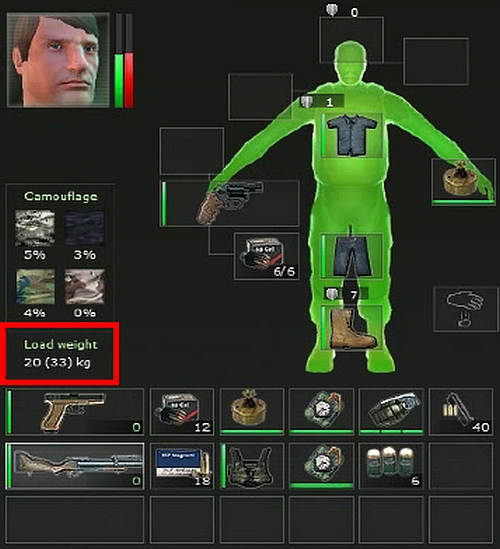
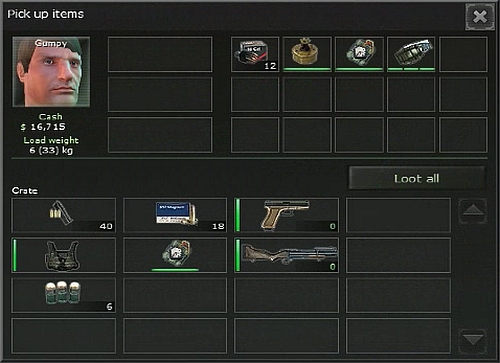
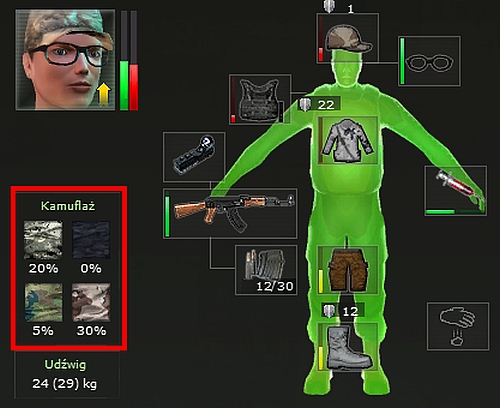
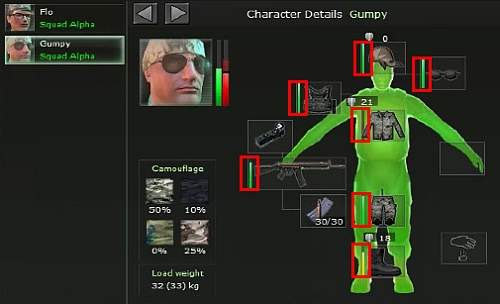
Equipment: by pressing I you open an equipment of the chosen mercenary. Clicking RMB on the item, you use it, if your character knows how to use it (explosives, med kit). When you have few identical items (e.g. ammo), you can divide it using SHIFT+ LMB. Every mercenary has a maximum load - after crossing it, he'll walk much slower.
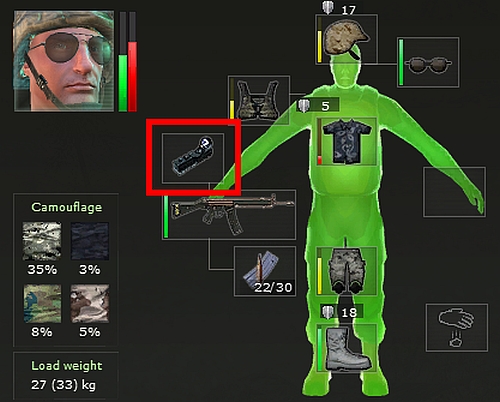
To some types of guns you can add sight (better accuracy) or silencer. To do so, you need to put the add-on in the empty space over the gun (screen). Every time you change weapon, the add-on returns to equipment. Without free slot for it, you won't be able to change weapon.
Wear of items: every item and gun in the game has its endurance (bar by the item). Every item wears while you're using it, and, finally, becomes useless: so remember of changing worn items. Gun can be repaired by the weapon oil or cleaning set. It's important, because even hardly used weapon can jam.
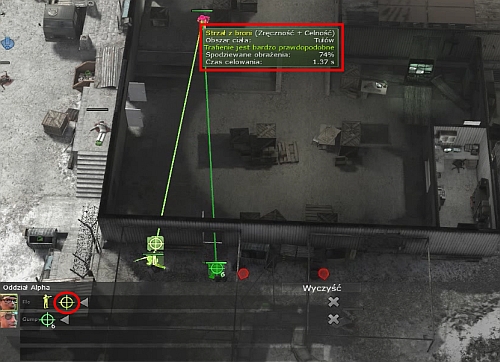
Tactic Mode: After pressing SPACE the time stops. In this moment you get additional information about chance of hit, depending of the body part you're aiming at and expected damage. Remember, that the fire mode also affects your accuracy. You change it by bullets icons on the right side of the screen. Damage depends on the gun, enemy's armor and mercenary's experience. Sometimes it's better to fire with smaller chances of hit, but bigger damage. Take a notice that damage also depends on enemy's equipment. You can also synchronize commends for mercenaries by dragging one of them onto another (circle on the screen).
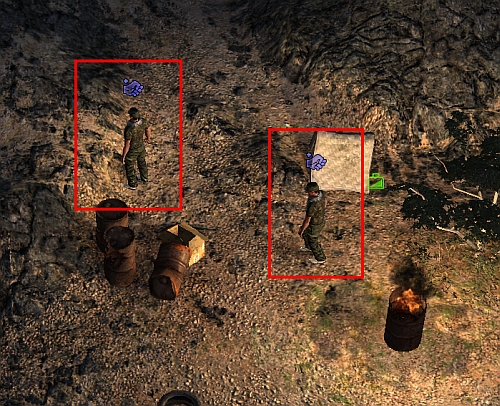
Partisans: after liberating each region you can arm its partisans (fist icon over the NPC). To give them weapon, you don't have to have it in your equip, it's enough that you've found it. They're not too useful during the game. I used them only once in defence. Because of the high cost of training and their limited usefulness, it's better to invest in new mercenaries. But if you've found a weapon you don't want to use, you can give it to the partisans.
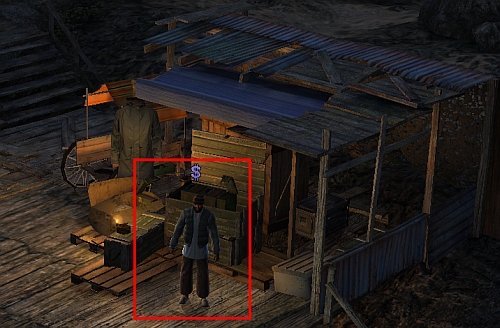
Traders: after liberating the land, you can also buy and sell items via NPC (dollar icon over the NPC). Every merchant has limited amount of money: if you get all of them, you have to look for another merchant, or buy something from him. Part of merchants start trading with you after completing some secondary mission.
Secondary missions: after liberating the particular region, NPCs with the exclamation mark will give you additional missions. Most of them are very profitable or allow you to recruit additional mercenary, so you should complete them. Their detailed description you can find in the Secondary Missions chapter.
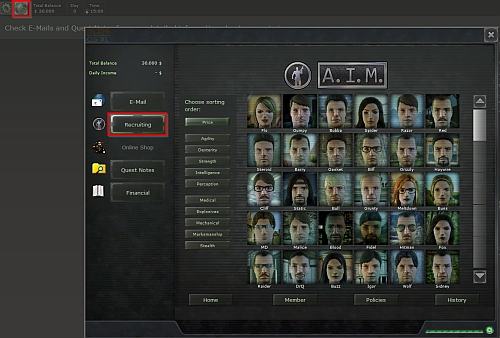
Before starting the mission, you have to recruit at least one mercenary. Open the laptop icon in the upper left corner and click on Recrutation. You'll find a list of mercenaries, which you can hire. In the further part of the game, also the online shop will appear here.
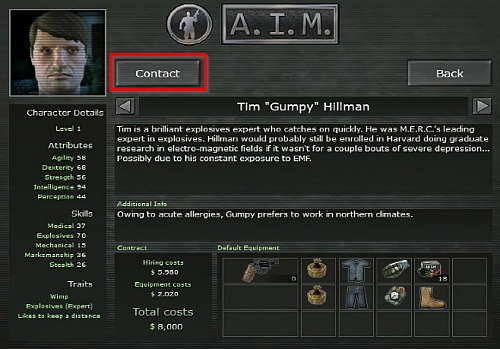
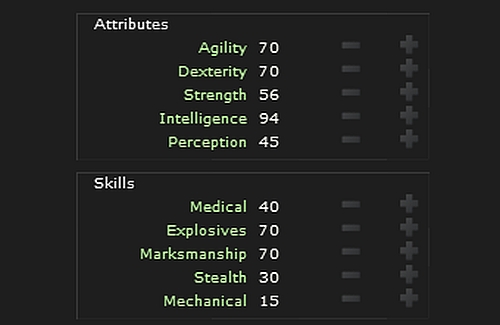
LMB on the mercenary, to see his exact statistics and equipment. Every of them has different statistics and abilities. You need to create a group that will complement one another. The most important man is a medic, who'll heal and resuscitate your mercenaries. Equally important is the one who'll be standing in the first line, someone with lot of HP and good accuracy (you should give him a kevlar also). If you decide on someone, click on Contact and then Hire.
As you have limited money at the beginning, choose two, maximum three mercenaries. I've chosen Flo and Gumpy, and complete the campaign with this two. In Gumpy I developed the medical skills. Flo is a mechanic, who can repair damaged weapon. Good choice (more specialized mercenaries) is Bubby or Spider. Remember, that not all of mercenaries will want to work for you (especially those with high levels).
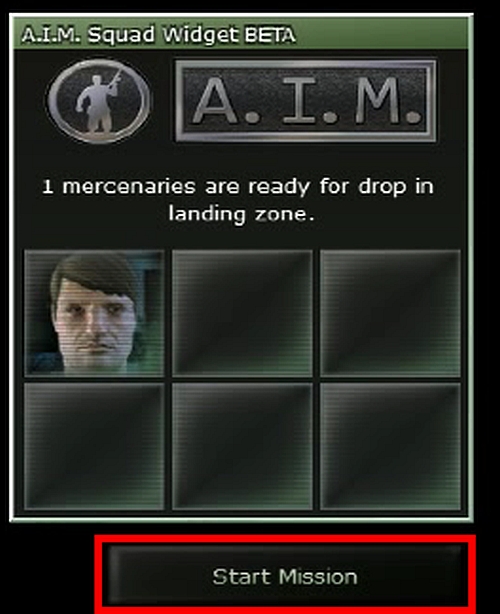
When you hire mercenaries, you can begin the mission, by clicking on the button in the right bottom corner.
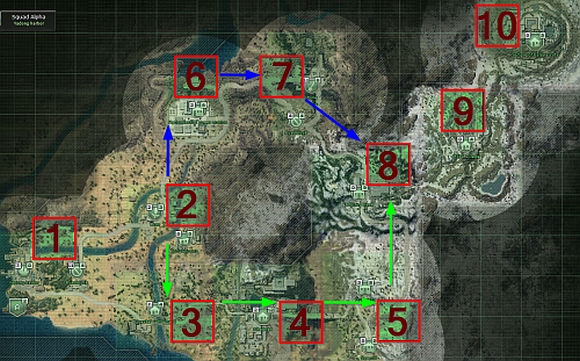
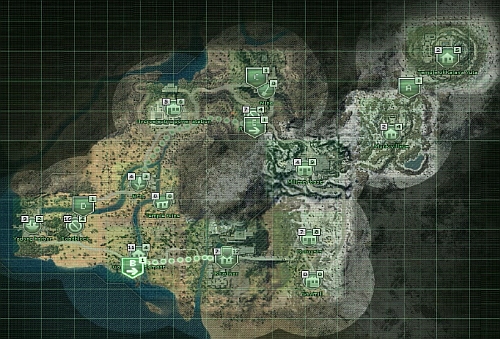
Legend:
By the name of location, you can see information about daily profit from the region when you conquer it. It changes according to your progress.
![You begin in the harbor - Yadong harbor and Roadblock [1] - p. 1 - Campaign - beginning locations - Jagged Alliance: Crossfire - Game Guide and Walkthrough](https://game.lhg100.com/Article/UploadFiles/201512/2015121610222504.jpg)
You begin in the harbor. Open the chest (screen) nearby the place you've started. You find very useful for groups of enemy M79 grenade launcher.
![First take over point is on the east - Yadong harbor and Roadblock [1] - p. 1 - Campaign - beginning locations - Jagged Alliance: Crossfire - Game Guide and Walkthrough](https://game.lhg100.com/Article/UploadFiles/201512/2015121610222593.jpg)
First take over point is on the east. Before you head there, make sure, that you won't get surprised by the guard (screen), who can patrol the western entrance to the fist target, marked by the arrow.
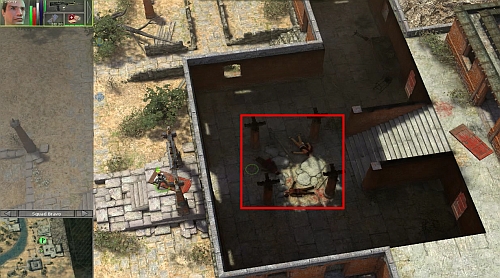
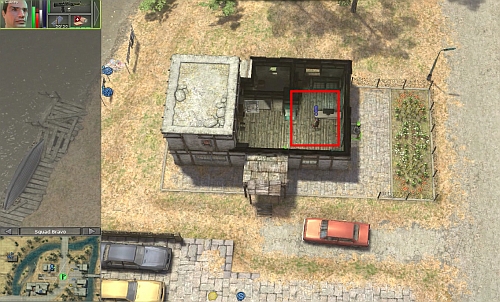
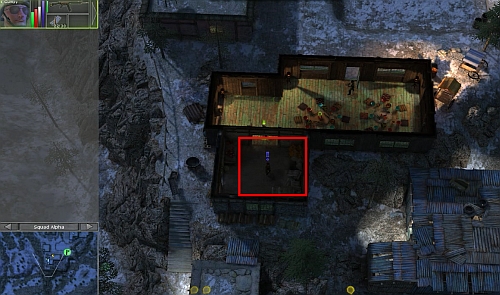
![In the building you will have to eliminate one or few enemies - Yadong harbor and Roadblock [1] - p. 1 - Campaign - beginning locations - Jagged Alliance: Crossfire - Game Guide and Walkthrough](https://game.lhg100.com/Article/UploadFiles/201512/2015121610222673.jpg)
In the building you will have to eliminate one or few enemies. If there is more than one, I recommend to stay in the corner and wait for enemies to come to you.
![If there are any opponents on the lower floors, crawl inside and shoot them in the back - Yadong harbor and Roadblock [1] - p. 1 - Campaign - beginning locations - Jagged Alliance: Crossfire - Game Guide and Walkthrough](https://game.lhg100.com/Article/UploadFiles/201512/2015121610222613.jpg)
If there are any opponents on the lower floors, crawl inside and shoot them in the back.
![The next target is on the northern west - Yadong harbor and Roadblock [1] - p. 1 - Campaign - beginning locations - Jagged Alliance: Crossfire - Game Guide and Walkthrough](https://game.lhg100.com/Article/UploadFiles/201512/2015121610222699.jpg)
The next target is on the northern west. Go to the place shown on the screen, on the west from the target (use back exit from the first place). Make sure that there isn't an enemy patrolling the rear of the building. If he is here, step up on the platform when he turns back, and kill him.
![There could be one more enemy in the building - Yadong harbor and Roadblock [1] - p. 1 - Campaign - beginning locations - Jagged Alliance: Crossfire - Game Guide and Walkthrough](https://game.lhg100.com/Article/UploadFiles/201512/2015121610222601.jpg)
There could be one more enemy in the building. Use one of three entrances (arrows on the screen) to attack him from the back. Wait a while in a safe place, because another enemy may enter this building.
![Now your way to the target is clean - Yadong harbor and Roadblock [1] - p. 1 - Campaign - beginning locations - Jagged Alliance: Crossfire - Game Guide and Walkthrough](https://game.lhg100.com/Article/UploadFiles/201512/2015121610222633.jpg)
Now your way to the target is clean. If you like, arm your mercenary in M79, because there is a chance, that enemies will be standing close to each other and you'll kill/wound them all. If not, load the game and try once again.
![The third goal, a ruined building, you find in the southern part of the map - Yadong harbor and Roadblock [1] - p. 1 - Campaign - beginning locations - Jagged Alliance: Crossfire - Game Guide and Walkthrough](https://game.lhg100.com/Article/UploadFiles/201512/2015121610222780.jpg)
The third goal, a ruined building, you find in the southern part of the map. Try to lure out enemies in front of the main entrance, where you can easily eliminate them.
![If any enemies stays inside, you may blow out the wall using C4 to distract them and attack from the back - Yadong harbor and Roadblock [1] - p. 2 - Campaign - beginning locations - Jagged Alliance: Crossfire - Game Guide and Walkthrough](https://game.lhg100.com/Article/UploadFiles/201512/2015121610222778.jpg)
If any enemies stays inside, you may blow out the wall using C4 to distract them and attack from the back.
![After cleaning up, youll find a chest with few useful things in the building - Yadong harbor and Roadblock [1] - p. 2 - Campaign - beginning locations - Jagged Alliance: Crossfire - Game Guide and Walkthrough](https://game.lhg100.com/Article/UploadFiles/201512/2015121610222783.jpg)
After cleaning up, you'll find a chest with few useful things in the building.
![Go to the next target (southern east part of the map) - Yadong harbor and Roadblock [1] - p. 2 - Campaign - beginning locations - Jagged Alliance: Crossfire - Game Guide and Walkthrough](https://game.lhg100.com/Article/UploadFiles/201512/2015121610222759.jpg)
Go to the next target (southern east part of the map). Good idea here is to lure enemies inside to the door marked on the screen. Thanks to that you may kill them one after another, while the rest is blocked.
![Notice also, if from the northern point (Roadblock) the guard wont come - Yadong harbor and Roadblock [1] - p. 2 - Campaign - beginning locations - Jagged Alliance: Crossfire - Game Guide and Walkthrough](https://game.lhg100.com/Article/UploadFiles/201512/2015121610222817.jpg)
Notice also, if from the northern point (Roadblock) the guard won't come.
![On the southern east of this point you find an ammo box (also scepter, item required to the quest The Guardian of Volcano may be inside) - Yadong harbor and Roadblock [1] - p. 2 - Campaign - beginning locations - Jagged Alliance: Crossfire - Game Guide and Walkthrough](https://game.lhg100.com/Article/UploadFiles/201512/2015121610222800.jpg)
On the southern east of this point you find an ammo box (also scepter, item required to the quest The Guardian of Volcano may be inside).
If the road is cleaned, head to the Roadblock, moving on the north from the previous point. If the stairs (screen) are free, go upstairs. Place behind the umbrella is a good place for start fire, because enemies won't spot you until you shoot. Try to eliminate as many opponents as you can from this place.
![Another good point to fire, and to retreat, is hiding behind cars - Yadong harbor and Roadblock [1] - p. 2 - Campaign - beginning locations - Jagged Alliance: Crossfire - Game Guide and Walkthrough](https://game.lhg100.com/Article/UploadFiles/201512/2015121610222865.jpg)
Another good point to fire, and to retreat, is hiding behind cars. Here you'll have a good visibility at enemies going downstairs, when you're behind the cover.
![Now, return to the main map, where you could use the online shop, supply ammo and choose next target: Bras - Bras [2] - Campaign - beginning locations - Jagged Alliance: Crossfire - Game Guide and Walkthrough](https://game.lhg100.com/Article/UploadFiles/201512/2015121610222844.jpg)
Now, return to the main map, where you could use the online shop, supply ammo and choose next target: Bras.
![After getting there, check which most is the least defended - Bras [2] - Campaign - beginning locations - Jagged Alliance: Crossfire - Game Guide and Walkthrough](https://game.lhg100.com/Article/UploadFiles/201512/2015121610222996.jpg)
After getting there, check which most is the least defended.
![Then get on the roof of random building and start firing at coming enemies (they should come one after another) - Bras [2] - Campaign - beginning locations - Jagged Alliance: Crossfire - Game Guide and Walkthrough](https://game.lhg100.com/Article/UploadFiles/201512/2015121610222913.jpg)
Then get on the roof of random building and start firing at coming enemies (they should come one after another).
![When they stop coming, look for a roof from which you can attack next ones - Bras [2] - Campaign - beginning locations - Jagged Alliance: Crossfire - Game Guide and Walkthrough](https://game.lhg100.com/Article/UploadFiles/201512/2015121610222934.jpg)
When they stop coming, look for a roof from which you can attack next ones.
![When youre moving, try not to get too close to the place marked with the flag - Bras [2] - Campaign - beginning locations - Jagged Alliance: Crossfire - Game Guide and Walkthrough](https://game.lhg100.com/Article/UploadFiles/201512/2015121610223051.jpg)
When you're moving, try not to get too close to the place marked with the flag. It'll lure all remaining enemies there. On the other hand, you can use it as a trap, when there'll be only few enemies left.
![Continue eliminating enemies, until you clean up your side of river - Bras [2] - Campaign - beginning locations - Jagged Alliance: Crossfire - Game Guide and Walkthrough](https://game.lhg100.com/Article/UploadFiles/201512/2015121610223074.jpg)
Continue eliminating enemies, until you clean up your side of river.
![Now, get on the other side of the river (Temple ruins) and, again, eliminate enemies from the buildings roof - Bras [2] - Campaign - beginning locations - Jagged Alliance: Crossfire - Game Guide and Walkthrough](https://game.lhg100.com/Article/UploadFiles/201512/2015121610223057.jpg)
Now, get on the other side of the river (Temple ruins) and, again, eliminate enmies from the building's roof.
![In case of need, you can retreat to the inside, from where you can fire through the open door - Bras [2] - Campaign - beginning locations - Jagged Alliance: Crossfire - Game Guide and Walkthrough](https://game.lhg100.com/Article/UploadFiles/201512/2015121610223058.jpg)
In case of need, you can retreat to the inside, from where you can fire through the open door. In the temple on the southern east you find a corpse related with the quest The Missing Monks.
![Its also worth to check the room shown on the screen (you get there from the roof), where you can find an Automag - Bras [2] - Campaign - beginning locations - Jagged Alliance: Crossfire - Game Guide and Walkthrough](https://game.lhg100.com/Article/UploadFiles/201512/2015121610223136.jpg)
It's also worth to check the room shown on the screen (you get there from the roof), where you can find an Automag. Return to the main map. Now you have two possibilities: go south, heading to the Coastal settlement (you may find better weapons) or to the north to Hydroelectric power station (bigger profits). Both paths joins at the Military base. I personally recommend the way on south because of the equipment (e.g. LAW rocket launcher). There is nothing against conquering one point on the way and return to the other way.
![After taking over the region, go to the main map and choose Coastal settlement [3] - Coastal settelment [3] - p. 1 - Campaign - southern way - Jagged Alliance: Crossfire - Game Guide and Walkthrough](https://game.lhg100.com/Article/UploadFiles/201512/2015121610223171.jpg)
After taking over the region, go to the main map and choose Coastal settlement [3].
![Again check which point has the weakest defence and where you can enter without being noticed - Coastal settelment [3] - p. 1 - Campaign - southern way - Jagged Alliance: Crossfire - Game Guide and Walkthrough](https://game.lhg100.com/Article/UploadFiles/201512/2015121610223165.jpg)
Again check which point has the weakest defence and where you can enter without being noticed. In my case it was on the east of the map.
![As usual, try to attack enemies in the back and, if it is possible, from two sides - Coastal settelment [3] - p. 1 - Campaign - southern way - Jagged Alliance: Crossfire - Game Guide and Walkthrough](https://game.lhg100.com/Article/UploadFiles/201512/2015121610223121.jpg)
As usual, try to attack enemies in the back and, if it is possible, from two sides.
![Next to this point, by the truck, you can find an ammo box (with the scepter, required to the quest The Guardian of Volcano) - Coastal settelment [3] - p. 1 - Campaign - southern way - Jagged Alliance: Crossfire - Game Guide and Walkthrough](https://game.lhg100.com/Article/UploadFiles/201512/2015121610223273.jpg)
Next to this point, by the truck, you can find an ammo box (with the scepter, required to the quest The Guardian of Volcano).
![If you have an occasion, use the fragmentation grenade or M79 to get rid of enemies standing in group - Coastal settelment [3] - p. 1 - Campaign - southern way - Jagged Alliance: Crossfire - Game Guide and Walkthrough](https://game.lhg100.com/Article/UploadFiles/201512/2015121610223231.jpg)
If you have an occasion, use the fragmentation grenade or M79 to get rid of enemies standing in group.
![Look around by the next point (southern west part of map) to find the weakest defended side - Coastal settelment [3] - p. 1 - Campaign - southern way - Jagged Alliance: Crossfire - Game Guide and Walkthrough](https://game.lhg100.com/Article/UploadFiles/201512/2015121610223236.jpg)
Look around by the next point (southern west part of map) to find the weakest defended side. After getting into the building, place yourself to find a cover and eliminate coming enemies.
![The last point, on the south of the map, may be very challenging - Coastal settelment [3] - p. 2 - Campaign - southern way - Jagged Alliance: Crossfire - Game Guide and Walkthrough](https://game.lhg100.com/Article/UploadFiles/201512/2015121610223330.jpg)
The last point, on the south of the map, may be very challenging. I recommend to get on the roof and place between two ladders leading upstairs, to have time aim at climbing enemies. Watch out on the enemy with the blade.
![Alternately place in a way which allows you fire at enemies located in different directions - Coastal settelment [3] - p. 2 - Campaign - southern way - Jagged Alliance: Crossfire - Game Guide and Walkthrough](https://game.lhg100.com/Article/UploadFiles/201512/2015121610223352.jpg)
Alternately place in a way which allows you fire at enemies located in different directions.
![Enemies from the inside you can lure out or shoot through the windows - Coastal settelment [3] - p. 2 - Campaign - southern way - Jagged Alliance: Crossfire - Game Guide and Walkthrough](https://game.lhg100.com/Article/UploadFiles/201512/2015121610223397.jpg)
Enemies from the inside you can lure out or shoot through the windows.
![When you take over all region, return to the main map and expect the attack from Khadwan - Coastal settelment [3] - p. 2 - Campaign - southern way - Jagged Alliance: Crossfire - Game Guide and Walkthrough](https://game.lhg100.com/Article/UploadFiles/201512/2015121610223398.jpg)
When you take over all region, return to the main map and expect the attack from Khadwan.
![With that knowledge, you can place your mercenaries on the good positions before enemies get here - Coastal settelment [3] - p. 2 - Campaign - southern way - Jagged Alliance: Crossfire - Game Guide and Walkthrough](https://game.lhg100.com/Article/UploadFiles/201512/2015121610223442.jpg)
With that knowledge, you can place your mercenaries on the good positions before enemies get here. Doing so, you can eliminate them very easily.
![Or set up the anti-personnel mines if you know their future path (red dots on the screen) - Coastal settelment [3] - p. 2 - Campaign - southern way - Jagged Alliance: Crossfire - Game Guide and Walkthrough](https://game.lhg100.com/Article/UploadFiles/201512/2015121610223445.jpg)
Or set up the anti-personnel mines if you know their future path (red dots on the screen).
![When you get rid of attackers, return to the main map and head to Khadwan - Khadwan [4] - p. 1 - Campaign - southern way - Jagged Alliance: Crossfire - Game Guide and Walkthrough](https://game.lhg100.com/Article/UploadFiles/201512/2015121610223468.jpg)
When you get rid of attackers, return to the main map and head to Khadwan.
![After getting there, as usual, choose the weakest point - Khadwan [4] - p. 1 - Campaign - southern way - Jagged Alliance: Crossfire - Game Guide and Walkthrough](https://game.lhg100.com/Article/UploadFiles/201512/2015121610223476.jpg)
After getting there, as usual, choose the weakest point. After killing guards wait a while and make sure that the shots won't alarmed other opponents.
![During conquering this point, try to stay behind the cover, because enemies here may be well equipped - Khadwan [4] - p. 1 - Campaign - southern way - Jagged Alliance: Crossfire - Game Guide and Walkthrough](https://game.lhg100.com/Article/UploadFiles/201512/2015121610223511.jpg)
During conquering this point, try to stay behind the cover, because enemies here may be well equipped.
![In case of need, enter the building and lure enemies inside, where eliminating them should be easy - Khadwan [4] - p. 1 - Campaign - southern way - Jagged Alliance: Crossfire - Game Guide and Walkthrough](https://game.lhg100.com/Article/UploadFiles/201512/2015121610223573.jpg)
In case of need, enter the building and lure enemies inside, where eliminating them should be easy.
![In the next point on the south of map, place yourself in the kitchen, where hidden behind the covers (screen) youll be a tough target with a good vision - Khadwan [4] - p. 1 - Campaign - southern way - Jagged Alliance: Crossfire - Game Guide and Walkthrough](https://game.lhg100.com/Article/UploadFiles/201512/2015121610223503.jpg)
In the next point on the south of map, place yourself in the kitchen, where hidden behind the covers (screen) you'll be a tough target with a good vision.
![In the kitchen is a worth searching cupboard with weapon - Khadwan [4] - p. 1 - Campaign - southern way - Jagged Alliance: Crossfire - Game Guide and Walkthrough](https://game.lhg100.com/Article/UploadFiles/201512/2015121610223571.jpg)
In the kitchen is a worth searching cupboard with weapon.
![Of course, another good fireplace is roof, from which you can eliminate next enemies - Khadwan [4] - p. 1 - Campaign - southern way - Jagged Alliance: Crossfire - Game Guide and Walkthrough](https://game.lhg100.com/Article/UploadFiles/201512/2015121610223691.jpg)
Of course, another good fireplace is roof, from which you can eliminate next enemies.
![1 - Khadwan [4] - p. 1 - Campaign - southern way - Jagged Alliance: Crossfire - Game Guide and Walkthrough](https://game.lhg100.com/Article/UploadFiles/201512/2015121610223629.jpg)
![After securing the vicinity, look around inside the building for chests and cupboards - Khadwan [4] - p. 1 - Campaign - southern way - Jagged Alliance: Crossfire - Game Guide and Walkthrough](https://game.lhg100.com/Article/UploadFiles/201512/2015121610223644.jpg)
After securing the vicinity, look around inside the building for chests and cupboards.
![At the next target, by the bridge, I suggest luring enemies out while staying in the place shown on the screen - Khadwan [4] - p. 2 - Campaign - southern way - Jagged Alliance: Crossfire - Game Guide and Walkthrough](https://game.lhg100.com/Article/UploadFiles/201512/2015121610223679.jpg)
At the next target, by the bridge, I suggest luring enemies out while staying in the place shown on the screen.
![Again: watch out on the enemy with blade - Khadwan [4] - p. 2 - Campaign - southern way - Jagged Alliance: Crossfire - Game Guide and Walkthrough](https://game.lhg100.com/Article/UploadFiles/201512/2015121610223743.jpg)
Again: watch out on the enemy with blade.
![In case of need, you can plant anti-personnel mines before the encounter - Khadwan [4] - p. 2 - Campaign - southern way - Jagged Alliance: Crossfire - Game Guide and Walkthrough](https://game.lhg100.com/Article/UploadFiles/201512/2015121610223746.jpg)
In case of need, you can plant anti-personnel mines before the encounter.
![If lure enemies run in a larger group, use the M79 - Khadwan [4] - p. 2 - Campaign - southern way - Jagged Alliance: Crossfire - Game Guide and Walkthrough](https://game.lhg100.com/Article/UploadFiles/201512/2015121610223709.jpg)
If lure enemies run in a larger group, use the M79. In the warehouse in the western part of this point you find items related to the mission Dealer: Goods Piled High.
![At the last point in this region, on the northern east part of the map, its worth to lure out enemies in the place shown on the screen, and place your mercenaries as above - Khadwan [4] - p. 2 - Campaign - southern way - Jagged Alliance: Crossfire - Game Guide and Walkthrough](https://game.lhg100.com/Article/UploadFiles/201512/2015121610223808.jpg)
At the last point in this region, on the northern east part of the map, it's worth to lure out enemies in the place shown on the screen, and place your mercenaries as above. Enemies should come to you without noticing your position, so you can fire at their backs.
![After cleaning up whole region, go to the main map - you may be attacked again from the east - Khadwan [4] - p. 2 - Campaign - southern way - Jagged Alliance: Crossfire - Game Guide and Walkthrough](https://game.lhg100.com/Article/UploadFiles/201512/2015121610223823.jpg)
After cleaning up whole region, go to the main map - you may be attacked again from the east.
![With that knowledge, set your mercenaries in well covered places with good visibility of the bridge in the eastern part of the map - Khadwan [4] - p. 2 - Campaign - southern way - Jagged Alliance: Crossfire - Game Guide and Walkthrough](https://game.lhg100.com/Article/UploadFiles/201512/2015121610223800.jpg)
With that knowledge, set your mercenaries in well covered places with good visibility of the bridge in the eastern part of the map. As always, in case of troubles use anti-personnel mines. Return to the main map when you finish.
![Your next target should be an Outposts (you conquer Sawmill automatically, if you arm partisans in the Outposts) - Outposts and Sawmill [5] - Campaign - southern way - Jagged Alliance: Crossfire - Game Guide and Walkthrough](https://game.lhg100.com/Article/UploadFiles/201512/2015121610223886.jpg)
Your next target should be an Outposts (you conquer Sawmill automatically, if you arm partisans in the Outposts).
![Outposts is rather hard target if you want to attack from the west - Outposts and Sawmill [5] - Campaign - southern way - Jagged Alliance: Crossfire - Game Guide and Walkthrough](https://game.lhg100.com/Article/UploadFiles/201512/2015121610223965.jpg)
Outposts is rather hard target if you want to attack from the west. Enemies are well fortified and close enough to hear shoots when you fire at one group: so you'll have to face many of them at once.
![A good idea is to set up anti-personnel mines - Outposts and Sawmill [5] - Campaign - southern way - Jagged Alliance: Crossfire - Game Guide and Walkthrough](https://game.lhg100.com/Article/UploadFiles/201512/2015121610223929.jpg)
A good idea is to set up anti-personnel mines. In case of need retreat to the bridge at which you began the level (screen) and use M79. If the fight goes smoothly, and only single enemies remain, move back even more and wait until the fight ends to save the game.
![Again be careful with enemies armed in blades charging at you - Outposts and Sawmill [5] - Campaign - southern way - Jagged Alliance: Crossfire - Game Guide and Walkthrough](https://game.lhg100.com/Article/UploadFiles/201512/2015121610223986.jpg)
Again be careful with enemies armed in blades charging at you.
![After cleaning up, check the boxes at the end of the bridge - Outposts and Sawmill [5] - Campaign - southern way - Jagged Alliance: Crossfire - Game Guide and Walkthrough](https://game.lhg100.com/Article/UploadFiles/201512/2015121610223921.jpg)
After cleaning up, check the boxes at the end of the bridge.
![Try to get to the next point on the southern west of the map by the hill (according to the dots on the screen) and remain unnoticed - Outposts and Sawmill [5] - Campaign - southern way - Jagged Alliance: Crossfire - Game Guide and Walkthrough](https://game.lhg100.com/Article/UploadFiles/201512/2015121610224041.jpg)
Try to get to the next point on the southern west of the map by the hill (according to the dots on the screen) and remain unnoticed. It allows you attack from surprise.
![If not all enemies get lured out, you can use C4 and make an additional entrance which let you attack from the back - Outposts and Sawmill [5] - Campaign - southern way - Jagged Alliance: Crossfire - Game Guide and Walkthrough](https://game.lhg100.com/Article/UploadFiles/201512/2015121610224054.jpg)
If not all enemies get lured out, you can use C4 and make an additional entrance which let you attack from the back.
![Or, you can throw the grenade inside through the window - Outposts and Sawmill [5] - Campaign - southern way - Jagged Alliance: Crossfire - Game Guide and Walkthrough](https://game.lhg100.com/Article/UploadFiles/201512/2015121610224065.jpg)
Or, you can throw the grenade inside through the window.
At the north from this point, you should find a patrol with an enemy holding the case required to the quest The Big Deal: Dubious Business Partners.
![Try to sneak to the last point on the top of the mountain (eastern part of the map), because its well fortified and shoot-out before getting on the top may end up badly - Outposts and Sawmill [5] - Campaign - southern way - Jagged Alliance: Crossfire - Game Guide and Walkthrough](https://game.lhg100.com/Article/UploadFiles/201512/2015121610224037.jpg)
Try to sneak to the last point on the top of the mountain (eastern part of the map), because it's well fortified and shoot-out before getting on the top may end up badly. At this moment, only several enemies should remain.
![After killing the last enemies, search the vicinity for the chest shown on the screen above, at the east from the bridge - Outposts and Sawmill [5] - Campaign - southern way - Jagged Alliance: Crossfire - Game Guide and Walkthrough](https://game.lhg100.com/Article/UploadFiles/201512/2015121610224193.jpg)
After killing the last enemies, search the vicinity for the chest shown on the screen above, at the east from the bridge. It contains LAW rocket launcher.
![Now, return to the world map, where you can expect another attack at Bras - Outposts and Sawmill [5] - Campaign - southern way - Jagged Alliance: Crossfire - Game Guide and Walkthrough](https://game.lhg100.com/Article/UploadFiles/201512/2015121610224149.jpg)
Now, return to the world map, where you can expect another attack at Bras. If you can't return there at time, you can rise partisans level to 3rd or lose this point and take it over again.
![Your next target is Hydroelectric power station - Hydroelectric power station [6] - Campaign - northern way - Jagged Alliance: Crossfire - Game Guide and Walkthrough](https://game.lhg100.com/Article/UploadFiles/201512/2015121610224170.jpg)
Your next target is Hydroelectric power station.
![The only entrance here is the main gate in the eastern part of the map - Hydroelectric power station [6] - Campaign - northern way - Jagged Alliance: Crossfire - Game Guide and Walkthrough](https://game.lhg100.com/Article/UploadFiles/201512/2015121610224217.jpg)
The only entrance here is the main gate in the eastern part of the map. Try to get there unnoticed.
![If the gate is defended by many enemies, you can begin from the point more on the north and get to the first points using the stairs shown on the screen (northern west of the map) - Hydroelectric power station [6] - Campaign - northern way - Jagged Alliance: Crossfire - Game Guide and Walkthrough](https://game.lhg100.com/Article/UploadFiles/201512/2015121610224220.jpg)
If the gate is defended by many enemies, you can begin from the point more on the north and get to the first points using the stairs shown on the screen (northern west of the map).
![1 - Hydroelectric power station [6] - Campaign - northern way - Jagged Alliance: Crossfire - Game Guide and Walkthrough](https://game.lhg100.com/Article/UploadFiles/201512/2015121610224291.jpg)
![Try to attack opponents from the back and use their cover when you eliminate them - Hydroelectric power station [6] - Campaign - northern way - Jagged Alliance: Crossfire - Game Guide and Walkthrough](https://game.lhg100.com/Article/UploadFiles/201512/2015121610224231.jpg)
Try to attack opponents from the back and use their cover when you eliminate them. Don't forget about the chest shown on the screen (may contain ring required to the secondary mission The Dealer's Reward).
![Sneak to the remaining enemies inside the power station, using the stairs or the ladder - Hydroelectric power station [6] - Campaign - northern way - Jagged Alliance: Crossfire - Game Guide and Walkthrough](https://game.lhg100.com/Article/UploadFiles/201512/2015121610224237.jpg)
Sneak to the remaining enemies inside the power station, using the stairs or the ladder.
![Get rid of enemies at the second point in the center of the map, and open the chest shown on the screen - Hydroelectric power station [6] - Campaign - northern way - Jagged Alliance: Crossfire - Game Guide and Walkthrough](https://game.lhg100.com/Article/UploadFiles/201512/2015121610224328.jpg)
Get rid of enemies at the second point in the center of the map, and open the chest shown on the screen. In this box you find ring required to the secondary mission The Dealers Reward.
![In you need to travel safely, you can use the underground passage (screen, entrance marked by arrows), in the center of map - Hydroelectric power station [6] - Campaign - northern way - Jagged Alliance: Crossfire - Game Guide and Walkthrough](https://game.lhg100.com/Article/UploadFiles/201512/2015121610224360.jpg)
In you need to travel safely, you can use the underground passage (screen, entrance marked by arrows), in the center of map.
![To the last point on the north, you can get from the main gate (east part of the point) or use the stairs mentioned at the beginning (northern west of the map) - Hydroelectric power station [6] - Campaign - northern way - Jagged Alliance: Crossfire - Game Guide and Walkthrough](https://game.lhg100.com/Article/UploadFiles/201512/2015121610224380.jpg)
To the last point on the north, you can get from the main gate (east part of the point) or use the stairs mentioned at the beginning (northern west of the map). Adjust choice to the strength of this places defence. When you get there, I recommend to get on the roof (ladder on the screen) and shoot-out from there.
![After cleaning up, search the box shown on the screen (may cointain ring required to the secondary mission The Dealers Reward) - Hydroelectric power station [6] - Campaign - northern way - Jagged Alliance: Crossfire - Game Guide and Walkthrough](https://game.lhg100.com/Article/UploadFiles/201512/2015121610224347.jpg)
After cleaning up, search the box shown on the screen (may cointain ring required to the secondary mission The Dealers Reward).
![Return to the main map and attack Mine and Roadblock - Mine and Roadblock [7] - Campaign - northern way - Jagged Alliance: Crossfire - Game Guide and Walkthrough](https://game.lhg100.com/Article/UploadFiles/201512/2015121610224411.jpg)
Return to the main map and attack Mine and Roadblock.
![At the beginning, notice if any patrol is heading at you - Mine and Roadblock [7] - Campaign - northern way - Jagged Alliance: Crossfire - Game Guide and Walkthrough](https://game.lhg100.com/Article/UploadFiles/201512/2015121610224491.jpg)
At the beginning, notice if any patrol is heading at you. If yes, place yourself like on the screen and begin firing. It's also a good place to lure our enemies from the Roadblock.
![1 - Mine and Roadblock [7] - Campaign - northern way - Jagged Alliance: Crossfire - Game Guide and Walkthrough](https://game.lhg100.com/Article/UploadFiles/201512/2015121610224465.jpg)
![Now you have two possible paths, both leading through the bridge - Mine and Roadblock [7] - Campaign - northern way - Jagged Alliance: Crossfire - Game Guide and Walkthrough](https://game.lhg100.com/Article/UploadFiles/201512/2015121610224526.jpg)
Now you have two possible paths, both leading through the bridge. Take the less defended.
![In my case it was a bridge in the southern east part of map with the fallen truck, which I used as a cover - Mine and Roadblock [7] - Campaign - northern way - Jagged Alliance: Crossfire - Game Guide and Walkthrough](https://game.lhg100.com/Article/UploadFiles/201512/2015121610224537.jpg)
In my case it was a bridge in the southern east part of map with the fallen truck, which I used as a cover. Remember, that you can hide and heal behind the cover.
![When you clean the way through any of bridge, another good point to fire is the center of the map (screen) - Mine and Roadblock [7] - Campaign - northern way - Jagged Alliance: Crossfire - Game Guide and Walkthrough](https://game.lhg100.com/Article/UploadFiles/201512/2015121610224524.jpg)
When you clean the way through any of bridge, another good point to fire is the center of the map (screen). Hide behind the bags with sand and fire at lured enemies. By the truck you find a chest (may contain ring required to the secondary mission The Dealer's Reward)
![Last point to take over in this region is a building in the mountain on the north - Mine and Roadblock [7] - Campaign - northern way - Jagged Alliance: Crossfire - Game Guide and Walkthrough](https://game.lhg100.com/Article/UploadFiles/201512/2015121610224557.jpg)
Last point to take over in this region is a building in the mountain on the north. Dependant on the number of remaining enemies you can fire through windows (small number) or throw the grenade being inside (lot of them).
![Return to main map and wait few hours, expecting counterattack - Mine and Roadblock [7] - Campaign - northern way - Jagged Alliance: Crossfire - Game Guide and Walkthrough](https://game.lhg100.com/Article/UploadFiles/201512/2015121610224679.jpg)
Return to main map and wait few hours, expecting counterattack. If you get attacked, hide behind the parapet (screen) and wait for enemies.
![After destroying the attack, head to the Military bas from the north - Military base [8] - p. 1 - Campaign - way junction - Jagged Alliance: Crossfire - Game Guide and Walkthrough](https://game.lhg100.com/Article/UploadFiles/201512/2015121610224693.jpg)
After destroying the attack, head to the Military bas from the north. Prepare to the hard encounter, including a tank: you'll need at least 3 LAW's rockets to destroy it (normal difficulty level).
![If you begin in the northern part of the map, check immediately if the patrol isnt heading at you - Military base [8] - p. 1 - Campaign - way junction - Jagged Alliance: Crossfire - Game Guide and Walkthrough](https://game.lhg100.com/Article/UploadFiles/201512/2015121610224629.jpg)
If you begin in the northern part of the map, check immediately if the patrol isn't heading at you. If no, or you have enough time, sneak at the top of the hill (screen: northern west part of the map).
![When you get rid of enemies, you find yourself in the very good position to destroy the tank - Military base [8] - p. 1 - Campaign - way junction - Jagged Alliance: Crossfire - Game Guide and Walkthrough](https://game.lhg100.com/Article/UploadFiles/201512/2015121610224745.jpg)
When you get rid of enemies, you find yourself in the very good position to destroy the tank. You have a great range, being simultaneously out of his range.
![1 - Military base [8] - p. 1 - Campaign - way junction - Jagged Alliance: Crossfire - Game Guide and Walkthrough](https://game.lhg100.com/Article/UploadFiles/201512/2015121610224757.jpg)
![Prepare also for enemies, who, alarmed, may come from south and north (arrows on the screens) - Military base [8] - p. 1 - Campaign - way junction - Jagged Alliance: Crossfire - Game Guide and Walkthrough](https://game.lhg100.com/Article/UploadFiles/201512/2015121610224746.jpg)
Prepare also for enemies, who, alarmed, may come from south and north (arrows on the screens).
![Eliminate the rest enemies here using grenades or M79 - Military base [8] - p. 1 - Campaign - way junction - Jagged Alliance: Crossfire - Game Guide and Walkthrough](https://game.lhg100.com/Article/UploadFiles/201512/2015121610224887.jpg)
Eliminate the rest enemies here using grenades or M79.
![Next points, in the building on the north, may be challenging - Military base [8] - p. 1 - Campaign - way junction - Jagged Alliance: Crossfire - Game Guide and Walkthrough](https://game.lhg100.com/Article/UploadFiles/201512/2015121610224875.jpg)
Next points, in the building on the north, may be challenging. There is a lot of enemies inside, who'll quickly kill you in an open encounter. The best way is to lure them out.
![You can also try attack from the southern part of the building, firing through the window and guard the door (screen) from which enemies will running out - Military base [8] - p. 2 - Campaign - way junction - Jagged Alliance: Crossfire - Game Guide and Walkthrough](https://game.lhg100.com/Article/UploadFiles/201512/2015121610224823.jpg)
You can also try attack from the southern part of the building, firing through the window and guard the door (screen) from which enemies will running out.
![1 - Military base [8] - p. 2 - Campaign - way junction - Jagged Alliance: Crossfire - Game Guide and Walkthrough](https://game.lhg100.com/Article/UploadFiles/201512/2015121610224842.jpg)
![On the northern side of the building you find two places where you can plant C4 what gives you an additional passage and lure enemies - Military base [8] - p. 2 - Campaign - way junction - Jagged Alliance: Crossfire - Game Guide and Walkthrough](https://game.lhg100.com/Article/UploadFiles/201512/2015121610224950.jpg)
On the northern side of the building you find two places where you can plant C4 what gives you an additional passage and lure enemies.
![Another good place to attack is the one at the back of the building in the northern west part of the map, where you can also plant the C4 (screen) - Military base [8] - p. 2 - Campaign - way junction - Jagged Alliance: Crossfire - Game Guide and Walkthrough](https://game.lhg100.com/Article/UploadFiles/201512/2015121610224997.jpg)
Another good place to attack is the one at the back of the building in the northern west part of the map, where you can also plant the C4 (screen). This passage lets you attack enemies from the behind.
![In the building you find boxes with many guns(e - Military base [8] - p. 2 - Campaign - way junction - Jagged Alliance: Crossfire - Game Guide and Walkthrough](https://game.lhg100.com/Article/UploadFiles/201512/2015121610224945.jpg)
In the building you find boxes with many guns(e.g. G3A3, AK 47), sights, explosives and ammo.
![Another possibility is to climb up on the roof and try to enter building by the stairs (screen) - Military base [8] - p. 2 - Campaign - way junction - Jagged Alliance: Crossfire - Game Guide and Walkthrough](https://game.lhg100.com/Article/UploadFiles/201512/2015121610224962.jpg)
Another possibility is to climb up on the roof and try to enter building by the stairs (screen).
![Return to the main map and attack Monk village - Monk village [9] - p. 1 - Campaign - way junction - Jagged Alliance: Crossfire - Game Guide and Walkthrough](https://game.lhg100.com/Article/UploadFiles/201512/2015121610225032.jpg)
Return to the main map and attack Monk village.
![You begin on the road leading to the mountains - Monk village [9] - p. 1 - Campaign - way junction - Jagged Alliance: Crossfire - Game Guide and Walkthrough](https://game.lhg100.com/Article/UploadFiles/201512/2015121610225060.jpg)
You begin on the road leading to the mountains. Try to sneak to the first point in the southern west part of a map, checking if any patrol is coming from the north. Shots will attract remaining enemies here - kill them.
![If they stay on their positions, eliminate them from the distance - Monk village [9] - p. 1 - Campaign - way junction - Jagged Alliance: Crossfire - Game Guide and Walkthrough](https://game.lhg100.com/Article/UploadFiles/201512/2015121610225022.jpg)
If they stay on their positions, eliminate them from the distance. On the screen I marked the chest with items.
![Another point to take over is on the other side of the bridge - Monk village [9] - p. 1 - Campaign - way junction - Jagged Alliance: Crossfire - Game Guide and Walkthrough](https://game.lhg100.com/Article/UploadFiles/201512/2015121610225056.jpg)
Another point to take over is on the other side of the bridge. If there are any enemies nearby, fire at them from the positions marked on the screen.
![When there are no enemies, go on the other side of the bridge and hide behind the bags with sand - Monk village [9] - p. 1 - Campaign - way junction - Jagged Alliance: Crossfire - Game Guide and Walkthrough](https://game.lhg100.com/Article/UploadFiles/201512/2015121610225199.jpg)
When there are no enemies, go on the other side of the bridge and hide behind the bags with sand. When you get close enough, you take over the point what attracts all enemies inscribed to this point. Depend on how many run at you, prepare the proper weapons. Be ready that shots will lure more enemies here.
![Now, staying in the same place, try lure guards at the northern bridge - Monk village [9] - p. 2 - Campaign - way junction - Jagged Alliance: Crossfire - Game Guide and Walkthrough](https://game.lhg100.com/Article/UploadFiles/201512/2015121610225103.jpg)
Now, staying in the same place, try lure guards at the northern bridge. Again: depending on how many enemies arrive, prepare the proper weapons. Repeat this action until you clean up the vicinity.
![Enemies on the other side of the northern bridge are well fortified behind the bags with sand, so staying behind your position, send one mercenary on the distance of fire - Monk village [9] - p. 2 - Campaign - way junction - Jagged Alliance: Crossfire - Game Guide and Walkthrough](https://game.lhg100.com/Article/UploadFiles/201512/2015121610225127.jpg)
Enemies on the other side of the northern bridge are well fortified behind the bags with sand, so staying behind your position, send one mercenary on the distance of fire. After a shot and hit, run behind your bags and kill enemies running at you.
It may happen that you lure too many enemies at once. In such case, withdraw even further to lose the chase. Enemies should stop and stay in one place, at the northern bridge, what you should use with M79. Eliminate the remainings.
![When you clean up the area, close to the northern bridge and the parapet (screen) and fire at the remaining enemies at the next point - Monk village [9] - p. 2 - Campaign - way junction - Jagged Alliance: Crossfire - Game Guide and Walkthrough](https://game.lhg100.com/Article/UploadFiles/201512/2015121610225219.jpg)
When you clean up the area, close to the northern bridge and the parapet (screen) and fire at the remaining enemies at the next point. Of course, in case of need, retreat to the previous position.
![When the vicinity is safe, go on the other side of the bridge and clean up the remaining area, hiding behind the bags of sand - Monk village [9] - p. 2 - Campaign - way junction - Jagged Alliance: Crossfire - Game Guide and Walkthrough](https://game.lhg100.com/Article/UploadFiles/201512/2015121610225212.jpg)
When the vicinity is safe, go on the other side of the bridge and clean up the remaining area, hiding behind the bags of sand. In the chest (screen) you find another M79.
![When you exit to the main map, expect the attack of bigger group of enemies - Monk village [9] - p. 2 - Campaign - way junction - Jagged Alliance: Crossfire - Game Guide and Walkthrough](https://game.lhg100.com/Article/UploadFiles/201512/2015121610225217.jpg)
When you exit to the main map, expect the attack of bigger group of enemies. You can hide behind the bags (screen) with prepared M79 or withdraw deeper, counting on partisans help.
![After that, you can expect another attack, which I decided to force back in Temple of Kalaya Yuta - Temple of Kalaya Yuta [10] - p. 1 - Campaign - way junction - Jagged Alliance: Crossfire - Game Guide and Walkthrough](https://game.lhg100.com/Article/UploadFiles/201512/2015121610225367.jpg)
After that, you can expect another attack, which I decided to force back in Temple of Kalaya Yuta.
![Approach to the parapet at the bridge where you begin mission, and kill coming enemies - Temple of Kalaya Yuta [10] - p. 1 - Campaign - way junction - Jagged Alliance: Crossfire - Game Guide and Walkthrough](https://game.lhg100.com/Article/UploadFiles/201512/2015121610225368.jpg)
Approach to the parapet at the bridge where you begin mission, and kill coming enemies. Fire begin immediately when enemies get into your range. They should run in small groups, so you won't have too much problems with them.
![When its safe, go to the first point in the southern part of the map - Temple of Kalaya Yuta [10] - p. 1 - Campaign - way junction - Jagged Alliance: Crossfire - Game Guide and Walkthrough](https://game.lhg100.com/Article/UploadFiles/201512/2015121610225312.jpg)
When it's safe, go to the first point in the southern part of the map. You can go inside the building (screen), where patrols should pass you: you can attack them from behind.
![If any enemies remain inside the first point, try to lure them, having some rapid-fire gun - Temple of Kalaya Yuta [10] - p. 1 - Campaign - way junction - Jagged Alliance: Crossfire - Game Guide and Walkthrough](https://game.lhg100.com/Article/UploadFiles/201512/2015121610225331.jpg)
If any enemies remain inside the first point, try to lure them, having some rapid-fire gun.
![After cleaning up the first point, go to the next one (southern east of the map) and eliminate opponents on the outside from the distance - Temple of Kalaya Yuta [10] - p. 1 - Campaign - way junction - Jagged Alliance: Crossfire - Game Guide and Walkthrough](https://game.lhg100.com/Article/UploadFiles/201512/2015121610225413.jpg)
After cleaning up the first point, go to the next one (southern east of the map) and eliminate opponents on the outside from the distance.
![Those inside fire through the window - Temple of Kalaya Yuta [10] - p. 1 - Campaign - way junction - Jagged Alliance: Crossfire - Game Guide and Walkthrough](https://game.lhg100.com/Article/UploadFiles/201512/2015121610225430.jpg)
Those inside fire through the window.
![If you have a mercenary who can open closed door (jemmy or lock-pick) you can get to the next point through the building shown on the screen (on the west from the point) - Temple of Kalaya Yuta [10] - p. 1 - Campaign - way junction - Jagged Alliance: Crossfire - Game Guide and Walkthrough](https://game.lhg100.com/Article/UploadFiles/201512/2015121610225472.jpg)
If you have a mercenary who can open closed door (jemmy or lock-pick) you can get to the next point through the building shown on the screen (on the west from the point).
If you don't have one, you have to climb to the north. Try to eliminate as many enemies as you can (upper rectangle), being hidden behind the bags (bottom rectangle). You have also pay attention to the snipers, marked with the arrow.
![Alternately, you can try get rid of enemies from the position shown on the screen, where you should be out of the snipers range - Temple of Kalaya Yuta [10] - p. 1 - Campaign - way junction - Jagged Alliance: Crossfire - Game Guide and Walkthrough](https://game.lhg100.com/Article/UploadFiles/201512/2015121610225571.jpg)
Alternately, you can try get rid of enemies from the position shown on the screen, where you should be out of the snipers' range.
![When you clean the road, begin sneak on the top, staying close to the wall of rocks, to approach the distance from which you can eliminate the enemies above you - Temple of Kalaya Yuta [10] - p. 1 - Campaign - way junction - Jagged Alliance: Crossfire - Game Guide and Walkthrough](https://game.lhg100.com/Article/UploadFiles/201512/2015121610225587.jpg)
When you clean the road, begin sneak on the top, staying close to the wall of rocks, to approach the distance from which you can eliminate the enemies above you.
![Continue the climbing and try to get unnoticed to the point on the northern east - Temple of Kalaya Yuta [10] - p. 1 - Campaign - way junction - Jagged Alliance: Crossfire - Game Guide and Walkthrough](https://game.lhg100.com/Article/UploadFiles/201512/2015121610225558.jpg)
Continue the climbing and try to get unnoticed to the point on the northern east.
![Try to get in that way to the place on the screen (northern west), where, hiding, eliminate closest enemies - Temple of Kalaya Yuta [10] - p. 1 - Campaign - way junction - Jagged Alliance: Crossfire - Game Guide and Walkthrough](https://game.lhg100.com/Article/UploadFiles/201512/2015121610225519.jpg)
Try to get in that way to the place on the screen (northern west), where, hiding, eliminate closest enemies.
![Now turn back to the previous point (northern east), clean it up - Temple of Kalaya Yuta [10] - p. 2 - Campaign - way junction - Jagged Alliance: Crossfire - Game Guide and Walkthrough](https://game.lhg100.com/Article/UploadFiles/201512/2015121610225618.jpg)
Now turn back to the previous point (northern east), clean it up. After taking it over wait a while if any enemies run at you.
![Next point, on the west, can be challenging - Temple of Kalaya Yuta [10] - p. 2 - Campaign - way junction - Jagged Alliance: Crossfire - Game Guide and Walkthrough](https://game.lhg100.com/Article/UploadFiles/201512/2015121610225682.jpg)
Next point, on the west, can be challenging. Try to provoke enemies to run from behind their positions and return your mercenary to the previous points. Opponents should lose your trace and stay in a bigger group.
![1 - Temple of Kalaya Yuta [10] - p. 2 - Campaign - way junction - Jagged Alliance: Crossfire - Game Guide and Walkthrough](https://game.lhg100.com/Article/UploadFiles/201512/2015121610225613.jpg)
![Now choose the mercenary with the weapon which has better range and start firing at enemies from the position shown on the screen (by the point on northern east) - Temple of Kalaya Yuta [10] - p. 2 - Campaign - way junction - Jagged Alliance: Crossfire - Game Guide and Walkthrough](https://game.lhg100.com/Article/UploadFiles/201512/2015121610225667.jpg)
Now choose the mercenary with the weapon which has better range and start firing at enemies from the position shown on the screen (by the point on northern east). It may take some time, and when you eliminate most of them you can begin more open encounter. Alternately, use the M79.
![Enemies who stayed in the place, you can fire through the hole shown on the screen, if you can see them - Temple of Kalaya Yuta [10] - p. 2 - Campaign - way junction - Jagged Alliance: Crossfire - Game Guide and Walkthrough](https://game.lhg100.com/Article/UploadFiles/201512/2015121610225732.jpg)
Enemies who stayed in the place, you can fire through the hole shown on the screen, if you can see them. Otherwise get closer and eliminate them.
![In the last point, in the center of the map, lure enemies to the door (screen) - Temple of Kalaya Yuta [10] - p. 2 - Campaign - way junction - Jagged Alliance: Crossfire - Game Guide and Walkthrough](https://game.lhg100.com/Article/UploadFiles/201512/2015121610225739.jpg)
In the last point, in the center of the map, lure enemies to the door (screen). Run quickly with one mercenary inside and return to the stairs when he gets noticed.
![Enemies in hearth of the temple you can fire from M79 - Temple of Kalaya Yuta [10] - p. 2 - Campaign - way junction - Jagged Alliance: Crossfire - Game Guide and Walkthrough](https://game.lhg100.com/Article/UploadFiles/201512/2015121610225713.jpg)
Enemies in hearth of the temple you can fire from M79. If you don't have an ammo, run into their field of vision and return to the stairs, where they should follow you.
![2 - Temple of Kalaya Yuta [10] - p. 2 - Campaign - way junction - Jagged Alliance: Crossfire - Game Guide and Walkthrough](https://game.lhg100.com/Article/UploadFiles/201512/2015121610225703.jpg)
![The tougher enemies staying behind the door or the wall, you can treat with grenade - Temple of Kalaya Yuta [10] - p. 2 - Campaign - way junction - Jagged Alliance: Crossfire - Game Guide and Walkthrough](https://game.lhg100.com/Article/UploadFiles/201512/2015121610225877.jpg)
The tougher enemies staying behind the door or the wall, you can treat with grenade. After cleaning up this are, you take over the last point on the map. When you return to the main map, the Yadong harbor will be attacked and, probably, taken over, if you don't have partisans there.
![Three points are taken in the western part of a map - Temple of Kalaya Yuta [10] - p. 2 - Campaign - way junction - Jagged Alliance: Crossfire - Game Guide and Walkthrough](https://game.lhg100.com/Article/UploadFiles/201512/2015121610225819.jpg)
Three points are taken in the western part of a map. Re-take them using the methods from the beginning of the game. If you arm partisans, lure enemies to there - they'll help you. When you eliminate all enemies, go to the port on the west. You'll find a Behnam on the boat. Talk to him and end the game.
![Below you can find an description of completing the secondary missions, which you obtain from NPCs with exclamation mark over their heads - Yadong harbor [1] - Secondary missions - Jagged Alliance: Crossfire - Game Guide and Walkthrough](https://game.lhg100.com/Article/UploadFiles/201512/2015121610225830.jpg)
Below you can find an description of completing the secondary missions, which you obtain from NPCs with exclamation mark over their heads. You can begin the mission after securing the particular region. During the dialogue, always choose the upper options to take the mission. They are divided on particular regions in which you can find the mission-givers. If any quest has any special requirements, you'll find it at the beginning of the description.
![In the northern west part of this map, on the marketplace you find Sanjay - Yadong harbor [1] - Secondary missions - Jagged Alliance: Crossfire - Game Guide and Walkthrough](https://game.lhg100.com/Article/UploadFiles/201512/2015121610225880.jpg)
In the northern west part of this map, on the marketplace you find Sanjay. Your mission is to conquer the rest of this region (Yadong harbor and Roadblock [1]).
![When you do it, return to the marketplace and talk with Hasim - Yadong harbor [1] - Secondary missions - Jagged Alliance: Crossfire - Game Guide and Walkthrough](https://game.lhg100.com/Article/UploadFiles/201512/2015121610225947.jpg)
When you do it, return to the marketplace and talk with Hasim. This conversation ends the mission and unlocks next ones in this region.
![To begin this mission, you have to complete clean up the streets - Yadong harbor [1] - Secondary missions - Jagged Alliance: Crossfire - Game Guide and Walkthrough](https://game.lhg100.com/Article/UploadFiles/201512/2015121610225951.jpg)
To begin this mission, you have to complete clean up the streets. In the northern east part of marketplace you find Ehsan, who gives you another quest. You goal is to take over Khadwa [4]. When you do it, return to Ehsan. You get few items in return.
![The last one mission in this region you get from Siavash, who is in the northern part of a marketplace - Yadong harbor [1] - Secondary missions - Jagged Alliance: Crossfire - Game Guide and Walkthrough](https://game.lhg100.com/Article/UploadFiles/201512/2015121610225996.jpg)
The last one mission in this region you get from Siavash, who is in the northern part of a marketplace. He asks you to find three lost monks in Temple ruins [2].
![When you get there, go to the destroyed temple on the southern east - Yadong harbor [1] - Secondary missions - Jagged Alliance: Crossfire - Game Guide and Walkthrough](https://game.lhg100.com/Article/UploadFiles/201512/2015121610225958.jpg)
When you get there, go to the destroyed temple on the southern east. You'll find corpses of monks. Return to Siavash and tell him about it.
Families torn apart: father should know
![You get an access to this quest after finishing Families torn apart: tell them I'm fine - Yadong harbor [1] - Secondary missions - Jagged Alliance: Crossfire - Game Guide and Walkthrough](https://game.lhg100.com/Article/UploadFiles/201512/2015121610230068.jpg)
You get an access to this quest after finishing Families torn apart: tell them I'm fine..., which you get in Khadwan [4]. Speak to Linh who is in the middle of a map. Your task is to inform her husband, Masoud, that their son Roshan, is lost.
![Masoud can be found in Khadwan [4], in the center - Yadong harbor [1] - Secondary missions - Jagged Alliance: Crossfire - Game Guide and Walkthrough](https://game.lhg100.com/Article/UploadFiles/201512/2015121610230026.jpg)
Masoud can be found in Khadwan [4], in the center. Further part of this quest takes place in Monk village [9].
![After the dialogue you get a key, with which you can open the door in the building - Yadong harbor [1] - Secondary missions - Jagged Alliance: Crossfire - Game Guide and Walkthrough](https://game.lhg100.com/Article/UploadFiles/201512/2015121610230046.jpg)
After the dialogue you get a key, with which you can open the door in the building. Take the key and pick up money and items from the room.
![To unlock this quest, you have to finish The big deal: the missing son - Yadong harbor [1] - Secondary missions - Jagged Alliance: Crossfire - Game Guide and Walkthrough](https://game.lhg100.com/Article/UploadFiles/201512/2015121610230011.jpg)
To unlock this quest, you have to finish The big deal: the missing son. Talk with Dilshad, who'll give you information about Nudda's travel to Sawmill [5].
![In Sawmill [5] on the way on north, from the point on the southern west, you find a patrol with the suitcase required for this mission - Yadong harbor [1] - Secondary missions - Jagged Alliance: Crossfire - Game Guide and Walkthrough](https://game.lhg100.com/Article/UploadFiles/201512/2015121610230037.jpg)
In Sawmill [5] on the way on north, from the point on the southern west, you find a patrol with the suitcase required for this mission.
![When you find a suitcase, return to the boys mother on south of Coastal settleement [3] - Yadong harbor [1] - Secondary missions - Jagged Alliance: Crossfire - Game Guide and Walkthrough](https://game.lhg100.com/Article/UploadFiles/201512/2015121610230133.jpg)
When you find a suitcase, return to the boy's mother on south of Coastal settlement [3]. As a reward you get 42 000$.
![Inside the house on the west, on the first floor you find Dodo, wholl ask you for finding his three chests with stuff - Bras [2] - Secondary missions - Jagged Alliance: Crossfire - Game Guide and Walkthrough](https://game.lhg100.com/Article/UploadFiles/201512/2015121610230113.jpg)
Inside the house on the west, on the first floor you find Dodo, who'll ask you for finding his three chests with stuff. You'll find it in Khadwan [4].
![When you eliminate all enemies, go to the warehouse on the west, where in the room (screen) on the cupboard you find the stolen stuff - Bras [2] - Secondary missions - Jagged Alliance: Crossfire - Game Guide and Walkthrough](https://game.lhg100.com/Article/UploadFiles/201512/2015121610230164.jpg)
When you eliminate all enemies, go to the warehouse on the west, where in the room (screen) on the cupboard you find the stolen stuff. Pick it up and return to Dodo. You get 20 000 $ and Dodo will give you another missions.
![To begin this quest you have to finish Dealer: goods piled high - Bras [2] - Secondary missions - Jagged Alliance: Crossfire - Game Guide and Walkthrough](https://game.lhg100.com/Article/UploadFiles/201512/2015121610230108.jpg)
To begin this quest you have to finish Dealer: goods piled high. Talk again with Dodo who orders you to find 10 pieces of coltan.
![Few pieces you find in Mine [7] in the building in the middle of a map, in a warehouse on the ground floor - Bras [2] - Secondary missions - Jagged Alliance: Crossfire - Game Guide and Walkthrough](https://game.lhg100.com/Article/UploadFiles/201512/2015121610230263.jpg)
Few pieces you find in Mine [7] in the building in the middle of a map, in a warehouse on the ground floor.
![And in small room on the roof of the same building - Bras [2] - Secondary missions - Jagged Alliance: Crossfire - Game Guide and Walkthrough](https://game.lhg100.com/Article/UploadFiles/201512/2015121610230217.jpg)
And in small room on the roof of the same building.
![In Monk village [9] you can find another pieces of coltain, on the southern west - Bras [2] - Secondary missions - Jagged Alliance: Crossfire - Game Guide and Walkthrough](https://game.lhg100.com/Article/UploadFiles/201512/2015121610230287.jpg)
In Monk village [9] you can find another pieces of coltain, on the southern west.
![Another deposit is in the Temple of Kalaya Yuta [10] - Bras [2] - Secondary missions - Jagged Alliance: Crossfire - Game Guide and Walkthrough](https://game.lhg100.com/Article/UploadFiles/201512/2015121610230391.jpg)
Another deposit is in the Temple of Kalaya Yuta [10].
![To do this quest you have to control a mercenary who can open doors (with jemmy or lock-pick) - Bras [2] - Secondary missions - Jagged Alliance: Crossfire - Game Guide and Walkthrough](https://game.lhg100.com/Article/UploadFiles/201512/2015121610230364.jpg)
To do this quest you have to control a mercenary who can open doors (with jemmy or lock-pick). Talk with Mai who can be found on the northern west part of the city. You have to find her kidnapped husband who was taken to Mine [7].
![When you get there and eliminate enemies, go to the building on the northern west - Bras [2] - Secondary missions - Jagged Alliance: Crossfire - Game Guide and Walkthrough](https://game.lhg100.com/Article/UploadFiles/201512/2015121610230377.jpg)
When you get there and eliminate enemies, go to the building on the northern west. To open door you need lock-pick or jemmy. Inside you find the kidnapped husband, Jamshed. As a reward you obtain few pieces of C4. After this mission you can recruit Jamsheda.
![Talk with Pem on the south - Coastal settlement [3] - Secondary missions - Jagged Alliance: Crossfire - Game Guide and Walkthrough](https://game.lhg100.com/Article/UploadFiles/201512/2015121610230303.jpg)
Talk with Pem on the south. She'll tell you that her son Nudda, is lost. Go to Yadong harbor [1].
![In the central part of map, by the marketplace, you find Nudda - Coastal settlement [3] - Secondary missions - Jagged Alliance: Crossfire - Game Guide and Walkthrough](https://game.lhg100.com/Article/UploadFiles/201512/2015121610230436.jpg)
In the central part of map, by the marketplace, you find Nudda. Talk with him, what unlocks another mission.
![In the central part of location talk with Masoud - Khadwan [4] - Secondary missions - Jagged Alliance: Crossfire - Game Guide and Walkthrough](https://game.lhg100.com/Article/UploadFiles/201512/2015121610230432.jpg)
In the central part of location talk with Masoud. He'll ask you to inform his family about his situation. His relatives are in the Yadong harbor [1].
![When you get there, find a wooden cottage in the center of a map - Khadwan [4] - Secondary missions - Jagged Alliance: Crossfire - Game Guide and Walkthrough](https://game.lhg100.com/Article/UploadFiles/201512/2015121610230427.jpg)
When you get there, find a wooden cottage in the center of a map. Talk with Linh, Masouda's wife, what ends this mission and unlocks the one ordered by Linh (you find it in the section Yadong harbor).
![1 - Hydroelectric power station [6] - Secondary missions - Jagged Alliance: Crossfire - Game Guide and Walkthrough](https://game.lhg100.com/Article/UploadFiles/201512/2015121610230449.jpg)
![In the northern west corner of a map you find a small camp with Amir - Hydroelectric power station [6] - Secondary missions - Jagged Alliance: Crossfire - Game Guide and Walkthrough](https://game.lhg100.com/Article/UploadFiles/201512/2015121610230552.jpg)
In the northern west corner of a map you find a small camp with Amir. He orders you to find a ring.
![2 - Hydroelectric power station [6] - Secondary missions - Jagged Alliance: Crossfire - Game Guide and Walkthrough](https://game.lhg100.com/Article/UploadFiles/201512/2015121610230521.jpg)
![Ring can be found in one of chests in the middle of a map - Hydroelectric power station [6] - Secondary missions - Jagged Alliance: Crossfire - Game Guide and Walkthrough](https://game.lhg100.com/Article/UploadFiles/201512/2015121610230568.jpg)
Ring can be found in one of chests in the middle of a map.
![If there is no ring in the chest above, check chests on the roof of the northern point - Hydroelectric power station [6] - Secondary missions - Jagged Alliance: Crossfire - Game Guide and Walkthrough](https://game.lhg100.com/Article/UploadFiles/201512/2015121610230546.jpg)
If there is no ring in the chest above, check chests on the roof of the northern point.
![Another possibility is the box in the center of Mine [7] - Hydroelectric power station [6] - Secondary missions - Jagged Alliance: Crossfire - Game Guide and Walkthrough](https://game.lhg100.com/Article/UploadFiles/201512/2015121610230695.jpg)
Another possibility is the box in the center of Mine [7]. When you get it, return to Amir.
![On the north, inside the warehouse, at which youve destroyed tank, talk with Dariush - Military base [8] - Secondary missions - Jagged Alliance: Crossfire - Game Guide and Walkthrough](https://game.lhg100.com/Article/UploadFiles/201512/2015121610230601.jpg)
On the north, inside the warehouse, at which you've destroyed tank, talk with Dariush. He asks for delivering G36 and MP7.
![1 - Military base [8] - Secondary missions - Jagged Alliance: Crossfire - Game Guide and Walkthrough](https://game.lhg100.com/Article/UploadFiles/201512/2015121610230604.jpg)
![G36C is in this region, at the body of enemy in the room with supplies of guns and ammo - Military base [8] - Secondary missions - Jagged Alliance: Crossfire - Game Guide and Walkthrough](https://game.lhg100.com/Article/UploadFiles/201512/2015121610230606.jpg)
G36C is in this region, at the body of enemy in the room with supplies of guns and ammo.
![MP7 you can take from your mercenary, Fox - Military base [8] - Secondary missions - Jagged Alliance: Crossfire - Game Guide and Walkthrough](https://game.lhg100.com/Article/UploadFiles/201512/2015121610230634.jpg)
MP7 you can take from your mercenary, Fox. Return to Dariush. Now you can hire him.
![In the center of a map find Roshan - Monk village [9] - Secondary missions - Jagged Alliance: Crossfire - Game Guide and Walkthrough](https://game.lhg100.com/Article/UploadFiles/201512/2015121610230758.jpg)
In the center of a map find Roshan. When you finish, talk with him again to recruit him.
![For now on the quest is bugged and impossible to complete - Temple of Kalaya Yuta [10] - Secondary missions - Jagged Alliance: Crossfire - Game Guide and Walkthrough](https://game.lhg100.com/Article/UploadFiles/201512/2015121610230734.jpg)
For now on the quest is bugged and impossible to complete. On the south, in the house at the first point to take over you find Shenyen. If you bring him Scimitar, he'll join you.
![If youre lucky, one of your enemy at the place youre right now will have a sword - Temple of Kalaya Yuta [10] - Secondary missions - Jagged Alliance: Crossfire - Game Guide and Walkthrough](https://game.lhg100.com/Article/UploadFiles/201512/2015121610230764.jpg)
If you're lucky, one of your enemy at the place you're right now will have a sword.
![When you liberate all region, you can talk with Arjun - Temple of Kalaya Yuta [10] - Secondary missions - Jagged Alliance: Crossfire - Game Guide and Walkthrough](https://game.lhg100.com/Article/UploadFiles/201512/2015121610230741.jpg)
When you liberate all region, you can talk with Arjun. He'll tell your about enemy's reinforcements who will attack Yadong Harbor [1] and order you to find three artifacts. Remark: you have three days to bring artifacts. You can get them before the mission begins, so it's worth to have them when you begin this mission.
![Go to Khadwan [4] where on the northern east you find Jay - Temple of Kalaya Yuta [10] - Secondary missions - Jagged Alliance: Crossfire - Game Guide and Walkthrough](https://game.lhg100.com/Article/UploadFiles/201512/2015121610230889.jpg)
Go to Khadwan [4] where on the northern east you find Jay. Talk with him twice, and he'll give you the first relic.
![The second relic is a ring from the mission The dealer's reward (if you completed this quest, you can rebuy item from the owner), which can be found in Hydroelectric power station [6] or Mine [7] (details in the paragraph dedicated to the mission The dealer's reward) - Temple of Kalaya Yuta [10] - Secondary missions - Jagged Alliance: Crossfire - Game Guide and Walkthrough](https://game.lhg100.com/Article/UploadFiles/201512/2015121610230845.jpg)
The second relic is a ring from the mission The dealer's reward (if you completed this quest, you can rebuy item from the owner), which can be found in Hydroelectric power station [6] or Mine [7] (details in the paragraph dedicated to the mission The dealer's reward).
![The last item you need is a scepter - Temple of Kalaya Yuta [10] - Secondary missions - Jagged Alliance: Crossfire - Game Guide and Walkthrough](https://game.lhg100.com/Article/UploadFiles/201512/2015121610230880.jpg)
The last item you need is a scepter. It can be found in various places.
![First option is a chest on the southern east in Yadong harbor [1] - Temple of Kalaya Yuta [10] - Secondary missions - Jagged Alliance: Crossfire - Game Guide and Walkthrough](https://game.lhg100.com/Article/UploadFiles/201512/2015121610230867.jpg)
First option is a chest on the southern east in Yadong harbor [1].
![Another one is a chest on the east of Coastal settlement [3] by the truck - Temple of Kalaya Yuta [10] - Secondary missions - Jagged Alliance: Crossfire - Game Guide and Walkthrough](https://game.lhg100.com/Article/UploadFiles/201512/2015121610230921.jpg)
Another one is a chest on the east of Coastal settlement [3] by the truck. Having three artifacts return to Arjun in Temple of Kalaya Yuta [10] to finish the quest.


 Just Cause 3 Game Guide & WalkthroughJagged Alliance: Back in Action Game Guide & WalkthroughJagged Alliance: Crossfire Game Guide & WalkthroughJust Cause Game Guide & Walkthrough