
Introduction
Guide for Jagged Alliance: Back in Action contains advices about liberating particular territories of Arulco and many hints referring to choice both proper mercenaries and equipment. What is more, in this guide you can find map of Arulco with legend including all locations.
Jagged Alliance: Back in Action gives various possibilities in choosing mercenaries and equipment to reach your goals. Furthermore, sequence of completing missions and taking over the locations can differ from this presented below. In connection with that, presented solutions aren't obligatory, but they allow you to complete the game without problems.
Besides, for making easier distinguishing particular elements of this guide, various colors were used:
italics - missions
black - locations, important remarks and keys combinations
(number) - footnote to the illustration above
blue - mercenaries
brown - common items
green - characters and items connected with the mission
orange - abilities, attributes
()

Hints below let you get through locations without problems, that's why it's a good idea to learn them before beginning fighting with Deidranna.
* At the beginning do not recruit many mercenaries. It's better to have two-three well equipped and trained men.
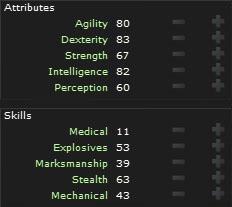
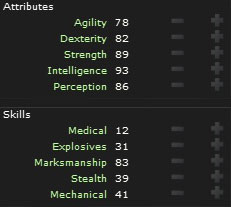
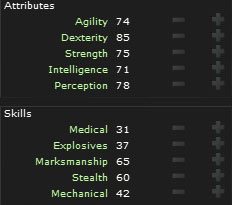
* Later, during creating you main squad, make sure that you have at least one shooter (marksmanship), medic (medical), sapper (explosives) and mechanic (mechanical). Those functions can be mixed, but remember that high effectiveness in one field requires focusing only on it during assigning training points. According to the solution below, roles of shooter and medic go to the Thor. Among sappers you should choose Red. And if you had enough money, hire Static (mechanic).
* Make sure that specialists mentioned above have proper tools (bandages, lock-picks etc)
* Besides medic, it's worth to have in a squad a mercenary with medical at least on 20 and with the syringe in the backpack. In case of medic's death, we can try reanimate him.
* Mechanic should have at least one weapon oil (used in case of small wear of a gun), cleaning set (used when the bar of weapon's endurance is yellow) and Tool box (used when weapon is in the tragic condition).
* Don't count only on bandages. In case of bleeding or wound it'll be necessary to use First Aid Kit. It's worth to have at least one in the backpack.
* Because of bleeding (drop of blood on the portrait) mercenary loses HP, and when he's wounded (red cross on the portrait) his strength decreases.
* After reanimation maximum HP of character (green bar) is decreased. To regenerate it, speed up the time and not move the squad.
* After longer wandering the maximum energy level (red bar) also decreased. It regenerates like the HP.
* Every mercenary should have at least two types of ammo to his weapon. In case of salvo fire we should have twice as much of ammo.
* In case of machine guns we can switch between single shot and salvo fire. To do it, click icons on the right side of the screen (single bullet/three bullets).
* As we can't repair our clothes, we should remember about changing them often. If we don't have an opportunity to change used wear don't throw them out, because they still increase our camouflage level (it doesn't concern Kevlars).
* Send one of the weakest mercenaries to transport items connected with the storyline and supplies from the Northern Airport.
* It's worth to regularly get clothes and specialist equipment from the internet shop. Delivery lasts long, so do it before your supplies run out.
* We save the game after every fight and, what is more important, before seizing the location.
* It's always profitable to recruit free mercenaries, even if they're weak. We can train them or use as a couriers/porters.
* Militia arming provides not only protection before Deidranna's patrol attack but also increases loyalty level of the location. To train a militia man, you need to give a weapon to the person with an icon of the blue fist over his head in the conquered location.
Requirements for medicaments:
1. syringe - 20 points of medical
2. bandage - 40 points of medical
3. first aid kit - 50 points of medical
4. big first aid kit - 80 points of medical
Requirements for mechanic's items:
1. weapon oil - 10 points of mechanical
2. cleaning set - 30 points of mechanical
3. locksmith kit - 40 points of mechanical
4. tool box - 50 points of mechanical
Requirements for sapper's equipment:
1. mine - 25 points of explosives
2. mine disarming cet - 50 points of explosives
3. C4 with a clock - 50 points of explosives
4. C4 with a pilot - 75 points of explosives
Additional suggestions referring to equipment and mercenaries are set in the beginning of all locations' description.
* Rotate camera (ALT+mouse) and zoom (wheel) to reconnaissance. We should pay attention particularly to issues such like terrain, roofs' entrances, walls to blow up, windows' localization and patrols' paths.
* During reconnaissance firstly check if there is any elevation nearby enemies. If yes, move your squad there and start firing from a lying position. Simultaneously avoid fighting uphill (in such cases try provoke enemy to go down).
* Avoid charging on buildings: enemies often sits nearby windows, what let to get rid of them easily. We can also blow up walls to smoke out opponents with grenades.
* But if we are charging on the building, use the mercenary with a shotgun and grenades. Use covers like desks, chests etc.
* Try to eliminate enemies one by one. If we decide to lure enemy to our fire range, make it in a way which will make impossible attacking us from back or sides for him. If it can't be done, locate your men in places from which they will be able to move quickly.
* Tanks have very big range of view. If we can't attack it from side, try to manoeuvre one of mercenary to get him of the tank's sight. In the same time, the other one with the LAW fire from the direction opposite to the rotating of the barrel.
* When enemies are healing, throw grenades: they can't avoid them.
* If Deidranna's troops still harming one of location, prepare additional squad to defend it. Knowing from where enemies will rush, mine an entrance to the location. Remember, to not set up mines where militia troops are wandering: our mines don't affect mercenary squads but they blow up in a contact with civilians and militia.
* Basic targets of enemy's patrols attacks are Roadblocks and Surface-to-air missiles Stations but sometimes about which of our location will be attacked decides how much it's on the south (because patrols set off from the southern-west corner of the map, Deidranna's Palace).
* When we are shooting at enemies in buildings or behind obstacles, remember to rotate camera during the tactical pause: maybe you'll see an opportunity to make an accurate shot.
* During liberating locations, firstly eliminate single patrols, which are easy targets.
* Taking over the strategic point (flag in a circle on the minimap) also attract an attention of the closest enemies, so be sure they'll rush on you.
Detailed hints about fights are included in locations' descriptions.
Remark: Locations in which we meet tanks are marked with an exclamation mark. Number after the semicolon is a daily income provided by the particular location with 100% loyalty. Level of loyalty can be increased by arming militia. In case of line, there are no incomes.
1. Junk Yard (San Mona); 100 $
2. San Mona; 3000 $
3. Kingpin's Mansion; -
4. Farm (Kingpin's); 300 $
5. Hideout (Kingpin's men); -
6. Northern Airport; 300 $
7. Road Block I; -
8. Drassen; 1500 $
9. Hideout (Miguel); -
10. Farm; 250 $
11. University; -
12. Hospital; 250 $
13. Cambria; 2160 $
14. Mine; 7500 $
15. Water Pump; -
16. SAM Station; -
17. Road Block II; -
18. Industrial Park (Grumm); 6343 $
19. Supply Depot (Grumm); -
20. Grumm; 1900 $
21. Road Block III; -
22. Estoni; 303 $
23. Dumped Containers; 150 $
24. Hideout; -
25. Crushed Truck; -
26. Barracks; -
27. Docks; 1500 $
28. Prison (Alma); -
29. Alma; 5000 $
30. Beach Promenade; 250 $
31. Supermarket; 250 $
32. Laboratory; -
33. Hideout; -
34. Supply Depot (Tixa); -
35. Prison (Tixa); -
36. Stakeout Post; -
37. Road Block IV; -
38. Restaurant; 500 $
39. Gas Station !; 800 $
40. Road Block V; -
41. Hideout; -
42. Road Block VI; -
43. Balime Slum; -
44. Balime !; 3000 $
45. SAM Station II; -
46. Southern Airport; 600 $
47. SAM Station III; -
48. Meduna; 2000 $
49. Maze !; -
50. Deidranna's Palace; -
To provide yourself a better start in Jagged Alliance: Back in Action we should firstly visit locations specified in this subchapter. Thanks to that, we'll start conquering other parts of island with good equipment.

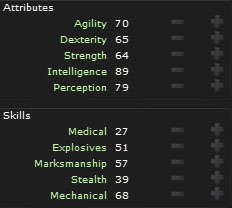
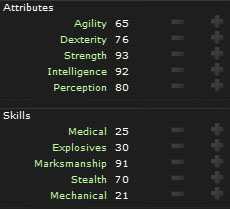
Suggested mercenaries: Thor (shooter), Red (sapper)
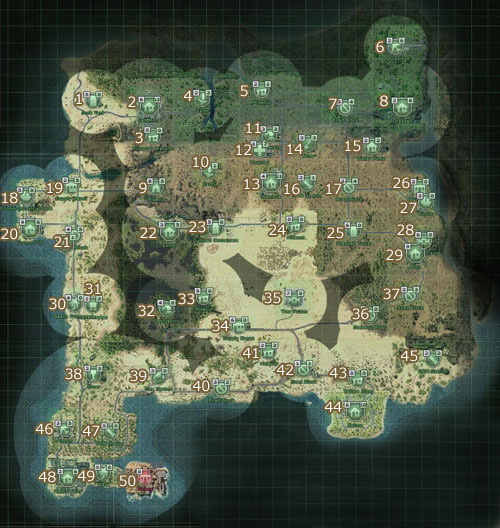
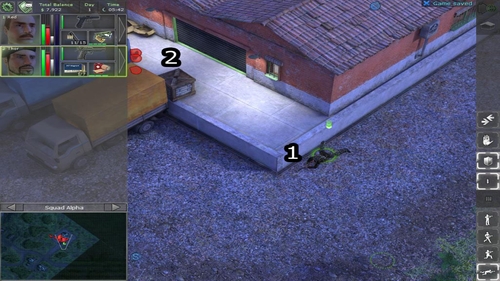
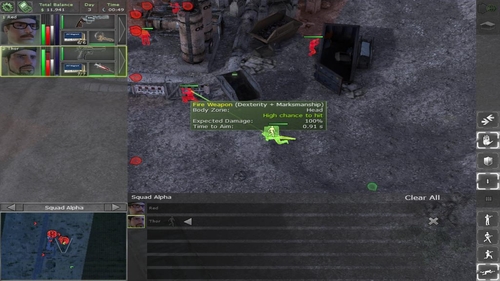
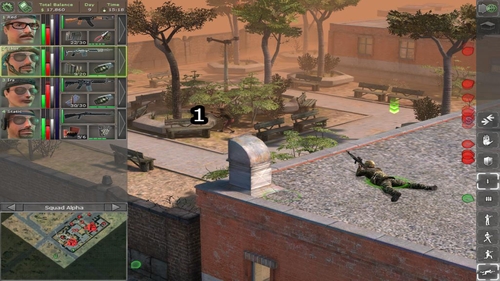
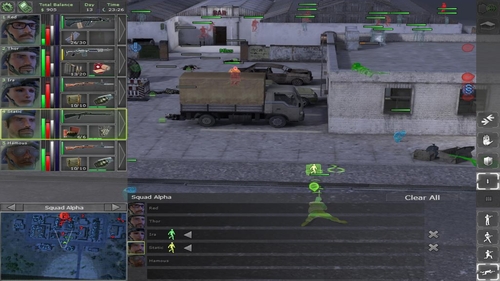
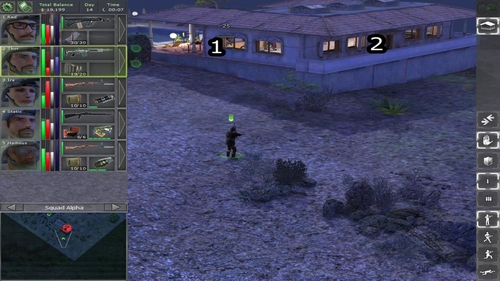
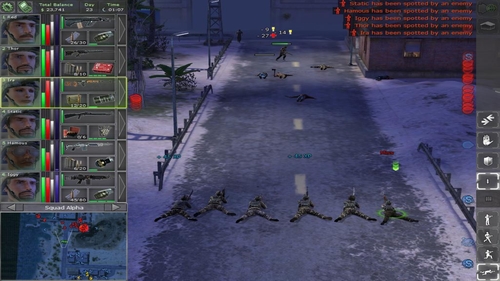
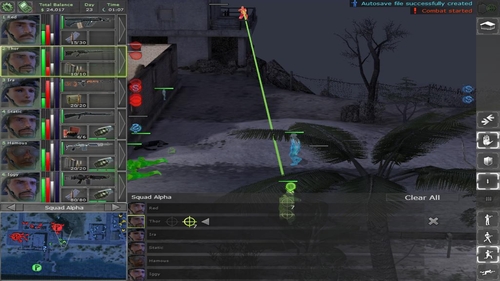
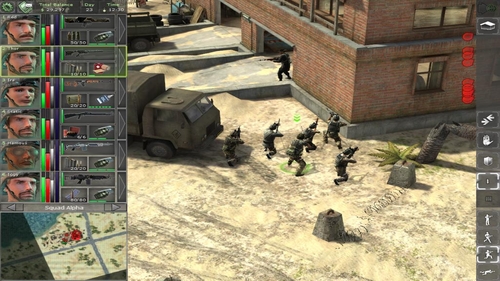
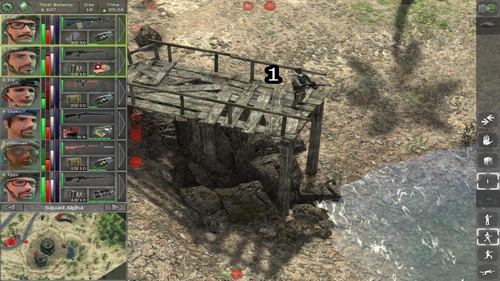
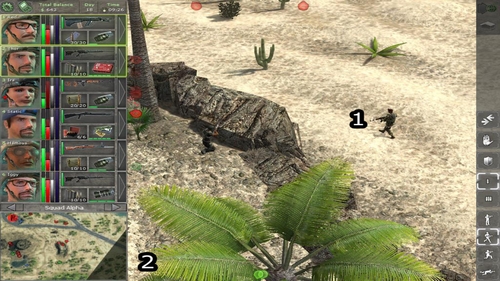
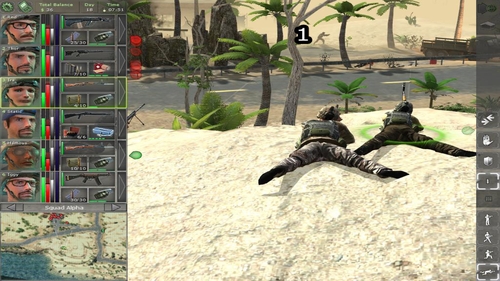
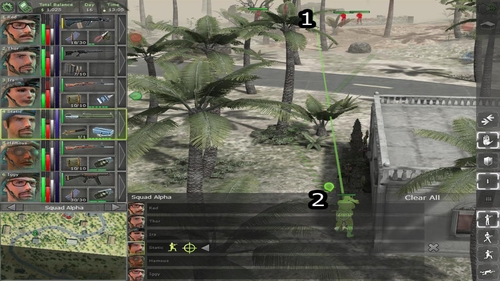
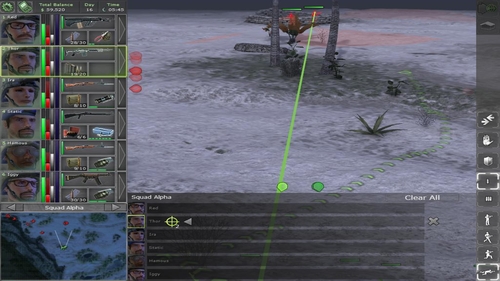
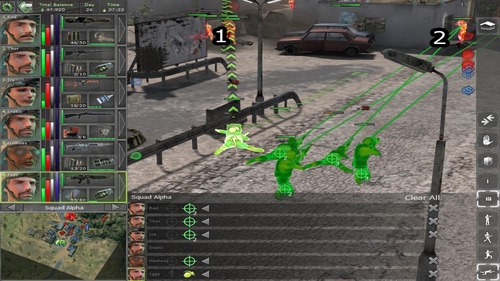
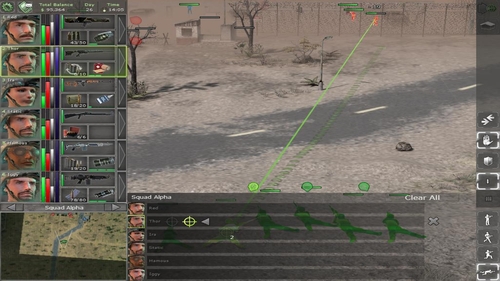
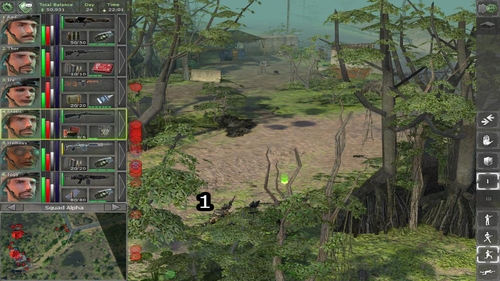
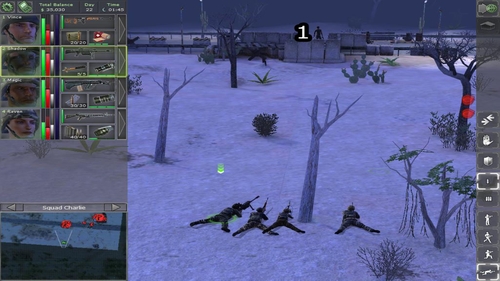
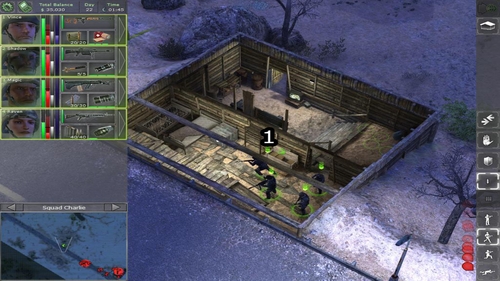
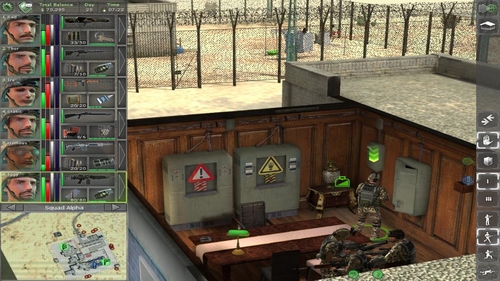
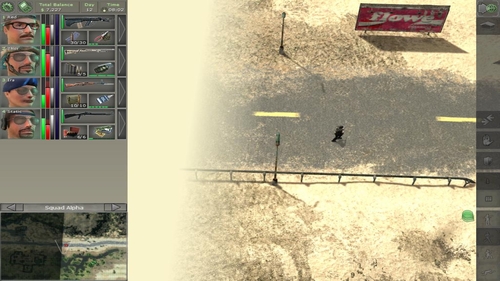
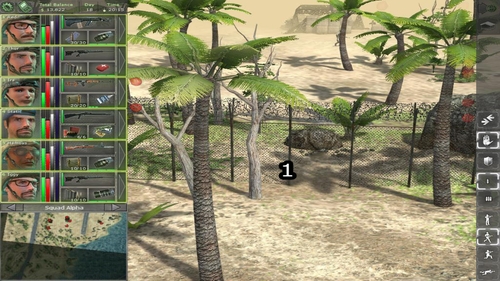
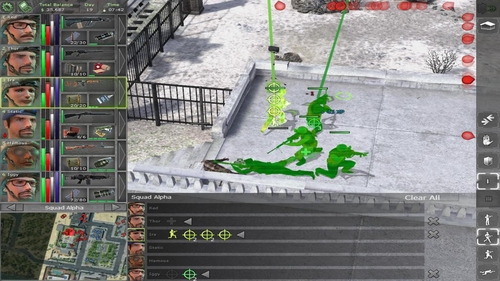
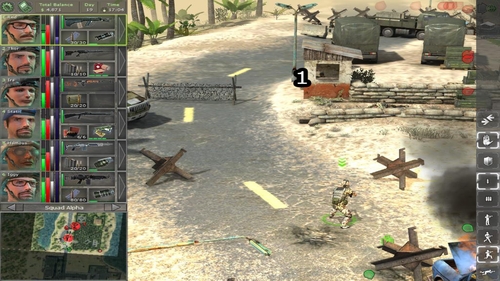
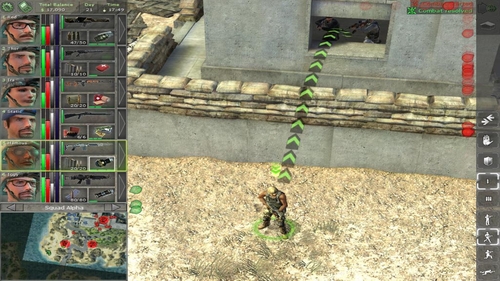
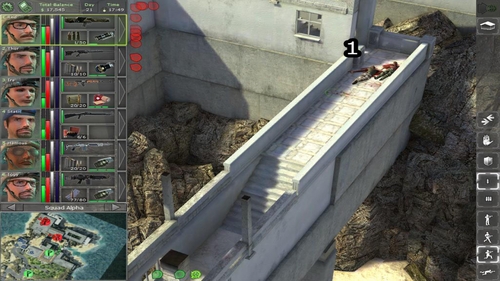
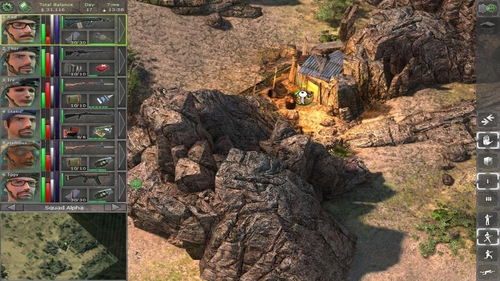
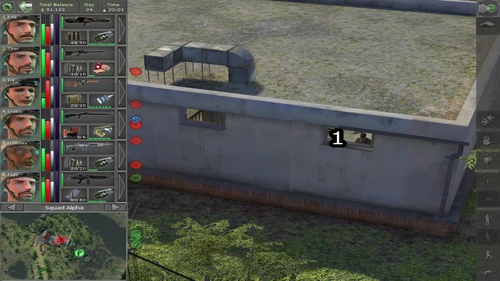
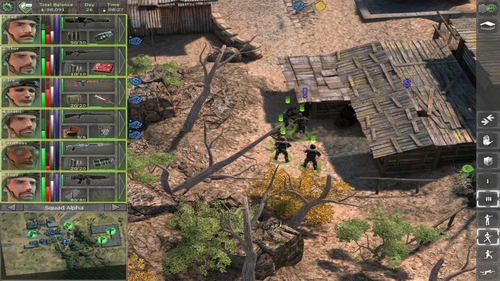
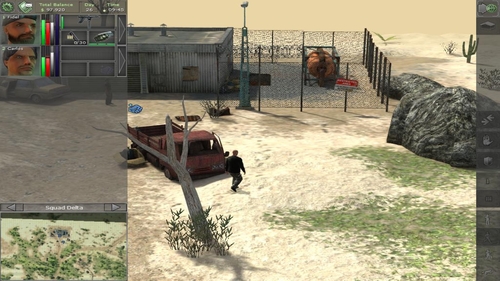
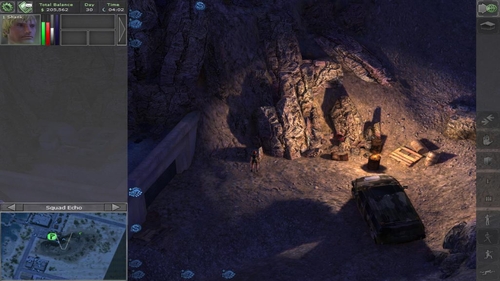
Northern Airport is an essential location for our operations. Taking it over let us buy from an internet shop and recruit more mercenaries. To tell the truth, we need only Thor in this mission, but taking Red is useful because of two reasons: we let us gather more equipment and secure our backs. But moving to our main soldier: Thor is specialized in the stealth and also has marksmanship and medical what makes him an ideal killer. Thanks to the fact, that he has Deagle pistol with the silencer he can, theoretically, kill all enemies one after another without starting open fight. Firstly we should clean up insides and surroundings of the quarters, and finish at the manager's office (nearby plane) and hangar. How to do it? For instance we can crawl our soldier under the window of the building with enemies inside it (1) then crouch and fire few times...
Remark: In the equipment, the silencer is in the separate slot. Remember about it during changing weapons, because if it's not compatible with the particular kind of guns (e.g. shotguns) it's put back to the backpack.
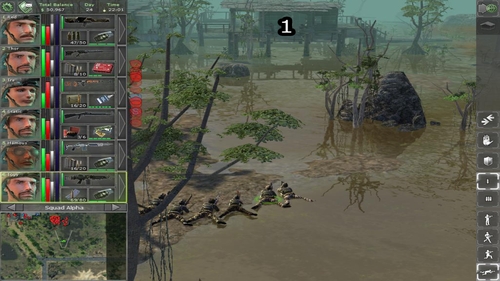
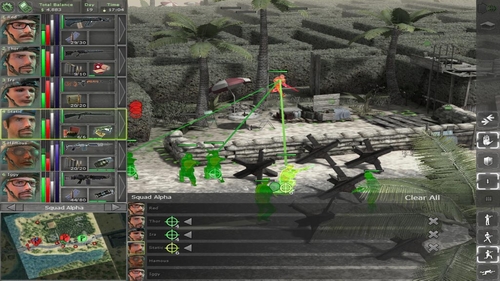
... we can also use Red to set up the mine, and then make a noise by running to make enemy step on the mine. If we want, we can try kill one of the opponents by blowing the wall in the particular place (1) (using C4 with a clock). Unfortunately, Red isn't as good in stealth as Thor, because of what soldier standing nearby that wall may see what is happening and avoid death.
Remark: During creating mine-trap remember to choose the place which enemy will surely choose as his path. In this particular example it's clear that an opponent who hears noises outside will run through the doors (2) and then sprint along the wall without hesitation(3).
It's worth to pay attention to the patrols at the beginning of every mission. If we see that enemy is constantly walking around the building we can hide out of his sight range (1) and when he step into our fire range, kill him (at short distances use shotguns; in barracks we'll find one of these, M870, and also light Kevlar with rest of clothing).
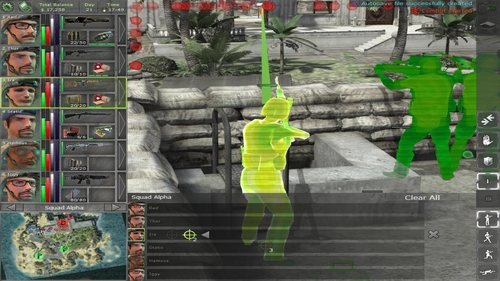
In case of manager's office, it's best to use both mercenaries. We can just crouch nearby the plane and, using a tactical pause, synchronize the fire (we have to zoom the camera and direct it at the building. Only in that way we'll be able to fire at soldiers inside). Or, what is more risky, but sometimes can be more profitable, use one of you soldiers as a bait. Make him run in safe distance from an enemy, but let him be noticed, and then sprint to your second, well prepared soldier (crouching/laying behind a cover with reloaded and aimed M870) who will kill the chaser. Whereas the hangar, when the rest of the area is cleaned up, we seize only with Thor and his Deagle. When we conquer the airport, we go to the manager who allows us to trade with Waldo who is in the hangar.
Final remarks:
- Holding control over the Northern Airport gives us an opportunity to sending supplies and hiring new mercenaries.
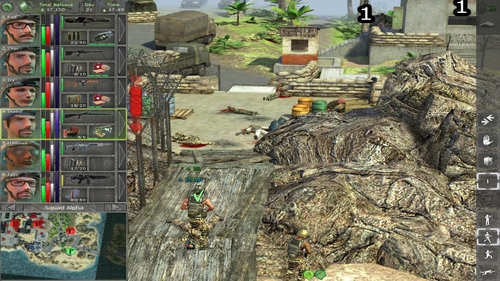
It's the first village we meet on our way of liberating Arulco. Firstly, focus on the factory in the northern-west part of Drassen. Of course, kill single soldiers on the way. You shouldn't have problems with attacking their backs with Thor. When you get closer to the factory, try to crawl unnoticed (Thor) to the marked place (1). Leave Red lying nearby with M870: in case of troubles he'll be a nice support. When enemy walking on the landing turn back, tell Thor to get up and fire him. This kill will alarm rest of guards so make him lay again. Now we have to be careful: if opponents will try to circle the landing, recall the Thor and prepare Red to fire. If any of enemies is still in the building, make an ambush. Order one of mercenaries to stand with gun aimed to the doors and the second one to run around the building. After eliminating all of them, move south.
Remark: If there is no enemy on the landing, try to circle the building and attack from the west, hiding behind the corner of the house or obstacles. But be careful, because enemies are better equipped. And try to make a stealth attack (Thor).
For the time being we ignore all enemies nearby the house on the east (1) and head to the church. To do that, move mercenaries south but keeping on the west edge of the map. On the south eliminate all enemies quietly (preferably by the shot in the head from short distance) and to kill patrols next to the cemetery use both your soldiers.
If we don't alarm enemies in the region of the last one building from southern-west part of Drassen we can try stealth nearby cars and kill enemies easily (1). But watch out for soldiers with the melee weapon (2) because they're the strongest ones. Best to kill them from a long distance.
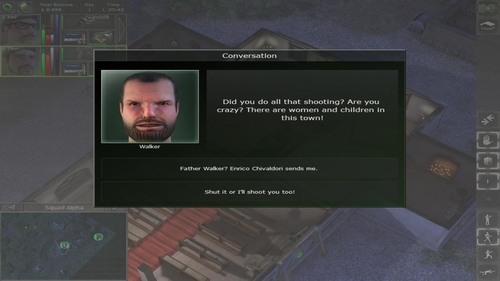
At the end, we take care about enemies from the house on the east and the church (if there are any). Besides charge at the building, think about a trap. Prepare one of soldiers in the front of the entrance and try to lure opponents by making noise with the second one. Direct attack is the worst solution: remember, that Red should take most of shots on him, because in case of need Thor can reanimate him. Later search all location and sell the useless items to the trader in a bar. When we finish it, go talk with the Father Walker in the church, what begins series of missions.
Final remarks:
- It's worth to recruit maximum number of militia here, because it's the last one station before the Northern Airport.
- On the way from Drassen to next locations we can attack Road Block I but it'll be quickly attacked by the enemy's patrol. On the other hand, we can re-take this sector for additional experience.

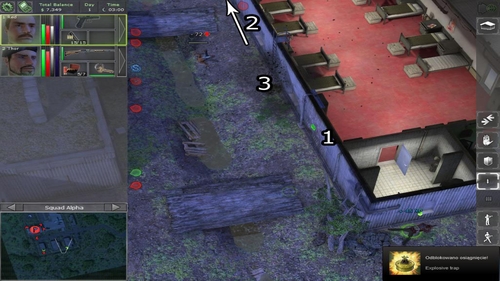
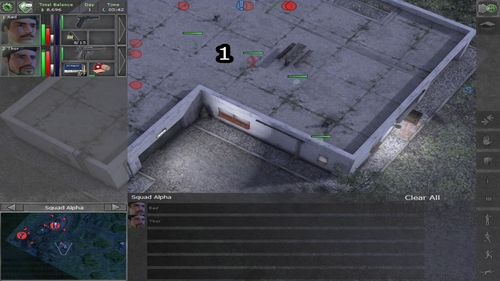
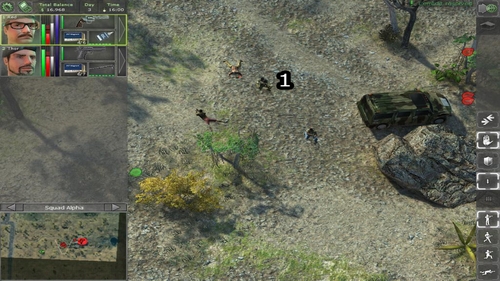
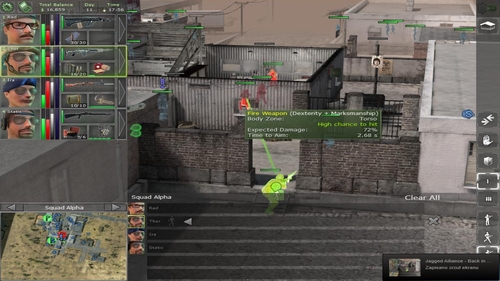
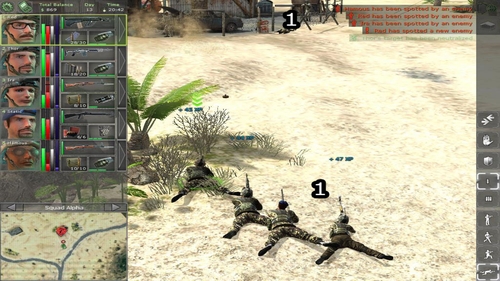
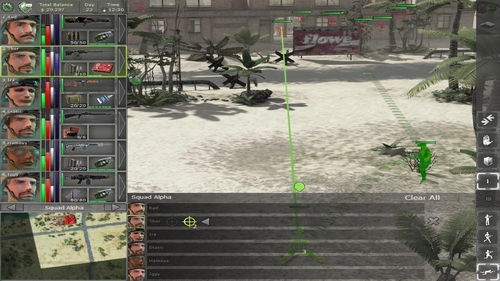
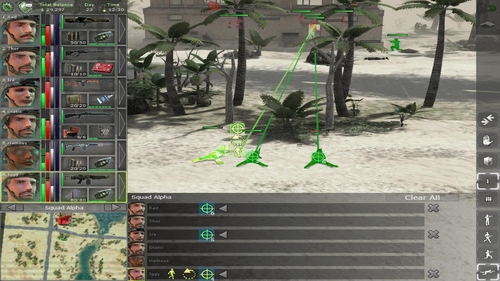
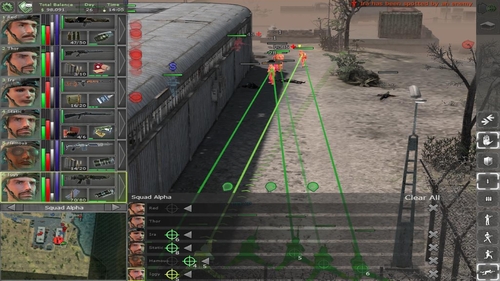
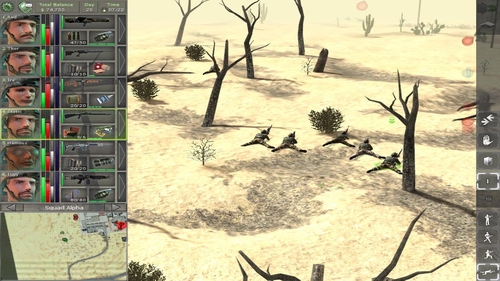
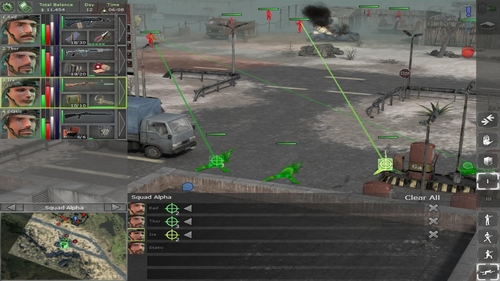
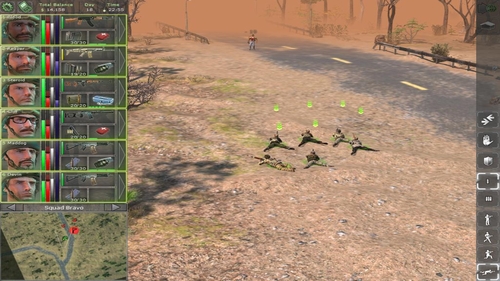
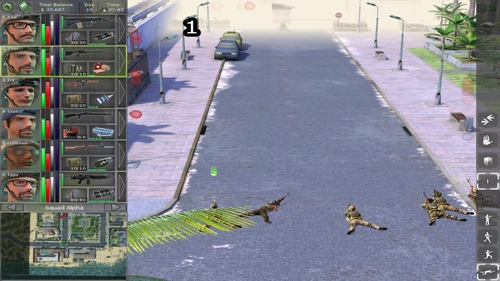
This is the third location we have to conquer. When you get there, set your people north of the road (1), lying. Thor should hit enemies on the roof without problems from there. If they get to close, make Red join the encounter.
Then send Thor south, without being noticed by enemies. He has so high stealth, that he can get rid of enemies by sneaking from the back to them and fire in the head (illustration). What remains, is a matter of few enemies in the building: we kill all of them in described above way or from distance, always in lying position. So attack with both mercenaries, and they won't be able to defend.
Another location we have is a Water Pump. And if the most of enemies aren't challenging, the one has NF-FAL rifle(1), which we want to get for Thor. Attack from north is a suicide, so try with few provocative actions lure enemies to go out from the buildings area (1). Although it won't be easy, we have to make an attempt to kill enemies without loses from behind covers. If opponents get closer, we can draw back to the safe place and heal. If we kill enemies, who were standing on the roof, the rest of soldiers won't be a problem.
Having Static in the squad, it's good to move back here, because locked house on the north is notable: we'll find there lot of weapons and ammo.
Final remarks:
- After liberating Water Pump move to the Drassen to join Ira. Although she is not a great soldier, she'll be useful as a porter and secure. If we want, we can swap her later.
- Recruit Static (mechanic) ASAP.
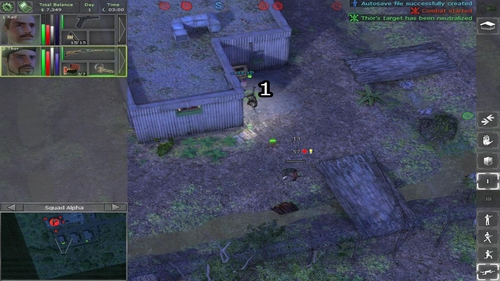
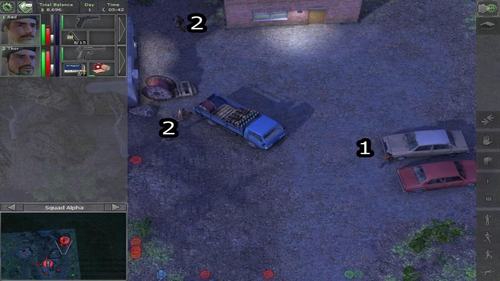
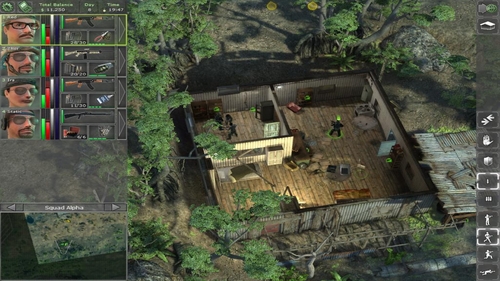
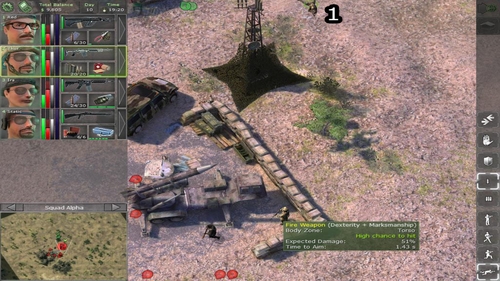
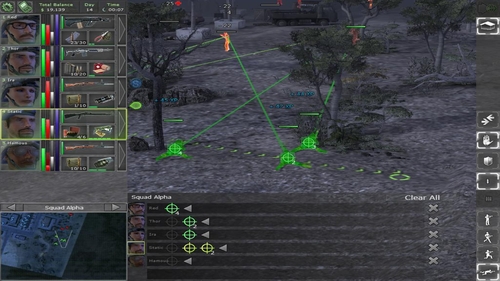
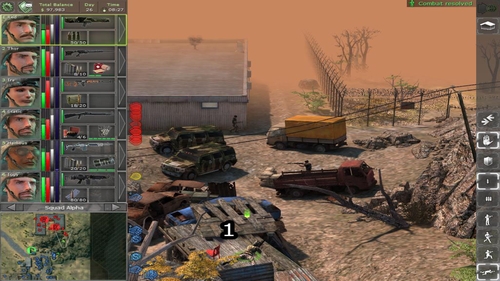
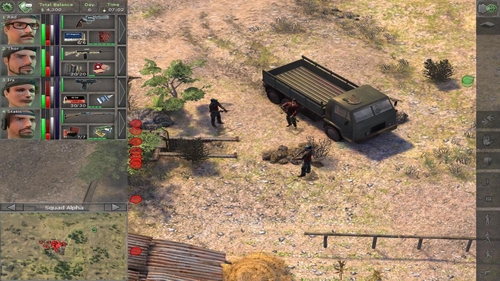
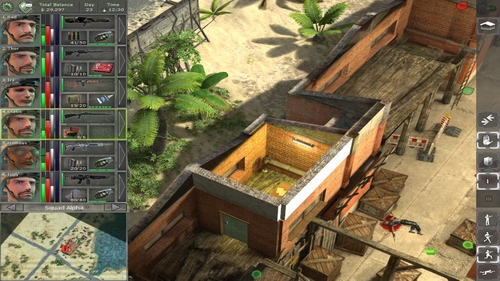
From the point of view at the beginning phase of the game Farm is a very important stage. Here we get first good equipment (cellar). Basing on a fact that only Thor has decent rifle, NF-FAL, collected in the Water Pump we send him on the southern edge of the Farm on a convenient shooter position (1).
If we can't hit anyone from this position, move on the bridge, from which we'll kill enemies from the near house (1).
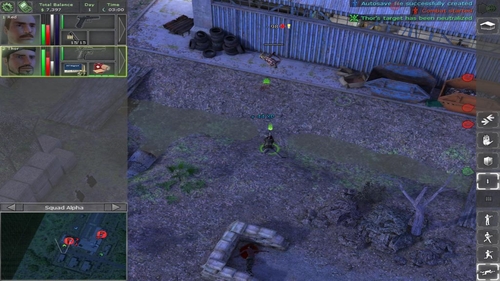
The most dangerous enemies are those by the truck. They have bigger firepower and shorter reload time guns so we have to shoot them out from a distance. From a position shown on an above illustration you should make it without problems. But keep Red nearby in case of difficulties.
Last enemies are in the cellar. Be careful, because one of them may have an axe (especially dangerous). In such case draw back, to kill him from a distance. In the cellar opponents have great covers (barrels, chests etc) and a chance of hit is very small. Nevertheless, try to kill them using NF-FAL. After that, you can enjoy your first serious arsenal.
Required equipment: C4 with a clock, set of grenades
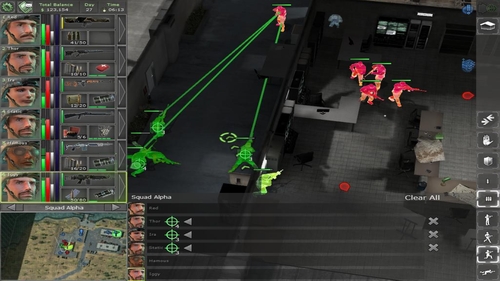
We'll attack University from a right bottom corner: thanks to the hole in the wall we'll be able not only to kill nearby enemies (1) but also get on the roof. Two of our soldiers we sent there (including Thor) rest of them guards the ladder and the breach.
After killing all enemies on the roof, start eliminate those in the vicinity of the University (1). In such way, nervous people from the building on which roof we are will run out in one place...
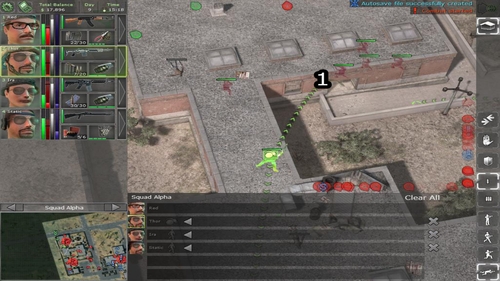
...what allow us to get rid of them with the grenade (1). Of course not all of them will die, but with 1-3 enemies with low HP our men will solve the case perfectly. If there are any enemies in the northern-west part of the University move there with all the squad. You shouldn't have problems with them.
Required equipment: C4 with a clock, set of grenades
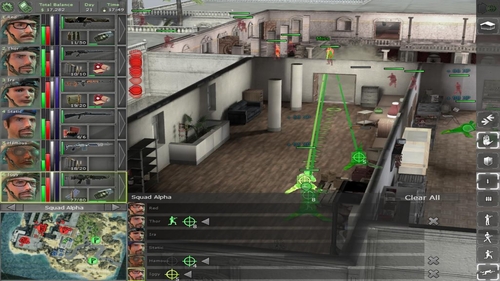
Just after seizing University we head to a Hospital. It's best to attack the building from the south. There you can kill patrol quietly from an ambush (1). Our goal is roof where we send all team.
Thanks to mercenaries with Steyr and M-14 we'll shoot enemies on the lower roof one by one (1). Rest of the group play as a support if opponents get too close.
Remark: There are windows in the roof through which we can be hit by the men inside, so be very careful.
The last one element of taking over is going into the building. It's better to resign from the main entrance for the back gate (nearby ladder) or the wall we can blow up (illustration). You need to take into account that enemies will be waiting with guns aimed at. In such case, use grenades: even if they don't kill, they made enemies run. And running chickens are the perfect target.
Final remarks:
- In Hospital we'll find a lot of medicaments. It's worth to replenish supplies and go back here if we need to.
Required equipment: locksmith kit, C4 with a clock
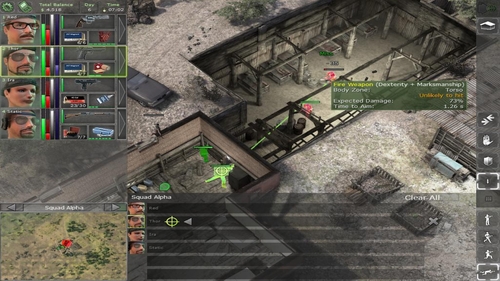
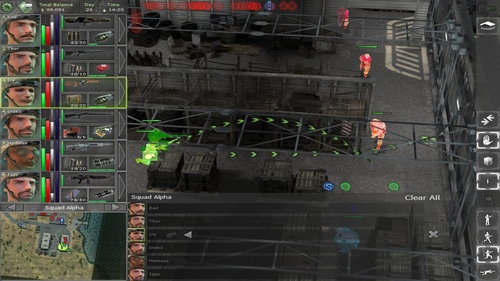
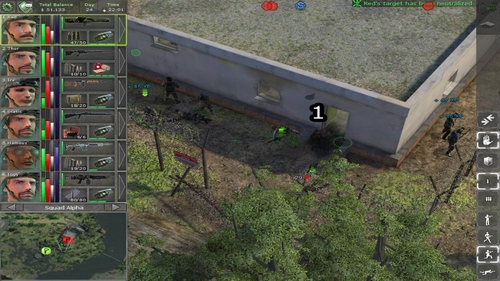
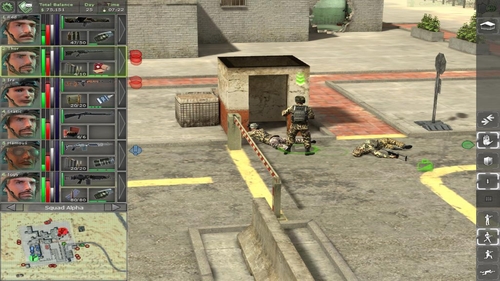
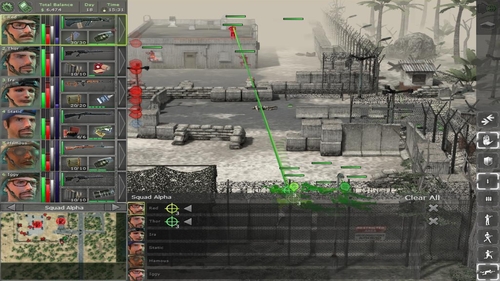
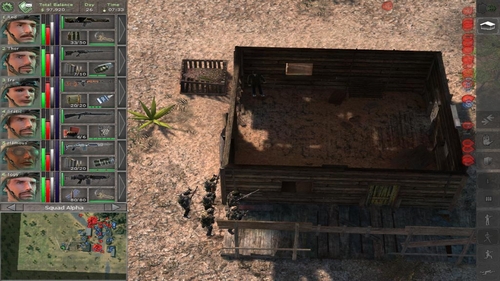
Cambria should be attacked from the east, because from this side we'll meet only few single patrols. When we get rid of them, we should focus on the first strategic point: a prison. Place one or two soldiers (1) in a way which allow them to eliminate alarmed enemies running from the prison (2). It's a good idea to go into the house from the illustration, because we can shoot through the windows. When only opponents from the inside of the jail remain, use the C4 with a clock (Red) to destroy the wall.
From the northern side it's worth to attack with Thor. Taking into consideration fact that he is the best shooter in our squad, he'll easily eliminate even those enemies only partially seen through the window or the open doors (1). We can also attack the prison from three sides (east, north, south. For the last one mechanic is required because the doors are locked).
Before we attack bar, send Red with Steyr on the roof and then with single shoots try to kill opponents in the windows. Even if we can't do so, we can back here when the back wall of the bar will be exploded.

During that, Thor equipped in M-14 and Static with NF Shotgun would be sent to get rid of enemies from the house a little on west from the jail. Let Thor kill opponents in front of the building and those in windows and secure him with Static placed nearby doors (if someone run out of the house, Static kills him faster than Thor).
When we eliminate all enemies from the house, the last remaining building will be bar. After blowing up the wall we can move back Red on the roof and make Static secure the breach. Whereas Thor can be sent to the place shown on the illustration. Thanks to that, all exits will be secured. To smoke enemies out (if any remains inside) make a noise. If it doesn't help, storm the bar (Static and Thor from the breach side, Red from the street).
Final remarks:
- With regard for wide assortment it's worth to visit the merchant in the southern-west part of the city.
- Cambria is a city which will be attacked most often at the certain stage of the game. So it's worth to call up another squad to protect it and equip local militia.
Locations below require better equipment. We move to this location only after conquering the beginning ones. On the contrary to the previous subchapter the sequence of taking over doesn't have to be like presented in the guide.
Road Blocks are single enemy's posts conquering which let us move quicker (we can use main roads). Taking over looks similar in every case, and that's why there is a little about them in this guide. And as both those and Hideouts are easy to seize, we can allow take them over for Deidranna's soldiers just to gain additional experience for our weaker soldiers. But if you have any difficulties, look to the General advices and use proposed tactics in analogy.

It's the only location on the island which is not connected with the fighting. Whereas it's a source of missions, which can effect with recruiting Miguel and Dymitri.
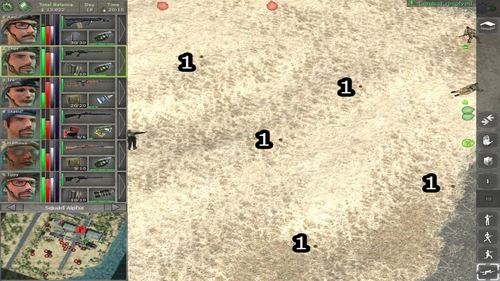
Although there are not many of soldiers in here, those are well equipped army men. What is more, distance between particular enemies is so small that if we attack the single one, we'll alarm rest of them. What we can do is placing Thor in a good position for the first shoot (1) and rest of the squad in a way which allow them kill running enemies quickly. Before we go for that mission, buy (at least) light Kevlars for all in the squad.
Final Remarks:
- SAM Station I should be first army-controlled location we meet. But before that visit Farm where you'll find a proper equipment.
- Every SAM Station greatly increase our sight range. It's useful because it help us spot enemies earlier. That's why keeping this locations should be our priority.
Suggested equipment: several mines, one set of grenades for every mercenary, at least one (random) C4.
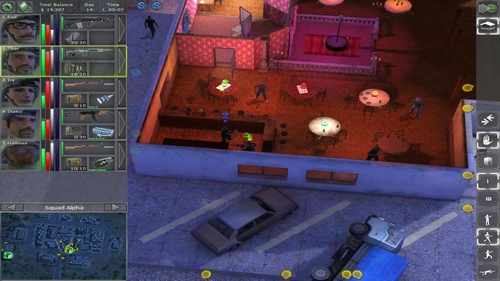
Entering the San Mona from the west, eliminate all single patrols and sent only Thor on the north. At the hem of the road, lying between shrubs, he'll be well camouflaged to kill enemies one by one. And they won't know from where the shoots gone.
The rest of our team should focus on the place shown above. Locate on the roof two best - besides Thor - shooters. Leave the Static on the street to have a ladder in a range of fire: if any of enemies will try to get up by the ladder, Static will have to kill him. It's good idea also to mine surroundings of the club's entrance and ladder.
Remark: Watch out for grenades which enemies can throw on the roof. Luckily it's big enough to run away before the explosion.
When few enemies remain, we can send Red on Thor's position and start moving in the direction of main entrance to the club (1). When only few of opponents are in the club, we can storm it from both entrances.
But if we have problems with soldiers going out from the club and for instance hiding behind the wall (1) we can temporarily send Thor on a roof of a building on the south from the club (illustration).).
Final remarks:
- After destroying wall shown on the illustration above, we get to the shop of two merchants with quite big assortment. We can buy good armament, grenades or specialist equipment.
- San Mony is directly connected with the Kingpin's Mansion so it's worth to go there.
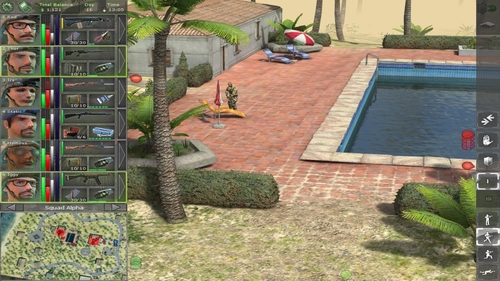
After seizing San Mona the time will come for Kingpin's Mansion. Although we want to talk with him, we have to eliminate all of his people. Begin from the western side, moving along the grass. When you finish all enemies there, move little north.
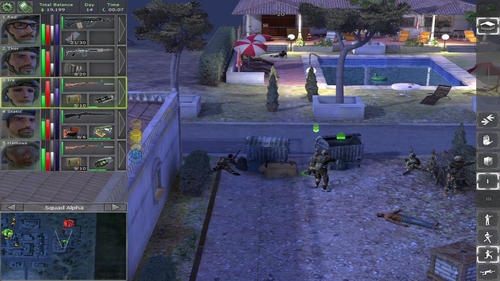
There will be few skips, from behind which we can fire to the bodyguards around the swimming pool. Use to that all soldiers except Thor.
Thor should move, along the southern edge of the location, to the place seen on the picture above. From this position he'll not only try to eliminate few enemies inside the house (1) and on the balcony (2), but also support the rest of the team.
Final remarks:
- In case of serious wounds, move your team back in the safe place and attack again. Kingpin's bodyguards have good kevlars and big firepower so take into account big consumption of ammo and, perhaps, HP. Necessarily change the cloths before the battle!

This location we attack from the northern-west edge of the map. With help of best shooters, start firing at visible enemies. Part of them will run into your direction: it's an opportunity for the rest of the team. Whereas Thor will try to do in another enemies. Truth to say, walking around this location and hiding behind covers we can eliminate all enemies without any direct fight. But if we don't want to lose much time, we can storm if there are 3 enemies max.
Suggested equipment: Mine disarming kit
This location is a piece of a cake. Firstly, move to the hut on the north, where you can find an equipment. Then locate people in a way which links their barrels in a straight line with soldiers on the junk yard (1) and start firing. Almost all enemies will be shot down like ducks. If any survives, change position for more proper one.
Final remarks:
- There is a lot of equipment in the hut on the north
Required equipment: grenades, gas grenades, smoke grenades, locksmith kit
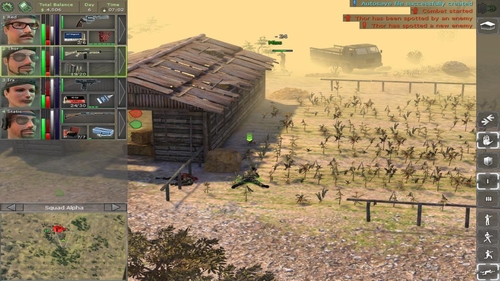
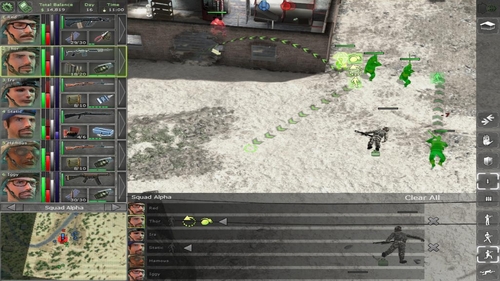
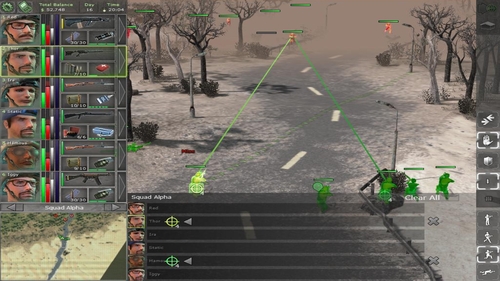
Grumm we attack from the east. Firstly, go into the lane on the south. Set up all of our soldiers, (lying) at its beginning. All besides Thor who has a special task. When he reach Fatima (quest-giver), tell him to crawl to the sentinel at the end of the illustrated above land and eliminate him. From such position he can start firing at enemies on the market square (1) and on the opposite roof. Enemies will run at us, heading directly upon rifles of our comrades, so eliminating them will be very easy.
Remark: Below the lane on which we place Thor is a house with an enemy inside. If he spots our man, he'll attack him. In such situation move Thor back for a moment.
If we eliminate all enemies form roofs around the market square, send two shooters with grenades there. Beware of patrols at the main street. From the roof we get rid of survivors on the market square...

...and then we focus on enemies in a building (1). We can do in like on a picture above with a support of grenades and gas grenades, but if it doesn't enough, we can try attack them both from the north and south (house has two entrances).
Final remarks:
- Local merchant has a lot of clothes. It's good to change your clothes after the battle.
- Many doors here are locked. If we want to search this location a locksmith kit is essential.
Required equipment: grenades, gas grenades, smoke grenades, C4 with a pilot
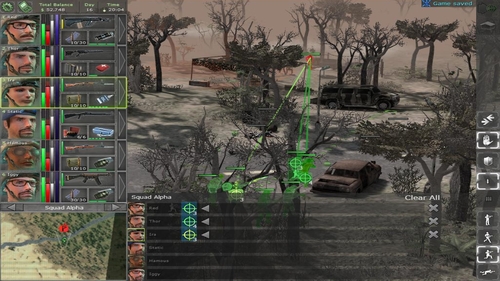
Industrial Park (Grumm) and Supply Depot (Grumm) are harder to seize than Grumm so because we attack them, focus on other sectors. Having well trained (at least one person on the 10th level) and equipped squad (example from the illustration: Steyr, KH PSG 1, Druganoff, NF Shotgun, M-14, Minimi; all besides the shotgun with telescopic sights) go to the Grumm from south. Firstly locate our people on the street, to lure all enemies in the range of a fire. When they stop gathering here, move to the small port.

Ignoring few enemies on the street, it's not easy conquerable point. Opponents will be hiding behind boxed and fire to everything moving closer. To avoid loses, don't spare grenades.
Then move back to the previous place. From there, Thor should eliminate enemies from the balcony (picture). A next step is a storm on the building seen on the picture above on the left.
The last one place before taking over this location is a building shown on the illustration above and its surroundings. All enemies from the inside we can kill by moving our team on the east. There, again from lying position, start an attack. Although not all of soldiers we'll kill through the windows, but majority of them for sure. When there will be 1-2 enemies left, storm the building.
Required equipment: C4 with a pilot, grenades
It's best to enter this location from the south. Locating our team as on the picture above, we'll be able to shoot down most of enemies from this sector, who'll run at us without hesitation. By reason of enemy's number advantage, we should order a salvo fire for all mercenaries with machine guns.
Our next step will be moving our men into the place shown above. All mercenaries, besides Red we prepare for welcoming enemies nearby exit from the building. Red should be send to blow up the wall.
Then we move away from buildings to kill enemies from a distance. Part of our people we can leave next to the breach in the wall, to throw grenades inside and eliminate enemies who decide to go outside.
The final attack before an assault on the Supply Depot (Grumm) we manage from the east. One of ours has to open the doors to have another enemies in the range. When there'll remain only few of them inside, we can assault from three sides what'll bring us a victory.
Final remarks:
- Magasin office can be opened only with the key which Elliot (Meduna) has.
- We have to beware of the shooter placed in the window in the western part of the building. It's hard to kill him from outside, so we should take care of him at the end.
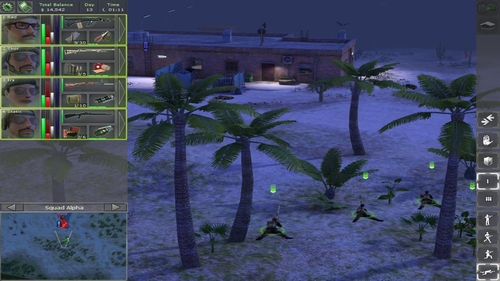
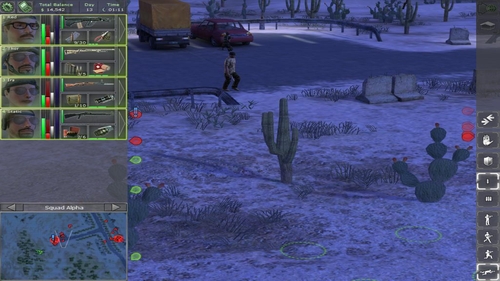
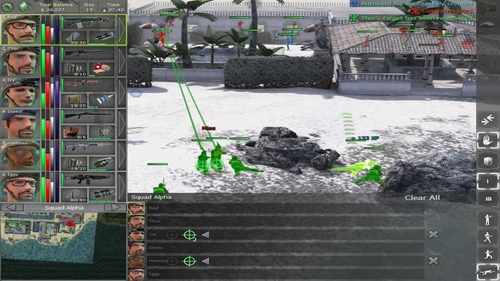
Beach Promenade is best to attack from the south. Move on the north along the beach. When enemies appear, told our soldiers to lay down and eliminate them. Before attacking man in the box, eliminate rest of patrols (1) but do not leave the beach.
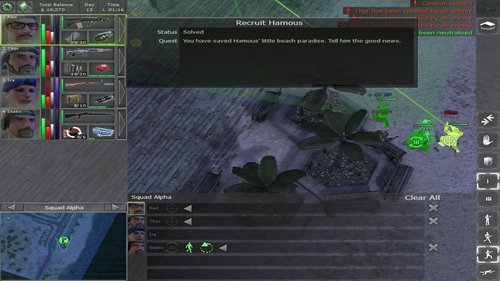
If we can't kill the man in the box through the window, we can smoke him out with grenades or just open the doors and fire at him. After killing last one man, move to the Supermarket to recruit Hamous (porter).
To the Supermarket we move from the east. There, between trees, order team to lay down and start firing. When the encounter ends, save the game and move little on the north.
Lying on one of the dunes, we should have in range all enemies patrolling the parking in front of the shop. Perhaps few of them will be till in the shop, but using NF Shotgun and Steyr with salvo mode, we'll be able to rush inside and eliminate them quickly.
Required equipment: few mine disarming kits, LAW, 1-2 rockets, grenades, smoke grenades
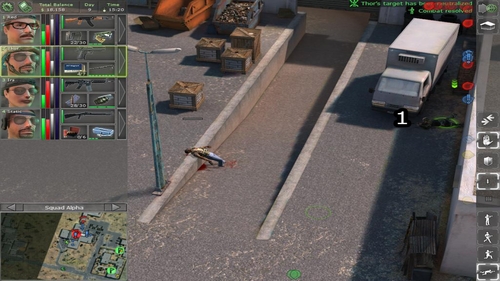
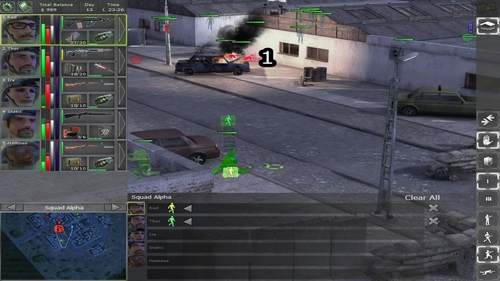
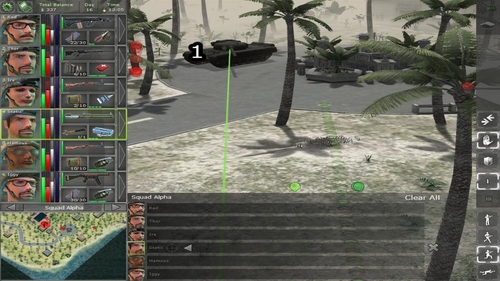
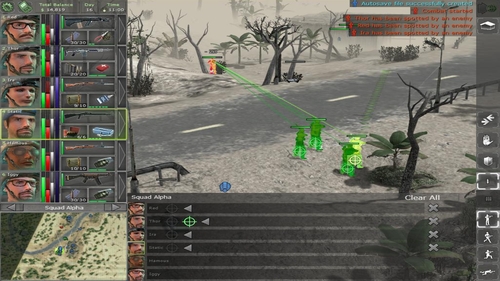
Restaurant we should attack from the east. Our priority is to kill sniper on the landing (1) and then eliminating enemies next to the two rocks nearby strategic point.
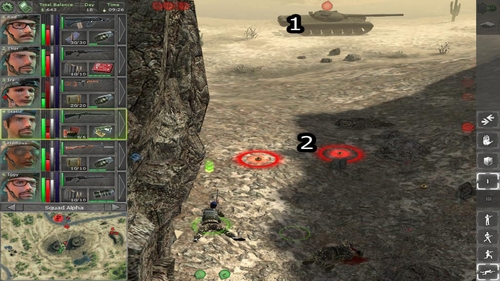
Nest step is moving mercenary with a LAW (don't pull out it yet, he has to crawl) between mentioned rocks. When we take a station, select LAW and destroy the tank (1). Watch out for mines during crawling (2).
Now we just need to get rid of closest enemies (1). Start from eliminating those from the hill (2); attack from a distance which make them go down, what will decrease their terrain advantage. They seize the hill yourself (2) killing single opponents nearby (1). Last from Deidranna's men is in the only one building in this location. As we probably now have number advantage (6:2 or 6:3) we can smoke them out with grenades and smoke grenades (thrown through the door and window). If enemies don't die, they'll run outside when our team members will be waiting with an aimed weapon.
Final remarks:
- There are plenty of mines around, so it's easy to lose a mercenary. To avoid it, use mine disarming kit.
Required equipment: LAW, 1-2 rockets, grenades
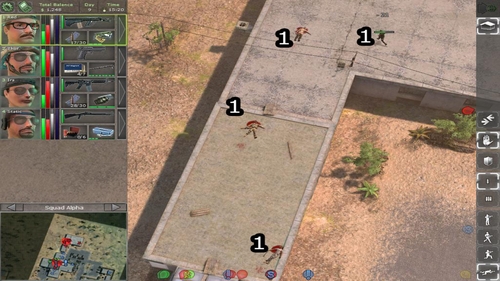
Place soldiers as on the picture above. It'll let us do in few enemies nearby the truck (1) and another few their alarmed fellows. After that take care about the tank.
Trying not to lean out too much, eliminate the tank from behind the hill. Pay an attention to which direction tank's barrel is revolved and then attack from the opposite one.
Now we just need to use convenience which is a hill on the south of the Gas Station. From its top we'll shoot down mostly enemies both outside (1) and inside the building.
If 1-2 enemies survive, use grenades. It's important to move whole team there and - besides throwers - place them properly so they kill enemy quickly.
Required equipment: LAW (at least 5 rockets) and 2-3 locksmith kits
Mercenary suggested to use the LAW: Static (mechanic)
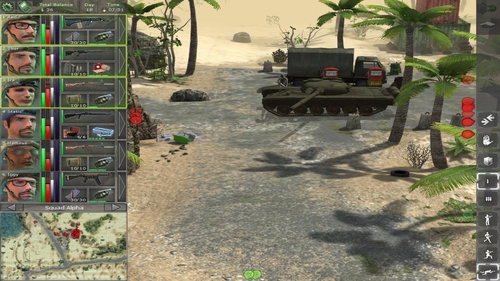
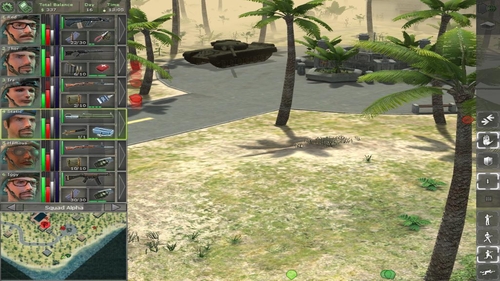
It's the first location in which we meet tanks, so the LAW is absolutely essential. But before we eliminate mentioned machines, move our squad, keeping away from the center of location, to the southern-east edge of the. Of course we'll meet single patrols on our way, but they shouldn't be problematic. When you're approaching the goal, check the vicinity because you may find 3-person patrol (as on the screen above). Remember to stay out of tank's range: you can destroy it, when there are no other dangers.
To destroy a tank, hit it from the side which requires the biggest angle revolution of the barrel (it takes a lot of time, so we should blow him up before he'll be able to fire at us). But it's worth to hide between the trees just in case.
Remark: If it's possible, save the game before attacking a tank. The same with the tank nr 2.
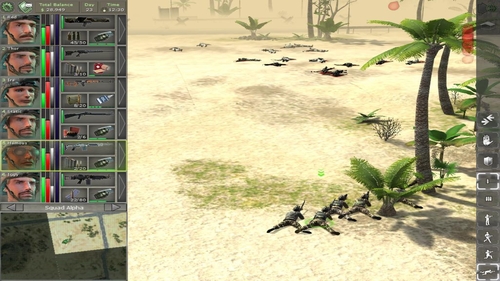
If mercenary using LAW has enough level of the marksmanship we should destroy the second tank without any problems (1), placing our soldier in the shown place (2). Firing from that distance won't show our position to the soldiers nearby the tanks, so we'll have a time to switch weapon and draw back to the safe place. Our next target is a group of soldiers standing by the destroyed a while ago tank. To eliminate them, set people among the trees so the Thor with KH PSG 1 with telescopic lunette can fire at them from a long distance. When enemies start running in our direction, get rid of them using the rest of the team.
What's left is a cleaning up the buildings in the central part of the Balime. We circle those buildings trying to kill as many as possible through the windows. If someone survives, smoke him out with grenades.
Final remarks:
- In Balime's houses you can find lot of precious items, so it's worth to search them. Unfortunately all doors are locked so we won't do it without a mechanic with high mechanical.
- we'll obtain 250 000 $ from Kingpin for eliminating soldiers in the Balime.

Required equipment: grenades
To the Balime Slum we enter from the east. From one of the elevation (screen) we start firing. When all visible enemies are eliminated, we'll have to, probably, only to finish up opponents in the building and single patrols.
Throw grenades through the breach in the wall. If any enemies survive, less than 2, make a frontal attack (Red and Static).
Only at the end we kill few enemies on the southern side of the road. When we finish, it's worth to visit a local merchant.
Basically, we have three targets in this location: single patrols, eliminated from a distance (screen above), soldiers nearby the containers (by the road) and soldiers defending a rocket launcher (in the mountains). It's a type of terrain in which it's good to send 2-3 best people to fight with rest of the team covering them.
After single patrols, the neighbourhood of the containers. If we use an option of synchronization, enemies will be dead before they reach us (1). In this moment an easy part of this quest ends, so it's worth to save the game.
Strategic point, the main base, is in the northern-east corner, between mountains. We should move to it from the south, paying attention to place our shooters in the possible best position, what is difficult, because enemies stand on the big hill. If we get suppressed by the fire too much, move back behind the rock to heal. It's worth to try lure enemies to the trenches: then the fight will be easier.
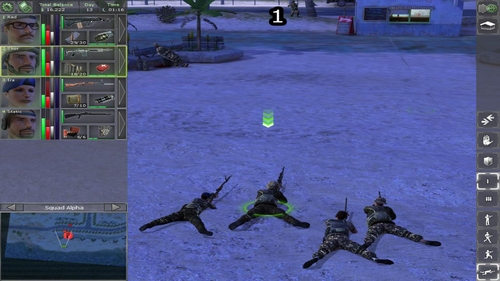
It's a good idea to start taking over Alma from the south, because then we'll probably eliminate a majority of enemies without changing position (as on the screen above). As usual we use our best shooters to kill enemies with a shoots in a head. When enemies stop running at us, move the squad little further.
In such situation, enemies will run also from the left (1). But concentrate the fire on the main path (2) and on the left throw a smoke grenade and then grenade. In such way, there'll probably be only survivors to finish off.

Although seizing the location we won't be able to activate the quest with Matt and trade with local merchants, because the game requires from us liberating the Prison (Alma) also. That's why, before attacking Alma, prepare also to fight in the location Prison (Alma) and, what would be the best, also in Docks and Barracks.
Final remark:
- One of the merchant has a lot of C4.
Few soldiers from this region we kill during seizing Alma, when they run to us alarmed by the shots. After taking over Alma, go the tight pass (eastern part) in the direction of the Prison (Tixa). We'll meet few enemies there, who will have a terrain advantage. To cancel it, use grenades: frightened enemies will run just upon our sights. Then move Thor and/or the second shooter on the footbridge (1) from where we'll shoot down nearest enemies. After that, move the squad on the west (moving back to Alma by the pass and then on the north), to see an entrance to the building. After doing in single soldiers, the time will come for an assault.
To the building we go from the southern, the least secured side. Rest of enemies is probably waiting in the prison block.
To avoid loses, we can use a fact which is a time what the unit needs to aim. It's rather effective, so try to remember it. Enemies is behind the closed doors. Tell one of our men to lie, so after opening the doors he'll have an enemy on the fire line. Then order him to fire (although closed door) and tell the other soldier to run and open the doors and later return on his position. In such way, our prepared shooter will start firing (or even kill an enemy) before an opponent turns round. To such task use soldiers with the machine guns and salvo fire.
Suggested equipment: grenades
Attack Docks from the southern-east. Placing group as on the screen above, kill as many enemies as you can. Then move to the Docks' terrain from the south.
Make an order to lie nearby storehouse (screen) and start firing. Enemies, not only from Docks but also from Barracks will rush at us immediately. Set the salvo fire in machine guns, order Thor to shoot only in heads and then go to the storehouse to seize a strategic point.
After that, rest of enemies will run after us. It's an occasion for the ambush: prepare rifles, grenades and wait for an unaware enemies. Later you can move to the Barracks.
Suggested equipment: grenades, smoke grenades, gas grenades
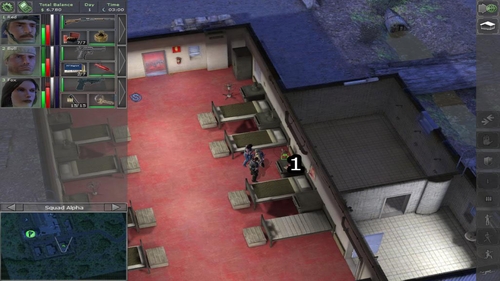
Similarly as in the case of Docks we begin from the west. When we eliminate all enemies from this side, we should, with an appropriate distance, circle the building of Barracks from the south and east. There are few soldiers, who shouldn't be a problem. Then move back to the starting point and slowly head to the main entrance.
When we are inside, seize the main corridor and then kill all enemies (they'll appear one by one) in the northern rooms. The biggest group (screen) eliminate with grenades.
Remark: we have to have at least three mercenaries guarding remaining exits. If we want, we can also plant few mines and then lure enemies to go out.
Required equipment: grenades, smoke grenades
Firstly take care of the post by the road. Hiding on the roadside (1) we'll easily kill all enemies, who have no place to hide except for the post. Then move on the swamps from the south.
Placing group in the position shown above, we start firing at enemies in front of us (1). We can expect that few of them will try to run at us: then they'll choose the path on the right, where they'll by protected by the stone, so prepare smoke grenades and grenades.
Then move Thor east, so he the remaining enemies stay in his range. When we seize the eastern strategic point, move whole squad next to the main building. Opponents running out of there should be welcomed with grenades (1) and when rest won't be lured, rush inside.
The best is to send inside only Static with NF Shotgun and grenades and when opponents (1,2) concentrate fire on him, order the rest to run inside with machine guns set on salvo fire.
On the contrary to the Supply Depot (Grumm) this location will be taken over much quicker and easier. Placing squad as on the screen above, begin firing at enemies within our sight range (1). But let them alarm others, so we can get rid of several of them at once.
Soldiers around the depot we also kill from a distance whereas the inside, due to small number of enemies, we can attack from the front. When the fight is over, it's a good idea to visit cubby-hole nearby the road (more on the west) where we find a box of mines (1).
Suggested equipment: locksmith kit, mine disarming kit, few C4 with a pilot
We can take over mostly of Prison (Tixa) without changing a position shown on the screen above, because when we attack one enemy he'll alarm his fellows who starts to run out from the gate upon us. What is worth remembering: enter the location from the western side.
When we are inside, try to smoke out enemies from the building using various tricks, like C4 with a pilot. Buildings' exits we can mine, but it isn't necessary.
When there are no enemies in the lodges and we eliminated also all patrols, the remaining soldiers in the building we kill from an impetus. Later we head to the warden's office (screen above) where we find two items connected with a mission (more in the chapter: Missions)
Required equipment: mine disarming kit, C4 with a clock
It's a good idea to approach this region from the east where we won't find enemies. Our first target is a building on the north. We won't find a big resistance there, but take into consideration that there is a plenty of mines in this location. Taking proper positions on the parking (screen) start firing at enemies being on the dump. If no one is in our range, move to the railing and blow it up in the suitable place. It lets us go inside without stamping on mines.
After defeating enemies (use covers!), we move south. Be careful about mines there is lot of them. Besides that, we shouldn't bother with anything as there is little of enemies. We can do in them calmly without any direct encounter. Then go to the swamps (through the bridge) and kill two last enemies. Now the location is ours.
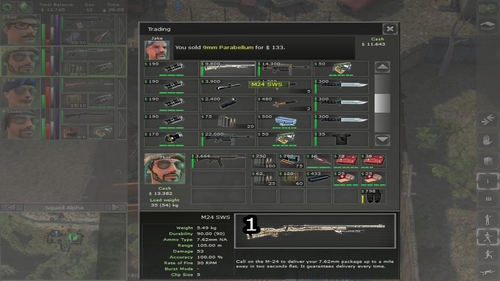
After the battle, it's worth to visit the local merchant, he has a great sniper rifle - M24 SWS (1). It's ineffective in the open combat but the huge range makes him an excellent alternative weapon for Thor or any other shooter we want to change into a sniper.
First of all, we shouldn't approach this location near the road, because we'll meet single patrols there. Usually they are harmless, but they spot us quickly when we enter the region what may cause unnecessary loses. After eliminating those units, take care about the group in the middle of location. Lie and shoot them down as ducks (remember to check if enemies are in range).
It's an another location which seizing shouldn't be problematic. We can send here a backup squad, only to make our main squad take over some bigger location. Truth to say, it's enough to make all our soldiers lie (preferably with machine guns) and start firing. Enemies won't even reach us.

After killing them, go to the truck for Dr Wills Medical Supplies (1). Now, leave the place.
Conquering Stakeout Post similarly to conquering other, lonely posts in the game (like Road Blocks) doesn't require too much of finesse. Attack from the south, placing the team in a row by the road. We can use street lamp or barrier as a cover. In such way we eliminate most of enemies.
Due to many trees, killing remaining 1-2 enemies requires moving closer, but not close enough to receive any blows. After encounter search all chests.
In this subchapter you can find location from the Deidranna's Palace surroundings, what is our final target. But it doesn't mean we shouldn't head to them before seizing all the rest locations, this division is made only to make guide's navigation easier.
Required equipment: 2-4 mines disarming kits
We should start seizing the Southern Airport from the north. There is a hole in the railing(1), which we should use. But be careful, because this location is the most mined region after the Maze.

So send Red to disarm vicinity of the railing (it's best when he have rather empty backpack to collect few mines). Then move all the squad on the second side. At the beginning place your men near the coast and start firing. After finishing that, move further, on the landing strip.
More or less in the middle of runway start firing at enemies guarding or patrolling the eastern part of an airport. Then place your group in a row on the landing strip, with barrels aimed on the hangars. From such position you should be able to do in most of enemies (1-3 may remain in hangars or patrol southern-east corner of an airport). When we clean up the airport from left enemies, we can take care of single enemies patrolling the southern road.
Mines collected by the Red (1) we can use to mine nearby SAM station III.
Required equipment: smoke grenades, grenades, mine disarming kit
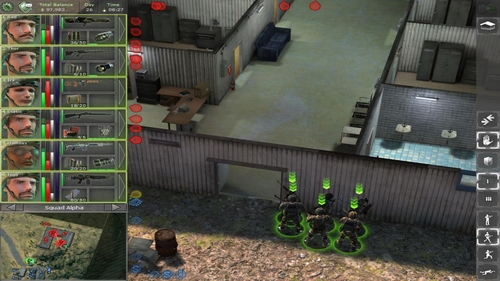
It's, against the pretences, one of the most pleasant location in the game, because having quite big marksmanship and strength we are able to take over this region quickly and painlessly. Firstly, eliminate all units standing outside the base. To the base enter through the main gate. Before we move there our squad, tell our people to lie down and kill our enemies nearby the gates. After that, order Red to disarm one of mines under the railing (remember to let him free space in the equipment), and take it. Now, our main task is to kill all running enemies and possible shooters on the roof of the only building in the base.
Essential is smoking out people from this mentioned building. Order our people to crouch behind a trench, so they can kill all running out enemies (1) immediately. Using the mine we get earlier, mine the terrain under the ladder - it'll secure us from any attempts of regaining the roof.
Being on the roof we have a range of fire which let us eliminate all enemies in the base: you just have to set soldiers at the right angles. In the moment there should remain only one enemy, in the underground shelter which is also an armory.
To get to this place, we need to find a card-key in the building. After killing last one enemy, we can replenish ammo in the armory and trade with the merchant in the upper corner of the map.
Final remarks:
- After seizing this location, every patrol will be heading here, because Deidranna considers this point as an essential one. That's why all additional mercenaries who you don't need, place here with huge amount of ammo and give machine guns to the local militia.
- merchant on the north has a little of clothes and ammo, but it's worth to visit him.
Required equipment: LAW, 1-2 rockets, several C4 with a pilot, few kits of grenades, smoke grenades and gas grenades
The time has come for conquering the capitol. Before we get there, it's possible that even 50-60 soldiers will gather in this city. It's a huge number, but it can be easily decreased. If we enter the location from the north (more on east, but not in the corner) we will be spotted by the big group of soldiers. We have to run out on west, almost to the very road. Enemies will run after us, but before they reach a building's corner, we'll be lost from their sight range. Then the man with LAW go into action: thanks to the one rocket we can kill dozen soldiers at once. Of course, we should place our shooters properly to finish off the survivors.
Then we make a breach in the wall, and take over the terrace on the elevation (after killing enemies running out from the building on the second side of terrace). But we have to be careful, because if enemies spot us, they'll begin firing from the eastern building and more of them will move out from the house by the terrace. Try to kill as many enemies as it's possible from the distance, being careful simultaneously. If we see that we can't do anything from this side or, what worse, enemy has a big number advantage, retreat through the breach in the wall.
Next enemies we meet in the centre: place mercenaries on the road with gun aimed on the east and, using Thor lure enemies(1). If they move to close, the rest have to eliminate them.
Fortress, which is the building in the upper right corner of the location, comes for the end. Take over the residence on the south in the meantime. The best way of doing in enemies is attack from the beach: although it may seem that firing through walls and trees is impossible, we should look a good position until we find one.
Remark: Enemies will try to surround us from the west, so do not focus only on the swimming pool and the roof on the right. Static will be great to secure the left flank (equipped in a shotgun is deadly effective on short distance).
If the last enemies on the map are in the building in the right upper corner, move the squad to the building shown on the screen. We use the C4 with a pilot in a possible place and then mine the whole ground floor and surroundings. Then fire at enemies on the roof the mentioned building: after a while they'll start running down. If we can't shoot them down, mines will finish the job. If even it isn't enough, use grenades and smoke grenades. Probably, few enemies hide in the office on the first floor - but with mines and grenades you shouldn't have problems with luring them out. But watch out - they're well armed.
Final remarks:
- in the neighbourhood of the capitol is no good merchant so during taking it over think about some replenishing clothes and equipment.
Required equipment: 1-2 mine disarming kits, LAW, 1 rocket, lot of different grenades
It's the last but one location on our way to defeating Deidranna. We shouldn't enter this location from the side of the road, because soldiers standing there will surely damage us seriously. But we can attack there as a provocation, counting on a fact that hid enemies (1) will rush after us behind the corner of the hedge where the rest of the squad will be waiting for them. But it's unlikely, so using grenades (according to the tactics: smoke grenade + grenade, blast grenade + assault, gas grenade = smoking out from the trenches) try to kill enemies from the first frontline.
But before we reach an entrance to the gardens (screen above), circle all location and attack from the beach: after killing few enemies thanks to the ambush (hide behind the hedge as one mercenary lure enemies there) and killing the rest from the distance (those nearby mini-prison by the bridge to the Deidrannas's Palace) take care about the tank.
Remember that, when we will be approaching the building from the east, tank can't have us in the range of fire. And when we'll be already at the backs of mentioned prison, tell Static to climb on the roof and destroy the tank. Then, finish stealthing enemies with grenades. It's worth to have at least two mercenaries nearby the ladder for the security.
If we don't move whole squad on the beach, not it's time to support Static. From a lying position attack remaining enemies. If any enemies are still in the prison, smoke them out with grenades. After that we can begin an ultimate encounter with an Arulco's usurper.

Required equipment: double amount of ammo, few kits of grenades for each mercenary
After reaching Deidranna's Palace move squad on the beach. Then after killing all enemies there, focus on the first guarding tower nearby. Hiding behind obstacles finish off all of those who went outside the tower. If anyone survives, grenade him. After battle save the game.
Before we follow the footbridge, place Thor on the roof of the guarding tower, to eliminate a sniper from the second tower. When he did it, we can order one of soldier to throw a grenade or gas grenade through this tower's window (screen).
Remark: send him main street, not a footbridge if he was spotted.
Simultaneously we can move squad on the footbridge from which we eliminate nearby enemies (1) and those running from the palace. Save the game again and move your people to the second tower.
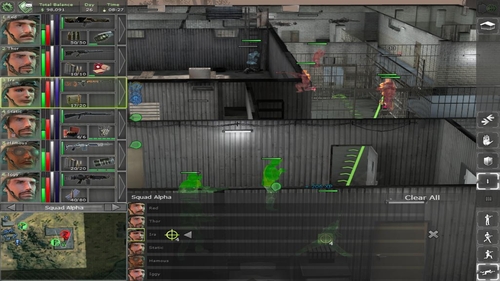
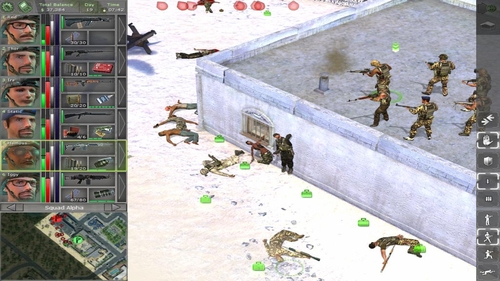
From the top of a tower try to eliminate as many enemies from the main hall as possible. IF we want, we can throw few grenades inside but frontal attack is very risky and it's better to shoot them from a distance. When we assert that we can't eliminate anyone else, speed to on the left (to the trucks). We shouldn't meet too much enemies. What is left to do is blowing up the wall and rush inside.
Split the squad on two groups. One (with Thor and Red) leave in this room, the second one place in the next room. Then open the door: now we have two lying groups whose barrels are aimed in the direction of a main hall. Try to lure few enemies there. If it happens that you are under heavy fire, use smoke grenades. When we eliminate all enemies from this floor we can go out the rooms and finish off opponents on the ground floor.
After seizing the third strategic point go on the bridge linking a hall with main palace's chambers. We can try to provoke enemies to run out from the marked corridor (1) upon your barrels. To eliminate them, order Thor, Red and Static go on the bridge nearby corpses (1) from where Red and Thor will be able to kill enemies on the balcony and Static will secure them.
In a longitudinal room, place squad on the ground, besides one less trained mercenary whose task is to lure melee fighting enemies to chase him. When ambush succeeded, attack Deidranna's rooms from two sides (1). And although the entering is difficult, we should be able to throw many grenades at enemies and finish them off.
When in the room left only Deidranna with 1-2 soldiers, enter the room and hide behind the wall. From this position (screen) we deal with enemies and Deidranna what ends the game.
This mission is a liberating Northern Airport. Keeping this location is crucial because this is where our supplies from the internet shop and new mercenaries will arrive. More about it you fin it the chapter Locations: Northern Airport.
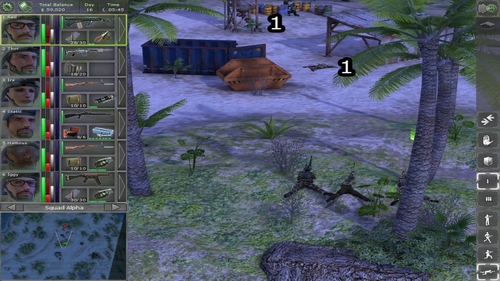
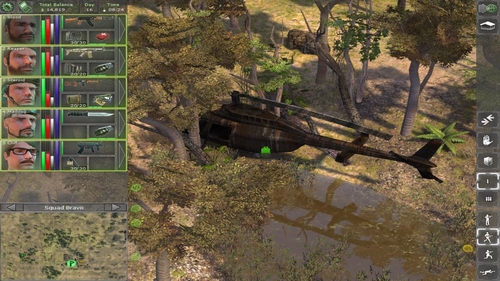
After seizing Northern Airport, on the heliport an option of dialogue with a helicopter's pilot, Skyrider, activates. He'll ask for regaining Skyrider's Bag of Diamonds which he lost during the air crush. Those diamonds we may find near the helicopter in the Farm (first illustration). As an award, besides half of diamonds, we obtain key to the secret store in the Road Block IV (second screen).

After taking over Drassen we go to the church where we find Father Walker. He directs us to the Ire, member of the resistance movement on the island. She is in the pub, on the north.
Ire will be rather sceptical, so we move back to the Father Walker. He orders us to eliminate cannibal's family from the Farm. Hicks are rather weakly armed, but they have lot of guns and ammo in the cellar. After returning to the Drassen Father Walker gives us 1500 dollars.
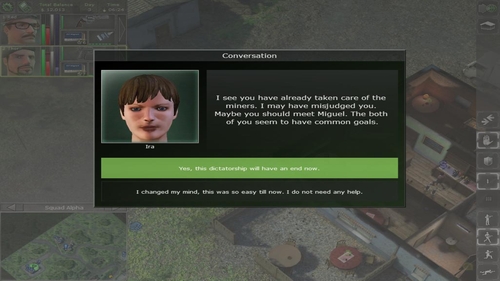
Ire tests us, because she doesn't believe that we arrived to support the rebellion. Our quest is to liberate a Mine. In return for help, Ire show us where rebellion's leader, Miguel, is hiding.
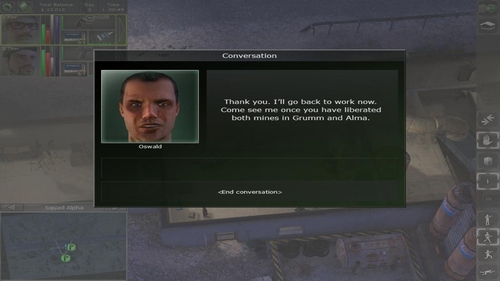
Oswald, miner from the Mine will suggest us to take over remaining location with ores - which are in Grumm and Alma. After seizing them, it's enough to go back here for 20 000 $ reward. Hints how to take over mentioned regions you can find in the Locations.
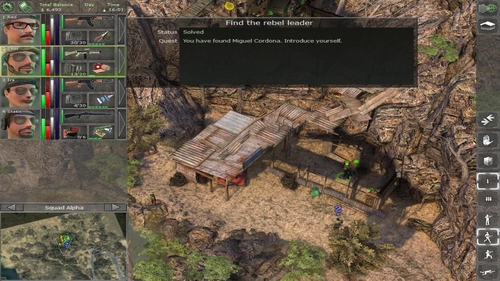
To do that quest, it's enough to reach the Hideout (Miguel) and talk to him.
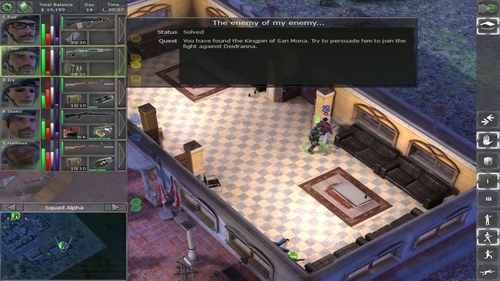
Miguel asks us to talk with Kingpin about cooperation. But the gangster won't be eager to talk with us, until we liberate the San Mona.
This quest we get from Kingpin in Kingpin's Mansion. It refers to the Miguel's ask about collaboration. But before it happens, we have to eliminate all soldiers in the San Mona. When it's done, Kingpin support us with 50 000 $ and allow his man, Iggy, to join us. He is in the club (San Mona).
Kingpin, aware of our potential, order us to regain Balima because it's inhabitable by the richest citizens of Arulco, who are his clients. In return for that, we'll obtain 250 000 $ (taking Balime over isn't easy because of two tanks, so do not hurry with that. Hints in the Locations: Balime).
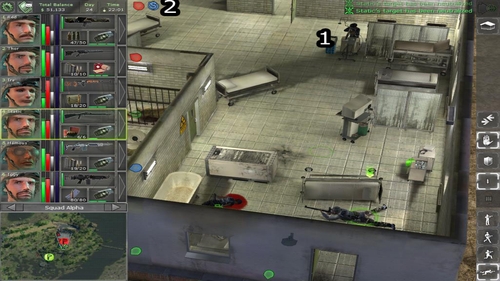
Dr Willis tells us to find Fredo, provider of the Hospital. We'll find him in the Industrial Park (Grumm) in place shown on the screen.
Fredo gives us sight on Warehouse 14 where we should find Dr Wills Medical Supplies. Unfortunately, this place has been robbed (against the internet opinions, this place exists: it's a Supply Depot (Tixa)). The required items we'll find in the following locations:
1. Crushed Truck: by the truck (1)
2. Road Block IV: on the truck (1)
3. Stakeout Post: in the chest (1)
After returning Dr Wills Medical Supplies, we get the quest to find a Laboratory where Dr Poppin is working on a chemical weapon. We'll find him in the strongly guarded building (1). After eliminating enemy's soldiers, we can talk to him. From that find out about Elliot, a man who is responsible for taking research's results to the Deidranna. But before we start chasing him, we have to kill Dr Poppin.
Basing on the information from Dr Poppin we start chasing Elliot. We'll find him in Meduna where after a stormy discussion he says us where the report is. Unfortunately, key to this particular office (screen) has Elliot, so we have to kill him (this option activates during the next conversation). We have only one day to reach the report, so it's best to talk with an Elliot early in the morning.
In the casino of San Mona we find Brenda who demands from us an Exotic Lesbian Magazine. One is enough, but there are more of this:
1. Northern Airport: on the bedside table in the barracks (1).
2. Prison (Tixa): in the room nearby manager's office, on the bed.
3. San Mona: in one of brothel's room, on the cupboard.
In exchange we get Automatic rocker rifle, 10 rockets and 6 C4 with a clock.
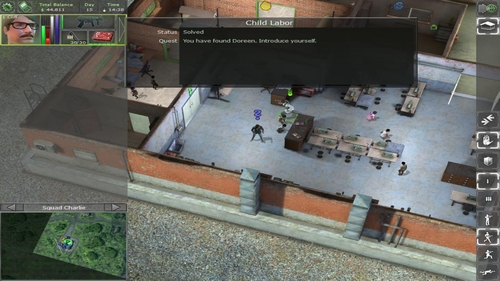
In Grumm we meet Fatima, mother of children who were forced to work in the factory in Drassen. She asks us to free her children. To do so, we have to go to the Drassen and talk with a factory's owner. As it turns out, she's a Deidranna's relative. When she attacks us, kill her and move back to Fatima. As a reward we obtain few hundred of dollars, family necklace (worth 3000 $) and food.
Matt, miner from Alma, mentions about the prison in which political enemies are held, including his brother. He asks us to free him. To do so, we have to go to the Prison (Tixa) and conquer it.
In Balime, before an entrance to the museum, we meet an eccentric keeper who gives us a quest of returning two items: The crown (1) and The ring (2). We find them in the Maze, in the places shown on the screen. As a reward we receive Automatic rocker rifle, 10 rockets and 6 C4 with a clock.
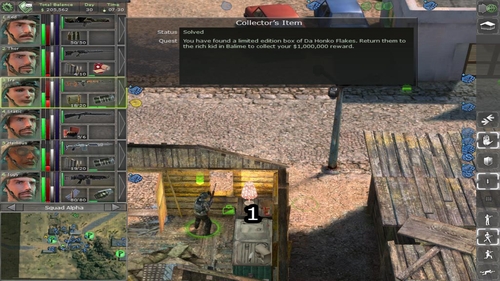
In Balime, in one of residence, we meet the Rich Kid who wants get the Da Honko Cereals (Limited Edition). It is said, that in those cereals you may find code to the only one browser game created on Arulco, which gives you bug advantage. We'll find it in Alma, on the cupboard of one of drug stores (white building white "Flowe" sign). In return, we obtain one million dollars.

It's our main goal, which is in the Quest Log from the very beginning. We have to kill Deidranna; to do so, we need to get to the Deidranna's Palace (details in Location: Deidranna's Palace). Deidranna is equipped as her soldiers, but reaching her is a quite challenging.
Remark: killing of Deidranna finishes the game, so if we think about completing remaining missions, do it before that.
Missions in the particular location get unlocked in the moment of liberating it. What is more, some missions required finishing previous ones.
Location: Supply Depot (Tixa)
Requirement: defeating gang located in Road Block III and IV, Stakeout Post.
Values:
- can bargain with merchants,
- lower morale level without glasses,
- higher morale level when in the full squad.
Location: Barracks
Requirements: delivering five Military Intel which you can find in:
1. Barracks: office next to the one where we meet Conrad - cupboard,
2. Barracks: conference hall - on the table,
3. Prison (Alma): main office - bookcase by the desk,
4. Road Block IV: under camouflage roof - on the chest,
5. Prison (Tixa): warden's office - in the board in which we find Cellblock key f.2
Values:
- increased sight range,
- higher morale level with women in the squad,
- higher morale level during the night.
Location: Slums of Balime
Requirements: giving back two mines, one C4 with a clock and two C4 with a pilot
Values:
- lucky,
- explosives' expert,
- higher morale level when his health is low.
Location: Hideout (Miguel)
Requirements: eliminating enemies from: Farm, Hideout (Kingpin)
Values:
- pistols' expert,
- lower morale level during the night.
- higher morale level when in the full squad.
Location: Hospital
Requirements: liberating three SAM Stations during 30 days.
Values:
- lose condition slower while running,
- higher morale level when in the full squad.
Location: Prison (Tixa)
Requirements: release from the jail. To do that, we have to find Cellblock key f.1 (before proposition of joining, Dynamo asks us to free Shank); this quest we receive from Dynamo's brother, Matt (miner from Alma).
Values:
- shotgun's expert,
- melee weapon's expert,
- experienced with sniper rifles.
Location: Supermarket
Requirements: liberating Beach Promenade
Values:
- lose condition slower while running,
- can bargain with merchants,
- lower morale level without glasses.

Location: San Mona (casino)
Requirements: liberating San Mona (quest Poor people are poor customers from Kingpin)
Values:
- receive less damages in melee fighting,
- expert in SMG,
- experienced with an assault rifles.
Location: Drassen (bar)
Requirements: liberating Mine
Values:
- higher morale level when only women are in the squad,
- high stealth, even without any camouflage clothes,
- receive less damages in melee fighting.
Location: Estoni
Requirements: giving back locksmith kit, Knife and C4 with a clock
Values:
- higher morale level when low health,
- higher morale level the full health.
Location: Hideout (Miguel)
Requirements: giving Oswald's Bag of Diamonds; we can find it in a Mine.
Values:
- lose condition slower while running,
- experienced with an assault rifles,
- higher morale level when in the full squad.
Location: Prison (Tixa)
Requirements: releasing from the cell; to do so, we have to search warden's office to find Cellblock key f.2. It's in the cabinet at the southern wall.
Values:
- lucky,
- low penalty while shooting from a hip.
Quests below we get from Carmen who sits in the pub in Cambria. After eliminating one target go back to talk with him. Only after completing one task, we get another.
Location: Road Block V
Reward: 7500 $
Location: Industrial Park (Grumm)
Reward: 10 000 $
Location: Alma
Reward: 12 500 $
Location: Estoni
Reward: 15 000 $
Location: San Mona
Reward: 20 000 $
Location: Meduna
Reward: 50 000 $

 Just Cause Game Guide & WalkthroughJagged Alliance: Back in Action Game Guide & WalkthroughJagged Alliance: Crossfire Game Guide & WalkthroughJust Cause 3 Game Guide & Walkthrough