Six campaigns, thirty missions. You must complete them in a given order, as they are all connected by the game's story. There's a dramatic and touching scenario before you, a story of love and power. What's unusual in video games' world, most plots don't get any happy endings here.
The further, the tougher - as always. This guide points out how to complete all the missions as fast as possible. It contains maps of all them. On some of them, there are additional hints on how to find certain places and objects. In order to complete the game, you have to perform all the quests pointed out below.
Good fighting!
Author: Malwina "Mal" Kalinowska
Quests:
Assemble 100 Peasants.
Assemble 25 Footmen.
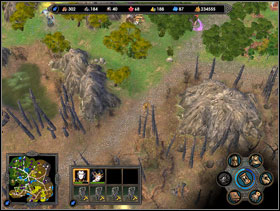
Capture the Garrison.
Isabel must survive.
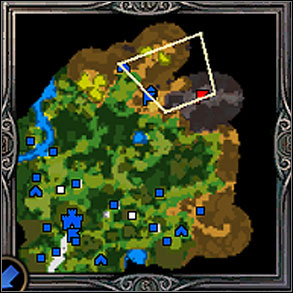
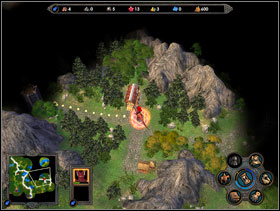
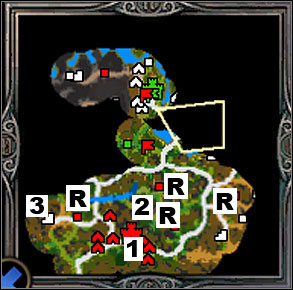
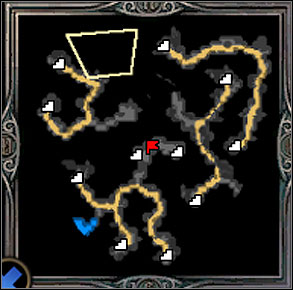
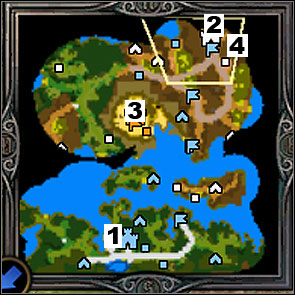
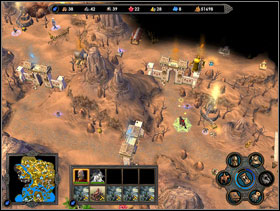
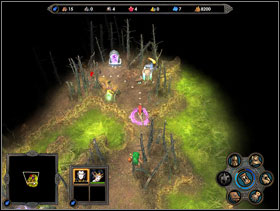
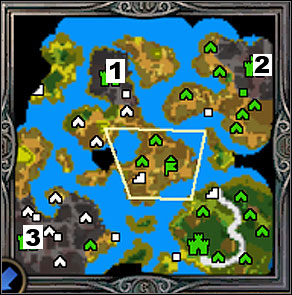
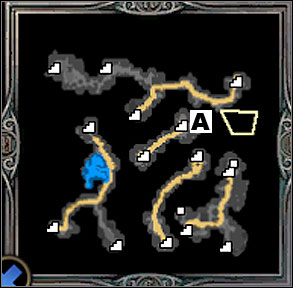
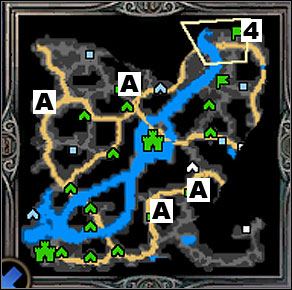
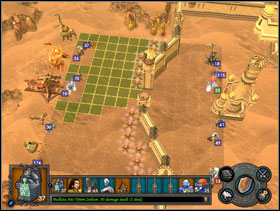
This is a training mission, through which you are guided by on-screen hints. Go along the road and gather all the useful things along the way. Defeat the Garrison's defenders on the South.
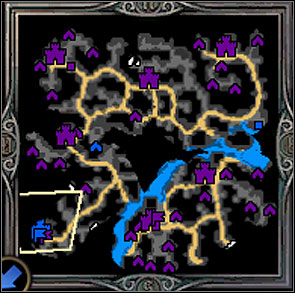
Quests:
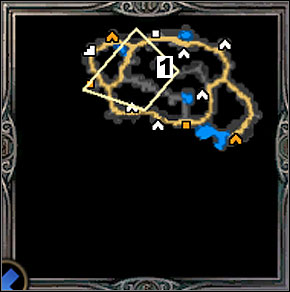
Capture Strongbow within a week.
Isabel must survive.
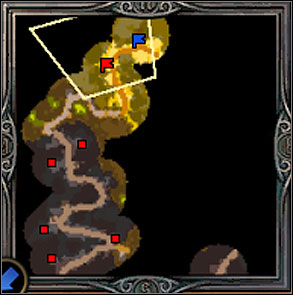
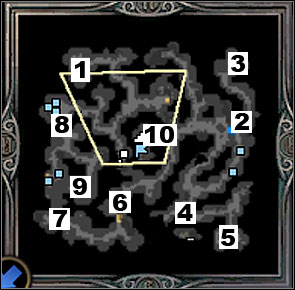
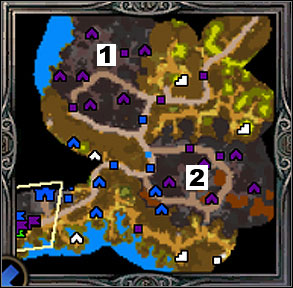
Go straight ahead. To the right there's an Archer recruitment point, and a poorly guarded artifact. Strongbow (1) is not heavily guarded, take it without any ado.
 It's not hard to capture a city without any defensive structures.
Quests:
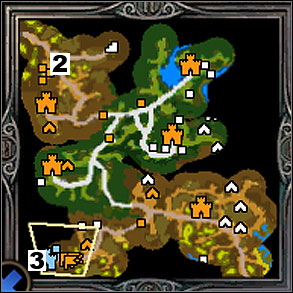
Assemble 100 Archers.
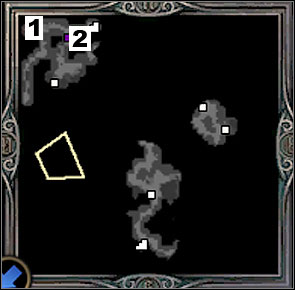
Capture Ashwood.
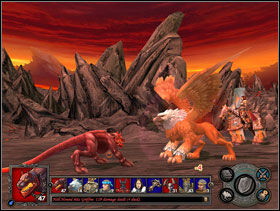
There are 3 Archer recruitment points in the central area of the map. You can also train the units in your city. The city of Ashwood (2) in the North-East. It's easier to capture it if you assemble the Gryphons along the way.
Quests:
Build a Jousting Area and upgrade it to Hall of Paladins.
Clear the area of enemy scouts.
Isabel must survive.
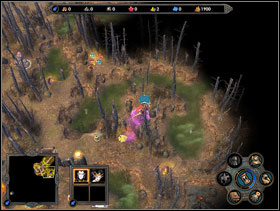
You have to construct Stables first in order to enable building a Jousting Area. You'll then be able to upgrade it to Hall of Paladins, too. When you scout the area around the city, you have to destroy all the demon units in the vicinity. When you get rid of them all, you'll get a message about having completed the quest. Soon, a red unit will appear on the map and you'll have to fight it. It's good to have Paladins for this one.
Quests:
Meet Alaron's army.
Capture Brightwood.
Isabel must survive.
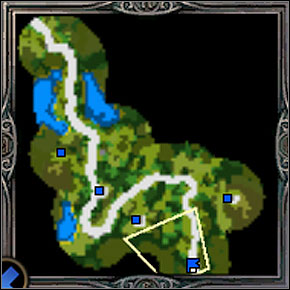
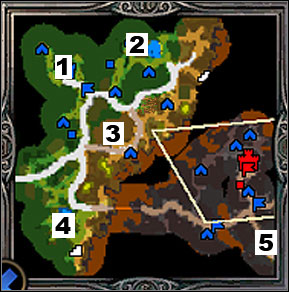
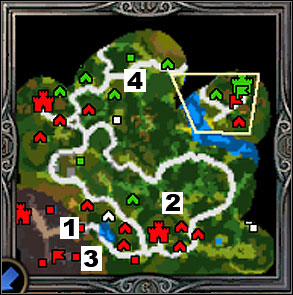
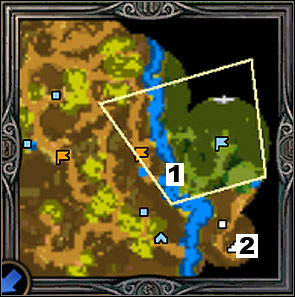
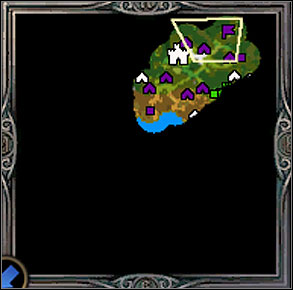
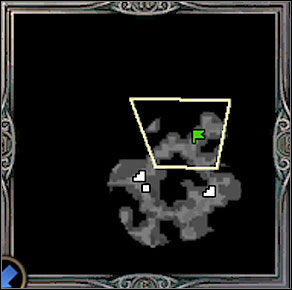
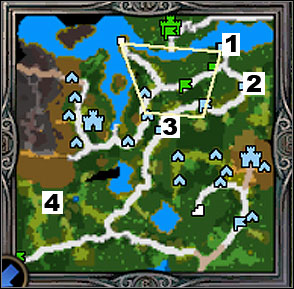
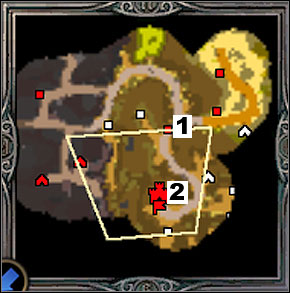
Go along the road to the North-West. There are several useful objects around the area. Take your time to reach (1), where you'll find an Archer recruitment point, an artifact shop and a building that lets you upgrade all your units. Go further to reach Brightwood (2) and capture it. Go to the post to the West (3).
 You can afford but some of the artifacts.
Quests:
Upgrade the Magic Guild in Brightwood.
Meet the Seer.
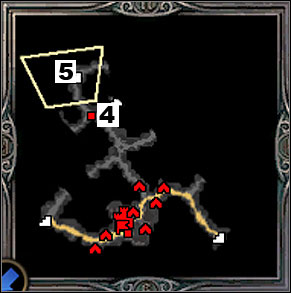
Build a third level magic guild in your city. The seer's shack is South of the post (4).
Quest:
Find Boots of Levitation.
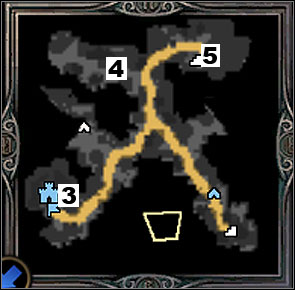
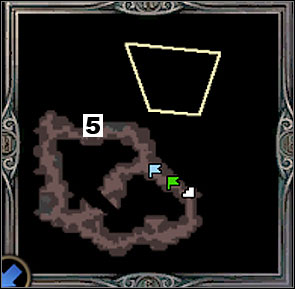
Go to the underground (5) and head South, to the Green Crypt, in which you'll find the boots. It's well guarded, and it's worth to have some Paladins on your side. Wear the boots and leave the dungeon. Go across the river and meet Alaron. Go further, straight into a trap. Mission complete - even though you've just made a huge mistake.
Quests:
Rescue Isabel and capture Dunmoor.
Capture any city within a week.
Isabel and Godric must survive.
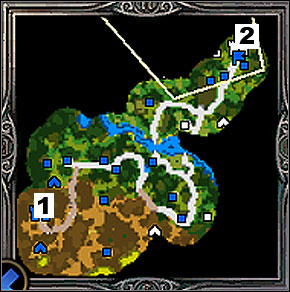
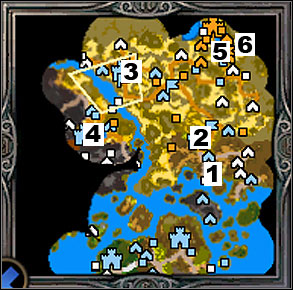
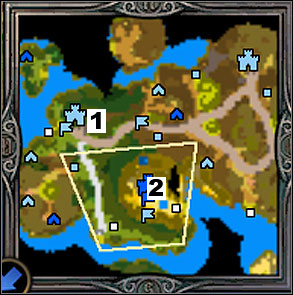
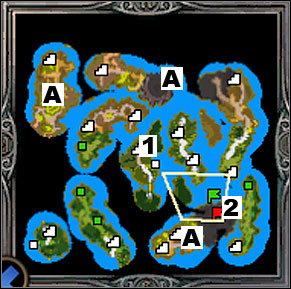
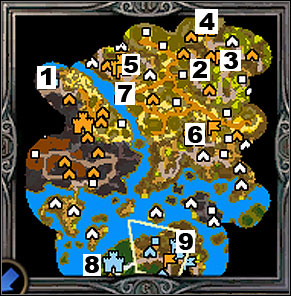
Go to the North and take Dunmoor (1). Take time to visit a recruitment point and an artifact shop along the way. The second recruitment point is to the right of Dunmoor. Near the city there's a tower in which Isabel is trapped. Defeat its guards and give her some decent units to command.
Quest:
Hold Dunmoor against enemy attacks.
After a few days of peace, there will be red units appearing on the map from time to time. You can't leave your city defenseless, so keep some units (and preferably a hero) in there. Use Isabel to get rid of the enemy units so none of them reaches the city.
Quest:
Set up Tear of Asha in Dunmoor.
Tear of Asha is a treasure that you have to dig out using the special puzzle map. To see the whole map, pay a visit to three obelisks (2) (3) and (4). Take the treasure to Dunmoor and confirm that you want to construct Elrath's Sentinel in there.
The treasure's location is random.Quest:
Send Godric to Nikolai.
Isabel is escorting Godric to the passage to the South-East. Godric should command nothing but minimum number of units. Don't attack the demon city, as it's too heavily guarded for now. Defeat the Garrison's crew (5). Command Godric to go further, to the end of the map.
Quest:
Message from Nikolai.
Godric will disappear, and Nikolai will take his place. You can't trade units with him. Agrael's army will come out of the red castle. Let Nikolai battle him.
To make things a bit easier in this campaign, focus your hero on offensive magic and unit-enhancing spells, like "Gating".
Quests:
Find a way to Sheogh.
Agrael must survive.
Speed is essential in this mission, so first of all pick up the nearby artifact - boots that will enhance your traveling range. Agrael is being chased by two blue heroes, and you shouldn't engage in combat with them. If you have to, use the Sanctuary to hide and wait until they leave the vicinity.
 Blacksmith's is one of the few places worth paying a visit to in here.
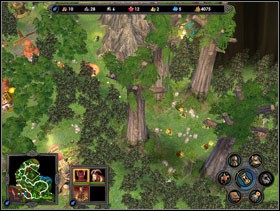
Go along the road to the South-East, visit the lookout point. There's a recruitment point to the South-West. Head North-East from here. It's useful to visit a Blacksmith to the East. Enter the red tent (1), and then go through the portal nearby. Get rid of the red post (2) South-West. Go to the dungeons. There's a few recruitment points in there - you can't miss them. Make your way to the other end of the dungeon. When you leave it the other way, you'll be forced into battle. Win it to complete this scenario.
Quests:
Capture the Heart of the Griffin.
Agrael must survive.
Time is of the essence here. Don't waste time gathering all the minor loot around the map, your goal is to defeat the blue hero before the orange one beats you to it. Follow the road to the North. Only take time to visit major recruitment points and stables. Battle the blue hero - when you win, you will be attacked and have to battle one more time. Winning both battles ends the scenario.
Quests:
Cross the border.
Agrael must survive.
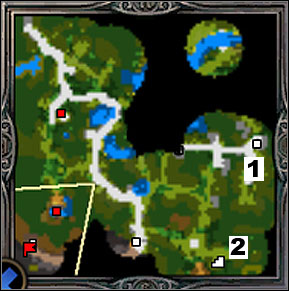
Once again, time is precious, so be quick and confident. Visit all the recruitment points to the East and South of the city. The short road to the East leads you to a post (1), where a green unit awaits you. Beat it to complete the first quest.
Quest:
Capture all elfish cities.
Go along the road to the East and capture the first city, Wenlan.
Quest:
Defeat Gilraen.
Immediately visit the orange key master's tent (2) to get to a recruitment point South-East of your city (3). The faster you do it, the less probable is for the enemy to surprise you. You can visit other tents if you like to - they open up passages to various treasures.
While reaching the tent, take time to capture a coal mine and a sawmill. When you defeat the defenders of the nearby recruitment point, you can start t capture other mine. Skip the Phoenixes guarding the mercury mines for now. After two months, when Agrael is powerful enough, you can attack them. It's even better to wait for one of the green units to do it. To that point, get your mercury at the marketplace.
Gilraen will come South by himself, you won't have to search for him. Hire a second supply hero, who'll transport the units between the city and Agrael. Your own city units and the Inferno recruitment point's recruits will be more than enough to get rid of your enemy. Don't wait for the enemy to strengthen his positions. Don't leave Agrael defenseless at any time, always support him with additional troops. Use the "Gating" spell on your units during the battles. To weaken Gilraen's forces, you can send ahead your supply hero leading the army from Wenlan.
Other way to beat this one is to quickly capture another green city to the North-West and use it to combat Gilraen with more Sylvan units.
 The grove can be reached from the North.
Quest:
Destroy the druid grove.
As long as the druids do well, the enemy has an extra source of units, so you have to deal with it. You'll have to reach the grove from the North (4). Kill all the guards and fight the druids themselves. Now all that's left is to conquer the remaining 2 cities to the North-West and North-East.
Quests:
Capture Erewel.
Agrael must survive.
Follow the only available path and go right at the T-junction.
Quest:
Capture Ur-Nebyrazias.
Capture the city of Hallin (1). You can't build an inn in there, so visit an inn near the city (2). Hire an elfish hero and help him develop. Give him the army from Hallin and send him to recruit Hunters from all 4 recruitment points around the area (R).
 The Inn is your only source of heroes for now.
Have Agrael visit the dungeon (3) and capture Ur-Nebyrazias, which will eliminate the orange player. Pay a visit to the dragons (4) guarding the passage there.
Quest:
Bring 100 Hunters or Master Hunters to the Dragons.
The Dragons will let you pass if you bring Hunters to them. Bring more of them along with you (120-130) as their numbers decrease daily. Reach the passage (5) and go to the city of Erewel. A strong unit is defending it. You can use your supply hero to weaken them, and then move in with Agrael's demonic army to finish the job.
Quests:
Find Tieru.
Agrael must survive.
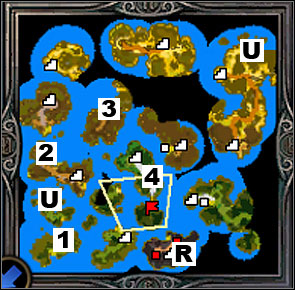
There's no hurry here. Take time to scout around the map, you'll need it to navigate through the islands. There are no cities in this scenario. The only recruitment points are around (R). There are also two spots where you can upgrade your units (U).
Sail to the right. Land on the island and visit a Tower and a lookout point (1). Continue on to the North-East, land on the beach, visit another lookout point, and enter the dungeon. Go left at the junction there and use yet another observation point (2). Go back to the underground and go along the previously unused path. Make use of the recruitment points here. The passage is to the South on the next island. Follow the underground passages to reach the island to the North. Go left, to the teleport. Go down and follow the yellow road. Build a ship on the next island. Now's a good moment to go back to get additional units. It's good to wait near the recruitment points (even a few weeks if you have the patience), and then pay a visit to the upgrade point.
 Towers and lookout points are your keys to victory here.
Land on the island near the center (3) and visit the lookout point there. Sail to the sandy island in the middle. Enter the dungeon once again and use the short corridor to reach the exit. Once on the other island, go to the South-East. Defeat the dragons guarding the bridge (4). Tieru awaits you a few steps ahead.
Quests:
Reach the borders of the Empire.
Avoid enemy patrols.
Markal must survive.
There are two orange units wandering around. From time to time, they return to a point to the North-West. You have to watch their movements and move so you don't get caught by them. On the left side of the river there are three recruitment points, and a mine to the South. The best way to cross the river is at (1). To get there, you have to follow the path to the North. Assemble as much units as possible to this point, as you won't be able to go back for them. One of the orange units will start to follow you, so be quick. Go to the dungeon entrance (2).
In the dungeons, capture the mine near the road and turn left at the first crossroad, to reach the city (3). Take your time in there, build it up a bit. The orange units will be defeated by the violet army, which will attack you in your city. Be ready to defend yourself. When you win, gather your armies and go North. Defeat another violet unit (4) and leave the dungeon (5). Attack the army there.
Quests:
Find and rebuild Lorekeep.
Markal and Godric must survive.
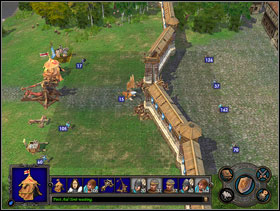
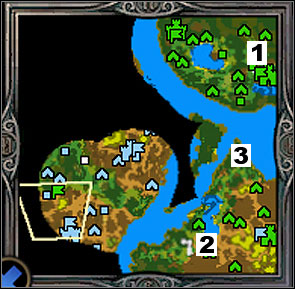
Capture a shipyard East of Newpost (1). There are Giants there, but fortunately there are few of them. Godric should get rid of them at once, as they grow in numbers each week. Next to the city there's an Archer recruitment point - use it and Godric should manage to get rid of the Giants somewhere around the third day. In this battle, use Godric himself as your main offensive force, while other units will be weakening the enemies and win you some time. Blacksmith's equipment comes in handy, too. It's easy to get it, especially if you've chosen money as your starting bonus.
There are some orange ships to be destroyed around the sea. The city of Lorekeep is to the North-East (2). The undead along the way will surely join Markal.
Quest:
Capture Hikim.
There's a sandy island to the North - that's where Hikim is (3). Don't attack the garrison guarding the entrance from the beach. Build a citadel in Lorekeep, and the units securing the teleport will disappear (4).
 Lorekeep is an important city.
Go through the teleport and capture Hikim.
Quests:
Obtain Staff of Netherworld (in Ziad).
Obtain Cloak of Death's Shadow (in Bahiyaa).
Obtain Ring of The Unrepentant ( in Al Safir).
Markal and Isabel must survive.
Next to Newpost there's a shipyard, and East of the island - a second one. West of Lorekeep, near the recruitment point, there's a lookout point that will show you three orange player's cities - there are artifacts in two of them. Markal should gather his army and sail towards the orange player's territory. Land on the beach (1) and capture the first city (2). Watch out for the orange units wandering around the map! Should you loose the city, it won't be a problem to take it back. Don't hesitate to move Markal where the heat is.
Quests:
Curse the mages' cities.
Destroy the elfish army.
Assemble 1000 Skeletons under Markal's command.
You curse cities by entering them, then leaving, and confirming that you want to spend 10000 Gold. Do so to (2) (3) and (4).
Don't expand your necromancy, as long as Markal raises dead enemies as Skeletons. The 1000-skeleton quest shouldn't be a problem this way.
Leave Isabel by Newpost to gather army and wait. Soon, there will be a green unit on the Southern shore - defeat it.
 At least 2 days will pass until the green player appears.
After capturing 3 cities, expand them and train units in them. Head along the way to the North-East, defeating three garrisons in there. Reach the last city (5).
 The last garrison is the most difficult to reclaim.
Quests:
Assemble 20 Bone Dragons.
Follow Cyrus and kill him.
When you have 20 Dragons at your command, attack the teleport from the right side, below the last city (6). That's where Cyrus entered. This time there won't be any combat.
Quests:
Find and defeat Cyrus.
Markal must survive.
This scenario is all about finding your way through the underground labyrinth. You don't have to hurry too much. Cyrus will leave Titans to fight you behind him, so it won't be too easy. Do the following:
Attack the unit guarding the lookout point and use it. Head North to visit the key master's tent (1). Use the teleport next to the tent. You'll end up South of the starting point. Go East, paying a visit to the Forge. Reach (2). Go North to another lookout point. Visit the blue tent (3) and use the teleport nearby. Now go South to (4). Go East and then South to reach the green tent (5).
 The tent teleports are one-way tickets.
Go through the teleport. Now head West, to (6). There are some mean enemies here. There's a yellow tent at the end of the path (7). Go through the nearby teleport and then go West, all the way to (8). Look around for some recruitment points here. There are even some buildings here where you can hire Dragons. The passage to the South-East will lead you to a teleport (9). There are two units of Titans here - try to get past one of them and fight the other. Go out of the dungeon (10) and fight Cyrus.
Quests:
Obtain Amulet of Necromancy.
Capture Godric's daughter.
Markal and Isabel must survive.
In this mission Godric will capture his mines at a distance (if you try to take them from him) and retake Isabel's troops. The best way to avoid the latter is to only keep one unit with her. Focus on Markal's city, defending and expanding it. Watch out for orange player's units, which from time to time land on the central island. If you need money or experience points, visit a Sphinx on the South-Eastern island and solve his riddle - the correct answer is "Tear of Asha".
Gather Markal's forces throughout the first month. After that time, you won't have a minute to spare.
Quest:
Obtain the Amulet within a month.
Left of Newpost there's a lookout point - use it. When Markal's army is grown in numbers, use him to attack the prison tower (1) to take Godric's daughter, Freyda.
Quest:
Bring Godric's daughter to Lorekeep.
Freyda will appear in Markal's inventory after paying a visit in the tower.
 Freyda can't be passed on to another hero.
Go with her to Lorekeep, then leave and go to Newpost. Along the way you'll be attacked by a unit of Angels. Wear the wings you win by beating them to fly over the mountains.
Quest:
Capture Hikim.
Attack Godric near his city (2). When the battle is over, some new units will appear by his side. These are the ones that abandoned Isabel. Win this battle and the amulet will be yours.
Quests:
Prepare for the tournament.
Raelag must survive.
Raelag has a city at his disposal and a small territory with mines to capture. You've got a month and two days to get as many units as you are able. When the time comes, the hero together with his units and artifacts will be teleported to the tournament area. Go through the portal and defeat your competitors.
 The green player is the strongest one.
It's good to wait for the enemies to fight each other, so they are weakened. When you win, go North to get the ring.
Quests:
Visit Malasara.
Raelag must survive.
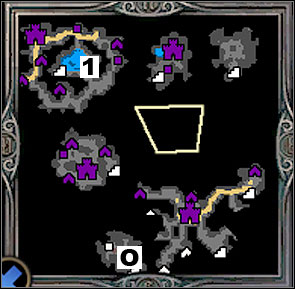
Follow the path South, capturing the mines along the way. Enter the seer's shack (1) and talk to Malasara. To the left of the tent there's an exit to the surface. Look for some recruitment points and mines around here. The red key master's tent will let you open the passage to the teleport, which will lead you to Elemental recruitment point. Watch out for the enemy unit that's entering the dungeon, you'll have to battle it. Go to the surface and to the West.
Quest:
Build the Mother of Darkness in Virbeth.
You have to find six obelisks (O), which will give you map pieces. One of them can only be reached through a teleport near the place where you entered the surface. Take time to weaken the orange player whenever you have the opportunity. The Tear of Asha is hidden in a random spot. When you get it, go back to your first city and confirm the building order.
 A hole in the ground indicates the spot where the treasure was.
Defeat the nearby orange Garrison.
Quest:
Destroy the Nightshard army.
Go to the underground using the Northern passage and capture the city there. Notice the recruitment point nearby.
Quests:
Stop enemy messengers.
Shadia must survive.
While Raelag is busy capturing next cities and finding the obelisks, Shadia should take her place at the crossroads (3) and attack any orange hero that tries to get past her. It's worth to hire a supply hero in every new city to defend it and visit the nearby recruitment points.
Quests:
Capture Soulscar cities.
Capture any city within a month.
Raelag and Shadia must survive.
Turn left at the crossroads, and capture the city over there. Try to keep the pace up and capture the second one to the East as fast as possible.
Quest:
Defeat the Demons.
Between the two cities there a lookout point that will let you know when the red heroes are coming. Each of them uses the Southern passage. You'll have to get rid of them all. The last one will appear after 4 months.
During the first week all you can do is defend, as the blue player is attacking you from the North-East and the South-West. Expand your cities as fast as you can, constantly recruiting new units. When the situation is secured, leave Shadia to defend your land and use Raelag to capture the blue player's cities. The way to the furthest of them, to the North-West, is additionally guarded by a strong Garrison. You can cross the map counterclockwise and first capture the other one.
 There are no unbeatable units in this mission.
The teleports nearby help you travel the dungeons faster. To finish this scenario, you don't even have to go to the surface.
Quests:
Escape the maze within 2 months.
Raelag and Shadia must survive.
This mission can be completed very fast. The only available path for now leads you to the red key master's tent (1), but his keys have been stolen. Go South and use the teleport in there.
Quest:
Capture Grawl.
Go South and reach the exit to the surface. Use it and go North to find and kill Grawl.
 Don't use the teleport after beating Grawl, but go back the same way you came here.
Go to (2). Teleports along the way can fool you, so don't loose your orientation. When you reach that point, you'll see another surface exit - this time crossing it will end the mission.
Quests:
Cross the borders of the Empire.
Raelag and Shadia must survive.
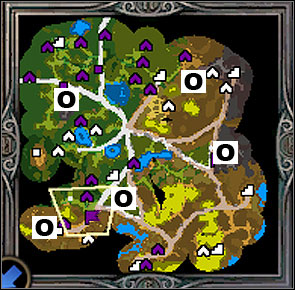
Pay a visit to the nearby lookout point. It will show you your goal, a point to the South-West. You have to go there with both your heroes. Along the way there's a lot of garrisons, but some of them are too well guarded for you. Take your time to get past them without engaging in combat. Save your units, as you won't be able to get any more of them in this mission. There are some recruitment points in the dungeons, but they don't really make a difference.
Defeat the defenders of the two blue garrisons nearby. Red and blue tents around here open up passages to the underground.
 The blue tent is near the red garrison and the other way round.
In the Northern part of the underground there are two Inferno recruitment points. You can make your way East from here, where you'll find a Dungeon recruitment point - with War Dancers. The next blue Garrison is too powerful, you'll have to get around it. Go North-West and capture a city there (1). When you capture it, it will be automatically destroyed. Go West, South, and then East, to find yourself below the Garrison. Get past the other one by going to the East. Destroy another city (2) and go along the Southern border of the map. In the Southern part of the map there's a dragon recruitment point. From now on you have to avoid blue units and go West only when they're not in your way. Raelag can use the Sanctuary to hide. Get past the last city and defeat the target Garrison. When Raelag and Shadia are there, Isabel appears.
Quests:
Destroy Veyer's army.
Isabel must survive.
Attack Vayer's army before the turn ends.

Quests:
Keep the border.
Do not cross the Empire's borders.
Findan must survive.
Focus your hero's development process on archery, fast travel and destructive magic. Black magic can also come in handy. This will greatly help you in the following missions.
Visit a lookout point left of the city. Blue player is attacking the green one's garrisons. If one of them falls, defeat the enemy that attacked it and put some of your troops there. The garrisons should hold without your help, though. Don't let yourself too far South, past the garrisons. After two months and two weeks you'll see a red unit approaching the third garrison, looking from the top. Move more troops to that garrison, so they weaken the enemy before Findan confronts him. When the red unit appears, "keep the border" quest will be completed.
Quest:
Destroy the Demon army.
The red unit is heading straight for the city. Stay there to make things a bit easier.
Quests:
Assemble 20 Dragons.
Findan must survive.
Don't take too long to power-up, because red units are doing exactly the same and you don't want them to get too powerful. Use the dungeon entrance to the North. The nearest exit to the surface leads to an island with mines. Go North and capture red player's city (1).
 Don't waste units on reaching the obelisks if the defenders are too strong.
Quest:
Capture all Demon cities.
Use the shipyard to build a ship in your city. Sail North-East to capture another town (2).
Sail to the North. Go past the rocks and head South to reach the last city (3). When you have all 3 of them, build a dragon recruitment point in Mensyl. Visit the obelisks around the map. They summon dragons, which appear somewhere on the map so you can capture them. You have to assemble a force of 20 Dragons to end the scenario.
Quests:
Retake the lost city.
Findan must survive.
The mission kicks off with a battle for the city. Try to take out as many attackers as you can to make things easier later. When the battle ends, use Findan's army to take the city back. Violet player will attack you from the East, and will do so every two weeks.
Quests:
Hold the city against attackers.
Free Talanara and Diarel.
Assemble an army in your city: 50 Elder Druids, 30 Silver Unicorns and 10 Green Dragons.
Sail to the cove to the South-East of the city (1). Don't support Findan with Druids, Unicorns and Dragons, use other units instead. Near the landing point there's a Hunter recruitment point (a green square on the map). It's good to summon a separate hero who'll take the Dragons out of the city and keep them somewhere safe so they don't get hurt during the attacks. Leave them in the city when you've got all the units required by the above quest.
Findan must move quickly, as he is being chased by the blue armies. Don't try to fight them, just run. Don't try to capture the cities, either. Only fight the two Garrisons: (2) and (3).
 Garrisons and prison guards are the only enemies worth fighting now.
Free the imprisoned heroes from the towers: one to the South-West (4) and one in the dungeons (5).
Order them to stand at the end of the South-Western path, so they don't get in the way. Findan must run all across the map, as he mustn't get caught. Don't go back to the city with him before you have enough units to complete the quest related with them. Use any means necessary to get away from his tail until the quest is complete.
Quests:
Find Tieru.
Collect the artifacts.
Findan must survive.
Time is quite important in here, because the monsters guarding all the artifacts grow in numbers day by day. The red player's army, however, doesn't expand.
Go to the Northern part of the island and enter the dungeon. Turn South at the junction and go back to the surface using the exit there. There are recruitment points in the Northern part of the island you're on now. Go back to the dungeon and follow the yellow path to another exit. Here you'll find a forge, a recruitment point and an upgrade point. Go back to the dungeon and use the corridor next to the teleport (it's easy to miss that spot, as it's quite dark in here). Go Southwestwards. When on the island, head East. Defeat the three Demon groups in there and you'll win yourself the first artifact (A), Pendant of Mastery.
Go back to the underground corridor and follow it to reach another island. Reach the Dragons guarding the second artifact (Unicorn Horn Bow) (A) from the South.<br>
 A teleport will help you back.
When back under ground, follow the yellow path to the next exit. There's another dungeon entrance on the island you'll find yourself, so use it and head South to reach the next island. There's a big recruitment here up North of this land. Back in the dungeon head West and exit to the surface. There are Dragons (A) in here, guarding the third artifact, Ring of Vitality. Go West. On the next island go North again and enter the dungeon once again. The last artifact (A) is past the entrance. Use the only way out to find Tieru (1). Agree for the nearby Unicorns to join you.
Quest:
Ensure Tieru is safe.
You can't really 'complete' this quest, as Tieru ends up dead whatever you do. If you developed you hero in a way that he now has teleportation ability, you can try to use it to destroy both enemies. It won't change the outcome, though. Attack the red units on the way. Kill them both and talk to Tieru's ghost.
Quest:
Find out why Tieru was attacked.
Board the red ship and sail Southeastwards, to destroy the second red unit (2).
This mission is probably the toughest in the whole game. Save your progress often and be prepared for trial and error. You have to be quick, not to let your opponent regain his strengths.
How to fight: When you confront the blue units, along with Nicolai, use "Imbue Arrow" together with some destructive magic. The most useful spell here is "Phantom Forces" that lets you multiply your troops. Try to use some massive destruction magic as well, and keep as many Master Hunters among your ranks as possible. In order for Phantom Forces to work, there must be an empty spot next to a unit you're casting it on. Casting that on a few hundreds Master Hunters can make your day! You can also achieve a lot by having Findan cast Phantom Forces on ranged units hidden behind a wall of Treants.
Quests:
Destroy Nicolai, the Vampire Lord.
Findan must survive.
Capture the mines around your cities, trying to do that as fast as possible. It's best to leave your territory during the second or third week. Visit the lookout point between your cities to see where the six groups of Spectral Dragons await. You'll have to kill them along the way. You can leave the ones on Nocolai's territory, though. You also don't have to visit all the obelisks.
Defeat the garrison (1) and go North to the teleport, which will lead you to the South-Eastern island. Be sure to visit the seer's shack (2).
Quest:
Find 4 dwarfish artifacts.
There's a teleport that leads to the underground on this island (3). Before you proceed, look around the island. There's a strong hero in here, you can beat him as long as you do it fast, before he gathers more troops. If fighting him still seems too hard for you, try the following trick: send the supply hero to the Western part of the island and lure the enemy there, and after a turn or two move Findan into the teleport to the North. The second hero can escape using the second teleport, and Findan won't be caught due to the enemy's delay. This way you don't get to control this island's city, and it certainly comes in handy later on.
The troops from this island won't use the teleports, so you don't have to think about defense against them. Findan should summon Sylvan units to himself. Before you leave the island, take time to capture the city to the South-East and kill the Spectral Dragons, which guard the useful artifacts to the South. One of the 10-level heroes should collect the undead army from the enemy cities and follow Findan. For now, this army can help you finish off lesser bests on your way, so you don't have to risk Sylvan units' loss.
When in the dungeon, defeat the garrisons guarding the dwarfish artifacts (A). These are: Dwarven Mithril Cuirass, Greaves of Dwarven King, Dwarven Mithril Shield and Dwarven Helmet. You can speed things up using the teleports here and there. Capture the cities in the middle and in the South-West, and use their units to support your second army. Capture all the enemy mines along the way.
 There are other treasures near each artifact.
Quest:
Show the artifacts to the seer.
Get back to the seer, and you will exchange your artifacts for 5 Phoenixes. It's essential that you do that!
In the North-Eastern part of the dungeon there's an exit to the surface (4). You shouldn't use it if you don't have the Phoenixes with you. Save your game after using it. In there, regenerate your mana. Nicolai is nearby, so watch out for him. If Findan isn't able to beat him by himself, first attack him with your support army (it doesn't matter that your second hero dies), and them immediately use Findan's main forces. The supply hero shouldn't have any artifacts on him, so they don't fall into enemy's hands. With each passing week, Nicolai is stronger, keep that in mind.
 If you want to fight Nicolai just once - Phoenixes must survive.
Phoenixes must be engaged in battle when Findan is fighting, but it's best to have them standing in the corner - at least one must survive the battle. If at least one is alive when you win, the mission is over. If not, you'll have to beat Nicolai over and over again, until you catch him in one of the cities. Try to keep the Phoenixes alive!
Quests:
Find and capture Kadashman.
Reach level 10.
Zehir must survive.
This mission is simple and quite relaxing. Capturing the mines head North, and then turn South-East. Snatch all the treasure chests, as they come in extremely handy when you want to level-up fast. To the East there are two worthwhile recruitment points: Gargoyle and Gremlin (red squares on the left of the map). When fighting, summon Elementals to help you win with tougher enemies here. Buy some things in the artifact shop and attack the Garrison (1). Now head South to Kadashman (2). There are some easy battles with enemy heroes ahead. Capture the city and you're done.
Quests:
Reclaim all the Silver Cities.
Build a fifth level Magic Guild in Al Safir.
Zehir must survive.
Capture most of the mines in the area, but don't go too far in the volcanic regions. Time is important. Hire a hero who will stay in the city and defend it against the blue player's attack. Luckily, his attacking forces are not too strong. A castle with a considerable amount of troops will do.
Capture Al Safir before its guards power-up too much. Defeat the garrison South of the city and use the teleport (1). It will transport you to a random place among the three other teleports - try again until it drops you in the Northern part of the map. Get past the two garrisons (2) (3) and attack the city (4).
How to fight: Don't wait for the reinforcements; the city's defenders will always be greater in numbers than your troops. Use Zehir to summon Fire Elementals, as they are the best against Titans. Remember about Gremlin's ability to repair war machines. Don't go past the city walls; wait for the enemy to come out.
Build a level 5 Magic Guild in the city once it's yours, provided the enemy didn't do it earlier.
 The ability to control war machines is very handy. It's good to destroy the towers first.
Now you can easily capture two necromancers' cities (5) and (6). Gather all the undead units and form them into a second army, led by a hired necromancer. Use the shipyard (7) and sail to the South. Have another hero transport troops from Al Safir to other cities, so Zehir can summon them.
Quest:
Capture Lorekeep.
The last bases of the blue player are to the South. It's easiest to get in by landing on the Western shore (8). Use the support army to weaken the guards and then use Zehir to finish the job. Go past Newpost and capture Lorekeep, which isn't as well guarded as the landing site.
Quests:
Meet Findan.
Free Godric.
Capture all Empire cities.
Zehir must survive.
Now you'll be controlling the Haven-type units. In order to complete this mission easily, you'll have to do things in different order than you're used to.
On the first junction turn East and go down to the dungeon. In its center, Godric is imprisoned (1), but you can leave him in his tower for now. Gather all the units from the underground recruitment points and go back to the surface with them. Capture the garrison (2). Now you have to capture all the cities except Markal's headquarters (3). Don't even approach it for now.
At first you'll have to use Elementals to fight, but when you capture the first city, it will be a bit easier. When you control 4 Haven cities, you've completed the first quest. It's good to capture the second Undead city as well, the one to the South-East. Now you can take your time to travel around the map.
Hire a second hero to gather units from your cities. It's good to have hundreds of them. Go back to the dungeon and free Godric. Two quests will be completed this way, as Findan will show himself as well.
Quests:
Defeat Markal.
Findan must survive.
Godric must survive.
Divide your forces so that all three heroes have decent armies under their commands. Findan should mostly get ranged units, as he will be attacking the enemy town and use his "Phantom Forces" to do so. Approach Markal's castle with all three heroes.
 Capturing the cities certainly pays when it comes to numbers attacking enemy cities.
When Godric begins his quest to storm the recruitment point near the enemy city, there will be a pop-up asking you whether the heroes are ready. Confirm and you will have to perform three consecutive battles during one turn. In the first two of them, Zehir and Godric will be fighting Markal's forces. The necromancer will raise his dead, so watch out which troops and real and which are phantoms. Deal with those that were on the battlefield from the very beginning in the first place. When you kill the "real" soldiers, their phantom counterparts will disappear. In the last battle Findan will be storming the enemy city. This time it should be easier. Winning this completes the scenario.
Quests:
Capture Isabel and stop the ritual.
Zehir, Godric and Findan must survive.
In this mission you should focus on Godric, as he has the shortest way before him and the most opportunities to hire new troops. First you'll have to eliminate the light-blue player, so he doesn't interrupt.
Godric and Findan are for now separated from Zehir. Visit all the recruitment points with them and capture the city to the West (1). Meanwhile, use Zehir to capture the one to the East (2). South of it, there's a huge Academy recruitment point. Now use Zehir to destroy the Eastern garrison (3) and Godric or Findan to destroy the Western one (4).
Quest:
Confront Raelag.
Raelag and Shadia (green) appear to the North-West.
Zahir's next quest will be to capture the blue castle (5) and the others should take care of the one to the South of the center of the map (6). When you capture the fourth castle, the light-blue player is out. The paths meet above those towns, so your heroes can finally meet.
Now Godric will take the brown post (7). Behind it there's an upgrade point, a lookout point and a brown Haven-type city (8), worth capturing. Expand the city and take the troops from it. To get some additional funds, have Zehir use the road along the Eastern border of the map. He'll reach a teleport which will lead him to two spots full of gold.
There's a road from your newly acquired Haven city to another post (9). Go further to find the next city (10), which should be claimed by Godric. The way to the North-West is leading straight to the place where the green player is (11). All that's left is to defeat the dark-blue garrison defenders that are blocking the way. Approach Raelag and Shadia, but don't attack them. A cut-scene will occur, and they will join you. They don't have to do anything particular, just use them to capture some more mines.
 Isabel awaits you in the North-Western corner of the map.
Quest:
Raelag and Shadia must survive.
Go West of the meeting place to find the last garrison, and behind it - Isabel's castle (12). Godric should defeat her in battle, thus ending this scenario. It's good to destroy the castle's defenses first. If you lack units to be successful here, capture some more of brown player's cities.

Quests:
Save Isabel.
Capture Biara.
Heroes must survive.
This mission consists of consecutive battles for all your heroes. There are no recruitment points here. The key is to *save* units. On higher difficulty levels it's best to repeat a battle each time you think the losses are too great. Make use of all of your assets here.
At first each hero will have to defeat the nearby garrison's defendants. You want to minimize your losses here. Everyone will meet in the center of the map, where Biara is hiding. It doesn't matter which hero you use to attack the city, every one of them will have his turn here. When you win, you'll be teleported to a one-way path to Demon Lord's castle.
Quest:
Confront the Demon Lord.
There's a castle at the end of the road - spot the mana regeneration point nearby. The situation is the same as before, all of your heroes will fight in this one. Focus on destroying the magical barrier using the catapults or any other means necessary.
 The shield is not very strong, one or two catapult shots will do.
The last series of battles is of course against the Demon Lord himself. Try to finish him off as soon as possible, as he has some powerful massive damage destructive spells. This time you don't have to save your units, as it's the last battle you'll fight in the campaign. Isabel is free, hazza for you.


 Heavy Rain Game Guide & Walkthrough
 Harry Potter and the Goblet of Fire Game Guide & Walkthrough
 Heroes VI - Pirates of the Savage Sea Game Guide & Walkthrough
 Harry Potter and the Half-Blood Prince Game Guide & Walkthrough
 Hearthstone: Curse of Naxxramas Game Guide & Walkthrough