This unofficial strategy guide to Flight Simulator X video game will help in learning all the basic elements of this very complex and challenging simulator. The first pages of the guide contain a list of the popular terminology used by the pilots themselves and by the ATC crew. They also describe the most important things about navigating the plane, including descriptions of the most important devices and indicators in the plane's cockpit.
The remaining chapters of this strategy guide contain examples of two flights and they describe all the procedures and other things a pilot must do to complete these missions (pre-flight checks, starting the plane, flying towards destination, landing and parking the plane). Hopefully this will allow the players to become experienced enough to try completing more challenging flights.
Flight Simulator X is one of the most complex simulators available on the market and it was published by Microsoft. The game puts a lot of effort into providing as much realism as possible and it's also a very big product, because it offers a chance to explore the entire globe and to take control over lots of different planes.
Bartek "konraf" Rutkowski, Krzysztof "RzEmYk" Rzeminski & Adrian "Red Scorpion" Napieralski ()
Both tutorial flights were described with rookie pilots in mind. They were strongly simplified, some activities and procedures have been purposely omitted.
Please remember that some ATC instructions will vary during the flight and the ATC instructions, NOT tutorial instructions should be followed.
VOR - VOR system (VHF Omnidirectional Range). Consists of the ground VOR station and the VOR receiver aboard the plane. When navigating with VORs, we can fly towards or from a specific station and intercept one of its 360 radials. The VOR stations may be equipped with DME (Distance Measuring Equipment), creating VOR/DME system. In this case the onboard VOR receiver can also read the distance from/to the VOR station.
ILS - (Instrument Landing System); The system is responsible for guiding the aircraft along the optimal landing path. It consists of the horizontal beam (localizer), the vertical beam (glideslope) and markers (distance measuring beacons). The aircraft are equipped with proper receivers being able to read the ILS system signals.
Intersection - fixed points in the airspace, usually intersections of airways or other specific points, like the point where an airway changes direction. They are defined only by coordinates.
Transponder - the onboard device that sends the "squawk" used to identify planes in the airspace by the ATC.
Transponder squawk - 4-digit number set by the crew and emitted by the transponder, which lets the ATC do identify and track the aircraft over the airspace.
FMC - (Flight Management Computer). The computer that provides automatic flight guidance. Planned route is stored in its memory and then followed. Continuous aircraft data analysis provides calculations for take-off and landing speeds, estimated time of arrival, the amount fuel after landing, etc.
IFR - (Instrument Flight Rules); The pilot flies the aircraft in conformity with instrument rules, ex. bad or no visibility.
ATIS - (Automatic Terminal Information Service); ATIS system provides aircraft crews with most up-to-date information on the airport organizational issues and weather conditions (wind, precipitation, pressure, etc.)
Flight Director - the system shown on display or analogue gauge, which indicated the optimal flight path (vertical and horizontal). Flying with F/D help means the lines form a cross
A small navigation guide.
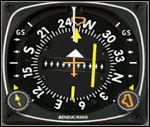
NDB (Non Directional Beacon) navigation
NDB stations are the simplest navaids, which inform us only about the aircraft location in relation to the NDB without any information about distance. Navigation is based on flying from one NDB station to another and the information abort reaching the NDB is acquired by change in the ADF (Advanced Direction Finder) gauge indication - the arrow flips downwards.
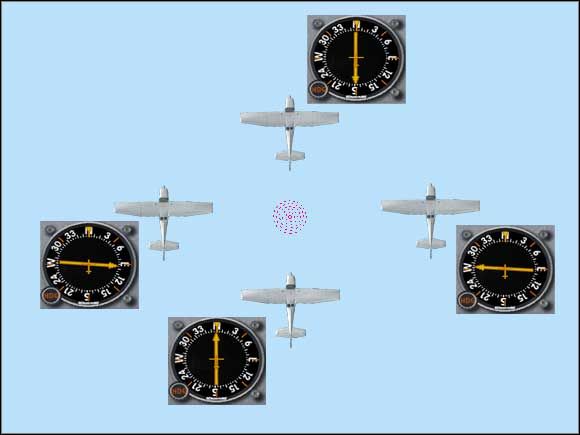 ADF gauge indication - aircraft location in relation to the NDB.
As we can see, the ADF shows only the direction to the tuned NDB station.
VOR (VHF Omnidirectional Range) navigation
VOR stations are more precise navaid than the NDBs, because their signal is enhanced with magnetic north orientation which makes it possible to fly along radials, "rays" going out of the station in all directions. Thanks to it we can plan our route, i.e. fly along the given radial or fly towards the VOR from a given side.
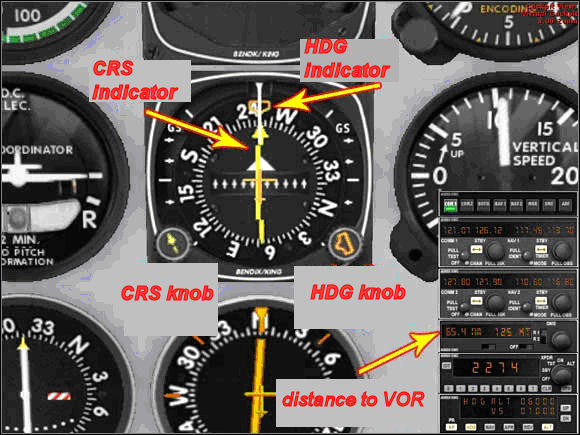
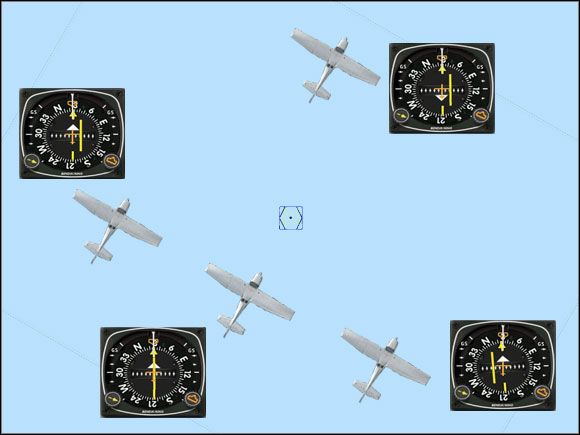 NAV gauge indication - aircraft location in relation to the VOR station.
On the picture above, our course is set to 30, so we'll fly along the radial 210, because the "ray" comes off the VOR in 210 degrees (course 30 plus 180 degrees is 210 degrees, as the radial leaves the VOR station).
In the lower left part we can see three situations (from the right): the aircraft is to the left from the radial 210, it's on the radial 210 and it's to the right from the radial 210. Nevertheless, the white triangle points toward the same side as the course arrow head.
In the upper right part we have a situation, where the aircraft has already passed the VOR - the white triangle points the opposite way. Additionally it's to the left from the radial 30. Yes, it's already radial 30, because that's the direction of the "ray" coming off the VOR station.
VOR navigation is based mainly on flying along radials and intercepting them.
VOR/DME(VHF Omnidirectional Range) navigation
VOR/DME is the VOR station equipped with a DME (Distance Measuring Equipment) system which always shows us the current distance to the tuned VOR. The information is shown on the DME display.
VOR/DME stations are the most popular navaids around the world.
ILS System (Instrumental Landing System)
ILS system is based on VOR station (or VOR/DME) and its task is to help pilots during landings by guiding the aircraft along the optimal descent path. ILS system consists of:
a) localizer - the outward horizontal beam which helps align the aircraft with the runway;
b) glide slope - vertical beam that helps keep the aircraft on an optimal descent path;
c) markers - three specific stations (The Outer Marker, the Middle Marker and the Inner Marker), set in front of the runway, which are an additional information about the distance from the threshold.
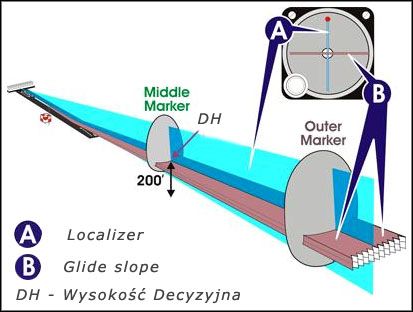 Radio beams of the ILS system.
As we can see, the localizer and the glideslope form a cross. The middle of that cross is the path the aircraft should follow to land right behind the runway threshold.
Decision height is the altitude on which we make a decision whether to continue landing or abort it. The DH can be found on airport approach charts, but if we use the ILS system, the most common DH is 200 feet above the ground level.
One of the most useful gauges used in navigation is the HSI (Horizontal Situation Indicator). Here are three exemplary situations:
 We are above the glideslope and to the left from the runway
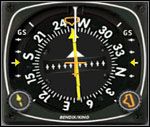 We are on the glideslope and on the localizer
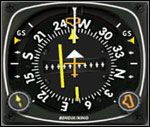 We are below the glideslope and to the right from the runway
As we can see, the runway centerline is symbolized by the course arrow. If the middle section deflects to the right, then the runway is to the right. Small yellow triangles on both sides of the HSI indicate the glideslope. If they drop below the center of the gauge, the glideslope is below us.
GPS (Global Positioning System)
GPS navigation is based on the satellite network around the globe. To navigate, we need a GPS receiver which gets information from 4 satellites and therefore is capable of calculating our position, heading and speed.
In Flight Simulator, there is an additional GPS panel which is called by pressing the Shift + 3 keys.
Hi! The following guide will cover the preparations for flight and the flight itself between the airports of Krakow (code EPKK) and Prague (code LKPR).
Let me begin with the Mooney Bravo cockpit description. You will not find much difference between this cockpit and cockpits of other Flight Simulator's light aircraft. If you are familiar with this particular cockpit, you may as well skip to the next paragraph.
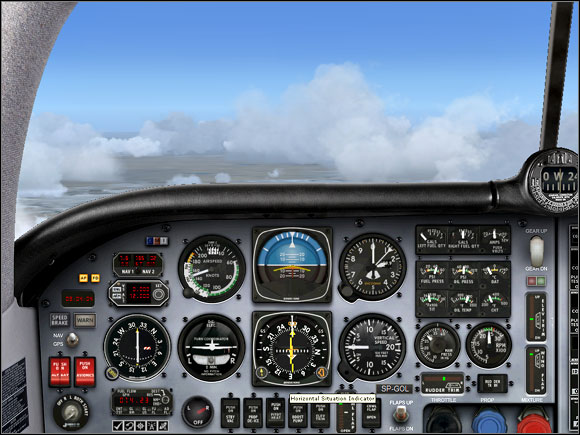
Let's begin with the main panel.
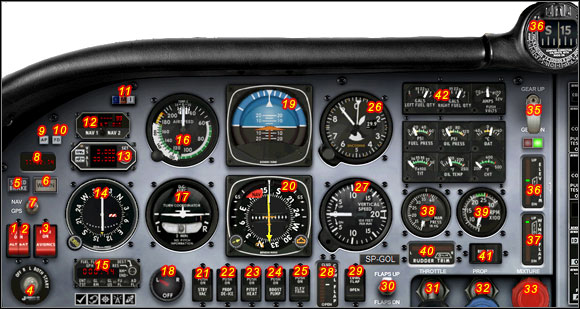 Main panel.
Gauges of the main panel:
1 - alternator main switch
2 - battery master switch
3 - avionics switch
4 - starter
5 - aerodynamic brakes indicator
6 - warnings indicator
7 - navigation mode switch (NAV or GPS)
8 - real time clock
9 - autopilot master switch
10 - Flight Director switch
11 - marker beacon annunciator lights
12 - DME indicators
13 - autopilot panel
14 - NAV2 Radio
15 - fuel flow gauge
16 - airspeed indicator
17 - turn coordinator
18 - fuel selector
19 - attitude indicator
20 - Horizontal Situation Indicator
21 - standby vacuum pump switch
22 - prop de-ice switch
23 - Pitot heat switch
24 - fuel pump boost switch
25 - elevator trim switch
26 - altimeter
27 - vertical speed indicator
28 - cowl flaps position indicator
29 - cowl flap switch
30 - flap position switch
31 - throttle control
32 - prop control
33 - mixture control
34 - magnetic compass
35 - landing gear lever
36 - rudder trim switch
37 - flap position indicator
38 - manifold pressure gauge
39 - tachometer
40 - rudder trim indicator
41 - rudder trim indicator
42 - fuel tank quantity gauges
Radio and autopilot panel
 Radio and autopilot panel.
Press Shift + 2 to open the panel. Radio and autopilot panel comprises the following gauges:
1 - audio switches used to listen to various radios and navaids;
2 - COMM1 section - the VHF1 radio section. Left part indicates current frequency, while the right part is used for storing backup frequency. Only that frequency can be edited and then set current using the arrow buttons.
3 - NAV1 section - radio receiver that is tuned to VOR transmitters. Frequencies are set similarly to the COMM1;
4 - COMM2 section - VHF2 radio section, frequencies are set similarly to the COMM1;
5 - NAV2 section - works similarly to the NAV1 section;
6 - DME indicator - left side shows the distance in nm to the VOR, right side shows our speed in relation to the VOR. R1 & R2 switches are used to choose the signal source - NAV1 and NAV2 respectively;
7 - transponder panel - the transponder squawk code is stored there using the digits;
8 - autopilot panel - lets you set the required altitude (ALT), vertical speed (VS) that is adjustable with the use of UP and DN buttons, enable the autopilot with the AP button and set HDG, NAV, APR, REV, ALT autopilot modes.
Autopilot modes:
HDG - the autopilot follows the set heading;
HDG - the autopilot follows the NAV course;
APR - the autopilot follows the ILS landing system indications;
REV - back-course type approach;
ALT - altitude change and holding.
Lights panel
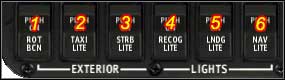 Light switches.
1 - rotating beacon
2 - taxi lights
3 - strobe lights
4 - recognition lights
5 - landing lights
6 - navigation lights
Rotating beacon light is turned on before the engine start-up sequence and turned off after the engine shutdown. Taxi lights are used during taxiing and take-off. Landing lights are used during take-off and landing. Strobe lights are used before entering the runway and turned off after vacating the runway. Recognition and navigation lights should be turned on incessantly.
Flight preparations comprise aircraft selection, fueling, router planning and online weather downloading.
Flight preparation and aircraft selection...
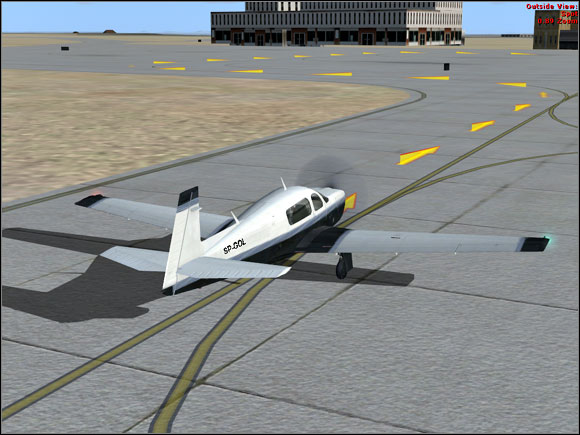
The aircraft we are going to select for our tutorial flight will be the single-engine Mooney Bravo with classic panel. While in Free Flight menu, click the Current Aircraft button and select the aircraft and its livery. Pressing the Details button enables the registration numbers change. In our case it is SP-GOL.
After returning to the Main Menu, click the Flight Planner button to create our flightplan. Choose Krakow Balice (EPKK) as Departure Airport and place the aircraft at Parking 6. Then choose the Prague Ruzyne (LKPR) as the Destination Airport and select the VFR rules flight as well as the VOR-to-VOR navigation. Finally click the Find Route button.
The generated flight route runs via two VOR stations - OTA (frequency 117.45) and VLM (frequency 114.30) to the destination airport.
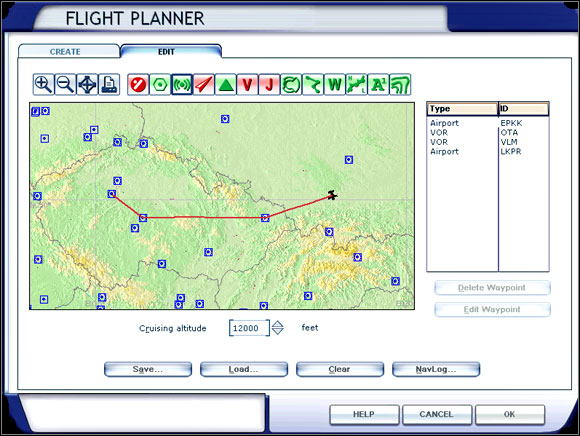 Flight route.
Set the flight altitude to 12000 feet then click the NavLog button to familiarize yourself with the flightplan details. If you wish, you can print the flightplan by clicking the Print button.
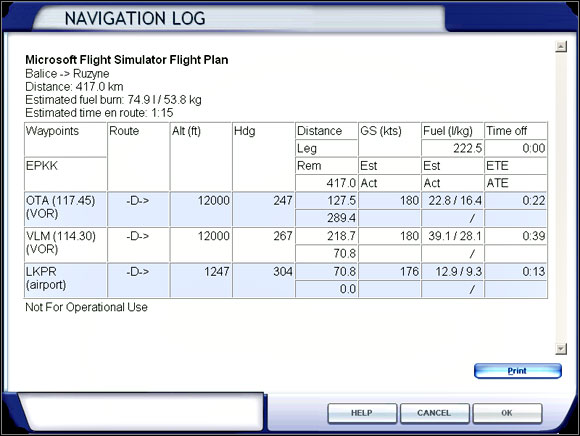 Navigation Log (NavLog).
The route length is about 225. Our flight should last one our and fifteen minutes and according to FS calculations the fuel consumption will be about 120 lbs. Unfortunately the fuel consumption calculation should not be trusted and the result should be multiplied by 1.5 and add some extra fuel for taxiing, holding or headwinds. 180 lbs should be optimal in our case, which means that each of the two tanks will be filled with 90 lbs of fuel.
The aircraft will be fuelled by simply accessing the Fuel and Payload menu and entering the values mentioned above.
Now we will set the in-flight weather, which is done in the Weather menu. Let 's select the Real-World Weather, which will cause the real world weather is downloaded from the Internet. Then we can choose "Static" or "updated every 15 minutes" option. The first option downloads the weather for the beginning of the flight and then it remains static until the end. If the second option is selected, the weather is downloaded every 15 minutes which makes the flight more realistic assuming that the computer remains online during the whole flight.
We are now ready to fly, so we access the Free Flight menu and click the Fly Now button. After a while we will find ourselves in the cockpit of out aircraft.
So we entered the aircraft...
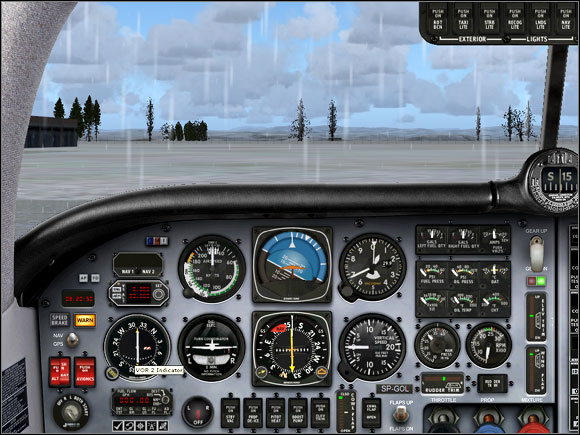 Our cockpit in Cold & Dark mode.
In our case the Cold & Dark cockpit mode is recommended, which means both the avionics and the engine are shutdown. Such conditions are shown at the picture above.
To enter the Cold & Dark mode, shut the engine down using the starter (4), pull the throttle (31), prop (32) and mixture (33) controls all the way back, cut off the fuel with the fuel cutoff switch (18), switch off all external lights, the avionics (3), the alternator (1) and - last but not least - the battery (2).
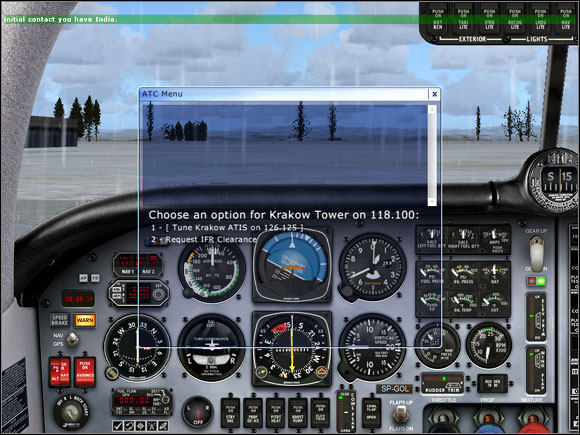
We begin with switching on the battery and the avionics, then we switch on the nav lights and after opening the radio panel, we set the ATIS frequency (126.125). We can tune in the ATIS automatically by opening the ATC window, pressing the accent key (~) and selecting Tune Krakow ATIS on 126.125.
In this case the ATIS will inform us that the temperature is -1 degrees Centigrade, the air pressure (QHN) is 3003 (30.03 inHg) and that runway 25 is now the active runway (runway heading is 255). The pressure is set into the altimeter using the knob located under the gauge.
Then we set the Krakow Tower frequency, which is 118.100.
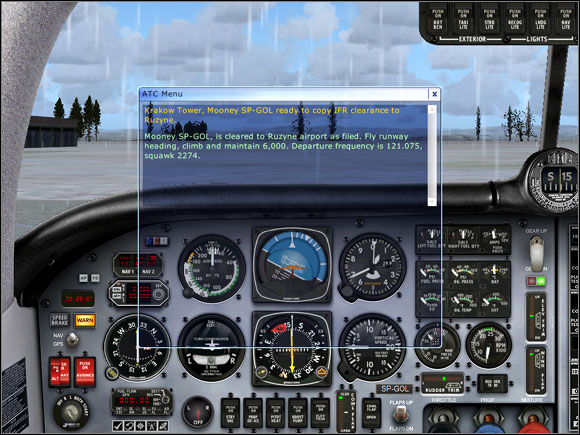
 Requesting the flight clearance.
Now we Request IFR Clearance, and are given one. After take-off we are to fly the runway heading (255), climb and maintain 6000 feet and set the transponder squawk to 2274 (that is done automatically in the radio panel). Now we should only read back the clearance by selecting the suitable option in the ATC window (Read Back IFR Clearance).
 We are cleared for the flight.
As soon as we are ready, we will request the taxiing clearance.
We begin with enabling the fuel flow, switching on the rotating beacon, the fuel boost pump switch and then we push the mixture control all the way in. Now we push the throttle very slightly and turn the starter key until the engine starts. After the start-up it's time to switch on the alternator and to open the throttle a little bit more to warm the engine.
After approximately 5 minutes the engine should be warm enough to fly. Now we can request the taxiing clearance.
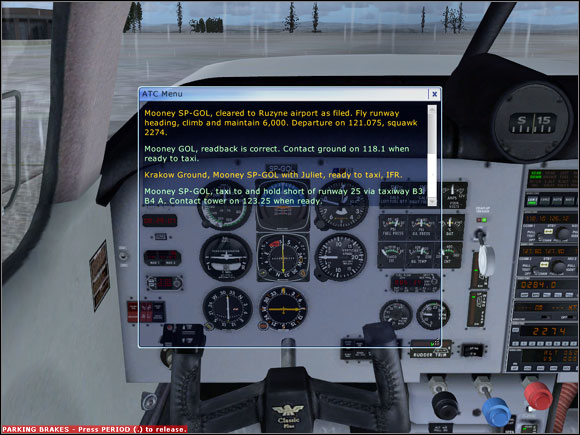 We are cleared for taxiing.
We are cleared to taxi to the holding point at runway 25 via B3 B4 A taxiways. If we are not equipped with the airport map then it is recommended to use the taxiing aid by selecting the Progressive Taxi option in the ATC window and taxiing over the displayed arrows.
So now we switch on the taxi lights, the Flight Director and push the prop control all the way in. After that we can release the parking brake and begin taxiing. In the meantime we will lower the flaps by one notch and switch on the Pitot heat. We will taxi as far as the runway 25 holding point and then we should ask for take-off clearance.
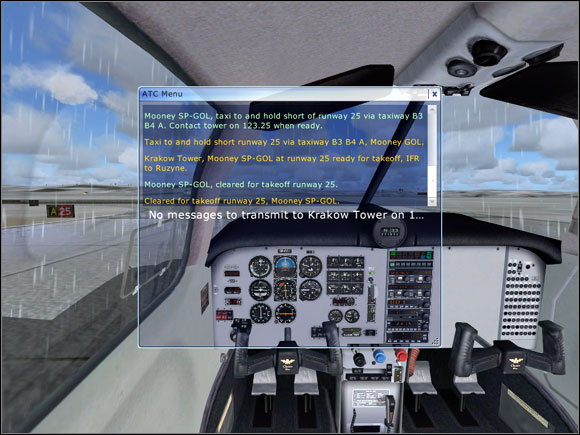 We are cleared for take-off.
As soon as we are cleared for take-off we should switch on the landing lights, strobe lights and then enter the runway. We should taxi onto the runway centerline to ensure the safe take-off.
In order to take-off we push the throttle all the way in. The aircraft begins to accelerate and when the speed reaches 70 knots, we pull the yoke (the stick) begin to climb. At positive rate of climb, raise the landing gear and accelerate to 90 knots. Then raise the flaps and keep on climbing.
Now we can switch on the autopilot. Open the radio panel and set our altitude (ALT) to 6000 feet (such altitude was indicated when we requested the flight clearance), press the ALT button and set the vertical speed (VS) to 1000 feet per minute. The autopilot itself is turned on by pressing the AP button. If heading was not set earlier, then set it to 255 using the knob and press the HDG button.
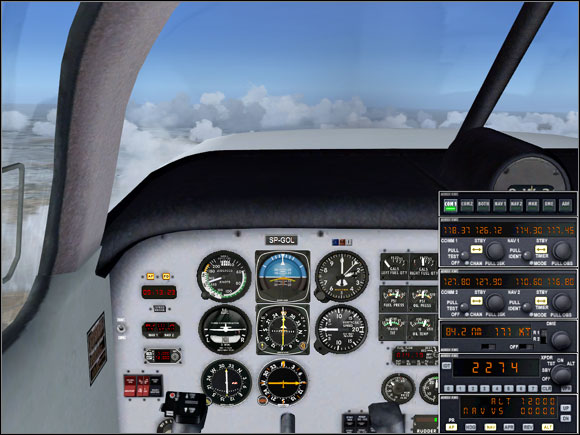
 Radio panel and flight control settings.
We can immediately tune the OTA VOR frequency (117.45) as shown above. The indicated distance to the VOR is 65,4 nm. Now rotate the course knob to achieve a solid white line and to flip the small white triangle upwards. We will begin to intercept that VOR as soon as the distance is reduced to 50 nm.
The course informs us about the aircraft location in relation to the VOR. Let's imagine a line connecting the aircraft with the VOR. The azimuth of the line (looking from the VOR) is called the outbound radial. If we add 180 degrees, we receive the inbound radial.
The indications shown above inform us that we fly the 250-degree heading. The course is also set to 250 degrees, the white triangle points upwards and the arrow is almost solid. It means we fly TO the VOR on outbound 250-degree radial, which is the inbound 70-degree radial (250 degrees +/- 180 degrees is 70 degrees). To be more precise, we fly a little bit to the right from the radial, as the middle section of the arrow is moved to the left and doesn't touch the end and the head of the arrow.
In the meantime the Krakow Tower should tell us to contact the Departure on 121.075. We switch the frequency and confirm the instruction.
After a while we receive an instruction to turn left to heading 250 to fly by our own navigation and climb to 6000 feet. Turn the heading knob to set 250 degrees. When we are close to the our desired altitude, we will receive next instruction to climb to 12000 feet. We set that altitude in our autopilot panel. As soon as we cross the altitude of 10000 feet, we can switch off the taxi and landing lights. When our ascent is complete, we can reduce thrust with the throttle to approximately 85% to save fuel.
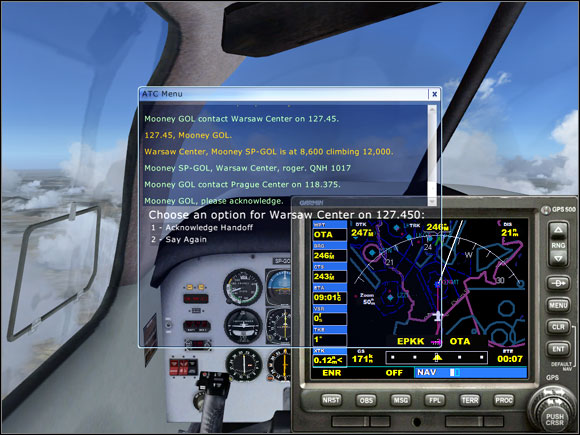
When we are close to the Departure area border, we will be redirected to Warsaw Center on 127.450.
We continue our flight and as soon as we are 50 nm from the OTA VOR, we will intercept and fly toward it. To achieve it we rotate the course knob to make the course indicator arrow as solid as possible. It should indicate the course of about 250 degrees. Now we rotate the heading knob to synchronize it with the course indicator. When the aircraft finishes the turn, we can switch the autopilot mode from HDG to NAV. Now the autopilot will fly the aircraft along the indicated radial.
When we cross the Polish - Czech border, we are instructed to contact the Prague Center on 118.375.
 Crossing the border...
We continue our flight as far as to about 5 nm from the OTA VOR and then change the autopilot mode back to HDG. We set the new heading of 267 degrees (the heading is shown in the Navigation Log) as this heading will bring us to the VLM VOR. When we reach the OTA VOR, we rotate the heading knob to intercept radial 267 FROM the OTA VOR, i.e. to make the yellow arrow solid and flip the white triangle downwards, which means we are flying FROM the VOR.
 Flying away from OTA VOR.
After a few miles we can switch the autopilot mode back to NAV. When the aircraft is stabilized, we rotate the heading knob to course indicated by the arrow.
We fly as far as to the distance of 50 nm from OTA VOR and then change the autopilot mode back to HDG. Now we change the NAV1 frequency to 114.30, which is the frequency of the VLM VOR.
Note, that the white triangle points upwards again.
 After switching frequency to VLM VOR and adjusting the gauges.
We continue flying that heading until we are about 50 nm from the VOR. Then again we switch the autopilot to NAV mode. Approximately 33 nm away from the VLM VOR we are given instructions for the approach. In our case the controller says we are 69 nm east of the airport, we are to turn right to heading 305 and expect vectors for ILS approach to runway 31.
 Closing to Prague.
Now we can choose:
1 - Acknowledgement of the specified approach;
2 - Change of landing runway;
3 - Change of type of approach, ex. a visual approach.
We choose our assigned approach and turn right to heading 305. After a while we are instructed to descend to 4000 feet.
We set the autopilot ALT to 4000, making no changes to the vertical speed. During the descent we have to remember about thrust reduction to avoid too high speed. When we cross the altitude of 10000 feet, we switch on the taxiing and landing lights as well as set the altimeter to local QNH pressure - in our case it's 1021 hPa, i.e. 30.15 inHG.
In the meantime we can have look at the airport chart. The ILS frequency for runway 31 is 109.500 and the runway heading is 305 degrees.
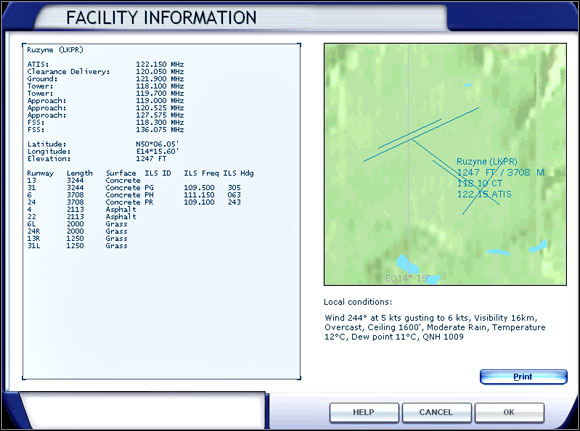 Prague Ruzyne airport chart.
Soon we receive an instruction to change frequency to 124.675 and contact Kbely Approach. The new station redirects us to heading 215.
As we are to be vectored to the final approach to runway 31, we can switch the NAV1 radio to ILS frequency (109.50) and set the new course to 305.
When we are about 19 miles from the airport, we receive further instructions to turn right to 275 degrees, descend and maintain 4000 feet (we should already have reached that altitude by now) and permission for ILS approach to runway 31 with maintaining 4000 feet until we are established on the localizer (the radial of runway 31). Now we have to contact Ruzyne Tower on frequency 119.700.
Note, that approach permission does not mean landing permission!
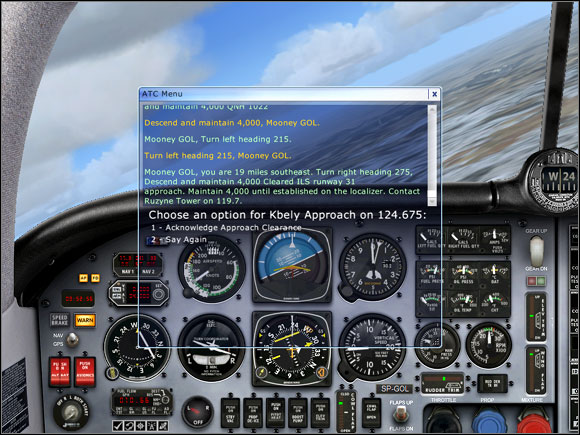 Permission for landing approach.
As we can see on the picture above, the course arrow sections do not form a solid line. The middle section is moved to the left, which means our aircraft is localized to the right of the localizer. We should keep flying at heading 275 to make the course arrow solid.
After establishing on the localizer we can set the autopilot to NAV mode, which will hold us on the localizer while closing to the glideslope. When two yellow triangles on both sides of the HSI (Horizontal Situation Indicator) start to go down, we can press the APP button on the autopilot panel which will keep us right on the correct path.
The glidepath can be compared to an incline that leads the aircraft toward the runway threshold.
While descending we should reduce thrust to maintain speed of 120 knots.
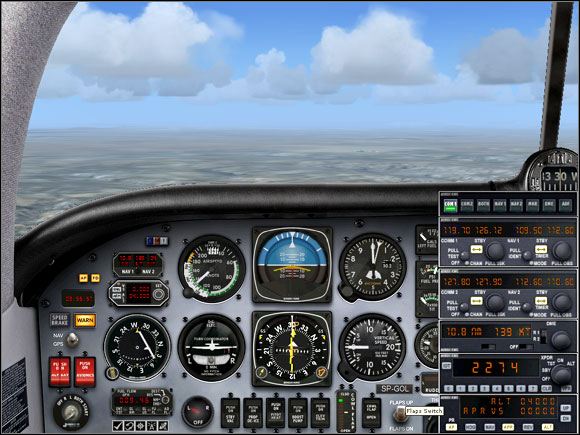 On the final to runway 31.
When we are about a quarter mile from the runway threshold, we will receive the landing permission, so we begin to reduce speed by further thrust reduction. When our speed drops to about 100 knots, we lower the flaps by one notch, but along with further speed reduction we should add more flaps to achieve the full landing flaps configuration. At 90 knots we lower the landing gear. We should remember about throttle adjustments, as full landing configuration means more drag, so we need more thrust to compensate it and keep 80 knots.
When we are close to the runway threshold, we should switch off the autopilot and continue our landing manually.
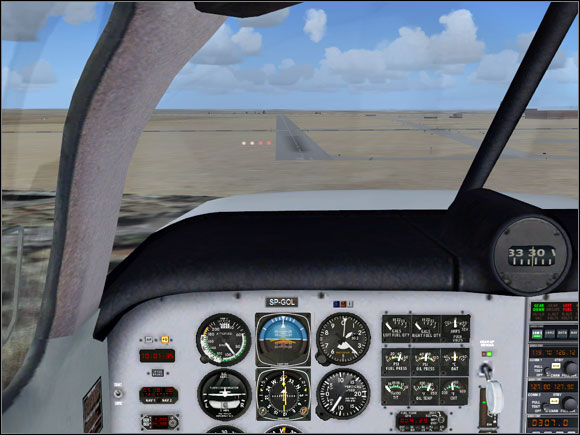 A little bit to the left from the runway centerline.
As we can see on the picture above, our aircraft is on the glideslope (confirmed by two white and two red lights near the runway) but is moved a little bit to the left from the runway centerline which means that we have to make some adjustments to find ourselves back on the centerline.
We should touchdown with approximately 75 knots or less, depending on our weight and fuel. After passing the threshold we close the throttle and gently set the aircraft on the runway keeping in mind that our vertical speed must not exceed 500 fpm. After the touchdown we gently apply the wheel brakes ("." key).
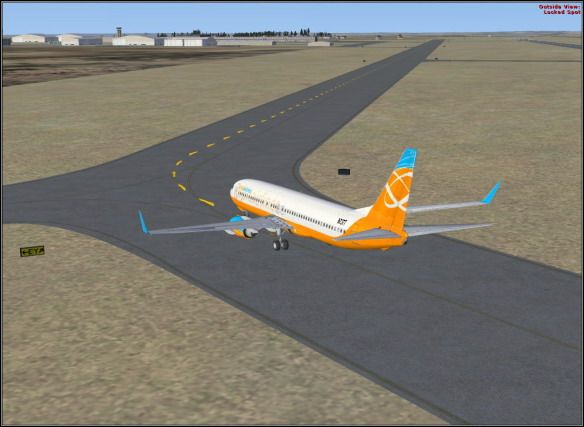
After landing we should vacate the runway as soon as possible by turning to the right taxiway.
After landing we should vacate the runway as soon as possible by turning to the right taxiway.
Now we can switch off the landing and strobe lights and raise flaps. Soon we will receive instructions to contact Ruzyne Ground on 121.900. Ground station will give us taxiing instructions via taxiways L and R. When we are lost, we can use the Progressive Taxi.
 Arrows shown by Progressive Taxi aid help us with taxiing.
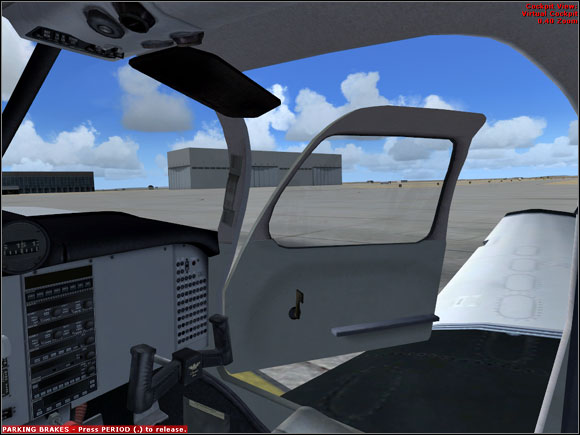
When we are at our destined parking spot, we switch off the taxi lights, set the parking brake (control + "."), shut down the engine, all lights as well as avionics and battery.
 Our flight is over...
Now we can get out from our virtual aircraft :)
In this part of our tutorial we will fly a Boeing 737-800 from Warsaw to Malmo.
We will begin with aircraft selection - Boeing 737-800 in our case. We make the selection in Free Flight and Current Aircraft menus. We can choose any livery.
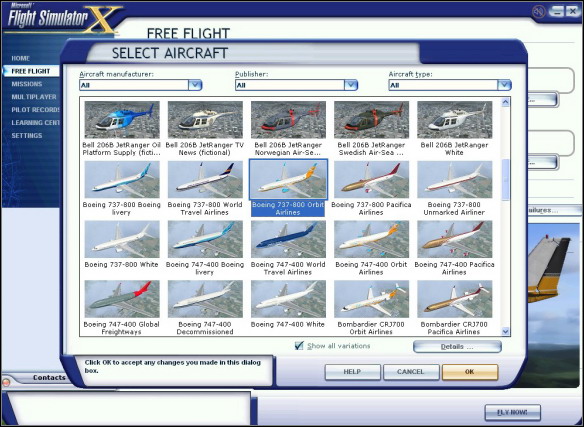 Aircraft selection menu.
After returning to main Free Flight menu we select the Flight Planner to create our flightplan. We select Warsaw Okecie (EPWA) as our departure airport (gate 24) and Malmo (ESMS) as our destination airport. Now we choose the IFR flight and High Altitude Airways as the method of route finding. Click the Find Route button and the program will create our flightplan.
 Preliminary flightplan.
As we can see, the proposed route consists of 7 waypoints (4 VORs and 3 intersections). During the flight we will use the GPS system. Aircraft in FSX are not equipped with the FMC (Flight Management Computer), that controls the aircraft during the whole flight. This is why the GPS system is very useful in navigation.
Generally we could accept the proposed flightplan, but as our route goes from GRU VOR to ROE VOR - and these are the points of airway UL621 - we can delete the points in-between.
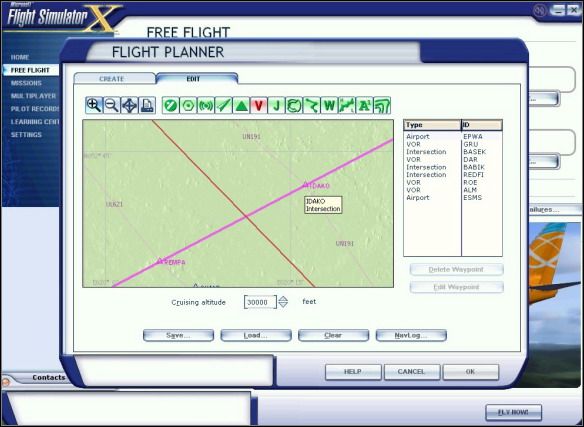
Besides, if we want to fly "as real as it gets", we should also add the EPWA TMA departure point, which is IDAKO (IDAKO waypoint is connected with the SID procedure - Standard Instrument Departure. Unfortunately SID/STAR procedures are not available in FSX). Our modified flightplan is shown below.
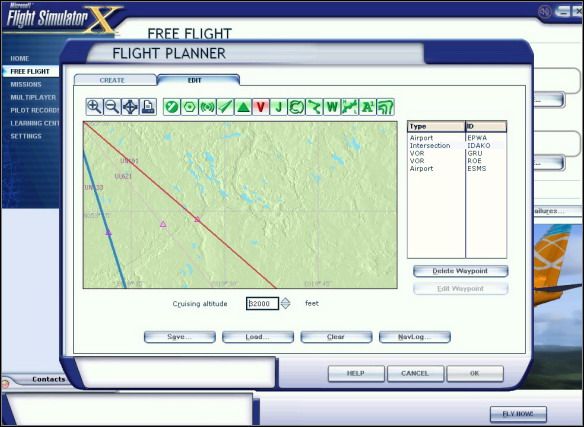 Final flightplan.
Now we set our planned altitude to 32000 feet and click the NavLog button to view the details. The planned route to Malmo is 336 nm long, expected fuel consumption is 716 gallons (4798 lbs) and the approximate time we'll spend in the air is 42 minutes. The navigation log can be printed out.
Soon we'll come back to the fuel consumption.
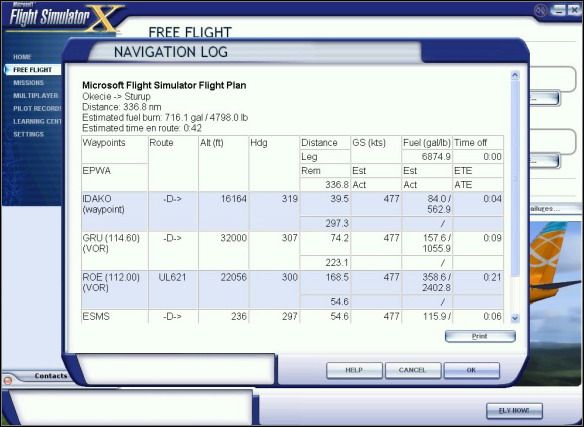 Navigation Log.
We have a great freedom in the weather settings section. Let's select the Real-World Weather (internet connection is required for that selection).
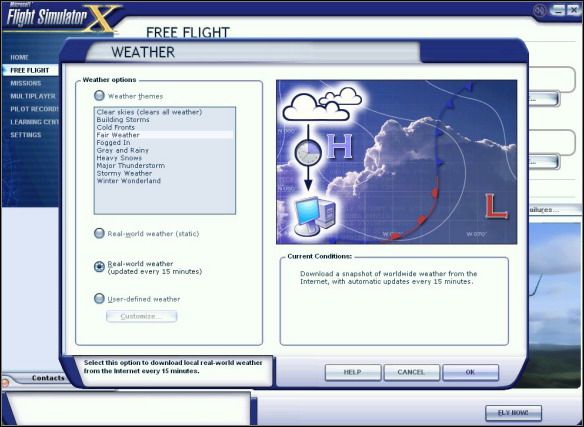 Weather selection menu.
Now we can set any date, season and hour of our flight.
Now it's time to go to the Fuel and Payload section to load our plane with fuel. As mentioned before, we should burn approximately 716 gallons (4798 lbs) of fuel. Unfortunately, these calculations are hardly true. Let's use a fuel planner which can be found at the following website:
http://www.metacraft.com/737NGFP/
According to that planner we should take about 11000 lbs of fuel (it's approximate, exact values depend on altitude, aircraft weight, speed and direction of wind, etc). So now we enter the almost doubled value of fuel - 11000 lbs. It means our wing tanks will be filled to about 60% of their capacity, while the central tank will remain empty. The amount of fuel calculated by FSX would be insufficient for our flight!
There's one obvious conclusion: FSX aircraft burn more fuel, than the aircraft specifications say. It is recommended to fill the wing tanks to about 85% of their capacity and leave the central tank empty. We won't change anything in the proposed cargo section.
Now it's time to click the Fly Now button and get to our cockpit at Okecie airport, gate 24. As we can see on the picture below, the FSX has downloaded the current weather.
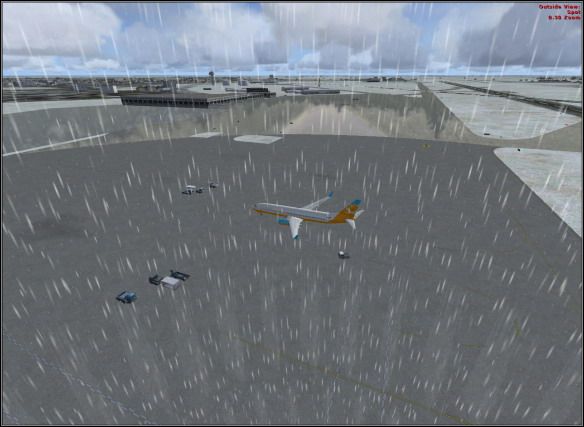 Bird's eye view to Okecie airport.
Typically all FSX (and FS2004 as well) aircraft are prepared for flight, which means their engines are running. Beginner pilots don't have to know all start-up procedures, so we'll leave the engines as they are.
We are in the cockpit. The 737-800 cockpit has been designed as a glass cockpit, which means that traditional analog gauges have been replaced with multifunctional displays.
 Request for flight.
The left display shows main flight parameters, such as speed, altitude, horizontal situation (HSI), course, pressure and vertical speed. The middle display works in three available modes which are changed using the CTR knob located above the icons that toggle the additional panels (these panels can be also toggled by pressing the Shift+2, 3, 4, 5, 6, 7, 8 keys combination) for radios, GPS, throttle quadrant, upper panel, etc. The CTR knob can switch the MAP mode (our route), VOR display or ILS displays (Instrument Landing System). The right display shows the engine operation parameters and fuel quantity.
In the beginning we should switch on the navigation lights (NAV) unless they're already on. The light switches are on the upper panel.
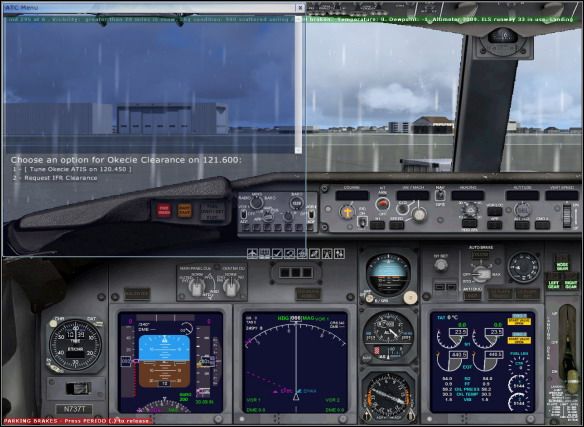
Now, pressing the accent key (~) we open the ATC window. We should now listen to the ATIS information. We'll know the runway 33 is the active runway (we can open the map and check the runway's length and direction).
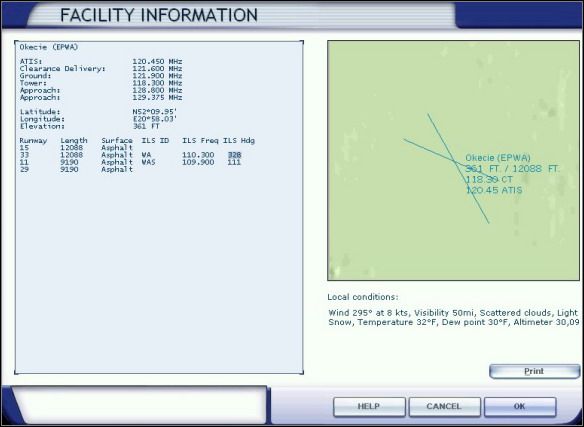 Map of Okecie airport.
Now we set the proper pressure using the BARO knob (30.09 in our case).
It's time to contact Okecie Clearance and ask for the IFR Clearance.
 Flight permission acknowledgment.
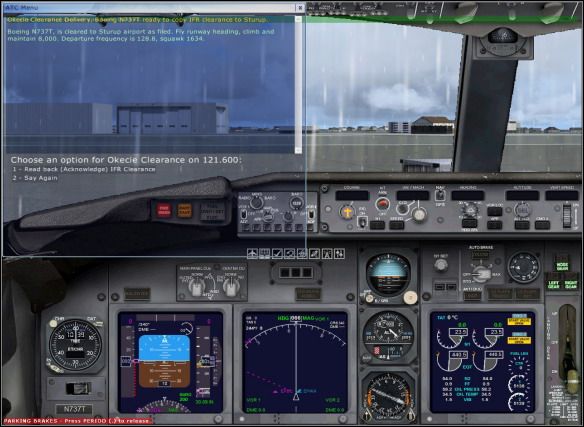
The controller instructs us to fly runway heading (329 degrees), climb to 8000 feet and set our transponder to 1634 (this will be done automatically on our radio panel). We should select "Read back IFR clearance" and then contact Okecie Ground (as soon as we are ready to taxi).
Before we do it though, we should switch on the taxi lights, set the autopilot course and heading to 328, set the altitude to 8000 feet, speed to 160 knots and lower flaps to 5 degrees (on various websites you can find many operating manuals and checklists for many aircraft, there you'll find recommended flap configurations for both takeoffs and landings).
Now we contact Okecie Ground and receive instructions to taxi to runway 33 (and holding before entering it) via taxiways: A3, A4, A5, A6, A7, H2, B6, B7, B8. We should push back the aircraft using the Shift + P keys (brakes must be released prior to the pushback). When our aircraft is pushed by approximately one length, we stop the pushback pressing the Shift+P keys again.
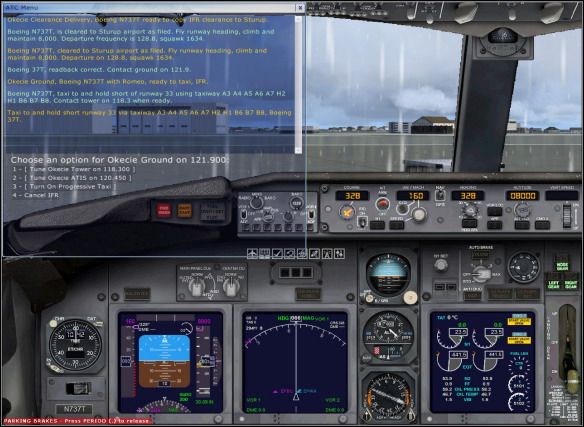 Taxi instructions.
Well, but how to find those taxiways? If you don't feel like searching for airport charts (because you want to go right away!), we can use the Progressive Taxi aid and follow the taxiing line overlain on the ground.
 Taxiing to the runway.
Note the aircraft should not taxi too fast (idle rolling is usually enough).
When we are at the holding line of runway 33, we switch off the taxi lights and switch on the landing and strobe lights. Now we should have a look at the autopilot panel and switch on the F/D (Flight Director) which indicates the optimal flight path and arm the A/T (autothrottle). Now we go to the upper panel and turn on the Probe Heat (Pitot tube heating - without it the tube may happen to freeze and our displays will indicate zero speed).
The autopilot is already set to the desired altitude and heading, so now we should set the maximum allowable speed of 250 knots. All aircraft must not exceed that speed below 10000 feet. That rule is not used in Flight Simulator, but it's good to remember about it.
So we contact Okecie Tower and receive take-off permission. We can enter the runway and get high!
To do it, we fully open the throttles. As soon as our speed reached approximately 145 knots, we gently raise the aircraft nose. When our -800 gets airborne, we raise the landing gear and continue our climb at 10-degree nose-up angle (see the horizontal, pink line on the left display). Now we gradually raise the flaps, switch on the autopilot by pressing the CMD A key and activate our previously set functions: heading HDG (328), speed SPD (250) and altitude ALT (8000 ft). Using the Vert Speed knob we set our vertical speed to +1800.
A short while later we contact Warsaw Departure and change our course, using the HDG knob on the autopilot panel. The aircraft starts its turn.
If you want the aircraft to be guided by GPS system (our flightplan is stored in its memory), switch the NAV/GPS (on the autopilot panel) to GPS position and press the VOR LOC button (light below the HDG SEL button should go off. If it doesn't, just click it).
When we reach 8000 feet, the ATC gives us new altitude of 14000 feet. So we set the new altitude on the autopilot panel and keep on climbing. When we cross 10000 feet, we can accelerate by setting 310-330 knots on the autopilot and switch off the landing lights. Next - according to instructions - we contact Radar frequency. We'll receive further climbing instructions - first to FL280, then to FL320. Climbing is controlled with the use of Vert Speed knob (vertical speed should be set between 1000 to 2500 fpm; too high rate may result in speed drop).
We should also remember, that when we cross 18000 feet, the altimeter should be reset to standard pressure 29.92 (B key) and speed hold mode on the autopilot should be changed from SPD to MCH. The information about pressure resetting is included in the Flight Checklist (to open it, click the third panel icon from the left).
 The checklist.
Unfortunately the creators of FSX did not remember that the pressure resetting altitude is different in the USA and in Europe.
When we reach the cruise altitude - FL320, we can set the Mach speed to 0.79, sit back and relax.
When we reach the cruise altitude - FL320, we can set the Mach speed to 0.79, sit back and relax.
The GPS system will take care of the navigation (if you want to do by yourself, you have to remain in HDG mode instead of GPS/VOR LOC and set courses manually according to the GPS display).
About 51 nm away from VOR ROE we will receive instruction to descend to FL240.
 Descending to FL240.
So, we set 24000 on the autopilot. When it's set, the Vert Speed window will indicate the negative value (ex. -1800). Of course we can adjust that value but have to keep in mind that too high descent rate causes the aircraft to accelerate. If our speed reaches the red field on the display, we are overspeeding, which means our we fly too fast for the construction of our aircraft.
About 21 nm away from VOR ROE we will be instructed to contact Malmo Center.
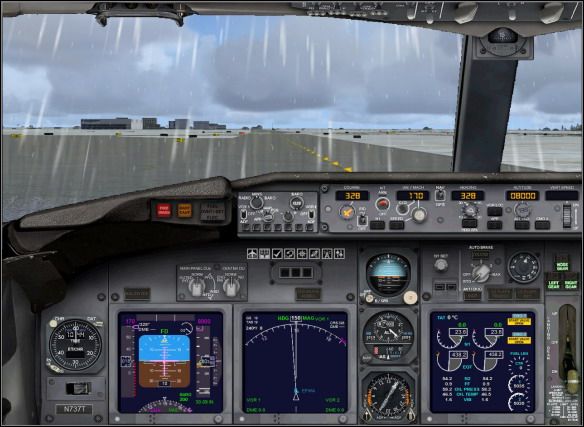
Further instructions tell us to descend to FL160 (note, that after crossing 18000 feet we need to set the current pressure in the altimeter by pressing B key) and give vectors (turn to 345 degrees) that will lead us toward runway 17 of Malmo airport.
 Closing to Malmo.
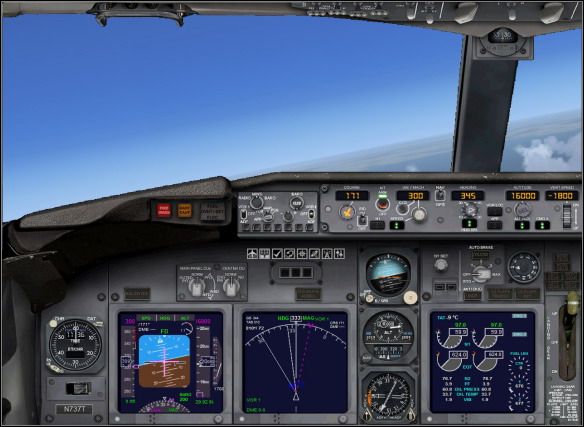
If the GPS mode is still active (NAV/GPS switch turned to GPS and VOR LOC button depressed), we have to deactivate it by switching NAV/GPS to NAV (upwards) and pressing the HDG SEL button. Use the HDG SEL knob to set heading 345. We also need to set the speed holding mode from Mach to IAS and set speed of 300 knots.
Now we can pause the game for a while and enter the map. Using the map cursors, we pan it and zoom in on ESMS airport. When the runway is visible, click it. The information window that pops up contains information on runway 17 heading (171 degrees) and ILS frequency (111.90 MHz).
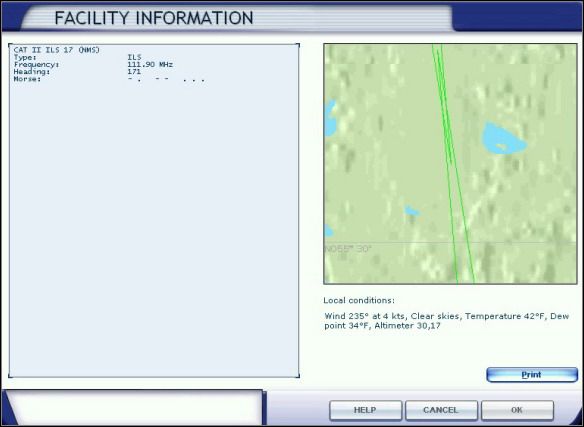 ILS runway 17 view.
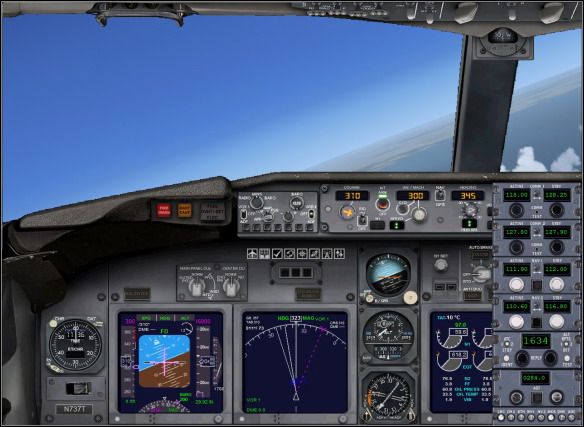
Now as we know the required data, we can set it in our aircraft. The runway heading is set in Course window of the autopilot and the ILS frequency (111.90) is set in the radio panel in NAV1 section (STBY field, then click the button between the freq displays to make it active).
Here you can see all our settings (course, heading, speed, altitude).If you feel "lost", you can switch on the GPS window and check our position.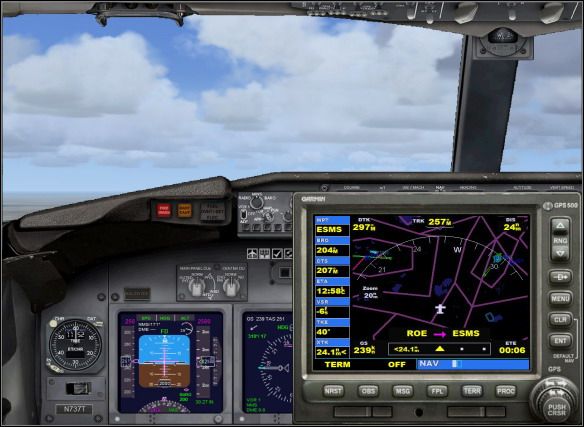
From that moment on, each flight on that route may be different. In our case we have received further descent instructions (up to 2500 ft) and heading changes.
We should also remember about systematic speed reduction to fly slower than 250 knots below 10000 feet and about switching on the landing lights below that altitude.
Set the middle display mode to APP (CTR knob). Now we know our location in relation to the runway.
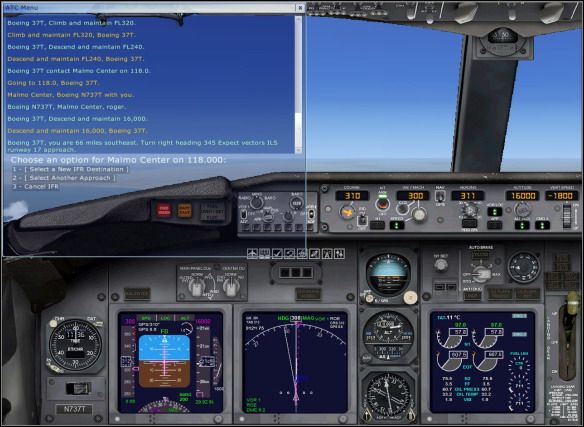
In our case, one of the ATC instructions told us to turn to Reading 205 and descend to 2500 ft. We were given permission to approach to ILS runway 17 and requested to contact Malmo Tower.
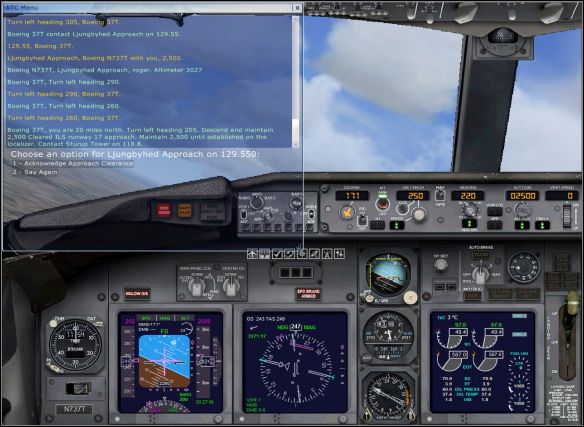 Approach clearance to ILS runway 17.
Now we can reduce our speed to about 200 -210 kts.
Vector 205 given by the ATC should practically lead us straight onto the runway. We must continuously observe the ILS display (middle display, that has already been set to APP mode). When the pink rectangle begins to move toward the arrow that indicates the runway heading (171), we have to turn the HDG to the left (HDG values should be reduced to 171). The aircraft begins to turn toward the runway.
If the rectangle "escapes" us to the left, we have three options: we can rotate the HDG knob further to the left (ex. To 160 degrees), to make the aircraft turn left and intercept the runway course (the rectangle will start moving back again) or disable the autopilot and fly the aircraft manually, or set the APP (Approach) mode of the autopilot. The APP mode will lead us to the runway course and begin automatic descent, according to ILS indications.
In the meantime we must keep on reducing our speed and lower the flaps. We'll land with flaps 30 and speed of about 145 kts.
If all goes well, we should promptly see the similar view to the one below. So when we see the runway, our speed should not exceed 150 kts, flaps should be fully lowered. Don't forget about the landing gear! (G key).
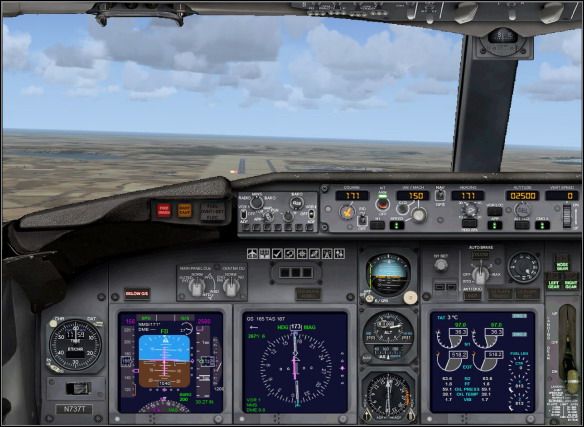 On final to runway 17.
If this is your first landing, don't worry if you fail. Keep on practicing. Before this flight you can use the FSX training lessons, which will give you a wider view to the autopilot, ILS and GPS systems and navigation.
Just before the runway threshold we have to switch off the autopilot (Z key), disarm the autothrottle (A/T Arm on the autopilot). Since that moment we'll control the throttles. Our speed should not drop below 145 kts (that speed is approximate for B737-800, in fact it depends on many factors such as the aircraft weight, wind speed and direction and is calculated by the Flight Management Computer - non-existing in Flight Simulator).
Right before the touchdown we have to flare gently the aircraft (raise its nose).
After touchdown we have to close the throttles and enable the reverse thrust by pressing and holding the F2 key. When our -800 slows down to 60 kts, move the throttles to idle thrust and start braking with wheel brakes. Now we should vacate the runway as quickly as possible.
Then we stop the aircraft, switch off the strobe and landing lights and contact Ground station which will give us taxiing instructions. During taxiing we switch on the taxi lights and raise flaps. If you don't know where to taxi, use the Progressive Taxi aid mentioned before.
 Taxiing to the gate.
When the aircraft is parked in the desired spot, we may open the throttle quadrant and switch both fuel flow switches to CUTOFF position which will result in both engines shutdown. Now we switch off all lights except navigation lights. This is the end of our flight.


 Far Cry 4 Game Guide & Walkthrough
 Fallout 3: Point Lookout Game Guide & Walkthrough
 Final Fantasy XIII Game Guide & Walkthrough
 Football Manager 2014 Game Guide & WalkthroughFallout: New Vegas Game Guide & Walkthrough