In Endless Legend the player takes on the role of one of the races that dwell in Auriga, which thanks to the power of money, war and diplomacy intends to seize control over the entire land. The game includes many complex and well hidden mechanisms, and learning all of the relationships takes lots of time. The below guide is intended for both the players, for whom it is the first encounter with a 4X strategy and for the veterans of the genre.
In this guide for Endless Legend, you will find information on:
Hints included in this guide concern refer to playing at the Normal difficulty level and Normal pace of game. Some of the hints become useless with different settings.
The guide has been prepared for version 0.5.18 of the game.
Lukasz "Salantor" Pilarski ()
The game ends as soon as one of the below conditions is met:
You receive points for everything: the size of the army, city development, technological development, the amount of owned Dust and so forth. Sp, if you want to get the advantage in points, start the game on a big map with a high number of opponents. Pangea, big islands or continents are good for that. Thanks to this, you will be obtaining points for everything you can.
Victory by conquest is a specific type of victory, because you can attain it both by means of war, as well as by means of colonization. It suffices to be faster than the rest of the players, while seizing neutral regions and conquer the rest with sword. You need, however, keep in mind that there are going to be problems, when it comes to marching, especially in winter.
The remaining three victory conditions consist, largely, in the same thing and favor some of the factions. If you want a well-balanced game, select the score condition only.
You will be informed, by the game, when you are close to meeting one of the conditions, or when you are close to reach the turn limit.
Unlike in Civilization V, the world map is not divided into hexes only, but also into regions. One region may host one city only, and a certain number of villages of smaller factions and resources. While planning on the development of your empire, you need to keep in mind that sometimes, there will be quite a distance between the individual cities of yours. You will be unable to take advantage of the bliss of each of the regions, to their fullest. You can build mines on every deposit of resources, but the useful anomalies will sometimes be out of your reach. Consider that, while setting up successive cities, or while conquering the ones that belong to the opponent. Sometimes, it pays off to conquer a city, raze it to the ground and build one elsewhere, where there are better conditions.
Pay attention to the situation. Keep an eye on what your enemy is dong, where his armies are and in which direction he is developing. Be the first one to take action, instead of reacting. By reacting, you waive initiative, to the opponent's advantage and ask for to be defeated.
Keep in mind that you will always be short of something. Dust, Influence Points, endorsement, army, turns or room for the expansion of a city. By dwindling resources away, or expanding your empire too fast, you will suffer the meager earlier. Therefore, try to manage what you have with care and save up for worse times. For example, do not buy a mine that will be built in 2 turns, if there is no need to. It is much more reasonable to buy a building, whose erecting will take 20 turns
Concentrate on your faction's strong points. As Broken Lords manufacture as much Dust as possible (Dust, local currency), to be able to buy units and buildings later on, instead of manufacturing them. As Necrophages focus on expanding your army, warring against neighbors and seizing the nearby villages. A well-balanced development is good for a faction with no apparent specialization, such as Wild Walkers, or ones that allow the player to choose the path of development, such as Ardent Mages. The buildings and technologies that you own at the beginning of the game should be a clear sign of what strategy you should choose, while controlling a given faction.
It is better to have lots of science and little industry than the other way around. With lots of science, you will make up for your shortcomings, in the key fields, quickly. On the other hand, with lots of industry, you may find yourself in a situation in which there is nothing to manufacture.
Whenever possible, complete the main quests for the faction. The rewards that you obtain this way may be highly valuable, especially the unique buildings and technologies. However, try not to ignore the remaining fields. Quests are supposed to be your priority, but leave them for later, when there are more urging matters.
AI can be unpredictable, it threatens factions that it allied itself with and declares war for no apparent reason. Make sure that you have a large supply of Influence Points, before you start diplomatic actions. It is possible that the expensive peace and all commercial agreements are broken after a turn, and you will have no idea why.
Try to place a governor in each city quickly. The additional +5% to science or industry seems to be a negligible bonus, but it may decisive along with the other ones, when it comes to victory. Especially that the governers also gain experience. Therefore, a 5% bonus may become a 15% bonus, after a while.
You do not need to many strategic resources, so do not focus on manufacturing them. Equipping the army does not cost that much, just like buildings and the prices for selling on the market are not high. Three mines that mine one material is the optimal number. Even when you have two, you may complete the game with excess strategic resources in your storages, if only you spend them with reason. Especially that mines are quick to build and they do not cost that much Dust. In general, build mines if you are going to need materials some time soon, and not because you have some unused deposits of resources.
Always have some spare Influence Points, just in case. You spend them both while drawing up the imperial plan, as well as diplomacy. Both of these cost quite a lot of points, but diplomacy usually costs more. For example, declaring a war may cost hundreds of Influence Points, which is especially important, in the case of fight-oriented factions, such as Necrophages. In such a case, try to amass just enough Influence Points, to ensure your units with various bonuses, in your imperial plan.
Use the market only in case of emergency. The prices there are usually very high and they rise with your progress and the purchases that you make. It is going to be much cheaper to manufacture army than to hire mercenaries. You can ignore this, while playing as Broken Lords or Roving Clans. They do not need to worry about money.
If possible, upgrade the equipment of your units. A hero fighting with good equipment is capable of tipping the scales to your advantage, in the majority of battles, whereas a unit with good equipment is worth three with poor.
Each army has movement points and action points. The latter is used for fighting battles and attacking neutral villages, but not for searching ruins. Also, remember about them, while planning on war campaigns.
Pay special attention to land formation during battles. Learn its secrets and you win the battle.
Whenever you see that you cannot hold a city, burn it down. It is better than to lose it to the enemy.
You cannot have more than 999 units of a given luxury or strategic resource. If you manufacture more towards the end of the turn, the game will automatically limit that.
Before you colonize a region, find out about its resources. Usually, you will be able to find two, or three good spots to found a city. Focus, first of all, on the anomalies and the areas that provide you with high bonuses to various types of production. If possible, pacify all of the neutral villages, thanks to which you will not have to wrangle with them. If you are concerned about competition, send several units ahead. Attacking a villager on a neutral ground will not lead to a war so, do not hesitate to do that.
Make sure that each new city has sufficiently high industrial production and food production. Otherwise, buildings there will not be erected fast enough, or the population growth will not be as fast. This may hinder your development for, as many as a dozen-or-so turns. In such case, you may want to use industrial and food supplies, but you not be able to access them at the beginning of the game. Consider and reconsider if a new city is going to be able to sustain itself at least, at the beginning of its existence.
While founding a city, consider its vicinities and plan on how you are going to expand it. Avoid mountain ranges and fields that provide no bonuses. For the majority of factions, rivers, seas and plains are a good choice, because they supply lots of food and Dust. If you want to manufacture, or play as Wild Walkers, try to build dwellings in forests. For the Broken Lords desert is a good choice.
Do not haste to colonize. Support for your rule dwindles with the number of cities and citizens. Low contentment leads to decrease in production. On the other hand, high contentment stimulates production.
Reconnaissance is the key. Try to explore the colonized lands, and their vicinities, thoroughly. If possible, build watchtowers. Even in all possible spots, if only you feel that they may be of use. With high amounts of Influence Points, try to sign peace with the neighbor. You can ask the factions, which you signed peace with, to exchange maps with you, which considerably speeds up discovering the world.
Always send, at least, one military unit, with a colonist. A colonist, when alone, loses every fight, especially with bandits. A colonist accompanied by infantry always has a chance to survive it, or even to win it.
As you colonize new regions, try to outline your own borders, instead of fitting into them. If, there are, at least, two neutral regions between you and the opponent, colonize the one closer to the opponent,. Thanks to this, you will cut him off from the areas that you will be able to conquer later on.
Found a city where you start. If necessary, a field or two away, provided that you have enough movement points, to get there. The maps are generated in a way that allows all of the players to start at the same level, more or less. Therefore, your starting point should be good enough, for starters. Do not worry if it turns out that a neighboring space is a bit better and you just overlooked it before. Usually, you will be able to get there with districts. At the beginning of the game, one turn is a lot of time so, do not postpone building the first city until the second, or the third turn. Otherwise, this may cost you dearly.
Explore the vicinities with the hero. Focus on exploring ruins and searching for villages of minor factions. As of now, do not leave the boundaries of the first region. First, explore your own area and then get to the neighboring ones. Without settlers, you are unable to do anything anyways.
Start your research with the Public Library. If you started on a rocky ground, also build Science 8 Improvement. Thanks to these buildings, you will be able to obtain new technologies faster. What to do next depends on your needs. If you want to start manufacturing, quickly, invent a Mill foundry. If you want money, invent an Imperial mint, and if you started your game at the water, focus on Dust Refinery. Everyone needs the Sewer System, just like the technologies that provide access to strategic resources or luxury resources. For the time being, you can ignore war technologies, your initial army should be good enough, for defending the city and pacifying the nearby villages. Still, if you do not want to fight the villages go for the Language Square.
There is not much that you can do, as regards the order in which you erect buildings. Not at the beginning. Start by putting up the Founder's Memorial, and follow with the rest of the buildings that are available for your faction at the beginning. If you manufacture lots of Dust and your industrial production is high enough, do not buy buildings. There will be time for that.
Do not manufacture units. Your initial army is strong enough to handle the nearby villages and the new soldiers will be holding back the production queue. Create new units only whenever necessary. For example, if this is required by a quest, or there is nothing else that needs producing.
Up until turn 20, obtain at least 60 Influence Points. Thanks to this, you will be able to pick two, instead of one, options of empire development, which is much helpful at the beginning.
Villages of the minor factions are not an urging problem. Their units do not attack mines, not always do they besiege cities, and the initial army deals with them well. If a minor faction does not offer any interesting bonuses, you can put off pacifying them. In any case, you can destroy the village and rebuild it later on.
An example range of vision. The cliff stands in the way, the slope does not. If a military unit was to stand on the cliff, they would be able to see what is below.
Cliffs and high hills limit range of vision. If you are marching at the foot of a hill, you cannot see what is at the peak. During the exploration, it is better to travel over hills and watch over the area from there. Especially that hills may form a natural maze, which makes exploration more difficult.
There are two types of fog of war. The first one covers the undiscovered regions and the other one, veils the discovered areas, where there aren't any of your troops or buildings. While determining long marching routes, for the first type, the game moves blindly. This means that you may run into a sea, along your path, which you will be informed about right before you do. This is why it is better to take baby steps, o you can turn around and retreat, if necessary. While marching over an area already discovered, the game will choose the most optimal route for you.
The game highlights the boundaries of the region that you roll your mouse over. It also happens, when a part of the area is hidden under the fog of war. take that into consideration, while determining the marching route. Thanks to this, you will avoid wasting movement points
Toy learn the name of the region only after you explore its central part. It is easy to find the center, if only you set the camera back, roll the mouse over the region and find out, which part yet remains to be explored. This trick is especially useful in the case of the region of irregular shape, e.g. elongated.
Note the shape of the terrain under the fog of war. You will quickly realize that water is marked differently than land. Hills and the other elevations should also be easy to recognize. This will also allow you to determine the shape of the region, without the necessity to explore it in fully.
Always save the game before exploring ruins. Sometimes, instead of Dust or luxury resources, you can find there a big group of enemies that you will have to fight with. On other occasions, you will receive a time-consuming quest, or one that is impossible to complete at that moment. For example, while playing on the isles, you can receive a quest to explore some other ruins on an island farther away. Without entering the second era, and discovering Sea Travel you will not be able to get there, which may set you back by several tens of turns and a chance that the quest will be deemed not completed.
Bribery is better than negotiations, negotiations are better than fighting. The cheapest villages to bribe cost 40 Dust, which is a low cost, even at the beginning of the game. Negotiations are very random, in nature,. Sometimes you will receive a simple task, some other time you will be able to complete it in the 100th turn. What is even more, you cannot negotiate with two villages at the same time so, it may happen that you will get stuck with a quest that is too difficult.
Fighting villages is good for the beginning, when the number of defenders is low. Later on, however, there are too many. Fight whenever your army is at an advantage in numbers or in strength, or when you play as Necrophages. Otherwise, it is better to bribe villages.
Try not to set soldiers apart. Single units can easily fall victim to traveling bandits. A reconnaissance army should be two units strong, at least. For the reason of safety.
Neutral units attack the armies of the other players, even if they are staying in cities. Of you do not want to fight nearby bandits, move your army to the garrison. Wait for the enemy to leave the area, pull your soldier out of the garrison and continue your march. It may happen, however, that the bandits start besieging the city and it will remain so, until you defeat them. The besieged city will not be attacked, even if its defenses drop to zero so, the only reason to hurry is the deteriorating economic condition.
After they see your armies, neutral units will try to approach. If you have more movement points, you can try and lure them into a trap, or lead them away from your regions. With a bit of practice, you will be able to pit them against the enemy units. The exception are the situations, in which your armies are too strong. The neutral bands attack them, sometimes, but they can, just as well, ignore them. Unfortunately, there are no clear-cut rules here.
Neutral units of the same faction may reinforce each other in battle. If you see several of them, close to each other, wait for them to disperse. Just in case. Otherwise, you may be overwhelmed by the opponent's advantage in numbers. You may be, because not always does it happen. Again, no rule.
All of the neutral villages start off with two defenders. This number increases, with time, and it can reach, as many as, twenty. If you want to pacify villages, try to do that as early as possible. Later on, it may turn out to be too time-consuming, or too difficult.
A village that has been pacified once, remains calm until the end of the game, even if another faction takes control over the region. Therefore, it may happen that you bribe a neutral villages in the region and, several turns later, it will turn out that it has been colonized by another player, which saved him the trouble. You can also bribe villages in the opponent's regions, which he will profit from. Or attack it and destroy it, thanks to which the owner of the region will be able to rebuild it. Some do not attempt colonizing too many villages outside of your regions, because someone else may profit from that. The exception are the villages neighboring your regions the source of the armies that nag at them. You can pacify them, even if you do not plan on colonizing the region that they are in.
Many of the pacified villages are at the edges of regions, right next to their boundaries. If a region has access to sea, the village will be located, most probably, on the promontory. It is easy to find them, also in the regions of irregular, serrated shapes, best at narrow strips of land, or at the foot of a mountain. In other words, if you want to find a village in a new region quickly, search near boundaries or on uneven, difficult terrain.
There are two seasons of the year in the game - summer and winter. In summer, everything is fine. In winter, production of food and Dust plummets, industry does not do that well and units see less, and are slower. This makes winter a bad time for waging wars but, it is a good season to defend. Winter makes it more difficult to deliver food and buy mercenaries, which leaves separated armies to their fate. Try not to send your troops too far away, when there are only few turns left until winter.
Try not to march in winter. Slowing down of the armies means that a march that would normally take three turns, may last as many as eight in winter. It may even happen that summer is back, before you reach the destination.
If you are concerned with food problems make provisions before winter and use them when the season changes. Thanks to this, the population of your cities does not change. This becomes possible, as late as, in the fourth era.
Throughout the game, time between successive winters gets shorter and the duration of winter rises. After turn 200, winter becomes the only season of the year. If you want to win in points, or thanks to Dust production, remember about this limitation.
In games of the Endless series, interface is usually expanded and difficult to master. This section is meant for the players that experience problems with that.
The most important thing - the majority of the interface elements are supplied with a description. If you do not know what a given symbol or digit means, most usually it suffices to roll mouse over it and wait for an information pop-up to appear. If not, you will have to wait until the next version of the game is released. Pay attention to the looks of the icons, e.g. Dust, because you will be seeing them often.
1 - Marching route. White line shows how far the army can reach within a given turn. Orange symbolizes how far they will reach in the following turns. The number in the circle is the number of turns that the army needs to take, to reach the destination.
2 - Army. The color of the army depends on which player controls it. The figure shows how many units it includes.
3 - City. The number under the silhouette of man informs you of the city population. The color of the silhouette depends on which player controls the city. The number next to the helmet means the number of garrisons that protect the city. the number next to the shield means the city's defenses. Next to it, you can learn what is being manufactured in the city and how many turns this will take.
4 - Villages and boundaries. The number above a village of a minor faction shows how many units protect it. The color of the region's boundary symbolizes which player controls that region.
1 - Eight windows. From the left, by clicking on an icon, you access:
2 - Resources bar. In the upper part of the bar, there are, from the left, Dust and its production, per turn, current developments and the number of turns until the research is completed, the amount of Influence Points and their production per turn. Below, there are six icons of strategic resources, including the current state. An icon is invisible if you do not have a given resource.
This screen pops up after you click any of your cities.
1 - Information about the region:
At the very top, you can see the name of the minor factions that lives in that region.
The icons on the right show the number of villages. A red icon symbolizes an enemy village, white - destroyed, green - pacified.
Under the name of the faction, there are icons of strategic resources and luxury resources, available in that region.
Under the resources icons, there is the number of the available, and used by the region, trading routes. If there was a trade to take place, on the right, there would appear information of the profits made. The orange icon is the access to the trade window.
2 - Basic information about the city:
The ping palm signifies the overall contentment of the city. The marker on the right signifies contentment in percent. The more of it the better.
The figure under the palm shows the population of the city. The marker on the right states how many turns are left, until the next citizen is born. The grayed out icon is only available for Broken Lords. It allows for buying citizens for Dust.
3 - Citizens and production:
Second row - production per capita. This is how many units of a given resource one citizen produces.
Third row - workers. The number of citizens that work in a given field of production. By clicking on the miniatures, you can transfer them between their duties.
Fourth row - city tiles. The overall production from the fields around the city.
Fifth row - modifiers. All of the upsides and downsides of the buildings in the city, the governor's aptitude, seasons of the year and so on.
Sixth row - total. The overall production.
The window presents one of the current tasks. You can select it in the tasks tab. Useful, on condition that the description is brief. Long text on bright background becomes unreadable, especially the fragments in green. Use with reason or ignore. The owners of big screens can activate an appropriate option in the game settings (Options -> UI -> Big Screen User Interface). Thanks to this, the text becomes easier to read. If you have such a screen, check out if it works for you with this option on.
1 - Map button. The button on the left turns the hex net on/off. However, after being zoomed out, to a sufficient distance, they will be invisible on the revealed fields. The button on the right allows you to check what is being produced on each of the fields on the map.
2 - Army management buttons.
The one on the left allows you to select the next army with the option to move.
The right one makes your armies move in the specified direction, if only the destination for their march is set and they have spare movement points. If the number of movement points is too low, the button becomes active, on the next turn, again.
3 - End Turn button. After you press it, the current turn ends. The number of the top specifies which turn is currently being played. Remember that when the counter reaches 200, the game ends. The colorful buttons below are the factions of the players. The question marks symbolize that you have not yet met a given faction.
4 - Season of the year. The icon against black background specifies the current season of the year, the one against the white background, the forthcoming one. The sun is summer and the snowflake is winter. The digits next to the forthcoming season mean the predicted number of turns until the season changes. So, it may turn out that winter came earlier than you assumed. The button above the turn counter allows you to access game options.
The screen that shows up after you select one of your cities.
1 - Garrison. There are two types of garrison units: militia (grayed out) and regular units (can be selected). The four icons below allow you to:
Form a new army, off the selected units
Select all of the units that can be selected
Upgrade the selected units to the current version
Disband the selected units
The digits at the bottom of the screen symbolize how many regular units there currently are and how many can stay at the garrison.
2 - Governor. If you have not named any of the heroes as the governor of the city, the field at the top is empty. In such a case, the option "unassign hero" is replaced with "assign hero". Below, there is an option for the automatic governance of the city by the computer. By default, it is disabled. The computer may focus on the production of one of the five main resources (food, industry, income, Dust, science) or try to manage the city in a balanced way.
3 - Building queue. Units and buildings on the top are to be built earlier, the ones below, later. The number on the right specifies the number of turns necessary to complete the construction. The Dust icon allows you to buy a unit or a building. The items that you bought, become available with the next turn. In the case of insufficient funds, this icon is grayed out.
4 - The available buildings and units. Here, you can see the units and buildings that can be manufactured in the city. The icons that are grayed out, mean that there are no necessary strategic resources or the required population. The four icons allow you to put the available units and buildings into categories. From the left:
Show all
Buildings in the city
Expansions for the city and region (districts, harbors, mines)
Units.
5 - The viewed field. This information appears after you roll mouse over any field on the map. There, you learn:
The name of the field
The miniature of the field
Field type (only in the case of anomalies, ruins, resources and such)
Which resources will be obtained from the field every turn, if it comes within the city's range. You can learn here, why the output from a given field is higher or lower, than it should be.
The overall amount of resources obtained from the field, per turn, if it comes within the city's range.
The cost to enter the field, expressed in the army's movement points.
1 - Army make-up. Here, you can view all units that make up the army. The icons above, from the left, show:
The overall number of the army's health points.
Available and maximum number of the army's movement points.
The army's range of vision.
Thanks to the options below, you can:
Select all the units that make up the army.
Upgrade the selected units to the current version.
Disband the selected units
2 - Orders. list of the orders available to be issued to the army. It is different, depending on the location of the army. Around the ruins, the icon to search the ruins (magnifying glass) appears. Around a city there are the options to attack, negotiate and bribe available. By default, there are the following icons active:
Automatic reconnaissance (disabled in the early version of the game).
Automatic defense (disabled in the early version of the game).
Transfer the selected unit to another band.
Transfer the selected unit to the city garrison.
The inactive icons are grayed out.
3 - Commander. If you have not assigned a hero to be the commander, the field on the top is empty. In such a case, the "unassign hero" option is replaced with "assign hero".
Any division into better or worse factions does not exist. Each faction plays differently, each one has its strong and weak points. The factions are better and worse only in certain situations. While selecting your faction, find out about their strong and weak points. Your entire game depends on it.
For detailed information about heroes, armies and tasks for each of the factions, see the appropriate fragments of this guide.
Masters of the forest.
A faction that brings elves to mind, which draws additional profits from forests, which knows beforehand when the enemy attacks. It does not stand out too much, in comparison with the rest of the factions, but it also does not have any serious downsides. It is ideal for quick conquests, at the beginning of the game but, with progress, it can be easily defeated by stronger factions. This faction does not require any special playing style, especially thanks to its technologies so, it is a perfect choice of the more experienced players.
Hints for those who play as Wild Walkers:
Rely on ranged units. The basic unit of this factions are crossbowmen with high initiative. In big groups, they are capable of eliminating the opponent before he manages to reach them and, thanks to the low production cost, they can be plentiful. They are useful both in attack and in defense. Additionally, your first hero is also a crossbowman, stronger than the rest. Master the rules of the battlefield and always march in big groups. From time to time, upgrade your gear. With the help of crossbowmen, you are bound to win, nearly, every battle.
Watch the enemy closely. The special ability of Walkers allows them to see the enemy units through the fog of war. It functions on the faction's grounds and on the neighboring ones. Where there should the enemy unit be, there is an exclamation mark. This ability is moderately useful. At the beginning, it is useful to know where the enemy is but, in the second era, you will be able to invent a Watchtower. These buildings dissipate the fog of war, over a considerable area, which makes this ability useless. Apart from that, the exclamation mark does not let you know how many opponents there are so, just in case, assume that there are too many.
Settle down and fight in forests. This faction receives a bonus to the production in forest areas so, try to build and develop cities there. The bonus will allow you to start the production of crossbowmen earlier, in an event of war. Later into the game, the technologies and buildings, such as lumber mill (the second era) allow you to increase production off forests. Thanks to this, forests will be capable to provide supplies for the cities that need faster expansion. Additionally, thanks to the Way of the Woodland (the fourth era) all of your units that fight in forest receive +50% to defense.
Complete quests. With your progress in the storyline, Walkers gain access to several useful technologies.
the first era: Visions of Glory. Receive 5 Influence Points each time that a building is built in a region controlled by you. Mines, harbors and watchtowers do not count. Thanks to this technology, Walkers may become skillful diplomats and you will have an easier access to higher levels of the empire development plans. The 5 points seem to be a small bonus, but with longer game, it can affect the outcome. Especially victory, thanks to the accumulation of the Influence Points.
the second era: Survival Instinct. This technology ensures 2 extra movement points, if there is an enemy within the range of vision. Good for fleeing and for quick raids on the escaping enemy units.
The fourth era: Arcane Repository of Zaltana. The building ensures 80 support in the city and may be built only once. Moderately useful that late into the game.
Growing Buildings. Production cost of all buildings for the faction drops by 25%, thanks to which the construction is faster. You receive it too late for it to have any serious effect on the game.
Dust-driven machines.
The constructs function thanks to Dust. In spite of several important shortcomings, it is one of the most flexible and strongest factions in the game, which can be led in many different ways. With appropriate strategy, it is easy lead them to victory, especially the economic and military ones. Good for everyone, with the emphasis on beginners. Still, players need to be prepared for more plentiful instances of micromanagement of the empire. Grows vehemently with progress in the game.
Hints for those who play as Broken Lords:
Produce Dust. While playing as Lords you need to base your economy on Dust production. Without it, you cannot create new citizens, cities and you will not be able to heal the wounded units. That is why, while building a new city, try to pick the spots that produce as much Dust as possible, such as deserts. Especially that each Dust-producing field yields one unit more. While picking the Empire Plan, always select bonuses to Dust production and lower costs of buying buildings. While selecting the faction to assimilate, always pick the ones that provide high financial bonuses.
Control your costs. Each successive citizen costs more. The price depends on the number of your subjects in the city and the entire empire, as well as on time spent playing. In general, the more subjects and the later a turn, the higher the prices, which means that later into the game, you will most probably have many cities of low population. You really need to consider and reconsider the option to conquer a metropolis, because you may, later on, have problems with increasing its population. On the other hand, what pays off is conquering the smaller cities, which you then will be able to expand at low cost, and leaving the empty areas for later. It is then that building a city from a scratch, buying all of the necessary buildings and citizens will be very cheap. Also, remember that each battle means the necessity to heal your units. You cannot do that without Dust, and the cost is higher with your progress into the game.
Buy what you need. With production of Dust sufficiently high, you can ignore industry. Assign the majority of citizens to Dust production. Do not produce units and buildings and buy them instead. Do not conquer neutral villages and bribe them instead. In the case of the meager of resources, use the market. By focusing on making money, you are capable of buying everything that you need. Remember, however that you will be producing enough Dust to cover your needs, only later into the game and until then, you need to expand cities somehow. So, do not be too hasty to ignore industry and gradually limit its significance, at the pace at which you produce more and more money.
Make provisions for winter. If there is nothing to produce at the cities, make industrial, or scientific, provisions. You never know when you run out of Dust and you will have to create units the traditional way.
Focus on research. You cannot manufacture food and work out new technologies. Therefore, your technology tree is smaller than in the case of the other factions. In exchange, it allows you to invent the required units and buildings faster. While selecting the technologies, focus on bonuses for production of Dust, trade and on decreasing the costs to upkeep and produce new units and buildings. You could also use access to industrial supplies and market.
Do not worry about the contentment of people. Later into the game, you can ignore people's support altogether. Lower food production does not concern you and you can ignore the ones to industrial production, thanks to high production of Dust, for which to buy everything. In other words, ensure support for as long as you need it and not longer.
Seize new lands carefully. Expansion costs for Lords are very high. Apart from that, some of the lands, plains that produce food only, are useless to them. If, however, you have no other choice, make sure that you build cities in such a way, so as to make the useless grounds be one, or two, out of the six that surround the city center. While expanding them, also make sure that the new districts do not reach the areas that are useless to you.
Expand in any way you want to. There are no diplomatic limitations on you so, it depends on you only, whether you win the game thanks to conquest, amassing the highest amount of points or the highest production of Dust. Also, this means that you can freely choose in which direction you want to conduct research, depending on the situation on the map. Remember, however that your priority is still the production of Dust.
Fight carefully. Lords do not have ranged units and their heroes, and the basic infantry, fight at close quarters. You need to accept the fact that you will be sustaining losses, in the initial battles, or high healing costs. With lots of money for healing and the best equipment, your army will be, nearly, invincible.
Do not hire just anybody. While buying a hero, note his abilities. Each one that provides a bonus to food production is useless to you so, if a character has no other valuable attributes, it is better to invest in someone else. As for governers of cities, the Lord heroes are at an advantage. Only they have a set of abilities with bonuses to Dust production(Aquatic Dust, Dust Diviner, Dust Trickery).
Win thanks to money. Later into the game, you should already have enough Dust, to be able to buy the entire garrisons, even in the newly-conquered cities. If your profits allow that, pick the weakest of the neighbors. Conquer his city, buy new units there and move your armies ahead. If necessary, also send the fresh garrison into the battle and buy another one to replace it. Also, do not forget to equip them with the best possible gear and heal them after every battle. By utilizing this strategy, you will be able to defeat all of your opponents, one by one.
Complete quests. Thanks to the main storyline, Broken Lords gain access to several technologies useful to them:
Era I: Archeologist. The Science Points cost of all technologies of the first era is 10% lower. In other words, not only there is less to develop in the first era, but also you can do that faster.
Era II:
Vault dwellers.
The faction of warriors and scientists. They can quickly cover long distances and obtain more strategic resources, than their opponents. At the initial stage of the game, they are dangerous, thanks to crossbowmen. Later on they can easily get the upper hand over the rivals, when it comes to scientific development. It is recommended for the players with some experience with the game.
Hints for those who play as Vaulters:
Research and discover. This faction receives an additional science point, from the areas that supply science. For this reason, while building in your city, or expanding it, pay attention to the fields that provide an appropriate bonus (Red Rock, Mountain Rock, Sandstone Swirls, anomalies, such as Wizard Stone and Earthspine). Also, try to develop technologies that increase the rate of scientific development. A big facilitation is the technology of Endless Recycling (the third era), but only in the cities with numerous districts. With appropriate planning, you can bring about the situation, where you can take advantage of the facilities of the third Era, while the rest are still sticking to the second Era. This makes a tremendous difference that tips the scales to your advantage. Exploit it.
Pick the holy resource. Vaulters can name one of the strategic resources holy. This requires a certain amount of that resource, identical as in the case of luxury resources (10 for 1 city, 15 for 2 and so on). You can use that for:
1. Erecting unique and useful structures, such as Deep Generator (the second era).
2. Temporary strengthening of a faction. The holy resource is also treated as a luxury resource, which means that you can use up some of it, in order to gain several useful bonuses for 10 turns.
Teleporting between cities.
Boosting the production of the holy resource by 200%, during the Winter.
Reluctance of the population, towards expansion -50%.
An additional bonus, dependant on the individual resource:
You can use the holy resource often, because the faction has a bonus to the production of strategic resources. You can also use this bonus while buying a better equipment for your units. In spite of that, your choice is very limited. It is hardly probable that you manage to reach the equipment of the fourth era and the resources of the third era also become available quite late into the game. Therefore, you should pick Titanium or Glassteel, depending on which one you consider more useful and which one you are producing more of. Especially that you do not pick the holy resource permanently and at a later stage of the game, you will be allowed to activate another strategic resource.
NOTE! Up until you pick your holy resource, technologies of the deep generator and Endless Recycling can be viewed in the research window. Similarly, you will not be able to view the buildings that require the holy resource, in the city window, up until it is active.
NOTE2! If you are erecting a structure that requires the holy resource, and the bonus from that resource depletes before the works end, the structure will not be completed and the building will stop. It will be resumed after you reactivate the holy resource.
Teleport. The ability to teleport between cities requires you to activate the holy resource, but it is one of the best things in the entire game. You can teleport any of your units to any city, even if it is located at the other end of the continent. Thanks to this, you can easily reinforce the defense of besieged cities, or of the newly-conquered ones. You can also transport settlers over to the areas with no settlements in them, or you can play a tricky game. Seize a city behind the enemy lines, raze it to the ground and teleport your units over to you. Or, instead of burning the city down, you can use the city to teleport your units there and make him fight on two fronts. You can also teleport away from the enemy areas, as well as the neutral ones, the only condition is to activate the holy resource. Of your supply of the holy resource is sufficiently high, consider teleportation as the quintessence of your strategy.
Raze all of your enemies to the ground. Marine, the Vaulters's basic unit, are armed with crossbows. When deployed correctly, and in large numbers, they are capable of obliterating the enemy before he manages to approach them. If you want to achieve military victory quickly, marines will help you make that plan come true. Also the first hero of the faction is a crossbowman, which additionally strengthens your army at the beginning. Still, if you do not want to take advantage of crossbowmen, this faction also has cavalry and heavy infantry.
Seize the initiative. A quick technological development will provide you with access to many useful structures. Thanks to them, you will quickly get the upper hand over the opponents and, as a result, you will be able to make them react to your actions. If you want to fight, be the first one to start the war. Thanks to the technological superiority, you will have a greater chance to win. If not, develop your cities and gain advantage over your opponents, either in the technological race, or for points. Your armies will be capable of defending the cities and, if the need arises, you can develop the Strength of the Vault (the third era), a building that boosts the city defenses and the rate at which they regenerate their defense points.
Perform quests. Thanks to the main storyline, the faction gains access to new technologies:
the second era: Winter Shelters. Thanks to this technology, food production does not drop in cities, during winter. This allows you to widen the gap between yourself and the rest of the players. Especially later into the game, when winters are more frequent and longer.
The fourth era:
Resource Magnetron. A structure that increases the production of holy resource by 10 units, in cities. It can be built only once and it requires 30 units of titanium.
Extreme Yields. Increases the production of the holy resource all around the empire, by 200%. In combination with the above structure, holy resource can be activated, virtually, for the whole time and all of the units can use the equipment made of it. Still, due to the late stage of the game, both of the bonuses may not be used to their fullest extent. Simply, there may be no need to.
Insects eaten away by illness.
A faction of insectoid warriors, whose only meaning in life is fight and expand its territories. They cannot enter alliances and their development depends n attacking the other factions and villages. They are a good choice of the players that want to win thanks to conquests and the ones that have already had some experience with the game.
Hints for those who play as Necrophages:
Do not worry about food. The faction receives a penalty to food production, from all regions. This means that its cities are much smaller, at the beginning, than in the case of the rest of the factions and, with time, their development comes to a halt. However, you do not need to worry, because there are several ways to obtain food, available to you.
In other words, population in your cities depends on the rate at which you conquer villages and defeat enemy units.
Develop your cities. The cost of building a district is lower, in the case of necrophages, which makes for the fact that the cities of this faction are the vastest. You can, this way, make up for the shortages in food production or, if you do well at war, focus on developing industry production. Science and Dust are important for this faction, but industry is more important. Thanks to it, you can produce units that obtain more cadaver for you. In the case of any problems with support, you can sacrifice your subjects, thanks to the Demanding Gods technology (the second era).
Develop the armies. Your cities expand thanks to conquest, which is why you should focus on production of units. You cannot develop diplomatic technologies and, as a result, conduct talks with neutral villages so, conquer them. Eliminate each enemy band on your terrain. Do not worry about injuries, your units have a bonus to healing. Develop the technology of Cannon Fodder (the second era) quickly, which additionally lowers the maintenance costs for the army. Also, develop the other fields, but invest mainly in war technologies, especially that you have access to, nearly, all the units available for this faction, at the beginning of the game, with the exception of the proliferators of the second era. Necrophages have little chance to win in peaceful way so, it is better to focus on waging war. Apart from that, you do not have access to diplomatic technologies so, you can focus on the development of the other, more important fields. This fact itself will ensure you with slight advantage over your opponents.
Fight face to face. This faction does not have any ranged units. Also its heroes fight at close quarters. Be prepared to sustain some losses in every battle, especially if you are fighting against long-range opponents. This is why it is better to start a fight with, at least, two full armies and,, later into the game, three. You will then win thanks to sheer advantage in numbers, rather than thanks to the quality of your units. Especially that, thanks to the proliferator unit, you will receive several new squads, after each battle.
Eternal war. Before you declare war to somebody, give it a good consideration. Your faction cannot enter pacts, nor sign peace treaties. The only thing available to you is truce. As soon as you start fighting, fight until you either win, or lose, because truce does not pay off, in majority of cases. If you do not feel up to, wait for the enemy to declare war on you and react to his actions. Sometimes, however, you might want to take the risk, because your troops receive a bonus of +4 to attack, for each faction that you are at war with. Wit sufficiently strong armies, you can risk waging war against the whole world.
Complete quests. Thanks to the quests in the main storyline, you gain access to technologies:
The third era: Fungal Laboratory. Thanks to this building, each citizen assigned to food production produces 4 units more. A very useful building, in combination with the Demanding Gods yet, it becomes available relatively late into the game.
Fourth:
Mages in search of transcendence.
A faction of mages that use pillars filled with powers. They do not enjoy any permanent bonuses, only the temporary ones specified by the player. For this reason, this faction requires a certain level of familiarity with the game and the ability to react to the current situation. Recommended to experienced players.
Hints for those who play as Ardent Mages:
Use the pillars. At the beginning of the game, you can use two pillars. The first one ensures you with a bonus to science in the districts around it, whereas the other one decreases the cost of movement of units. These bonuses are in effect for the duration of 10 turns, encompass a certain area and they cost you Dust; more with each next one. The cost depends on the number of the pillars that already are active. Therefore, a good tactic is to focus on Dust production and to spend it to buy more pillars. Thanks to this, starting with the second era, you will easily get the upper hand, both in scientific and diplomatic terms. Pay attention to the bonuses provided by an individual pillar. A city district is not the same as a hex of terrain. In other words, try to place pillars in the way that allows them to encompass the vastest area possible and to provide the greatest bonuses. Pillars function in the following way:
Use spells. Bundled together with column, comes a spell. Spells also cost Dust and you cast them in combat, during the second phase of the battle, after you select targets for your units to attack. Spells affect an area, they can weaken or strengthen several units at a time. Spells function in the following way:
Focus on research. You can gain access to the rest of pillars thanks to research, which is why it is best to research into them in the first place. Thanks to the bonuses that they provide, further research is faster and the general development easier. Apart from that, in the later eras, you gain access to research that increases the potency of spells (Dust purifier, the second era) and pillars Dust mechanics (the third era). Ardent Mages have the highest number of unique technologies, from among all of the available factions.
Develop cities with care. Pillars provide a bonus to production in cities, but they take up space on fields. You cannot put up a pillar on the field occupied by a district or a mine. In the same way, you cannot build a district on a field occupied by a pillar. Keep that in mind, while developing your cities.
Flexible armies. The basic unit is infantryman, but you can develop a ranged soldier, as soon as in the first era, and an airborne unit in the second one. You should be able to allow yourself lots of freedom, while forming your army, and trying to fit its size to the opponent. First of all, spare no expenses on ranged soldiers (Ateshi Zealot). Thanks to their ability, they can make each enemy that they hit move slower. Thanks to this, you will be able to fin many battles, before the opponent even comes close to you.
Win with magic. Pillars that ensure you with bonuses to research allow you to discover appropriate technologies faster. The pillars that generate Influence Points will allow you to use the blessings of Empire Plan easier. Thanks to spells, it will be easier to win difficult battles. Therefore, your opportunities to develop the faction, and pick the road to victory, are vast, as long s you remember to amass Dust supplies for a rainy day. However, try not to focus on pillars and spells only. They are powerful, but they will not ensure you with victory by themselves.
Perform quests. Thanks to the main storyline, this faction gains access to:
the second era. Verda's Temple. Thanks to this building, each area that produces science, will produce 2 points more. Can be built only once per empire. Available quite early into the game and, although it does not ensure you with scientific victory, helps you achieve that goal.
The third era. Cold Engineering. Grants you access to winter versions of pillars. As the name suggests, winter pillars function in winter, unlike the regular ones. Winter columns are weaker than their summer counterparts but they can grant a slight advantage, when the rest of the factions are struggling with problems.
The fourth era.
Traders of the desert.
A faction of traders and nomads oriented towards making money and towards amicable relations with its neighbors. Good for the players that want to win in a peaceful way, who favor calm development of cities over wars. It requires familiarization with the game slight enough to be suitable for beginners.
Hints for those who play as Roving Clans:
Make money on trade. The faction receives detailed information on purchases made by the other factions. Also, it receives 10% of the incurred expenses back, which may be very useful, in the case of multiplayer. If you do not want any of the players to use market, you can ban them from trading. You can do that during diplomatic talks. Banning someone from market requires you to spend Influence Points. Classes also receive more information on transactions made in the market. Remember, however, that cities start trading between each other in the second era so, do not expect to make quick money this way.
Buy in the market. Since the very beginning of the game, you have access to the market, where you can buy mercenaries, heroes and resources. If you focus on the production of Dust, you will, simply, be able to buy the majority of materials and units. It especially pays off to buy mercenaries. Your faction ensures them with a bonus to vitality and to movement points. Also, you can sell the units that you have, in the market, if necessary. Take advantage of that, if the upkeep of your army costs you too much, or when you have lots of weak units that you do not need anymore.
Do not get on your neighbors' nerves. Clans cannot declare wars and, eventually, respond to enemy attacks, and negotiate truce. This means that you need to build new cities faster than the others, otherwise there will be no space for you left. And you will not win it, if someone else does not declare war on you, in the first place. There are two important upsides of that, however. First of all, you save up Influence Points, which you would have, otherwise, to spend on the declaration of war. You can spend them on changing your Empire Plan. Secondly, at the same time, at which you sign a peace treaty, you also sign a commercial and a scientific ones. Thanks to this, you obtain more Dust and science points, which saves you even more Influence Points that you would otherwise have to spend on both treaties.
Moving cities. Clans can pack their cities and relocate them. So, you do not need to attach that much attention to exploration and exploration of regions, before you seize them. If it turns out that the new location is unsuitable for your needs, you can simply relocate the city. This will take one turn and, after it is put together, it is treated like a settler. You can also take advantage of this during war. If the enemy is marching towards your city, and you know that you will not be able to hold it, pack your stuff and relocate to a safer area. You can also try and steal an enemy city: seize it, pack it up and send to your territory to unpack it in a safe location. After it is unpacked, the city takes up only one field and it has all of the structures that have already been built there. Rebuilding each one of districts in that city takes one turn and all of the districts can be rebuilt simultaneously. Therefore, you are capable of unpacking the city, and restoring it to the state in which it can be used, within one turn.
Blitzkrieg. All of your units and heroes move on horses, or other animals. This means high speed and initiative in your army. Take advantage of that, during quick raids into the enemy territory and while luring the enemy into traps. If you cannot fight, simply get away to a safe distance. The majority of the opponents will not be able to catch up with you. If you want to fight, remember that you have both short-ranged and long-ranged units. And heroes among the latter. Fit your army to the enemy's capabilities. Cavalry also means faster exploration of the map, thanks to the higher amount of movement points. At the same time, do not hesitate to dispatch your units by themselves. They are fast so, they will be able to escape the wandering bands. It is enough that you are careful, while exploring the unknown areas, so the units still have several movement points left, up their sleeve.
Perform quests. Thanks to quests of the storyline, clans gain access to the following technologies:
the first era. High Towers. After they are built, the range of vision, of city centers and districts is longer and the entire city yields additional 5 science points. Can be built only once. An excellent reconnaissance technology. Build towers in the border city. Whenever you want to colonize new areas, simply relocate the city there and build another one in the location where the city used to be. Thanks to this, one of the borders will know about the adversary's actions. It is especially useful in the city that borders with Necrophages or any other belligerent faction.
The third era. Trader's Tent. All of the trading routes in cities generate 50% more Dust. It is a very useful technology, in combination with the 3rd level of the imperial plan, in "economy and population", and with abilities of heroes. Not necessarily will it alter the outcome of the game, but it will definitely speed up the victory.
The fourth era.
Chain Suspension. The building requires Right of Way to be built in the city, as well as the production of Dust at the level of 30.
Thanks to the structure, the city gains 2 additional trading routes. In extreme situations, it allows you to trade with five other cities, all at the same time. This provides you with large amounts of Dust and science points. Unfortunately, it becomes available very late into the game, due to which its usefulness drops.
Money Talks. A diplomatic technology. You can cause a high inflation in another faction. Thanks to this, all of the trading routes of that faction yield 20% less Dust and science points. After you impose this limitation on a faction, you can also lift it. Again, it becomes available very late, but it is still very useful, even then. It does not damage factions, such as Broken Lords too much, but in the case of Necrophages or Wild Walkers it can have severe effects.
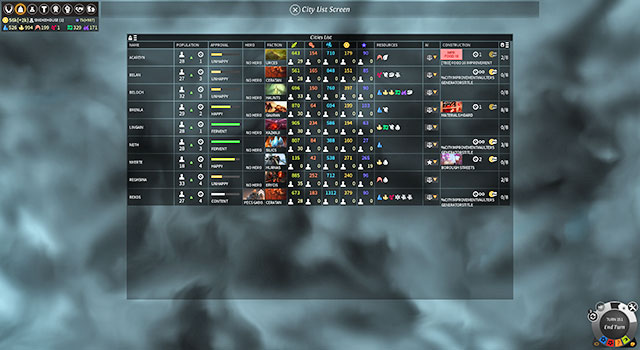 City management window.
To a large extent, specialization of a city depends on the tasks assigned to citizens, and not on the buildings. Production buildings are so few in numbers that you can have in each city, with a bit of planning. Especially that some of them function only near rivers, sea or rocky areas. The amount of buildings will only be a problem in the case of new cities under development. Still, sooner or later, also they will be able to erect them all. Therefore, while deciding on the order in which to build them, pay attention to what you need at the moment. Leave the rest of them for later.
Cities can specialize in:
Scientific production. A field that is key to everyone. There should be, at least, one city that specializes in science, so there is anything to manufacture, for the rest of them.
Dust production. Again, important for all factions. Many special abilities, the market or buying buildings requires Dust. Have, at least, a half of your cities, focus on Dust production.
Influence points production. You need these points to determine the imperial plan, for diplomacy or for assimilation of the minor factions. A small empire will do with just one city that specializes in that. A big one requires two, or even three.
Later into the game, buy cheaper buildings, such as the foundry or library, and build the more expensive ones yourself. This will also allow you to found cities on the less hospitable terrain. For example, if you are founding a city on fields devoid of food, you will be able to make up for that, thanks to Seed Storages (the first era) and Public Granary (the second era). Therefore, you should not be afraid to experiment with location of cities, because there are many ways to improve on their condition.
Do not found cities near the deposits of strategic resources or luxury resources. Especially if there are much better locations around. Mines do not need to be located near cities, for proper functioning and you will not be able to benefit from anomalies, and the other valuable areas, without a city. And you should, because anomalies provide many useful bonuses and they are, usually, more profitable for cities, than simple forests or plains. Still, if you really need to build a city near a deposit of a resource, remember that each district works like a mine. However, you cannot build a district over a mine that has already been built. Therefore, try not to build it where you have planned previously, or build a district later on.
Try not to found cities in the neighborhood of ruins. You will be using the field that they are located on, but you will be unable to build a district there. This means that one of the six development paths will be blocked off, which may be quite a problem for a newly-founded city.
Remember that the number of districts, in a city, depends on its population. It is especially important in the case of Broken Lords, who need to buy each new citizen. If your food production is low, you need to realize that your city is going to be small. In such a case, consider and reconsider founding a city in the given area, because it may turn out that you will not be able to expand it in the way you wanted.
As you build more districts, consider if you want to boost the level of the ones that already exist, or maybe seize as many fields as possible. A district progresses to the second level, if it is surrounded with four other districts. Thanks to this, it yields more Influence Points. On the other hand, however, the reach of districts built one next to another is shorter. Each time you want to build a new district, find out how many fields it is going to encompass. Note that sometimes it is going to be three fields, sometimes two and sometimes just one. Therefore, you need to decide - either as many fields as possible, or a higher level of districts. You cannot have it both ways. You will either run out of time, or resources, or citizens.
If the valuable fields, or anomalies, are at a considerable distance from each other, ignore them. You can simply run out of time to build a district that would encompass them. If a valuable field is within the distance of two or three hexes of the city, it is worthwhile trying to reach them. If it is farther away, ignore it. If there are several such locations to choose from, try to reach one, or two at most.
After all, the meaning of anomalies drops later into the game, when shortages in cities can be dealt with, y means of buildings it founding new cities loses in importance. This does not mean, however, that you can erect them without any plan on your mind. Simply, with the option to buy the majority of important buildings, or making use of food provisions and industrial provisions, you do not need to stick to as many instructions as in the initial turns.
Note land formation. Some of the elevations can be climbed on two sides, whereas the other only on one side. If you found a city in such a location, you will make it more difficult for the enemy to siege it, because you will know where the enemy armies stop. If, however, one of the districts is below the elevation, the siege may start on that side. However, it is difficult to find a vast area entirely on an elevation so, do not worry if the better areas increase the chance of siege.
All you need for seafaring is the Cargo Docks (the second era) technology. Therefore, not all cities in coastal areas need to be harbor cities.
If you do not have time, or any idea on how to develop a city, use the option of automatic building. The computer is nothing of a genius, but it can properly manage the city, while adhering to your instructions.
This statistic shows how much your subjects are content with your rule. Support counts separately for each city and in total, for the whole empire. Therefore, one discontent city is not capable of ruining this figure.
The more cities and the higher population of that cities, the lower support from your subjects. This results from two things:
Overpopulation - it grows as population rises. With five, support drops by 20 points, with seven by 30 and so on. Sometimes, the game fails to calculate this factor correctly, so with seven subjects, you still lose only 20 support points.
Expansion disapproval - it grows with the number of cities that you have. With two cities, you lose 10 support points, with three - 20 support points and so on.
Both of these factors are best visible while founding new cities and during conquest of the cities of the opponent. If your support is low, consider burning down the newly seized city. Also, try not to found new ones, until support goes up again.
High support ensures bonuses to production. It is just the opposite in the case of low support. Therefore, it does not pay off to build new cities , because their effectiveness will be too low. Instead, it is better to raise support in the existing ones and then build new ones.
You can raise support thanks to:
Anomalies, such as Oasis, Dragon Tree, Life Tree, Earthspine, Earth Tower, Wizard Stone..
If you found new cities with consideration, you will not be founding new ones too fast and you limit conquest, you should be able to retain high support for your rule with no problems.
If you see that you will not be able to raise support to fast, buy large quantities of luxury resources in the market. Each use will ensure you with high support for 10 consecutive turns.
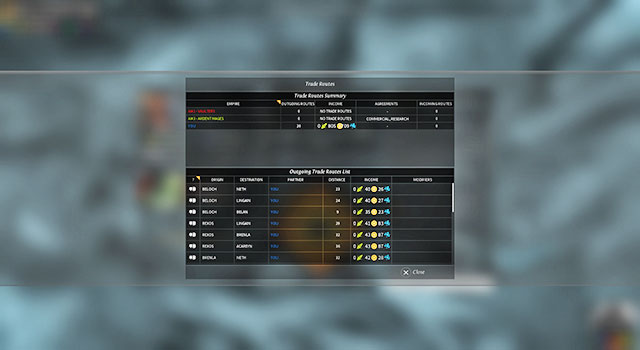 Trading routes window.
Commerce in Endless Legend requires two cities, joined together either with roads or harbors. The earliest that you can meet these requirements is at the beginning of the third era. If this happens, the cities will be joined together, with a trading route, automatically. They can both be the player's cities, as well as the ones belonging to his allies.
The game specifies which cities can trade with each other and this happens at the beginning of each turn. You do not need to do anything, when it comes to trade, apart from building roads and harbors. At the same time, you need to note the distances. Regions with rods should be located next to each other. If a region is separated from the rest, with a neutral, or the opponent's one, you will not be able to trade. Similarly, harbors need to be located within the distance of two regions of each other, at least. Allied regions can be used as a part of the network, even if the ally does not have any roads built.
If your regions do not trade with each other, make sure that you have built roads there. If so, check if they are sufficiently close to each other. Two harbors may not want to trade with each other, if they are too far away from each other. In such a situation, build another one between them. If this is not enough, build another one. Sooner or later, this will result in a chain of harbors that are capable of trading with each other. The same goes for mainland regions and roads.
If you want to trade with another player, you need to enter a trading agreement. There are two, for Dust and for science. Apart from that, the other party also needs roads and/or harbors. That is why, while playing against the stupid AI, you can run out of time waiting until your ally is prepared to trade.
Each city can open one trading route. In the capital city, there is the Palace, thanks to which you can open an additional trading route. Apart from that, you can also build caravanserai (the third era), which adds another trading route, possible to open by a city.
Trading supplies Dust, food and science points. At the very beginning, in small amounts but, with time, these reach very high levels. Therefore, you should make sure that all cities trade with each other, as quickly as possible. You will be make a really big profit after you have lots (around 8) densely populated (15 citizens and more) cities, with 2, or more, trading routes that are within long distances of each other. The game attempts to make trading routes as long as possible, because this generates additional profit, just like their size. In such a situation, you will be making hundreds of units of Dust and of science points.
At the moment, there are only three technologies, connected with trade, available: cargo docs, Right to Way and caravanserai. They are useful, but they cannot make trade the base for your empire's functioning. Therefore, do not perceive trade in this way, but rather as an addition, however important.
Whether is pays off to use luxury resources, depends on your finances. If you can afford buying them on a regular basis, or you have lots of mines, do not hesitate to regenerate bonuses as soon as the previous ones deactivate. Otherwise, treat them as a tool for combating crisis and use only if necessary.
Unlike in the case of strategic resources, at least the ones from the initial eras, luxury resources are always something that you will have too little of. Especially in the case of a vast empire, gathering them in big quantities may be problematic. For that reason, try not to use them foolishly, because it may take lots of time before you will be able to use them again.
There are no better or worse luxury resources. Each one of them ensures bonuses useful in certain situations. For example Dust Orchid seems to be better than Dustwater, because it raises production of, nearly, everything, but only by 25%. At the same time, Dustwater raises the production of Dust only, but by 50%, which makes it better, in some situations, than Dust Orchid. This is why, while buying luxury resources, or considering the construction of a mine, follow your current needs, or the future ones, rather than considering which one is "the best".
It is not a good idea to sell these resources. You use strategic resources in certain situations and it is easy to predict, whether you are going to need them. However, you may find yourself in need of luxury resources one turn after you have sold them. They cannot be stolen, nor can you lose them in any way so, it is better to store them for worse times. Especially that bonuses provided by various resources accumulate. The only exception is a situation, in which you have, nearly, 999 units of a given resource, because the game will add no more units above that value. In such a situation, you can consider selling some of your supplies.
The amount of a resource that you need to use up, to receive a bonus, is 10 + 5 pear each city, above two. This means that if you have two cities, you need to spend 15 units, with three cities you need to spend 20 units and so on.
Name
Can be mined from era
Bonus
Blood Crystal
III
Increases the attack of each unit by 25%. Increases support in cities by 10 points.
Dust Orchid
IV
Raises the production of Dust, food, industry and science in each city, by 25%. Increases support in cities by 10 points.
Dustwater
IV
Increases the production of Dust by 50%. Increases support in cities by 10 points.
Dye
I
Increases the production of Influence Points by 50%. Increases support in each city by 5 points.
Emerald
I
Increases Dust income in each city, from trading routes, by 100%. Increases support in each city by 5 points.
Gold
I
Decreases the cost to maintain buildings, in each city, by 50%. Increases support in each city by 5 points.
Grassilk
III
Raises the upper defense threshold, in each city, by 33%. Increases support in cities by 10 points.
Hydromiel
IV
In each city, increases yield of food, from trading routes, by 4. Increases support in cities by 10 points.
Moonleaf
III
Increases the production science points by 50%. Increases support in cities by 10 points.
Pixie Blood
IV
In each city, increases health regeneration rate by 20%. Increases support in cities by 10 points.
Quicksilver
III
Whenever any unit receives experience points, the value is doubled. Increases support in cities by 10 points.
Redsang
IV
Whenever any hero receives experience points, the value is doubled. Increases support in cities by 10 points.
Spices
I
Increases the production of food by 50%. Increases support in each city by 5 points.
Titan Bones
III
Increases the production of industry by 50%. Increases support in cities by 10 points.
Wine
I
Increases support from people by 30 points.
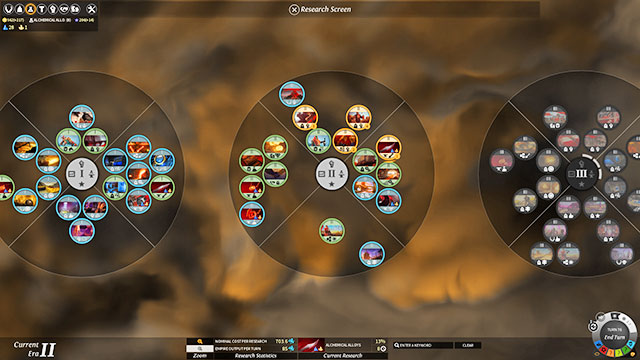 Research window.
Technologies have been divided into six eras. Reaching the next era requires you to discover a specific number of technologies from the previous one. The number of lines around the digit of the next era informs you of how many technologies there are still to develop. So, if there are few of them, and you need quick technological advancement, develop technologies of the first and the second eras, which you would not even touch, otherwise.
In each era:
After you advance to eras I, III and IV new sources of luxury resources and strategic resources appear on the map. You cannot exploit them without appropriate technologies. Additionally, in the second era, there appear foundations for watchtowers on the map, which you also need to develop beforehand.
The order of development of new technologies depends, mainly on the strategy that you have adopted. If you want to wage war, develop better units, industrial buildings and weapons. If you want to produce Dust, focus on the development of mints and buildings that allow for trading. I each era, there are, at least, several technologies fitting the adopted playing style.
A much more important thing, while determining the order of development, is the situation on the map. If you see that the enemy has more units, focus on the technologies that increase industrial production. If they are better than yours, consider developing new weapons, or on the development of units of higher level. At the same time, pay attention to what is available to you. Each race has unique units that you can deem useless. Do not perceive the selected research path as the ultimate one. If you decide that the current one does not live up to your expectations, or does not provide you with the means to surpass your opponents, change it.
However, regardless of the situation, in the first place, try to develop technologies that increase the rate of research. The reason is simple - thanks to this, you will have more science points. With more science points, you will develop the rest of the technologies faster. High industrial production is useless if there is nothing for you to produce and this is what you need research for. Apart from that, you gain access to the successive eras and, which follows, to some bonuses, only after you have developed a specific number of technologies of the previous eras. The more science points, the faster you develop.
Also, try to develop technologies that raise the support of subjects, as quickly as possible. High support ensures bonuses to production, allows you to found more cities and limits the effects of overpopulation. Therefore, it is useful in each situation.
In each era, there are several specific technologies that are worthy of a wider explafaction. Below, I have ignored the inventions that raise the rate of production of the basic materials and/or which do not require strategic resources. You only need to see what bonuses they offer, and in which situations, to decide if they are worth developing.
Economy and population
Open Pit Mine. Virtually, in each region, there is a luxury resource, sometimes, there even are two sources. This is why you should develop this technology if you want to take advantage of the bonuses that they offer, and you cannot afford regular purchases from the market.
Advanced Filigree. You can find quite a few useful items in the accessories. Develop this technology if you have access to strategic resources (for accessories of the first era titanium and glasstell) and you want to improve on the quality of your units. Otherwise, you can ignore it. The same goes for the similar technologies of the second and the fourth eras.
Army
Rookery. This technology allows you to hire heroes. These are very useful, but expensive units so, you can ignore it, if your production of Dust is low, or you do not need the back up from the heroes.
Stronghold Architecture. this technology is useful, if there are many neutral bands in your regions, or you are at war with a stronger opponent. Especially additional units of militia will be helpful. For the players that prefer playing a peaceful game, or the ones that can defend themselves using their army, this technology is useless.
Science and industry
Alchemist's Furnace is moderately important, because there are no buildings, in the first era, which would require titanium and glasstell. Such buildings appear as late as in the second era. Useful only if you want to build them, or arm your units with weapons and accessories that use these resources. If your answer was "No" in both cases, and you do not plan on selling resource in the market, you can ignore this technology.
Advanced Alloys and Advanced Armor. Both of these technologies are useful if you strive for the high quality of your armies. Otherwise, you can ignore them. Skip them also n the situation, in which you are not going to research into the Alchemist's Furnace and/or buy strategic resources in the market. The same goes for the similar technologies of the second and the fourth eras.
Empire and expansion
Sewer System. In itself, this technology does not require any long introduction, with the exception of one thing. It yields 1 income point, if citizens are, at least, pleased, which is a high value at the beginning of the game. That is why, if you are going to make use of imperial plans, the sewers become increasingly more important to you.
Search Party. In theory, this technology is useful for searching through ruins. In reality, treasures in ruins are random, to a large extent, and they are small, in the scale of the entire empire, especially later into the game. So, you can develop this one if you want to find several units of various resources or single items, but this is not necessary.
Language Square. Develop this technology if you want to bribe minor factions or negotiate with them. For players that prefer forceful solutions, this technology is useless and very useful for the remaining ones. the second era
Economy and population
Fish Farm. This technology provides two buildings that produce food. Both of them require glassteel. Do not invent it if you do not have access to a mine of the market. Otherwise, there will be no way for you to build either of these structures.
Prisoners, Slaves and Volunteers. You can buy units and buildings for 75% of their price. It is compulsory for the factions that focus on the production of Dust For the rest of the factions, not too useful or completely useless.
Tailor's Guild. Invent only if you are using accessories.
Imperial Coinage. This technology is indispensable for the factions that produce lots of Dust and want to spend it on resources and units. The remaining ones may use it for selling surplus but, it is not required for that. In general, this technology is not a priority, but it is better to have it, as opposed to not having it. You never know when it becomes useful.
Still houses. Food provisions may always be useful, especially in winter. Therefore, if there is nothing more urging to invent, you can develop this technology. After all, you can sell the provisions on the market. The same goes for the improved version of the fourth era.
Army
Meritocratic promotion. Be default, the army and a garrison are four units strong. Most usually, this is enough to win the majority of battles. However, if you feel that four units is not enough, you can take along two or three armies, to your expeditions. There are four situations, in which it is profitable to have this technology developed.:
Commander. The hero ensures the units in his army with a bonus, but not in the remaining armies. If you care for them and you do not want to buy a separate hero for each army, develop this technology.
City defense. There is a limited number of soldiers in each garrison. Develop this technology if you want to increase them in size, or you do not want to maintain several independent armies in each city (an army stationed in a city is not included into the garrison). Also, develop it if you want to produce large amounts of units and you do not want to pull them away for the whole time (the game does not allow you to produce units in the cities with full garrisons, or halts the previously planned production, in wait for the units of the garrison are formed into a new army. This is not difficult to do, but is time consuming and distracts you, in the case of nigger number of cities).
Action points. Each costs one action point. So does support from the fighting unit. If the opponent has a bigger number of armies, it may be more reasonable to attack with several larger groups, rather than with a dozen-or-so of smaller ones.
Game time. Later into the game, when villages are defended by twenty units, an army of four does not impress that much and it can be easily obliterated.
Conscription center. There is little difference between a unit of the 1st and the 2nd level. You can discern the difference between units of the 1st and the 3rd level and between the ones of the 1st and the 4th. In spite of that, it is always a good idea to have some spare experience points left, because it will then be easier for an unit to advance to the higher level. This technology is not a compulsory one. Develop it if you feel that you need to.
Science and industry
Lumber mill. Do not develop it if you do not have the Alchemist's Furnace or titanium that you bought in the market.
Alchemy Workshop. Just like above.
Industrial storage. This technology is useful if there is nothing to produce currently and you want to get prepared for the incoming war. It is also useful when you are founding a new city and you want to build all the necessary buildings in it really quickly, without spending money. You can also buy supplies in the market, with Dust, but in the current version of the game this option has been disabled. Therefore, you can ignore this technology if you are not planning on founding new cities, if you are capable of achieving high industrial production fast, or you can afford buying new units and buildings, instead of producing them. This also goes for the improved version of the fourth era.
Empire and expansion
Central Market. +25 to citizen support is really a lot, just like increased production of food and Dust. A must have for each faction.
Watchtowers. A must have. Develop it even if your regions are being patrolled by high numbers of units, because it increases the healing rate in the immediate proximity.
Sea Travel. An unnecessary technology if the majority of your areas are deep into the mainland. in the case of islands or several continents, it is indispensable. Also, it is important for the players that want to trade with the use of harbors.
Diplomat's manse. Useless if you want to focus on waging wars uninterrupted with times of peace. In the game, there is a division into war and cold war, which allows you to call truce, which is insufficient for belligerent factions that do not consider trading with neighbors.
Economy and population
Uncommon Filigree. If you want accessories, I recommend that you choose these here. The reason is simple - accessories of the first and the second eras are weaker than the ones of the third era, and you will not have enough time to enjoy the ones from the fourth era for too long. So, if you have invented the technology of mining adamantian and palladian, you can also develop the accessories that are produced from these materials.
Reaping Station. Identical as in the case of the Open Pit Mine of the first era.
Caravanserai. A technology compulsory for a faction with harbors or roads, i.e. a trading one. Also, useful for the ones, for whom trade is only a supplementary source of income. You can skip it, if you do not need too much Dust.
Dust Refinery. Useful for each faction with a glasstell mine, or which can afford buying appropriate amounts.
Army
Medical Center. Useless for the Broken Lords. The cost of healing their units, in Dust is so low that it simply does not pay off to wait. Useful in the case of factions that need to defend cities and for the players that prefer defense strategy. Do not buy this technology if you have not invented the smelting station or you cannot afford buying palladian.
Mercenary Market. A good choice for factions with lots of Dust and that are willing to reinforce their armies with units of the minor factions. For example, with crossbowmen, in the case of Necrophages or with cavalry, in the case of Wild Walkers. When it comes to the rest of factions, it is unnecessary.
Imperial Kennels and Materials Hoard. Useful if you are made to defend your cities, or you prefer to. Skip it if you prefer an aggressive strategy and attacking the enemy cities. Both buildings require titanium to be built.
Science and industry
Smelting Station. This technology is useful, if you manage to advance to the fourth era and use the best strategic resources. Otherwise, it can be ignored.
Uncommon alloys and Uncommon Armor. Develop if you have invented the smelting station and you want to equip your armies with better gear.
Royal Institute. Develop this technology if you have a surplus of industrial production, an empty building queue and few science points. Thanks to this technology, you can use industrial production to speed up research. Otherwise, there is no point in developing it.
Empire and expansion
Native District. A very useful technology. Bonuses from minor factions are low, but they grow at the scale of the entire empire. If you have pacified another race, which you want to assimilate, develop this technology. Otherwise, you can do that but it is not necessary.
Lookout Towers. Develop them if you have invented watchtowers in the second era and you actively use them. Otherwise, skip it.
Bread and Circuses. A must have. At this stage of the game, you should already have several cities and, which follows, you will have to face the reluctance of citizens towards expansion. This technology may not bring it down to zero, but will limit it considerably. It may even provide you with bonuses that result from high support of subjects.
Right of Way. Skip it if the majority of your cities are in coastal areas and will have, or already have, a harbor. You can develop if you want to move troops between cities, over the mainland, considerably faster, and for the cities that are too far away from sea to be able to build a harbor. Also, it may be useful if you want to trade with the other players, but you need to keep in mind that the computer is not always prepared for that.
Cargo Docs. Thanks to this technology you can use naval trading routes. It requires the technology of Sea Travel. Develop this technology if the majority of your cities are located in coastal regions. Ignore, if you are rather going to use the Right of Way. Developing both of them is only useful if you have an equal amount of coastal and mainland cities, or some of your cities are founded on distant islands, with the rest of them on the continent.
Glory of Empire and National Museum. Very important technologies for the factions that use diplomacy and Empire Plan. Especially, if they use both of them simultaneously. The National Museum requires strategic resources (adamantian and palladian), so you could develop them only if you have already developed the Smelting Station.
Economy and population
Refrigeration Plant and Fertilizer Plant. Both of these technologies require the Alchemist's Furnace and the Smelting Station.
Smokehouse. An upgraded Still House of the second Era. If you have not used it, you are not going to use the Smokehouse either. Otherwise, you can develop it.
Rare Filigree. Requires the Rare Metal Foundry. Skip it if you do not have and you cannot purchase the resources (mithrite and hyperium) and you are not going to improve the equipment of your units.
Advanced Harvester. Requires glassteel, and therefore the Alchemist's Furnace or access to the market. This technology becomes available quite late into the game, but it may help you mine for more luxury resources. At this point of the game, it is not necessary, but it is a good thing to have one.
Army
Brigade System. Raises defensive capabilities of units. For the warlike factions, it is a must.
Signal Corps. The situation is identical with the Meritocratic promotion.
Army Manual. Building increases experience of the newly-trained units, but it requires mithrite. Useful, especially in combination with the Recruitment Center.
Mercenary Corps. Develop it, if your army is made up, largely, of mercenaries. Especially if you play as the Roving Clans. Otherwise, it is negligible. .
Science and industry
Automated Production and Production Line. Both of them require titanium and adamantian, i.e. either the market or the Alchemist's Furnace and the Smelting Station.
Rare Metal Foundry. Requires titanium. If you want to make use of mithrite and hyperium, and you cannot afford buying them in the market, you should definitely develop it. Otherwise, you can ignore it.
Warehouse. An upgraded version of the Industrial storage of the second era. If you use it, develop this technology. Otherwise, ignore it.
Rare Alloys and Rare Armor. The situation is identical with the one in the case of the previous technologies of this type. Plus you may run out of time to use it, to their fullest, later into the game. Additionally, the equipment that uses strategic resources is good enough and you do not need to give up on it.
Empire and expansion
Highways Agency. Develop if you have the Right of Way, and your armies rely mainly on roads for movement.
The Historical Society. Moderately useful. The rewards from ruins are random, to a large extent, and the 150 units of Dust is a modest amount. develop it, if there is nothing more urging to invent.
Hospitality Den. At the lower difficulty levels, the computer has certain difficulties with recognizing alliances and the technology becomes available so late that you may have nobody to enter an alliance with. Develop it only if you feel the need to, or there are no inventions that are more urgent. Otherwise,, or if you are planning on fighting your neighbors, ignore it.
 Empire plan determining window.
Every 20 turns, you will have the option to determine the plan for your empire. In general, this means selecting the bonuses that are going to be in effect, for your country, for the duration of the next 20 turns. The Empire plan has been divided into five parts, four per level and, just like diplomacy, it uses up Influence Points. Unlike diplomacy, it requires much more of them.
The successive levels of the empire plan become available with the successive eras, which means that you need to conduct research to gain access to them. Successive levels become available right after you advance to the next era. Therefore, if you are at the brink of a scientific breakthrough, and the moment at which you define a new empire plan, assign some of the subjects to research. 20 turns between the instances of defining an empire plan, may constitute a difference. Especially that the bonuses and discounts offered by it are quite high.
The plan requires Influence Points. Thanks to simulation, you are able to find out how many. Several turns before you set another plan, use this option. Thanks to this, you will know if you should temporarily increase the production of Influence Points in cities.
There is no one good Empire plan. It is necessary that you select bonuses depending on what you need and on the situation. For example, bonuses to scientific production, during winter, are not too useful, if summer was in full swing, for the successive 20 turns. Similarly with bonuses for units, if you are not waging any war, at the moment.
The cost of setting up the Empire plan, on the selected level, depends on the number of cities that you have and it looks in the following way.
The Era of improvement
Cost per city
I
20
II
40
III
90
IV
250
For example, you want to set up a military plan for the 2nd level. You have 5 cities. For level 1, of the military plan, you spend, therefore, 100 Influence Points (5 x 20), and for the 2nd level 200 (5 x 40), which sums up to 300 Influence Points. You can experiment with expenditures in each field, as much as the cost does not exceed the amount of points that you actually have. While determining the plan, you will be able to monitor expenses on a regular basis.
The first era. Each citizen that produces Dust, now produces 3 units more. It is a bonus that is profitable for the factions that are concerned about increasing the size of treasure, such as Broken Lords or Roving Clans. As for the rest, the bonus is lower, because there are less people assigned to Dust production. If your main concern is the production of Dust, select this plan. Otherwise, buy it only if you are interested in additional bonuses.
The second era. The cost of building production - the amount of points necessary to build them - drops by 33%. It is an excellent bonus for the factions that produce, rather than buying, buildings. Very useful, especially at later stages of the game, where each building is costly. Buy it if you are up for buildings big numbers of structures and you want to speed it up a bit.
The third era. All of the trading routes in cities generate income higher by 50%. Very useful, especially if you own many cities that trade with each other. Thanks to this, not only will you be able to generate more Dust, but also more science and food. The latter is useful for each of the races, especially for Necrophages.
The fourth era. Eliminates market payments. These occur during selling and buying and they raise and lower the price. Therefore, it is a good idea to buy this level, if you trade often and you feel like saving up some Dust. If you produce lots of it, however, the price fluctuations are not that important to you.
The first era . The reduction of unit production, by 25%. Just like in the case of buildings, it allows you to produce more units, at a lower cost in industry points. It is useful at the beginning, when you need to manufacture more units to defend against neutral bands. Also later on, its value does not drop, because it helps you manufacture units equipped with expensive gear of higher levels.
The second era. Each unit receives a bonus of 30% to attack. Unnecessary in peace time, especially if you have already pacified all of the neighboring villages. In wartime, it is an important bonus, especially for strong units and heroes.
The third era. Decreases cost of buildings and units, all around the empire, by 50%. A bonus necessary for all of the empire. It is especially going to be beneficial for the Dust -oriented factions and also for the players with too large armies and to the players balancing, at the verge of budgetary deficit.
The fourth era. Each unit receives a bonus of 50% to health points. Just like in the case of the bonus for the second era, it is useless in peace time, in wartime it becomes a must-have.
The first era . Cities generate 20% science points more. At the initial stage of the game, take it on the spot. Thanks to this, you will save several turns on inventions and you will reach the second era faster. Later into the game, also take it, because the cost of research gets higher and because of that, each bonus is worth its weight in gold. Scientific research is one of the fields that separates strong countries from the weak ones so, if you can speed up research, do that.
The second era. Each city receives 25 additional points to support. Later into the game, it may save you, due to the large number of cities and citizens in them, It may seem a scanty amount but, later into the game, 25 points may draw the line between penalties to production and no penalties.
The third era. A +2 bonus to the production of science points in winter. It is unclear, whether it is a bonus per city or per a field of the map. Still, it is additional 2 points which will always be of use. If, during the next 20 turns, there is going to be winter, invest in this level. Otherwise, you can ignore it.
The fourth era. Cities generate 100 science points more. A very useful bonus, however expensive and available later into the game, when many of the technologies have already been developed. It is useful, if you want to progress to the next turn faster, or gain an easy access to the earlier technologies that have not yet been developed.
The first era. Each unit receives +2 to the range of vision. It is good during wartime and during reconnaissance, especially if you have dispatched many groups. Otherwise, and also if you are not interested in additional bonuses, you can ignore this one also.
The second era. decreases the cost of the buildings that you buy, by 33%. If you generate lots of Dust and you prefer to buy buildings, instead of producing them, this bonus is a good choice. You can experience the difference especially in the case of buildings of the third and the fourth eras.
The third era. Each unit receives +4 movement points. This bonus is especially useful for the factions such as the Roving Clans, which can cover large distances fast, thanks to it. It will also be useful to the other factions, especially if they do not yet have a vast net of roads, have to move over sea or find it difficult to catch up with the fleeing enemy army. As a matter of fact, it is easy to find a reason, for which this one is worth investing in.
The fourth era. Increases food production by 50% in summer time. A problematic level. It becomes available quite late into the game, when the majority of cities are large and it us unclear what the increased food production rate relates to. Apart from that, its significance drops as you progress in the game, when winters become more frequent and longer. Invest in this level only in the case of urgency.
To get involved in diplomatic actions, you need to find opponent's city or one of his armies. In such a case, you should receive information about the establishment of diplomatic relations. Remember, however, that the game may sometimes fails to recognize the occurrence of this fact. In such a case, you need to keep searching - for example - for another opponent city - or wait for several turns. Sooner or later, you will receive the message.
In the first place, diplomacy requires science. Without the appropriate technologies developed, the majority of the diplomatic actions will be unavailable to you and you will only be able to choose from declaring a war, truce and several minor options. You will be able to negotiate peace only from the second era, thanks to the option of Diplomat's Manse, and enter alliances only as late as in the fourth era, thanks to the Hospitality Den. This means that you will be unable to enter an alliance throughout the majority of the game, because the transition to the fourth era takes place quite late and the majority of players may not last out until then - but you can draw profit from trade between factions.
Diplomacy also requires Influence Points, which are generated in cities and obtained thanks to quests. The cost to declare a war is high, so is it in the case of forming an alliance. In combination with the regular setting of the Empire plan, this forces you to generate large amounts of these points. This makes diplomacy a tool oriented towards limited contacts with neighbours, such as blitzkrieg, calling peace and signing commercial treaties. The players that want to make a more frequent use of diplomacy will be discouraged by the high cost, which rises with time.
In the case of a game against the AI, diplomacy is an ineffective tool. If you do not know why the ally shut his borders from you, do not worry. Most probably, you have taken no misstep and the opponent is unsure of his reasons. Sometimes, the AI opponent either breaks the treaty, right after signing it, or threatens you in spite of alliance. Therefore, you should prepare yourself for high costs of diplomatic talks. Either that, or ignore it. At least, in the case of vast maps, where distances between the players are considerable and you can effectively avoid them, for an extended period of time. In the case of small maps, where you can run into someone at any moment, try to amass sufficiently many points to sign a treaty with two of the closest neighbors. This should get the job done.
The AI opponent does not attack the factions that he considers too dangerous. He only limits himself to sending threats. A good practice, therefore, is to form an army that is sufficiently strong to back up your peace request. Also, remember that there exists a division into war and cold war.
1. War breaks up at the moment at which you attack the opponent on his territory. In such a case, both sides fight without any limitations, until one of them is destroyed, or truce is signed.
2. Cold war means that you can fight on neutral territories and that you are entitled to attack any other faction on your territory, without paying the income points and declaring a war. There is a condition, though - from the moment, at which you meet the opponent's faction, there need 10 turns to elapse. Otherwise, the clash turns into a fully-fledged war.
In other words, you can defend your territory and destroy bands of the other factions, in the neutral regions and you will not bear the consequences of your actions. Unless, the other faction declares war on you. Still, if you want to besiege and attack an opponent's city, you first need to declare war on him.
remember that there also is a division into peace and truce.
1. Truce turns into war or cold war. This means that you can still fight, but the conditions are limited.
2. Peace disallows even that. After you sign a peace treaty, both of the sides must be nice towards each other, or declare war.
Therefore, you need to consider the idea of signing peace treaty with a faction that, otherwise, you could attack on neutral, or your, territories. In the case of majority of factions, especially the Roving Clans, it is a good move. Not so much for Necrophages.
There is a considerable upside, tough, to entering an alliance. It allows you to negotiate trading treaties and exchanging of maps. Sign a peace treaty if you are not bent on attacking the other factions, even on neutral territories, and you want to explore the rest of the map faster and earn a buck on trade. There is no point in entering an alliance, unless your potential ally is the strongest faction in the game. This is due to the fact that the AI is incapable of exploiting the full potential of alliance, especially with a weaker faction.
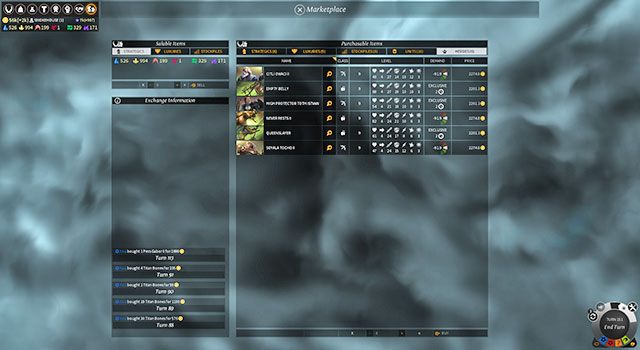 The market window.
Trading on the market is subject to limitations similar to that on diplomacy. Also here, you need to have specific technologies developed:
Roving Clans have all three technologies from the very beginning, whereas the remaining factions first need to develop them. This makes sense especially in the case of the Broken Lords, because only them, and the Clans will be able to afford regular purchases, later into the game. Trading requires Dust so, if your production is low, or you have nothing to sale, in exchange for Dust, it is better to stay away from the market.
There are two exceptions, though. The first one - the heroes. Each of the factions will do with a commander or an governer so, if it is an option for you, collect money to buy them. The cost is high and it soars with time, but a character with appropriate abilities may enhance the conditions in the city.
The second one - sales. If you have access to numerous mines and you do not consume all of the resources, which you will rather not do, due to overabundance, you can sell them on the market. This is especially true for strategic resources, which only Vaulters should make a regular use of, whereas the rest will only need them occasionally. The prices are not steep, especially in the case of resources of the early eras, but it should be enough to cover small expenses.
If you play as the Roving Clans, you should pay a visit here frequently. Not only do you receive some of the spent amount back, but also you have access to additional information. Thanks to this, who should be deprived of the access to market and who it is best to trade with, on a regular basis.
Prices in the market change, depending on your progress into the game and your actions. Buying large amounts of a resource rings the price of that resource up, just like selling it brings the price down.
Heroes of the several first levels cost several hundred Dust - the ones at level eight are several thousand worth. Therefore, if you are going to buy here, buy and sell in large quantities. You can wait several turns, but fluctuations in prices are never high enough to postpone purchases.
Some heroes that appear on the market are subject to the rules of exclusiveness and they disappear after a certain number of turns. Therefore, if you want a hero in particular, buy him before time runs out. In the same way, save no expenses on resources whose availability is limited. Sometimes, it is better to wait until more of that resource appears, but it is way better to buy the entire batch straight away, instead of buying single units, which brings price up.
As of now, you cannot buy food, industrial and scientific supplies in the market.
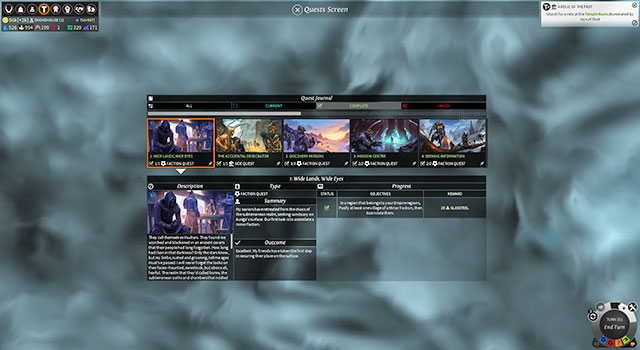 Hero window.
You can hire heroes in the market, in the part that becomes available after you invent Rookery (the first era). They come in two variations - ones available until they are bought and ones that are available only for a certain number of turns. Then, they are replaced with other heroes.
You should buy heroes always when you can afford it. They are ones of the best units in the battlefield, especially at higher levels and, thanks to their abilities, they can boost the rate of development of cities. There is no limitation on the number of heroes that you can have. You can have as many of them as you can afford and it is something that is worth striving for, because they are useful in many situations. All in all, it pays off to have an governer in each city and up to three, or in extreme situations, four heroes, who lead the armies.
While hiring heroes, do not hesitate to hire the ones that belong to a different faction. Their class and ability tree are different, which may make them more useful. Most frequently, you will be able to choose from among six heroes, which is why you should take your time and buy the one that suits your needs most.
You can move heroes between armies, cities and the academy freely but, after you do that, you need to wait for several turns. A newly appointed hero cannot be removed and, just like in the case of the academy, you need to wait for several turns. You need to take this into consideration, before you start appointing characters and removing them from the posts they occupy.
Heroes should be specialists in their respective fields. If you want an governer, invest into city management abilities only. If you need a warrior, invest in war abilities only. It is easier to combine a commander (bonuses for the city) and a warrior, than an governer and a warrior. You will run out of points and both of the fields are to different from each other. So, if you want the hero to fight, buy abilities connected with fighting and the ones connected with the army in the second place. Otherwise, have him manage the city.
While buying equipment, pay attention to two things - properties and purpose. A weapon that requires strategic resources not necessarily needs to be better than one which requires Dust only. Its properties may be more useful and it may add to the attributes that are more important to you. The only exception are the high-level items made of Mithrite and Hyperium, but most probably, you will gain access to them too late, for it to have any bearing on the game.
Pay attention to the properties of a weapon, or an armor and base on this, while selecting something for you. In the case of accessories, you need to remember about the division into the ones that are useful to the army and the ones useful for city management. Scrolls and books are good for governers, whereas rings and necklaces, and the rest, are useful to commanders. An item can be bought only once, but each hero can have a copy. So, if you have seven governers and good items for them, give one to each of them.
Items are different from each other, depending on the profession and the faction. You can try heroes out, before you hire them, thanks to which you will find out, if the items that you own are more useful to them or to the heroes, of your faction, that you already have. Pay attention to this, especially in the case of governers, because there is a wider variation in the items available to them.
Always try to buy the best equipment possible. A hero with high defense receives low damage and, armed with a good weapon, he is capable of defeating an enemy unit in one attack. In combination with high level, it is easy to create a character that can take on smaller armies, singlehandedly and, with back-up, they can take on the bigger ones. Especially that heroes are immortal and, in the case of a lost battle, they can be brought back to life with Dust. At the beginning, the cost is high, but most frequently, you will have no problems paying the amount.
Each hero has a set of basic features that fits the profile of each faction. They are independent of ability trees and they are supposed to encourage you to experiment with heroes from outside of your faction.
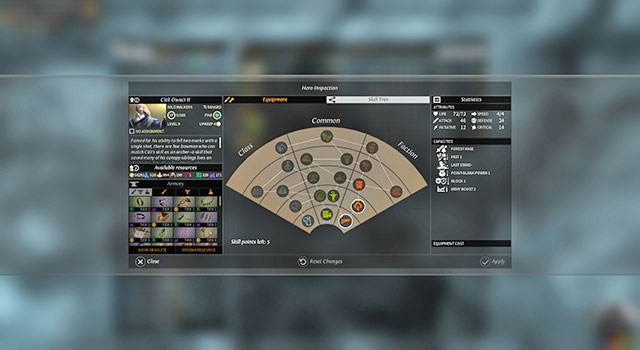 Ability tree.
Each hero has three branches of the ability tree:
The majority of abilities are useful only in specific situations. For example, an governer that increases food production is useless in a Broken Lords city, because this race does not use food. Just as useless is the ability that decreases the units production costs in cities, if you play as a faction with high production of Dust and which buys armies, instead of producing them. That is why you should find out about a hero's abilities, before hiring one. If his abilities do not suit your needs, find someone else.
Also, note that all of the abilities are connected with each other. This means that you cannot buy Inspirational Leader points, if you do not invest in Thrifty beforehand. That is why, while planning on the hero's development, keep in mind that you will first have to waste some points on worse abilities, before you can access the better ones.
Also, do not hesitate to invest several points into one ability. For example, if you have a city in a coastal region, and there are Dust-producing buildings there, a second , or a third point invested in Aquatic Dust may be more useful than the first point invested in Dust Diviner. Calculate which is more profitable to you, because some abilities provide various bonuses at higher levels. Additionally, there is only one development level, in the case of some of the abilities, instead of three. Most often, that provide the hero with an additional feature of certain value and characteristics.
All abilities accumulate. Buying out all three levels of Natural Resources increases industrial production in the city by 30 (5 + 10 + 15) points.
Woodland Forager. +1/+1/+1 to industrial production in the city.
An additional reason, for which it is a good idea to settle in forests. It ensures the city with a bonus to industrial production, on forest terrain so, if you have a city there, it is a perfect choice.
Natural Resources. +5/+10/+15 to industrial production in the city.
Useful to all factions and in each city. 5 points may seem to be a low value, but it can become a considerable one, in combination with other bonuses.
Functioning Insomniac. Decreases time between individual assignments of a hero, by 2 turns/2 turns.
Useful only if you are going to transfer the hero between cities or between armies. Otherwise, invest one point only, in order to gain access to the other abilities.
Living Walls. Decreases the cost of maintaining a city by 30%/30%/30%.
It pays off to invest, at least, one point and save some Dust. Especially in the case of big cities that are expensive to maintain.
Behemoth Tamer. Decreases the cost of erecting buildings in city, by 10%/15%.
Another, very useful ability, especially in combination with the previous ones. Not only does the city generate more industry, but also buildings are put up faster. Especially useful in new cities, devoid of the most important structures.
Natural Architect. Increases industrial production in cities, by 15%/15%/20%.
A skill indispensable to each governer. If possible, buy it.
Aquatic Dust. Increases Dust production from rivers by 1/2/3.
If you have a city at a river, and especially on several riverside areas, buy the maximum level of this ability. Otherwise, one point is enough.
Dust Diviner. Increases Dust production from Dust-bearing fields, by 1/1/1.
Just like in the case of the Aquatic Dust, only for each terrain. It is a good idea to reach the top level, especially in the case of desert and seaside cities. For riverside cities, it is a good idea to combine this ability with the previous one, to receive a higher bonus.
Distributed Defenses. Increases defense value in garrison units by 10%/10%/10%.
This ability is on the side of the branch and it is useful only in the case of cities that face the threat of a siege. If the governer is in a border city, it is a good idea to buy, at least, one point. Otherwise, ignore it.
Mining Authority. Mines in the region provide 1/1/1 more resources.
A very good ability, for the regions with three, and more, mines, or ones that mine for valuable and rare resources. If the governer is staying in one, buy three levels of this ability. Otherwise, one point is enough.
Siege Engine. Defenses of a besieged city drop by 1/1/1 points, per each unit in the army.
An unique ability on this tree. Useful to commanders, but it has been placed where commanders are not likely to reach it. Invest one point into it and forget all about it, because there is no way to use it, as a matter of fact.
Dust Trickery. Increases Dust in the city, by 15%/15%/20%.
Each governer should have it developed to the top level. In combination with Dust Diviner and Aquatic Dust, this ability turns the city into a Dust factory. Try to invest three points into it, as quickly as possible.
Alchemical Genius. The city center, and each district, produces now more science, by 2/2/2 points.
A good ability for a governer of a big city, especially of a scientific one, with 4 or more districts. Also useful to the smaller ones, although not as much. If you have a big scientific city, invest three points. In the case of smaller ones, one point is enough.
Escape Artist. allows you to flee a besieged city.
This ability blocks off the rest of the tree so, you will have to invest, at least, one point into it anyways, but its usefulness is moderate. With a good tactic, the enemy will have no way of reaching your city walls, in the first place and additionally, you can move your governers still before the city is besieged. Either way, buy it, because you have no other choice.
Thick Skinned. The hero receives 2/3/3 additional defense points.
A good ability, but not for the governer. Commanders may attempt buying it, if they have several spare points thanks to which to reach this ability. In such a case, it is best to buy the third level.
Subterranean Networker. The city receives 2/3/5 additional defense points, per turn.
Useful for the governer of a border city that is exposed to multiple attacks, or which is besieged often. Otherwise, one point is enough, just to unlock the rest of the tree.
Tunnel Rat. This ability seems to be disabled in this version of the game.
Mechanical Exhibitionist. Increases science points that you receive from trading routes, by 1 and 40%/1 and 60%/2 and 100%.
Buy it on the third level if the governer is staying in a city with, at least, two trading routes and high income in science points. Otherwise, you can either invest one point into it, or ignore it.
Necrotic Agriculture. Increases food production in the city, by 5/10/15 points.
A very useful ability, especially in the case of Necrophages. Worth buying, at least on the second and, in a distant future, on the third level.
Slave Driver. Decreases units production costs, in the city, by 10%/15%.
Two points are worth investing, if you are going to play an aggressive game and wage wars. Otherwise, one point is enough.
Roadside Picnic. Increases the army health points regeneration rate, on your and allied terrain, by 0.1/0.1/0.1.
This ability would be useful, had it not been for the low regeneration rate. You can buy it on the third level, only in combination with Iron Constitution. On the other hand, you need this ability to reach Iron Constitution so, you can invest three points just as well.
Cadaverous Pesticides. Increases food production in the city, by 15%/15%/20%.
Again, very useful. It is a good idea to spend three points on it.
Berserker Pheromone. Increases the value of the hero's attack by 5 points.
Useless for city governers and too far away from the rest, for commander to reach. Ignore.
Iron Constitution. Increases health points regeneration rate, in your armies, on your or allied and non-allied territory, by 0.1/0.1/0.1.
Your choice is as follows - you either buy this ability and Roadside Picnic on level three, or you ignore both. 0.6 points of health regeneration seems to be a lot, especially in combination with the increased rate of healing, in the case of the Necrophages, but this will cost you 6 ability points. This is quite a lot, especially that there are other abilities that are more useful to commanders. If you feel the need to, buy it. Otherwise ignore it.
Renaissance Thinker. Increases science generation in the city, by 5/10/15 points.
It is a good idea to buy the second level at an early stage of the game, thanks to which you should be able to gain advantage over the rest of the faction quickly. The third level is also useful, but not compulsory.
Seething Fire. +10%/+10%/+10% to attack, per unit in the army.
Useless for the governer and quite the opposite for the commander. If the hero is only supposed to manage the city, ignore it. If you want him to command, buy it at the maximum level.
Deadly Anatomy. Increases the hero's attack by 3/4/5 points.
Again, useless to the governer and highly useful to the commander. Have the former ignore this ability and the second one buy it, at least at the second level.
Scientific Literacy. Increases production of science points, from a field with anomaly, by 2/3/3 points.
Buy on level three if there is one, or several anomalies. Otherwise, you can devote one point to it.
Persuasive Methods. Decreases reluctance towards expansion, in the city, by 50%/50%.
It is imperative that you buy the second level, as quickly as possible. Especially if you have many cities and you are experiencing problems maintaining high support.
Firestarter. Increases production of science points in the city by 15%/15%/20%.
For the governer of the city concerned with science, this one is compulsory. In any other city, it also comes in handy, which is why you should invest, at least, one point. It is a good idea to combine it with Renaissance Thinker and Scientific Literacy.
Traveling Salesman. Increases Dust production from a field with anomaly, by 2/3/3.
Buy on level three if there is one, or several anomalies. Otherwise, you can devote one point to it.
Travels Light. Allows one event of sailing into the sea or landing without losing movement points . Seems to be disabled in the current version of the game.
Safe Passage. Increases income from trading routes, by 20%/30%/50%
Buy if the hero is administrating a city with two, or more, trading routes. Otherwise, one point is enough.
Game Theory. Decreases units production cost in cities, by 10%/15%.
An useful ability, but on the side of the tree. You can buy the first level, if you are getting prepared to defend your empire. Buy the second level if there are no abilities to buy, which would be more important at the moment.
Fast Trader. Increases Dust income from trading routes by 1 and 40%/1 and 60%/2 and 100%.
A situation identical as the one with Safe Passage. The only difference is that you should buy this ability, at level three, in the first place.
Black Marketer. The city receives a bonus from the black market.
It is not sure if this ability works but, according to the description, it allows you to trade with cities of the faction that you are at war with. If so, the enemy cities have roads, harbors and they are sufficiently big, to make this profitable, you can buy this ability. Not a priority, though.
Indiana Bones. Improves exploration of ruins, at both levels.
You are going to need, at least, one point to be able to access the rest of the tree. You can spend another one only if you explore ruins very often and you want to complete the quests hidden there.
No idle hands. Each unit in the army receives +1/+1/+1 experience point, per turn.
You are going to need, at least, one point here. You can consider investing two although this way of gaining experience is very slow and, in the long run, not worthwhile. Invest the second and the third point if there is nothing else to be bought.
Fast Healer. Speeds up the hero's healing rate by 3/3.
The best way to heal the wounded heroes is with Dust so, this ability is useful only for the races that suffer from dust shortages. Otherwise, you can ignore it.
Defender. The number of the city's defense points rises, by 4/5/6.
Useful to the hero that is meant to defend cities, or one that is made to defend a city right after it is conquered. A situation-dependant ability which you can invest one point into, but not necessarily more.
Master of Disguise. This ability seems to be disabled in the current version. You can invest one point only, to be able to reach what is past this ability, or ignore it and take another path of development.
Thrifty. Decreases the cost of maintaining armies and units, by 50%/50%.
According to the description, costs are reduced both for the armies and the units, which may be misleading. In a nutshell - the army is cheaper and this is the only reason that you need to buy this ability. If possible, both levels.
Inspirational Leader. Industrial, scientific, food and Dust production in the city is higher, by 5%/5%/10%.
It is a problematic ability. It is good for city governers, but they use a separate tree, where it is difficult to reach this ability (the way "up the tree" does not work and you need to buy all of them, from Indiana Bones, up the way). If you can obtain, at least, one point in this ability, the better for you. Still, I do not recommend it as a compulsory one).
Cold Operator. The hero, his army and/or the city are invulnerable to all the adverse effects of winter.
Very useful, later into the game. Earlier, it is a good idea to give it to the commander and send him into battle in winter, without worrying about penalties to movement points and range of vision. If you manage to reach it, do not hesitate to buy it.
Strength of the Wild. Increases the hero's defense value, by 2/2/2.
High defense may make the hero nearly invulnerable to attacks so, for a character in the first line of attack it is perfect.
Iron Taskmaster. Increases the hero's health points by 4/5/7.
The bonus seems to be small, especially in comparison with the better items. Still, a character with high defense values will lose few health points. In combination with Strength of the Wild, it is easy to create a hero with high capability for taking damage and that blocks off the other units. It is a good idea to invest even two points into it.
Armor Engineer. +1 accessory slot in the hero's equipment.
Useful if you are using this type of items. Otherwise, you will have to buy this ability anyways because it is in the way to the successive ones.
Garb of Battle. +1/+1/+2 to defense per unit in the army.
The additional defense points allow units to go on for longer so, it is a good idea to invest, even two points into this ability.
Rallying Call. Allows you to summon more reinforcements into the battlefield.
Considering the difficulty level of battles, choose this ability only to gain access to the last one.
Ice of the Veins. Decreases penalties by 20% during winters.
A context ability. Works well at a later stage of the game, not necessarily at the earlier. Buy it if there is nothing better to buy.
Agile Mover. +1/+1 movement point per unit in the army.
A useful skill, especially for a reconnaissance army. It is worth investing two points into this ability.
Farsighted. +1 to the army's range of vision.
An additional point is a small value, but it always allows you to see the enemy faster than he sees you.
Spare Quiver. +1 accessory slot in the hero's equipment.
Accessories can be highly useful, especially if they strengthen the whole army. If you use them, buy this one.
Staggered Blows. +1/+2/+2 to attack per unit in the army.
Especially useful to big armies of 6 and more units, which are oriented towards quick attacks. If this is an option, buy all three levels.
Perfectly Balanced. +1 to firing range for units.
A necessary ability, if you have many ranged units in the army. Thanks to it, their effectiveness will rise, just like the chance of winning battle, before the opponent manages to approach you.
Artisan's Eye. +2/+2/+2 to chance for a critical hit, per unit.
Very useful, especially in combination with Perfectly Balanced and equipment that increases the chance of a critical hit. Buy all three levels, as quickly as possible.
Defensive Tactician. +1/+1/+1 to defense, per unit in the army.
The first ability for this profession. It is a good idea to invest two and, later into the game, three points into it.
Keen Observer. Allows you to call more reinforcements into the battlefield.
Considering the difficulty level of battles, select this ability only to gain access to what is beyond.
Battle Hymn. +1/+2/+4 to attack, per unit in the army.
Very useful, especially at the third level, although it is not combined with any other ability. To the extent it is possible, spend three points on it.
Practiced Strike. +1/+1/+2 to initiative, per unit in the army.
Another useful ability. More initiative means the ability to make a move before the opponent does, which is especially important to ranged units. Buy the third level as quickly as possible.
Last Reserves. +4/+6/+10 to health points per unit in the army per unit in the army.
It is a good idea to have this one, at least, at the first level. The third level won't harm, but do not haste to obtain it.
Armor Ergonomics. +1 accessory slot in the hero's equipment.
Accessories can be useful, especially if they strengthen the whole army. If you use them, buy this ability.
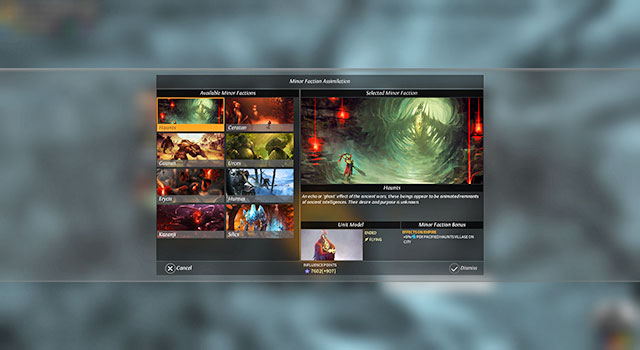 Who do we assimilate next?
You will obtain information on factions after you find the first village. In such a case, you will receive information on who you found, how strong they are and what you gain if you assimilate them.
There are three ways to get a minor faction under control:
As it has been mentioned earlier, bribery is better than talks and talks are better than combat. Usually, this depends on which faction you are playing as. In the case of the Necrophages only combat and later restoration make sense. Bribery is usually the cheapest and the quickest of options. Combat requires you to devote some time and soldiers and some quests may be so long that they become unprofitable.
If the price of bribery is too high, due to the high number of defenders, you can attack the village and kill off as many as you can (each battle lasts 6 rounds, at most. It is possible that it will last just as long in your case also), and try to bribe the faction again. The price should be much lower then.
You can assimilate the factions in the empire window, thanks to which you will receive various bonuses. The more (not destroyed) villages of a given faction you have, the better the bonuses. For example, three Kazanji village increases the production of prestige points in all cities, by 15%. Additionally, each village that you pacify means an additional citizen, in the city located in the same region as the village. However, this additional citizen is not included into the overall population and, which follows, he does not participate in lowering support, resultant from overpopulation, nor does he participate in calculating how much food is necessary for a new citizen to be born.
You can assimilate factions that do not have their villages rebuilt. The fact of conquering them is sufficient to assimilate them. The downside of this solution is the lack of bonuses that you would otherwise receive, as a result of assimilating a faction. The additional 5% to food production, times 0 villages, gives 0 bonus points. In other words, you can burn down villages but, before you use them to their full potential, you first need to restore them. Which makes bribery, or talks, better, in the long run.
Assimilation itself is quite cheap and it can be performed many times, within one turn so, if you are dissatisfied with your first choice, you can simply change it. Also, you may have no factions assimilated but, this does not pay off, because maintaining an assimilated faction costs you nothing.
Bonuses are active for all cities or units, depending on what they concern. Additionally, you receive the option to produce units of that faction. You can only assimilate one faction. Another one requires the Native District (the third era).
Assimilate those of the nations, whose bonuses you need currently, instead of those, whose most villages you have conquered. Bonuses to attack, or defense, are useless in peace time, unlike increased production rate of Influence Points or food. Another criterion are the units. If you do not have ranged units or cavalry, minor factions can help you make up for that. Additionally, the units of minor factions can also be equipped with gear that is characteristic to you so, before you make the decision, it is a good idea to find out what they have. Some of them are so strong that they can well replace the units of the playable factions. Therefore, it is a good idea to compare them to the soldiers available to you and make sure if it is more cost-effective to produce them instead.
In general, treat both them and the bonuses that they provide as an addition, which you can easily reach out for, if in need. Especially later into the game, where you will have several villages of each minor faction, at most, due to which the bonuses that they provide are not too high.
This has not been included in the table, but the majority of units have the option of a group counter-attack. If they counter attack, they wound more than one unit. To learn the details, see the description of the Sweep Strike Back ability.
Faction
Bonus per pacified village
Unit
Kazanji
+5% to the production of prestige points in city.
Daemon, airborne. has high attack and speed value and he can wound several units at a time. Unfortunately, the rest of his statistics are low, especially the number of health points.
Urces
Increases the cost of building production by 5%.
Rumbler, infantry. His statistics are quite high and while attacking, he wounds the unit behind the one that he attacks. Just like the minotaur, with appropriate equipment becomes a demanding opponent.
Sisters of Mercy
+0.1 regeneration points to an unit's health.
Justicere, support. He can shield an ally from poisons and diseases, and it fights well against infantry. He also has high statistics, with the exception of speed and health points. With appropriate equipment, she should be useful in the battlefield.
Jotus
+0.5 to range of vision on armies.
Tetike, ranger. Can counter-attack twice his initiative, attack and speed are high. Unfortunately, his range is limited and both his defense leave much to wish for.
Erycis
+0.5 movement points on armies.
Vinesnake, infantry. Has lots of health points, decent attack and good speed. While attacking it wounds all of the enemy units around, which makes it a perfect unit when surrounded. Unfortunately, the rest of statistics are not as good.
Silics
+0.5 to resource mining in city.
Harmonite, infantry. High on health points, good attack, poor defense, the rest of the statistics are low. It can attack two targets standing in a row, but he is slow and may not come close to the opponent.
Delvers
+5% to Dust production in city.
Dredge. High on attack and on initiative. Quite a lot of defense and an attack that stuns the opponent, and wounds all of the enemies around. Unfortunately, his amount of health points and his chance to land a critical hit are a bit too low.
Bos
+5% to food production in city.
Centaur, cavalry. He is quick and can attack the units next to the target. Can counterattack twice and has high statistics. With appropriate equipment, it is a valuable unit.
Haunts
+5% to science production in city.
Ended, airborne. Wounds the units neighboring the target and is resistant to poisoning. Has lots of health points and high attack value. Unfortunately, hi defense value is low, his AoE attack does not work against an armored opponent and, although fast, has very low initiative. Apart from that, incapable of scoring critical hits.
Ceratan
+5% to defense on units.
Drider, support. The upside is lots of health, high chance of a critical hit, high attack and ranged attack, as well as the ability to enclose an allied unit in a cocoon, which provides +100% to defense. The downsides are low defense and initiative.
Gauran
+5% to health points on units.
Minotaur, cavalry. Has high statistics, resistant to slowing down, resultant from winter and deals higher damage to cavalry. One of the best units. With appropriate equipment, it becomes the bane of enemy units.
Hurnas
+5% to attack on unit.
Orc, ranger. Very high attack, moves faster in the battlefield and has no problems marching in winter. However, his initiative and chances of landing a critical hit are low, as well as too few health points. With good equipment, he is worthy being given a shot.
Lots of quests, lots of rewards.There are two types of quests - main quests, which are connected with the story of a given faction and side quests that you can receive in ruins and neutral villages. None of them need to be completed, to completed the game but, completing them provides you with resources, Dust and technology. At the same time, you can have several quests active - most of them do not have time limit on them so, you do not need to hurry to complete them. The remaining quests are labeled as failed, after a certain number of turns, although the game does not inform you how many turns need to elapse. This is why, if you receive a quest with four objectives, which need to be completed one after another, try to do that as quickly as possible, or otherwise you will fail it.
Whenever the quest is to search ruins, you need to take terrain into consideration. If you are playing on the isles, the ruins that you need to explore may be located on a neighboring isle, instead of on the one that you are currently on. This means that, up to the second era, you will not be able to reach the isle and complete the quest. You might have already explored the ruins that you need to explore to complete the quest. This makes no difference to the game.
All of the ruins that you will have to explore are marked with beams of light. The game dissipates the fog of war around them and allows you to find it, thanks to the quest log. You simply need to press a small button in the quest description. The situation is similar in the case of all the armies that you will have to destroy, as an objective of a quest. These come marked in yellow. What is important, this is the color used to mark the armies that the other players need to destroy, as an objective of their quests. Still, you can defeat those armies, if you feel like to.
If the quest is to amass an appropriate amount of resources, to discover an appropriate number of technologies, or set the empire play at the appropriate level, you sometimes need to wait for one turn, after the conditions are met, for the computer to recognize them as completed. Sometimes, it happens that you meet the conditions in the same turn as you receive a new quest and the game is incapable of recognizing them as met, immediately.
When the quest is to explore ruins, note that exploration within quest and outside of the quest are calculated separately. It may happen that you will have the option to explore ruins twice, or even three times, where you will obtain what you need during the last visit. Exploring ruins does not equal completing quests hidden there. It only means exploring the ruins. Usually, this makes no difference, to the game, what you have found inside. You explored the ruins and that is enough. The quest that you find inside is treated separately.
During quests, where you need to defeat enemy armies, or defend against them, the armies will appear either in ruins that you explore or in the neighboring regions. There is no clear rule here. In the same way, not always it is clear if the army is moving or still. In such a case, you need to find them on your own or you fail the quest. If the quest is to defend a city, the enemy army may run into another city, along its path, at which point they start besieging it. In which situation, you need to attack them yourself.
If, for completing a quest, you are rewarded with a technology, the technology is automatically developed and ready to be used. This concerns all technologies, including the ones that allow you to put up buildings. In ruins, you can even find technologies of the fourth era, which will allow you to increase the production rate of luxury resources, or provide you with access to very strong items. It is a good idea to look around for them.
For completing quests, you are main rewarded with new technologies, items, Dust and resources. With the exception of single items and technologies, the majority of rewards are generated at random. This is why I have only named the ones that remain unchanged each time.
Objective 1: Search any 3 ruins.
A very simple quest, as soon as the ruins are generated in an inaccessible area. You should be able to deal with it within several turns.
Objective 1: Found a new city.
Objective 2: In the newly-founded city, industrial production needs to reach the level of 25 points.
Reward: Visions of Glory (the first era).
Another easy quest. It is best to complete it by founding a city in the forest and building foundry. If, in spite of that, production is still low, place a hero in the city, for several turns. Thanks to this, industrial production should be sufficiently high.
Objective 1: Explore the ruins. Your army needs to consist of a hero, 4 rangers and two units of minor factions.
Objective 2: For the duration of 10 turns, protect the capital regions from enemy armies.
Reward: Survival Instinct (the second era).
The first quest is moderately difficult, because it requires you to build two additional ranger units and to assimilate one minor faction (both units may originate from the same faction). After you gather your forces, search the ruins.
As for the second objective,, enemy forces appear in the capital region and the neighboring ones, and they march towards the city. All of the armies should stand, not more than, 3 units strong. If there are no units in the region, marked in yellow, in the 10th turn - units of minor factions from neutral villages don't count - the mission will be completed.
Objective 1: In any of the cities, upgrade one city center and one district to level 2. Upgrades may take place in two different cities.
Look at the objective - one district and one city center, i.e. two city parts in total. A district advances to level 2, if it is surrounded by four other districts. To make thing easier, focus on one city. The city center will have effect on the neighboring district and the other way around, which makes things easier at the very beginning. You can build the rest of the district in the way, in which they will influence both the city center and the selected district. In itself, this quest is ease, however time-consuming.
Objective 1: Search the ruins.
Objective 2: Search the ruins.
Reward: Ahote Zaltana, a Wild Walkers hero of level 1.
Again, a simple mission. Both ruins should be in close proximity. The only threat here may be neutral bands.
Objective 1: Train Ahote Zaltana to level 2 of the Natural Resources.
Objective 2: Dispatch Zaltana, with the army, to search the ruins.
Reward: Arc of the Builders, bow. +15 to attack, +10 to chance of critical hit, +5 to armor. Cost - 40 Dust.
Natural Resources is a second tier ability, which means that you are going to need the 4th experience level to reach it. It is easy to gain experience in battle. Equip Zaltana with the best gear, provide him with a party of several soldiers on send out to pacify neutral villages and bands. If this is not enough, have him complete quests from ruins. As a last resort, you can declare war on someone and send the hero to fight.
Objective 1: Give Zaltana the Arc of the Builders and name him the governer of any city.
Objective 2: While determining the empire plan, set Economy and Population to level 4.
Reward: Arcane Repository of Zaltana (the fourth era).
This quest requires access to empire plan of level 4, i.e. the fourth technological era. If you still do not have it, focus on research and develop the necessary technologies, as quickly as possible. The rest of the quest requires a small amount of Dust for the bow and Influence Points to determine the empire plan. In the case of a big empire, you will have to focus on production of these points in several cities, because in itself, level 4 is expensive and for a dozen-or-so cities its cost may amount to thousands of points.
Objective 1: In any city, build the Arcane Repository of Zaltana.
Reward: Growing Buildings (the fourth era).
Another easy quest. Select the city where the building is going to serve its purpose best, assign more people to industrial production and wait for several turns.
Objective 1: Search the ruins with an army of, at least 3 infantry units.
Objective 2: Search the ruins again, this time with, at least, 50 Dust in your treasure.
Objective 3: defeat the opponent guarding the ruins.
Reward: Archeologist, (the first era).
A moderately difficult quest. The initial army consists of two units so, you may want to erect several important buildings first and produce more infantry afterwards. Focusing on expanding the army may slow down the development of the empire, a little, which may turn out to be difficult to make up for, later into the game.
It should be easy to collect the required amount of Dust, just like defeating the enemy. His army consists of one unit so, the three infantry units that you have, and the hero, should be able to deal with him.
Objective 1: Develop 8 technologies of the first era.
Objective 2: Develop 12 technologies of the first era.
Reward: Quivering circlet, accessory. With the city governer, it provides the city with +7 to science, industry and production of Dust. Costs 50 Dust.
Thanks to the archeologist you should be able to complete this quest pretty quickly. It is not important which technologies you choose. What matters is that they come from the first era and that they are developed by you. The game ignores the technologies that you obtain during quests.
Objective 1: Found a new city. Its initial Dust production is to be, at least, 13.
Objective 2: In the region that you found the city in, build, at least, one watchtower and pacify all of the villages in any way possible.
Rewards: Peninent Chapel (the second era). Martin de Ildan De Suluzzo, a Broken Lords hero of the 1st level.
This quest requires, at least, the second technological era, but you should have been able to reach it in the previous quest. Consider it colonization of new areas, which only requires you to found a city subject to certain requirements. Also, do not forget to develop watchtowers of the second technological era. They are easy to build so, do not haste to invent them, if you still have not dealt with the villages.
Objective 1: Appoint Martin the governer of any city, for the duration of 10 turns. Upgrade a district of any, not necessarily the same, city to level 2.
Objective 2: While determining the empire plan, set military to 3. You need to have the sufficient amount of Influence Points.
Reward: Dust Crematorium (the second era).
This quest is easy t complete if you have been trying to upgrade a district, of one of your cities, to level 2. In such a situation, you simply need to determine the empire plan, which requires you to progress to the third era. However, if you only just started doing that, do not worry. It is enough that you found a new city and at a cost lower, than in the other cities, you buy citizens. Upgrading the district will then become sheer formality.
Objective 1: Conquer or destroy the city.
Objective 2: Search the ruins in the region that you conquered the city in. The ruins must be explored by an army of Martin de Ildan de Suluzzo and, at least, one Dust Bishop at the 6th experience level.
Reward: Pendant of Judgment, an accessory. A governer with this item provides the city with a bonus of +20 to science production.
A troublesome quest, because the only thing that you receive is the name of the city, without any indication of who it belongs to and where it is. With the majority of the map revealed, this is not a problem and, otherwise, you need to do a reconnaissance. Find the city, declare war on the owner and conquer it. Take into consideration the fact that anyone can be the owner so, just in case, prepare yourself for a tough battle.
The second part of the quest is much more difficult. An unit of level 6 can be obtained in two different ways: thanks to numerous battles and experience that you obtain, or by progressing to the sixth era and producing one. The latter should, rather, not be taken into consideration, a sit is time-consuming so, it is best to develop an appropriate technology and simply train the Dust Bishop to experience level 6. Then, search the indicated ruins.
Be prepared for the fact that, after you complete the quest, you lose Martin and there will be no way to get him back.
Due to a bug in the game, this quest has the tendency for not being activated. For this reason, neither this quest, nor the two following ones have not been described here.
Objective 1: In a region that belongs to you, pacify and assimilate a minor faction.
A piece of cake, especially that you would do that anyways, sooner or later. If you do not like the faction in the starting region, assimilate it and wait for the quest to be complete. Then, change it into another one. This will do no harm.
Objective 1: Explore the ruins in the region indicated by the game.
Objective 2: Explore the ruins in another region indicated by the game.
Objective 3: Defeat the attacking enemy armies.
Reward: Winter Shelters (The second era). Deep Diviner, an accessory. Ensures the unit with a bonus of +1 to initiative. It costs 50 glassteel.
The first two objectives are easy, as long as there are no neutral bands around. As for the third objective, the army should appear in the region with the ruins, or in one of the territories neighboring yours. Chances are high that the army will be stranding still and waiting for you. After you have smashed the army, the quest is not yet complete and you need to search for another army. You should not experience too many problems defeating them.
Objective 1: Build Winter Shelters in the city indicated by the game.
Objective 2: Build two new districts in the city indicated by the game.
The only difficulty of this quest is the city selected by the game. If it is big, it is going to take a while, to build new districts. On the other hand, building the shelters should not be too difficult.
Note! Shelters require the holy resource to be built. You cannot see them on the building bar and the construction will not be complete until you activate the resource!
Objective 1: Seize the city indicated by the game, or make sure that it is destroyed.
Objective 2: Search the ruins in the region, where there is the captured city. Ruins need to be searched through, by a hero with the Deep Diviner item.
The situation is similar to the one of quest 5 for Broken Lords. What may be the greatest problem here is collecting the 50 units of glassteel to create the Deep Diviner. As long as it is not a holy resource, you do not have any supplies of Dust or a mine. Difficulty level of the rest of this quest depends on the indicated city and its owner so, just in case, get prepared to fight a tough battle and for an ensuing defense. You can also prepare a supply of Influence Points, to negotiate peace with the opponent, right after you have defeated him.
Objective 1: Talk to the village indicated by the game.
Objective 2: Gather 50 units of the indicated luxury resource, 30 units of the indicated strategic resource and talk to the village again.
Objective 3: Search the ruins indicated by the game.
Reward: An army of 3 units of the minor faction that you are to talk to.
A piece of cake, with the exception of the second objective. The odds are high that the game indicates the resources that you do not have, or you have too few of. In such a case, there are two things that you can do wait for the mines to excavate enough, or buy the resources in the market. The best thing to do is to gather Dust and buy whatever you need.
Objective 1: From any Vaulters hero, buy the 3rd tier of the Mechanical Exhibitionist ability.
Objective 2: For the duration of 10 turns, do not use holy resource of the Vaulters, which means only that you cannot activate it. Apart from that, place any hero, with Mechanical Exhibitionist in any city, as the governor.
It is a difficult quest. The ability requires a hero on the 8th experience level, because the Mechanical Exhibitionist is the last ability on the faction's tree. Therefore, you are going to need 4 points to reach it and 3 more to upgrade it.
There are three ways to complete this mission:
Although it may look different, the second objective is very easy. The Holy resource does not need to be active for the whole time so, your empire will not collapse out of lack of bonuses from it. If, however, you need them, simply wait. There is no time limit on this quest so, you can complete it later on.
Objective 1: In one of the cities, increase the production of science points to the level of, at least, 40 points.
Reward: Resource Magnetron (The fourth era).
At this stage of the game, the quest is as easy as pie, because there is, at least, one of your cities that meets the requirements. If not, assign all citizens of the biggest city, to science production, for one turn. This should do.
Objective 1: In the selected city, build the Resource Magnetron.
Objective 2: For 9 turns defend the city, in which you built the Resource Magnetron. The city cannot be conquered.
Objective 3: Defend the city from the last wave of the Necrophages.
Reward: Extreme Yields (The fourth era).
In the case of the second objective, outside of the boundaries of your empire, there will appear several groups of Necrophages. You need to defend against them. It is possible that, if the enemy appeared on the terrain of a different faction, they will start fighting them, instead of you. It is also possible that they will be roaming around, or head for your city along strange paths, because this may also happen to the AI. So, if nothing is going on, for several successive turns, set outside of the region's boundaries and find the enemy.
As for the third objective, you are supposed to defeat an army commanded by a Proliferator. It is not too difficult to recognize this characteristic unit.
All of the units that you run into, during quests 2 and 3, are elite ones (7th experience level) so, remember to take along a big and well equipped army.
Objective 1: In the indicated region, pacify all of the villages of the selected minor faction. Also, search through all indicated ruins.
Objective 2: There is an army on the move, towards your empire. Eliminate them
The quest's difficulty depends on the number of villages in the region. There may be one, or three. That is why, before you set out, it is best to increase the army by one or two units and prepare for, at least, several turns without a break to regenerate health.
The army from objective 2 consists of units of the minor faction that you have just defeated and they launch their attack in the region, where the pacified villages used to be. Catch up with the army, or wait for the siege to start, attack and defeat them. Which should not be too difficult, because there is only one small army.
Objective 1: Search ruins. At that time, you need to own 10 units of the strategic resource and 20 units of the luxury resource.
Objective 2: Search the same ruins. At that time, you need to own 150 Dust.
Reward: Ka-Riss, a Necrophages hero of level 1.
Both of the resources are selected at random, but they should be within your reach. If you cannot find them anywhere in the regions that you have already seized, you are bound to find them in the neighboring ones. In the end, you can turn to the market. It may happen that, as a reward, you will receive sufficiently enough Dust, to make Objective 2 pure formality.
Objective 1: Train Ka-Riss to the second level of the No Idle Hands ability, or to the first level of the Fast Healer ability.
Objective 2: Have the army, commanded by Ka-Riss, search the ruins in the indicated region.
Reward: Fungal Laboratory (The third era).
Fast Healer requires No Idle Hands, at least, at the first level and both of them require Indiana Bones. You need, at least, the 4th experience level to complete this mission. You can also follow the faction tree, but only if you want to make the character into the governer. Apart from that, the costs are the same so, for this quest, the direction that you choose does not matter.
What is the easiest way to obtain the ability points? Provide Ka-Riss with the best equipment available, an army and send them to pacify the villages, or to fight against the other factions. The experience points that you receive, per turn, are too small in number to have the hero reach level sufficiently fast.
Objective 1: Make z Ka-Riss into the governer of the indicated city and restore the Fungal Laboratory there.
Objective 2: Expand the garrison of the indicated city to 6 units. Also, make sure that there are no enemy armies in the region, for the consecutive 9 turns.
Reward: An army of 4 Necrophage units.
As much as the building itself is easy, Objective 2 is going to require the Meritocratic Promotion (the second era) technology. You should already have it developed, but not necessarily though. Expanding the garrison is a very easy task, especially that you only need to direct units from the other cities there, and the defense of the region consists in eliminating neutral bands. Who may not even appear there, if all of the nearby villages have been pacified. So, the entire quest only seems to be difficult.
Objective 1: Hire one Wild Walkers hero and one Vaulters hero.
Objective 2: Defeat 2 enemy armies with an army commanded by the Wild Walkers hero and defeat 2 enemy armies with an army commanded by the Vaulters hero.
A strange quest. First of all, you need the technology of Roockery (the first era ), then enough Dust to buy both of the heroes and finally, an army that these two will command. It does not really matter who you hire. The most important thing is that the factions are right.
Also, it does not matter who they defeat. Neutral bands are just as good as the armies of the other factions. You only need to make sure that you do not make any mistake in your calculations. If the mission has not been completed, this means that one of the heroes should fight one more battle.
Objective 1: Conquer, or colonize 3 new regions.
Reward: Incubation orb, an accessory. Decreases the hero's health by 100 points.
A very simple quest. At this stage, you should already have either enough regions to colonize in your neighborhood, or enough enemies to defeat. Pick your method. You can also combine the two, because this does not matter, for completion of the quest, which way you take. You need to obtain 3 new cities and it is up to you which way.
Objective 1: Assimilate 2 minor factions.
Objective 2: Increase the population of the indicated city to 8.
Reward: Givers of Remembrance (The fourth era).
For objective 1, you need the technology of Native District (the third era), which may mean the necessity to focus on research, temporarily. Assimilate the factions that you consider the most useful to you, for the game it does not matter which ones.
The indicated city is one of the newly-founded or conquered in the precious quest. So, there is a chance that the game selects the one that are (almost) sufficiently big ones. In such a case, reaching the population of 8 should be much easier.
Objective 1: In one of the cities, build Givers of Remembrance and reach the fourth technological era.
Objective 2: Train hero Ka-Riss to level 10.
Objective 3: Provide one of the heroes with the Incubation orb. Have that hero search the three indicated ruins.
Reward 3: Mindless Slaughter (The fourth era).
By now, you should have already reached the fourth era and, most probably, you have already put up the building so, objective 1 is a piece of cake.
Objective 2 is much more of a challenge, but you can solve it with standard tactics - provide the hero with weapon and send him into the battle. Level 10 is going to require quite a few battles but, at this point into the game, villages are being defended by 10, and more, units. There will be plenty of enemies. And if you run out f villages, you can dispatch the hero to fight the other factions, even if you were not going to fight them, in the first place.
Searching ruins, during the completion of the third objective, does not activate any additional quests. You search the ruins, the game recognizes that and you can go on, because there is nothing more to see there. In such a case, visiting all three is pure formality, especially at this level, neutral bands should pose no threat to you.
Objective 1: Talk to, at least, two villages.
Objective 2: Explore the ruins marked on the map.
Reward: An army of 2 units of Ardent Mages.
The first objective is already problematic, because you lack the technology that would enable you to talk to neutral factions (Language Square, The first era). You can do either of two things - you start developing it and neglect the other matters, or do that later on and, as a result, you will receive more quests later on.
The talks themselves are not a problem. If, in the first village, you have received a quest that requires you to return to it, after you have met the requirements, both talks will be recognized and the first objective completed. If not, you will have to complete the first objective and then, talk to the other village afterwards. Even if you fail to complete the second objective, the main mission will still count as completed.
The problem, however, the quest that you receive in the first village. With your lookouts good, the quest is only going to be time-consuming. In a worse, scenario situation, you will have to face a situation, where you will not be able to complete the quest without meeting some requirements first. Consider saving the game before the talks start.
Objective 2 is going to require you to search through all the ruins. There are no enemies lurking there, and only an allied army. Explore the ruins and they will join you. This will complete the quest.
Objective 1: Explore the ruins on the map.
Objective 2: Defeat the opponent.
Objective 3: Talk to the indicated village.
Objective 4: Defeat the opponent.
Reward: Transcendent Rod of Verda, a two-handed scepter. +40 to attack, +33 to chance for a critical hit. It costs 220 Dust and 60 units of hyperium.
A piece of cake. The only problem here may be to defeat the two enemy armies but, they are only several units strong, each, and you still have the units left over from the previous quest. You only need to explore the ruins and talk to the village, with your support sufficiently high and the quest will be over quickly and without any major problems.
Objective 1: Pacify, at least, 5 villages within the boundaries of your empire.
No commentary needed.
Objective 1: Build a city that is going to produce 10 science points from the very beginning.
Objective 2: Raise the production of science, in the newly-founded city, to 30 points.
Objective 3: Build Verda's Temple in the newly-founded city.
Reward: Verda's Temple, (The second era).
You receive the Temple for completing Objective 2 which, along with the other two, should be easy to accomplish. If necessary, use the pillars or assign more citizens to the production of science points.
Objective 1: Build your cities in such a way, so as to enclose 6 anomalies within them.
Objective 2: In one of your cities, produce 30 Influence Points, per turn, for the duration of 5 turns.
Reward: Cold Engineering (The third era).
At this stage, this should be easy. If you have not yet gained access to 6 anomalies, simply build/conquer new cities and build sufficient number of districts in them. Much depends on the map but, if the number of anomalies on a map has been set to very low, Objective 1 should not be a problem to you. Similar is the case with Objective 2. In case of any difficulties, assign citizens, of one of the cities, to production of Influence Points and the problem is solved.
Objective 1: In your empire, there are to be four Pillars of Extraction (The third era) functioning simultaneously.
Objective 2: Explore the indicated ruins. You need to do that with a hero of the Ardent Mages with the Transcendent Rod of Verda. He must be accompanied by, at least, two units of Ateshi Zealots, both at the 6th level of experience.
Both objectives require you to reach, at least, the third era, because it is there that the technology of Pillars of Extraction is. The resources that you need, to create the item, are available in the fourth era, or in the market. Training the units will either require many battles, or progressing to the sixth era and producing them with immediate 6th level of experience. In other words, there are many paths that lead to the completion of this quest, but both require you to focus on research and production of some Dust for the expenses. That is not it, however, because the item requires 60 units of hyperium, and this is not the amount that you would find in the market.
Objective 1: Defend the capital against the incoming onslaught.
Objective 2: Maintain the capital's support at level "happy" (above 60%) for the duration of 10 turns.
Reward: Altar of Transcendence (The fourth era).
There are several armies, but not all of them appear in your regions. Just as well, that can appear on a neighboring isle, or several regions away. So, if the quest remains incomplete, after you have killed the opponent, do some reconnaissance and find one. This may either be easy or difficult, depending on the size of the map and on how far you can see. The battle itself should not pose a problem. Not at this stage of the game.
The second part of the quest is much easier. If contentment is low, try to boost it with luxury resources. Their bonuses accumulate so, you will reach the required level, most probably. If you have too few of them, use the market.
Objective 1: Build, at least, 1 adamantian mine and 1 mithrite mine.
Objective 2: Build the Altar of Transcendence somewhere in the empire.
Reward: Secrets of Virtuals (the fourth era).
An easy quest to end with. If there are no resources within your reach, build a new city, or seize the existing ones. At this point, you should have little problem doing that so, building the Altar is a pure formality.
Objective 1: Pacify all the villages in the region with the indicated ruins in.
Objective 2: Explore the indicated ruins.
Reward: Roads of Dust, an accessory. +1 to movement points and +8 to industrial production for the city governed by the hero with this item.
An easy quest to for the start. You enter the region, attack or, if you already have an appropriate technology, bribe all the villages and explore the indicated ruins. The only difficult point, here, may be the number of villages but, at this stage, this only results in postponing the completion of the quest.
Objective 1: Hire a Wild Walkers hero, equip him with Roads of Dust and make him the governer of the city.
Objective 2: Build high towers in the city governed by the Wild Walkers hero.
Reward: high towers (The first era).
Again, a simple quest. You already have the rookery so, hiring a hero only requires you to gather the required amount of Dust. Also, the item does not require you to pay too much to buy it.
You receive high towers after you have completed Objective 1 and, due to their cost, construction should not take too long.
Objective 1: Gather 60 units of any luxury resource and strategic resource.
Any, in this case, really means just any picked by you, and not by the game. So, also this Objective is easy to attain.
Objective 1: For the duration of 5 turns, produce 60 Dust and 40 Influence Points, in all of the empire.
Reward: Traders' Tent, (The third era).
The whole empire means, in this case, all of the cities within the boundaries of the empire. As a matter of fact, it is enough if only one, or two, meet the requirement but, just as well, you can distribute production over all of the cities. This quest is easy, if only you make no mistake, while calculating the production.
Objective 1: Seize, or destroy, the indicated city.
Objective 2: Explore all of the indicated ruins with a hero of the 8th level.
Destroying the city is going to be difficult, and that for a simple reason - you cannot wage wars. What you can do though, is seize it by means of diplomacy. You simply need to offer the AI opponent to buy the city, or to exchange it for others. If you throw some Dust, or resources in, your offer will surely be accepted. Also, you can threaten the opponent around, a bit, and wait for him to declare war on you. At this point, you only need to retaliate.
As for Objective 2, as a matter of fact, you do not need to train the hero to reach level 8. You can buy one in the market, assign him with an army and dispatch him into the ruins.
Objective 1: develop, at least, 12 technologies of the third era.
Objective 2: You need to own, at least, 3 cities that generate income from trade, amounting to, at least, 10 Dust.
Another easy quest. If you find it difficult to complete Objective 1, assign more citizens to the production of science points. The game does not go into which technologies you develop so, pick the ones that you deem the most necessary, plus several additional ones, just to meet the requirement, if necessary. Make sure that you develop Right of Way and/or Cargo Docks, thanks to which you will be able to complete objective 2 quickly. Trade is going to require these buildings so, the faster you develop them, the faster you can put them up.
Objective 1: Assimilate 2 minor factions with, at least, 4 villages each. None of the villages may be destroyed.
Reward: Chain Suspension (The fourth era).
A quite easy quest. It is only going to require a high number of regions. The only difficulty may be gathering enough villages. It may happen that one of the factions has 4, whereas the other has 3. In such a case, go for a reconnaissance, find a region with the last village that you need, build a city there and pacify the village. The game does not care about which minor factions you are going to assimilate so, if they do not fit your playing style, exchange them for the ones that suit you more, after you have met the requirements.
Objective 1: Build the Chain Suspension in any city.
Reward: Money Talks (The fourth era).
This quest requires no further explanation.
While forming the army, you face a simple choice: either quality or quantity. All of the units are sufficiently strong to do well in the battlefield, without any improvements. Still, with each consecutive era, you are going to need more and more troops. Upgraded units require a longer production time, sometimes also strategic resources, but they are worth much more in the battlefield.
The difference is in numbers. Four crossbowmen with gear of the third level cam deal with eight infantrymen, equipped with gear of the first level. Still, twelve may pose a problem to them. Simply, there will be too many opponent units to be dealt with, before they reach your positions.
You can also take the third path, i.e. produce lots of slightly upgraded units. There are upsides and downsides to each tactic, but you can beat the game if you stick to any. This is why, you should pick the one that you find the most convenient.
While selecting equipment, keep its usability in mind. If you focus on ranged units, you will find no use for bonuses to health points. The situation is different in the case of bonuses to attack. If you are using infantry, items that drain health points and provide lots of armor may be a better choice than bonuses to initiative.
There is not much difference between items that require strategic resources and the ones that don't. In both groups, there are items that are either useful or useless, and the selection is so wide that it is difficult to name the best ones. Pick the ones that you have easy access to and you know that they will be of use. Just try not to be carried away with expenses. You can focus on quality but, too good a unit is going to take longer to produce, or cost lots of Dust. If you can afford it, go for it. Otherwise, it is better to equip the units with a gear of a bit lower quality that is cheaper.
If this is an option for you, form diversified armies. There are four types of units, each with its strong points and flaws:
Support may either reinforce allied armies, or sabotage the enemy. Still, it deals low damage and is easily killed.
Armies that comprise ranged soldiers only can be easily shattered, if they run into cavalry, and slow infantry may not withstand crossbowmen fire. A good tactic is to march as two armies. One of them fights at close range, whereas the other one comprises ranged soldiers only. After you learn how reinforcements work, you will be able to take full advantage of this tactic.
Units can be upgraded up to the 9th experience level, but the differences between a newly-produced unit and an experienced one become discernible around level 3. Along with progressing eras, the base cost to produce a unit rises, thanks to which differences become less pronounced however, a battle between a level one and a level four unit is, nearly, bound to be won by the latter. With higher numbers of troops the difference becomes even more pronounced. Therefore, you should try not to waste your units, thanks to which they will gain experience and improve on their statistics.
Try to improve your units on a regular basis and make use of the retrofit option. Even a slightly improved gear may tip the scales over to your advantage and additional health points may let the unit survive for several more rounds. If, however, your armies are obsolete and you are out of Dust, and resources to upgrade them, send them into battle in the first place. Thanks to this, the upgraded units will fight the exhausted opponent and the obsolete armies will always make themselves useful.
All of the below hints concern the units that use default equipment. Thanks to appropriate gear, even a seemingly useless unit may prove useful.
You have neither cavalry, nor airborne units, your infantry becomes available, as late as in the second era. The basic unit are Dekari Rangers. You, therefore, need to defeat the opponent before he comes close to you, at best thanks to the highest amounts of crossbowmen possible. This will make it easier for reinforcements, Agache Shaman, that raises defense values of the allied units. So, if anybody comes close to the crossbowmen, they will not be able to deal too much damage to them. Tenei Walker infantry is of high vitality, but their defenses are not much better than that of the crossbowmen. If you can raise it, use this unit. If not, focus on rangers. Especially that shamans can attack over range so, with a bit of training, you can win all battles thanks to your range.
All of your units receive a bonus to attack, when they fight in forest. It does not matter what kind of forest. Take advantage of that, lure the enemy into traps and make them fight on terrain of your choice. Additionally, opponents in forests receive penalties to speed, thanks to which they will be slower to approach you. Another good terrain, although for different reasons, are hills. Thanks to them, you will be able to lay fire down on the enemy, and receive bonuses from height. Avoid plains, your advantageous characteristics do not count there.
You have access to infantry, cavalry and support so, you have to fight at close range. The basic infantry has high attack values, decent defense and initiative. Cavalry has worse armor, but more attack points and all units boast high number of health points. So, if you have enough Dust for healing, you may not worry about high numbers of the enemy units and, due to the lack of rangers, you are made to rely on sheer numbers. An infantry unit, if surrounded, is easily killed, which is why your task is to move your armies, so that it is the opponent that keeps being surrounded. If this fails, have at least, your units stand side-by-side, thanks to which they can be support to each other.
Support, Dust Bishop, heals allied units, if they are attacked by the enemy. Cavalry, Ryder, heals after the enemy attack and Stalwarts, after it is killed. In other words, attacking the enemy is always advantageous to you. Additionally, cavalry can stun the opponent while attacking and the support has a greater chance to score a critical hit, with the second attack. Therefore, do not hesitate to attack, even if you are outnumbered. Especially if the enemy has rangers, because you lack the means to fight them effectively. The exception is cavalry, but they first need to reach them, which not necessarily needs to be easy. Therefore, try to fight on plains, where it is difficult to hide and fire at your soldiers from high altitudes.
You do not have airborne units and support and your infantry becomes available, as late as in the second era. In return, you have access to rangers, Marine, and already in the first era, you can develop cavalry, Dawn Officer. This makes your army highly flexible, which allows them to fight on hills, in forest or on plains. And what is especially effective is the army comprising both of these units, since their skills complement each other. In this variant, you do not need infantry, but it is a good idea to have some, if you are fighting on hills or in forest, where your cavalry does not do that well and high defense is more important than speed. All in all, it is better if you use defensive tactics, with rangers participating, because Titan deals damage to neighboring units, if attacked.
All of your units have a decent amount of health points, decent attack and defense. Initiative of cavalry is very high and defenses of infantry prove to be difficult to crush. Additionally, all of them receive high bonuses, if they have been equipped with gear that requires holy resource to be produced. At the beginning of the game, an army equipped with titanium or glassteel gear will be much stronger than the opponent's counterparts. Using this equipment is not compulsory but, while selecting the holy resource it is worth considering which one is the most suitable to create armors, for your armies, out of.
You do not have rangers, but you have infantry, an airborne unit and support. What is more, from the very beginning, you have access to the first two units so, you can allow yourself more flexibility, while forming the army. In spite of that, you need to expect two things - close combat and losses. Infantry, Forager, along with the support from the airborne Necrodrone need to be capable of approaching the enemy fast, it would be best if they surround it. Which should not be too difficult, due to high initiative in these units. Therefore, a dream terrain to fight on are plains, but any other should not be a problem either. All this, thanks to airborne units. If your industrial production is strong, you can even give up infantry, which may have higher defense level, more initiative and higher chance to land a critical hit, but is not capable of reaching everywhere and ignoring natural obstacles. This is why, the choice mainly depends on the territory and your favorite tactic. Infantry is faster and easier to kill, whereas airborne units require more time to move, but they also survive in the battlefield for longer.
All of your units have high attack and initiative values, but not too good armor and only Necrodrone boasts a decent amount of health points. All units are resistance to disease and they spread it themselves, with each attack, which makes the opponent take damage over time. This is especially important in the case of support from the Proliferator, who turns into militia each unit that it kills. Militia does not count as a part of the army so, you can even have an army of 40/6. That is why it is a good idea to combine the support and airborne units, raise their numbers with the smaller, neutral troops and increase the size with the bigger opponents, at a later stage of the game. In this way, a small army will be able to defeat any opponent, thanks to advantage in numbers only.
You have infantry, rangers and airborne units so, you have access to very flexible armies. Therefore, you should not be limited by the landform features, especially if you form an army comprising all three types. Infantry, Telsem Warlock, will defend rangers, Ateshi Zealot, rangers, attack the enemy and the Eneqa Wing, attack the enemy rangers, thanks to the ability to ignore natural obstacles. Thanks to this tactic, you will be able to win the majority of battles, while keeping your losses low, although you are the second to attack and move, due to statistics of the units. Be prepared for that, especially that defense values of your units are low, due to which they will keep losing lots of heath points.
All of your units have the Ardent Fire attribute, thanks to which they become stronger with damage they take. Infantry has lots of health points, but their defense and initiative are very poor. The ranger attack is quite good, their defense is hopeless and they have trifle too few health points, but they make up for that with their abilities. An unit attacked by them moves slower. Additionally, also the unit standing next to the target takes damage. Eneqa Wing boasts high amount of health points, and partial invincibility. If the unit dies, it drops an egg. If the egg survives three turns, or if the battle ends in your victory, the egg returns to life.
You have one cavalry unit, Dervish, one unit of horseback rangers, Kassai and infantry, which is easy to confuse for cavalry, i.e. Yirmak. The best battlefield, for such diversified armies, are therefore completely flat, or slightly uneven, plains. In connection with this type of units, you need to expect potential losses, especially if cavalry fails to get behind enemy lines. In such a case, infantry needs to bear the burden of defending rangers against enemy attacks.
All units have high speed, attack, defense and quite a lot of health points, but their initiative is rather poor. In other words, most of the times you will be the second one to attack but, thanks to high speed, you will be able to move around the battlefield quickly. If the enemy is slow, you will be able to escape from him and attack from afar, with rangers, or quickly block his path to Dervish, with cavalry. In general, you should rely on high mobility of your units, which in combination with high attack should ensure you with victory. Do not hesitate to split your forces. With their speed, gathering them back in one place is not a problem.
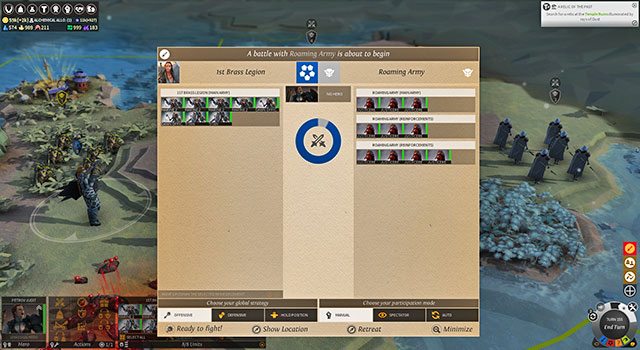 Army numbers before battle.
Pay attention to the type of terrain, where the battle is going to take place. After you roll over the enemy army, hold down the right mouse button to see the terrain. White lines mark boundaries and the big, white dots mark the initial deployment of troops. Terrain changes, depending on the side from which the army is attacked. To grasp the concept, stand right next to the enemy army to see what the battlefield would look like. Then, move over, by one hex, while still standing next to the opponent and check the future battlefield. You will notice the differences between the two cases.
Reinforcements do not need to stand on the future battlefield, not even in the same region. However, they need to be stationed within the distance of, at most, seven hexes of the field occupied by the opponent and have an action point. In other words, if they have already fought in this turn, they will be incapable of fighting again as reinforcements. They will only be able to fight, if directly attacked.
Battlefield is limited in size, which may decrease your chances of winning. For example, if there are tall rocks behind you, which you would like to put rangers on, make sure that there also is an approach to the rocks, within the battlefield. Otherwise, you will not be able to climb them.
Movement on the battlefield is subject to all the rules of movement, which you experienced on the main map. If you can climb a hill from the South, the unit approaching from the North will first have to walk around that hill. If a plain is intersected with forest, it will take more time to cross it. Pay attention to those of the landscape elements that provide an advantage in battle.
There is a trick connected with battlefield. Attack the opponent on the promontory, in a narrow passage or right next to strong rocky wall. If the opponent's side of the battlefield is too small, not all of his units will take part in the battle. In other words, if you are attacking a village at the edge of an island, it may turn out that you will be fighting against two defenders, instead of, e.g. eight. Simply, there will not be enough room for the rest of the units to be deployed, which is why the game will leave them for later.
If possible, summon reinforcements into the battle. If there is a city nearby, you can summon militia, garrison, or even the governer, if there is any around. Even militia can change a lot, because this always means one, or two, more units.
Remember that the battle ends as soon as one of the parties is destroyed, or if 6 rounds have elapsed. In such a situation, the remnants of both armies return to their initial positions and you get the battle report. You can then fight again, but you will have to fight the battle with another army, because the current one will be incapable to.
NOTE! After you have attacked an opponent's troop, you cannot retreat from the battle. The situation is similar if your army is attacked. If you want to avoid the battle, end the turn outside of the opponent's reach and watch out for what you are clicking on.
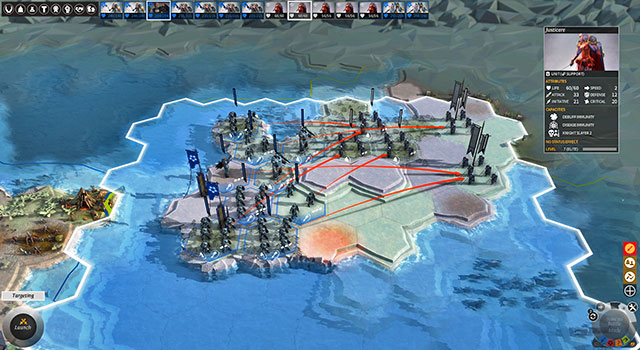 The commander issuing orders to troops.
At the beginning of each battle, troops of both sides take their positions at the edges of the battlefield. They do that automatically so, as soon as they finish, correct their positions. It may happen that crossbowmen are standing before the infantry lines, or cavalry takes positions in front of the forest, which would slow them down.
While deploying your troops, pay attention to three things:
Range of shooting. Crossbowmen cannot be deployed too far away from the opponent. If they are in their aggressive stance, they will be trying to approach the enemy and shoot afterwards. Otherwise, they will hold their ground and wait for the opponent to come within reach, which they will do only as soon as their turn comes. Do not deploy them too far in the back, or they will be waiting or busy looking for their way to the opponent, instead of fighting. The only exception is the situation, in which an enemy standing far away approaches you quickly. In such a situation, rangers will either attack immediately, during their turn, or approach a hex or two closer and fire in the same turn. After several battles, you will get the picture.
Order of movement. To grasp the importance of order of movement, you first need to grasp the rules that attack and counter attack are subject to:
A unit attacked fir the first time in the round, counterattacks. This only concerns fighting face to face.
A unit attacked for the second time in the turn does not respond with counterattack. This is why it pays off to attack with several units at a time. Only one of them takes damage then.
A unit attacked by rangers does not respond with counterattack. Rangers, if attacked by rangers, also do not counterattack. The same goes for support that also attacks over range.
Rangers respond, with a counterattack, to a direct attack, if they have not yet attacked, independently, in that turn. Otherwise, they take on the attack only. Distance, over which the attack took place does not matter. Only the instance of attacking.
With these in mind, find out about the order of movement of units, during the battle. If possible, deploy your units in a way that will make the opponent lose two turns of approaching them. If you can attack, an enemy unit, with several units, before he manages to do anything, do that. Also this requires a bit of training, but you should get it quickly.
Land formation. The rule is simple - the unit higher above gets bonuses, the one below gets penalties. Rangers on hills are a lethal weapon, but also infantry is capable of taking advantage of them. So, if possible, position your units on elevations. Also, take a note of airborne units, because they ignore certain limitations on movement.
Remember that you determine deployment of your fighting army only, and not of reinforcements. The latter are deployed by the computer so, be prepared.
Focus your fire. If the opponent has eight units, do not allow them to attack one after another. After the first turn, the enemy will still have eight units, only wounded, in a situation in which it could have five or six.
Units in the aggressive mode search for another opponent, after they have killed the previous one. This is a potentially dangerous situation, because they may attack a unit different from the one that you actually wanted to attack. This is why it is better to set targets for your units manually, rather than to have them all attack one opponent and hope that they will handle the situation.
Aggressive mode is useful if you have a high number of fast units. The remaining ones are better for slower armies, which prefer to wait for the enemy to approach. All depends on what kind of units you have under your command and what you expect of them. There is no one right strategy here, much depends on the land formation and the opponent. You should experiment, at best by attacking smaller enemy groups and find out about the effectiveness of diverse tactics.
Targets for your troops are selected in each round of the battle. This is important, because, at any point, you can walk away from the battlefield and take to your business. Still, if this takes too long, the battle will come to a standstill and your troops will be waiting for further orders.
If you want to hold a tighter control of the battlefield, change the time that may elapse between the individual orders that you issue. This will limit the situations, in which your units do something, in spite of your plans.
Support may attack an enemy unit, or reinforce one of their own. Their attacks are usually weak so, if they do nothing more than deal damage, you'd better have them serve as reinforcements for your troops.
Try not to waste your units. If something can be killed at a long range, kill it at a long range. If the enemy can be defeated with two units, do that. If the hero's armor is tough, and he has too many health points, have him block access to the weaker units. If there is no need to, have your units stand their ground, in a situation, in which rangers can get the job done on their own. Healing is time-consuming, or it costs Dust so, it is best to avoid losses. Especially among heroes, because healing them is the most costly.
If there is an enemy hero in the battlefield, try to take him out in the first place. If he acts alone, throw everything that you have at him. If he comes with reinforcements, have short-range units deal with them and kill the hero at a long range. Each high-level hero with good equipment is a formidable opponent. The faster you eliminate him, the better for you.

 Eador: Masters of the Broken World Game Guide & WalkthroughEuro Truck Simulator 2: Scandinavian Expansion Game Guide & Walkthrough
 Euro Truck Simulator 2 Game Guide & WalkthroughEVE Online Game Guide & WalkthroughEndless Legend Game Guide & Walkthrough