
Dear kids! :-) It's a pleasure for me to present you a game guide to Battlestations: Midway - quite enjoyable and playable game, combining two genres: RTS and an arcade quasi simulator. This game is fully loaded with a dynamic action and concentrates on the conflict between USA and Japan - their naval forces, to be precise - in the forties of past century.
You will find in this document very detailed walkthrough of the singleplayer campaign of the game - it refers to regular (medium) difficulty in game. This guide also consists of a walkthrough of all challenge-missions. That's not all - you will find here the informations about (almost) every hidden objective from these missions: I was working veeery hard to provide you this info and now only two hidden objectives are missing. What else? Detailed map of each level included.
Have a nice reading and... I hope this guide will be readable for you - take into account that I had my last English lesson - let me count - 10 or maybe 12 years ago... Besides, I'm not good in operating even my own, native language and You want me to use English? :-)
Pawel "PaZur'76" Surowiec
Lets start off with couple of hints - some of them probably seem trivial and obvious to you, but it's easy to forget about even such simple things, when playing this very dynamical and quite difficult game.
 Naval Academy completed but I wasn't a primus, I think :-)...
Before you'll start your proper game complete Naval Academy - this tutorial is long and boring, but it will help you to get used to non-typical steering/controls and to master the commanding units in the first place.
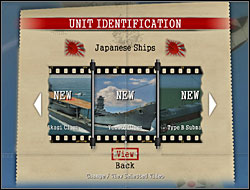
In Battlestations: Midway you will find also a Units/Weapons Encyclopedia - besides it's very interesting, it can provide you valuable informations about enemy units (their armament, armor and speed values, etc.).
 Well, well, well - what we have here? Yamato Battleship? Pfff...
Ok, time to be more concrete.
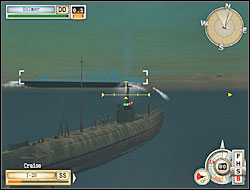
When you're commanding a submarine the biggest threat for your ship presents enemy destroyers and patrol boats - both equipped with sonars and armed with depth charges. And even if these small patrol boats have no sonars, their crews have probably 6th instinct of detecting submerged submarines - all my experiences lead to this conclusion. You can avoid these enemies by diving to level 4th (max. submersion), however, water pressure on this level slowly but unrelentingly crushes your submarine's hull - first, and second - it's a temporary and partial solution. So it's better to pick up the glove and to fight the enemy. And you have a one, very effective way to win this. Let your enemy detect you with his sonar when you're sailing on the periscope depth. He is closing then and when he's very close (let's say 2-3 lengths of his hull) - stop your engines. Your speed decreases to zero, you stop making noise and enemy is losing sound contact with your submarine. So he is turning and traversing your submarine's course ahead her bow or behind her stern. If he don't want to cut in your course for some reason, just turn on the engine and shut it down once again after few seconds.
 You shouldn't mistreat me earlier with depth charges, loser!
Now he must rise to the bait, I mean catch up a sound contact with you for a moment once again, make a proper turn and finally traverse your course. All you have to do now is to lunch two torpedos at his side/board (take an adjustment "at a guess" on his movement first), firing them from rear (stern) or front (bow) launchers (depends on situation). But pay attention that the enemy cannot pass by your submarine too close, otherwise your torpedos - even if they were properly aimed - will go under him. It's very effective tactic and developer should actually limit its usage with some patch, I think...
The description above applies to situation when enemy destroyer is closing from your board (side), but if he's approaching from the stern or bow, parallel to the submarine, you can deal with him in the same way, except that after shutting down the engine enemy will make a turn leaving your course. And then you must quickly fire two torpedos before he will move too far away to one of your sides (boards).
The submarine under your command unfortunately needs to come to the surface from time to time, to allow your crew to take a breath of fresh air. But emerging when enemy is close can be dangerous (damn, it is!) from obvious reasons. So you have three tricks to minimalize that danger. First - come to the surface when you're far enough from your enemies. Try to stay backwards to them, to expose only your stern to enemy fire (you will be presenting a small target then), eventually manoeuvre hard to avoid artillery shells. It's even better to sail away, turnaround and emerge with bow pointed at the enemy, so your deck gun can open fire - but you must plan such a maneuver properly earlier... Then take a deep breath catching max. amount of air and dive again.
Second trick - come to the surface close to the board of enemy tanker or cargo ship (if they are in the area), making one of them your shield against the enemy warship. However, these "civilian" ships are armed with cannons sometimes, but you can quickly neutralize their armament with your own deck gun. Besides, enemy warship often fires his guns regardless of the ships he should protect.
Third trick (best in my opinion): we're emerging just for a second (literally), to only let the conning tower of our submarine show up above the water-level, and we're diving back immediately. Repeat this operation couple of times to catch up max. amount of fresh air. Of course enemy will be shooting at us when he'll see us on the water but he should't have a time to hit us accurately.
 Crew, prepare for boarding!
To sink enemy destroyer or cargo ship you will need two torpedos, cruiser wants three or four (depends on his version - light or heavy) before he'll head to the bottom, bigger warships like battleships and aircraft carriers require even six torpedos. This note refers to all kind of torpedos - these launched by your submarines and destroyers, but also dropped by your torpedo bombers (airplanes). Before firing the torpedos try to get as close as possible to the enemy to not give him a chance of avoiding your salvo. Oh, and try to perform your torpedo attacks (especially when using airplanes to these purposes) in short time intervals. Otherwise the enemy - after collecting a few torpedos that didn't sink him though - will fix (patch) all holes/leaks in his hull and.. the whole party starts from the beginning (well, almost).
 Three, almost simultaneous torpedo impacts - they will have a lot to patch...
Spread over the whole target's silhouette your torpedos firing in one salvo, to be sure that at least one of them will hit him, even if he's taking evasive actions (orders full astern, for example) - aim at bow with one, at stern with second and at midship with rest. This hint refers to the attack performed mainly by the submarine.
While commanding some destroyers, also armed with torpedos, it's a wise idea to order them (right in the beginning of a mission) to use this weapon at own will (free fire), by holding down left Alt, cycling to "torpedos" and turning this feature on. Later, in the fervor of a battle, you can easily forget about this, or manually firing the torpedos from every destroyer can be difficult and makes us lost.
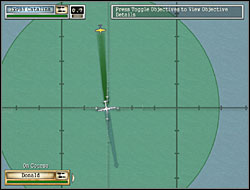
Launched torpedos (their tracks) are visible on map when its fully zoomed in. Try to avoid torpedos enemy has launched in your direction by taking suitable evasive actions - change your ship's course, speed up or slow down, sometimes even stop in place. If you have no chances to duck, turn with ship's bow towards the incoming torpedos - maybe only one or two will hit you, instead of the whole salvo. There are no neuralgic for ship's maneuverability mechanisms in your ship's bow (while stern hides the engine room) so it can survive few impacts.
 Ufff, that was close...
 A piece of empty ocean all around but here's crowded as in city bus during rush hours.
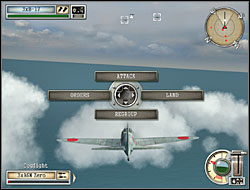
When you have a few ships at your disposal one of them is usually more important than the rest - often it's an aircraft carrier. The enemy knows his importance and tries to sink him with torpedos, among other things. So it's good to protect such a "floating airfield" (or another important ship), by placing rest of your fleet sailing with him in formation pretty tightly, to shield his big body (his boards) with ships' hulls from the direction enemy torpedo-bombers are coming. Better to lose a scrubby destroyer than a carrier, right? You can change your formation by choosing suitable command from order's menu (activated with left Alt) and than left-clicking & dragging with your mouse (on map which appears) small circles symbolizing points of destination for your ships.
Besides, enemy airplanes (torpedo-bombers), when approaching the target, will have to make their way through the AA fire wall raised by our ships screening the big guy.
On the other hand, when we're fighting with the enemy using our deck guns (artillery), and with several ships, we should place all of them in a row formation, one behind another, to let all of them fire at the target without interference - the firepower is then great. And, of course, we're trying to stay sideways to the enemy with all our ships to let every deck gun fire.
Try to open fire with your deck guns from a maximum possible range, using the binoculars and zooming in the view (middle mouse button). The biggest range and deck guns have battleships, medium - cruisers, and destroyers have the smallest range and the weakest artillery. Try to aim (taking adjustment on enemy movement) at the ammo magazines (their explosions can sink enemy warships in the twinkling of an eye) - usually they are located below the guns' towers. However, potential hits at these places are the matter of luck in this game...
 Well-aimed salvo at the ammo magazine and this duel is won.
The dots you see under the crosshair - green/yellow/red/purple - denote whether the deck gun (one of these dots) can see the target/the target is in range/you can fire at him (green dot), the gun is reloading or turning towards the target (yellow), the deck gun can't shoot at a target cause he's out of range or the deck gun can't see a target or the deck gun is damaged (red). Purple dot can be seen probably only when commanding a submarine and denotes that you have no more torpedos for suitable torpedo launcher (unfortunately you can't reload them in base/shipyard).
 Bombers attack the target longitudinally, torpedo planes use transverse approach (from sides).
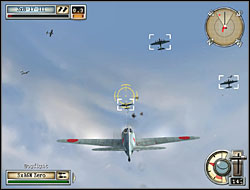
Before you attack enemy warships with your bombers (no matter: dive bombers or level bombers) or torpedo planes, set the routes of approach for them, because game won't do this for you. This advice concerns especially torpedo-bombers - without our intervention they love to attack at some stupid angle (from ship's bow, for example) and then they missed with their torpedos, because the target was small and narrow. So your bombers should approach the target in his longitudinal axis and torpedo planes should attack from his board (side). Only when all planes are in proper course you can assign targets for them and eventually lead the attack by yourself.
Dive bombers and their bombs present controversial usefulness (at least for me - I personally prefer torpedo planes), except two situations - when you have to bombard carriers' flight decks and enemy land installations. Actually, it's better to use for this first purpose your level bombers (B-17 Flying Fortress or B-25 Mitchell). But if you insist to use dive bombers, better check first hot to make a proper dive bombing - peep how is doing this (automatically) the computer, when you have assigned the target for him (don't touch your mouse when spying, unless you're holding down Ctrl key): aircraft decreases his airspeed, rolls on his back and then dives.
 The Japanese over there below will remember for a long time this steely rain which fell on them today...
 Japanese "divine wind" (kamikadze) in American edition.
When you're attacking a floating target with your torpedo or dive bombers, it's good to turn yourself into the "kamikadze" after releasing the torpedo/bomb and to crash into the enemy - such an action inflicts additional damages to him (though, not large). Do this especially if your plane is heavily damaged and his return to the base is questionable. Besides, his RTB (return to base) takes a long time and usually you don't have a possibility to launch other planes in that time. But often you have many airplanes at your disposal in suitable scenarios, so you can turn into "kamikadze" some of them. Shortly - in many missions it's more profitable to commit a suicide attack with your plane, than long home-coming.
[However, if you decided to make your way home with these aircrafts remember, that during their return they can help your fighters and shoot down a couple of enemy planes.] Additionally, to be sure that most of our bombs or torpedos will hit the target, you can attack him only with one unit at the same time (lead that unit personally), while rest of squadrons wait closely but on safe positions for their turn. When job is done by your first unit, switch to next. This way you have an assurance that nobody will fail (screw-up) his job.
Arm your fighter planes (before launching them) with 200 lbs bombs - they can often perform dive bombing while not dealing with enemy airplanes and I didn't notice negative influence of additional load on their flight characteristics. Remember only to direct them back to dogfighting after bombardment, because they like to head home then. Your fighterplanes can also destroy enemy cargo ships using only their machineguns - strafe enemy cargo ships' decks.
 Typical situation when enemy sails with a cargo of fireworks.
 Three flights of fighterplanes and one flight of torpedo-bombers - take-off immediately!
When using an aircraft carrier and his airplanes it's a wise idea - especially during the battle with enemy carriers - to launch from this "floating airfield" three flights (each consists of 3 planes) of fighters and one flight of torpedo planes. In many cases it's a max. number of planes that can take-off and operate from one of our carrier in a given moment. These three torpedo-bombers can sink enemy destroyers from his carrier's escort one after another and they have also ability to damage something bigger (a cruiser for example), while three flights of fighters can properly take care of the same number of enemy planes. Because simultaneous attack on maximum numbers of enemy aircrafts is very important in plenty of missions, especially when you have to repel enemy air raid, several waves of his planes one after one. I would recommend this scheme and such a composition of your own airforces as very effective.
You can order your aircrafts (mainly fighters) to escort other planes (e.g. bombers), during their flight to the target - just select your fighter unit and right-click on bombers: you'll see a green arrow from first unit to second. This way you can also order your planes to escort one of your ships, to patrol aerial area over him.
 Hey, hey, wait for me!
 Two "Zeros" takes-off for a CAP over the island. "Zero" is an american codename of this type of Japanese planes, not the description of their pilots flight skills :-).
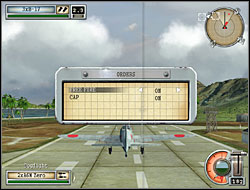
Other useful command (again - mostly for fighters) is to patrol any area, so-called "combat air patrol" (CAP). Hold left Alt to open order's menu of your air unit and turn on "CAP" and "free fire" features, then right-click on map with your mouse. Your planes will circle over this spot and attack enemy aerial units nearby, but should also bombard enemy ships (if your fighters have bombs).
To yet increase the number of enemy aerial units simultaneously attacked by your forces you can - when controlling one of your flights/squadrons/etc. - order your wingman to attack one of enemy units (by clicking them on map or in external view) and personally strike another. Of course this tactic is for players that doing fine in the air alone. After the dogfight you can gather your teammates around you by ordering them to regroup.
 By holding down left Alt button and pressing W, S, A or D key, you're assigning simple commands.
 I think I had some +6g during that attack :-).
When the dogfight starts, shoot down enemy planes aiming at their engines (especially when facing multi-engined bombers). Start your attack when you're already closing them frontally. Later, the tactic of attacking them at different angles works good, because I've noticed that such a typical action when you're sitting on theirs six in many cases requires a lot of ammo and... patience to send them to the ground - some enemy planes seem to be almost indestructible.
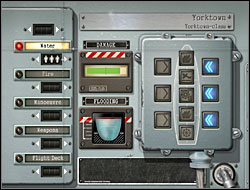
The most dangerous damages your ship can sustain and that have direct impact on his vitality are water leaks and fires. First are created mostly in effect of torpedos impacts, second rises as a result of bombardment. All those damages can be fixed in the repair's panel (press R to open it), by sending emergency teams (those little human figures) to adequate compartments/with suitable orders (patching the holes, fire fighting). It's good to hold one of these man in each of neuralgic locations all the time and from the beginning of a mission, to quickly deal with problems. So, for your carrier, place one man in locations called "water", "fire" and "flight deck". For rest of your ships place these emergency teams in spots "water", "fire" and "weapons" (mainly deck guns are there). Location called "manoeuvre" is not so important and you can assign people there only when you see some failures.
Additionally, when ship has suffered a damage, you should quickly look into this panel and check how dangerous the damage is. If the water leak is big (blue <<< and >>> on the boards) immediately assign all three humans to suitable location ("water") and hold them there not until the hole in the hull is patched but even longer - because they can also pump out some water. Similarly, when dangerous fire occurs (red icon of fire), quickly fight with it using all three man.
Jesus Christ, all to water pumps, quickly! Or to sea-boats better...
From time to time (particularly before starting the fight) you should look into the location called "weapons" in this repair's panel (by default you can't see your weapons there) and check the condition of your deck guns (red colour means that gun is heavily damaged, yellow - damages are minor, etc.). Otherwise you can "wake up with one hand in the chamberpot" - this is old Polish proverb ;-) that means, in this particular situation, that in crucial moment of a battle you have no guns to fire, because you forgot to repair them earlier.
 Hey, buddy, do you want this pontoon or not!? Judging your battleship's condition it can be useful for you...
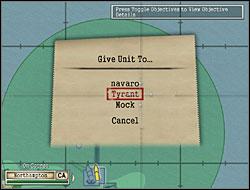
You can give your units to the teammates in multiplayer games by left-clicking with your mouse unit you want to give and pressing your mouse wheel. Than select a player in menu that appears.
Finally (yup, that's all, folks - no more obvious hints :-)): tactical sheet (in-game available after pressing Esc key and then "tactics" button, or something like that - so uncomfortably) showing which our units have chances (and how big) when fighting against suitable enemy units (this green mark denotes that our unit has good chances against the enemy, red X means no chances and dash - potential duel will remain indecisive):
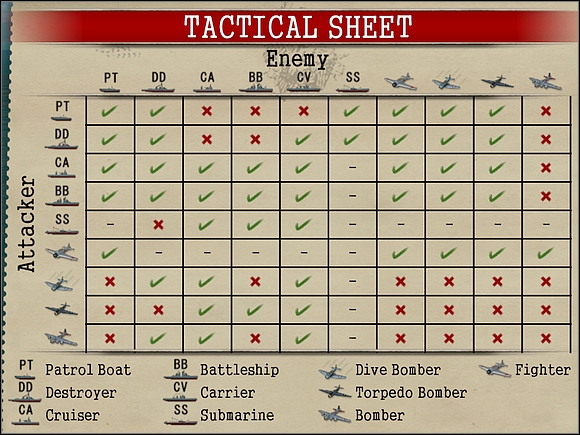
However, the correctness and usefulness of this sheet is controversial: for example it points to the conclusion that the submarine has no chances when dealing with enemy destroyer, but I already told you earlier in this chapter that things stand just the opposite :-)...

Units at your disposal: type Elco patrol boat, fighterplane F2A1 "Buffalo-I"
Enemy: Japanese fighterplanes A6M "Zero", bombers D3A "Val" and B5N "Kate", mini-submarine, warships (destroyers, aircraft carriers)
Level of difficulty: 1 (3 with hidden objective); scale 1-6, where 1 - easiest level of difficulty, and 6 - the most difficult
Primary objectives:
Hidden objective:
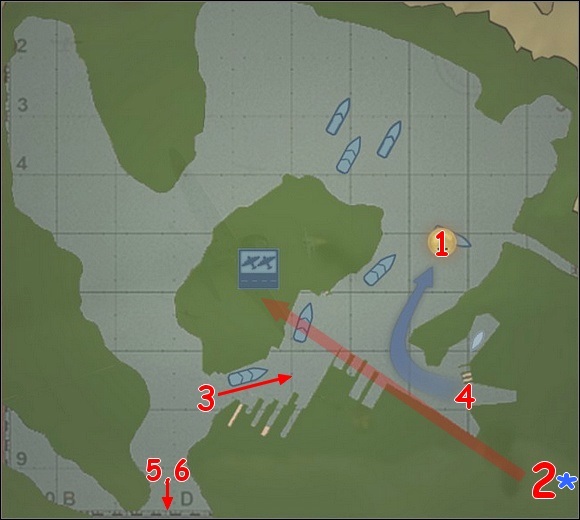
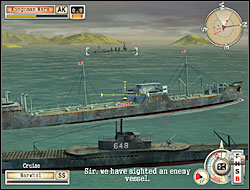
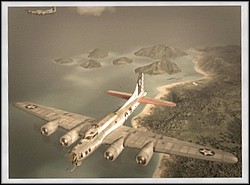
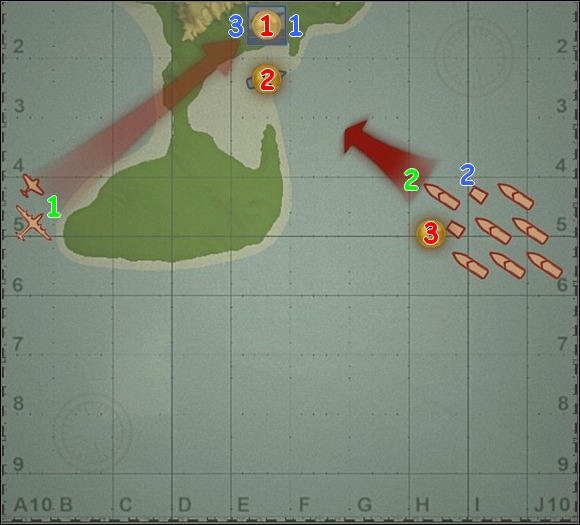
Sit comfortably and watch first of movies from this mission. This one presents you two main characters of the game: Henry Walker and Donald Who-Knows-Me, both from US Navy forces (last one from airforces). Both of them, unaware of what expect for them in a moment, are going to Pearl Harbor, American navy base on Hawaii. [#1] On this movie you see also take-off of Japanese aircrafts preparing for the attack on this American base. Henry will give up with his friend on the wharf and will catch his boat - PT 23, type Elco patrol boat. At that moment you start off. Your first task - to sail to the USS "Phoenix" (1), where Henry serves as a Lieutenant. Proceed straight a little, then turn right and once again right - it's rather hard to get lost. [#2]
![[ 1] - Stationed at Pearl - Singleplayer Campaign - Battlestations: Midway - Game Guide and Walkthrough](https://game.lhg100.com/Article/UploadFiles/201512/2015121216483572.jpg) [ 1]
[ 1]![[ 2] - Stationed at Pearl - Singleplayer Campaign - Battlestations: Midway - Game Guide and Walkthrough](https://game.lhg100.com/Article/UploadFiles/201512/2015121216483591.jpg) [ 2]
[ 2]
Phoenix's location in the port is marked on the compass in the upper right corner of the screen with a yellow triangle, additionally it's also indicated by a blue triangle on your screen. [#3] Henry will not embark this warship though, cause USS "Phoenix" will be unexpectedly attacked by the Japanese. [#4]
![[ 3] - Stationed at Pearl - Singleplayer Campaign - Battlestations: Midway - Game Guide and Walkthrough](https://game.lhg100.com/Article/UploadFiles/201512/2015121216483566.jpg) [ 3]
[ 3]![[ 4] - Stationed at Pearl - Singleplayer Campaign - Battlestations: Midway - Game Guide and Walkthrough](https://game.lhg100.com/Article/UploadFiles/201512/2015121216483510.jpg) [ 4]
[ 4]
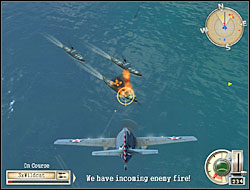
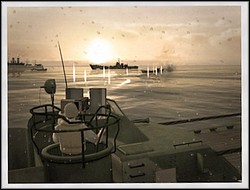
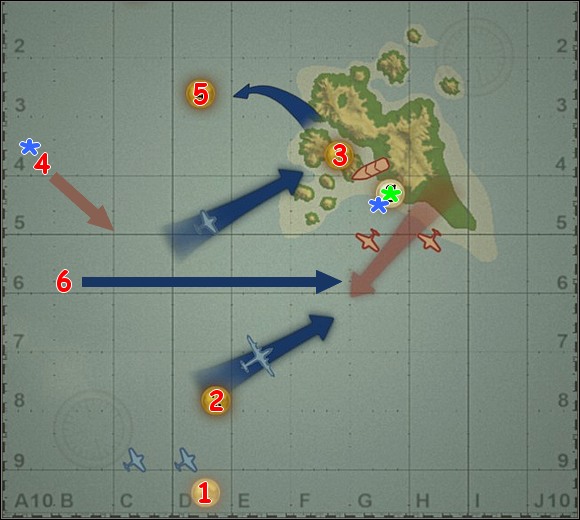
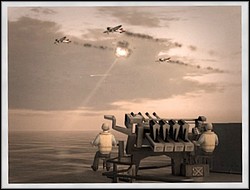
You'll see a real hell in the harbor, next flights of Japanese aircrafts furiously attacking following American warships mooring at the wharf. Join the battle by shooting down enemy airplanes with your .50 cal machineguns your patrol boat is armed with. Don't stand in one place because you're easy to hit - sail pretty fast all over the harbor but take a look around from time to time to avoid crashing into the wharf or mooring warships. [#5] Use your binoculars and zoom in when shooting at enemies flying by in the distance - take an adjustment "at a guess" on their movement. You can also assign targets for your crew by right-clicking them. [#6] If you have shot down at least 30 enemy planes (*) you've completed also hidden objective.
![[ 5] - Stationed at Pearl - Singleplayer Campaign - Battlestations: Midway - Game Guide and Walkthrough](https://game.lhg100.com/Article/UploadFiles/201512/2015121216483587.jpg) [ 5]
[ 5]![[ 6] - Stationed at Pearl - Singleplayer Campaign - Battlestations: Midway - Game Guide and Walkthrough](https://game.lhg100.com/Article/UploadFiles/201512/2015121216483681.jpg) [ 6]
[ 6]
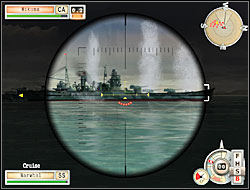
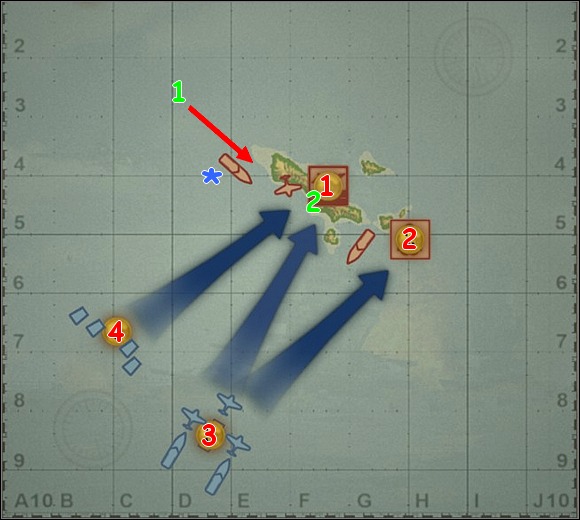
In this mission you don't have an access to the map, unfortunately. Your mission all the time is to survive the first attack wave (2). It shouldn't be so difficult for you to complete this task but it can't be said about the rest of American units. A moment later you will be given another opportunity to show your skills - the port will be penetrated by enemy mini-submarine and your next task is to sink her (3). [#7] Proceed in the direction of yellow triangle on the screen, which marks the location of this small ship. Switch weapons for depth charges with your Shift key, slow down a little when sailing over the mini-sub and treat her with them. Probably you won't be able to sink her at first run so turn back, pursue her and attack again. Min-sub should head to the bottom now (actually she will emerge) and the task is completed. [#8]
![[ 7] - Stationed at Pearl - Singleplayer Campaign - Battlestations: Midway - Game Guide and Walkthrough](https://game.lhg100.com/Article/UploadFiles/201512/2015121216483698.jpg) [ 7]
[ 7]![[ 8] - Stationed at Pearl - Singleplayer Campaign - Battlestations: Midway - Game Guide and Walkthrough](https://game.lhg100.com/Article/UploadFiles/201512/2015121216483652.jpg) [ 8]
[ 8]
Your small ship has managed to survive (4). See another short cutscene showing this Hell on Earth here, in Pearl Harbor. [#9] Now it's time to play as Donald who has managed to take-off in his fighterplane. This time you're attacking again enemy aircrafts but during their return to the carriers now - take a revenge for Pearl Harbor on them (5). Pursue them on max. speed and when you're close enough: slow down to avoid passing by the enemy or worse - crashing into him. [#10] Then shoot down every plane you can.
![[ 9] - Stationed at Pearl - Singleplayer Campaign - Battlestations: Midway - Game Guide and Walkthrough](https://game.lhg100.com/Article/UploadFiles/201512/2015121216483659.jpg) [ 9]
[ 9]![[ 10] - Stationed at Pearl - Singleplayer Campaign - Battlestations: Midway - Game Guide and Walkthrough](https://game.lhg100.com/Article/UploadFiles/201512/2015121216483619.jpg) [ 10]
[ 10]
Japanese aircrafts approach the carriers with an intention to land on them of course - this is good moment to hunt them down. Remember that you can take aim precisely by zooming in your view with middle-mouse button. Hurry up because Japanese disappears after the landing, using the lift to go down under the deck. [#11] After destroying the last enemy airplane mission will end successfully - as far as Donald is still alive (6). Just contemplate only another short movie presenting the scenery after the battle and this embarrassing defeat of US Navy. [#12]
![[ 11] - Stationed at Pearl - Singleplayer Campaign - Battlestations: Midway - Game Guide and Walkthrough](https://game.lhg100.com/Article/UploadFiles/201512/2015121216483683.jpg) [ 11]
[ 11]![[ 12] - Stationed at Pearl - Singleplayer Campaign - Battlestations: Midway - Game Guide and Walkthrough](https://game.lhg100.com/Article/UploadFiles/201512/2015121216483667.jpg) [ 12]
[ 12]
Units at your disposal: type Elco patrol boat
Enemy: Japanese fighterplanes Ki-43 "Oscar-I", dive-bombers D3A "Val-III" and torpedo-bombers G4M "Betty-II", 2 landing ships (LST Landing Ship) and boats (Daihatsu LCP), 3 cargo ships, destroyer
Level of difficulty: 1 (2 with hidden objectives)
Primary objectives:
Secondary objective:
Hidden objectives:
Potential medals to earn:
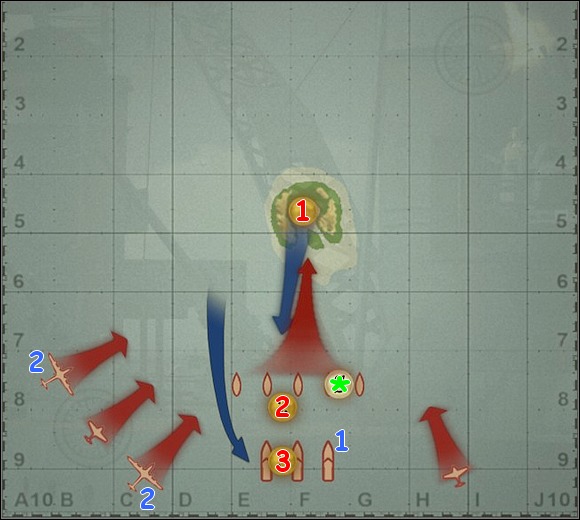
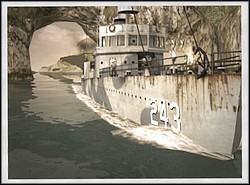
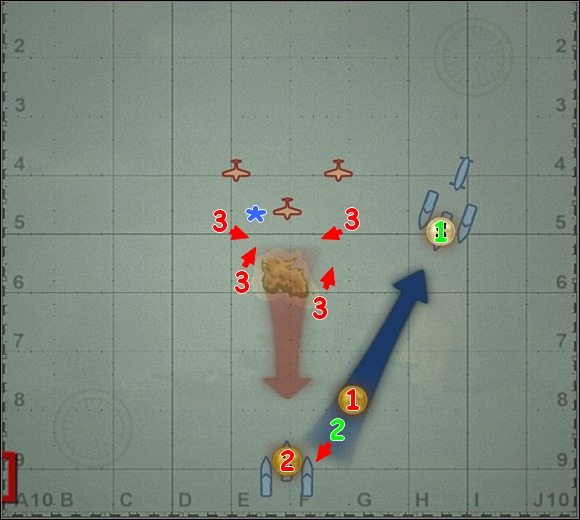
For a kick-off view an intro movie - you're getting told off on it first, but a moment later a next task is assigned to you and... a new patrol boat of class Elco, PT 108. [#1] You start off your proper game in the harbour, somewhere on the Philippines. You don't have an access to the map again, probably it's a standard when operating on patrol boats. Sailor on your boat has problems with turning on the engine while the Japanese invasion on island starts. You see over the harbour first enemy aircrafts - fighterplanes and bombing planes (inclusive dive bombers). You should leave the harbor now and in one piece (1) but before your crew will be able to start up the engine take care of enemy planes. [#2]
![[1] - Defense of the Philippines - Singleplayer Campaign - Battlestations: Midway - Game Guide and Walkthrough](https://game.lhg100.com/Article/UploadFiles/201512/2015121216483778.jpg) [1]
[1]![[2] - Defense of the Philippines - Singleplayer Campaign - Battlestations: Midway - Game Guide and Walkthrough](https://game.lhg100.com/Article/UploadFiles/201512/2015121216483792.jpg) [2]
[2]
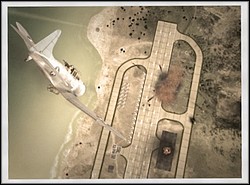
If you want to complete one of hidden objectives concentrate on enemy bombers - shoot down at least five level bombers G4M "Betty-II" (2) flying on high altitude. Take an adjustment on their movement while aiming at them and shoot using your .50 machineguns - don't bother to aim at their engines as game suggested during the scenario loading. Shoot using the external view when enemy bombers fly by close, use your binoculars and zoom in your view when they're far. [#3] When your sailor has managed to turn on the engine head on to the open sea, in the direction of one of these yellow triangles you see on picture [#2]. It's time to repel the enemy invasion on the island. [#4] There's no sense in sitting here, in the harbor, because Japanese aircrafts will finally target even your small patrol boat.
![[3] - Defense of the Philippines - Singleplayer Campaign - Battlestations: Midway - Game Guide and Walkthrough](https://game.lhg100.com/Article/UploadFiles/201512/2015121216483796.jpg) [3]
[3]![[4] - Defense of the Philippines - Singleplayer Campaign - Battlestations: Midway - Game Guide and Walkthrough](https://game.lhg100.com/Article/UploadFiles/201512/2015121216483790.jpg) [4]
[4]
When you have left the port you'll be probably attacked by enemy fighters (they fly in pairs) practicing the hedgehopping. [#5] Shoot back: if you want to quickly send them to the ocean start shooting at first of them when he's pretty far, using the binoculars and zooming in the view. Your crew should also know exactly what is the general purpose of machineguns installed on your patrol boat, but if they don't want to use them for some reason, better check whether the "free fire" option is turned on in order's menu. [#6]
![[5] - Defense of the Philippines - Singleplayer Campaign - Battlestations: Midway - Game Guide and Walkthrough](https://game.lhg100.com/Article/UploadFiles/201512/2015121216483783.jpg) [5]
[5]![[6] - Defense of the Philippines - Singleplayer Campaign - Battlestations: Midway - Game Guide and Walkthrough](https://game.lhg100.com/Article/UploadFiles/201512/2015121216483744.jpg) [6]
[6]
However, your main task here, in the open sea, is to destroy all Japanese landing crafts (2) (these smallest boats). The Japanese must not land more than five boats (2). Furthermore, you should also sink two landing ships (2) (those of medium size) and transport ships (3) (the biggest ships in number of three). One of your hidden objectives is also to send to the bottom Japanese destroyer from the escort (1). First, take care of these smallest boats fully loaded with Japs and quickly pushing to the island - you can destroy them efficiently and spectacularly using even your machineguns, zooming in the view with middle-mouse button if necessary. [#7] Though, watch out at what you're firing because there are other American PT boats operating in this area and they can be easily mistaken with the enemy. After completely destroying the first wave of landing boats (*) (this is secondary objective) you'll be able to use the torpedos your patrol boat is also armed with. Switch to them by pressing Shift key. Launch one torpedo at each landing ship of medium size (LST Landing Ship) transporting Japanese tanks and vehicles - this should be enough to send them to the coral. [#8] Fire your torpedoes from minimal range to not give the enemy a possibility of avoiding them.
[7]![[8] - Defense of the Philippines - Singleplayer Campaign - Battlestations: Midway - Game Guide and Walkthrough](https://game.lhg100.com/Article/UploadFiles/201512/2015121216483751.jpg) [8]
[8]
You can sail without any fear very close to the Japanese destroyer assuring the invasion forces (he's nearby) and sink him with two torpedos. [#9] Finally take care of three enemy cargo ships (these biggest in light painting) launching on the water those smallest boats you've been destroying earlier (and now do the same if you see'em again). Fire to torpedos at each of these cargo ships to stop them from launching those boats. [#10]
![[9] - Defense of the Philippines - Singleplayer Campaign - Battlestations: Midway - Game Guide and Walkthrough](https://game.lhg100.com/Article/UploadFiles/201512/2015121216483763.jpg) [9]
[9]![[10] - Defense of the Philippines - Singleplayer Campaign - Battlestations: Midway - Game Guide and Walkthrough](https://game.lhg100.com/Article/UploadFiles/201512/2015121216483736.jpg) [10]
[10]
Sinking them should finish the scenario. [#11] Time to see another cutscene which will lead you to the conviction that you'll be commanding something bigger than the patrol boat in next mission, a Clemson-class destroyer namely. [#12]
![[11] - Defense of the Philippines - Singleplayer Campaign - Battlestations: Midway - Game Guide and Walkthrough](https://game.lhg100.com/Article/UploadFiles/201512/2015121216483895.jpg) [11]
[11]![[12] - Defense of the Philippines - Singleplayer Campaign - Battlestations: Midway - Game Guide and Walkthrough](https://game.lhg100.com/Article/UploadFiles/201512/2015121216483817.jpg) [12]
[12]
Units at your disposal: American Clemson-class destroyer USS "Kane"
Enemy: 5 big Japanese cargo ships plus 4 small, landing ships, patrol boats, submarines, recon planes, coastal fortresses and destroyer
Level of difficulty: 4 (5 with hidden objectives)
Primary objectives:
Secondary objectives:
Hidden objectives:
Potential medals to earn:

Your main objective in this scenario is to reach the other side of the strait (1) you can see in front of you. [#1] And the destroyer under your command should do this in one piece, he must survive (3). When you switch to map you'll see pretty big traffic in that strait and many Japanese ships mooring at a shore. There are enemy bases in two locations (one of them, further to the north is PT boat base). Here and there on the hills you can also see coastal fortresses occupied by the enemy. [#2] However you don't have much time to look at map because in your direction fly two enemy recon planes, both armed with torpedos.
![[ 1] - Running the Palawan Passage - Singleplayer Campaign - Battlestations: Midway - Game Guide and Walkthrough](https://game.lhg100.com/Article/UploadFiles/201512/2015121216483865.jpg) [ 1]
[ 1]![[ 2] - Running the Palawan Passage - Singleplayer Campaign - Battlestations: Midway - Game Guide and Walkthrough](https://game.lhg100.com/Article/UploadFiles/201512/2015121216483860.jpg) [ 2]
[ 2]
Try to shoot them down during their first bombing run, simultaneously place yourself sideways to the closest enemy fortress and destroy it with your artillery, sailing all the time through the strait. [#3] A moment later you'll see two Japanese cargo ships - you can sink both with your torpedos (by firing two at each of them) but it's better to save this weapon for better opportunity. Instead of this destroy both cargo ships with accurate salvos of your artillery. [#4]
![[3] - Running the Palawan Passage - Singleplayer Campaign - Battlestations: Midway - Game Guide and Walkthrough](https://game.lhg100.com/Article/UploadFiles/201512/2015121216483843.jpg) [3]
[3]![[4] - Running the Palawan Passage - Singleplayer Campaign - Battlestations: Midway - Game Guide and Walkthrough](https://game.lhg100.com/Article/UploadFiles/201512/2015121216483875.jpg) [4]
[4]
Pretty fast you will also have to deal with Japanese patrol boats - avoid their torpedos (you can see them well on the map when it's zoomed in) and burn these small boats with your AA guns fire or - when they're really close - with one or two artillery rounds. [#5] If you have suffered a damage during the fight (red icons twinkling in the lower right corner of the screen) switch to repair's panel and take care of all failures immediately. [#6]
![[5] - Running the Palawan Passage - Singleplayer Campaign - Battlestations: Midway - Game Guide and Walkthrough](https://game.lhg100.com/Article/UploadFiles/201512/2015121216483805.jpg) [5]
[5]![[6] - Running the Palawan Passage - Singleplayer Campaign - Battlestations: Midway - Game Guide and Walkthrough](https://game.lhg100.com/Article/UploadFiles/201512/2015121216483962.jpg) [6]
[6]
You can sail over the whole strait back and forth, using one or another canal and destroying all around, for example enemy submarines mooring at a shore (among other things). Probably you will finally sail to the canal with enemy recon base on the shore - watch out for few squadrons of enemy planes approaching from the right (east) edge of a map! Shoot them down. [#7] Destroy the hangar of enemy recon base (1) with your artillery and by placing your ship sideways to him to let all of your deck guns fire. But first - get over with the Japanese coastal fortress! Sink also all small ships you'll see at a pier. [#8]
![[7] - Running the Palawan Passage - Singleplayer Campaign - Battlestations: Midway - Game Guide and Walkthrough](https://game.lhg100.com/Article/UploadFiles/201512/2015121216483950.jpg) [7]
[7]![[8] - Running the Palawan Passage - Singleplayer Campaign - Battlestations: Midway - Game Guide and Walkthrough](https://game.lhg100.com/Article/UploadFiles/201512/2015121216483907.jpg) [8]
[8]
Some cargo ships lie at anchor close to this location - these are nice targets for your artillery or torpedos. Sending them to the coral (2) is one of hidden objectives in this mission. [#9] Farther on you'll find enemy submarines standing at anchor but still dangerous because armed with single deck guns - take them out quickly as you did it with cargo ships earlier. [#10]
![[9] - Running the Palawan Passage - Singleplayer Campaign - Battlestations: Midway - Game Guide and Walkthrough](https://game.lhg100.com/Article/UploadFiles/201512/2015121216483971.jpg) [9]
[9]![[10] - Running the Palawan Passage - Singleplayer Campaign - Battlestations: Midway - Game Guide and Walkthrough](https://game.lhg100.com/Article/UploadFiles/201512/2015121216483944.jpg) [10]
[10]
Close to the other side of the strait, to the north, on left (west) shore, you'll see Japanese PT boat base - these small patrol boats are probably harassing you all the time. Set your destroyer sideways to the base and quickly demolish the hangar on the shore (2) with few well-aimed artillery salvos to complete secondary objective number two. Destroy enemy fortress located a little bit further on this shore: don't set up yourself opposite to her because she has limited angle of fire and you can take out that fortress without sailing into this angle - keep yourself on the side. [#11] Route to the open sea stands now open. However, before you sail to the open sea repair all damages (don't forget about those applying to your weapons) because you will have to face one more enemy in a moment. Namely you'll see a Japanese destroyer on your left. You can send him few torpedoes, he will use his probably. [#12] Your task now is to sink him (2) and your unit must stay in one piece (3).
![[11] - Running the Palawan Passage - Singleplayer Campaign - Battlestations: Midway - Game Guide and Walkthrough](https://game.lhg100.com/Article/UploadFiles/201512/2015121216483924.jpg) [11]
[11]![[12] - Running the Palawan Passage - Singleplayer Campaign - Battlestations: Midway - Game Guide and Walkthrough](https://game.lhg100.com/Article/UploadFiles/201512/2015121216483922.jpg) [12]
[12]
I've managed to do this without using my torpedoes - I've sent him to the bottom with couple of artillery salvos. When you're also using your deck guns take an adjustment on target movement. It's best to shoot and observe on zoom where rounds fall (water fountains) - it's also obvious probably :-). [#13] Now you will only have to meet with the Allied submarine - if you have managed to meet with her within 17 minutes (counting from the beginning of a mission) you have also completed hidden objective (1). [#14]
![[13] - Running the Palawan Passage - Singleplayer Campaign - Battlestations: Midway - Game Guide and Walkthrough](https://game.lhg100.com/Article/UploadFiles/201512/2015121216483916.jpg) [13]
[13]![[14] - Running the Palawan Passage - Singleplayer Campaign - Battlestations: Midway - Game Guide and Walkthrough](https://game.lhg100.com/Article/UploadFiles/201512/2015121216483926.jpg) [14]
[14]
Units at your disposal: American fighterplanes F4F "Wildcat", dive bombers SBD "Dauntless" and torpedo bombers TBF "Avenger", later - aircraft carrier USS "Lexington" with his planes
Enemy: Japanese battleship "Fuso", cruiser "Tone", destroyers, fighterplanes A6M "Zero", cargo ships, oil tanker, patrol boats, the airfield
Level of difficulty: 3 (4 with hidden objective)
Primary objectives:
Secondary objective:
Hidden objective:
Potential medals to earn:
This time you play as Donald. He must - together with his fighterplanes "Wildcats" - defend the B-17 bomber squad (2) during their flight to the target of bombardment: Japanese airfield located on the island. [#1] Because from this airfield Japanese fighters take-off with a task of intercepting and shooting down oncoming B-17s. So do your job, Donald, and send all these "Zeros" back to the ground - it's not difficult. Thereupon reduce your flight altitude, fly over the island and dive towards the airfield located there (you should have it in front of you) which is - as you remember - the target of bombardment for B-17s saved by you a moment earlier. [#2]
![[ 1] - Vengeance at Luzon - Singleplayer Campaign - Battlestations: Midway - Game Guide and Walkthrough](https://game.lhg100.com/Article/UploadFiles/201512/2015121216484063.jpg) [ 1]
[ 1]![[ 2] - Vengeance at Luzon - Singleplayer Campaign - Battlestations: Midway - Game Guide and Walkthrough](https://game.lhg100.com/Article/UploadFiles/201512/2015121216484052.jpg) [ 2]
[ 2]
Before bombers will do their job you should be able to sink enemy cargo ship anchored at the wharf, strafing his deck with your machineguns. If you're there before the bombardment you can also play with enemy AA guns emplacements on the airfield but watch out for Donald - he must survive (1) if you want to finish this scenario successfully. Then you can attack another ship on the sea behind the airfield. [#3] [Maybe you won't be able to accomplish this last task personally because somewhere around that moment game switches your control to dive bombers, also attacking this island. In this instance assign the target (mentioned ship) for your fighterplanes using the map and they'll perform their attack automatically, controlled by a computer.] Let's return to "Dauntless" dive bombers - their objective is to sink the anchored Japanese battleship in the harbor (3) which was attacked earlier (on the intro movie) by Dutch submarine (unfortunately without success) and incorrectly identified as a battleship (you'll find out hereof in a moment). Close to the target there are also anchored two destroyers, some cargo ships, an oil tanker and some other small boats. [#4]
![[3] - Vengeance at Luzon - Singleplayer Campaign - Battlestations: Midway - Game Guide and Walkthrough](https://game.lhg100.com/Article/UploadFiles/201512/2015121216484004.jpg) [3]
[3]![[4] - Vengeance at Luzon - Singleplayer Campaign - Battlestations: Midway - Game Guide and Walkthrough](https://game.lhg100.com/Article/UploadFiles/201512/2015121216484047.jpg) [4]
[4]
Lead the "Dauntless" armed with bombs (each of them has one) to the attack on a supposed battleship, initiating a dive bombing over this warship. If you don't know how to perform proper dive bombardment then assign the target for your planes on map and let the computer to take control over the squadron, don't touch the mouse or keyboard. You can peep the attack and its result or take over the control in a suitable moment to finish the job by yourself - in that second case you're releasing the bomb by switching to her with the Shift key (hold that key pressed) and then pressing left mouse button when you have aimed at enemy ship. [#5] Remember only to decrease your speed while diving and don't wait with releasing the bomb too long, otherwise you won't be able to level your plane! Probably you won't be able to sink Japanese warship using only your bombs and game will give under your control next American planes - this time the torpedo planes "Avengers" (each of them has one torpedo). Now you should be able to sink this Japanese monster - this time attack him from one side, flying low and fast (on max. speed). Enemy ship doesn't manoeuvre/isn't moving rather so you can release the torpedoes when you're far away from him, to avoid being shoot down by his AA fire. [#6]
![[5] - Vengeance at Luzon - Singleplayer Campaign - Battlestations: Midway - Game Guide and Walkthrough](https://game.lhg100.com/Article/UploadFiles/201512/2015121216484095.jpg) [5][6]
[5][6]
Simultaneously rest of your planes (Donald's fighters and dive bombers) can attack other enemy ships on the water, instead of retreating to the navigation point (5) as game suggests - strafe the decks of cargo ships with machineguns, destroy small patrol boats, etc. Simply assign target for them on map when you have some time and personally lead the raid if you want to. First of all destroy the Japanese oil tanker (*) anchored somewhere between two destroyers near the attacked battleship. [#7] And that last warship will be soon (when he's going to the bottom) identified as an ordinary cruiser "Tone". Well, incorrect unit identification happens sometimes ("shit happens" ;-)... [#8]
[7]![[8] - Vengeance at Luzon - Singleplayer Campaign - Battlestations: Midway - Game Guide and Walkthrough](https://game.lhg100.com/Article/UploadFiles/201512/2015121216484027.jpg) [8]
[8]
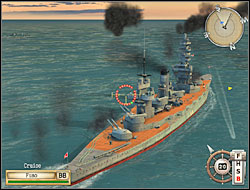
However, you will have an opportunity to sink a real Japanese battleship (4) in this mission yet since "Fuso" will soon occur on the arena of this battle - you'll see him sailing from west direction towards the island, with two flights (2x3 planes) of "Zero" fighterplanes and two destroyers as his companions. At this moment game gives under your command an American aircraft carrier USS "Lexington" (caressingly nicknamed "Lex" by his crew), also heading from west to the island, with a course parallel to the Fuso's. Later, near the island, "Lex" turns back and sails towards the Japanese battleship but you must be conscious that from both of you your carrier is the one that must survive, the USS "Lexington" must not sink (6). Unfortunately you can't steer your warship, changing the course for example. Probably these two Japanese destroyers still stand on anchor near the island on the east because you weren't able to sink them... [#9] Immediately launch a squadron (or better two) of fighters armed with bombs from your carrier and send them towards the "Fuso". [#10]
![[9] - Vengeance at Luzon - Singleplayer Campaign - Battlestations: Midway - Game Guide and Walkthrough](https://game.lhg100.com/Article/UploadFiles/201512/2015121216484106.jpg) [9]
[9]![[10] - Vengeance at Luzon - Singleplayer Campaign - Battlestations: Midway - Game Guide and Walkthrough](https://game.lhg100.com/Article/UploadFiles/201512/2015121216484179.jpg) [10]
[10]
Primo, they should shoot down the Japanese aerial escort of "Fuso" - I mean these two flights of "Zeros". [#11] Later the remaining "Wildcats" should dive towards both destroyers also escorting "Fuso" and bombard them with their bombs, maybe even sending both of them to the coral at once. [#12]
![[11] - Vengeance at Luzon - Singleplayer Campaign - Battlestations: Midway - Game Guide and Walkthrough](https://game.lhg100.com/Article/UploadFiles/201512/2015121216484178.jpg) [11]
[11]![[12] - Vengeance at Luzon - Singleplayer Campaign - Battlestations: Midway - Game Guide and Walkthrough](https://game.lhg100.com/Article/UploadFiles/201512/2015121216484163.jpg) [12]
[12]
Simultaneously prepare similar fate for two destroyers anchored near the island by sending against them next two squadrons of planes - dive or torpedo bombers, which of them you prefer. [#13] Eliminating (sinking) all destroyers completes hidden objective (*). After accomplishing these two tasks (sinking the destroyers - those anchored and those from "Fuso's" escort) head back to your nurse ship ("Lex"). When first planes land immediately take-off with next, first of all with your dive and torpedo planes. Send all of them towards the enemy battleship. Pay attention to attack the target longitudinally with your bombers, when torpedo planes use transverse approach (from boards). Applique "Fuso" a few torpedoes. [#14]
![[13] - Vengeance at Luzon - Singleplayer Campaign - Battlestations: Midway - Game Guide and Walkthrough](https://game.lhg100.com/Article/UploadFiles/201512/2015121216484109.jpg) [13]
[13]![[14] - Vengeance at Luzon - Singleplayer Campaign - Battlestations: Midway - Game Guide and Walkthrough](https://game.lhg100.com/Article/UploadFiles/201512/2015121216484166.jpg) [14]
[14]
Mistreat him with couple of bombs. [#15] And finally he will head to the bottom picturesquely. [#16]
![[ 15] - Vengeance at Luzon - Singleplayer Campaign - Battlestations: Midway - Game Guide and Walkthrough](https://game.lhg100.com/Article/UploadFiles/201512/2015121216484169.jpg) [ 15][16]
[ 15][16]
Units at your disposal: two American destroyers, one of them of Clemson-class (player), second of Fletcher-class
Enemy: two destroyers, patrol boats, 7 cargo ships and light cruiser & destroyer (Japanese reinforcements)
Level of difficulty: 4 (5 with hidden objectives)
Primary objectives:
Secondary objectives:
Hidden objectives:
Potential medals to earn:
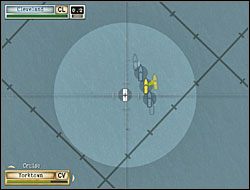
It seems that two objectives in this mission (primary - to eliminate the enemy reinforcements (3) and hidden - to finish the mission before reinforcements arrive (1)) mutually exclusive each other, you can accomplish only one of them :-). I'd suggest to split your forces (I suppose that you have done your homework, i.e. completed Naval Academy and you know how to do this): send the accompanying destroyer to the fight with the enemy warship of the same type you'll see in the entrance of the Japanese harbor located on the island in the distance. [#1] He should cut a dash. Let us hope so... Support him with your own warship when necessary but as a matter of fact you should sail farther to the south-east, so to say behind the island, because after sending to the bottom first Japanese destroyer you'll see second sailing out from behind that island. [#2]
![[ 1] - Raid on Balikpapan - Singleplayer Campaign - Battlestations: Midway - Game Guide and Walkthrough](https://game.lhg100.com/Article/UploadFiles/201512/2015121216484202.jpg) [ 1]
[ 1]![[ 2] - Raid on Balikpapan - Singleplayer Campaign - Battlestations: Midway - Game Guide and Walkthrough](https://game.lhg100.com/Article/UploadFiles/201512/2015121216484270.jpg) [ 2]
[ 2]
Try to quickly deal with him, calling for help your companion if you have some problems this time and your accompanying ship got over with his enemy. Because USS "John D. Ford" (your own destroyer) must survive (2) if you want to successfully end this mission. [#3] After sinking these two enemy destroyers and fighting all the time with the Japanese patrol boats it's time to take care of Japanese cargo ships anchored in the harbor (1) - now you must gentlemanly send them all to the coral. But first, zero in on the PT boat hangar (1) to stop these small units harassing you with their raids. Also focus yourself on enemy coastal fortress situated on the hill above the harbor and destroy it too (2). [#4]
![[3] - Raid on Balikpapan - Singleplayer Campaign - Battlestations: Midway - Game Guide and Walkthrough](https://game.lhg100.com/Article/UploadFiles/201512/2015121216484257.jpg) [3]
[3]![[4] - Raid on Balikpapan - Singleplayer Campaign - Battlestations: Midway - Game Guide and Walkthrough](https://game.lhg100.com/Article/UploadFiles/201512/2015121216484232.jpg) [4]
[4]
Each your warship can destroy one construction by placing himself sideways to it and firing at it with his deck guns or you can concentrate the fire of both destroyers on one of these targets first, then on second. Sequence of fusillade depends on which of these targets troubles you more - the fortress or the PT boats. Destroying both structures (fortress and PT boat hangar) completes secondary objectives. [#5] Now you can finally sink all these unprotected at present enemy cargo ships (1). Sail to the canal near the harbor and shell - together with your second destroyer - Japanese ships you're passing by or send each of them two torpedos in order to destroy them. [#6]
![[5] - Raid on Balikpapan - Singleplayer Campaign - Battlestations: Midway - Game Guide and Walkthrough](https://game.lhg100.com/Article/UploadFiles/201512/2015121216484299.jpg) [5][6]
[5][6]
After eliminating the last of them, and if you have additionally managed to do this quickly, mission should end successfully before Japanese reinforcements arrive (1). But if you have loitered and the Japanese in force of a cruiser and destroyer have entered the scene (they can arrive from south-west or north - it's realized randomly I think) you will also have to deal with them. I mean - to eliminate them (3). Probably at first you'll see in your sights enemy destroyer - fix the fire of both of your warships on him to quickly send him to the bottom. Similarly (concentration of fire) deal with second enemy (cruiser). [#7] You can also mistreat him with your torpedos, at last both of your destroyers should have a lot of them. To be sure that your own warship will survive this duel you can order your accompanying ship to get closer to the enemy - let the Japanese focus his attention and his fire on that second destroyer. [#8] However, if you have managed to win this battle with both of your destroyers in good condition and in one piece (2) then you have also completed second hidden objective.
![[7] - Raid on Balikpapan - Singleplayer Campaign - Battlestations: Midway - Game Guide and Walkthrough](https://game.lhg100.com/Article/UploadFiles/201512/2015121216484228.jpg) [7][8]
[7][8]

Units at your disposal: airfield, shipyard, Fletcher-class destroyer (USS "John D. Ford"), fighters P-40 "Warhawk", dive bombers SBD "Dauntless", torpedo bombers TBF "Avenger", level bombers B-25 "Mitchell", recon planes PBY "Catalina", patrol boats of type Elco
Enemy: fighters A6M "Zero", bombers D3A "Val" and G3M "Nell", light cruiser, 3 destroyers, 2 cargo ships, oil tanker, landing ships and boats
Level of difficulty: 3 (4 with hidden objectives)
Primary objectives:
Secondary objectives:
Hidden objectives:
New scenario and new challenges. This time you have under your command an American military base on Bali island. The base consists of an airfield and the shipyard. You must protect the airfield (1) against expected Japanese invasion, as a matter of fact - against the enemy bombers first: they will come (in few waves) in a moment from south-west. Along the shore there are placed some bunkers (3) that Japanese invasion forces are going to capture probably. I wrote "probably" because in my game they have never managed to get so far, they never landed on the island. [#1] However, for the present the biggest danger for you represent enemy oncoming bombers. So immediately after starting the game switch to the airfield (it's best to do this by cycling through available units and installations with the Tab key or by left clicking the airfield in map view), open the management menu (Shift key) and launch maximum number of fighters you are able to send at the moment (one flight - 3 fighterplanes - should already take-off without your interference). You should throw to the action all 4 units. Though, don't order them to take bombs yet. [#2]
![[ 1] - Holding the Lombok Strait - Singleplayer Campaign - Battlestations: Midway - Game Guide and Walkthrough](https://game.lhg100.com/Article/UploadFiles/201512/2015121216484374.jpg) [ 1]
[ 1]![[ 2] - Holding the Lombok Strait - Singleplayer Campaign - Battlestations: Midway - Game Guide and Walkthrough](https://game.lhg100.com/Article/UploadFiles/201512/2015121216484377.jpg) [ 2]
[ 2]
Now enter to the shipyard and - in a similar way - order two recon planes PBY "Catalina" to take-off, arm both with torpedos or bombs (each of them should have two). [#3] Send your fighters in south-west direction to intercept enemy oncoming bombers: by default your aircrafts have turned on free fire and CAP features (functions) so you don't even have to assign concrete targets for them. However, I was always focusing my attention on the enemy bombers first (to let none of them reach the airfield in one piece), then I was dealing with "Zero" fighters from their escort. Or majority of my planes was attacking the bombers while rest was fighting with "Zeros". Send these two Catalina recon planes east/south-east with a task of patrolling the area over the ocean there (turn on free fire and CAP options for both planes). They will look for enemy invasion (landing) forces incoming from that direction: these Japanese appear on map entering it from east or south-east (once they have also entered from north-east during my gameplay). Your recon planes don't need fighters escort cause they shouldn't meet enemy planes. Meanwhile the USS "John D. Ford" (the destroyer you also have under your control) can patrol the entrance to the harbor's bay or - initially it could be better solution - position him sideways near the shore and the shipyard & airfield to let him fire (using his AA guns) at enemy planes if they have managed to get over the airfield. Don't assign any dangerous tasks to him because you have only one destroyer and additionally the USS "John D. Ford" must survive (2), in order to successfully finish this mission. [#4]
![[3] - Holding the Lombok Strait - Singleplayer Campaign - Battlestations: Midway - Game Guide and Walkthrough](https://game.lhg100.com/Article/UploadFiles/201512/2015121216484350.jpg) [3]
[3]![[4] - Holding the Lombok Strait - Singleplayer Campaign - Battlestations: Midway - Game Guide and Walkthrough](https://game.lhg100.com/Article/UploadFiles/201512/2015121216484332.jpg) [4]
[4]
Shoot down enemy planes using your "Warhawk" fighters, systematically monitor and replenish your losses by switching to the airfield and launching next planes - you should always have in the air max. number of "Warhawks". Send all the Japanese medium bombers to the ground (1) - I don't remember exactly how many waves you'll have to face to but you'll see approximately 5 groups of planes (several aircrafts in each) approaching in short time intervals. [#5] And if after the battle comes to light that 50 % of your own air forces survived it you'll complete one of hidden objectives. Although you will use your aircrafts in this scenario yet. After destroying all waves of enemy planes, the Japanese landing forces will appear on the sea east of the island - light cruiser at the head of the convoy, two destroyers, same number of landing support ships (LST) & cargo ships and an oil tanker. [#6]
![[5] - Holding the Lombok Strait - Singleplayer Campaign - Battlestations: Midway - Game Guide and Walkthrough](https://game.lhg100.com/Article/UploadFiles/201512/2015121216484381.jpg) [5]
[5]![[6] - Holding the Lombok Strait - Singleplayer Campaign - Battlestations: Midway - Game Guide and Walkthrough](https://game.lhg100.com/Article/UploadFiles/201512/2015121216484308.jpg) [6]
[6]
But you should already have two "Catalina" recon planes flying over them, as you remember. Now, make a good use of both of these planes: switch to them and attack the Japanese convoy. I striked at the cruiser, damaging him heavily, but you can also try to sink at once these two destroyers - at last your Catalinas have two torpedos (bombs) each: just enough to send both destroyers to the bottom. [#7] Also land with all your fighterplanes on the airfield right away and immediately, when you have such an opportunity, take-off with two B-25 bombers armed with bombs. Order them to bombard enemy cruiser at the head of a convoy, destroying him finally. [#8] Then they can return to the airfield ("land" command in their orders menu activated with Alt key).
![[7] - Holding the Lombok Strait - Singleplayer Campaign - Battlestations: Midway - Game Guide and Walkthrough](https://game.lhg100.com/Article/UploadFiles/201512/2015121216484329.jpg) [7]
[7]![[8] - Holding the Lombok Strait - Singleplayer Campaign - Battlestations: Midway - Game Guide and Walkthrough](https://game.lhg100.com/Article/UploadFiles/201512/2015121216484393.jpg) [8]
[8]
If both enemy destroyers still escort the Japanese convoy heading towards the island, meet them suitably by sending towards them two Elco-class PT boats launched from the shipyard. Every PT boat should attack each enemy destroyer from one side, sailing to him at full speed and firing at him two torpedos. [#9] Of course you can attack enemy landing forces with your other units, i.e. dive and torpedo bombers, even with your fighters armed with bombs this time. Remember that you can sink these big Japanese cargo ships even strafing their decks with machineguns. [#10]
![[9] - Holding the Lombok Strait - Singleplayer Campaign - Battlestations: Midway - Game Guide and Walkthrough](https://game.lhg100.com/Article/UploadFiles/201512/2015121216484423.jpg) [9]
[9]![[10] - Holding the Lombok Strait - Singleplayer Campaign - Battlestations: Midway - Game Guide and Walkthrough](https://game.lhg100.com/Article/UploadFiles/201512/2015121216484416.jpg) [10]
[10]
Generally - organize a preemptive strike at the enemy invasion force (2), prevent the invasion force from capturing the island/landing on the shore (3) and don't allow any of the bunkers to be captured by the enemy (3). Now you can also place your destroyer in the entrance of a harbor's bay, sideways to the incoming enemy, and let him wait for the enemy calmly. Using the binoculars, zoom and AA guns/artillery knock out from a max. possible range Japanese landing boats fully loaded with soldiers and rushing to the shore. Destroy also both landing support ships (2) and then take care of these big cargo ships - they're launching small boats, as you remember. [#11] You shouldn't have bigger problems with sending the whole Japanese landing force to the bottom of the ocean. [#12]
![[11] - Holding the Lombok Strait - Singleplayer Campaign - Battlestations: Midway - Game Guide and Walkthrough](https://game.lhg100.com/Article/UploadFiles/201512/2015121216484436.jpg) [11]
[11]![[12] - Holding the Lombok Strait - Singleplayer Campaign - Battlestations: Midway - Game Guide and Walkthrough](https://game.lhg100.com/Article/UploadFiles/201512/2015121216484404.jpg) [12]
[12]
Units at your disposal: American cruiser of Northampton-class, two destroyers of Clemson-class (later - similar forces but British and a submarine)
Enemy: bombers B5N "Kate" and D3A "Val", submarine of type-B, 5 destroyers, heavy cruiser, battleship of Kongo-class
Level of difficulty: 5 (6 with hidden objectives)
Primary objectives:
Secondary objectives:
Hidden objectives:
Potential medals to earn:
Your first task in this mission is to meet with Royal Navy forces at the given coordinates (1). So order "full speed ahead!" and sail to the marked area. The Brits had to be around here somewhere although you can't see them... [#1] Instead of them you'll see the Japanese bombers and torpedo planes quickly flying from the north towards your small flotilla. Quickly change the formation and place both your destroyers on your own cruiser sides: primo - when they aren't sailing in the row formation (behind your warship) the enemy shouldn't be able to sink all of them in one bombing run, and second- enemy torpedo planes will attack you soon from sides (boards) and in this kind of arrangement (destroyers on cruiser's sides) you are pretty nice defended (shielded) against their torpedos by these destroyers. Better to loose one scrubby destroyer then your own warship, right? At last USS "Houston (your cruiser) must not sink (2) if you want to successfully finish this mission... Besides, enemy torpedo planes attack only from one side, so one allied destroyer will be shielded against their torpedos by your own cruiser - it's important because you will need this destroyer later. [#2]
![[ 1] - Randezvous in the Java Sea - Singleplayer Campaign - Battlestations: Midway - Game Guide and Walkthrough](https://game.lhg100.com/Article/UploadFiles/201512/2015121216484435.jpg) [ 1]
[ 1]![[ 2] - Randezvous in the Java Sea - Singleplayer Campaign - Battlestations: Midway - Game Guide and Walkthrough](https://game.lhg100.com/Article/UploadFiles/201512/2015121216484450.jpg) [ 2]
[ 2]
Take evasive actions to avoid Japanese bombs, try to quickly shoot down enemy planes when they're far, before they can even think about releasing their deadly load. Use your binoculars and zoom in your view - that's the best method. [#3] If you see bombs falling off the aircrafts' bodies that's a good moment to dodge, turn round. Focus your fire only on these Japanese you have in front of you (on these that are attacking in a suitable moment), don't shoot at them if they already released their cargo and are turning - you will have an opportunity to fire at them later. That's because Japanese pilots will attack this time from the side (your left probably) and on low altitude. [#4] Knock them down to the ocean from max. possible range, using the binoculars and zoom initially. Look at map when you have time (zoom it in maximally) to recon where torpedos run and take suitable evasive actions to avoid them - perform turns, speed up or slow down, sometimes even stop.
![[3] - Randezvous in the Java Sea - Singleplayer Campaign - Battlestations: Midway - Game Guide and Walkthrough](https://game.lhg100.com/Article/UploadFiles/201512/2015121216484432.jpg) [3]
[3]![[4] - Randezvous in the Java Sea - Singleplayer Campaign - Battlestations: Midway - Game Guide and Walkthrough](https://game.lhg100.com/Article/UploadFiles/201512/2015121216484587.jpg) [4]
[4]
Finally enemy planes will fly away, but you will encounter on your course to the meeting area (1) another danger - the Japanese submarine (2), submerged and sailing directly towards you. It's time to break the formation and send the destroyers (I hope you still have at least one) forward to play with Japanese sub. [#5] They shouldn't have problems with sending this enemy sub to the coral (2) using their depth charges (your cruiser unfortunately hasn't such a weapon) and one of secondary objectives will be soon completed. [#6]
![[5] - Randezvous in the Java Sea - Singleplayer Campaign - Battlestations: Midway - Game Guide and Walkthrough](https://game.lhg100.com/Article/UploadFiles/201512/2015121216484572.jpg) [5]
[5]![[6] - Randezvous in the Java Sea - Singleplayer Campaign - Battlestations: Midway - Game Guide and Walkthrough](https://game.lhg100.com/Article/UploadFiles/201512/2015121216484574.jpg) [6]
[6]
Now it should come to light that you didn't see the Brits in the marked area (1) because they are currently fighting with Japanese forces to the north from a nearby island, somewhere round the place marked on my map with *. Of course you will join this battle with a pleasure... [#7] Enemy forces consist of a cruiser and two destroyers and Brits have similar flotilla that should also be given under your control now. You can split your forces and strike Japanese cruiser with both your warships of similar type (American USS "Houston" and British HMS "Exeter"), leaving these enemy destroyers (sailing south-east) for rest of your warships. [#8]
![[7] - Randezvous in the Java Sea - Singleplayer Campaign - Battlestations: Midway - Game Guide and Walkthrough](https://game.lhg100.com/Article/UploadFiles/201512/2015121216484568.jpg) [7]
[7]![[8] - Randezvous in the Java Sea - Singleplayer Campaign - Battlestations: Midway - Game Guide and Walkthrough](https://game.lhg100.com/Article/UploadFiles/201512/2015121216484513.jpg) [8]
[8]
You can also attack Japanese destroyers with "Houston's group", leaving the task of sinking the cruiser for "Exeter's group". In this second case arrange both groups in row formations (one ship sails behind another) so each of your warships will be able to fire at the enemy without interfering with another - then you will have a great firepower. [#9] Pay attention only that both of your main (flag) warships, I mean "Houston" and "Exeter" cruisers, should survive this battle - especially the first of them (primary mission objective (1)), additionally - the second (secondary mission objective (1)). As usual watch out for enemy torpedos launched by Japanese destroyers - try to quickly sink these units with well-aimed artillery salvos, for example. [#10]
![[9] - Randezvous in the Java Sea - Singleplayer Campaign - Battlestations: Midway - Game Guide and Walkthrough](https://game.lhg100.com/Article/UploadFiles/201512/2015121216484595.jpg) [9]
[9]![[10] - Randezvous in the Java Sea - Singleplayer Campaign - Battlestations: Midway - Game Guide and Walkthrough](https://game.lhg100.com/Article/UploadFiles/201512/2015121216484528.jpg) [10]
[10]
Prepare the same fate for Japanese cruiser. [#11] Immediately repair any damages of your flag ships because one more serious battle waits for you in this scenario yet. Namely you'll see Japanese battleship "Haruna" in a company of three destroyers. [#12] This battleship appears in different locations - it's realized randomly, I think. I've marked on my map these locations (3) where I saw him when I was playing this scenario a couple of times. Your goal now is to sink battleship "Haruna" (3), of course.
![[11] - Randezvous in the Java Sea - Singleplayer Campaign - Battlestations: Midway - Game Guide and Walkthrough](https://game.lhg100.com/Article/UploadFiles/201512/2015121216484551.jpg) [11]
[11]![[12] - Randezvous in the Java Sea - Singleplayer Campaign - Battlestations: Midway - Game Guide and Walkthrough](https://game.lhg100.com/Article/UploadFiles/201512/2015121216484507.jpg) [12]
[12]
You can order your survived destroyers to fire the torpedos at free will and send these warships to the fight with enemy ships of adequate type. [#13] An allied submarine will be also given under your control now - by using the patent of luring the enemy into an ambush by turning on and off the sub's engine (take a look at 'Hints" chapter of this document), support with this submarine other warships, by sinking smaller Japanese units with two torpedos. [#14]
![[13] - Randezvous in the Java Sea - Singleplayer Campaign - Battlestations: Midway - Game Guide and Walkthrough](https://game.lhg100.com/Article/UploadFiles/201512/2015121216484594.jpg) [13]
[13]![[14] - Randezvous in the Java Sea - Singleplayer Campaign - Battlestations: Midway - Game Guide and Walkthrough](https://game.lhg100.com/Article/UploadFiles/201512/2015121216484632.jpg) [14]
[14]
But first of all, try to applique the whole salvo of four torpedos into the board (side) of the mighty "Haruna". [#15] This warship is slow (as battleship supposed to be) so it shouldn't be difficult to hit him. Meanwhile try also to encircle this enemy from both sides (boards) with your cruisers. [#16]
![[15] - Randezvous in the Java Sea - Singleplayer Campaign - Battlestations: Midway - Game Guide and Walkthrough](https://game.lhg100.com/Article/UploadFiles/201512/2015121216484690.jpg) [15]
[15]![[16] - Randezvous in the Java Sea - Singleplayer Campaign - Battlestations: Midway - Game Guide and Walkthrough](https://game.lhg100.com/Article/UploadFiles/201512/2015121216484696.jpg) [16]
[16]
Kill off this Japanese monster with couple of accurate artillery salvos, you needn't take a big adjustment on his movement/his speed. [#17] The battle is over when enemy kisses the bottom of an ocean. [#18] If you have managed to prepare the same fate for all enemy warships you have also completed mission's hidden objective (*).
![[ 17] - Randezvous in the Java Sea - Singleplayer Campaign - Battlestations: Midway - Game Guide and Walkthrough](https://game.lhg100.com/Article/UploadFiles/201512/2015121216484633.jpg) [ 17]
[ 17]![[ 18] - Randezvous in the Java Sea - Singleplayer Campaign - Battlestations: Midway - Game Guide and Walkthrough](https://game.lhg100.com/Article/UploadFiles/201512/2015121216484623.jpg) [ 18]
[ 18]
Units at your disposal: aircraft carrier USS "Yorktown", bombers B-17 "Flying Fortress", fighters F4F "Wildcat", dive bombers SBD "Dauntless", torpedo planes TBF "Avenger", 2 destroyers of Fletcher-class
Enemy: airfield, shipyard, light and heavy cruiser, 3 destroyers, fighters A6M "Zero", recon seaplanes H8K "Emily" and bombers (D3A "Val" and B5N "Kate"), patrol boats, 4 cargo ships
Level of difficulty: 4
Primary objectives:
Secondary objectives:
Hidden objective:
You've been sent back to navy base in Pearl Harbor. The promotion waits for you there, also - the aircraft carrier USS "Yorktown" will be given under your command. [#1] First mission in new role and with new unit is to strike on Tulagi island which is in Japanese hands for the moment. Your task - to attack the airfield and the shipyard located on the island, concretely - to destroy the hangars built there (airfield hangar (1) and seaplane hangar (2)). When this job is done you'll see American landing forces coming ashore. Take care of your carrier, USS "Yorktown" must survive this encounter (3). Just after starting the mission switch to him and take-off from his deck with fighterplanes. Send north-east B-17 bombers you also have at your disposal to attack the enemy cruiser heading towards your forces. [#2]
![[ 1] - Strike on Tulagi - Singleplayer Campaign - Battlestations: Midway - Game Guide and Walkthrough](https://game.lhg100.com/Article/UploadFiles/201512/2015121216484643.jpg) [ 1]
[ 1]![[ 2] - Strike on Tulagi - Singleplayer Campaign - Battlestations: Midway - Game Guide and Walkthrough](https://game.lhg100.com/Article/UploadFiles/201512/2015121216484670.jpg) [ 2]
[ 2]
Bombard this warship (then B-17s will unfortunately leave the arena of battle). [#3] If he didn't sink you can help him to go to the bottom by shelling him using the deck guns of your two destroyers accompanying the "Yorktown" carrier. [#4] Remember about quick reparation of any damages your ships had taken (blinking red icons) because even damaged this Japanese is still dangerous. By using AA guns installed on your destroyers fight also with small enemy patrol boats coming to the area of operations from the neighbouring shipyard - look out for their torpedos!
![[3] - Strike on Tulagi - Singleplayer Campaign - Battlestations: Midway - Game Guide and Walkthrough](https://game.lhg100.com/Article/UploadFiles/201512/2015121216484676.jpg) [3]
[3]![[4] - Strike on Tulagi - Singleplayer Campaign - Battlestations: Midway - Game Guide and Walkthrough](https://game.lhg100.com/Article/UploadFiles/201512/2015121216484767.jpg) [4]
[4]
Meanwhile your fighters should fly over the island and shoot down enemy planes (fighters, bombers) taking off from the nearby airfield. [#5] Send to the ocean also Japanese seaplanes launched form a shipyard. Aerial area over your carrier should be patrolled by few aircrafts all the time in case of enemy plane has managed to get here. Pay attention that USS "Yorktown" can shoot down these enemy planes using his small-calibre AA guns. [#6]
![[5] - Strike on Tulagi - Singleplayer Campaign - Battlestations: Midway - Game Guide and Walkthrough](https://game.lhg100.com/Article/UploadFiles/201512/2015121216484725.jpg) [5]
[5]![[6] - Strike on Tulagi - Singleplayer Campaign - Battlestations: Midway - Game Guide and Walkthrough](https://game.lhg100.com/Article/UploadFiles/201512/2015121216484726.jpg) [6]
[6]
The Japanese will probably try to sink your "floating airfield" with help of two destroyers. Send towards them a couple of torpedo planes to establish order - you can sink each of these Japanese units with two torpedos so you need practically only two flights of "Avengers". [#7] But if your torpedo planes screwed up their job kill off the Japanese with your destroyers. [#8]
![[7] - Strike on Tulagi - Singleplayer Campaign - Battlestations: Midway - Game Guide and Walkthrough](https://game.lhg100.com/Article/UploadFiles/201512/2015121216484717.jpg) [7]
[7]![[8] - Strike on Tulagi - Singleplayer Campaign - Battlestations: Midway - Game Guide and Walkthrough](https://game.lhg100.com/Article/UploadFiles/201512/2015121216484774.jpg) [8]
[8]
In the free time (when not dealing with enemy planes) your "Wildcat" fighters can finish the cargo ships sailing close by (*) - by strafing their decks using fighters' machineguns and destroying them you'll complete hidden objective. [#9] Though you have to take care of the airfield on the island launching more and more enemy planes and the shipyard sending to the fight Japanese seaplanes and patrol boats. Some aircrafts parking near the airstrip on the airfield you can burn with "Wildcats" again. These fighters cal also deal with enemy planes when they're taking off and destroy them already on this airstrip. Sink also with their help another cargo ship (or an oil tanker) anchored nearby, at the wharf. [#10]
![[9] - Strike on Tulagi - Singleplayer Campaign - Battlestations: Midway - Game Guide and Walkthrough](https://game.lhg100.com/Article/UploadFiles/201512/2015121216484723.jpg) [9]
[9]![[10] - Strike on Tulagi - Singleplayer Campaign - Battlestations: Midway - Game Guide and Walkthrough](https://game.lhg100.com/Article/UploadFiles/201512/2015121216484728.jpg) [10]
[10]
However, your main objective is to destroy both hangars: this on the airfield (1) and that in the shipyard (2). Assign these tasks to your dive bombers also stationing on the USS "Yorktown" while "Wildcat" fighters protect them against enemy planes. One bombardment of each target and job should be done. [#11] You can also probably raze these buildings to the ground with a couple of artillery salvos of your destroyers, after encircling the island with them, but you will need these warships later in another distant place and then they couldn't get (sail) to that location in time. So it's better to leave the task of flatten the hangars for your "Dauntless" dive bombers. And destroyers can meanwhile shell the Japanese coastal fortress located on the south-west shore of the island (2) - its destruction is a secondary goal. Somewhere around this moment of a game starts American invasion on the island, so you'll see the landing forces - make sure that at least three landing ships come ashore (4). This landing operation can be interrupted by the Japanese reinforcements/support (cruiser and destroyer) which also appear on the scene - you should see these enemy units sailing from the north/north-west towards the island. Strike'em with all you've got - with planes and destroyers. You won't need your fighters any more so they can land on "Yorktown" to make a space in the air for other planes. [#12]
![[11] - Strike on Tulagi - Singleplayer Campaign - Battlestations: Midway - Game Guide and Walkthrough](https://game.lhg100.com/Article/UploadFiles/201512/2015121216484732.jpg) [11]
[11]![[12] - Strike on Tulagi - Singleplayer Campaign - Battlestations: Midway - Game Guide and Walkthrough](https://game.lhg100.com/Article/UploadFiles/201512/2015121216484755.jpg) [12]
[12]
Use your dive bombers against enemy warships. [#13] Or torpedo planes - which you prefer (I like these with torpedos). Finish the job (if it isn't done) with your destroyers. [#14] You should simply destroy the Japanese support (1) to protect the LSTs (4).
![[13] - Strike on Tulagi - Singleplayer Campaign - Battlestations: Midway - Game Guide and Walkthrough](https://game.lhg100.com/Article/UploadFiles/201512/2015121216484711.jpg) [13]
[13]![[14] - Strike on Tulagi - Singleplayer Campaign - Battlestations: Midway - Game Guide and Walkthrough](https://game.lhg100.com/Article/UploadFiles/201512/2015121216484822.jpg) [14]
[14]
When both enemy warships are heading to the bottom, American landing forces can come ashore with no fear. [#15] And you, Henry, you'll be surely very pleased of meeting an old friend Donald on Yorktown's flight deck. [#16]
![[15] - Strike on Tulagi - Singleplayer Campaign - Battlestations: Midway - Game Guide and Walkthrough](https://game.lhg100.com/Article/UploadFiles/201512/2015121216484890.jpg) [15]
[15]![[16] - Strike on Tulagi - Singleplayer Campaign - Battlestations: Midway - Game Guide and Walkthrough](https://game.lhg100.com/Article/UploadFiles/201512/2015121216484832.jpg) [16]
[16]

Units at your disposal: aircraft carrier, light cruiser, destroyers, fighters, torpedo planes, dive bombers, recon seaplane PBY Catalina
Enemy: 3 destroyers, light cruiser, two aircraft carriers, bombers, torpedo and fighter planes
Level of difficulty: 4
Primary Objectives:
Hidden Objective:
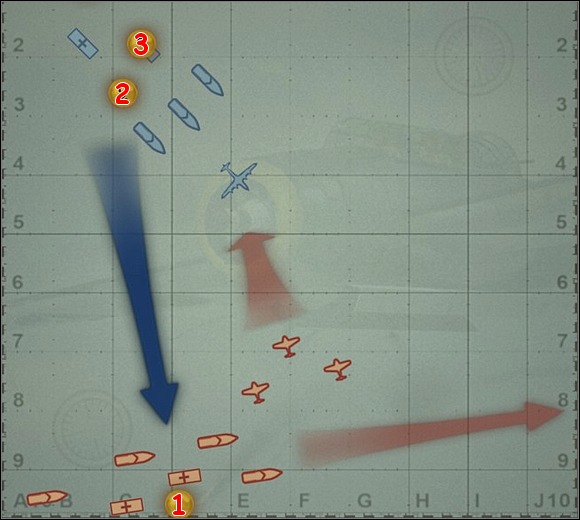
At first - see short intro movie on which Henry talks with his friend, Donald The Pilot. Enjoy this moment because this is the last moment when you see Donald alive. [#1] Enemy air raid breaks this sweet conversation. From two American aircraft carriers only the one, USS "Yorktown" (yours), will survive that sudden strike - "Lex" is going to the bottom. [#2]
![[ 1] - Battle of the Coral Sea - Singleplayer Campaign - Battlestations: Midway - Game Guide and Walkthrough](https://game.lhg100.com/Article/UploadFiles/201512/2015121216484843.jpg) [ 1]
[ 1]![[ 2] - Battle of the Coral Sea - Singleplayer Campaign - Battlestations: Midway - Game Guide and Walkthrough](https://game.lhg100.com/Article/UploadFiles/201512/2015121216484825.jpg) [ 2]
[ 2]
Immediately launch from your carrier three flights (3 planes in each) of "Wildcat" fighters, additionally armed with bombs. Take-off also with one flight of "Avenger" torpedo planes. [#3] That's the max. number of aircrafts that can take-off from your "floating airfield" in that moment. Fighters will take care of enemy planes flying towards your flotilla from south-east and your "Avengers" will try to sink one of Japanese warships you'll find soon on the sea. So send your "Wildcats" south-east to attack Japanese planes. In the air you have also Donald in his aircraft and a recon seaplane PBY Catalina. Order Donald to escort that last aircraft and send both to the south. [#4]
![[3] - Battle of the Coral Sea - Singleplayer Campaign - Battlestations: Midway - Game Guide and Walkthrough](https://game.lhg100.com/Article/UploadFiles/201512/2015121216484871.jpg) [3]
[3]![[4] - Battle of the Coral Sea - Singleplayer Campaign - Battlestations: Midway - Game Guide and Walkthrough](https://game.lhg100.com/Article/UploadFiles/201512/2015121216484840.jpg) [4]
[4]
After a little Donald should see some "Zero" fighters trying to shoot down the "Catalina" - order him to destroy'em all. [#5] Even if he's alone he is a tough guy and should cut a dash. In fact you don't have to worry about him specially because he's doing fine usually and should survive this mission (2). After shooting down "Zeros" you can direct Donald back to help rest of your "Wildcats" - you should see no more "Zeros" on Catalina's tail later. And this seaplane has a task of searching for enemy naval forces which consist of two aircraft carriers, three destroyers and a cruiser. They should be somewhere in this area on south... In the same time rest of your warships should sail south-east, to cut in the course of mentioned Japanese convoy which sails east. For the moment position your destroyers and a cruiser on the right board of the "Yorktown" carrier, in order to shield him against enemy torpedos and defend against enemy planes, if they have managed to break through Wildcats' barrier. You must protect the "Yorktown" from sinking (3) at last. [#6]
![[5] - Battle of the Coral Sea - Singleplayer Campaign - Battlestations: Midway - Game Guide and Walkthrough](https://game.lhg100.com/Article/UploadFiles/201512/2015121216484934.jpg) [5]
[5]![[6] - Battle of the Coral Sea - Singleplayer Campaign - Battlestations: Midway - Game Guide and Walkthrough](https://game.lhg100.com/Article/UploadFiles/201512/2015121216484976.jpg) [6]
[6]
Remember also that it is possible to convert the Japanese planes into meteorites rain (shooting stars) by firing at them from the destroyers and cruiser, using the AA guns. [#7] Your recon plane PBY Catalina flying somewhere over the ocean on the south will quickly find the enemy. However, don't fly with her too close to avoid getting under the Japanese AA fire. [#8]
![[7] - Battle of the Coral Sea - Singleplayer Campaign - Battlestations: Midway - Game Guide and Walkthrough](https://game.lhg100.com/Article/UploadFiles/201512/2015121216484977.jpg) [7]
[7]![[8] - Battle of the Coral Sea - Singleplayer Campaign - Battlestations: Midway - Game Guide and Walkthrough](https://game.lhg100.com/Article/UploadFiles/201512/2015121216484928.jpg) [8]
[8]
Your task now is to defeat the Japanese carriers (1). "Wildcat" fighters - which I proposed to arm with bombs at the beginning - can bombard some enemy ships when not fighting with Japanese aircrafts. [#9] However, don't milk the bull and target only weaker enemy units - the destroyers. You can also sink one of them now with "Avenger" torpedo planes you have launched at the start. [#10] Two torpedos should be enough to send one destroyer to the coral but you can also - if you feel secure - try to sink the cruiser at the head of enemy convoy. I see no sense in attacking the Japanese carrier with torpedos of three "Avengers", because they will naturally damage him, but they can't sink him for sure. And your "Avengers" will have to return to the "Yorktown" to rearm - when they're here again with new torpedos enemy carrier is repaired and whole party starts from the beginning. So better try to sink one of destroyers or cruiser... [You can also crash your "Avengers" into the one of these just torpedoed enemy ships: in effect he will probably sink and additionally you'll be able to immediately launch new planes (already armed) from your carrier, without waiting for the return of these "Avengers" (it takes a long time). You can as well (also fully tested with a good effect) send in the beginning of a mission one squadron of "Avengers" (4-5 planes) to the south with a task of sinking the cruiser and then take care of Japanese destroyers by attacking them one after one with already only a flight of torpedo planes (3 aircrafts). The disadvantage of this last method is that you have initially small number of fighters in the air and you have to bustle when shooting enemy planes down, you must destroy them even from the decks of your warships when Japanese planes have managed to get dangerously close to the "Yorktown".]
![[9] - Battle of the Coral Sea - Singleplayer Campaign - Battlestations: Midway - Game Guide and Walkthrough](https://game.lhg100.com/Article/UploadFiles/201512/2015121216484973.jpg) [9]
[9]![[10] - Battle of the Coral Sea - Singleplayer Campaign - Battlestations: Midway - Game Guide and Walkthrough](https://game.lhg100.com/Article/UploadFiles/201512/2015121216484914.jpg) [10]
[10]
When you're close to the enemy with your small flotilla you can leave the "Yorktown" behind you and send both destroyers and a cruiser towards the enemy forces in order to destroy them. Let's hope that Japanese warships are sick & tired of your aerial attacks... Strike at enemy cruiser with your ship of similar type, attack with your destroyers adequate enemy units. [#11] Remember to order your destroyers to use their torpedos at free will. This should be one-on-one fight (or maybe you have even outnumbered the enemy) so the Americans should win it. Watch out for Japanese torpedos launched by destroyers, mistreat these warships using same weapon. [#12]
![[11] - Battle of the Coral Sea - Singleplayer Campaign - Battlestations: Midway - Game Guide and Walkthrough](https://game.lhg100.com/Article/UploadFiles/201512/2015121216484981.jpg) [11]
[11]![[12] - Battle of the Coral Sea - Singleplayer Campaign - Battlestations: Midway - Game Guide and Walkthrough](https://game.lhg100.com/Article/UploadFiles/201512/2015121216484961.jpg) [12]
[12]
Sink the enemy cruiser with couple of accurate artillery volleys of yours. [#13] When all units escorting the Japanese carriers have been destroyed you can finally deal with these "floating airfields". Use all you've got - artillery, torpedos, you can sand here more planes with their bombs, etc. [#14]
![[13] - Battle of the Coral Sea - Singleplayer Campaign - Battlestations: Midway - Game Guide and Walkthrough](https://game.lhg100.com/Article/UploadFiles/201512/2015121216484919.jpg) [13][14]
[13][14]
However, in this scenario you can only damage enemy carriers, because when one of them is heavily damaged... mission ends successfully (although, the enemy isn't sinking). [#15] Well, this isn't a full success, though, because on the outro movie you see also the death of Donald, which will be killed on Yorktown's flight deck in consequence of one more enemy air raid. [#16]
![[15] - Battle of the Coral Sea - Singleplayer Campaign - Battlestations: Midway - Game Guide and Walkthrough](https://game.lhg100.com/Article/UploadFiles/201512/2015121216485002.jpg) [15]
[15]![[16] - Battle of the Coral Sea - Singleplayer Campaign - Battlestations: Midway - Game Guide and Walkthrough](https://game.lhg100.com/Article/UploadFiles/201512/2015121216485079.jpg) [16]
[16]
[And to the end I left the best - this scenario can be finished in about 5 minutes. How? Just take-off from your carrier (in the beginning of a mission) with a squadron of "Avenger" torpedo planes (5 aircrafts) and head south to attack one of the Japanese "floating airfields". Simultaneously Donald in his fighter takes out "Zeros" in order to not let them shoot down your "Avengers" flying by. When your torpedo planes are close to the target they all attack one enemy carrier (after releasing the torpedo each of them can additionally crash into the enemy). And... voila - enemy carrier becomes heavily damaged, a message telling you that the Japanese are withdrawing appears on your screen and scenario ends successfully. But you have more fun when you play this mission normally, right?]
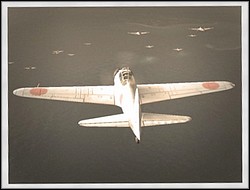
Units at your disposal: two airfields, the shipyard, fighters, torpedo planes, dive bombers, level bombers B-17, seaplanes Catalina, two patrol boats, later - aircraft carrier with his planes and two destroyers
Enemy: two aircraft carriers, 5 destroyers, 4 cargo ships, landing boats, fighters, torpedo planes and bombers
Level of difficulty: 5
Primary objectives:
Hidden objective:
Potential medals to earn:

Recon seaplane Catalina will detect many Japanese aircrafts heading towards the Midway from north-west. [#1] Your first task after starting the game will be to repel this enemy air raid (1) pointed against your shipyard and both airfields situated on the island. Immediately switch to first of these airfields and take-off with 4 flights (3 planes in each) of fighters armed already with bombs. When they're in the air direct them against incoming enemy aircrafts. [#2] Try to intercept them as far from your installations on Midway as you can.
![[ 1] - Turning Point at Midway - Singleplayer Campaign - Battlestations: Midway - Game Guide and Walkthrough](https://game.lhg100.com/Article/UploadFiles/201512/2015121216485088.jpg) [ 1]
[ 1]![[ 2] - Turning Point at Midway - Singleplayer Campaign - Battlestations: Midway - Game Guide and Walkthrough](https://game.lhg100.com/Article/UploadFiles/201512/2015121216485074.jpg) [ 2]
[ 2]
On 2nd airfield only level bombers B-17s are stationing - also order them to take-off in case of enemy airplanes have managed to bombard this airfield, because your bombers won't start off from the destroyed airstrip of course and it's better to have them in the air already. [#3] Send B-17s south-west at first, in the direction of point (2), where you later (after repelling the enemy air raid) see Japanese transport ships. You can wait there for those cargo ships with your B-17s level bombers, but I'd suggest to direct them further to the north, because in the location marked on my map with (3) you will find soon more important targets, I think - namely: the Japanese aircraft carriers. You're taking roundabout way (route) to keep at a distance from enemy planes, especially "Zero" fighters. You can eventually escort your bombers with a flight of "Wildcats" (choose such an incomplete one). Simultaneously, right at the beginning of a mission, you should switch to the shipyard and launch two Elco-class patrol boats. Send both south-west from the island, to the (2) location, with a task of preparing a warm welcome ceremony for enemy transport ships you'll see there in the latter phase of a gameplay. Of course your fighters shoot down all the time the Japanese planes approaching over the island. Don't pursue the enemy which has managed to drop his bombs, better concentrate on these enemies that are approaching in a given moment and still have their deadly cargo, because they can damage your airfield yet. [#4]
![[3] - Turning Point at Midway - Singleplayer Campaign - Battlestations: Midway - Game Guide and Walkthrough](https://game.lhg100.com/Article/UploadFiles/201512/2015121216485030.jpg) [3]
[3]![[4] - Turning Point at Midway - Singleplayer Campaign - Battlestations: Midway - Game Guide and Walkthrough](https://game.lhg100.com/Article/UploadFiles/201512/2015121216485073.jpg) [4]
[4]
Finally you'll repel this first air strike. However, after a moment you'll see this long-awaited Japanese cargo ships convoy, heading to the island from south-west direction. This convoy consists of few transport ships in the escort of two destroyers. Your next task is to sink the Japanese transport ships (2), all of them. [#5] If you have followed my instructions then two your PT boats of Elco-type already wait for these Japanese. Try to send to the bottom these two destroyers first, by sailing as close as possible to them and launching two torpedos at the boards of each of them. This could be a challenge for you because of heavy AA fire of enemy ships defending themselves, but believe me: this task is doable. Fire rest of your torpedos into the boards (sides) of cargo ships - two torpedos should sink each of these ships. [#6]
![[5] - Turning Point at Midway - Singleplayer Campaign - Battlestations: Midway - Game Guide and Walkthrough](https://game.lhg100.com/Article/UploadFiles/201512/2015121216485043.jpg) [5]
[5]![[6] - Turning Point at Midway - Singleplayer Campaign - Battlestations: Midway - Game Guide and Walkthrough](https://game.lhg100.com/Article/UploadFiles/201512/2015121216485060.jpg) [6]
[6]
However, if your PT boats screwed up their job, you can also attack enemy ships with your "Wildcat" fighters armed additionally with bombs - use bombs against destroyers, though, because cargo ships can be destroyed even with machineguns fire (strafe their decks). Or, if the shipyard still functions, you can possibly send here two Catalina seaplanes with torpedos to finish off these enemy destroyers. Destroy all transport ships (2) using the "Wildcats", as I mentioned, and their machineguns or bombs, if you still have some. When diving towards the target and shooting at him, decrease your airspeed and try to stay as long as possible over him, because now you need many bullets to sink him - these aren't such a weak cargo ships as you've played against earlier. In some moment the Japanese transports will start launching small landing boats fully loaded with troops wishing to get to the island of Midway. Quickly destroy these boats strafing them with your "Wildcats" (if you still have patrol boats they are also good in burning these enemy units), but remember that the boats appear until you sink mother-ships, I mean transports. [#7] So focus on cargo ships. After sending to the bottom all Japanese ships in this area (2) you will see next enemy in place marked with (3) on my map: two aircraft carriers escorted by three destroyers. These forces also sail towards your Midway. [#8]
![[7] - Turning Point at Midway - Singleplayer Campaign - Battlestations: Midway - Game Guide and Walkthrough](https://game.lhg100.com/Article/UploadFiles/201512/2015121216485103.jpg) [7]
[7]![[8] - Turning Point at Midway - Singleplayer Campaign - Battlestations: Midway - Game Guide and Walkthrough](https://game.lhg100.com/Article/UploadFiles/201512/2015121216485163.jpg) [8]
[8]
You must localize and destroy this Japanese flotilla (3) as if, but you should already have B-17s bombers flying over these enemy warships. You've sent these bombers here earlier, remember? So use them now and bombard enemy carriers by attacking them in their longitudinal axis. Probably it's best to concentrate only on one of "floating airfields": three flights of B-17s (max. number of these aircrafts in the air in one moment) can sink one carrier (if they'll manage to hit it with their bombs). And, in consequence of their bombardment, you will have to face smaller numbers of enemy planes later. [#9] I'm really not sure if these three flights of B-17 can sink both carriers at once... You should also assemble in this area your fighters launched from the airfield on Midway to shoot down at the earliest all enemy aircrafts taking off from the carriers and heading towards the island again. At the same time you'll also see an American aircraft carrier USS "Yorktown" (in company of two destroyers), entering the map in its north-east corner. [#10] Thereupon the Japanese will send towards the American flotilla their own planes launched from the carriers (or the only one now ;-). You must be conscious that "Yorktown" must survive this battle (4).
![[9] - Turning Point at Midway - Singleplayer Campaign - Battlestations: Midway - Game Guide and Walkthrough](https://game.lhg100.com/Article/UploadFiles/201512/2015121216485155.jpg) [9]
[9]![[10] - Turning Point at Midway - Singleplayer Campaign - Battlestations: Midway - Game Guide and Walkthrough](https://game.lhg100.com/Article/UploadFiles/201512/2015121216485196.jpg) [10]
[10]
Switch to him immediately and take-off from his flight deck with three flights of "Wildcat" fighters armed with bombs. Direct them to the fight with enemy planes - together with your other aircrafts from Midway island. Simultaneously send the trio of "Avenger" torpedo planes towards the enemy destroyers escorting the Japanese carrier/s. Check if you can send similar trio from the airfield located on the island. Attack with them enemy destroyers (or one of them - depends on how many torpedo bombers you have in the air). Guide also your own destroyers (from the escort of "Yorktown") south-west with a task of engaging the enemy warships. The "Yorktown" himself can slightly change his course to the left (but stick to south-west direction all the time) to cut in the course of enemy flotilla trying to circumnavigate the Midway from south. [#11] Try to sink one after one all Japanese destroyers escorting the carrier/s with your "Avengers" sent off from time to time and their torpedos. Maybe before your own warships will get to this area these Japanese will be kissing the bottom of an ocean since a long time. [#12] But even if they still stand on their foots when you're there with your destroyers, they shouldn't present a problem and danger, weakened by your aerial attacks. However, remember to not send to many "Avengers" against the enemy destroyers because you should have a great number of fighters in the air all the time: 2 flights of torpedo planes (3 aircrafts in each flight) it's good idea for now, it's enough.
![[11] - Turning Point at Midway - Singleplayer Campaign - Battlestations: Midway - Game Guide and Walkthrough](https://game.lhg100.com/Article/UploadFiles/201512/2015121216485178.jpg) [11]
[11]![[12] - Turning Point at Midway - Singleplayer Campaign - Battlestations: Midway - Game Guide and Walkthrough](https://game.lhg100.com/Article/UploadFiles/201512/2015121216485199.jpg) [12]
[12]
When your own destroyers have managed to reach the Japanese carriers finally you only have to finish the mission by sinking the enemy (3). Fire at him a salvo of torpedos, shell him with arty. [#13] Now you can also send here more "Avengers" armed with torpedos (a squadron or two, 5 planes in each) to finish off the job. Unfortunately the "Yorktown" will be attacked and heavily damaged by the enemy once again (you can't prevent that aggression), then scenario will end. [#14]
![[13] - Turning Point at Midway - Singleplayer Campaign - Battlestations: Midway - Game Guide and Walkthrough](https://game.lhg100.com/Article/UploadFiles/201512/2015121216485117.jpg) [13]
[13]![[14] - Turning Point at Midway - Singleplayer Campaign - Battlestations: Midway - Game Guide and Walkthrough](https://game.lhg100.com/Article/UploadFiles/201512/2015121216485119.jpg) [14]
[14]
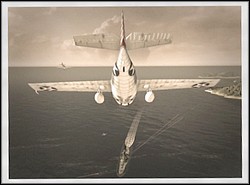
Units at your disposal: two aircraft carriers, cruiser, two destroyers, fighters, torpedo planes, bombers, two seaplanes Catalina
Enemy: 2 aircraft carriers, fighters, torpedo planes, bombers, 3 seaplanes, 2 submarines, 2 destroyers, 3 cruisers
Level of difficulty: 4 (5 with hidden objectives)
Primary objectives:
Secondary objectives:
Hidden objectives:
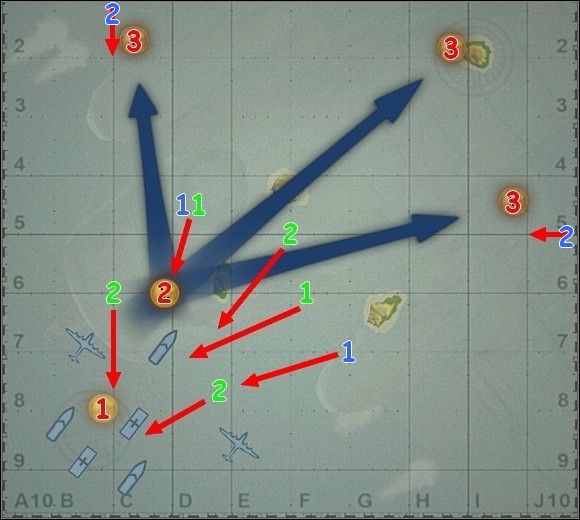
Now it's time to play a decisive battle. On one side your forces which consist of two aircraft carriers (USS "Enterprise" and USS "Hornet" wit their planes) plus a cruiser and two destroyers as an escort. [#1] On the other side - similar Japanese forces. [#2]
![[ 1] - Endgame at Midway - Singleplayer Campaign - Battlestations: Midway - Game Guide and Walkthrough](https://game.lhg100.com/Article/UploadFiles/201512/2015121216485211.jpg) [ 1]
[ 1]![[ 2] - Endgame at Midway - Singleplayer Campaign - Battlestations: Midway - Game Guide and Walkthrough](https://game.lhg100.com/Article/UploadFiles/201512/2015121216485287.jpg) [ 2]
[ 2]
When you switch to the tactical map you'll see two enemy cruisers heading in your direction and a few aircrafts circling over these warships. So, take-off from both carriers you have at your disposal with suitable reactionary forces, I mean - with fighters. But don't launch too many of them yet, leave yourself an opportunity to start off with a squadron (or at least a flight) of "Avenger" torpedo planes later. Assign some small fighter escort to both Catalina seaplanes that are circling over your own warships (two fighters per Catalina should be enough). There is no danger lying in wait for you in the air for the moment, so attack straight off with a mentioned "Avengers" closest enemy cruiser - this one heading from the north. You can also send to the fight your warship of similar class. [#3] At the same time your destroyers will detect the presence of the Japanese submarines (submerged) - at first they'll find one sailing from one of possible directions: north or north-east. Order them to attack this sub with their depth charges. [#4] One of your Catalina seaplanes can also hit this enemy. Later on sink in a similar way another submarine (2) hiding near the closest island to complete 2nd of secondary objectives.
![[3] - Endgame at Midway - Singleplayer Campaign - Battlestations: Midway - Game Guide and Walkthrough](https://game.lhg100.com/Article/UploadFiles/201512/2015121216485240.jpg) [3]
[3]![[4] - Endgame at Midway - Singleplayer Campaign - Battlestations: Midway - Game Guide and Walkthrough](https://game.lhg100.com/Article/UploadFiles/201512/2015121216485227.jpg) [4]
[4]
Shoot down also enemy seaplane (1) flying around the Japanese cruiser with one of your fighter squadrons/flights, then another one which will most likely approach from north-east. This way you'll realize first of hidden objectives (these Japanese seaplanes most surely report the enemy your position). [#5] First of mentioned earlier Japanese cruisers should be sunk without any problems by your torpedo planes, before you will even get close to him with your cruiser. [#6] Similarly deal with 2nd cruiser approaching from north-east and you will complete 1st of secondary objectives i.e. to destroy the patrolling Japanese cruisers (1).
![[5] - Endgame at Midway - Singleplayer Campaign - Battlestations: Midway - Game Guide and Walkthrough](https://game.lhg100.com/Article/UploadFiles/201512/2015121216485209.jpg) [5]
[5]![[6] - Endgame at Midway - Singleplayer Campaign - Battlestations: Midway - Game Guide and Walkthrough](https://game.lhg100.com/Article/UploadFiles/201512/2015121216485245.jpg) [6]
[6]
Meanwhile your seaplanes with their little escorts should patrol aerial area over the nearby islands (and the ocean generally) and search for two Japanese aircraft carriers (2) hiding somewhere around the places marked on my map with (3). Enemy carriers can be found in one of these places - in my games they were usually on east, I've also founded them once on north-west. When you will find out finally where they are in your game, send between them and your own aircraft carriers rest of your warships and fighter planes. The warships will have a task of shooting down enemy planes flying over them and shielding the "big guys" (your carriers) against the Japanese torpedos released by these planes. And your fighters must simply destroy enemy aircrafts before they'll get close to your "floating airfields" because at least one of American carriers has to survive the encounter (1). [#7] Oh, and you can hide your carriers behind the islands to make an attack even more difficult for enemy torpedo planes - they will have to perform additional turns in order to accurately strike your carriers' boards with their torpedos. [#8]
[7]![[8] - Endgame at Midway - Singleplayer Campaign - Battlestations: Midway - Game Guide and Walkthrough](https://game.lhg100.com/Article/UploadFiles/201512/2015121216485216.jpg) [8]
[8]
As you suspect, your task now is to destroy the Japanese carriers (3). But - in the first instance - systematically send pairs or trios of torpedo "Avengers" to sink enemy destroyers. [#9] Use the whole (full) squadron (5 planes) against the Japanese cruiser. When all warships escorting the carriers are heading to the bottom it's time to attack these "floating airfields" with own cruiser and destroyers, while your fighters still shoot down enemy planes (systematically send them some reinforcements when they're taking losses). [#10]
![[9] - Endgame at Midway - Singleplayer Campaign - Battlestations: Midway - Game Guide and Walkthrough](https://game.lhg100.com/Article/UploadFiles/201512/2015121216485371.jpg) [9]
[9]![[10] - Endgame at Midway - Singleplayer Campaign - Battlestations: Midway - Game Guide and Walkthrough](https://game.lhg100.com/Article/UploadFiles/201512/2015121216485338.jpg) [10]
[10]
Your warships shouldn't have problems with Japanese carriers. Mistreat the enemy with your torpedos, fire also a few artillery salvos. Although you'll see enemy reinforcements (two cruisers and two destroyers) entering the map somewhere near the Japanese carriers (red arrow close to (3) on my map) you don't have to worry about them because... at this moment mission should end successfully. That's because Japanese aircraft carriers are sinking. [#11]
[However, if you want to realize 2nd of hidden objectives you must destroy these mentioned Japanese reinforcements (2) before you'll send to the coral enemy carriers. How to do this? Similarly as you did it earlier with Japanese warships escorting the "floating airfields" - engage the reinforcements with your torpedo planes at first: attack each of cruisers with the whole squadron of "Avengers", send a pair or triplet of these planes against every destroyer). Then kill'em off with your own warships. [#12]]
![[11] - Endgame at Midway - Singleplayer Campaign - Battlestations: Midway - Game Guide and Walkthrough](https://game.lhg100.com/Article/UploadFiles/201512/2015121216485358.jpg) [11]
[11]![[12] - Endgame at Midway - Singleplayer Campaign - Battlestations: Midway - Game Guide and Walkthrough](https://game.lhg100.com/Article/UploadFiles/201512/2015121216485305.jpg) [12]
[12]
![[13] - Endgame at Midway - Singleplayer Campaign - Battlestations: Midway - Game Guide and Walkthrough](https://game.lhg100.com/Article/UploadFiles/201512/2015121216485340.jpg) [13]
[13]The singleplayer campaign of this game is now finished. Well, almost. You should only view the outro movie and our main character, Henry Walker, paying the last honors to the fallen heroes. [#13] And now... let's play challenge missions!
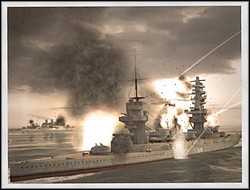
Units at your disposal: Japanese battleships "Fuso" and "Yamashiro"
Enemy: 14 destroyers, 2 cruisers, American battleship of New York-class, British battleships "Repulse" and "Prince of Wales"
Level of difficulty: 4 (5 with hidden objective)
Primary objectives:
Secondary objective:
Hidden objective:
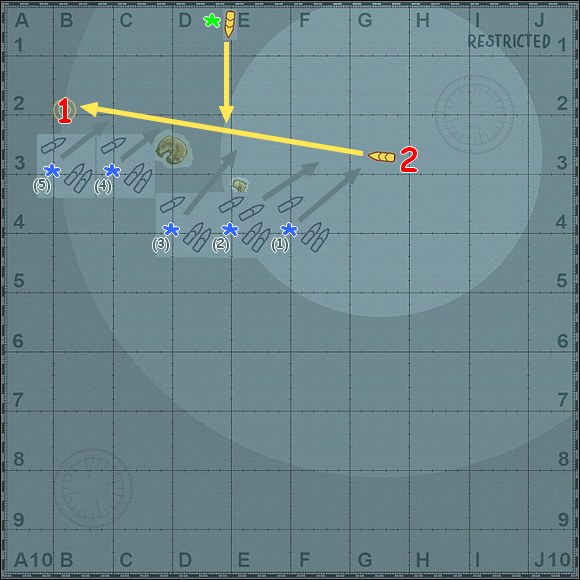
Your main goal in this scenario is to reach the evac point to escape the area (1). You're retreating with a powerful Japanese battleship "Fuso". [#1] Of course "Fuso" must survive (2) the incoming battle if you want to escape successfully. Switch to the map with Tab key and right-click the evac point (1) to set the course for your warship. During the journey you will have to repel successive groups of enemy warships of course. How many these groups you'll see depends probably on how fast you destroy each of them and how fast you sail. In my gameplay I had to face to five groups, they all attacked me from left board. [#2] 1st group consists of three destroyers, 2nd - four destroyers. In 3rd I saw three warships (two of them were heavy cruisers) and in 4th - also three ships (one of them was an American battleship of New York-class). The last group consists of three warships but two of them are British battleships "Prince of Wales" and "Repulse". Groups of these warships are marked on my map with numbers 1-5 in brackets and they all don't attack you simultaneously of course but... well - almost: they appear on map systematically when you're closing to the evac point. I have more problems not with the battleships, as you probably thought, but with small, agile and fast enemy destroyers armed with torpedos. Shell'em using your artillery (deck guns), take an adjustment "at a guess" on their movement while aiming.
![[1] - Strike on the Monster - Ship Challenges - Battlestations: Midway - Game Guide and Walkthrough](https://game.lhg100.com/Article/UploadFiles/201512/2015121216485304.jpg) [1]
[1]![[2] - Strike on the Monster - Ship Challenges - Battlestations: Midway - Game Guide and Walkthrough](https://game.lhg100.com/Article/UploadFiles/201512/2015121216485332.jpg) [2]
[2]
You can also switch to the map from time to time and assign targets on it by right-clicking them to order your warship attack them automatically. But pay attention that your deck guns fire automatically only when you're in map view - after exiting the map you must fire by yourself unfortunately.
Update: you say that the ship will only auto fire when you are in map mode, but if you want to let it target distant targets while you take the helm to dodge torpedos, you can just switch to your AA guns, and the ship will keep firing artillery.
(submitted by: sona1111)
On this map, when it's gully zoomed in, you can also see the torpedos launched by enemy destroyers. Try to avoid these torpedos by taking evasive actions - slow down, speed up, sometimes even stop if necessary or make a turn: every manoeuvre depends on situation. [#3] It's smart also to turn your bow towards the incoming salvo of torpedos when you have no chances to avoid it to get hit only by one or two torpedos instead of the whole salvo. Though, from time to time you will get hit by a torpedo surely and at the edge of the screen you'll see blinking red icon that means usually that you must deal with water leak, one or more. [#4]
![[3] - Strike on the Monster - Ship Challenges - Battlestations: Midway - Game Guide and Walkthrough](https://game.lhg100.com/Article/UploadFiles/201512/2015121216485484.jpg) [3]
[3]![[4] - Strike on the Monster - Ship Challenges - Battlestations: Midway - Game Guide and Walkthrough](https://game.lhg100.com/Article/UploadFiles/201512/2015121216485432.jpg) [4]
[4]
At that time quickly switch to repair's panel and send emergency team (or more than one) to suitable location(s). Take a look at "Hints" chapter of this guide to learn about ship's damages and how to deal with them. [#5] If you're shooting at enemy personally (in external vie) it's wise to use binoculars and zoom in the view (mouse wheel) to fire at enemy warships from a max. possible range, before the enemy can even get closer to you and open his fire. This note refers especially to the Allied cruisers and later - also battleships. [#6]
![[5] - Strike on the Monster - Ship Challenges - Battlestations: Midway - Game Guide and Walkthrough](https://game.lhg100.com/Article/UploadFiles/201512/2015121216485482.jpg) [5]
[5]![[6] - Strike on the Monster - Ship Challenges - Battlestations: Midway - Game Guide and Walkthrough](https://game.lhg100.com/Article/UploadFiles/201512/2015121216485488.jpg) [6]
[6]
Half-way to the evac point (1) will join you another Japanese battleship ("Yamashiro") sailing from the north. If you want to realize secondary objective the "Yamashiro" also must not sink (*). Take a look at him in external view and right-click him to place him in formation with your warship. [#7] Sinking enemy warships (also battleships) approaching from left board should be much easier since you're together. Destroy New York-class battleship at first by firing at him from a max. distance (use binoculars and zoom in the view). Take an adjustment on his movement, not big because he's rather slow. [#8]
![[7] - Strike on the Monster - Ship Challenges - Battlestations: Midway - Game Guide and Walkthrough](https://game.lhg100.com/Article/UploadFiles/201512/2015121216485444.jpg) [7]
[7]![[8] - Strike on the Monster - Ship Challenges - Battlestations: Midway - Game Guide and Walkthrough](https://game.lhg100.com/Article/UploadFiles/201512/2015121216485446.jpg) [8]
[8]
Prepare similar fate for British battleships "Prince of Wales" and "Repulse" - they can try to attack you from both directions. [#9] By sending to the bottom both of them and also all other enemy ships that attacked you in waves you'll complete hidden mission objective (*). At that moment (when all Allied ships are destroyed or you've managed to reach the evac point) this scenario should end successfully. [#10]
![[9] - Strike on the Monster - Ship Challenges - Battlestations: Midway - Game Guide and Walkthrough](https://game.lhg100.com/Article/UploadFiles/201512/2015121216485487.jpg) [9]
[9]![[10] - Strike on the Monster - Ship Challenges - Battlestations: Midway - Game Guide and Walkthrough](https://game.lhg100.com/Article/UploadFiles/201512/2015121216485492.jpg) [10]
[10]
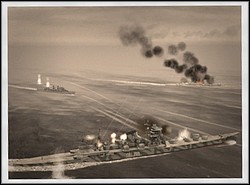
Units at your disposal: two Japanese destroyers, "Nachi" cruiser
Enemy: a few (exactly 5) groups (flotillas) of American warships; each of them always consists of two destroyers and a cruiser (in first three flotillas - light cruiser)
Level of difficulty: 6
Primary objectives:
Potential medals to earn:
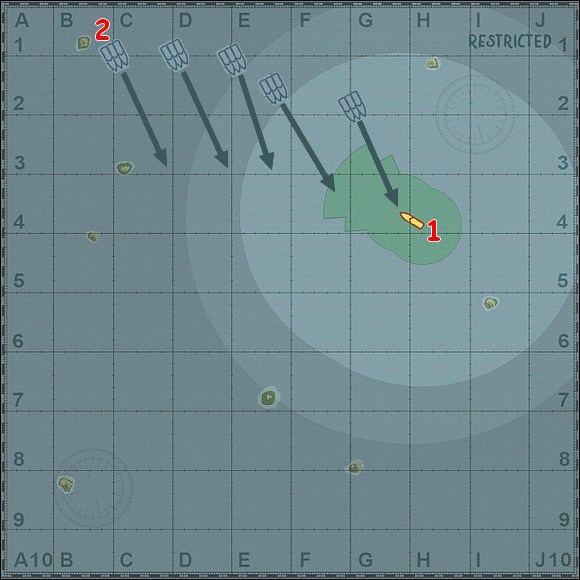
This is a pretty difficult scenario in which your small forces (a cruiser and two destroyers) are again attacked by a few enemy flotillas approaching one after one from the north. You have to face to five these groups of enemy warships. Each consists of three units: two destroyers and a cruiser (so has a composition similar to yours). But in first three flotillas you'll see light cruisers, when in last two - heavy versions of this warships. Your main task in this mission is to send to the bottom an American cruiser USS "Houston" (2), which sails in the last enemy flotilla. Of course your own warship, the "Nachi" cruiser, must not sink (1), if you want to successfully finish this scenario. Just after starting the game order your units to use their torpedos at free will by pressing the Alt key and choosing a suitable option. [#1] A moment later starts the battle. I have invented in my gameplay a tactic of escaping, which demands from a player a pretty big dose of patience and an accurate eye. This tactic consists in turning round to the left with all my warships (sailing in a row formation with the "Nachi" cruiser) and retreating to the south-west just after I'll see first enemy units. My destroyers sail in front of the "Nachi" cruiser and slightly to his left board (side) so they keep themselves farther from the enemy. Thus the "Nachi", which deck guns have the biggest range, will open the fire at the pursuing enemy as first. And the opponent pursues us by sending forward his two pretty fast destroyers at first- his cruiser lags behind. Just the thing! But you must remember (when also using this tactic) about sailing with a slightly obliquely course (as you see on picture [#2]) to let all of your deck guns see the target and fire at him. This is generally the tactic against all enemy groups of warships - to escape from them with a slightly obliquely course. [#2] You can make one innovation (introduce small variation) by following the "Nachi" with your destroyers, so they will open fire as first. However, I was trying to protect them/save them from destroying to have them at my side as long as possible (they're useful).
![[1] - Battle of the Java Sea - Ship Challenges - Battlestations: Midway - Game Guide and Walkthrough](https://game.lhg100.com/Article/UploadFiles/201512/2015121216485528.jpg) [1]
[1]![[2] - Battle of the Java Sea - Ship Challenges - Battlestations: Midway - Game Guide and Walkthrough](https://game.lhg100.com/Article/UploadFiles/201512/2015121216485525.jpg) [2]
[2]
We're switching to deck guns (artillery) when sailing, zooming in the view with binoculars and start shooting at fast enemy destroyers just when they're entering our range (so we're already firing at them from a max. possible distance). Usually you must aim slightly below the enemy unit's silhouette. Our accurate artillery salvo is often very effective and causes an explosion of ammunition on enemy warship, then sends him to the coral in consequence of this last event. [#3] But if you're not a good shooter and the enemy units have managed to get dangerously close to you, they should also enter in the firing range of your destroyers. This way you're taking down first enemy destroyer and a moment later - 2nd. When American cruiser lagging behind them finally stays alone, you can sink him pretty quickly by attacking him with all three your warships now. Then return to the row formation and once again escape from the next enemy flotilla of warships entering the scene (map) from north, simultaneously sending to the bottom all these units one after another. Till you'll see the USS "Houston" in a company of two destroyers (the last, 5th group of enemies). But don't change your tactic even now and sink his destroyers' escort at first. Then you'll only have to destroy this lonely American cruiser (2). [#4]
![[3] - Battle of the Java Sea - Ship Challenges - Battlestations: Midway - Game Guide and Walkthrough](https://game.lhg100.com/Article/UploadFiles/201512/2015121216485514.jpg) [3]
[3]![[4] - Battle of the Java Sea - Ship Challenges - Battlestations: Midway - Game Guide and Walkthrough](https://game.lhg100.com/Article/UploadFiles/201512/2015121216485588.jpg) [4]
[4]
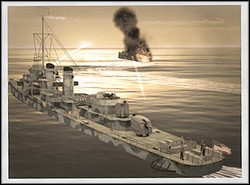
Units at your disposal: 3 American destroyers
Enemy: 4 Japanese destroyers, 2 light cruisers and a heavy one
Level of difficulty: 4 (5 with hidden objectives)
Primary objectives:
Secondary objective:
Hidden objectives:
Potential medals to earn:
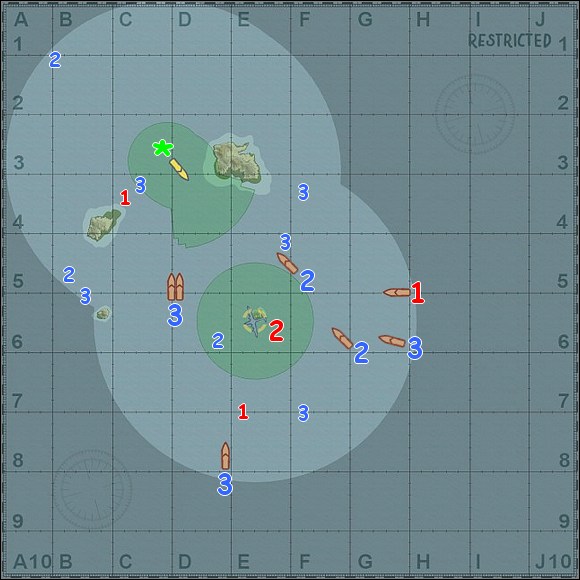
This time you will hunt for the Japanese cruiser "Nachi" you have played him in previous mission. First, you must find and destroy the "Nachi" (1). Each time you play this scenario the game places the "Nachi" on the ocean randomly, as all other enemy warships. Thus I've marked with a ship icon and a big, red 1 one of Nachi's positions (where I spot him in that particular game), while with smaller, red 1s - other potential locations where you can find him playing this scenario several times. I did similar with rest of enemy warships - cruisers (big and small blue 2s) and destroyers (big and small blue 3s). Just after starting the game, but before you'll begin the hunt for Japanese cruiser, you should proceed with all your three American destroyers in the direction of small island located south-east, with an intention to RV (meet) with the reconnaissance seaplane Catalina (2). Then (when you're close to the island) this plane will take-off and start circling over the ocean to help you find the "Nachi". Ok, let's move then. [#1] It's good to order (at the start of a mission) all of your warships to use their torpedos at free will. You'll quickly see some enemy units sailing towards you (at first two destroyers probably). It's a wise idea to attack every enemy warship in this scenario with all your own destroyers simultaneously - this hint refers especially to the Japanese cruisers. Primo: you have an advantage when fighting with rest of your units at your side (together). And second: when acting like this you have greater chances that all of your destroyers will survive the battle (*). That's because when you're focusing the fire of all your units only on one target you're eliminating him pretty quickly and he has no time to hurt you, no time to inflict greater damages to your ships. [#2] However, the realisation of this secondary objective isn't necessary to successfully complete this mission.
![[1] - Hunt for the Cruiser - Ship Challenges - Battlestations: Midway - Game Guide and Walkthrough](https://game.lhg100.com/Article/UploadFiles/201512/2015121216485536.jpg) [1]
[1]![[2] - Hunt for the Cruiser - Ship Challenges - Battlestations: Midway - Game Guide and Walkthrough](https://game.lhg100.com/Article/UploadFiles/201512/2015121216485596.jpg) [2]
[2]
And, of course, you should open fire from a max. possible distance, helping yourself with the binoculars and zooming in the view. [#3] It's good to shell with arty and torpedo from both sides (boards) enemy light cruisers, by - so to say - encircling them. [#4] It seems that in this game our deadly torpedos are equipped with friendly-foe recognition system, so they can't hurt you even if they missed the enemy warship and now are heading right in your direction - they should explode earlier, before they'll hit you...
![[3] - Hunt for the Cruiser - Ship Challenges - Battlestations: Midway - Game Guide and Walkthrough](https://game.lhg100.com/Article/UploadFiles/201512/2015121216485571.jpg) [3]
[3]![[4] - Hunt for the Cruiser - Ship Challenges - Battlestations: Midway - Game Guide and Walkthrough](https://game.lhg100.com/Article/UploadFiles/201512/2015121216485655.jpg) [4]
[4]
You can also - when you're heavily damaged - shield yourself from the side enemy is attacking you with one of friendly units and prey that the opponent will concentrate his attention on nearest target, giving you time for necessary repairs. [#5] In this mission you must watch out very much for enemy torpedos, I mean to look often at the map (fully zoomed in) and take evasive actions when you see torpedos coming in your direction. [#6] However, if you're out of luck and you were hit by anything (torpedo or artillery round) immediately switch to repair's panel and quickly fix the damages.
![[5] - Hunt for the Cruiser - Ship Challenges - Battlestations: Midway - Game Guide and Walkthrough](https://game.lhg100.com/Article/UploadFiles/201512/2015121216485672.jpg) [5]
[5]![[6] - Hunt for the Cruiser - Ship Challenges - Battlestations: Midway - Game Guide and Walkthrough](https://game.lhg100.com/Article/UploadFiles/201512/2015121216485644.jpg) [6]
[6]
When you have finally reached the island where you should meet with the reconnaissance plane (2), this aircraft will take-off, then start circling in the air and pretty fast indicating you the position of the "Nachi" Japanese cruiser. Unfortunately you can't give orders or control this seaplane. [#7] To destroy the "Nachi" (1) it's best to engage him simultaneously with all of your destroyers - as you did earlier with other enemy warships. [#8]
![[7] - Hunt for the Cruiser - Ship Challenges - Battlestations: Midway - Game Guide and Walkthrough](https://game.lhg100.com/Article/UploadFiles/201512/2015121216485686.jpg) [7]
[7]![[8] - Hunt for the Cruiser - Ship Challenges - Battlestations: Midway - Game Guide and Walkthrough](https://game.lhg100.com/Article/UploadFiles/201512/2015121216485653.jpg) [8]
[8]
Launch at him all the torpedos you still have. [#9] Open fire at him from every operational deck gun. If the enemy has sunk one of your destroyers you should have a possibility to switch to another and continue the fight. Finally your opponent will sink. [#10] If you have managed to destroy all Japanese warships (1), including the cruisers (2) and destroyers (3) you have also completed all hidden objectives of this scenario.
![[9] - Hunt for the Cruiser - Ship Challenges - Battlestations: Midway - Game Guide and Walkthrough](https://game.lhg100.com/Article/UploadFiles/201512/2015121216485632.jpg) [9]
[9]![[10] - Hunt for the Cruiser - Ship Challenges - Battlestations: Midway - Game Guide and Walkthrough](https://game.lhg100.com/Article/UploadFiles/201512/2015121216485646.jpg) [10]
[10]

Units at your disposal: Japanese battleship "Yamato", light cruiser, two destroyers
Enemy: cruisers, destroyers, submarines, two aircraft carriers, torpedo planes & bombers
Level of difficulty: 4
Primary objectives:
Potential medals to earn:
In this scenario you will have under your command a real beast - Japanese battleship "Yamato". [#1] Except him you'll also control a light cruiser and two destroyers. Don't delay and sail straight to the north, order "full speed ahead". When you switch to the map you'll see American forces consist of a cruiser and four destroyers heading in your direction. Attack enemy cruiser USS "Houston" with your warship of adequate class and with own "Yamato" battleship. Both your destroyers can take care of American warships of similar type for the moment. [#2]
![[1] - Might of Yamato - Ship Challenges - Battlestations: Midway - Game Guide and Walkthrough](https://game.lhg100.com/Article/UploadFiles/201512/2015121216485748.jpg) [1]
[1]![[2] - Might of Yamato - Ship Challenges - Battlestations: Midway - Game Guide and Walkthrough](https://game.lhg100.com/Article/UploadFiles/201512/2015121216485724.jpg) [2]
[2]
Avoid the torpedos launched by enemy flotilla - you should know exactly how to do this, at last this is not the first scenario when you're under this kind of attack. Simultaneously quickly destroy the "Houston" with your battleship. [#3] A moment later help your companions by sending to the bottom particular American destroyers - using the armament you have at your disposal it's a piece of cake. [#4]
![[3] - Might of Yamato - Ship Challenges - Battlestations: Midway - Game Guide and Walkthrough](https://game.lhg100.com/Article/UploadFiles/201512/2015121216485751.jpg) [3]
[3]![[4] - Might of Yamato - Ship Challenges - Battlestations: Midway - Game Guide and Walkthrough](https://game.lhg100.com/Article/UploadFiles/201512/2015121216485765.jpg) [4]
[4]
Sail north at full speed all the time. You must locate the carrier group to the north before they escape (2). This group consists of two "floating airfields" escorted by three cruisers, all these warships also head north. Then you must destroy the Hornet and the Enterprise (two carriers from this enemy flotilla) before the escape from the map (3). And your own battleship "Yamato" must survive the battle (1), he must not sink. But first you'll have to fight with two Japanese submarines and the whole horde of enemy planes flying from the north towards you (they attack in waves). Engage enemy subs with your destroyers. [#5] Use the depth charges. [#6]
![[5] - Might of Yamato - Ship Challenges - Battlestations: Midway - Game Guide and Walkthrough](https://game.lhg100.com/Article/UploadFiles/201512/2015121216485753.jpg) [5]
[5]![[6] - Might of Yamato - Ship Challenges - Battlestations: Midway - Game Guide and Walkthrough](https://game.lhg100.com/Article/UploadFiles/201512/2015121216485757.jpg) [6]
[6]
Your powerfully armed battleship "Yamato" fires at the enemy planes and at the same time manoeuvre hard to avoid their bombs and torpedos. In the distance you should see American carriers now. You can start fire at them (and their escort) from your powerfully deck guns. [#7] Probably you'll get hit once or twice by a torpedo (it's hard to duck with this lightly maneuverable monstrum), so it's a wise idea to always have max. number of emergency teams in the "water" field in the repair panel, to quickly deal with any water leaks. [#8]
![[7] - Might of Yamato - Ship Challenges - Battlestations: Midway - Game Guide and Walkthrough](https://game.lhg100.com/Article/UploadFiles/201512/2015121216485750.jpg) [7]
[7]![[8] - Might of Yamato - Ship Challenges - Battlestations: Midway - Game Guide and Walkthrough](https://game.lhg100.com/Article/UploadFiles/201512/2015121216485770.jpg) [8]
[8]
Approach the enemy at a slight angle by sailing to the north-east, for example (or maybe even better: north-west), to let all your deck guns see the target and fire at him. Rest of your warships should focus their attention only on one target to quickly send him to the bottom. [#9] When both American aircraft carriers are burning wrecks, mission will end successfully. [#10]
![[9] - Might of Yamato - Ship Challenges - Battlestations: Midway - Game Guide and Walkthrough](https://game.lhg100.com/Article/UploadFiles/201512/2015121216485738.jpg) [9]
[9]![[10] - Might of Yamato - Ship Challenges - Battlestations: Midway - Game Guide and Walkthrough](https://game.lhg100.com/Article/UploadFiles/201512/2015121216485778.jpg) [10]
[10]
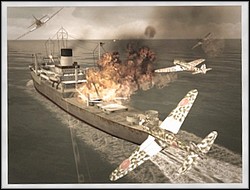
Units at your disposal: fighter plane Ki-43 "Oscar" - as a matter of fact a squadron of these planes (5 aircrafts with yours)
Enemy: fighters F2A1 "Buffalo-I" (3 flights, 3 planes in each), 7 cargo ships, 3 oil tankers
Level of difficulty: 1 (2 with hidden objective)
Primary objectives:
Secondary objective:
Hidden objective:
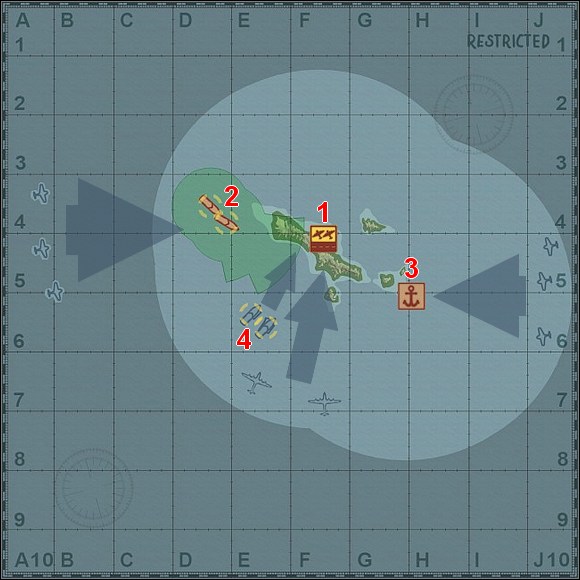
You start off your game with a squadron of Ki-43 "Oscar" fighters (5 aircrafts including your own plane), somewhere over the ocean. Underneath you should see an American naval convoy which consists of 7 cargo ships (marked with yellow triangles) sailing south. You must destroy all of them (1). You'll also see two flights (each consists of 3 planes) of enemy fighters F2A1 "Buffalo" (convoy's aerial escort) flying in your direction. Order your comrades (wingmans) to attack enemy fighters - they should easily and without any losses cut a dash with this enemy because their aircrafts outmatch American planes (the Japanese have higher maneuverability among other things). [Remember: your squadron must survive (2) (at least your own plane) to finish this scenario.] It's best to assign target for squadron members by aiming your crosshair at the enemy and then right clicking him with your mouse, or switching with this button through available targets until you'll find a proper one (American fighters in this case) - his name will appear in the upper left corner of the screen. Your comrades should then engage the enemy - in the lower left corner of the screen you'll see "dogfight" label. [#1] You can also switch to the map (Tab key) and indicate the target for your squadron by clicking with the right mouse button one of two blue icons, symbolizing enemy planes approaching in your direction. [#2] The disadvantage of 2nd method is that your plane will also fly towards the enemy.
![[ 1] - Shortage of Reinforcements - Plane Challenges - Battlestations: Midway - Game Guide and Walkthrough](https://game.lhg100.com/Article/UploadFiles/201512/2015121216485892.jpg) [ 1]
[ 1]![[ 2] - Shortage of Reinforcements - Plane Challenges - Battlestations: Midway - Game Guide and Walkthrough](https://game.lhg100.com/Article/UploadFiles/201512/2015121216485869.jpg) [ 2]
[ 2]
However, in the meantime (when your squadron members fight with American aircrafts) you should dive towards the cargo ships convoy sailing to the south and attack him. Because your plane must sink half of the cargo ships (*) if you want to complete secondary mission objective. You should focus your attention on ships sailing at the head of enemy convoy (cargo ships "Brazos" and "Liberty") and sink them first, to not allow any of transports escape from the area. However, during the flight over the convoy, engage one after one all American units that will enter into your crosshair. These ships' decks are vulnerable to your machineguns fire so strafe the deck when attacking enemy ship in his longitudinal axis and diving towards him at a quite acute angle. Decrease your airspeed when you're getting close to stay over the target and fire at him as long as you can to inflict max. damage. [#3] Speed up when you're stalling to avoid crashing yourself into the ocean/target or being killed in consequence of enemy AA fire. Though, if you're attacking the target from his side (board), fire at his deck by strafing to the sides with your rudder (A and D keys). Don't turn back if you have not managed to destroy the target in your first run (you'll take care of him later), but fly forward to engage ships sailing at the head of a convoy. When your squadron members have finished off these two flights of American fighters (you'll see one more flight approaching from the south in the latter phase of the game) also order them to attack American cargo ships, starting from the convoy's forehead. [#4] Assign targets to them by clicking enemy ships with right mouse button in TPP view or using the map. You'll see a label "strafe" when your wingmans attack one of American ships. If your plane is not in good condition and there left a few cargo ships to destroy yet, you can leave the task of sinking them for your squadron members, while keeping yourself away from enemies. After sending to the bottom last cargo ship mission will end successfully. If all squadron members have survived this fight (*) you have also realized hidden scenario objective.
![[ 3] - Shortage of Reinforcements - Plane Challenges - Battlestations: Midway - Game Guide and Walkthrough](https://game.lhg100.com/Article/UploadFiles/201512/2015121216485895.jpg) [ 3]
[ 3]![[ 4] - Shortage of Reinforcements - Plane Challenges - Battlestations: Midway - Game Guide and Walkthrough](https://game.lhg100.com/Article/UploadFiles/201512/2015121216485856.jpg) [ 4]
[ 4]
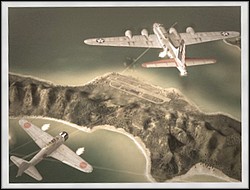
Units at your disposal: Japanese fighter planes A6M "Zero"
Enemy: hordes of American bombers B-17 (approx 24 planes) and dive bombers SBD "Dauntless" (approx 75) and torpedo planes TBF "Avenger" (approx 30), 2 cargo ships, landing boats
Level of difficulty: 6
Primary objectives:
This scenario probably seems very difficult and finishing it almost impossible for some of you, because of hordes of enemies you must repel but... trust me, this mission can be completed. Take-off from your airfield with 4 flights (3 planes in each) of "Zero" fighters, armed additionally with bombs. You must have max. number of aircrafts in the air, but also in max. number of units, because you will have to face to many enemies and you should simultaneously attack as many of them as possible. [#1] After the take-off proceed with all of your planes to the south, to shoot down successive flights of enemy B-17 "Flying Fortress"bombers, systematically oncoming over your airfield from the south with an intention to bombard it. Your first task is to protect that airfield from destroying (1). These bombers always appear in two flights (3 planes in each) - I mean every wave of them consists of two such flights. You will see a few such pairs of flights (unfortunately I don't remember exactly how many, but mathematics prompts me that 4 :-)), approaching in short time intervals. After shooting down first ones focus on next. After sending to the ground every group of enemy planes, game displays a message, telling you how many squadrons (as a matter of facts these are flights) of them you have to take down yet. Attack every flight of bombers with two own. Start firing at them when you're already approaching them frontally, aim at the engines. It's also good to engage them at different angles - from below, top, side and behind finally. [#2] For the present, you shouldn't have bigger problems.
![[ 1] - Saving Tulagi - Plane Challenges - Battlestations: Midway - Game Guide and Walkthrough](https://game.lhg100.com/Article/UploadFiles/201512/2015121216485872.jpg) [ 1]
[ 1]![[ 2] - Saving Tulagi - Plane Challenges - Battlestations: Midway - Game Guide and Walkthrough](https://game.lhg100.com/Article/UploadFiles/201512/2015121216485956.jpg) [ 2]
[ 2]
When game displays a message that there's left only one, last flight of enemy bombers to shoot down, leave that task for two your flights and send rest of your aircrafts west, to the edge of a map. When bombers are gone, quickly send also these last two flights of your planes to the west edge of a map. If you know that you have sustained losses during the dogfight with American bombers, quickly switch to the airfield (cycling with Tab key works best for me) and take-off with next fighters, armed with bombs (this weapon will be very useful later) - you must have max. number of planes in the air and necessarily in four flights! After destroying enemy B-17s you'll see on the waters near the island two Japanese (so yours) destroyers, and in the air - successive flights of American planes (torpedo and dive bombers this time) approaching from west. Try to attack them as early as you can, I mean - near the left (west) edge of a map. Engage simultaneously as many as possible - every your flight dogfights with one enemy flight. The Americans have now an intention to sink both Japanese destroyers and you must protect these warships (2). [#3] Unfortunately you can't control these ships. You'll see a dozen or so groups of enemy planes - game all the time displays how many these flights (trios) left (after destroying each of them). And now starts the most difficult phase of a gameplay. At the moment when you see on screen a massage telling you that there's left only one (last) flight of enemy planes, attack him with only one yours. It's best to use such a small one (even consisting of one plane, literally) and additionally - the most advanced to the west one. Send rest of your aircrafts (these closer to the airfield and jetty buildings located further to the right (east)) towards the mentioned jetty buildings and even farther - to the right (east) edge of a map. If both Japanese destroyers are in good condition (almost free from damages) you can even risk leaving them without care and send all your flights to the east. And you can do it even earlier, when game informs you that there's left three flights of enemy planes trying to sink your warships. In spite of all, if the destroyers are in good state, they should survive. Or at least one of them - and that will do. Because now you must have your planes as close as possible to the right (east) edge of a map - since you'll see there next hordes (waves) of enemy planes, flying towards the jetty buildings to bombard and destroy these installations. You must protect the jetty buildings (3) now. If you have in the air four own flights of planes but incomplete (so you haven't got a max. number of planes in fact), then crash into the ground or ocean (yes, that's right!) the one which consists of only one plane and immediately take-off from the airfield with next planes (after such a kamikadze action you should have a place for one unit there) to fill gaps. Remember, you must always have in the air max. number of planes and in max. number of units. [#4] Thus, four flights - that's the key to success. Sorry for repeating this sentence 3rd time, but it's very important. Otherwise you won't complete this scenario, even if you're the best pilot in the world!
![[3] - Saving Tulagi - Plane Challenges - Battlestations: Midway - Game Guide and Walkthrough](https://game.lhg100.com/Article/UploadFiles/201512/2015121216485962.jpg) [3]
[3]![[4] - Saving Tulagi - Plane Challenges - Battlestations: Midway - Game Guide and Walkthrough](https://game.lhg100.com/Article/UploadFiles/201512/2015121216485985.jpg) [4]
[4]
If all goes according to the plan, you'll be well prepared to welcome worthily successive flights of enemy dive bombers - you have to face to a dozen or so of groups, approaching from the east (right) edge of a map in short time intervals. Attack them as close to this edge as you can. Every your unit fights only with one American unit. Additionally, when you're personally leading one of your flights, you can order your wingman to engage one group of enemies and destroy another by yourself (solo). [#5] Simply - you should simultaneously attack as many enemy units as possible and... all will be fine, the jetty buildings will survive American air raid. After destroying last waves of enemies (which is really very difficult if you have other plan) it's time to complete the last task. Now you will have to eliminate the landing fleet (4) which approaches the shore of your island from the south. However, it's a piece of cake now, ufff. Enemy landing forces consist of two cargo (troops) ships. They launch from time to time small landing boats, fully loaded with marines wishing themselves to get to the island. As you probably remember from previous missions these landing boats appear on the ocean till you destroy nurse ships. Thus, focus your attention on these big units first of all, and attack each of them with one your flight of fighter planes. Now you can finally drop bombs your fighters have taken at the beginning of a game. You can also strafe the decks of these cargo ships and fire at them using only your machineguns. In the meantime other two flights massacre small landing boats. [#6] After destroying all enemy ships, these small and these big ones, mission will end successfully. That was a real HARDCORE, especially the third phase of this scenario.
![[5] - Saving Tulagi - Plane Challenges - Battlestations: Midway - Game Guide and Walkthrough](https://game.lhg100.com/Article/UploadFiles/201512/2015121216485974.jpg) [5]
[5]![[6] - Saving Tulagi - Plane Challenges - Battlestations: Midway - Game Guide and Walkthrough](https://game.lhg100.com/Article/UploadFiles/201512/2015121216485936.jpg) [6]
[6]
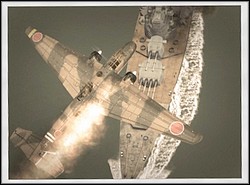
Units at your disposal: two airfields, many fighters, torpedo planes and bombers
Enemy: two British battleships, aircraft carrier, two destroyers and many of fighter planes
Level of difficulty: 5 (4 with hidden objective)
Primary objective:
Hidden objective:
This scenario is easier to finish successfully if you will focus at first on enemy aircraft carrier sailing between both allied battleships and sink him quickly (*), completing hidden objective by the way. In consequence he will stop launching his "Hurricane" fighter planes (he's heading to the bottom at last, right?) and you will have more space in the air. So immediately take-off with bombers G3M "Nell" from both of your airfields located on the islands (northern and southern). Launch four flights of these planes (3 aircrafts in each) from every airfield - all your bombers should be armed with six 250kg bombs each. [#1] Don't bother about fighter escort for them, as a matter of fact you can forget about Japanese fighter planes in this mission, they're useless. Systematically direct all flights - just after the take-off of each of them - to the point situated in front of enemy flotilla (which sails to the east with an intention of leaving the map). When you have most of your planes in that point order them to bombard enemy carrier by attacking him in his longitudinal axis. [#2]
![[ 1] - Attack on Force Z - Plane Challenges - Battlestations: Midway - Game Guide and Walkthrough](https://game.lhg100.com/Article/UploadFiles/201512/2015121216485954.jpg) [ 1]
[ 1]![[ 2] - Attack on Force Z - Plane Challenges - Battlestations: Midway - Game Guide and Walkthrough](https://game.lhg100.com/Article/UploadFiles/201512/2015121216485941.jpg) [ 2]
[ 2]
Your level bombers drop their bombs from a high altitude and even when they're taking heavy losses in consequence of enemy AA fire and during the battle with enemy fighters, they should be able to sink allied carrier in this first air raid. [#3] Then they'll start returning to the bases. Don't worry about pursuing British fighter planes - bombers' crews will probably shoot down some of them or many of these fighters will be destroyed over the islands by Japanese AA artillery. Maybe even all of them. However, if any of your flights consists now of only one bomber don't bother returning home with this flight - just crash him into the ocean or into the one of British warships. And immediately take-off with next planes (you should have this opportunity after such a kamikadze action). Now you need G4M "Betty" planes armed (all of them) with torpedos. These aircrafts are better than previous in performing torpedo attacks because they're smaller (so more difficult to hit) and they have greater maneuverability than G3M "Nell" bombers. [#4]
![[3] - Attack on Force Z - Plane Challenges - Battlestations: Midway - Game Guide and Walkthrough](https://game.lhg100.com/Article/UploadFiles/201512/2015121216490003.jpg) [3][4]
[3][4]
After the take-off also gather them in places where they should wait till you have many of them there, but this time assign these places on both sides of the Allied flotilla and a little bit in front of it. However, don't assemble them too close to the enemy to avoid getting with them under AA fire. The purpose of this whole operation is to assemble a great number of planes and attack the enemy with all of them simultaneously to not let him shoot down every plane. Focus on enemy battleships and attack them from sides - try to concentrate on the "Repulse" which has closer to the edge of a map. [#5] When you personally lead one of the attacks additionally crash into the enemy warship just after releasing the torpedo - turn yourself into "kamikadze". [#6] Immediately take-off with next planes from both of your airfields, especially from this on south (you have closer to the target from there). You should hunt down 2nd of enemy battleships just at the edge of a map. And when they're both heading to the coral (*) mission ends successfully.
![[5] - Attack on Force Z - Plane Challenges - Battlestations: Midway - Game Guide and Walkthrough](https://game.lhg100.com/Article/UploadFiles/201512/2015121216490075.jpg) [5]
[5]![[6] - Attack on Force Z - Plane Challenges - Battlestations: Midway - Game Guide and Walkthrough](https://game.lhg100.com/Article/UploadFiles/201512/2015121216490078.jpg) [6]
[6]
Units at your disposal: American submarine the USS "Narwhal"
Enemy: Japanese cargo ships and their warship escort - 2 destroyers, 2 cruisers (one of them light), 2 patrol boats, 3 airplanes F1M "Pete" armed with depth charges
Level of difficulty: 3 (6 with hidden objectives)
Primary objectives:
Hidden objectives:
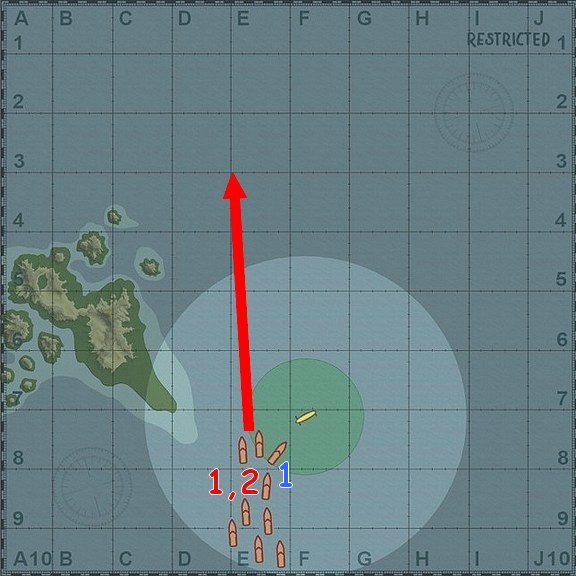
Your yellow submarine (yellow only on map) starts off the game on periscope depth. [#1] You're already placed on the course perpendicual to the Japanese cargo ships convoy sailing to the north. Enemy cargo ships have a strong escort of warships - two destroyers, cruisers (one of them is in heavy version) and patrol boats, so the destruction of two most important cargo ships (2) won't be easy. [#2]
![[ 1] - Crucial Cargo - Submarine Challenges - Battlestations: Midway - Game Guide and Walkthrough](https://game.lhg100.com/Article/UploadFiles/201512/2015121216490068.jpg) [ 1]
[ 1]![[2] - Crucial Cargo - Submarine Challenges - Battlestations: Midway - Game Guide and Walkthrough](https://game.lhg100.com/Article/UploadFiles/201512/2015121216490046.jpg) [2]
[2]
However, at first you must identify these two important cargo ships among the others and report their position (1). In order to that raise your periscope and take a look at the convoy. Game, each time you're playing this scenario, randomly chooses these two ships from among the others. In other words - game will assign two different primary targets each time you will play this mission. And during your gameplay you'll be informed with suitable messages which ships you must destroy (till you identify these targets finally) - program will display on screen names of these ships. Remember these names, especially 1st parts of them, because 2nd is always the same ("Maru"). By finding these two ships among the others you'll complete 1st of primary objectives and these two targets will be marked with yellow triangles and boxes. [#3] By the way - on map you can see only these enemy ships that are entering the green circle around your sub: this is your range of detection when you're submerged. Formally the destruction of all Japanese warships escorting the convoy (1) isn't crucial for finishing this mission successfully (that's only one of hidden objectives), but you make your game easier when you send all of them to the bottom at first. In order to complete this 1st of hidden objectives you have to sink only these big warships, destroying the patrol boats isn't necessary. At first, take care of the Japanese "Yugiri" destroyer, which will head towards you practically just after starting the game. He can be easily destroyed with two torpedos, but first you must lure him into an ambush, using the method of turning on and off your sub's engine that you should already know perfectly from "Hints" chapter of this guide. [#4]
![[3] - Crucial Cargo - Submarine Challenges - Battlestations: Midway - Game Guide and Walkthrough](https://game.lhg100.com/Article/UploadFiles/201512/2015121216490047.jpg) [3]
[3]![[4] - Crucial Cargo - Submarine Challenges - Battlestations: Midway - Game Guide and Walkthrough](https://game.lhg100.com/Article/UploadFiles/201512/2015121216490140.jpg) [4]
[4]
After destroying "Yugiri" you should be already jolly well placed to attack "Mikuma" heavy cruiser - fire a salvo of few torpedos at his board (side) and he will sink just as previous warship. [#5] If after the previous attack (on the destroyer) not every of your torpedo launchers is loaded again by the crew, fire at "Mikuma" these torpedos you can. Then wait till rest of launchers is loaded and quickly fire next torpedos follow the damaged enemy cruiser sailing away. Alternatively, don't wait, but dive under the target (or sail behind his stern) and kill him off with two torpedos fired from the stern (rear) launchers. In a similar way destroy also the remaining two warships - the destroyer and light cruiser. If you must go to the surface to catch some fresh air between your attacks, do it a couple of times (each time emerge only just for a second) and additionally near the side (board) of some Japanese cargo ship, to be shielded by him against enemy warships (search in "Hints" chapter for details). [#6]
![[5] - Crucial Cargo - Submarine Challenges - Battlestations: Midway - Game Guide and Walkthrough](https://game.lhg100.com/Article/UploadFiles/201512/2015121216490121.jpg) [5][6]
[5][6]
When eliminating particular warships from convoy's escort, you can also simultaneously sink the cargo ships, if you have an opportunity. Launch your torpedos by taking an adjustment at a "guess" on enemy ship's movement. However, don't squander your torpedos, although you have approx 30 (4 in front launchers, 2 in rear, rest in magazine), leave yourself four torpedos for sinking these two crucial targets (cargo ships - each of them will need to torpedos to be destroyed). Remember - your main goal in this scenario is to send to the bottom these two already identified cargo ships (2). Although you should be able to destroy couple more of transports earlier. Pay attention also that reloading of your torpedos takes time, tens of seconds. If you want to realize 2nd of hidden objectives, I mean to sink all the cargo ships in the area (convoy) (2), then you should - before you'll destroy both of primary targets - emerge (but only when warship escort is gone!) and send to the coral particular cargo ships by firing at them using your deck gun (to save torpedos). Attack them from behind (stern) to let your gun see the target and fire while their guns (some of cargo ships have these installed on bows) can't target you. Often you will need to use only a few rounds to cause an explosion on enemy cargo ship and quickly destroy him in consequence of this event. [#7] Finally sink also these two main cargo ships (2) - using the gun or saved torpedos. [#8] If you have problems with orientating yourself (understanding) where they are in a current moment, switch to the map and find them on it (I remind you that all enemy ships are displayed on map when they're entering green circle around your sub - your range of detection). Then right-click one of them with your mouse and your sub will head towards a marked target.
![[7] - Crucial Cargo - Submarine Challenges - Battlestations: Midway - Game Guide and Walkthrough](https://game.lhg100.com/Article/UploadFiles/201512/2015121216490152.jpg) [7]
[7]![[8] - Crucial Cargo - Submarine Challenges - Battlestations: Midway - Game Guide and Walkthrough](https://game.lhg100.com/Article/UploadFiles/201512/2015121216490179.jpg) [8]
[8]
Though, you should be careful when fighting on the ocean's surface and watch out for these two small patrol boats. In my humble opinion they are more dangerous and annoying than the "big guys" you've already sunk. Generally, I would strongly recommend to avoid fighting with them: primo - it's not easy to hit'em from the distance using your deck gun, and second - this encounter often causes a damage... of your own deck gun. An irreparable damage, to be precisely, which your emergency teams - even if you'll send all three with a task of repairing the cannon - cannot fix when sub is sailing on the surface. [#9] When you're submerged you can avoid these patrol boats armed with depth charges (in general they're well armed), if they get too close, by turning off the engine (just like you did in case of destroyers). And for God's sake don't raise your periscope if you don't have to (and usually you really don't, because TPP view works fine) - this device attracts the attention of patrol boats! However, if you persist to destroy also these small units, then fire at them using the deck gun and from minimal range (it's easier to hit them). Don't use AA machinegun which is useless in this particular instance. [#10]
[9]![[10] - Crucial Cargo - Submarine Challenges - Battlestations: Midway - Game Guide and Walkthrough](https://game.lhg100.com/Article/UploadFiles/201512/2015121216490101.jpg) [10]
[10]
However, I strongly recommend to avoid fighting with these small units (as written above). Because if you will even destroy both of them you'll see next enemies - Japanese planes (armed with depth charges), approaching from different directions. [#11] And then you can be in real troubles, because they're attacking you almost simultaneously, so shooting all of them down can be problematic. [#12]
![[11] - Crucial Cargo - Submarine Challenges - Battlestations: Midway - Game Guide and Walkthrough](https://game.lhg100.com/Article/UploadFiles/201512/2015121216490130.jpg) [11]
[11]![[12] - Crucial Cargo - Submarine Challenges - Battlestations: Midway - Game Guide and Walkthrough](https://game.lhg100.com/Article/UploadFiles/201512/2015121216490125.jpg) [12]
[12]
Units at your disposal: Japanese submarine I-15
Enemy: 3 American destroyers, a cruiser and a battleship of New York-class
Level of difficulty: 2
Primary objective:
Potential medals to earn:
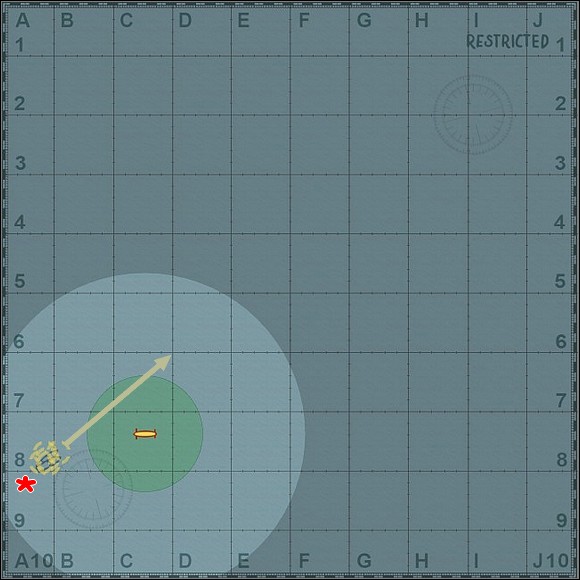
This mission should be first in submarine challenges because it's easier then previous. Dive to the periscope depth and sail west to cut in the course of enemy flotilla of warships heading to the north-east direction. This flotilla consists of three destroyers, heavy cruiser and a battleship. You can easily deal with enemy destroyers by fighting with them using my method, which you should already learn by reading the "Hints" chapter of this guide: turn off the engine when American destroyer is getting close to your sub and send him two torpedos when he's turning and cutting in your course, after loosing the sound contact with your ship on his sonar. [#1] Fire your torpedos from rear (stern) or front (bow) launchers - depends on situation. And you don't have to even raise your periscope, you can launch torpedos in the external view. If the destroyer don't want to cut in your course for some reason (take a look at map to get to know when he's going to sail), just turn on the engine once again (but only for a while) to lure him into an ambush, to enforce a proper turn on him. After sinking American destroyers (which is easier than avoiding them/not fighting with them) it's time to play with other two warships, still retreating to the north-east. If you must emerge earlier to have a breath of fresh air, just sail away a bit (to the safe distance) and emerge couple of times (each time just for a second) to catch max. amount of fresh air. Then dive again on periscope depth and attack! The rest of American warships isn't armed with depth charges, they also don't have sonars to detect you, so you can approach them with impunity from one of the boards (sides). To sink the cruiser you'll have to fire at him a salvo of four torpedos at least. You will need probably more then four torpedos to send to the bottom enemy battleship. [#2]
![[ 1] - Periscopes Threatening - Submarine Challenges - Battlestations: Midway - Game Guide and Walkthrough](https://game.lhg100.com/Article/UploadFiles/201512/2015121216490229.jpg) [ 1]
[ 1]![[2] - Periscopes Threatening - Submarine Challenges - Battlestations: Midway - Game Guide and Walkthrough](https://game.lhg100.com/Article/UploadFiles/201512/2015121216490253.jpg) [2]
[2]
So after firing the salvo of four torpedos you can sail under this damaged warship (by diving deeper) and when you passed by him - finish him off (from the periscope depth this time) by launching two torpedos from rear (stern) launchers. [#3] After destroying the entire retreating fleet (*) scenario will end successfully. [#4]
![[3] - Periscopes Threatening - Submarine Challenges - Battlestations: Midway - Game Guide and Walkthrough](https://game.lhg100.com/Article/UploadFiles/201512/2015121216490261.jpg) [3]
[3]![[4] - Periscopes Threatening - Submarine Challenges - Battlestations: Midway - Game Guide and Walkthrough](https://game.lhg100.com/Article/UploadFiles/201512/2015121216490264.jpg) [4]
[4]
Units at your disposal: two Japanese submarines I-25 and I-26
Enemy: American aircraft carrier USS "Enterprise", light cruiser, two destroyers, patrol boats, seaplane PBY Catalina and torpedo planes Avengers armed with depth charges
Level of difficulty: 4 (6 with hidden objective)
Primary objective:
Secondary objective:
Hidden objective:
This time you have at your disposal two Japanese submarines - I-25 and I-26. Second of them will be used by you as a decoy to attract the attention of American forces (two destroyers, cruiser patrol boats and planes armed with depth charges), while first will skim off by sending to the bottom enemy aircraft carrier USS "Enterprise" (*). [#1] Direct both your subs towards the target (American carrier), order "full speed ahead!". Don't change the course of I-25 - this sub can sail east but you should dive deeper with her (4th level) to avoid being detected by enemy destroyers (and then you won't have to trouble about her for some time). However, water pressure on this level slowly but unrelentingly crushes your submarine's hull, so you can dive to 3rd level. Though, pay attention that on this level of depth (submersion) you can be sometimes detected by destroyers. At the same time emerge with 2nd sub, I-26 (when American destroyers and a cruiser are still far away from her) and fire at a seaplane Catalina, three torpedo planes "Avengers" and some patrol boat - all of them heading in her (I-26) direction. Manoeuvre hard to make hitting you (with depth charges by planes and with torpedos by patrol boats) more difficult for these enemies. With an ounce of luck you should be able to shoot down most of enemy aircrafts (unfortunately American carrier probably sends more from time to time). [#2] You should be able also to sink this small patrol boat before bigger units (mainly destroyers) will reach this area.
[ 1]![[2] - Coup de Grace - Submarine Challenges - Battlestations: Midway - Game Guide and Walkthrough](https://game.lhg100.com/Article/UploadFiles/201512/2015121216490211.jpg) [2]
[2]
Then dive with your I-26 on periscope depth and try to lure closer both destroyers, one after one (using the method consisting in turning off and on your sub's engine which you should already know from "Hints" chapter of this guide). Sink these two warships by firing at their sides (boards) two torpedos (two at each of them). [#3] By sending to the coral "DeHaven" (*) (one of destroyers) you'll complete hidden objective. You should be able also to destroy defenceless (during the absence of destroyers) American cruiser (*) with a salvo of four torpedos this time - and secondary mission objective is completed too. [#4]
![[3] - Coup de Grace - Submarine Challenges - Battlestations: Midway - Game Guide and Walkthrough](https://game.lhg100.com/Article/UploadFiles/201512/2015121216490361.jpg) [3]
[3]![[4] - Coup de Grace - Submarine Challenges - Battlestations: Midway - Game Guide and Walkthrough](https://game.lhg100.com/Article/UploadFiles/201512/2015121216490340.jpg) [4]
[4]
Meanwhile I-25 (your 1st sub), sailing in deep submersion, should get to the area where the USS "Enterprise" is anchored (*). Decrease the level of submersion to periscope depth and sail further to cut in the course of USS "Enterprise" which will probably try to retreat from that area by heading north-west. Try to get close as you can to his side (board), but watch out for enemy patrol boats patrolling on the ocean's surface - don't raise your periscope if you don't need it to avoid attracting their attention. You should be able to sink the USS "Enterprise" (*) using only external view. However, if your sub emerges because of low amount of fresh air, you can seize this opportunity to quickly destroy these small boats, using your AA machineguns and deck gun. But I'm not sure if you won't see more of them a moment later - I think there is a PT boat base on a nearby island... Additionally stop the engine when you're close to the "Enterprise". Fire at him a salvo of four torpedos (from front/bow launchers), launch them from minimal distance to not let the enemy avoid them. Finish him off (if necessary) with two torpedos fired from rear/stern launchers (make a necessary turn earlier). [#5] When he is heading to the bottom mission is finished. [#6]
![[5] - Coup de Grace - Submarine Challenges - Battlestations: Midway - Game Guide and Walkthrough](https://game.lhg100.com/Article/UploadFiles/201512/2015121216490376.jpg) [5]
[5]![[6] - Coup de Grace - Submarine Challenges - Battlestations: Midway - Game Guide and Walkthrough](https://game.lhg100.com/Article/UploadFiles/201512/2015121216490343.jpg) [6]
[6]


 BioShock: Infinite Game Guide & Walkthrough
 Batman: Arkham Origins Game Guide & WalkthroughBattlefield Hardline Game Guide & Walkthrough
 Bionic Commando Game Guide & Walkthrough
 Burnout Paradise: The Ultimate Box Game Guide & Walkthrough