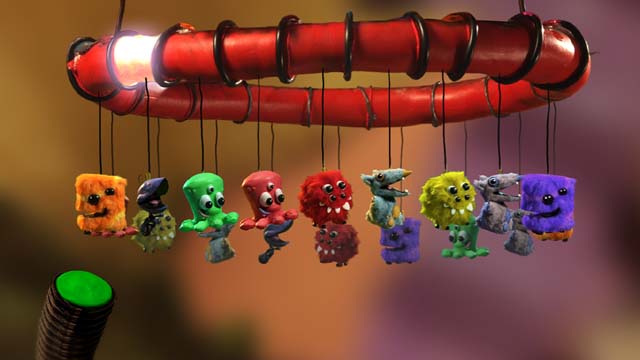
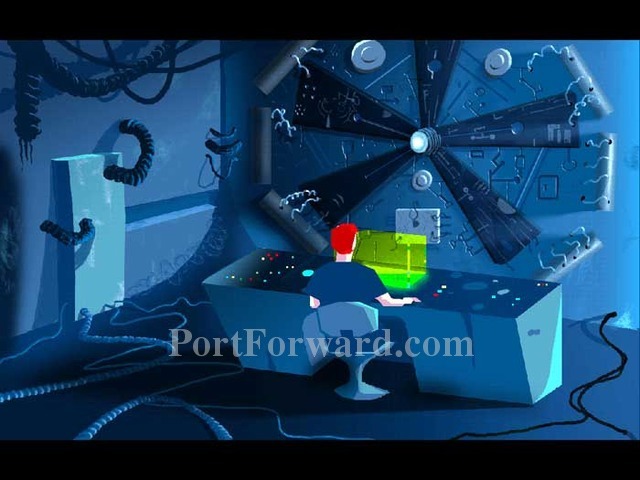
Armikrog game guide contains lot of tips useful during this funny, unconventional adventure. It is thorough, illustrated solution, which will guide you through all the actions that are needed to end gameplay. You will meet Tommynaut and his animal friend Beak-Beak - they come to the planet Spiro 5 to find P-tonium and save their home planet Ixen. To make using this game guide easier to navigate, each chapter has been divided into subchapters with describing all tasks which you need to deal with. All objects you need to take are marked in red, the puzzle solutions and important information are bolded. In the game you can control Tommy and sometimes his talking dog Beak-Beak. Beak-Beak is very useful when you need someone tiny.
Armikrog game guide contains:
Katarzyna "Kayleigh" Michalowska (www.gry-online.pl)
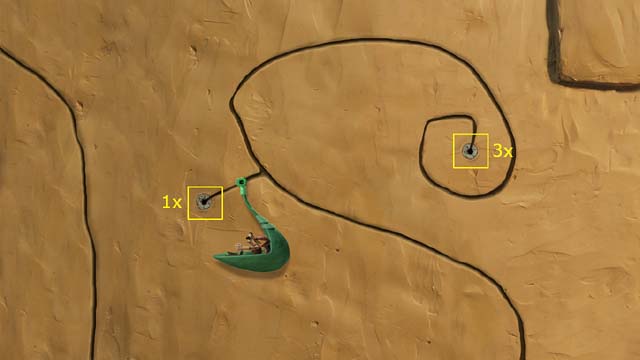
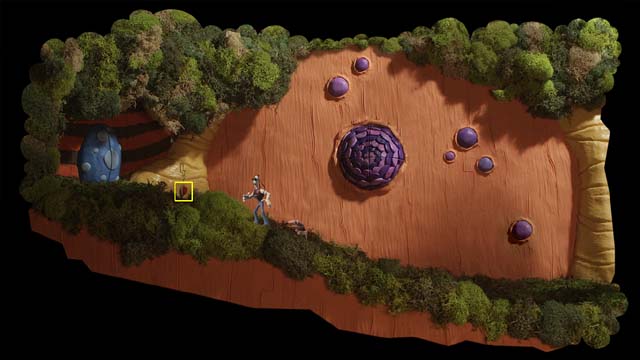
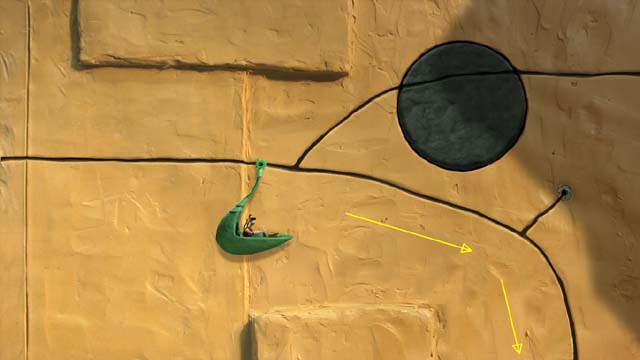
Pick up a lever (on the left side, close to the door). Click on the left side of the front door to put the lever on its place. Go to the left. Before you do this, you can look through the window (6 times), if door closes, open it again by moving the lever.
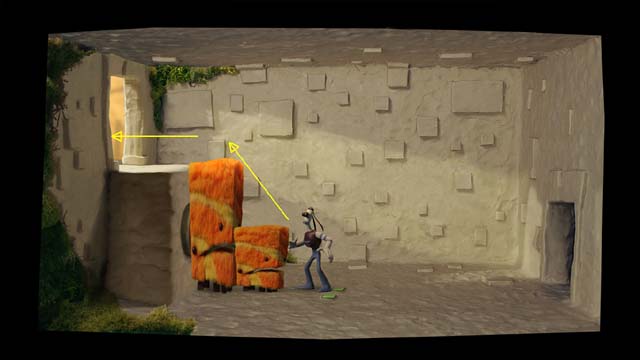
Click on the statue on the left three times. Push orange creature.
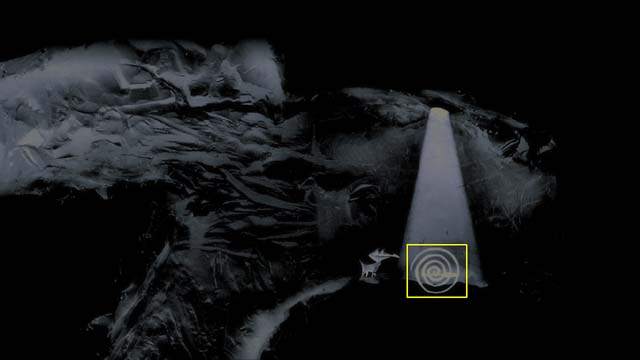
Click the red button on the left wall and look on the picture. As a dog go through the wall tunnel.

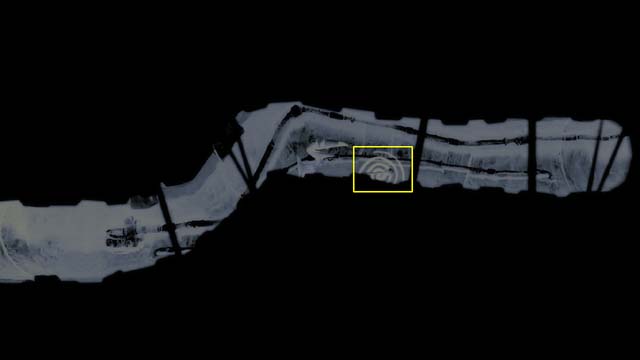
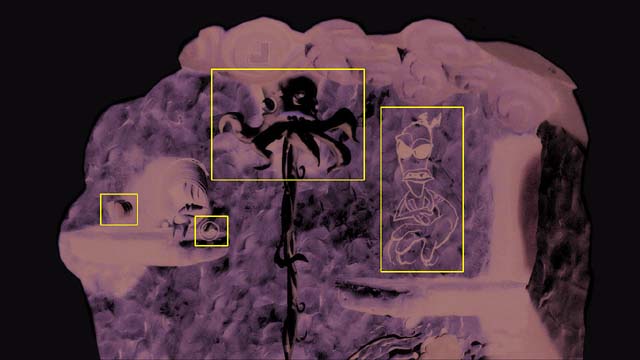
When you come into the weird overexposed room (the first one in the tower), look at the picture (the biggest one - it's the first hint to the picture puzzle, which is random, so every time the picture will be different).
Go back to the tunnel and swallow another lever (there is pulsating spiral in this place). Go to the left. When you find Tommy, Beak-Beak will throw out the lever. As Tommy pick it up and go back to the room you were before by pushing the orange creature.
Put the lever into the mechanism (click it, Tommy will do the rest) on the door on the left side of the room. Push the orange creature into the passage on the right. Click on the tentacle and then on the top of the room. Tommy will get to the next level. There is this picture puzzle but you need hints, so click again on the top of the room to go onto the highest level (where the octopus creature is).
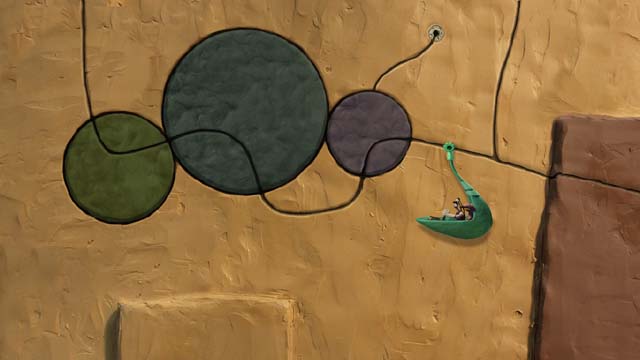
Go to the right and pick up a crank. Go back to the tentacle (to the left) and go one level down.
Use the crank with pink hole in the blue pipe. Turn the crank three times (Tommy will do the first one automatically). Go through the open door into the red room.
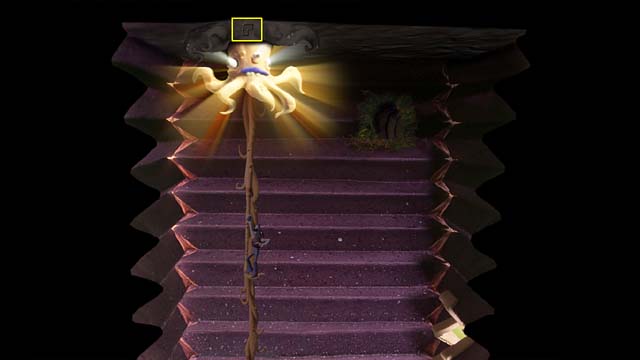
As Beak-Beak go to the tunnel. You will come to the room with octopus.
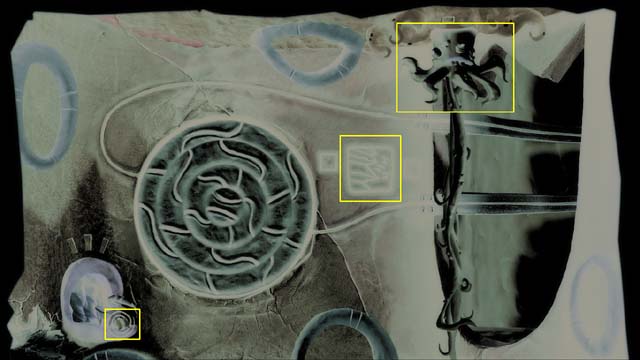
Look at the second (a bigger one) picture on the wall and remember it (it's the second hint to the random picture puzzle). Click on the octopus and see the story.
Finally swallow a mysterious yellow item, which now is lying on the floor. Go back to Tommy. Beak-Beak will throw out this item. As Tommy pick it up and use with the machine. As Beak-Beak activate the red button on the right side of the room.
Click Tommy and leave the room. Turn the crank 5 times and go to the green room.
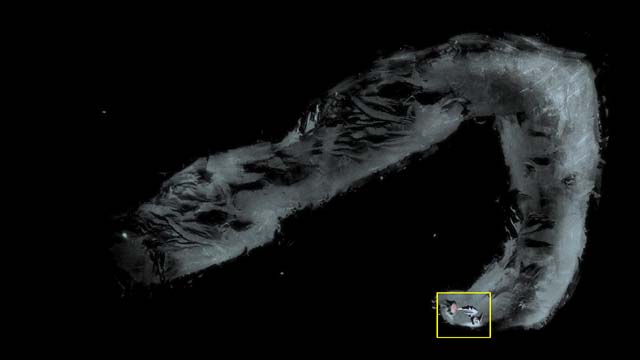
Look at the moving animal fur. You will find a baby. Take another lever and leave the room.
The baby will start cry and the tentacle will run away. Click the baby. You need to solve the puzzle.
Push the green button on the left pipe. You need to play the melody on the carousel but there are 3 elements missing. The carousel has 9 elements, every one of them is playing a part of the melody. If you hang on one part in the wrong place, it'll fell while playing.
The solution is on the screenshot above. You need to wait as the light above the last toy will turn on.
Pick up a seagreen crystal.
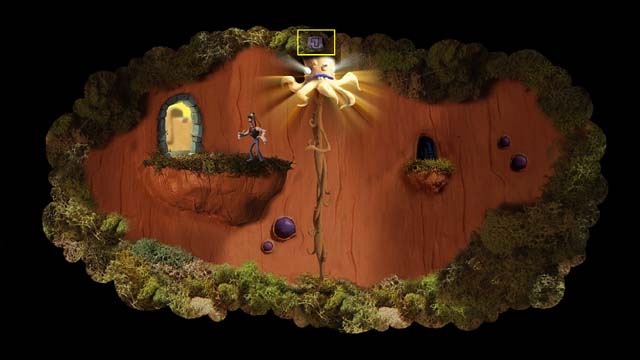
Climb to the highest level and go to the right. Use the lever from the green room with the machine. When Tommy and Beak-Beak will be in the car, click the line and follow it (to the right).
You will come to the dark place, go to the end of the route - you will see the third picture (remember it) - the last hint to the picture puzzle.
Go back the same way. Click the metal wheel on the wall. When you will come to the platform, go to the left and climb two levels down.
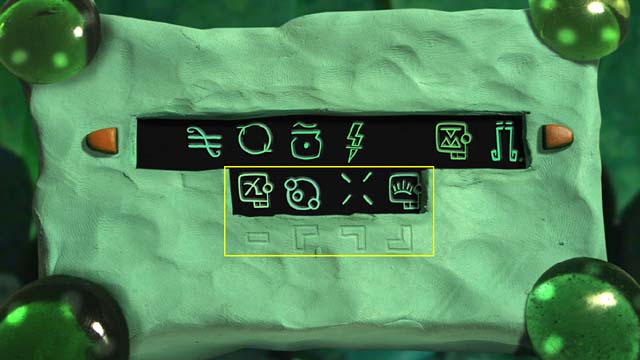
You will come to the pink room, where click a panel with picture puzzle.
Click the panel with picture puzzle. On the first place set the picture from the overexposed room (where the dog was after going through the first tunnel), on the middle set the picture from the room with the octopus (where the dog was after going through the second tunnel). As the last set the picture which you have seen after driving the car cable. You can move pictures vertically and horizontally. Finally push the yellow button. An example solution of this random puzzle is on the screenshot above.
Go into the open passage at the left. In the rotating room move the lever which is close to the entrance. Go right. A metal bolt will hit the button. As you can see, you need to repeat the same pattern which is above the bolt. The bolt on the right side will show you the symbol from the beginning and the end, the bolt on the left - symbols from the middle.
When you see the first symbol, go left. When the left bolt hit, go a little bit to the right and again left. The left bolt will hit again. Go right - the right bolt will hit again.
When you get the right pattern (like on the screenshot above) go left and back to the pink room.
There click pink egg in the wall and talk with Abrahant Lincoln, who will give you a hint to the another puzzle. Remember the sequence: first element 2 times, second 3 times and third one time.
Climb on the highest level, go to the right and move the lever. Ride by cable car to the left (to the end), up and then right (you can ride through the octopus room only because you set the right pattern in the rotating room). When you come to the place with dark grey circle, you need to put the line to ride through it.
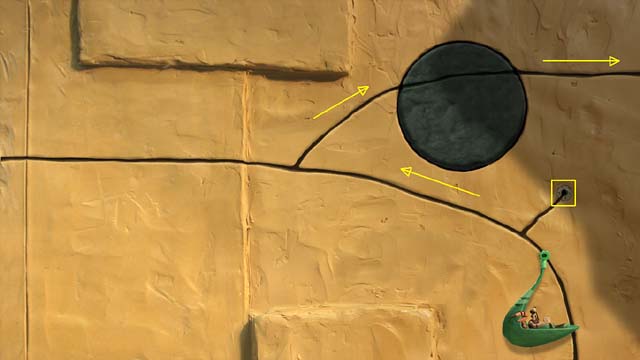
Ride down to the branch below and to the circle, then go back and do this again. When the line is complete, back to the dark grey circle and go right. Ride right as you come to the second tower. Put the cable car below the circle.
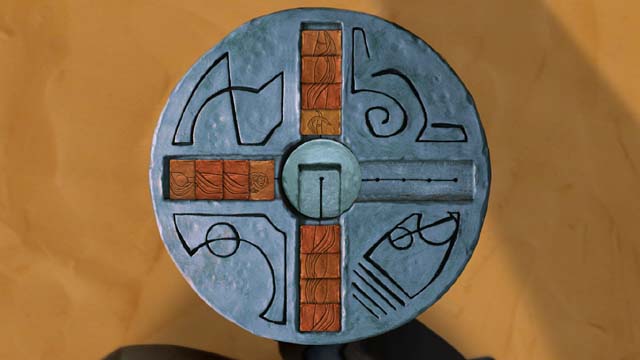
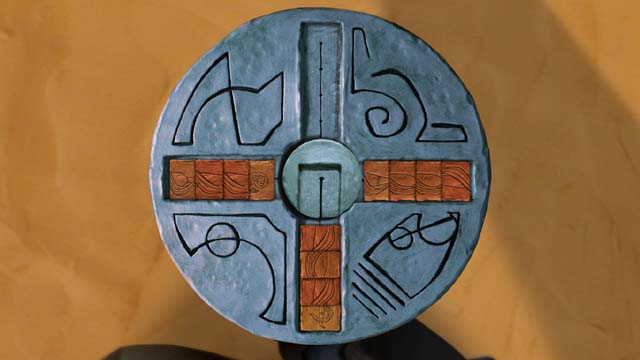
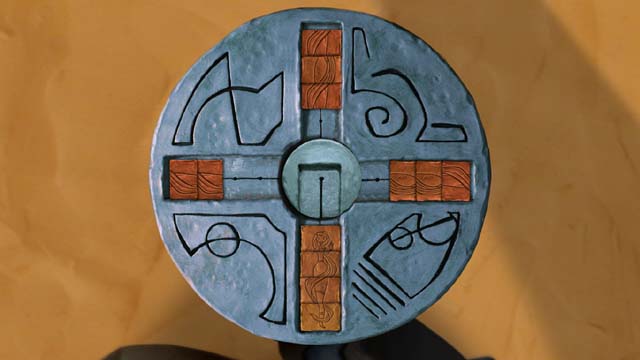
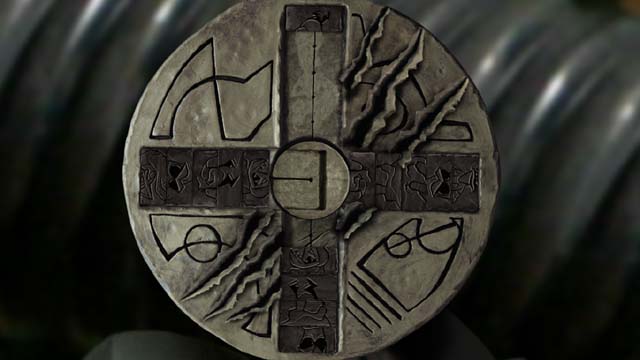
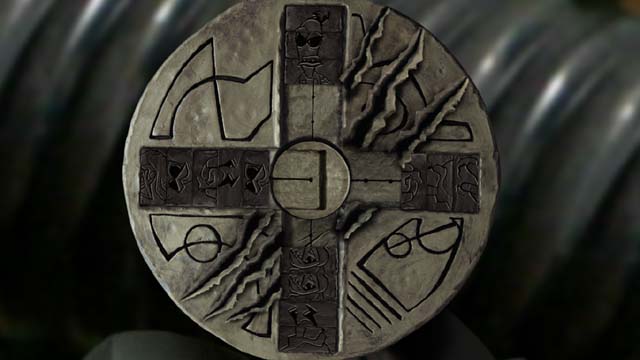
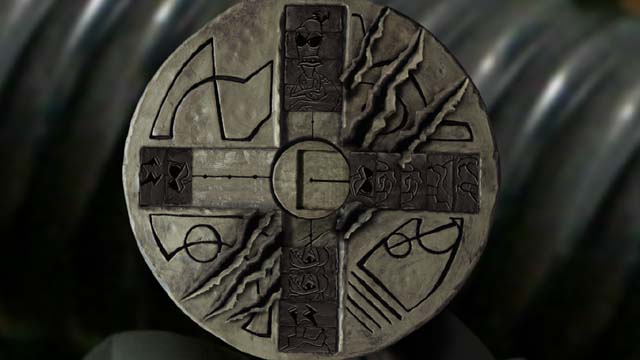
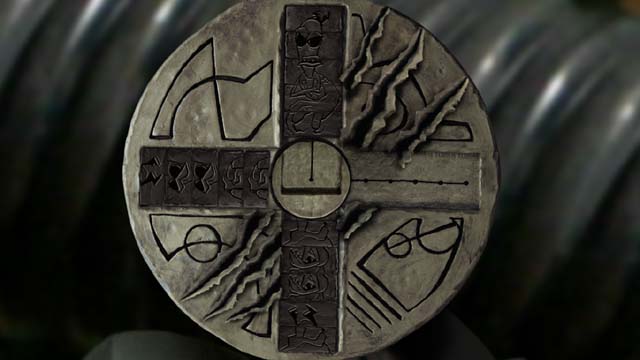
Click the panel on the front gate. You need to solve the puzzle.
You need to move three squares with pattern (they are on the edges of the arms and upper part of the cross). The goal is to cover the pattern on lowest part of the cross.
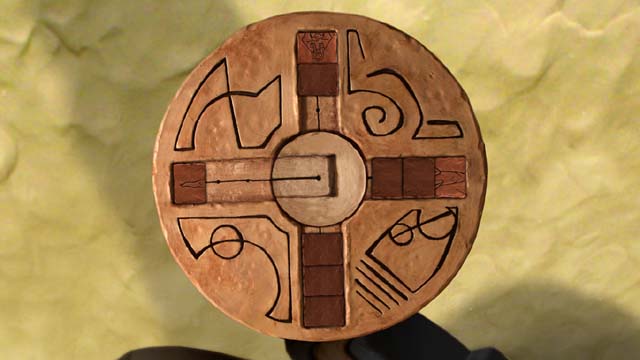
At the beginning move two dark squares from the left arm to the bottom of the cross.
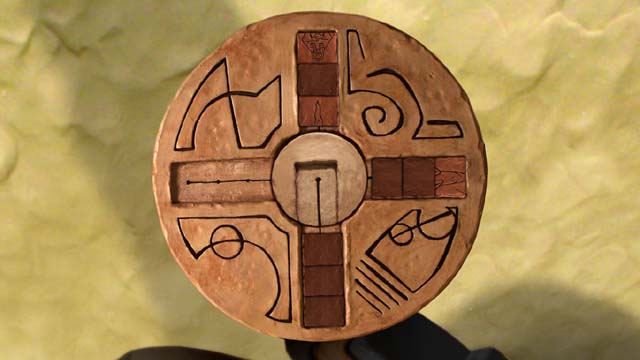
Then move left square with pattern up.
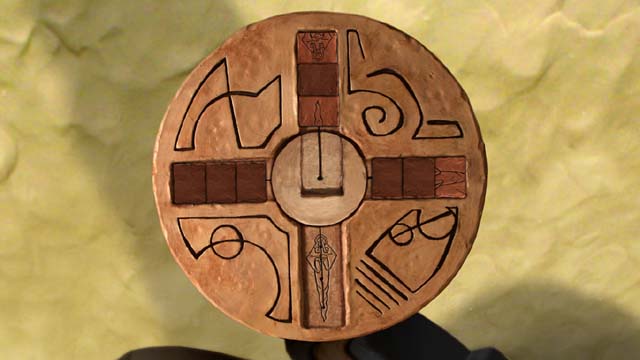
When the left arm is empty, move three blocking squares from the bottom of the cross.
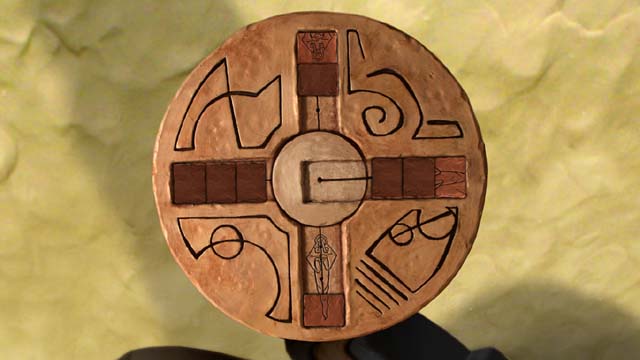
Then move the square with pattern from the top of the cross to the bottom.
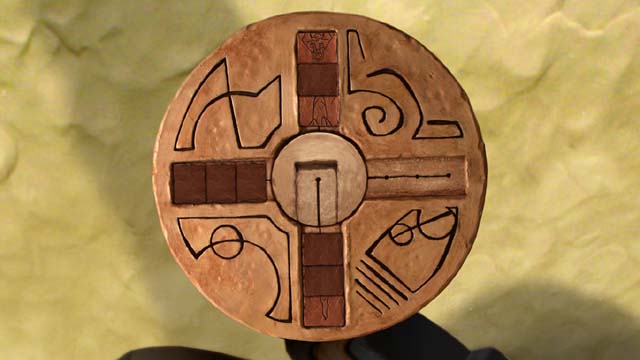
Move two blocking squares from the right arm to the lower arm and the square with pattern from the right arm to the upper arm.
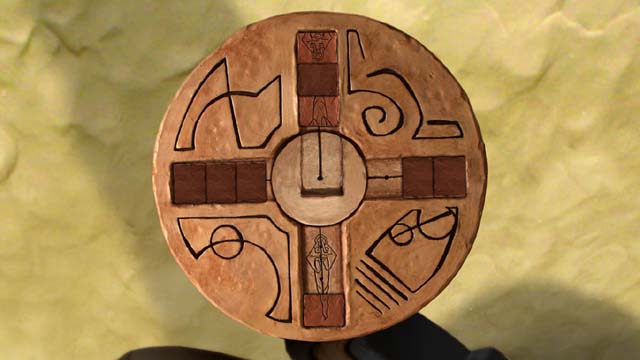
When right arm is empty, move two blocking squares from the bottom to the right arm.
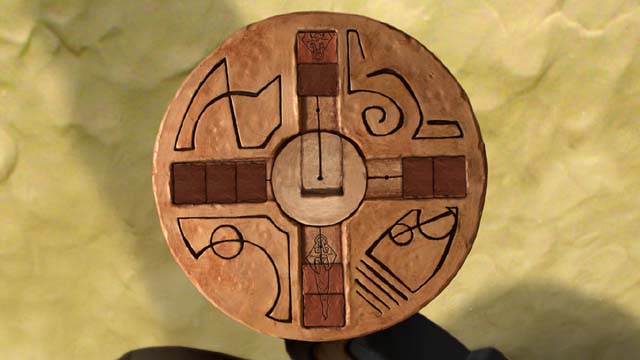
Then move the square with pattern from the upper arm to the lower arm.
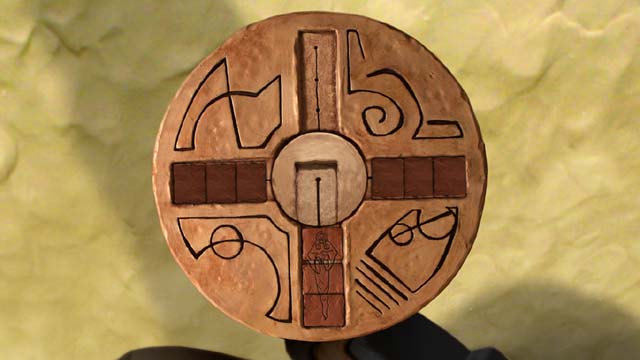
Finally move the blocking square from the top of the cross to the right arm. The square with pattern move to the lower arm.
Go inside.
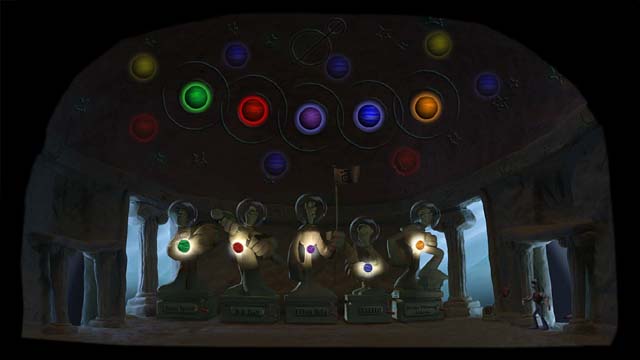
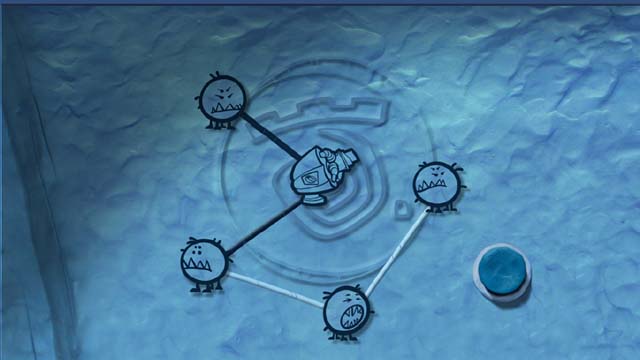
Go right. In the room with astronaut's statues remember the colours of these statues: green, red, purple, blue and orange. Go right and talk with the statue. Push the red button in the column on the right side. Go back to the room with astronaut's statues.
Look at ceiling. You need to match colours of five planets (these, which are connected with themselves by orbits) with colours of the statues.
Every statue has a crank. When you turn the crank, the planet above the statue will move and also the planet above next statue. There is also a lever, which can change the places of all 5 planets. The basic colours are red, blue and yellow. Others you can make by connecting two colours: green= blue + yellow, purple= blue + red, orange= red + yellow.
If the planet above the statue (e.g. fourth) has basic colour red (you can see orange or purple, what is basic colour you can check by moving the crank of the statue), you may change this basic colour by turning the crank of fifth statue. You can do the same action for the third statue by turning the crank of fourth statue and for the first statue by turning the crank of the second statue.
At first set the red colour of fifth planet (by turning the lever as many times as you need). Then turn the crank of the fifth statue to change the colour of the planet from red to orange. If it's already set orange (after moving the lever only), turn the crank of the fifth statue to check if the basic colour is red. If it is yellow, change it by moving the lever to red and then turn the crank to set orange.
The fourth planet should have basic colour blue. If you see purple or green, turn the crank to set blue.
Now turn the crank of the third statue as many times as you need to set the red colour of second planet (as basic). If you see orange or purple, turn the crank of the second statue to set red.
Then turn the crank of the first statue to change the colour of first planet to green.
Finally turn once the crank of the fourth statue, which change the colour of the third planet to purple. The result is on the screenshot below. You will open the passage in the next room.
Go right to the room with talking statue. As Beak-Beak jump on the red button on the floor. As Tommy go right and push the orange creature - you can do this only when Beak-Beak is standing on the button.
Jump on the orange creature and take a lever which is lying on the right.
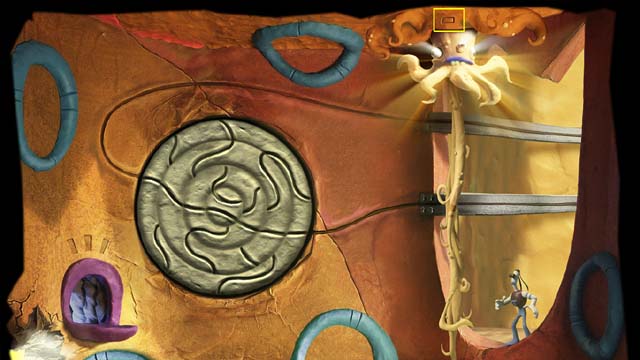
Go back to the first room in the tower (left). Use the tentacle to go one level down. Go right and in the place with cannon and weird birds put the lever in the wall on the left. Go to the left and then again left through the green hole.
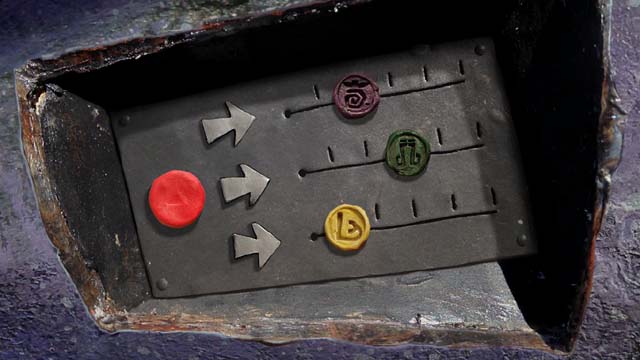
Go left, pass two rooms. You will come to the rotating room. Go forward and click the pink egg in the wall. Talk with Thomas Jeffersant - he is in need of goose's feather. Look at the declaration and at the seals: purple, dark green and yellow.
Leave the rotating room and go right, pass three rooms. You will come to the place with cannon.
Click the yellow cover. There is a puzzle. You have two hints: from Lincoln and Jeffersant. Click the top seal 3 times - it becomes purple, click the middle once - becomes dark green and 4 times the bottom seal - it becomes yellow. Now click the upper arrow twice, the middle 3 times, and the bottom once - just as Lincoln said. Push the red button. The solution is on the screenshot below.
The cannon will fire and the ball will hit the bird. Take a feather and give it to Jeffersant (go back left).
When JeffersANT signs declaration, remember his signature - the same symbol you can see in the wall of the rotating room (behind the egg with JeffersANT). Leave the room and click the round symbol (on the blue wall close to the exit).
There is another puzzle - you need to join toothed faces and cannon. The lines between faces and cannon need to have a shape of JeffersANT's signature. On the left side should be two darker lines, on the bottom lighter (just as in JeffersANT's hint). There are many solutions to this puzzle. One of them - click: cannon, middle face, top-right face, cannon, bottom-right face, bottom-left face, middle face, cannon. Push the blue button. The right sequence is on the screenshot below.
Before you go through the door, click the dog. As Beaky jump on the green button (on the floor). As Tommy go left, pass three rooms (in the first one jump above the orange creature). In the fourth room push another orange creature to the left. The creature will hit the red button. You can do this only if Beak-Beak is standing on the green button. Go back to the dog, click Beaky and together go again left.
Now you can push smaller orange creature to the next room. Jump above the creature and go to the another room. As Beak-Beak stand on the blue button. Go back, jump above the creature and push it to the left. Go right and with Beaky go to the blue corridor with green button. As Beaky stand on this button.
As Tommy go left, push the orange creature next to the bigger one. Climb on the creatures and go left.
There is something flying here - a kind of bird. When it fells, pick it up and go back to Beak-Beak.
Go right as you come to the room with the octopus. The baby starts to cry, and the tentacle will run away.
Click the baby - this time 5 toys fell off the carousel. Hang them in this sequence: green octopus, red octopus, red fur mascot, rat, yellow fur mascot (the same sequence as before) and then push the green button. Pick up sea-green crystal.
Click the bowl on the right. Tommy will throw the bird to the bowl. Click the dog and then the bird. Beak-Beak will swallow the bird. Now Beaky can fly, so move the mouse cursor up.
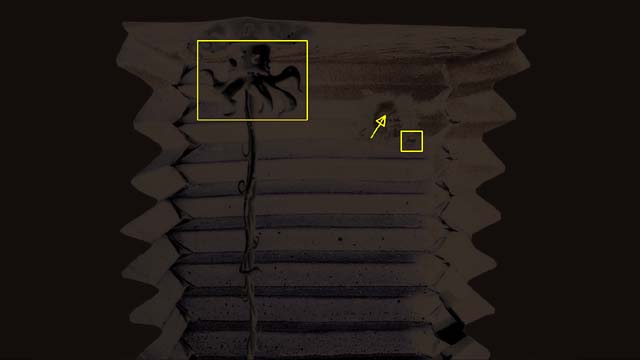
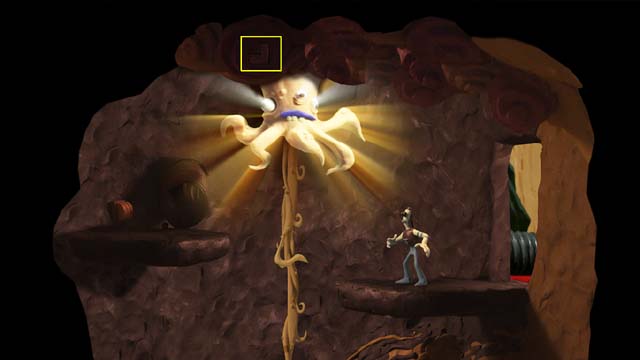
On the top of the room sit in the niche and then click the octopus. Hear the story. Finally swallow a curved item. Go through the tunnel.
Swallow another lever (pulsating spiral). Exit the tunnel, go right until you come to the room with talking statue. Go back, go left, fly up and then click lower and lower, so Beaky can land near Tommy. The dog will spit out both items, pick them up.
Go left to the blue room with the machine. Use the curved item with the machine. Go left, as Beaky push the red button (on the wall in the blue corridor) to activate the machine.
Go back to the room with octopus and go one level down. Push the red button on the right - the passage will open. Click the bowl - Tommy will throw the bird into it. Switch to Beaky and click the bowl. Beak-Beak will swallow the bird.
By clicking mouse cursor upper and upper show the route which Beaky should fly.
When Beak-Beak will fly to the crossroad, turn right. Click the next lever (the dog will swallow it). Turn left and up, then right.
On the bottom of this tunnel is red button, push it and go back (left, then down). As Tommy pick up the lever.
Leave the cavern - put the lever into the grip on the left side of the door. Open the door and go outside. Put the second lever into the machine.
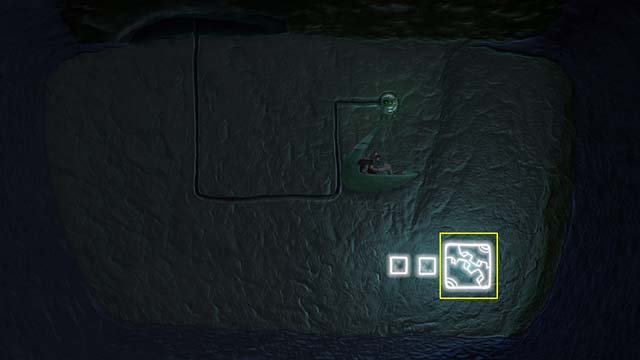
Ride left until you come to the three circles. You need to set them to connect lines in one route.
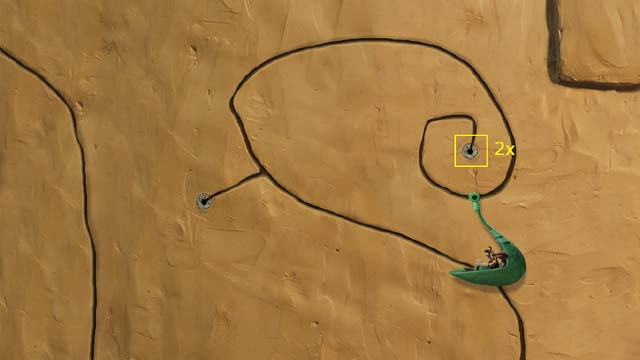
Ride up and come to the end of this branch. Then go back (just a little) and do this action once again.
Now go back to the beginning and ride the branch coming through the first circle. Ride to the end - you will set the line of second circle. Go back and up to set the line on the third and on the first circle to connect them with the route.
Ride left on the short branch, then three times on the curved branch. The right setting is on the screenshot below.
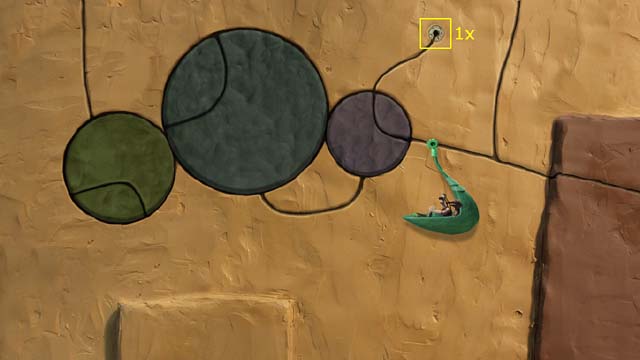
Then go back and ride the route (left for all the time). You will come to the third tower.
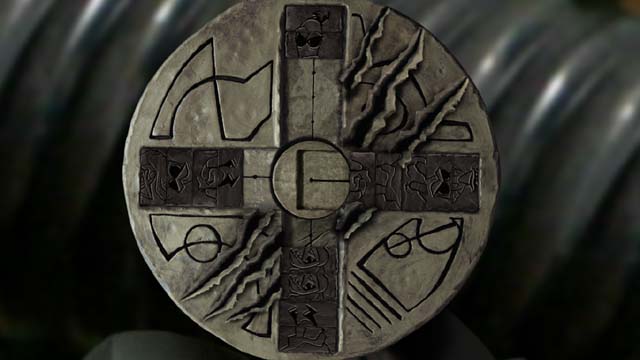
You need to solve the puzzle to enter the tower. Click the panel.
The opening third tower's gate puzzle
This time there are four squares with right pattern. Two are on the end of the left arm and should be located on the bottom arm as fourth and first. One is on the right arm and should be located on the bottom as third. The last is on the upper arm and should be located on the bottom as second. All of them are a little bit lighter than rest.
At first move two darker squares from the right arm to the bottom, then first one light square with pattern move to the left arm and the second move up.
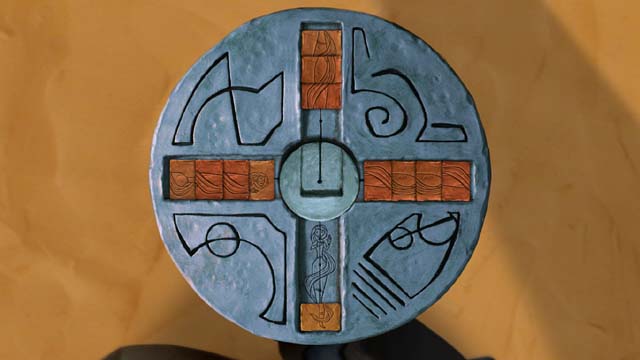
Move four darker squares from the bottom to the right arm. Light square with pattern move from the top to the bottom.
Move two darker squares from the top to the bottom. Move also one darker square from the right arm to the bottom. Then move light square with pattern from the top to the right arm.
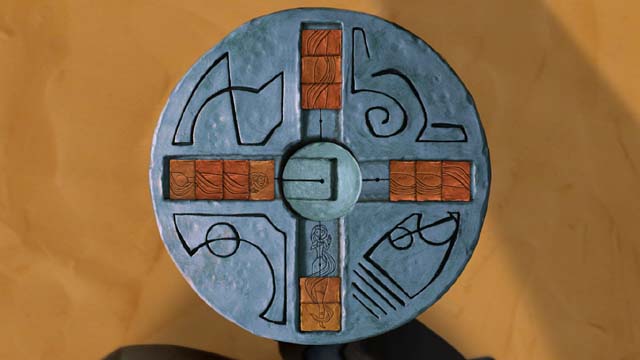
Move three darker squares from the bottom to the top. Move light square with pattern from the right arm to the bottom.
Now move light square with pattern from the left arm to the right and two darker squares to the bottom.
Move light square with pattern from the left arm to the top of the cross. Move two darker squares from the bottom to the left.
Finally move light square with pattern from the top to the bottom and then the last light square with pattern from the right arm to the bottom.
Go inside.
Click talking statue four times. Go upstairs and to the left. Click the purple egg - you will see Theodore Roosevelt. Come through the blue gate on the left.
Throw the bird to the bowl and make Beak-Beak swallow it. As the dog fly up and land before the entrance to the tunnel. Go through the tunnel, swallow the lever, and go further.
Click the octopus, hear the story and swallow triangular item. Go back to Tommy, fly up and then down to the ground. Click Tommy, Beak-Beak will spit out one item - pick it, so he can spit out the second one - pick it too.
Now look at the panel in the wall. Push the blue button, you will see how blue ball is shot. Your task is to set the pictures to make the ball landing in the nest.
The pattern is on the sandy wall (the one which isn't crossed out). You need to be accurate, because the symbols are looking very similar, so it's easy to make a mistake.
When you set the pictures (the right setting is on the screenshot above), push the blue button.
Leave the place and go right. The baby starts to cry again, and the tentacle will hide.
Click the baby. This time 8 toys has fallen. Push the green button and hang them in the following sequence (from the left side): black froggy creature, green octopus, red octopus, red fur mascot, greenish-yellow rat, yellow fur mascot, grey rat and purple fur mascot. Pick another sea-green crystal.
Go right and put in the machine the yellow item.
Go left, come to the blue gate. Ask Beaky to push the red button (on the right side of the gate). Go back right to the tentacle and climb up. Go outside.
Use the lever with the machine. Tommy and Beak-Beak will sit in the cable car. Ride left.
Ride left (by all the time). Look at the pattern behind the nest.
Set the cable car under the circle. As Beaky come inside the pipe. Run through the tunnel as you come to the room with octopus. Click the octopus and hear next part of the story. Swallow the curved item (another yellow part of the machine).
Look at the white silhouette (on the right from the octopus). Remember how it looks. Click the panel and set the same pattern you have seen on the sandy rock behind the nest. Click on the edge of the board to exit this puzzle. Go through the tunnel and back to Tommy (all time right). As Tommy pick the item, which Beaky spits out.
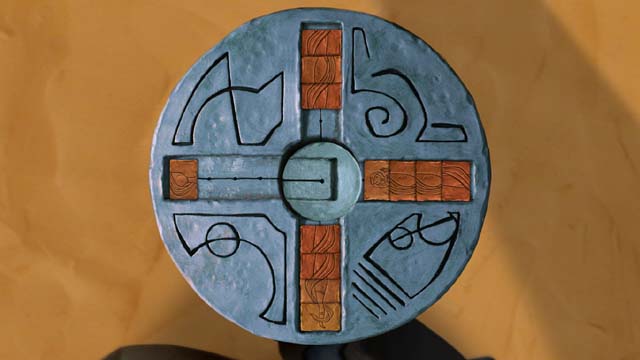
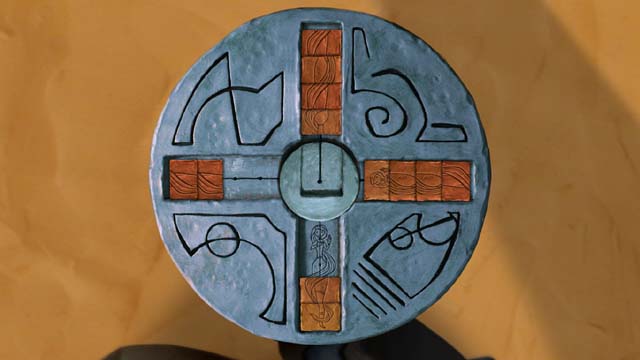
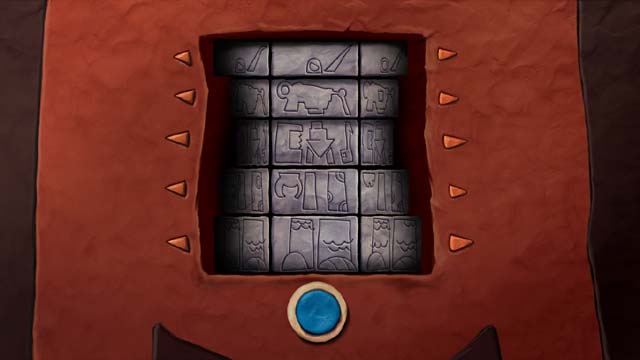
Click the panel opening the entrance door. This time you need to set pattern from 5 squares. It's not the pattern, which is on the bottom of the cross, but the white silhouette you have seen in the octopus room. You can see her light barely visible shape on the top of the cross.
Move two squares from the left arm of the cross to the right arm. Move one square with right pattern from the left arm to the bottom. Then move three squares from the upper arm to the left arm, the square from the bottom move to the top. First part of the pattern is on its place.
Move one square from the left arm to the top. From the bottom move three squares to the top and the one with right pattern move to the left arm. Move four squares from the top to the bottom. The square from the left arm move to the top - the second part of the pattern is on its place.
From the right arm move three squares to the top, one to the left arm and one (this with right pattern) to the bottom. Move three squares from the top to the right. Move the square from the bottom to the top - the third part of the pattern is on its place.
Now move two squares from the left arm to the top, two to the right and the one with right pattern to the bottom. Move two squares from the top to the left. Move the square from the bottom the top - the fourth part of the pattern is on its place.
Finally move three squares from the right arm to the left and one to the bottom. The last square from the right arm move to the top - the fifth part of the pattern is on its place.
It will appear a platform leading to the entrance, but you still can't open the door. Move the railway lever and ride the cable car to the right and down. Thanks to the setting the pictures in the octopus room you will come to another stop. Set the cable car under the circle.
Click the machine - Tommy will put the missing part into it. Go through the tunnel, pick the lever and use it with grip on the left. Switch to Beak-Beak and push red button in the wall on the right. Exit the tunnel, move the railway lever and ride cable car to the red door. Push red button and go inside.
When you come to the octopus room, click the octopus and hear another part of the story. Pick up an item in shape of letter 'P'. Use the tentacle to climb down (on the lowest floor).
There click twice part of broken talking statue and hear another hints. The passage to the left will open. Go left to the next room and click the baby, which is lying in the mysterious device on the left.
You will come to emerald chamber in the first tower. Go down and leave the room (door on the left side).
Climb up, jump to the niche on the right side and click octopus (remember the symbol above the octopus) - you will hear once again her story, but this time the octopus will be speaking in understandable language. Look at the symbols, which will appear during the story, especially remember the servitude symbol. Then come to the platform on the right, turn lever. Ride left and up (by cable car).
Ride the route as you come to the grey circle. Ride right ad down. You will come to the second tower. Set the cable car under the circle. Go inside.
Climb up by using the tentacle. Click the second octopus (remember her symbol) and hear her story. Remember the family symbol.
Climb down on the lowest level, go to the platform (to the left), turn the lever and ride by cable car to the left as you come to third tower. Set the car under the circle and go left. Climb up by using the tentacle. Jump on the grassy platform on the left side.
Click the third octopus (remember the symbol above the octopus) and hear the story. Remember the hope symbol.
Then go to the platform (to the left), move the lever and ride all the time left to the fourth tower. Set the cable car under the circle and go inside. Click the fourth octopus (remember her symbol) and hear her part of story. Remember the honor symbol.
Finally climb down to the lowest level by using the tentacle and go left to the room with teleport. Go to the oval platform and teleport to the emerald chamber in the first tower.
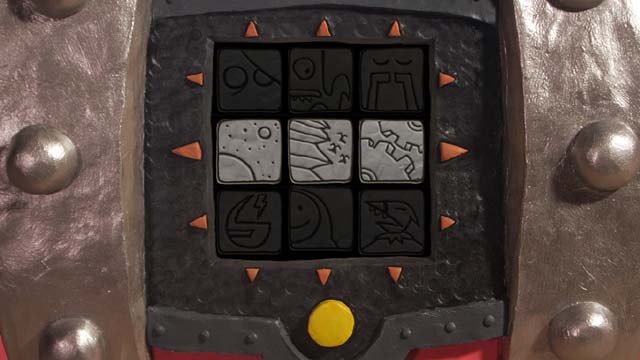
Go left and click the console with four sea-green crystals. Tommy will use the lacking part ('P') and the console activates. By clicking buttons on the left and on the right side search four symbols from the stories. Set them into the black space below the symbols series.
Under this space you can see the symbols of every octopus, so you will know where to put symbols from the stories. The right sequence is on the screenshot and video above. When you do this action correctly, the dome of the device standing on the centre of the room will disappear. Now you have an access to sea-green crystal.
Go outside and turn the crank as many times as you see that the light bulb above the door on the left will light up. You will also see the spiral symbol on the door. Go back to the emerald chamber - now you can get on the platform with the device. Push the red button, Tommy will get rid of all the four crystal. Push the red button once again. The puzzle will appear.
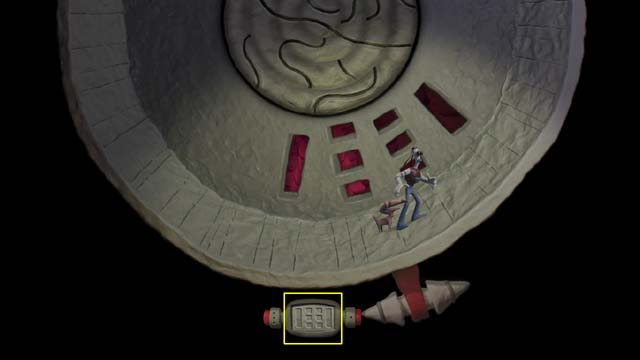
Now you need to set the crystals in the holes of the machine. At first move the emerald button to the second gap (from the left), then put the crystals into the holes. Crystals should be set from the lowest to the highest, but it depends not on their high because some of the holes are deeper than others.
If you start from the original setting, you need to put them in the following sequence: second crystal into the first hole, fourth into the second hole, first to the third hole, fifth to the fourth hole and third into the fifth hole. The right setting is on the screenshot above. Finally push the red button.
The hint to this puzzle is the picture, which has appeared after pushing the red button on the wall in the room on the lowest level of the tower, where Tommy comes at the beginning of the gameplay.
 Alan Wake Game Guide & Walkthrough
 ArmA II: Operation Arrowhead Game Guide & Walkthrough
 Assassins Creed Chronicles: China Game Guide & Walkthrough
 ArmA II Game Guide & WalkthroughArmikrog Game Guide & Walkthrough