ArmA III is the third installment of the cycle of games that begun in 2006 by the Czech studio Bohemia Interactive. ArmA games are known for extremely tactical gameplay that is missing in today's first person shooters. Realistic handling of guns or vehicles and refined AI of the opponents, force the player to think about every step, as in this virtual battlefield, one small mistake can result in a defeat.
In this guide you will find detailed information about gameplay basics, a walkthrough of all the missions and an explanation of the various elements in the game.
This guide contains:
Attention! This guide has been made based on the content of the Beta version of the game. Content of this guide may be changed after the release of the full game.
Bartek "Snek" Duk (www.gry-online.pl)
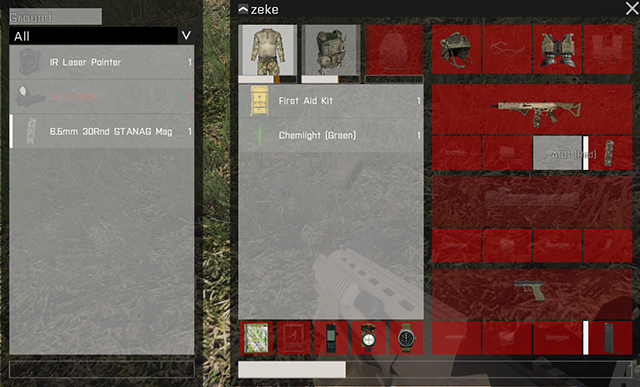
One of the most important elements of the interface is your inventory.
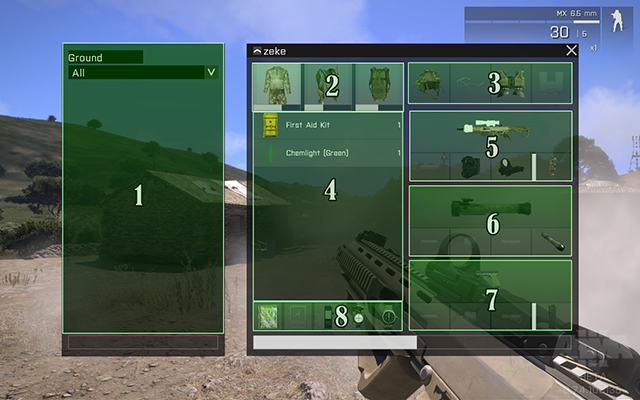
1: this part of the inventory shows what's on the ground, next to the player. You can pick things up from the ground while holding the left mouse button on the object and then dragging it to your inventory
2: starting from the left side - a slot for regular clothes, a slot for the vest where you can also store items (eg. First aid kit) and a slot for your backpack
3: starting from the left side - a slot for a helmet, a slot for sunglasses, a slot for nightvision goggles, a slot for binoculars or rangefinders
4: items that are stored in your vest or a backpack
5: your primary weapon and slots for its attachments (silencer, laser point, scope, magazines)
6: an anti-tank weapon and slots for its attachments (silencer, laser point, missiles)
7: your secondary weapon and slots for its attachments (silencer, laser point, scope, magazines)
In addition to the inventory, there are also other elements of the interface to which you should pay attention.
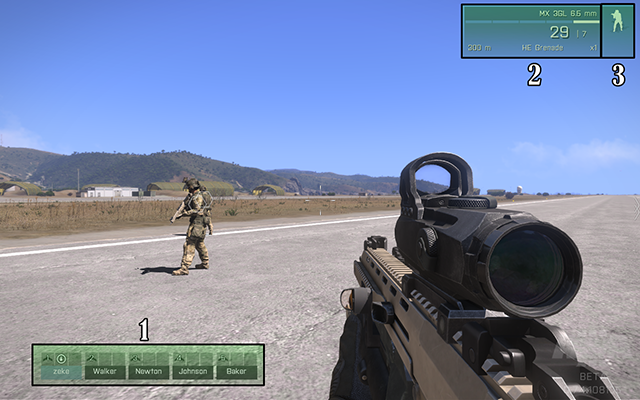
1: shows the names of the members in your team, as well as icons that indicate what vehicle your teammate is in
2: shows information about your weapon, like the ammount of ammo it has, as well as grenades and the zeroing of your scope
3: shows the position in which you are currently in
ArmA III, as well as any previous installment in the series, offers a wide stock of weapons - starting from pistols and assault rifles, ending on missile launchers. Each of these weapons have different ballistics - that is, properties such as recoil, rate of firing or firing mode. In this section you will find the information on several kinds of weapons you will find in the game.
Assault Rifles - Example: MX 6.5 mm (30 rounds in a magazine) lub Katiba 6.5 mm (30 rounds in a magazine). Both rifles have two firing modes - automatic and single fire. Automatic causes more recoil, especially if you hold down the trigger. In single mode, as the name suggests, it is best to shoot single shots, thus having a smaller dispersion and better accuracy.
 Katiba 6.5 mm
 MX 6.5 mm
Anti-tank - Example: PCML or RPG-42 are used, as the name suggests, against armored vehicles. Number of missiles required to destroy a vehicle depends on the vehicle itself. Regarding civilian cars or regular military jeeps, usually one missile is enough. It's not as easy with armored vehicles. You can also use homing missiles, which are a lot more simple to use.
 RPG-42 Alamut
 PCML
PCML
Sniper rifles - Example: M320 LRR .408 or GM6 Lynx 12.7 mm. Sniper rifles are obviously of high caliber, thus one shot at an opponent is usually enough to get rid of him. This type of weapon, however, has a massive recoil when fired, so it is best to choose a good position, such as prone. If you're a sniper, it is recommended to stay away from the battlefield, because you will not have a lot of advantage in close quarter combat.
GM6 Lynx 12.7 mm M320 LRR .408
Sidearms - Example: PO7 9 mm or Rook-40 9 mm. Sidearms are generally used when we run out of ammunition for the assault rifle. The damage of a sidearm is not great and it requires at least four or five hits in order to kill your opponent (unless you shoot him in the head). The recoil is low, so single shots and good accuracy can save you from a difficult situation.
 PO7 9 mm
 Rook-40 9mm
Each weapon can be modified, but our options are somewhat limited. We can add a silencer, a laser sight, a scope or a few kinds of magazines.
In the Showcase missions that are available in Beta, you won't have many opportunities to modify your weapon. However, some multiplayer servers offer a box filled with modifications and different weapons. Adding the attachments to your weapon is not a complicated process - just click on the part you want to attach, hold the left mouse button and drag it to a slot on your weapon.
Knowing how to navigate yourself on the battlefield is extremely important, especially during the exchange of fire. There's no enemies with red markers over their heads running around, so you'll have to use the available tools.
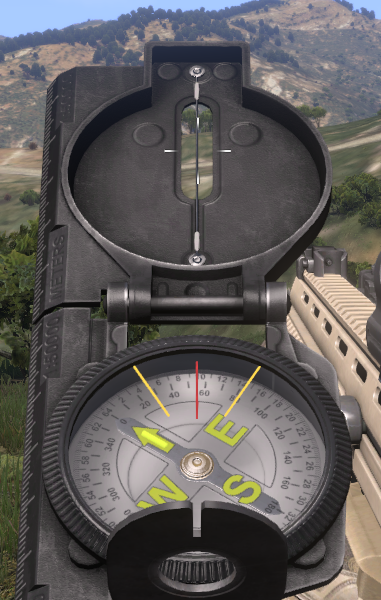 Compass
Most often you will be forced to use a compass. Members of your team will often use phrases such as "enemy, 200 meters, west" in both the single player missions and multiplayer. It is then best to use a compass, which is available by default under K. You can also see the "bearing" on your compass. Bearing is a set of numbers that are spaced apart at the edges of the compass. For example, if someone in your group says "enemy, bearing 250", then open the compass and turn it, so the red line is on the number 250.
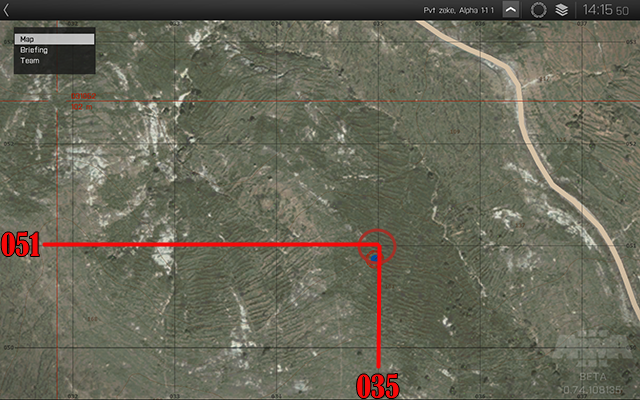
Another element of navigation in the area is also the co-ordination of "grid". For example - the members of your group will use a phrase "enemy, grid 051035", when they'll spot an enemy at a certain location. In order to find out that location, you will have to open your map (M by default). You'll notice numbers on the left and the bottom side of the map. Grid co-ordination numbers always begin with the left side and then the bottom. From each number there is a line, so you need to look at a spot where the lines from the number 051 and 035 connect with each other - that is where the enemy is located.
An important element of the gameplay is moving on the battlefield. A strategic positioning is a priority during the exchange of fire and can very often save your life.
To begin with, you should know about the modes of movement. In addition to the default type, of course, there is also a tactical trot, which you can activate by pressing C. You will be a little slower, but your weapon will still be raised, which can be useful in many situations.
You can also use the tactical walk, by pressing two keys, W and S, at the same time. This is particularly important in close quarter locations, because moving too fast can often lead to your death.
Holding down the SHIFT button will make you go into a sprint mode, which will make you move a lot faster but it will also tire you out very quickly. Fatigue can significantly affect your accuracy - your gun begins to swing and that prevents you from being accurate when shooting.
Your soldier moves in an upright position by default, but you can switch to a few different positions that can be useful under many other circumstances. Hold down the CTRL button and then press the S button to change positions. Starting from an upright position you will go down to slightly leaning, heavy leaning and then crouching. From crouching you can go to a more leaning crouching until you get to a sitting down position, from which you can go to prone. While you're proning, you can also lie down on your side, which allows you to peek around the corner.
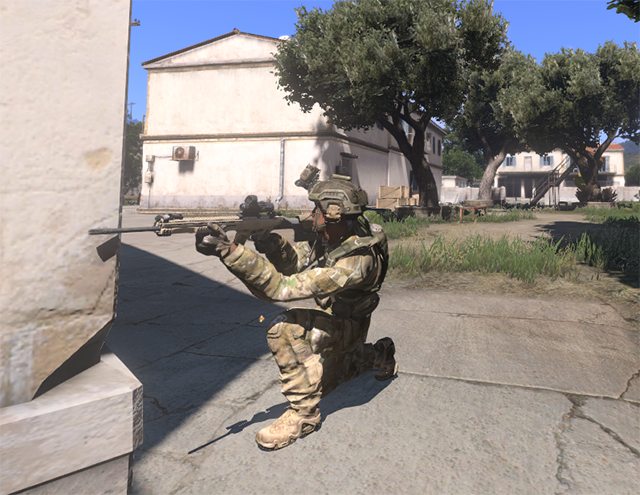 Peeking around the corner
Moving around is important, but very often you will find yourself in a situation where you will be forced to take a defensive position and hold it until you push back the enemy attack.
Peeking around the corner is incredibly useful when you're hiding behind a building. Q and E keys allow you to slightly lean to the side, while CTRL + A or D will mainly lean out your weapon, which reduces to chances of you getting shot.
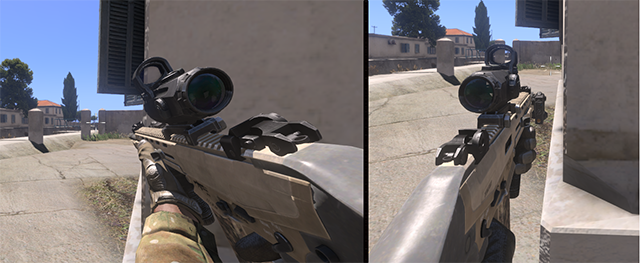 The difference between Q/E and CTRL + A/D
Leaning by using CTRL + A/D also allows you to return fire at a greater angle, which is often very useful.
These can be used in any position, both crouched, standing and lying down.
Using Q and E keys while lying down makes you roll sideways, and with CTRL + A/D you will be able to lie down on your side and lean out the weapon.
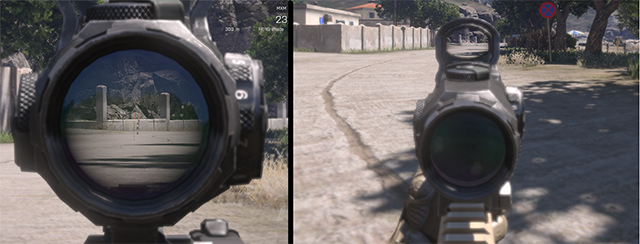 Switching the optic scope
Some of the sights hare also double, so you can switch between them, depending on whether you need to shoot at a close range or at a long distance. You can do that by holding down the CTRL key and clicking RMB.
In ArmA III, you will find a large variety of vehicles that you can use.
Control of armored vehicles or regular cars does not require great skills. Just get into the vehicles and drive it around by using the WSAD keys or the mouse.
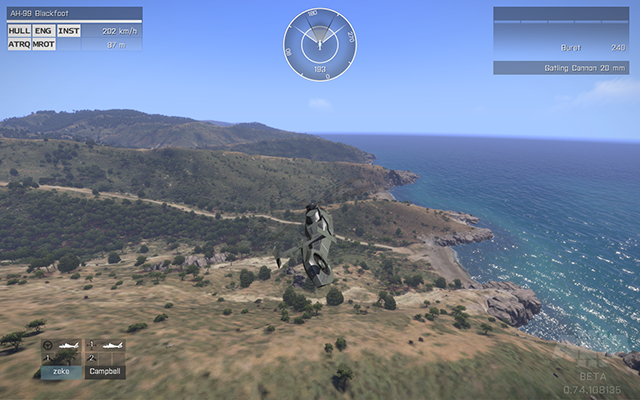 A flight above Stratis
Helicopters on the other hand, are a bit more complicated. If you've never used helicopters in previous ArmA games, then you should familiarize yourself with the function of Auto-hover. After entering the helicopter, scroll the mouse wheel and then select Auto-hover. This allows you to stay still while you're flying up, no matter which direction you move - the helicopter will automatically return to a stable position. It is recommended to use Auto-hover whenever you're flying up or landing - it simplifies both actions and sometimes can save the lives of you and your passengers. To rise into the air, you have to press the Q key and wait a few seconds. When you're at a safe distance from the ground, turn off Auto-hover and use to WASD keys or the mouse to navigate. The question of whether to use the keyboard or the mouse is fully dependent on you and your taste.
Please note that every helicopter model is different in weight, size or armor, which affects their mobility and resistance. Not every aircraft will be conducted in the same way.
Commanding the AI is an important part of the game. This section contains useful information on commanding a team.
Under the ~ key, there is a main menu for commands. The commands issued from this menu will be performed by every unit in your team. To request a single unit, hover the cursor over that unit and you should see a number with the name of that individual. So, if the number is 4, a menu command for this unit will be located unter the F4 key.
If you want a unit to move to a certain spot, go the command menu of that unit and select Move There. Now use your crosshair and point it at a place to which you want that unit to move to, and then press Move There once again.
Now open the Move menu, by entering a command menu of one of your units and pressing the 1 key. The commands in this menu are:
Return to formation- all units go back to a default formation.
Advance - a selected unit will advance a few meters ahead.
Stay back - a selected unit will stand behind you in formation.
Flank left - a selected unit will move on your left flank.
Flank right - a selected unit will move on your right flank.
Stop - a selected unit will stop and will remain in that position until you tell him to move.
Wait for me - if a selected unit is far ahead of you, then he will stop and wait until you get there.
Find cover - during the enemy contact, a selected unit will start looking for cover.
Another important menu is Engagement. Open it by going into a command menu of one of your units, and then press the 3 key. Commands in this menu are:
Open Fire - selected units will open fire on marked enemies.
Hold Fire - selected units will hold fire.
Fire - if a selected unit is on Hold Fire command but it still has enemies marked, then a Fire command will make the selected unit open fire and go back to Hold Fire, after the enemy is killed.
Engage - a selected unit will start chasing a marked enemy, leaving the formation. It will return after the enemy has been killed.
Engage at will - a selected unit will engage on every marked enemy
Disengage - a selected unit that have received the Engage or Engage at will commands will return to formation.
Scan horizon - selected units will scan the horizion in search for the enemy.
Watch direction - a selected unit will carefully scan the direction you chose.
If you see a group of enemies and you will want to command your team to open fire, you will have two options. Move the crosshair on the enemy and then select the command menu of one of your units - the first option that should appear in this menu is Attack (enemy) - select this, and then press Open Fire. The selected unit will then attack the enemy.
You can do the same thing but without actually seeing the enemy. Choose a unit, go into its command menu and press the 2 key. You will see a menu with a list of enemies that are in sight of that unit. Choose one of the enemies and then press Open Fire.
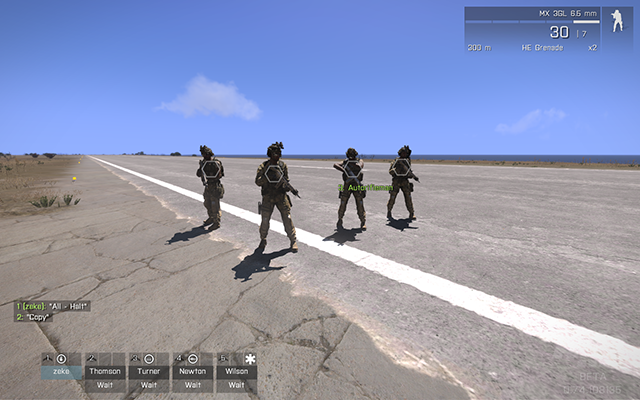 A team
The following menu is Mount. You can open it by going into the command menu of one of your units and then press the 4 key. The commands in this menu will allow you to send units to a selected vehicle on different positions.
To send a unit to a vehicle, aim your crosshair at a selected vehicle and then press Get in (vehicle) - you will see a menu from which you can choose a position to which you want that unit to go to.
You can also command a unit to drive the car into a selected spot. Send a unit to the driver seat of a selected vehicle, enter the command menu of that unit and then press Move There on a desired spot for that unit to go to.
Using the Action menu, you can command a unit to treat yourself or other units, as well as to collect weapons and ammunition from dead enemies.
In order to heal a wounded unit, you need to have a medic in your team. Go into the command menu of your medic, and then press the 6 key. If one of your units is wounded, you should see a command called Treat (unit).
Same goes for picking up guns or ammunition, only that it can be done by every unit, not just a medic. Just go into the command menu of a selected unit, press 6 and if there are any dead bodies in the area, then you will notice a command called, eg. Take Katiba 6.5 mm.
The next useful menu is Combat Mode. Go into the command menu of one of your units, and then press the 7 key.
Stealth - selected units will go into stealth mode, and they will try not to make any noise and hold fire.
Danger - selected units will go into danger mode - their weapons will always be raised and they will attack the enemy as soon as they see one.
Aware - selected unit will go into aware mode - their weapons will be lowered, but they will go into danger mode as soon as there's an enemy in sight.
Safe - selected units will go into safe mode and will avoid exchanging fire.
Stand up - selected units will go into a standing up position.
Stay crouched - selected units will go into a crouching position.
Go prone - selected units will go into a lying down position.
Copy my stance - selected units will go into a position that you are currently in.
Being a sniper in ArmA games is not easy and requires patience and tactical approach.
The most important part is to keep a distance from the battlefield. Best to find yourself a hill or a mountain from which you will have a good view on what's going down on the battlefield, and then find a spot in the bushes and lie down. Make sure you wait a moment, if you ran for a period of time. Running makes you tired, and fatigue has a great impact on your accuracy.
After finding a good position, you will not have to find some enemies to kill. Use the rangefinder by pressing B and search for a target.
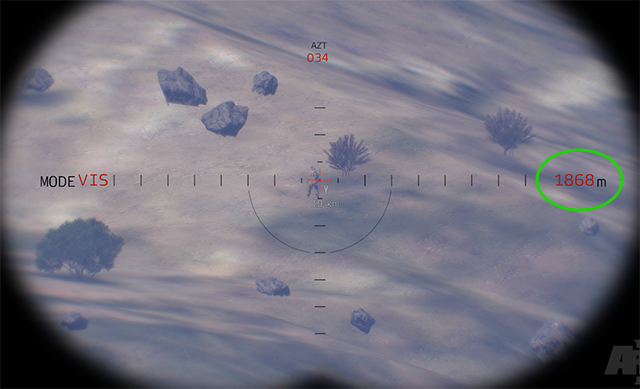
Once you've found one, hover the red dot in the center of your rangefinder vision. On the right side you will notice the distance in which you are away from that target. Remember that number and put away your rangefinders.
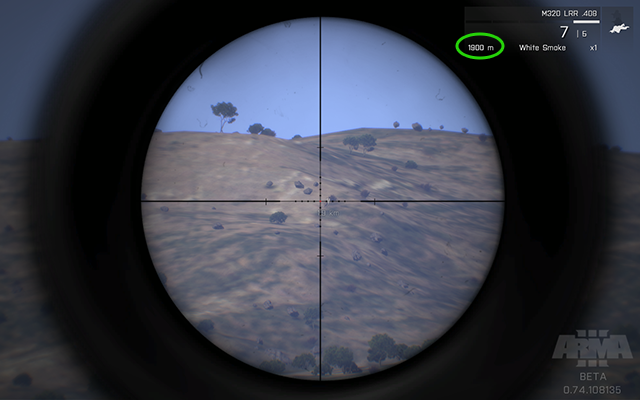
Now pick up your sniper rifle and you will have to calibrate the zeroing on that weapon, so that the bullet travels the desired distance. So for example - if your targer is about 1900 meters away from you, then you have to set the zeroing for the same distance. You do this by pressing the Page Up key (goes up by 100m) and Page Down (goes down by 100m). You can also zoom in with your scope by pressing the + key on your numpad.
After calibration, you will now have to make an accurate shot. If there's a great distance between you and your target, the weapon will slightly swing, even if you're lying on the ground. You will then have to hold your breath, and you do that by holding down the right mouse button. Aim the red cross in the middle of your scope at your target and shoot when you're ready.
Remember - if you're shooting at a long distance, the bullet can travel up to two or three seconds, so do not fire a second shot too soon.
Wasteland was and still is one of the most popular mods for ArmA II, so no one was suprised when it came over to ArmA III.
In Wasteland you can be a member of two factions : BLUFOR (USA), OPFOR (Iran) or Independent. The latter have no allies, so if you choose this faction, you will be on your own.
The main goal is to survive - there is an idicitator of both hunger and thirst. If you get too hungry or too thirsty, you will start losing health, which in turn will result in your death.
Getting food or water won't be your only concern, since the island has a lot of other players that want to get rid of you.
You start with a PO7 pistol, but you can find many other weapons that are scattered around the island, hidden in cars. You can even buy them in gun stores that are marked on the map. You earn money by killing other players or completing various missions. Missions appear at scheduled intervals, and these usually differ depending on the server. The objectives of those missions are generally simple - for example, at some point on the island there will appear a destroyed vehicle surrounded by a bunch of enemies controlled by AI. The group of players that will reach that place first and kill all the enemeis, will be rewared with a box filled with weapons or money.
One of the most interesting elements of Wasteland is building your own base. There's a lot of building elements scattered around the map, such as sandbags or sniper towers. Such items can be moved and placed into a car, if, of course, there is enough space.
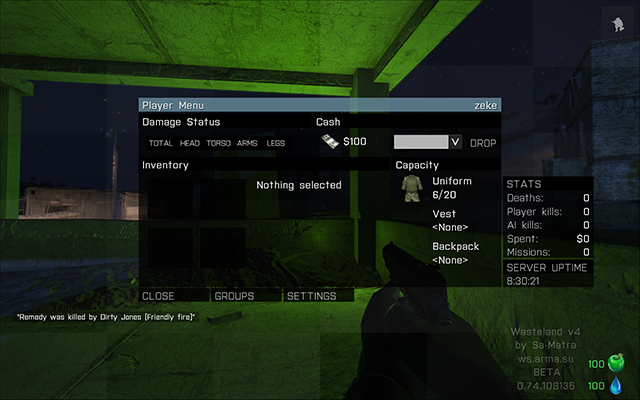 Player menu in Wasteland
In this mod, you can basically lead your "second life". There are many possibilities and probably many more will be added in the future. You can become a police officer and live by the law or you can become a criminal and rob everything and everyone - although once you get caught, you well get into prison. You will need a driver's license in order to buy your own car which you can lock, so that no one else can get into it. You can buy the right to carry a weapon and to use it for self-defense, in case you get attacked. The amount of money you get depends on the server, but it will definitely increase if you find a job.
It's hard, however, to find a good server. Most of them are not controlled by their administrators, and both police and civilians do whatever their hearts desire.
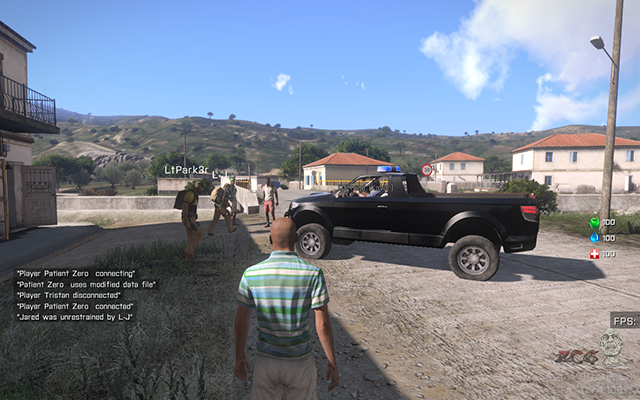 Affairs in Stratis Life happen on a daily basis
Domination servers are divided into two modes: Co-op, where all players are allies and they fight the enemy controlled by AI and TvT, where two teams, both controlled by players, are fighting each other.
In both modes, from time to time, there are new missions and control points to take over, similar to Wasteland. The team, which manages to take over the point - wins, but the satisfaction of the victory is the only reward. There are no rounds and the battle lasts forever.
After entering a server, you will show up in your team's base. You will find boxes of weapons and ammunition, and a lot of vehicles, both aircraft and land. The servers usually have designated pilots, so they will take new players onto the battlefield.
Cooperation between players is what matters most in this mod, so if you want to play by yourself - this mod is not for you.
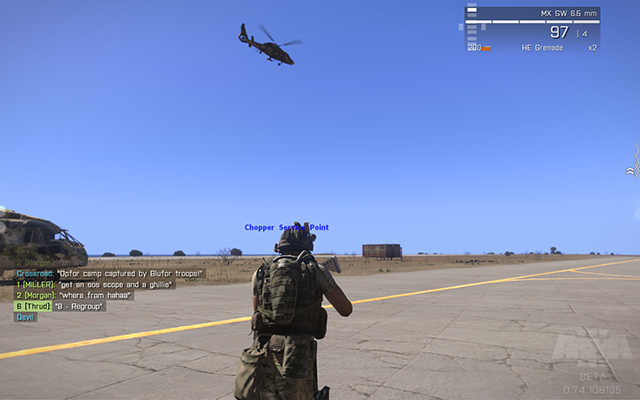 Chopper flies away with a new batch of soldiers
 APB Reloaded Walkthrough All Points Bulletin: Reloaded
 Alan Wakes American Nightmare Walkthrough Act I: The Mechanic
 Army of Two Game Guide & Walkthrough
 Assassins Creed (XBOX360) Game Guide & Walkthrough
 Anno 2070 Game Guide & Walkthrough