Knowing how to create drones, move them, and use them to place blocks allows you to build anything you can imagine in Minecraft. Building large, complex structures, however, requires lots of code, and the whole process can get confusing.
Before making a large, complex structure, explore how to make a smaller structure so that you can understand the mechanics of building with drones. The following spells out how to create a tower using drones.
You can design code to build a tower in many different ways. Here, you design it by drawing it on paper or using real-life blocks to build it:
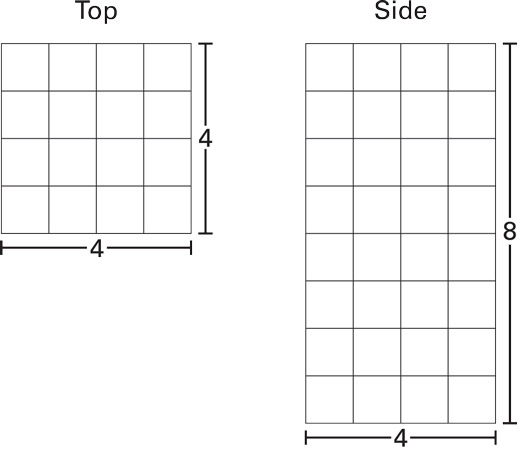
Sketch or build the tower as it would appear in Minecraft.
If you’re drawing it on paper, this step can be difficult because paper is 2-dimensional (2D) and Minecraft is 3-dimensional (3D). The drawing doesn’t have to be perfect, however — you just need to form an idea of what it takes to make a tower (such as how many blocks or what type of block). Here is two sides of a tower.
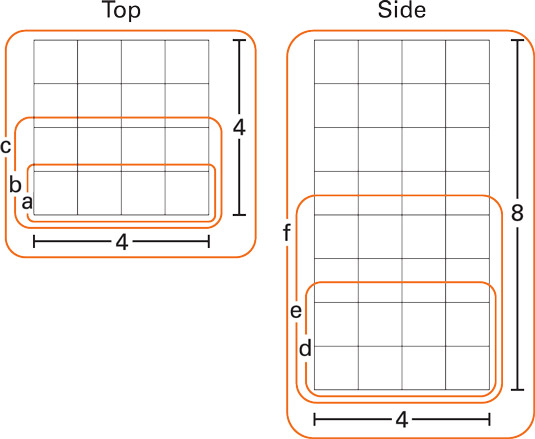
On a piece of paper, break your design into manageable pieces.
The image below shows one way to do it:
One row of blocks: Indicates where the drone is moving.
Two rows of blocks: Show how you need to reset the drone for each row. That means the drone will have to move back to the beginning of the row, before moving up.
One full square of blocks: Indicates an entire square, which requires 16 blocks. The tower consists of 8 squares arranged on top of each other.
Two rows of squares: Show how you need to reset the drone for each column.
Four rows of squares: Ensure that you’re still on the right track.
Eight rows of squares: The Tower.
During the development phase, you build each of the six chunks of your tower. When you write the code for each chunk, test it to make sure that it does what you want.
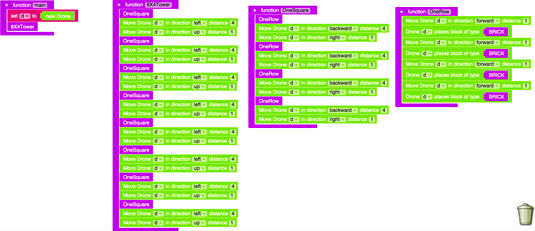
Create a new mod named Tower using Blockly as the language.
Before you begin this step list, make sure you have earned the first Drones badge. To build and test the tower, follow these steps:
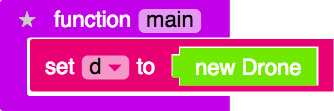
Set up your drone.
This shows the code to set up your drone to build a tower.
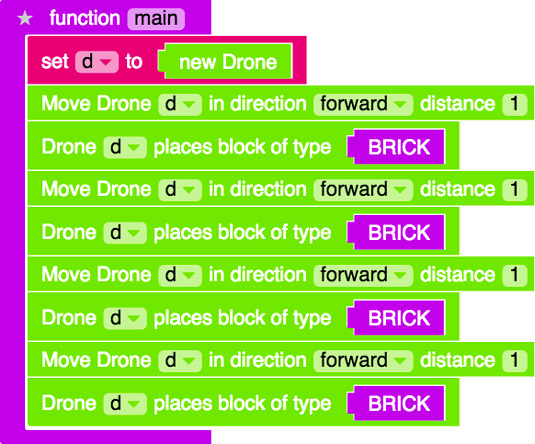
Make one row of blocks.
Here is the code to make one row of blocks. As shown earlier, the tower measures four bricks by four bricks, so each row should have four bricks in it.
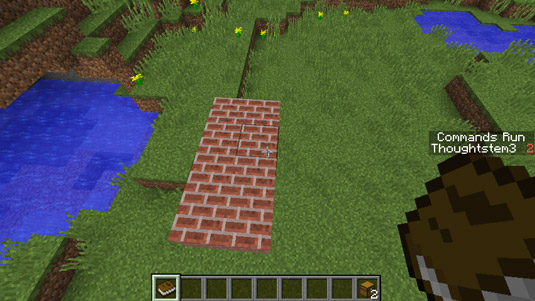
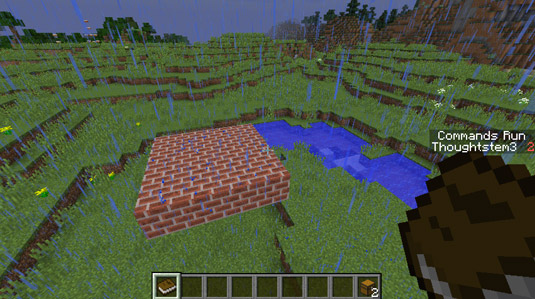
Test the code to ensure that it makes one row of blocks.
This is what the row of blocks should look like.
The structure will appear in the area in which you’re looking, so it’s best to go to an empty area when you build. You can even go into Creative mode and build in the sky: Double-click the spacebar to hover, and then press the spacebar to move upward.
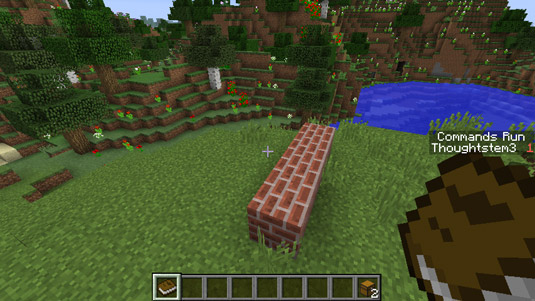
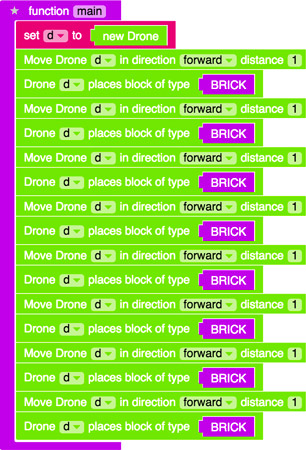
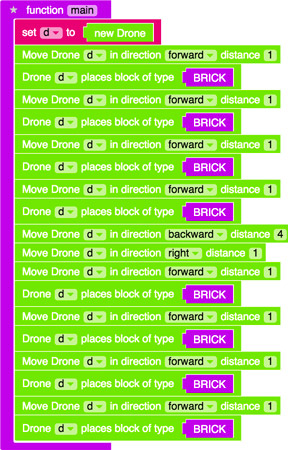
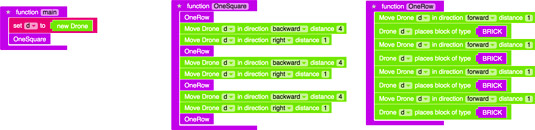
Make two rows of blocks by copying the first row.
Here is the code for making two rows.
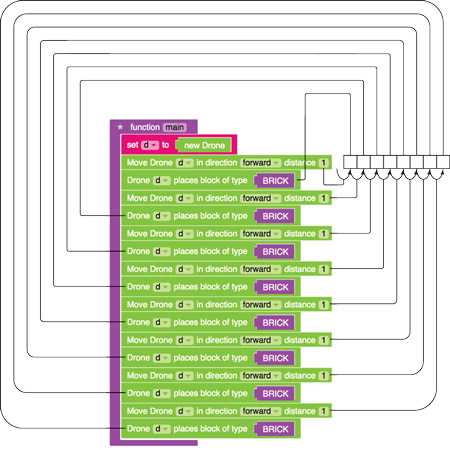
Trace the code.
Look over the code carefully, and sketch out what you think the drone will do. Here is one way to sketch it out and trace your code. And, in case you’re wondering, it doesn’t make two rows — it makes one row that is eight blocks long.
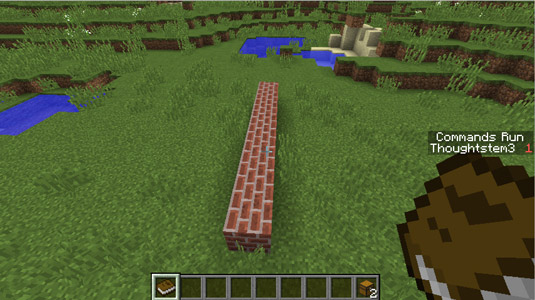
Test the code.
You can see that the tracing above matches what is made in the scene.
Edit the code.
Before you add the code to make the second row, reset the drone by moving it back to the right. Then move the drone forward.
Forward and backward are relative to you, the player, not to the drone. So whatever direction you’re facing is forward, and the opposite direction is backward.
Test the code again. Doing so produces this scene: two rows of blocks where each row is four blocks long.
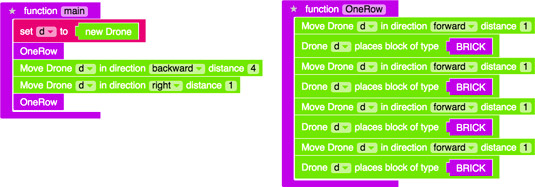
Refactor your code.
Refactoring your code means changing the way it looks, but not what it does. This concept is truly useful when your code is getting long and you want to separate it into smaller functions.
The code above is already starting to get long, and you’ve made only two rows of blocks. The easiest way to refactor this code is to find the bits that repeat, such as making one row of four blocks, and put them in a separate function. Check out the same code, refactored to be shorter.
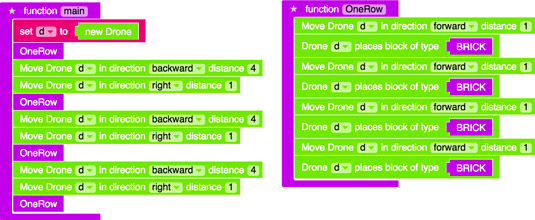
Make one square of blocks.
After you have refactored your code, making a 4 x 4 square of blocks should seem simple. Here’s the code to create the structure.
Here’s the result of using that code.
Refactor the code again. In Step 9, you refactor the code to make it easier to make multiple rows of four blocks. Now refactor the code to make it easier for you to make multiple rows of 4 x 4 squares. Refactor the code to match.
Make two rows of 4 x 4 squares.
After you can make one square, of course, you can easily make a second square on top of it. The tricky part is to reset the drone correctly. You might need to “test-edit-test” a few times to get it just right. This is one way to start to make an actual tower.
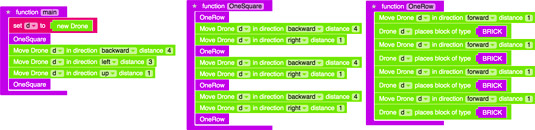
This is another correct way to make a tower.
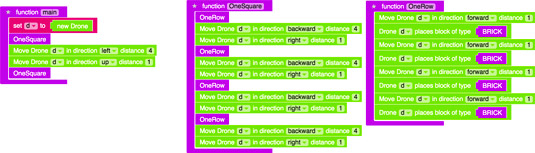
Make four rows of squares.
This is how to make a 4 x 4 tower, starting with the code above.
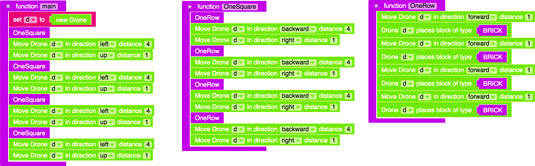
Make eight rows of squares.
At last, you can make an 8 x 4 tower. Here’s a final refactored version of the tower code.

 How to Use the Gameplay Loop in Minecraft Mods - For Dummies
 How to Earn Minecraft Scramble Badges - For Dummies
 How to Build a Shelter and Door in Minecraft - For Dummies
 Neutral and Allied Mobs in Minecraft - For Dummies
 Minecraft Modding: How to Add Effects to Your Spleef Game - For Dummies